IP Handset - Phone 2N Telecommunications - Free user manual and instructions
Find the device manual for free IP Handset 2N Telecommunications in PDF.


User questions about IP Handset 2N Telecommunications
0 question about this device. Answer the ones you know or ask your own.
Ask a new question about this device
Download the instructions for your Phone in PDF format for free! Find your manual IP Handset - 2N Telecommunications and take your electronic device back in hand. On this page are published all the documents necessary for the use of your device. IP Handset by 2N Telecommunications.
USER MANUAL IP Handset 2N Telecommunications
natural_image
Black and white photo of a black and white landline telephone with coiled cord, no visible text or symbolsUser Manual
2N® IP Handset
Software Version: 1.4.1
Release Date: 2020/11/01
Directory
Directory....I
1 Picture......IV
2 Table....V
3 Safety Instruction....1
4 Overview....2
4.1 Overview....2
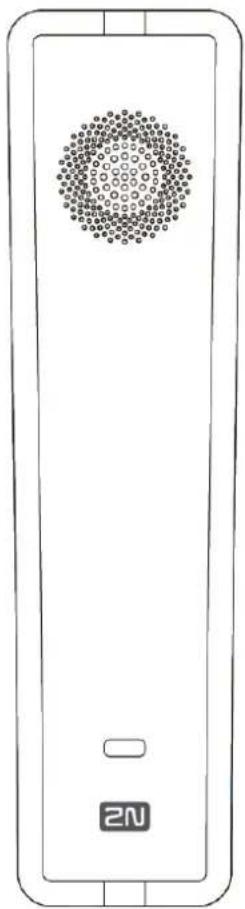
4.2 Packing Contents....3
5 Desktop Installation....4
5.1 PoE And the use of external power adapters....4
5.2 Wall mounted installation method .... 5
6 Appendix Table....7
6.1 Appendix I –LED Definition ....7
7 Introduction to the User ....8
7.1 Instruction of Keypad....8
7.2 Using Handset / Hands-free Speaker ....10
8 Basic Function....11
8.1 Making Phone Calls....11
8.2 Answering Calls....11
8.3 End of the Call ....11
8.4 Redial....12
8.5 Auto-Answering....12
8.6 Mute....13
8.6.1 Mute the Call....13
8.6.2 Ringing Mute....13
8.7 Call Hold/Resume....13
8.8 Call Waiting....13
8.9 Conference....14
8.9.1 Local Conference ....14
8.9.2 Network Conference....15
8.10 Hotline....16
9 Advance Function ....18
9.1 Intercom....18
9.2 MCAST....19
9.3 Message....19
9.3.1 MWI (Message Waiting Indicator) .....19
10 Phone Settings....20
10.1 Basic Settings....20
10.1.1 Language....20
10.2 Function Key....20
11 Web Configurations....22
11.1 Web Page Authentication....22
11.2 System >> Information....22
11.3 System >> Account....22
11.4 System >> Configurations ....22
11.5 System >> Upgrade....23
11.6 System >> Auto Provision....25
11.7 System >> Tools ....27
11.8 System >> Reboot Phone....28
11.9 Network >> Basic 28
11.10 Network >> Service Port....29
11.11 Network >> VPN....30
11.12 Network >> Advanced....31
11.13 Line >> SIP 32
11.14 Line >> SIP Hotspot ....38
11.15 Line >> Dial Plan....41
11.16 Line >> Basic Settings....44
11.17 Phone settings >> Features ....44
11.18 Phone settings >> Media Settings....48
11.19 Phone settings >> MCAST ....50
11.20 Phone settings >> Action....51
11.21 Phone settings >> Time/Date....51
11.22 Phone settings >> Tone....52
11.23 Phonebook >> Call List ....53
11.24 Phonebook >> Web Dial....53
11.25 CallLog ....54
11.26 Function Key >> Function Key ....54
11.27 Function Key >> Speed Dial List....54
11.28 Security >> Web Filter....55
11.29 Security >> Trust Certificates....56
11.30 Security >> Device Certificates ....56
11.31 Security >> Firewall....57
11.32 Device Log >> Device Log....59
12 Trouble Shooting....60
12.1 Get Device System Information....60
12.2 Reboot Device....60
12.3 Reset Device to Factory Default....60
12.4 Network Packets Capture....61
12.5 Get Log Information 62
12.6 Common Trouble Cases....62
1 Picture
Picture 1 - Device installation ....5
Picture 2 - Connecting to the Device....6
Picture 3 - Instruction of Keypad ....8
Picture 4 - Web page to start auto-answering....12
Picture 5 - Web call waiting tone setting....14
Picture 6 - Local conference setting....15
Picture 7 - Network conference....16
Picture 8 - Hotline set up on webpage....17
Picture 9 - Web Intercom configure....18
Picture 10 - New Voice Message Notofication....19
Picture 11 - Language setting on Web page....20
Picture 12 - Web page firmware upgrade....23
Picture 13 - Auto Provision settings....25
Picture 14 - Network mode Settings....28
Picture 15 - Service Port Settings....29
Picture 16 - Register SIP account....39
Picture 17 - SIP hotspot server configuration....40
Picture 18 - SIP hotspot client configuration....40
Picture 19 - Dial plan settings ....41
Picture 20 - Custom setting of dial - up rules....42
Picture 21 - Dial rules table (1)....43
Picture 22 - Dial rules table (2)....43
Picture 23 - MCAST....50
Picture 24 - Time/Date ....51
Picture 25 - Tone settings on the web....53
Picture 26 - Web Filter settings ....55
Picture 27 - Web Filter Table....55
Picture 28 - Certificate of settings....56
Picture 29 - Device certificate setting ....56
Picture 30 - Network firewall Settings ....57
Picture 31 - Reset ....60
Picture 32 - Web capture ....60
2 Table
Table 1 - DSS KEY LED State....7
Table 2 - Instruction of Keypad....9
Table 3 - Intercom configure....18
Table 4 - Firmware upgrade ......23
Table 5 - Service port ....30
Table 6 - Line configuration on the web page....32
Table 7 - SIP hotspot Parameters....39
Table 8 - Phone 7 dialing methods ......41
Table 9 - Dial - up rule configuration table ....42
Table 10 - Set the line global configuration on the web page....44
Table 11 - General function Settings 44
Table 12 - Voice settings....48
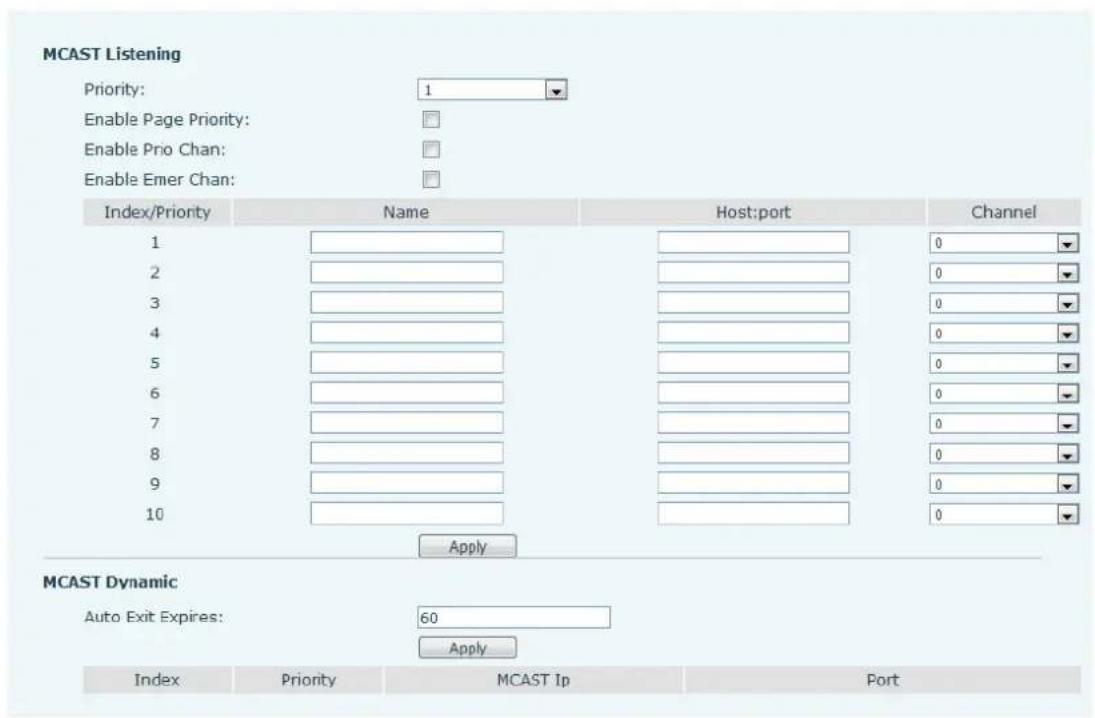
Table 13 - Multicast parameters ....50
Table 14 - Time&Date settings....51
Table 15 - Function Key configuration ....54
Table 16 - Network Firewall....57
Table 17 - Trouble Cases....61
Please read the following safety notices before installing or using this unit. They are crucial for the safe and reliable operation of the device.
- Please use the external power supply that is included in the package. Other power supply may cause damage to the phone and affect the behavior or induce noise.
- Before using the external power supply in the package, please check the home power voltage. Inaccurate power voltage may cause fire and damage.
- Please do not damage the power cord. If power cord or plug is impaired, do not use it because it may cause fire or electric shock.
- Do not drop, knock or shake the phone. Rough handling can break internal circuit boards.
- This phone is design for indoor use. Do not install the device in places where there is direct sunlight. Also do not put the device on carpets or cushions. It may cause fire or breakdown.
- Avoid exposure the phone to high temperature or below 0°C or high humidity.
- Avoid wetting the unit with any liquid.
- Do not attempt to open it. Non-expert handling of the device could damage it. Consult your authorized dealer for help, or else it may cause fire, electric shock and breakdown.
- Do not use harsh chemicals, cleaning solvents, or strong detergents to clean it. Wipe it with a soft cloth that has been slightly dampened in a mild soap and water solution.
- When lightning, do not touch power plug, it may cause an electric shock.
- Do not install this phone in an ill-ventilated place. You are in a situation that could cause bodily injury. Before you work on any equipment, be aware of the hazards involved with electrical circuitry and be familiar with standard practices for preventing accidents.
4 Overview
4.1 Overview
2N ^® IP Handset is a network telephone specially designed for hotels. The simple design of the device brings excellent user experience for users. The equipment is not only a telephone, but also a masterpiece placed in the living room or office.
H2U is the latest generation of network telephone designed for the hotel, which still continues the excellent performance and specifications of traditional equipment; such as high-definition voice, high-performance echo cancellation, 100M Ethernet, QoS, encrypted transmission, automatic configuration, etc.; new system, smooth operation, flat interface setting and many other advantages.
For enterprise users, the equipment is a cost-effective office equipment, while realizing environmental protection, it also provides convenient operation; For home users, the device is a highly efficient communication device. Users can flexibly configure and define the functions of one DSS keys, saving space and cost. It will be an ideal choice for enterprise users and home users who pursue high quality and high efficiency.
In order to help some interested users better understand the details of the product, this user manual can be used as a reference guide for the use of X1S/X1SP. This document may not be applicable to the latest version of the software. If you have any questions, you can use the help prompt interface of the X1S/X1SP phone, or download and update your user manual from the office website.
4.2 Packing Contents
natural_image
Front view of a mobile phone with a circular display and '2N' logo (no text or symbols on device body)IP Phone
text_image
1 2 ABC 3 DEF 4 CHI 5 JK L 6 MIN D 7 P2 R2 8 TUT V 9 AX Y2 * 0 # - - +Handset

natural_image
Illustration of a coiled cable or hose with two connectors (no text or symbols)Handset Cord

Quick Guide
5 Desktop Installation
5.1 PoE and the use of external power adapters
The device supports two power supply modes, power supply from external power adapter or over Ethernet (PoE) complied switch.
PoE power supply saves the space and cost of providing the device additional power outlet. With a PoE switch, the device can be powered through a single Ethernet cable which is also used for data transmission. By attaching UPS system to PoE switch, the device can keep working at power outage just like traditional PSTN telephone which is powered by the telephone line.
For users who do not have PoE equipment, the traditional power adaptor should be used. If the device is connected to a PoE switch and power adapter at the same time, the power adapter will be used in priority and will switch to PoE power supply once it fails.
Please use the power adapter and the PoE switch met the specifications to ensure the device work properly.
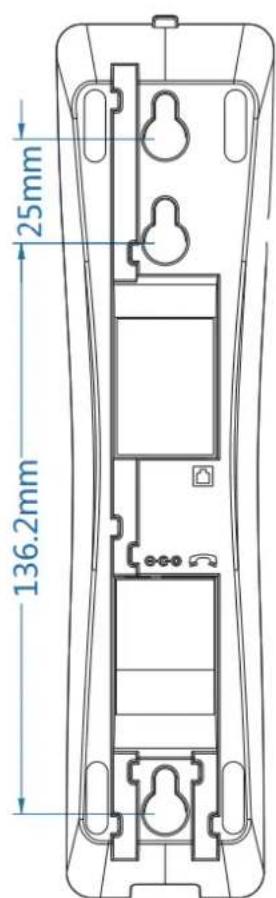
5.2 Wall mounted installation method
The device supports wall mounted.
Please follow the instructions in the picture below to install the phone:
1) Drill two holes in the wall with a vertical distance of 136.2 or 161.2mm.
2) Insert two rubber plugs and screws in turn. Note that 5mm is reserved between the nut and the wall, which is convenient for hanging the phone base.
3) Connect the cable, handle cable and power supply.
4) Align the wall hole on the base with the screws in step 2 and slide down to complete the installation.
text_image
25mm 136.2mmPicture 1 - Device installation
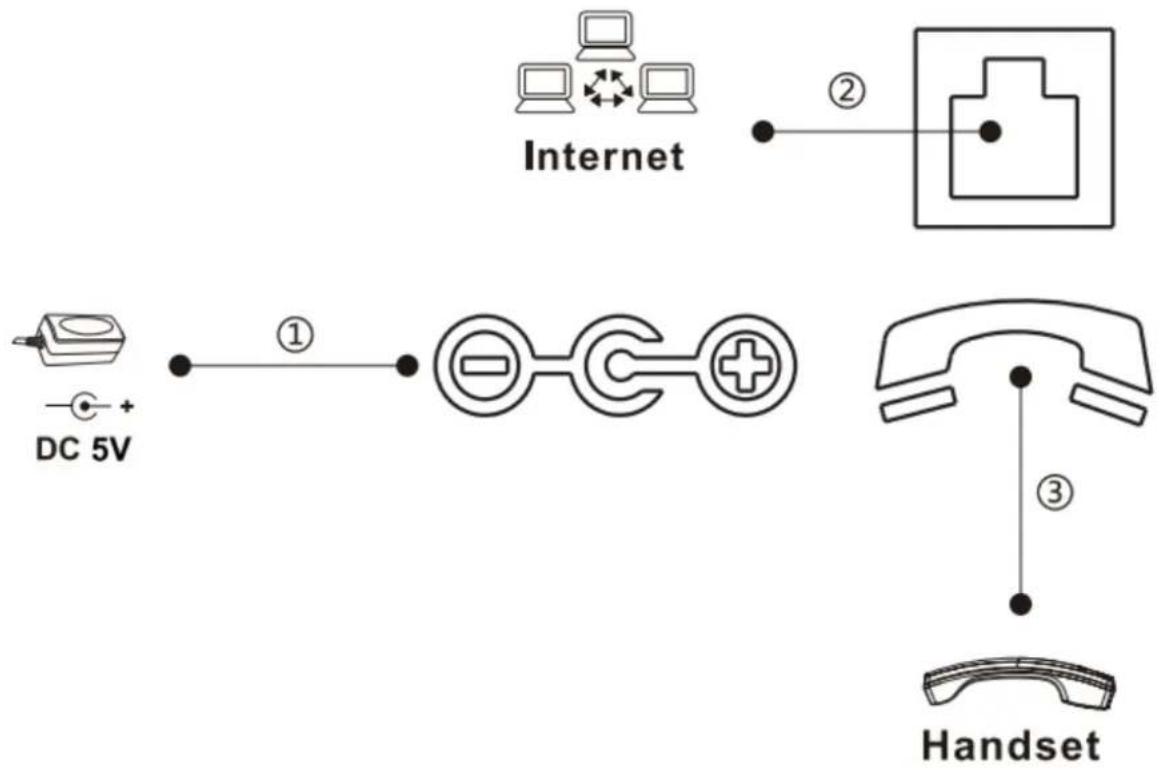
Connect the power adapter, network, PC, phone to the appropriate port as shown in the picture below.
flowchart
graph TD
    A["DC 5V"] -->|①| B["⊕"]
    B --> C["⊕"]
    C --> D["Internet"]
    D -->|②| E["Handset"]
    E -->|③| F["Handset"]
Picture 2 - Connecting to the Device
6 Appendix Table
6.1 Appendix I –LED Definition
Table 1 - DSS KEY LED State
| Type | LED Light | State |
| default standby | standby | Green On |
| mute | Green slow flash | |
| Line error (Registration failure)/Network disconnection | Red slow flash | |
| call | calling/Pick up the handle | Red On |
| mute | Orange slow flash | |
| hold/held | Orange slow flash | |
| Ringing | Red flash |
7 Introduction to the User
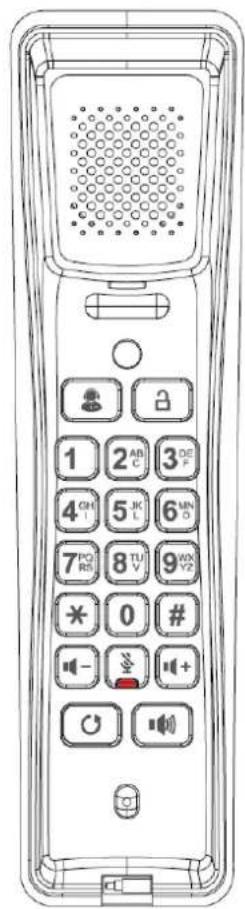
7.1 Instruction of Keypad
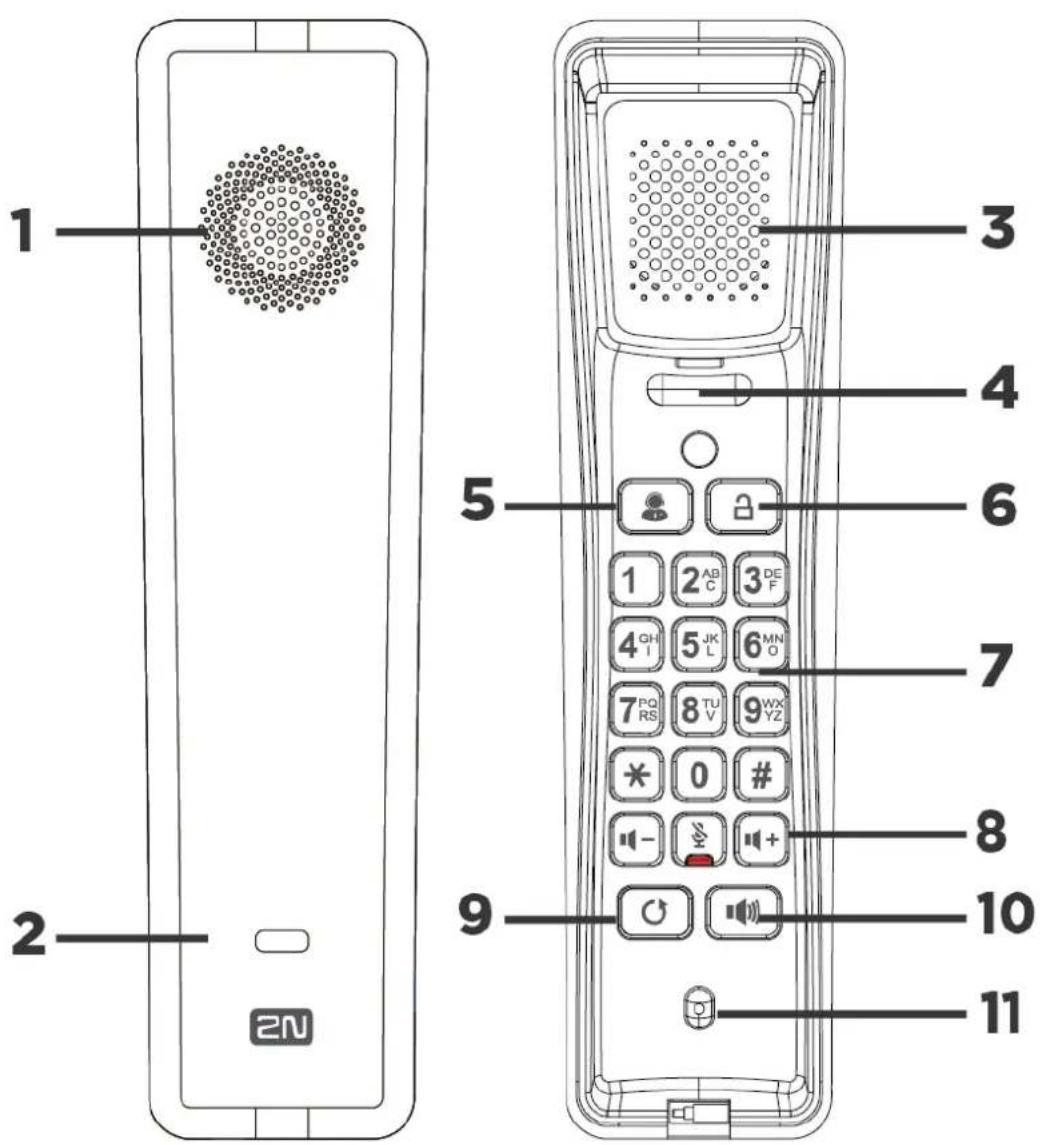
text_image
1 2 2N 3 4 5 6 7 8 9 10 11Picture 3 - Instruction of Keypad
The picture above shows the keypad layout of the phone. Each button provides its own specific function. Users can refer to the instructions for the keys in the illustration in this section to operate the phone.
Table 2 - Instruction of Keypad
| Number | The keypad names | Instruction |
| ○,1 | Hands-free Speaker | The hands-free channel plays sound |
| ○,2 | Status indicator lamp | Power indication/line status indication |
| ○,3 | Handle the horn | The handle channel plays sound |
| ○,4 | Hook | Hang up the handle and hang up the phone |
| ○,5 | Function Key | User-defined functionality |
| ○,6 | Door Unlock Button | Activates a switch for door lock control. |
| ○,7 | Standard Telephone Keys | The 12 standard telephone keys provide the same function as standard telephones, but further to the standard function, some keys also provide special function by long-pressing the key, Key #- Long-pressed to broadcast IP (Default English). |
| ○,8 | Volumes Key | The volume to add and subtract-In the standby state, ring and ring configuration interface, press this button to increase/reduce the ring volume; Press this button to increase/lower the volume on the callMute Key-During a call, the user can press this key to mute the microphone. |
| ○,9 | Redial | Press the Redial key to redial the last number dialed |
| ○,10 | Hands-free Key | The user can press this key to open the audio channel of the speakerphone |
| ○,11 | Microphone | Listen when the receiver is answering (do not listen when the phone is hands-free) |
7.2 Using Handset / Hands-free Speaker
■ Using Handset
About the use of the handle, the user can pick up the handle to dial the number, press the "#" button after pressing the number, the number will be dialed. Users can switch audio channels of the phone by pressing the hands-free button.
■ Using Hands-free Speaker
For the use of the speakerphone, the user can dial the number by pressing the speakerphone button, or by dialing the number and then pressing the speakerphone button. When the voice channel of the handle is opened, the user can switch the audio channel of the phone by pressing the button of the hands-free speaker.
8 Basic Function
8.1 Making Phone Calls
■ Default Line
The device provides two line services (1 main line and 1 standby line). If both lines are configured successfully, the user uses line 1 to make or receive calls by default.
■ Dialing Methods
Users can dial a number in the following ways:
The Device end
- Dial directly, pick up the handle and input the number, then press "#" to call out
● Redialing the last dialed number (Redial)
The Web end
● Dial from web fill in number dial
- Selecting a phone number from call logs
■ Cancel Call
When calling a number, the user can cancel the call by putting back the handle/pressing down the spring.
8.2 Answering Calls
Users can answer the call by picking up the handle or pressing the speakerphone button to open the hands-free channel.
The telephone does not support multiple calls. When there is an established call, the user needs to hang up the current call before answering the second call.
8.3 End of the Call
When the call is over, the user can put the handle back on the phone and press the speakerphone button to end the call.
8.4 Redial
● Redial the last outgoing number:
When the phone is in standby mode, press the redial button and the phone will call out the last number dialed.
- Call out any number with the redial key:
Enter the number, press the redial key, and the phone will call out the number on the dial.
- Redial record clearing
After the phone is used, redial will default to the last used number; therefore, it is necessary to clear the records used by the last customer without affecting the use of other customers.
8.5 Auto-Answering
User may enable auto-answering feature on the device and any incoming call will be automatically answered. The auto-answering can be enabled on line basis.
- WEB interface:
Log in the phone page, enter [Line] >> [SIP], select [SIP] >> [Basic settings], start auto-answering, and click apply after setting the automatic answering time.
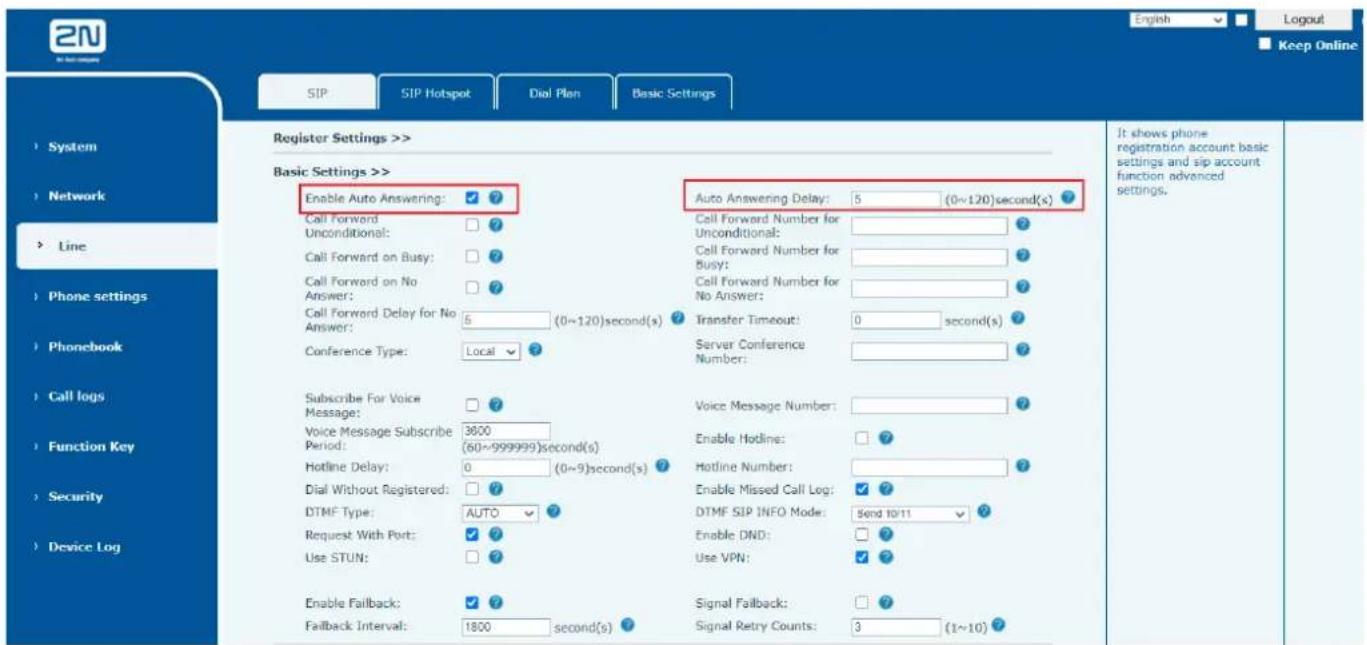
text_image
2N SIP SIP Hotspot Dial Plan Basic Settings Register Settings >> Basic Settings >> Enable Auto Answering: ✓ ? Call Forward Unconditional: ? Call Forward on Busy: ? Call Forward on No Answer: Call Forward Delay for No Answer: 5 (0~120)second(s) ? Conference Type: Local ? Subscribe For Voice Message: ? Voice Message Subscribe Period: 3600 (60~999999)second(s) Hotline Delay: 0 (0~9)second(s) ? Dial Without Registered: ? DTMF Type: AUTO ? Request With Port: ✓ ? Use STUN: ? Enable Failback: ✓ ? Failback Interval: 1800 second(s) ? Auto Answering Delay: 5 (0~120)second(s) Call Forward Number for Unconditional: ? Call Forward Number for Busy: ? Call Forward Number for No Answer: ? Transfer Timeout: 0 second(s) Server Conference Number: ? Voice Message Number: ? Enable Hotline: ? Hotline Number: ? Enable Missed Call Log: ✓ ? DTMF SIP INFO Mode: Send 10/11 ✓ ? Enable DND: ? Use VPN: ✓ ? Signal Failback: ✓ Signal Retry Counts: 3 (1~10) ? It shows phone registration account basic settings and sip account function advanced settings. System Network Line Phone settings Phonebook Call logs Function Key Security Device LogPicture 4 - Web page to start auto-answering
8.6 Mute
You can turn on mute mode during a call and turn off the microphone so that the local voice is not heard. Normally, mute mode is automatically turned off at the end of a call.
You can also turn on mute on any screen (such as the free screen) and mute the ringtone automatically when there is an incoming call.
Mute mode can be turned on in all call modes (handles or hands-free).
8.6.1 Mute the Call
During the conversation, press the mute button on the phone: The mute lamp is red and the power lamp is orange.
Cancel mute: press cancel mute on the phone again. When the mute lamp goes out, the power lamp returns to its original state
8.6.2 Ringing Mute
- Mute: press the mute button when the phone is in standby mode: mute light red always bright, power lamp green flashing; There is no ringer for incoming calls.
Cancel ring tone mute: On the standby or incoming call screen, press the mute button again or volume up cancel ring tone mute
8.7 Call Hold/Resume
The user can press the [Hold] button to maintain the current call, and this button will become the [Resume] button, and the user can press the "resume" button to restore the call.
8.8 Call Waiting
- Enable call waiting: new calls can be accepted during a call.
- Disable call waiting: new calls will be automatically rejected and a busy tone will be prompted.
- Enable call waiting tone: when you receive a new call on the line, the tone will beep.
The user can enable/disable the call waiting function in the web interface.
- WEB interface: Enter [Phone Settings] >> [Features] >> [Basic Settings], enable/disable call waiting and call waiting tone.
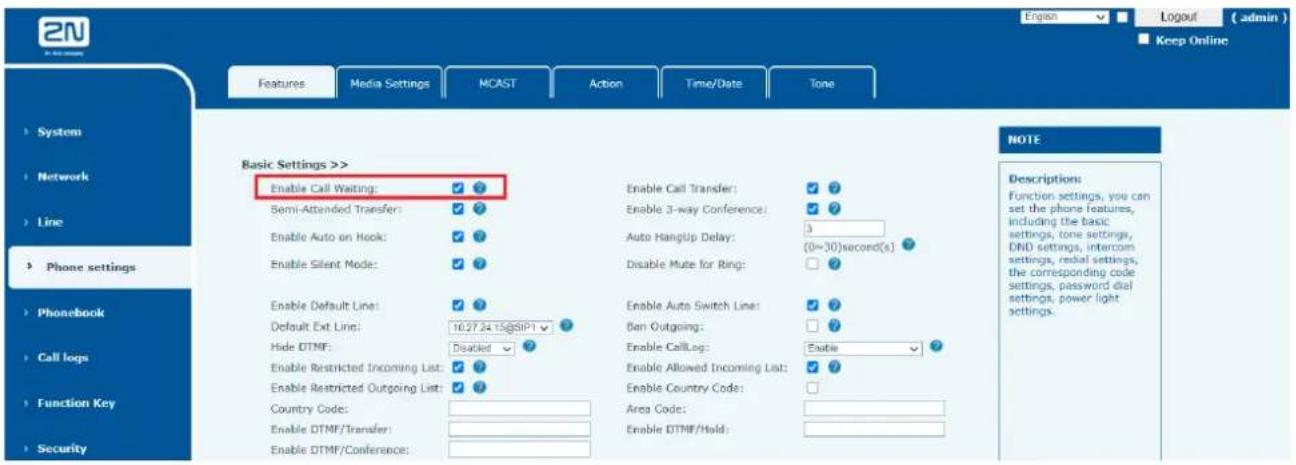
text_image
2N Features Media Settings NCAST Action Time/Date Tone Basic Settings >> Enable Call Waiting: ✓ ? Semi-Attended Transfer: ✓ ? Enable Auto on Hook: ✓ ? Enable Silent Mode: ✓ ? Enable Default Line: ✓ ? Default Ext Line: 10.27.24.15@SIP1 ✓ ? Hide OTMF: Disabled ✓ ? Enable Restricted Incoming List: ✓ ? Enable Restricted Outgoing List: ✓ ? Country Code: Enable OTMF/Transfer: Enable OTMF/Conference: Enable Call Transfer: ✓ ? Enable 3-way Conference: ✓ ? Auto HangUp Delay: 3 (0=30)second(s) ✓ Disable Mute for Ring: ✓ ? Enable Auto Switch Line: ✓ ? Ben Outgoing: ✓ ? Enable CallLog: Enable ✓ Enable Allowed Incoming List: ✓ ? Enable Country Code: ✓ Area Code: Enable OTMF/Hold: NOTE Descriptions Function settings, you can set the phone features, including the basic settings, tone settings, DND settings, intercom settings, redal settings, the corresponding code settings, password dial settings, power light settings. Engen Logout ( admin ) Keep Online System Network Line Phone settings Phonebook Call logs Function Key Security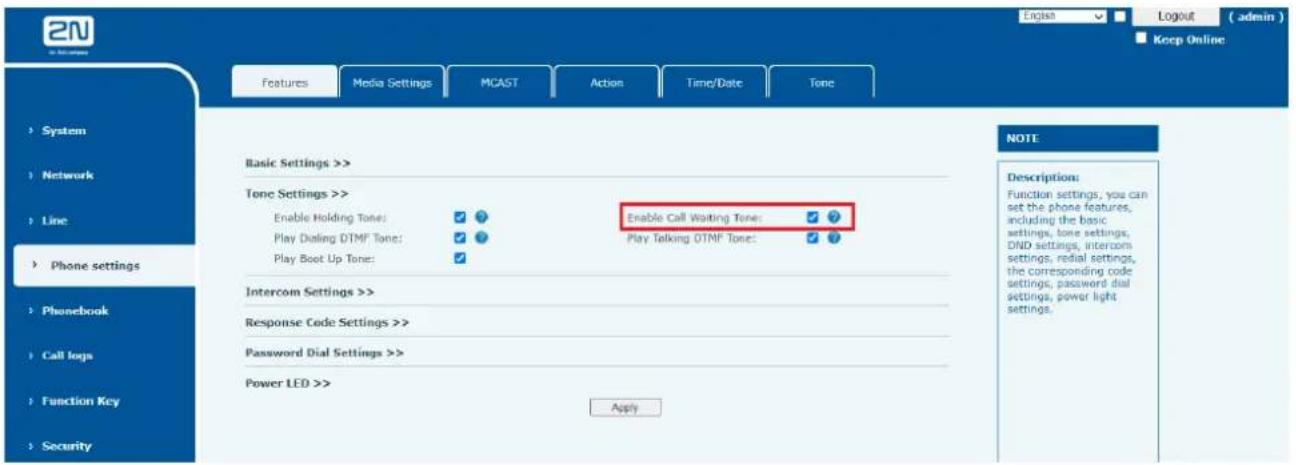
text_image
2N Features Media Settings MCAST Action Time/Date Tone System Network Line Phone settings Phonebook Call logs Function Key Security Basic Settings >> Tone Settings >> Enable Holding Tone: ✓ ✓ Enable Call Waiting Tone: ✓ ✓ Play Dialing DTMF Tone: ✓ ✓ Play Boot Up Tone: ✓ Intercom Settings >> Response Code Settings >> Password Dial Settings >> Power LED >> Apply NOTESDescription: Function settings, you can set the phone features, including the basic settings, tone settings, DND settings, intercom settings, redial settings, the corresponding code settings, password dial settings, power light settings.Picture 5 - Web call waiting tone setting
8.9 Conference
8.9.1 Local Conference
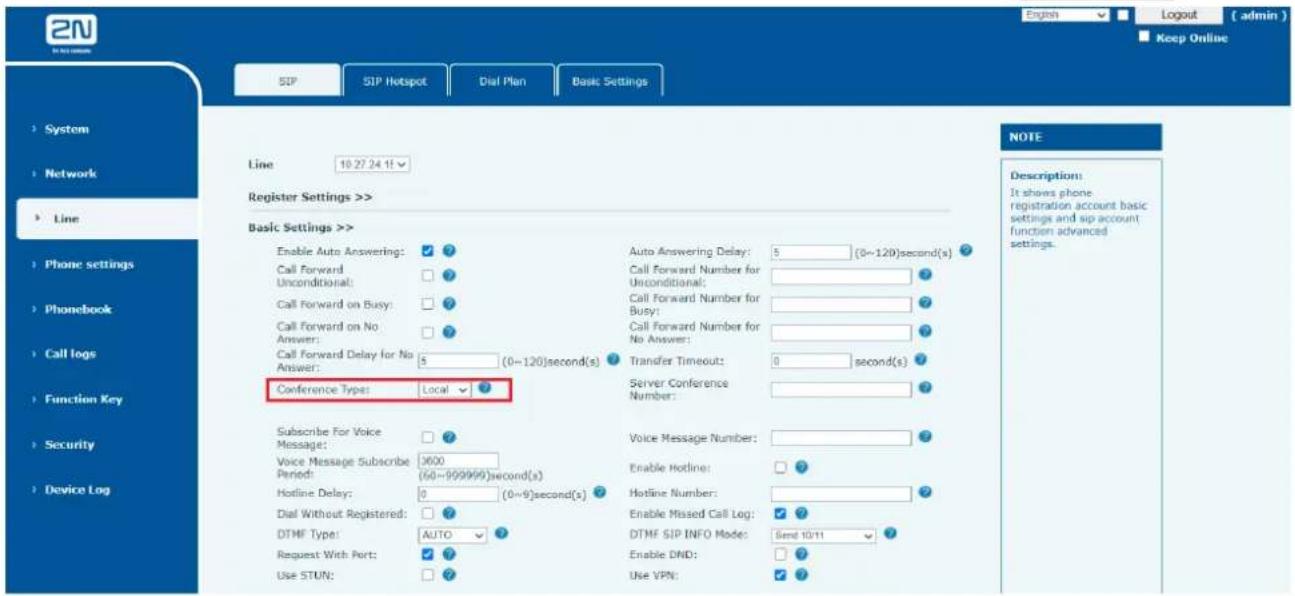
To conduct local conference, the user needs to log in the webpage and enter [Line] >> [SIP] >> [Basic settings]. The meeting mode is set as local (the default is local mode), as shown in the figure:
text_image
2N SIP SIP Hotspot Dial Plan Basic Settings Line 10:27:24:11 Register Settings >> Basic Settings >> Enable Auto Answering: ✓ ? Call Forward Unconditional: ✓ ? Call Forward on Busy: ✓ ? Call Forward on No Answer: ✓ ? Call Forward Delay for No Answer: 5 (0~120)second(s) Transfer Timeout: 0 second(s) Server Conference Number: Subscribe For Voice Message: ✓ ? Voice Message Subscribe Period: 3600 (60~999999)second(s) Hotline Delay: 0 (0~9)second(s) Dial Without Registered: ✓ ? DTMF Type: AUTO Request With Port: ✓ ? Use STUN: ✓ Auto Answering Delay: 5 (0~120)second(s) Call Forward Number for Unconditional: ✓ ? Call Forward Number for Busy: ✓ ? Call Forward Number for No Answer: ✓ ? Conference Type: Local ✓ Voice Message Number: ✓ ? Enable Hotline: ✓ ? Hotline Number: ✓ ? Enable Missed Call Log: ✓ ? DTMF SIP INFO Mode: Send 10/11 ✓ ? Enable DND: ✓ ? Use VPN: ✓ NOTE Description: It shows phone registration account basic settings and sip account function advanced settings. System Network Line Phone settings Phonebook Call logs Function Key Security Device LogPicture 6 - Local conference setting
Two ways to create a local conference:
1) The device has two channels of communication. Press the conference button on the call interface. When selecting the conference number, select the other number that already exists.
2) If the device has a call all the way, press the conference key in the call interface, enter the number to join the meeting and press the call; After the opposite end is answered, press the conference button again to set up the local tripartite conference:
Note: during the meeting, press the separate key to separate the meeting, and press the end key to end the call.
8.9.2 Network Conference
Users need server support for network conference.
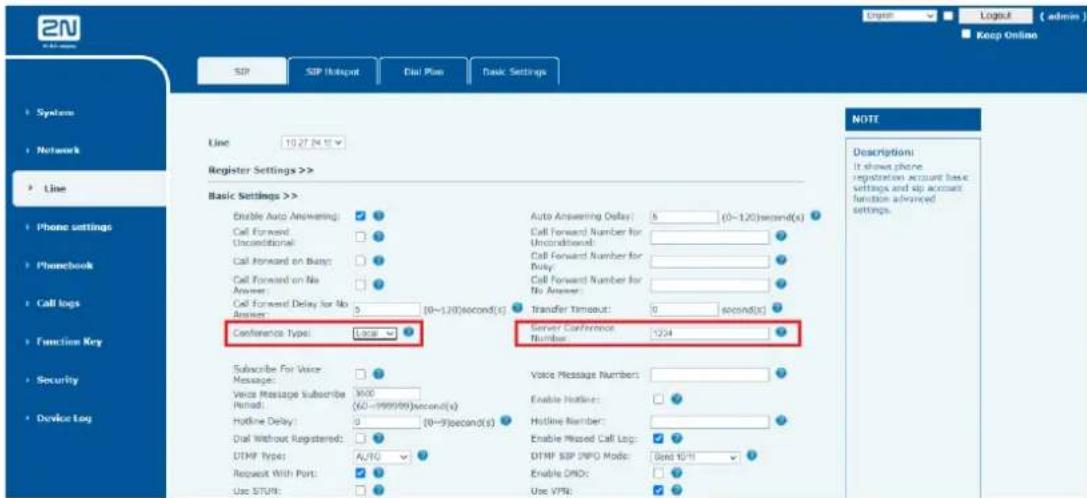
Log in the web page, enter [Line] >> [SIP] >> [Basic settings], set the conference mode as server mode (default is local mode), set the server conference room number (please consult your system administrator), as shown in the figure:
text_image
2N SIP SIP Hotspot Dial Plan Basic Settings Line 10:27:24:15 Register Settings >> Basic Settings >> Enable Auto Answering: Cell Forward Unconditional: Call Forward on Base: Cell Forward on No Answer: Call Forward Delay for No Answer: Conference Type: Local Auto Answering Delay: 6 (0~1,20)second(s) Call Forward Number for Unconditional: Call Forward Number for Ruby: Call Forward Number for No Answer: Transfer Timeout: 0 second(s) Server Conference Number: 1234 Subscribe For Voice Message: Voice Message Subscribe Period: 300 (60~999999)second(s) Hotline Delay: 0 (0~9)second(s) Dual Without Registered: DTPM Type: A/TC Request With Port: Use STUN: Voice Message Numbers: Enable Hotlines: Hotline Number: Enable Missed Call Log: DTPM SIP INFO Mode: Basic USB: Enable OMO: Use VPN: NOTT Descriptions: It shows phone registration account basic settings and sip account function advanced settings. Systems Network Line Phone settings Phonebook Call logs Function Key Security Device LogPicture 7 - Network conference
Method to join a network conference:
- Multi-party call number of network conference room and enter the password then all enter the conference room.
● The two phones have established common calls. Press the conference button to invite new members to the conference. Follow the voice prompt to operate.
Note: the upper limit of the number of participants in the network conference varies according to the server.
8.10 Hotline
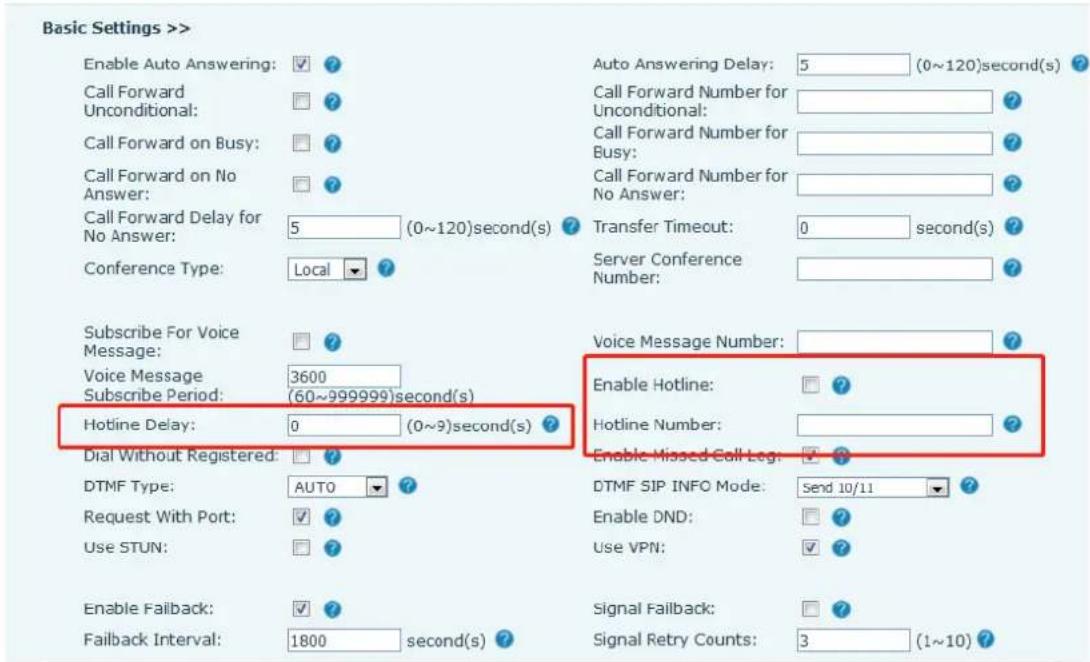
The device supports hotline dialing. After setting up the hotline dialing, directly pick up the handset, hands-free, earphone, etc., and the phone will automatically call according to the hotline delay time.
● On the website [Line] >> [SIP] >> [Basic Settings], can also set up a hotline.
- The setup hotline also corresponds to the SIP line. That is, the hotline set in the SIP1 webpage can only be activated in the SIP1 line.
text_image
Basic Settings >> Enable Auto Answering: ✓ ? Call Forward Unconditional: ☐ ? Call Forward on Busy: ☐ ? Call Forward on No Answer: ☐ ? Call Forward Delay for No Answer: 5 (0~120)second(s) ? Transfer Timeout: 0 second(s) ? Conference Type: Local ? Subscribe For Voice Message: ☐ ? Voice Message 3600 Subscribe Period: (60~999999)second(s) Hotline Delay: 0 (0~9)second(s) ? Dial Without Registered: ☐ ? DTMF Type: AUTO ? Request With Port: ✓ ? Use STUN: ☐ ? Enable Failback: ✓ ? Failback Interval: 1800 second(s) ? Auto Answering Delay: 5 (0~120)second(s) ? Call Forward Number for Unconditional: ? Call Forward Number for Busy: ? Call Forward Number for No Answer: ? Transfer Timeout: 0 second(s) ? Server Conference Number: ? Voice Message Number: ? Enable Hotline: ☐ ? Hotline Number: ? Enable Missed Call Leg: ✓ ? DTMF SIP INFO Mode: send 10/11 ? Enable DND: ☐ ? Use VPN: ✓ ? Signal Failback: ☐ ? Signal Retry Counts: 3 (1~10) ?Picture 8 - Hotline set up on webpage
9 Advance Function
9.1 Intercom
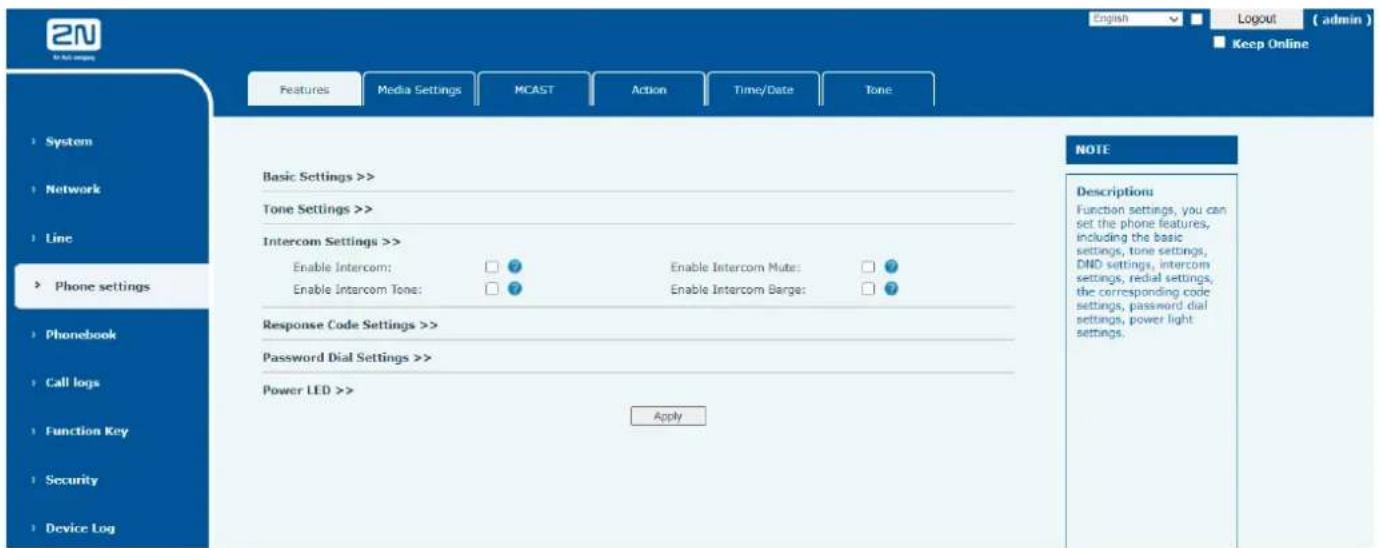
When the Intercom is enabled, it can automatically receive calls from the intercom.
text_image
EN M-Net logog Features Media Settings MCAST Action Time/Date Tone System Network Line Phone settings Phonebook Call logs Function Key Security Device Log Basic Settings >> Tone Settings >> Intercom Settings >> Enable Intercom: ☐ 7 Enable Intercom Mute: ☐ 7 Enable Intercom Tone: ☐ 7 Enable Intercom Barge: ☐ 7 Response Code Settings >> Password Dial Settings >> Power LED >> Apply NOTE Description Function settings, you can set the phone features, including the basic settings, tone settings, DND settings, intercom settings, redial settings, the corresponding code settings, password dial settings, power light settings.Picture 9 - Web Intercom configure
Table 3 - Intercom configure
| Parameter | Description |
| Enable Intercom | When intercom is enabled, the device will accept the incoming call request with a SIP header of Alert-Info instruction to automatically answer the call after specific delay. |
| Enable Intercom Mute | Enable mute mode during the intercom call |
| Enable Intercom Tone | If the incoming call is intercom call, the phone plays the intercom tone |
| Enable Intercom Barge | Enable Intercom Barge by selecting it, the phone auto answers the intercom call during a call. If the current call is intercom call, the phone will reject the second intercom call |
9.2 MCAST
This feature allows user to make some kind of broadcast call to people who are in multicast group. User can configure a multicast DSS Key on the phone, which allows
user to send a Real Time Transport Protocol (RTP) stream to the pre-configured multicast address without involving SIP signaling. You can also configure the phone to receive an RTP stream from pre-configured multicast listening address without involving SIP signaling. You can specify up to 10 multicast listening addresses.
9.3 Message
9.3.1 MWI (Message Waiting Indicator)
If the service of the lines supports voice message feature, when the user is not available to answer the call, the caller can leave a voice message on the server to the user.
The user will be notified of the server voice message and the status of the power lamp.
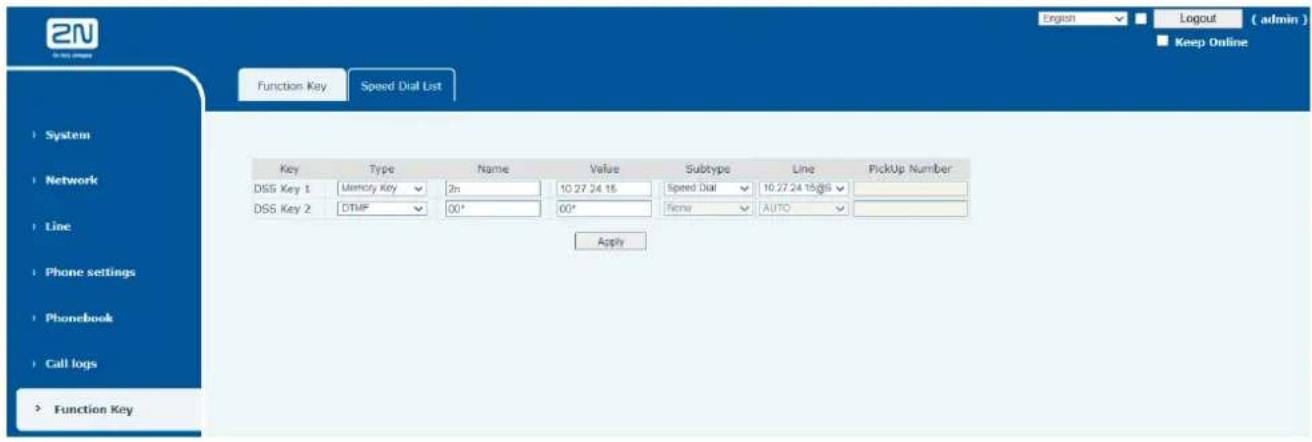
text_image
EN Logout ( admin ) Keep Online Function Key Speed Dial List Key Type Name Value Subtype Line PickUp Number DSS Key 1 Memory Key 2h 10.27.24.15 Speed Dial 10.27.24.15/65 DSS Key 2 DTMF 00* 00* None AUTO ApplyPicture 10 - New Voice Message Notification
To listen to a voice message, the user must first configure the voicemail number. After the voicemail number is configured, the user can retrieve the voicemail of the default line.
10.1 Basic Settings
10.1.1 Language
The user can set the phone language through the web interface.
- Web interface: Log in to the phone webpage and set the language in the drop-down box at the top right corner of the page, as shown in the figure:
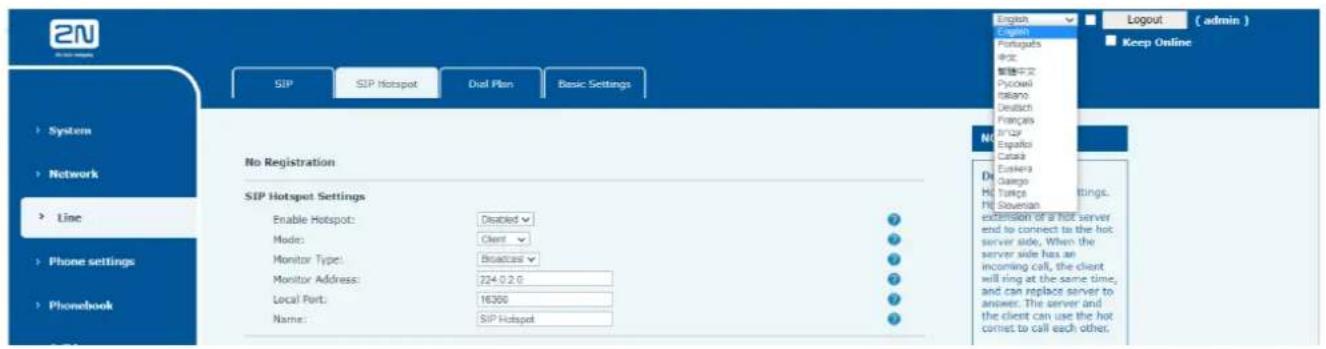
text_image
2N SIP SIP Hotspot Dual Plan Basic Settings No Registration SIP Hotspot Settings Enable Hotspot: Disabled Mode: Client Monitor Type: Broadcast Monitor Address: 224.0.2.6 Local Port: 16300 Name: SIP Hotspot English Portugues 中文 繁體中文 Pycowei Italiano Deutsch Françars Friser Españor Catala Euskera Gazgo Hi Tanja Hi Slovenian exclusion of a hot server end to connect to the hot server side. When the server side has an incoming call, the client will ring at the same time, and can replace server to answer. The server and the client can use the hot comet to call each other. Logout ( admin ) Keep OnlinePicture 11 - Language setting on Web page
- The function box on the right side of the web interface language setting box is "Synchronize language to phone"; if selected, the phone language will be synchronized with the webpage language. If it is not selected, it will not be synchronized.
10.2 Function Key
The device has a total of 11 configurable custom function keys; One direct call foreground key and 10 custom digital speed dial keys.
Device direct call key, default configuration as a fixed number;(customizable replacement)
0\~9 numeric keys can be used as customized shortcut keys, users can customize the configuration of 0\~9 numeric keys in the web page, users can quickly dial the corresponding number by long press each shortcut key.
The DSS Key could be configured as followings,
◆ Memory Key
■ Speed Dial/Intercom/BLF/Presence/Call Park/Call Forward (to someone)
DTMF
Action URL
◆ MCAST Paging
Webpage interface: [Function key] >> [Function key].
Moreover, user also can add the user-defined title for the DSS Keys, which is configured as Memory Key / Line / URL / Multicast / Prefix.
NOTICE! User-defined title is up to 10 characters.
More detailed information refers to 11.26 Function Key and 6.3 Appendix I - LED Definition.
11 Web Configurations
11.1 Web Page Authentication
The user can log into the web page of the phone to manage the user's phone information and operate the phone. Users must provide the correct user name and password to log in.
For security reasons, we recommend that you change the default administrator password upon the first login to the web interface by pressing the Modify button in the User Management section.
Default access data:
User: admin
Password: 2n
11.2 System >> Information
User can get the system information of the device in this page including,
■ Model
■ Hardware Version
■ Software Version
■ Uptime
And summarization of network status,
■ Network Mode
■ MAC Address
IP
■ Subnet Mask
■ Default Gateway
Besides, summarization of SIP account status,
■ SIP User
■ SIP account status (Registered / Unapplied / Trying / Timeout)
11.3 System >> Account
On this page the user can change the password for the login page.
Users with administrator rights can also add or delete users, manage users, and set permissions and passwords for new users.
11.4 System >> Configurations
On this page, users with administrator privileges can view, export, or import the phone configuration, or restore the phone to factory Settings.
■ Clear Configurations
Select the module in the configuration file to clear.
SIP: account configuration.
AUTOPROVISION: automatically upgrades the configuration
TR069:TR069 related configuration
MMI: MMI module, including authentication user information, web access protocol, etc.
DSS Key: DSS Key configuration
BASIC NETWORK: NETWORK configuration
■ Clear Tables
Select the local data table to be cleared, all selected by default.
■ Reset Phone
The phone data will be cleared, including configuration and database tables.
11.5 System >> Upgrade
web interface: log into the phone web page and enter the [system] >> [upgrade] page.
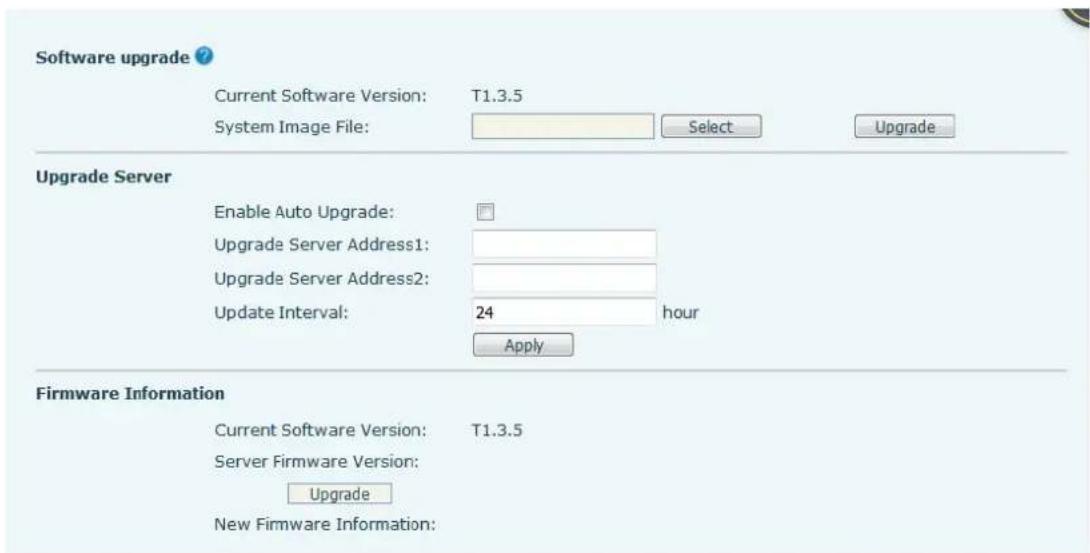
text_image
Software upgrade ? Current Software Version: T1.3.5 System Image File: Select Upgrade Upgrade Server Enable Auto Upgrade: Upgrade Server Address1: Upgrade Server Address2: Update Interval: 24 hour Apply Firmware Information Current Software Version: T1.3.5 Server Firmware Version: Upgrade New Firmware Information:Picture 12 - Web page firmware upgrade
Table 4 - Firmware upgrade
| Parameter | Description |
| Upgrade server | |
| Enable Auto Upgrade | Enable automatic upgrade, If there is a new version txt and new software firmware on the server, phone will show a prompt upgrade message after Update Interval. |
| Upgrade Server Address1 | Set available upgrade server address. |
| Upgrade Server Address2 | Set available upgrade server address. |
| Update Interval | Set Update Interval. |
| Firmware Information | |
| Current Software Version | It will show Current Software Version. |
| Server Firmware Version | It will show Server Firmware Version. |
| [Upgrade] button | If there is a new version txt and new software firmware on the server, the page will display version information and upgrade button will become available; Click [Upgrade] button to upgrade the new firmware. |
| New version description information | When there is a corresponding TXT file and version on the server side, the TXT and version information will be displayed under the new version description information. |
- The file requested from the server is a TXT file called vendor_model_hw10.txt.Hw followed by the hardware version number, it will be written as hw10 if no difference on hardware. All Spaces in the filename are replaced by underline.
- The URL requested by the phone is HTTP:// server address/vendor_Model_hw10 .txt: The new version and the requested file should be placed in the download directory of the HTTP server.
- TXT file format must be UTF-8
- vendor_model_hw10.TXT The file format is as follows:
Version=1.6.3 #Firmware
Firmware=xxx/xxx.z #URL, Relative paths are supported and absolute paths are possible, distinguished by the presence of protocol headers.
BuildTime=2018.09.11 20:00
Info=TXT|XML
XXXX
Xxxxx
Xxxxx
Xxxxx
● After the interval of update cycle arrives, if the server has available files and
versions, the phone will prompt as shown below. Click [view] to check the version information and upgrade.
11.6 System >> Auto Provision
Page interface: log into the phone page and enter the [system] >> [automatic deployment] page.
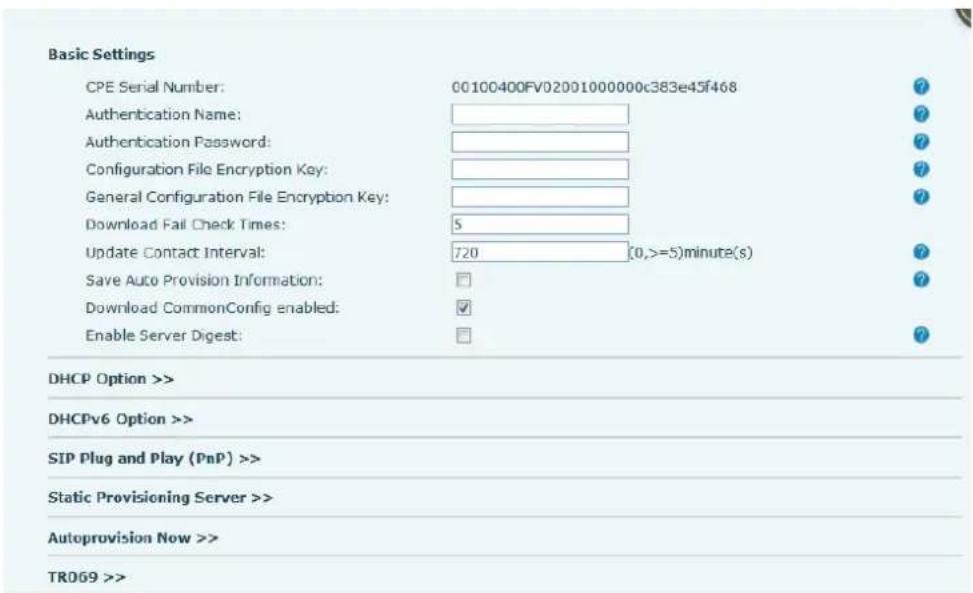
text_image
Basic Settings CPE Serial Number: 00100400FV02001000000c383e45f468 ? Authentication Name: Authentication Password: Configuration File Encryption Key: General Configuration File Encryption Key: Download Fail Check Times: 5 Update Contact Interval: 720 (0,>=5)minute(s) Save Auto Provision Information: Download CommonConfig enabled: Enable Server Digest: DHCP Option >> DHCPv6 Option >> SIP Plug and Play (PnP) >> Static Provisioning Server >> Autoprovision Now >> TR069 >>Picture 13 - Auto Provision settings
2N® IP Handset support SIP PnP, DHCP options, Static provision, TR069. If all of the 4 methods are enabled, the priority from high to low as below:
PNP>DHCP>TR069> Static Provisioning
Transferring protocol: FTP, TFTP, HTTP, HTTPS
Details refer to 2N ^® IP Handset Auto Provision.
| Parameters | Description |
| Basic settings | |
| CPE Serial Number | Display the device SN |
| Authentication Name | The username of provision server |
| Authentication Password | The password of provision server |
| Configuration FileEncryption Key | If the device configuration file is encrypted, user should add the encryption key here |
| General Configuration FileEncryption Key | If the common configuration file is encrypted, user should add the encryption key here |
| Download Fail Check Times | If there download is failed, phone will retry with the configured times. |
| Update Contact Interval | Phone will update the phonebook with the configured interval time. If it is 0, the feature is disabled. |
| Save Auto Provision Information | Save the HTTP/HTTPS/FTP username and password. If the provision URL is kept, the information will be kept. |
| Download Common Config enabled | Whether phone will download the common configuration file. |
| Enable Server Digest | When the feature is enable, if the configuration of server is changed, phone will download and update. |
| DHCP Option | |
| Option Value | Confugre DHCP option, DHCP option supports DHCP custom option | DHCP option 66 | DHCP option 43, 3 methods to get the provision URL. The default is Option 66. |
| Custom Option Value | Custom Option value is allowed from 128 to 254. The option value must be same as server define. |
| Enable DHCP Option 120 | Use Option120 to get the SIP server address from DHCP server. |
| SIP Plug and Play (PnP) | |
| Enable SIP PnP | Whether enable PnP or not. If PnP is enable, phone will send a SIP SUBSCRIBE message with broadcast method. Any server can support the feature will respond and send a Notify with URL to phone. Phone could get the configuration file with the URL. |
| Server Address | Broadcast address. As default, it is 224.0.0.0. |
| Server Port | PnP port |
| Transport Protocol | PnP protocol, TCP or UDP. |
| Update Interval | PnP message interval. |
| Static Provisioning Server | |
| Server Address | Provisioning server address. Support both IP address and domain address. |
| Configuration File Name | The configuration file name. If it is empty, phone will request the common file and device file which is named as its MAC address.The file name could be a common name, mac.cfg,input.cfg. The file format supports CFG/TXT/XML. |
| Protocol Type | Transferring protocol type, supports FTP、TFTP、HTTP and HTTPS |
| Update Interval | Configuration file update interval time. As default it is 1, means phone will check the update every 1 hour. |
| Update Mode | Provision Mode.1. Disabled.2. Update after reboot.3. Update after interval. |
| TR069 | |
| Enable TR069 | Enable TR069 after selection |
| ACS Server Type | There are 2 options Serve type, common and CTC. |
| ACS Server URL | ACS server address |
| ACS User | ACS server username (up to is 59 character) |
| ACS Password | ACS server password (up to is 59 character) |
| Enable TR069 Warning Tone | If TR069 is enabled, there will be a prompt tone when connecting. |
| TLS Version | TLS version (TLS 1.0, TLS 1.1, TLS 1.2) |
| INFORM Sending Period | INFORM signal interval time. It ranges from 1s to 999s |
| STUN Server Address | Configure STUN server address |
| STUN Enable | To enable STUN server for TR069 |
11.7 System >> Tools
This page provides tools for users to resolve problems.
- Syslog
Can choose the log level, export the system log; In order to analyze the problem in case of failure. - Web Capture
Grab packets from network data to analyze problems in case of failure - Watch Dog
When the device is stuck while in use, it will automatically restart and recover. - Ping
Check the destination IP address to be reached and record the result, showing whether the destination is responding and how long it takes to receive the reply.
11.8 System >> Reboot Phone
This page can restart the phone.
11.9 Network >> Basic
The phone only supports wired network connections. The phone USES an IP network connection to provide services. Unlike traditional telephony based on circuit technology, IP telephony exchanges packets and data over a network based on the IP address of the telephony.
To enable the phone, the network configuration must be configured correctly; The default network mode of the device is DHCP/IPv4. The client wants to modify the other modes and needs to go to the device's web configuration interface.
Web interface: [network] >> [basic] select network mode

text_image
Network Mode ? Network Mode: IPv4 Only IPv4 Network Status IP: 172.16.12.104 Subnet mask: 255.255.255.0 Default gateway: 172.16.12.1 MAC: 0c:38:3e:45:f4:68 IPv4 Settings Static IP DHCP PPPoE Enable Vendor Identifier: Disabled ? Vendor Identifier: VOIP H2U ? DNS Server Configured by: DHCP ? Primary DNS Server: 223.5.5.5 ? Secondary DNS Server : 114.114.114.114 DNS Domain: ApplyPicture 14 - Network mode Settings
IP Mode
There are 3 network protocol mode options, IPv4, IPv6 and IPv4 & IPv6.
■ IPv4
In IPv4 mode, there are 3 connection mode options: DHCP, PPPoE and Static IP.
When using DHCP mode, phone will get the IP address from DHCP server (router).
- Use DHCP DNS: It is enabled as default. "Enable" means phone will get DNS address from DHCP server and "disable" means not.
- Use DHCP time: It is disabled as default. "Enable" to manage the time of get DNS address from DHCP server and "disable" means not.
When using PPPoE, phone will get the IP address from PPPoE server.
- Username: PPPoE user name.
- Password: PPPoE password.
When using Static IP mode, user must configure the IP address manually.
- IP Address: Phone IP address.
● Mask: sub mask of your LAN. - Gateway: The gateway IP address. Phone could access the other network via it.
- Primary DNS: Primary DNS address. The default is 8.8.8.8, Google DNS server address.
- Secondary DNS: Secondary DNS. When primary DNS is not available, it will work.
■ Pv6
In IPv6, there are 2 connection mode options, DHCP and Static IP.
- DHCP configuration refers to IPv4 introduction in last page.
- Static IP configuration is almost same as IPv4's, except the IPv6 Prefix.
- IPv6 Prefix: IPv6 prefix, it is similar with mask of IPv4.
11.10 Network >> Service Port
This page provides settings for Web page login protocol, protocol port settings and RTP port.
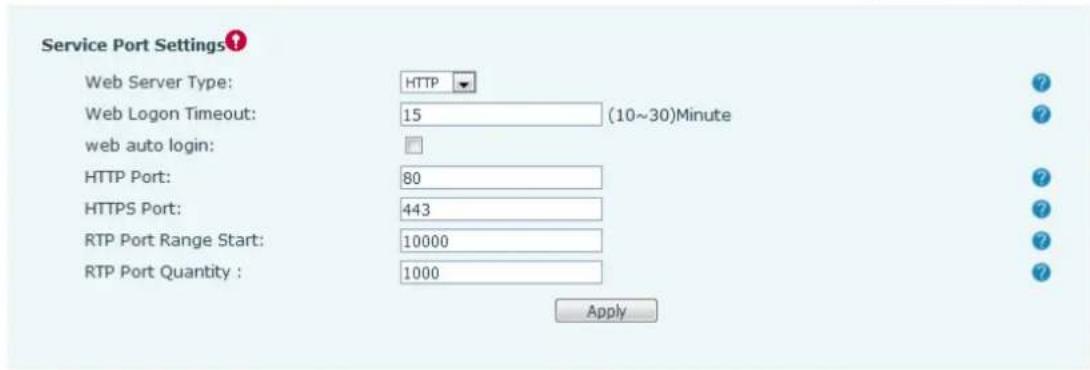
text_image
Service Port Settings Web Server Type: HTTP Web Logon Timeout: 15 (10~30)Minute web auto login: HTTP Port: 80 HTTPS Port: 443 RTP Port Range Start: 10000 RTP Port Quantity : 1000 ApplyPicture 15 - Service Port Settings
Table 5 - Service port
| Parameter | Description |
| Web Server Type | Reboot to take effect after settings. Optionally, the web page login is HTTP/HTTPS. |
| Web Logon Timeout | Default as 15 minutes, the timeout will automatically exit the login page, need to login again. |
| Web auto login | After the timeout does not need to enter a user name password, will automatically login to the web page. |
| HTTP Port | The default is 80. If you want system security, you can set ports other than 80.Such as :8080, webpage login: HTTP://ip:8080 |
| HTTPS Port | The default is 443, the same as the HTTP port. |
| RTP Port Range Start | The value range is 1025 to 65535. The value of RTP port starts from the initial value set. For each call, the value of voice and video port is added 2. |
| RTP Port Quantity | Number of calls. |
11.11 Network >> VPN
Virtual Private Network (VPN) is a technology to allow device to create a tunneling connection to a server and becomes part of the server's network. The network transmission of the device may be routed through the VPN server.
For some users, especially enterprise users, a VPN connection might be required to be
established before activate a line registration. The device supports two VPN modes, Layer 2 Transportation Protocol (L2TP) and OpenVPN.
The VPN connection must be configured and started (or stopped) from the device web portal.
L2TP
NOTICE! The device only supports non-encrypted basic authentication and non-encrypted data tunneling. For users who need data encryption, please use OpenVPN instead.
To establish a L2TP connection, users should log in to the device web portal, open webpage [Network] >> [VPN]. In VPN Mode, check the "Enable VPN" option and select "L2TP", then fill in the L2TP server address, Authentication Username, and Authentication Password in the L2TP section. Press "Apply" then the device will try to connect to the L2TP server.
When the VPN connection established, the VPN IP Address should be displayed in the VPN status. There may be some delay of the connection establishment. User may need to refresh the page to update the status.
Once the VPN is configured, the device will try to connect with the VPN automatically when the device boots up every time until user disable it. Sometimes, if the VPN connection does not establish immediately, user may try to reboot the device and check if VPN connection established after reboot.
■ OpenVPN
To establish an OpenVPN connection, user should get the following authentication and configuration files from the OpenVPN hosting provider and name them as the following, OpenVPN Configuration file: client.ovpn
CA Root Certification: ca.crt
Client Certification: client.crt
Client Key: client.key
User then upload these files to the device in the web page [Network] >> [VPN], select OpenVPN Files. Then user should check "Enable VPN" and select "OpenVPN" in VPN Mode and click "Apply" to enable OpenVPN connection.
Same as L2TP connection, the connection will be established every time when system rebooted until user disable it manually.
11.12 Network >> Advanced
LLDP
Link Layer Discovery Protocol. LLDP is a vendor independent link layer protocol used by
network devices for advertising their identity, capabilities to neighbors on a LAN segment.
Phone could use LLDP to find the VLAN switch or other VLAN devices and use LLDP learn feature to apply the VLAN ID from VLAN switch to phone its self.
CDP
Cisco Discovery Protocol. CDP is a not-for-profit charity that runs the global disclosure system for investors, companies, cities, states and regions to manage their environmental impacts. According to the CDP, Cisco devices could share the OS version, IP address, hardware version and so on.
Picture 14 - QoS & VLAN
| Parameters | Description |
| LLDP setting | |
| Report | Enable LLDP |
| Interval | LLDP requests interval time |
| Learning | apply the learned VLAN ID to the phone configuration |
| QoS | |
| QoS Mode | configure SIP DSCP and audio DSCP |
| WAN VLAN | |
| WAN VLAN | WAN port VLAN configuration |
| LAN VLAN | |
| LAN VLAN | LAN port VLAN configuration |
| CDP | |
| CDP | CDP enable/disable, CDP interval time |
11.13 Line >> SIP
Configure the Line service configuration on this page.
Table 6 - Line configuration on the web page
| Parameters | Description |
| Register Settings | |
| Line Status | Display the current line status at page loading.To get the up to date line status, user has trefresh the page manually. |
| Activate | Whether the service of the line is activated |
| Username | Enter the username of the service account. |
| Authentication User | Enter the authentication user of the service account |
| Display Name | Enter the display name to be sent in a call request. |
| Authentication Password | Enter the authentication password of the service account |
| Realm | Enter the SIP domain if requested by the service provider |
| Server Name | Input server name. |
| SIP Server 1 | |
| Server Address | Enter the IP or FQDN address of the SIP server |
| Server Port | Enter the SIP server port, default is 5060 |
| Transport Protocol | Set up the SIP transport line using TCP or UDP or TLS. |
| Registration Expiration | Set SIP expiration date. |
| SIP Server 2 | |
| Server Address | Enter the IP or FQDN address of the SIP server |
| Server Port | Enter the SIP server port, default is 5060 |
| Transport Protocol | Set up the SIP transport line using TCP or UDP or TLS. |
| Registration Expiration | Set SIP expiration date. |
| SIP Proxy Server Address | Enter the IP or FQDN address of the SIP proxy server. |
| Proxy Server Port | Enter the SIP proxy server port, default is 5060. |
| Proxy User | Enter the SIP proxy user. |
| Proxy Password | Enter the SIP proxy password. |
| Backup Proxy Server Address | Enter the IP or FQDN address of the backup proxy server. |
| Backup Proxy Server Port | Enter the backup proxy server port, default is 5060. |
| Basic Settings | |
| Enable Auto Answering | Enable auto-answering, the incoming calls will be answered automatically after the delay time |
| Auto Answering Delay | Set the delay for incoming call before the systemautomatically answered it |
| Call Forward Unconditional | Enable unconditional call forward, all incoming calls will be forwarded to the number specified in the next field |
| Call Forward Number for Unconditional | Set the number of unconditional call forward |
| Call Forward on Busy | Enable call forward on busy, when the phone is busy, any incoming call will be forwarded to the number specified in the next field. |
| Call Forward Number for Busy | Set the number of call forward on busy. |
| Call Forward on No Answer | Enable call forward on no answer, when an incoming call is not answered within the configured delay time, the call will be forwarded to the number specified in the next field. |
| Call Forward Number for No Answer | Set the number of call forward on no answer. |
| Call Forward Delay for No Answer | Set the delay time of not answered call before being forwarded. |
| Transfer Timeout | Set the timeout of call transfer process. |
| Conference Type | Set the type of call conference, Local=set up call conference by the device itself, maximum supports two remote parties, Server=set up call conference by dialing to a conference room on the server |
| Server Conference Number | Set the conference room number when conference type is set to be Server |
| Subscribe For Voice Message | Enable the device to subscribe a voice message waiting notification, if enabled, the device will receive notification from the server if there is voice message waiting on the server |
| Voice Message Number | Set the number for retrieving voice message |
| Voice Message Subscribe Period | Set the interval of voice message notification subscription |
| Enable Hotline | Enable hotline configuration, the device will dial to the specific number immediately at audio channel opened by off-hook handset or turn on hands-free speaker or headphone |
| Hotline Delay | Set the delay for hotline before the system automatically dialed it |
| Hotline Number | Set the hotline dialing number |
| Dial Without Registered | Set call out by proxy without registration |
| Enable Missed Call Log | If enabled, the phone will save missed calls into the call history record. |
| DTMF Type | Set the DTMF type to be used for the line |
| DTMF SIP INFO Mode | Set the SIP INFO mode to send ‘*’ and ‘#’ or ‘10’ and ‘11’ |
| Enable DND | Enable Do-not-disturb, any incoming call to this line will be rejected automatically |
| Subscribe For Voice Message | Enable the device to subscribe a voice message waiting notification, if enabled, the device will receive notification from the server if there is voice message waiting on the server |
| Use VPN | Set the line to use VPN restrict route |
| Use STUN | Set the line to use STUN for NAT traversal |
| Enable Failback | Whether to switch to the primary server when it is available. |
| Failback Interval | A Register message is used to periodically detect the time interval for the availability of the main Proxy. |
| Signal Failback | Multiple proxy cases, whether to allow the invite/register request to also execute failback. |
| Signal Retry Counts | The number of attempts that the SIP Request considers proxy unavailable under multiple proxy scenarios. |
| Codecs Settings | Set the priority and availability of the codecs by adding or remove them from the list. |
| Video Codecs | Select video code to preview video. |
| Advanced Settings | |
| Use Feature Code | When this setting is enabled, the features in this section will not be handled by the device itself but by the server instead. In order to control the enabling of the features, the device will send feature code to the server by dialing the number specified in each feature code field. |
| Enable DND | Set the feature code to dial to the server |
| Disable DND | Set the feature code to dial to the server |
| Enable Call Forward Unconditional | Set the feature code to dial to the server |
| Disable Call Forward Unconditional | Set the feature code to dial to the server |
| Enable Call Forward on Busy | Set the feature code to dial to the server |
| Disable Call Forward on Busy | Set the feature code to dial to the server |
| Enable Call Forward on No Answer | Set the feature code to dial to the server |
| Disable Call Forward on No Answer | Set the feature code to dial to the server |
| Enable Blocking Anonymous Call | Set the feature code to dial to the server |
| Disable Blocking Anonymous Call | Set the feature code to dial to the server |
| Call Waiting On Code | Set the feature code to dial to the server |
| Call Waiting Off Code | Set the feature code to dial to the server |
| Send Anonymous On Code | Set the feature code to dial to the server |
| Send Anonymous Off Code | Set the feature code to dial to the server |
| SIP Encryption | Enable SIP encryption such that SIP transmission will be encrypted |
| RTP Encryption | Enable RTP encryption such that RTP transmission will be encrypted |
| Enable Session Timer | Set the line to enable call ending by session timer refreshment. The call session will be ended if there is not new session timer even update received after the timeout period |
| Session Timeout | Set the session timer timeout period |
| Enable BLF List | Enable/Disable BLF List |
| BLF List Number | BLF List allows one BLF key to monitor the status of a group. Multiple BLF lists are supported. |
| Response Single Codec | If setting enabled, the device will use single codec in response to an incoming call request |
| BLF Server | The registered server will receive the subscription package from ordinary application of BLF phone.Please enter the BLF server, if the sever does not support subscription package, the registered server and subscription server will be separated. |
| Keep Alive Type | Set the line to use dummy UDP or SIP OPTION packet to keep NAT pinhole opened |
| Keep Alive Interval | Set the keep alive packet transmitting interval |
| Keep Authentication | Keep the authentication parameters from |
| previous authentication | |
| Blocking Anonymous Call | Reject any incoming call without presenting caller ID |
| User Agent | Set the user agent, the default is Model with Software Version. |
| Specific Server Type | Set the line to collaborate with specific server type |
| SIP Version | Set the SIP version |
| Anonymous Call Standard | Set the standard to be used for anonymous |
| Local Port | Set the local port |
| Ring Type | Set the ring tone type for the line |
| Enable user=phone | Sets user=phone in SIP messages. |
| Use Tel Call | Set use tel call |
| Auto TCP | Using TCP protocol to guarantee usability of transport for SIP messages above 1500 bytes |
| Enable Rport | Set the line to add rport in SIP headers |
| Enable PRACK | Set the line to support PRACK SIP message |
| DNS Mode | Select DNS mode, A, SRV, NAPTR |
| Enable Long Contact | Allow more parameters in contact field per RFC 3840 |
| Enable Strict Proxy | Enables the use of strict routing. When the phone receives packets from the server, it will use the source IP address, not the address in via field. |
| Convert URI | Convert not digit and alphabet characters to %hh hex code |
| Use Quote in Display Name | Whether to add quote in display name, i.e. “2N” vs 2N |
| Enable GRUU | Support Globally Routable User-Agent URI (GRUU) |
| Sync Clock Time | Time Sync with server |
| Enable Inactive Hold | With the post-call hold capture package enabled, you can see that in the INVITE package, SDP is inactive. |
| Caller ID Header | Set the Caller ID Header |
| Use 182 Response for Call waiting | Set the device to use 182 response code at call waiting response |
| Enable Feature Sync | Feature Sync with server |
| Enable SCA | Enable/Disable SCA (Shared Call Appearance) |
| CallPark Number | Set the CallPark number. |
| Server Expire | Set the timeout to use the server. |
| TLS Version | Choose TLS Version. |
| uaCSTA Number | Set uaCSTA Number. |
| Enable Click To Talk | With the use of special server, click to call out directly after enabling. |
| Flash mode | Chose Flash mode, normal or SIP info. |
| Flash Info Content-Type | Set the SIP info content type. |
| Flash Info Content-Body | Set the SIP info content body. |
| PickUp Number | Set the scramble number when the Pickup is enabled. |
| JoinCall Number | Set JoinCall Number. |
| Intercom Number | Set Intercom Number. |
| Unregister On Boot | Whether to enable logout function. |
| Enable MAC Header | Whether to open the registration of SIP package with user agent with MAC or not. |
| Enable Register MAC Header | Whether to open the registration is user agent with MAC or not. |
| BLF Dialog Strict Match | Whether to enable accurate matching of BLF sessions. |
| PTime(ms) | Set whether to bring ptime field, default no. |
| SIP Global Settings | |
| Strict Branch | Set up to strictly match the Branch field. |
| Enable Group | Set open group. |
| Enable RFC4475 | Set to enable RFC4475. |
| Enable Strict UA Match | Enable strict UA matching. |
| Registration Failure Retry Time | Set the registration failure retry time. |
| Local SIP Port | Modify the phone SIP port. |
11.14 Line >> SIP Hotspot
SIP hotspot is a simple but practical function. With simple configurations, the SIP hotspot function can implement group ringing. SIP accounts can be expanded.
Phone set functions as a SIP hotspot and other phone sets (B and C) function as SIP hotspot clients. When somebody calls phone set A, phone sets A, B, and C all ring.
When any phone set answers the call, other phone sets stop ringing. The call can be answered by only one phone set. When B or C initiates a call, the SIP number registered by phone set A is the calling number.
To set a SIP hotspot, register at least one SIP account.
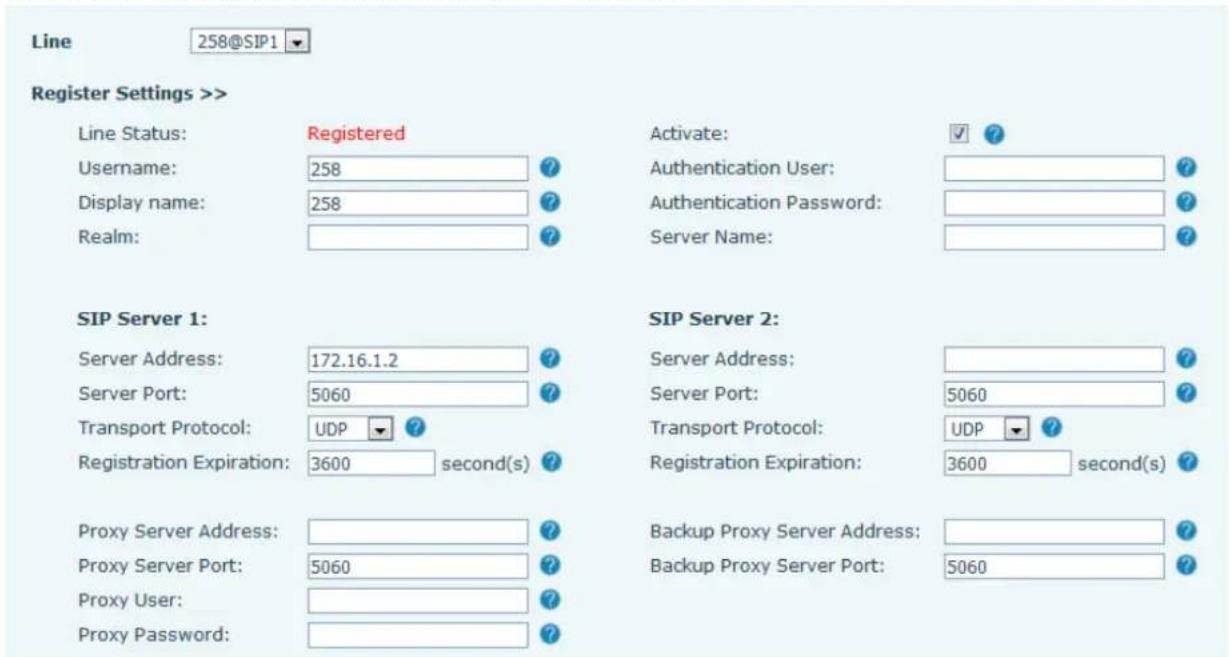
text_image
Line 258@SIP1 Register Settings >> Line Status: Registered Username: 258 ? Display name: 258 ? Realm: Activate: ✓ ? Authentication User: ? Authentication Password: ? Server Name: ? SIP Server 1: Server Address: 172.16.1.2 ? Server Port: 5060 ? Transport Protocol: UDP ? Registration Expiration: 3600 second(s) ? SIP Server 2: Server Address: ? Server Port: 5060 ? Transport Protocol: UDP ? Registration Expiration: 3600 second(s) ? Proxy Server Address: ? Proxy Server Port: 5060 ? Proxy User: ? Proxy Password: ? Backup Proxy Server Address: ? Backup Proxy Server Port: 5060Picture 16 - Register SIP account
Table 7 - SIP hotspot Parameters
| Parameters | Description |
| Device Table | If your phone is set to “SIP hotspot server”, Device Table will display as Client Device Table which connected to your phone.If your phone is set to “SIP hotspot client”, Device Table will display as Server Device Table which you can connect to. |
| SIP hotspot | |
| Enable hotspot | Set it to be Enable to enable the feature. |
| Mode | Choose hotspot, phone will be a “SIP hotspot server”; Choose Client, phone will be a “SIP hotspot Client” |
| Monitor Type | Either the Multicast or Broadcast is ok. If you want to limit the broadcast packets, you’d better use broadcast. But, if client choose broadcast, the SIP hotspot phone must be broadcast. |
| Monitor Address | The address of broadcast, hotspot server and hotspot client must be same. |
| Remote Port | Type the Remote port number. |
Configure SIP hotspot server:
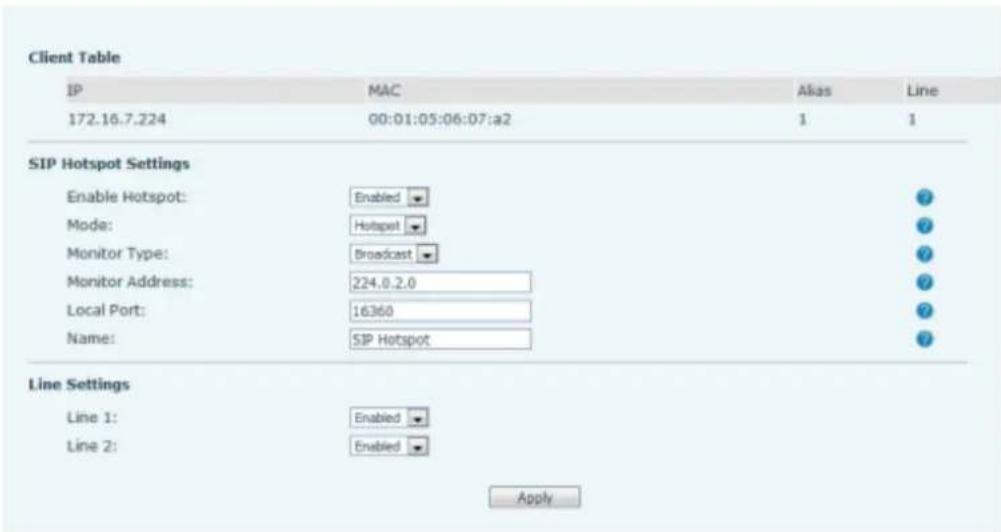
text_image
Client Table IP MAC Alias Line 172.16.7.224 00:01:05:06:07:a2 1 1 SIP Hotspot Settings Enable Hotspot: Enabled ● Mode: Hotspot ● Monitor Type: Broadcast ● Monitor Address: 224.0.2.0 ● Local Port: 16360 ● Name: SIP Hotspot ● Line Settings Line 1: Enabled ● Line 2: Enabled ● ApplyPicture 17 - SIP hotspot server configuration
Configure SIP hotspot client:
To set as a SIP hotspot client, no SIP account needs to be set. The Phone set will automatically obtain and configure a SIP account. On the SIP Hotspot tab page, set Mode to Client. The values of other options are the same as those of the hotspot.
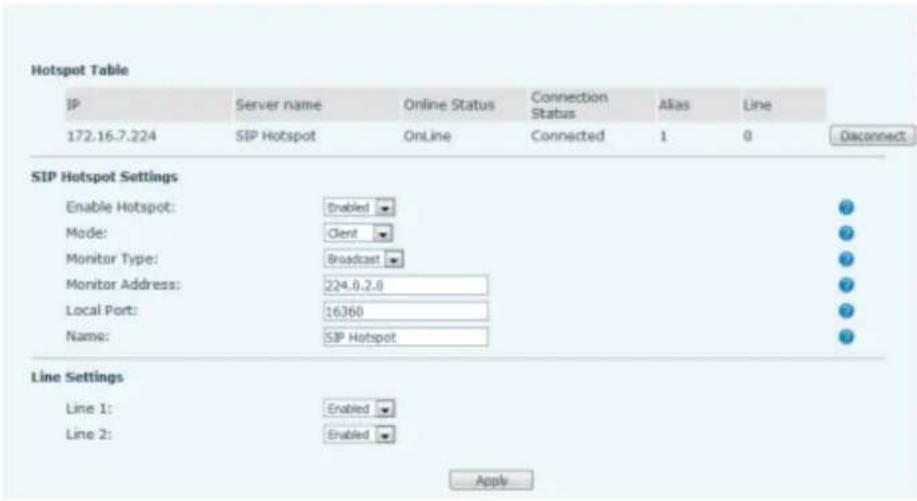
text_image
Hotspot Table IP Server name Online Status Connection Status Alias工程项目 172.16.7.224 SIP Hotspot.OnLine Connected 1 0 Disconnect: SIP Hotspot Settings Enable Hotspot: Enabled Mode: Gent Monitor Type: Broadcast Monitor Address: 224.0.2.0 Local Port: 16360 Name: SIP Hotspot Line Settings Line 1: Enabled Line 2: Enabled ApplyPicture 18 - SIP hotspot client configuration
As the hotspot server, the default extension number is 0. When the phone is used as the client, the extension number is increased from 1, you can view the extension number through the [SIP Hotspot] page.
Call extension number:
- The hotspot server and the client can dial each other through the extension number.
- For example, extension 1 dials extension 0.
11.15 Line >> Dial Plan
text_image
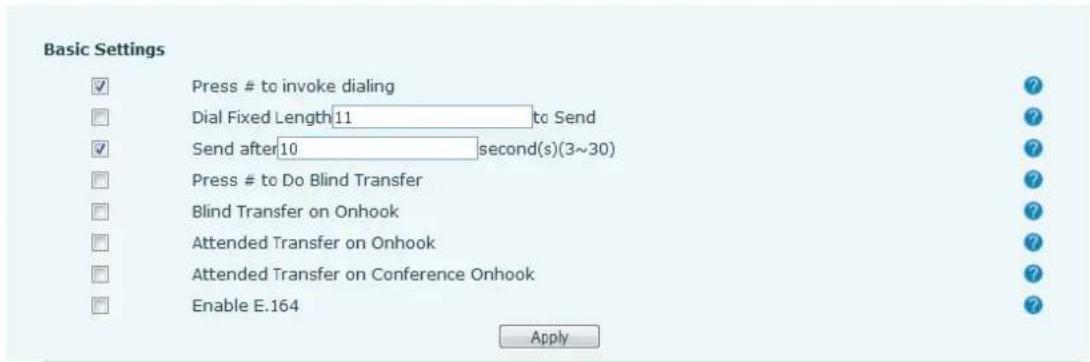
Basic Settings ✓ Press # to invoke dialing ☐ Dial Fixed Length11 to Send ✓ Send after 10 second(s)(3~30) ☐ Press # to Do Blind Transfer ☐ Blind Transfer on Onhook ☐ Attended Transfer on Onhook ☐ Attended Transfer on Conference Onhook ☐ Enable E.164 ApplyPicture 19 - Dial plan settings
Table 8 - Phone 7 dialing methods
| Parameters | Description |
| Press # to invoke dialing | The user dials the other party's number and then adds the # number to dial out; |
| Dial Fixed Length | The number entered by the user is automatically dialed out when it reaches a fixed length |
| Timeout dial | The system dials automatically after timeout |
| Press # to Do Blind Transfer | The user enters the number to be transferred and then presses the "#" key to transfer the current call to a third party |
| Blind Transfer on Onhook | After the user enters the number, hang up the handle or turn off the hands-free function to transfer the current call to a third party. |
| Attended Transfer on Onhook | Hang up the handle or press the hands-free button to realize the function of attention -transfer, which can transfer the current call to a third party. |
| Attended Transfer on Conference Onhook | During a three-way call, hang up the handle and the remaining two parties remain on the call. |
| Enable E.164 | Please refer to e. 164 standard specification |
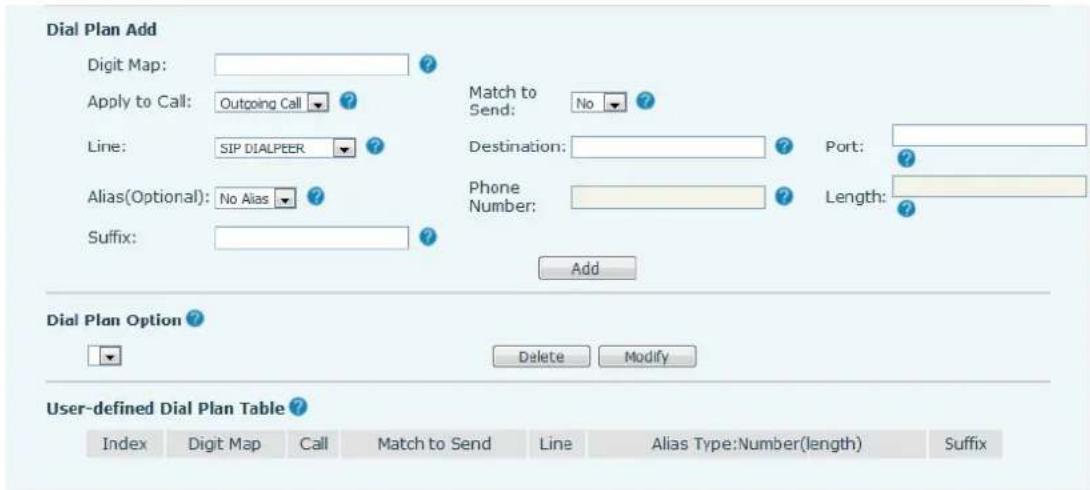
Add dialing rules:
text_image
Dial Plan Add Digit Map: Apply to Call: Outgoing Call ? Line: SIP DIALPEER ? Alias(Optional): No Alias ? Suffix: Match to Send: No ? Destination: Port: Phone Number: Length: Add Dial Plan Option ? Delete Modify User-defined Dial Plan Table ? Index Digit Map Call Match to Send Line Alias Type:Number(length) SuffixPicture 20 - Custom setting of dial - up rules
Table 9 - Dial - up rule configuration table
| Parameters | Description |
| Dial rule | There are two types of matching: Full Matching or Prefix Matching. In Full matching, the entire phone number is entered and then mapped per the Dial Peer rules.In prefix matching, only part of the number is entered followed by T. The mapping with then take place whenever these digits are dialed. Prefix mode supports a maximum of 30 digits. |
| Note: Two different special characters are used.■ x -- Matches any single digit that is dialed.■ [ ] -- Specifies a range of numbers to be matched. It may be a range, a list of ranges separated by commas, or a list of digits. | |
| Destination | Set Destination address. This is for IP direct. |
| Port | Set the Signal port, and the default is 5060 for SIP. |
| Alias | Set the Alias. This is the text to be added, replaced or deleted. It is an optional item. |
| Note: There are four types of aliases.■ all: xxx - xxx will replace the phone number. | |
| ■ add: xxx - xxx will be dialed before any phone number.■ del - The characters will be deleted from the phone number.■ rep: xxx - xxx will be substituted for the specified characters. | |
| Suffix | Characters to be added at the end of the phone number. It is an optional item. |
| Length | Set the number of characters to be deleted. For example, if this is set to 3, the phone will delete the first 3 digits of the phone number. It is an optional item. |
This feature allows the user to create rules to make dialing easier. There are several different options for dial rules. The examples below will show how this can be used.
Example 1: All Substitution -- Assume that it is desired to place a direct IP call to IP address 172.168.2.208. Using this feature, 123 can be substituted for 172.168.2.208.
| Index | Digit Map | Call | Match to Send | Line | Alias Type:Number(length) | Suffix | Media |
| 1 | "123" | Out | No | SIP DIALPEER(172.16.1.15:5560) | Default |
Picture 21 - Dial rules table (1)
Example 2: Partial Substitution -- To dial a long distance call to Beijing requires dialing area code 010 before the local phone number. Using this feature 1 can be substituted for 010. For example, to call 62213123 would only require dialing 162213123 instead of 01062213123.
| User-defined Dial Plan Table ? | |||||||
| Index | Digit Map | Call | Match to Send | Line | Alias Type:Number(length) | Suffix | Media |
| 1 | "1T" | Out | No | Fanvil@SIP1 | rep:010(1) | Default | |
Picture 22 - Dial rules table (2)
Example 3: Addition -- Two examples are shown. In the first case, it is assumed that 0 must be dialed before any 11 digit number beginning with 13. In the second case, it is assumed that 0 must be dialed before any 11 digit number beginning with 135, 136, 137, 138, or 139. Two different special characters are used.
x -- Matches any single digit that is dialed.
[] -- Specifies a range of numbers to be matched. It may be a range, a list of ranges separated by commas, or a list of digits.
11.16 Line >> Basic Settings
Set up the register global configuration.
Table 10 - Set the line global configuration on the web page
| Parameters | Description |
| STUN Settings | |
| Server Address | Set the STUN server address |
| Server Port | Set the STUN server port, default is 3478 |
| Binding Period | Set the STUN binding period which can be used to keep the NAT pinhole opened. |
| SIP Waiting Time | Set the timeout of STUN binding before sending SIP messages |
| The TLS authentication | |
| TLS Certification File | Upload or delete the TLS certification file used for encrypted SIP transmission. |
11.17 Phone settings >> Features
Configuration phone features.
Table 11 - General function Settings
| Parameters | Description |
| Basic Settings | |
| Enable Call Waiting | Enable this setting to allow user to take second incoming call during an established call. Default enabled. |
| Enable Call Transfer | Enable Call Transfer. |
| Semi-Attended Transfer | Enable Semi-Attended Transfer by selecting it |
| Enable 3-Way Conference | Enable 3-way conference by selecting it |
| Enable Auto Onhook | The phone will hang up and return to the idle automatically at hands-free mode |
| Auto Onhook Time | Specify Auto Onhook time, the phone will hang up and return to the idle automatically after Auto Hand down time at hands-free mode, and play dial tone Auto Onhook time at handset mode |
| Ring for Headset | Enable Ring for Handset by selecting it, the phone plays ring tone from handset. |
| Auto Headset | Enable this feature, headset plugged in the phone, user press ‘answer’ key or line key to answer a call with the headset automatically. |
| Enable Silent Mode | When enabled, the phone is muted, there is no ringing when calls, you can use the volume keys and mute key to unmute. |
| Disable Mute for Ring | When it is enabled, you can’t mute the phone |
| Enable Default Line | If enabled, user can assign default SIP line for dialing out rather than SIP1. |
| Enable Auto Switch Line | Enable phone to select an available SIP line as default automatically |
| Default Ext Line | Select the default line to use for outgoing calls |
| Ban Outgoing | If you select Ban Outgoing to enable it, and you cannot dial out any number. |
| Hide DTMF | Configure the hide DTMF mode. |
| Enable CallLog | Select whether to save the call log. |
| Enable Restricted Incoming List | Whether to enable restricted call list. |
| Enable Allowed Incoming List | Whether to enable the allowed call list. |
| Enable Restricted Outgoing List | Whether to enable the restricted allocation list. |
| Enable Country Code | Whether the country code is enabled. |
| Country Code | Fill in the country code. |
| Area Code | Fill in the area code. |
| Enable Number Privacy | Whether to enable number privacy. |
| Match Direction | Matching direction, there are two kinds of rules from right to left and from left to right. |
| Start Position | Open number privacy after the start of the hidden location. |
| Hide Digits | Turn on number privacy to hide the number of digits. |
| Allow IP Call | If enabled, user can dial out with IP address |
| P2P IP Prefix | Prefix a point-to-point IP call. |
| Caller Name Priority | Change caller ID display priority. |
| Emergency Call Number | |
| Search path | Select the search path. |
| LDAP Search | Select from with one LDAP for search |
| Emergency Call Number | Configure the Emergency Call Number. Despite the keyboard is locked, you can dial the emergency call number |
| Restrict Active URI Source IP | Set the device to accept Active URI command from specific IP address. More details please refer to this link |
| Push XML Server | Configure the Push XML Server, when phone receives request, it will determine whether to display corresponding content on the phone which sent by the specified server or not. |
| Enable Pre-Dial | Disable this feature, user enter number will open audio channel automatically.Enable the feature, user enter the number without opening audio channel. |
| Enable Multi Line | If enabled, up to 10 simultaneous calls can exist on the phone, and if disabled, up to 2 simultaneous calls can exist on the phone. |
| Line Display Format | Custom line format: SIPn/SIPn: xxx/xxx@SIPn |
| Contact As White List Type | NONE/BOTH/DND White List/FWD White List |
| Block XML When Call | Disable XML push on call. |
| SIP notify | When enabled, the phone displays the information when it receives the relevant notify content. |
| Tone Settings | |
| Enable Holding Tone | When turned on, a tone plays when the call is held |
| Enable Call Waiting Tone | When turned on, a tone plays when call waiting |
| Play Dialing DTMF Tone | Play DTMF tone on the device when user pressed a phone digits at dialing, default enabled. |
| Play Talking DTMF Tone | Play DTMF tone on the device when user pressed a phone digits during taking, defaultenabled. |
| DND Settings | |
| DND Option | Select to take effect on the line or on the phone or close. |
| Enable DND Timer | Enable DND Timer, If enabled, the DND is automatically turned on from the start time to the off time. |
| DND Start Time | Set DND Start Time |
| DND End Time | Set DND End Time |
| Intercom Settings | |
| Enable Intercom | When intercom is enabled, the device will accept the incoming call request with a SIP header of Alert-Info instruction to automatically answer the call after specific delay. |
| Enable Intercom Mute | Enable mute mode during the intercom call |
| Enable Intercom Tone | If the incoming call is intercom call, the phone plays the intercom tone |
| Enable Intercom Barge | Enable Intercom Barge by selecting it, the phone auto answers the intercom call during a call. If the current call is intercom call, the phone will reject the second intercom call |
| Response Code Settings | |
| DND Response Code | Set the SIP response code on call rejection on DND |
| Busy Response Code | Set the SIP response code on line busy |
| Reject Response Code | Set the SIP response code on call rejection |
| Password Dial Settings | |
| Enable Password Dial | Enable Password Dial by selecting it, When number entered is beginning with the password prefix, the following N numbers after the password prefix will be hidden as *, N stand for the value which you enter in the Password Length field. For example: you set the password prefix is 3, enter the Password Length is 2, then you enter the number 34567, it will display 3**67 on the phone. |
| Encryption Number Length | Configure the Encryption Number length |
| Password Dial Prefix | Configure the prefix of the password call number |
| Power LED | |
| Common | Standby power lamp state, off when off, open is always bright red. Off by default. |
| SMS/MWI | The status of power lamp when there is unread short message/voice message, including off/on/slow flash/quick flash, default slow flash. |
| Missed | The state of the power lamp when there is a missed call, including off/on/slow flash/quick flash, the default slow flash. |
| Talk/Dial | In the talk/dial state, the power lamp state, off is off, on is always red bright, the default is off. |
| Ringing | Power lamp status when there is an incoming call, including off/on/slow flash/quick flash, default flash. |
| Mute | Power lamp status in mute mode, including off/on/slow flash/quick flash, off by default. |
| Hold/Held | The power lamp state, including off/on/slow flash/quick flash, is turned off by default when left/retained. |
11.18 Phone settings >> Media Settings
Change voice Settings.
Table 12 - Voice settings
| Parameter | Description |
| Codecs Settings | Select enable or disable voice encoding:G.711A/U, G.722, G.729, G.726-16, G726-24,G726-32, G.726-40,ILBC, Opus |
| Audio Settings | |
| Handset Volume | Set the Handset volume, the value must be 1~9 |
| Default Ring Type | Configure default ringtones. If no special ringtoneis set for the phone number, the default ringtone will be used. |
| Speakerphone Volume | Set the hands-free volume to 1-9. |
| Headset Ring Volume | Set the volume of the earphone ringtone to 1~9. |
| Headset Volume | Set the volume of the headset to 1~9. |
| Speakerphone Ring Volume | Set the volume of hands-free ringtone to 1~9. |
| G.723.1 Bit Rate | 5.3kb/s or 6.3kb/s is available. |
| DTMF Payload Type | Enter the DTMF payload type, the value must be 96~127. |
| AMR Payload Type | Set AMR load type, range 96~127. |
| Headset Mic Gain | Set the earphone's radio volume gain to fit different models of earphones. |
| Opus payload type | Set Opus load type, range 96~127. |
| OPUS Sample Rate | Set Opus sampling rate, including opus-nb (8KHz) and opus-wb (16KHz). |
| ILBC Payload Type | Set the ILBC Payload Type, the value must b 96~127. |
| ILBC Payload Length | Set the ILBC Payload Length |
| Enable MWI Tone | When there is a new voice message message, the phone will start a special dial tone. |
| Enable VAD | Whether voice activity detection is enabled. |
| Onhook Time | Configure a minimum response time, which defaults to 200ms |
| EHS Type | EHS headset is available after enabling. |
| RTP Control Protocol (RTCP) Settings | |
| CNAME user | Set CNAME user |
| CNAME host | Set CNAME host |
| RTP Settings | |
| RTP keep alive | Hold the call and send the packet after 30s |
| Alert Info Ring Settings | |
| Value | Set the value to specify the ring type. |
| Ring Type | Type1-Type9 |
11.19 Phone settings >> MCAST
Using the multicast function, we can simply and conveniently send the announcement to each member of the multicast, and send the multicast RTP stream to the preconfigured multicast address by setting the multicast key on the phone. Listen for and play the RTP stream sent from the multicast address by configuring the listening multicast address on the phone.
text_image
MCAST Listening Priority: 1 Enable Page Priority: Enable Prio Chan: Enable Emer Chan: Index/Priority Name Host:port Channel 1 2 3 4 5 6 7 8 9 10 Apply MCAST Dynamic Auto Exit Expires: 60 Apply Index Priority MCAST Ip PortPicture 15 - MCAST
Table 13 - Multicast parameters
| Parameters | Description |
| Normal Call Priority | Define the priority of the active call, 1 is the highest priority, 10 is the lowest. |
| Enable Page Priority | The voice call in progress shall take precedence over all incoming paging calls. |
| Name | Listened multicast server name |
| Host: port | Listened multicast server's multicast IP address and port. |
11.20 Phone settings >> Action
Action URL
Action urls are used for IPPBX systems to submit phone events.
11.21 Phone settings >> Time/Date
The user can configure the time Settings of the phone on this page.
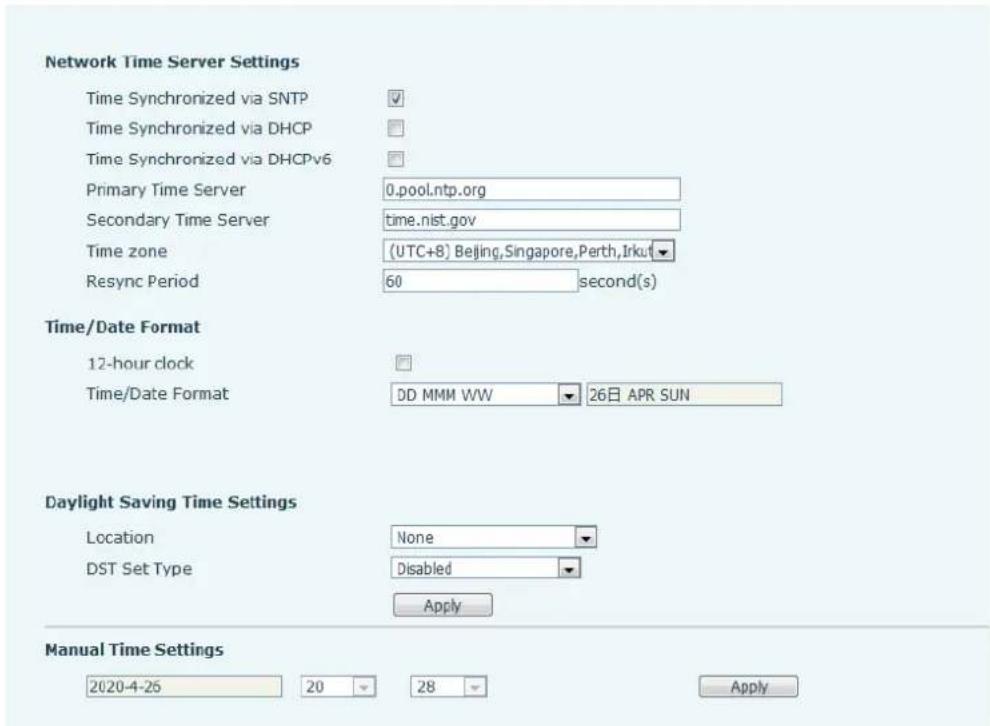
text_image
Network Time Server Settings Time Synchronized via SNTP Time Synchronized via DHCP Time Synchronized via DHCPv6 Primary Time Server 0.pool.ntp.org Secondary Time Server time.nist.gov Time zone (UTC+8) Beijing,Singapore,Perth,Irkut Resync Period 60 second(s) Time/Date Format 12-hour clock Time/Date Format DD MMM WW 26日 APR SUN Daylight Saving Time Settings Location None DST Set Type Disabled Apply Manual Time Settings 2020-4-26 20 28 ApplyPicture 24 - Time/Date
Table 14 - Time&Date settings
| Parameters | Description |
| Network Time Server Settings | |
| Time Synchronized via SNTP | Enable time-sync through SNTP protocol |
| Time Synchronized via DHCP | Enable time-sync through DHCP protocol |
| Primary Time Server | Set primary time server address |
| Secondary Time Server | Set secondary time server address, when primary server is not reachable, the device will try to connect to secondary time server to get time synchronization. |
| Time Zone | Select the time zone |
| Resync Period | Time of re-synchronization with time server |
| 12-Hour Clock | Set the time display in 12-hour mode |
| Date Format | Select the time/date display format |
| Daylight Saving Time Settings | |
| Local | Choose your local, phone will set daylight saving time automatically based on the local |
| DST Set Type | Choose DST Set Type, if Manual, you need to set the start time and end time. |
| Fixed Type | Daylight saving time rules are based on specific dates or relative rule dates for conversion. Display in read-only mode in automatic mode. |
| Offset | The offset minutes when DST started |
| Month Start | The DST start month |
| Week Start | The DST start week |
| Weekday Start | The DST start weekday |
| Hour Start | The DST start hour |
| Minute Start | The DST start minute |
| Month End | The DST end month |
| Week End | The DST end week |
| Weekday End | The DST end weekday |
| Hour End | The DST end hour |
| Minute End | The DST end minute |
| Manual Time Settings | You can set your time manually |
11.22 Phone settings >> Tone
This page allows users to configure a phone prompt.
You can either select the country area or customize the area. If the area is selected, it will bring out the following information directly. If you choose to customize the area, you can modify the button tone, call back tone and other information.
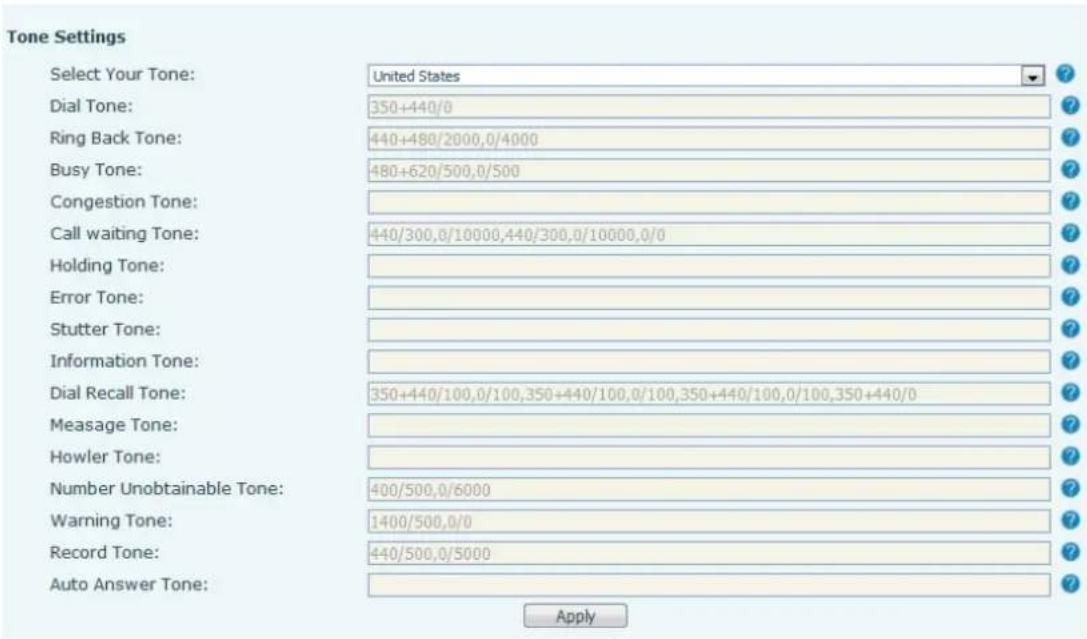
text_image
Tone Settings Select Your Tone: United States Dial Tone: 350+440/0 Ring Back Tone: 440+480/2000,0/4000 Busy Tone: 480+620/500,0/500 Congestion Tone: Call waiting Tone: 440/300,0/10000,440/300,0/10000,0/0 Holding Tone: Error Tone: Stutter Tone: Information Tone: Dial Recall Tone: 350+440/100,0/100,350+440/100,0/100,350+440/100,0/100,350+440/0 Message Tone: Howler Tone: Number Unobtainable Tone: 400/500,0/6000 Warning Tone: 1400/500,0/0 Record Tone: 440/500,0/5000 Auto Answer Tone: ApplyPicture 25 - Tone settings on the web
11.23 Phonebook >> Call List
■ Restricted Incoming Calls:
It is similar like a blacklist. Add the number to the blacklist, and the user will no longer receive calls from the stored number until the user removes it from the list.
Users can add specific Numbers to the blacklist or add specific prefixes to the blacklist to block calls with all Numbers with this prefix.
■ Restricted Outgoing Calls:
Adds a number that restricts outgoing calls and cannot be called until the number is removed from the table.
11.24 Phonebook >> Web Dial
Use web pages for call, reply, and hang up operations.
11.25 Call logs
The phone can store up to 600 call records, the user can browse the complete call record in this page. The call record can be sorted by time, call number, contact name or line, and the call record can be screened by call record type (incoming call, outgoing call, missed call, forward call).
The user can also save the number in the call record to his/her phone book or add it to the blacklist/whitelist.
Users can also dial the web page by clicking on the number in the call log.
The user can delete the call records by pressing the delete button, or select all the call records by exporting
11.26 Function Key >> Function Key
Table 15 - Function Key configuration
| Parameters | Description |
| Memory Key | Speed Dial: You can call the number directly which you set. This feature is convenient for you to dial the number which you frequently dialed.Intercom: This feature allows the operator or the secretary to connect the phone quickly; it is widely used in office environments |
| DTMF | It allows user to dial or edit dial number easily. |
| Multicast | Configure the multicast address and audio codec. User presses the key to initiate the multicast. |
| Action URL | The user can use a specific URL to make basic calls to the phone. |
11.27 Function Key >> Speed Dial List
The user can configure the number button "0\~9" to be the speed dial key. After the configuration is completed according to the figure below, the user can press the configured shortcut key for the phone to quickly dial the configuration number. Can more quickly and conveniently exhale, eliminating the need to dial, check the number of the trouble.
11.28 Security >> Web Filter
The user can set up a configuration management phone that allows only machines with a certain network segment IP access.
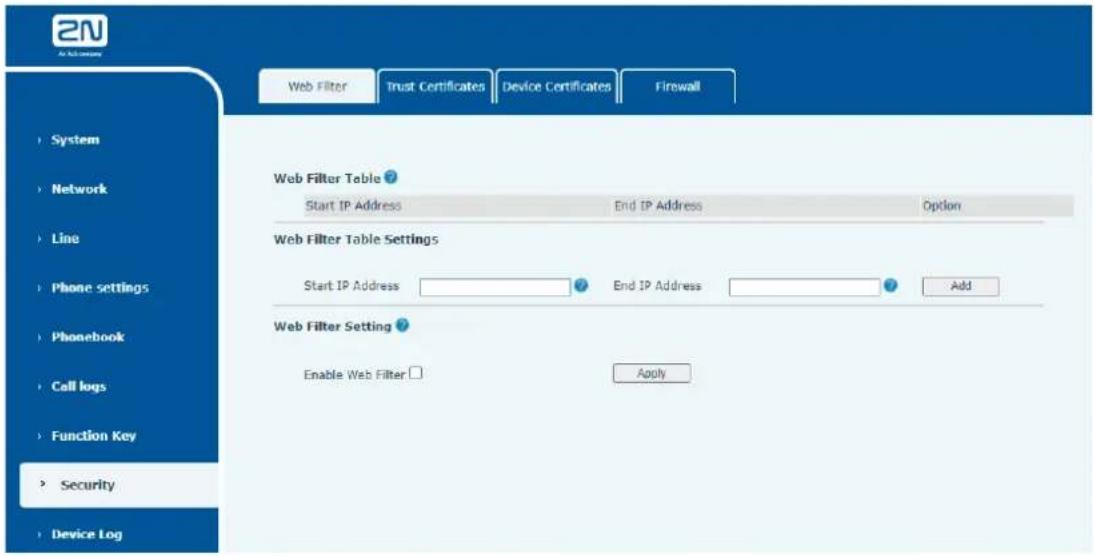
text_image
2N Web Filter Trust Certificates Device Certificates Firewall System Network Line Phone settings Phonebook Call logs Function Key Security Device Log Web Filter Table ? Start IP Address End IP Address Option Web Filter Table Settings Start IP Address End IP Address Add Web Filter Setting ? Enable Web Filter □ ApplyPicture 26 - Web Filter settings

text_image
Web Filter Table Start IP Address End IP Address Option 192.168.1.1 192.168.254.254 Modify DeletePicture 27 - Web Filter Table
Add and remove IP segments that are accessible; Configure the starting IP address within the start IP, end the IP address within the end IP, and click [Add] to submit to take effect. A large network segment can be set, or it can be divided into several network segments to add. When deleting, select the initial IP of the network segment to be deleted from the drop-down menu, and then click [Delete] to take effect.
Enable web page filtering: configure enable/disable web page access filtering; Click the "apply" button to take effect.
Note: if the device you are accessing is in the same network segment as the phone, please do not configure the filter segment of the web page to be outside your own network segment, otherwise you will not be able to log in the web page.
11.29 Security >> Trust Certificates
Set whether to open license certificate and general name validation, select certificate module.
You can upload and delete uploaded certificates.
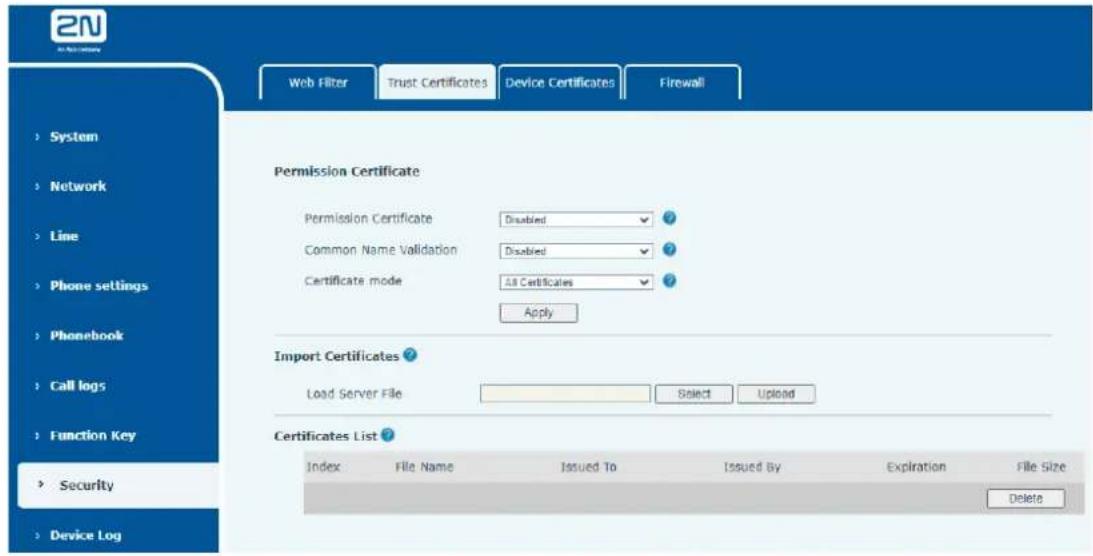
text_image
2N In Web Services Web Filter Trust Certificates Device Certificates Firewall System Network Line Phone settings Phonebook Call logs Function Key Security Device Log Permission Certificate Permission Certificate Disabled Common Name Validation Disabled Certificate mode All Certificates Apply Import Certificates Load Server File Select Upload Certificates List Index File Name Issued To Issued By Expiration File Size DeletePicture 28 - Certificate of settings
11.30 Security >> Device Certificates
Select the device certificate as the default and custom certificate.
You can upload and delete uploaded certificates.
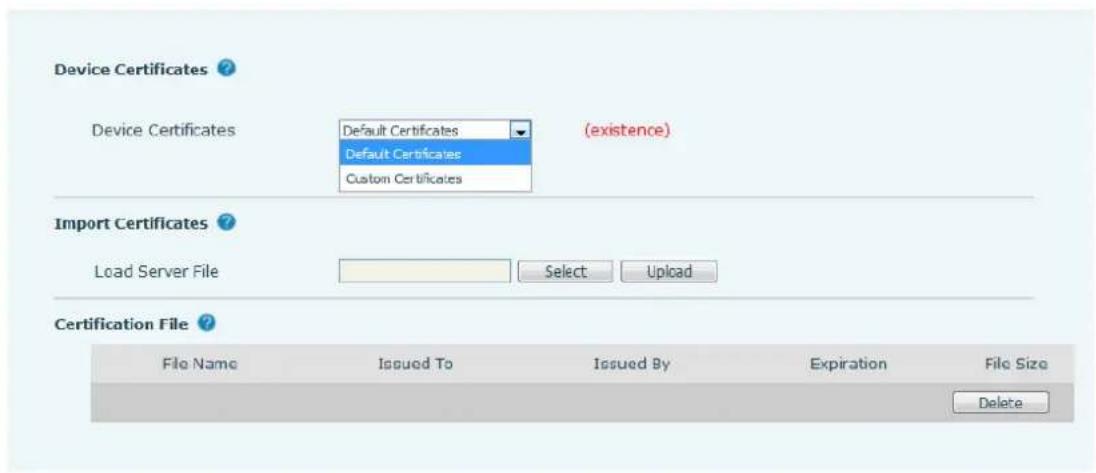
text_image
Device Certificates ? Device Certificates Default Certificates Default Certificates Custom Certificates (existence) Import Certificates ? Load Server File Select Upload Certification File ? File Name Issued To Issued By Expiration File Size DeletePicture 29 - Device certificate setting
11.31 Security >> Firewall
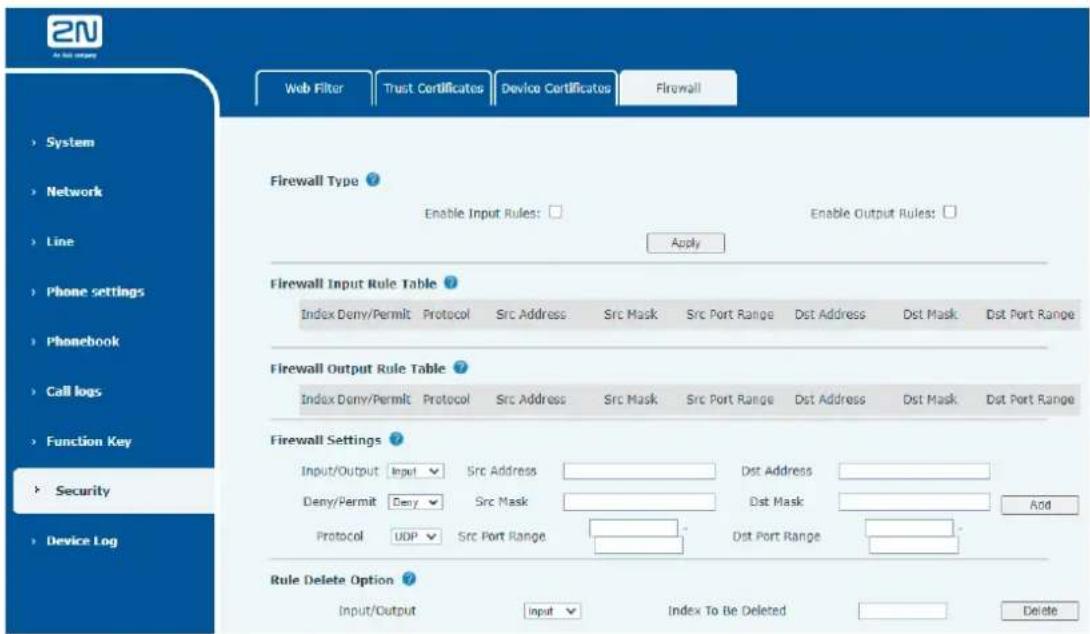
text_image
2N As the company Web Filter Trust Certificates Device Certificates Firewall System Network Line Phone settings Phonebook Call logs Function Key Security Device Log Firewall Type ? Enable Input Rules: Apply Enable Output Rules: Firewall Input Rule Table ? Index Deny/Permit Protocol Src Address Src Mask Src Port Range Dst Address Dst Mask Dst Port Range Firewall Output Rule Table ? Index Deny/Permit Protocol Src Address Src Mask Src Port Range Dst Address Dst Mask Dst Port Range Firewall Settings ? Input/Output Input Src Address Dst Address Deny/Permit Deny Src Mask Dst Mask Add Protocol UDP Src Port Range Dst Port Range Rule Delete Option ? Input/Output Input Index To Be Deleted DeletePicture 30 - Network firewall Settings
Through this page can set whether to enable the input, output firewall, at the same time can set the firewall input and output rules, using these Settings can prevent some malicious network access, or restrict internal users access to some resources of the external network, improve security.
Firewall rule set is a simple firewall module. This feature supports two types of rules: input rules and output rules. Each rule is assigned an ordinal number, allowing up to 10 for each rule.
Considering the complexity of firewall Settings, the following is an example to illustrate:
Table 16 - Network Firewall
| Parameter | Description |
| Enable Input Rules | Indicates that the input rule application is enabled. |
| Enable Output Rules | Indicates that the output rule application is enabled. |
| Input/Output | To select whether the currently added rule is an input or output rule. |
| Deny/Permit | To select whether the current rule configuration is disabled or allowed; |
| Protocol | There are four types of filtering protocols: TCP | UDP | ICMP | IP. |
| Src Port Range | Filter port range |
| Src Address | Source address can be host address, network address, or all addresses 0.0.0.0; It can also be a network address similar to *.*.*.0, such as: 192.168.1.0. |
| Dst Address | The destination address can be either the specific IP address or the full address 0.0.0.0; It can also be a network address similar to *.*.*.0, such as: 192.168.1.0. |
| Src Mask | Is the source address mask. When configured as 255.255.255.255, it means that the host is specific. When set as 255.255.255.0, it means that a network segment is filtered. |
| Dst Mask | Is the destination address mask. When configured as 255.255.255.255, it means the specific host. When set as 255.255.255.0, it means that a network segment is filtered. |
After setting, click [Add] and a new item will be added in the firewall input rule.
Then select and click the button [Apply].
In this way, when the device is running: ping 192.168.1.118, the packet cannot be sent to 192.168.1.118 because the output rule is forbidden. However, other IP of the ping 192.168.1.0 network segment can still receive the response packet from the destination host normally.
Select the list you want to delete and click [Delete] to delete the selected list.
11.32 Device Log >> Device Log
You can grab the device log, and when you encounter an abnormal problem, you can send the log to the technician to locate the problem. See 12.5 Get log information.
12 Trouble Shooting
When the phone is not in normal use, the user can try the following methods to restore normal operation of the phone or collect relevant information and send a problem report to technical support mailbox.
12.1 Get Device System Information
Users can get information by pressing the [Menu] >> [Status] option in the phone. The following information will be provided:
The network information
Equipment information (model, software and hardware version), etc.
12.2 Reboot Device
Users can reboot the device from soft-menu, [Menu] >> [Basic] >> [Reboot System], and confirm the action by [OK]. Or, simply remove the power supply and restore it again.
12.3 Reset Device to Factory Default
Reset Device to Factory Default will erase all user's configuration, preference, database and profiles on the device and restore the device back to the state as factory default.
To perform a factory default reset, user should press [Menu] >> [Advanced], and then input the password to enter the interface. Then choose [Factory Reset] and press [Enter], and confirm the action by [OK]. The device will be rebooted into a clean factory default state.
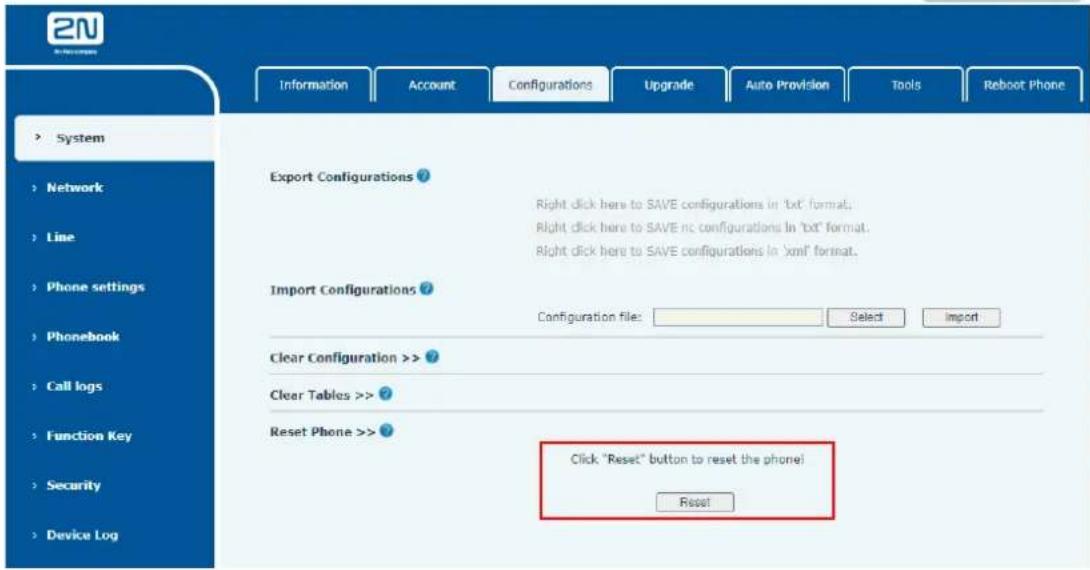
text_image
2N Information Account Configurations Upgrade Auto Provision Tools Reboot Phone System Network Line Phone settings Phonebook Call logs Function Key Security Device Log Export Configurations ? Right click here to SAVE configurations in 'txt' format. Right click here to SAVE rc configurations In 'txt' format. Right click here to SAVE configurations In 'xml' format. Import Configurations ? Configuration file: Select Import Clear Configuration >> Clear Tables >> Reset Phone >> Click "Reset" button to reset the phone! ResetPicture 31 - Reset
12.4 Network Packets Capture
Sometimes it is helpful to dump the network packets of the device for issue identification. To get the packets dump of the device, user needs to log in the device web portal, open page [System] >> [Tools] and click [Start] in "Network Packets Capture" section. A pop-up message will be prompt to ask user to save the capture file. User then should perform relevant operations such as activate/deactivate line or making phone calls and click [Stop] button in the web page when operation finished. The network packets of the device during the period have been dumped to the saved file.
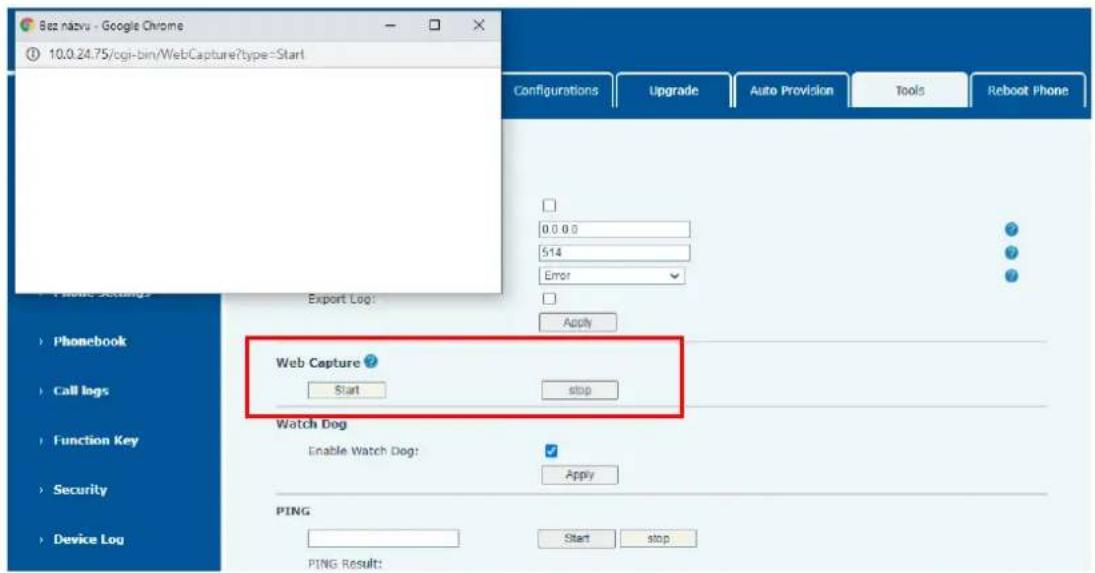
text_image
Bez nazvy - Google Chrome 10.0.24.75/cgi-bin/WebCapture?type=Start Configurations Upgrade Auto Provision Tools Reboot Phone 0 0 0 0 514 Error Phone Settings Export Log? Apply Phonebook Call logs Function Key Security Device Log Web Capture ? Start stop Watch Dog Enable Watch Dog: Apply PING Start stop PING Result:Picture 32 - Web capture
User may examine the packets with a packet analyzer or send it to technical support mailbox.
12.5 Get Log Information
Log information is helpful when encountering an exception problem. In order to get the log information of the phone, the user can log in the phone web page, open the page [Device log], click the [Start] button, follow the steps of the problem until the problem appears, and then click the [End] button, [Save] to local analysis or send the log to the technician to locate the problem.
12.6 Common Trouble Cases
Table 17 - Trouble Cases
| Trouble Case | Solution |
| Device could not boot up | 1. The device is powered by external power supply via power adapter or PoE switch. Please use standard power adapter PoE switch met with the specification requirements and check if device is well connected to power source. |
| Device could not register to a service provider | 1. Please check if device is well connected to the network. The network Ethernet cable should be connected to the [Network] port NOT the [PC] port.2. Please check if the device has an IP address. Check the system information, if the IP displays “Negotiating...”, the device does not have an IP address. Please check if the network configurations is correct.3. If network connection is fine, please check again your line configurations. If all configurations are correct, please kindly contact your service provider to get support, or follow the instructions in “13.5 Network Packet Capture” to get the network packet capture of registration process and send it to technic support to analyze the issue. |
| No Audio or Poor Audio in Handset | 1. Please check if Handset is connected to the correct Handset ( ) port NOT Headphone ( ) port.2. The network bandwidth and delay may be not suitable for audiocall at the moment. |
| Poor Audio or Low Volume in Headphone | 1. There are two Headphone wire sequence in the market. Please use the Headphone provided by 2N, or consult 2N the wire sequence if you wish to use a third-party headphone.2. The network bandwidth and delay may be not suitable for audio call at the moment. |
| Audio is chopping at far-end in Hands-free speaker mode | This is usually due to loud volume feedback from speaker to microphone. Please lower down the speaker volume a little bit, the chopping will be gone. |