GC-Q257CAFC - Fridge LG - Free user manual and instructions
Find the device manual for free GC-Q257CAFC LG in PDF.

| Brand | LG |
| Model | GC-Q257CAFC |
| Product Type | French Door Refrigerator-Freezer |
| Total Capacity | Approx. 620 L |
| Width | 913 mm |
| Depth | 735 mm |
| Height | 1780 mm |
| Weight | Approx. 110 kg |
| Power Supply | 220-240 V, 50 Hz |
| Refrigerant | R600a (Isobutane) |
| Climate Class | SN, N, ST, T (10°C to 43°C) |
| Energy Consumption | Approx. 350 kWh/year |
| Noise Level | Approx. 40 dB |
| Features | InstaView Door-in-Door, Express Cool, Express Freeze, Wi-Fi Connectivity, Smart Diagnosis, Door Alarm, LED Lighting, Deodorizer, Automatic Defrost |
| Temperature Range (Fridge) | 1 °C to 7 °C (default 3 °C) |
| Temperature Range (Freezer) | -23 °C to -15 °C (default -18 °C) |
| Icemaker | Manual icemaker (fill and twist) |
| Drawers | Vegetable crisper with humidity control, freezer drawers, snack drawer |
| Installation Clearance | At least 50 mm at back, sides and top |
Frequently Asked Questions - GC-Q257CAFC LG
User questions about GC-Q257CAFC LG
0 question about this device. Answer the ones you know or ask your own.
Ask a new question about this device
Download the instructions for your Fridge in PDF format for free! Find your manual GC-Q257CAFC - LG and take your electronic device back in hand. On this page are published all the documents necessary for the use of your device. GC-Q257CAFC by LG.
USER MANUAL GC-Q257CAFC LG
Before beginning installation, read these instructions carefully. This will simplify installation and ensure that the product is installed correctly and safely. Leave these instructions near the product after installation for future reference.
ENGLISH

MFL71798844
Rev.00_082321
www.lg.com
Copyright © 2021 LG Electronics Inc. All Rights Reserved.
TABLE OF CONTENTS
This manual may contain images or content that may be different from the model you purchased.
This manual is subject to revision by the manufacturer.
SAFETY INSTRUCTIONS
READ ALL INSTRUCTIONS BEFORE USE....3
WARNING....3
CAUTION 8
INSTALLATION
Before Installation ....11
Removing the Fridge and Freezer Door....12
Levelling and Door Alignment....13
Turning on the Power....15
Moving the Appliance for Relocation ....15
OPERATION
Before Use 16
Product Features....18
Control Panel 21
InstaView....22
Door in Door....23
Drawer....23
Shelf 24
Icemaker 25
Door Basket 26
SMART FUNCTIONS
LG ThinQ Application....27
Smart Diagnosis ....29
MAINTENANCE
Cleaning 30
Deodorizer 31
TROUBLESHOOTING
Before Calling for Service....32


natural_image
Pure geometric lines and crosshair symbols without any text or labels

natural_image
Pure geometric diagram with intersecting lines and shapes, no text or symbols presentSAFETY INSTRUCTIONS
READ ALL INSTRUCTIONS BEFORE USE
The following safety guidelines are intended to prevent unforeseen risks or damage from unsafe or incorrect operation of the appliance. The guidelines are separated into 'WARNING' and 'CAUTION' as described below.
Safety Messages

This symbol is displayed to indicate matters and operations that can cause risk. Read the part with this symbol carefully and follow the instructions in order to avoid risk.

WARNING
This indicates that the failure to follow the instructions can cause serious injury or death.

CAUTION
This indicates that the failure to follow the instructions can cause the minor injury or damage to the product.
WARNING

WARNING
To reduce the risk of explosion, fire, death, electric shock, injury or scalding to persons when using this product, follow basic precautions, including the following:
Technical Safety
- This appliance is not intended for use by persons (including children) with reduced physical, sensory or mental capabilities, or lack of experience and knowledge, unless they have been given supervision or instruction concerning use of the appliance by a person
4 SAFETY INSTRUCTIONS
responsible for their safety. Children should be supervised to ensure that they do not play with the appliance.
- This appliance is intended to be used in household and similar applications such as:
- staff kitchen areas in shops, offices and other working environments;
- farm houses and by clients in hotels, motels and other residential type environments;
- bed and breakfast type environments;
- catering and similar non-retail applications.
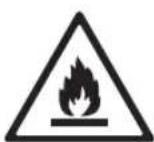
This symbol alerts you to flammable materials that can ignite and cause a fire if you do not take care.
- This appliance contains a small amount of isobutane refrigerant (R600a), but it is also combustible. When transporting and installing the appliance, care should be taken to ensure that no parts of the refrigerating circuit are damaged.
- The refrigerant and insulation blowing gas used in the appliance require special disposal procedures. Consult with service agent or a similarly qualified person before disposing of them.
- Do not damage the refrigerant circuit.
- If the power cord is damaged or the hole of the outlet socket is loose, do not use the power cord and contact an authorized service centre.
- Do not locate multiple portable outlet sockets or portable power supplies at the rear of the appliance.
- Securely plug the power plug in the outlet socket after completely removing any moisture and dust.
- Never unplug the appliance by pulling on the power cable. Always grip the power plug firmly and pull straight out from the outlet socket.
- Keep ventilation openings, in the appliance enclosure or in the built-in structure, clear of obstruction.


natural_image
Pure geometric lines and shapes without any text, numbers, or symbols

natural_image
Pure geometric diagram with intersecting lines and shapes, no text or symbols presentSAFETY INSTRUCTIONS
5
- Do not store explosive substances such as aerosol cans with a flammable propellant in this appliance.
- Do not tilt the appliance to pull or push it when transporting.
- When positioning the appliance, ensure the supply cord is not trapped or damaged.
- Do not use mechanical devices or other means to accelerate the defrosting process.
- Do not use a hair drier to dry the inside of the appliance or place a candle inside to remove the odours.
- Do not use electrical appliances inside the refrigerator.
• Make sure not to get a body part such as a hand or foot stuck while moving the appliance. - Disconnect the power cord before cleaning the appliance interior or exterior.
- Do not spray water or inflammable substances (toothpaste, alcohol, thinner, benzene, flammable liquid, abrasive, etc.) over the interior or exterior of the appliance to clean it.
- Do not clean the appliance with brushes, cloths or sponges with rough surfaces or which are made of metallic material.
- Only qualified service personnel from LG Electronics service centre should disassemble, repair, or modify the appliance. Contact an LG Electronics customer information centre if you move and install the appliance in a different location.
Risk of Fire and Flammable Materials
- If a leak is detected, avoid any naked flames or potential sources of ignition and air the room in which the appliance is standing for several minutes. In order to avoid the creation of a flammable gas air mixture if a leak in the refrigerating circuit occurs, the size of the room in which the appliance is used should correspond to the amount of refrigerant used. The room must be 1 ~m^2 in size for every 8 g of R600a refrigerant inside the appliance.
• Refrigerant leaking out of the pipes could ignite or cause an explosion.


natural_image
Pure geometric lines and shapes without any text, numbers, or symbols

natural_image
Pure geometric diagram with intersecting lines and circles, no text or symbols present6 SAFETY INSTRUCTIONS
- The amount of refrigerant in your particular appliance is shown on the identification plate inside the appliance.
Installation
- This appliance should only be transported by two or more people holding the appliance securely.
• Install the appliance on a firm and level floor.
- Do not install the appliance in a damp and dusty place. Do not install or store the appliance in any outdoor area, or any area that is subject to weathering conditions such as direct sunlight, wind, rain, or temperatures below freezing.
- Do not place the appliance in direct sunlight or expose it to the heat from heating appliances such as stoves or heaters.
- Be careful not to expose the rear of the appliance when installing.
• Install the appliance in a place where it is easy to unplug the power plug of the appliance.
- Be careful not to let the appliance door fall during assembly or disassembly.
- Be careful not to pinch, crush, or damage the power cable during assembly or disassembly of the appliance door.
- Be careful not to point the power plug up or let the appliance lean against the power plug.
- Do not connect a plug adapter or other accessories to the power plug.
- Do not modify or extend the power cable.
- Ensure that the outlet socket is properly grounded, and that the earth pin on the power cord is not damaged or removed from the power plug. For more details on grounding, inquire at an LG Electronics customer information centre.
- This appliance is equipped with a power cord having an equipment-grounding conductor and a grounding power plug. The power plug must be plugged into an appropriate outlet socket that is installed and grounded in accordance with all local codes and ordinances.


natural_image
Pure geometric lines and crosshair symbols without any text or labels

natural_image
Pure geometric diagram with intersecting lines and shapes, no text or symbols presentSAFETY INSTRUCTIONS
7
- Never start up an appliance showing any signs of damage. If in doubt, consult your dealer.
- Dispose of all packaging materials (such as plastic bags and styrofoam) away from children. The packaging materials can cause suffocation.
- Do not plug the appliance into a multi socket adapter which does not have a power cable (mounted).
- The appliance should be connected to a dedicated power line which is separately fused.
- Do not use a multi socket outlet which is not properly grounded (portable). In case of using a properly-grounded multi socket outlet (portable), use the multi socket outlet with the current capacity of the power cord rating or higher and use the multi socket outlet only for the appliance.
Operation
- Do not use the appliance for any purpose (storage of medical or experimental materials or shipping) other than any domestic household food storage use.
- If water penetrates electrical parts of the appliance, disconnect power plug and contact an LG Electronics customer information centre.
- Unplug the power plug during a severe thunderstorm or lightening or when not in use for a long period of time.
- Do not touch the power plug or the appliance controls with wet hands.
- Do not bend the power cable excessively or place a heavy object on it.
- Immediately unplug the power plug and contact an LG Electronics customer information centre if you detect a strange sound, odour, or smoke coming from the appliance.
- Do not place hands or metallic objects inside the area emitting the cold air, cover or heat releasing grille on the back.
- Do not apply excessive force or impact to the back cover of the appliance.


natural_image
Pure geometric lines and crosshair symbols without any text or labels

natural_image
Pure geometric diagram with intersecting lines and shapes, no text or symbols present8 SAFETY INSTRUCTIONS
- Be careful of nearby children when you open or close the appliance door. The door may bump the child and cause injury.
- Avoid the danger of children getting trapped inside the appliance. A child trapped inside the appliance can cause suffocation.
- Do not put animals, such as pets into the appliance.
- Do not place heavy or fragile objects, containers filled with liquid, combustible substances, flammable objects (such as candles, lamps, etc.), or heating devices (such as stoves, heaters, etc.) on the appliance.
- Do not place any electronic appliance (such as heater and mobile phone) inside the appliance.
- If there is a gas leakage (isobutane, propane, natural gas, etc.), do not touch the appliance or power plug and ventilate the area immediately. This appliance uses a refrigerant gas (isobutane, R600a). Although it uses a small amount of the gas, it is still combustible gas. Gas leakage during appliance transport, installation or operation can cause fire, explosion or injury if sparks are caused.
- Do not use or store flammable or combustible substances (ether, benzene, alcohol, chemical, LPG, combustible spray, insecticide, air freshener, cosmetics, etc.) near the appliance.
Disposal
- When discarding the appliance, remove the door gasket while leaving the shelves and baskets in place and keep children away from the appliance.
CAUTION
CAUTION
To reduce the risk of minor injury to persons, malfunction, or damage to the product or property when using this product, follow basic precautions, including the following:
Installation
• After unpacking, check the appliance for any damage that may have occurred during transit.
- Wait for at least 3 to 4 hours in order to ensure the refrigerant circuit is fully efficient.
Operation
- Do not touch frozen food or the metal parts in the freezer compartment with wet or damp hands. It may cause frostbite.
- Do not place glass containers, bottles or cans (especially those containing carbonated drinks) in the freezer compartment, shelves or ice bin that will be exposed to temperatures below freezing.
- The tempered glass on the front side of the appliance door or the shelves can be damaged by an impact. If it is broken, do not touch it with hands.
- Do not hang from the appliance doors, storage room, shelf or climb up into it.
- Do not store an excessive amount of water bottles or containers for side dishes on the door baskets.
- Do not open or close the appliance door with excessive force.
- If the hinge of the appliance door is damaged or operates improperly, stop using the appliance and contact an authorized service centre.
- Prevent animals from nibbling on the power cable or water hose.
- Never eat frozen foods immediately after they have been taken out in the freezer compartment.
• Make sure not to get a hand or foot stuck upon opening or closing the appliance door or door in door.
Maintenance
- This appliance is equipped with maintenance-free LED interior light. Do not remove cover or LED lamp in any attempt to repair or change it. Contact an LG Electronics customer information centre.


natural_image
Pure geometric lines and crosshair symbols without any text or labels

natural_image
Pure geometric diagram with intersecting lines and shapes, no text or symbols present
natural_image
Pure electrical circuit lines without any symbols
natural_image
Pure geometric diagram with intersecting lines and circles, no text or symbols present10 SAFETY INSTRUCTIONS
- Do not clean glass shelves or covers with warm water when they are cold. They may shatter if exposed to sudden temperature changes.
- Do not insert the shelves upside down. The shelves may fall.
• To remove frost from the appliance, contact an LG Electronics customer information centre. - Dispose of the ice inside the ice bin in the freezer compartment during an extended power outage.


natural_image
Pure geometric lines and shapes without any text, numbers, or symbols

natural_image
Pure geometric diagram with intersecting lines and shapes, no text or symbols presentINSTALLATION
Before Installation
Dimensions and Clearances
Too small of a distance from adjacent items may result in the degradation of freezing capability and increased electricity costs. Allow over 50 mm of clearance between the back of the appliance and the wall when installing the appliance.
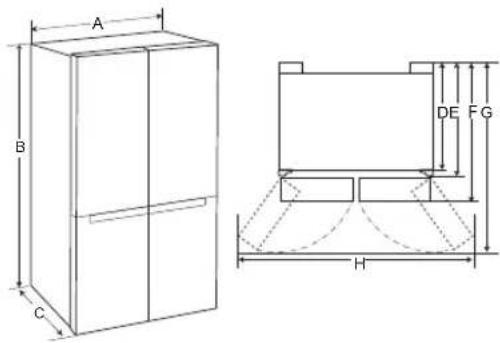
| - Size (mm) | |
| A | 913 |
| B | 1 |
| C | 735 |
| D | 620 |
| E | 691 |
| F | 735 |
| G | 1 |
| H | 1 |
NOTE
- You can determine what type of appliance it is by looking at the label inside the appliance.
Ambient Temperature
- The appliance is designed to operate within a limited range of ambient temperatures, depending on the climate zone.
- The internal temperatures could be affected by the location of the appliance, the ambient temperature, the frequency of door opening and so on.
- The climate class can be found on the rating label.
| Climate Class Ambient Temperature Range °C | |
| SN (Extended Temperate) | +10 - +32 |
| N (Temperate) +16 - | -32 |
| ST (Subtropical) +16 - | +38 / +18 - +38** |
| T (Tropical) +10 - +43* | / +16 - +43 / +18 - +43** |
* Australia, India, Kenya

Argentina
9
0
NOTE
- The appliances rated from SN to T are intended to be used at an ambient temperature between 10 °C and 43 °C.
1 8 0
Accessories 3 5
*1 This feature is only available on some models.

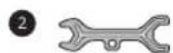
① Spanner A*1
② Spanner B*1


natural_image
Pure geometric lines and shapes without any text, numbers, or symbols

natural_image
Pure geometric diagram with intersecting lines and shapes, no text or symbols present12 INSTALLATION
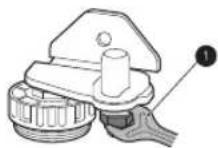
Removing the Fridge and Freezer Door
If your entrance door is too narrow for the appliance to pass through, remove the appliance doors and pass the appliance laterally.
WARNING
- Disconnect the power cord, house fuse or circuit breaker before installing, removing the doors, or cleaning the appliance. Failure to follow these instructions may result in death, fire or electric shock.
Removing the Freezer Door
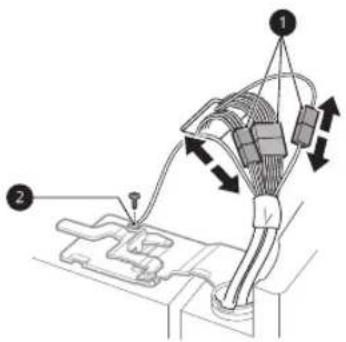
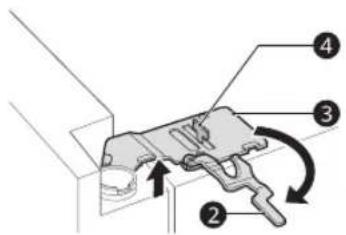
1 Remove the screw from the hinge cover at the top of the appliance. Lift the hook, located at the bottom of the front side of the cover, with a flat-head screwdriver.

natural_image
Technical line drawing of a mechanical assembly with a tool and base (no text or symbols)2 Disconnect all wire harnesses ①. Unscrew the ground wire ②.
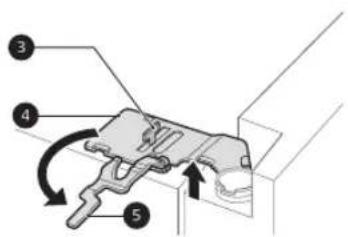
3 Rotate the hinge lever 5 counterclockwise. Lift the top hinge 4 free of the hinge lever latch 3
CAUTION
- When lifting the hinge free of the latch, be careful that the door does not fall forward. It is recommended that two or more people carry out the door removal and refitting.
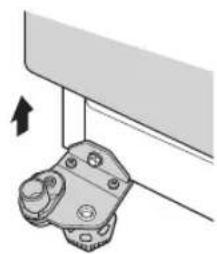
4 Lift the freezer door until it is free of the bottom hinge assembly.
natural_image
Mechanical component diagram showing a bracket with mounting holes and a directional arrow (no text or symbols)CAUTION
- Place the door on a non-scratching surface with the inner side facing up.
Removing the Fridge Door
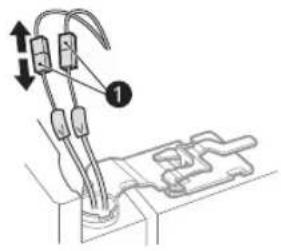
1 Disconnect all wire harnesses ①.
NOTE
- The number of wire harnesses may vary depending on the model.
2 Rotate the hinge lever ② clockwise. Lift the top hinge ③ free of the hinge lever latch ④.
CAUTION
- When lifting the hinge free of the hinge lever latch, be careful that the door does not fall forward. It is recommended that two or more people carry out the door removal and refitting.
3 Lift the fridge door until it is free of the bottom hinge assembly.
natural_image
Mechanical assembly diagram showing a bracket and mounting bracket with an arrow indicating direction (no text or symbols)CAUTION
- Place the door on a non-scratching surface with the inner side facing up.
Refitting the Fridge and Freezer Door
Refit the doors in the reverse sequence of their removal once the appliance has been passed through all access doors.
CAUTION
• Install the fridge door first.
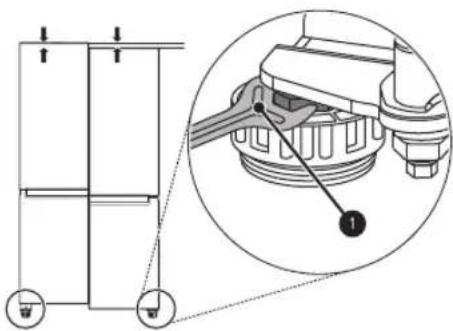
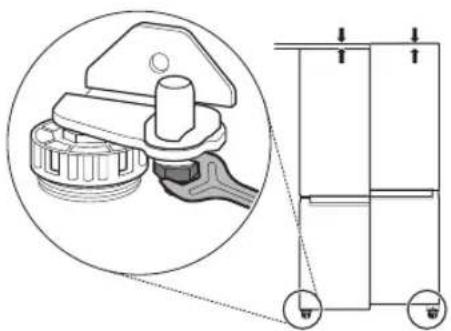
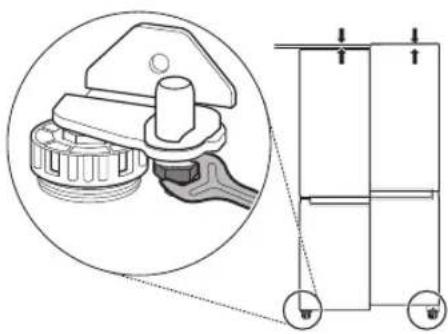
Levelling and Door Alignment
Before Beginning
When the appliance doors appear to be uneven, follow the instructions below to align the doors.
NOTE
- The spanner may differ depending on the model. You will be provided with either spanner type A or B.
- Spanner Type A
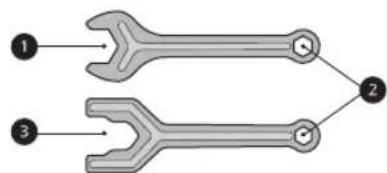
- Spanner Type B

14 INSTALLATION
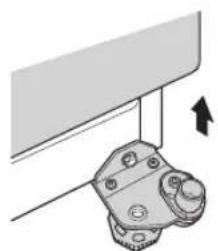
Levelling the Appliance
The appliance has two front levelling legs. Adjust the legs to alter the tilt from front to back or side to side. If the appliance seems unsteady, or the doors do not close easily, adjust the appliance's tilt using the instructions below.
Use the spanner ① to adjust the height by turning the levelling leg to the left to raise it or to the right to lower it.
NOTE
- Leveling the doors may not be possible when the floor is not leveled, or is of weak or poor construction.
- The refrigerator is heavy and should be installed on a rigid and solid surface.
- Some timber flooring may cause levelling difficulties if it flexes excessively.
Door Alignment for Freezer and Fridge Door
If the door of the appliance is not level, adjust the difference in the height of appliance door.
natural_image
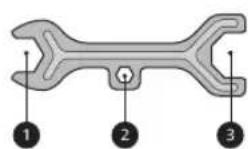
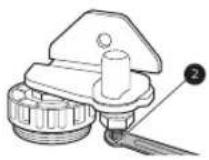
Technical diagram showing a mechanical assembly with a magnified inset of a component detail (no text or symbols)1 Open the door and use the spanner ① to loosen the keeper nut by turning it to the left.

2 Use the spanner ② to adjust the height by turning the adjustment hinge pin to the left or to the right.
CAUTION
- Do not adjust the height of the appliance door more than 3 mm.
3 Use the spanner ① to fasten the keeper nut by turning it to the right.


natural_image
Pure geometric lines and shapes without any text, numbers, or symbols
natural_image
Pure geometric diagram with intersecting lines and shapes, no text or symbols presentNOTE
- Leveling the doors may not be possible when the floor is not leveled, or is of weak or poor construction.
- The refrigerator is heavy and should be installed on a rigid and solid surface.
- Some timber flooring may cause levelling difficulties if it flexes excessively.
4 Move the appliance with more than two people carefully. When transporting the appliance over a long distance, keep the appliance upright.
5 After installing the appliance, connect the power plug into a mains outlet socket and switch it on.
Turning on the Power
Connecting the Appliance
After installing the appliance, connect the power plug into the outlet socket. Do not double up with other appliances on the same outlet.
NOTE
• After connecting the power supply cord (or plug) to the outlet, wait 3 or 4 hours before you put food into the appliance. If you add food before the appliance has cooled completely, your food may spoil.
• To turn off the appliance, disconnect the power plug from the socket outlet.
Moving the Appliance for Relocation
Preparing for Relocation
1 Remove all food from inside the appliance.
2 Pull the power plug out, insert and fix it into the power plug hook at the rear or on top of the appliance.
3 Tape parts such as shelves and the door handle to prevent from falling off while moving the appliance.


natural_image
Pure geometric lines and shapes without any text, numbers, or symbols

natural_image
Pure geometric diagram with intersecting lines and shapes, no text or symbols present16 OPERATION
OPERATION
Before Use
Notes for Operation
- Users should keep in mind that frost can form if the door is not closed completely or if the humidity is high during the summer.
- Ensure there is sufficient space between food stored on the shelf or door basket to allow the door to close completely.
- Opening the door for long periods can cause a significant increase of the temperature in the compartments of the appliance.
- If the refrigerating appliance is left empty for long periods, switch off, defrost, clean, dry, and leave the door open to prevent mould developing within the appliance.
Door Open Alarm
The alarm sounds 3 times in 30 second intervals if the door is left open or not completely closed for 1 minute.
NOTE
- Contact the LG Electronics customer information centre if the alarm sound continues even after closing all doors.
Failure Detection
The appliance can automatically detect problems during the operation.
NOTE
- If a problem is detected, the appliance may not operate and an error code is displayed even when any button is pressed.
- If an error code is indicated on the display, do not turn off the power. Immediately contact the LG Electronics customer information centre and report the error code. If you turn off the power,
the repair technician from the our information centre may have difficulty finding the problem.
Suggestion for Energy Saving
- For the most efficient use of energy, make sure that door bins, drawers and shelves are assembled properly.
- Ensure there is sufficient space between stored foods. This allows cold air to be circulated evenly and lowers electricity bills.
- Store hot food only after it has cooled in order to prevent dew or frost.
- When storing food in the freezer compartment, set the freezer temperature lower than the temperature indicated on the food.
- Do not set the temperature of the appliance lower than needed.
- Do not put food near the temperature sensor of the fridge compartment. Keep a distance of at least 3 cm from the sensor.
- Note that a temperature rise after defrosting has a permissible range in the appliance specifications. If you wish to minimise the impact on the food storage due to a temperature rise, seal or wrap the stored food in several layers.
- The automatic defrosting system in the appliance ensures that the compartment remains free of ice buildup under normal operating conditions.
Storing Foods Effectively
- Food may freeze or spoil if stored at the wrong temperature. Set the refrigerator to the correct temperature for the food being stored.
- Store frozen food or refrigerated food inside sealed containers.
- Check the expiration date and label (storage instructions) before storing food in the appliance.


natural_image
Pure geometric lines and crosshair symbols without any text or labels

natural_image
Pure geometric diagram with intersecting lines and shapes, no text or symbols present- Do not store food for a long period of time if it spoils easily at a low temperature.
- Do not place unfrozen food in direct contact with food that is already frozen. It could be necessary to reduce the quantity to be frozen if freezing every day is anticipated.
- Place the refrigerated food or frozen food in each fridge or freezer compartment immediately after purchasing.
- Store raw meat and fish in suitable containers in the refrigerator, so that it is not in contact with or drip onto other food.
• Refrigerated foods and other food items can be stored on top of the vegetable drawer. - Avoid refreezing any food which has been completely thawed. Freezing any food which has been completely thawed again will lower its taste and nutrition.
- Do not overfill the appliance. Cold air can not circulate properly if the appliance is overfilled.
- Cool hot food before storing. If too much hot food is placed inside, the internal temperature of the appliance can increase and negatively affect other foods stored in the appliance.
- If you set an excessively low temperature for food, it may become frozen. Do not set a temperature lower than the required temperature for the food to be stored correctly.
- If there are chill compartments in the appliance, do not store vegetables and fruits with higher moisture content in the chill compartments as they may freeze due to the lower temperature.
• In the event of a blackout, call the electricity company and ask how long it is going to last. - You should avoid door openings while the power is off.
- When the power supply gets back to normal, check the condition of the food.
NOTE
- The max freezing capacity of your appliance is stated on the rating label inside the fridge compartment.
- For maximum freezing capacity, set the freezer temperature to the coldest temperature setting.
Freezing the Maximum Amount of Food
If large quantities of food are to be stored, all the freezer drawers should be taken out of the appliance and the food should be stacked directly on the freezer shelves in the freezer compartment.

CAUTION
• To remove the drawers, first remove the food from drawers and then pull out the drawers carefully. Not doing so could cause injury or damage to the drawers.
NOTE
- The shape of each drawer may be different, insert in the right position.
Maximum Freezing Capacity
- Express Freeze must be switched on for 7 hours before fresh products are placed in the freezer compartment.
• To get better air circulation, insert all inner parts like baskets and shelves.


natural_image
Pure geometric lines and crosshair symbols without any text or labels

natural_image
Pure geometric diagram with intersecting lines and shapes, no text or symbols present
natural_image
Pure electrical circuit lines without any symbols
natural_image
Pure geometric diagram with intersecting lines and circles, no text or symbols present18 OPERATION
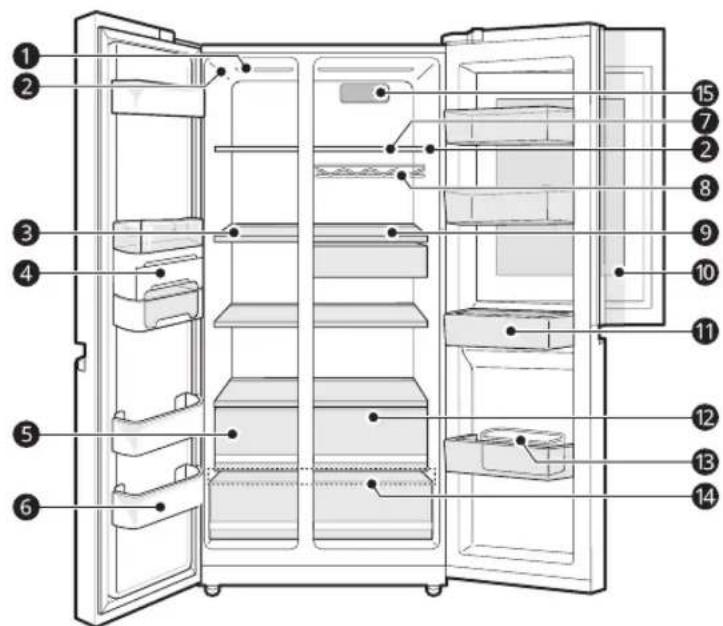
Product Features
The appearance or components of the appliance may differ from model to model.
Exterior
*1 This feature is only available on some models.
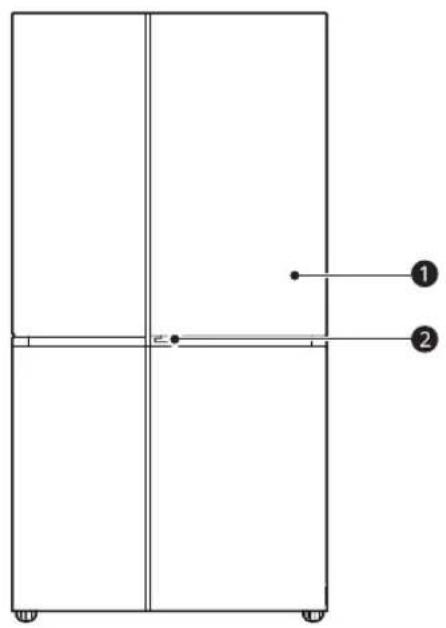

① Door in Door*1
This is a convenient storage area for frequently-used items that require easy access.
② Door in Door Lever ^*1
Opens Door-in-Door.
③ InstaView Door in Door ^*1
The InstaView Door-in-Door compartment allows for easy access to commonly used food items.

natural_image
Pure geometric lines and shapes without any text, numbers, or symbols

natural_image
Pure geometric diagram with intersecting lines and shapes, no text or symbols presentInterior
*1 This feature is only available on some models.
Door in Door Model:

InstaView Door in Door Model:

① LED Lamp
The LED lamps inside the appliance light up when you open the door.
natural_image
Pure geometric lines and shapes without any text, numbers, or symbols

natural_image
Pure geometric diagram with intersecting lines and shapes, no text or symbols present20 OPERATION
② Temperature Sensor ^*1
This sensor senses the temperature of the fridge compartment.
- Maintain the distance between the sensor and food to accurately sense the temperature.
③ Freezer Shelf
Stores frozen food such as meat, fish, and ice cream.
• To freeze food items quickly, store the food on the left side of the top shelf. If you need to store more food, store it on the shelves in order starting from the top shelf. Food items will freeze most quickly in the zone.
4 Icemaker\*1
This is where ice is manually produced and stored.
⑤ Freezer Drawer\*1
Stores frozen food for longer storage.
⑥ Freezer Door Basket
Stores small packages of frozen food. Do not store ice cream or food which will be stored for a long period of time.
⑦ Fridge Shelf
Stores refrigerated foods and fresh foods.
- Stores the foods with higher moisture content at the front of the shelf.
- The shelf height can be adjusted by inserting the shelf in another groove of different height.
- The actual number of shelves will differ from model to model.
⑧ Bottle Rack\*1
Stores containers and tall bottles using the bottle rack.
CAUTION
- Do not store short bottles or containers. The items may fall and cause an injury or appliance damage.
9 Snack Drawer\*1
Stores containers and tall bottles using the bottle rack.
⑩ Door in Door Compartment\*1
Stores commonly used food items such as beverages and snacks.
⑪ Fridge Door Basket
Stores small packages of refrigerated foods, drinks and sauce containers.
⑫ Fridge Drawer
Stores fruits and vegetables to keep fresh for as long as possible.
⑬ Egg Box\*1
Stores eggs.
- Do not use it as the ice bin or place it on the shelf on top of the fridge or the vegetable drawer.
14 Bottom Drawer Cover


natural_image
Pure geometric lines and shapes without any text, numbers, or symbols
natural_image
Pure geometric diagram with intersecting lines and shapes, no text or symbols presentThis is the bottom drawer cover.
CAUTION
- Do not store any items at the front of the bottom shelf. The items may fall and cause an injury or appliance damage.
⑮ Air Filter*1
Reduces odours inside the fridge compartment.
Control Panel
The actual control panel may differ from model to model.
Control Panel and Functions
*1 This feature is only available on some models.
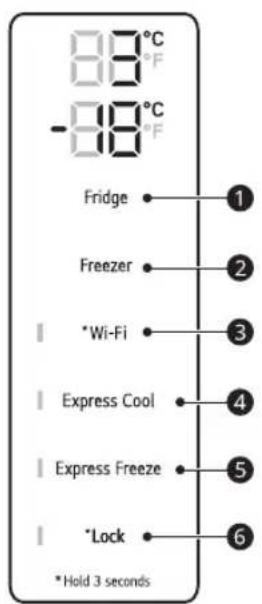

① Fridge
Press this button repeatedly to select a desired temperature between 1 °C and 7 °C.
• The default fridge temperature is 3^ C.
NOTE
- The actual inner temperature varies depending on the food status, as the indicated setting temperature is a target temperature, not actual temperature within the appliance.
② Freezer
natural_image
Pure geometric lines and shapes without any text, numbers, or symbols22 OPERATION
Press this button repeatedly to select a desired temperature between -23 °C and -15 °C.
• The default freezer temperature is -18 °C.
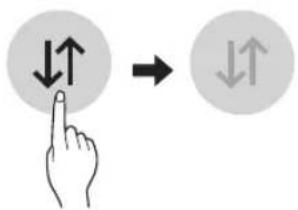
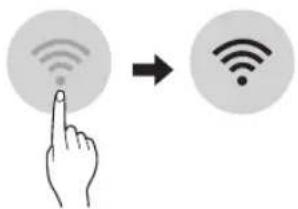
③ Wi-Fi ^*1
This button allows the appliance to connect to a home Wi-Fi network. Refer to Smart Functions for information on the initial setup of the LG ThinQ application.
④ Express Cool
This function can quickly cool a large amount of foods such as vegetable, fruit and so on.
- This function is enabled and disabled in turn each time you press the button.
• This function automatically terminates after a specific period has passed.
⑤ Express Freeze
This function can quickly freeze a large amount of ice or frozen foods.
- Press the Express Freeze button to activate the function for 20 hours. The function automatically shuts off after 20 hours.
- This function is enabled and disabled in turn each time you press the button.
- This function automatically terminates after a specific period has passed.
⑥ Lock
The lock function disables every other button on the display.
- To lock the control panel buttons, press and hold the Lock button for 3 seconds until indicator light turns on and the function is activated.
- To disable the function, press and hold the Lock button for 3 seconds until the indicator light turns off and the function is deactivated.
NOTE
- The displayed temperature is the target temperature, and not the actual temperature inside the appliance.
- The actual temperature inside the appliance depends on the following factors: room temperature, the amount of food and how often the doors are opened, where the appliance is. Set the temperatures by considering these factors.
- The control panel automatically turns off for energy saving.
- When the appliance is in the energy saving mode, the display remains off until a door is opened or a button is pressed. Once on, the display remains on for 20 seconds.
- If there is any finger or skin contacts to the control panel while cleaning it, the button function may operate.
- This appliance incorporates an earth connection for functional purposes only.
InstaView
This feature is only available on some models.
Using the InstaView Door in Door
The InstaView Door in Door lets you see if you're running low on frequently used items like


natural_image
Pure geometric lines and crosshair symbols without any text or labels

natural_image
Pure geometric diagram with intersecting lines and shapes, no text or symbols presentbeverages and snacks, without opening the fridge door.

natural_image
Simple line drawing of a hand holding a small object inside a rectangular frame (no text or symbols)1 Knock twice on the glass to turn the LED light inside the Door in Door on or off.
2 The LED light turns off automatically after ten seconds.
CAUTION
- Do not open the door of the appliance with the door in door open, or do not open the door in door while the door of the appliance is open. The door in door may be struck by the edge of the appliance and damaged.
NOTE
- The InstaView Door in Door function is disabled for 2 seconds after closing the left or right freezer door, and momentarily disabled whilst the ice dispenser is in use.
- Knock near the center of the glass. Knocking near the edges of the glass may not activate the InstaView Door in Door function.
- Knock hard enough so that the knocking sound is audible.
- The InstaView Door in Door function may activate if a loud noise occurs near the refrigerator.
- Clean the glass door with a dry cloth. To remove stubborn stains, slightly moisten a clean cloth with lukewarm water or a glass cleaner. Do not spray glass cleaner directly at the glass door.
Door in Door
This feature is only available on some models.
Using the Door in Door
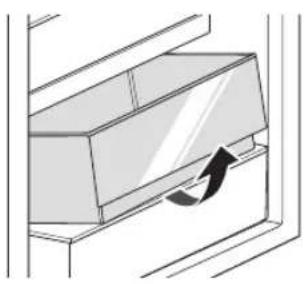
Pull the lever at the bottom of the door upwards until the door in door opens.
There is plenty of storage space inside the door in door and its surrounding baskets, allowing you to store food in an organized manner.
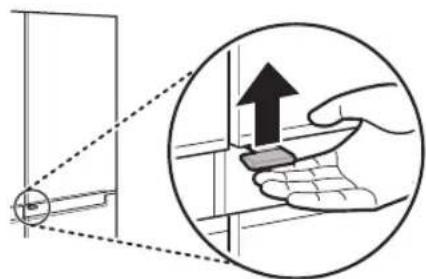
CAUTION
- Do not open the door of the appliance with the door in door open, or do not open the door in door while the door of the appliance is open. The door in door may be struck by the edge of the appliance and damaged.
Drawer
CAUTION
• Always empty the drawers before removing them, and use both hands when removing and refitting them.
- Make sure that the fridge doors are fully open before removing and refitting the drawers.
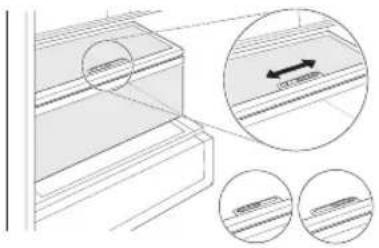
Using the Vegetable Drawer
This feature is only available on some models.
The humidity in the vegetable crisper drawer can be controlled by sliding the lever in either direction.
- If moved to the left side, the air guide will be open and allow air to circulate through the drawer for reduced humidity.

natural_image
Pure geometric lines and crosshair symbols without any text or labels

natural_image
Pure geometric diagram with intersecting lines and shapes, no text or symbols present24 OPERATION
- If moved to the right side, the air guide will be closed and will maintain any humidity that is currently in the crisper drawer.
natural_image
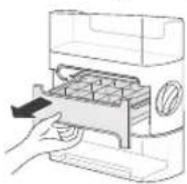
Technical illustration of a mechanical component with cross-sectional views and dimension arrows (no text or symbols)Removing/Refitting Drawers
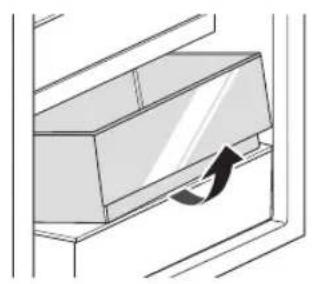
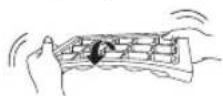
1 Remove the contents of the drawer. Hold the handle of the vegetable drawers and gently pull them out.
2 Lift the vegetable drawer up and remove it by pulling it out.
natural_image
Diagram of a door handle with an arrow indicating direction (no text or symbols)3 Refit the drawer in the reverse order of the removal process.
CAUTION
• Always empty the drawers before removing them, and use both hands when removing and refitting them.
• Make sure that the fridge doors are fully open before removing and assembling the drawers.
Shelf
CAUTION
• Glass shelves are heavy. Use special care when removing them.
- Do not clean glass shelves with warm water while they are cold. Shelves may break if exposed to sudden temperature changes or impact.
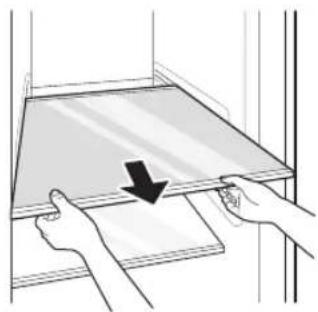
Removing/Refitting the Shelf
1 Tilt up the front of the shelf and then lift the shelf straight up.
2 Pull the shelf out.
natural_image
Illustration of hands holding a rectangular object with a black arrow pointing to it (no text or symbols present)3 Mount them in the reverse order of the removal process.
CAUTION
• Glass shelves are heavy. Use special care when removing them.
- Do not clean glass shelves with warm water while they are cold. Shelves may break if exposed to sudden temperature changes or impact.
• Make sure that shelves are level from one side to the other. Failure to do so may result in the shelf falling or food spilling.


natural_image
Pure geometric lines and shapes without any text, numbers, or symbols

natural_image
Pure geometric diagram with intersecting lines and shapes, no text or symbols presentIcemaker
Before Using the Icemaker

WARNING
- Fill with potable water only into icemaker or dispenser water tank.
NOTE
- The icemaker produces ice normally once approximately 48 hours have passed after the appliance is initially installed.
- If half-frozen ice is put into the ice storage bin, it will cause the exiting ice cubes to lump together. It takes about 4 hours at - 20 °C for ice production.
- If the freezer door is frequently opened, warm air enters the freezer compartment. It may take a longer time to freeze ice.
- Be careful not to twist the ice maker with force since it can break.
- Do not freeze the ice in the ice storage bin. This could break it and cause appliance damage or injury.
Using the Icemaker
*1 This feature is only available on some models.
Icemaker Type A\*1
1 Hold the handle of ice tray and pull it out.
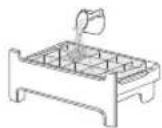
2 Fill the ice tray with potable water up to the water line.
3 Place the ice tray back to its position carefully.

4 Rotate the icemaker handle clockwise.
5 Lift and remover the ice storage bin slightly.
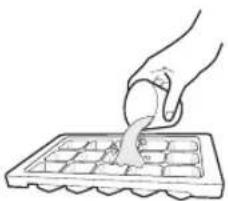
Icemaker Type B\*1
1 Fill the ice tray with potable water and place it in the freezer compartment.
natural_image
Hand using a tool to cut or spread a grid on a tray (no text or symbols visible)2 After the water is frozen, hold the ice tray at its ends and twist gently.


natural_image
Pure geometric lines and shapes without any text, numbers, or symbols

natural_image
Pure geometric diagram with intersecting lines and shapes, no text or symbols present26 OPERATION
NOTE
- You can remove the icemaker or ice storage bin to create more space inside the freezer if you do not use it.
Door Basket
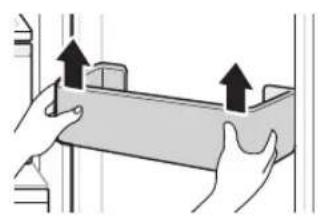
Removing/Refitting the Door Basket
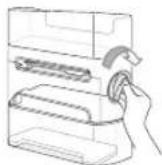
1 Hold both edges of the basket and remove it by lifting it upward.
natural_image
Illustration of hands holding a rectangular object with two upward arrows indicating motion or force (no text or symbols)2 Refit the door baskets in the reverse order of the removal process.
SMART FUNCTIONS
LG ThinQ Application
This feature is only available on models with Wi-Fi. The LG ThinQ application allows you to communicate with the appliance using a smartphone.
LG ThinQ Application Features
Communicate with the appliance from a smartphone using the convenient smart features.
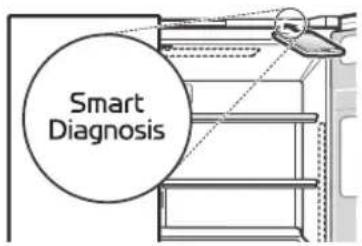
Smart Diagnosis
- If you experience a problem while using the appliance, this smart diagnosis feature will help you diagnose the problem.
Settings
- Allows you to set various options on the appliance and in the application.
NOTE
- If you change your wireless router, internet service provider, or password, delete the registered appliance from the LG ThinQ application and register it again.
• The application is subject to change for appliance improvement purposes without notice to users.
• Functions may vary by model.
Before Using LG ThinQ Application
1 Check the distance between the appliance and the wireless router (Wi-Fi network).
- If the distance between the appliance and the wireless router is too far, the signal strength becomes weak. It may take a long time to register or installation may fail.
2 Turn off the Mobile data or Cellular Data on your smartphone.
ENGLISH
3 Connect your smartphone to the wireless router.
NOTE
- To verify the Wi-Fi connection, check that the Wi-Fi indicator on the control panel is lit.
- The appliance supports 2.4 GHz Wi-Fi networks only. To check your network frequency, contact your Internet service provider or refer to your wireless router manual.
- LG ThinQ is not responsible for any network connection problems or any faults, malfunctions, or errors caused by network connection.
- If the appliance is having trouble connecting to the Wi-Fi network, it may be too far from the router. Purchase a Wi-Fi repeater (range extender) to improve the Wi-Fi signal strength.
- The Wi-Fi connection may not connect or may be interrupted because of the home network environment.
- The network connection may not work properly depending on the Internet service provider.
- The surrounding wireless environment can make the wireless network service run slowly.
- The appliance cannot be registered due to problems with the wireless signal transmission. Unplug the appliance and wait about a minute before trying again.
28 SMART FUNCTIONS
NOTE
- If the firewall on your wireless router is enabled, disable the firewall or add an exception to it.
- The wireless network name (SSID) should be a combination of English letters and numbers. (Do not use special characters.)
- Smartphone user interface (UI) may vary depending on the mobile operating system (OS) and the manufacturer.
- If the security protocol of the router is set to WEP, you may fail to set up the network. Please change it to other security protocols (WPA2 is recommended) and register the product again.
Installing the LG ThinQ Application
Search for the LG ThinQ application from the Google Play Store or Apple App Store on a smartphone. Follow instructions to download and install the application.
Connecting to Wi-Fi
The Wi-Fi button, when used with the LG ThinQ application, allows the appliance to connect to a home Wi-Fi network. The Wi-Fi indicator shows the status of the appliance's network connection. The Wi-Fi indicator illuminates when the appliance is connected to the Wi-Fi network.
• Initial Appliance Registration
Run the LG ThinQ application and follow the instructions in the application to register the appliance.
• Re-registering the Appliance or Registering Another User
Press and hold the Wi-Fi button for 3 seconds to temporarily turn it off. Run the LG ThinQ application and follow the instructions in the application to register the appliance.
NOTE
• To disable the Wi-Fi function, press and hold the Wi-Fi button for 3 seconds. The Wi-Fi indicator will be turned off.
Wireless LAN Module Specifications
| Model LCW-004 | |
| Frequency Range | 2412 - 2472 MHz |
| Output Power (Max.) | IEEE 802.11 b: 17.82 dBm |
| IEEE 802.11 g: 17.72 dBm | |
| IEEE 802.11 n: 16.61 dBm | |
Wireless function S/W version: V 1.0
For consideration of the user, this device should be installed and operated with a minimum distance of 20 cm between the device and the body.
Open Source Software Notice Information
To obtain the source code under GPL, LGPL, MPL, and other open source licenses, that is contained in this product, please visit https://opensource.lge.com.
In addition to the source code, all referred license terms, warranty disclaimers and copyright notices are available for download.
LG Electronics will also provide open source code to you on CD-ROM for a charge covering the cost of performing such distribution (such as the cost of media, shipping, and handling) upon email request to opensource@lge.com. This offer is valid for a period of three years after our last shipment of this product. This offer is valid to anyone in receipt of this information.
Smart Diagnosis
This feature is only available on models with the Ⓧ or Ⓧ logo.
Use this feature to help you diagnose and solve problems with your appliance.
NOTE
- For reasons not attributable to LGE's negligence, the service may not operate due to external factors such as, but not limited to, Wi-Fi unavailability, Wi-Fi disconnection, local app store policy, or app unavailability.
- The feature may be subject to change without prior notice and may have a different form depending on where you are located.
Using LG ThinQ to Diagnose Issues
If you experience a problem with your Wi-Fi equipped appliance, it can transmit troubleshooting data to a smartphone using the LG ThinQ application.
- Launch the LG ThinQ application and select the Smart Diagnosis feature in the menu. Follow the instructions provided in the LG ThinQ application.
Using Audible Diagnosis to Diagnose Issues
Follow the instructions below to use the audible diagnosis method.
- Launch the LG ThinQ application and select the Smart Diagnosis feature in the menu. Follow the instructions for audible diagnosis provided in the LG ThinQ application.
1 Press the Lock button to activate the lock function.
- If the display has been locked for over 5 minutes, you must deactivate the lock and then reactivate it.
2 Open the fridge door and then hold the phone on the upper right speaker hole.
ENGLISH
3 Press and hold the Freezer button for three seconds or longer while holding your phone to the speaker until the data transfer is complete.
4 After the data transfer is complete, the diagnosis will be displayed in the application.
NOTE
- For best results, do not move the phone while the tones are being transmitted.


natural_image
Pure geometric lines and crosshair symbols without any text or labels

natural_image
Pure geometric diagram with intersecting lines and shapes, no text or symbols present30 MAINTENANCE
MAINTENANCE
Cleaning
General Cleaning Tips
- Performing manual defrosting, maintenance or cleaning of the appliance while food is stored in the freezer can raise the temperature of the food and reduce its storage life.
• Regularly clean any surfaces that can come in contact with food. - When cleaning the inside or outside of the appliance, do not wipe it with a rough brush, toothpaste, or flammable materials. Do not use cleaning agents containing flammable substances. This may cause discolouration or damage to the appliance.
- Flammable substances: alcohol (ethanol, methanol, isopropyl alcohol, isobutyl alcohol, etc.), thinner, bleach, benzene, flammable liquid, abrasive, etc.
• After cleaning, check if the power cable is damaged.
Cleaning the Interior
- When removing a shelf or drawer from inside the appliance, remove all stored foods from the shelf or drawer to prevent injury or damage to the appliance. Otherwise, injury may occur due to the weight of stored foods.
- Detach the shelves and drawers and clean them with water, and then dry them sufficiently, before replacing them.
- Regularly wipe the door gaskets with a wet soft towel.
- Door basket spills and stains should be cleaned as they can compromise storage ability of the basket and could even be damaged.
- Never clean the shelves or containers in the dishwasher. The parts may become deformed due to the heat.
- The automatic defrosting system in the appliance ensures that the compartment remains free of ice buildup under normal operating conditions. Users do not need to defrost it manually.
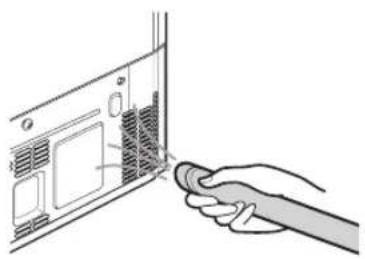
Cleaning the Condenser Cover
Use a vacuum cleaner with a brush to clean the condenser cover and vents. Do not remove the panel covering the condenser coil area.
We recommend that this be done every 12 months to maintain operating efficiency.
natural_image
Hand inserting a button into a computer drive (no text or symbols visible)
Cleaning the Exterior
- When cleaning the outside air vents of the appliance by means of vacuuming, then the power cord should be unplugged from the outlet to avoid any static discharge that can damage the electronics or cause an electric shock. Regular cleaning of the rear and side ventilation covers is recommended to maintain reliable and economical operation of the unit.
- Keep the air vents on the exterior of the appliance clean. Blocked air vents can cause fire or appliance damage.
- For the appliance exterior, use a clean sponge or soft cloth and a mild detergent in warm water. Do not use abrasive or harsh cleaners. Dry thoroughly with a soft cloth. Do not use contaminated cloths when cleaning the stainless steel doors. Always use a dedicated cloth and wipe in the same direction as the grain. This helps reduce surface staining and tarnishing.

natural_image
Pure geometric lines and shapes without any text, numbers, or symbols

natural_image
Pure geometric diagram with intersecting lines and shapes, no text or symbols presentDeodorizer
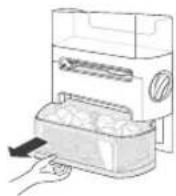
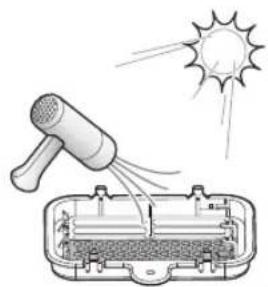
Reusing the Deodorizer
You can re-use the deodorizer by removing odors from the deodorizer.
1 Pull out the upper fridge drawer.
natural_image
Diagram of a door handle with an arrow indicating direction (no text or symbols)performance. Even if it falls off, it is not harmful. Wipe it off with a towel or cloth.
natural_image
Illustration of a sun-dyeing device emitting exhaust from a speaker into a battery pack (no text or symbols)ENGLISH
CAUTION
- Do not wash the deodorizer with water.
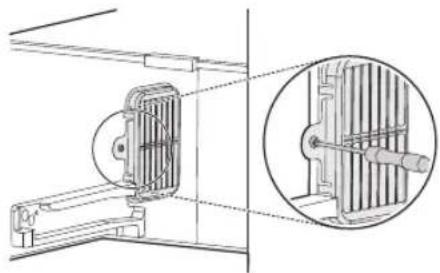
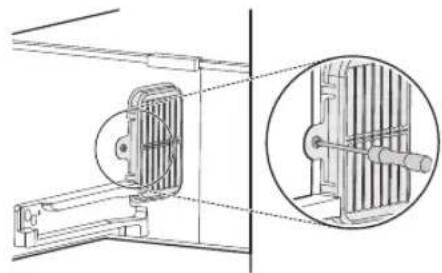
2 Unscrew the screw at the deodorizer.
natural_image
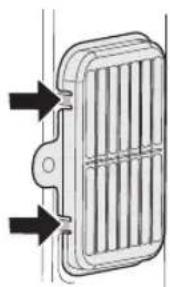
Technical line drawing of a mechanical assembly with a magnified inset showing internal components (no text or symbols)3 Press on the hooks at the deodorizer and then take it out.
natural_image
Diagram of a heat exchanger or radiator with directional arrows indicating airflow or movement (no text or symbols present)4 Dry the deodorizer by using a hair dryer or by leaving it in the sunlight.
- A natural palm wood powder is used for the deodorizer to increase deodorizing


natural_image
Pure geometric lines and shapes without any text, numbers, or symbols

natural_image
Pure geometric diagram with intersecting lines and shapes, no text or symbols present32 TROUBLESHOOTING
TROUBLESHOOTING
Before Calling for Service
Cooling
| Symptoms Possible Cause & Solution | |
| There is no refrigeration or freezing. | Is there a power interruption?Check the power of other appliances. |
| Check the power of other appliances.Plug the power plug in the outlet properly. | |
| A fuse in your home may be blown or the circuit breaker tripped. Or the appliance is connected to a GFCI (Ground Fault Circuit Interrupter) outlet, and the outlet's circuit breaker has tripped.Check the main electrical box and replace the fuse or reset the circuit breaker. Do not increase fuse capacity. If the problem is a circuit overload, have it corrected by a qualified electrician.Reset the circuit breaker on the GFCI. If the problem persists, contact an electrician. | |
| There is poor refrigeration or freezing. | Is the fridge or freezer temperature set to its warmest setting?Set the fridge or freezer temperature to a colder setting. |
| Is the appliance in direct sunlight, or is it near a heat generating object such as cooking oven or heater?Check the installation area and reinstall it away from heat generating objects. | |
| Did you store hot food without cooling it first?Cool the hot food first before putting it in the fridge or freezer compartment. | |
| Did you put in too much food?Maintain an appropriate space between food. | |
| Are the appliance doors completely closed?Completely close the door and make sure that stored food is not obstructing in the door. | |
| Is there enough space around the appliance?Adjust the installation position to make enough space around the appliance. | |


natural_image
Pure geometric lines and shapes without any text, numbers, or symbols

natural_image
Pure geometric diagram with intersecting lines and shapes, no text or symbols present| Symptoms Possible Cause & Solution | |
| The appliance contains a bad smell. | Is the fridge or freezer temperature set to 'Warm'?Set the fridge or freezer temperature to a colder setting. |
| Did you put in food with a strong smell?Store foods with strong smells in sealed containers. | |
| Vegetables or fruit may have spoiled in the drawer municipal waste.Throw away rotten vegetables and clean the vegetable drawer. Do not store vegetables too long in the vegetable drawer. | |
Condensation & Frost
| Symptoms Possible Cause & Solution | |
| There is condensation inside the appliance or on the bottom of the vegetable drawer cover. | Did you store hot food without cooling it first?• Cool the hot food first before putting it inside the fridge or freezer. |
| Did you leave the appliance door open?• Although the condensation will disappear soon after you close the appliance door, you can wipe it with a dry cloth. | |
| Do you open and close the appliance door too frequently?• Condensation can form due to the temperature difference from the outside. Wipe out the dampness with a dry cloth. | |
| Did you put warm or moist food inside without sealing it in a container?• Store food in a covered or sealed container. | |
| Frost has formed in the freezer compartment. | Doors may not be closed properly.• Check if the food item inside the appliance is blocking the door and make sure that the door is tightly closed. |
| Did you store hot food without cooling it first?• Cool the hot food first before putting it in the fridge or freezer compartment. | |
| Is the air entry or exit of the freezer compartment blocked?• Make sure that air entry or exit is not blocked so that the air can circulate inside. | |
| Is the freezer compartment overfilled?• Maintain an appropriate space between items. | |


natural_image
Pure geometric lines and shapes without any text, numbers, or symbols

natural_image
Pure geometric diagram with intersecting lines and shapes, no text or symbols present34 TROUBLESHOOTING
| Symptoms Possible Cause & Solution | |
| Frost or condensation has formed inside or outside the appliance. | Did you open and close the appliance door frequently or is the appliance door improperly closed?Frosts or condensation can form if the outside air penetrates inside the appliance. |
| Is the installation environment humid?Condensation can appear on the exterior of the appliance if the installation area is too humid or on a humid day such as a rainy day. Wipe off any moisture with a dry cloth. | |
| The side or front of the appliance is warm. | There are anti condensation pipes fitted to these areas of the appliance to reduce condensation forming from around the door area.The heat releasing pipe to prevent condensation is installed on the front and side of the appliance. You may feel it particularly hot right after the appliance is installed or during the summer. You can be assured that this is not a problem and is quite normal. |
| There is water inside or outside of the appliance. | Is there water leakage around the appliance?Check if the water has leaked from a sink or another place. |
| Is there water on the bottom of the appliance?Check if the water is from the thawed frozen food or a broken or dropped container. | |
Parts & Features
| Symptoms Possible Cause & Solution | |
| The appliance door is not closed tightly. | Is the appliance leaning forward?Adjust the front feet to raise the front side slightly. |
| Were the shelves properly assembled?Refit the shelves if needed. | |
| Did you close the door with excessive force?If you apply too much force or speed when closing the door, it may remain briefly open before closing. Make sure that you do not slam the door closed. Close the door gently. | |
| It is difficult to open the appliance door. | Did you open the door right after you closed it?If you try to open the appliance door within one minute after you closed it, you may have difficulties because of the pressure inside the appliance. Try to open the appliance door again in a few minutes so that the internal pressure stabilizes. |

natural_image
Pure electrical circuit lines without any symbols
natural_image
Pure geometric diagram with intersecting lines and circles, no text or symbols present

natural_image
Pure geometric lines and shapes without any text, numbers, or symbols

natural_image
Pure geometric diagram with intersecting lines and shapes, no text or symbols present| Symptoms Possible Cause & Solution | |
| The inside lamp in the appliance does not turn on. | Lamp failure• Close the door and re-open. If the lamp does not turn on, please contact the LG Electronics customer information centre. Do not attempt removal of the lamp. |
Noises
| Symptoms Possible Cause & Solution | |
| The appliance is noisy and generates abnormal sounds. | Is the appliance installed on a weak floor or improperly levelled?• Install the appliance on a solid and flat area. |
| Does the rear of the appliance touch the wall?• Adjust the installation position to allow enough clearance around the appliance. | |
| Are objects scattered behind the appliance?• Remove the scattered objects from behind the appliance. | |
| Is there an object on top of the appliance?• Remove the object on top of the appliance. | |
| Clicking noises The defrost control will click when the automatic defrost cycle begins and ends. The thermostat control (or appliance control on some models) will also click when cycling on and off.• Normal Operation | |
| Rattling noises Rattling noises may come from the flow of appliance, the water line on the back of the unit (for plumbed models only), or items stored on top of or around the appliance.• Normal Operation | |
| Whooshing noises Evaporator fan motor is circulating air through the fridge and freezer compartments.• Normal Operation | |


natural_image
Pure geometric lines and shapes without any text, numbers, or symbols

natural_image
Pure geometric diagram with intersecting lines and shapes, no text or symbols present36 TROUBLESHOOTING
| Symptoms Possible | Cause & Solution |
| Gurgling noises Appliance | flowing through the cooling system.• Normal Operation |
| Popping noises Contraction | ion and expansion of the inside walls due to changes in temperature.• Normal Operation |
| Vibrating If the side or back | ack of the appliance is touching a cabinet or wall, some of the normal vibrations may make an audible sound.• To eliminate the noise, make sure that the sides and back do not make any contact with any wall or cabinet. |
Wi-Fi
| Symptoms Possible Cause & Solution | |
| Your home appliance and smartphone are not connected to the Wi-Fi network. | The password for the Wi-Fi that you are trying to connect to is incorrect.· Find the Wi-Fi network connected to your smartphone and remove it, then register your appliance on LG ThinQ. |
| Mobile data for your smartphone is turned on.· Turn off the Mobile data of your smartphone and register the appliance using the Wi-Fi network. | |
| The wireless network name (SSID) is set incorrectly.· The wireless network name (SSID) should be a combination of English letters and numbers. (Do not use special characters.) | |
| The router frequency is not 2.4 GHz.· Only a 2.4 GHz router frequency is supported. Set the wireless router to 2.4 GHz and connect the appliance to the wireless router. To check the router frequency, check with your Internet service provider or the router manufacturer. | |
| The distance between the appliance and the router is too far.· If the distance between the appliance and the router is too far, the signal may be weak and the connection may not be configured correctly. Move the location of the router so that it is closer to the appliance. | |


natural_image
Pure geometric lines and shapes without any text, numbers, or symbols

natural_image
Pure geometric diagram with intersecting lines and shapes, no text or symbols presentSmart Diagnosis ....31
natural_image
Pure geometric lines and crosshair symbols without any text or labels

natural_image
Pure geometric diagram with intersecting lines and shapes, no text or symbols presentnatural_image
Pure electrical circuit lines without any symbols

natural_image
Pure geometric diagram with intersecting lines and shapes, no text or symbols presentnatural_image
Pure geometric lines and crosshair symbols without any text or labels

natural_image
Pure geometric diagram with intersecting lines and shapes, no text or symbols presentnatural_image
Pure geometric lines and shapes without any text, numbers, or symbols

natural_image
Pure geometric diagram with intersecting lines and shapes, no text or symbols presentnatural_image
Pure geometric lines and shapes without any text, numbers, or symbols

natural_image
Pure geometric diagram with intersecting lines and shapes, no text or symbols presentnatural_image
Pure geometric lines and crosshair symbols without any text or labels

natural_image
Pure geometric diagram with intersecting lines and shapes, no text or symbols presentnatural_image
Pure geometric lines and shapes without any text, numbers, or symbols

natural_image
Pure geometric diagram with intersecting lines and shapes, no text or symbols presentОбслуживание
natural_image
Technical line drawing of a mechanical assembly with a rotating component (no text or symbols)ВНИМАНИЕ!
natural_image
Mechanical component diagram showing a bracket with mounting holes and a directional arrow (no text or symbols)ВНИМАНИЕ!
natural_image
Pure geometric lines and crosshair symbols without any text or labels

natural_image
Pure geometric diagram with intersecting lines and shapes, no text or symbols present14 УСТАНОВКА
ПРИМЕЧАНИЕ
⚠️ ВНИМАНИЕ!
natural_image
Mechanical assembly diagram showing a bracket with mounting holes and a rotating arrow (no text or symbols)ВНИМАНИЕ!
natural_image
Technical diagram of a mechanical assembly with a magnified inset showing a component being inserted into a housing (no text or labels present)natural_image
Pure geometric lines and shapes without any text, numbers, or symbols
natural_image
Pure geometric diagram with intersecting lines and shapes, no text or symbols present16 УСТАНОВКА
ВНИМАНИЕ!
natural_image
Pure geometric lines and shapes without any text, numbers, or symbols

natural_image
Pure geometric diagram with intersecting lines and shapes, no text or symbols presentЭКСПЛУАТАЦИЯ
natural_image
Pure geometric lines and shapes without any text, numbers, or symbols

natural_image
Pure geometric diagram with intersecting lines and shapes, no text or symbols present
natural_image
Pure electrical circuit lines without any symbolsru_main.book.book Page 20 Monday, August 23, 2021 3:54 PM

natural_image
Pure geometric diagram with intersecting lines and circles, no text or symbols present20 ЭКСПЛУАТАЦИЯ

natural_image
Pure geometric lines and shapes without any text, numbers, or symbols

natural_image
Pure geometric diagram with intersecting lines and shapes, no text or symbols presentВнутренняя часть
Модель InstaView Door in Door:
natural_image
Pure geometric lines and crosshair symbols without any text or labels

natural_image
Pure geometric diagram with intersecting lines and shapes, no text or symbols present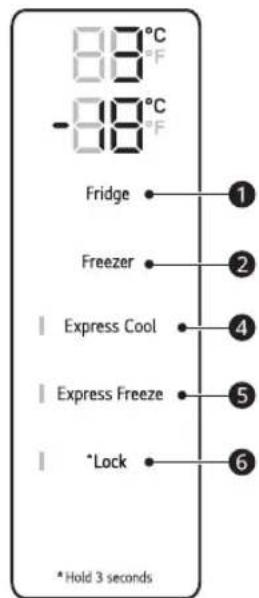
① Fridge
natural_image
Pure geometric lines and crosshair symbols without any text or labels

natural_image
Pure geometric diagram with intersecting lines and shapes, no text or symbols present24 ЭКСПЛУАТАЦИЯ
ПРИМЕЧАНИЕ
natural_image
Pure geometric lines and crosshair symbols without any text or labels

natural_image
Pure geometric diagram with intersecting lines and shapes, no text or symbols presentnatural_image
Simple line drawing of a hand holding a small object inside a rectangular frame (no text or symbols)natural_image
Pure geometric lines and shapes without any text, numbers, or symbols

natural_image
Pure geometric diagram with intersecting lines and shapes, no text or symbols present26 ЭКСПЛУАТАЦИЯ
natural_image
Technical illustration of a structural component with cross-sectional views and dimension arrows (no text or symbols)⚠️ ВНИМАНИЕ!
natural_image
Diagram of a mechanical component with an arrow indicating rotation or movement (no text or symbols)natural_image
Pure geometric lines and shapes without any text, numbers, or symbols

natural_image
Pure geometric diagram with intersecting lines and shapes, no text or symbols presentПолка

ВНИМАНИЕ!
natural_image
Illustration of hands holding a tray with a black arrow pointing to the tray (no text or symbols)3
natural_image
Pure geometric lines and shapes without any text, numbers, or symbols

natural_image
Pure geometric diagram with intersecting lines and shapes, no text or symbols present28 ЭКСПЛУАТАЦИЯ
natural_image
Hand using a tool to cut or spread a grid on a chocolate board (no text or symbols visible)natural_image
Illustration of hands holding a rectangular object with two upward arrows indicating motion or force (no text or symbols)natural_image
Pure geometric lines and shapes without any text, numbers, or symbols

natural_image
Pure geometric diagram with intersecting lines and shapes, no text or symbols presentПРИМЕЧАНИЕ
natural_image
Pure geometric lines and shapes without any text, numbers, or symbols

natural_image
Pure geometric diagram with intersecting lines and shapes, no text or symbols presentnatural_image
Pure geometric lines and shapes without any text, numbers, or symbols

natural_image
Pure geometric diagram with intersecting lines and shapes, no text or symbols presentnatural_image
Hand inserting a USB into a computer drive (no text or symbols visible)2 Открутите винт на дезодораторе.
natural_image
Technical line drawing of a mechanical assembly with an inset close-up showing a cylindrical component inserted into a housing (no text or symbols)РУССКИЙ
natural_image
Diagram of a car air vent with airflow arrows indicating direction (no text or labels)Дезодоратор
natural_image
Diagram of a door handle with an arrow indicating clockwise motion (no text or symbols)natural_image
Illustration of a hairdryer emitting heat to a device with a sun in the background (no text or symbols)⚠️ ВНИМАНИЕ!
natural_image
Pure geometric lines and shapes without any text, numbers, or symbols

natural_image
Pure geometric diagram with intersecting lines and shapes, no text or symbols presentnatural_image
Pure geometric lines and shapes without any text, numbers, or symbols

natural_image
Pure geometric diagram with intersecting lines and shapes, no text or symbols presentnatural_image
Pure geometric lines and shapes without any text, numbers, or symbols

natural_image
Pure geometric diagram with intersecting lines and shapes, no text or symbols presentnatural_image
Pure geometric lines and shapes without any text, numbers, or symbols

natural_image
Pure geometric diagram with intersecting lines and shapes, no text or symbols presentnatural_image
Pure geometric lines and shapes without any text, numbers, or symbols

natural_image
Pure geometric diagram with intersecting lines and shapes, no text or symbols presentnatural_image
Pure geometric lines and shapes without any text, numbers, or symbols

natural_image
Pure geometric diagram with intersecting lines and shapes, no text or symbols presentДля заметок
Smart Diagnosis ....31
Кызмет көрсету
Тазалау....32
Иіс кетіргіш 33
АКАУЛАРДЫ ЖОЮ
natural_image
Pure geometric lines and shapes without any text, numbers, or symbols
natural_image
Pure geometric diagram with intersecting lines and shapes, no text or symbols presentnatural_image
Pure geometric lines and crosshair symbols without any text or labels

natural_image
Pure geometric diagram with intersecting lines and shapes, no text or symbols present4 КАУІПСІЗДІК НУСКАУЛАРЫ
natural_image
Pure geometric lines and crosshair symbols without any text or labels

natural_image
Pure geometric diagram with intersecting lines and shapes, no text or symbols presentnatural_image
Pure geometric lines and crosshair symbols without any text or labels

natural_image
Pure geometric diagram with intersecting lines and shapes, no text or symbols present6 КАУІПСІЗДІК НУСКАУЛАРЫ
natural_image
Pure geometric lines and crosshair symbols without any text or labels
natural_image
Pure geometric diagram with intersecting lines and circles, no text or symbols present

natural_image
Pure geometric diagram with intersecting lines and shapes, no text or symbols presentnatural_image
Pure geometric lines and shapes without any text, numbers, or symbols

natural_image
Pure geometric diagram with intersecting lines and circles, no text or symbols present8 КАУІПСІЗДІК НУСКАУЛАРЫ
Пайдалану
natural_image
Pure geometric lines and crosshair symbols without any text or labels

natural_image
Pure geometric diagram with intersecting lines and shapes, no text or symbols presentnatural_image
Pure electrical circuit lines without any symbols
natural_image
Pure geometric diagram with intersecting lines and circles, no text or symbols present

natural_image
Pure geometric lines and shapes without any text, numbers, or symbols

natural_image
Pure geometric diagram with intersecting lines and shapes, no text or symbols present12 OPHATY
OPHATY
Орнату алдында
| - Өлшемі (мм) | |
| A | 913 |
| B | 1 |
| C | 735 |
| D | 620 |
| E | 691 |
| F | 735 |
| G | 1 |
| H | 1 |
ECKEPTNE
natural_image
Technical line drawing of a mechanical assembly with a tool and base (no text or symbols)ECKEPTY
natural_image
Mechanical component diagram showing a bracket with mounting holes and a directional arrow (no text or symbols)


natural_image
Pure geometric lines and shapes without any text, numbers, or symbols

natural_image
Pure geometric diagram with intersecting lines and shapes, no text or symbols present14 OPHATY
ECKEPTY
ECKEPTNE
ECKEPTY
natural_image
Mechanical assembly diagram showing a bracket with mounting holes and a directional arrow (no text or symbols)ECKEPTY

natural_image
Technical diagram showing a mechanical assembly with a magnified inset of a gear mechanism (no text or labels)natural_image
Pure geometric lines and crosshair symbols without any text or labels

natural_image
Pure geometric diagram with intersecting lines and shapes, no text or symbols present16 OPHATY
ECKEPTY
natural_image
Pure geometric lines and crosshair symbols without any text or labels

natural_image
Pure geometric diagram with intersecting lines and shapes, no text or symbols presentПайдалану
Пайдалану алдында
natural_image
Pure electrical circuit lines without any symbolskk_main.book.book Page 19 Monday, August 23, 2021 3:55 PM
Пайдалану
19
natural_image
Pure geometric lines and shapes without any text, numbers, or symbols

natural_image
Pure geometric diagram with intersecting lines and shapes, no text or symbols present
natural_image
Pure electrical circuit lines without any symbolskk_main.book.book Page 20 Monday, August 23, 2021 3:55 PM
natural_image
Pure geometric diagram with intersecting lines and circles, no text or symbols present20 Пайдалану
Өнім мүмкіндіктері

① Косымша есік*1
natural_image
Pure geometric lines and shapes without any text, numbers, or symbols

natural_image
Pure geometric diagram with intersecting lines and shapes, no text or symbols presentIwi
InstaView Door in Door үлгіci:

① ЖШД шамы
natural_image
Pure geometric lines and shapes without any text, numbers, or symbols

natural_image
Pure geometric diagram with intersecting lines and shapes, no text or symbols present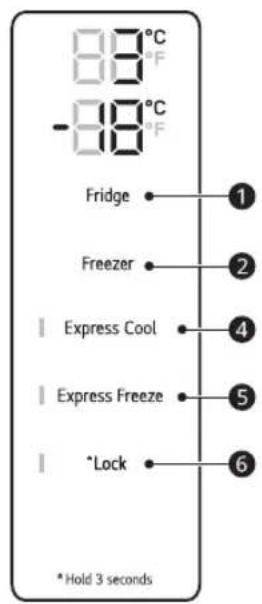
① Fridge
natural_image
Pure geometric lines and crosshair symbols without any text or labels

natural_image
Pure geometric diagram with intersecting lines and shapes, no text or symbols present24 Пайдалану
ECKEPTNE
natural_image
Pure geometric lines and crosshair symbols without any text or labels

natural_image
Pure geometric diagram with intersecting lines and shapes, no text or symbols presentnatural_image
Simple line drawing of a hand holding a small object inside a rectangular frame (no text or symbols)

26 Пайдалану
ECKEPTY
natural_image
Technical diagram showing layered structure with inset magnified views of a component (no text or symbols)Тартпаларды алу/кайта орнату
natural_image
Diagram of a mechanical component with an arrow indicating direction (no text or symbols)natural_image
Pure geometric lines and shapes without any text, numbers, or symbols

natural_image
Pure geometric diagram with intersecting lines and shapes, no text or symbols presentnatural_image
Illustration of hands pressing down on a rectangular panel with a black arrow indicating downward motion (no text or symbols)natural_image
Pure electrical circuit lines without any symbols
natural_image
Pure geometric diagram with intersecting lines and circles, no text or symbols present28 Пайдалану
natural_image
Hand using a tool to spread or spread a grid on a tray (no text or symbols visible)natural_image
Illustration of two hands holding a rectangular object with upward arrows indicating motion or force (no text or symbols)natural_image
Pure geometric lines and crosshair symbols without any text or labels

natural_image
Pure geometric diagram with intersecting lines and shapes, no text or symbols presentСМАРТ ФУНКЦИЯЛАРЫ
LG ThinQ қолданбасы
ECKEPTNE
natural_image
Pure geometric lines and shapes without any text, numbers, or symbols

natural_image
Pure geometric diagram with intersecting lines and shapes, no text or symbols present30 СМАРТ ФУНКЦИЯЛАРЫ
ECKEPTNE
natural_image
Pure geometric lines and shapes without any text, numbers, or symbols

natural_image
Pure geometric diagram with intersecting lines and shapes, no text or symbols present32 Кызмет көрсету
Кызмет көрсету
Тазалау
natural_image
Hand inserting a button into a device panel (no text or symbols visible)natural_image
Diagram of a car air vent with airflow arrows indicating direction (no text or labels)Иіс кетіргіш
natural_image
Diagram of a door handle with an arrow indicating clockwise motion (no text or symbols)natural_image
Illustration of a sun-dyeing device emitting exhaust from a speaker into a battery pack (no text or symbols)ECKEPTY
natural_image
Technical line drawing of a mechanical assembly with an inset close-up showing internal components (no text or symbols)

natural_image
Pure geometric lines and crosshair symbols without any text or labels

natural_image
Pure geometric diagram with intersecting lines and shapes, no text or symbols present34 АКАУЛАРДЫ ЖОЮ
АҚАУЛАРДЫ ЖОЮ
natural_image
Pure geometric lines and shapes without any text, numbers, or symbols

natural_image
Pure geometric diagram with intersecting lines and shapes, no text or symbols present36 АКАУЛАРДЫ ЖОЮ
natural_image
Pure geometric lines and shapes without any text, numbers, or symbols

natural_image
Pure geometric diagram with intersecting lines and shapes, no text or symbols presentnatural_image
Pure geometric lines and shapes without any text, numbers, or symbols

natural_image
Pure geometric diagram with intersecting lines and shapes, no text or symbols present38 АКАУЛАРДЫ ЖОЮ
Шуылдар
natural_image
Pure geometric lines and shapes without any text, numbers, or symbols

natural_image
Pure geometric diagram with intersecting lines and shapes, no text or symbols presentЕске салу
FOYDALANUVCHI QO'LLANMASI
SOVUTGICH VA MUZLATGICH

FOYDALANISHDAN AVVAL BARCHA KO'RSATMALARNI O'QIB CHIQING ....3
OGOHLANTIRISH....3
DIQQAT 9
O'RNATISH
O'rnatishdan avval ....11
Sovutgich va muzlatgich eshigini chiqarib olish 12
Tekislash va eshikni tenglashtirish ....13
Qurilmani yoqish....15
Door-in-Door (eshikdagi eshik) 24
Tortmasi 25
Tokcha 25
Muz Tayyorlagich 26
Eshik savatchasi....27
AQLLI FUNKSIYALAR
LG ThinQ ilovasi....28
Smart diagnostika....29
TEXNIK XIZMAT KO'RSATISH
Tozalash 31
Dezodorant ....32
NOSOZLIKLARNI BARTARAF ETISH
natural_image
Pure geometric lines and crosshair symbols without any text or labels

natural_image
Pure geometric diagram with intersecting lines and shapes, no text or symbols presentXAVFSIZLIK KO'RSATMALARI
FOYDALANISHDAN AVVAL BARCHA KO'RSATMALARNI O'QIB CHIQING
natural_image
Pure geometric lines and crosshair symbols without any text or labels

natural_image
Pure geometric diagram with intersecting lines and shapes, no text or symbols present6 XAVFSIZLIK KO'RSATMALARI
Yong'in va yonuvchan materiallar xavfi
- Agar shunday oqish holati yuzaga kelgan bo'lsa, jihoz atrofida ochiq alanga yoki ehtimoliy isitish manbalari bo'lishiga yo'l qo'ymang va jihoz turgan xonani bir necha daqia davomida shamollating. Agar sovituvchi modda oqishi kuzatilsa, yonuvchan gazlarning havodagi aralashmasi yuzaga kelishining oldini olish uchun, jihoz foydalanilayotgan xona o'lchamlari undagi sovituvchi modda miqdoriga mos bo'lishi zarur. Jihoz ichidagi R600a sovituvchi moddasining har 8 grammiga xonada 1 m² joy bo'lishi zarur.
- Jihoz naychalaridan sovituvchi moddaning oqishi yong'in yoki portlashni keltirib chiqarishi mumkin.
- Aynan sizning jihozingizdagi sovituvchi modda miqdori jihoz ichidagi identifikatsiya yorlig'ida ko'rsatilgan.
O'rnatish
- Bu jihozni ikki yoki undan ortiq kishi mahkam ushlagan holda joyidan ko'chirishi lozim.
• Jihozni qattiq va tekis polga o'rnating.
- Jihozni nam va changli joyga o'rnatmang. Jihozni tashqariga yoki to'g'ridan-to'g'ri quyosh nuri, shamol yoki yomg'ir tegadigan, harorat muzlashgacha boradigan joylarga o'rnatmang yoki saqlamang.
- Jihozni quyosh nuri to'g'ridan-to'g'ri tushadigan joyga qo'ymang va plita yoki isitkich kabi qizdiruvchi jihozlardan chiqadigan issiqlik ta'sirida qoldirmang.
- Jihozni o'rnatishda orqa tomonini ochilib qolishidan ehtiyot bo'ling.
- Jihozni uning elektr kabeli tarmoqdan oson uziladigan joyga o'rnating.
- Jihoz eshigini o'rnatishda yoki yechishda uning qulab ketishiga yo'l qo'ymang.
- Jihoz eshigini o'rnatishda yoki yechishda elektr kabelining qisilib qolishi, ezilishi yoki shikastlanishidan ehtiyot bo'ling.
- Elektr kabeli sanchqisi yuqoriga yo'nalib qolishi yoki jihozning elektr kabeli sanchqisiga tiralib qolishidan saqlaning.


natural_image
Pure geometric lines and crosshair symbols without any text or labels

natural_image
Pure geometric diagram with intersecting lines and shapes, no text or symbols presentXAVFSIZLIK KO'RSATMALARI
7
- Elektr kabeli sanchqisiga sanchqi adapteri yoki boshqa qurilmalarni ulamang.
- Elektr kabelini almashtirmang yoki uzaytirmang.
- Rozetka yerga to'g'ri uzatilganligiga, elektr kabelidagi yerga ulash mixchasi shikastlanmaganligiga va uning elektr tarmog'idan uzib qo'yilmaganligiga ishonch hosil qiling. Yerga ulash bo'yicha batafsil ma'lumot uchun LG Electronics mijozlarni qo'llab quvvatlash markaziga murojaat qiling.
- Bu jihozning elektr shnuri uskunani yerga ulash simi va vilkasi bilan jihozlangan. Elektr shnurining vilkasi barcha mahalliy qonun-qoidalarga muvofiq tarzda o'rnatilgan va yerga ulangan rozetkaga ulanishi shart.
- Biror shikastlanish belgisi bo'lgan jihozni ishga tushirmang. Agar bunga shubha qilsangiz, dileringizga murojaat qiling.
- Qadoq materiallari (plastik paketlar va penoplast)ni bolalardan uzoqroqda chiqitga chiqaring. Qadoq materiallari bo'g'ilib qolishga sabab bo'lishi mumkin.
- Jihozni quvvat kabeliga (o'rnatilgan) ega bo'Imagan ko'p rozetkali adapterga ulamang.
- Bu jihoz alohida saqlagichga ega bo'lgan maxsus ajratilgan elektr liniyasiga ulanishi kerak.
- Mos tarzda yerga ulanmagan ko'p teshikli rozetkaga (ko'chma) ulamang. Mos tarzda yerga ulangan ko'p teshikli rozetkadan (ko'chma) foydalanilganda ko'rsatilgan nominal tok kuchiga yoki undan balandroq tok kuchiga mo'ljallangan ko'p teshikli rozetkadan foydalaning va bu rozetkadan faqat jihozning o'zi uchun foydalaning.
Ishlatish
- Jihozda oziq-ovqat mahsulotlarini saqlashdan boshqa maqsadlarda (tibbiy yoki tajriba materiallari saqlash yoxud yetkazib berishda) foydalanmang.
- Agar jihozning elekt qurilmalari ichiga suv kirib ketadigan bo'lsa, elektr kabeli sanchqisini tarmoqdan uzing va LG Electronics mijozlar uchun axborot markaziga murojaat qiling.


natural_image
Pure geometric lines and crosshair symbols without any text or labels

natural_image
Pure geometric diagram with intersecting lines and circles, no text or symbols present8 XAVFSIZLIK KO'RSATMALARI
• Qattiq momaqaldiroq yoki chaqmoq paytida yo uzoq muddat foydalanishi ko'zda tutilmagan holatlarda jihozning elektr kabeli sanchqisini tarmoqdan uzib qo'ying.
- Ho'l qo'lingiz bilan elektr vilkasiga yoki jihozning tugmalariga tegmang.
- Elektr kabelini haddan ortiq bukmang yoki ustiga og'ir buyum qo'ymang.
- Agar jihozdan g'alati ovoz, hid yoki tutun chiqayotganini sezsangiz, darhol elektr kabeli sanchqisini tarmoqdan uzing va LG Electronics mijozlarni qo'llab quvvatlash markaziga murojaat qiling.
- Jihozning sovuq chiqaradigan joyiga, orqa paneliga yoxud issiqlik chiquvchi panjarasiga qo'lingizni yoki metal buyumlarni qo'ymang.
- Jihozning orqa paneliga ortiqcha kuch yoki zarba ishlatmang.
- Jihoz eshigini ochish yoki yopishda atrofda yurgan bolalarga ehtiyot bo'ling. Eshik bolaga jarohat yetkazishi yoki shikastlashi mumkin.
- Bolalarning jihoz ichiga qamalib qolish xavfidan ehtiyot bo'ling. Jihoz ichiga qamalib qolgan bola dimiqib qolishi mumkin.
- Jihoz ichiga uy hayvonlari yoki boshqa jonzotlarni solmang.
- Jihoz ichiga og'ir yoki mo'rt buyumlarni, ichida suyuqlik bor idishlarni, yonuvchan moddalarni, oson alangalanuvchan buyumlarni (sham, shamchiroq kabilarni) va qizdiruvchi uskunalarni (plita, isitkich kabilarni) qo'ymang.
- Jihoz ichiga hech qanday elektr uskunasi (isitkich yoki mobil telefoni kabilar) solmang.
- Agar gaz (izobutan, propan, tabiiy gaz va h.k.) chiqayotgan bo'lsa, jihozga yoki elektr kabeli sanchqisiga tegmang va darhol xonani shamollating. Bu jihoz sovutuvchi gazdan (izobutan, R600a) foydalanadi. Garchi undagi gaz miqdori juda oz bo'lsa-da, u baribir yonuvchandir. Jihozni tashish, o'rnatish yoki undan foydalanish paytida undan gaz chiqsa va uchqun chiqishi kuzatilsa, bu yong'in, portlash yoki tan jarohatlariga olib kelishi mumkin.
- Jihoz yaqinida tez alangalanuvchan yoki yonuvchan moddalardan (efir, benzol, spirt, boshqa kimyoviy moddalar, siqilgan suyuq gaz, yonuvchan aerozol, hasharotlarga qarshi purkaluvchi vosita, havo
tozalagich, pardoz vositasi va h.k.) foydalanmang yoki ularni saqlamang.
Chiqitga chiqarish
- Jihozni tashlab yuborayotganda uning tokchalarini va savatchalarini joyida qoldirgan holda, eshik qistirmasini olib tashlang va bolalarni jihozdan uzoq tuting.
DIQQAT

DIQQAT
Kichik shaxsiy jarohatlarning xavfini kamaytirish, mahsulotning noto'g'ri ishlashi yoki mulkka shikast etishining xavfini kamaytirish uchun asosiy dastlabki ehtiyot choralari ko'rilishi kerak, jumladan, quyidagilar:
O'rnatish
- Qutidan ochilganidan keyin, jihozni tashish vaqtida yuzaga kelishi mumkin bo'lgan shikastlar yo'qligini tekshiring.
- Sovutgich modda oqimini to'liq ishlashini ta'minlashi uchun kamida 3-4 soat kuting.
Ishlatish
- Muzlatgich bo'lmasidagi muzlagan oziq-ovqat mahsulotlari yoki uning metal qismlariga nam yoki xo'l qo'l bilan teginmang. Bu sovuq urishiga sabab bo'lishi mumkin.
- Harorati muzlash nuqtasidan pastroq haroratga tushadigan muzxona, tokchalar yoki muz idishiga shisha idishlar, butilka yoki banka solmang (ayniqsa ichida gazli ichimlik bo'lsa).
- Jihoz eshigining old tomonidagi toblangan shisha yoki polkalar ta'sir natijasida shikastlanishi mumkin. Agar u sinsa, unga qo'llaringiz bilan tegmang.


natural_image
Pure geometric lines and shapes without any text, numbers, or symbols

natural_image
Pure geometric diagram with intersecting lines and shapes, no text or symbols present10 XAVFSIZLIK KO'RSATMALARI
- Jihoz eshiklari, kamerasi yoki tokchalariga osilmang yoki ustiga chiqmang.
- Eshik savatchalarida ortiqcha miqdordagi suv idishlari yoki likopchalar uchun idishlarni saqlamang.
• Jihoz eshigini ortiqcha kuch ishlatib ochib yopmang. - Agar jihoz eshigining oshiq-moshig'i shikastlangan yoki noto'g'ri ishlayotgan bo'lsa, uni ishlatishdan to'xtating va vakolatli xizmat ko'rsatish markaziga murojaat qiling.
- Uy hayvonlari elektr kabeli yoki suv chiqadigan rezina quvurni kemirishiga yo'l qo'ymang.
- Muzlagan oziq-ovqat mahsulotlarini muzlatgich bo'lmasidan olinishi bilanoq iste'mol qilmang.
- Jihoz eshigini yoki eshikdagi eshikni ochib yopganda qo'l yoki oyog'ingiz qisilib qolmasligiga ishonch hosil qiling.
Texnik xizmat ko'rsatish
- Agar jihozga texnik xizmat ko'rsatmaydigan ichki LED-chiroq o'rnatilgan bo'lsa, uning qopqog'i yoki LED-chiroqning o'zini tuzatish yoki ta'mirlash maqsadida aslo chiqarib olmang. LG Electronics mijozlar uchun axborot markaziga murojaat qiling.
- Shisha tokchalar yoki qopqoqlarni sovuqligida issiq suv bilan tozalamang. Harorat birdan o'zgarishi tufayli ular darz ketishi mumkin.
- Polkalarni to'ntarilgan holda solmang. Polkalar yiqilib ketishi mumkin.
- Jihoz muzini tushirish uchun LG Electronics mijozlarni qo'llab quvvatlash markaziga murojaat giling.
• Uzoq muddat elektr tarmog'idan tok kelmay qolgan paytda, muzlatgich bo'lmasidagi muz idishdagi muzni olib tashlang.


natural_image
Pure geometric lines and crosshair symbols without any text or labels

natural_image
Pure geometric diagram with intersecting lines and shapes, no text or symbols presentO'RNATISH
O'rnatishdan avval
O'Ichamlar va oraliqlar
Tegishli buyumlar bilan oralig'i juda kichkina bo'lsa, muzlatish samarasi pasayishi va elektr xarajati ortishi mumkin. Jihozni o'rnatishda jihozning orqa tomoni bilan devor orasida kamida 50 mm oraliq qoldiring.
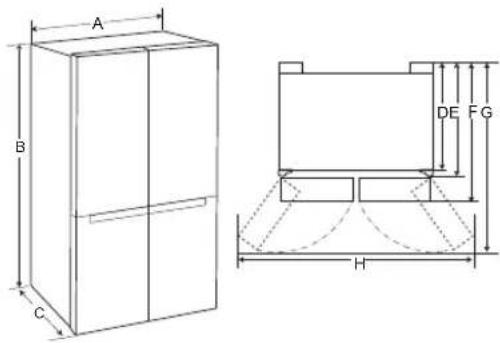
| - O'Ichami (mm) | |
| A | 913 |
| B | 1 |
| C | 735 |
| D | 620 |
| E | 691 |
| F | 735 |
| G | 1 |
| H | 1 |
Izoh
- Siz jihoz ichidagi yorliqni tekshirgan holda uning qanday turdagi jihoz ekanligini aniqlashingiz mumkin.
Atrof-muhit harorati
- Jihoz iqlim zonasiga bog'liq ravishda atrofdagi haroratlarning cheklangan diapazonida ishlashga mo'ljallangan.
- Ichki haroratlarga jihoz o'rnatilgan joyi, atrof-muhitdagi harorat, eshikning qancha ochilib-yopilishi va boshqalar ta'sir ko'rsatadi.
- Iqlim sinfini pasport taxtachasida ko'rish mumkin.
| Iqlim sinfi Atrof-muhit harorati diapazoni °C | |
| SN (Me'yordan past iqlim) | +10 - +32 |
| N (O'rtacha iqlim) +16 - +32 | |
| ST (Subtropikal) +16 - | +38 / +18 - +38** |
| T (Tropik) +10 - +43* / | +16 - +43 / +18 - +43** |
* Avstraliya, Hindiston, Kenya
** Argentina
7 9 0
Izoh
- SN dan T gacha ko'rsatilgan moslamalar 10 °C - 43 °C atrof haroratida foydalanishga mo'ljallangan.
natural_image
Pure geometric lines and shapes without any text, numbers, or symbols

natural_image
Pure geometric diagram with intersecting lines and shapes, no text or symbols present12 O'RNATISH
Sovutgich va muzlatgich eshigini chiqarib olish
Agar kirish eshigingiz jihozni olib kirish uchun juda tor bo'lsa, jihozning eshiklarini yechib oling va jihozni yon tomonlama qilib u yerdan o'tkazing.

OGOHLANTIRISH
- Eshiklarni o'rnatish, chiqarib olishdan yoki jihozni tozalashdan avval elektr kabelini, uydagi elektr saqlagichi yoki avtomatik o'chirgichni tarmoqdan uzing. Ushbu ko'rsatmalarga amal qilmaslik o'lim, yong'in yoki tok urishiga sabab bo'lishi mumkin.
Muzlatish kamerasi eshigini chiqarib olish
1
natural_image
Technical line drawing of a mechanical assembly with a tool and base (no text or symbols)2
Barcha sim bog'ichlari ① ni uzing. Yerga ulash simi ② ni bo'shating.
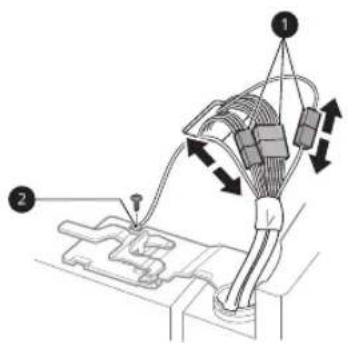
3
Sharnir dastagi ⑤ ni soat strelkasiga qaramaqarshi yo'nalishda aylantiring. Yuqori sharnir
④ ni sharnir dastagi lo'kidoni ③ dan tepaga ko'tarib bo'shating.
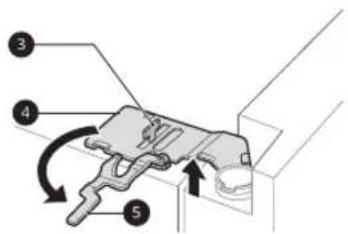

DIQQAT
- Sharnirni lo'kidonidan ko'tarib bo'shatishda eshikning oldinga qulab tushmasligi uchun ehtiyot bo'ling. Eshikni olish yoki o'rnatishda ikki yoki undan ortiq odam uni ushlab turishi tavsiya etiladi.
4
Muzlatish kamerasi eshigini u tag qismdagi yig'ich sharniridan bo'shagunicha ko'taring.
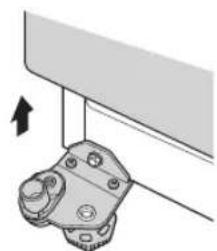
natural_image
Mechanical component diagram showing a bracket with mounting holes and a directional arrow (no text or symbols)
DIQQAT
- Eshikni tirnamaydigan yuzaga ich tomonini yuqoriga qaratgan holda qo'ying.
Sovutkich eshigini chiqarib olish
1 Barcha simli tirkovchi moslamalar ① ni uzing.
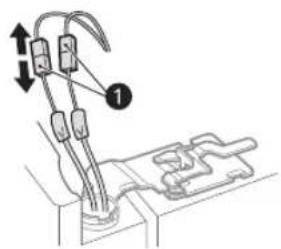
Izoh
- Modelga bog'liq ravishda sim bog'ichlar soni farq qilishi mumkin.
2 Sharnir dastagi ② ni soat strelkasiga qaramayo'nalishda aylantiring. Yuqori sharnir ③ ni sharnir dastagi lo'kidoni ④ dan tepaga ko'tarib bo'shating.
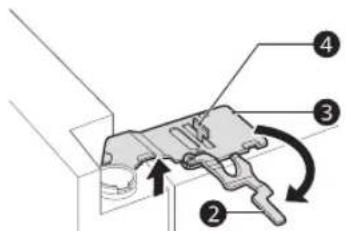
DIQQAT
- Sharnirni sharnir dasdagi lo'kidonidan ko'tarib bo'shatishda eshikning oldinga qulab tushmasligi uchun ehtiyot bo'ling. Eshikni olish yoki o'rnatishda ikki yoki undan ortiq odam uni ushlab turishi tavsiya etiladi.
3 Sovutkich eshigini u tag qismdagi yig'ich sharniridan bo'shagunicha ko'taring.
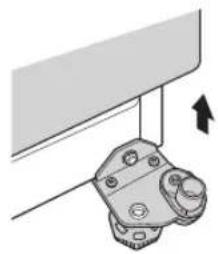
natural_image
Mechanical component diagram showing a bracket with mounting holes and an arrow indicating rotation (no text or symbols)DIQQAT
- Eshikni tirnamaydigan yuzaga ich tomonini yuqoriga qaratgan holda qo'ying.
natural_image
Pure geometric lines and shapes without any text, numbers, or symbols

natural_image
Pure geometric diagram with intersecting lines and shapes, no text or symbols present14 O'RNATISH
Izoh
- A turdagi gayka klyuchi
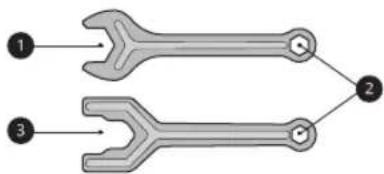
flowchart
graph TD
    A["1"] --> B["2"]
    C["3"] --> B["2"]
- B turdagi gayka klyuchi
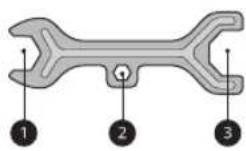
Izoh
- Pol tekis bo'Imaganida yoki u kuchsiz yoki yaxshi qurilmagan hollarda eshiklarni tekislab bo'lmaslik mumkin.
- Sovutkich og'ir va u mustahkam va qattiq yuzaga o'rnatilishi kerak.
- Ayrim taxta pillar xaddan tashqari egilgan hollarda tekislash bilan bog'liq qiyinchiliklarni yuzaga keltirishi mumkin.
Muzlatkich va sovutkich eshigi uchun eshikni tenglashtirish
Agar jihoz eshigi tekis ochilmayotgan bo'lsa, jihoz eshigi balandligidagi farqni yo'qoting.

natural_image
Technical diagram of a mechanical assembly with a magnified inset showing a component being inserted into a housing (no text or labels present)1 Uni chapga burash orqali gaykani bo'shatish uchun eshikni oching va gayka klyuchi ① dan foydalaning.
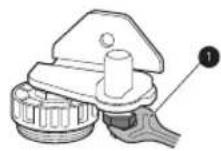
2 Sozlash sharniri boltini chapga yoki o'ngga burash orqali balandlikni sozlash uchun gayka klyuchi ② dan foydalaning.
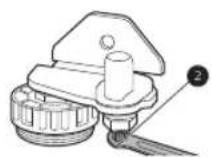
DIQQAT
- Jihoz eshigi balandligini 3 mm dan ko'proqqa o'zgartirmang.
3 Gaykani o'ngga burash orqali qotirish uchun gayka klyuchi ① dan foydalaning.
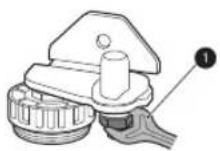
Izoh
- Pol tekis bo'Imaganida yoki u kuchsiz yoki yaxshi qurilmagan hollarda eshiklarni tekislab bo'Imaslik mumkin.
- Sovutkich og'ir va u mustahkam va qattiq yuzaga o'rnatilishi kerak.
- Ayrim taxta pillar xaddan tashqari egilgan hollarda tekislash bilan bog'liq qiyinchiliklarni yuzaga keltirishi mumkin.
Qurilmani yoqish
Jihozni ulash
Jihozni o'rnatgandan keyin elektr shnurini devordagi rozetkaga ulang. Bitta rozetkaga boshqa jihozlarni ulamang.
Izoh
- Rozetkaga elektr kabelini (yoki sanchqini) ulagandan so'ng, jihoz ichiga oziq-ovqat mahsulotlarini qo'yish uchun 3 yoki 4 soat kuting. Agar jihoz to'liq sovib olgunga qadar uning ichiga oziq-ovqat mahsulotlari solinsa, ular aynib qolishi mumkin.
- Jihozni o'chiring, rozetkadan elektr shnurini chiqaring.
natural_image
Pure geometric lines and shapes without any text, numbers, or symbols

natural_image
Pure geometric diagram with intersecting lines and shapes, no text or symbols present16 Ishlatish
Ishlatish
Foydalanishdan avval
natural_image
Pure geometric lines and shapes without any text, numbers, or symbols

natural_image
Pure geometric diagram with intersecting lines and shapes, no text or symbols present
natural_image
Pure electrical circuit lines without any symbolsuz_main.book.book Page 18 Monday, August 23, 2021 3:51 PM

natural_image
Pure geometric diagram with intersecting lines and dots, no text or symbols present18 Ishlatish
natural_image
Pure geometric lines and shapes without any text, numbers, or symbols

natural_image
Pure geometric diagram with intersecting lines and shapes, no text or symbols present
① Door-in-Door (eshikdagi eshik) ^*1
③ InstaView Door-in-Door (eshikdagi eshik) ^*1
The InstaView Door-in-Door (Eshikdagi eshik) bo'lmasi odatiy ishlatiladigan oziq-ovqat mahsulotlarini oson olish imkoniyatini beradi.

natural_image
Pure geometric lines and crosshair symbols without any text or labels

natural_image
Pure geometric diagram with intersecting lines and shapes, no text or symbols present
natural_image
Pure electrical circuit lines without any symbolsuz_main.book.book Page 20 Monday, August 23, 2021 3:51 PM

natural_image
Pure geometric diagram with intersecting lines and circles, no text or symbols present20 Ishlatish
Ichki qism
InstaView Door in Door Modeli:

① LED-chiroq
Jihoz eshigi ochilganda uning ichidagi LED-chiroqlar yonadi.
natural_image
Pure geometric lines and shapes without any text, numbers, or symbols

natural_image
Pure geometric diagram with intersecting lines and shapes, no text or symbols present② Harorat o'lchagich\*1
10 Door-in-Door (Eshikdagi eshik) bo'Imasi\*1
Ichimliklar va gazaklar kabi ko'p foydalaniladigan oziq-ovqat mahsulotlar saqlanadi.
natural_image
Pure geometric lines and shapes without any text, numbers, or symbols

natural_image
Pure geometric diagram with intersecting lines and shapes, no text or symbols present22 Ishlatish
- Undan muz chelagi sifatida foydalanmang yoki uni sovutkich yoki sabzavotlar tortma qutisining ustidagi polkaga joylashtirmang.
14 Pastki torma qopqog'i

① Fridge
1 °C dan 7 °C gacha oraliqdagi kerakli haroratni tanlash uchun bu tugmani qayta-qayta bosing.
- Sovutkichning sukut bo'yicha harorati 3 °C.
natural_image
Pure geometric lines and crosshair symbols without any text or labels

natural_image
Pure geometric diagram with intersecting lines and shapes, no text or symbols presentIzoh
- Joriy ichki harorat jihoz ichidagi oziq-ovqat mahsuloti holatiga qarab o'zgaradi, chunki ko'rsatilgan o'rnatilgan harorat jihozning joriy harorati emas, balki ko'zlangan haroratidir.
② Freezer
-23 °C dan -15 °C gacha oraliqdagi kerakli haroratni tanlash uchun bu tugmani qayta-qayta bosing. • Muzlatish kamerasining sukut bo'yicha harorati -18 °C.
③ Wi-Fi ^*1
Bu tugma jihozni uydagi Wi-Fi tarmog'iga ulashga imkon beradi. LG ThinQ ilovasining dastlabki o'rnatish bo'yicha ma'lumotlar olish uchun Smart funksiyalar bo'limiga qarang.
4 Express Cool
Bu funksiya sabzavotlar, mevalar kabi katta miqdordagi oziq-ovqat mahsulotlarini tez sovutishi mumkin.
- Bu funksiya mazkur tugmani har bosganingizda navbatma-navbat o'chib yonadi.
- Bu funksiya ma'lum vaqt o'tganidan so'ng avtomatik tarzda o'chadi.
⑤ Express Freeze
Bu funksiya ko'p miqdordagi muz yoki muzlagan oziq-ovqat mahsulotlarini tez muzlatish imkonini beradi.
- Express Freeze tugmasini funksiyani 20 soatga faollashtirish uchun bosing. Ushbu funksiya 20 soatdan keyin avtomatik tarzda o'chadi.
- Bu funksiya mazkur tugmani har bosganingizda navbatma-navbat o'chib yonadi.
- Bu funksiya ma'lum vaqt o'tganidan so'ng avtomatik tarzda o'chadi.
⑥ Lock
natural_image
Pure geometric lines and crosshair symbols without any text or labels
natural_image
Pure geometric diagram with intersecting lines and shapes, no text or symbols present24 Ishlatish
InstaView
InstaView Eshikdagi eshikdan foydalanish
InstaView Door in Door funksiyasi sovutgich eshigini ochmasdan chanqovbosti ichimliklar va gazaklar kabi tez-tez olinadigan mahsulotlar kamayib qolganini ko'rish imkonini beradi.
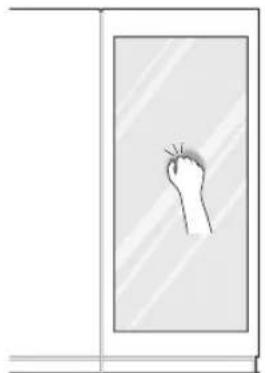
natural_image
Simple line drawing of a hand holding a small object inside a rectangular frame (no text or symbols)1 Door in Door ichidagi LED-chiroqni yoqish yoki o'chirish uchun oynani ikka marta taqillating.
2 LED-chiroq o'n soniyadan so'ng avtomatik tarzda o'chadi.
DIQQAT
- Jihoz eshigidagi eshik ochiq turganda uning eshigini ochmang yoki jihoz eshigi ochiq turganda uning eshigidagi eshigini ochmang. Eshikdagi eshik jihoz qirrasiga qisilib qolishi va buzlishi mumkin.
Izoh
- InstaView Door in Door funksiyasi muzlatgichning chap yoki o'ng eshigini yopgandan keyin 2 soniya ichida va muz ulashgich ishlaganida bir zumda o'chiriladi.
Door-in-Door (eshikdagi eshik)
Eshikdagi eshikdan foydalanish
Ichki bo'lmani yopib turgan eshik ochilishi uchun eshik tagidagi dastakni yuqoriga torting.
Eshikdagi eshik ichiga oziq-ovqat mahsulotlarini tartib bilan solish uchun yetarlicha bo'sh joy va atrofidagi savatchalar bor.
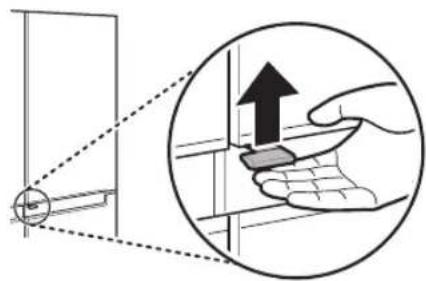
DIQQAT
- Jihoz eshigidagi eshik ochiq turganda uning eshigini ochmang yoki jihoz eshigi ochiq turganda uning eshigidagi eshigini ochmang. Eshikdagi eshik jihoz qirrasiga qisilib qolishi va buzlishi mumkin.
Tortmasi
DIQQAT
natural_image
Technical diagram showing a layered structure with three circular insets highlighting different components (no text or symbols present)natural_image
Diagram of a mechanical component with an arrow indicating rotation or movement (no text or symbols present)O'ZBEKCHA
2 Polkani tashqariga torting.
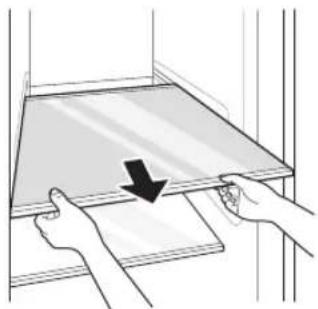
natural_image
Illustration of two hands pressing down on a tray with a black arrow indicating direction (no text or symbols)- Agar sovutkich eshigi tez-tez ochilsa, iliq havo muzlatish bo'lmasiga kiradi. Muz hosil qilish uchun uzoqroq vaqt talab qilinishi mumkin.
- Muz tayyorlagichni kuch bilan qiyshaytirmaslik uchun ehtiyot bo'ling, chunki u sinib ketishi mumkin.
- Muzni muz saqlash chelagida muzlatmang. Chelak yorilib ketishi va jihozga zarar yetkazishi yoki odamni jarohatlashi mumkin.
3 Olib tashlash jarayonining aksini bajargan holda uni o'z joyiga o'rnating.
DIQQAT
natural_image
Pure geometric lines and shapes without any text, numbers, or symbols

natural_image
Pure geometric diagram with intersecting lines and shapes, no text or symbols present
natural_image
Pure electrical circuit lines without any symbols4 Muz tayyorlagich dastasini soat strelkasiga qarama-qarshi yo'nalishda aylantiring.
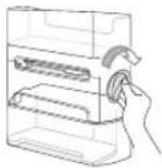
5 Muz saqlash chelagini bir oz ko'taring va chiqarib oling.
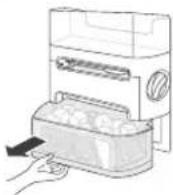
B turdagi muz tayyorlagich \*1
natural_image
Hand pouring liquid into a grid-patterned tray (no text or symbols visible)2 Suv muzlaganidan keyin muz idishni uchlaridan ushlang va astalik bilan qiyshaytiring.
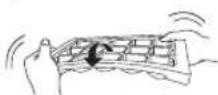
Izoh
natural_image
Illustration of two hands holding a rectangular object with upward arrows indicating motion or force (no text or symbols)natural_image
Pure geometric lines and crosshair symbols without any text or labels

natural_image
Pure geometric diagram with intersecting lines and shapes, no text or symbols present28 AQLLI FUNKSIYALAR
AQLLI FUNKSIYALAR
LG ThinQ ilovasi
Bu xususiyatdan faqat Wi-Fi ga ega bo'lgan modellarda foydalanish mumkin.
3 Smartfoningizni simsiz routerga ulang.
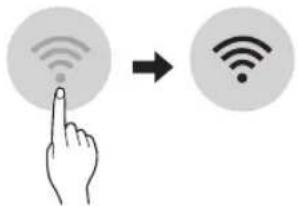
Izoh
• Wi-Fi ulanishini tekshirish uchun boshqaruv panelida Wi-Fi indikatori yoqilganligini ko'ring.
- Bu jihoz faqat 2.4 GGs chastotali Wi-Fi tarmoqlarda ishlaydi. Tarmoq chastotasini tekshirish uchun internet-provayderingizga murojaat qiling yoki simsiz router qo'llanmasiga qarang.
- LG ThinQ tarmoqqa ulanish muammolari yoki tarmoqda yuzaga kelgan har qanday nosozlik, noto'g'ri ishlash yoki xatolarni bartaraf qilish uchun mo'ljallanmagan.
- Agar jihozlar Wi-Fi tarmog'iga ulana olmasa, muammo jihoz routerdan uzoqda joylashganligi sababli yuzaga kelgan bo'lishi mumkin. Wi-Fi signalini kuchaytirish uchun Wi-Fi retranslyator (signal kuchaytirgich) sotib oling.
- Uydagi tarmoq muhitiga qarab Wi-Fi ulanishi o'rnatilmasligi yoki uzilib qolishi mumkin.
- Internet ta'minotchisiga qarab, tarmoq ulanishida muammolar yuzaga kelishi mumkin.
- Atrofdagi simsiz aloqa muhiti tufayli simsiz tarmoq xizmati sekin ishlashi mumkin.
- Simsiz signal uzatilishida muammo bo'lsa, jihoz tarmoqqa ulana olmaydi. Jihozni o'chiring va yana urinib ko'rishdan avval taxminan bir daqiqa kuting.


natural_image
Pure geometric lines and shapes without any text, numbers, or symbols
natural_image
Pure geometric diagram with intersecting lines and shapes, no text or symbols presentnatural_image
Pure geometric lines and shapes without any text, numbers, or symbols

natural_image
Pure geometric diagram with intersecting lines and shapes, no text or symbols presentTEXNIK XIZMAT KO'RSATISH
Tozalash
natural_image
Pure geometric lines and crosshair symbols without any text or labels
natural_image
Pure geometric diagram with intersecting lines and shapes, no text or symbols present
natural_image
Pure electrical circuit lines without any symbols
natural_image
Pure geometric diagram with intersecting lines and circles, no text or symbols present32 TEXNIK XIZMAT KO'RSATISH
Ishlatish samaradorligini ushlab turish uchun biz buni har 12 oyda bir marta bajarishni tavsiya qilamiz.
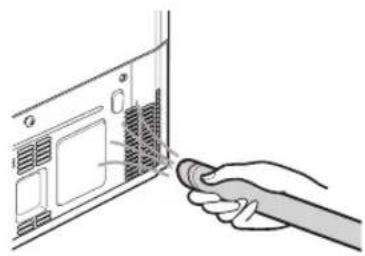
natural_image
Hand inserting a USB into a computer drive (no text or symbols visible)Dezodorant
natural_image
Diagram of a door handle with an arrow indicating clockwise motion (no text or symbols)3 Dezodoratordagi ilgichlarga bosib chiqarib olasiz.
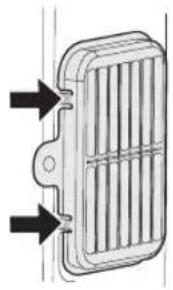
natural_image
Diagram of a heat exchanger or radiator with directional arrows indicating flow or movement (no text or symbols present)4 Soch quritgich yordamida yoki oftobda qoldirib dezodoratorni quriting.
- Dezodoratorning xushbo'ylashtirish samaradorligini oshirish uchun tabiiy palma yog'ochidan tayyorlangan kukun ishlatiladi. To'kilsa ham zarari yo'q. Sochiq yoki mato bilan artib yuboring.
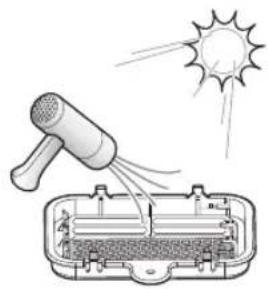
natural_image
Illustration of a hand welding a device with a sun spraying into it (no text or symbols)DIQQAT
- Dezodoratorni suv bilan yuva ko'rmang.
2 Dezodoratordagi vintni burang.
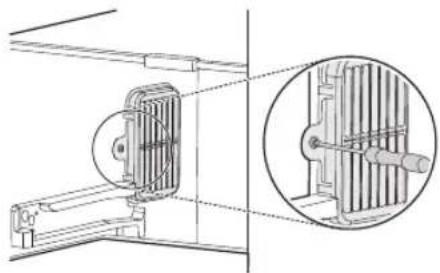
natural_image
Technical line drawing of a mechanical assembly with an inset close-up showing internal components (no text or symbols)


natural_image
Pure geometric lines and shapes without any text, numbers, or symbols

natural_image
Pure geometric diagram with intersecting lines and shapes, no text or symbols presentNOSOZLIKLARNI BARTARAF ETISH
natural_image
Pure geometric lines and shapes without any text, numbers, or symbols

natural_image
Pure geometric diagram with intersecting lines and shapes, no text or symbols present34 NOSOZLIKLARNI BARTARAF ETISH
| Alomatlari Mumkin bo'lgan sababi va yechimi |
| Jihozdan yoqimsiz hid kelmoqda. Sovutgich yoki muzlatgich harorati "Warm" (iliq) qilib sozlanganmi?Sovutgich yoki muzlatgich haroratini sovuqroq darajaga o'rnating. |
| Hidi o'tkir bo'lgan ovqat qo'ydingizmi?Hidi o'tkir ovqatlarni yopiq idishlarda saqlang. |
| Tortmadagi sabzavot yoki meva aynib qolishi mumkin.Chirigan sabzavotlarni tashlab yuboring va sabzavotlar tortmasini tozalang. Sabzavotlar tortmasida sabzavotlarni uzoq muddat saqlamang. |
Kondensatsiyalanish va muzlash
natural_image
Pure geometric lines and shapes without any text, numbers, or symbols

natural_image
Pure geometric diagram with intersecting lines and shapes, no text or symbols presentNOSOZLIKLARNI BARTARAF ETISH
| Alomatlari Mumkin | bo’lgan sababi va yechimi |
| Jihozning ichida yoki tashqarisida muz yo suv kondensati hosil bo’ldi. | Jihoz eshigini tez-tez ochib yopdingizmi yoki jihoz eshigi nobop yopilganmi?• Agar tashqaridagi havo jihoz ichiga kiradigan bo’lsa muz yo suv kondensati hosil bo’lishi mumkin. |
| Jihoz o’rnatilgan muhitning havo namligi yuqorimi?• Agar jihoz o’rnatilgan joyda havo namligi o‘ta yuqori bo’lsa yoki yomg’ir sabab havo namligi yuqori bo’lgan kun bo’lsa, jihoz tashqi tarafida suv kondensati paydo bo’lishi mumkin. Har qanday namlikni quruq latta bilan artib tashlang. | |
| Jihozning yon tarafi yoki old qismi qiziganmi? | Eshik atrofida kondensat suv hosil bo’lishini kamaytirish maqsadida jihozning bu joylarida suv kondensatiga qarshi naychalar o’rnatilgan.• Suv kondensatining oldini olishga mo’ljallangan, o’zidan issiq ajratuvchi naychalar jihozning old eshigida va yon tomonlariga o’rnatilgan. Asosan jihozni o’rnatishingiz bilanoq yoki yoz paytida ushbu issiqlikni sezishingiz mumkin. Bu holat muammoni anglatmaydi va me’yoriy holat hisoblanganligi sabab, xotirjam bo’ling. |
| Jihozning ichida yoki tashqarisida suv paydo bo’ldi. | Jihoz atrofida biror joydan suv oqyaptimi?• Oshxona chanog’i yoki boshqa joydan suv oqmayotganini tekshiring. |
| Jihoz ostida suv bormi?• Bu suvning erigan oziq-ovqat mahsulotidan yoki singan yo tushib ketgan idishdan oqib tushgan yoki tushmaganini tekshiring. |
natural_image
Pure geometric lines and circular shapes without any text, numbers, or symbols
natural_image
Pure geometric diagram with intersecting lines and shapes, no text or symbols presentNOSOZLIKLARNI BARTARAF ETISH
| Alomatlari Mumkin bo'lgan sababi va yechimi |
| Shildiragan ovoz Jihozning sovitish tizimida suyuqlik oqmoqda. • Me'yorda ishlamoqda |
| Qalquvchi ovoz Harorat o'zgarganligi sababli ichki devorlarning qisqarishi yoki kengayishi. • Me'yorda ishlamoqda |
| Zirillash Agar jihozning yon yoki orqa tarafi javon yo devorga tegib turgan bo'lsa, me'yoriy zirillashlar ham turli tovushlar chiqarishi mumkin. • Bu shovqinni yo'qotish uchun jihozning yon yoki orqa tarafi devor yoki javonga tegib turmaganiga ishonch hosil qiling. |
Wi-Fi
| Alomatlari Mumkin bo’lgan sababi va yechimi | |
| Uy jihozingiz va smartfoningiz Wi-Fi tarmoqqa ulanmagan. | Siz ulanishga harakat qilayotgan Wi-Fi paroli xato.Smartfoningizga ulangan Wi-Fi tarmoqni toping va uni o’chirib yuboring, so’ng jihozingizni LG ThinQ ilovasida ro’yxatdan o’tkazing. |
| Smartfoningizda Mobil internet yoqilgan.Smartfoningizda Mobil internetni o’chiring va Wi-Fi tarmoqdan foydalangan holda jihozingizni ro’yxatdan o’tkazing. | |
| Simsiz tarmoq nomi (SSID) xato o’rnatilgan.Simsiz tarmoq nomi (SSID) inglizcha harflar va raqamlar birikmasidan iborat bo’lishi lozim. (Maxsus belgilarni ishlatmang) | |
| Router chastotasi 2.4 GGs emas.Router faqat 2.4 GGs chastotada ishlaydi. Simsiz routerni 2.4 GGs chastotaga sozlang va jihozingizni simsiz routerga ulang. Router chastotasini tekshirish uchun Internet xizmati provayderingizga yoki routeringizni ishlab chiqargan kompaniyaga murojaat qiling. | |
| Jihoz va simsiz router orasidagi masofa juda uzoq.Agar jihoz va simsiz router orasidagi masofa juda uzoq bo’lsa, signal kuchsiz bo’lishi va ulanish to’g’ri yo’lga qo’yilmasligi mumkin. Routeringizni jihozga yaqinroq joyga o’rnating. | |


natural_image
Pure geometric lines and shapes without any text, numbers, or symbols

natural_image
Pure geometric diagram with intersecting lines and shapes, no text or symbols present

natural_image
Pure electrical circuit lines without any symbolsuz_main.book.book Page 38 Monday, August 23, 2021 3:51 PM
natural_image
Pure geometric diagram with intersecting lines and circles, no text or symbols present
LG
Life's Good
EAC
natural_image
Pure geometric lines and crosshair symbols without any text or labels