
HI3200SB - Cooker TESLA - Free user manual and instructions
Find the device manual for free HI3200SB TESLA in PDF.


| Type | Induction Hob |
| Model | HI3200SB |
| Brand | Tesla |
| Number of Cooking Zones | 4 |
| Cooking Zone Sizes | 2x 160 mm, 2x 200 mm |
| Power per Zone | 1400 W, 2000 W, 2300 W, 3000 W (Boost) |
| Voltage | 220-240 V / 380-415 V 3N AC, 50/60 Hz |
| Current | 32 A |
| Net Weight | 5 kg |
| Gross Weight | 5.72 kg |
| Cut-out Dimensions (W x D) | 520 x 300 mm |
| Control Type | Touch Control |
| Timer | Independent and Per-zone |
| Child Lock | Yes |
| Boost Function | Yes (5 minutes max) |
| Residual Heat Indicator | Yes |
| Pan Detection | Yes |
| Safety Features | Automatic switch-off, overheat protection, child lock |
| Surface Material | Ceramic Glass |
| Cleaning Instructions | Use damp soapy cloth, no abrasives, no steam cleaners |
| Environmental Compliance | WEEE Compliant |
| Operational Life | 10 years |
Frequently Asked Questions - HI3200SB TESLA
User questions about HI3200SB TESLA
0 question about this device. Answer the ones you know or ask your own.
Ask a new question about this device
Download the instructions for your Cooker in PDF format for free! Find your manual HI3200SB - TESLA and take your electronic device back in hand. On this page are published all the documents necessary for the use of your device. HI3200SB by TESLA.
USER MANUAL HI3200SB TESLA
Thank you very much for your preference for products.
We recommend you to read the instruction manual carefully and keep it handy before you use this induction hob so that it maintains its quality just like the first day you bought it and serves you most efficiently.

This instruction manual has been prepared for a variety of models. Some of the features specified in the manual may not exist in your device. These features are marked with an asterisk (*).
Our devices are designed for domestic use. They are not for commercial use.
PLEASE READ THE INSTRUCTIONS BEFORE YOU INSTALL OR USE THIS DEVICE.
This product has been manufactured in an environmentally-friendly and modern plant without harming the nature.
Conforms with the WEEE Regulations.
IMPORTANT WARNINGS
-
Installation and repair should always be performed by "AUTHORIZED SERVICE". Manufacturer shall not be held responsible for operations performed by unauthorized persons.
-
Please read this operating instructions carefully. Only by this way you can use the appliance safely and in a correct manner.
-
The cooker should be used according to operating instructions.
-
Keep children below the age of 8 and pets away when operating.
-
WARNING: Fire hazard; do not store the materials on the cooking surface.
-
WARNING: The appliance and its accessible parts are hot during operation.
-
Setting conditions of this device are specified on the label. (Or on the data plate)
-
The accessible parts may be hot when the grill is used. Small children should be kept away.
-
WARNING: This appliance is intended for cooking. It should not be used for other purposes like heating a room.
-
To clean the appliance, do not use steam cleaners.
-
NEVER try to put out the fire with water. Only shut down the device circuit and then cover the flame with a cover or a fire blanket.
-
Children under 8 years of age should be kept away, if they cannot be monitored continuously.
-
Touching the heating elements should be avoided.
-
CAUTION: Cooking process shall be supervised. Cooking process shall always be supervised.
-
The appliance is not suitable for use with an external timer or a separate remote control system.
-
This device can be used by children over 8 years of age, people with physical, hearing or mental challenges or people with lack of experience or knowledge; as long as control is ensured or information is provided regarding the dangers.
-
This device has been designed for household use only.
-
Children must not play with the appliance. Cleaning or user maintenance of the appliance shall not be performed by children unless they are older than 8 years and supervised by adults.
-
Keep the appliance and its power cord away from children less than 8 years old.
-
Put curtains, tulles, paper or any flammable (ignitable) material away from the appliance before starting to use the appliance. Do not put ignitable or flammable materials on or in the appliance.
-
Keep the ventilation channels open.
-
Do not heat closed cans and glass jars. The pressure may lead jars to explode.
-
Do not use the product in states like medicated and/or under influence of alcohol which may affect your ability of judgement.
-
After each use, check if the unit is turned off.
-
Be careful when using alcohol in your foods. Alcohol will evaporate at high temperatures and may catch fire to cause a fire if it comes in contact with hot surfaces.
-
If the appliance is faulty or has a visible damage, do not operate the appliance.
-
Do not touch the plug with wet hands. Do not pull the cord to plug off, always hold the plug.
-
Do not put objects that children may reach on the appliance.
-
The packaging materials are dangerous for children. Keep packaging materials away from the reach of children.
- Cooker supply can be disconnected during any construction work at home. After completing the work, re-connecting the cooker shall be done by authorized service.
- Do not place metal utensils such as knife, fork, spoon on the surface of the appliance, since they will get hot.
- To prevent overheating, the appliance should not be installed behind of a decorative cover.
- Turn off the appliance before removing the safeguards. After cleaning, install the safeguards according to instructions.
- Cable fixing point shall be protected.
Electrical Safety
- Plug the appliance in a grounded socket protected by a fuse conforming to the values specified in the technical specifications chart.
- Have an authorized electrician set grounding equipment. Our company shall not be responsible for the damages that shall be incurred due to using the product without grounding according to local regulations.
- WARNING: If the surface is cracked, turn off the appliance to avoid risk of electric shock.
- Never wash the appliance by spraying or pouring water on it. There is a risk of electrocution.
- Do not touch the plug with wet hands. Do not pull the cord to plug off, always hold the plug.
- Unplug the unit during installation, maintenance, cleaning and repair.
- Make sure the plug is inserted firmly into wall socket to avoid sparks.
- If the power supply cord (the cord with plug) is damaged, this cord shall be replaced by the manufacturer or its service agent or an equally qualified personnel to prevent a hazardous situation.
-
Do not use cut or damaged cords or extension cords other than the original cord.
-
CAUTION: If the glass of the stove is broken, turn off any heating element immediately and disconnect the appliance from power source, do not touch the surface of the appliance and do not use the appliance.
- User should not handle the cooker by himself.
- When not turning of the cooker during cooking, user can touch hot surfaces causing burns.
- If heavier loads are places on the cooker, these loads can trip over. It may cause personal injuries.
- WARNING: As the induction surfaces generate a magnetic field, it may cause harmful effects for people using medical devices such as pacemakers or insulin pumps.
-
WARNING: When induction furnaces are operated at high power or based on the material of the pan base, it may emit certain noises. This is normal.
-
Do not use steam cleaners for cleaning the appliance, otherwise electric shock may occur.
- Make sure there is no liquid or humidity in the outlet where the product plug is installed.
- An omnipolar switch capable to disconnect power supply is required for installation. Disconnection from power supply shall be provided with a switch or an integrated fuse installed on fixed power supply according to building code.
- The power supply cord (the cord with plug) shall not contact the hot parts of the appliance.
- Unplug the unit during installation, maintenance, cleaning and repair.
- Appliance is equipped with a type "Y" cord cable.
- The circuit breaker switches of the cooker shall be placed so that end user can reach them when the cooker is installed.
- Fixed connections shall be connected to a power supply enabling omnipolar disconnection. For appliances with over voltage category below III, disconnection device shall be connected to fixed power supply according to wiring code.
- Do not remove ignition switches from the appliance. Otherwise, live electric cables can be accessed. It may cause an electric shock.
Methods for Protecting Ceramic Glass Cooking Surface From Damage
Ceramic glass surface is not sensitive to heat (up to 650^ C) and temperature fluctuations. It is unbreakable and scratch-resistant to a certain degree. However, to avoid any damage, please do the following:
- Never pour cold water on hot stoves.
- Do not stand on a ceramic glass plate.
- Sudden pressure, for example, the effect of a falling salt shaker may be critical. So, do not place such objects on a place above the hobs.
-
After each use, make sure that the base of the cooking pot and surfaces of cooking zones are clean and dry.
-
Do not peel vegetables on the hob surfaces. Sand grains falling from the vegetables may scratch the ceramic glass plate.
- Do not lay flammable materials such as cardboard or plastic on the oven. Objects such as tin, zinc, or aluminium (as well as aluminium foils or empty coffee pots) may melt on hot cooking surfaces and thus cause damage.
- Take care not to let sugary foods or fruit juices contact the hot cooking zones. The ceramic glass surface may be stained by these.
Intended Use
- This product is designed for home use. Commercial use of the appliance is not permitted.
- This appliance may only be used for cooking purposes. It shall not be used for other purposes like heating a room.
-
The manufacturer assumes no responsibility for any damage due to misuse or mishandling.
-
Operational life of the product you have purchased is 10 years. This is the period for which the spare parts required for the operation of this product as defined is provided by the manufacturer.
Electrical Connection
- Setting conditions of this appliance is indicated in tag or data plate.
- Your appliance should be plugged in a fuse appropriate for electric power. If necessary, it is recommended that installation is done by authorized service.
- Your appliance is configured in accordance with electrical supply of 220-240V AC/380-415V 3N AC 50/60Hz.
- If main electrical network is different from these values, contact with your authorized service.
- Electrical connections of your appliance should only be made to the fuses having suitably wired grounding (grounded) system. If no convenient fuse is available in the place where your appliance is to be installed, contact with authorized service immediately. Manufacturing firm is not responsible definitely for the damages that fuses whose
grounding is not made and connected to the appliance can cause.
- Plug of the appliance should be close to be accessed easily to the fuse whose grounding is made without use of extension cord.
- Do not allow contacting the power cable of your appliance with hot regions. Similarly, keep away it from sharp edges and corners.
- If feeder cord is damaged, this cord should be replaced either by manufacturer or its service agency or same degree qualified personnel in order to hinder a dangerous situation.
- Wrong electrical connection may give damage to the appliance. In this case, your appliance will remain out of guarantee scope. Electrical connection of your appliance should be done by authorized service.
Electrical Connection Scheme
Connect the cables as specified below.
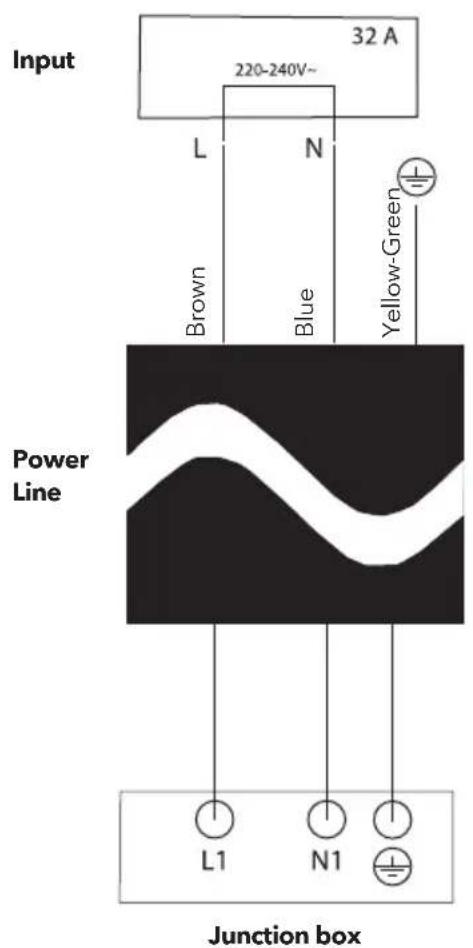

Your appliance is configured in accordance with electrical supply of 220-240V AC / 380-415V 3N AC 50/60Hz.
INTRODUCTION OF THE APPLIANCE
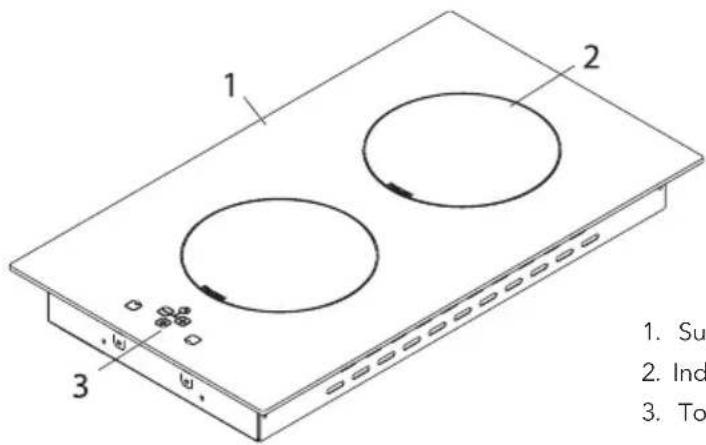
- Surface of the induction hob
- Inductionheater
- Touchscreen control panel
| 160 mm heater zone 1400 W | |
| 160 mm heater zone (P) 2000 W | |
| 200 mm heater zone * 2300 W | |
| 200 mm heater zone (P) * 3000 W | |
| Voltage 220-240 / 380-415 V | |
| Net weight 5 kg | |
| Gross weight 5,72 kg |

WARNING!
- For the modification to be done by authorized service, this table should be considered. Manufacturer may not be held responsible for any problems rising because of any faulty modification.
- In order to increase the product quality, the technical specifications may be changed without prior notice.
- The values provided with the appliance or its accompanying documents are laboratory readings in accordance with the respective standards. These values may differ depending on the use and ambient conditions.
INSTALLATION OF COOKTOP
Check if the electrical installation is proper to bring the appliance in operating condition. If electricity installation is not suitable, call an electrician and plumber to arrange the utilities as necessary. Manufacturer shall not be held responsible for damages caused by operations performed by unauthorized persons.

WARNING!
- It is customer's responsibility to prepare the location the product shall be placed on and also to have the electrical installation prepared.
- The rules in local standards about electrical installations shall be followed during product installation.
- Check for any damage on the appliance before installing it. Do not have the product installed if it is damaged. Damaged products cause a risk for your safety.
Correct Place For Installation
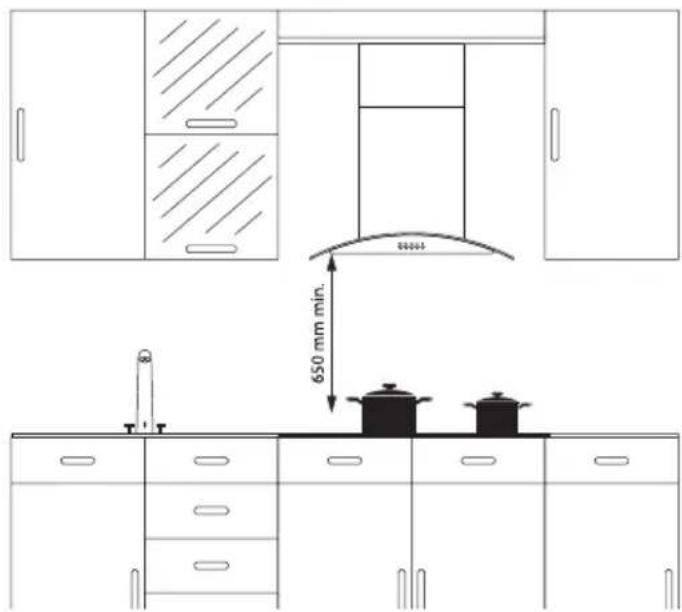
Product is designed in accordance with the kitchen counters supplied from market. A safe distance should be left between the product and kitchen walls and furniture. If hood/aspirator will be installed over your appliance, obey to the recommendation of hood / aspirator manufacturer for assembly height. (min. 65 cm) The gap that cooktop is to be placed on the counter should be cut in line with cooktop installation dimen- sions.
For installation of the product, the rules specified in local standards related to electricity should be complied.
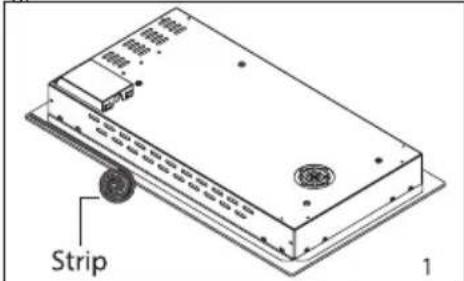
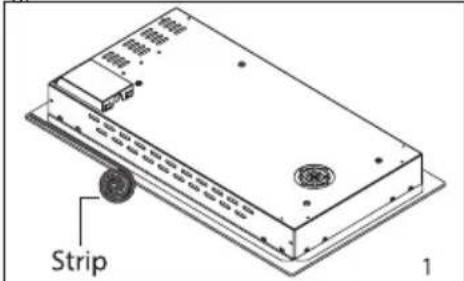
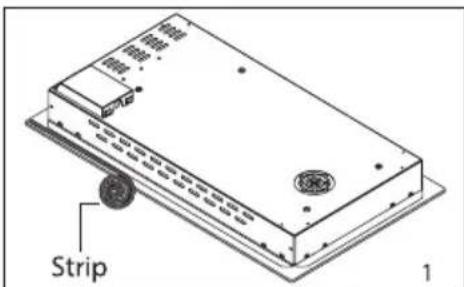
Application Of A Strip Under The Appliance
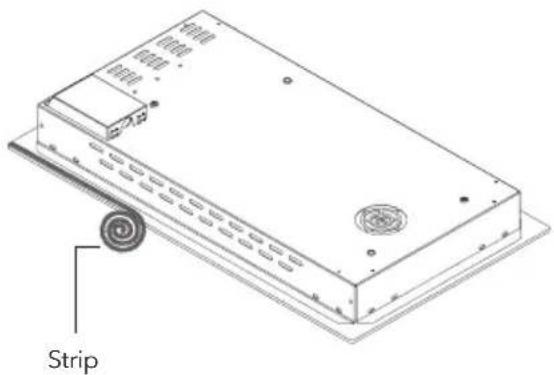
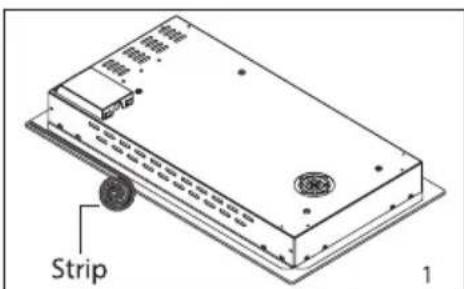
A strip shall be affixed to the bottom of the appliance to prevent substances that may overflow, such as water and oil, from entering the appliance in case of any overflow while cooking and heating. Place the appliance on the drain on the countertop by gently pressing it.
If there is a built-in oven under the appliance, kitchen furniture shall be arranged to allow ventilation.
Installation
When product is mounted on a drawer, if it is possible to touch lower side of product, this section should be separated with a wooden shelf.
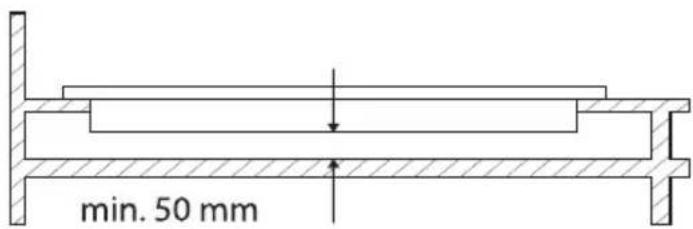
While mounting cooktop on a closet, as shown in the figure above, in order to separate between closet and cooktop, a shelf should be mounted. If it is mounted on a built-in oven, there is no need to do that. If your cooktop will be mounted next to right or left wall, the minimum distance between wall and cooktop should be 50 mm.
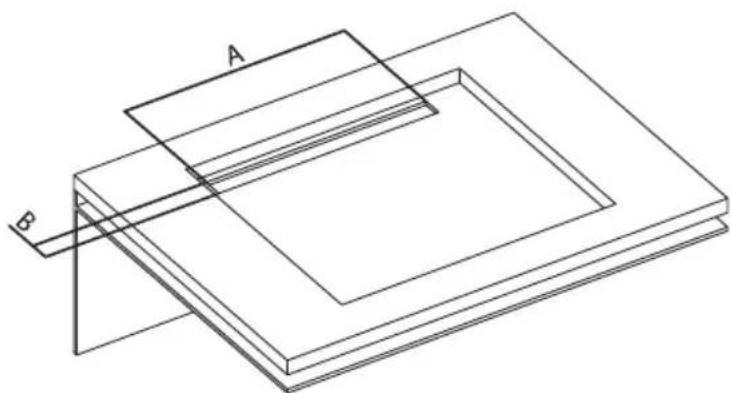
At the back of the furniture as shown below leave a venting gap of 180 cm^2 (450 x 40 mm) is required.
natural_image
Isometric line drawing of a layered structure with labeled points A and B (no text or symbols beyond labels)| A Min. | 450 mm |
| B 40 mm |
Installation Diagram
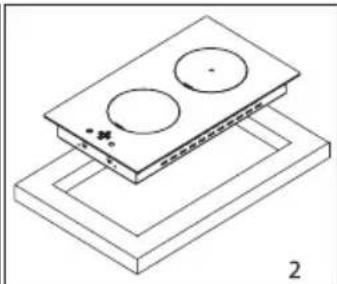
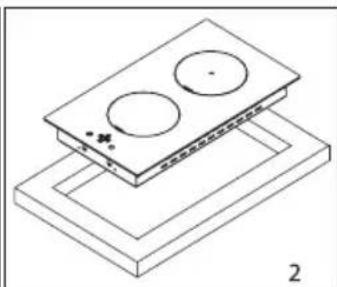
- Turn the cooktop down and place on smooth ground.
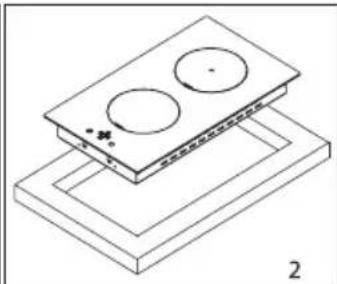
- In order to prevent entrance of foreign substances and liquids between cooktop and counter, apply the paste given in package to the sides of lower guard of counter. For corners, curl paste and increase curls till filling corner gaps.
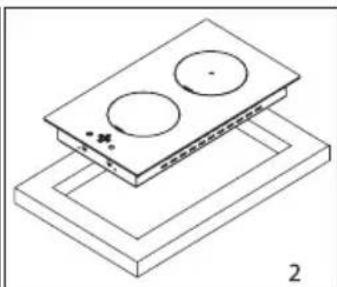
- Turn cooktop again and align with and place on counter.
- Fasten up your cooktop on counter by using the clamp and screws supplied.
natural_image
Isometric line drawing of a layered electronic component with two circular holes and a base plate (no text or symbols)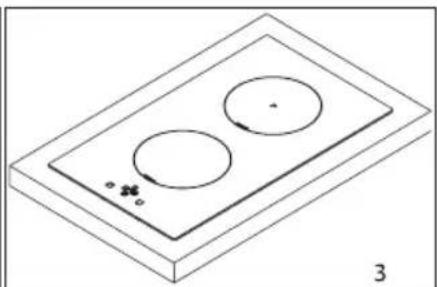
natural_image
Isometric line drawing of a two-circled appliance with base and top components, no text or symbols present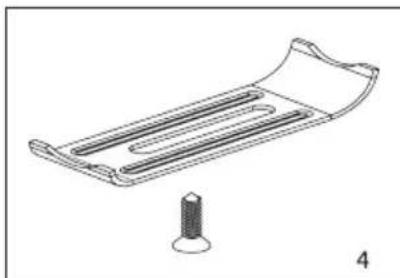
natural_image
Technical line drawing of a mechanical component with a base and pin (no text or symbols)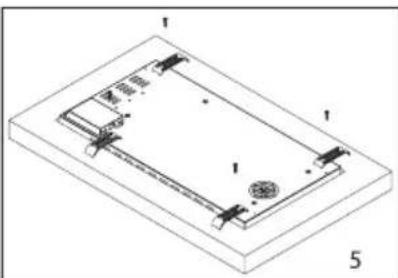
natural_image
Isometric technical drawing of a rectangular electronic device with labeled components (no text or symbols)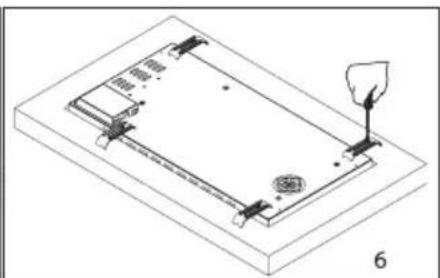
natural_image
Isometric technical diagram of a mechanical assembly with no visible text or symbols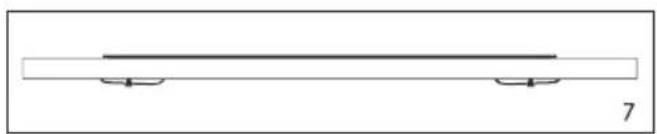
natural_image
Simple line drawing of a horizontal beam with two supports at one end, labeled '7' (no text or symbols on the beam itself)Counter Cut-Off Sizes
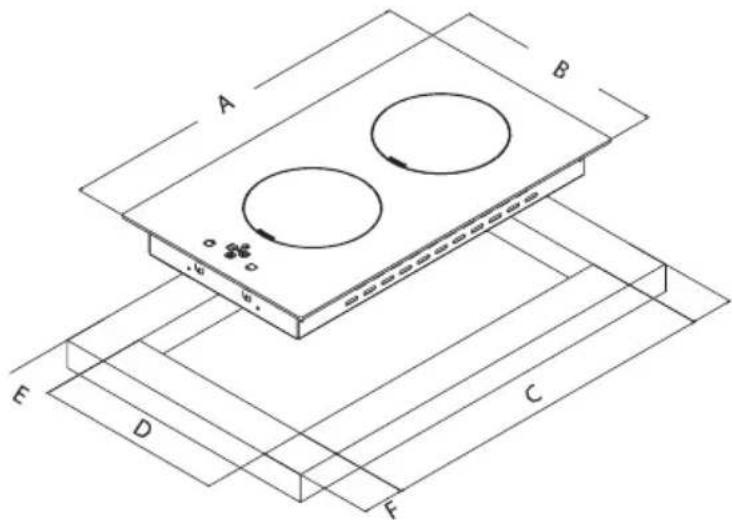
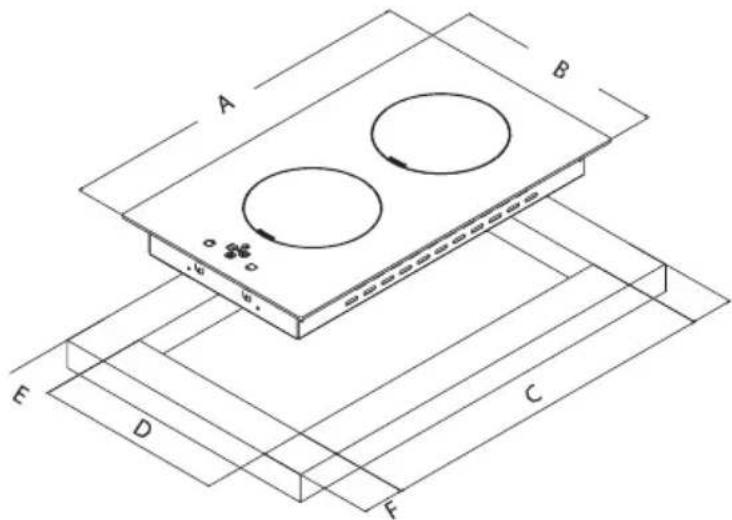
Note the following values while installing your stove or cutting the counter.
The gap on which the hob is placed must be cut in accordance with the dimensions of hob installation.
| A 520 mm | |
| B 300 mm | |
| C 490 mm | |
| D 260 mm | |
| E | Min. 60 mm |
| F | |
USING YOUR APPLIANCE
- To turn the device on and off, press and hold the on/off button until you hear a "beep". When the unit is turned on, the heat zone indicators shall be displayed.
- The controls react to touching, so you do not need to apply any pressure to the controls.
- Place a suitable pot, pan, etc. on the cooking area that you want to use.
- Make sure that the base of the pot, pan, etc. you have placed and the surface of the cooking area are clean and dry.
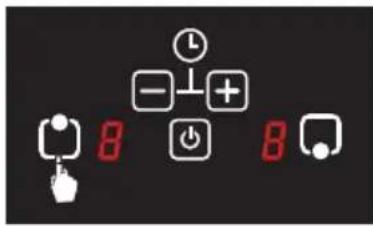
- When you touch the heating zone selection control, the indicator next to the key you are touching shall flash.
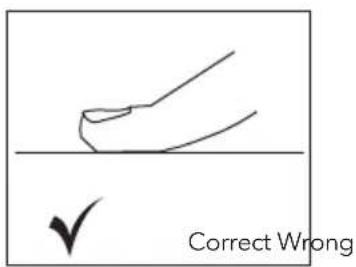
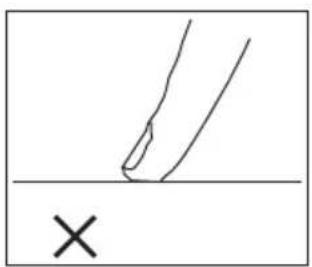
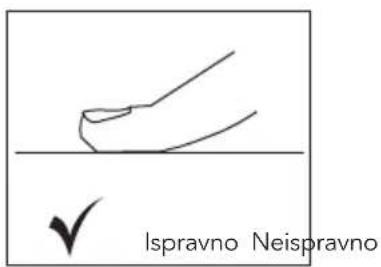
- Use the bottom, not the tip of your finger while using the device. You shall hear a "beep" at every touch.
natural_image
Simple line drawing of a hand holding a tool above a horizontal line with a cross mark below (no text or symbols)- Make sure that the touch controls are always clean and dry. Even a thin layer of water may make it difficult for touch controls to work.
Selection Of The Right Pot
-
Place suitable amount of food to the pots and pans. Thus, you may prevent overflowing of meals and avoid unnecessary cleaning.
-
Do not use containers that are unstable and that may be easily tipped over on the cooktop.
-
Do not put empty pots and pans on the hobs with their flames on.
-
Do not put containers that may be affected by heat on the product.
-
Do not operate the hobs without any pots and pans placed on them.
-
Do not place the lids of the pots and pans on the hobs.
-
Keep the lid of container you use for heating oil open.
-
Do not put oil with a volume more than one third of the pan. Do not leave the oil unattended when the oil is being heated. Extremely hot oils may cause fire.
-
Use pots and pans with machined bases only. Sharp edges cause scratches on the surface.
-
Glass, ceramic and earthen pots, copper- or aluminium-based non-magnetic stainless steel pots shall not be used.
-
Put the suitable pots by centering them on the hobs.

natural_image
Four identical line drawings of cooking pots with handles, shown in different orientations (no text or symbols)INCORRECT INCORRECT INCORRECT CORRECT
- Do not use pots with concave or convex bases.

natural_image
Three identical line drawings of cooking pots with crossed handles, no text or symbols presentINCORRECT INCORRECT CORRECT
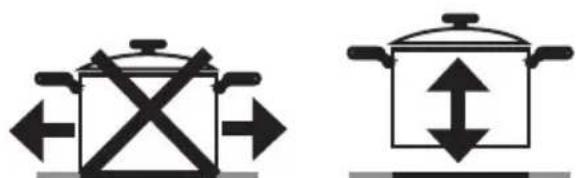
- When you want to put the pot on another hob, take the pot up and place it again instead of sliding it.
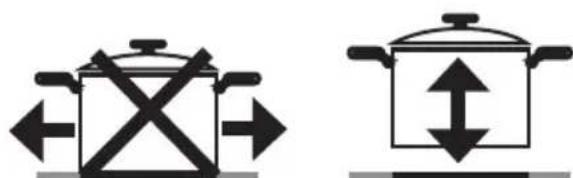
natural_image
Two identical black-and-white line drawings of a cooking pot with directional arrows, no text or symbols present.INCORRECT CORRECT
- You may use steel, teflon or special magnet-based aluminium cookware with a label or warning that indicates it is compatible for induction on your induction stove.
- You can check if the pot is suitable for the induction stove. Move a magnet towards the base of the pot. If it is pulled, your pot is suitable for an induction stove.
- It is important that you use metal cookware specially designed and / or approved for induction stoves.

WARNING!
Do not allow melamine or plastic containers to come into contact with the heating zones.
Cooking Applications
Use your appliance at a suitable heating setting for cooking.
| Heating adjustment Usage | |
| 0 Off | |
| 1-3 Keeping hot | |
| 4-5 Slow heating/cooking | |
| 6-7 Reheating, fast cooking | |
| 8 Boiling | |
| 9 Maximum level | |
| P Maximum power |

CAUTION!
Information on the table above is only for guidance.
Hobs
| Big hob Small hob | |
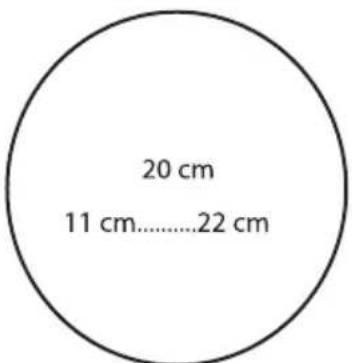 | 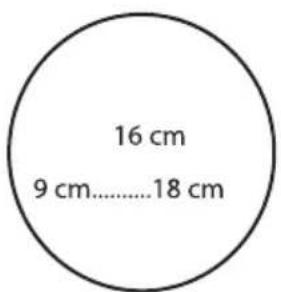 |
| Fits automatically to the pot.Distributes the power in the most appropriate way.Provides excellent heat dissipation.You may cook small or large portions of crepes,fish, etc. | Slow cooking (sauces, creams, etc.)Preparation of small portions or portions for one person. |

CAUTION!
Cooking information provided on the table are for informative purposes only.
30 CM INDUCTION STOVE ELECTRONIC CARD MANUAL
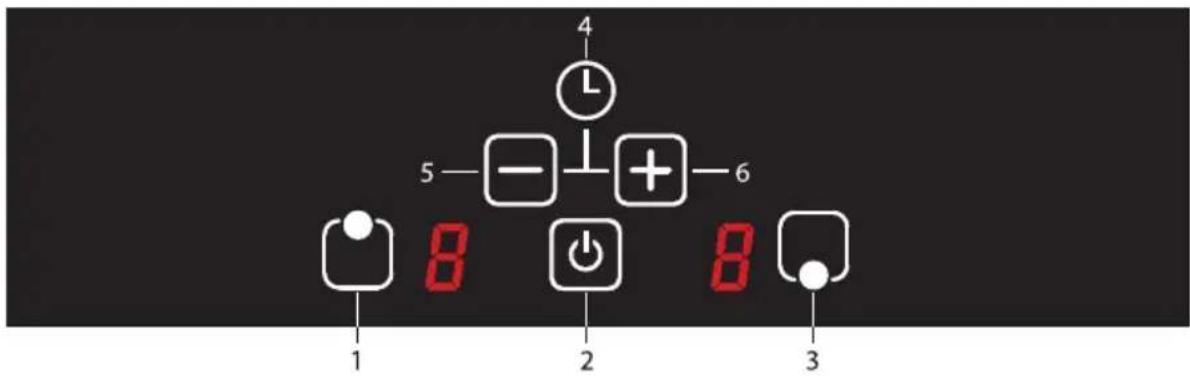
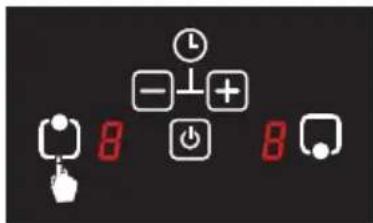
- Upper cooking area key
- ON/OFF button
-
Lower cooking area key
-
Timer function
- Temperature and timer minus key
- Temperature and timer plus key

NOTE
Unit becomes operational within 1 second after it is plugged to the mains. All LEDs and displays illuminate for 1 second.
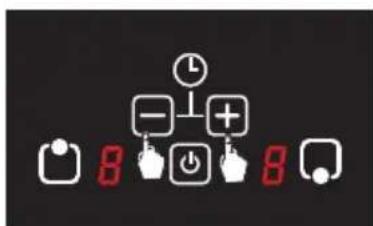
Turning the appliance on
The unit is switched on by pressing the on/off ( 🔍 button. The symbol is displayed on all displays. If the temperature of the glass over the hobs is above +60°C, H and symbols are displayed on the display of the relevant hob successively. ( H = 0.5 seconds, I = 0.5 seconds)
Turning the appliance off
The unit is switched off by pressing the on/off ( ⏻ ) button. You may switch off the appliance by pressing the ( ⏻ ) key even if the child lock is activated.

WARNING!
- Appliance remains active for 20 seconds. If there is no cooking level or selected timer in this time interval, the appliance shall automatically switch to "off mode" with a beep.
- If symbol is flashing on any of the displays of the hob, the hob switches off automatically when the symbol disappears.
Residual heat indicator H
If symbol is flashing on the displays of the relevant hobs it means the relevant hob is still hot. It can be used to heat a small amount of food.

WARNING!
- Residual heat display does not light up, and thus warn the user against heat in case of a power outage.
- The residual heat indicator of each cooking zone remains active until the measured glass temperature is lower than +60 °C.
Turning the Stove Cooking Areas (Hobs) On
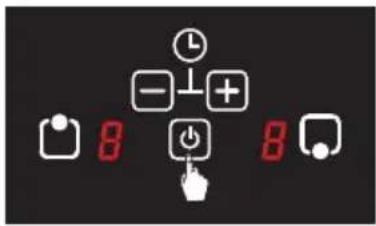
- The stove is turned on by pressing the on/off ( ⏻ ) button.
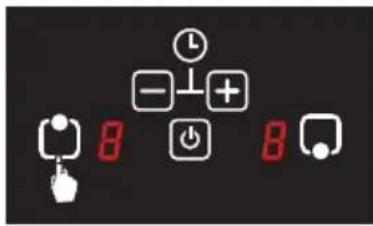
- Select the hob you want to cook on.
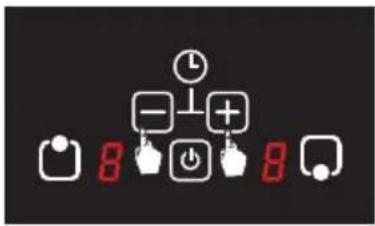
- Power level of the selected hob may be set from 1 to 9 using the minus (☐) and plus (⊕) buttons.
Turning the Stove Cooking Areas (Hobs) Off
A selected hob may be turned off in 3 ways
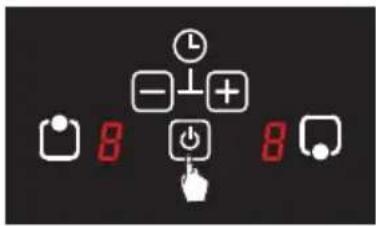
- The selected hob may be turned off by pressing the on/off( ⏻ ) button.
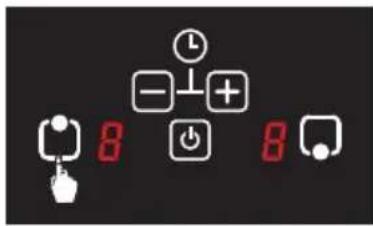
- Select the relevant hob.
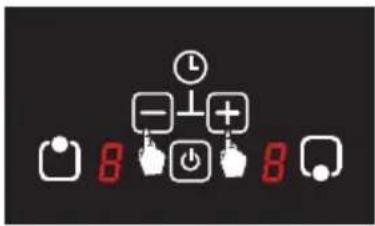
Bring the temperature level of the selected hob to zero (☐) using the minus (—) and plus (+) buttons.

WARNING!
The Symbol flashes on the displays of the relevant hobs, if the relevant hobs are still hot. The symbol is displayed if the relevant hob is not hot.
- Selected hob may be turned off by setting a timer. When the set time has expired, the hob set by the timer automatically switches off with a beep.
Child Lock Function (optional)
Child lock may be activated to prevent unintended use.
To activate the child lock
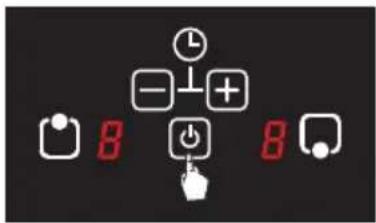
- The stove is turned on by pressing the on/off (💡) button.
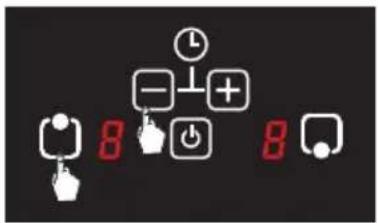
- Press the upper cooking area selection key (☐) and the minus (☐) key simultaneously.
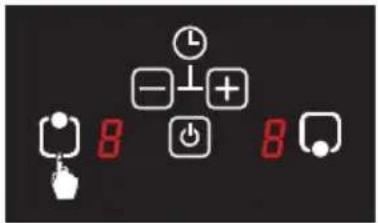
- Then, press the upper cooking area selection key (💡) again.
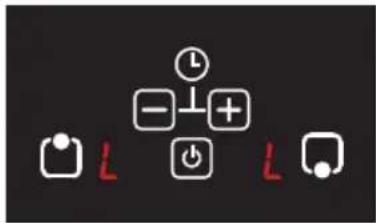
- The L symbol is displayed on all displays, and thus the child lock is activated.

WARNING!
- When the child lock is activated, all buttons except the on/off ( ⏻ ) button are deactivated. Cooking is not possible in this case.
- Child lock may not be activated if there is a cooking operation active at present.
To deactivate the child lock
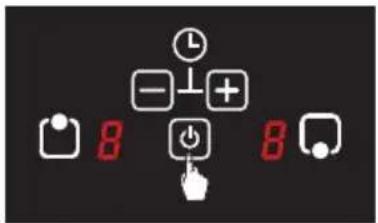
- The stove is turned on by pressing the on/off ( ⏻ ) button.
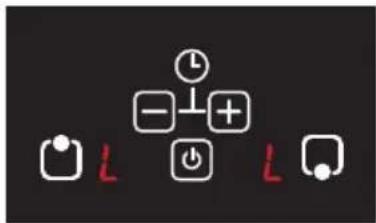
- The symbol is displayed on all displays.
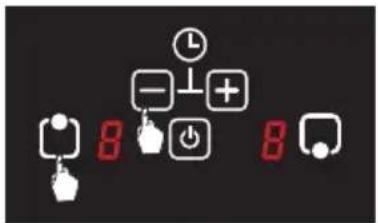
- Press the upper cooking area selection key (☐) and the minus (☐) key simultaneously.
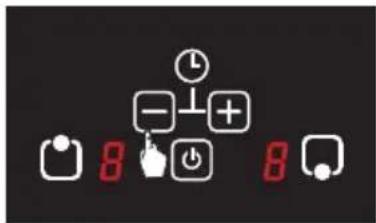
- Then, the minus (☐) button is pressed again, and the stove is turned off automatically. Child lock shall be deactivated when the stove is turned on again.
Timer function
There are two types of timer functions.
1. Independent Timer Function
It may be set when neither of the hobs' setting mode is inactive. It may be used as an alarm, too. Independent timer continues to operate when any cooking area is started to be used (level > 0).
To set the independent timer
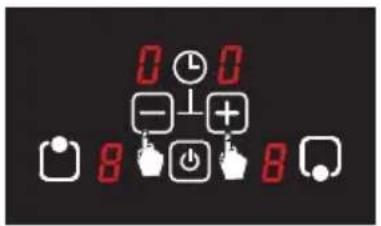
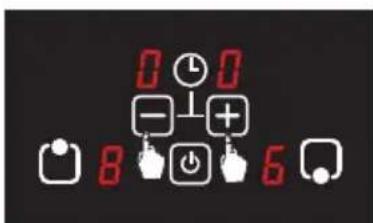
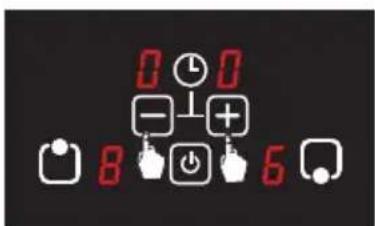
- Press the minus ⏚ and plus ( ) + ittons simultaneously for 3 seconds and ensure that 00 flashes on the timer display.
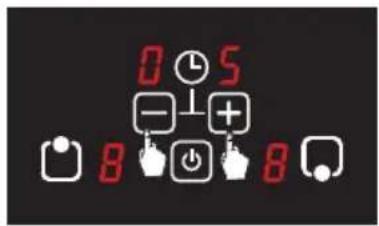
-
Time may be set from 1 to 99 minutes using the minus (■) and plus (+) buttons.
-
Countdown starts with the final setting after the timer is set. After 5 seconds, timer selection ends automatically and the timer display indicates the set time value.
To change the time for independent timer
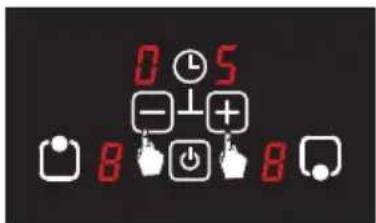
Time may be set from 1 to 99 minutes again by pressing the minus (☐) and plus (+buttons simultaneously for 3 seconds.
A buzzer sounds and the timer display flashes as 00 after the set time has expired. Just press any button on the touchscreen panel once to stop the buzzer.

WARNING!
- Buzzer ends automatically after 2 minutes when no key is touched.
- Turning the stove off (by pressing on/off ( ⏻ ) button) stops the independent timer. Timer does not resume when the stove is turned on.
2. Cooking Area Timer Function
To set the cooking area timer
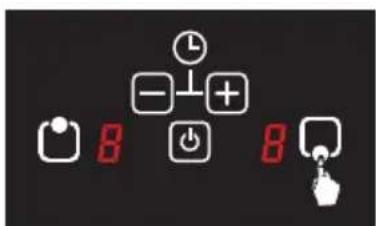
- Select the relevant hob to be set while the stove is on.
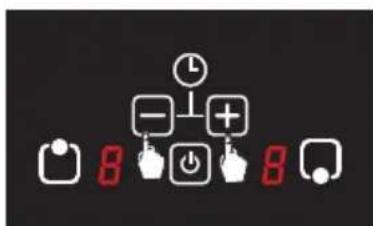
- Set the selected hob to the desired level between 1 and 9 using the minus(☐) and plus(⊕) buttons.
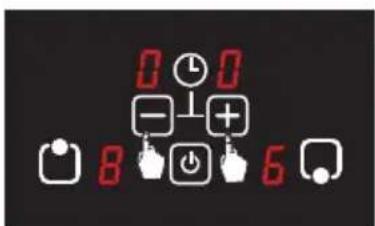
- The desired time is set using minus (☐) and plus (☑) buttons. when the temperature level is flashing (for 5 seconds).


The point next to the temperature level on the hob, for which the remaining time is being displayed, flashes.
- A buzzer sounds and the programmed cooking area finishes the cooking function after the set time has expired. The symbol is displayed or the H symbol flashes on the display if the cooking area is hot.

WARNING!
If more than one timer is available, timer display indicates the lowest remaining time value after the 5-second setting period. The point next to the hob, for which the remaining time is being displayed, flashes on the timer.
Pot identification / focusing (There is No Pot Warning)

In induction cooking, energy is formed only on the area covered by the bottom of the pot on the relevant hob. Base of the pot is detected by the induction system.
Cooking stops if there is no pot (either there is no pot or the pot is not induction- compliant) when the cooking is started or if the pot is removed from the hob while cooking. There is no pot warning ( ) is displayed on the touchscreen panel for the relevant hob after 5 seconds.
There is no pot warning lasts 60 seconds. If there is no pot on the hob when this time has expired, cooking area is turned off automatically and the panel displays the symbol or the symbol if the cooking area is hot.
High power function (boost)
You may use the high power function (boost) for faster cooking.
To activate the boost function
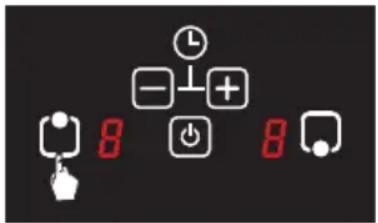
- Select the relevant hob where the boost function shall be activated.
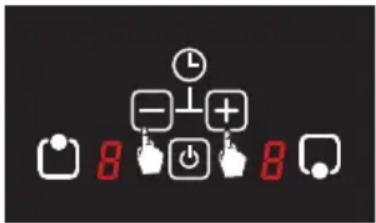
- Set the power level of the selected hob to the desired level between 1 and 9 using the minus (☐) and plus (+buttons.
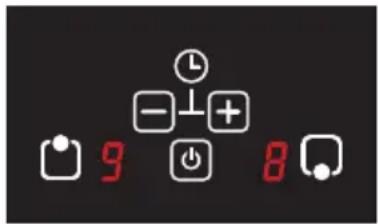
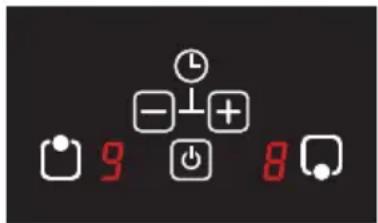
- Bring the selected hob to level 9.
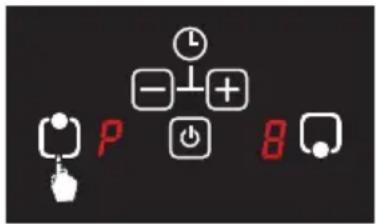
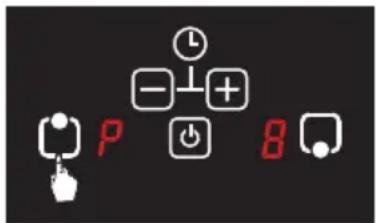
- Press one more time to the selected hob to see the P symbol on the display of the relevant hob and thus activating the boost function.

WARNING!
Maximum duration of the boost function is 5 minutes. When this time is expired, the selected hob resumes cooking operation at the 9th temperature level.
To deactivate the boost function
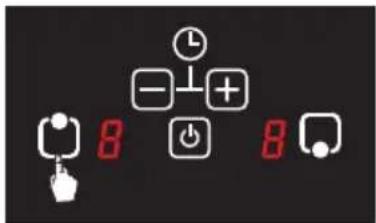
- Select the relevant hob where the boost function shall be deactivated.
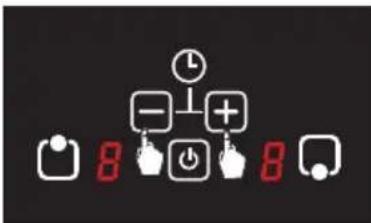
- Set the power level of the selected hob between 1 and 9 using theminus( - ) and plus( + ) buttons.
Error Codes And Recommended Solutions
The table below provides the error codes, possible causes and recommended solutions for these codes.
| Error Code Possible Cause What to do | ||
| ER03 | Pressing more than one buttons at the same time. | Turn off the cooker. Clean the touchscreen panel and try again after turning the stove on. |
| ER22 | Touch buttons are not detected by the circuit or short circuit error on the button analysis. | Contact the manufacturer. |
| ER20 Flash error. Contact the manufacturer. | ||
| ER47 | Communication wire is not installed incorrectly or mid-level card is different. | Contact the manufacturer. |
| E2 Excessive temperature. | Restart cooking again after the hob is cooled. | |
| E3 IGBT error. Contact the manufacturer. | ||
| E5 / E6 | Network frequency is out the permitted frequency range. | Check the connection. |
| E8 Fan error. Contact the manufacturer. | ||
| E9 Temperature sensor error. Contact the manufacturer. | ||
CLEANING AND MAINTENANCE OF THE APPLIANCE
- Always unplug the appliance before starting any maintenance or cleaning. Wait until the stove cools down if it is hot.
- Do not use abrasive clothes, spray cleaners or sharp objects for the cleaning of the glass tray.
- Clean remains of burnt food with a damp, soapy cloth. Dust on the surface shall be cleaned with a damp cloth.
- Discolourations that may occur on the ceramic glass surface do not affect the functional structure and permanence of the glass. Discolouration is not caused by a change in the material, but it is due to the fact that burnt remains on the surface are not cleaned, that the pots used wear the glass surface and that unsuitable cleaning materials are used.
- To ensure that your stove has a long economic life, it shall be regularly cleaned and maintained.
- Do not clean your stove with hard tools such as a hard brush, steel wool or a knife. Do not use abrasive and acidic materials or detergents.
- After cleaning the parts of the appliance with a soapy cloth, rinse and dry them thoroughly with a soft cloth.
- Clean glass surfaces with special glass cleaning materials. Do not use abrasive cleaners or sharp metal scrapers to clean the glass surfaces as the scratching of the glass surfaces may cause the glass to break.
- Do not clean your stove using steam cleaners.
- Do not use flammable materials such as acids, thinner or gas to clean your stove.
- Do not wash any component of your stove in a dishwasher.
- Quickly clean any material containing vinegar, lemon, salt, coke and similar acids and alkalines that spill over your stove.
RECOMMENDATIONS FOR ENERGY SAVING
- Induction cooking zones automatically adapts to the size of the pot base to some extent.
- Place the pot in the cooking zone before turning the heater on. The induction heaters have a sensor that detects the presence of a pot.
- Use pots with their lids closed to shorten the cooking times.
- Lower the heating setting when it starts to boil. Do not exceed the amount of water and oil to shorten the cooking time.
- Use your appliance at a suitable heating setting for cooking.
HANDLING RULES
- Handle and transport in the original packaging.
- Pay maximum attention to the appliance while loading / undloading and handling.
- Make sure that the packaging is securely closed during handling and transportation.
- Protect the appliance from external factors (such as humidity, water, etc.) that may damage the packaging.
- Be careful not to damage the appliance due to bumps, crashes, drops, etc. while handling and transporting and not to break or deform it during operation.
TROUBLESHOOTING
You may solve the problems you may encounter with your product by checking the following points before calling the technical service.
If The Appliance Does Not Operate
- Check if power cable of cooktop is plugged in.
- Examine with safe ways if electric exists on network.
- Auditfuses.
- Control whether damage is available on power cable.
ENVIRONMENTALLY-FRIENDLY DISPOSAL
natural_image
Symbol of a trash bin crossed with no text or labels, representing environmental restriction (no text present)Dispose of packaging in an environmentally-friendly manner.
This appliance is labelled in accordance with European Directive 2012/19/EU concerning used electrical and electronic appliances (waste electrical and electronic equipment - WEEE).
The guideline determines the frame work for the return and recycling of used appliances as applicable throughout to the EU.
PACKAGE INFORMATION
Packaging materials of the product are manufactured from recyclable materials in accordance with our National Environment Regulations. Do not dispose of the packaging materials together with the domestic or other wastes. Take them to the packaging material collection points designated by the local authorities.
Poštovani korisniče,
Zahvaljujemo Vam što ste odabrali naš proizvod.
Preporučujemo Vam da pažljivo pročitate ovo uputstvo za upotrebu i da Vam uvijek bude pri ruci tokom upotrebe ploče za kuhanje, tako da možete da održavate njen kvalitet na nivou, na kom je bio prvog dana kada ste je kupili i da Vas služi na najefikasniji način.

NAPÓMENA
Ovo uputstvo za upotrebu je sačinjeno za različite modele. Neke od funkcija navedenih u uputstvu možda ne postoje na vašem uređaju. Te funkcije su označene sa (*).
Naši uređaji su dizajnirani isključivo za kućnu upotrebu. Nisu za profesionalnu upotrebu.
MOLIMO VAS PROČITAJTE UPUTSTVO PRIJE NEGO ŠTO INSTALIRATE ILI KORISTITE OVAJ UREĐAJ.
natural_image
Isometric line drawing of a layered structure with labeled points A and B (no text or symbols beyond labels)| A Min. | 450 mm |
| B 40 mm |
Skice za instalaciju
- Okrenite ploču za kuhanje i postavite je na glatku površinu.
- Da bi se spriječio ulaz stranih supstanci i tečnosti između ploče za kuhanje i šporeta, nanesite zaptivač koju ste dobili uz uređaj na stranu donje ivice radne površine. Za uglove, koristite veću količinu zaptivača kako bi u potpunosti ispunili ugaone praznine.
- Ponovo okrenite ploču za kuhanje, poravnajte je i postavite na kuhinjsku radnu površinu.
- Pričvrstite Vašu ploču za kuhanje na kuhinjsku radnu površinu pomoću priložene stezaljke i vijaka.
5
natural_image
Isometric diagram of a layered electronic component with two circular holes and a base plate (no text or symbols)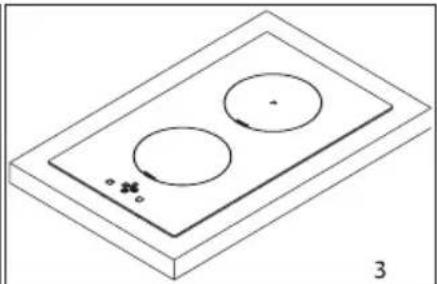
natural_image
Isometric line drawing of a two-circled appliance with base and top plates, no text or symbols present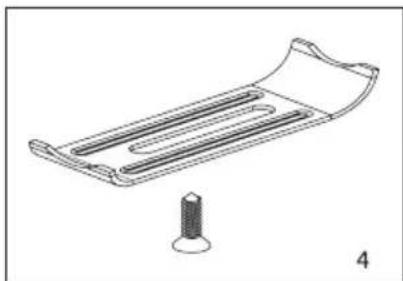
natural_image
Technical line drawing of a mechanical component with a screw and curved plate (no text or symbols)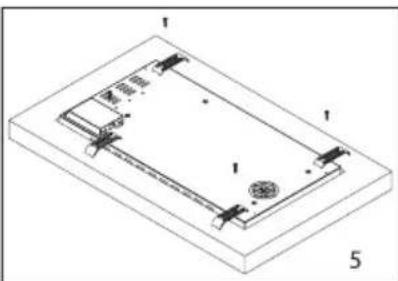
natural_image
Isometric technical drawing of a rectangular electronic component with labeled parts (no text or symbols present)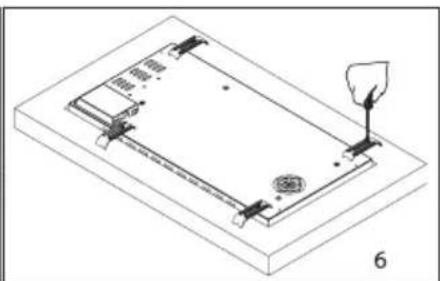
natural_image
Isometric technical diagram of a mechanical assembly with no visible text or symbols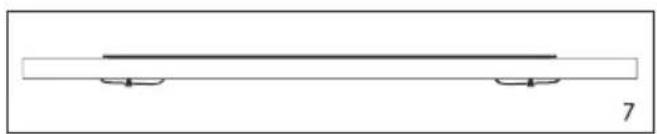
natural_image
Simple line drawing of a horizontal beam with two supports at one end, labeled '7' (no text or symbols on the beam itself)Instalacija ploče za kuhanje na kuhinjsku radnu površinu
natural_image
Simple line drawing of a hand holding a tool above a horizontal line with a cross mark below (no text or symbols)- Pobrinite se da kontrole na dodir uvijek budu čiste i suhe. Čak i sloj vode može otežati rad kontrola na dodir.
Izbor odgovarajuće posude za kuhanje
-
Stavite odgovarajuću količinu hrane u posude i tiganje. Na taj način možete spriječiti prelivanje obroka i izbjeći nepotrebno čišćenje.
-
Nemojte koristiti posude koji su nestabilne i koje se lako mogu prevrnuti na ploči za kuhanje.
-
Ne stavljajte prazne posude i tiganje na uključene ploče za kuhanje.
-
Nemojte stavljati posude na koje može uticati toplota.
-
Nemojte koristiti ploče za kuhanje bez posuda i tiganja.
-
Ne stavljajte poklopce posuda i tiganja na ploče za kuhanje.
-
Prilikom zagrijavanja ulja ne poklapajte posudu poklopcem.
-
Ne stavljajte ulje u zapremini većoj od jedne trećine posude. Ne ostavljajte ulje bez nadzora dok se zagrijava. Izuzetno vruća ulja mogu izazvati požar.
-
Koristite samo posude i tiganje koji su mašinski obrađeni. Ostre ivice mogu da prouzrokuju ogrebotine na površini ploče.
-
Ne smiju se koristiti posude od stakla, keramike i zemljane posude, posude od bakra ili aluminijuma.
-
Stavite pogodne posude tako što ćete ih nacentrirati na ploče.

natural_image
Four identical line drawings of cooking pots with handles, shown in different orientations (no text or symbols)NEPRAVILNO NEPRAVILNO NEPRAVILNO PRAVILNO
- Ne koristite posude sa konkavnim ili konveksnim dnom.

natural_image
Three identical line drawings of cooking pots with crossed handles, no text or symbols presentNEPRAVILNO NEPRAVILNO PRAVILNO
- Kada želite da stavite posudu na drugu ploču, podignite posudu i stavite je ponovo, umjesto da je gurnete.
natural_image
Two identical line drawings of cooking pots with directional arrows indicating movement (no text or symbols)NEPRAVILNO PRAVILNO
- Možete koristiti čelik, teflon ili specijalno aluminijumsko posuđe na bazi magneta sa oznakom ili upozorenjem koje ukazuje da je kompatibilan za indukciju na Vašem indukcionom šporetu.
- Možete provjeriti da li je posuda pogodna za indukcioni šporet. Pomjerite magnet prema dnu posude. Ako se povuče, posuda je pogodna za indukcioni šporet.
- Važno je da koristite metalnu posudu za kuhanje posebno dizajniranu i / ili odobrenu za indukcione šporete.

UPOZORENJE!
- Šporet se uključuje pritiskom na on/off ( ⏻ ).
- Izaberite ploču za kuhanje na kojoj želite da kuhate.
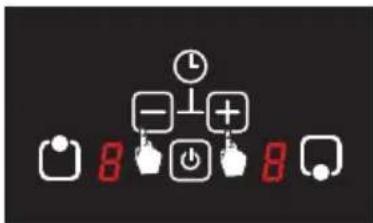
- Nivo snage izabrane ploče za kuhanje može se podesiti od 1 do 9 pomoću (■) minus i (+) plus tastera.
Podesite nivo temperature odabrane ploče na nulu (0) pomoću minus (−) i plus (+) tastera.

UPOZORENJE!
- Šporet se uključuje pritiskom na on/off ( ⏻ ) taster.
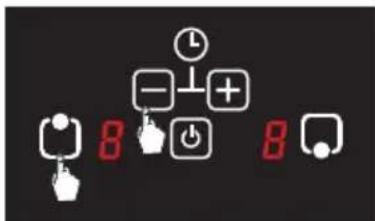
- Istovremeno pritisnite (☐) taster za izbor gornje zone za kuhanje i (☐) taster minus.
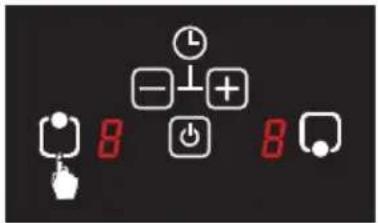
- Zatim ponovo pritisnite (L) taster za izbor gornje zone za kuhanje.
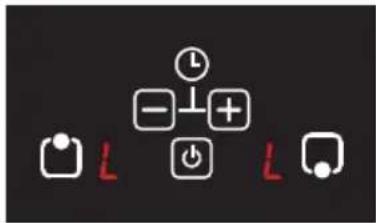
- Simbol se prikazuje na svim ekranima i blokada za djecu je aktivirana.

UPOZORENJE!
- Šporet se uključuje pritiskom na on/off ( ⏻ ) taster.
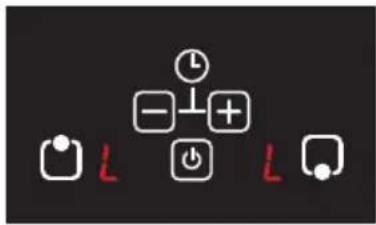
- Istovremeno pritisnite (☐) taster za izbor gornje zone za kuhanje i (—) taster minus.
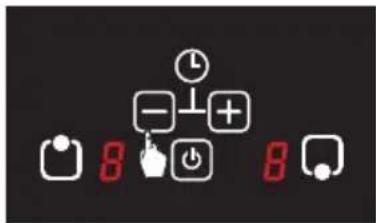
- Potom pritisnite (☐) taster minus ponovo, i šporet se automatski isključuje. Blokada za djecu se deaktivira kada se šporet ponovo uključi.
Funkcije tajmera
Postoje dvije vrste funkcija tajmera.
1. Funkcija nezavisnog tajmera
Može se podesiti kada nije podešen nijedan režim podešavanja ploče za kuhanje. Također se može koristiti i kao alarm. Nezavisni tajmer nastavlja da radi kada se koristiti bilo koja površina za kuhanje (nivo > 0).
Ukoliko želite da podesite nezavisni tajmer
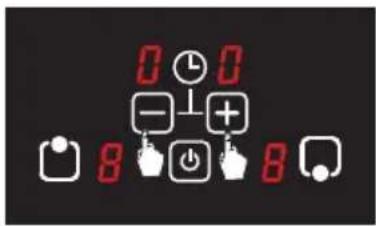
- Pritisnite minus (−)i plus ( )+stere istovremeno na 3 sekunde i provjerite da li 00 treperi na ekranu tajmera.
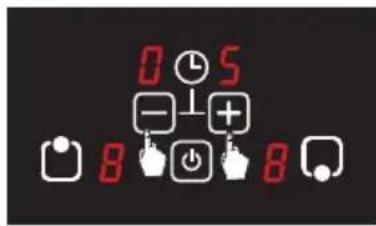
Vrijeme se može podesiti od 1 do 99 minuta ponovo pritiskom na (■) minus i (†plus taster istovremeno na 3 sekunde.
- Podesite odabranu ploču za kuhanje na željeni nivo između 1 i 9 pomoću (■) minus i (+) plus tastera.
-
Željeno vrijeme se podešava pomoću (☐) minus i (☐)astera kada treperi nivo temperature (5 sekundi).
-
- Tačka pored nivoa temperature na ploči za kuhanje, za koju se prikazuje preostalo vrijeme, treperi.
-
Zvučni signal se oglašava i programirana zona za kuhanje završava funkciju kuhanja nakon isteka podešenog vremena. Prikazuje se simbol ili mmbol treperi na ekranu ako je zona za kuhanje vruća.

UPOZORENJE!
Ako je dostupno više od jednog tajmera, ekran tajmera pokazuje najnižu preostalu vremensku vrijednost nakon perioda podešavanja od 5 sekundi. Tačka pored ploče za kuhanje, za koju se prikazuje preostalo vrijeme, treperi na tajmeru.
Identifikacija posude za kuhanje / postavljanje
(ne postoji upozorenje o posudi za kuhanje)

- Podesite nivo snage odabrane ploče za kuhanje na željeni nivo između 1 i 9 pomoću ( — ) minus i ( + plus tastera.
- Podesite odabranu ploču za kuhanje na nivo 9.
- Pritisnite isto još jednom na odabranoj ploči za kuhanje dok se na ekranu ploče za kuhanje ne pojavi simbol i time ste aktivirali funkciju pojačavanja.

UPOZORENJE!
Maksimalno trajanje ove funkcije je 5 minuta. Kada ovo vrijeme istekne, izabrana ploča za kuhanje nastavlja sa radom na 9. nivou temperature.
- Podesite nivo snage izabrane ploče za kuhanje između 1 i 9 pomoću ( - ) minus i ( + ) plus tastera.
natural_image
Symbol of a trash bin crossed with no text or labels, representing environmental restriction (no text present)natural_image
Isometric line drawing of a layered structure with labeled points A and B (no text or symbols beyond labels)| A Min. | 450 mm |
| B 40 mm |
Skice za instalaciju
- Okrenite ploču za kuhanje i postavite je na glatku površinu.
- Da bi se spriječio ulaz stranih supstanci i tekučina između ploče za kuhanje i pečnice, nanesite brtvu koju ste dobili uz uređaj na stranu donjeg ruba radne površine. Za uglove, koristite veću količinu brtve kako bi u potpunosti ispunili ugaone praznine.
- Ponovo okrenite ploču za kuhanje, poravnajte je i postavite na kuhinjsku radnu površinu.
- Pričvrstite Vašu ploču za kuhanje na kuhinjsku radnu površinu pomoću priložene stezaljke i vijaka.
5
natural_image
Isometric diagram of a layered electronic component with two circular holes and a base plate (no text or symbols)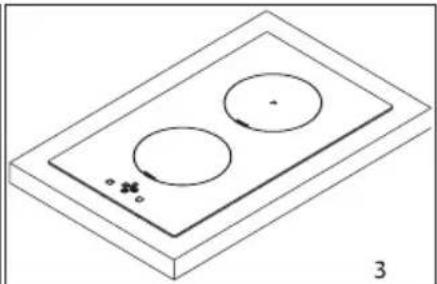
natural_image
Isometric line drawing of a two-circled appliance with base and top plates, no text or symbols present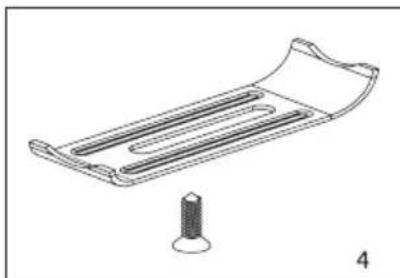
natural_image
Technical line drawing of a mechanical component with a base and pin (no text or symbols)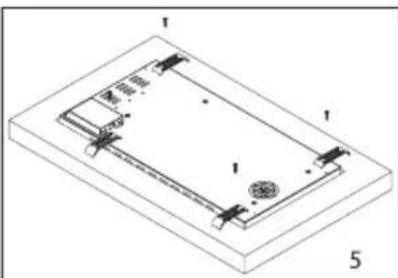
natural_image
Isometric technical drawing of a rectangular electronic device with labeled components (no text or symbols)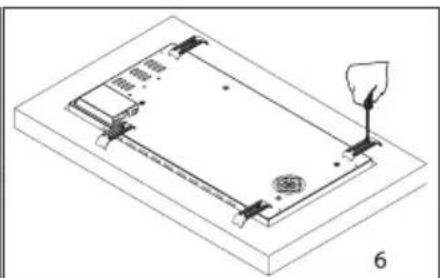
natural_image
Isometric technical diagram of a mechanical assembly with no visible text or symbols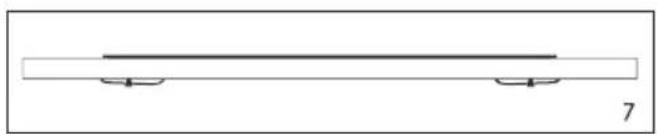
natural_image
Simple line drawing of a horizontal beam with two supports at one end, labeled '7' (no text or symbols on the beam itself)Instalacija ploče za kuhanje na kuhinjsku radnu površinu
Obratite pažnju na sljedeće vrijednosti prilikom ugradnje ploče za kuhanje ili rezanja kuhinjske radne površine. Otvor u koji se postavlja ploča za kuhanje mora se izrezati u skladu sa dimenzijama instalacije za ploče za kuhanje.
| A 520 mm | |
| B 300 mm | |
| C 490 mm | |
| D 260 mm | |
| E | Min. 60 mm |
| F | |
KORIŠTENJE VAŠEG UREĐAJA
- Da bi ste uključili i isključili uređaj, pritisnite i držite on/off tipku dok ne čujete „bip“. Kada se jedinica uključi, indikatori toplinske zone će biti prikazani.
- Kontrole reagiraju na blag dodir, tako da ne morate vršiti pritisak na kontrole.
- Stavite odgovarajuću posudu, tavu, itd. na mjesto za kuhanje koje želite da koristite.
- Obratite pažnju da su baza na koju ste postavili posude, tavu, itd. i površina prostora za kuhanje čisti i suhi.
- Kada dodirnete tipku za izbor toplinske zone, indikator pored tipke koji dodirujete će treptati.
- Koristite donji dio jagodice prsta, a ne vrh jagodice prsta dok koristite uredaj. Pri svakom dodiru ćete čuti „bip”.
natural_image
Simple line drawing of a hand holding a tool above a horizontal line with a cross mark below (no text or symbols)- Pobrinite se da kontrole na dodir uvijek budu čiste i suhe. Čak i sloj vode može otežati rad kontrola na dodir.
HR
Izbor odgovarajuće posude za kuhanje
-
Stavite odgovarajuću količinu hrane u posude i tave. Na taj način možete spriječiti preljevanje obroka i izbjeći nepotrebno čišćenje.
-
Nemojte koristiti posude koji su nestabilne i koje se lako mogu prevrnuti na ploči za kuhanje.
-
Ne stavljajte prazne posude i tave na uključene ploče za kuhanje.
-
Nemojte stavljati posude na koje može uticati toplina.
-
Nemojte koristiti ploče za kuhanje bez posuda i tava.
-
Ne stavljajte poklopce posuda i tava na ploče za kuhanje.
-
Prilikom zagrijavanja ulja ne poklapajte posudu poklopcem.
-
Ne stavljajte ulje u zapremini većoj od jedne trećine posude. Ne ostavljajte ulje bez nadzora dok se zagrijava. Izuzetno vruća ulja mogu izazvati požar.
-
Koristite samo posude i tave koji su strojno obrađeni. Oštri rubovi mogu prouzrokovati ogrebotine na površini ploče.
-
Ne smiju se koristiti posude od stakla, keramike i zemljane posude, posude od bakra ili aluminijuma.
-
Stavite pogodne posude tako što ćete ih nacentrirati na ploče.

NEPRAVILNO NEPRAVILNO NEPRAVILNO PRAVILNO
- Ne koristite posude sa konkavnim ili konveksnim dnom.
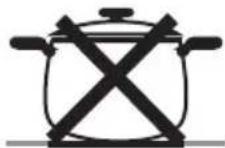
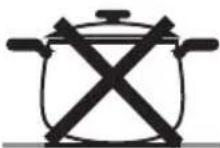
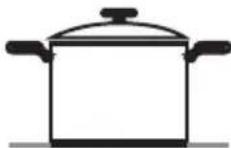
NEPRAVILNO NEPRAVILNO PRAVILNO
- Kada želite da stavite posudu na drugu ploču, podignite posudu i stavite je ponovo, umjesto da je gurnete.
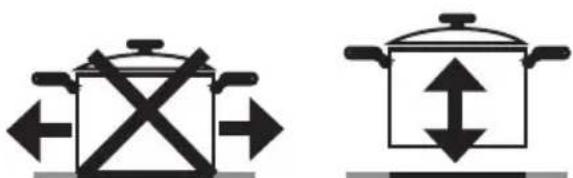
NEPRAVILNO PRAVILNO
- Možete koristiti čelik, teflon ili specijalno aluminijumsko posuđe na bazi magneta sa oznakom ili upozorenjem koje ukazuje da je kompatibilan za indukciju na Vašem indukcijskoj peči.
- Možete provjeriti da li je posuda pogodna za indukcijsku peč. Pomaknite magnet prema dnu posude. Ako se povuče, posuda je pogodna za indukcijsku pečnicu.
- Važno je da koristite metalnu posudu za kuhanje posebno dizajniranu i / ili odobrenu za indukcijske pečnice.

UPOZORENJE!
- Pečnica se uključuje pritiskom na on/off ( ⏻ ).
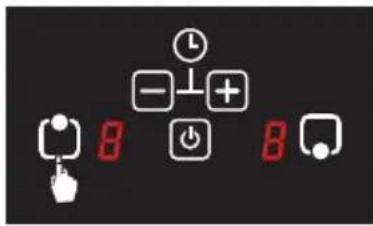
- Izaberite ploču za kuhanje na kojoj želite kuhati.
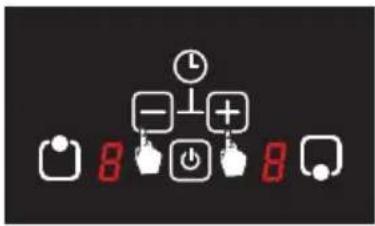
- Nivo snage izabrane ploče za kuhanje može se podesiti od 1 do 9 pomoću (■) minus i (+) plus tipke.
- Izaberite odgovarajuću ploču za kuhanje.
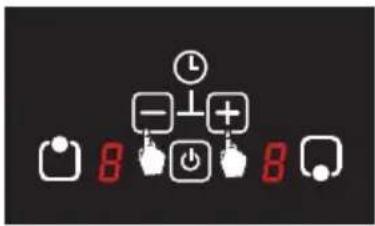
Podesite nivo temperature odabrane ploče na nulu (☐) pomoću minus (—) i plus (+) tipke.

UPOZORENJE!
- Pečnica se uključuje pritiskom na on/off ( ⏻ ) tipku.
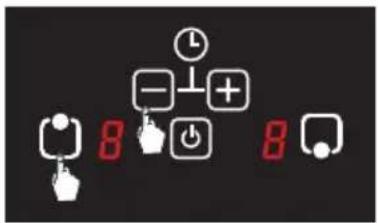
- Istovremeno pritisnite (☐) tipku za izbor gornje zone za kuhanje i (☐) tipku minus.
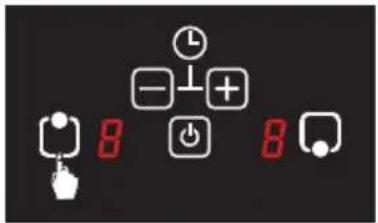
- Zatim ponovo pritisnite (tipku za izbor gornje zone za kuhanje.
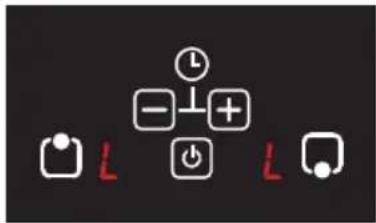
- Simbol se prikazuje na svim ekranima i blokada za djecu je aktivirana.

UPOZORENJE!
- Pečnica se uključuje pritiskom na on/off ( ⏻ ) tipku.
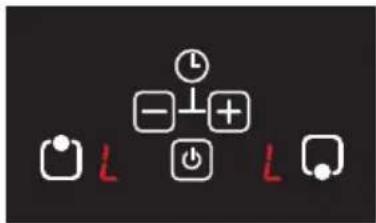
- Istovremeno pritisnite (☐) tipku za izbor gornje zone za kuhanje i (☐) tipku minus.
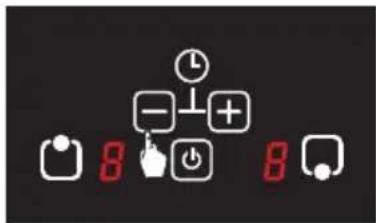
- Potom pritisnite (☐) tipku minus ponovo, i pečnica se automatski isključuje. Blokada za djecu se deaktivira kada se šporet ponovo uključi.
Funkcije tajmera
Postoje dvije vrste funkcija tajmera.
1. Funkcija nezavisnog tajmera
Može se podesiti kada nije podešen nijedan režim podešavanja ploče za kuhanje. Također se može koristiti i kao alarm. Nezavisni tajmer nastavlja da radi kada se koristiti bilo koja površina za kuhanje (nivo > 0).
Ukoliko želite da podesite nezavisni tajmer
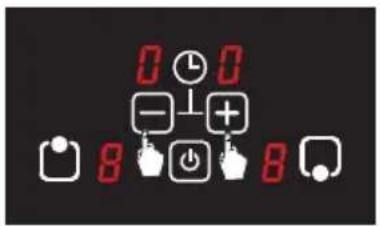
- Pritisnite minus ⏻i plus( )+ke istovremeno na 3 sekunde i provjerite da li 00 treperi na ekranu tajmera.
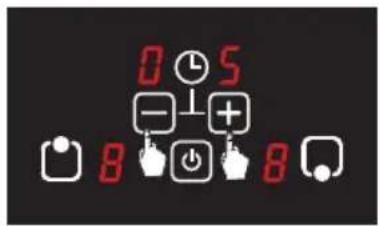
- Odaberite odgovarajuću ploču za kuhanje koju želite da podesite dok je pečnica uključena.
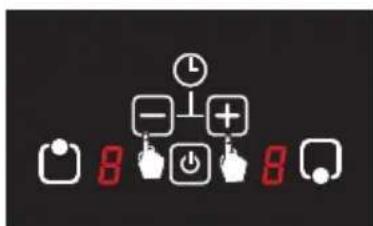
- Podesite odabranu ploču za kuhanje na željeni nivo između 1 i 9 pomoću (■) minus i (+) plus tipki.
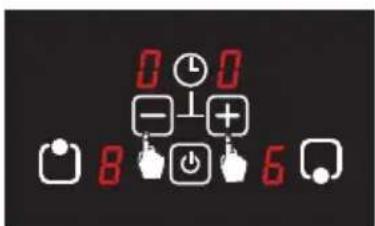
- Željeno vrijeme se podešava pomoću (☐) minus i (☐) ipki kada treperi nivo temperature (5 sekundi).


Točka pored nivoa temperature na ploči za kuhanje, za koju se prikazuje preostalo vrijeme, treperi.
- Zvučni signal se oglašava i programirana zona za kuhanje završava funkciju kuhanja nakon isteka podešenog vremena. Prikazuje se simbol ili imbol treperi na ekranu ako je zona za kuhanje vruća.

UPOZORENJE!
Ako je dostupno više od jednog tajmera, ekran tajmera pokazuje najnižu preostalu vremensku vrijednost nakon perioda podešavanja od 5 sekundi. Točka pored ploče za kuhanje, za koju se prikazuje preostalo vrijeme, treperi na tajmeru.
Identifikacija posude za kuhanje / postavljanje
(ne postoji upozorenje o posudi za kuhanje)

Kod indukcijskog kuhanja, energija se formira samo na površini koja je pokrivena dnom posude na odgovarajućoj ploči za kuhanje. Osnova posude se detektira indukcijskim sistemom.
Kuhanje se zaustavlja ako nema posude (ili nema posude ili posuda nije kompatibilna sa indukcijom), kada je kuhanje počelo ili ako se posuda ukloni sa ploče za kuhanje prilikom kuhanja. Upozorenje da posuda za kuhanje nije postavljena na odgovarajuću ploču za kuhanje ( ) prikazuje se na ekranu osjetljivom na dodir nakon 5 sekundi.
Upozorenje da nema posude za kuhanje traje 60 sekundi. Ako posuda nije postavljena na ploči za kuhanje kada ovo vijreme istekne, zona za kuhanje se automatski isključuje i na ploči se prikazuje symbol ili kako je zona za kuhanje vruća.
- Podesite nivo snage odabrane ploče za kuhanje na željeni nivo između 1 i 9 pomoću ( — ) minus i ( + plus tipki.
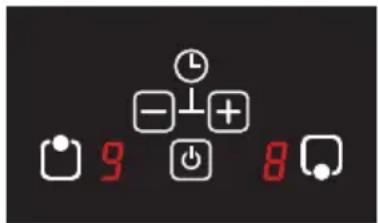
- Podesite odabranu ploču za kuhanje na nivo 9.
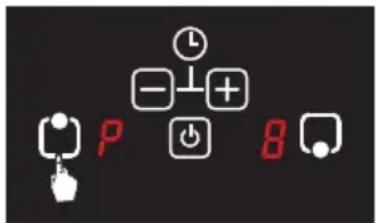
- Pritisnite isto još jednom na odabranoj ploči za kuhanje dok se na ekranu ploče za kuhanje ne pojavi simbol i time ste aktivirali funkciju pojačavanja.

UPOZORENJE!
Maksimalno trajanje ove funkcije je 5 minuta. Kada ovo vrijeme istekne, izabrana ploča za kuhanje nastavlja sa radom na 9. nivou temperature.
- Podesite nivo snage izabrane ploče za kuhanje između 1 i 9 pomoću ( - ) minus i ( + ) plus tipki.
natural_image
Symbol of a trash bin crossed with no text or labels, representing waste sorting or disposal (no text present)natural_image
Isometric line drawing of layered rectangular blocks labeled A and B, no text or symbols present| A Min. | 450 mm |
| B 40 mm |
natural_image
Isometric diagram of a layered electronic component with two circular holes and a base plate (no text or symbols)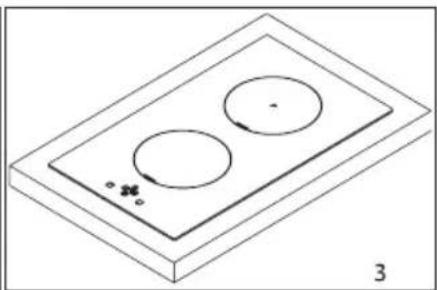
natural_image
Isometric line drawing of a rectangular tray with two circular cutouts and small dots at the bottom (no text or symbols)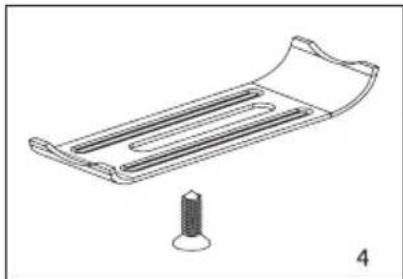
natural_image
Technical line drawing of a mechanical component with a screw base and curved internal structure (no text or symbols)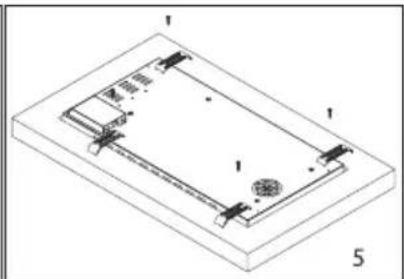
natural_image
Isometric technical diagram of a rectangular device with labeled components (no text or symbols present)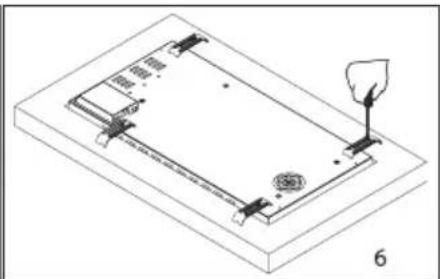
natural_image
Isometric technical diagram of a mechanical assembly with a hand holding a tool, no visible text or symbols
natural_image
Simple line drawing of a horizontal beam with two supports at one end, labeled '7' (no text or symbols on the diagram itself)natural_image
Simple line drawing of a hand holding a tool above a horizontal line with an 'X' mark below (no text or symbols)natural_image
Four identical line drawings of cooking pots with crossed handles, shown in different orientations (no text or symbols)НЕПРАВИЛНО НЕПРАВИЛНО НЕПРАВИЛНО ПРАВИЛНО
natural_image
Three identical line drawings of cooking pots with crossed handles, no text or symbols presentНЕПРАВИЛНО НЕПРАВИЛНО ПРАВИЛНО
natural_image
Two identical line drawings of a cooking pot with directional arrows indicating flow or movement (no text or symbols)НЕПРАВИЛНО ПРАВИЛНО
Turning the appliance on
natural_image
Symbol of a trash bin crossed with a diagonal line, no text or numbers presentnatural_image
Isometric line drawing of a layered rectangular structure with labeled points A and B (no text or symbols beyond labels)| A Min, 450 mm |
| B 40 mm |
Skice za instalaciju
- Okrenite ploču za kuvanje i postavite je na glatku površinu.
- Da bi se sprečio ulaz stranih supstanci i tečnosti između ploče za kuvanje i šporeta, nanesite zaptivač koju ste dobili uz uređaj na stranu donje ivice radne površine. Za uglove, koristite veću količinu zaptivača kako bi u potpunosti ispunili ugaone praznine.
- Ponovo okrenite ploču za kuvanje, poravnajte je i postavite na kuhinjsku radnu površinu.
- Pričvrstite Vašu ploču za kuvanje na kuhinjsku radnu površinu pomoću priložene stezaljke i vijaka.
natural_image
Isometric line drawing of a layered electronic component with two circular holes and a base plate (no text or symbols)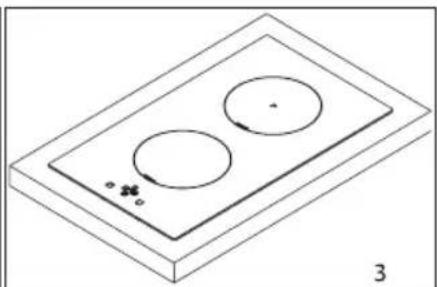
natural_image
Isometric line drawing of a two-circled appliance with base and top components, no text or symbols present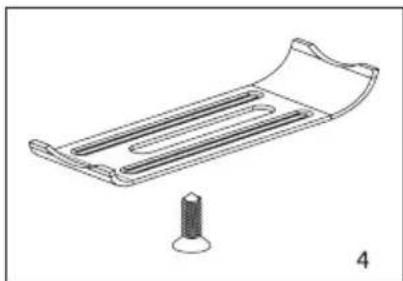
natural_image
Technical line drawing of a mechanical component with a screw and curved plate (no text or symbols)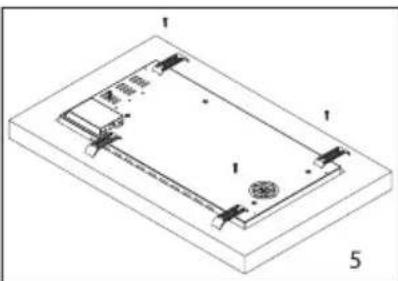
natural_image
Isometric technical diagram of a rectangular device with labeled components (no text or symbols present)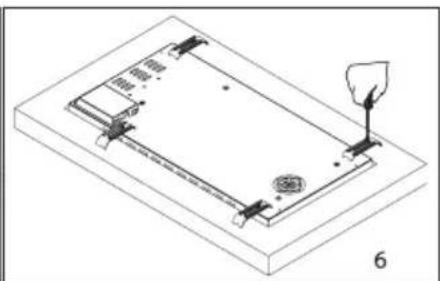
natural_image
Isometric technical diagram of a mechanical assembly with no visible text or symbols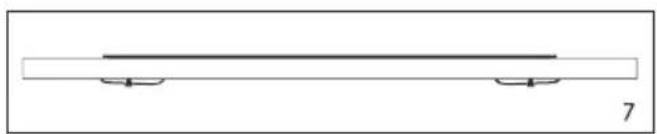
natural_image
Simple line drawing of a horizontal beam with two supports at one end, labeled '7' (no text or symbols on the beam itself)natural_image
Simple line drawing of a hand holding a tool above a horizontal line with a cross mark below (no text or symbols)- Šporet se uključuje pritiskom na on/off taster ( ⏻ ).
- Izaberite ploču za kuvanje na kojoj želite da kuvate.
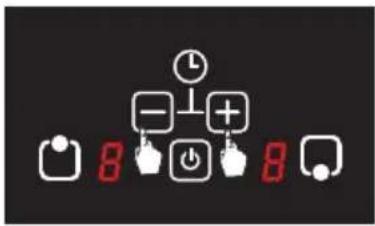
Podesite nivo temperature odabrane ploče na nulu (☐) pomoću minus (☐) i plus (☐) tastera.

UPOZORENJE!
- Šporet se uključuje pritiskom na on/off ( ⏻ ) taster.
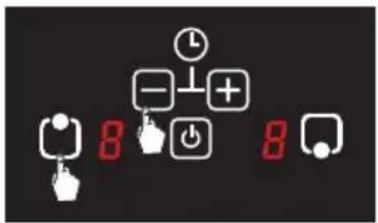
- Istovremeno pritisnite (☐) taster za izbor gornje zone za kuvanje i (☐) taster minus.
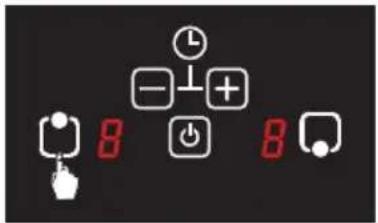
- Simbol se prikazuje na svim ekranima i blokada za decu je aktivirana.

UPOZORENJE!
- Šporet se uključuje pritiskom na on/off ( ⏻ ) taster.
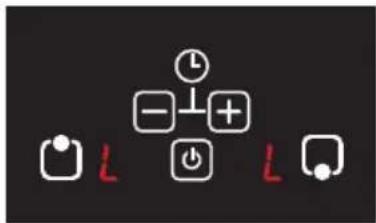
- Istovremeno pritisnite (☐) taster za izbor gornje zone za kuvanje i (—) taster minus.
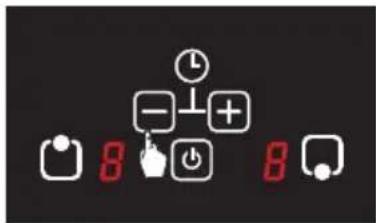
- Potom pritisnite (☐) taster minus ponovo, i šporet se automatski isključuje. Blokada za decu se deaktivira kada se šporet ponovo uključi.
Funkcije tajmera
Postoje dve vrste funkcija tajmera.
1. Funkcija nezavisnog tajmera
Vreme se može podesiti od 1 do 99 minuta ponovo pritiskom na (■) minus i († plus taster istovremeno na 3 sekunde.
Zvučni signal se oglašava, a ekran tajmera treperi do nakon isteka podešenog vremena. Samo jednom pritisnite bilo koje dugme na ekranu osetljivom na dodir da biste zaustavili zvučni signal.

UPOZORENJE!
- Zvučni signal se automatski zaustavlja nakon 2 minuta kada se ne dodiruje nijedan taster.
- Isključivanje šporeta (pritiskom na on/off ( ⏻ ) taster) zaustavlja nezavisni tajmer. Tajmer se ne obnavlja kada se šporet ponovo uključi.
- Podesite odabranu ploču za kuvanje na željeni nivo između 1 i 9 pomoću ( - ) minus i (+) plus tastera.
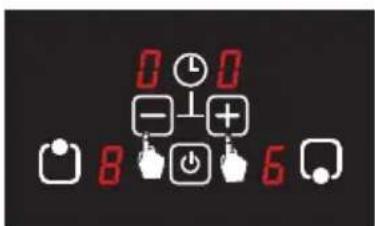
-
Željeno vreme se podešava pomoću ( - ) minus i ( + ) tastera kada treperi nivo temperature (5 sekundi).
-
- Tačka pored nivoa temperature na ploči za kuvanje, za koju se prikazuje preostalo vreme, treperi.
-
Zvučni signal se oglašava i programirana zona za kuvanje završava funkciju kuvanja nakon isteka podešenog vremena. Prikazuje se simbol ili mbol treperi na ekranu ako je zona za kuvanje vruća.

UPOZORENJE!
Ako je dostupno više od jednog tajmera, ekran tajmera pokazuje najnižu preostalu vremensku vrednost nakon perioda podešavanja od 5 sekundi. Tačka pored ploče za kuvanje, za koju se prikazuje preostalo vreme, treperi na tajmeru.
- Podesite nivo snage odabrane ploče za kuvanje na željeni nivo između 1 i 9 pomoću ( - ) minus i ( + plus tastera.
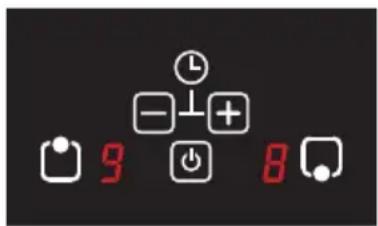
- Pritisnite isto još jednom na odabranoj ploči za kuvanje dok se na ekranu ploče za kuvanje ne pojavi simbol i time ste aktivirali funkciju pojačavanja.

UPOZORENJE!
Maksimalno trajanje ove funkcije je 5 minuta. Kada ovo vreme istekne, izabrana ploča za kuvanje nastavlja sa radom na 9. nivou temperature.
- Podesite nivo snage izabrane ploče za kuvanje između 1 i 9 pomoću ( - ) minus i ( + ) plus tastera.
natural_image
Symbol of a trash bin crossed with no text or labels, representing waste sorting or disposal (no text present)

- IMPORTANT WARNINGS
- Electrical Safety
- Methods for Protecting Ceramic Glass Cooking Surface From Damage
- Intended Use
- Electrical Connection
- Electrical Connection Scheme
- INTRODUCTION OF THE APPLIANCE
- WARNING!
- INSTALLATION OF COOKTOP
- Correct Place For Installation
- Application Of A Strip Under The Appliance
- Installation
- Installation Diagram
- Counter Cut-Off Sizes
- USING YOUR APPLIANCE
- Selection Of The Right Pot
- Cooking Applications
- Hobs
- CM INDUCTION STOVE ELECTRONIC CARD MANUAL
- NOTE
- Turning the appliance on
- Turning the appliance off
- Residual heat indicator H
- Turning the Stove Cooking Areas (Hobs) On
- Turning the Stove Cooking Areas (Hobs) Off
- Child Lock Function (optional)
- To activate the child lock
- To deactivate the child lock
- Timer function
- Independent Timer Function
- To set the independent timer
- To change the time for independent timer
- Cooking Area Timer Function
- To set the cooking area timer
- Pot identification / focusing (There is No Pot Warning)
- High power function (boost)
- To activate the boost function
- To deactivate the boost function
- Error Codes And Recommended Solutions
- CLEANING AND MAINTENANCE OF THE APPLIANCE
- RECOMMENDATIONS FOR ENERGY SAVING
- HANDLING RULES
- TROUBLESHOOTING
- If The Appliance Does Not Operate
- ENVIRONMENTALLY-FRIENDLY DISPOSAL
- PACKAGE INFORMATION
- NAPÓMENA
- Skice za instalaciju
- Instalacija ploče za kuhanje na kuhinjsku radnu površinu
- Izbor odgovarajuće posude za kuhanje
- UPOZORENJE!
- Funkcije tajmera
- Funkcija nezavisnog tajmera
- Ukoliko želite da podesite nezavisni tajmer
- Identifikacija posude za kuhanje / postavljanje
- (ne postoji upozorenje o posudi za kuhanje)
- KORIŠTENJE VAŠEG UREĐAJA
Brand : TESLA
Model : HI3200SB
Category : Cooker