
KD110 - Security Camera TP-LINK - Free user manual and instructions
Find the device manual for free KD110 TP-LINK in PDF.

| Product Type | Smart Doorbell Camera |
| Brand | TP-Link |
| Model | KD110 |
| Video Resolution | HD (720p) |
| Field of View | 180° diagonal (estimated) |
| Night Vision | Yes, automatic switching with IR LEDs |
| Two-Way Audio | Yes, with built-in speaker and microphone |
| Motion Detection | Person detection and general motion |
| Local Storage | microSD card (up to 128GB, not included) |
| Cloud Storage | Optional via Kasa Care subscription |
| Indoor Chime | Included, with multiple ringtones and volume control |
| Weather Resistance | IP64 (dust and water resistant) |
| Power Source | Wired (existing doorbell transformer, 8-24 VAC) |
| Operating Temperature (Doorbell) | -20°C to 45°C (-4°F to 113°F) |
| Operating Temperature (Chime) | 0°C to 40°C (32°F to 104°F) |
| Smart Home Integration | Amazon Alexa, Google Assistant, IFTTT, Samsung SmartThings |
| App Support | Kasa Smart (iOS/Android) |
| Dimensions (Doorbell) | Approx. 2.4 x 1.5 x 5.0 in (6.1 x 3.8 x 12.7 cm) |
| Dimensions (Chime) | Approx. 2.8 x 1.7 x 5.0 in (7.1 x 4.3 x 12.7 cm) |
| Weight | Not specified |
| Reset Method | Physical reset button on doorbell (hold 3s for Wi-Fi reset, 15s for factory reset) |
| Maintenance | Clean with dry cloth; avoid water jet |
Frequently Asked Questions - KD110 TP-LINK
User questions about KD110 TP-LINK
0 question about this device. Answer the ones you know or ask your own.
Ask a new question about this device
Download the instructions for your Security Camera in PDF format for free! Find your manual KD110 - TP-LINK and take your electronic device back in hand. On this page are published all the documents necessary for the use of your device. KD110 by TP-LINK.
USER MANUAL KD110 TP-LINK
natural_image
Close-up of a black digital door with a white circular button and camera lens (no text or symbols visible)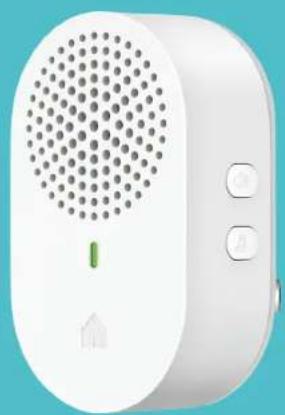
natural_image
White smart home phone with circular vent and control buttons (no visible text or symbols)User Guide
Kasa Smart Doorbell
KD110
Contents
About This Guide....1
Introduction 2
Appearance - Chime 3
Appearance - Doorbell 4
Set Up Your Kasa Smart Doorbell 5
Main Device Controls 8
Set Schedules 9
Enable 24/7 Recording....11
Check 24/7 Recording Videos....12
Do Not Disturb 13
Manage Device Settings 15
Reset Your Smart Doorbell 27
Smart Actions - Motion Sensing……30
Voice & Third-Party Support 35
Authentication 39
About This Guide
This guide provides a brief introduction to the Kasa Smart Doorbell and the Kasa Smart app, as well as regulatory information.
Features available in Kasa Smart may vary by model and software version. Kasa Smart availability may also vary by region. All images, steps, and descriptions in this guide are only examples and may not reflect your actual Kasa Smart experience.
Conventions
In this guide, the following convention is used:
| Convention | Description |
| Teal | Key information appears in teal, including management page text such as menus, items, buttons and so on. |
| Underline | Hyperlinks are in teal and underlined. You can click to redirect to a website. |
More Info
- Specifications can be found on the product page at https://www.tp-link.com.
• Our Technical Support and troubleshooting information can be found at https://www.tp-link.com/support/. - A TP-Link Community is provided for you to discuss our products at https://community.tp-link.com.
• Frequently Asked Questions (FAQs) can be found at https://www.tp-link.com/support/faq/.
Introduction
Replace your existing wired doorbell with a smarter one and answer your door from anywhere with your phone. Receive instant notifications whenever someone comes by—even before they knock. Keep an eye out for your deliveries, visitors, or possible intruders 24/7 with crystal clear video and audio. It allows you to see visitors, as well as monitor intruders or package deliveries.
With a microSD card, the doorbell can store up to 128GB of video.

HD Video

Person Detection
Secure Local Storage

Two-Way Audio Indoor Chime Provided

All-Weather
All-Star
- HD Video – Sharp and clear high resolution offers greater detail and colors, even when you zoom in.
- Person Detection – Send person alerts to differentiate people and other motion activity.
- Local and Cloud Storage – Save your footage continuously on a microSD card ^+ or subscribe to a Kasa Care Plan ^ to store video clips to the cloud. Up to 128GB microSD card is supported.
^ microSD card not included.
^* Kasa Care Plans vary by country and region.
• Live View with Two-Way Audio – Watch live video and carry on a conversation from anywhere with your phone or other supported device. - Indoor Chime Provided - Choose from a variety of ringtones to get alerted immediately when you are at home.
- All-Weather All-Star - IP64 certified weatherproofing ensures your doorbell stays protected against rain and dust.
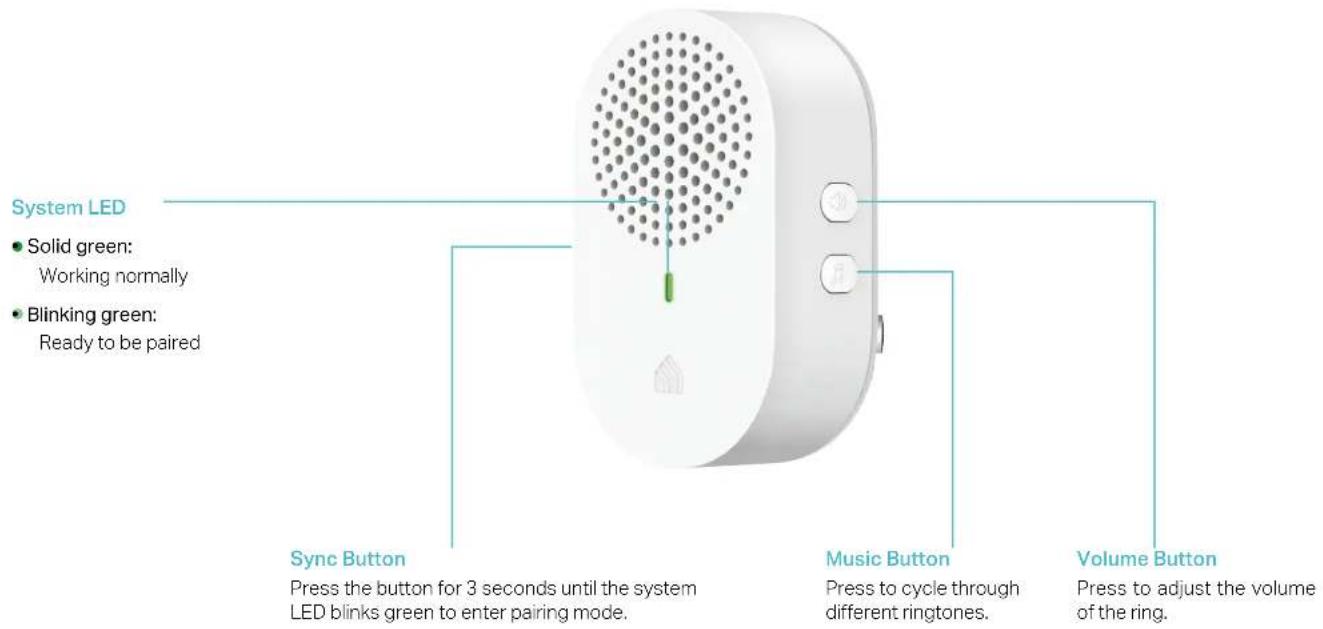
Appearance - Chime
Kasa Smart Doorbell is made up of a Chime and a Doorbell.
The Chime has a system LED that changes color according to its status, a sync button, a music button, and a volume button. Refer below for details.
Appearance - Doorbell
The doorbell has a ring button, a status LED, and a microSD card slot. Refer below for details.
Front
System LED
• Solid orange: Starting up.
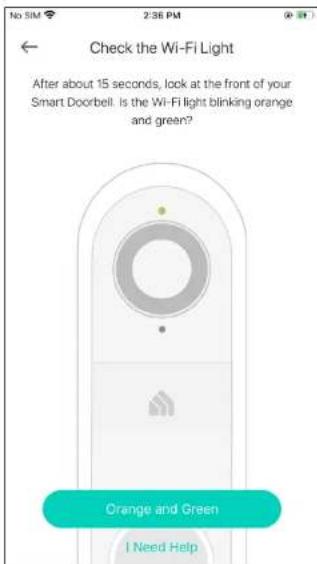
- Blinking orange & green: Ready for setup.
- Blinking red:
Connecting to home Wi-Fi; or
Disconnected from home Wi-Fi
- Blinking green slowly: Connected to home Wi-Fi
- Solid green: Connected to cloud
- Blinking green quickly: Updating
Ring Button
Press the button ring the doorbell.
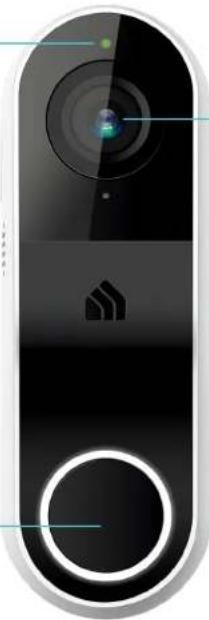
natural_image
Close-up of a black digital door with a circular dial and a logo on the front (no readable text or symbols)Camera It allows live view.
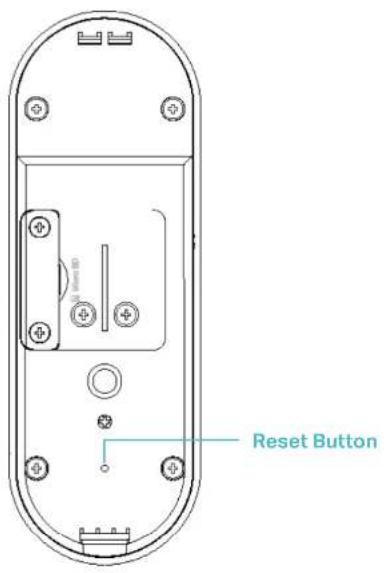
Back
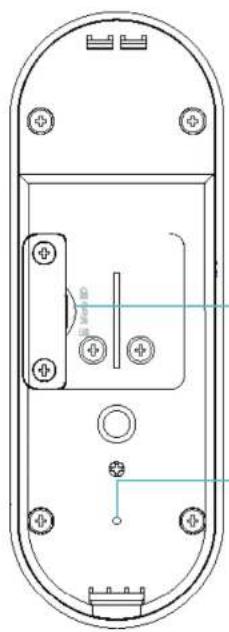
natural_image
Technical line drawing of a remote control panel with mounting holes and internal components (no text or symbols)microSD Card Slot
Insert a microSD (8-128GB) card into the slot for recording.
Reset Button
Press and hold for 3s until the status LED blinks orange slowly to reset Wi-Fi connection.
Press and hold for 15s until the status LED blinks orange quickly to restore to factory default settings.
Set Up Your Kasa Smart Doorbell
Follow the steps below to get started with your new Kasa Smart Doorbell.
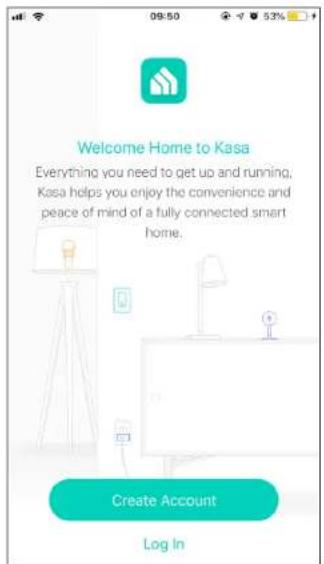
Step 1. Download Kasa
Get the Kasa Smart app from the App Store or Google Play, or by scanning the QR code below.

Step 2. Log In
Open the app, and log in with your TP-Link ID. If you don't have an account, create one first.
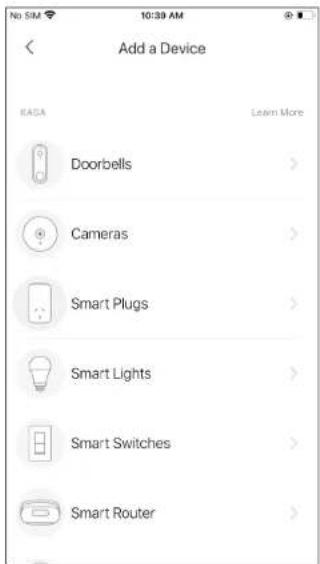
Step 3. Add Device
Tap the button in the Kasa app and select Doorbells.
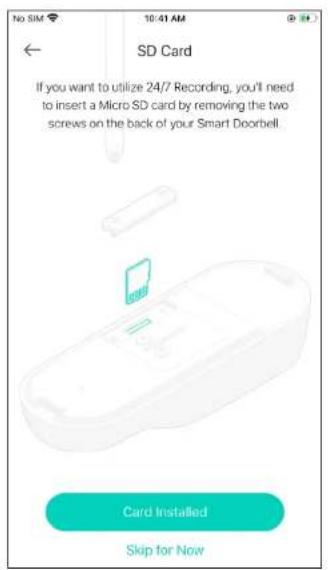
Step 4. Insert a microSD Card
If you want to record videos locally, you'll need to insert a microSD card by removing the two screws on the back of the doorbell.
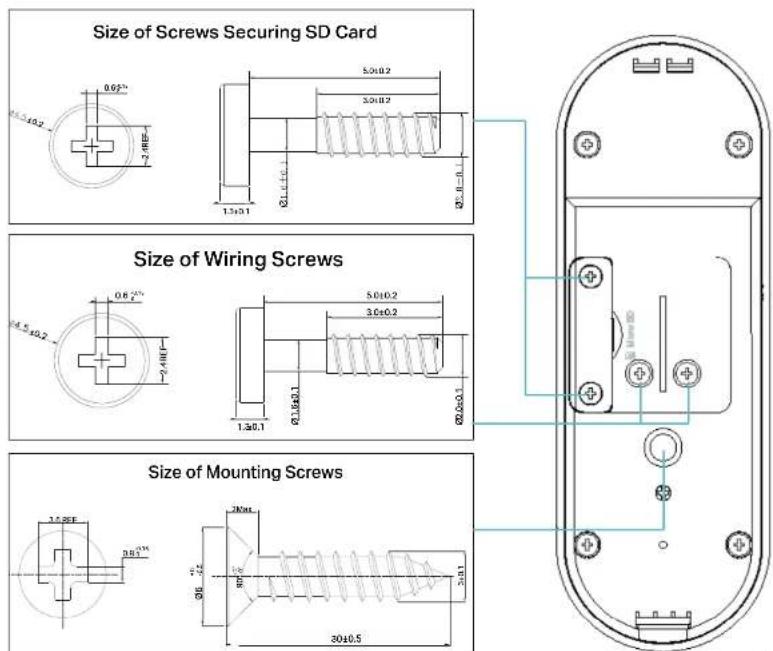
Step 5. Install your doorbell
Follow app instructions to install your doorbell. Below are the size of screws:
Step 6. Set Up
Follow app instructions to set up your doorbell and pair with your chime.
Main Device Controls
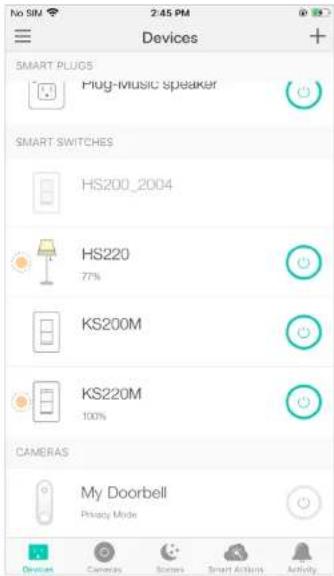
After you successfully set up your Smart Doorbell, you will see the home page of the Kasa Smart app. Here you can view and manage all devices that you've added to Kasa. Tap your smart doorbell to enter the live view page and further manage it.
Home Page
You can see all your Kasa devices listed in the Home page.
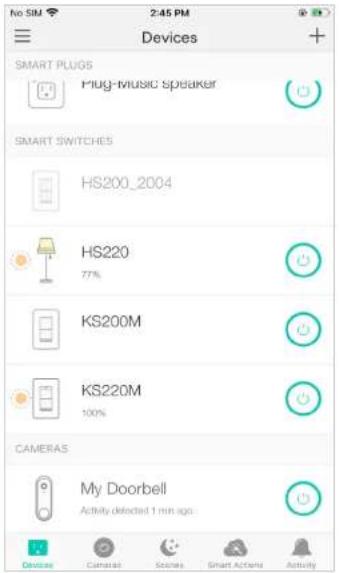
Turn On/Off Your Kasa Smart Doorbell
Turn on/off your Smart Doorbell quickly by tapping the switch on the home page, which means you are entering the privacy mode and cannot stream live video.
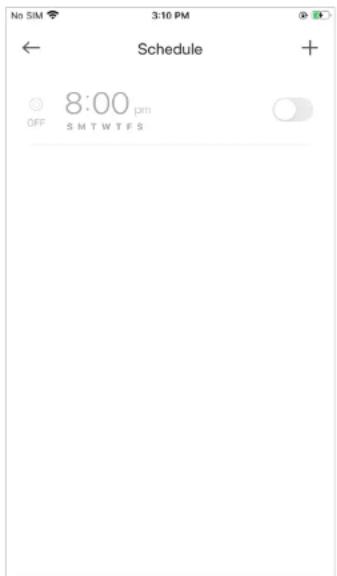
Set Schedules
Set schedules to automatically turn on/off your doorbell at set times according to your daily routine.
- Tap your Smart Doorbell in the Home page to enter the live view page, and then

- Tap + on the top right corner. 3. Set a schedule to turn your Smart Doorbell on or off.
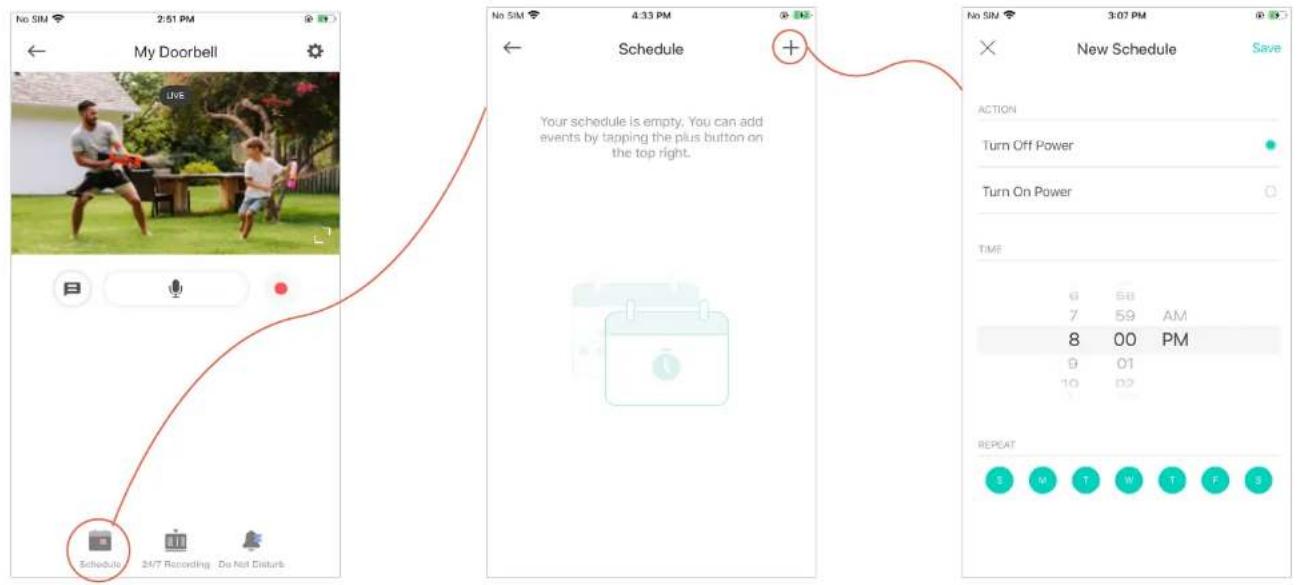
-
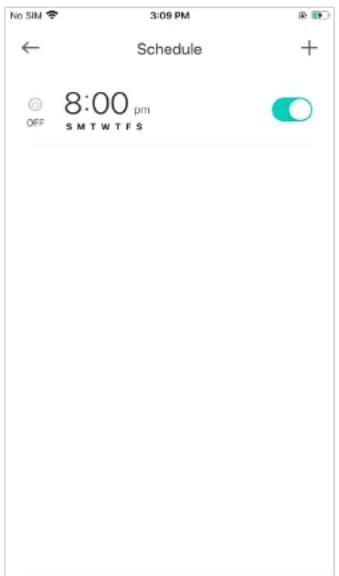
Tap Save and you'll see your schedule listed in the Schedule Page. You can add more schedules following the same steps.
-
You can turn off your schedule any time at the Schedule page.
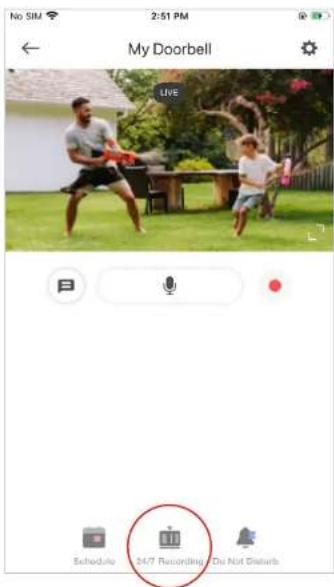
Enable 24/7 Recording
When 24/7 Recording is enabled, your camera record every minute of every day so you'll never miss a thing.
Note: You need to insert a microSD card first.
In the live view page, tap 📍 then 24/7 Recording. You can enable or disabled the feature and check the storage of your microSD card.

Check 24/7 Recording Videos
The recorded videos are saved in the microSD card. You can check it in the app.
In the Home page to enter the live view page, tap . You will see recorded videos.
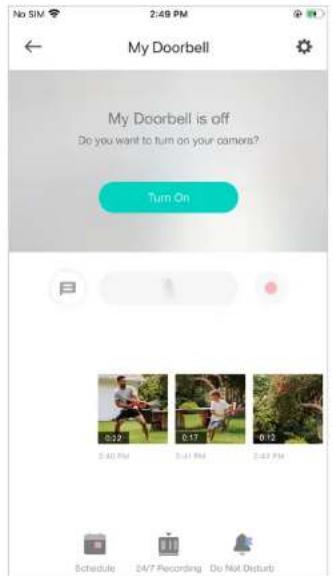
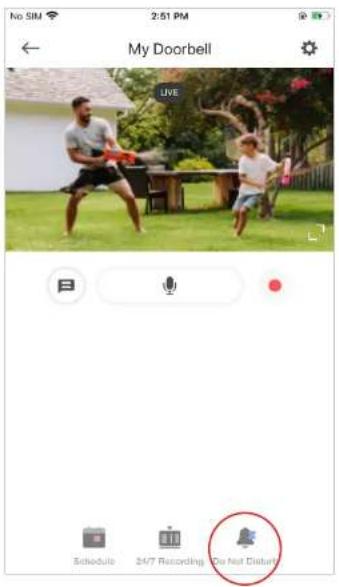
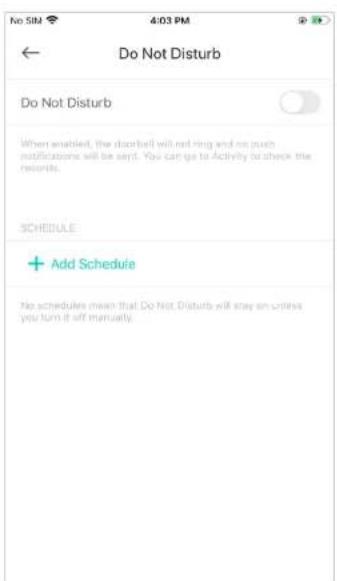
Do Not Disturb
When enabled, the doorbell will not ring and no push notifications will be sent. You can go to Activity to check the records. You can turn it on when you do not want visitor to disturb you.
- Tap your Smart Doorbell in the Home page to enter the live
view page, and then tap

Do Not Disturb
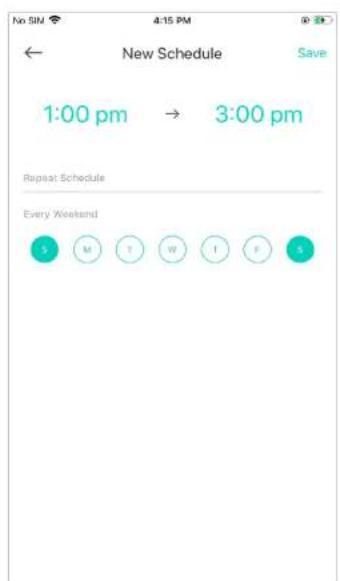
- Add a Do Not Disturb schedule.
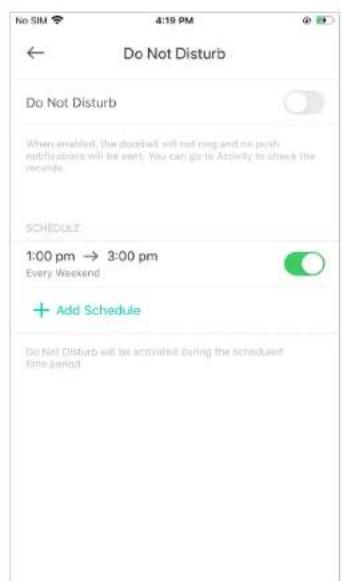
Note: Do Not Disturb turns on when the schedule starts, and turns off the schedule ends. You can turn Do Not Disturb on or off, the next schedule will still activate.
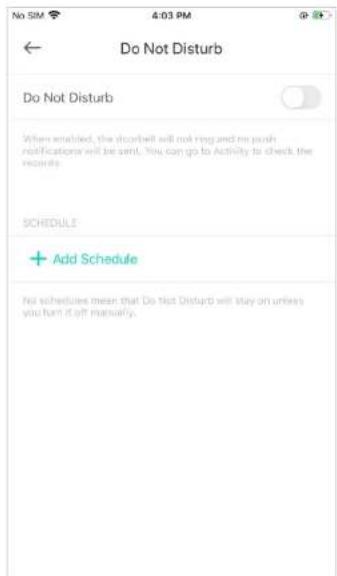
- Set schedules to turn on Do Not Disturb automatically at set times.
For example, I don't want to be disturbed from 1:00 PM to 3:00 PM every Saturday and Sunday.
Manage Device Settings
-
Tap your Smart Doorbell in the Home page to enter the live view page and then tap 🔒
-
Turn on or off the camera.
When Camera is turned off, it means privacy mode is enabled. You can turn the camera off when you do not want your doorbell to stream live view and record videos.
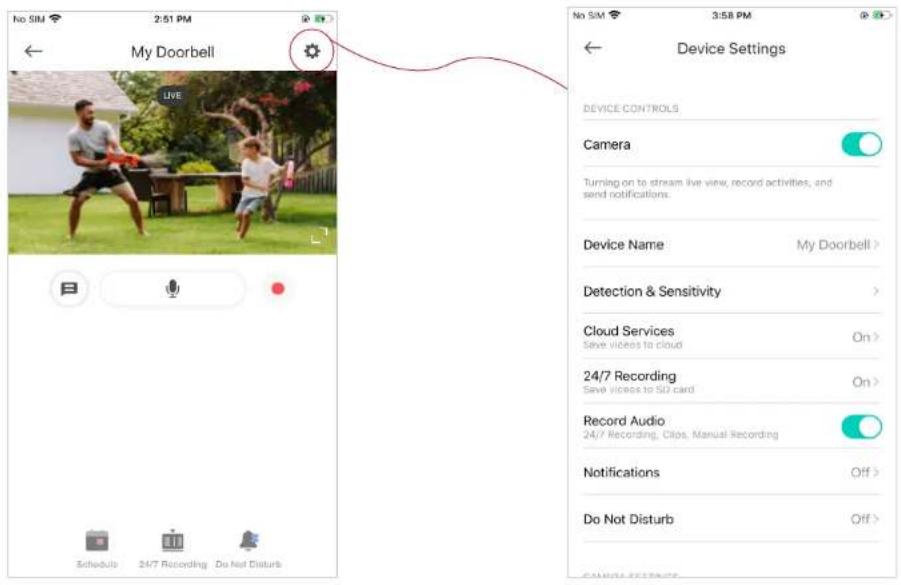
3. Edit device name.
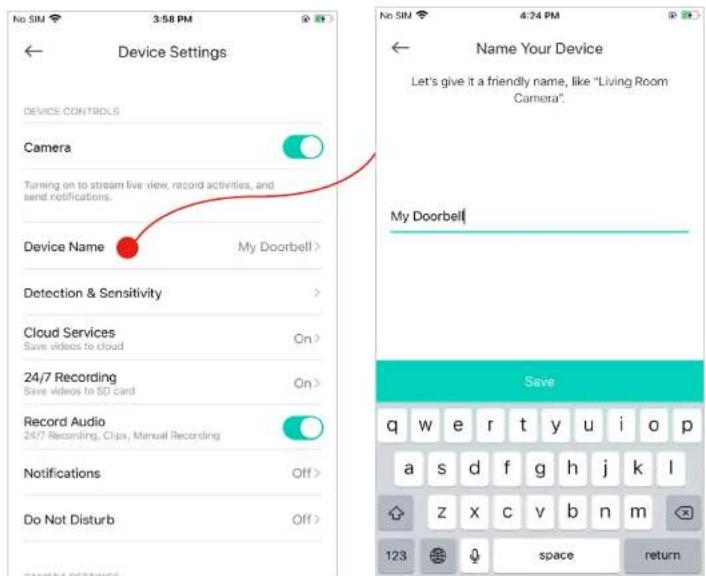
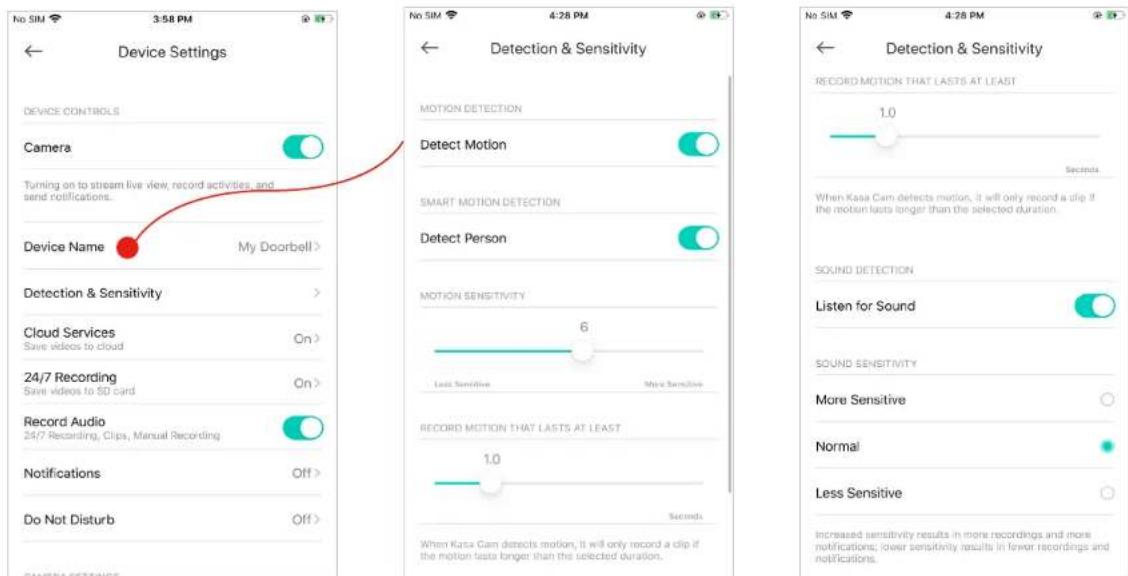
- Set detection and sensitivity for recording videos.
Enable Detect Motion / Detect Person if you want your doorbell camera to record when motion / person is detected. Also set the sensitivity of detection.
Enable Listen for Sound if you want your doorbell camera to record when sound is detected and set its sensitivity.
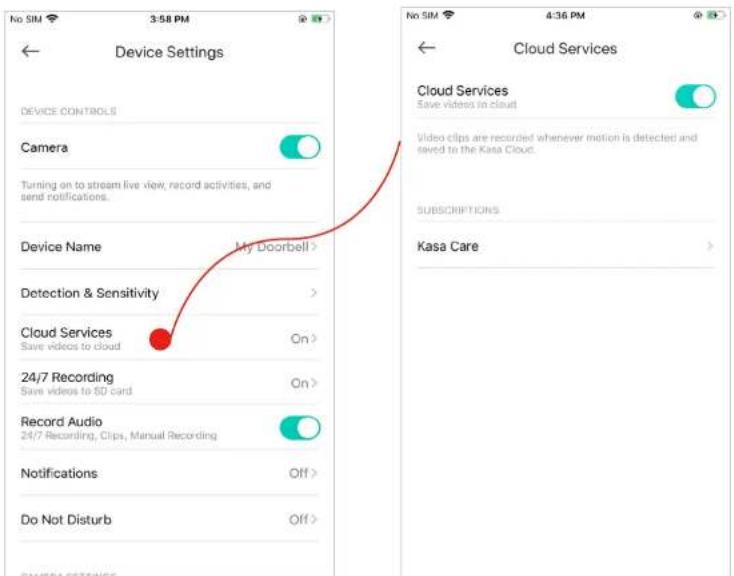
- Enjoy cloud service.
If you have subscribed to Kasa Care, you can enable Cloud Services to save the videos recorded by your doorbell to the cloud. Kasa offers unlimited cloud storage.
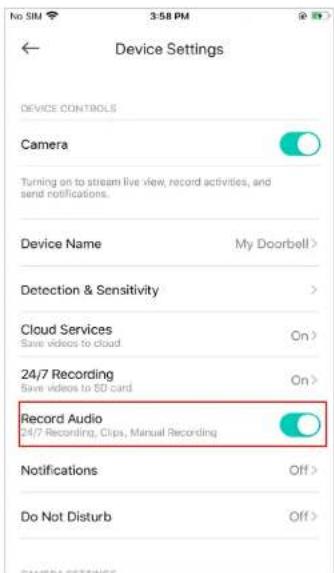
- Choose whether to record audio.
Enable Record Audio if you want to also record sound during recording.
7. Choose whether to receive notifications.
Enable Person Detected / All Other Motion & Sound / Doorbell is Pressed if you want to be notified when person / all other motion and sound / doorbell press is detected. You can also select the time when you want to receive notifications.
If you don't want to be bothered by frequent notifications, enable Automatically Limit Notifications.

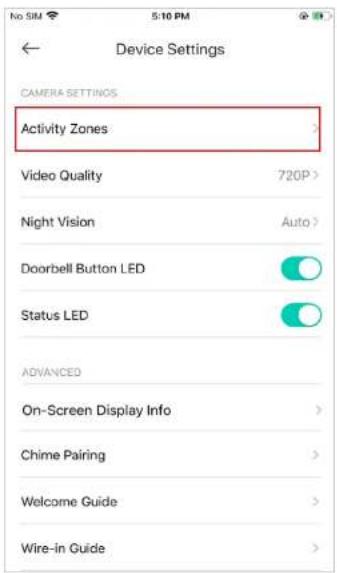
8. Set activity zones.
Control what alerts you by creating multiple custom activity zones around areas that are important to you

natural_image
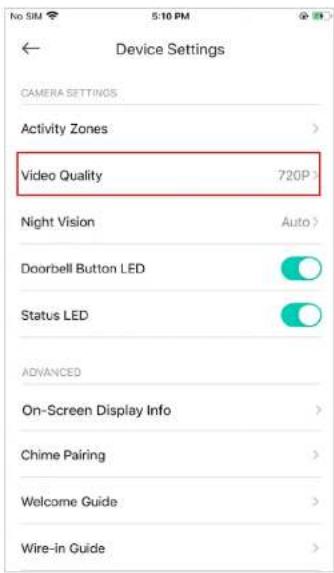
Outdoor patio scene with a long wooden table, chairs, potted plants, and a modern blue-framed door (no visible text or symbols)- Choose the resolution for videos.
The highest quality looks better but requires faster internet connection and larger size for saving the videos.
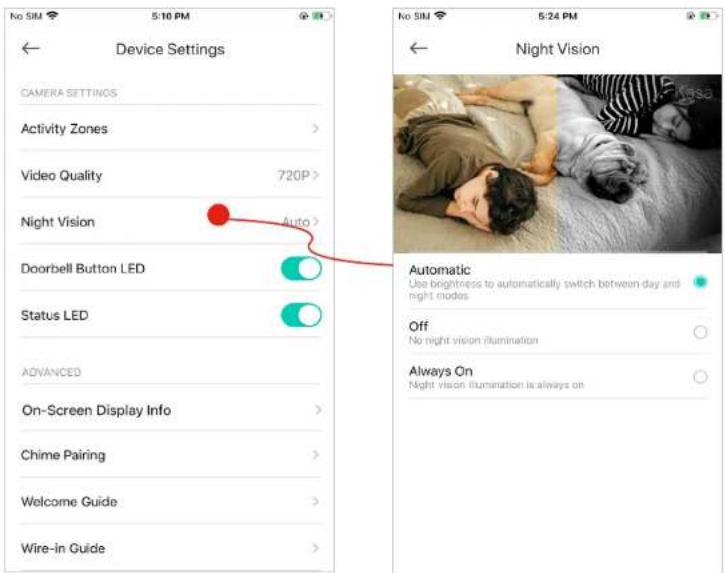
- Choose when you want the night vision to be on.
Night vision allows you to see clearly at night. You can choose Automatic to turn on night vision automatically in low light conditions and turn off in daylight.
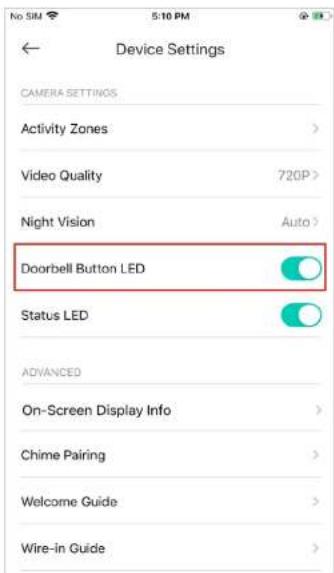
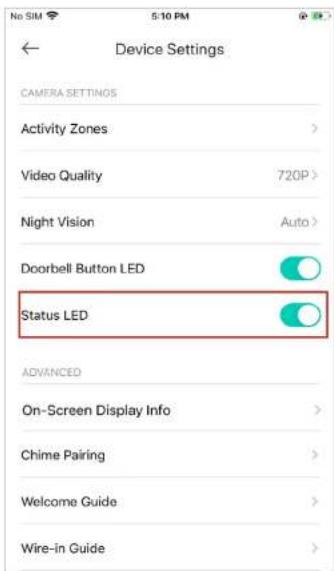
- Turn on/off Doorbell Button LED.
Turn on or off the button LED on the doorbell.
- Turn on/off Status LED.
Turn on or off the status LED on the doorbell.
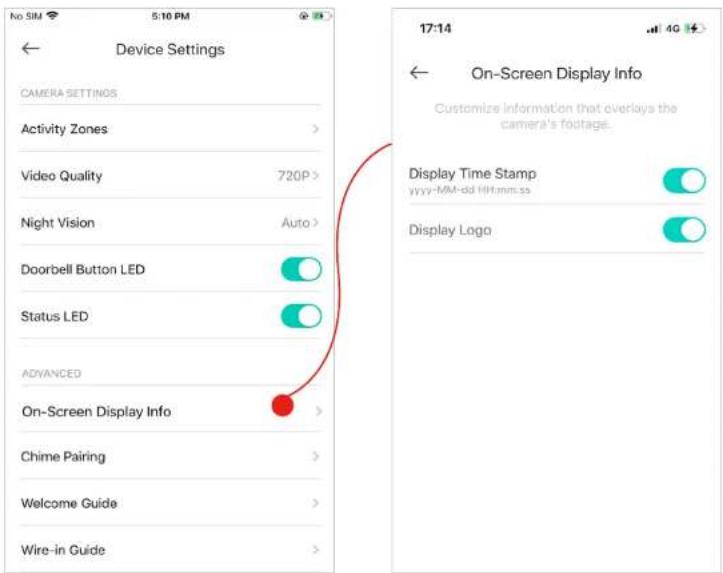
- Customize on-screen display information.
Choose whether you want to display time stamp or logo on the Live View screen.
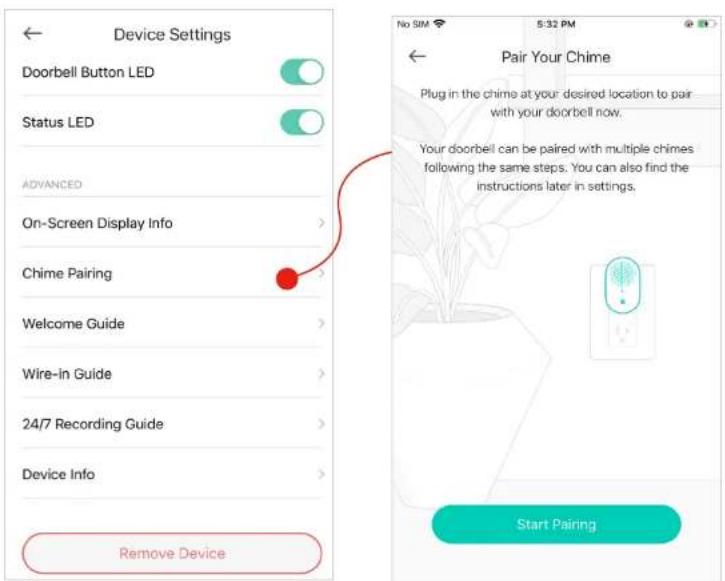
- Pair your chime.
Tap Chime Pairing and pair your chime with the doorbell.
Reset Your Smart Doorbell
TP-Link provides three methods to reset your Smart Doorbell.
Method 1
Use a pin to press and hold the Reset button for 5s to reset Wi-Fi connection.
Use a pin to press and hold the Reset button for 15s to restore to factory default settings.
Method 2
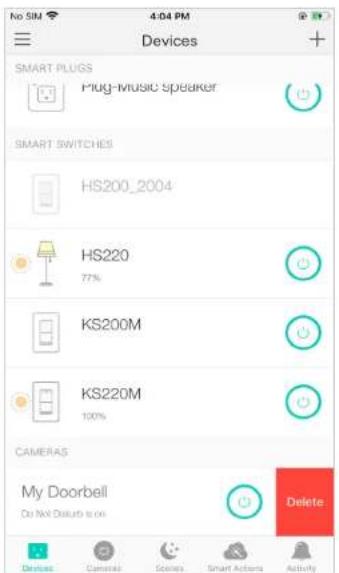
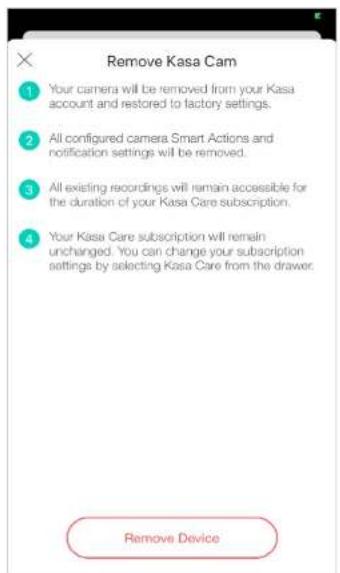
Swipe left your Smart Doorbell on the Devices page and tap Delete. Then tap Remove Device. Your Smart Doorbell will be removed from your Kasa account and restored to factory settings.
Method 3
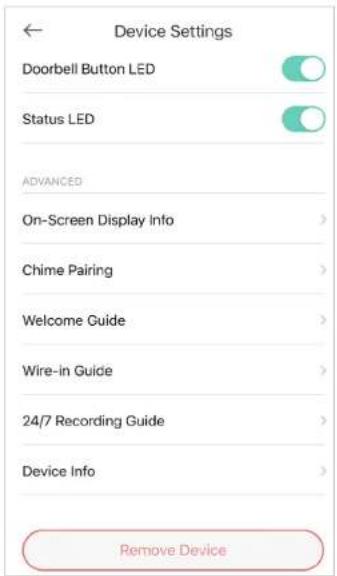
Tap your Smart Doorbell and go to the Devices Settings page. Then tap Remove Device in the bottom. Your Smart Doorbell will be removed from your Kasa account and restored to factory settings.

Smart Actions - Motion Sensing
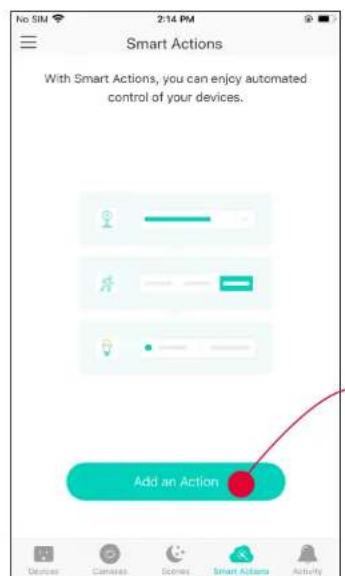
Smart Actions is a function provided that allows device interconnections and home automations. With Smart Actions, your Kasa devices can work together to create a smarter smart home. From the moment you wake up to the moment you drift asleep, Smart Actions make your home safer and more comfortable. There are four types of smart actions. For your Kasa Smart Doorbell, you can set Motion Sensing action.
-
Tap at the bottom, then tap Add an Action.
-
Select an automation type for your Smart Actions. Here we choose Motion Sensing.
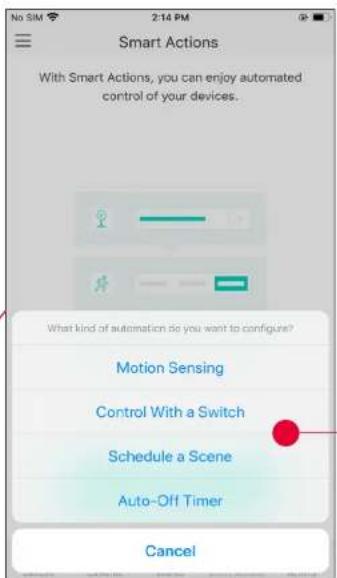
Motion Sensing: Take actions when a Kasa camera senses a motion.
Control With a Switch: Extend the Smart Switch control to other Kasa Smart devices. Turn on/off a group of devices with the Smart Switch all together.
Schedule a Scene: Schedule a "Scene" to be turned on automatically at the time specified.
Auto-off Timer: Whenever a smart device is turned on, turn it off after the designated amount of time.
Configure Motion Sensing if you also have another Kasa smart device
E.g. I want to turn my Kasa light switch on when my doorbell senses a motion.
-
Tap Motion Sensing then select your doorbell.
-
Select your Smart Light Switch.

- Set the time when you want the action to run. You can choose Always or tap Custom to choose time according to your needs.
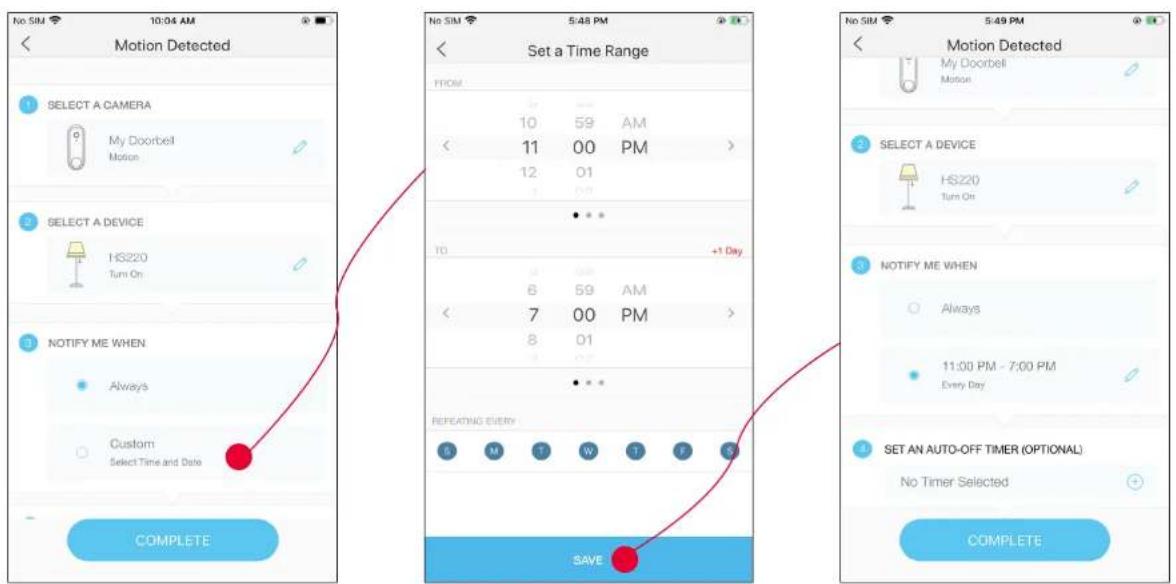
-
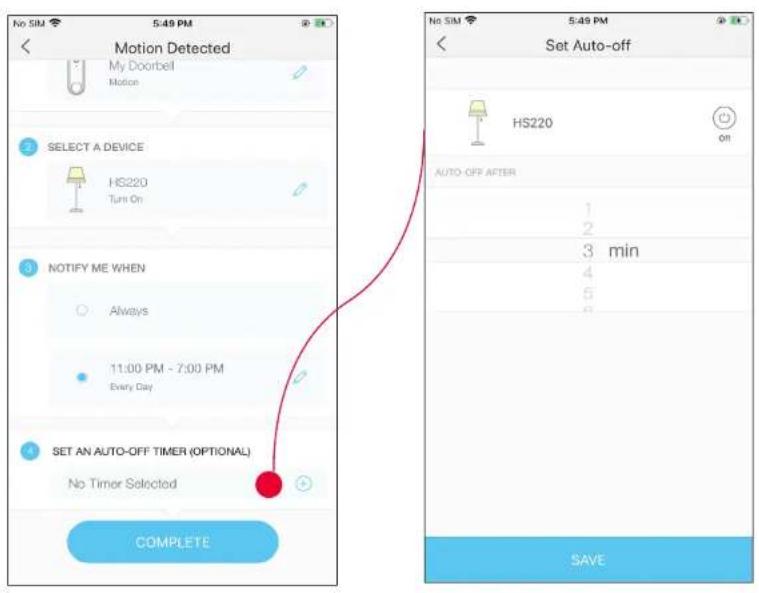
(Optional) Set an auto-off timer then tap Complete. Then your light will be turned off after the time you set.
-
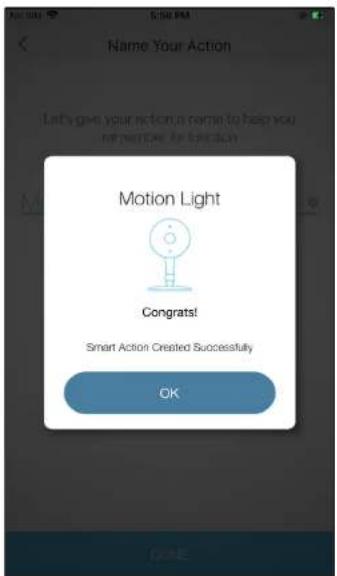
Name your action for easy identification.
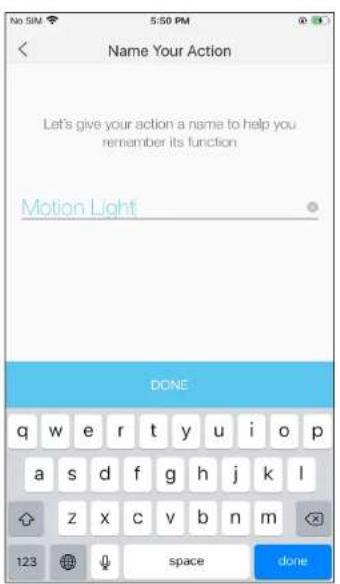
- The Smart Action is created successfully and displayed in the Smart Actions list.
Voice & Third-Party Support
Use the Kasa Smart app to pair your Smart Doorbell with Amazon Alexa or Google Home Assistant, and enjoy a full hands-free experience. Kasa helps manage the rest of your smart home too, working with Samsung Smart Things to trigger changes when you arrive home or leave for the day.
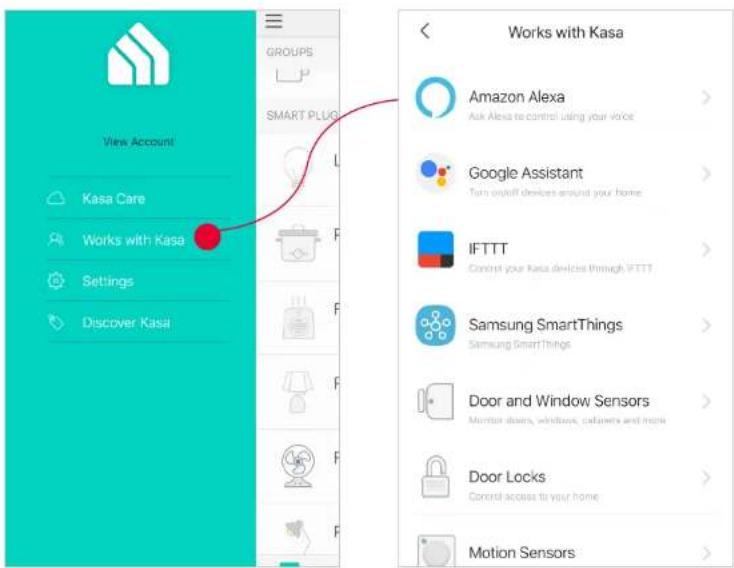
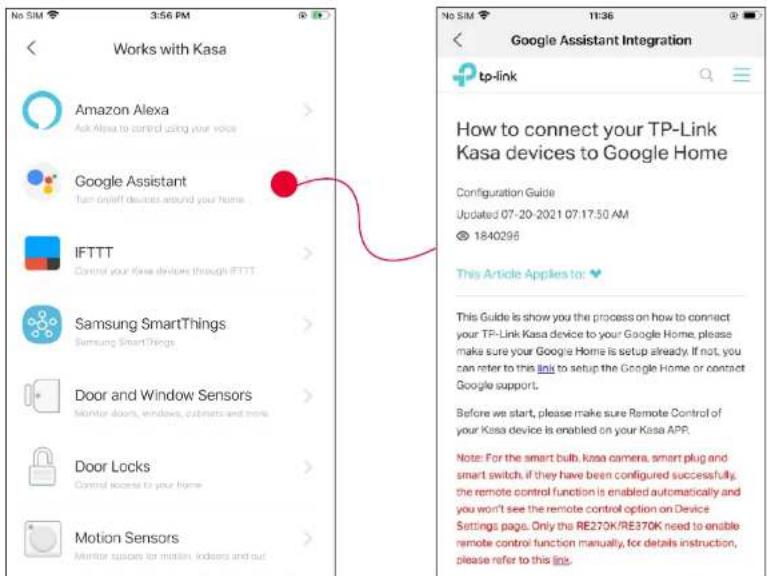
Launch the Kasa Smart app. Go to the sidebar and tap Works with Kasa. You can choose Amazon Alexa / Google Assistant / IFTTT / Samsung SmartThings for detailed instructions.
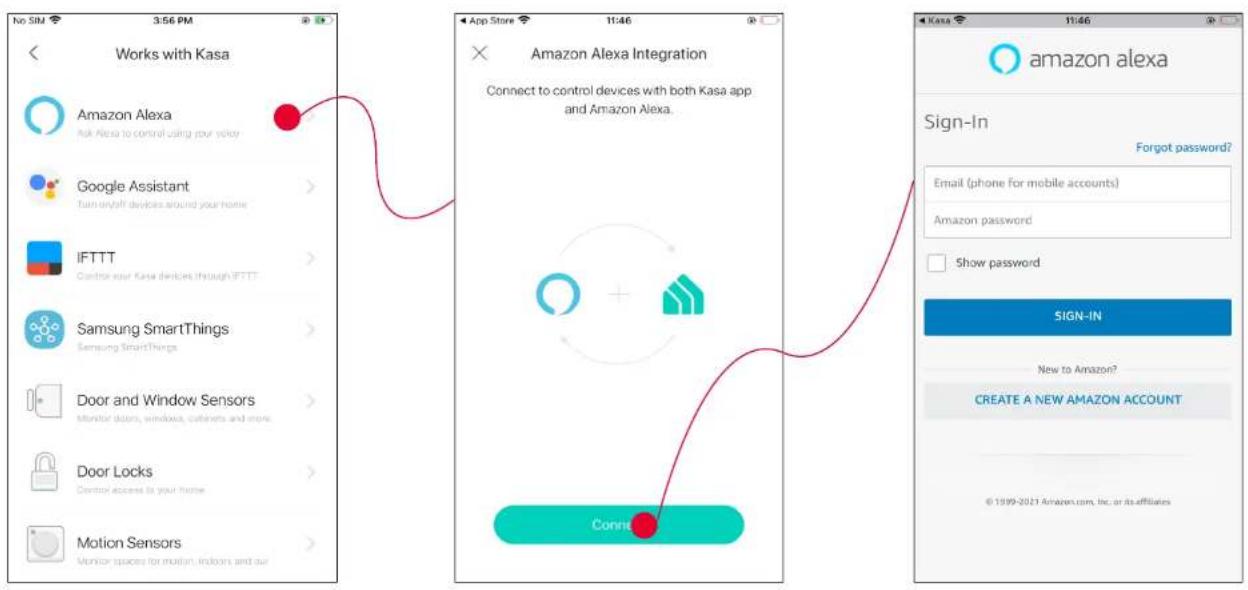
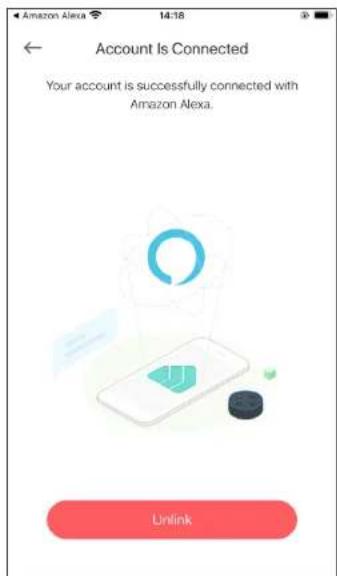
1. Set up Amazon Alexa
-
Tap Amazon Alexa.
-
Tap Connect.
-
Sign in with your amazon account.
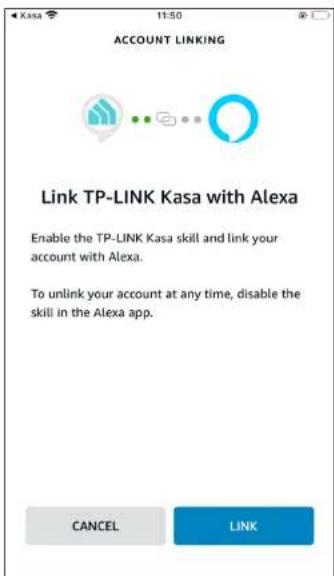
-
After sign-in, tap LINK.
-
Your TP-Link ID has been successfully linked with your amazon account. You can stream the doorbell videos to Amazon Echo Show or Fire TV using simple voice commands.
2. Set up Google Assistant
-
Tap Google Assistant.
-
Follow instructions to connect your device to your Google Home.
Or find the FAQ at https://www.tp-link.com/en/support/faq/1534/.
Authentication
FCC compliance information statement

Product Name: Kasa Smart Doorbell
Model Number: KD110
Component Name Model
Kasa Doorbell Chime KD110C
Responsible Party:
TP-Link USA Corporation
Address: 10 Mauchly, Irvine, CA 92618
Website: https://www.tp-link.com/us/
Tel: +1 626 333 0234
This equipment has been tested and found to comply with the limits for a Class B digital device, pursuant to part 15 of the FCC Rules. These limits are designed to provide reasonable protection against harmful interference in a residential installation. This equipment generates, uses and can radiate radio frequency energy and, if not installed and used in accordance with the instructions, may cause harmful interference to radio communications. However, there is no guarantee that interference will not occur in a particular installation. If this equipment does cause harmful interference to radio or television reception, which can be determined by turning the equipment off and on, the user is encouraged to try to correct the interference by one or more of the following measures:
- Increase the separation between the equipment and receiver.
- Connect the equipment into an outlet on a circuit different from that to which the receiver is connected.
- Consult the dealer or an experienced radio/ TV technician for help.
This device complies with part 15 of the FCC Rules. Operation is subject to the following two conditions:
- This device may not cause harmful interference.
- This device must accept any interference received, including interference that may cause undesired operation.
Any changes or modifications not expressly approved by the party responsible for compliance could void the user's authority to operate the equipment.
Note: The manufacturer is not responsible for any radio or TV interference caused by unauthorized modifications to this equipment. Such modifications could void the user's authority to operate the equipment.
FCC RF Radiation Exposure Statement
This equipment complies with FCC RF radiation exposure limits set forth for an uncontrolled environment. This device and its antenna must not be co-located or operating in conjunction with any other antenna or transmitter.
"To comply with FCC RF exposure compliance requirements, this grant is applicable to only Mobile Configurations. The antennas used for this transmitter must be installed to provide a separation distance of at least 20 cm from all persons and must not be co-located or operating in conjunction with any other antenna or transmitter."
We, TP-Link USA Corporation, has determined that the equipment shown as above has been shown to comply with the applicable technical standards, FCC part 15. There is no unauthorized change is made in the equipment and the equipment is properly maintained and operated.
Issue Date: 2022-01-14
FCC compliance information statement
Product Name: Kasa Doorbell Chime
Model Number: KD110C
Responsible Party:
TP-Link USA Corporation
Address: 10 Mauchly, Irvine, CA 92618
Website: https://www.tp-link.com/us/
Tel: +1 626 333 0234
This equipment has been tested and found to comply with the limits for a Class B digital device, pursuant to part 15 of the FCC Rules. These limits are designed to provide reasonable protection against harmful interference in a residential installation. This equipment generates, uses and can radiate radio frequency energy and, if not installed and used in accordance with the instructions, may cause harmful interference to radio communications. However, there is no guarantee that interference will not occur in a particular installation. If this equipment does cause harmful interference to radio or television reception, which can be determined by turning the equipment off and on, the user is encouraged to try to correct the interference by one or more of the following measures:
- Increase the separation between the equipment and receiver.
- Connect the equipment into an outlet on a circuit different from that to which the receiver is connected.
- Consult the dealer or an experienced radio/ TV technician for help.
This device complies with part 15 of the FCC Rules. Operation is subject to the following two conditions:
-
This device may not cause harmful interference.
-
This device must accept any interference received, including interference that may cause undesired operation.
Any changes or modifications not expressly approved by the party responsible for compliance could void the user's authority to operate the equipment. Note: The manufacturer is not responsible for any radio or TV interference caused by unauthorized modifications to this equipment. Such modifications could void the user's authority to operate the equipment.
We, TP-Link USA Corporation, has determined that the equipment shown as above has been shown to comply with the applicable technical standards, FCC part 15. There is no unauthorized change is made in the equipment and the equipment is properly maintained and operated.
Issue Date: 2022-01-14
Canadian Compliance Statement
This device contains licence-exempt transmitter(s)/receiver(s) that comply with Innovation, Science and Economic Development Canada's licence-exempt RSS(s). Operation is subject to the following two conditions:
Radiation Exposure Statement:
This equipment complies with IC radiation exposure limits set forth for an uncontrolled environment. This equipment should be installed and operated with minimum distance 20cm between the radiator & your body.
Industry Canada Statement
CAN ICES-3 (B)/NMB-3(B)
Korea Warning Statements:
Note 1: “Exceeding 0.1 wt %” and “exceeding 0.01 wt %” indicate that the percentage content of the restricted substance exceeds the reference percentage value of presence condition.
Note 2: “○” indicates that the percentage content of the restricted substance does not exceed the percentage of reference value of presence.
Note 3: The “—” indicates that the restricted substance corresponds to the exemption.

- Keep the device away from fire or hot environments. DO NOT immerse in water or any other liquid.
- Do not attempt to disassemble, repair, or modify the device. If you need service, please contact us.
- Do not use the device where wireless devices are not allowed.
- Cut off the power supply to the transformer before installation to avoid accidental short-circuit of transformer output leads.
- The product must be installed and used in accordance with the National Electric Code (NEC) or your local electrical code. If you are unfamiliar with these codes and requirements, or are uncomfortable performing the installation, consult a qualified electrician.


CAUTION:
Double pole, neutral fusing.
Disconnect mains before servicing.
Please read and follow the above safety information when operating the device. We cannot guarantee that no accidents or damage will occur due to improper use of the device. Please use this product with care and operate at your own risk.
Warnings
- Operating Temperature for Chime: 0^ - 40^ (32°F-104°F)
- Operating Temperature for Doorbell: -20°C-45 °C (-4°F-113°F)
Explanation of the symbols on the product label
| Symbol Explanation | ||
 | Direct current | |
| Alternating current | ||
 | Indoor use only | |
 | Class II equipment | |
 | RECYCLINGThis product bears the selective sorting symbol for Waste electrical and electronic equipment (WEEE). This means that this product must be handled pursuant to European directive 2012/19/EU in order to be recycled or dismantled to minimize its impact on the environment.User has the choice to give his product to a competent recycling organization or to the retailer when he buys a new electrical or electronic equipment. | |
 | Caution, risk of electric shock | |
 | Fuse is used in neutral N | |
 | Caution | |
| Symbol Explanation | |
| Operator's manual | |