
Kasa KC401 - Security Camera TP-LINK - Free user manual and instructions
Find the device manual for free Kasa KC401 TP-LINK in PDF.

| Product Type | Security Camera |
| Brand | TP-Link |
| Model | Kasa KC401 |
| Dimensions (H x W x D) | 117.6 x 85.8 x 85.8 mm |
| Weight | 272 g |
| Power Supply | Micro USB, 5V DC, 1A |
| Video Resolution | 1080p Full HD |
| Field of View | 130° diagonal |
| Night Vision | Up to 9.1 m (30 ft) with IR LEDs |
| Audio | Two-way audio with built-in microphone and speaker |
| Connectivity | Wi-Fi 2.4 GHz (802.11 b/g/n) |
| Motion Detection | Yes, with activity zones |
| Storage | MicroSD card up to 256 GB (not included) or cloud subscription |
| Weather Resistance | IP65 (outdoor rated) |
| Operating Temperature | -20°C to 45°C (-4°F to 113°F) |
| Mounting Options | Wall or ceiling mount |
| Compatibility | Amazon Alexa, Google Assistant, IFTTT |
| Security | WPA/WPA2 encryption, secure login |
| Maintenance | Clean lens with soft dry cloth; keep firmware updated |
| Spare Parts & Repairability | Not user-repairable; contact TP-Link support |
Frequently Asked Questions - Kasa KC401 TP-LINK
User questions about Kasa KC401 TP-LINK
0 question about this device. Answer the ones you know or ask your own.
Ask a new question about this device
Download the instructions for your Security Camera in PDF format for free! Find your manual Kasa KC401 - TP-LINK and take your electronic device back in hand. On this page are published all the documents necessary for the use of your device. Kasa KC401 by TP-LINK.
USER MANUAL Kasa KC401 TP-LINK
About This Guide....1
Introduction to Kasa Smart App....2
Set Up Your Camera 3
Main Device Controls 4
Set Schedules 7
Enable 24/7 Recording....10
Check 24/7 Recording Videos 11
Turn On/Off Spotlight Temporarily....12
Screen Recording 13
Enable/Disable Siren 14
Pan/Tilt 15
Add/Delete View Points 16
Manage Device Settings 17
Reset Your Camera 34
Cameras 36
Grouping 37
Me Page 42
Manage Your Account 42
Kasa Care 43
Third Party Services 44
Firmware Update 48
Notification 49
Widgets 50
Settings....59
Scenes 60
Smart Actions 65
Me Page 74
Manage Your Account 74
Kasa Care 75
Third Party Services 76
Firmware Update 80
Notification 81
Widgets 82
Settings 91
About This Guide
This guide provides a brief introduction to the Kasa Smart app and the Kasa Cameras, as well as regulatory information.
Features available of this product and in Kasa Smart may vary by model and software version. Kasa Spot and Kasa Smart availability may also vary by region. All images, steps, and descriptions in this guide are only examples and may not reflect your actual experience.
Conventions
In this guide, the following convention is used:
| Convention | Description |
| Teal | Key information appears in teal, including management page text such as menus, items, buttons and so on. |
| Underline | Hyperlinks are in teal and underlined. You can click to redirect to a website. |
More Info
- Specifications can be found on the product page at https://www.tp-link.com.
• Our Technical Support and troubleshooting information can be found at https://www.tp-link.com/support. - Frequently Asked Questions (FAQs) can be found at https://www.tp-link.com/support/faq.
Introduction to Kasa Smart App
Set Up Your Camera
Follow the steps below to get started with your new camera.
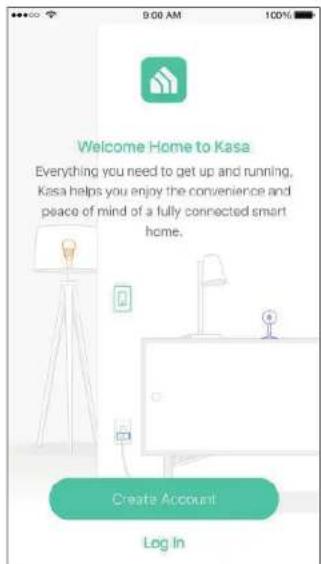
Step 1. Download Kasa
Get the Kasa Smart app from the App Store or Google Play, or by scanning the QR code below.

Step 2. Log In
Open the Kasa Smart app and log in with your TP-Link ID. If you don't have an account, create one Erst.
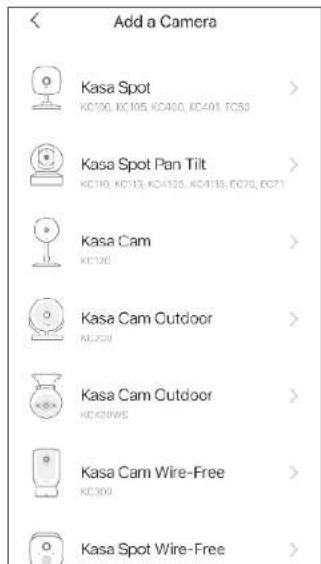
Step 3. Start Setup
Tap the + button in the Kasa Smart app, select Device > Cameras and then your model. Follow step-by-step app instructions to complete the setup.
Main Device Controls
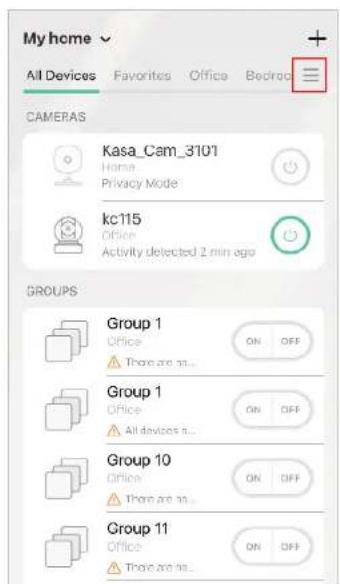
After you successfully set up your smart camera, you will see the home page of the Kasa Smart app. Here you can view and manage all devices that you've added to Kasa. Tap your smart camera to control and manage it.
Home Page
You can see all your Kasa devices listed in the Home page.
Turn On/Off Camera
Turn on/off your camera quickly by tapping the switch in the home page. If it is off, you are entering Privacy Mode and cannot stream live video.
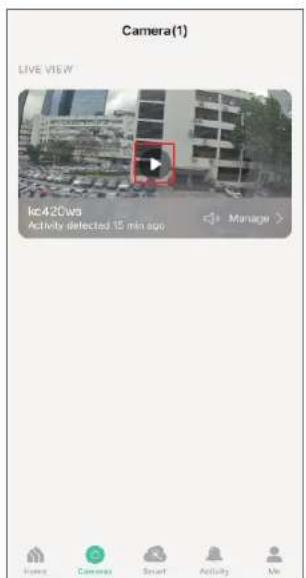
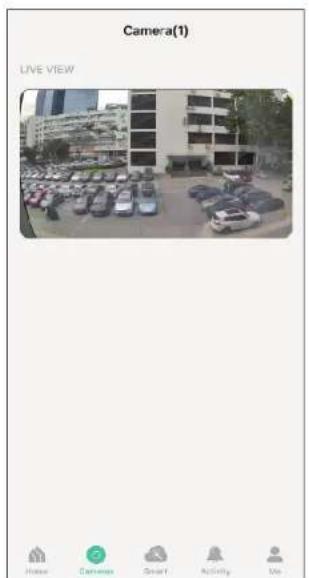
Live View Page
Tap the camera in the Home page to enter the Live View page. Here you can check live view video and activities detected by your camera.
Favorite Devices
Gather the devices you use most often to Favorites so you can easily find them. Long press your device and tap Favorite in the Home page.
Relocate Devices
Long press your device and tap Relocate to move the device to another home or room you have created.
Add Rooms
Tap and go to the home page. Then tap
+ Add Rooms to add rooms for this home.
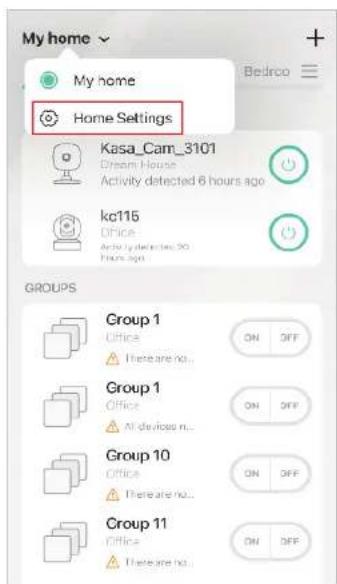
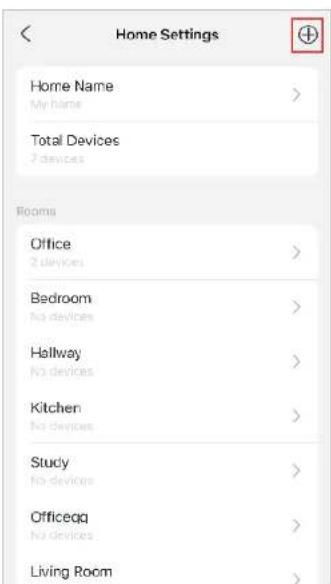
Add a Home
Tap My Home and go to Home Settings. Tap ⊕ to Add a Home. You can also add rooms for different homes in home settings page.
Set Schedules
Set schedules to automatically turn on/off your camera, or turn on/off patrol mode (the camera moving between your viewpoints) of your camera, at set times according to your daily routine.
Note: When the camera is off, you cannot watch live view video.
Note: Only pan/tilt cameras support Pantrol Mode schedules.
- Tap your camera in the Home page to enter 2. Tap + on the top right corner.
the live view page, and then tap
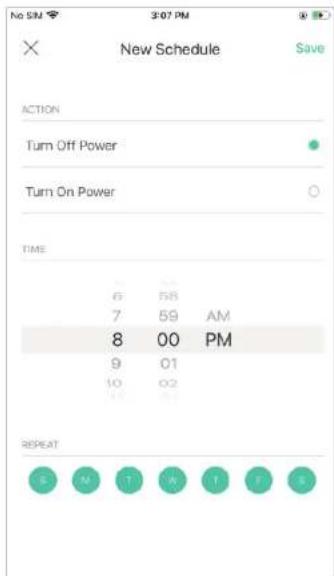
Power Schedule
Note: For pan/tilt cameras, select Power after tapping +.
- Set a schedule to turn your camera on or off. For example, I want to turn off the camera at 8:00 PM every day.
- Tap Save and you'll see your schedule listed in the Schedule Page. You can add more schedules following the same steps.
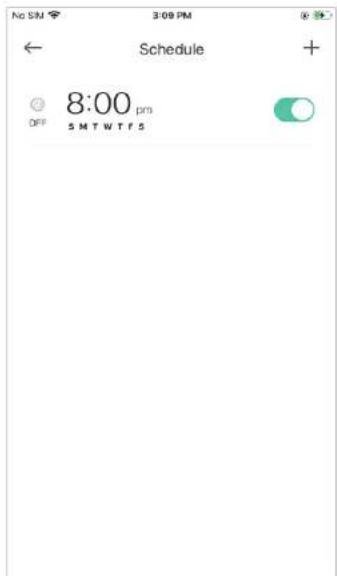
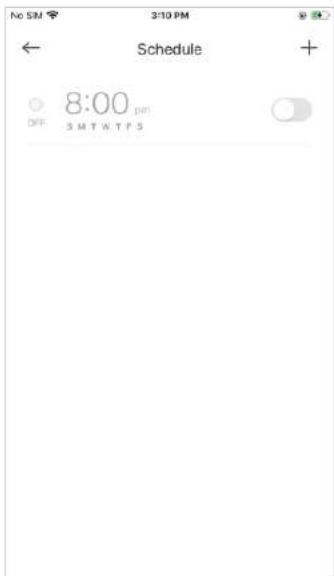
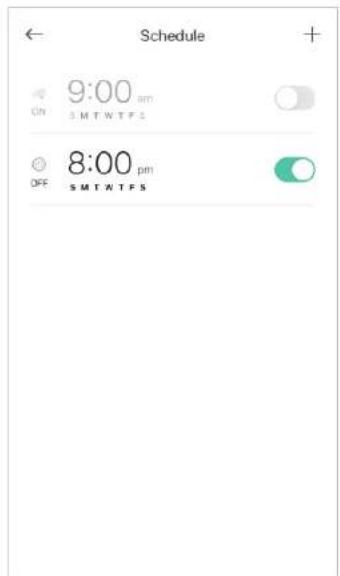
- You can turn off your schedule any time at the Schedule page.
Patrol Mode Schedule
Note: You need at least two viewpoints to use the patrol mode schedule.
Note: Only pan/tilt cameras support Pantrol Mode schedules. You can select Patrol Mode after tapping +.
1 Set a schedule to turn the patrol mode on or off. For example, I want to turn on patrol mode at 9:00 AM every weekday.
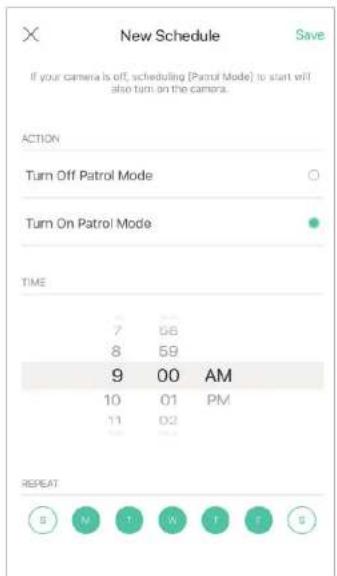
- Tap Save and you'll see your schedule listed in the Schedule Page. You can add more schedules following the same steps.
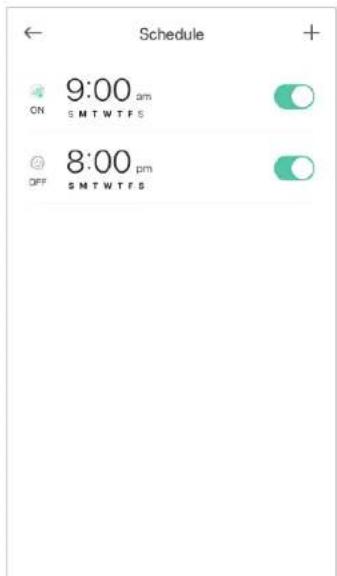
- You can turn off your schedule any time at the Schedule page.
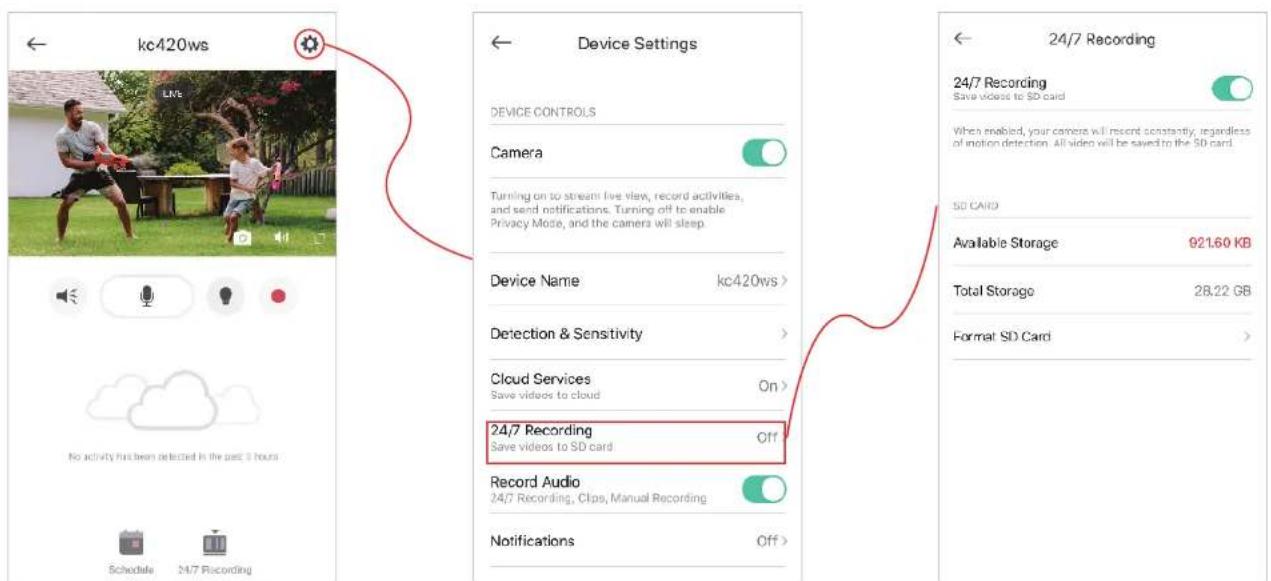
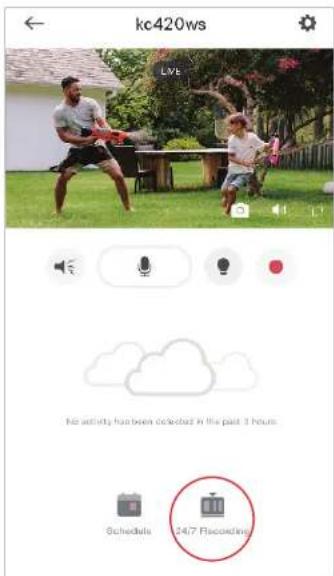
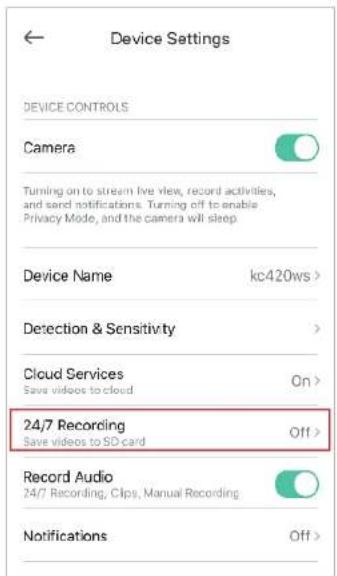
Enable 24/7 Recording
When 24/7 Recording is enabled, your camera will record every minute of every day so you'll never miss a thing.
Note: You need to insert a microSD card first.
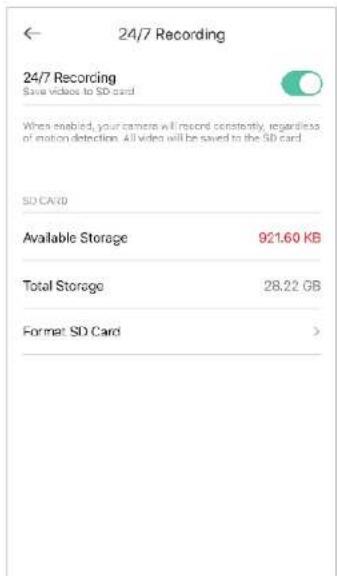
In the live view page, tap 📍 then 24/7 Recording. You can enable or disabled the feature and check the storage of your microSD card.
Encryption: When enabled, all videos recorded to your SD card can only be read from this Kasa camera.
Check 24/7 Recording Videos
The recorded videos are saved in the microSD card. You can check it in the app.
In the Live View page, tap 📄 24/7 Recording . You will see recorded videos.
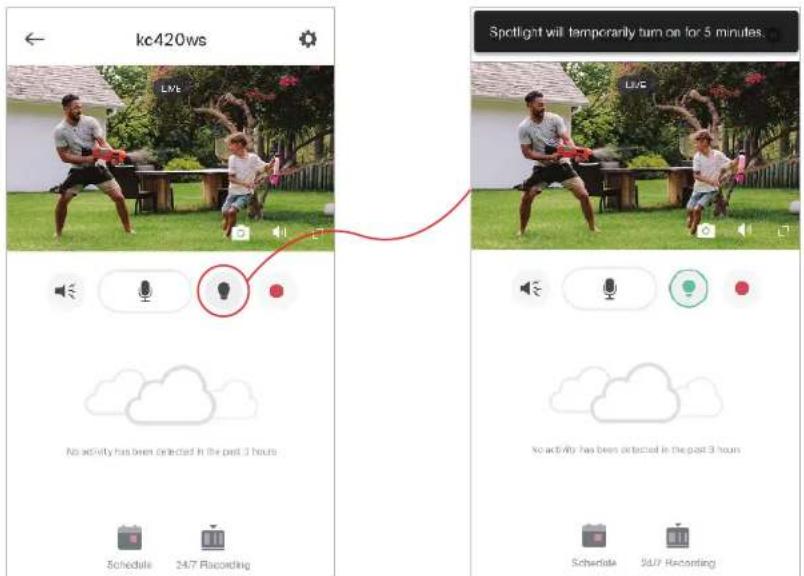
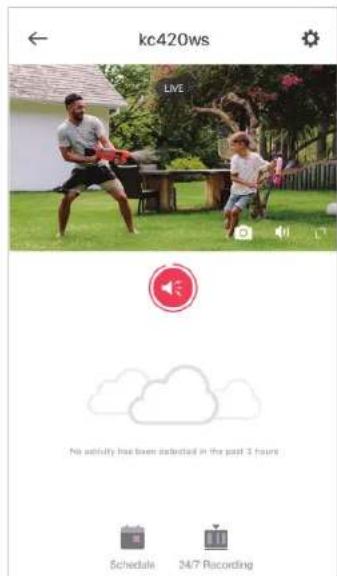
Turn On/Off Spotlight Temporarily
You can turn on/off spotlight temporarily in the Live View page. You can also customize the temporary period in Device Settings. Note: It is suitable for KC420WS only.
In the Live View page, tap

to turn on/off spotlight temporarily. To change the temporary period, go to Device Settings > Spotlight Settings.
Screen Recording
Quickly record what interests you in Live View.
Note: This feature is currently exclusive to Kasa Care subscribers.
Go to Me > Kasa Care, then subscribe the Kasa Care service for your camera.
In the Live View page, tap to record the
live view. The clips will be save to Activity.
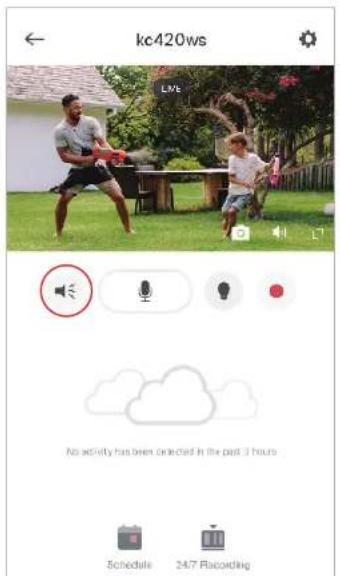
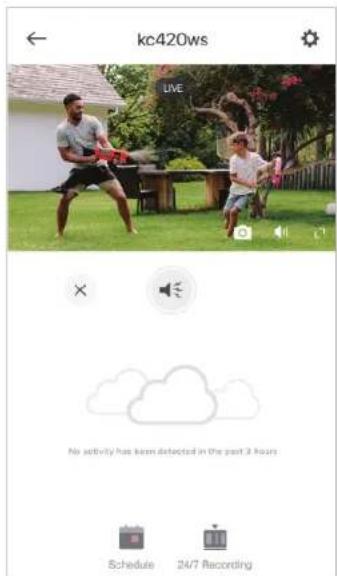
Enable/Disable Siren
You can manually trigger the siren when viewing live video to scare away unwanted visitors if necessary. Note: It is suitable for KC420WS only.
In the Live View page, tap 🔔 and the siren on/off button appears. You can tap once to trigger the siren, and tap again to disarm it.
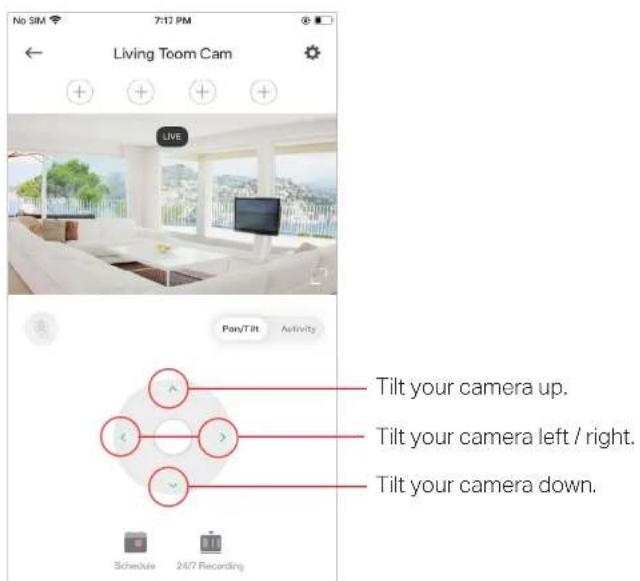
Pan/Tilt
You can swipe up, down, left, and right on your phone to rotate and set the camera's point of view. Note: It is suitable for pan/tilt cameras only.
In the Live View page, tap the arrow icon to rotate your camera as you like.
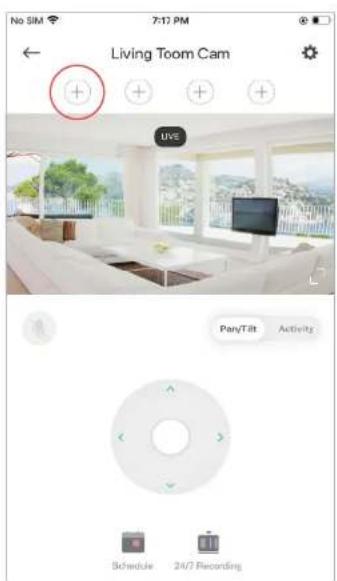
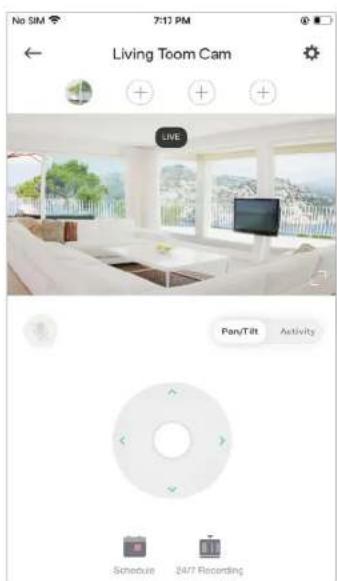
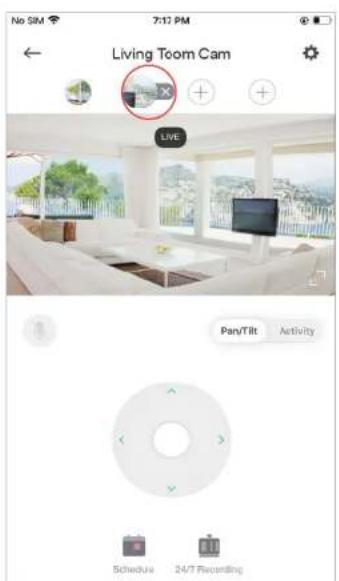
Add/Delete View Points
Add the spots that are most important to you, so you can easily turn your camera to the specific spot with a single tap. Note: It is suitable for pan/tilt cameras only.
In the Live View page, rotate your camera to locate the spot that matters to you, then tap + to add it as a viewpoint. Follow the same steps to add other view points.
Tap the viewpoint you have added and X appears. Then tap X to delete the viewpoint.
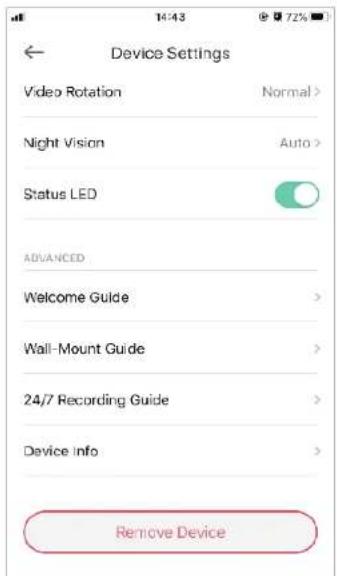
Manage Device Settings
Device controls, camera settings, and advanced are available on the device settings page.
-
In the live view page, tap ⚙ to go to Device Settings page.
-
Turn on or off the camera.
When Camera is turned off, it means privacy mode is enabled. You can turn the camera off when you do not want your camera to stream live view and record videos.
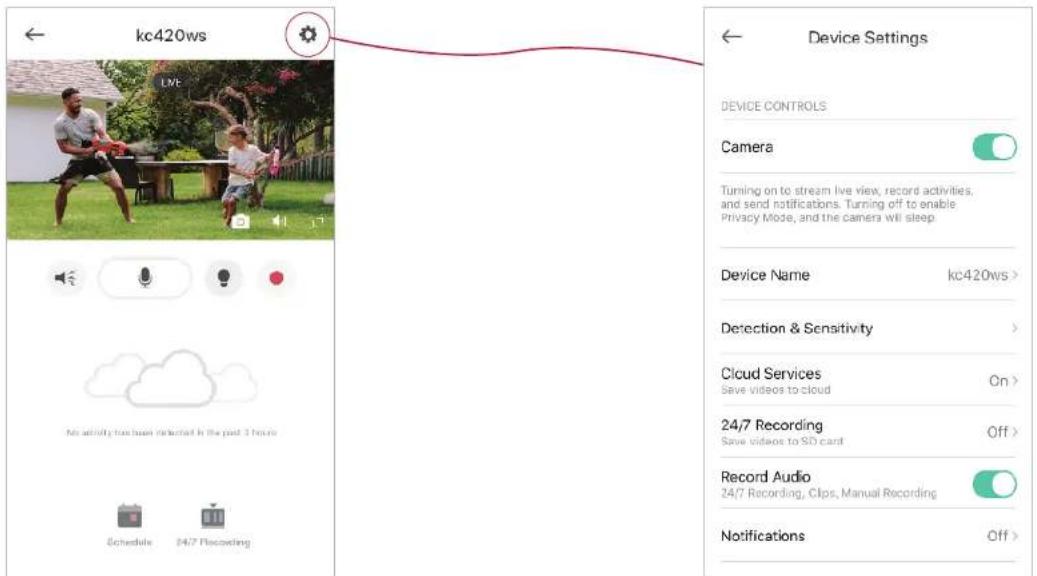
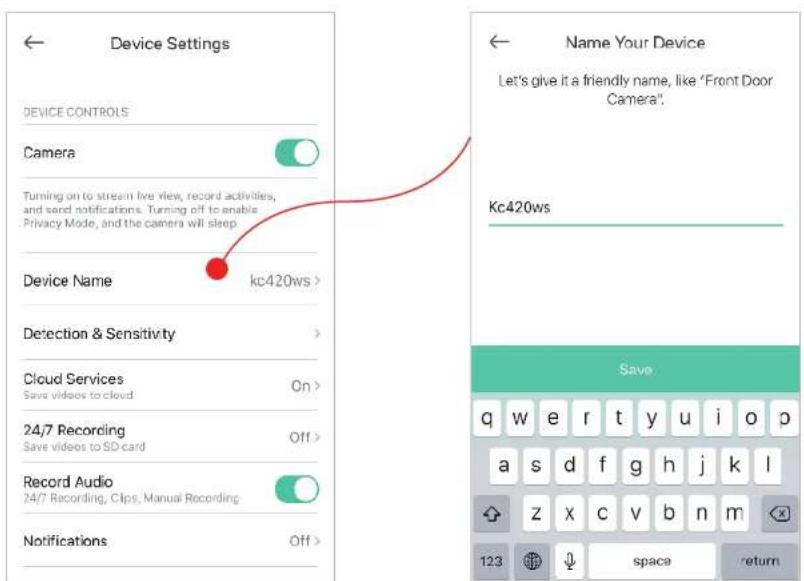
- Edit device name.
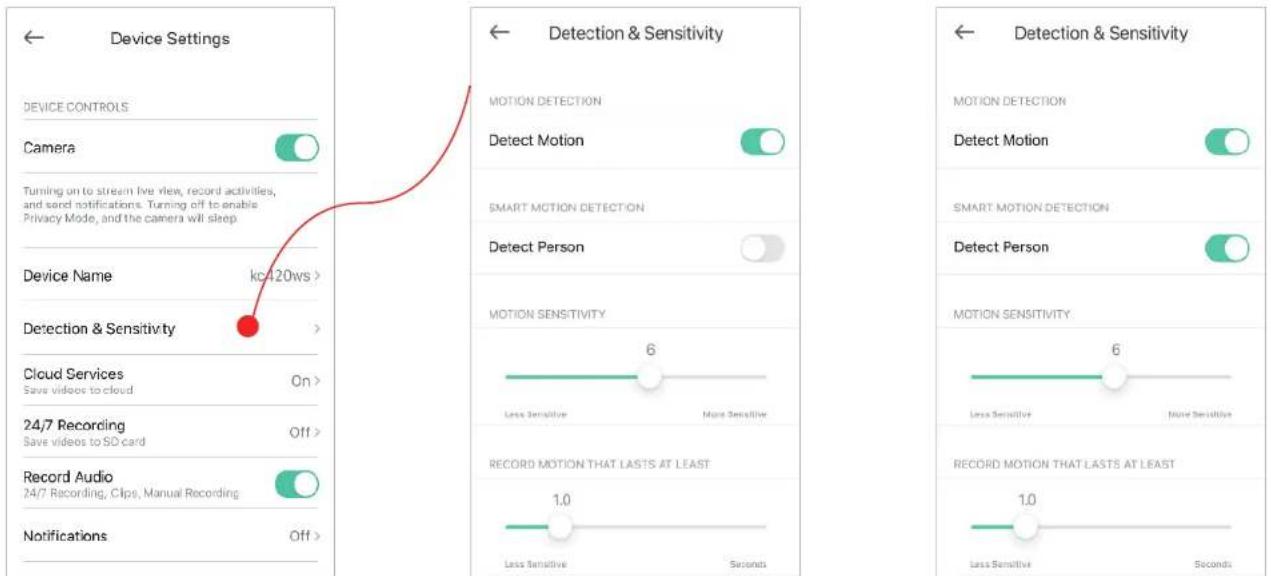
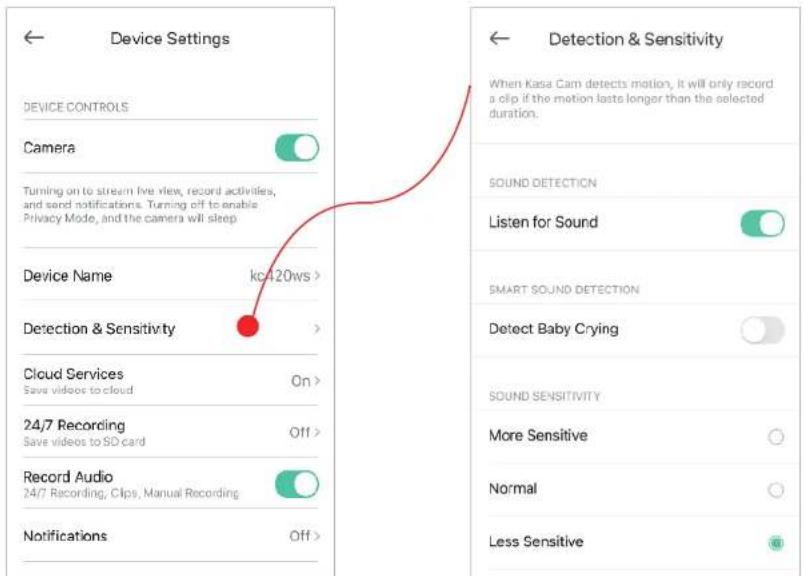
- Set motion detection for recording videos.
Enable Detect Motion if you want your camera to record when motion is detected. Also set the sensitivity of detection.
Enable Detect Person if you want your camera to record when person is detected.
- Set sound detection for recording videos.
Enable Listen for Sound if you want your camera to record when sound is detected. Then set its sensitivity.
Enable Detect Baby Crying if you want your camera to record when crying is detected.
Note: Only indoor cameras support baby crying detection.

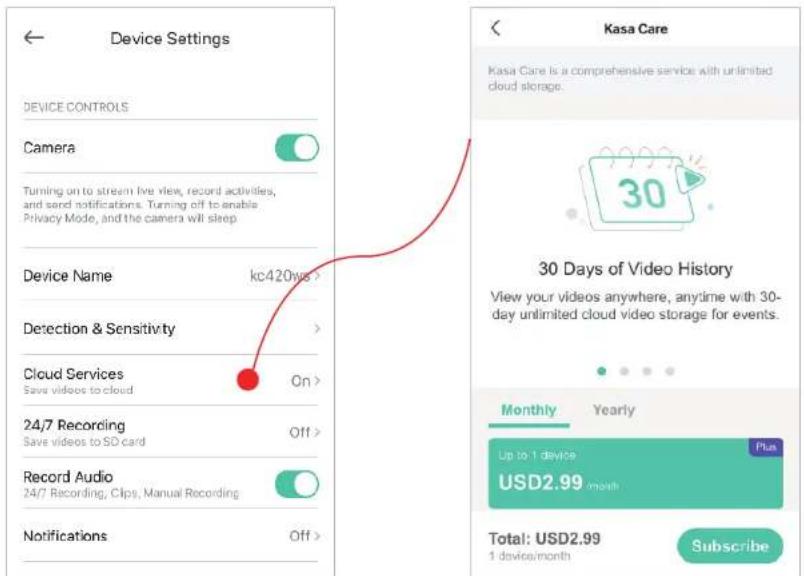
6. Turn on/off cloud services
Turn Cloud Services on/off for your cameras. When it is on, video clips are recorded whenever motion is detected and saved to the Kasa Cloud. Note: Cloud Services appears in Device Settings when you subscribe to the Kasa Care service.
7.24/7 Recording
Enable 24/7 Recording and your camera will record constantly. All videos will be saved to the SD card. Note: Insert a microSD card into the SD card slot on the device and initialize it in the Kasa Smart app.
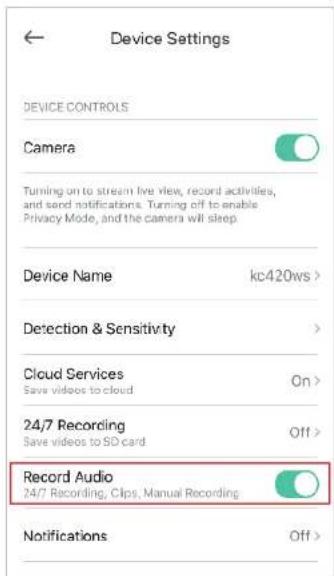
- Choose whether to record audio.
Enable Record Audio if you want to also record sound during recording.
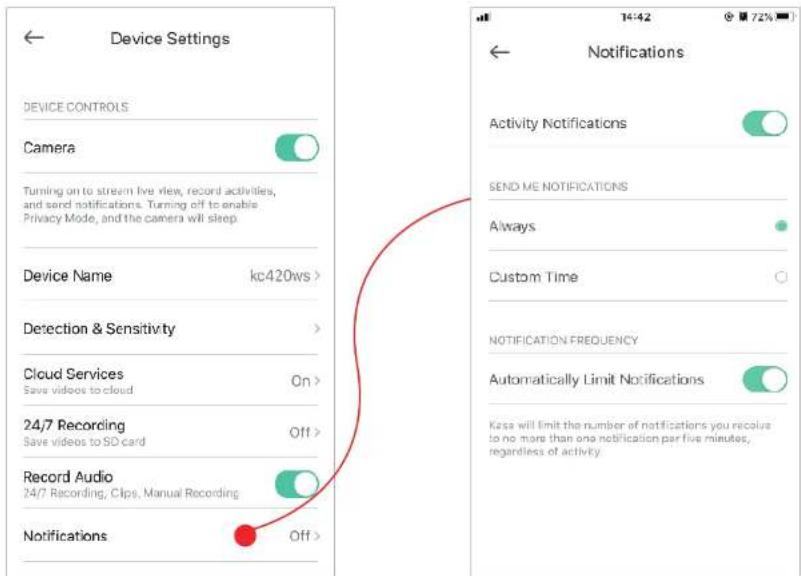
- Choose whether to receive notifications.
Enable Activity Notifications if you want to be notified when activity is detected. You can also set the time when you want to receive notifications. If you don't want to be bothered by frequent notifications, enable Automatically Limit Notifications.
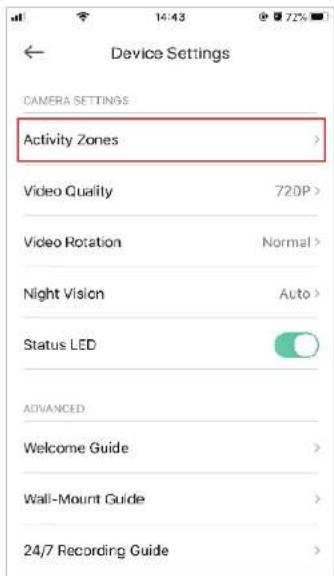
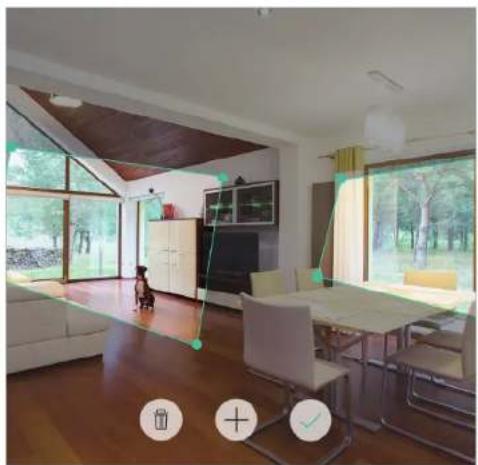
- Set activity zones.
Control what alerts you by creating multiple custom activity zones around areas that are important to you.
natural_image
Interior view of a modern living room with large windows and wooden flooring (no visible text or symbols)- Choose the resolution for videos.
The highest quality looks better but requires faster internet connection and larger size for saving the videos.

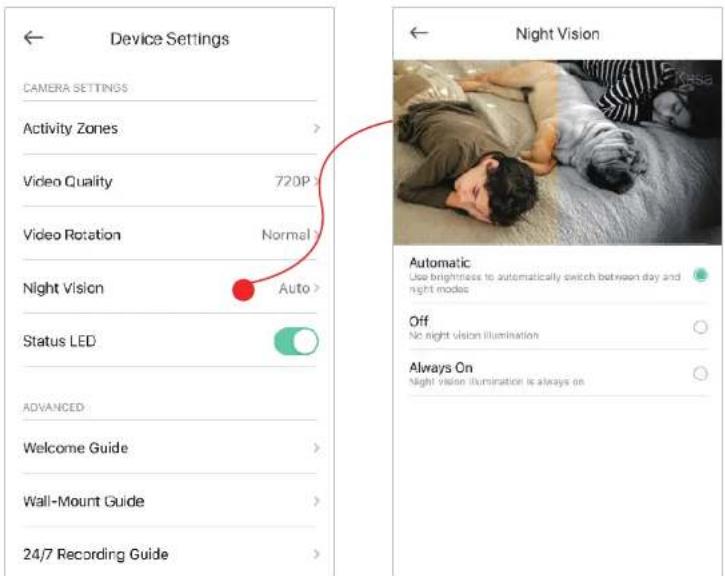
- Choose when you want the night vision to be on.
Night vision allows you to see clearly at night. You can choose Automatic to turn on night vision automatically in low light conditions and turn off in daylight.
Note: Night Vision is available with indoor cameras only.
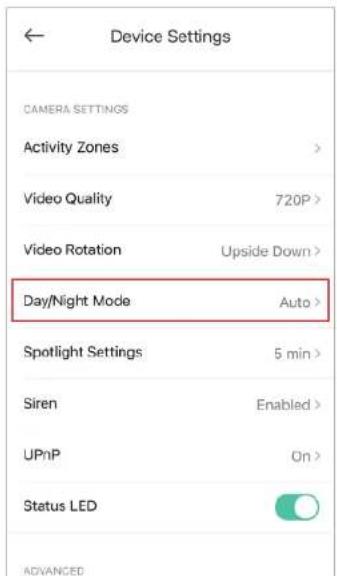
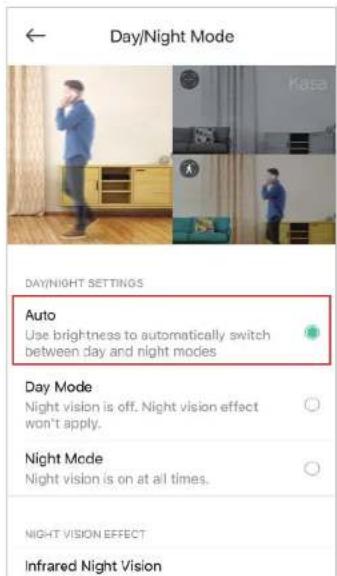
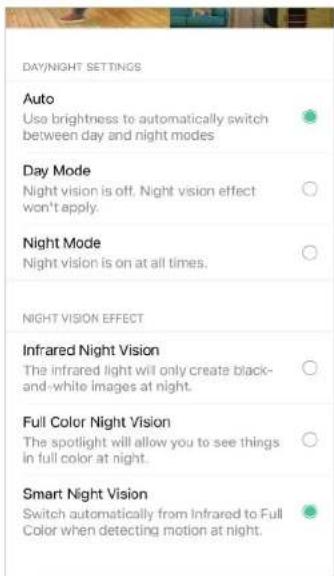
14. Set Day/Night Mode and the Night Vision Effect
Night vision allows you to see clearly at night. You can choose Automatic to turn on night vision automatically in low light conditions and turn off in daylight.
Full-Color night vision allows you to see things in full color at night. You can choose Smart Night Vision to switch automatically from Infrared to Full color when detecting motion at night.
Note: Day/Night Mode is available with outdoor cameras only.
15. Spotlight settings
You can temporarily turn on/off the spotlight in Live View. Here you can customzie the temporary period.
Note: Spotlight Settings is available with outdoor cameras only.

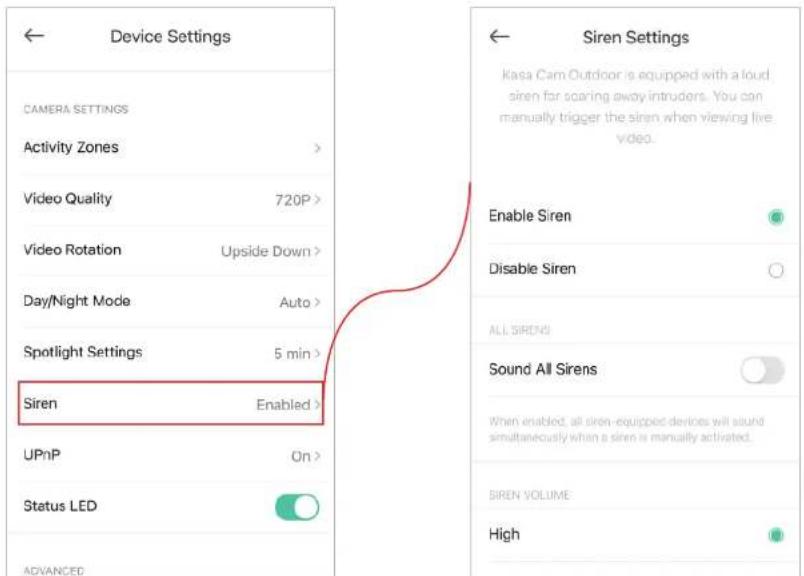
16. Siren settings
You can enable or disable siren, enable sound all sirens, set the siren volume and siren duration.
Note: Siren is available with outdoor cameras only.
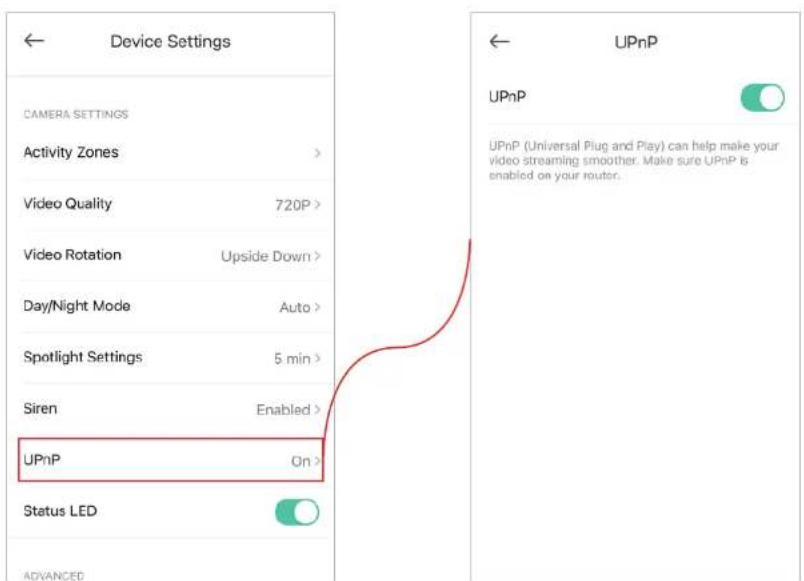
17. UPnP
UPnP (Universal Plug and Play) can help make your video streaming smoother. Make sure UPnP is enabled on your router.
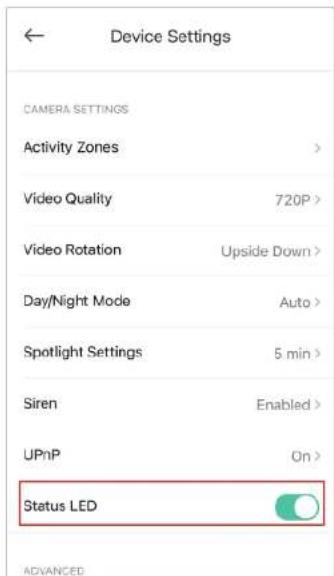
18. Status LED
You can turn off the status LED of your camera.
Reset Your Camera
Kasa Smart app provides two methods to reset your camera.
Method 1
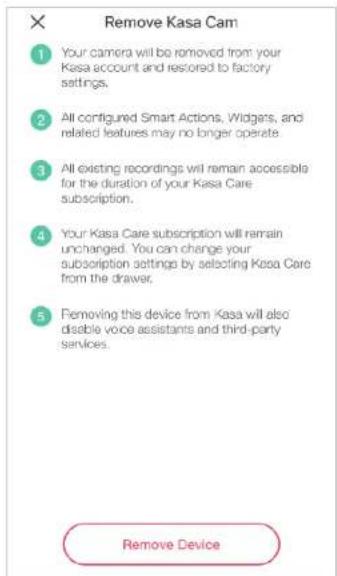
Long press your camera on the Home page and tap 📄. Then tap Remove Device. Your camera will be removed from your Kasa account and restored to factory settings.
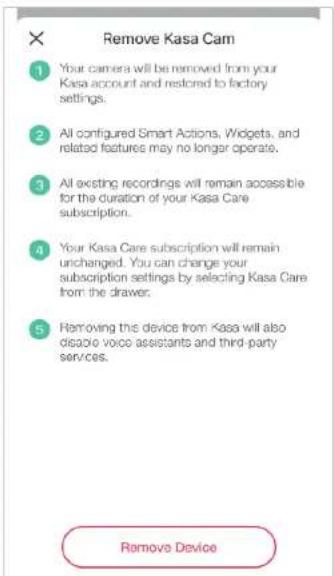
Method 2
Tap your camera and go to the Devices Settings page. Then tap Remove Device in the bottom. Your camera will be removed from your Kasa account and restored to factory settings.
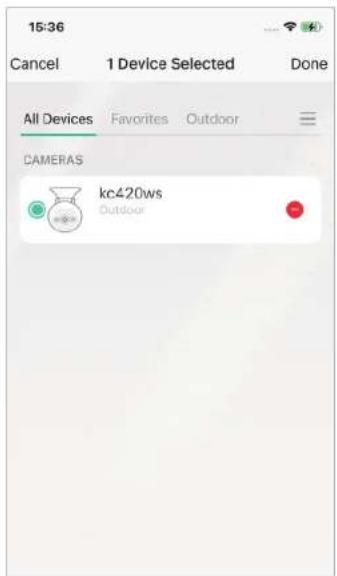
Cameras
Kasa Smart app provides a shortcut to live view all your cameras in one page.
Open the Kasa Smart app, tap Cameras on the bottom and you can live view all your kasa cameras in the same page.

Grouping
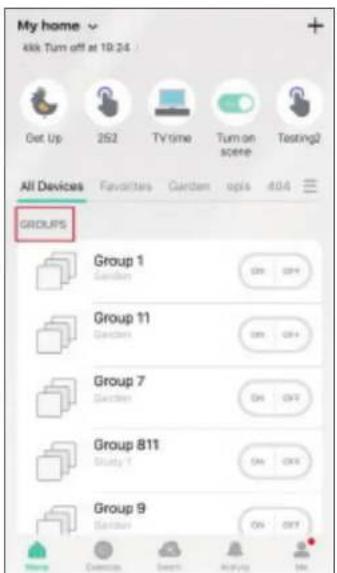
A group is a collection of devices that you can tap a single action to control all devices belonging in that group. It is accessible in the home screen just like any other devices.
You can group together smart plugs, smart switches and smart bulbs.
1. Create Groups
Step 1. Tap the Ⓐ button in the Home page of the Kasa Smart app, and select Group.
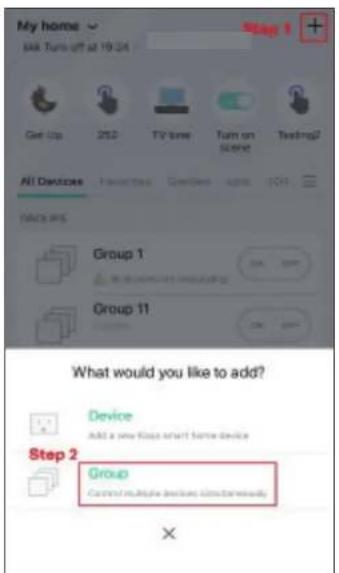
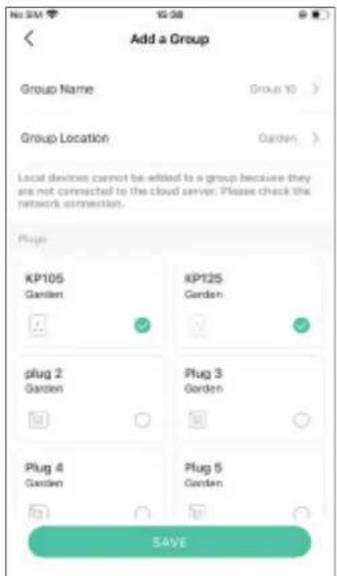
Step2. Name your group and set location for it. Select smart devices you want to add to the group and tap SAVE.
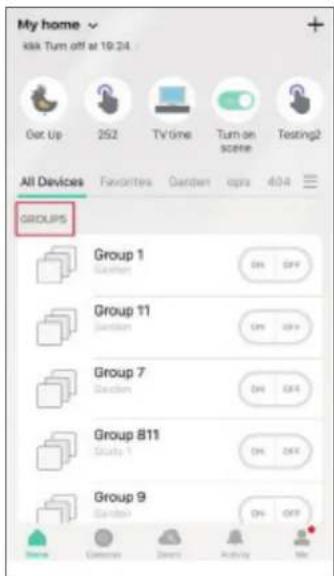
Step3. The created group is listed in the Home page. You can tap ON or OFF to turn on/off the smart devices together in the group.
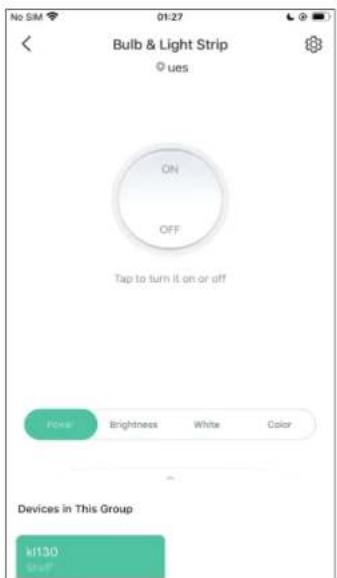
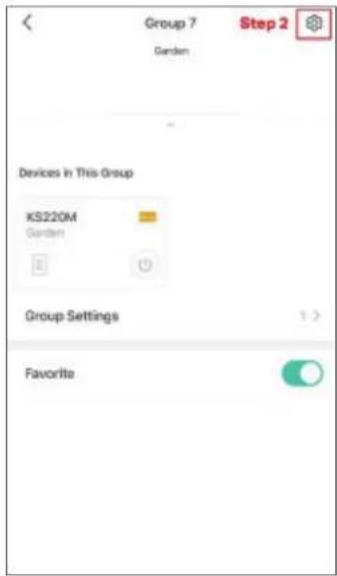
2. Manage the group
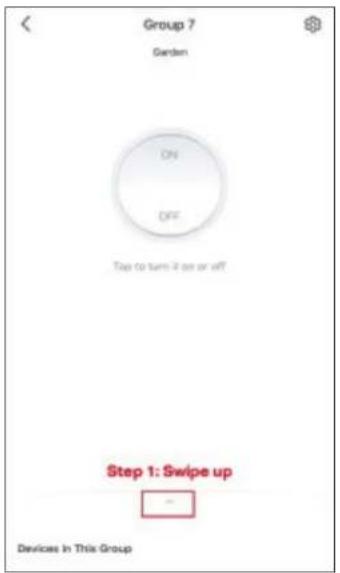
- Tap the group you want to manage. 2. Turn on or off the group in the status page.
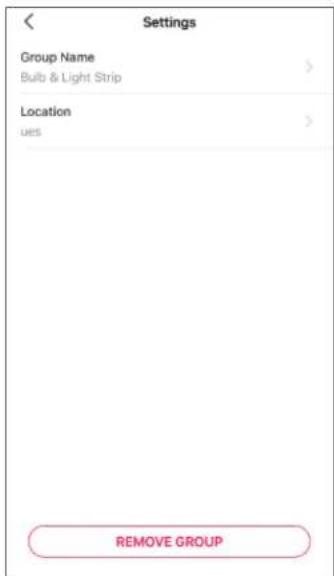
- Tap the top right corner to enter the settings page. Tap Group Name to rename the group and Location for relocate it.
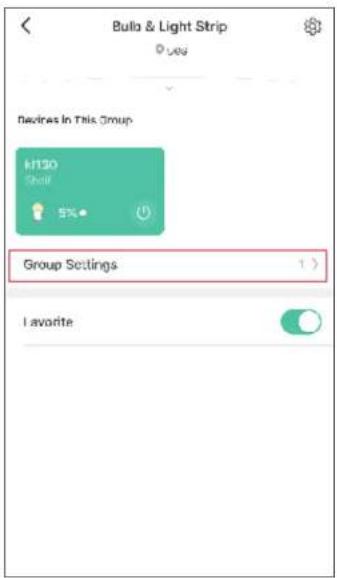
-
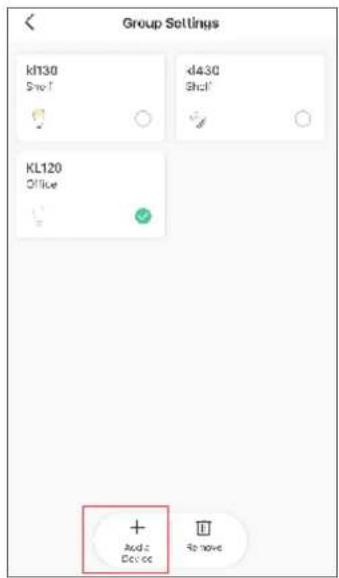
Swipe down the status page and tap Group Settings to add/delete device in the group. Tap Add Device and you can choose the available devices and tap ADD to add devices to your group.
-
Back to the Group Settings page, you can choose the device you want to delete and tap Delete to remove devices from the group.

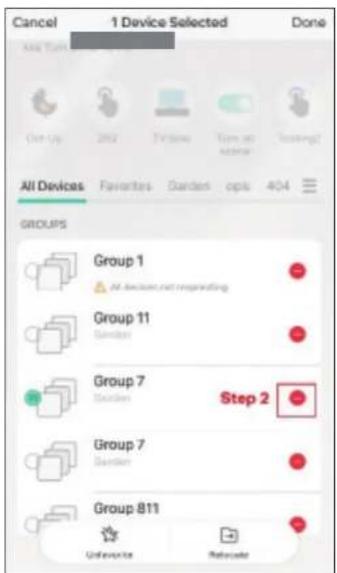
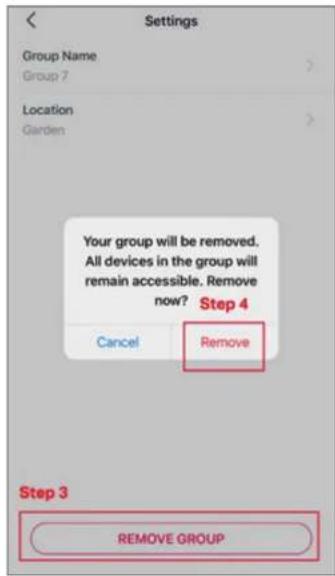
3. Delete a Group
Option 1. From device list, long press an individual group until the delete symbol appears on the right. Tap the delete symbol.
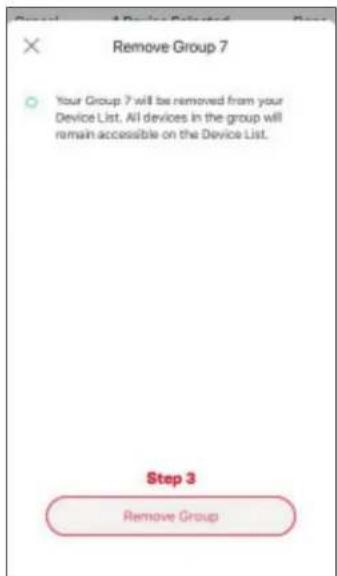
Option 2. Tap the gear icon on the Status Page to enter the Group Settings page. Then tap REMOVE GROUP and Remove to remove the device from your group.
Me Page
The Kasa app offers a list of advanced features to fulfill diverse smart home needs.
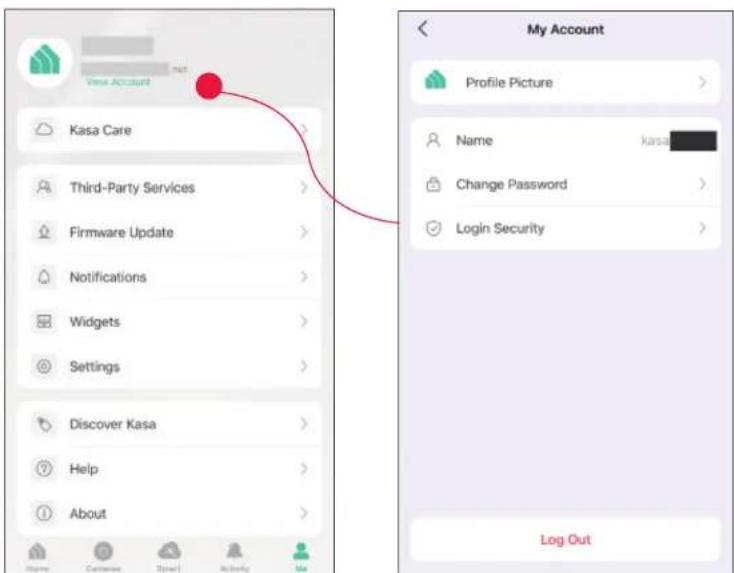
Manage Your Account
Launch the Kasa Smart app. Tap Go to the Me page and tap your account or profile. Here you can change your profile picture, password, and login security settings.
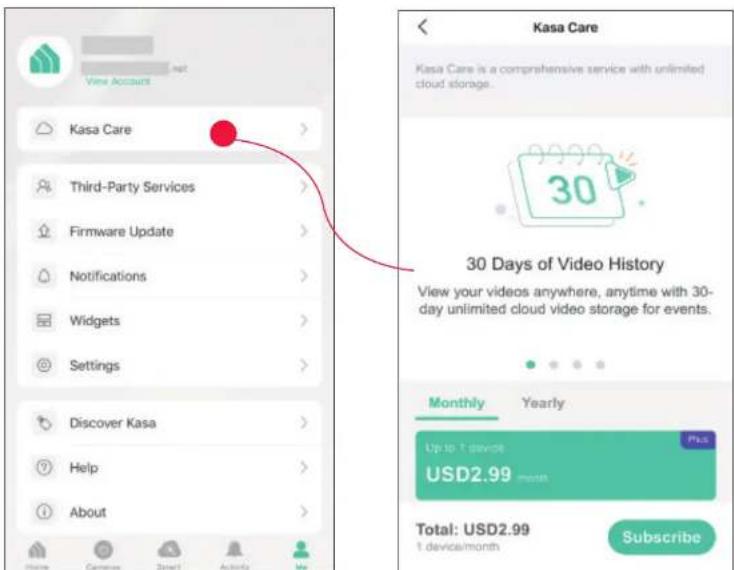
Kasa Care
Kasa Care is a cloud-based service that allows users to view and download activity recordings from a Kasa Cam. When you purchase a Kasa Cam, you can subscribe to our advanced plan to enjoy our Kasa Care cloud service.
To view the Kasa Care plan, from the Kasa APP > Tap Me on the bottom> Select Kasa Care.
Note: With the Kasa Care service, every Kasa account is eligible to sign up for a free trial for the new Kasa Care plan once.

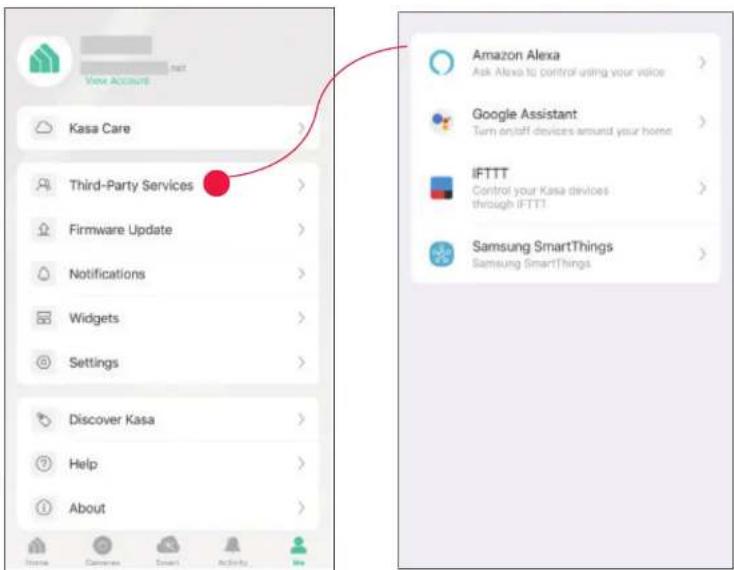
Third Party Services
Use the Kasa Smart app to pair your Smart devices with Amazon Alexa or Google Home Assistant, and enjoy a full hands-free experience. Kasa helps manage the rest of your smart home too, working with Samsung Smart Things to trigger changes when you arrive home or leave for the day.
Launch the Kasa Smart app. Go to the Me page and tap Third Party Services. You can choose Amazon Alexa / Google Assistant / IFTTT / Samsung SmartThings for detailed instructions.
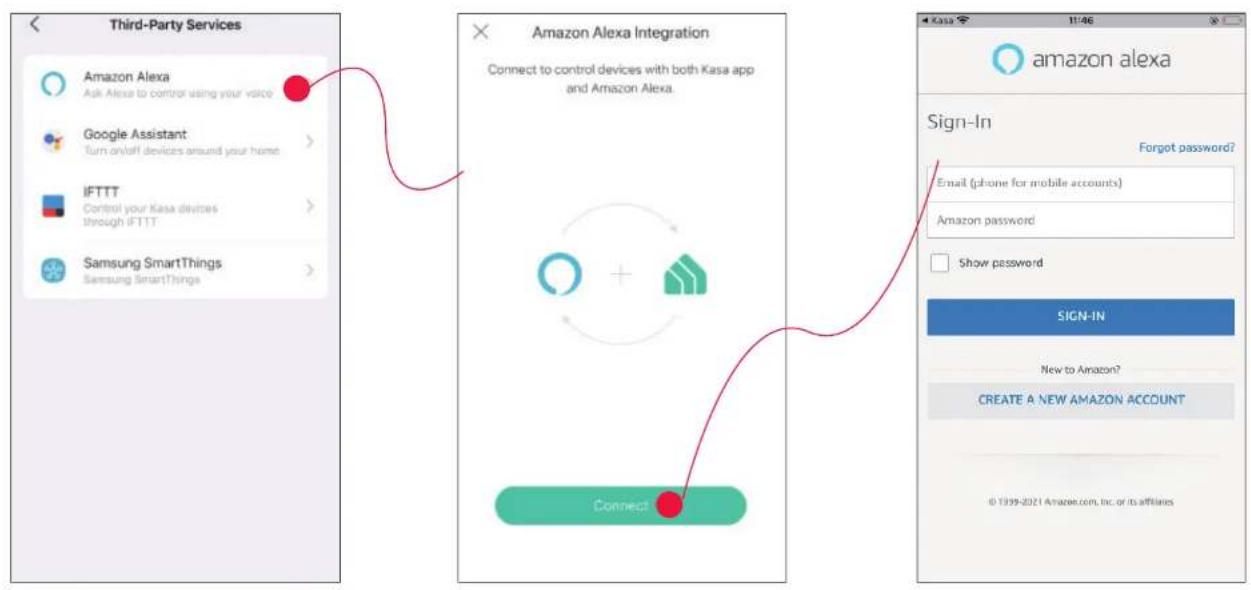
1. Set up Amazon Alexa
-
Tap Amazon Alexa. 2. Tap Connect.
-
Sign in with your amazon account.
flowchart
graph TD
    A["Third-Party Services"] --> B["Google Assistant"]
    B --> C["IFTTT"]
    C --> D["Samsung SmartThings"]
    D --> E["Amazon Alexa Integration"]
    E --> F["Connect to control devices with both Kasa app and Amazon Alexa."]
    F --> G["Connect"]
    G --> H["amazon alexa"]
    H --> I["Sign-In"]
    I --> J["Email (phone for mobile accounts)"]
    I --> K["Amazon password"]
    I --> L["Show password"]
    L --> M["SIGN-IN"]
    M --> N["New to Amazon?"]
    M --> O["CREATE A NEW AMAZON ACCOUNT"]
-
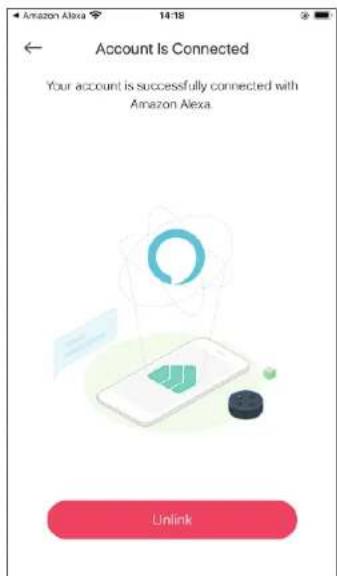
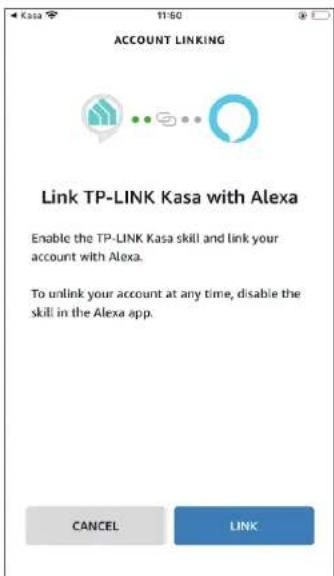
After sign-in, tap LINK.
-
Your TP-Link ID has been successfully linked with your amazon account. You can use Alexa voice commands to control your Smart Wi-Fi Power Strip.

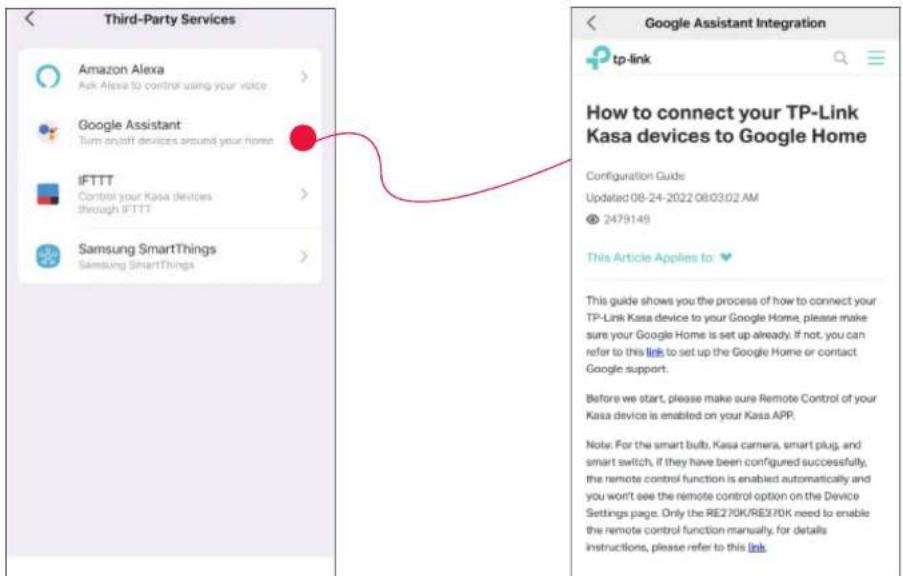
2. Set up Google Assistant
-
Tap Google Assistant.
-
Follow instructions to connect your device to your Google Home.
Or find the FAQ at https://www.tp-link.com/en/support/faq/1534/.
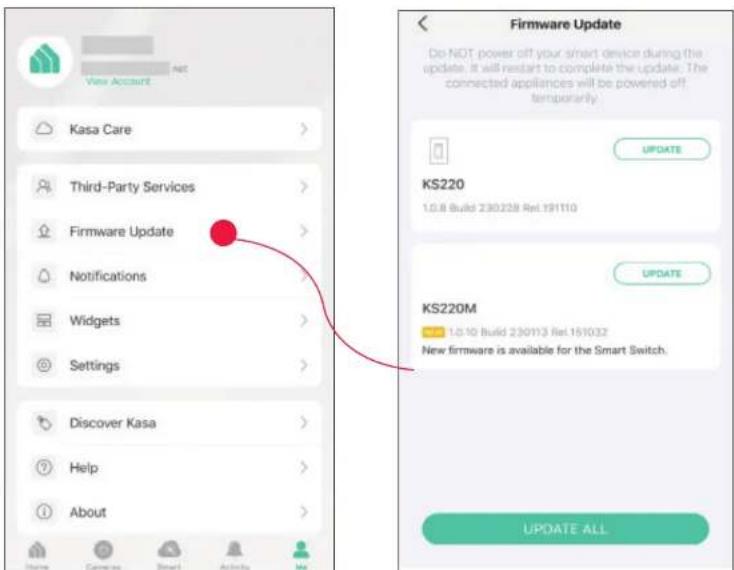
Firmware Update
The firmware on TP-Link Kasa smart devices can only be updated by using the TP-Link Kasa App.
To view the updated firmwares, from the Kasa APP > Tap Me on the bottom> Select Firmware Update. If any firmware updates are available, they will be displayed on this page.

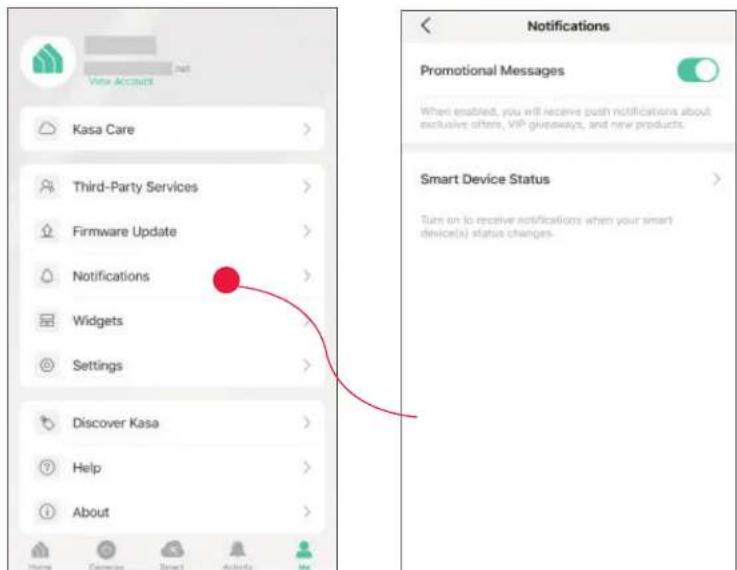
Notification
Kasa Cam utilizes the push notification of your smart phone to inform you of detected activities by the camera.
To configure notification settings, from the Kasa APP > Tap Me on the bottom > Select Notification.

Widgets
With widgets, you can tap and send commands to your Kasa devices, such as executing scenes, turning off lights, viewing your Kasa camera clips, and more.
The Kasa app provides three widgets: namely, KASA CAM WIDGET, KASA DEVICES, and KASA SCENES. These three gadgets cover some of the most frequently-used functions, including:
- KASA DEVICES: Display the status of your selected devices and simple commands like turning on/off.
• KASA SCENES: Enable/disable the selected scenes.
• KASA CAM WIDGET: Preview and check your video clips.
Widgets come along with your smart home app and can be activated with some simple steps.
For iOS user, the whole process is divided into two procedures:
- Firstly, select the Kasa Devices, Kasa Scenes, and Kasa Cam that you want to set as a widget on the Kasa app
• Secondly, add the Kasa Widgets on your home screen.
For Android user, you can directly add the Kasa Widgets on your home screen.
Note: Setting steps differ in adding the Kasa Widgets on your home screen in the iOS and Android systems.
1. Select Your Desired Widgets (for iOS)
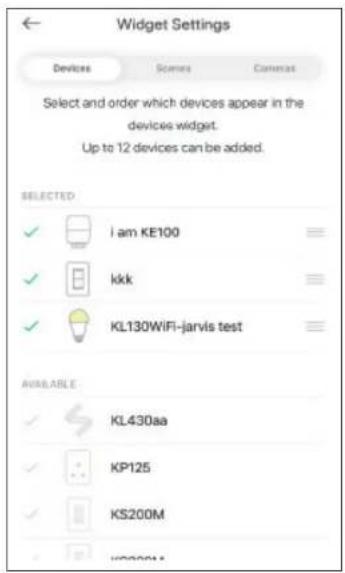
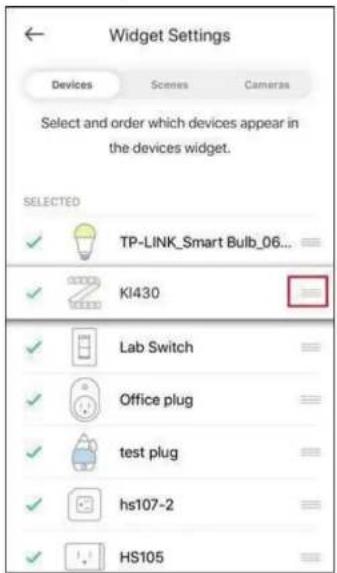
Step 1 To add widgets, from the Kasa APP > Tap Me on the bottom > Tap Widgets.
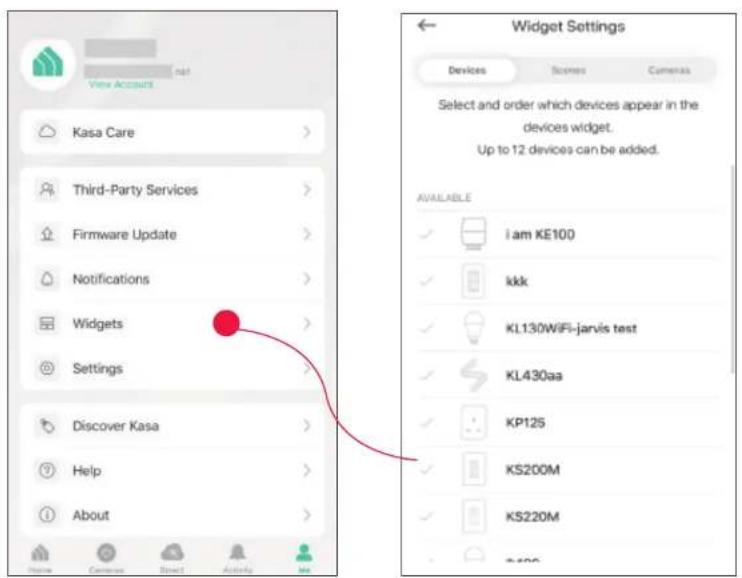
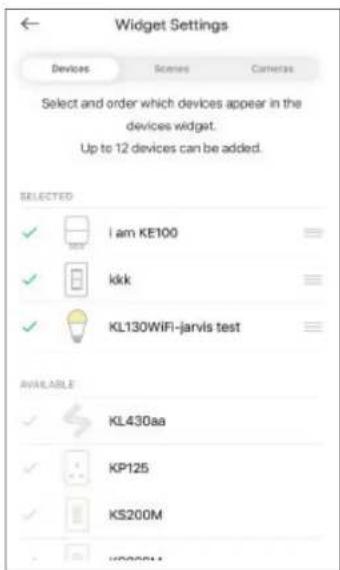
Step 2. Choose the Devices, Scenes and Cameras you want to add in the widgets.

Step 3. If you want to reorder your devices or scenes, touch and hold the = next to them and drag them in the order that you want.

2. Add to Your Home Screen (for iOS)
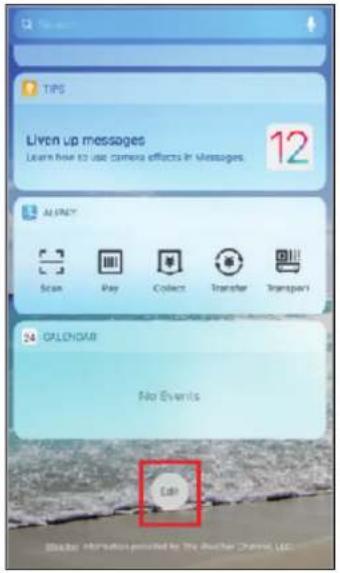
Step 1. Swipe right over the Home screen or Lock screen of iPhone, iPad, or iPod touch to see your widgets in the Today View. Scroll to the bottom and tap Edit. If your device is iOS 14 system or above, slide the interface down to the bottom and tap Customize.
Step 2 Add Kasa Devices, Kasa Scenes, and the Kasa Cam Widget.
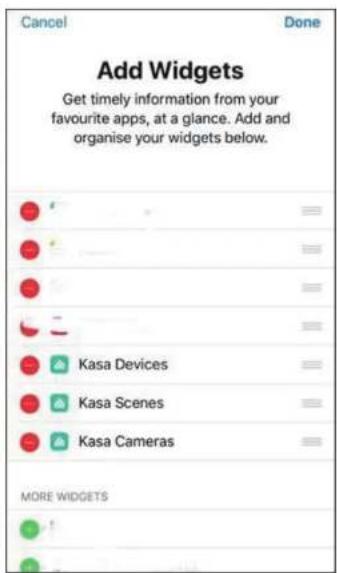
Step 3. Drag them to your desired spot by tapping and holding the = next to the apps.
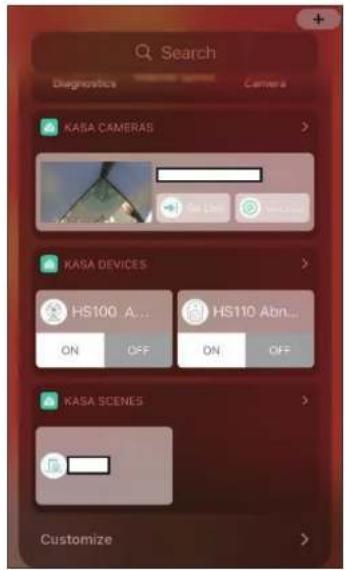
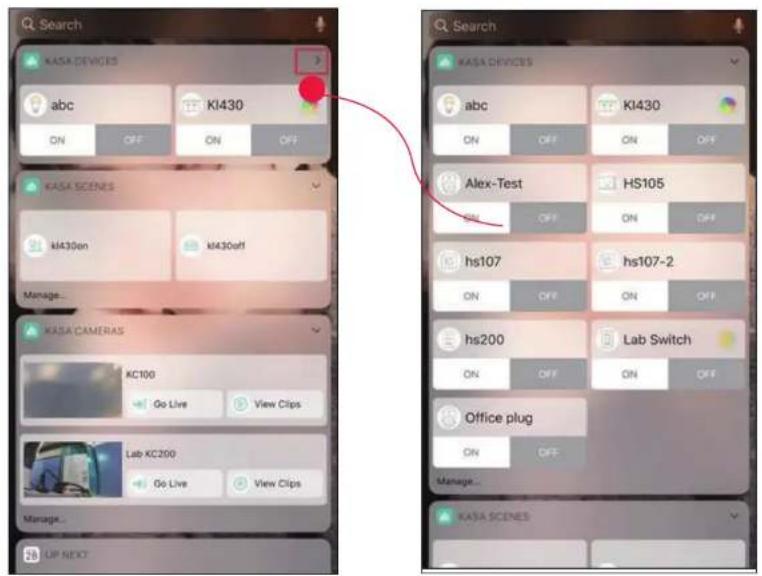
Step 4. Now you can control your Kasa Devices, Kasa Cam, and Kasa Scenes widgets from the Today View. Tap > and you can see all of your selected Kasa Devices, Scenes, and Cameras.

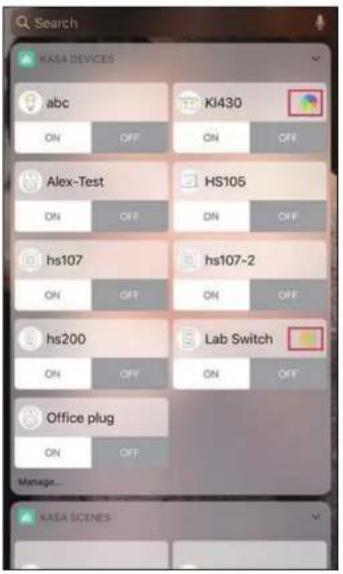
For all Kasa devices, you can switch on/off them. For Kasa devices with adjustable brightness and color, you can also adjust the brightness and color. Tap the round icon next to the devices and then you can see the corresponding options.
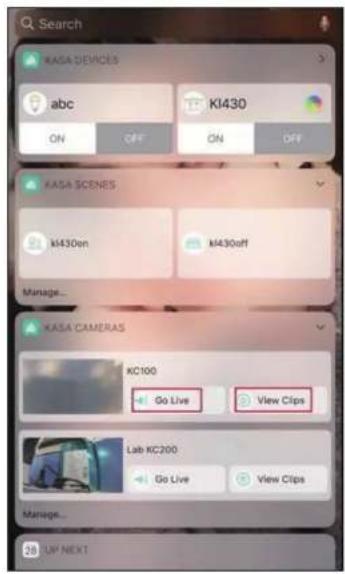
With the Kasa Cam widget, you can tap Go Live and easily go to the Live Page. Meanwhile, you can View Clips of activity detection.


Add to Your Home Screen (for Android)
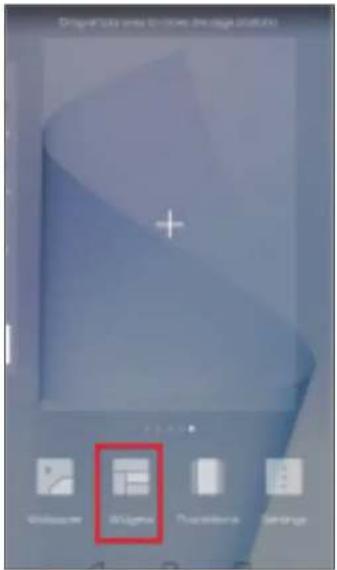
Step 1. Touch and hold an empty area on the home screen to enter home screen editing mode. Tap the Widgets and you can see all of your widgets.

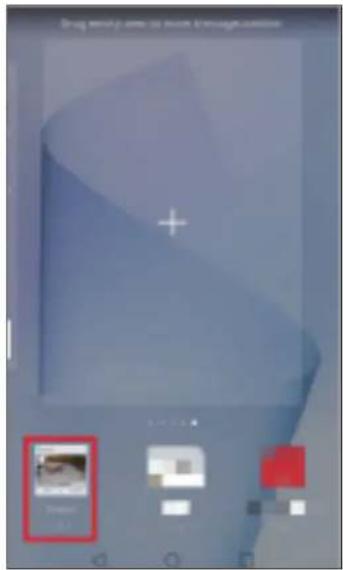
Step 2. Find Kasa widget and tap it.

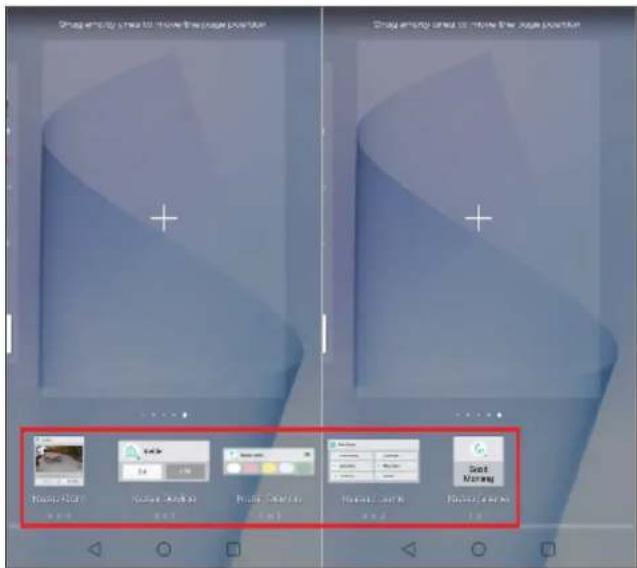
Step 3. There are several Kasa widgets including Kasa Cam, Kasa Device and Kasa scene. Touch and hold a widget and drag it to an empty area on the home screen. You can add widgets you want.
Check that there are enough empty spaces on the home screen for the widget. If there is not enough space, add an empty screen page or free up some space on the current home screen page

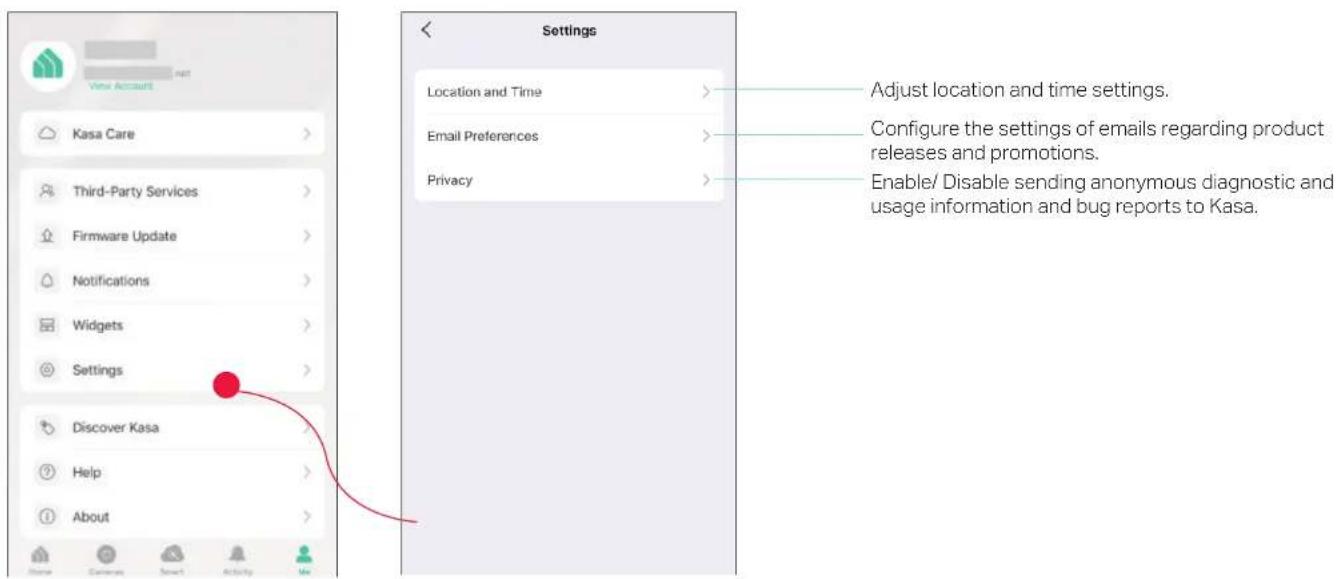
Settings
Kasa Cam utilizes the push notification of your smart phone to inform you of detected activities by the camera.
To view the Kasa Care plan, from the Kasa APP > Tap Me on the bottom > Select Notification.
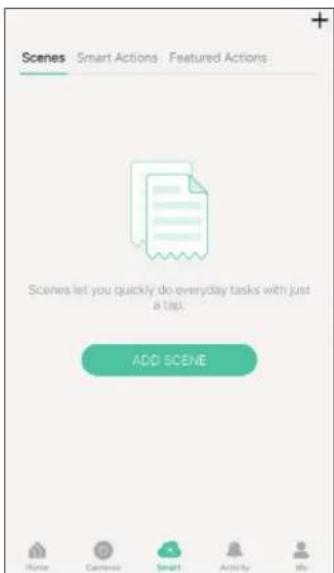
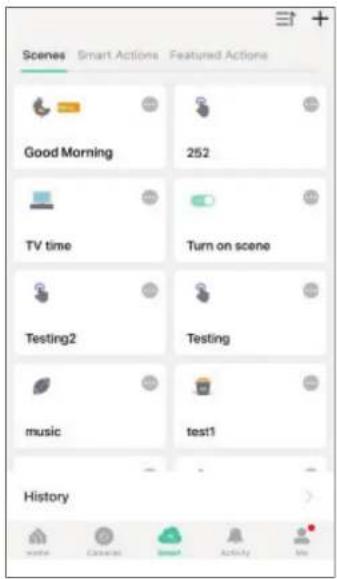
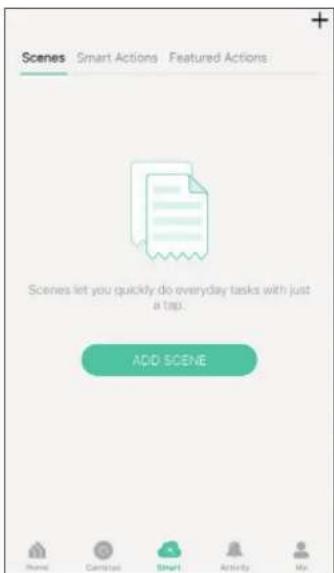
Scenes
A scene is a preset group of smart devices that can be programmed, customized and activated simultaneously at the touch of a button from your smartphone or tablet, allowing you to easily set your mood, activity or fit any special occasion. For example, when you are ready for bed, you can turn off your Tapo devices and dim the lights with one tap.
1. Create a Smart Action with Preset
Step 1. Tap at the bottom, then tap Featured Actions and you can see three preset scenes.
Step 2. Select a preset scene as you need.
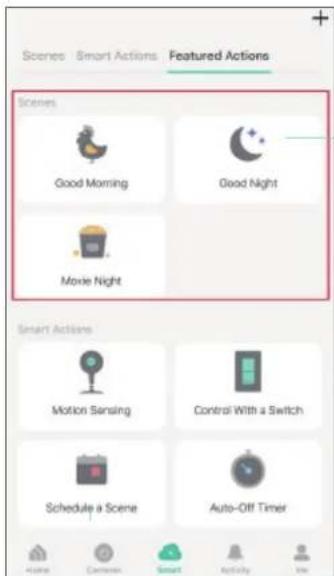
Good Morning: Turn on all your smart devices.
Good Night: Turn off all your smart devices.
Movie Night: Dim your lights for movie time.
2. Create Your Own Scene
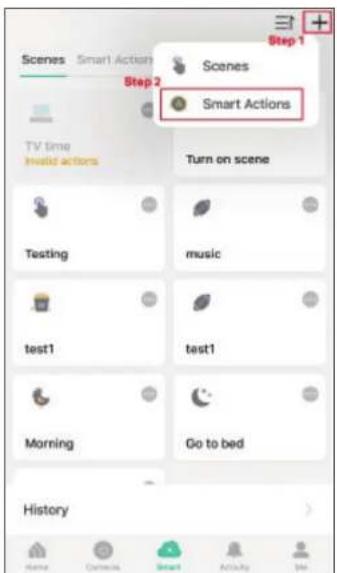
Step 1. Tap at the bottom, tap Scenes and then tap ADD SCENE. Alternatively, you can tap + and choose Scenes.
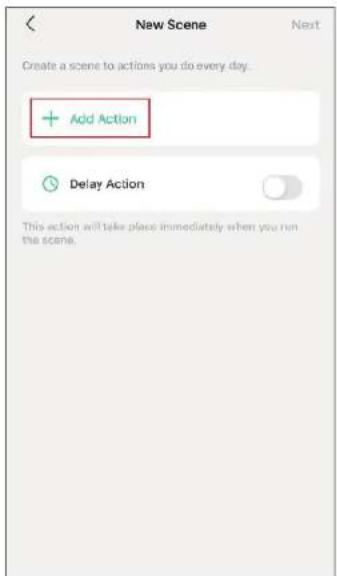
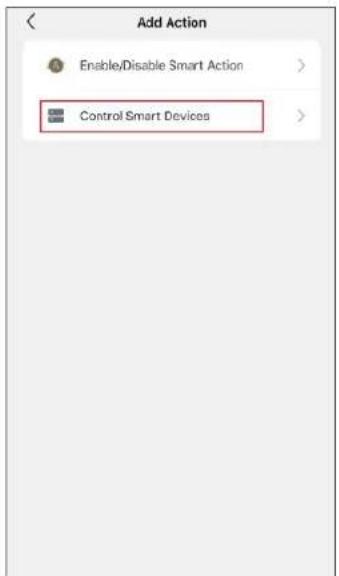
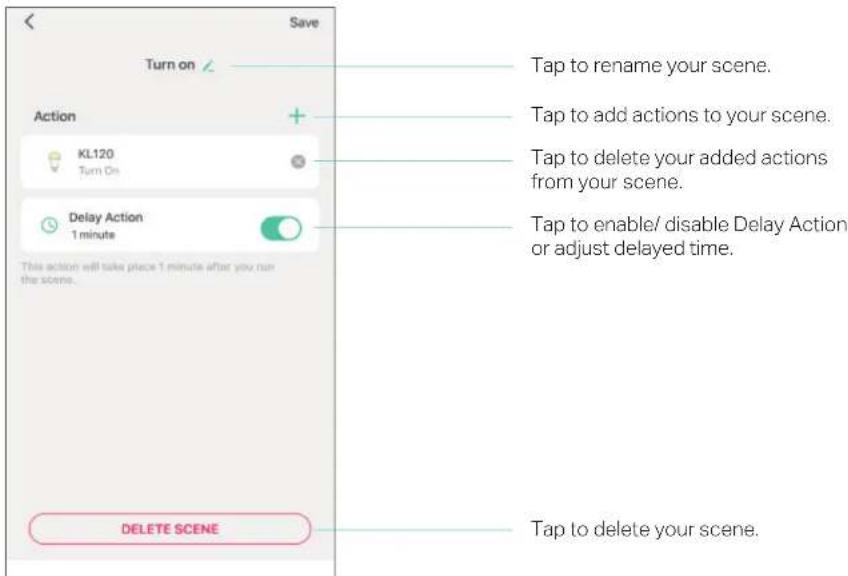
Step 2. Tap Add Action to create a new scene.
Step 3. Tap Control Smart Devices to select the smart devices you want to run in the scene.

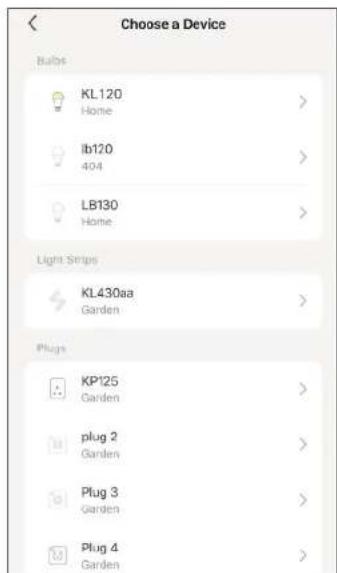
Step 4. Then choose the device you want to run in the scene
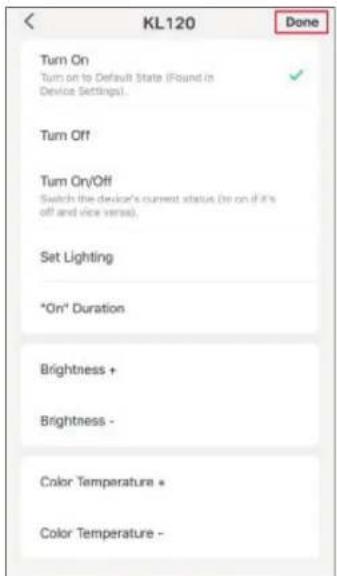
Step 5. Customize the status of the smart device, such as turn on the smart light. Then tap Done.
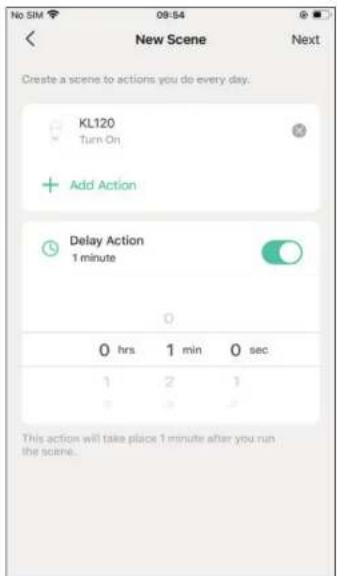
Step 6. You can repeat Step 2 to 5 to add more devices/ smart action in the scene. If you hope your scene to run after some time after you tap it, set Delay Action.
Step 7. Give the scene a Name and choose an icon to distinguish your new scene with other existing ones.

Step 8. Finally, tap Done. You can check your set scene on the top of the home page.
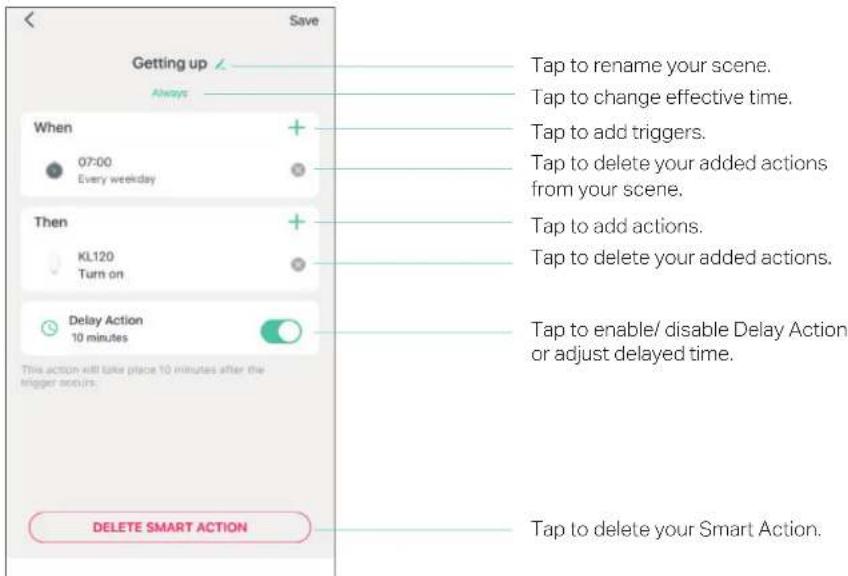
3. Manage Your Scene
1. Edit scene
Edit your scenes via Smart > Scenes and tap ⋯.
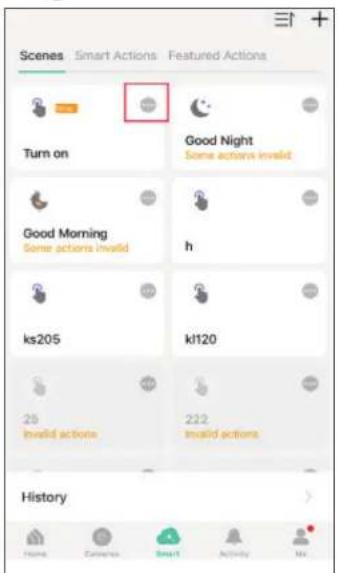
You can rename and delete the scene, add more action and adjust delay action of the scene.
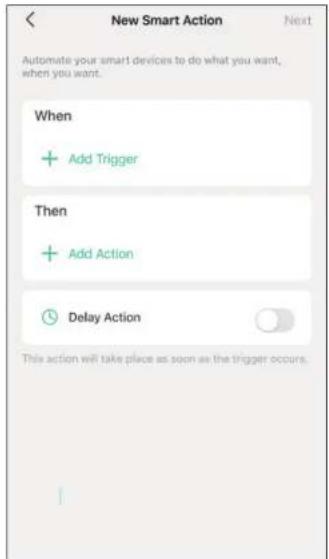
Smart Actions
Smart Actions is a function provided that enables device interconnections and home automations. With Smart Actions, your Kasa devices can work together to create a smarter smart home.
Note: At most three smart actions can be enabled simultaneously.
To use the Smart Action feature, you need to configure
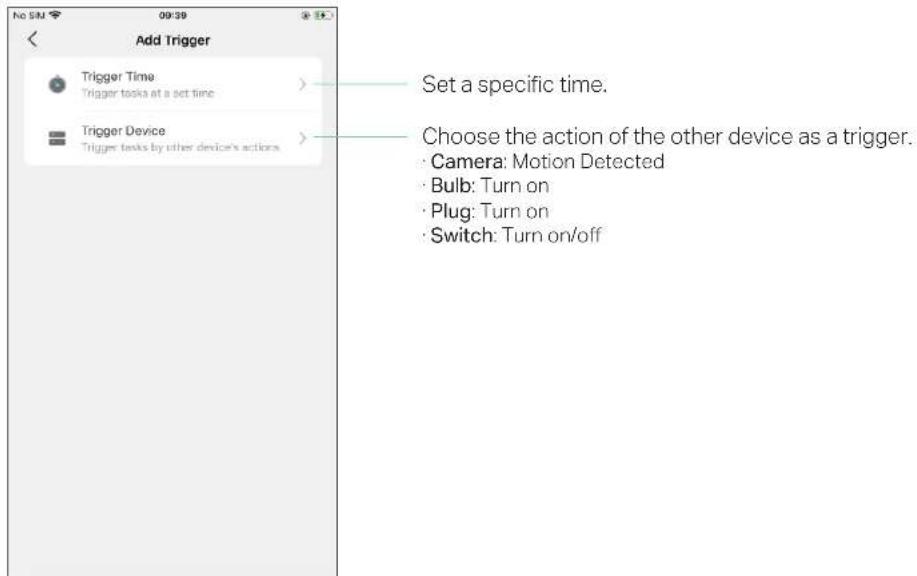
1) Add Trigger: Trigger Time or Trigger Device (Set A Specific Time)
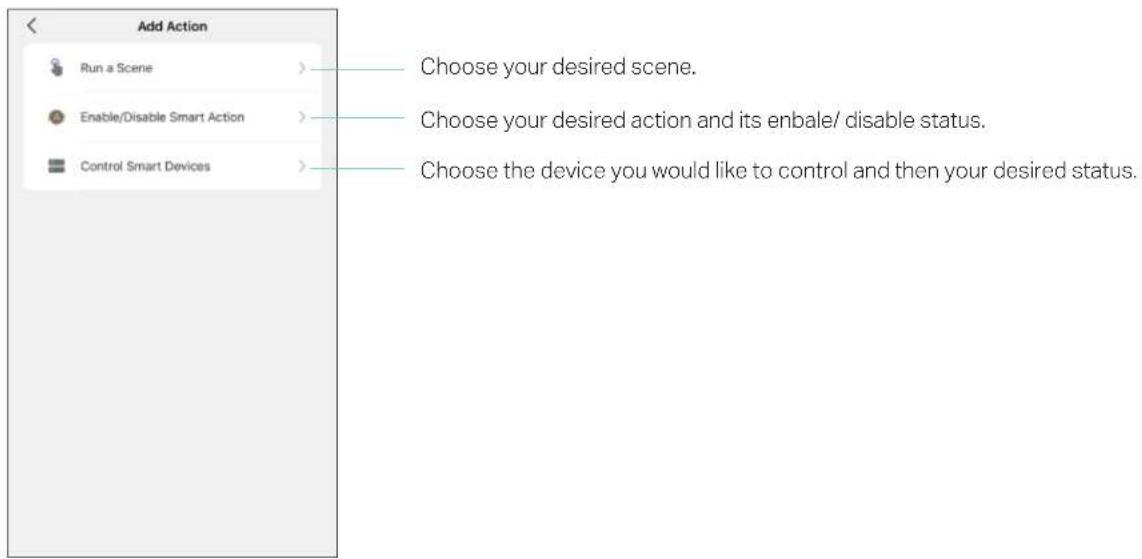
2) Add Action: Run a Sceneor Enable/Disable Smart Action/ Control Smart Devices
1. Create a Smart Action with Preset
Step 1. Tap at the bottom, then tap Featured Actions and you can see three preset scenes.
Step 2. Select a preset smart action as you need.
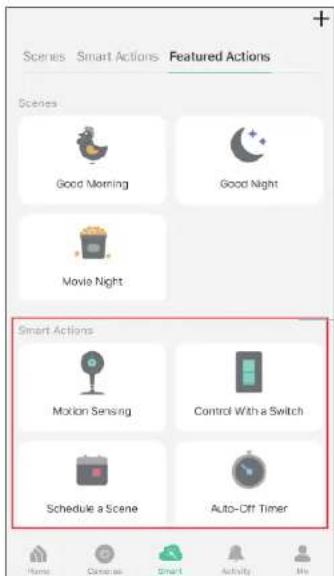
Motion Sensing: Whenever a Smart camera detects motions, add an action you would like to trigger.
Control With a Switch: Whenever a Smart switch turns on/off, add an action you would like to trigger.
Schedule a Scene: Schedule an action to be turned on automatically at the time specified.
Auto-off Timer: Whenever a Smart device is turned on, turn it off after the designated amount of time.
2. Create Your Own Smart Action
Step 1. Tap at the bottom, tap and then choose Smart Actions.
Step 2. Tap Add Trigger.
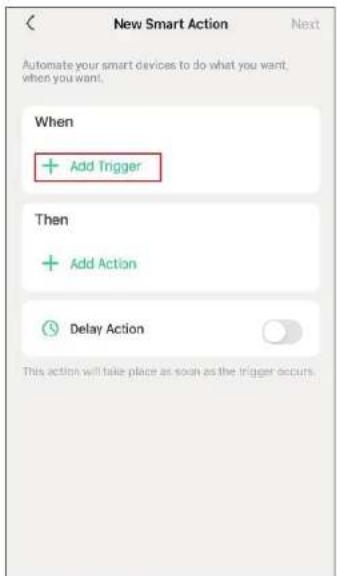
Step 3. Choose a trigger for your smart action.
Note: If there are 2 or more triggers added, any trigger will activate the smart action.
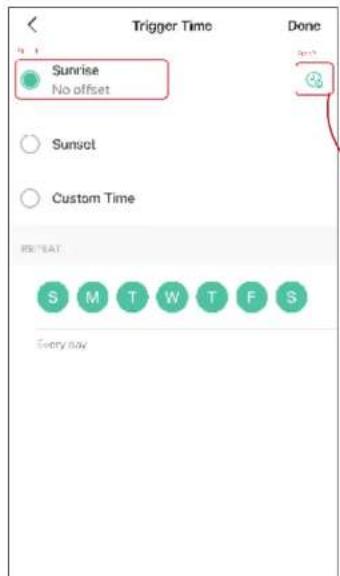
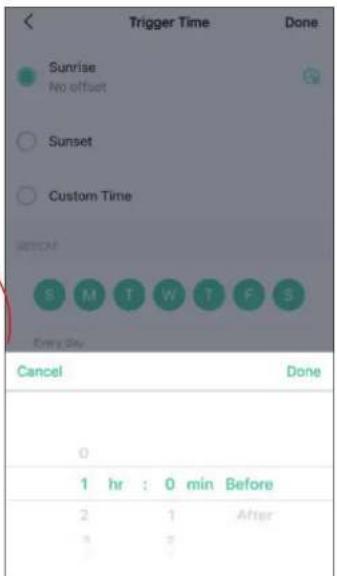
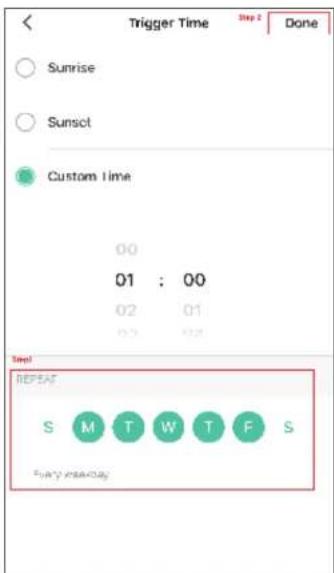
Step 4. Choose from Sunrise, Sunset and Custom Time to set the time for your desired timing for the smart action. For Sunrise and Sunset, you can also set offset time.
Note: The time of Sunrise and Sunset will be synchronized according to regional realities.
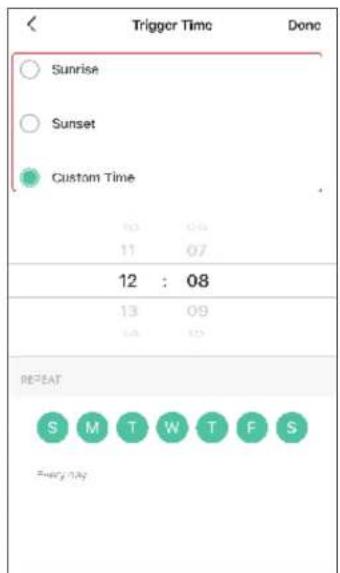
Step 5. Set the repeat times and then tap Done.
Step 6. Tap Add Action.

Step 7. Choose the action you want to add.
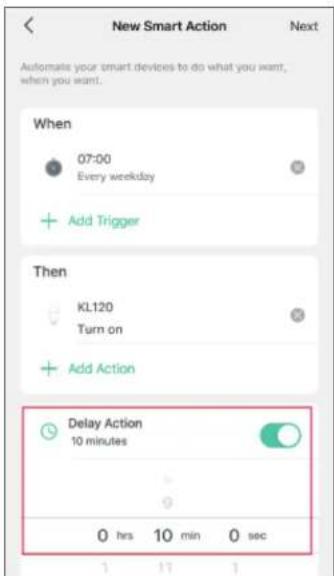
Step 8. If you hope your scene to run after some time after you tap it, set Delay Action.
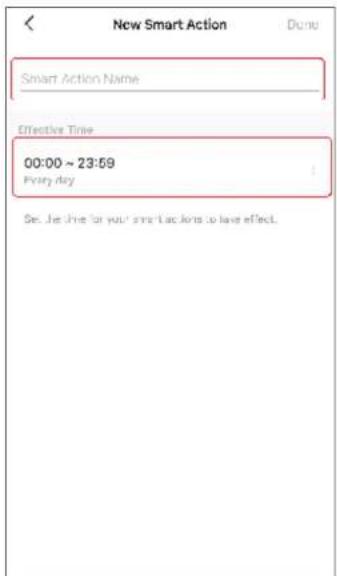
Step 9. Name your smart action and set the effective time for it. Tap Done to complete. You can find your newly set Smart Actions via Smart> Smart Actions.
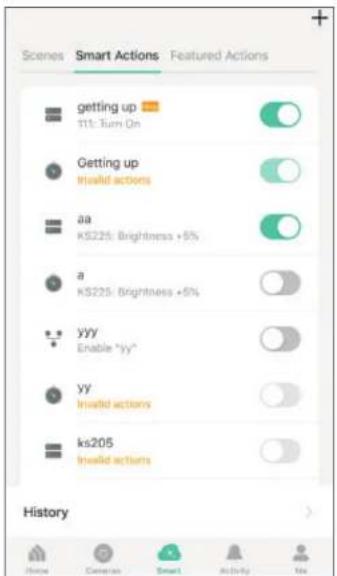
3. Manage Your Smart Action
Step 1. Find your Smart Actions list via Smart>SmartActions.
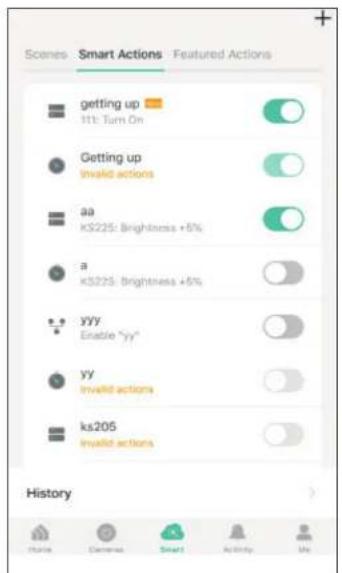
Step 2. You can rename and delete the smart action, and change its effective time, triggers, actions, and delay time.
Me Page
The Kasa app offers a list of advanced features to fulfill diverse smart home needs.
Manage Your Account
Launch the Kasa Smart app. Tap Go to the Me page and tap your account or profile. Here you can change your profile picture, password, and login security settings.

Kasa Care
Kasa Care is a cloud-based service that allows users to view and download activity recordings from a Kasa Cam. When you purchase a Kasa Cam, you can subscribe to our advanced plan to enjoy our Kasa Care cloud service.
To view the Kasa Care plan, from the Kasa APP > Tap Me on the bottom> Select Kasa Care.
Note: With the Kasa Care service, every Kasa account is eligible to sign up for a free trial for the new Kasa Care plan once.
Third Party Services
Use the Kasa Smart app to pair your Smart devices with Amazon Alexa or Google Home Assistant, and enjoy a full hands-free experience. Kasa helps manage the rest of your smart home too, working with Samsung Smart Things to trigger changes when you arrive home or leave for the day.
Launch the Kasa Smart app. Go to the Me page and tap Third Party Services. You can choose Amazon Alexa / Google Assistant / IFTTT / Samsung SmartThings for detailed instructions.

1. Set up Amazon Alexa
-
Tap Amazon Alexa. 2. Tap Connect.
-
Sign in with your amazon account.

flowchart
graph TD
    A["Third-Party Services"] --> B["Google Assistant"]
    B --> C["IFTTT"]
    C --> D["Samsung SmartThings"]
    D --> E["Amazon Alexa Integration"]
    E --> F["Connect to control devices with both Kasa app and Amazon Alexa."]
    F --> G["Connect"]
    G --> H["amazon alexa"]
    H --> I["Sign-In"]
    I --> J["Email (phone for mobile accounts)"]
    I --> K["Amazon password"]
    I --> L["Show password"]
    L --> M["SIGN-IN"]
    M --> N["New to Amazon?"]
    M --> O["CREATE A NEW AMAZON ACCOUNT"]
-
After sign-in, tap LINK.
-
Your TP-Link ID has been successfully linked with your amazon account. You can use Alexa voice commands to control your Smart Wi-Fi Power Strip.

2. Set up Google Assistant
-
Tap Google Assistant.
-
Follow instructions to connect your device to your Google Home.
Or find the FAQ at https://www.tp-link.com/en/support/faq/1534/.

Firmware Update
The firmware on TP-Link Kasa smart devices can only be updated by using the TP-Link Kasa App.
To view the updated firmwares, from the Kasa APP > Tap Me on the bottom> Select Firmware Update. If any firmware updates are available, they will be displayed on this page.
Notification
Kasa Cam utilizes the push notification of your smart phone to inform you of detected activities by the camera.
To configure notification settings, from the Kasa APP > Tap Me on the bottom > Select Notification.
Widgets
With widgets, you can tap and send commands to your Kasa devices, such as executing scenes, turning off lights, viewing your Kasa camera clips, and more.
The Kasa app provides three widgets: namely, KASA CAM WIDGET, KASA DEVICES, and KASA SCENES. These three gadgets cover some of the most frequently-used functions, including:
- KASA DEVICES: Display the status of your selected devices and simple commands like turning on/off.
• KASA SCENES: Enable/disable the selected scenes. - KASA CAM WIDGET: Preview and check your video clips.
Widgets come along with your smart home app and can be activated with some simple steps.
For iOS user, the whole process is divided into two procedures:
- Firstly, select the Kasa Devices, Kasa Scenes, and Kasa Cam that you want to set as a widget on the Kasa app
• Secondly, add the Kasa Widgets on your home screen.
For Android user, you can directly add the Kasa Widgets on your home screen.
Note: Setting steps differ in adding the Kasa Widgets on your home screen in the iOS and Android systems.
1. Select Your Desired Widgets (for iOS)
Step 1 To add widgets, from the Kasa APP > Tap Me on the bottom > Tap Widgets.

Step 2. Choose the Devices, Scenes and Cameras you want to add in the widgets.
Step 3. If you want to reorder your devices or scenes, touch and hold the = next to them and drag them in the order that you want.
2. Add to Your Home Screen (for iOS)
Step 1. Swipe right over the Home screen or Lock screen of iPhone, iPad, or iPod touch to see your widgets in the Today View. Scroll to the bottom and tap Edit. If your device is iOS 14 system or above, slide the interface down to the bottom and tap Customize.


Step 2 Add Kasa Devices, Kasa Scenes, and the Kasa Cam Widget.

Step 3. Drag them to your desired spot by tapping and holding the = next to the apps.

Step 4. Now you can control your Kasa Devices, Kasa Cam, and Kasa Scenes widgets from the Today View. Tap > and you can see all of your selected Kasa Devices, Scenes, and Cameras.
For all Kasa devices, you can switch on/off them. For Kasa devices with adjustable brightness and color, you can also adjust the brightness and color. Tap the round icon next to the devices and then you can see the corresponding options.
With the Kasa Cam widget, you can tap Go Live and easily go to the Live Page. Meanwhile, you can View Clips of activity detection.
Add to Your Home Screen (for Android)
Step 1. Touch and hold an empty area on the home screen to enter home screen editing mode. Tap the Widgets and you can see all of your widgets.
Step 2. Find Kasa widget and tap it.
Step 3. There are several Kasa widgets including Kasa Cam, Kasa Device and Kasa scene. Touch and hold a widget and drag it to an empty area on the home screen. You can add widgets you want.
Check that there are enough empty spaces on the home screen for the widget. If there is not enough space, add an empty screen page or free up some space on the current home screen page
Settings
Kasa Cam utilizes the push notification of your smart phone to inform you of detected activities by the camera.
To view the Kasa Care plan, from the Kasa APP > Tap Me on the bottom > Select Notification.


- About This Guide
- Conventions
- More Info
- Introduction to Kasa Smart App
- Set Up Your Camera
- Step 1. Download Kasa
- Step 2. Log In
- Step 3. Start Setup
- Main Device Controls
- Home Page
- Turn On/Off Camera
- Live View Page
- Favorite Devices
- Relocate Devices
- Add Rooms
- Add a Home
- Set Schedules
- Power Schedule
- Patrol Mode Schedule
- Enable 24/7 Recording
- Check 24/7 Recording Videos
- Turn On/Off Spotlight Temporarily
- Screen Recording
- Enable/Disable Siren
- Pan/Tilt
- Add/Delete View Points
- Manage Device Settings
- Turn on/off cloud services
- 7.24/7 Recording
- Set Day/Night Mode and the Night Vision Effect
- Spotlight settings
- Siren settings
- UPnP
- Status LED
- Reset Your Camera
- Method 1
- Method 2
- Cameras
- Grouping
- Create Groups
- Manage the group
- Delete a Group
- Me Page
- Manage Your Account
- Kasa Care
- Third Party Services
- Set up Amazon Alexa
- Set up Google Assistant
- Firmware Update
- Notification
- Widgets
- Select Your Desired Widgets (for iOS)
- Add to Your Home Screen (for iOS)
- Add to Your Home Screen (for Android)
- Settings
- Scenes
- Create a Smart Action with Preset
- Create Your Own Scene
- Manage Your Scene
- Edit scene
- Smart Actions
- Create Your Own Smart Action
- Manage Your Smart Action
Brand : TP-LINK
Model : Kasa KC401
Category : Security Camera