
EDV854J3WB - Tumble drier ELECTROLUX - Free user manual and instructions
Find the device manual for free EDV854J3WB ELECTROLUX in PDF.

| Product Type | Tumble Dryer (Vented) |
| Brand | Electrolux |
| Model | EDV854J3WB |
| Dimensions (Height x Width x Depth) | 795 mm x 600 mm x 560 mm |
| Power Supply | 220-240 V, 50 Hz |
| Heater Power | 1500 W |
| Drum Volume | 102 litres |
| Maximum Load Capacity | Up to 8.0 kg (depends on model) |
| Programs | Cottons, Mixed, Delicates, Bedding, Refresh, Energy Saver, Denim, Sports, Wool, Shirts, Synthetics, Fast 40 |
| Options | Dryness Level (Extra Dry, Cupboard Dry, Iron Dry), Time Dry (15-120 min), Dry Temp (Boost, Low, Airing), Delay Start (30 min to 20 h), Extra Anticrease (+2 h) |
| Control Panel | Program selector knob, touch buttons for options, display |
| Display | Digital number for cycle time, delay start, alarm codes; icons for filter cleaning, drying phase, cooling, anticrease |
| Child Lock | Yes, touchpad lock via Extra Anticrease button |
| Lint Filter Indicator | Blinking at end of cycle to remind cleaning |
| Anticrease Phase | Automatic 1-hour post-cycle drum rotation; extendable to 3 hours with Extra Anticrease option |
| Electrical Connection | Earthed socket, 220-240 V single-phase, 50 Hz |
| Installation | Floor, workbench (upright or inverted), or wall-mounted (with kit) |
| Accessories Included | Wall mounting kit, venting kit, control panel invert sticker |
| Ingress Protection | IPX4 |
| Safety Features | Child lock, door open detection, overheating protection, end-of-cycle buzzer (disablable) |
Frequently Asked Questions - EDV854J3WB ELECTROLUX
User questions about EDV854J3WB ELECTROLUX
0 question about this device. Answer the ones you know or ask your own.
Ask a new question about this device
Download the instructions for your Tumble drier in PDF format for free! Find your manual EDV854J3WB - ELECTROLUX and take your electronic device back in hand. On this page are published all the documents necessary for the use of your device. EDV854J3WB by ELECTROLUX.
USER MANUAL EDV854J3WB ELECTROLUX
Enjoy peace of mind. Register your appliance today.
Stay updated on better living services, safety notices and shop for accessories.
- Open the camera app on your smartphone and point at the QR code to scan.
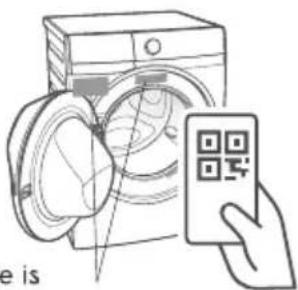
Product Registration QR code is located on the front of your appliance or inside the door rim.
-
Tap the notification or link to open the registration form.
-
Complete your details and enjoy peace of mind.
CONTENTS
1. SAFETY INFORMATION 4
1.1 Conditions Of Use ....4
1.2 Child Safety ....5
1.3 Dryer Safety....5
1.4 Installation 6
1.5 Electrical connection....6
1.6 Fire Hazards....7
2. PRODUCT DESCRIPTION 8
2.1 Accessories ......9
3. CONTROL PANEL 10
3.1 Display....11
4. PROGRAM TABLE 12
5. OPTIONS AND SETTINGS 13
5.1 Option Table ......13
5.2 Dryness Level....14
5.3 Time Dry 14
5.4 Dry Temp 15
5.5 Delay Start....15
5.6 Extra Anticrease ....15
5.7 Child Lock Function....15
5.8 Enabling/Disabling End-Of-Dry Buzzer 16
6. DAILY USE 17
6.1 Start a program without delay s tart ....17
6.2 Starting the program with delay s tart .....17
6.3 Change a program....17
6.4 Interruption of a program....17
6.5 At the end of the program....18
6.6 Stand-by function....18
7. DRYING HINTS 19
7.1 Preparing the laundry ..... 19
7.2 Guide....20
8. CARE AND CLEANING 21
8.1 Cleaning the lint filter....21
8.2 Cleaning the drum 21
8.3 Cleaning the control panel.....22
9. TROUBLESHOOTING 23
9.1 Troubleshooting....23
9.2 If the drying results are not satisfactory....24
10. TECHNICAL DATA 25
11. INSTALLATION 26
11.1 Unpacking....26
11.2 Positioning ....26
11.3 Machine Leveling....27
11.4 Electrical Connection....28
12. ENVIRONMENTAL CONCERNS 29
IMPORTANT INFORMATION THAT MAY IMPACT YOUR MANUFACTURER'S WARRANTY
Adherence to the directions for use in this manual is extremely important for health and safety. Failure to strictly adhere to the requirements in this manual may result in personal injury, property damage and affect your ability to make a claim under the Electrolux manufacturer's warranty provided with your product. Products must be used, installed and operated in accordance with this manual. You may not be able to claim on the Electrolux manufacturer's warranty in the event that your product fault is due to failure to adhere to this manual.
- Read the supplied instructions.
WE'RE THINKING OF YOU
Thank you for purchasing an Electrolux appliance. You've chosen a product that brings with it decades of professional experience and innovation. Ingenious and stylish, it has been designed with you in mind. So whenever you use it, you can be safe in the knowledge that you'll get great results every time. Welcome to Electrolux.
Visit our website to:

Get usage advice, brochures, trouble shooter, service information, buy accessories & spare parts, online product registration :
www.electrolux.com
CUSTOMER CARE AND SERVICE
We recommend the use of original spare parts. When contacting Service, ensure that you have the following data available. The information can be found on the rating plate. Model, PNC, Serial Number.

Warning / Caution-Safety information.

General information and tips.

Environmental information.
Subject to change without notice.
1. ⚠ SAFETY INFORMATION
1.1 Conditions Of Use
This appliance is intended to be used in household and similar applications such as:
- staff kitchen areas in shops, offices and other working environment;
- farm houses;
- by clients in hotels, motels, and other residential type environments;
- bed and breakfast type environments;
- areas for communal use in blocks of flats or in launderettes.
⚠ WARNING! The appliance must not be supplied through an external switching device, such as timer, or connected to a circuit that is regularly switched on and off by utility.
In the interest of your safety and to ensure the correct use, before installing and first using the appliance, read this user manual carefully, including its hints and warnings.
To avoid unnecessary mistakes and accidents, it is important to ensure that all people using the appliance are thoroughly familiar with its operation and safety features.
Save these instructions and make sure that they remain with the appliance if it is moved or sold, so that everyone using it through its life will be properly informed on appliance use and safety.
1.2 Child Safety
- This machine is not intended for use by young children or infirm persons without supervision.
- Young children should be supervised to ensure that they do not play with the appliance.
- Keep children and pets away from the appliance when the door is open. Make sure that children or pets do not climb into the drum.
- The packaging components (e.g. plastic film, polystyrene) can be dangerous to children - danger of suffocation! Keep them out of children's reach.
- If the appliance has a child safety device, it should be activated.
- Children shall not carry out cleaning and user maintenance of the appliance without supervision.
1.3 Dryer Safety
- Failure to follow these safety instructions could damage the dryer or your clothes.
You may then not be covered by warranty for this damage.
- Only plug this appliance directly into an AC power supply, which is properly earthed and has the correct voltage.
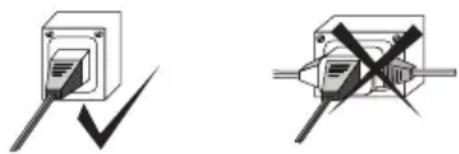

See the serial number sticker located on the bottom of the door opening for voltage information.
- CAUTION: Connect the mains plug to the mains socket only at the end of the installation process. Make sure that the mains plug is accessible after installation.
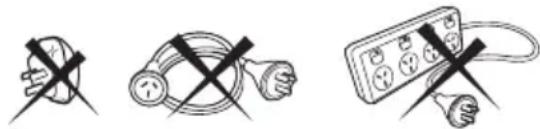
For safety reasons we strongly advise against the use of double adaptor, extension cords or power boards.
- If the electrical cord of this appliance is damaged, it must be replaced by the Manufacturer, Authorised Service Agent or similarly qualified person in order to avoid a hazard.
- These dryers are for drying clothes, towels and linen at home. Do not use them for any other purpose.
- Lint must not be allowed to accumulate around the tumble dryer.
- Do not dry unwashed items in the tumble dryer.
-
Never stop a tumble dryer before the end of the drying cycle unless all items are quickly removed and spread out so that the heat is dissipated.
-
The appliance must not be supplied through an external switching device, such as a timer, or connected to a circuit that is regularly switched on and off by a utility.
- This appliance is for household use only.
- Do not dry damaged (torn, frayed) items that contain padding or fillings.
- If laundry has been washed with a stain remover, carry out an additional rinse cycle before starting a drying cycle.
- Dry only fabrics that are suitable to dry in the appliance. Follow the cleaning instruction on the item label.
- Do not sit or stand on the open door of the appliance.
- Do not dry dripping wet clothes in the appliance.
- Do not exceed the maximum load of maximum capacity of your dryer (refer to the "Program chart" chapter).
- ⚠️ CAUTION: Do not run the appliance without a filter. Clean the lint filter before or after each use. (refer to the “Care and Cleaning” chapter)
1.4 Installation
- Remove all the packaging.
- Do not install or use a damaged appliance.
- Follow the installation instructions supplied with the appliance.
- Always take care when moving the appliance as it is heavy. Always use safety gloves and enclosed footwear.
- Do not install or use the appliance where the temperature can be lower than 5^ C or higher than 35^ C.
- The floor area on which the appliance is to be installed must be flat, stable, heat resistant and clean.
- Make sure that there is air circulation between the appliance and the floor.
• Always keep the appliance vertical
when it is being moved.
- The rear surface of the appliance must be put against a wall.
- When the appliance is in its permanent position, check if it is levelled correctly with the aid of a spirit level. If it is not, adjust the feet accordingly.
1.5 Electrical connection

WARNING!
Risk of fire and electric shock.
- Connect the mains plug to the mains socket only at the end of the installation. Make sure that there is access to the mains plug after the installation.
• The appliance must be earthed. - Make sure that the parameters on the rating plate are compatible with the electrical ratings of the mains power supply.
• Always use a correctly installed shockproof socket. - Do not use multi-plug adapters and extension cables.
- Do not pull the mains cable to disconnect the appliance. Always pull the mains plug.
- Do not touch the mains cable or the mains plug with wet hands.
1.6 Fire Hazards
Some fabrics are not suitable for tumble drying. The following MUST NOT be placed in your dryer due to the risk of a fire or an explosion:
- Items that have been spotted or soaked with vegetable oil, cooking oil, suntan oil, linseed oil, salad oil, lubrication oil or grease. Oil affected items can ignite spontaneously, especially when exposed to heat sources such as in a tumble dryer. The items become warm, causing as oxidation reaction in the oil. Oxidation creates heat. If heat cannot escape, the items can become hot enough to ignite.
Pilling, stacking or storing oil-affected items can prevent heat from escaping and create a fire hazard. If it is unavoidable that fabrics that contain vegetable or cooking oil, or have been contaminated by hair care products be placed in a tumble dryer, they should first be washed with hot water with extra detergent - this will reduce, but not eliminate the hazard.
The final part of tumble dryer cycle occurs without heat (Cooling cycle) to ensure that the items are left at the temperature that ensures that the items will not be damage.
- Item that have previously been cleaned in, washed in, or spotted with petrol/gasoline, industrial chemicals used only for cleaning, dry-cleaning solvents or other flammable or explosive substances are highly flammable.
Highly flammable or explosive commonly found around the house include acetone, (nail polish remover) denatured alcohol, petrol/gasoline, kerosene, some spot removers, turpentine, waxes and wax removers should not be put in the dryer. Items containing foam rubber (also known as latex foam) or similarly textured rubber-like materials.
Foam rubber materials can produce fire by spontaneous combustion when heated.
- Rubber-backed articles, clothes fitted with foam rubber pads, pillows, rubber boots and rubber-coated sports shoes.
For your safety, and to reduce the risk of fire or an explosion, DO NOT store or use petrol or other inflammable vapours and liquids near your dryer.
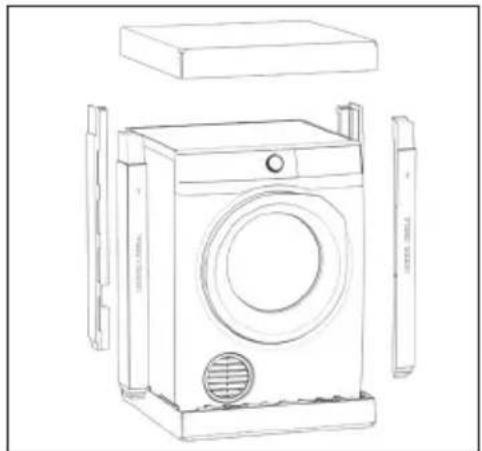
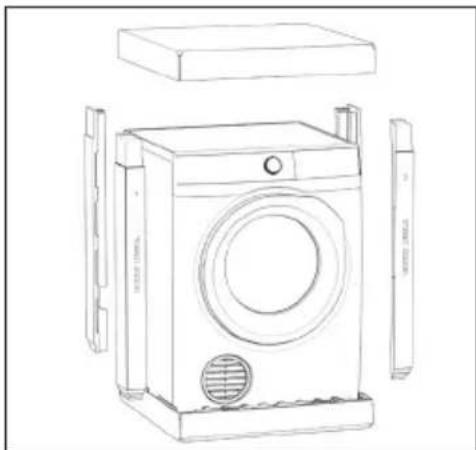
2. PRODUCT DESCRIPTION
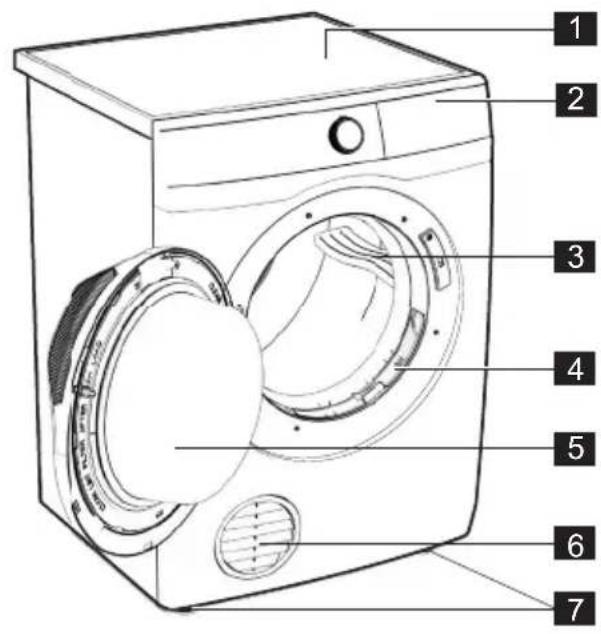
1 Work top
2 Control panel
3 Drum lifter
4 Lint filter
5 Appliance door
6 Exhaust grille
7 Front feet
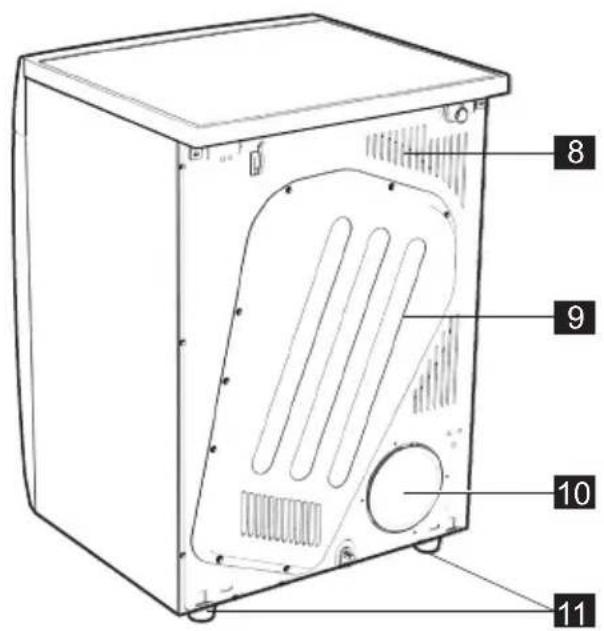
8 Air inlet duct
9 Outlet cover
10 Outlet cover
11 Back feet
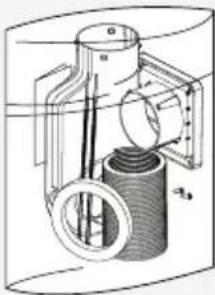
2.1 Accessories

Wall Mounting Kit:
to invert the dryer on a wall upside down.
natural_image
Technical diagram of a mechanical assembly with no visible text or symbolsDryer Venting Kit:
designed for dryers positioned directly against an outside wall.
Control Panel Invert Sticker
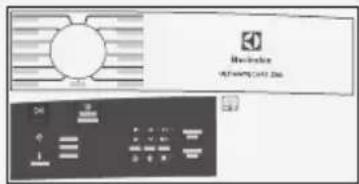
3. CONTROL PANEL
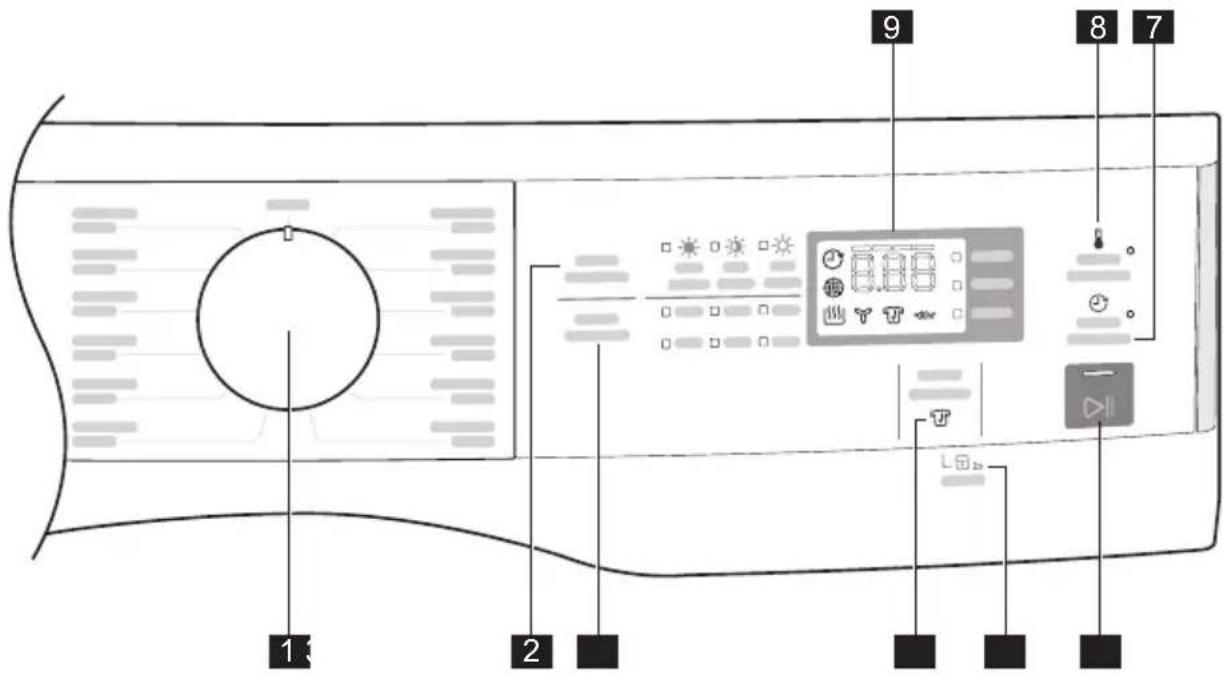
1 Program selector knob
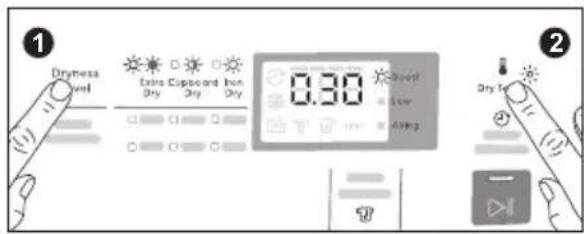
2 Dryness Level touch button
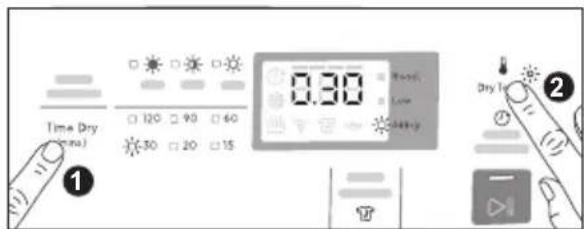
3 Time Dry touch button
4 Extra Anticrease touch button
5 Child Lock option
6 Start/Pause touch button
7 Delay Start touch button
8 Dry Temp touch button
9 Display
i Press the touch buttons with your finger in the area with the symbol or name of the option. Do not wear gloves when you operate the control panel. Make sure that the control panel is always clean and dry.
Inverted Mounting Mode
The vented dryer allows for inverted wall mounting and you can set the dryer to an Inverted Mounting Mode through a hidden key combination. (Invert control panel sticker supplied with the machine.)
This would adjust the display to read correctly when it is wall-mounted upside-down.
To set the appliance to Inverted mounting mode, press and hold the "Extra Anticrease" and "Start/Pause" touchpad at the same time about 5 seconds, the display will be inverting digit number with the sound "BEEP, BEEP".

3.1 Display
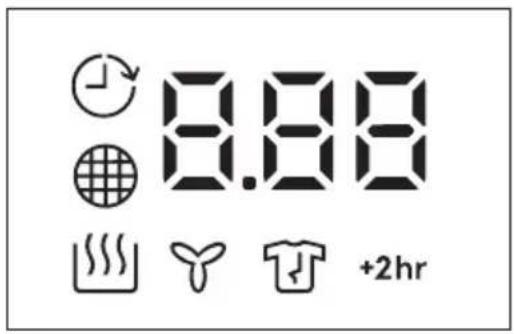
| Symbol on the display Symbol description | |
| 8.88 | Digital Number; will show:• Drying cycle time.• Delay start time.• The alarm codes. Refer to the chapter “Troubleshooting” for their description. |
| Delay start option on. | |
| Indicator: clean filterThe Clean Filter indicator turns on and blinks at the end of each dry cycle to serve as a reminder to user to clean lint filter at the end of each load. | |
| Indicator: drying phase | |
| Indicator: cooling phaseAfter the drying process finish, Cooling process will operate and switch off heater. The Cooling indicator blink until finish cooling process. This process will release heat from the clothes and crease protection. | |
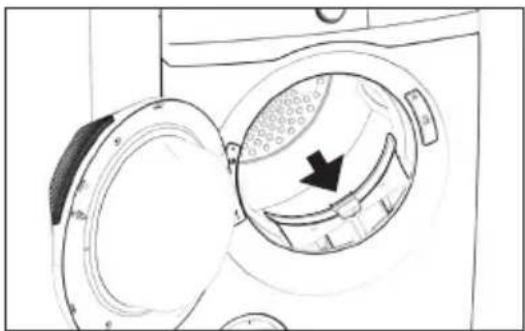
| Indicator: anticrease phaseThe anticrease cycle is designed to help prevent creases forming in the clothes after program drying cycle has ended.The anticrease progress indicator will start blinking with clean filter during the time anti crease phase is running. The drum will rotate for 5 seconds every minute and will go for 1 hour. i NOTEAnticrease phase CANNOT BE DISABLED.i NOTEAnticrease can be stopped at any time by opening the door and removing the clothes or press Start/Pause button. | |
| +2hr | Extra anticrease on. |
4. PROGRAM TABLE
| Program Load 1) Fabric type | |
| Off - This position to reset program/switching off the machine. | |
| Cottons Max. Ideal for towels or similar such as cotton and linen. | |
| Mixed Half Select this cycle to dry everyday fabrics including cottons, linens and sheets. | |
| Delicates 3.5 kg For drying delicate clothing and Synthetics. | |
| Bedding Half For Bedding clothing. | |
| Refresh 3-5 pcs (dry items) | For fabrics that have been in storage long time, normal synthetic that need to be damp after. (a short cycle with warm temp). |
| Energy Saver Max. Cycle to be used to dry cotton with “cotton extra” dryness level, with maximum energy saving. | |
| Denim 4 kg Leisure clothing such as jeans, sweat-shirts of different material thicknesses (e.g. at the neck, cuffs, and seams). | |
| Sports 4 kg A gentle program designed for mixed fabrics found in delicate clothes. | |
| Wool 1 kg Woollen fabrics. Gentle drying for hand-wash-able woolens. Remove items immediately when the program is completed. | |
| Shirts 3.5 kg Easy care fabrics for which a minimum of ironing is necessary. The drying results can be different from one type of fabric to the other. Shake the items before you put them in the appliance. When the program is completed, Immediately remove the items and put them on a hanger. | |
| Synthetics 3.5 kg Synthetic and mixed fabrics. | |
| Fast 40 1 kg Select this cycle to dry everyday fabrics, cotton or blended fabrics that need to be dried quickly. | |
1) Maximum capacity depends on the model.
5. OPTIONS AND SETTINGS
5.1 Option Table
1. Program with Dryness Level Option Selected
- Select Dryness Level option, then
- Select Dry Temp
| Program | Dryness Level Dry Temp Delay start | ||||
 |  |  | Boost Low Airing | ||
| Off | |||||
| Cottons ■ ■ ■ ■ ■ ■ | |||||
| Mixed ■ ■ ■ ■ ■ ■ | |||||
| Delicates ■ ■ ■ ■ ■ | |||||
| Bedding ■ ■ ■ ■ ■ ■ | |||||
| Refresh ■ ■ | |||||
| Energy Saver | ■ | ■ ■ | |||
| Denim | ■ ■ | ■ ■ | |||
| Sports | ■ | ■ ■ | |||
| Wool | ■ | ■ ■ | |||
| Shirts | ■ ■ ■ ■ ■ | ||||
| Synthetics | ■ ■ ■ ■ ■ ■ | ||||
| Fast 40 | ■ | ■ ■ | |||
rogram with Time Dry Option Selected
- Select Time Dry (mins.) option, then
- Select Dry Temp
| Program | Time Dry (mins.) Dry Temp Delay | start | ||||||||
| 120 | 90 | 60 | 30 | 20 | 15 | Boost | Low | Airing | ||
| Off | ||||||||||
| Cottons | ■ | ■ | ■ | ■ | ■ | ■ | ■ | ■ | ■ | ■ |
| Mixed | ■ | ■ | ■ | ■ | ■ | ■ | ■ | ■ | ■ | ■ |
| Delicates | ||||||||||
| Bedding | ||||||||||
| Refresh | ||||||||||
| Energy Saver | ||||||||||
| Denim | ||||||||||
| Sports | ||||||||||
| Wool | ||||||||||
| Shirts | ||||||||||
| Synthetics | ■ | ■ | ■ | ■ | ■ | ■ | ■ | ■ | ■ | ■ |
| Fast 40 | ||||||||||
5.2 Dryness Level
This function helps to increase dryness of the laundry.
There are 3 options:
- Extra dry
- Cupboard dry
- Iron dry
Dryness Option Guidelines:
| Level of dryness | Type of fabric Load | |
| Extra DryIdeal fortowels or similar | Cotton and linen(bathrobes, bath towels, etc) | up to Max.1) |
| Cupboard DrySuitable for itemsto putaway without ironing | Cotton and linen(towels,T-shirts, underwear, etc) | up to Max.1) |
| Synthetics and mixed fabrics(jumpers,blouses,underwear, household linen) | up to 3 kg | |
| Level of dryness | Type of fabric Load | |
| Iron DrySuitable for ironing | Cotton and linen (sheets, tablecloths, shirts, etc.) | up to Max.1) |
1) Maximum capacity depended on model of Dryer
i NOTE
Dryness level settings are based on the program selected.
5.3 Time Dry
You can set the program duration of 15, 20, 30, 60, 90 and 120 minutes. The required duration is related to the quantity of laundry in the appliance.
i NOTE
We recommend that you set a short duration for small quantities of laundry or for only one item.
Dry Time Option Guidelines:
| Type of fabric | Load Suggested Times | |
| 5 kg to Max.1) | 120 mins | |
| Cotton and linen (bath- robes, bath towels, etc.). | 3 kg to 5 kg | 60 mins to 90 mins |
| 1 kg to 3 kg | 30 mins to 60 mins | |
| 1 pcs to 1 kg | 15 mins to 30 mins | |
| Synthetic or mixed fabric items (jumpers, blouses, underwear, household linen, etc.). | Half 30 mins to 60 mins | |
| 1 kg 15 mins to 20 mins | ||
| Wool and hand wash- able wool. | 1 kg 15 mins to 30 mins | |
1) Maximum capacity depended on model of Dryer
5.4 Dry Temp
This function gives you the option of selecting different drying levels. There are 3 levels:
- Boost
For drying most fabrics.
- Low
For drying delicates and synthetics at lower heat for maximum care of the fabrics. The Low Heat setting will cause the heater to cycle on for shorter time than the Boost setting.
- Airing
This setting does not heat. ONLY circulate the air in the dryer to shake out dust and refresh clothes and only available in Time Dry option.
5.5 Delay Start
This option makes it possible to delay the start of the program by 30 min, 60 min or 90 min and then by every hour from 2 to 20 hours. The delay you have selected is indicated on the display. The end time will increase in order to show you the selected delay.
You must select this option after you have set the program and before you press the Start/Pause button.
If you wish to add laundry in the machine during the delay time, press Start/Pause touchpad to put the machine in pause mode. Add laundry, close the door and press Start/Pause touchpad again.
You can cancel or change the delay time at any moment, by pressing Start/Pause touchpad then press "Delay Start" touchpad once, time will reset to "0", now you can change the time or cancel it, press the Start/Pause touchpad again to continue operating the machine.
5.6 Extra Anticrease
This option extends the anti-crease phase by 2 hours at the end of the drying cycle. This function reduces creases. The laundry can be removed during the anti-crease phase.
The display will shows “+2hr” when this option is selected.
5.7 Child Lock Function
This option prevents children playing with the appliance while a program is operating. The touch buttons are locked.
- To activate the function, press and hold "Extra Anticrease" touchpads about 2 seconds until the display shows the icon "LOC".
① If you press any touchpad while Child Lock is activated, the icon "LOC" will flash on display 3 times along with buzzer sound.
5.8 Enabling/Disabling End-Of-Dry Buzzer
This setting permits you to either enable or disable the buzzer at the end of the program. As an example, you might wish to disable this buzzer when you start a drying when going to bed, so that when the cycle finished it will not disturb you through the night.
(i) Error warning beeps such as critical faults are not disabled.
- To disable the buzzer sound, press "Dryness Level" and "Time Dry" touchpads at the same time for 3 seconds, the display will show "bOF" with the "BEEP, BEEP" sound.
- To return to default c onfiguration press these 2 touchpads at the same time for 3 seconds, the display will show "bOn" with the "BIP" sound.
6. DAILY USE
6.1 Start a program without delay start
- Prepare the laundry and load the appliance. For best result we recommend to sort out your laundry according to fabric type and spin dry at highest speed available in your washing machine.
Load your dryer loosely until it is no more than TWO THIRDS FULL. Clothes must tumble freely in a dryer. Don't cram them in. Wet clothes fluff up when dry.
i Overloading will: - reduce efficiency - Increase drying time - Increase the risk of creasing.
Do not load clothes or other articles which are dripping wet or have sand and grit on them into your dryer.
-
Turn the Program Selector knob to choose drying program.
-
Set the correct program and options for the type of load. The display shows the program duration.
Do not select the "Extra Dry" option for delicates fabric such polyester as shrinking may occur.
To obtain the best drying results with small loads it is recommended to use “Time drying” program.
- Press the Start/Pause touchpad. The program starts.
Never stop a tumble dryer before the end of the drying cycle unless all items are quickly removed and spread out so that the heat is dissipated.
6.2 Starting the program with delay start
-
Set the correct program and options for the type of load.
-
Press the Delay Start touchpad again and again until the display shows the delay time you want to set.
-
Press the Start/Pause touchpad.
The display shows the countdown of the delay start.
When the countdown is completed, the program starts.
Additional drying
Should the laundry still be too wet at the end of the program, set another short drying cycle.
Warning
To prevent the formation of creases or shrinking of fabrics, avoid excessive drying.
6.3 Change a program
Changing a running program is possible only by resetting it.
-
Turn the program selector knob to the position "Off" to cancel the program and to turn off the appliance.
-
Turn the program selector knob to the new program position and set the new option, then press "Start/Pause". touchpad again.
6.4 Interruption of a program
-
To pause, press Start/Pause touchpad. The LED indicator will start flashing.
-
Press the Start/Pause touchpad again. The program will continue.
6.5 At the end of the program
Changing a running program is possible only by resetting it.
• The appliance stops automatically.
• The acoustic signal will operate.
- The display shows “End”
- The indicator " 🔍" is on.
- The indicators “ 📋 ” filter may come on.
• The Start/Pause indicator is on.
The appliance continues to operate with the anticrease phase for approximately 1 hour or more if Extra Anticrease option was set (see chapter Option - Extra Anticrease).
The anti-crease phase reduces creasing. You can remove the laundry before the anti-crease phase is completed. We recommend, for better results, that you remove the laundry when the phase is almost completed.
i Always clean the filter when a program is completed.
6.6 Stand-by function
To reduce energy consumption, this function automatically deactivates the appliance:
• After 5 minutes if you do not start the program.
• After 5 minutes from the end of the program.
7. DRYING HINTS
(i) Your load, when dry must not exceed the rated capacity of your dryer.
7.1 Preparing the laundry
- Never tumble dry the following: Delicate items such as net curtains, woollen, silk, fabric with metal trim, nylon tights, bulky materials such as anoraks, blankets, eiderdown, sleeping bags, feather quilts and any item containing rubber foam or materials similar to foam rubber.
- Do not place in your dryer undergarments such as bras and corsets that contain metal reinforcements. Your dryer may be damaged if metal parts were to come loose from the garment. Place such items in a bag designed for this purpose.
- Check and empty pockets. Clips, pens, nails and pins can damage both the dryer and your clothes. Other items such as matches or cigarette lighters will cause a fire.
- Close all press studs, hooks, eyes and zips that may catch on something else. Tie all belts and apron strings to prevent tangling.
- Drying time will depend on fabric type and construction, load size and wetness, Save time and money and always spin the load as dry as possible in your washing machine.
- Drying time will also be affected by voltage fluctuations, room temperature and humidity. Clothes will dry more slowly on a cool or humid day.
- For best results, sort the load according to fabric types. Such as heavy items which may take longer to dry, eg towels, flannelette sheets etc, than ones which dry quickly, eg poly/cotton shirts and sheets.
- Avoid drying dark clothes with light coloured items such as towels as lint will show on the dark clothes.
Note: Some fabrics will collect lint from other clothes and items.
Separate the lint “givers” and the lint “collectors” to minimise this problem.
- Clothes that give lint include towels, nappies, chenille.
-
Clothes that collect lint include corduroy, synthetics and permanent press garments.
-
If individual items are still damp after drying, please add appropriate Time Drying program. This may be necessary particularly for multilayered items (e.g. jeans, items with collars or pocket) or very small loads
- Always clean the lint filter-this will reduce drying time and save you money.
- The laundry must be thoroughly spun before tumble drying.
- Easy-care items eg shirts, should be briefly pre-spun before drying (depending on the crease resistance approximately 30 seconds)
- To avoid static charge when drying is completed, use either a fabric softener when you are washing the laundry or a fabric conditioner specifically for tumble dryers.
- Remove the laundry when the dryer has finished drying.
- Do not over-dry laundry, this avoids creasing and saves energy.
- Clothes or towels containing sand or grit should be washed first.
- Due to variations in dryer load fabric texture and thickness it is possible that not all items will be dried evenly. It you experience uneven dryness on Cupboard program please use either Extra Dry or Timer Program but be mindful of the type of fabric being dried to avoid overdrying certain types of fabric. Always follow drying instructions attached to the items intended to be dried in a clothes dryer.
To help you, here is a list of the average weights of some common laundry items.
| Sheet 700g - 1000g |
| Tablecloth 400g - 500g |
| Kitchen towel 70g - 120g |
| Table napkin 50g - 100g |
| Towelling hand towel 150g - 250g |
| Bathrobe 1000g - 1500g |
| Men's shirt 200g - 300g |
| Pillowcase 100g - 200g |
| Men's pyjamas 400g - 500g |
| Ladies nightdress 200g 250g |
| Bath towel 300g - 400g |
7.2 Guide
Always check your labels for the drying symbol which this international Care Labelling Code now uses.
| Fabric label Description | |
| Laundry is suitable for tumble drying. | |
| Laundry is suitable for tumble drying at higher temperatures. | |
| Laundry is suitable for tumble drying at low temperatures only. | |
| Laundry is not suitable for tumble drying. | |
- Permanent press and synthetics
- take out as soon as the dryer stops to reduce wrinkles.
- Woollen articles - not recommended. Pull them to their original shape, then dry them flat.
- Woven and loop knit materials
-
may shrink, by varying amount, depending on their quality. Do not use the "Extra Dry" setting for these fabrics, Always stretch them out immediately after drying.
-
Fibre or leather materials - always check the manufacturer's instructions.
- Baby clothes and night gowns - acrylic clothing or sleepwear use only on the "Iron Dry" setting.
- Rubber and plastics - Do not dry any items made from or containing rubber or plastics, such as aprons, bibs, babies' water proof napkins, curtains, tablecloths, shower caps, clothes fitted with foam rubber pads, pillows, galoshes, or rubber coated tennis shoes.
- Fibreglass - not recommended, glass particles left in the dryer could be picked up by your clothes the next time you use the dryer and irritate your skin.
- Fabric softeners or similar products should not be used in a tumble dryer to eliminate the effects of static electricity unless this practise is specifically recommended by the manufacturer of the fabric softener or product.
i Note:
We strongly advise against the use of fabric conditioners of the sheet type that are added to the clothes in the drum. These products may lead to rapid blockage of the lint filter and inefficient operation of your dryer.
8. CARE AND CLEANING
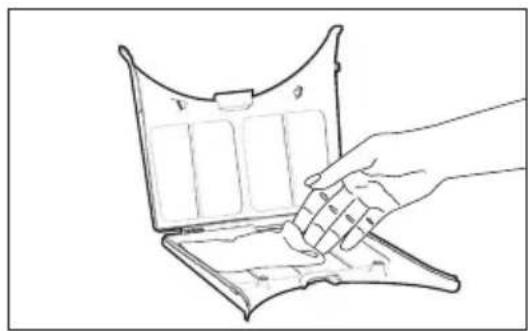
8.1 Cleaning the lint filter
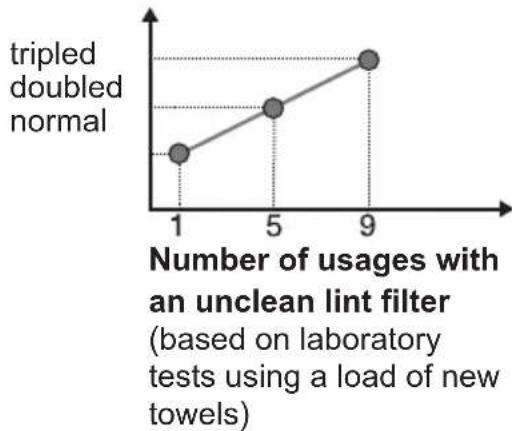
i LINT BUILD-UP IS A FIRE HAZARD
A clean lint filter reduces drying times, saves energy and avoids overheating. Overheating may also damage your clothes.
What happens If I forget to clean the lint filter?
line
| Number of usages with an unclean lint filter | tripled doubled normal | | --------------------------------------------- | ---------------------- | | 1 | 0 | | 5 | 2 | | 9 | 4 |Cleaning the filter

natural_image
Line drawing of a washing machine with a circular button and grid pattern (no text or symbols)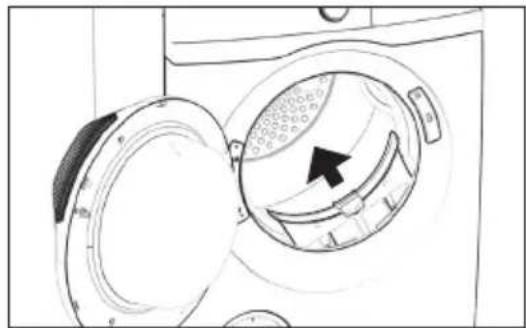
natural_image
Line drawing of a washing machine with a lid open, showing the blade and inner blades (no text or symbols)
natural_image
Line drawing of a hand inserting a component into an open device (no text or symbols)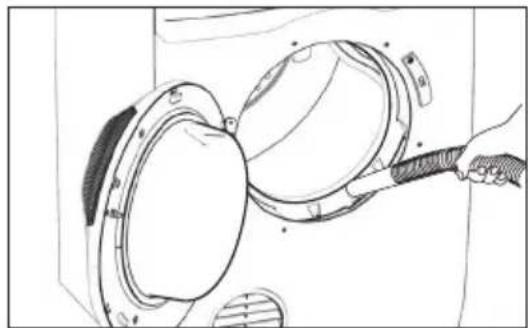
natural_image
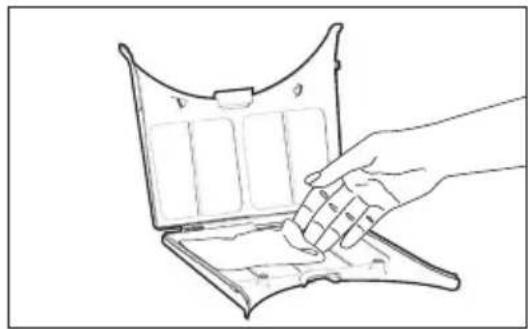
Technical line drawing of a mechanical component with a hand holding a tool, no visible text or symbolsIf necessary remove fluff from the filter socket and gasket. You can use a vacuum cleaner.
natural_image
Line drawing of a washing machine with an open lid and a curved door, showing internal components (no text or symbols)8.2 Cleaning the drum
! WARNING!
Disconnect the appliance before you clean it.
Use a standard neutral soap detergent to clean the inner surface of the drum and drum lifters. Dry the cleaned surfaces with a soft cloth.
CAUTION!
Do not use abrasive materials or steel wool to clean the drum.
8.3 Cleaning the control panel
Use a standard neutral soap detergent to clean the control panel. Use a moist cloth to clean. Dry the cleaned surfaces with a soft cloth.
CAUTION!
Do not use furniture cleaning agents or cleaning agents which can cause corrosion.
9. TROUBLESHOOTING
9.1 Troubleshooting
| Problem Possible solution | |
| You cannot activate the appliance. | Make sure that the mains plug is connected to the mains socket. |
| Check fuse in fuse box (domestic installation). | |
| The program does not start. | Press Start/Pause. |
| Make sure that the appliance door is closed. | |
| The appliance door does not close. | Make sure that the installation of the filter is correct. |
| Make sure that the laundry is not caught between the appliance door and the rubber seal. | |
| The appliance stops during operation. | Load is too small, increase the load or use the Time Drying program. |
| The cycle time is too long or unsatisfactory drying result. | Make sure that the weight of the laundry is suitable for the duration of the program. |
| Make sure that the filter is clean. | |
| The laundry is too wet. Spin the laundry in the washing machine again. | |
| Ensure that the room temperature is higher than +5°C and lower than +35°C. Optimal room temperature is 19°C to 24°C. | |
| Set the Time Drying or the Extra Dry program. (It can happen that some area remains humid when drying big items (e.g. bed sheets)) | |
| The display shows “---”. | If you want to set a new program, deactivate and activate the appliance. |
| Make sure that the options are suitable for the program. | |
| The display shows Error code. | Alarm Code: |
 The appliance door is open or not closed correctly. Please check the door! The appliance door is open or not closed correctly. Please check the door! | |
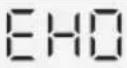 The main supply is unstable. Wait until the main supply is stable. The main supply is unstable. Wait until the main supply is stable. | |
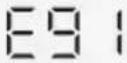 No communication between electronic elements of the appliance. Switch off and switch on again. No communication between electronic elements of the appliance. Switch off and switch on again. | |
9.2 If the drying results are not satisfactory
- The set program was incorrect.
- The filter is clogged.
- There was too much laundry in the appliance.
- The drum is dirty.
- Room temperature is too low or too high ( optimal room temperature 19°C to 24°C )
10. TECHNICAL DATA
| Dimensions (Height / Width / Depth) 795 mm x 600 mm x 560 mm | |
| Power Supply (Voltage / Frequency) 220 - 240 V / 50 Hz | |
| Heater Power (Watt) 1500 W | |
| Drum volume 102 litres | |
| Maximum Capacity Max. | ^1) kg |
| Type of use Household | |
| Level of protection against ingress of solid particles and moisture ensured by the protective cover, except where the low voltage equipment has no protection against moisture | IPX4 |
1) Maximum capacity depended on model of Dryer
11. INSTALLATION
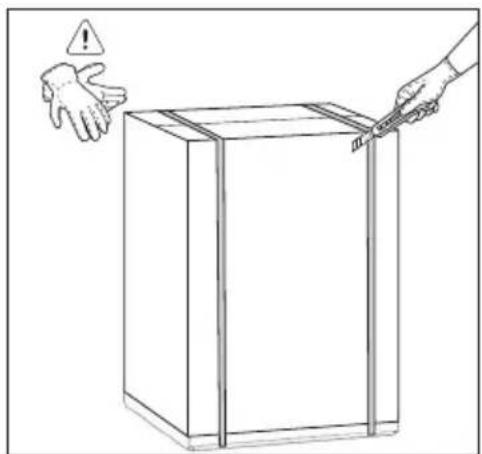
11.1 Unpacking
- Use gloves. Cut and remove four cut out straps as shown.
natural_image
Line drawing of a box being cut with a tool, showing hand and warning symbol (no text or labels)- Remove the carton box. Remove the polystyrene packaging materials. Remove the plastic bag which cover the machine.
natural_image
Line drawing of a washing machine with front panel and side panel (no text or symbols)- Open the door. Remove all the items from the drum.
natural_image
Line drawing of a washing machine with internal components and a close-up view of the lid (no text or symbols)- Put one of the polystyrene packaging elements on the floor behind the appliance. Carefully put down the appliance with the rear side on it.
natural_image
Line drawing of a mechanical device with mounting base and internal components (no text or symbols)-
Remove the polystyrene base.
-
Pull up the appliance in vertical position.
11.2 Positioning
You can choose to put your dryer :
- on the floor
- on a work bench upside down or upright.
- on a wall.
The appliance must not be installed behind a lockable door, a sliding door or a door with a hinge on the opposite side to that of the tumble dryer in such away that a full opening of the restricted.
The exhaust grille has a range of positions, which allows you to select the optimum exhaust air angle. Simply hold the grille and rotate it until it hits the built-in stop. Do not install your dryer in a cupboard or small un-vented laundry unless you are using a venting kit.
There are 2 venting options
- Front
- Rear - using a included kit
Important: Use only kits approved by Electrolux with your dryer.
The exhaust duct must not exceed 2
metres in length at 100mm diameter.
If connecting the dryer to a common ducting system, safety advice should be requested from the manufacturer.
If you choose to use included kit, the exhaust grille at the front of the dryer will need to be replaced with the outlet cover from the back of the dryer. Gently prise open the grille, using a thin bladed tool. Next, remove the cover from the back and clip it into the grille space at the front.
The exhaust grille is not required when using a vent kit.
You can position the vent kit at the back of the dryer to remove air upwards or sideways.
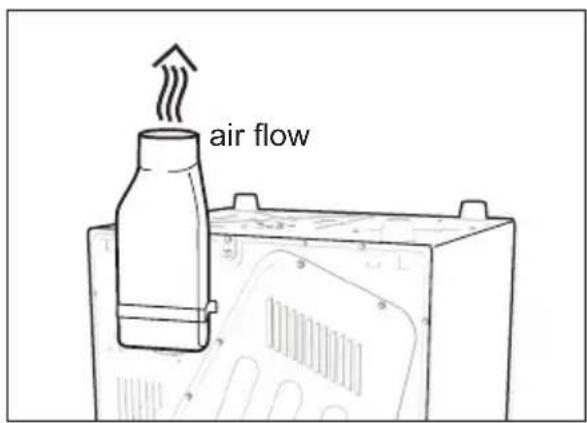
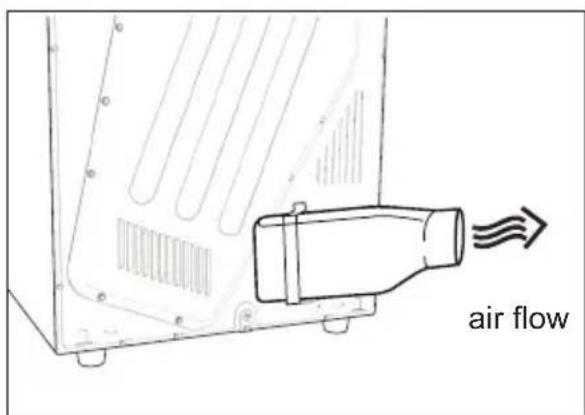
Inlet and outlet points need clear airflow to prevent overheating, so ensure there is adequate ventilation. (i.e. open window or external door.)
If a venting kit is used and the exhaust is discharged out of the room, there must be adequate ventilation to avoid the back flow of gases in to the room from
appliances burning other fuels, including open fires, when operating the tumble dryer. This is not applicable where a venting hose is directed to an open window.
The exhaust air must not be discharged into a flue which is used for exhausting fumes from appliances burning gas or other fuels.
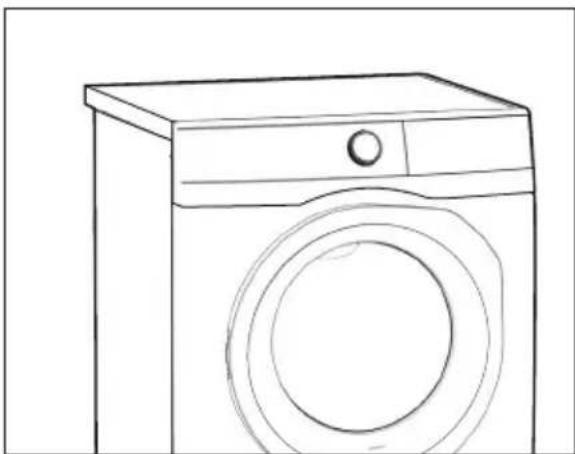
11.3 Machine Leveling
It is important that your Dryer stands firm and leveled on the floor to ensure correct operation. The appliance must not be installed behind a lockable door, a sliding door or a door with a hinge on the opposite side to avoid restricting the Dryer door.
Use a spirit level on the top and side of the Dryer to check the levels.
natural_image
Line drawing of a washing machine with front panel and side door (no text or symbols)If you do not have a spirit level, as a guide use the edge of a door frame, cupboard or bench to check that the Dryer is leveled.
Never place cardboard, wood or similar materials under the machine to compensate for any unevenness in the floor. Install the machine on a flat hard floor.
Make sure that air circulation around the machine is not impeded by carpets, rugs etc.
Check that the machine does not touch the wall or cupboard units.
11.4 Electrical Connection
This machine is designed to operate on a 220-240 V, single-phase, 50 Hz supply.
"An incorrect power supply may void your warranty."
Check that your domestic electrical installation can take the maximum load required, also taking into account any other appliances in use.
CAUTION!
Connect the machine to an earthed socket outlet.
CAUTION!
The manufacturer declines any responsibility for damage or injury through failure to comply with the above safety precaution.
CAUTION!
Should the appliance power supply cable need to be replaced, this shall be carried out by our Service Centre.
When the appliance is installed, the power supply cable must be easily accessible.
12. ENVIRONMENTAL CONCERNS
Recycle materials with the symbol
Put the packaging in relevant containers to recycle it. Help protect the environment and human health by recycling waste of electrical and electronic appliances.
Do not dispose of appliances marked with the symbol ✗ with the household waste.
Return the product to your local recycling facility or contact your municipal office.
DAFTAR ISI
1. INFORMASI KESELAMATAN 32
1.1 Syarat Penggunaan....32
1.2 Keselamatan Anak-anak....33
1.3 Keselamatan Terkait Mesin Pengering....33
1.4 Pemasangan ....34
1.5 Sambungan Kelistrikan....34
1.6 Bahaya Kebakaran....35
2. DESKRIPSI PRODUK 36
2.1 Aksesori....37
3. PANEL KONTROL 38
3.1 Tampilan ....39
4. TABEL PROGRAM 40
5. OPSI DAN PENGATURAN 41
5.1 Tabel Opsi....41
5.2 Dryness Level (Tingkat Kekeringan)....42
5.3 Time Dry (Pengeringan Sesuai Waktu)....42
5.4 Dry Temp (Suhu Pengeringan)......43
5.5 Delay Start (Tunda Mulai)....43
5.6 Extra Anticrease (Ekstra Anti-kusut)....43
5.7 Fungsi Child Lock (Kunci Anak).....44
5.8 Mengaktifkan/Menonaktifkan Bel End-Of-Dry (Akhir Pengeringan).....44
6. PENGGUNAAN SEHARI-HARI 45
6.1 Menjalankan program tanpa tunda mulai ....45
6.2 Menjalankan program dengan tunda mulai ....45
6.3 Mengubah program .....45
6.4 Interupsi program .....46
6.5 Pada akhir program....46
6.6 Fungsi Stand-by (Siaga)......46
7. PETUNJUK PENGERINGAN 47
7.1. Menyiapkan cucian....47
7.2 Panduan 48
8. PEMELIHARAAN DAN PEMBERSIHAN 49
8.1 Membersihkan filter serat .....49
8.2 Membersihkan tabung....49
8.3 Membersihkan panel kontrol .....50
9. PEMECAHAN MASALAH 51
1 Permukaan atas
2 Panel kontrol
3 Pengangkat tabung
4 Filter serat
5 Pintu mesin
6 Kisi-kisi buang
7 Kaki depan

natural_image
Technical line drawing of a mechanical assembly with no visible text or symbolsKit Ventilasi Mesin Pengering:
5. OPSI DAN PENGATURAN
5.1 Tabel Opsi
| Program | Tingkat Kekeringan | Suhu Pengeringan | Tunda mulai | ||||
 |  |  | Boost (Kuat) | Low (Rendah) | Airing (Angin) | ||
| Off | |||||||
| Cotton ■ ■ ■ ■ ■ ■ | |||||||
| Mixed ■ ■ ■ ■ ■ ■ | |||||||
| Delicate ■ ■ ■ ■ ■ | |||||||
| Bedding ■ ■ ■ ■ ■ ■ | |||||||
| Refresh ■ ■ | |||||||
| Energy Saver ■ ■ ■ | |||||||
| Denim ■ ■ ■ ■ | |||||||
| Sports | ■ ■ ■ | ||||||
| Wool | ■ | ■ ■ | |||||
| Shirt | ■ ■ ■ ■ ■ | ||||||
| Synthetics | ■ ■ ■ ■ ■ ■ | ||||||
| Fast 40 | ■ ■ ■ | ||||||
natural_image
Line drawing of a washing machine with a circular dial indicator (no text or symbols)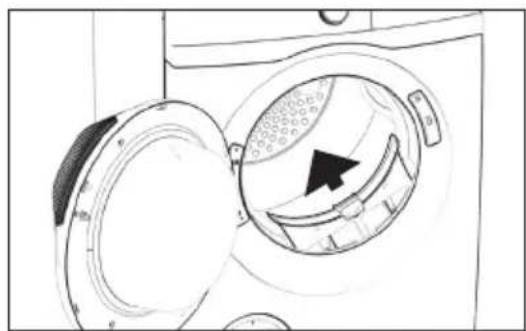
natural_image
Diagram of a washing machine with a door open, showing internal components and a black arrow indicating rotation (no text or symbols present)
natural_image
Line drawing of a hand inserting a component into an open device (no text or symbols)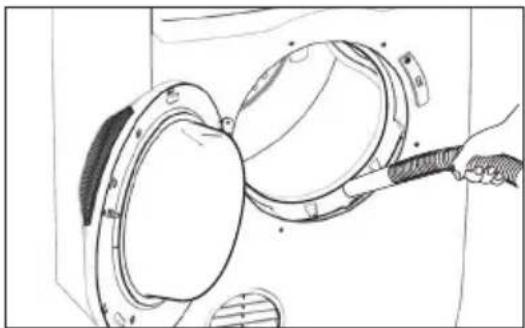
natural_image
Line drawing of a hand holding a device with an open lid, showing mechanical components and a handle (no text or symbols)natural_image
Line drawing of a washing machine with a door open and a circular vent showing internal components (no text or symbols)8.2 Membersihkan tabung
! PERINGATAN!
natural_image
Line drawing of a box being cut with a hand holding an exclamation mark (no text or symbols present)- Lepaskan kotak karton. Lepaskan bahan pengemas polistirena. Lepaskan kantung plastik yang menutupi mesin.
natural_image
Line drawing of a washing machine with front panel and side panel (no text or symbols)natural_image
Line drawing of a washing machine with internal components and a hand valve indicating airflow (no text or symbols)natural_image
Technical line drawing of a mechanical device with mounting base and internal components (no text or symbols)-
Ambil alas polistirena.
-
Tarik berdiri mesin ke posisi vertikal.
11.2 Mengposisikan
natural_image
Line drawing of a washing machine with front panel and side door (no text or symbols)natural_image
Pure decorative pattern with repeating geometric motifs and no text or symbols- Enjoy peace of mind. Register your appliance today.
- CONTENTS
- SAFETY INFORMATION 4
- PRODUCT DESCRIPTION 8
- CONTROL PANEL 10
- PROGRAM TABLE 12
- OPTIONS AND SETTINGS 13
- DAILY USE 17
- DRYING HINTS 19
- CARE AND CLEANING 21
- TROUBLESHOOTING 23
- TECHNICAL DATA 25
- INSTALLATION 26
- ENVIRONMENTAL CONCERNS 29
- IMPORTANT INFORMATION THAT MAY IMPACT YOUR MANUFACTURER'S WARRANTY
- WE'RE THINKING OF YOU
- Visit our website to:
- CUSTOMER CARE AND SERVICE
- ⚠ SAFETY INFORMATION
- Conditions Of Use
- Child Safety
- Dryer Safety
- Installation
- Electrical connection
- WARNING!
- Fire Hazards
- PRODUCT DESCRIPTION
- Accessories
- Wall Mounting Kit:
- Dryer Venting Kit:
- Control Panel Invert Sticker
- CONTROL PANEL
- Inverted Mounting Mode
- Display
- PROGRAM TABLE
- OPTIONS AND SETTINGS
- Option Table
- Program with Dryness Level Option Selected
- rogram with Time Dry Option Selected
- Dryness Level
- i NOTE
- Time Dry
- Dry Temp
- - Boost
- - Low
- - Airing
- Delay Start
- Extra Anticrease
- Child Lock Function
- Enabling/Disabling End-Of-Dry Buzzer
- DAILY USE
- Start a program without delay start
- Starting the program with delay start
- Additional drying
- Warning
- Change a program
- Interruption of a program
- At the end of the program
- Stand-by function
- DRYING HINTS
- Preparing the laundry
- Guide
- i Note:
- CARE AND CLEANING
- Cleaning the lint filter
- i LINT BUILD-UP IS A FIRE HAZARD
- Cleaning the drum
- ! WARNING!
- CAUTION!
- Cleaning the control panel
- TROUBLESHOOTING
- Troubleshooting
- If the drying results are not satisfactory
- TECHNICAL DATA
- INSTALLATION
- Unpacking
- Positioning
- Machine Leveling
- Electrical Connection
- ENVIRONMENTAL CONCERNS
- DAFTAR ISI
- INFORMASI KESELAMATAN 32
- DESKRIPSI PRODUK 36
- PANEL KONTROL 38
- TABEL PROGRAM 40
- OPSI DAN PENGATURAN 41
- PENGGUNAAN SEHARI-HARI 45
- PETUNJUK PENGERINGAN 47
- PEMELIHARAAN DAN PEMBERSIHAN 49
- PEMECAHAN MASALAH 51
- Kit Ventilasi Mesin Pengering:
- OPSI DAN PENGATURAN
- Tabel Opsi
- Membersihkan tabung
- ! PERINGATAN!
- Mengposisikan
Brand : ELECTROLUX
Model : EDV854J3WB
Category : Tumble drier