
MNV7760DS - Dishwasher Concept - Free user manual and instructions
Find the device manual for free MNV7760DS Concept in PDF.


| Product Type | Built-in Dishwasher |
| Model | MNV7760DS |
| Brand | Concept |
| Dimensions (H x W x D) | 595 x 595 x 500 mm (closed door) Open door depth: 930 mm |
| Weight | 28 kg |
| Power Supply | 230 V ~ 50 Hz, 1380 – 1620 W |
| Energy Efficiency Class | A+ |
| Annual Energy Consumption | 205 kWh |
| Annual Water Consumption | 2240 L |
| Capacity | 8 place settings |
| Noise Level | 49 dB(A) |
| Washing Programs | Auto, Intensive, ECO, Glass, Rapid, Self-cleaning |
| Special Functions | Half load option, Delayed start (up to 24h), Child lock, FRESH function, Extra drying |
| Water Softener Settings | 6 levels (H1 to H6), factory preset H3 |
| Salt Container Capacity | Approx. 1.5 kg |
| Rinse Aid Capacity | Approx. 140 ml |
| Filtration System | Coarse and fine filters, removable for cleaning |
| Spray Arms | Upper and lower, removable for cleaning |
| Water Pressure Range | 0.04 – 1.0 MPa |
| Standard Program Duration (ECO) | 185 min |
| Safety Features | Child lock, anti-flood protection, door safety switch |
Frequently Asked Questions - MNV7760DS Concept
User questions about MNV7760DS Concept
0 question about this device. Answer the ones you know or ask your own.
Ask a new question about this device
Download the instructions for your Dishwasher in PDF format for free! Find your manual MNV7760DS - Concept and take your electronic device back in hand. On this page are published all the documents necessary for the use of your device. MNV7760DS by Concept.
USER MANUAL MNV7760DS Concept
POPIS OVLÁDACÍHO PANELU
flowchart
graph LR
    A["Hand holding a salt container"] --> B["Salt being added"]
    B --> C["Add to a container with salt"]
    C --> D["Hearts the steps: adding, pouring, and adding again"]
Obr. 1
Poznámka:
Obr. 3 Obr. 4 Obr. 5
Obr. 8 Obr. 9
natural_image
Diagram of a device with a lid, vent, and starburst symbol (no text or labels)natural_image
Diagram showing structural change of a vehicle chassis before and after assembly, with no visible text or symbolsObr. 12
Vyndávání nádobí
natural_image
Circular diagram with vertical lines and a crossed X symbol, no readable text or labelsPŘEHLED MYCÍCH PROGRAMŮ
natural_image
Line drawing of a hand washing a cup on a kitchen sink (no text or symbols)Poznámka:
natural_image
Technical line drawing of a mechanical component with an inset showing a circular detail (no text or symbols)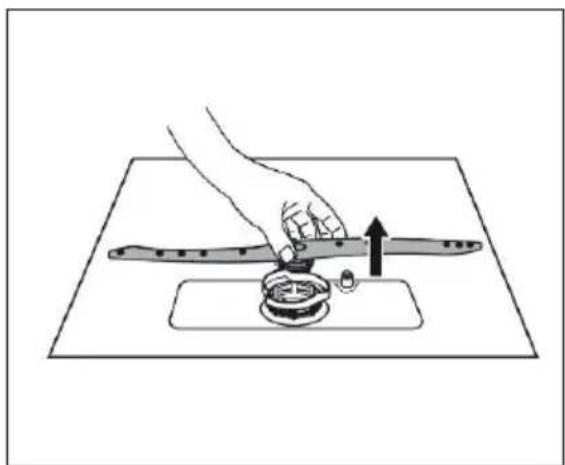
natural_image
Illustration of a hand using a tool to press or install a mechanical component on a flat surface (no text or symbols)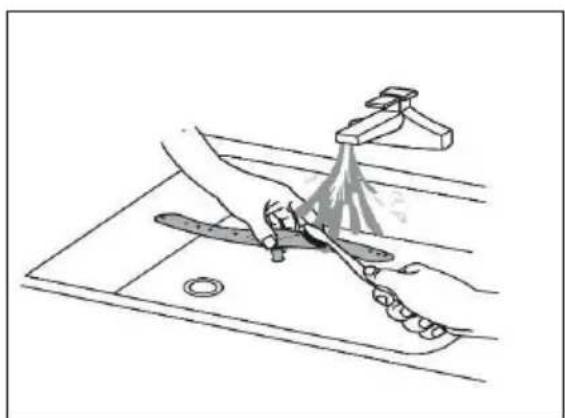
natural_image
Line drawing of a kitchen sink with a hand cleaning the surface and a faucet spraying water (no text or symbols)UPOZORNĚNÍ!
natural_image
Close-up of a white plastic mechanical component with concentric grooves and a central slot, placed on a perforated surface (no text or symbols visible)natural_image
Close-up of a white plastic mechanical component with a mesh texture and central ribbed structure (no text or symbols visible)natural_image
Close-up of a white plastic mechanical component with a circular grooves and central slot, mounted on a perforated metal surface (no text or symbols visible)
Obr. 14
natural_image
Technical line drawing of a mechanical component with dimension label D3 (no text or symbols present)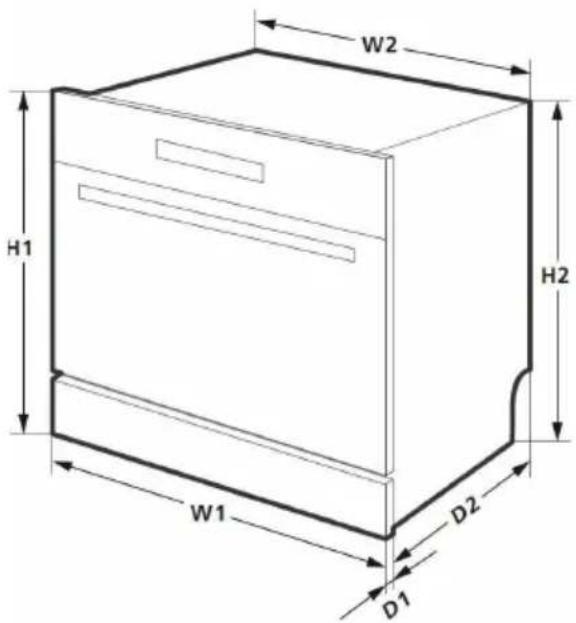
PŘÍKLAD ULOŽENÍ NÁDOBÍ
natural_image
Silhouette of various kitchen utensils and a square base (no text or symbols)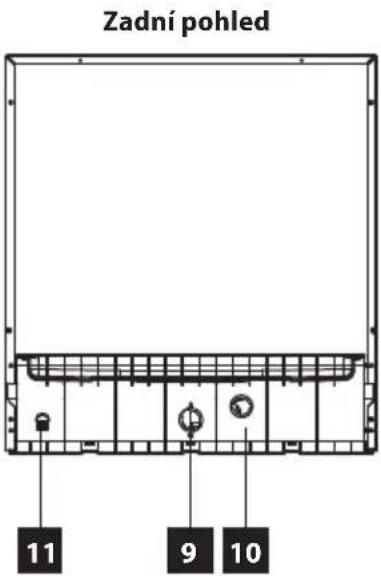
natural_image
Wireframe diagram of a multi-tiered shopping basket with no visible text or symbols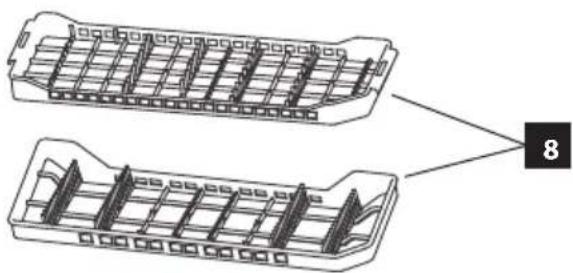
natural_image
Technical line drawing of a dual-chamber plastic housing with internal compartments and mounting holes (no text or symbols)POPIS OVLÁDACIEHO PANELU
flowchart
graph LR
    A["Initial state: Salt container with salt"] --> B["Step 1: Extraction of salt"]
    B --> C["Step 2: Inserted salt into a container"]
    C --> D["Step 3: Collection of salt into a container"]
    D --> E["Step 4: Rejection of salt into a container"]
Obr. 1
Poznámka:
natural_image
Simple line drawing of a door with a window and starburst symbol, no text or labels present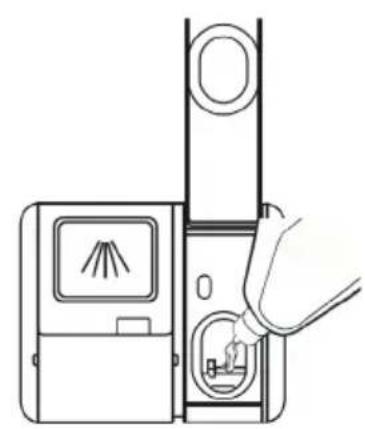
natural_image
Line drawing of a hand inserting a device into a vertical panel (no text or symbols)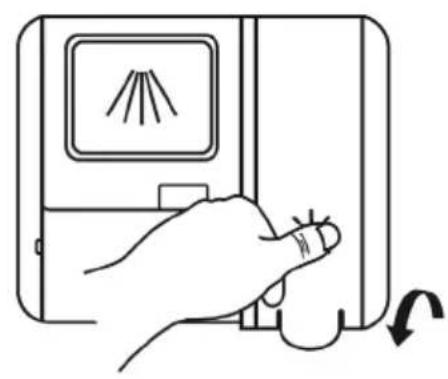
natural_image
Line drawing of a hand pressing down on a device with a screen showing a flame symbol (no text or labels)Obr. 3 Obr. 4 Obr. 5
Obr. 8 Obr. 9
natural_image
Diagram of a door with a vent and starburst symbol, no text or labels presentnatural_image
Diagram showing structural deformation of a vehicle chassis, with no text or symbols presentObr. 12
Vyberanie riadu
natural_image
Circular diagram with vertical lines and a crossed X at the bottom, no text or symbols present.PREHŁAD ČISTIACICH PROGRAMOV
flowchart
graph LR
    A["Hand with triangular head"] --> B["3 sec press icon"]
    B --> C["ECO control box with icons"]
    C --> D["Hand with triangular head"]
Poznámka:
flowchart
graph LR
    A["Hand press"] --> B["5 sec container"]
    B --> C["Bar chart with downward arrow"]
    C --> D["Battery with hand gesture"]
    D --> E["Hand gesture to press"]
POZOR!
natural_image
Line drawing of a hand washing a cup with a tool, no text or symbols present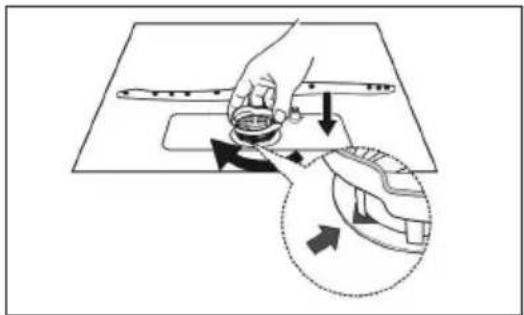
Poznámka:
natural_image
Technical line drawing of a mechanical component with internal structure and a magnified inset showing a disassembled part (no text or symbols)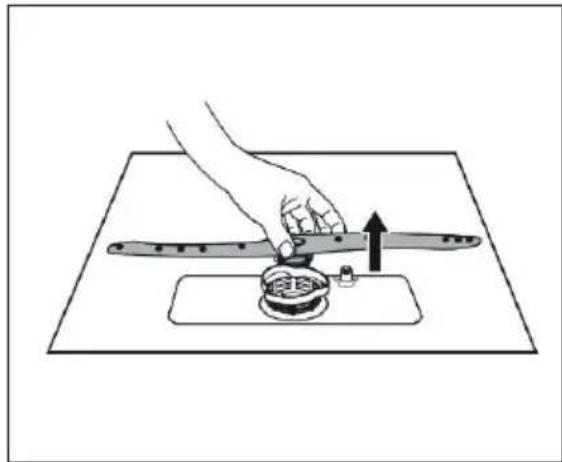
natural_image
Illustration of a hand using a tool to press or install a small object on a flat surface, with no visible text or symbols.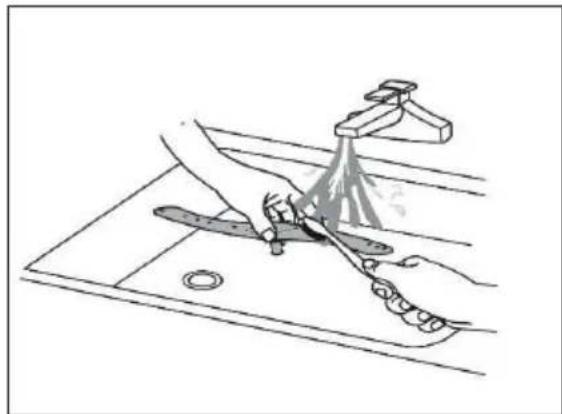
natural_image
Line drawing of a kitchen sink with a hand cleaning the surface using a spray gun (no text or symbols)UPOZORNENIE!
natural_image
Close-up of a white plastic mechanical component with concentric grooves, mounted on a perforated surface (no visible text or symbols)natural_image
Close-up of a white plastic mechanical component with a meshed surface (no visible text or symbols)natural_image
Close-up of a white industrial fan or filter structure with a perforated mesh floor (no visible text or symbols)
Obr. 14
Pripojenie do elektrickej siete
natural_image
Technical line drawing of a mechanical component with dimension label D3 (no text or symbols present)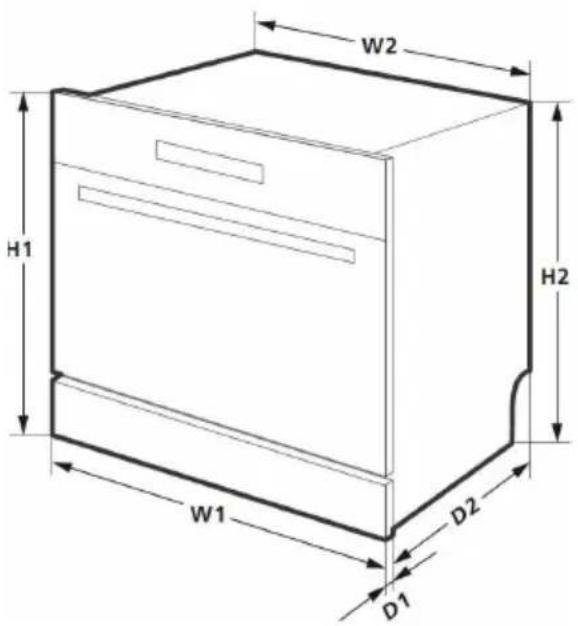
PRÍKLAD UMIESTNENIA RIADU
Dolný kôš Horný kôš
natural_image
Black silhouette of various kitchen utensils and a spoon arranged in rows (no text or symbols)Widok z tyłu
natural_image
3D wireframe model of a mesh structure with numbered annotations (no readable text or symbols)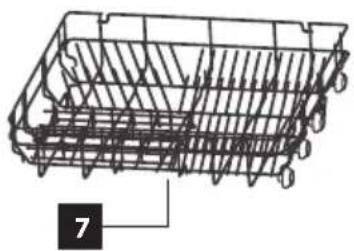
natural_image
Technical line drawing of a multi-layered plastic basket structure with no visible text or symbols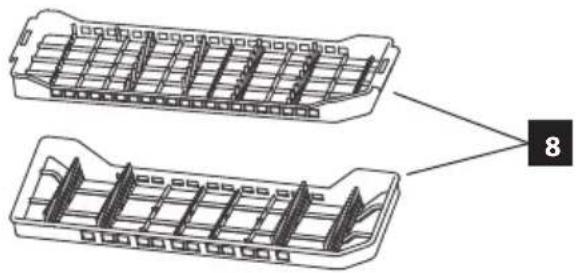
natural_image
Technical line drawing of a multi-layered plastic tray with internal compartments, showing two views (no text or symbols)OPIS PANELU STEROWANI
flowchart
graph LR
    A["Hand holding salt container"] --> B["Salt container with salt"]
    B --> C["Heated salt container pouring salt"]
    C --> D["Hand holding salt container with arrow indicating rotation"]
Rys. 1
Pamiętaj:
natural_image
Simple line drawing of a door with a window and starburst symbol, no text or labels present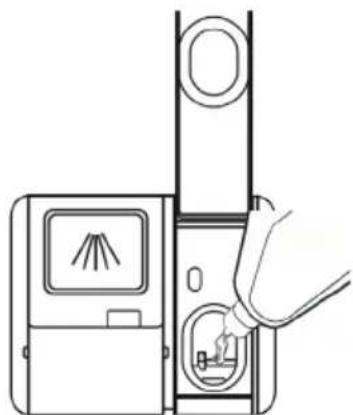
natural_image
Line drawing of a device with a hand inserting a component into a vertical panel (no text or symbols)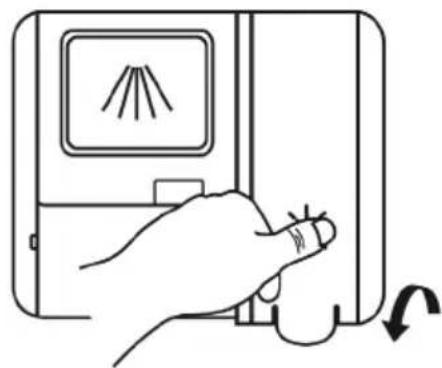
natural_image
Line drawing of a hand pressing down on a device with a screen showing a flame symbol (no text or labels)Rys. 8 Rys. 9
natural_image
Diagram of a door with a window and ceiling-mounted fan, showing airflow direction (no text or symbols)natural_image
Diagram showing structural deformation of a vehicle chassis, with no visible text or symbolsRys. 12
Wyjmowanie naczyń
natural_image
Simple line drawing of a table with a ladder and a cross symbol, no text or symbols present.PRZEGLĄD PROGRAMÓW MYCIA
flowchart
graph LR
    A["Hand press icon"] --> B["5 sec battery with hand icon"]
    B --> C["Bar chart with hand icon"]
    C --> D["Water meter with battery icon"]
    D --> E["Touch button icon"]
UWAGA!
natural_image
Line drawing of a hand washing a cup on a kitchen sink with a spray bottle (no text or symbols)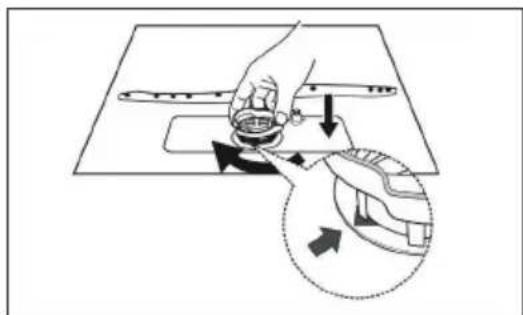
natural_image
Diagram showing a hand holding a small object on a flat surface with arrows indicating motion or force direction, and a magnified inset showing the same motion (no text or symbols)Pamiętaj:
natural_image
Technical line drawing of a mechanical component with a magnified inset showing a disassembled part (no text or symbols present)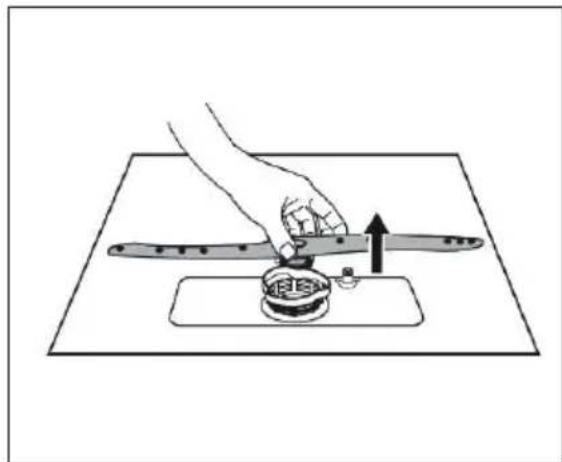
natural_image
Illustration of a hand using a tool to press or install a small object on a flat surface, with no visible text or symbols.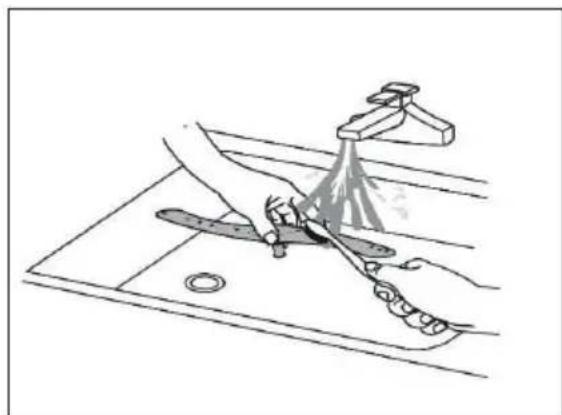
natural_image
Line drawing of a kitchen sink with a hand cleaning the surface and a faucet spraying water (no text or symbols)PRZESTROGA!
natural_image
Close-up of a white plastic mechanical component with concentric grooves and a textured surface (no visible text or symbols)natural_image
Close-up of a white plastic mechanical component with a textured surface (no visible text or symbols)natural_image
Close-up of a white industrial pipe fitting with a perforated base, no visible text or symbolsny filtr
Obr. 14
Rys. 21
natural_image
Technical line drawing of a mechanical component with dimension label D3 (no text or symbols present)PRZYKŁAD UŁOŻENIA NACZYŃ
natural_image
Technical line drawing of a mechanical assembly with multiple components and structural elements (no text or labels)natural_image
Silhouette of various kitchen utensils and kitchenware arranged in rows, with numbered labels below each (12, 45, 78)Skats no aizmugures
natural_image
Line drawing of a shopping basket with handle and spout, no text or symbols present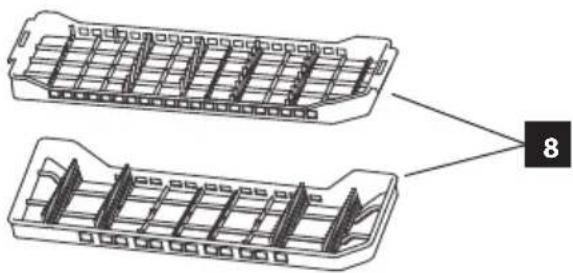
natural_image
Technical line drawing of a multi-layered plastic tray or container with internal structure, no text or symbols presentVADĪBAS PANELA APRAKSTS
flowchart
graph LR
    A["Hand holding a salt container"] --> B["Salt with a sash"]
    B --> C["Hear pouring salt into a container with a flame"]
    C --> D["Hand holding a salt container"]
- att.
Piezime:
natural_image
Diagram of a door with a window and starburst symbol, showing airflow direction (no text or labels)- att.
natural_image
Line drawing of a hand inserting a device into a vertical panel (no text or symbols)- att.
natural_image
Line drawing of a hand pressing down on a device with a screen showing a flame symbol (no text or labels)- att.
- att.
natural_image
Diagram of a refrigerator interior with a door and window, showing no text or symbols- att.
natural_image
Diagram showing structural deformation of a vehicle chassis, with no text or symbols present- att.
Trauku iznemšana
natural_image
Simple line drawing of a fence with diagonal braces and a cross symbol below (no text or labels)MAZGĀŠANAS PROGRAMMU PĀRSKATS
natural_image
Line drawing of a hand washing a cup on a kitchen sink with a faucet (no text or symbols)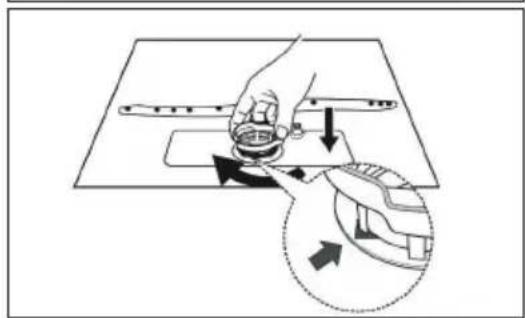
natural_image
Diagram showing a hand pressing down on a mechanical component with an inset close-up of the motion (no text or symbols)natural_image
Technical line drawing of a mechanical component with an inset showing a circular detail (no text or symbols)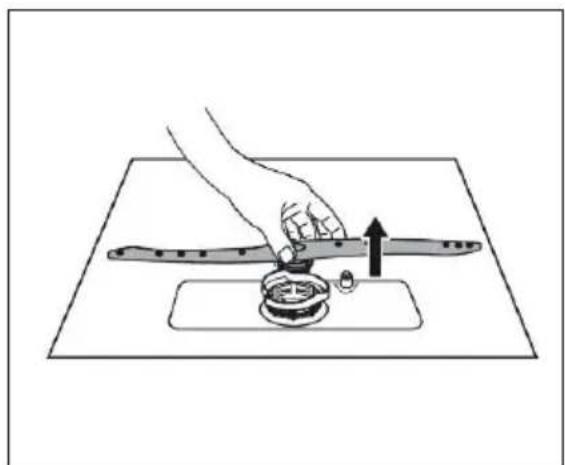
natural_image
Illustration of a hand using a tool to press or install a mechanical component on a flat surface (no text or symbols)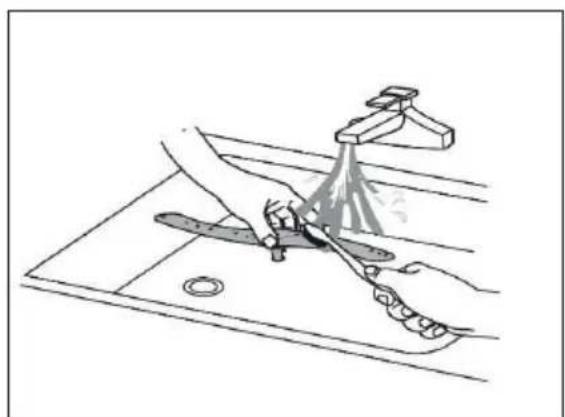
natural_image
Line drawing of a hand washing a kitchen sink with a faucet, no text or symbols presentnatural_image
Close-up of a white plastic mechanical component with concentric grooves and a central trough, placed on a textured surface (no text or symbols visible)natural_image
Close-up of a white plastic mechanical component with a meshed surface and internal grooves (no text or symbols visible)natural_image
Close-up of a white industrial pipe fitting with meshed surface (no visible text or symbols)
Obr. 14
21.att
natural_image
Technical line drawing of a mechanical component with dimension label D3 (no text or symbols present)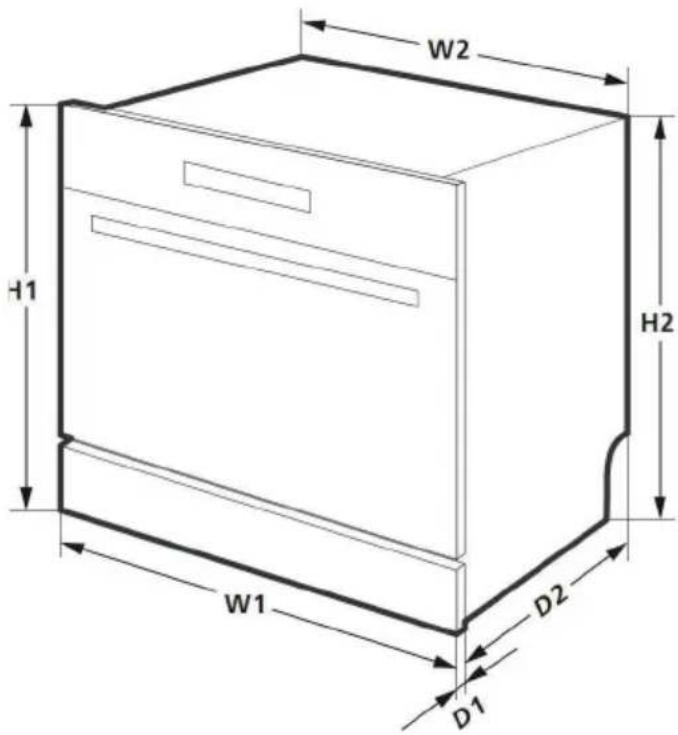
TRAUKU IEVIETOŠANAS PIEMĚRI
natural_image
Technical line drawing of a mechanical assembly with multiple components and no visible text or symbolsnatural_image
Black silhouette of various kitchen utensils and kitchenware arranged in rows, with numbers 12, 45, and 78 below each item (no text or symbols on the items themselves)Thank you for purchasing the Concept product. We want you to be satisfied with everything we make every day you use it.
Please read the instructions carefully before initial use. You should retain them for future reference. Ensure that anyone using the warming drawer is familiarized with the instructions.
TABLE OF CONTENTS
Technical specifications
Important safety information
Product description
Control panel description
User manual
Loading the regenerating salt
Loading the rinse aid
Detergents
Unsuitable dishware
Loading dishware
Washing programs overview
Putting the appliance into operation
Cleaning and maintenance
Installation of the appliance
Troubleshooting
Error message
Dimensions
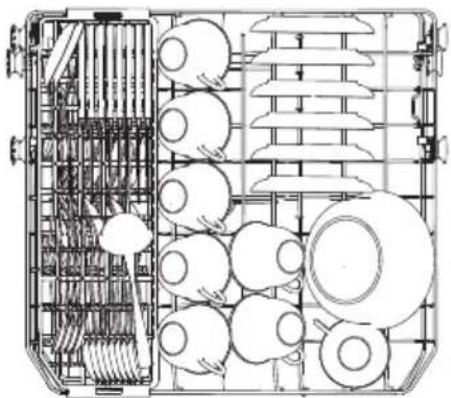
Example of loading dishware
Environmental protection
| Technical specifications | |
| Energy class A+ | |
| Annual consumption 205 kWh | |
| Energy consumption during the standard washing cycle | 0.72 kWh |
| Energy consumption when the appliance is off 0.45 W | |
| Energy consumption when the appliance is on 0.49 W | |
| Annual water consumption 2240 l | |
| Drying efficiency class A | |
| Standard washing cycle ECO 45°C | |
| Duration of the Standard washing cycle 185 min | |
| Noise level 49 dB (A) | |
| Height 595 mm | |
| Width 595 mm | |
| Depth (closed door) 500 mm | |
| Depth (open door) 930 mm | |
| Input power 1 380 – 1620 W | |
| Charging/frequency 230 V ~ 50 Hz | |
| Water pressure | 0.04–1 MPa |
| Capacity | 8 dishware sets |
| Weight | 28 kg |
The manufacturer reserves the right to make potential technical changes, typographical errors and any differences in the representation without prior notice.
IMPORTANT SAFETY INFORMATION
Upon delivery of the dishwasher
- Immediately after delivery, check the package for any damage during shipping.
- Caution! Caution! Some edges of this appliance that are hidden after installation are sharp! Be careful not to get cut when handling an uninstalled unit.
- Do not install the appliance if it has been damaged. Contact the store where you purchased it immediately.
- Remove all the packaging and marketing materials before first use.
- Keep the packaging materials away from children or dispose of them properly.
During installation
-
Do not use the appliance in any way other than as described in this manual.
• This appliance can be used in households and similar places like: -
Kitchen cabinets in shops, offices and other workplaces.
• Appliances used in agriculture. - Appliances used by guests in hotels and other areas in a hotel environment.
- Appliances used in a Bed and Breakfast environment.
- Do not touch the appliance with wet hands.
- Load sharp knives with the handles up or horizontally to reduce the risk of cut-type injuries.
- Use the dishwasher only for household purposes and only for washing kitchen utensils.
- Do not store anything inside the appliance.
- Do not stand or sit on the open door of the appliance.
• Water from the washing area is not drinkable.
- Do not use any solvents in the dishwasher (danger of explosion).
- Use only the products suitable for dishwashers.
- During the running washing program always open the dishwasher door very carefully, water may spurt out.
- Follow the instructions for safety and use on the packaging of the cleaning agents.
- Do not touch hot surfaces and heating elements during use or shortly after use.
- Do not allow children or unauthorized people to handle the appliance, use it out of their reach.
- Children should not play with the appliance. - Pay extra attention if the appliance is used near children.
- Do not allow the appliance to be used as a toy.
- This appliance can be used by children aged 8 years and over. Persons with reduced physical, sensory or mental capabilities, or lack of experience and knowledge, should be supervised or familiarized with the instructions for use of the appliance in a safe way and have been made aware of the risks involved.
- Caution! A large amount of steam may be released from the appliance when you open the door. Be careful. Risk of scalding!
- If a malfunction occurs, turn off the appliance and unplug it from the wall outlet.
- When disconnecting the unit from the wall outlet, never pull the power cord, grasp the plug end and disconnect it by removing it from the receptacle.
- Do not immerse the power cord or the plug in water or any other liquid.
- Check the appliance and the power cord for damage regularly.
- Do not switch on the appliance if it has been damaged.
- Do not use the appliance if the door or the door seals are damaged. Call the authorised service centre.
- Do not use the appliance without properly installed covers and without a front plate.
- The appliance is designed for washing dishware suitable for washing in the dishwasher. Avoid contact of plastic dishware with the heating elements of the appliance.
- Do not use any accessories other than those recommended by the manufacturer.
- Do not use accessories with damaged surface treatment or if it has been worn out or has other defects.
• Before cleaning of the appliance, leave it for at least 30 minutes to cool down.
- Children should not clean and maintain the appliance unless they are at least 8 years old and under supervision.
- Keep the detergents and rinse aids from children.
- Keep children away from the open dishwasher, there could still be detergent residues.
CAUTION!
To avoid injury open the door only for a short period of time to load or unload dishware. Children may lock themselves inside the appliance (risk of suffocation) or be exposed to other dangers.
Possible defects
- Only qualified service technicians should repair or perform maintenance to this appliance.
- During the repairs the appliance must be disconnected from the power. Switch off the circuit breaker or remove the plug from the wall outlet.
- When disconnecting the unit from the wall outlet, never pull the power cord, grasp the plug end and disconnect it by removing it from the receptacle.
If you fail to follow these instructions, any possible repair cannot be recognized as a warranty repair.
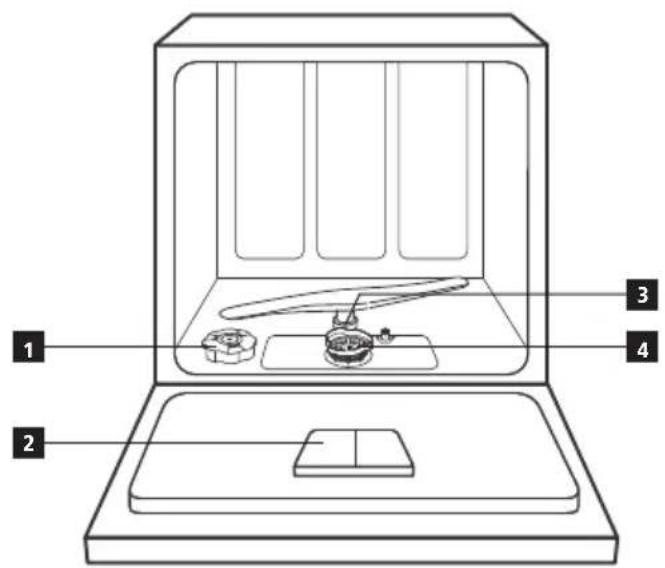
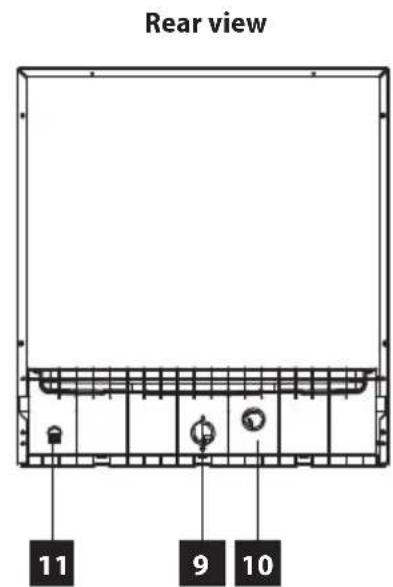
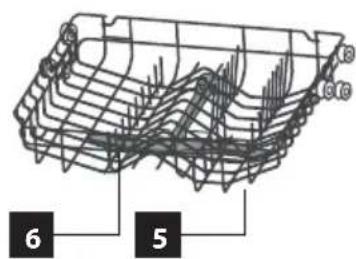
PRODUCT DESCRIPTION
1 Regenerating salt container
2 Detergent and rinse aid dispenser
3 Lower spray arm
4 Filtration system
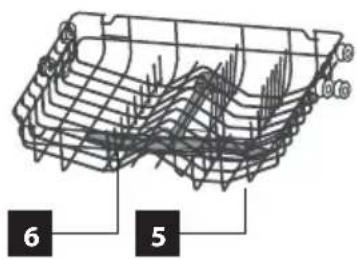
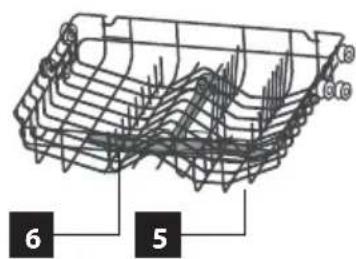
5 Upper basket
6 Upper spray arm
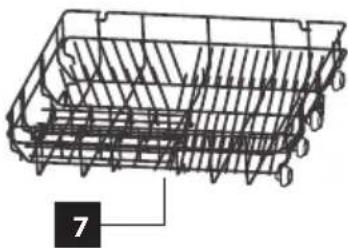
7 Lower basket
8 Cutlery rack
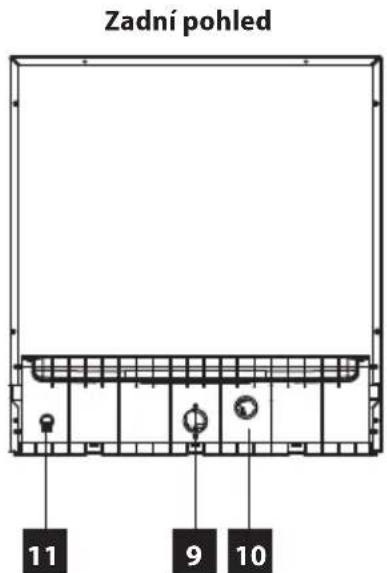
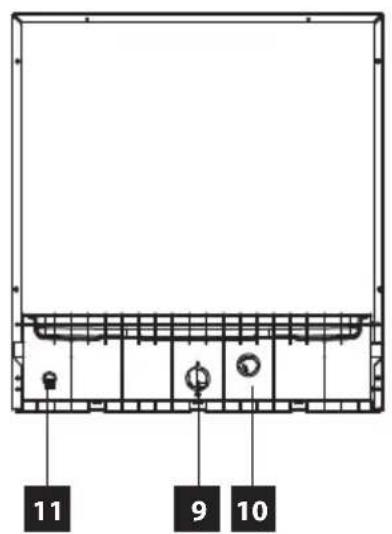
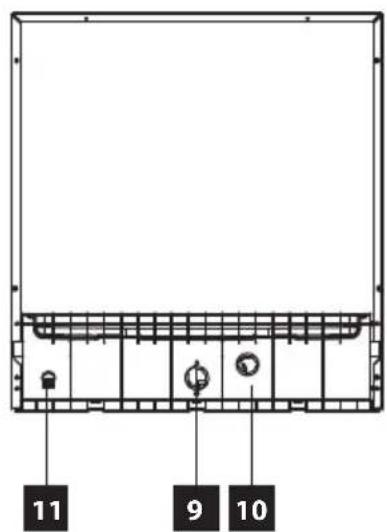
9 Water supply connector
10 Drain hose
11 Power cord
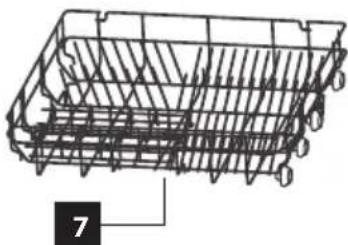
natural_image
Wireframe diagram of a shopping basket with numbered label (7), no text or symbols present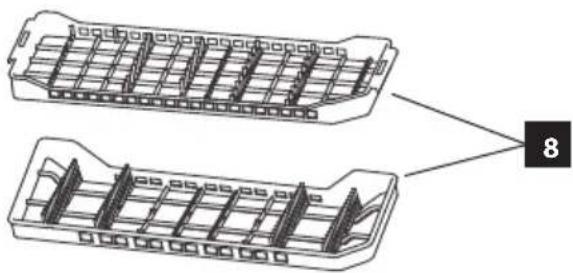
natural_image
Technical line drawing of a multi-layered plastic tray or container with internal structure, no text or symbols presentCONTROL PANEL DESCRIPTION
1 Power button
2 Washing program selection button
3 Child lock button
4 Delayed start function button
5 Adding/subtracting the delayed start time button
6 FRESH function button
7 Half load option button
8 Start/Pause button
9 Selected program indicators
10 Time and temperature indicator
11 Rinse aid and regenerating salt level indicators
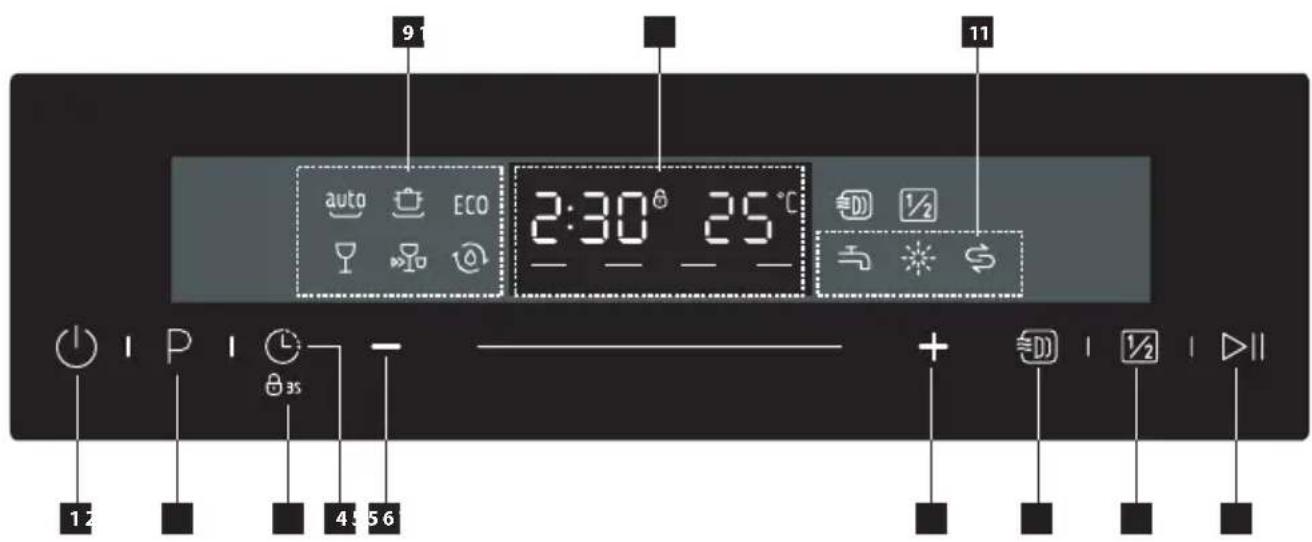
DESCRIPTION OF INDIVIDUAL BUTTONS OF THE CONTROL PANEL
Washing program selection button
- Press the button to select desired washing program.
- You can choose from following washing programs: Auto, Intensive, ECO, Glass, Rapid, Self-cleaning.
- The selected washing program is indicated by the indicator light of the respective washing program.
Delayed start function button
- Press this button to set a delayed washing. You can delay the start of the washing for up to 24 hours.
Press this button once to delay the start of washing by one hour.
Extra drying
• For complete drying of dishes.
- It can only be used with Intensive, Normal, ECO, Glass and 90 Min programs. When this button is pressed, the corresponding indicator lights up.
Half load option button
- It is suitable for half loaded dishwasher. (e.g. 5 dishware sets)
- Washing is performed in both (upper and lower) racks.
• The water consumption is reduced and the length of the program is shortened. - Can only be used with Intensive, ECO and Glass. When this button is pressed, the corresponding indicator lights up.
Start/Pause button
- Starts the selected washing program or pauses it while the dishwasher is working.
Child lock button
• Holding down the button for more than 3 seconds locks the buttons other than the power button
FRESH Function
- Effectively removes odour from the dishwasher, prevents mould and improves drying.
- It can run for up to 72 hours.
- When this button is pressed, the corresponding indicator lights up.
Status indicator (Lights polishes complement, supplement regeneration salt)
- If the indicator status (11) LED lights up, it is needed to add the appropriate detergents.
| Symbol Status indicator | |
 | Rinse aid |
 | Salt |
 | Water tap |
| Symbol Mycí program | |
 | AutoFor lightly, normally or heavily dirty dishes, including dried food residues. |
 | IntensiveFor heavily dirty dishes and standard dirty pots, pans. With dried food residues. |
 | ECOThis is a standard program that is suitable for normally dirty dishes and is the most efficient program in terms of combined energy and water consumption for this type of dishes. |
 | GlassFor lightly dirty dishes and glassware. |
 | RapidShorter washing time for lightly dirty dishes that do not require drying. |
 | Self-cleaningThis program provides effective cleaning of the dishwasher itself. |
USER'S MANUAL
Before first use
- Set the appliance according to hardness of the water (see below).
- Pour the regenerating salt into the salt container.
- Pour the rinse aid into the rinse aid dispenser.
- Pour the detergent or put the tablet into the detergent dispenser.
Water softeners
Soft water is required for efficient washing (water with low calcium content), otherwise limescale is created on the dishes and in the interior of the dishwasher. Tap water which exceeds the given level of water hardness must be softened before being used for washing purposes (meaning free of calcium). This is achieved by regenerating salt in the softening unit of the dishwasher. Setting the unit and the required amount of salt depend on the hardness of tap water.
Water hardness is measured in equivalent degrees of hardness, German degrees °dH, French degrees °fH, British degrees °Clarke and mmol/l (millimoles per litre - international unit for the hardness of water).
The softening unit should be set according to the hardness of the water used for the appliance. Contact your local water utility company for information about the water hardness in your area. Set the dosage regulator manually according to the table.
Setting the appliance according to the water hardness
- Press the power button (1) to turn the appliance on.
- Press the Start/Pause button (8) for more than 5 seconds, within 60 seconds after switching on the appliance, to start the water softening setting.
- Press the Start/Pause button (8) again to select the correct setting according to your area, the setting will switch in the following order: H1->H2->H3->H4->H5->H6.
- There is no need to confirm the selection in any way, after 5 seconds the equipment will go into standby mode and the selection will be saved
| Water-hardness | Setting the water softening equipment | Sign on the display | |
| ^ dH mmol/l | |||
| 0~5 0 - 0.9 | 1 H1 | ||
| 6-11 1.0 - 2.0 | 2 H2 | ||
| 12-17 2.1 - 3.0 | 3 H3 | ||
| 18-22 3.1 - 4.0 | 4 H4 | ||
| 23-24 4.1 - 6.1 | 5 H5 | ||
| 35-55 6.2 - 8.0 | 6 H6 | ||
Note:
• This appliance is factory preset to H3.
- It is possible to set the water softener within 60 seconds from turning the appliance on.
$$ 1 ^ {\circ} \mathrm{dH} = 1. 2 5 ^ {\circ} \text {Clarke} = 1. 7 8 ^ {\circ} \mathrm{fH} = 0. 1 7 8 \mathrm{mmol/l} $$
°dH German degrees
°fH French degrees
°Clark British degrees
LOADING THE REGENERATION SALT
The effects of salt
During the washing cycle the salt goes automatically from the container to the softening unit where it dissolves the calcium content. Dissolved calcium is washed away from the dishwasher. The softening unit is then ready again for further action. This regeneration process works only if the salt is dissolved in water.
- Open the appliance door, remove the lower basket and proceed as shown in Fig. 1 below.
- Remove the regenerating salt container lid.
- Place the funnel (included in the package) on the opening of the regenerating salt container and slowly fill the container with the salt. The capacity of the empty container is about 1.5 kg.
- Fill the rest of the container with water before first use. It is normal for a small amount of water to flow out of the container during filling.
- Close the regenerating salt container after filling.
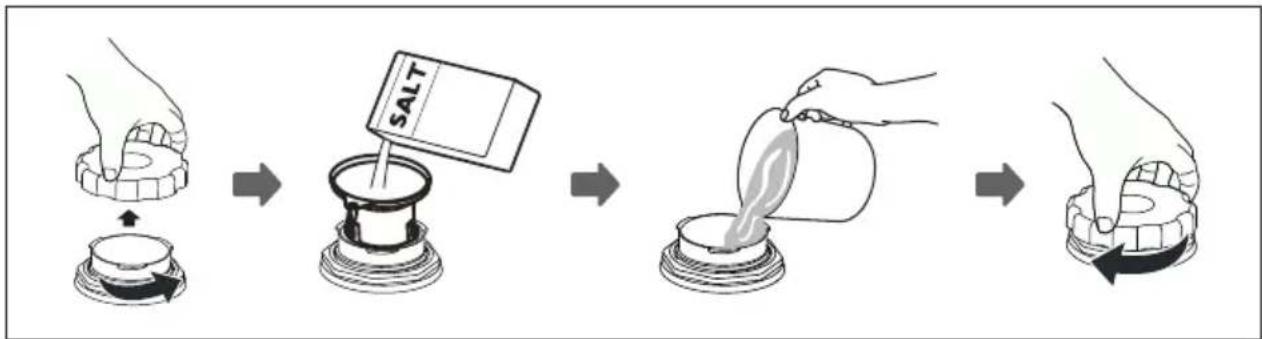
flowchart
graph LR
    A["Hand holding bowl with salt"] --> B["Add salt"]
    B --> C["Salt being added to a container"]
    C --> D["Hearts into container with liquid"]
    D --> E["Hearts back to container"]
Fig. 1
Note:
- The regenerating salt container is located under the lower rack.
- The regenerating salt container can be refilled only when the salt status indicator is on.
• After refilling the indicator goes off. - If there is a spillage of regenerating salt, run a short washing cycle to wash away the salt.
Caution!
- Load the regenerating salt before running washing cycle to wash away any spilled salt residues and prevent the risk of corrosion of the appliance interior.
• Always use regenerating salt designed for use in dishwashers. Never use table salt! - Never pour detergents into the regenerating salt container. Detergents can destroy the softening unit!
In the event of damage caused by improper use of salt, the manufacturer assumes no responsibility or liability for any caused damage.
LOADING THE RINSE AID
The rinse aid is used in the last stage of rinsing to prevent the drops of water from staying and drying out on the dishes leaving undesirable stains on the dishes.
- Open the appliance door.
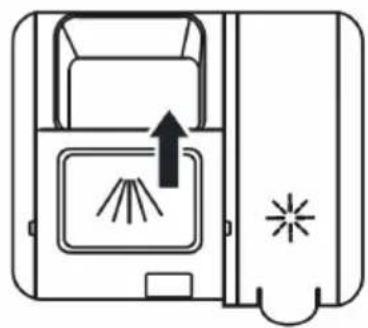
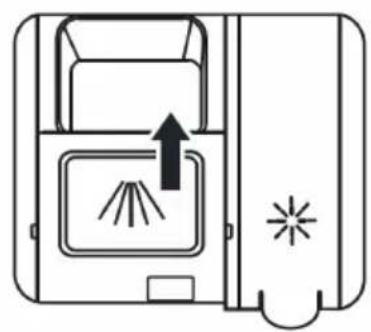
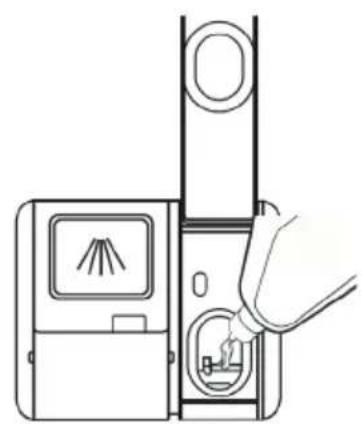
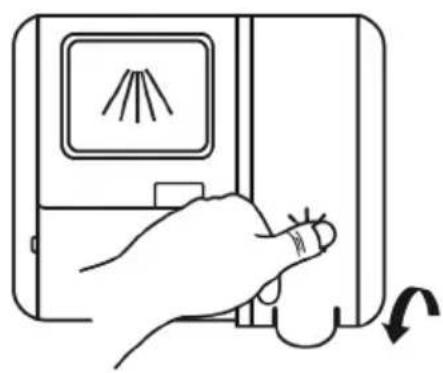
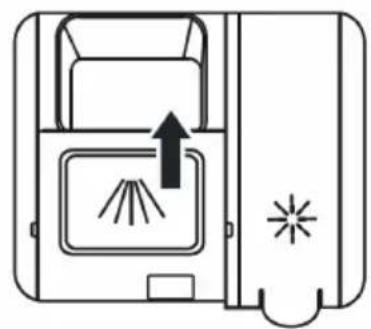
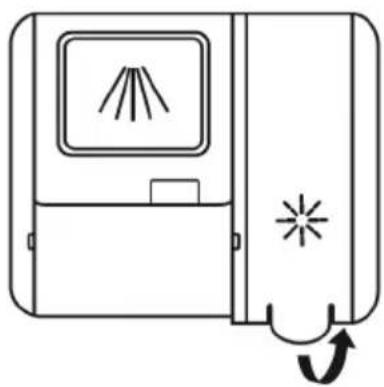
- Open the rinse aid dispenser as shown in Fig. 3.
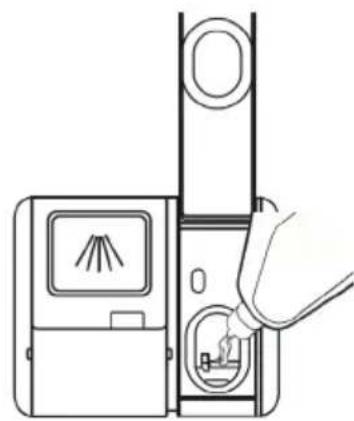
- Slowly pour the rinse aid into the dispenser (Fig. 4). The capacity of the empty dispenser is about 140 ml.
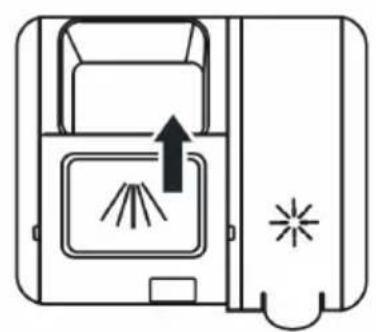
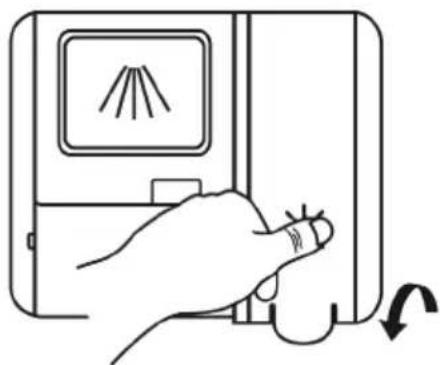
- After filling close the rinse aid dispenser cover (Fig. 5).
natural_image
Diagram of a door with indicator lights and a starburst symbol, showing airflow direction (no text or labels)Fig. 3
natural_image
Line drawing of a hand inserting a device into a device with a fan icon (no text or symbols)Fig. 4
natural_image
Hand pressing down on a device with a screen showing a flame symbol (no text or labels)Fig. 5
If the indicator of the amount of the rinse aid lights up, you must refill the dispenser before starting a new washing cycle!
Note:
- The rinse aid dispenser is located on the door next to the detergent dispenser.
- The appliance is designed to be used only with liquid rinse aids.
- If there is a spillage of the rinse aid, wipe it out using an absorbent cloth or run a short washing cycle to wash it away.
Caution!
- Use only rinse aids designed for use in dishwashers. Never pour detergents into the rinse aid dispenser.
- Load the rinse aid before running the short washing cycle to wash away any spilled rinse aid residues and prevent the risk of corrosion of the appliance interior.
Setting the dosage of the rinse aid
For better drying results with a limited amount of rinse aid, the dishwasher is designed to adjust consumption according to user settings. Follow the steps below.
- Close the door and switch on the dishwasher by plugging it into an electrical outlet.
- Within 60 seconds after step 1, press the "Program" button [2] for more than 5 seconds and then press the Delayed Start" button [4] to enter one of the pre-set options, the rinse aid status indicator flashes once per second.
- Press the "Program" button [2] to select the most appropriate setting to match your habits, the settings will change in the following order: D1->D2->D3->D4->D5->D1. The higher the number, the more rinse aid the dishwasher uses.
- Without reaction within 5 seconds or by pressing the "On/Off" button [1], you finish the setting, the setting is completed successfully.
If you only use a detergent with the integrated rinse aid, decrease the dosage of the rinse aid to minimum.
DETERGENTS
Detergents can be divided into four groups according to the form:
a) Loose,
b) Liquid,
c) Tablets,
d) Combined detergents (e.g. 3 in 1 tablets).
Detergents can be divided into two groups according to the chemical composition:
a) Alkaline,
b) With natural enzymes.
They can be also divided into:
a) phosphate and chlorine,
b) phosphate and chlorine-free,
c) phosphate-free and chlorine-free.
- When using phosphate-free detergents with hard water, a white film can be created in the appliance interior.
- Increasing the dose of detergent will prevent the sediment and get better washing results.
- Chlorine-free detergents have less bleaching effect. This may lead to enhancement of tea residue stains or colouring of plastic dishes. In this case, use a stronger washing program, increase the dose of detergent or use a chlorine detergent.
Detergents – Tablets
• The tablets from different manufacturers dissolve at different rates.
• Some detergent tablets cannot dissolve completely therefore they are less efficient while running short programs.
- For this reason, we recommend selecting longer washing programs to ensure the complete dissolution of the detergent tablets.
Detergent dispenser
The detergent dispenser must be refilled before every washing cycle. For regular use one tablespoon of detergent is plenty. If the dishes are heavily soiled, add more detergent. Add the detergent just before starting the washing program. If the detergent stays in the dispenser, it may get wet and it may not dissolve completely when starting a new cycle.
Filling the detergent dispenser
- Choose how to open the dispenser lid according to the actual design.
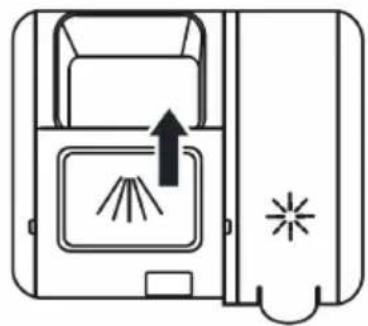
- Method 1: Slide the release latch to open the lid
- Method 2: Open the lid by pushing the release latch. (Fig. 7).
-
Add detergent to the dispenser main chamber (A) just before the washing cycle (Fig. 8). For better cleaning results, especially if you have very dirty dishes, pour a small amount of detergent directly onto the inner door recess (B). The detergent thus added is already activated during the pre-wash phase.
-
Finally, close the flap by sliding it to the left (Fig. 9).
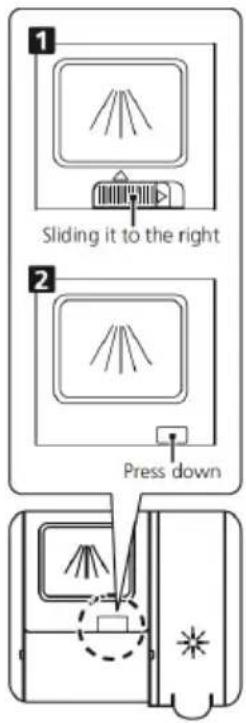
Fig.7
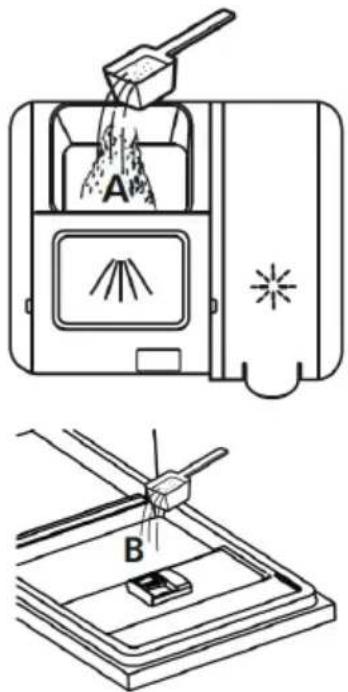
Fig. 8 Fig. 9
natural_image
Diagram of a door with a lamp inside, showing no text or symbolsTip how to save detergents
- When the dishes are soiled lightly, simply use a smaller amount of detergent than recommended.
Note:
- Add the detergent just before starting the washing program.
- Use a commercially available liquid or powder branded detergent or tablets.
- Never use detergents designed for manual washing!
- When using tablet detergents read the manufacturer's recommendations, where the tablets should be placed (detergent dispenser, cutlery basket, etc.).
- Make sure the cover of the detergent dispenser is closed, even if tablets are used.
Caution!
- Use only detergents designed for use in dishwashers.
- Keep the detergents in a dry place and out of reach of children.
- Do not leave the detergent in the detergent dispenser when the dishwasher is not intended to be used for some time.
UNSUITABLE COOKWARE
• Cutlery and dishware with wooden parts.
- Plastic dishware and dishware with glued parts that are not heat resistant.
• Glued items, cutlery or plates.
- Tin or copper dishware.
- Crystal glass.
• Steel items prone to rusting.
- Wooden bowls.
- Objects made of synthetic fibres.
Some aluminium and silver parts may change colour or fade. Certain types of glass can tarnish after several washing cycles.
Note:
- Do not put absorbent materials such as sponges and cloths in the dishwasher.
- Use detergents which are labelled by a manufacturer as gentle to dishes.
- Wash only the dishes confirmed to be suitable for washing in dishwashers.
- Do not wash dishes soiled with ash, wax, grease or paint in the dishwasher!
LOADING DISHWARE
Placing dishware
Remove large food residues from the dishes. Rinsing dishes under the tap before washing in the dishwasher is not necessary.
Load the dishes in the following manner:
- Place cups, glasses, pots, pans, etc. upside down.
- Place the dishes with hollows diagonally to allow excess water to drain and for best results of drying.
- Dishware must be loaded securely to avoid falling.
- Loaded dishes must not impede the spray arms to rotate freely.
- Dishware and cutlery should not lie on one another or cover each other.
- Glasses should not touch each other to avoid possible damage.
- Load pots and larger dishes in the lower rack.
- The upper rack is designed for loading of smaller and lighter dishware (glasses, cups, etc.).
- Long-bladed knives placed upright are very dangerous! Be careful, risk of injury!
- Long and sharp cutlery (carving knives) must be placed horizontally in the upper rack.
- Do not wash very small items in the dishwasher as they can easily slip out of the racks.
- Do not overload the dishwasher!
Upper rack
The upper rack is suitable for:
- glasses,
- coffee and tea cups,
- saucers,
- small bowls and plates,
- shallow pans.
Make sure that the loaded dishware cannot be overturned by running water from the spray arms.
Lower rack
The lower rack is suitable for:
- pots,
• pans, - lids,
- large bowls and plates.
Make sure that the loaded dishware cannot impede the rotation of the spray arms.
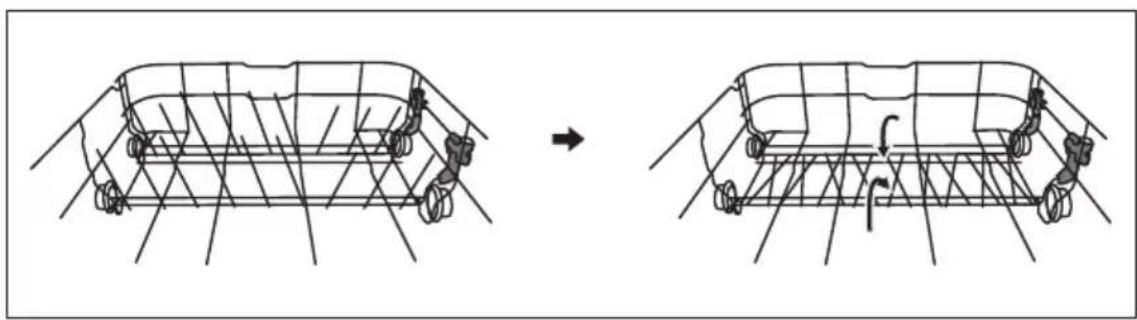
For washing larger items (pots, pans, etc.) tilt the plate holders in the lower rack (Fig. 12).
natural_image
Diagram showing a structural change before and after rebar installation, with no visible text or symbolsFig. 12
Unloading dishware
We recommend unloading the lower rack first to prevent any excess water from the upper rack from flowing down onto the dishware in the lower rack.
Caution!
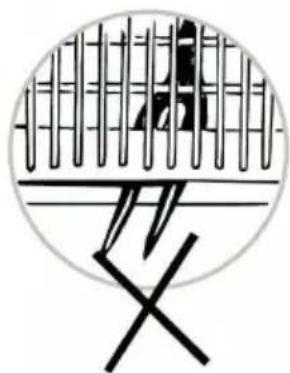
Make sure that cutlery with sharp parts or spikes do not protrude out of the basket. Risk of injury! Always put the knives with blades down!
natural_image
Circular diagram with intersecting lines and a central figure, no visible text or symbolsWASHING PROGRAMS OVERVIEW
| Program | Information about the washing program | Description of the washing cycle | Amount of detergent Previous/ main | Wash cycle time [min] | Power consumption [W] | Water consumption [L] | Rinse aid |
 | Normally dirty dishes, pots, plates, glasses and lightly soiled pans | Pre-wash (50°C) Washing (65°C) Rinsing Rinsing (70°C) Drying | 4/20g 150 | 0.85 – 1.05 | 7.5 - 10 YES | ||
 | Heavily soiled dishes, dirty pots, pans, etc., dried food | Pre-wash (50°C) Washing (65°C) Rinsing Rinsing (70°C) Drying | 4/20g | 160 | 1.25 | 12.5 | YES |
| ECO | The standard program is suitable for less dirty dishes | Pre-wash Washing (45°C) Rinsing (65°C) Drying | 4/20g | 185 | 0.72 | 8 | YES |
 | For lightly dirty dishes and glassware | Pre-wash Washing (45°C) Rinsing Rinsing (60°C) Drying | 4/20g | 95 | 0.7 | 10.5 | YES |
 | Short washing for lightly soiled dishes; for quick washing | Washing (45°C) Rinsing Rinsing (55°C) | 15 g | 35 | 0.52 | 7 | NO |
 | Dishwasher cleaning | Washing (70°C) Rinsing Rinsing (55°C) Drying | 18 g | 50 | 0.8 | 7 | NO |
Note:
If the display does not show the temperature during the running washing program, it means that phase of the program does not heat up the water.
PUTTING THE APPLIANCE INTO OPERATION
Starting the washing program
- Open the appliance door.
- Check the amount of the regenerating salt and refill if needed.
-
One by one pull out the upper and lower rack, load the dishes and then slide the racks back. We recommend loading the lower rack first and then the upper rack (see "Loading dishware").
-
Make sure that the water tap is open. Close the door of the appliance.
-
Press button (1) to turn the appliance on.
-
Select the desired washing program by pressing the button (2). The selected washing program is indicated by the indicator light of the respective washing program (9).
-
If you require a delayed start, press the delayed start function button (4) repeatedly. You can delay the start of the washing for up to 24 hours. Press this button once to delay the start of washing by one hour.
-
If the dishwasher is only half loaded with dishes, press button (7) to launch the half load option function. Washing is performed in both (upper and lower) racks, the water consumption is reduced and the length of the program is shortened.
-
After selecting the program and adjusting close the door of the appliance. The washing program or the countdown of the delayed start will start.
-
You will hear an eight-fold beep sound after the washing program is done.
-
Press button (1) to turn the appliance off.
-
Hot dishes are very fragile. We recommend leaving the dishes to cool down for about 15 minutes before unloading.
-
Unload the lower rack first and then the upper rack to prevent the excess water from the upper rack flowing down on the dishes in the lower rack.
Caution! Be careful while opening the door of the appliance, a large amount of water vapour can be released or hot water can spurt. There is a danger of scalding!
Changing the program during the running washing program
The washing cycle can only be changed if it is not running for a long time, otherwise the detergent could already be released and the dishwasher could have drained the washing water. In that case, the dishwasher must be reset and the detergent dispenser must be refilled (see chapter "Filling the detergent dispenser"). To reset the dishwasher, follow these steps:
- Press the Start/Pause button (8) to pause the washing.
- Press the Program button (2) for more than 3 seconds to cancel the program.
- Press the Program button (2) to select the desired program.
- Press the Start/Pause button (8), after 10 seconds the dishwasher will start.

flowchart
graph LR
    A["Hand with triangular head"] --> B["3 sec press icon"]
    B --> C["ECO control box with icons"]
    C --> D["Hand with triangular head"]
Note:
• If you open the appliance door during the running wash program, the program will be paused. Signal lights go off.
- A beep sound occurs every minute to warn the door is open during the running program.
Adding dishes to the dishwasher during the running washing program
Forgotten dishes can be added at any time before opening the detergent dispenser.
In that case, follow these steps:
- Press the Start/Pause button (8) to pause the washing.
- Wait 5 seconds and open the door.
- Add the forgotten dishes.
- Close the door.
- After 10 seconds, press the Start/Pause button (8) to start the dishwasher.

flowchart
graph LR
    A["Hand press"] --> B["5 sec device"]
    B --> C["Bar chart with downward arrow"]
    C --> D["Washing machine"]
    D --> E["Hand gesture"]
Caution!
Be careful while opening the door of the appliance, a large amount of water vapour can be released or hot water can spurt. Hot water with the detergent can be of a chemically aggressive nature and may have detrimental effects on your skin or furniture.
CLEANING AND MAINTENANCE
Regular maintenance and inspection prevent malfunctions. To maintain a perfect appearance of the interior of the dishwasher, we recommend using a special dishwasher cleaner once every 4–6 months.
- Check the spray arms and make sure there are no deposits of fat and lime. If deposits occur, fill the detergent dispenser with the detergent and start the washing program on the highest set temperature.
- Wipe the door sealing with a damp cloth regularly to remove any deposits.
- Check the indicator of the amount of the regenerating salt and refill the container if needed.
- Check the indicator of the amount of the rinse aid and refill the container if needed.
Filtration system
The filtration system at the bottom of the dishwasher retains coarse dirt from the washing cycle. The accumulated coarse residues may cause clogging of the filters. Check the filters regularly and clean them under running water if necessary. Follow the steps below to clean the dishwasher filters:
-
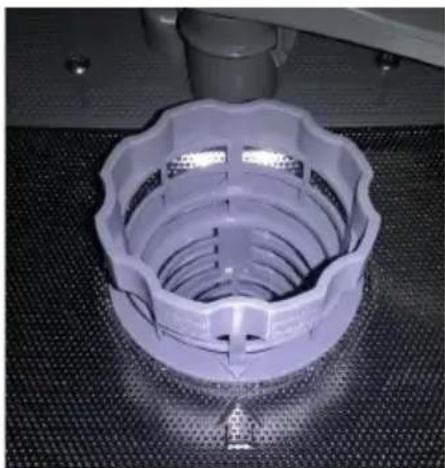
Grasp the coarse filter and unlock it by turning it counter-clockwise. Pull the filter upwards.
-
Remove the fine filter from the main filter.
-
Larger food residues can be cleaned by rinsing the filter under running water. Use a soft cleaning brush for more thorough cleaning.
-
Then reassemble the filters. Proceed in the reverse order to their disassembly. Put the filter assembly back into the dishwasher and turn it clockwise. Check that the filter is properly closed by the position of the arrow for closed filter.
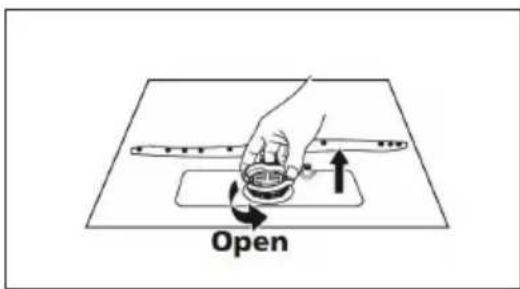
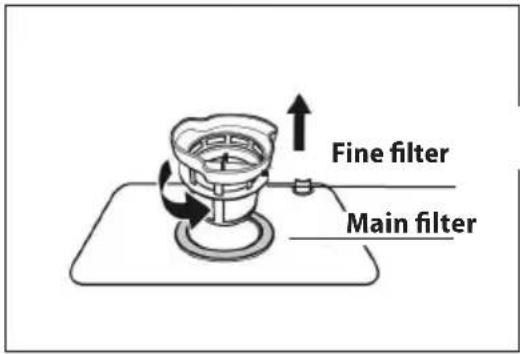
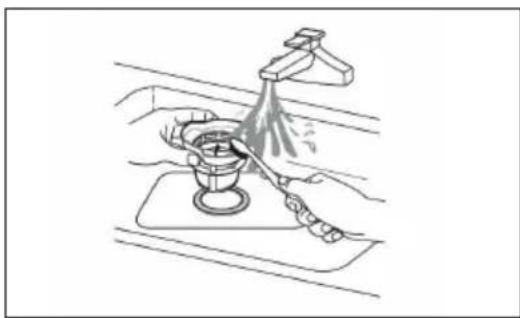
natural_image
Line drawing of hands using a tool to clean or wash a cup on a kitchen sink (no text or symbols)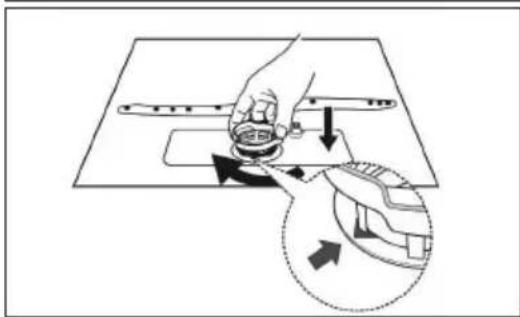
Cleaning the spray arms
It is necessary to clean the spray arms regularly. Calcium and dirt may block nozzles and bearings of the spray arms.
- Check the outlet nozzle of the spray arms whether they are blocked by food residues or not.
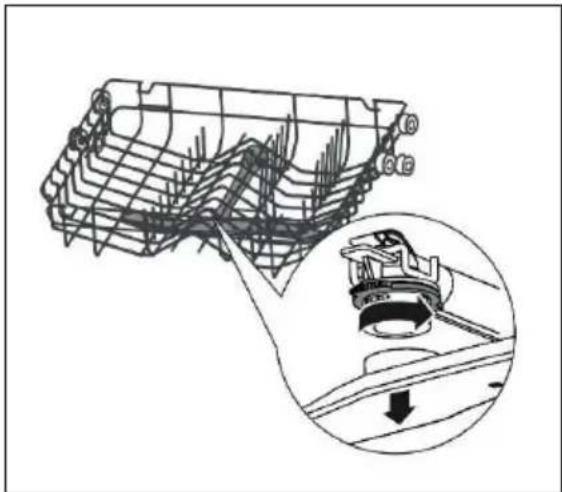
- If it is necessary, unscrew and remove the spray arms (Fig. 11). Wash them under running water and then place them back.
- To dismantle the upper arm, hold the nut, turn the arm clockwise and remove it.
- To dismantle the lower arm, remove the arm by lifting it upwards.
- Wash each spray arm in warm soapy water.
• To clean the nozzles use a fine brush.
• Install the arms back after cleaning.
natural_image
Technical line drawing of a mechanical component with a magnified inset showing a rotating assembly (no text or symbols)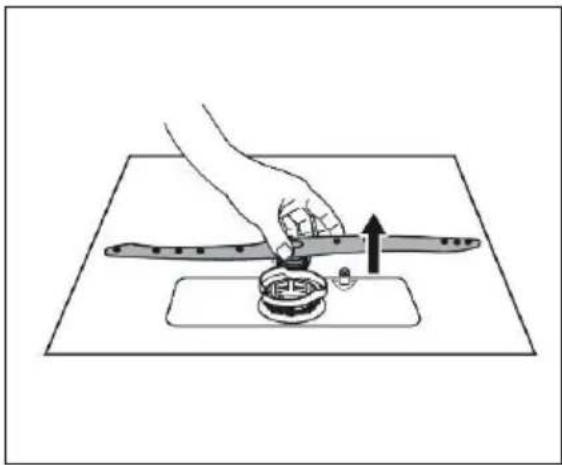
natural_image
Illustration of a hand using a tool to press or install a mechanical component on a flat surface (no text or symbols)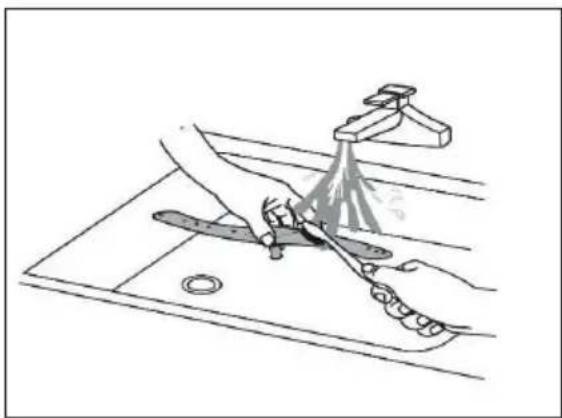
natural_image
Illustration of a hand washing a kitchen sink with a spray gun, no text or symbols presentNote:
Do not over tighten the filters. Reassemble the filters in the correct order, otherwise coarse dirt may enter the system and cause clogging. Never use the dishwasher without the filters inserted properly. Improper filter placement can reduce the performance of the appliance and damage dishes and cutlery.
natural_image
Close-up of a white plastic mechanical component with a flanged top and internal grooves, placed on a textured surface (no text or symbols visible)Properly secured filter P
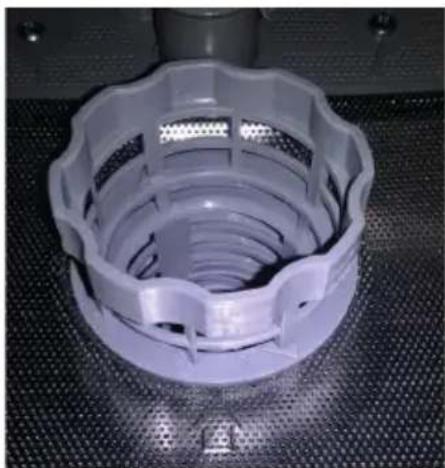
natural_image
Close-up of a white plastic mechanical component with a flanged top and internal grooves, placed on a perforated surface (no text or symbols visible)Poorly secured filter
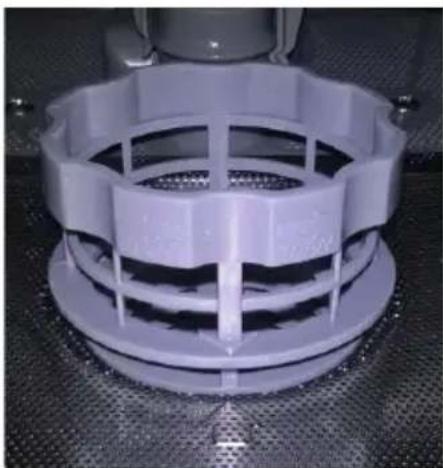
natural_image
Close-up of a white industrial mechanical component with a perforated base and internal structure (no visible text or symbols)
Cleaning the control panel and the surface of appliance
- Use only a soft damp cloth for cleaning.
- Do not use rough and sharp objects (e.g. steel wool) or aggressive detergents.
- Do not allow water to come in contact with the door lock of the appliance.
- To clean the control panel do not use a spray cleaner. It may cause damage to the door lock and electrical parts of the appliance.
- Some paper towels can scratch the stainless steel of the control panel.
Cleaning the door of the appliance
• To clean the edges around the door, use only a soft damp cloth.
- Do not use any spray cleaners, they may damage the door lock and electrical parts of the appliance.
Frost protection
If you are not going to use the appliance for a longer period of time or to place the appliance in places with low temperatures, it is necessary to follow these steps:
- Unplug the appliance from the mains.
- Close and disconnect the water inlet hose from the water supply.
- Dismantle the inlet hose and drain water from the hose and the dishwasher. To capture the water, you can use a shallow container e.g. basin.
- Reconnect the inlet hose to the dishwasher.
- Remove the filter system and drain/wipe the remaining water (using for example a sponge).
Note:
- If there is ice and the dishwasher cannot be turned on, contact the service centre.
Tips for maintaining
• After each washing cycle, close the water supply and leave the dishwasher door slightly open to prevent accumulation of moisture and odour.
- Before cleaning and maintenance, disconnect the power cord from the wall outlet.
- Do not use any coarse (e.g. steel wool, rough part of sponges) and sharp objects or aggressive cleaning agents, they may scratch the surface of the appliance.
- For cleaning use a damp cloth dipped in water and detergent.
- If you intend not using the dishwasher for a longer period of time, run a washing program without dishware. After each washing cycle, disconnect the power cord from the wall outlet and leave the dishwasher door slightly open to prevent accumulation of moisture and odour. Leaving the door slightly open prolongs the life of the seal.
- Keep the appliance in an upright position when manipulating. If this is not possible, lay the appliance and transport it on its back.
- Deposits on the seal are one of the sources of odours. Clean the seal to prevent that.
INSTALLATION OF THE APPLIANCE
Caution!
Risk of electric shock! Before installation, disconnect the power cord from the wall outlet. Otherwise there is a risk of death or electric shock.
Built-in dishwashers installed as a free-standing appliance must be secured against overturning. They must be for example screwed to the wall or placed under a worktop which is screwed to adjacent cabinets.
For safe operation the dishwasher must be installed by a qualified professional. Figures for the inflow and outflow of water and electrical grid parameters must match with the figures listed in the technical specifications or in the installation instructions.
- Defects caused by improper installation are not covered by the warranty.
• Installation is the responsibility of the customer not the manufacturer. - The manufacturer bears no responsibility for damage caused to people, animals or property due to incorrect installation.
• The dishwasher should be placed near the wall outlet, water supply and waste. - There should be a space for inlet and drain hose on one side of the lower cabinet.
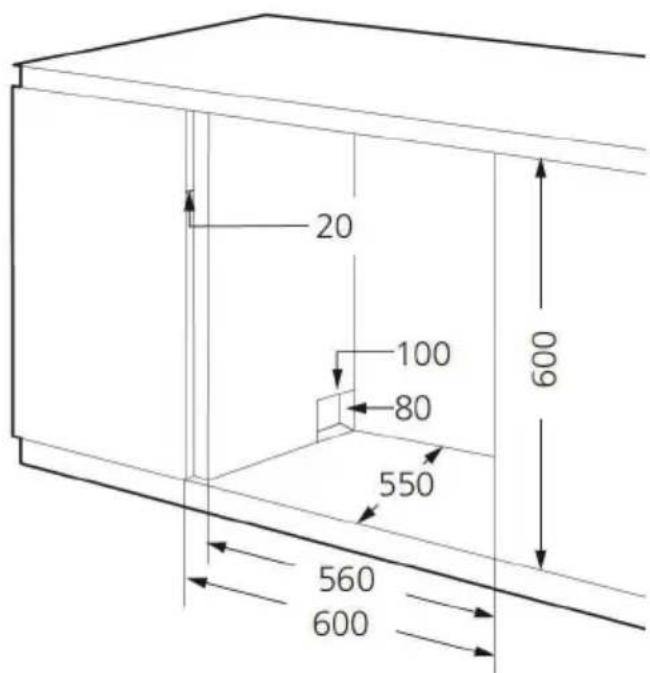
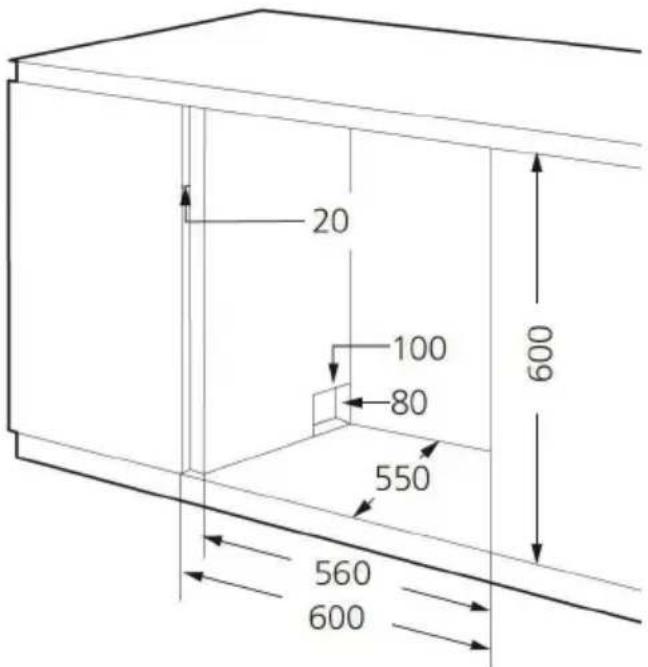
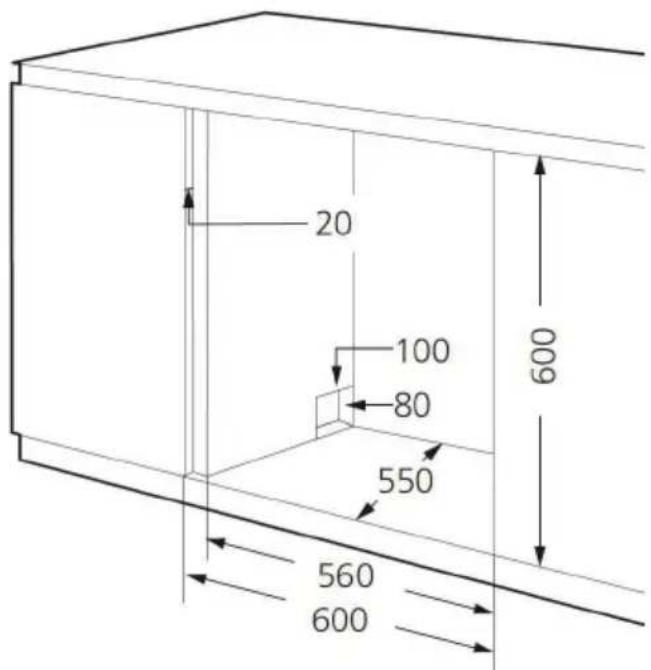
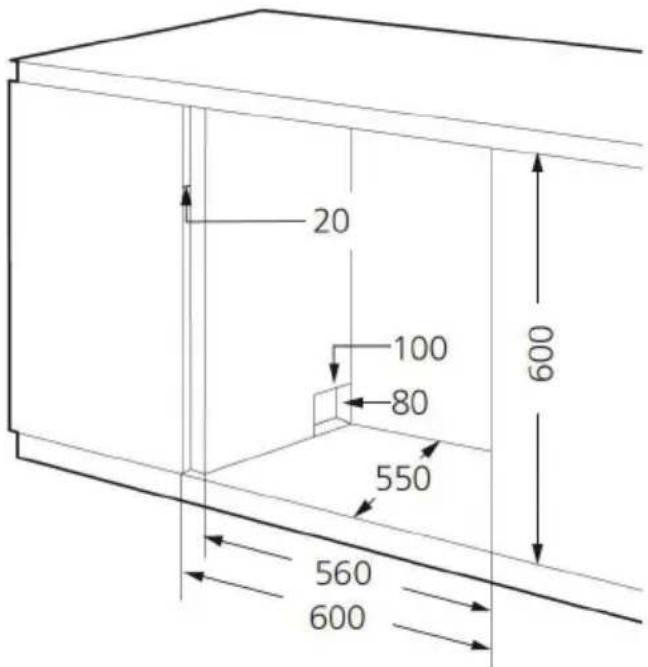
• Dimensions for mounting the appliance are shown in Fig. 14. - If the dishwasher is installed in a corner of the lower cabinets, make sure there is a free space around the open dishwasher door 50 mm.
- Leave a space of less than 5 mm between the top of the dishwasher and the kitchen top. Align the outside of the dishwasher door with the cabinet.
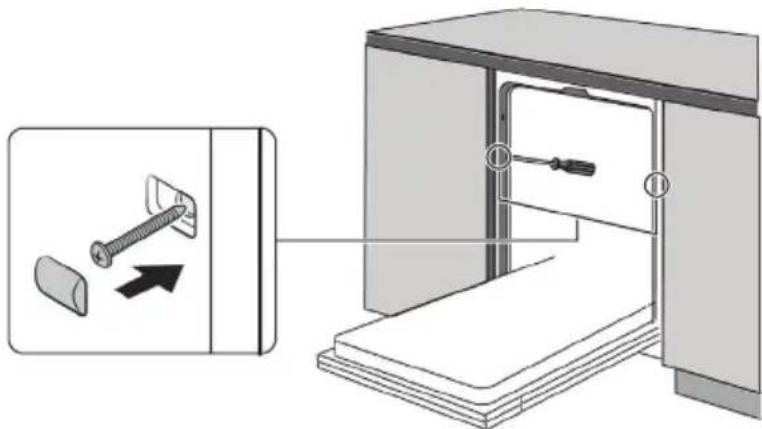
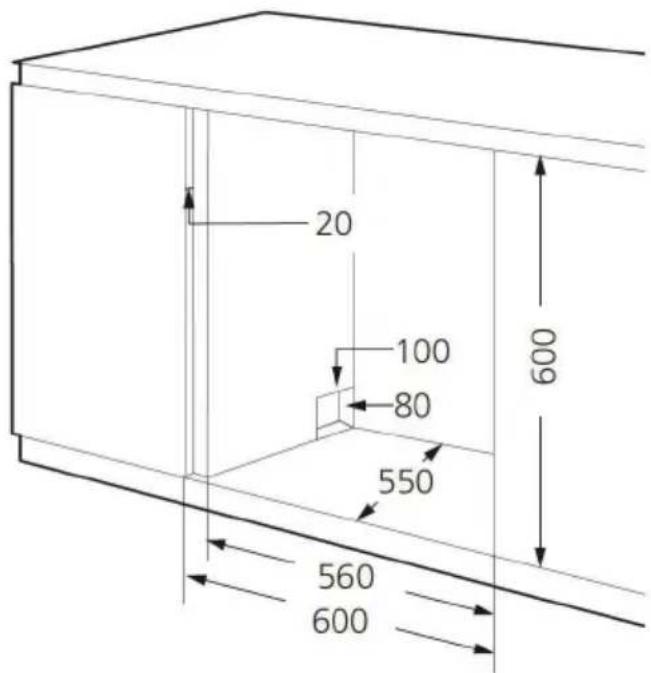
Obr. 14
Connection to the mains
• Make sure the mains voltage and current protection correspond to the values on the rating plate of the appliance. We recommend using a separate outlet with a 10A circuit breaker.
- Only use grounded sockets.
- Do not use multiple sockets, plugs and extension cords. There is a risk of overheating.
• The plug of the power cord on the appliance must be freely accessible even after the installation.
• Changes in a connection may only be performed by a qualified professional.
- Electrical safety of the appliance can be guaranteed only if the protective terminal of the appliance is connected to the protective conductor of the mains.
- The manufacturer bears no responsibility for damage to persons or property as a result of missing or bad protective connection.
Connection of the water supply
- Before connecting the inlet hose to the water supply, make sure that the water pressure is in the range of 0.04 to 1.00 MPa. When water pressure is higher, you must install a pressure reducing valve.
- Connect the inlet hose to the tap with 3/4" thread (Fig. 19). Make sure that the inlet hose is not bent, crushed or entangled.
- When replacing the appliance always use a new inlet hose!
- If the water pipes are new or they have not been used for a longer period of time, run off a sufficient amount of water before connecting the inlet hose to rinse the pipes and wash away any impurities.
- If these safety instructions are not observed, it may lead to blockage and damage to the appliance.
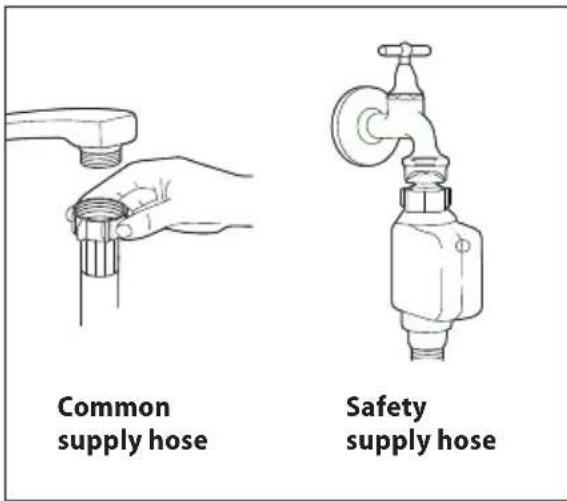
Fig. 19
Extension of the drain hose
The distance between the connection of the drain hose with the waste pipe and the bottom of the appliance should not be bigger than 750 mm. If you need to extend the drain hose, make sure to use the same one. The total length of the drain hose must not be longer than 4 m, otherwise it will reduce the cleaning effectiveness of the appliance.
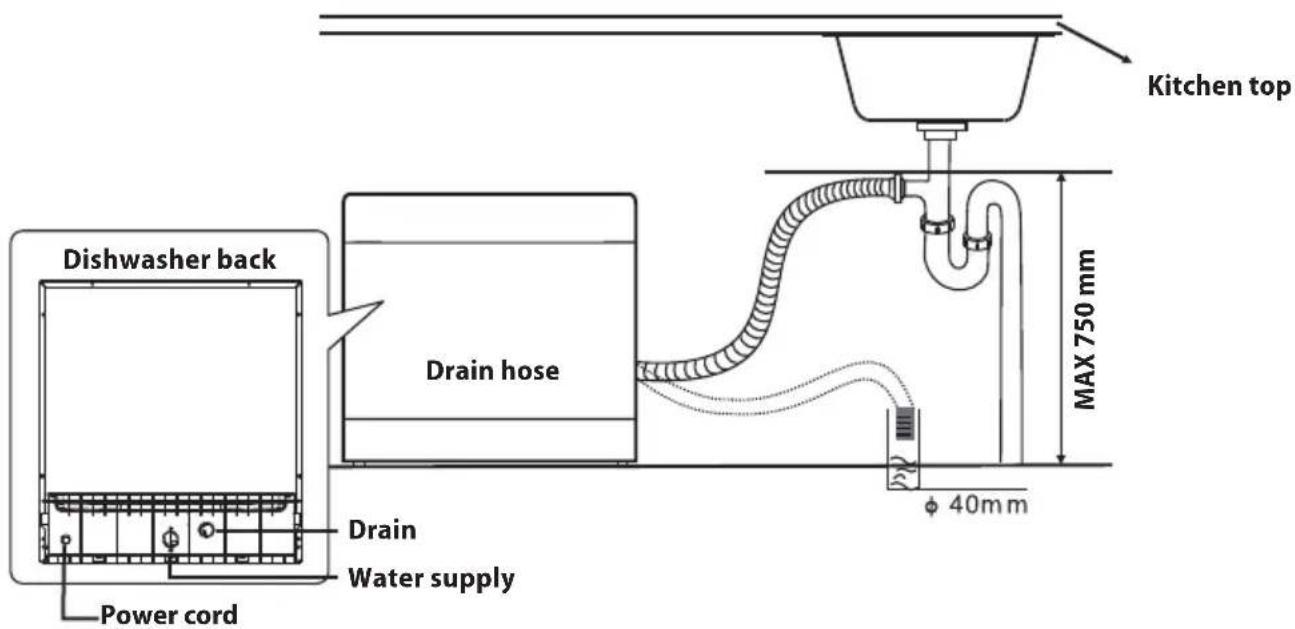
Fig. 20
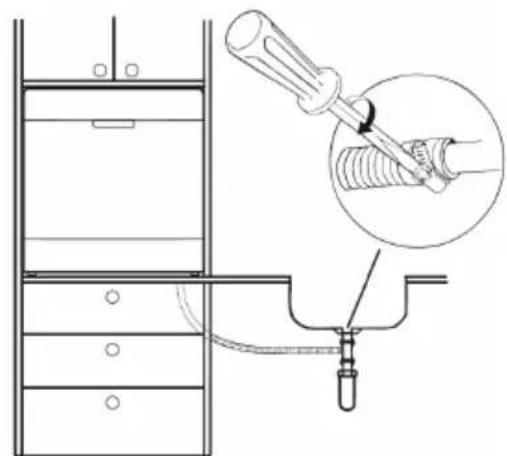
natural_image
Technical line drawing of a mechanical assembly with a magnified inset showing a threaded component inserted into a pipe (no text or symbols present)Fig.21
Disassembling
If you disassemble the appliance, it is important to follow the steps in the correct order:
- First, unplug the power cord from the mains (pull the plug or switch off the circuit breaker).
- Close the water supply.
- Loosen the drain and inlet hoses.
- Loosen the fastening screws.
- If the dishwasher is attached to the base plate, remove it.
- Pull the dishwasher out while gently pulling the drain and inlet hoses and the power cord.
Disconnection of the water supply
- Close the water supply (the tap).
- Press the button to release the water pressure in the inlet hose. Water cannot accidentally spurt out when the water pressure is low.
- Unscrew the inlet hose from the tap.
Draining excess water from hoses
If the drain hose is connected to the waste pipe at the maximum allowable height, the excess water cannot be drained completely. It is necessary to disconnect the drain hose and lay it as low as possible. To capture the water, you can use a shallow container e.g. a basin.
TROUBLESHOOTING
You can remove most of the minor malfunctions by yourself, there is no need to call the service centre. The following overview will help you find the causes of occurring errors.
| Defect description Possible cause Solution | ||
| The appliance does not work | Faulty circuit breaker | Check the circuit breaker in the switchboard if it is in working condition. Unplug all other appliances that are connected to the same circuit. |
| The power cord plug is not plugged in the wall outlet. | Make sure the appliance is switched on and the door is closed.Check the connection of the cord. | |
| Low water pressure | Make sure the water supply is open and the inlet hose is tightly connected to the water supply tap or the hose is not bent. | |
| Door is not closed properly. Make sure that the door is closed tightly. | ||
| Water is not pumped out of the appliance. | Broken drain hose Check the drain hose. | |
| Filter is clogged | Check the coarse filter (see „Cleaning the filter system“) | |
| Drainage is clogged | Check the drainage. If the drainage is clogged, clean it.Before contacting a qualified electrician disconnect the drain hose from the drainage and make sure water flows out of the drain hose. To catch water from the drain hose use e.g. a bucket or some other larger container. | |
| Soapy water in the appliance interior | Unsuitable detergent or spilled rinse aid. | Use only detergent designed for use in dishwashers. If there is a soapy foam in the interior, leave the appliance open to let the foam evaporate. Pour 4.5 litres of cold water into the washing area, close the appliance and then pump out the water. Repeat the process if needed. Spilled rinse aid always wipe off as soon as possible. |
| Spilled rinse aid | Spilled rinse aid always wipe off as soon as possible. | |
| Stains in the washing area | Coloured detergent has been used | Do not use detergents with dye. |
| White film on the inner surface of the dishwasher. | Sedimentary minerals | Use a damp sponge with a cleaning agent and put on rubber gloves. Never use any other cleaning agents than for dishwashers. |
| Stains on cutlery | Used cutlery is not corrosion resistant | |
| The appliance was not turned on after the salt was added in the dishwasher.Pieces of salt got in the washing cycle | After adding salt,alwaysrun a quick wash cycle without dishware loaded. | |
| Loose cover of the softener container | Check the softener container cover and make sure it is properly tightened. | |
| Knocking sound in the interior of the appliance during running washing program | The lower or upper spray arm is blocked by dishes or food remains | Pause the program, check the arrangement of dishes or rearrange the dishes and if necessary, clean the spray arm. |
| Rattling sound in the interior of the appliance during running washing program | During the running washing program Dishes move freely inside the appliance | Pause the program and rearrange the dishes to avoid spontaneous releasing of the dishes during the washing program. |
| Knocking noise in water pipes | It may be caused by the cross-section of the pipes. | The knocking noise does not influence the dishwasher. If you have doubts, consult it with a qualified professional. |
| The detergent dispenser cover cannot be closed | The dispenser is overfilled. Remove the excess amount of detergent. | |
| The mechanism is blocked by the detergent residues. | Clean the closing mechanism of the detergent dispenser. | |
| Dishes are dirty | The dishes were not arranged properly | See "Loading dishware". |
| The selected washing program was not strong enough | Select more intensive washing program. | |
| Insufficient amount of detergent | Use more detergent. | |
| The arm is blocked by dishes or food remains. | Check the dishes and clean the spray arm if needed. | |
| It is possible the filter is inserted improperly. Blockage of the arms may occur. | Clean or insert the filter properly. Clean the spray arms (see "Cleaning the spray arms"). | |
| Stains on glass | Combination of soft water and too much of detergents. | Use smaller amount of detergent and for washing glasses select the shortest washing cycle if water in your area is soft. |
| Black or grey stains on the dishes | Aluminium cutlery has touched the dishes during the washing cycle. | Use a gentle abrasive agent to clean such stains. Do not put this agent into the dishwasher!!! |
| Dishes are moist | Dishes were loaded improperly | See „Loading dishware“. |
| Insufficient amount of rinse aid | Use more rinse aid. | |
| You unload the dishes too soon. | Do not unload the dishes immediately after the washing program is done. Open the door slightly to allow the excess steam to escape. Start unloading when the dishes are almost cold to the touch. Always unload the lower rack first and then the upper rack to prevent the excess water from the upper rack flowing down onto the dishes in the lower rack. | |
| Wrong washing program was selected | The short washing program is less effective than the long programs and the temperature is also lower. Select longer washing program. | |
| Cutlery with wooden handle | Draining water from these is more difficult. This type of cutlery is not suitable for washing in the dishwasher. | |
ERROR MASSAGE
If a fault occurs, the dishwasher will display the following error codes:
| Code | Description of error Possible cause | |
| E1 | Longer dishwasher filling time | The water taps are not open or the water supply is limited or water pressure is too low.. |
| E3 | Failure to reach the required temperature. | Heating element malfunction. |
| E4 | Overflowing Some parts of the dishwasher are | leaking |
| Ed | Loss of communication between the control unit and the display | Open circuit or broken communication line. |
| E9 | Hold down the button for more than 30 seconds. | Water or something else on the button. |
Note:
• In case of overflowing turn off the main water supply and then contact the service.
- Before restarting the appliance, remove the excess water from the interior of the appliance.
DIMENSIONS
| Height (H1) 595 mm | |
| Height (H2) 590 mm | |
| Width (W1) 595 mm | |
| Width (W2) 550 mm | |
| Depth (D1) 20 mm (door thickness) | |
| Depth (D2) 480 mm | |
| Depth (D3) 930 mm (with door open up to 90 °) |
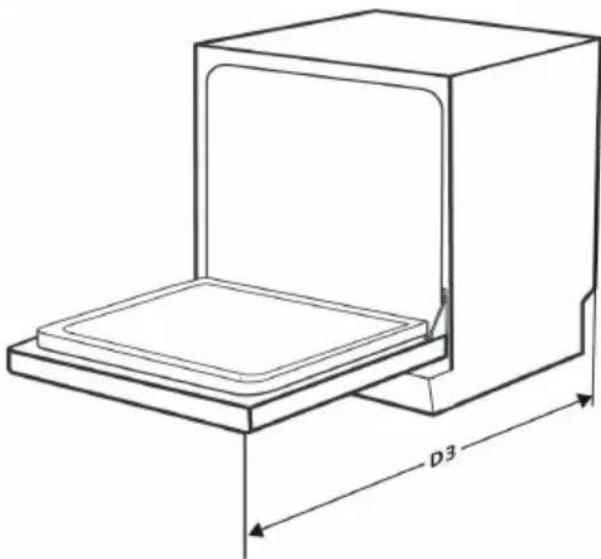
natural_image
Technical line drawing of a mechanical component with a D3 dimension label (no text or symbols beyond the dimension)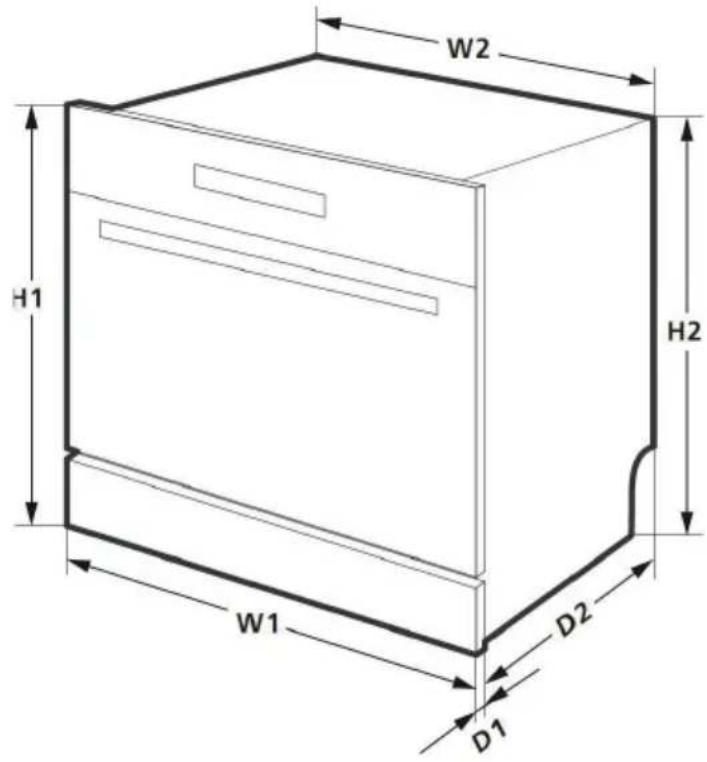
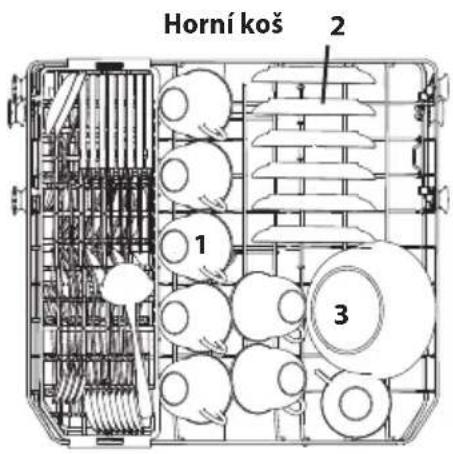
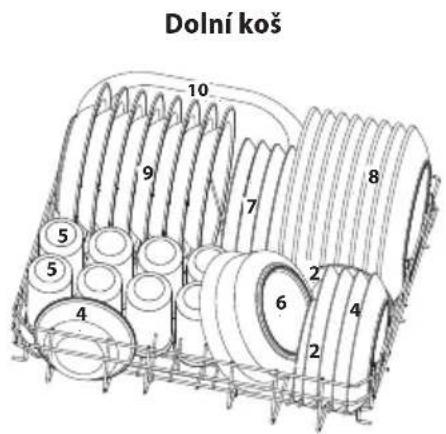
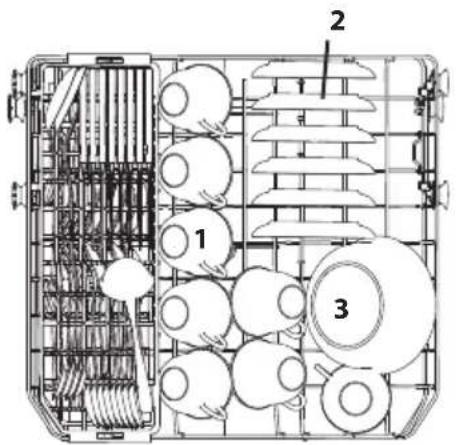
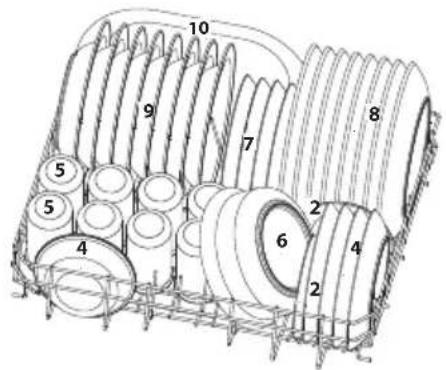
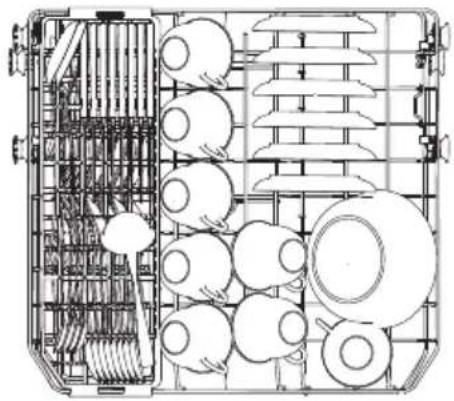
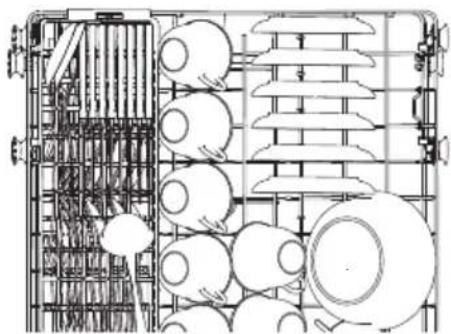
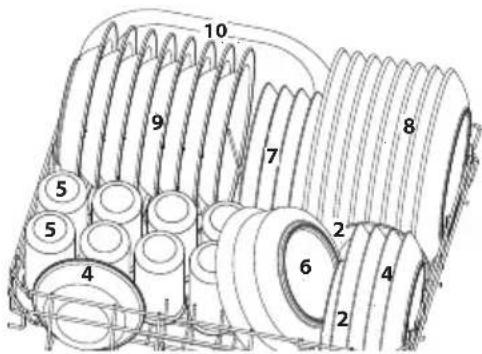
EXAMPLE OF LOADING DISHWARE
| Number Item Number Item | ||
| 1 Cups 6 Large bowls | ||
| 2 Plates 7 Dessert plates | ||
| 3 Medium bowls 8 Shallow plates | ||
| 4 Small bowls 9 Deep plates | ||
| 5 Glasses 10 Serving plate |
natural_image
Technical line drawing of a mechanical assembly with rollers and structural supports (no text or symbols)Upper rack
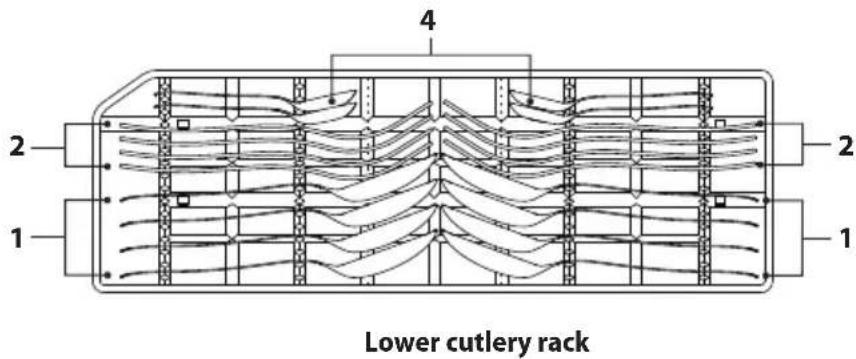
Lower rack
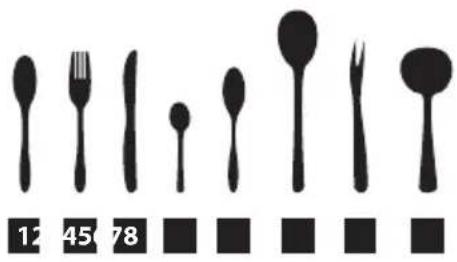
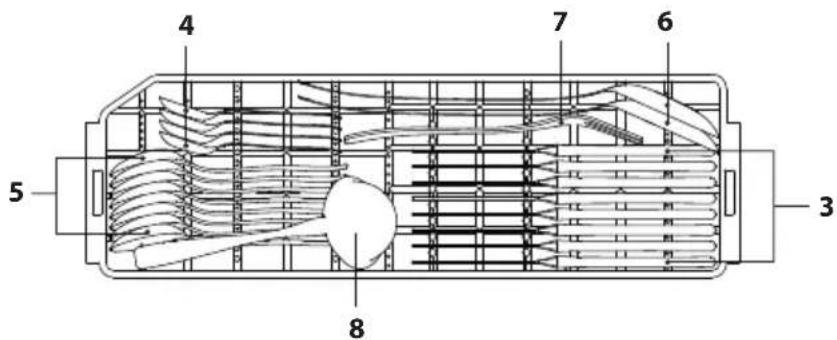
| Number Item | |
| 1 Tablespoons | |
| 2 Forks | |
| 3 Knives | |
| 4 Teaspoons | |
| 5 Dessert spoons | |
| 6 Serving spoons | |
| 7 Serving forks | |
| 8 Sauce spoons | |
Upper cutlery rack
ENVIRONMENTAL PROTECTION
- Prefer recycling of packaging materials and old appliances.
- Packaging materials may be disposed of as sorted waste.
- Dispose the plastic bags made of polyethylene (PE) of as sorted waste.
Recycling of the appliance at the end of its lifespan:
This appliance is labelled in accordance with European Directive 2012/19/EU concerning used electrical and electronic appliances (waste electrical and electronic equipment - WEEE). The symbol on the product or its packaging indicates that this product may not be treated as household waste. It is necessary to take it to a container park for the recycling of electrical and electronic equipment. By ensuring the correct disposal of this appliance you will help prevent potential negative consequences to the environment and human health, which could otherwise result from inappropriate disposal of this product. Disposal must be performed in accordance to the regulations for waste disposal. For more detailed information about recycling of this appliance see the authorized local office or service for household waste disposal or the shop, where you purchased the appliance.
CONCEPT POLSKA sp. z o.o.

- POPIS OVLÁDACÍHO PANELU
- Poznámka:
- Vyndávání nádobí
- UPOZORNĚNÍ!
- PŘÍKLAD ULOŽENÍ NÁDOBÍ
- POPIS OVLÁDACIEHO PANELU
- Vyberanie riadu
- POZOR!
- UPOZORNENIE!
- Pripojenie do elektrickej siete
- PRÍKLAD UMIESTNENIA RIADU
- OPIS PANELU STEROWANI
- Pamiętaj:
- Wyjmowanie naczyń
- UWAGA!
- PRZESTROGA!
- PRZYKŁAD UŁOŻENIA NACZYŃ
- VADĪBAS PANELA APRAKSTS
- Piezime:
- Trauku iznemšana
- TABLE OF CONTENTS
- IMPORTANT SAFETY INFORMATION
- Upon delivery of the dishwasher
- During installation
- CAUTION!
- Possible defects
- If you fail to follow these instructions, any possible repair cannot be recognized as a warranty repair.
- PRODUCT DESCRIPTION
- CONTROL PANEL DESCRIPTION
- DESCRIPTION OF INDIVIDUAL BUTTONS OF THE CONTROL PANEL
- Washing program selection button
- Delayed start function button
- Extra drying
- Half load option button
- Start/Pause button
- Child lock button
- FRESH Function
- Status indicator (Lights polishes complement, supplement regeneration salt)
- USER'S MANUAL
- Before first use
- Water softeners
- Setting the appliance according to the water hardness
- Note:
- LOADING THE REGENERATION SALT
- The effects of salt
- LOADING THE RINSE AID
- Setting the dosage of the rinse aid
- DETERGENTS
- They can be also divided into:
- Detergents – Tablets
- Detergent dispenser
- Filling the detergent dispenser
- Tip how to save detergents
- UNSUITABLE COOKWARE
- LOADING DISHWARE
- Placing dishware
- Load the dishes in the following manner:
- Upper rack
- Lower rack
- Unloading dishware
- PUTTING THE APPLIANCE INTO OPERATION
- Starting the washing program
- Changing the program during the running washing program
- Adding dishes to the dishwasher during the running washing program
- CLEANING AND MAINTENANCE
- Filtration system
- Cleaning the spray arms
- Cleaning the control panel and the surface of appliance
- Cleaning the door of the appliance
- Frost protection
- Tips for maintaining
- INSTALLATION OF THE APPLIANCE
- Connection to the mains
- Connection of the water supply
- Extension of the drain hose
- Disassembling
- Disconnection of the water supply
- Draining excess water from hoses
- TROUBLESHOOTING
- ERROR MASSAGE
- DIMENSIONS
- ENVIRONMENTAL PROTECTION
- Recycling of the appliance at the end of its lifespan:
- CONCEPT POLSKA sp. z o.o.
Brand : Concept
Model : MNV7760DS
Category : Dishwasher