SOLO609S - Range hood KKT Kolbe - Free user manual and instructions
Find the device manual for free SOLO609S KKT Kolbe in PDF.


User questions about SOLO609S KKT Kolbe
0 question about this device. Answer the ones you know or ask your own.
Ask a new question about this device
Download the instructions for your Range hood in PDF format for free! Find your manual SOLO609S - KKT Kolbe and take your electronic device back in hand. On this page are published all the documents necessary for the use of your device. SOLO609S by KKT Kolbe.
USER MANUAL SOLO609S KKT Kolbe
natural_image
Technical line drawing of a mechanical assembly with stacked components and a flat plate (no text or symbols)
text_image
QR code image containing encoded data, no visible human-readable textAndroid

text_image
QR code image containing encoded data, no visible human-readable textiOS
natural_image
Technical line drawing of a mechanical fan or motor assembly (no text or symbols)natural_image
Diagram showing a brick wall with a pipe and a cabinet, no text or symbols presentnatural_image
Simple line drawing of a box with a circular symbol above it and a downward arrow pointing to the top (no text or symbols)natural_image
Simple line drawing of a rectangular box with a lid and two arrows pointing to it (no text or symbols)natural_image
Simple line drawing of a cylindrical object with an arrow pointing downward, above a rectangular container (no text or symbols)natural_image
Line drawing of a hand holding a tool near a vertical stack of objects (no text or symbols)natural_image
Two hand-drawn diagrams showing a tool and a drill, no text or symbols presentnatural_image
Simple line drawing of a mechanical component with a cylindrical part and an upward arrow, no text or symbols present.text_image
Diagram showing a door lock mechanism with directional arrows and a close-up of the lock component detailnatural_image
Technical line drawing of two vertical-mounted industrial equipment units with directional arrows indicating assembly or movement (no text or symbols)text_image
KKT KOLBE KKT KOLBE KKT KOLBE KKT KOLBE KKT KOLBE KKT KOLBE KKT KOLBE KKT KOLBE KKT KOLBE KKT KOLBE KKT KOLBE KKT KOLBE KKT KOLBE KKT KOLBE KKT KOLBE KKT KOLBE KKT KOLBE KKT KOLTBE KKT KOLTBE KKT KOLTBE KKT KOLTBE KKT KOLTBE KKT KOLTBE KKT KOLTBE KKT KOLTBE KKT KOLTBE KKT KOLTBE KKT KOLTBE KKT KOLTBE KKT KOLTBE KKT KOLTBE KKT KOLTBE KKT KOLTBE KKT KOLTBE KFT KOLTBE KFT KOLTBE KFT KOLTBE KFT KOLTBE KFT KOLTBE KFT KOLTBE KFT KOLTBE KFT KOLTBE KFT KOLTBE KFT KOLTBE KFT KOLTBE KFT KOLTBE KFT KOLTBE KFT KOLTBE KFT KOLTBE KFT KOLTBE KFT KOLTBEUser's manual
for your cooker hood
Model:
SOLO HCM

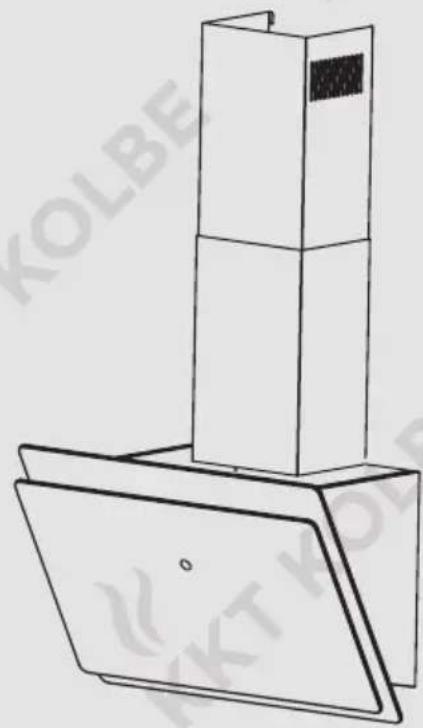
natural_image
Technical line drawing of a mechanical assembly with stacked components and a flat plate (no text or symbols)
Thank you for your confidence and congratulations on the purchase of your new cooker hood.
Read this manual thoroughly, before unpacking the appliance.
It contains important information about safe installation, use and maintenance, as well as important warnings about the use of your appliance.
Mark the passages that are important for you, keep the manual
so that you can refer to it at any time and also pass it on to other users.
In view of the constant further development, we reserve the right to make any necessary modifications to the appliance and/or the manual in order to better meet the requirements of user-friendliness, user protection and the current technical standard.
You can always find the latest version of your user's manual on the corresponding product page or in the "Questions & Answers" section of our online shop at www.kolbe.de.
Our appliances are not intended for commercial use.
They are designed for household use.
For commercial use, the warranty is reduced by 50%.
You have chosen a good appliance that will serve you for many years with proper operation and care.
Should you have any complaints despite our thorough quality control, please contact our in-house customer service.
They will be happy to help you.
For a smooth process in the event of any queries, we recommend that you note the 20-digit serial number of your product in the field below.
Your KKT KOLBE Team
Serial number of my appliance:
User's manual
Cooker hood SOLO 809/809/909 S HCM
Version 1.0
KKT KOLBE is a registered trademark.
Overview
Important safety instructions 40
Notes and icons 49
- General notes 52
1.1 Scope of delivery
1.2 Protection of the environment
1.3 Intended use
1.4 Hints for use
- Before using the hood 53
- Using the hood 53
3.1 Operating safety information
3.2 Exhaust air mode
3.3 Recirculation air mode
- Operating the hood 55
4.1 Operation and setting
4.2 Remote control of the cooker hood via smart phone app
- Cleaning and maintenance 59
5.1 Cleaning the metal filter
5.2 Activated carbon filters
5.3 Lighting
- Troubleshooting 61
6.1 Problems, possible causes and solutions
6.2 Customer service
- Installing the cooker hood 62
7.1 Installation data / dimensions
7.2 Important informations before installing
7.3 Using the extractor hood as an exhaust air hood
7.4 Converting the extractor hood to a circulation hood
7.5 Electrical connection
7.6 Mounting the carbon filter
-
Mounting the cooker hood 65
-
Informations on air flow 68
-
Technical data / Note on declaration of conformity 69

Important Safety Instructions
This manual is the basis for handling the appliance. Read and follow the instructions carefully before installing and operating the appliance.
The manufacturer is not responsible for any injury, damage or problems caused by failure to follow the instructions, incorrect installation or improper handling.

Intended use
To avoid injury or damage and to ensure trouble-free operation of the appliance, follow the instructions below:
- Keep young children away from the appliance.
Children from the age of 8 or persons with reduced physical, sensory or mental capabilities, lack of experience or knowledge may only use the appliance if they are supervised by a person responsible for their safety or have been instructed by him/her regarding the safe use of the appliance and have understood the resulting dangers. -
Do not allow children to play with the appliance, its components or near the appliance.
-
The appliance is designed for private use in a domestic environment and is intended for extracting cooking vapours produced during food preparation. Use it only for its intended purpose.
In case of commercial use, the warranty is reduced by 50 %.
- This appliance is intended for use up to a maximum altitude of 2000 metres above sea level.
- The appliance is not intended for operation via an external timer.
- Unused appliances are a safety hazard. Do not leave the appliance switched on unused and disconnect it from the power supply if you are not going to use it for a long period of time.

Important warnings
Danger to life and injury
- This appliance should be installed, connected and earthed by a suitably qualified professional in accordance with current regulations to ensure the necessary safety.
The installer is responsible for the proper functioning on site.
- Keep all packaging materials, assembly accessories and small parts out of the reach of children and pets! These can be very dangerous if, for example, they are pulled over the head or swallowed.
- In the event of a defect or damage, do not use the appliance. Disconnect it from the power supply immediately and contact customer service or appropriately qualified personnel.
- Repairs, replacement of the mains cable and maintenance of the appliance are dangerous for unqualified persons and may only be carried out by a suitably qualified specialist.
Never attempt to make changes to the appliance, its cable or the mains plug yourself and do not disassemble it. Only open the housing if this is described in the context of assembly and cleaning.
- If the cooker hood and room air-dependent fireplaces or appliances are operated simultaneously with exhaust air, insufficient supply air can cause a negative pressure, drawing smoke and toxic combustion gases from chimneys or exhaust air shafts back into the living rooms.
In this case there is a danger to life!
Always ensure that there is a sufficient supply of fresh air when the cooker bonnet is in exhaust air mode. Follow the instructions in the installation chapter.
- Edges and components can be sharp-edged and cause injuries. Exercise appropriate caution during installation and protect yourself if necessary, e.g. with work gloves.
- If not installed properly, the appliance may be unstable and fall down. Follow all the instructions in the installation chapter carefully and make sure the mounting is solid and secure.
- Note that the appliance can heat up considerably due to rising heat during cooking.
Be careful and do not touch the housing and the grease filters until they have cooled down.
- The light from LED luminaires can be very intense and can damage the eyes.
Avoid looking directly into the switched-on luminaires, especially for babies.
- When opening and closing the appliance, there is a risk of pinching. Do not reach into the area of the hinges.
- Do not place any objects on the appliance. These may fall and cause injury or damage.
- Permanent magnets are built into the appliance. These can affect electronic implants (e.g. pacemakers or insulin pumps). If you have such implants, keep at least 10 cm away from the appliance.
Risk of electric shock
- To avoid electric shock and damage, disconnect the appliance from the power supply during installation, maintenance, internal cleaning or other work on it and switch it off before any external cleaning.
- Check whether the technical data on the type plate of the appliance are compatible with the local conditions (specifi cation s with V and Hz). If this is not the case, return the appliance to the point of sale. If you are unsure, contact your electricity supplier.
-
The appliance is fitted with a grounding plug and must be connected to a grounded outlet installed in accordance with all applicable codes. If you are unsure, consult a qualified electrician.
-
Do not use multiple sockets or extension cables for the connection. These do not provide the necessary safety and pose a fire risk if overloaded.
- To avoid damage to the power cable and associated hazards, make sure that it is not bent or crushed and cannot come into contact with hot surfaces, sharp edges or similar.
Do not pull the plug out of the socket by the cable, but grasp it directly.
• Always keep the cable dry. - If the plug is no longer accessible after installation, ensure that there is an easily accessible tested disconnector (fuse) with a contact gap of min. 3 mm for the circuit in which the appliance is integrated, which allows the appliance to be completely disconnected from the mains if necessary. If necessary, contact a qualified electrician.
- To avoid possible electric shock due to creeping current, do not operate the appliance with wet or damp hands and wear footwear during operation.
- Contact of liquids or moisture with live parts may cause a short circuit or electric shock. Do not use high-pressure cleaners or steam cleaners to clean the appliance.
Fire hazard
-
If an exhaust air hose is connected, it must be made of heat- and fire-resistant material and, if necessary, be routed outside in a separate exhaust air shaft leading outside or connected to it.
It must not be routed through any other shafts or chimneys in order to avoid fire hazards. -
Deposits of oil or grease, especially in the filter and inside the appliance, can quickly ignite when heated.
Clean the appliance and filter regularly and never operate the appliance without a grease filter.
- Do not use an open fire under the cooker hood (e.g. for flambéing).
Open flames and the resulting rising heat can set fire to the appliance.
Do not operate gas burners under the appliance without cookware that matches their size and regulate the flame so that it does not pass over the bottom of the cookware. Do not operate high-power burners or wok burners with more than 5kW or two gas cooking zones at the same time with the highest flame for more than 15 minutes.
- Flying sparks near the bonnet can cause a fire. Only install the appliance near a fireplace for solid fuels (e.g. wood or coal) if there is a closed, non-removable cover on the fireplace.
- When frying or heating oils and fats, never leave your cooking food unattended because of the risk of fire. Note that the risk of spontaneous combustion increases if oil or fat is used repeatedly.
- In the event of a fire, disconnect the power supply and carefully smother the flames with a lid, fire blanket or similar. Never extinguish burning oil or grease with water. After extinguishing the appliance, have it checked by a suitably qualified specialist.

Causes for damage and functional impairments
- During installation, strictly observe the safety distances and other instructions given in this manual to avoid damage, e.g. due to heat exposure.
• Always keep the appliance in a clean condition, clean the metal filter and, if applicable, change the charcoal filter at the recommended intervals to avoid functional impairments, damage and hazards due to deposits of grease and dirt.
- To avoid damaging the surfaces, do not use aggressive or abrasive cleaning agents or utensils and follow the instructions in the relevant chapter for cleaning and maintenance.
- During cooking, moisture is produced, which can cause long-term damage to surfaces. To avoid this, always switch the appliance on when cooking.
Notes and icons
In this manual

Warning of danger to persons
Pay special attention to safety instructions marked with this icon and act with appropriate caution to avoid danger to life and health. Pass on these warnings to other users also.

Beware of damage
Follow the instructions marked with this icon especially to avoid damage to the appliance. Also pass on these safety instructions to all users.

Informations and tips
Following the instructions marked with this icon will provide you with useful information, facilitate the respective procedure and may save you from many a problem.
Note on illustrations
The figures in this manual are for illustrative purposes and may occasionally differ slightly from the appearance.
For appliances, components and accessories

EU conformity
The product complies with the applicable EU requirements regarding safety, environmental protection and health protection.

Follow the instructions for use provided
Read this manual carefully, especially the relevant sections, before using the product and pass on the relevant information to other users.
Environmental protection and disposal
Notes on disposal
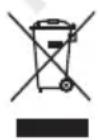
No disposal in household waste (WEEE marking)
Do not dispose of the product as unsorted waste.
Take it to a collection point for the recycling of electrical and electronic equipment for reuse and recovery.
To do this, disconnect the mains cable.

Recyclable material (Möbius loop)
Separate the relevant components of the product by type from the residual waste and dispose of them in accordance with local regulations.

Recyclable material (Triman icon)
Separate the product from residual waste for disposal according to the accompanying sorting instructions.
- The environment and health are endangered by incorrect disposal.
By ensuring that the appliance and its packaging are disposed of properly, you help to avoid possible hazards. - The materials used are selected carefully and should be recycled in order to reduce the use of raw materials and waste.
Separate their components by type and dispose of them accordingly. - For informations on current disposal methods and recycling, contact your local council, your waste disposal company or the seller.
Notes on transporting the appliance
If you need to transport the appliance after unpacking / at a later time, observe the following instructions to avoid damage:
- Keep the original packaging of the product and always transport the appliance packed in it in the same way as when it was delivered.
Observe the markings on it.
If the original packaging is not present:
- Secure all loose / remova be parts, so that they cannot touch each other.
- Avoid impact on the appliance and its components and take appropriate protective measures if necessary.
- Ensure that the appliance is in a horizontal position when transporting it and when putting it down.
1. General notes
1.1 Scope of delivery
1 Hood body incl. aluminium grease filter and lighting
1 Lower exhaust air shaft element
1 Upper exhaust air shaft element
1 Hood body support bracket
1 Lower shaft bracket
1 Upper shaft bracket
9 ST 4.2 × 30 mm tapping screws
4 ST 3.5 × 10 mm tapping screws
9 Plastic wall anchors
1 Aluminium exhaust pipe (outlet ∅ 150 mm)
2 Non-return flaps
1 K111 Carbon filter (2 parts)
1 User's manual
1.2 Protection of the environment

The packing materials (plastic bags, polystyrene moulded parts etc) are dangerous for children. So keep packing material out of the reach of children.
Package
Please dispose of all packaging material with respect for the environment.
This has been carefully selected and should be recycled to reduce raw material consumption and waste.
Please observe local regulations when disposing of the packaging material.
Disposal of old appliances
If this appliance is a replacement for an old one, please dispose of your old appliance according to the local regulations. Prior to disposal, the appliance must be rendered unserviceable by cutting off the power supply cable.
The appliance is to be sent for disposal to the responsible collection authorities.
1.3 Intended use

If you use the cooker hood in exhaust mode, make sure that no open fire is burning before switching on the appliance!
Otherwise massive smoke development could occur and toxic combustion gases can be drawn from the chimney or flue shaft into the living rooms. This can be life threatening!

The appliance is intended for domestic use. The manufacturer is not responsible for damage resulting from improper use or maloperation.

Extractor hoods remove unpleasant odours and vapours and create a pleasant room atmosphere.
Particles of grease, steam and also moisture are absorbed by the grease filter.
A correctly dimensioned extractor hood creates a pleasant room climate without producing draughts and ensures a bearable air humidity of 40-60%.
1.4 Hints for use


- Make sure that the room is sufficiently ventilated during operation of the cooker hood.
To do this, follow the corresponding instructions in the following chapter on using the hood, especially for exhaust air mode. - Constant maintenance guarantees problem-free operation and optimal hood performance.
- Prior to carrying out cleaning or maintenance work, the power supply of the cooker hood is to be cut off by unplugging or tripping out or removing the fuse.
- Regularly clean appliance surfaces from encrusted food.
- Regularly clean or replace the filters.
2. Before using the hood

Ensure that the hood has not been damaged during transport.
Installation and connection of the electrical supply must be carried out by professionals according to the manufacturer's instructions and in compliance with the local requirements.
3. Using the hood
3.1 Operating safety information


- The grease filter must always be in place when bringing the hood in service, otherwise grease vapour can become deposited inside the hood.
- Do not use an open fire under the cooker hood (e.g. when flambéing). High flames can damage the hood or even cause a fire (e.g. by igniting grease deposits in the filter).
- If you are using a gas stove, make sure that the cookers are not operated without cooking utensils. With open gas flames, parts of the appliance may be damaged by the rising heat.
- Due to the fire risk, frying or cooking with oils and fats under the hood has only to take place under durable surveillance.
Attention! The risk of self-ignition increases with oils or fat which have been repeatedly used.
3.2 Exhaust air mode
The extracted air is emitted outdoors via the exhaust pipe.
For this purpose, an exhaust air shaft or an exhaust air pipe leading to the outside must be available in your house.

- If the cooker hood is operated in exhaust air mode together with other room air dependent appliances or fireplaces with a chimney or exhaust air shaft (e.g. chimney fire, gas, oil, wood or coal-fired appliances), the negative pressure in the room must not exceed a value of 4 Pa (4 x 10⁻⁵ bar).
Make sure that the room is adequately ventilated, e.g. by means of non-closable openings in doors, windows, in connection with a supply air / exhaust air wall box or by other technical measures.
Otherwise, negative pressure can occur and smoke and toxic combustion gases can be drawn into the living rooms from chimneys or flues.
In this case, there is a danger to life!
Ask your chimney sweep to advise you on the ventilation system of the house and the appropriate ventilation measures.
- If there is no permanently installed exhaust air pipe or no separate exhaust air shaft, you must convert the extraction hood to recirculation mode (See installation chapter).
3.3 Recirculation mode
The extracted air is filtered through a carbon filter (also known as active carbon filter) and circulated in the room. The carbon filter retains the odours produced through cooking and the filtered air is circulated back into the kitchen through air openings at the side or on the top.
If the hood is used in circulation air mode, it is safe to simultaneously operate a room air-dependent fire.
- It is recommended to switch on the appliance a few minutes before the start of the cooking process.
- Set the power level according to the amount of smoke and odours to be extracted.
- Operate the hood for another ca. 5 to 10 minutes after cooking.
This will clear the kitchen air of remaining fumes and odours.
4. Operating the hood
4.1 Operation and setting

Coloured ambient lighting


Switching on/off / Display of power levels / time setting

Lighting / Off-Timer (automatic switch-off)
Power / Time setting Down control
Power / Time setting Up control
Switching on and off:
- When switched off, only the on/off key is visible.
Touch to switch on the appliance.
All operating keys start to light up with half brightness
and the power indicator in the middle of the key shows „0“.
The appliance is switched on and ready for operation (standby status).
- If there is no operation within 2 minutes, the appliance switches off automatically.
• To switch off the appliance in operating status and stop all running functions, also touch the key ○
Lighting:
- Touch the Key briefly in each case, to switch the lighting on and off.
Coloured ambient lighting:
- Touch the briefly (key lights up with full brightness, other operating keys with half brightness when switched on or are off when switched off).
The ambient lighting starts to light up in the colour blue.
• To change the colour of the ambient lighting, keep the ⚙️ key touching. The colour changes in the following order: dark blue, sky blue, light blue, green, orange, red, purple. When you release the key, the ambient lighting remains lit in the current colour.
• To switch off the ambient lighting, briefly touch the key again.
Note:
Switching the appliance on and off does not affect any kind of lighting.
Setting the power levels:
- To start the fan operation, touch the ▶ key in switched on status. A beep sounds and fan operation starts at level 1 (display „1“, key lights up for 2 seconds at full brightness and then switches to half brightness).
- To increase the power, touch the ▶□ key repeatedly until the desired power level (up to max. 9) is set.
- To reduce the power, use the ▶key in the same way (It is not possible to return to level 1 by continuing to use the ▶key after reaching the maximum level).
- To stop fan operation and switch to standby status, set the power to level 0 in the way as described.
Off-Timer (Automatic switch-off):
- To activate the off timer and set a time after which the appliance switches off automatically, touch the key for 2 seconds in standby or in operation status (a beep will sound when the key is touched and another beep will sound after 2 seconds to confirm).
- When the display changes to the time setting and starts flashing, you can use the kind keys to set a time span from 1 to 9 minutes until automatic switch-off (default setting: 1 minute).
- Then press the Key again or wait 10 seconds. When the display stops flashing and shows the power level, the setting is saved (also after switching off or in standby status. If the power supply is disconnected, the setting is deleted).
- To start the countdown of the automatic switch-off, touch the key again in operation status. The remaining time until automatic switch-off is displayed in minutes (with alternation between half and full brightness every second).
• After expiry, the appliance switches off automatically and all active functions are stopped.
4.2 Remote control of the cooker hood via smart phone app
To control the cooker hood remotely via your smartphone, download the „KKT Control“ app from the Google Play Store or APP Store and install it. You can also scan the corresponding QR code below with a suitable app on your smartphone and use the respective link:

text_image
QR code image containing encoded data, no visible human-readable textAndroid

text_image
QR code image containing encoded data, no visible human-readable textiOS
Wi-Fi configuration for your smart cooker hood
- Connect your smartphone to the Wi-Fi (This is only possible with 2.4 GHz. If necessary, adjust the router settings accordingly) and activate Bluetooth.
- Start the KKT Control App and register via your e-mail address.
• Make sure that the cooker bonnet is connected to the power supply. - In the main display window of the app, tap „+“ / „Add device“ at the top right or directly on the „Add device“ button.
- Select the cooker hood.
- Now enter your current Wi-Fi password and confirm.
- The cooker hood now automatically carries out a verification. It connects to the router and is displayed in KKT Control App.
- If you now tap the cooker hood, the operating window for the appliance appears with all available functions. Detailed instructions for remote control can be found on our website www.kolbe.de on the corresponding product page.
Hints in case of problems
- Make sure that the smartphone you want to use to remotely control the cooker hood, is switched on and connected to the corresponding Wi-Fi, that Bluetooth is activated and that the cooker hood is connected with the power supply.
- Ensure that the router and the app mobile network are working properly.
- Keep the distance between the cooker hood, router and mobile phone as small as possible during Wi-Fi configuration.
- The Smart Home cooker hood currently only works in conjunction with a 2.4 GHz network: Before connecting, make sure that the router is using this type of connection or make the appropriate settings.
- The password of the router must be correct and no special characters are recognized. The router account and password must not be longer than 32 digits.
- Make sure that the router's wireless setting is WPA2 encryption.
- If the router \$ already connected to too many appliances (including mobile phone or PC), first disconnect some devices, then turn off and restart the router.
- If you have problems establishing a connection, you can try to remove the device from the router's MAC filter list (if enabled) and/or to store the following port in the firewall: TCP/UDP 6668
Reconnecting with another smartphone
- The cooker hood can only be connected to one mobile phone.
- If you want to switch to another mobile phone, touch the ON/OFF key ○ for 3 seconds in the switched off state.
- When all the keys start flashing, the current smart phone connection has been successfully disconnected.
- To establish the connection with the other smart phone, now proceed again as described under „Wi-Fi configuration...“.
(This is still possible when the key illumination goes out).
5. Cleaning and maintenance

Before installation, maintenance or cleaning work is carried out, the cooker hood must be disconnected from the power supply by pulling the mains plug of the appliance or by switching off or unscrewing the fuse of the house wiring.
- The extractor hood may not be cleaned with a steam cleaner.
- Do not use cleaning agents containing alcohol to clean appliances with a matt black finish. This can lead to discolouring.
- Non-compliance with the maintenance and cleaning instructions can result in a fire hazard due to grease deposits.
- The grease filters on your appliance are to be cleaned or replaced at regular intervals.
Filters saturated with grease can quickly catch fire and also distribute unpleasant odours.
Grease filters obstructed by dirt particles seriously impair the appliance function.
- Especially cleaning the area of the control elements, take great care to prevent water entering the electronics.

Special information for appliances with a stainless steel casing
A commercially available non-abrasive stainless steel cleaning agent should be used for cleaning stainless steel surfaces. Use a soft cloth and dry the appliance well afterwards.
Aggressive cleaning agents, such as scouring agents, vinegar cleaner, or abrasive granulate damage the surface of the cooker hood.

Never use stainless steel cleaning agents in the vicinity of the control elements.
5.1 Cleaning the metal filter
- Cleaning interval for metal grease filters: every 2 - 3 weeks according to the frequency of use.
- Remove the metal filters as shown in the following illustration:
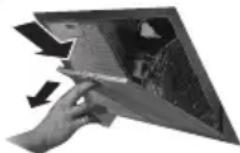
(Illustration may differ)
- Soak the metal grease filters well in hot rinse water, then clean them with a soft brush and then rinse well with hot water. If necessary, repeat the process.
- When cleaning metal grease filters take care not to damage the mesh.
- The metal grease filters can also be cleaned in the dishwasher in a standard program with 55 °C. To avoid fatty deposits on dishes or the accumulation of food particles in the mesh of the filter, the metal filters should be cleaned separately from dishes and glasses. Heavily soiled metal filters should first be soaked well in hot rinse water.
- Allow the filter to dry thoroughly and carefully replace it in the extractor hood.
- Frequent cleaning or the use of aggressive cleaning agents can cause color changes of the metal surface. These have no influence on the filter function and are not a reason for complaint.

Avoid using alkaline cleaning agents (ph value over 7).
5.2 Activated carbon filters
The activated carbon filter neutralises unpleasant odours from the room air, which is needed when operating the extractor hood in recirculation mode.
- Traditional activated carbon filters (normally round in shape) can be neither washed nor regenerated. They must be replaced.
- Replacement interval for activated carbon filters: every 9 - 12 months according to frequency of use.
- To remove the activated carbon filter see installation chapter; assembly in reverse order.
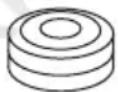
Original activated carbon filter for this model: K111
5.3 Lighting

- The LED lighting may only be repaired or replaced by qualified personnel.
- For this purpose, the appliance must be disconnected from the power supply.
- When changing a lamp, make sure that the new lamp does not have a higher wattage than of the original.
- Before connecting the hood, check that the voltage indicated on the rating plate (V) corresponds to the supply voltage in your home.
6. Troubleshooting
6.1 Problems, possible causes and solutions
Problem Possible cause Solution
| Both light and fan do not work | No power / device cable not connected properly | Check power supply and fuse, connect cable correctly |
| Light on, but fan does not work | Ventilation flap blocked Eliminate blockage | |
| Motor is demaged Replace motor | ||
| Motor smells ominously Motor is demaged Replace motor. | ||
| Lighting does not work Lamps are not fitted correctly / demaged | Check the lamp, whether it is properly fitted / defective, if necessary, replace lamp | |
| Insufficient suction Distance between hood and hob too large | Readjust the distance to 65 - 75 cm | |
| Too much drafts through open windows or doors | ||
| Negative pressure in the room due to insufficient air supply | ||
| Dirty filters Clean grease filter(s), replace carbon filter(s) at least every 9 - 12 months | ||
| insufficient size of exhaust air pipeline | ||
| Air flow blocked / slowed Check air duct for blockages, if necessary use outer cover plate with movable louvres / remove fly screen | ||
| Serious vibration of the appliance | Fan blade demaged Switch off the appliance, repair by qualified personnel only | |
| Fan motor is not fixed tightly Fix the motor properly | ||
| Hood is not fixed properly Check wether bracket are in proper position, fix hood properly | ||
| Appliance is unstable | Appliance not permanently mounted | Check the mounting |
| Fixing screws not tightened | Tighten fixing screws | |
If all the above checks fail to remedy the fault, it is possible you have a more serious problem.

Under no circumstances try to repair the electronic/electrical components in the appliance.
Contact your Customer Service.
6.2 Customer service
For technical queries concerning your appliance please contact:
KKT KOLBE Customer service
Tel. 0049 9502 667930
→ You can find further data and documents on our website www.kolbe.de under Questions & Answers.
7. Instal ing the cooker hood
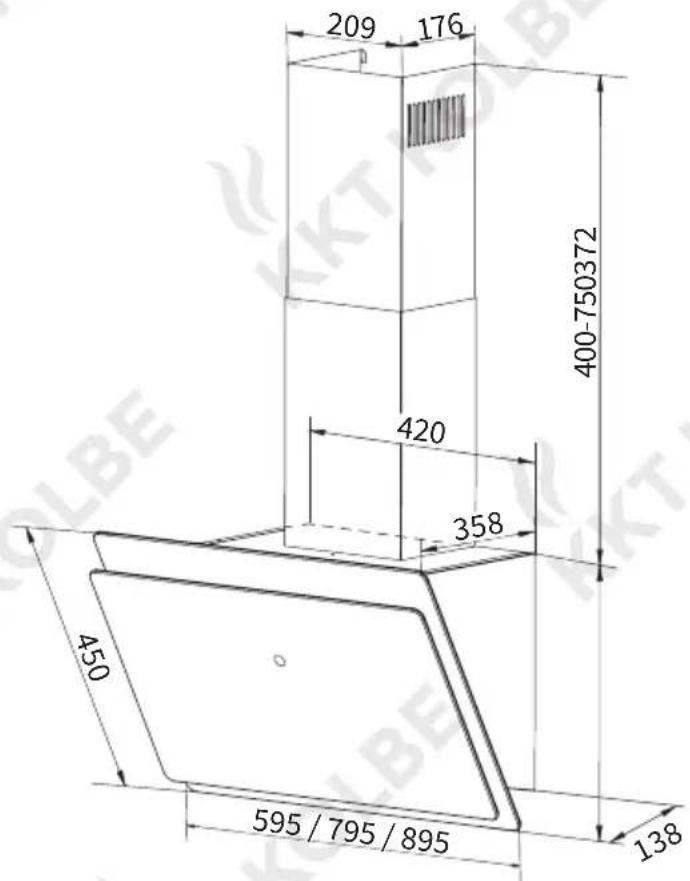
7.1 Installation data / dimensions
Distance from the lower edge of the hood body to
glass ceramic hob / cast iron hob:
50-60 cm
gas hob: 60-70 cm
hobs with coal / oil / wood firing:
70-80 cm

During and after installation of the appliance, use a spirit level to ensure that the cooker hood is level.
Otherwise, grease and/or condensation may accumulate in the corners of the appliance.
text_image
209 176 400-750372 420 358 450 595 / 795 / 895 138
7.2 Important informations before installing:
- Clean the environment thoroughly before and after installation so that no dust or construction debris can be sucked in during initial operation.
- Only install the unit in a suitable location.
- Check the wall for load-bearing capacity.
- Check the routing of electrical and other cables on and in the wall or ceiling so that they are not drilled into.
- Check the condition and load-bearing capacity of the electrical cables.
The installation of the appliance by a specialist is recommended.
On installation, the minimum distance between the hob and the hood must be exactly complied with (see "Installation data") and follow the description of the work steps under „Mounting the hood" and all further instructions.
In the execution with air exhausted outdoors, the vapours are extracted via an air exhaust hose fixed to the connector ring.
- The diameter of the exhaust air hose must conform to that of the connector ring.
- The exhaust air hose must not be led through a shaft together with gas pipes, hot air pipes etc.
- Route the exhau \$ hose as straight as possible away from the hood. The maximum permissible bend to the outside is 120°.
- If a smoke non-return valve is used or is planned, check whether it can open and close freely after the installation of the exhaust air hose.
7.3 Using the extractor hood as an exhaust air hood (with air extracted to outdoors)
If the extractor hood has been fitted at the factory with a carbon filter, this must be removed for exhaust air operation. It is only practicable to use this when operating your hood in circulation mode.
7.4 Converting the extractor hood to a circulation hood
If you wish to use the hood as a circulation hood, you must mount the activated carbon filter(s) to the fan motor before using the hood. If not included in the scope of supply, you must obtain the carbon filter(s) from the supplier of your extractor hood.
7.5 Mounting the carbon filter
- Remove the metal grease filte r
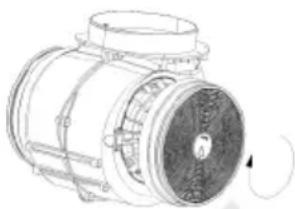
- The carbon filter is mounted in two parts to the right and left of the motor. Check whether the teeth correspond to the direction of the rotation of the respective side.
- Turn the activated carbon filter onto the motor housing (usually clockwise).
- Reinsert the metal filter.
natural_image
Technical line drawing of an electric motor with visible blades and mounting flanges (no text or symbols)7.6 Electrical connection

Only connect the appliance to the power supply once it is properly installed.

Never install the appliance if the data on the rating plate (V) does not agree with your supply voltage.
You will find the rating plate inside the appliance, behind the grease filter.
If the extractor hood is fitted with a standard connector plug, connect this to an easily accessible standard socket.

If the appliance is not fitted with a connector plug, a two-pole switch, conforming to standards with a minimum open contact gap of 3 mm is to be installed by an authorized tradesman in an easily accessible location.
8. Mounting the hood

Edges and internal components can be sharp-edged and cause injuries. Exercise appropriate caution and protect yourself if necessary, e.g. with work gloves.
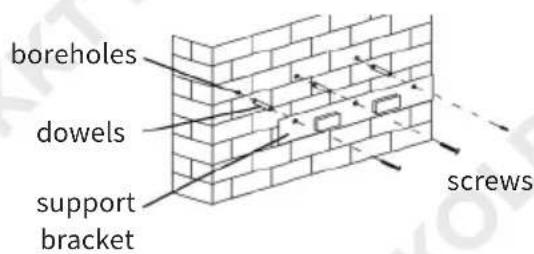
For installation on solid masonry, proceed as described below. If the appliance is to be mounted on a different type of wall (e.g. plasterboard, aerated concrete, Poroton brick), replace the mounting material according to the substrate. If the mounting surface is made of wood, you can do without the dowels. However ensure a secure hold.
- Determine the desired position for mounting the hood body support bracket centrally above your hob according to the previously mentioned distance regulations and dimensions.
Note: The hood will later be suspended from the bracket on the rear upper edge. To be sure, you can also fix it beforehand and pre-align it optically. - Place the hood body support bracket horizontally at the desired position on the wall using a spirit level and mark the position of the screw holes.
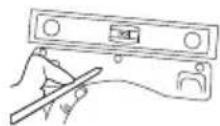
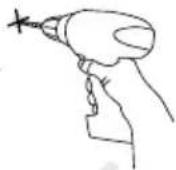
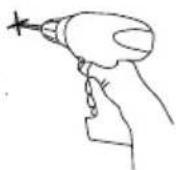
- Drill a hole at each of the marked positions according to the diameter of the dowels.
- Then carefully tap a dowel into each of the holes with a hammer and fasten the bracket to them with the screws provided (4.2 × 30 mm).
text_image
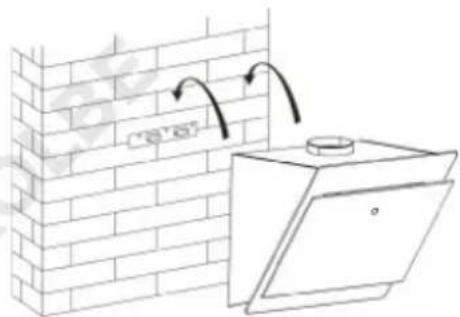
boreholes dowels support bracket screws- Raise the hood body and attach it to the wall bracket.
natural_image
Diagram showing a brick wall with a pipe outlet and a cabinet, no text or symbols present- From the inside of the cooker hood, mark the positions of the holes in its back on the wall. (For this step, open the front flap of the hood and remove the metal grease filter).
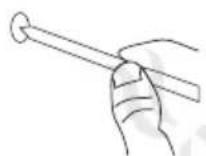
• Take the hood down, drill holes at the marked points according to the diameter of the dowels and carefully tap one of the other dowels into each of the drill holes with a hammer.
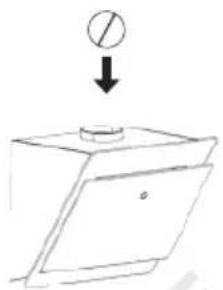
- To prevent air leakage in exhaust air mode (i.e. backflow of outside air), install the supplied backflow flaps on the top of the bonnet in the air outlet. Note: This step is not necessary for recirculation mode or if there is already a backflow flap in the exhaust air duct of your kitchen.
natural_image
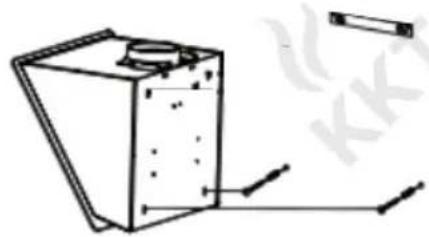
Simple line drawing of a box with a circular symbol above it and a downward arrow pointing to the top (no text or symbols)- Hang the hood back in place and fix its rear side to the wall or dowels with the additional screws (4.2 × 30 mm) supplied.
natural_image
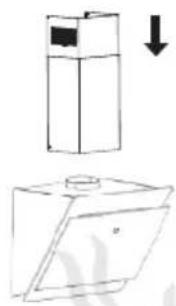
Simple line drawing of a rectangular box with a lid and side connectors, no text or symbols present.- Assemble the telescopic exhaust shaft from the two shaft elements by sliding them into each other and place it on the hood body.
natural_image
Simple line drawing of a cabinet with an arrow indicating downward motion (no text or symbols)- Pull the inner sharf part upwards to the desired height and mark the position of the upper corners adjacent to the wall for both shaft elements on the wall.
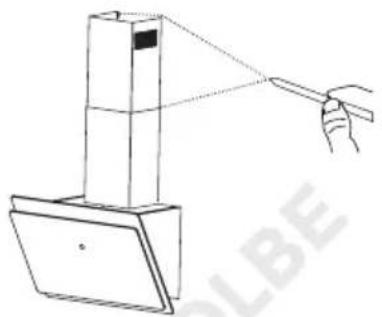
natural_image
Simple line drawing of a hand holding a tool near a vertical stack (no text or symbols)- Remove the shaft again. Place the top edge of each of the shaft brackets against the corresponding markings, mark the screw holes on the wall and drill 2 holes at each of the marked points according to the diameter of the dowels.
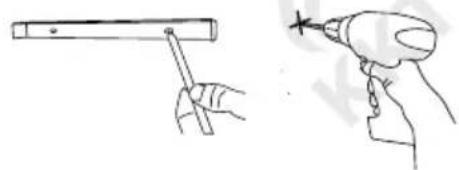
natural_image
Two hand-drawn illustrations: one using a tool to measure a rectangular object, the other showing a drill (no text or symbols)- Fasten the two shaft brackets to the wall with 2 dowels and screws (4.2 × 30 mm) each.
- For exhaust air operation of the hood, attach the exhaust air hose to the air outlet of the hood body and connect it to the exhaust air pipe.
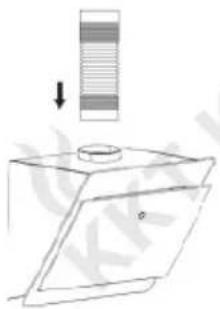
natural_image
Simple line drawing of a mechanical component with a cylindrical part and a downward arrow, no text or symbols present.- Now hang the two shaft elements onto the wall brackets from top to bottom and fix the upper element with the two short screws supplied (3.5 × 10 mm).
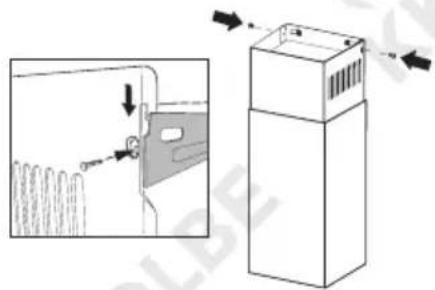
text_image
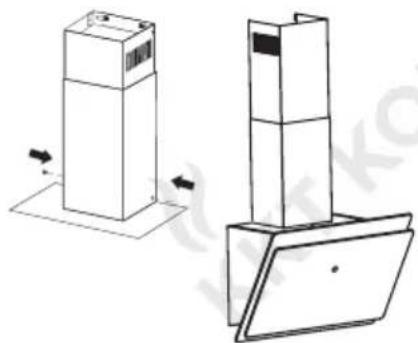
Diagram showing a mechanical device with a close-up view of a component being inserted, alongside its side view with directional arrows.- Finally, fix the outer shaft part to the canopy body with the 2 remaining short screws.
natural_image
Technical line drawing of two mechanical components with directional arrows indicating movement (no text or symbols)• Make sure that the metal grease filter is reinserted before using the appliance.
9. Informations on air flow
Note: Images are for illustration purposes only and may vary.
text_image
12
text_image
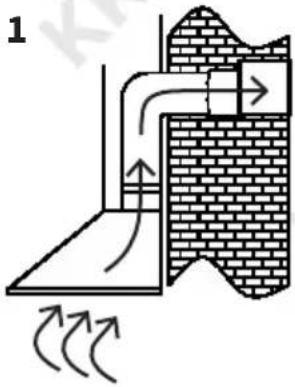
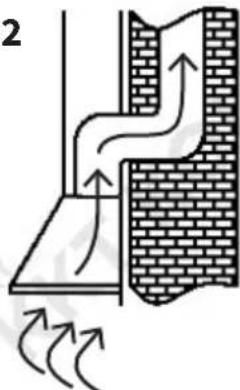
Diagram illustrating airflow or circulation through a pipe system with directional arrows and brick wall structureFig. 1: Exhaust air into the open
Fig. 2: Exhaust air via air shaft/chimney
• The exhaust air line should be as short and straight as possible.
• To avoid excessive noise or a reduced extraction capacity the diameter of the exhaust air pipeline should not be less than 150 mm.
- Use or form only large radius bends. Small radius bends reduce the extraction capacity of the hood.
- Use only smooth pipe lines or flexible hoses of non-flammable materials for the exhaust air pipeline
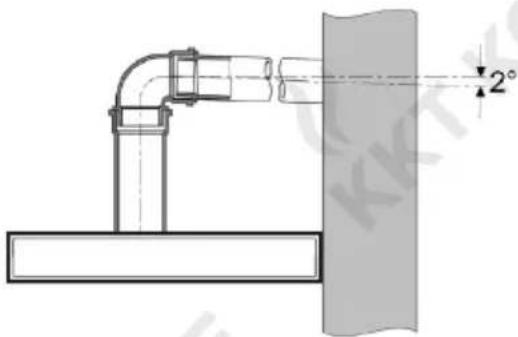
- If the exhaust air pipeline is horizontally routed, there must be a minimum gradient of 1 cm per metre or an inclination angle of 2°. (Fig. 3) Otherwise condensation water could run into the extractor hood motor.
- If the exhaust air is directed into an exhaust air duct, the end of the entry fitting must be directed in the direction of flow.
3
text_image
Technical diagram showing pipe connection with angle标注 2° and dimension linesFig. 3: inclination angle of the exhaust air pipeline
- If the exhaust air is directed into an exhaust air duct, the end of the entry fitting must be directed in the direction of flow.
- If the exhaust air pipeline is routed though cool rooms, lofts etc. there can be a large temperature drop within the individual parts of the pipeline, resulting in sweating or condensation water production. This renders outlet pipeline insulation necessary.
- In some cases a condensation water barrier must be installed in addition to adequate insulation

The manufacturer is not responsible for any faults occurring through non-compliance with the above information and provisions.
10. Technical data
| Supplier's name KKT KOLBE | ||
| Models SOLO 609 / 809 / 909 S HCM | ||
| Type Wall mounted hood with headroom | ||
| Venting type convertible | ||
| Number of power levels 9 | ||
| Lighting type LED | ||
| Lighting energy consumption 2 x 1.5 W | ||
| Number of grease filters 1 | ||
| Optional activated carbon filter K111 | ||
| Energy efficiency class A++ | ||
| Lighting energy efficiency class A / B / B | ||
| Fluid dynamic efficiency class | A | |
| Grease filter efficiency class | D | |
| maximum sound power level | 58 dB | |
| Air flow volume in most energy efficient mode | 184 m3/h | |
| Air flow, sound power level (rounded) according to power levels | Level 1: 186 m3/h, 35 dB | Level 6: 436 m3/h, 50 dB |
| Level 2: 236 m3/h, 38 dB | Level 7: 490 m3/h, 53 dB | |
| Level 3: 287 m3/h, 41 dB | Level 8: 541 m3/h, 56 dB | |
| Level 4: 337 m3/h, 44 dB | Level 9: 578 m3/h, 58 dB | |
| Level 5: 385 m3/h, 47 dB | ||
| Average illuminance of the lighting system onto cooking surface | 121 lx / 107 lx / 107 lx | |
| Power | 111 W | |
| Measured power consumption in standby mode | - | |
| Measured power consumption in off mode | 0.48 W | |
| Electrical power in most energy efficient mode | 26.3 W | |
| Voltage | 220 - 240 V / 50 Hz | |
| Dimensions (W × D × H) | 595 / 795 / 895 × 385 × 370 mm | |
| Exhaust outlet diameter | 150 mm | |
| Cable length 1,2 m | ||
| Weight | 13 / 15 / 15,9 kg | |
Note on the EC Declaration of Conformity
CE
Product Description:
SOLO 609/809/909 S HCM Cooker hood
Manufacturer:
For the product described in this manual, the corresponding EC Declaration of Conformity is available.
Some of the relevant documents can be viewed and downloaded from our website on the relevant product page.
You are welcome to obtain the complete documents on written request via the adjacent contact address.
Jan Kolbe
Head of Product Management
Thanks for reading. We wish you a lot of fun cooking.