
LK6460DS - Fridge Concept - Free user manual and instructions
Find the device manual for free LK6460DS Concept in PDF.


| Product Type | Freestanding fridge-freezer |
| Total Volume | 338 L |
| Fridge Volume | 216 L |
| Freezer Volume | 122 L |
| Freezing Capacity | 8.5 kg / 24 hours |
| Freezer Accumulation Time | 12 hours |
| Energy Class | E |
| Annual Energy Consumption | 256 kWh |
| Voltage | 220–240 V ~ 50 Hz |
| Defrost Heater Power | 170 W |
| Climate Class | SN/N/ST/T |
| Noise Level | 40 dB (A) |
| Height | 1858 mm |
| Width | 595 mm |
| Depth | 660 mm |
| Weight | 71 kg |
| Refrigerant Settling Time | At least 2 hours before first use |
| Control Panel Type | Touch sensor buttons with digital display |
| Super Cool Function | Yes, sets fridge to 2 °C |
| Super Freeze Function | Yes, sets freezer to -24 °C |
| Vacation Function | Yes, sets freezer to -18 °C |
| Door Open Alarm | Automatic after 2 minutes |
| Control Panel Lock | Auto lock after 30 seconds inactivity, manual lock available |
| Defrost Type | Automatic (frost-free) |
| Reversible Door | Yes, detailed instructions provided |
| Adjustable Feet | Yes, for leveling |
| Shelf Material | Glass |
| Storage Drawers | 3 freezer drawers, 1 fruit/vegetable drawer, 1 meat/fish drawer |
| Interior Light | Yes, inside refrigerator compartment |
Frequently Asked Questions - LK6460DS Concept
User questions about LK6460DS Concept
0 question about this device. Answer the ones you know or ask your own.
Ask a new question about this device
Download the instructions for your Fridge in PDF format for free! Find your manual LK6460DS - Concept and take your electronic device back in hand. On this page are published all the documents necessary for the use of your device. LK6460DS by Concept.
USER MANUAL LK6460DS Concept
natural_image
Three concept refrigerators displayed side by side, one white and one black with a digital display (no visible text or symbols on the devices themselves)LK6460wh / LK6460ds / LK6460ss

text_image
ENLVPLSKCZPODĚKOVÁNÍ
text_image
Záslenky decorative cover middle hingeObr. 6
text_image
uppering 3 2 4 1 uppleing uppleing cryhinge écovéntu Záslenka pántu decoratover Distančné stípikyObr. 7
ČISTENIE A ÚDRŽBA
text_image
Zoślenki decorative cover middle hingeByor.6
text_image
Upper hinge Upper hinge 3 2 4 1 2 Open hinge coverego Zestmpka zawiasu Zestmpka zawiasu Slupki dystansoweRyos.7
CZYSZCZENIE I KONSERWACJA
text_image
middle hinge Videminges Atloki ve cover- att.
text_image
upësëjähingë upësëjähingë coverëgs decorative Cover Starplikas Augëjähingest 3 2 4 1- att
TİRİŞANA UN APKOPE
Thank you for purchasing the Concept product. We want you to be satisfied with everything we make every day you use it.
Please read the instructions carefully before initial use. You should retain them for future reference. Ensure that anyone using this product is familiar with the instructions.
TABLE OF CONTENTS
Technical specifications
Important safety information
Product description
Control panel description
Tips for use
User manual
Additional functions
Installation of the appliance
Connection to the mains
Door swing direction
Cleaning and maintenance
Regular operating noise
Troubleshooting
Error message
Service centre
Environmental protection
| TECHNICAL SPECIFICATIONS | |
| Energy class E | |
| Voltage 220–240 V ~ 50 Hz | |
| Defrosting heater 170 W | |
| Annual power consumption 256 kWh | |
| Daily power consumption 0,701 kWh | |
| Total volume 338 l | |
| Usable volume (refrigerator/freezer) 216 l / 122 l | |
| Freezing capacity 8,5 kg / 24 hours | |
| Freezer accumulation time 12 hours | |
| Climate class SN/N/ST/T | |
| Noise level 40 dB (A) | |
| Height 1858 mm | |
| Width 595 mm | |
| Depth | 660 mm |
| Weight | 71 kg |
The manufacturer reserves the right to make potential technical changes, typographical errors and any differences in the representation without prior notice.
IMPORTANT SAFETY INFORMATION
Upon a delivery of a freestanding refrigerator freezer
- Immediately after delivery, check the package for any damage during shipping.
- Caution! Caution! Some edges of this appliance that are hidden after installation are sharp! Be careful not to injure yourself!
- Do not use the appliance if it has been damaged. Contact the store where you purchased it immediately.
- Remove all the packaging and marketing materials before first use.
- Keep the packaging materials away from children or dispose of them properly.
During installation
- Do not use the appliance in any other way than as described in this manual.
- Make sure the mains voltage and current protection correspond to the values on the rating plate of the appliance.
• This appliance can be used in households and similar places like: - kitchen cabinets in shops, offices and other workplaces
- appliances used in agriculture
- appliances used by guests in hotels and other areas in a hotel environment
- appliances used in a Bed and Breakfast environment
- Do not use the appliance if you are barefoot.
- Do not touch the appliance with wet hands.
- Do not touch the cooling parts of the freezer with wet hands. Risk of injury!
- Do not stand or sit on the open door of the appliance.
- Do not allow children or unauthorized people to handle the appliance, use it out of their reach.
• Children should not play with the appliance.
- Pay extra attention if the appliance is used near children.
- Do not allow the appliance to be used as a toy.
- This appliance can be used by children aged 8 years and over. Persons with reduced physical, sensory or mental capabilities, or lack of experience and knowledge, should be supervised or familiarized with the instructions for use of the appliance in a safe way and have been made aware of the risks involved.
- If a malfunction occurs, turn off the appliance and unplug it from the wall outlet.
- When disconnecting the unit from the wall outlet, never pull the power cord, grasp the plug end and disconnect it by removing it from the receptacle.
- Do not immerse the power cord or the plug in water or any other liquid.
- Check the appliance and the power cord for damage regularly.
- Do not switch on the appliance if it has been damaged.
- Do not use the appliance if the door or the door seals are damaged. Call the authorised service centre.
- Do not use any accessories other than those recommended by the manufacturer.
- Do not use accessories with damaged surface treatment or if it has been worn out or has other defects.
- IMPORTANT! Before switching on, let the appliance stand still for at least 2 hours to settle the refrigerant gases in the compressor after shipping.
- Use the appliance in a room with temperatures between +16 °C and +43 °C.
- Do not place the appliance near heat sources, it may increase its consumption and shorten the service life.
- Do not place any objects on the top of the appliance, as it could damage the appliance.
- Do not place any electrical devices such as mixers and others in the appliance.
- Do not store explosive substances such as aerosol cans with a flammable substance in the appliance,
- Before use, it is necessary to wipe the inside of the appliance with a solution of baking soda dissolved in tepid water. After cleaning, dry all parts thoroughly.
- Cleaning and user maintenance shall not be made by children unless they are older than 8 years and supervised.
- NOTICE! Do not use mechanical devices or other means to speed up the defrosting process other than those recommended by the manufacturer.
- Place the appliance on a flat place in a well-ventilated are.
- Do not place the appliance under the direct sun shine.
- Make sure there is enough free space around the appliance for free circulation of air.
- The appliance should be located at least 50 cm from a gas oven or burners and should be placed at least 5 cm away from an electric oven.
- If the appliance is placed close to the freezer, a distance of at least 2 cm should be between them in order to avoid creating moisture on the outside.
- The rear and side walls of the appliance should be at least 10 cm away from the wall. There should be a free space of approximately 30 cm above the appliance as it needs to ventilate freely.
• Children aged from 3 to 8 years are allowed to load and unload refrigerating appliances.
- If the refrigerating appliance is left empty for long periods, switch off, defrost, clean, dry, and leave the door open to prevent mould developing within the appliance.
- WARNING: When positioning the appliance, ensure the supply cord is not
trapped or damaged.
- WARNING: Do not locate multiple portable socket-outlets or portable power supplies at the rear of the appliance.
Caution!
To avoid injury, open the door only for a short period of time to insert or remove food. Children may lock themselves inside the appliance (risk of suffocation) or be exposed to other dangers.
Possible defects
- Only qualified service technicians should repair or perform maintenance to this appliance.
- During the repairs the appliance must be disconnected from the power. Switch off the circuit breaker or remove the plug from the wall outlet.
- When disconnecting the unit from the wall outlet, never pull the power cord, grasp the plug end and disconnect it by removing it from the receptacle.
Caution! The risk of fire / Flammable materials.
If you fail to follow these instructions, any possible repair cannot be recognized as a warranty repair.
PRODUCT DESCRIPTION
1 Refrigerator lighting
2 Glass shelves
3 Butter and cheese compartment
4 Bottle compartment
5 Fruit and vegetable drawer
6 Meat and fish drawer
7 Upper freezer drawer
8 Middle freezer drawer
9 Lower freezer drawer
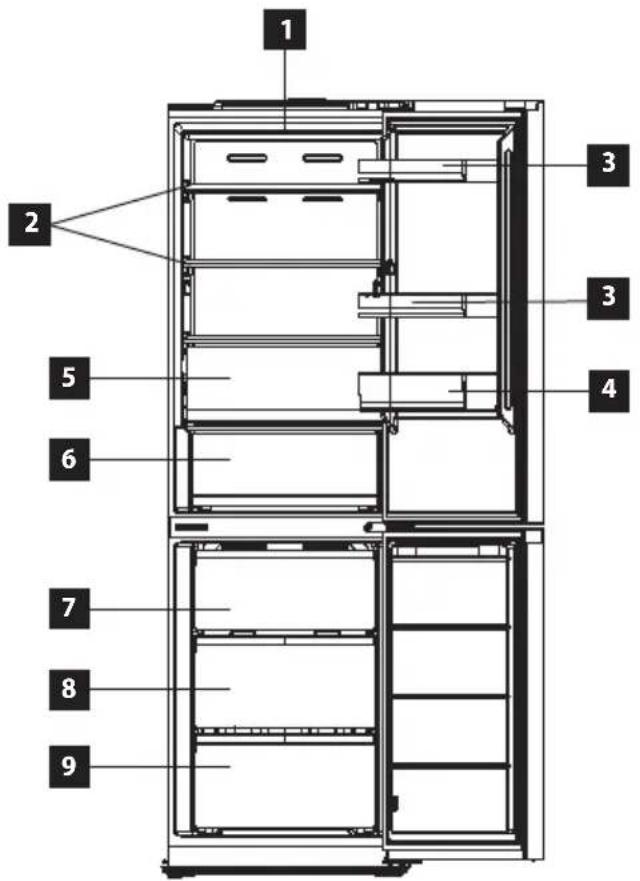
text_image
1 2 3 3 4 5 6 7 8 9CONTROL PANEL DESCRIPTION
1 Display – temperature inside the refrigerator
2 Display – temperature inside the freezer
3 Super Cool icon
4 Super Freeze icon
5 Vacation function icon
6 Control Panel Unlock icon
7 Sensor button – refrigerator temperature setting
8 Sensor button – freezer temperature setting
9 Sensor button to set the Vacation function and to lock/unlock the control panel
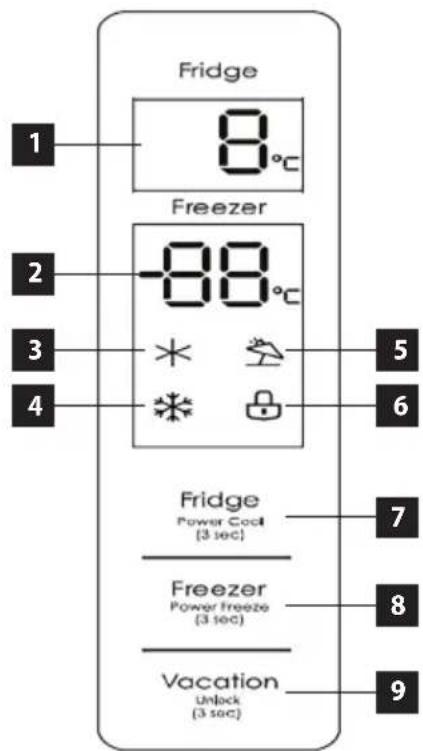
text_image
Fridge 8°C Freezer -88°C * * 6 5 4 Fridge Power Cool (3 sec) 7 Freezer Power Freeze (3 sec) 8 Vacation Unlock (3 sec) 9Display
The display lights for 3 seconds, when the appliance is connected to the mains. After that, a beep sound occurs and the display switches splayed in operation mode. In operation mode, the actual set temperature of each zone is displayed. Default temperatures for the individual zone are pre-set at 5^ / -18^ .
If an error occurs, the error code will be shown on the display. If the door does not get open opened and any other activity is not done within 30 seconds, the control panel gets locked. After the first start, the display shows the temperatures for the individual zones of the refrigerator as determined by the factory setting of the unit, i.e. 5 °C in the refrigerator and -18 °C in the freezer.
TIPS FOR USE
- We do not recommend putting hot food or fluids that are still evaporating inside the refrigerator. It will increase the humidity inside the refrigerator.
- Food intended for refrigerating should be wrapped or covered. It is recommended to use plastic bags, kitchen foil or food paper to wrap food. Liquids should be stored in closed containers or bottles.
- It is also not recommended to put beverages in glass bottles in the freezer, glass can easily rupture due to low temperatures inside the freezer.
USER MANUAL
Before first use
Before first use you should wipe the outside and inside of the appliance with a damp cloth for hygiene reasons. Wash all removable parts with warm soapy water.
After installing the refrigerator, leave the appliance standstill for at least 2 hours before connecting to the mains. It is necessary to allow the cooling gases to set down. Then you can connect the refrigerator to the mains and let it run for 2-3 hours to stabilize a normal operating temperature. Then put fresh or frozen food inside the appliance.
Note: If a power failure occurs during the first run, wait for at least 5 minutes before switching on again or connecting to the mains.
Setting the Temperature of Refrigerator Zone
- Press and hold the sensor button (9) for 3 seconds to unlock the control panel.
- Use the sensor button (7) to adjust the temperature inside the refrigerator by 1 °C steps.
- The temperature of the refrigerator zone can be set between 2 and 8^ .
Setting the Temperature of Freezer Zone
- Press and hold the sensor button (9) for 3 seconds to unlock the control panel.
- Use the sensor button (8) to adjust the temperature inside the freezer by 1 °C steps.
• The temperature of the freezer zone can be set between -24 and -16 °C.
Locking/Unlocking of the Control Panel
- Press and hold the sensor button (9) for 3 seconds to unlock the control panel.
- The control panel gets locked automatically after a short period of inactivity to prevent accidental resetting of the temperatures.
- You can lock the control panel manually by pressing the sensor button (9) for 3 seconds.
Door Open Alarm
- The refrigerator is equipped with a sound alarm which is triggered every time the door gets opened.
- If the door does not get closed within 2 minutes from opening, a beep sounds will occur every one second until the door is completely closed.
ADDITIONAL FUNCTIONS
Power Cool Mode function
- Press and hold the sensor button (9) for 3 seconds to unlock the control panel.
- Press and hold the sensor button (7) for 3 seconds to activate the Power Cool Mode function.
• The Quick Cool Mode function icon (3) appears on the display. - The Quick Cool Mode function sets the refrigerator temperature to 2^ .
- To switch off the Quick Cool Mode function, press the sensor button (7). The Quick Cool Mode function icon (3) disappears from the display.
- When the Quick Cool Mode function is switched off, the refrigerator temperature is set to 8 °C.
Power Freeze Mode function
- Press and hold the sensor button (9) for 3 seconds to unlock the control panel.
- Press and hold the sensor button (8) for 3 seconds to activate the Power Freeze Mode function.
- The Quick Freeze Mode function icon (4) appears on the display.
- The Quick Freeze Mode function sets the freezer temperature to -24^ .
- To switch off the Quick Freeze Mode function, press the sensor button (8). The Quick Freeze Mode function icon (4) disappears from the display.
- When the Quick Freeze Mode function is switched off, the freezer temperature is set to -20^ .
Vacation function
- Press and hold the sensor button (9) for 3 seconds to unlock the control panel.
- Press the sensor button (9) to activate the Vacation function, which will be indicated by the illuminated icon (5) on the display.
• The Vacation function sets the freezer temperature to -18 °C. - To switch off the Vacation function, press the sensor button (9). The Vacation function icon (5) disappears from the display.
- When the Vacation function is switched off, the refrigerator temperature is set to 8 °C and the freezer temperature is set to -20 °C.
INSTALLATION OF THE APPLIANCE
- Defects caused by improper installation are not covered by the warranty.
• Installation is the responsibility of the customer not the manufacturer. - The manufacturer bears no responsibility for damage caused to people, animals or property due to incorrect installation.
- Place the appliance on a flat place in a well-ventilated are.
- Do not place the appliance under the direct sun shine.
- The appliance should be placed at least 10 cm from the wall at the back and both sides. There should be a free space of approximately 30 cm above the appliance as it needs to ventilate freely.
- If necessary, use the adjustable feet at the bottom of the appliance to align the appliance in a horizontally stable position.
CONNECTION TO THE MAINS
- Make sure the mains voltage and current protection correspond to the values on the rating plate of the appliance. We recommend using a separate outlet with a 10 A circuit breaker.
- Only use grounded sockets.
- Do not use multiple sockets, plugs and extension cords. There is a risk of overheating.
- The plug of the power cord on the appliance must be freely accessible even after the installation.
• Changes in a connection may only be performed by a qualified professional. -
Electrical safety of the appliance can be guaranteed only if the protective terminal of the appliance is connected to the protective conductor of the mains.
-
The manufacturer bears no responsibility for damage to persons or property as a result of missing or bad protective connection.
- The power cord must be positioned in a way that it is not deformed or excessively bent.
DOOR SWING DIRECTION
- Switch off the circuit breaker or remove the plug from the wall outlet. When disconnecting the unit from the wall outlet, never pull the power cord, grasp the plug end and disconnect it by removing it from the receptacle.
- If you have any food and drinks in the refrigerator door compartments, remove them.
- Remove the upper plastic covers, the upper hinge of the refrigerator (Fig. 1) and disconnect the connector located at the upper hinge of the refrigerator (Fig. 1). Remove the refrigerator door and place it in a safe place.
- Remove the blind plugs and the middle hinge of the refrigerator (Fig. 2). Remove the freezer door and place it in a safe place.
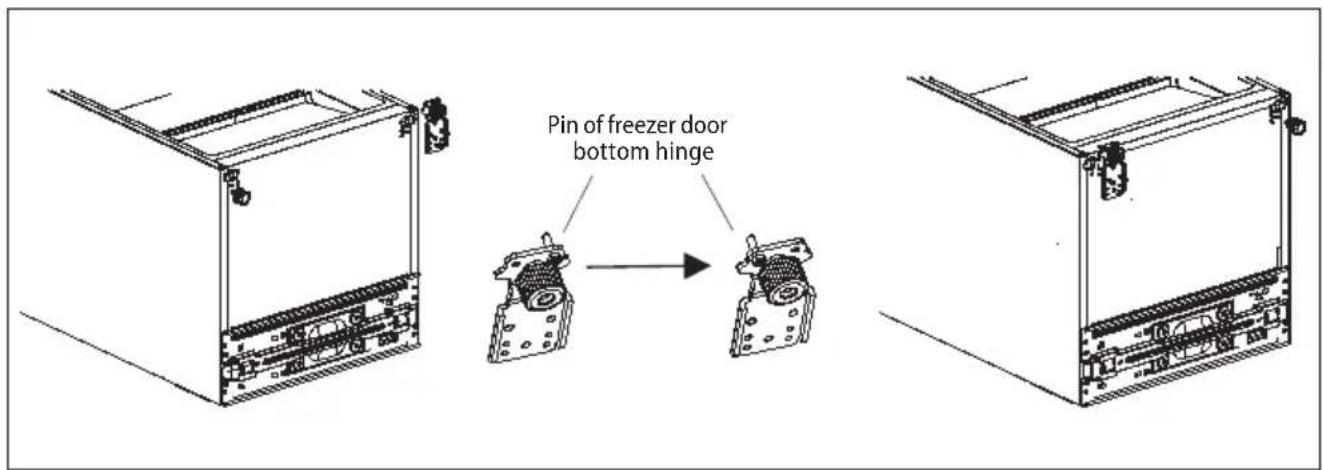
- Remove the blind plugs and the bottom hinges of the freezer (Fig. 3).
- Move the pin for fixing the freezer door to the other side of the freezer bottom hinge (Fig. 3). Install the freezer bottom hinge on the other bottom side of the unit as shown in Fig. 3.
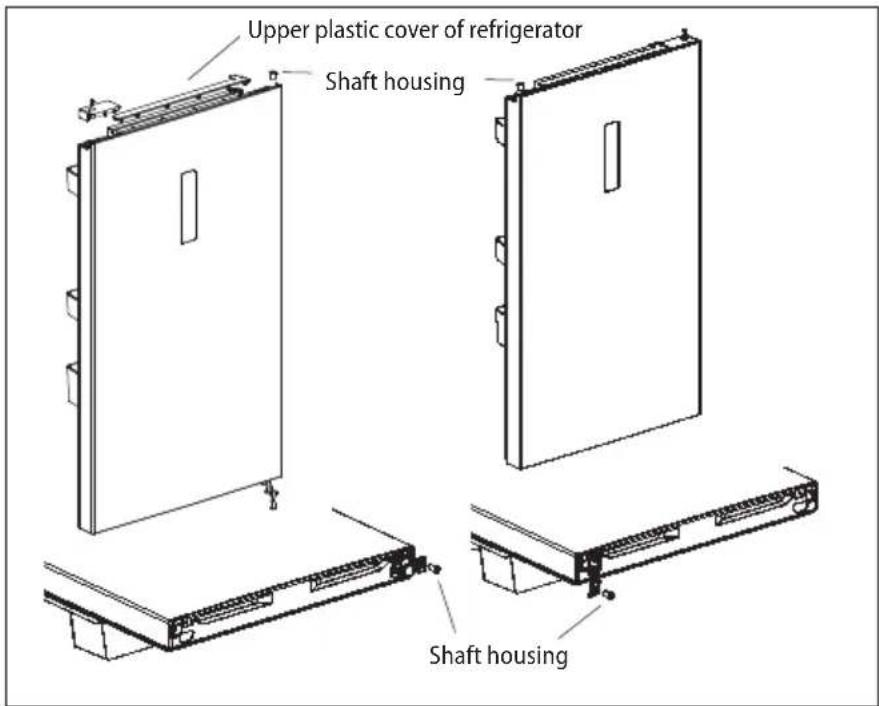
- Remove the upper plastic cover from the upper edge of the refrigerator door (Fig. 4).
- Remove the housing for fixing the upper refrigerator hinge and place it on the other side of the door (Fig. 4). After moving the housing, place the upper plastic cover back.
- Remove the plastic door stop, the metal holder, and the shaft housing for fixing the middle hinge of the refrigerator from the bottom edge of the refrigerator door (Fig. 4).
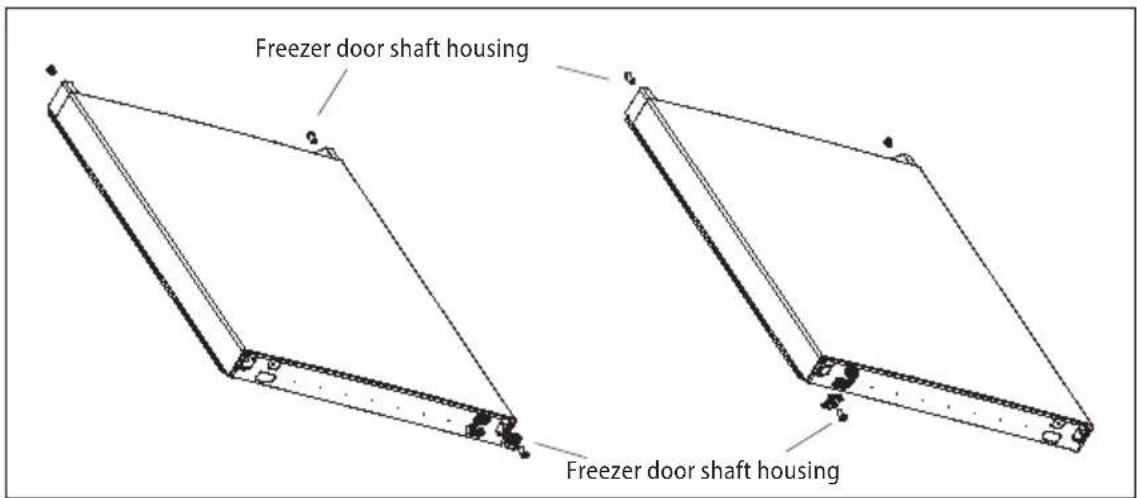
- Remove the shaft housing for fixing the middle hinge of the refrigerator from the door of the freezer and place it on the other side of the door (Fig. 5).
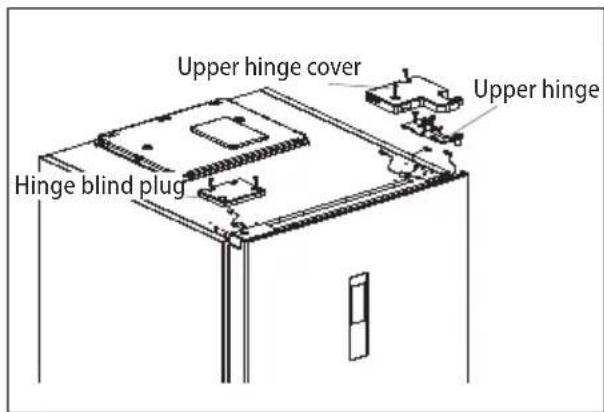
text_image
Upper hinge cover Upper hinge Hinge blind plugFig. 1
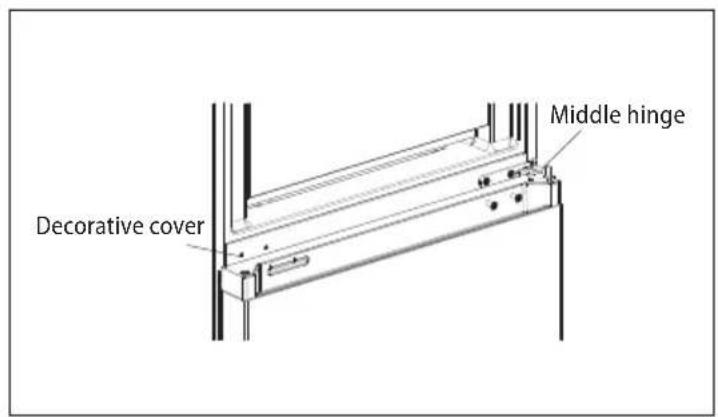
text_image
Decorative cover Middle hingeFig. 2
text_image
Pin of freezer door bottom hingeFig. 3
text_image
Upper plastic cover of refrigerator Shaft housing Shaft housingFig. 4
- Remove the plastic stop, the metal holder, and the housing for fixing the bottom hinge of the freezer from the bottom edge of the freezer door as shown in Fig. 5.
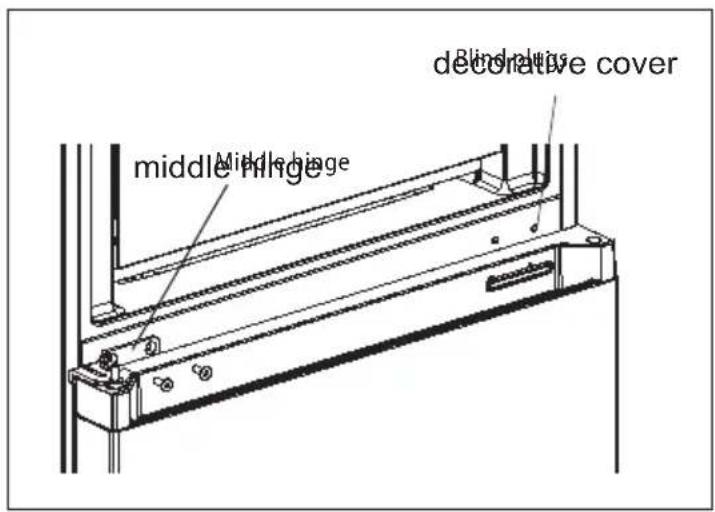
- Place the freezer door on the bottom hinge of the freezer and install the middle hinge of the refrigerator (Fig. 6).
- Place the refrigerator door on the installed middle hinge of the refrigerator.
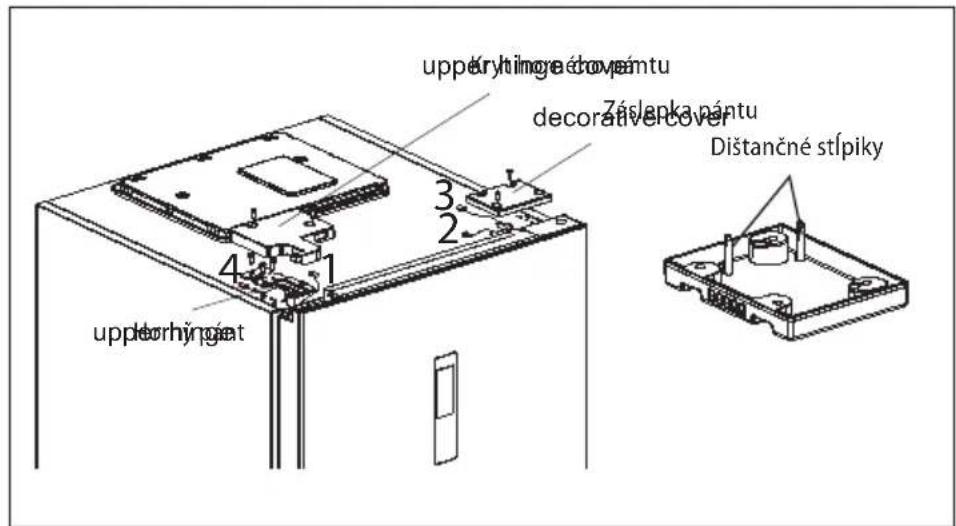
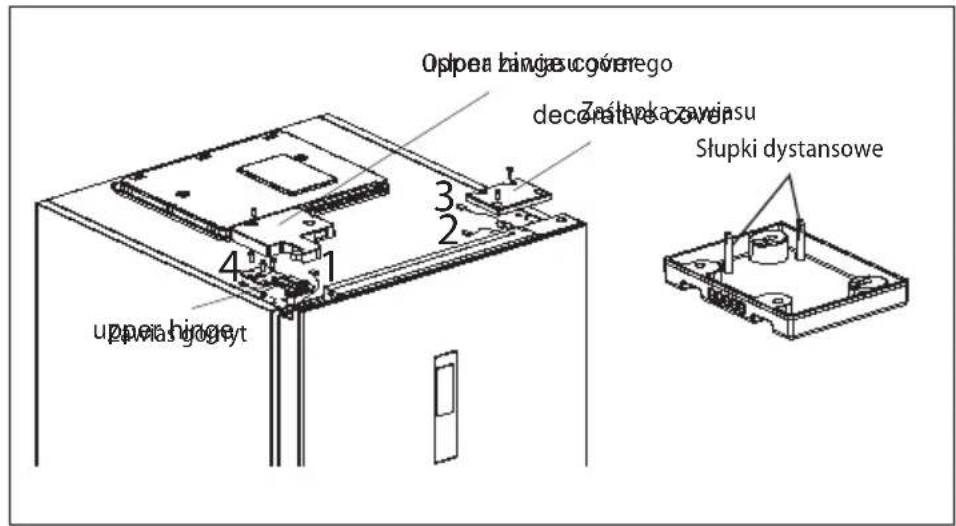
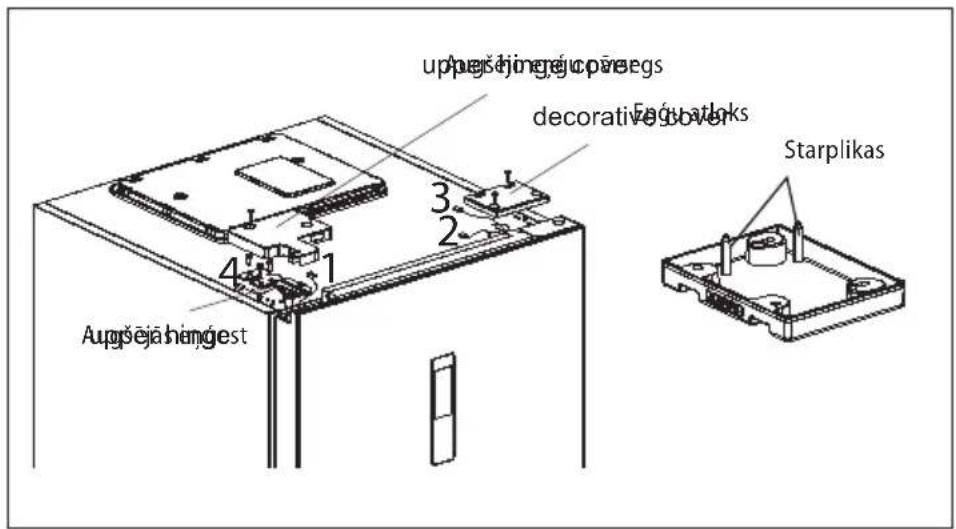
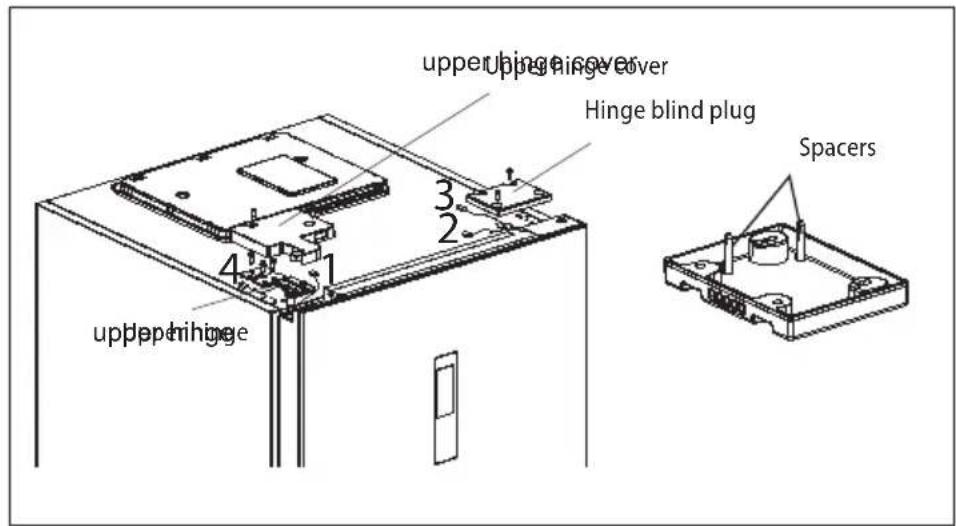
- Connect the refrigerator upper signal line [4] to the door body signal line [1] and the signal line [2] to the signal line [3] and install the upper plastic covers (Fig. 7).
- Shorten the spacers on the hinge blind plug and fit the cover as shown in Fig. 7.
text_image
Freezer door shaft housing Freezer door shaft housingFig. 5
text_image
middle hinge middle hinge Decorative cover Blind lineFig. 6
text_image
upper hinge Hinge blind plug upper hinge cover Hinge blind plug 4 1 2 3 4 upper hinge SpacersFig. 7
CLEANING AND MAINTENANCE
- Disconnect the power cord from the wall outlet or switch off the circuit breaker of the appliance before cleaning and maintenance.
- Dust and dirt on the appliance on the wall and on the ground should be regularly cleaned for trouble-free operation and energy savings.
• The inside of the refrigerator should be cleaned according to the frequency of use to avoid unpleasant odours. - One source of odour can also be dirt deposits around the sealing. Regular cleaning with a damp cloth prevents these unpleasant odours.
- For cleaning, we recommend using non-aggressive products, preferably clear lukewarm water along with a soft sponge or paper towel.
- When the cleaning is done, let the appliance open to dry out naturally.
- For cleaning, we do not recommend cleaning agents such as alcohol, acetone, oil, toothpaste or any other abrasive products.
• We do not recommend rough brushes, hard wipes or steel brushes.
• We do not recommend using boiling water as it may cause damage to the appliance. - We do not recommend cleaning the appliance with a stream of water that could interfere with the insulation or cause a short circuit of some electronic components of the appliance.
- Clean all the accessories of the appliance with a solution of lukewarm water and a detergent. Never wash the accessories in a dishwasher!
Defrosting: The freezer defrosts automatically during operation. During defrosting, water accumulates at the back of the appliance in the evaporation container, where it evaporates spontaneously.
It can be caused by expanding and shrinking of the air inside the refrigerator and freezer.
Short cracking
It can be heard when the thermostat turns on and off the compressor.
Noise of the compressor
Running compressor produces noise. After the installation of the appliance, the compressor may be a little louder for a short time.
Bubbling and flowing
This sound is generated when the refrigerant is flowing through the appliance pipes.
Sound of running water
Water flows into the evaporator groove during the defrosting process and it is audible throughout the defrosting process.
TROUBLESHOOTING
Most of the minor errors that appear when using the refrigerator can be removed by yourself, there is no need to contact an authorized service centre. The following overview should help you find the causes of occurring errors.
If the following overview does not help to remedy the error, please contact an authorized service centre.
| Defect description | Possible cause Solution | |
| The appliance does not work | The power cord plug is not plugged in the wall outlet. | Check the connection of the cord. |
| Damaged power cord | Do not connect the appliance into the mains. Contact a qualified expert or an authorised service. | |
| Faulty main electronics or control electronics | Contact an authorized service centre. | |
| The appliance cannot lower the temperature | Cooling fluids leakage Contact an authorized service centre. | |
| Clogged refrigerator or freezer piping Contact an authorized service centre. | ||
| The compressor is still running | Room temperature is high | Ensure that there is enough space around the appliance for free air circulation. |
| Too many items stored in the refrigerator and freezer | Remove some of the items that do not have to be stored in the appliance. | |
| Hot meals or liquids are placed inside the refrigerator | Remove all hot meals and liquids from the appliance and let them cool down firts. | |
| Door gets opened too frequently Do not open the door so often. | ||
| Faulty main electronics or control electronics | Contact an authorized service centre. | |
| Compressor creates too much noise. | Loose screws securing the compressor Tighten the screws. | |
| The refrigerator is not stable | Align the refrigerator so that it is in the plane. | |
| The light inside the refrigerator does not light up | The power cord plug is not plugged in the wall outlet. | Check the connection of the cord. |
| The light in the refrigerator is damaged Contact an authorized service centre. | ||
| There is too much water in the evaporator container | The door of the refrigerator is not completely closed | Make sure that the door of the refrigerator is closed and that there is no food or containers that could keep the door from closing properly. |
| Inside the refrigerator there is food that contains too much water - constant defrosting | Reduce the amount of food in the refrigerator that contains too much water. | |
| A frost deposit forms inside the freezer. | Insufficiently packaged food or wet containers | Ensure that the food packaging is not damaged or that the containers are dry before placing them in the freezer. |
| Door gets opened too frequently Do not open the door so often. | ||
| Incorrectly placed compartments in the freezer | Check that the freezer compartments are properly placed. | |
| The door sealing is damaged or worn out Contact an authorized service centre. | ||
ERROR MESSAGE
In case of failure, the display shows the error code.
| Code Problem description Remedy | ||
| E1 | Too high temperature in the refrigerator. Faulty temperature sensor. | Contact an authorized service centre. |
| E2 Faulty temperature sensor of the freezer. Contact an authorized service centre. | ||
| E3 | Faulty temperature sensor in the meat and fish drawer. | Contact an authorized service centre. |
| E5 Faulty defrost sensor of the refrigerator. Contact an authorized service centre. | ||
| E6 | Communication error between the main electronics and the control panel. | Contact an authorized service centre. |
| E7 | Faulty sensor reading ambient temperature. | Contact an authorized service centre. |
SERVICE CENTRE
CAUTION!
Extensive maintenance or repair, which requires access to internal parts of the product, has to be performed by a qualified service centre.
ENVIRONMENTAL PROTECTION
- Prefer recycling of packaging materials and old appliances.
- Packaging materials may be disposed of as sorted waste.
- Dispose the plastic bags made of polyethylene (PE) of as sorted waste.
Recycling of the appliance at the end of its lifespan:
This appliance is labelled in accordance with European Directive 2012/19/EU concerning used electrical and electronic appliances (waste electrical and electronic equipment - WEEE). The symbol on the product or its packaging indicates that this product may not be treated as household waste. It is necessary to take it to a container park for the recycling of electrical and electronic equipment. By ensuring the correct disposal of this appliance you will help prevent potential negative consequences to the environment and human health, which could otherwise result from inappropriate disposal of this product. Disposal must be performed in accordance to the regulations for waste disposal. For more detailed information about recycling of this appliance see the authorized local office or service for household waste disposal or the shop, where you purchased the appliance.