
RoboStar T60 - Vacuum Cleaner TESLA - Free user manual and instructions
Find the device manual for free RoboStar T60 TESLA in PDF.


| Product Type | Robotic vacuum cleaner with wet mopping |
| Brand | Tesla |
| Model | RoboStar T60 |
| Dimensions | Approx. 33 × 33 × 9 cm (estimate) |
| Weight | Approx. 3 kg (estimate) |
| Power Supply | 100–240 V~, 50/60 Hz; adapter output 19 V, 0.6 A |
| Battery | Rechargeable lithium‑ion (integrated) |
| Cleaning Modes | Smart (gyroscopic navigation), Auto, Spot, Turbo suction |
| Wet Mopping | Yes, with water tank and microfiber cloth |
| Scheduled Cleaning | Yes, programmable once daily via remote control |
| Remote Control | Yes, with LCD display and directional buttons |
| Filter System | Primary mesh filter, sponge filter, HEPA filter (replace every 6 months) |
| Dust Bin Capacity | Approx. 0.5 L (estimate) |
| Water Tank Capacity | Approx. 0.2 L (estimate) |
| Charging | Automatic return to charging station; orange blinking while charging, green when full |
| Sensors | Cliff sensors, bumper sensors, infrared object detection |
| Noise Level | < 65 dB (estimate) |
| Maintenance | Clean primary filter every 14 days; HEPA filter every 14 days; side/main brushes weekly |
| Spare Parts | HEPA filter, side brushes, main brush, mopping cloth (sold separately) |
| Virtual Wall | Compatible with Tesla RoboStar W20 (sold separately) |
| Safety | Auto shut-off, overcharge protection, anti‑fall sensors |
| Declaration of Conformity | CE compliant (EU) |
Frequently Asked Questions - RoboStar T60 TESLA
User questions about RoboStar T60 TESLA
0 question about this device. Answer the ones you know or ask your own.
Ask a new question about this device
Download the instructions for your Vacuum Cleaner in PDF format for free! Find your manual RoboStar T60 - TESLA and take your electronic device back in hand. On this page are published all the documents necessary for the use of your device. RoboStar T60 by TESLA.
USER MANUAL RoboStar T60 TESLA
natural_image
Technical illustration showing a mechanical component being cut into a housing, with no visible text or symbols.natural_image
Technical line drawing of a mechanical component with two views (top and side), no visible text or symbolsnatural_image
Technical line drawing of a mechanical component with internal components and mounting holes (no text or symbols)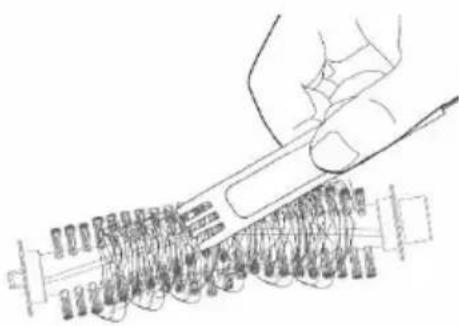
natural_image
Line drawing of a hand using a tool to cut a coiled spring or screw (no text or symbols present)Snímače nárazu
natural_image
Technical line drawing of a mechanical component with cross-sectional view (no text or symbols)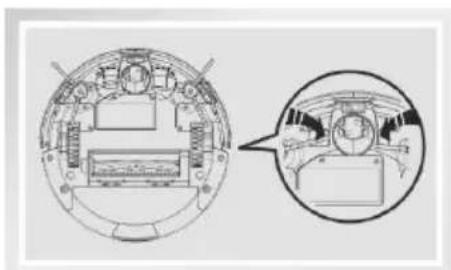
natural_image
Technical diagram of a mechanical component with cross-sectional view and magnified detail (no text or symbols)1 Sietka primárneho filtra
2 Filtrujúca hubka
3 HEPA filter
4 Kryt nádoby na nečistoty
5 Nádoba na nečistoty
Nádoba na vodu
natural_image
Technical diagram of a mechanical component with an arrow indicating assembly or transformation (no text or symbols present)natural_image
Line drawing of hands using a tool to adjust or install a mechanical component (no text or symbols visible)natural_image
Technical line drawing of a mechanical component with curved surfaces and mounting holes (no text or symbols)natural_image
Technical line drawing of a circular mechanical component with internal components and a separate side view (no text or symbols)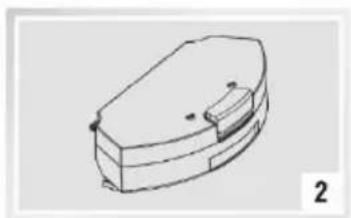
natural_image
Simple line drawing of a 3D object resembling a battery or casing with a slot, no text or symbols present.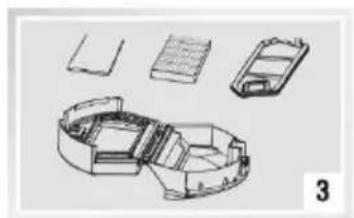
natural_image
Technical line drawing of a mechanical housing assembly with multiple components (no text or symbols)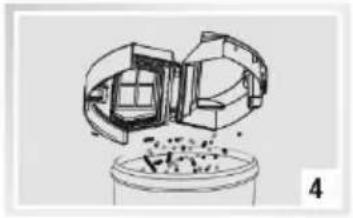
natural_image
Diagram of a mechanical assembly with internal components and a base, no visible text or symbols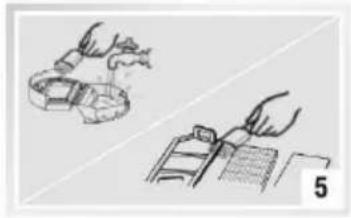
natural_image
Illustration of two hand-drawn diagrams showing a tool and a document, no text or symbols present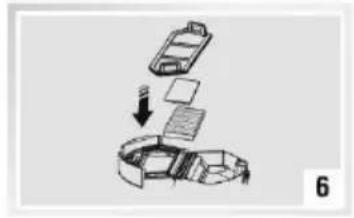
natural_image
Diagram showing a car being folded into a vehicle, with no visible text or symbolsPrimárny filter
natural_image
Technical line drawing of a circular mechanical component with internal components and mounting brackets (no text or symbols)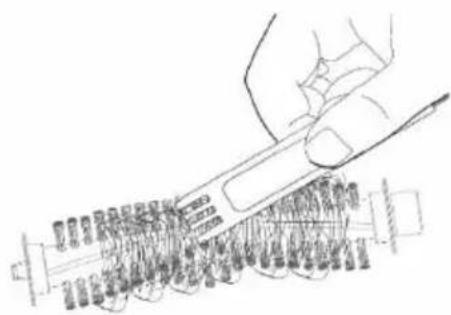
natural_image
Hand holding a tool interacting with a multi-wire battery (no visible text or symbols)Snímače nárazu
natural_image
Technical diagram of a mechanical assembly with cross-sectional and top views (no text or labels)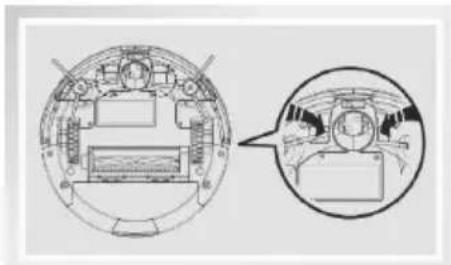
natural_image
Technical diagram of a vehicle interior showing cross-section and side view (no text or labels)natural_image
Technical diagram of a mechanical component with an arrow indicating downward motion (no text or symbols present)natural_image
Line drawing of hands using a tool to adjust or install a mechanical component (no text or symbols visible)natural_image
Technical line drawing of a mechanical component with two views (top and side), showing internal components and directional arrows (no text or symbols)natural_image
Technical line drawing of a circular mechanical component with internal components and a labeled section (no text or symbols)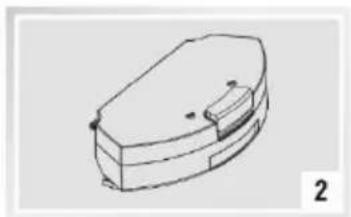
natural_image
Simple line drawing of a 3D object resembling a battery or casing (no text or symbols)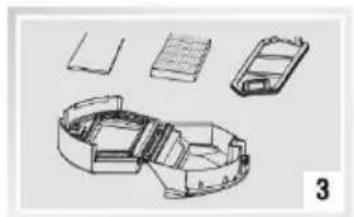
natural_image
Technical line drawing of a multi-section mechanical assembly with no visible text or symbols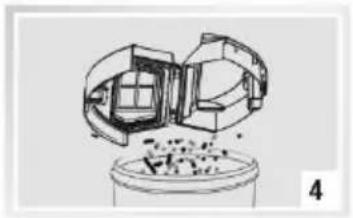
natural_image
Technical line drawing of a mechanical assembly with no visible text or symbols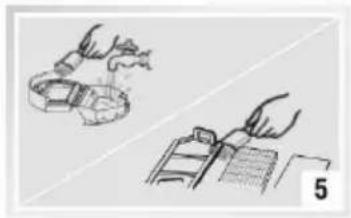
natural_image
Illustration of two hand-drawn diagrams showing a tool interacting with a device and a document, both without any text or symbols.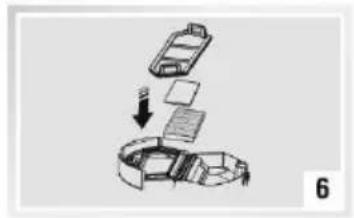
natural_image
Diagram showing a car being dropped into a curved ramp, with no text or symbols present.Filtr główny
natural_image
Technical line drawing of a circular mechanical or electronic component with internal components and mounting holes (no text or symbols)
natural_image
Line drawing of a hand using a tool to interact with a mechanical component (no text or symbols visible)natural_image
Technical diagram of a mechanical assembly with cross-sectional and top views (no text or labels)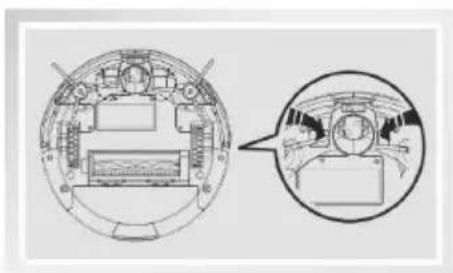
natural_image
Technical diagram of a vehicle interior showing cross-section and side view of the dashboard (no text or labels)natural_image
Technical line drawing of a mechanical component with labeled parts (1 and 2), no readable text or symbols beyond labels1 Töltőcsatlakozó
2
Be/Ki kapcsoló gomb
A portartály részei
4 A "CLOCK" (9) gomb
natural_image
Technical illustration showing a mechanical component being processed into a housing, with no visible text or symbols.natural_image
Technical line drawing of a mechanical component with two views (top and side), showing internal components without any text or symbols.natural_image
Technical line drawing of a circular mechanical component with internal components and mounting holes (no text or symbols)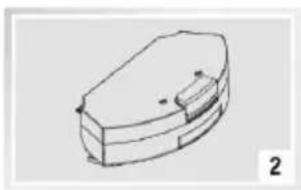
natural_image
Simple line drawing of a 3D object resembling a container or housing (no text or symbols)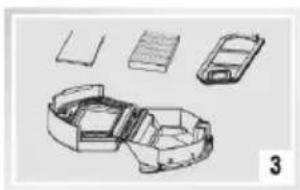
natural_image
Technical line drawings of a mechanical component assembly (no text or symbols)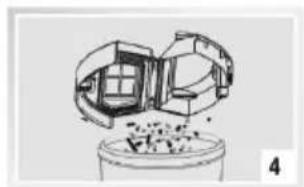
natural_image
Diagram of a mechanical device with internal components and particles, no visible text or symbols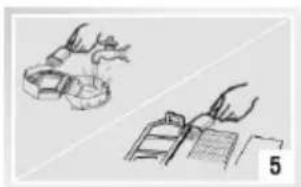
natural_image
Illustration of two hand-drawn diagrams showing a hand holding a device and another holding an open notebook, both without any text or symbols.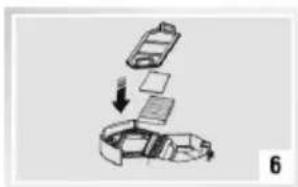
natural_image
Illustration of a car being folded into a box, showing structural components (no text or symbols)Elsódleges szúró
flowchart
graph LR
    A["Raw Materials"] --> B["Intermediate Products"]
    B --> C["Processed Products"]
natural_image
Technical line drawing of a circular mechanical or electrical component with internal components and mounting brackets (no text or symbols)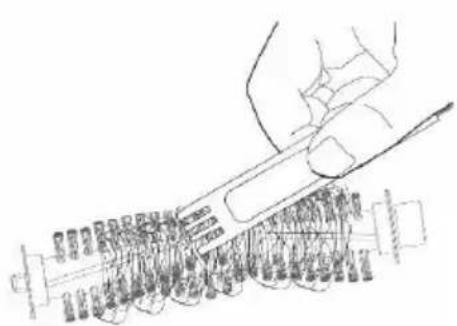
natural_image
Line drawing of a hand using a tool to cut or mark a cylindrical object with multiple pins (no text or symbols visible)natural_image
Technical diagram of a circular mechanical component with internal components and a magnified inset showing internal structure (no text or labels)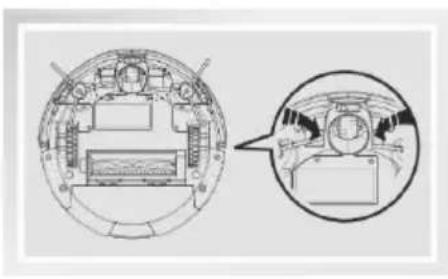
natural_image
Technical diagram of a vehicle interior showing cross-section and side view of the dashboard (no text or labels)Rezervoar za vodo
Daljinski upravljalnik
natural_image
Technical illustration showing a mechanical component being cut into a housing, with no visible text or symbols.natural_image
Technical line drawing of a mechanical component with two views (top and side), no visible text or symbolsnatural_image
Technical line drawing of a circular mechanical component with a base and mounting bracket (no text or symbols)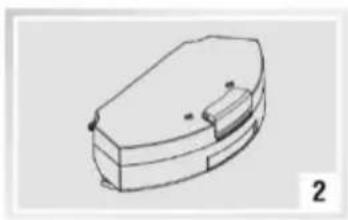
natural_image
Line drawing of a 3D object resembling a battery or casing with a small protrusion, labeled '2' in the corner (no text or symbols on the object itself)
natural_image
Technical line drawing of a mechanical assembly with multiple components (no text or symbols)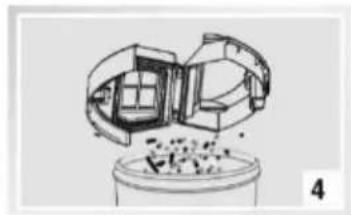
natural_image
Diagram of a mechanical assembly with internal components and particles, no visible text or symbols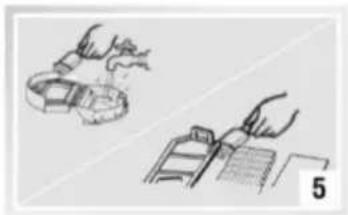
natural_image
Illustration of two hand tools: one applying a tool to a device, the other handling a tool with a grid (no text or symbols)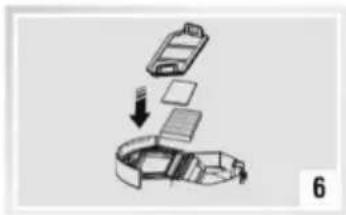
natural_image
Diagram showing a car being processed with a downward arrow, no text or symbols presentPrimarni filter
natural_image
Technical line drawing of a circular mechanical component with internal components and mounting holes (no text or symbols)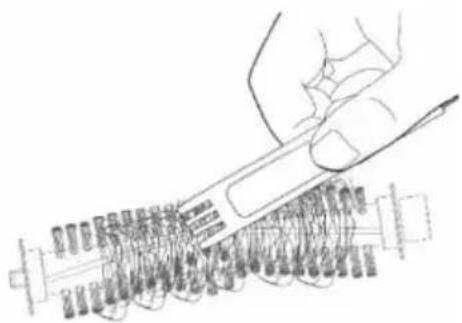
natural_image
Hand holding a pen over a coiled spring or screwdriver (no text or symbols visible)Senzorji udarca
natural_image
Technical diagram of a mechanical assembly with cross-sectional views (no text or labels)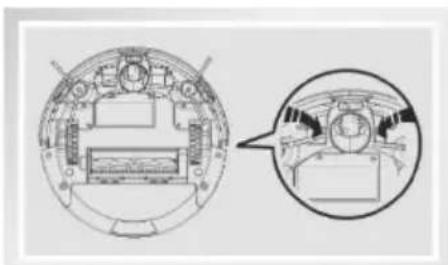
natural_image
Technical diagram of a mechanical assembly with cross-sectional view and magnified detail (no text or labels)VAŽNA SIGURNOSNA UPOZORENJA
natural_image
Technical line drawing of a vehicle chassis with labeled parts (no text or symbols present)1 Mrežica glavnog filtra
2 Spužvica za filtriranje
3 Zračni filtar visoke učinkovitosti
4 Poklopac spremnika za prljavštinu
5 Spremnik za prljavštinu
Spremnik za vodu
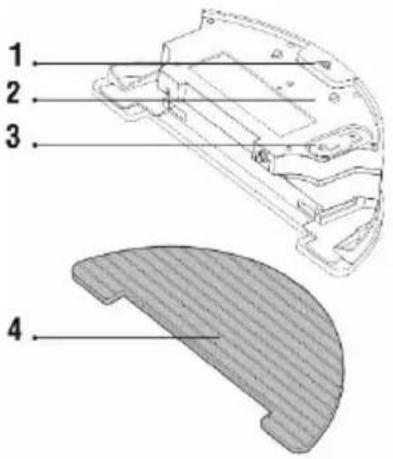
1 Gumb za vađenje spremnika iz usisavača
2 Spremnik za vodu
3 Gumeni čep
4 Krpa za brisanje
-
Za prekid/zaustavljanje usisavača ponovno pritisnite tipku „AUTO“ na gornjoj strani aparata ili tipku „7“ na daljinskom upravljaču.
-
Ako se usisavač zaustavi na dulje od 45 sekunda, automatski se prebacuje u način „Mirovanje“ i tako štedi bateriju. Tipku „AUTO“ na usisavaču neće treperiti, a tipke na daljinskom upravljaču neće reagirati. Da biste probudili usisavač, ponovno pritisnite tipku „AUTO“ na gornjoj strani
natural_image
Technical illustration showing a mechanical component being cut into a housing, with no visible text or symbols.Postavite mokru krpu za brisanje na donji dio sa spremnikom za vodu. Navlažite malo krpu za brisanje vodom za brže i neometanije brisanje. Pažljivo skidajte krpu s držača da ne biste brzim pokretom oštetiti suhu traku na čičak na držaču. Ako je krpa nakon čišćenja prljava, možete ju pažljivo oprati u vodi.
Otklopite plastični poklopac i ulijte vodu u plastični spremnik za vodu. Dodajte vodu u spremnik za brisanje vodom samo nakon što ste spremnik izvadili iz usisavača. Pri rukovanju spremnikom za brisanje vodom može doći do laganog curenja, npr. ostatka vode. U tom slučaju poliveno mjesto odmah obrišite suhom krpom. Preporučamo brisanje poda čistom vodom jer se sredstvo za čišćenje može pjeniti i tako pogoršati kapanje vode na krpu za brisanje te uzrokovati mrlje na podu nakon sušenja.
natural_image
Technical line drawing of a mechanical component with curved and flanged sections (no text or symbols)natural_image
Technical line drawing of a circular mechanical component with internal components and a directional arrow (no text or symbols)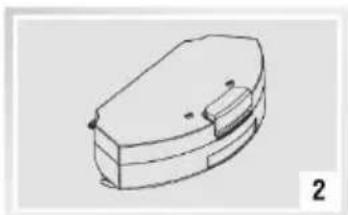
natural_image
Simple line drawing of a 3D object resembling a container or device, with no text or symbols present.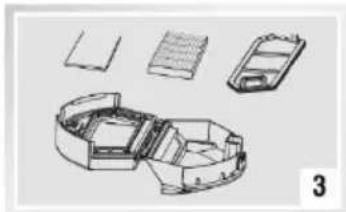
natural_image
Technical line drawing of a mechanical assembly with multiple components (no text or symbols)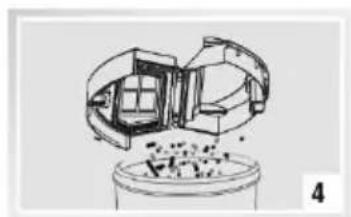
natural_image
Diagram of a mechanical assembly with internal components and particles, no visible text or symbols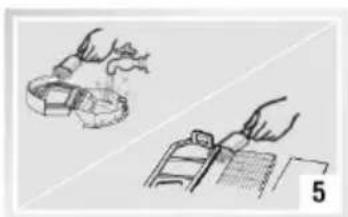
natural_image
Illustration of two hand tools: one measuring a circular object, the other measuring a rectangular object with a ruler and scale (no text or symbols)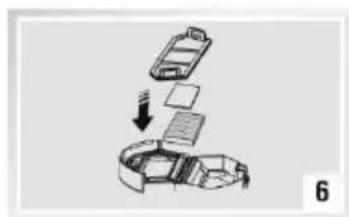
natural_image
Diagram showing a device being processed into a curved package, with no visible text or symbols.Glavni filtar
- Operite mrežicu glavnog filtra („1“) čistom vodom svakih 14 dana, osušite ju i vratite u filter.
natural_image
Technical line drawing of a circular mechanical or electrical component with internal components and mounting holes (no text or symbols)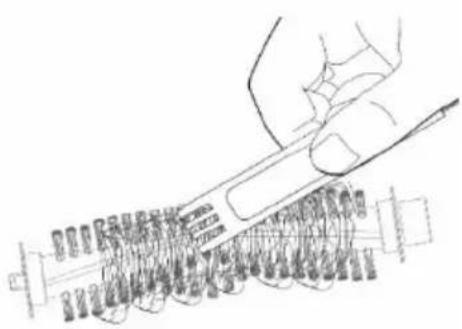
natural_image
Hand holding a pen over a coiled spring or screwdriver (no text or symbols visible)Senzori za udarce
Pazite da su senzori čisti jer tako sprečavate moguće oštećenje usisavača.
natural_image
Technical line drawing of a circular mechanical component with internal components and a magnified inset showing a detail (no text or symbols)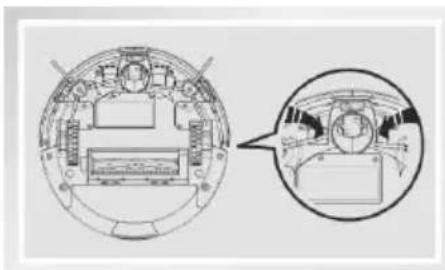
natural_image
Technical diagram of a mechanical component with cross-sectional view (no text or labels)Pazite da na središnjem kotačiću za upravljanje nema vlasi kose i prašine. Izvadite središnji kotačić za upravljanje iz usisavača i očistite senzor kretanja kotačića koji se nalazi ispod njega. Pazite i na čistoću prednjeg branika pod kojim su smješteni senzori za prepoznavanje predmeta.
Priključci za punjenje i baza za punjenje
Očistite priključe s donje strane usisavača i baze za punjenje finom mekom tkaninom.
POPIS PORUKA O POGREŠKAMA
Rezervorul de apă
Telecomanda
natural_image
Technical illustration showing two steps of assembling a mechanical component, with no visible text or symbols.natural_image
Technical line drawing of a mechanical component with curved and flanged sections (no text or symbols)ŞTERGEREA CU MOP USCAT
natural_image
Technical line drawing of a circular mechanical component with internal components and a central hole (no text or symbols)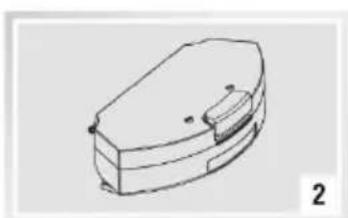
natural_image
Line drawing of a mechanical component with a base and housing (no text or symbols)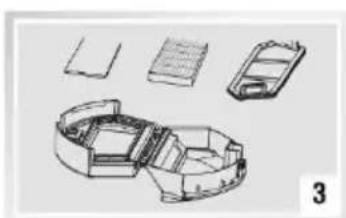
natural_image
Technical line drawing of a mechanical assembly with multiple views (no text or symbols)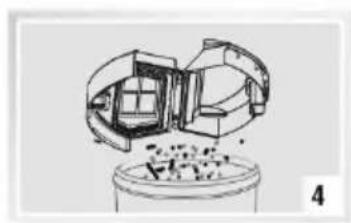
natural_image
Diagram of a mechanical assembly with internal components and a base, no visible text or symbols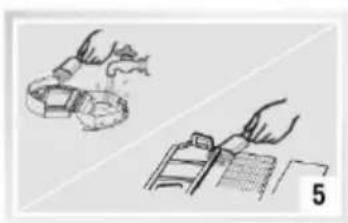
natural_image
Illustration of two hand tools: one applying a ring to a device, the other measuring a tool with a ruler (no text or symbols present)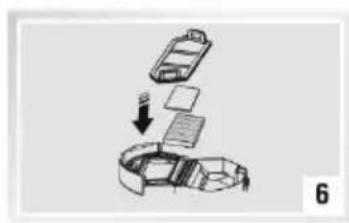
natural_image
Illustration of a car being processed with documents and a paper roll, no text or symbols presentFiltrul primar
natural_image
Technical line drawing showing internal components and a close-up of a mechanical assembly (no text or symbols)Senzori de impact
natural_image
Technical diagram of a circular mechanical component with internal components and a magnified inset showing internal structure (no text or labels)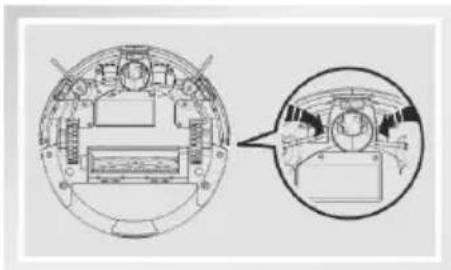
natural_image
Technical diagram of a circular mechanical component with internal components and a magnified inset showing internal structure (no text or symbols)Thank you for choosing the TESLA RoboStar T60.
Please, read the safety rules carefully and follow all common safety rules before using a robotic vacuum cleaner.
- read through the instructions for use thoroughly before using
- keep the user manual for future reference
- follow the rules stated in this manual to reduce the risk of damage to the robotic vacuum cleaner and possible injury
IMPORTANT SAFETY WARNINGS
This device is a complex electromechanical device, please, pay attention to the following guidelines:
• The appliance is intended for indoor use only at room temperature (max. 40°C).
• The appliance is not intended for outdoor use even in commercial or industrial environments.
- Use the vacuum cleaner as often as possible for the maximum cleaning effect.
• Before using, make sure that the dust bin and filter are installed correctly.
- Use only original accessories that are designed for this model.
- Only use the accessories provided by the robot vacuum cleaner to charge. Use of non-genuine accessories can damage the robotic vacuum cleaner, electric shock or fire.
- Do not touch the parts that are plugged into the mains if you have wet hands.
- Do not leave the appliance unattended in the presence of children, do not use it in the room where the baby is asleep.
- Do not allow children to use a robotic vacuum cleaner even under the supervision of an adult.
- Do not sit on a robotic vacuum cleaner or place other objects on it.
- Do not use the appliance if the power cord is damaged.
- Do not open or repair the unit, risking electric shock and loss of warranty.
- Do not use the device if you have wet hands or feet.
- Keep it out of the reach of flammable and volatile substances.
- Do not use the appliance in a warm, dusty or damp environment.
- Avoid heat radiation on the plastic surface of the device.
- Do not use it near objects with water that could damage it, for example by overflowing the water container.
- Avoid splashing the vacuum cleaner or its interior with liquid that could damage it.
- Do not clean the vacuum cleaner with water.
- The vacuum cleaner is not waterproof.
- Do not use the vacuum cleaner on a wet floor.
- Do not expose fluids, burning cigarettes, matches, combustible substances, shards, sharp objects, flour, cement, plaster, loose materials, larger pieces of paper, plastic bags or other items that can damage the vacuum cleaner
• An electrostatic charge may occur when vacuuming can be dangerous to the user.
• Inform the roommate about the use of the vacuum cleaner to avoid injury.
- Do not use appliance if its dust tank is full.
- The appliance is not intended for use on elevated places without barriers - built-in floor, stairs, balcony, furniture and more. The device is equipped with anti-fall sensors, but there may be circumstances when the control system evaluates the situation incorrectly (dirty sensor, current sensor failure, light reflection, trapped dirt, etc.) and does not prevent a fall (does not stop the device). In these cases, the seller cannot accept any claims of the buyer for such damage to the device.
- The manufacturer and importer to the European Union is not responsible for any damage caused by the operation of the device, such as injuries, scalding, fire, injury, damage to other things.
PACKAGE CONTENT
Carefully check you have unpacked all accessories, we recommend keeping the original paper box, user manual and packaging materials for the warranty period.
DESCRIPTION
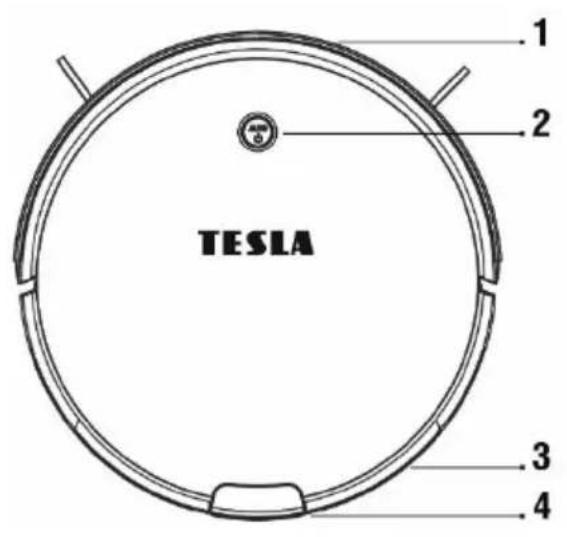
1 Front bumper
2 Start/Pause cleaning
3 Dust/water bin
4 Button to open the tray
5 Charging connectors
6 Battery cover

7 Left/Right wheel
8 Main brush unit
9 Cliff sensor
10 Nose wheel with under sensor
11 Left/Right brush
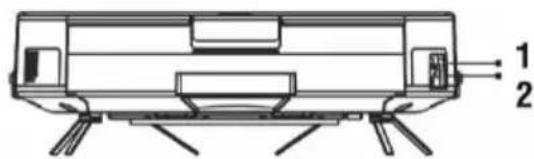
1 Charging connector
2 Power switch
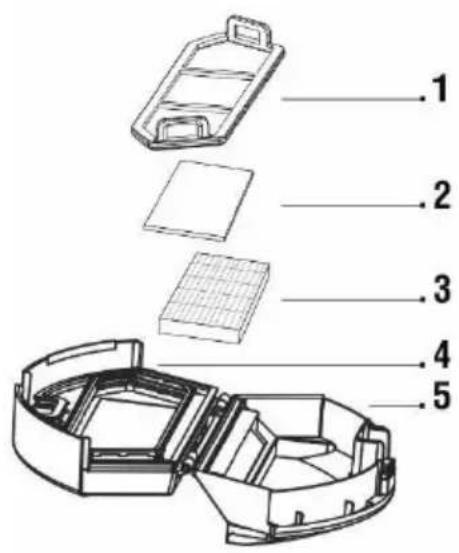
Dust tank
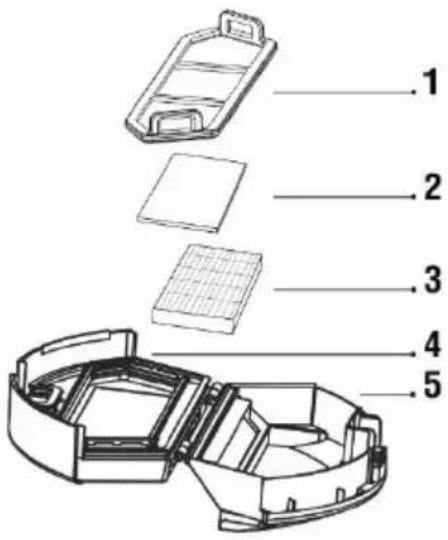
1 Primary filter
2 Sponge filter
3 HEPA filter
4 Dust bin lid
5 Dust bin
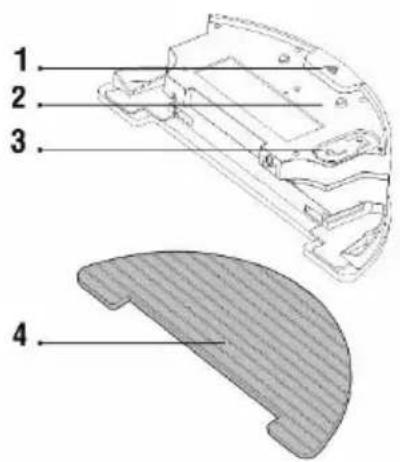
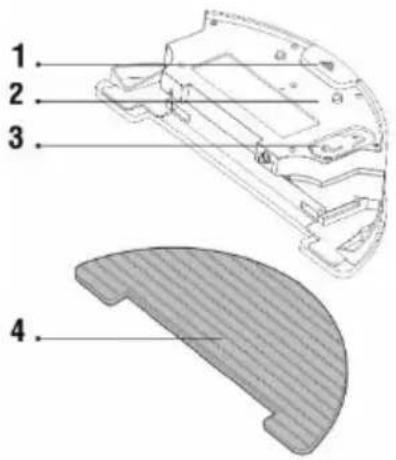
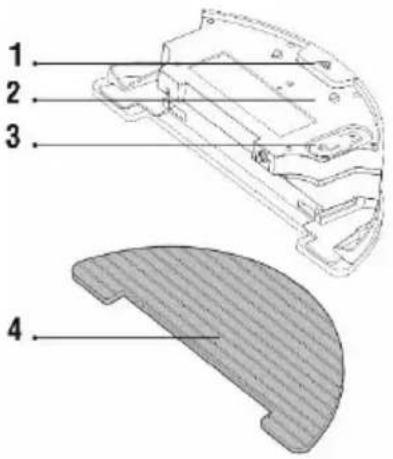
Water tank
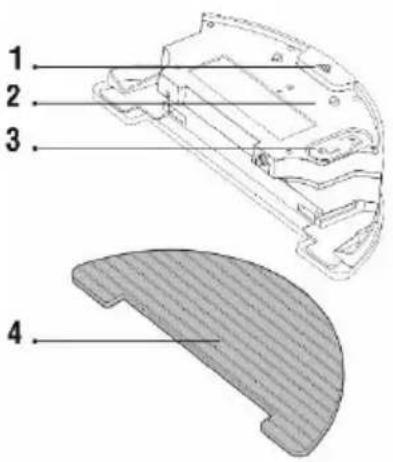
1 Water tank button
2 Water tank
3 Rubber cover
4 Mopping cloth
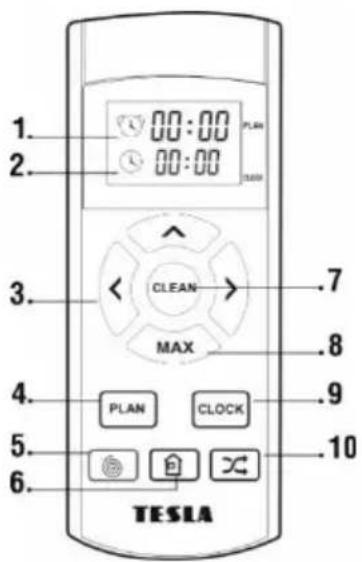
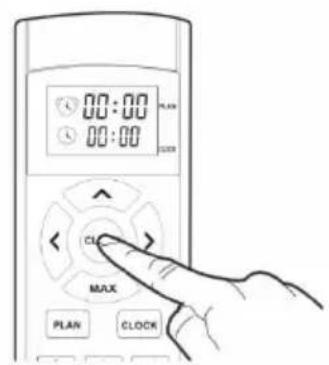
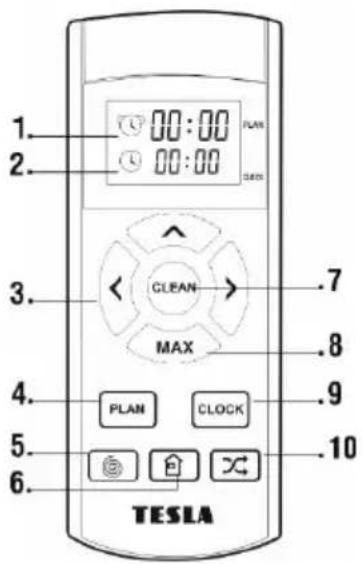
Remote control
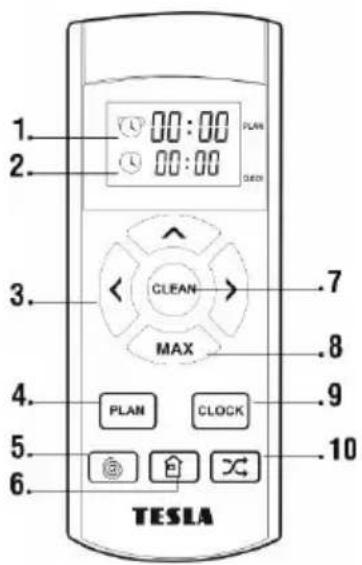
1 Schedule time
2 Current time
3 Direction button
4 Scheduled cleaning
5 Spot cleaning
6 Return to charging station
7 Start/Stop of SMART cleaning
8 Increased suction power for deep cleaning
9 Time setting
10 Automatic cleaning
REMOTE CONTROL
1 The "CLEAN" (2) button
- Start/Stop in "SMART" cleaning mode using gyroscopic navigation.
2 Directional buttons (5) and "MAX" button
Button ▲ : to increase the time value for the schedule cleaning and time setting Button ▲ : a directional button to move forward
Button „MAX“ : to decrease the time value for the schedule cleaning and time setting Button „MAX“ : a directional button to move backward
Button ◀ : to switch from setting the minutes to setting the hours for a schedule cleaning and time setting
Button ◀ : a directional button to move to the left
Button ▶ : to switch from setting the hours to setting the minutes for a schedule cleaning and time setting
Button ▶ : a directional button to move to the right
3 The "PLAN" (4) button
- Enter the "Schedule Cleaning" mode, use the directional buttons at the top half of the remote control display (HH: MM) to set the start for the schedule cleaning.
- Push the button again to confirm the "Scheduled Cleaning".
4 The "CLOCK" (9) button
- Enter the "Time Setting" mode, use the directional buttons (HH: MM).
- Push the button again to confirm the set time.
5 The "HOME" (6) button
- Push to command the vacuum cleaner to search for the charging station and start charging.
6 The "SPOT" (5) button
- Push to command the vacuum cleaner to start cleaning in circles - targeted cleaning.
7 The "AUTO" (7) button
- Push to command the vacuum cleaner to start automatic cleaning
8 The "MAX" (8) button
- Push to increase the suction power of the vacuum cleaner to the maximum power for deep cleaning. This mode is used for larger floor contamination or thorough carpet cleaning.
TURBO suction control
- Press the "CLEAN" button on the remote control twice quickly (2 beeps): Switch off turbo suction
- Press the "CLEAN" button on the remote control 3 times quickly (3 beeps): Switch on turbo suction.
Correct storage is indicated by the orange flashing of the "CLEAN" button.
Charging station
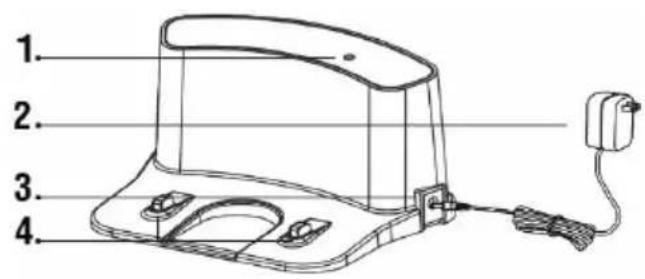
1 Power indicator
2 230 V power adaptor
3 230 V power adaptor port connector
4 Charging pins
FIRST CLEANING
- Remove all obstacles that can prevent effective cleaning.
- Also remove objects that can damage the robotic vacuum cleaner.
- The carpet must be secured so the robot cannot get on it when mopping. If the mopping pad with the water container is installed on the vacuum cleaner, it may interrupt the cleaning process or cause unwanted soaking of the carpet.
- Direct sunlight may cause a reduced sensitivity of the infrared sensors of the vacuum cleaner, please avoid direct sunlight light.
- Black furniture may not be properly detected due to the physical nature of infrared sensors. This may cause a slight impact, which will be reduced by the front bumper.
- The top of the vacuum cleaner is tempered glass. Although toughened glass is safer and stronger than standard glass, please handle it carefully so as not to scratch or break it.
CLEANING MODE - SMART CLEANING FIRST START
- This is the most common way of cleaning. The device uses advanced gyroscopic navigation and moves along a cleaning route that is optimized for the best floor cleaning.
2 Press the "AUTO" button on the top of robot vacuum or the number "7" on the remote control.
3 When activating „SMART“ cleaning, the vacuum cleaner should always be in the charging station.
4 Insert the batteries into the remote control, make sure the polarity is correct.
5 Connect the charging station to an electrical outlet with a 230 V power adapter.
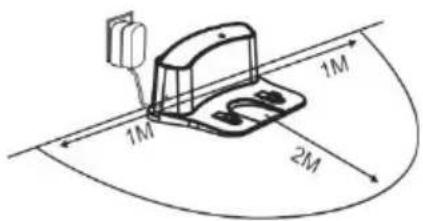
Ideal location of the charging base
There must be no obstacles within 2 meters in front and 1 meter on the sides from the charging station. The charging station must be placed on a flat surface, we also recommend to fix the station to the wall or floor with a double-sided adhesive tape. Place the power cord so it does not get entangle in the cleaning brushes of the vacuum cleaner.
A mirror or other objects with strong reflection can not be placed in the area of the charging base 15 cm above the ground. The base should not be exposed to direct sunlight.
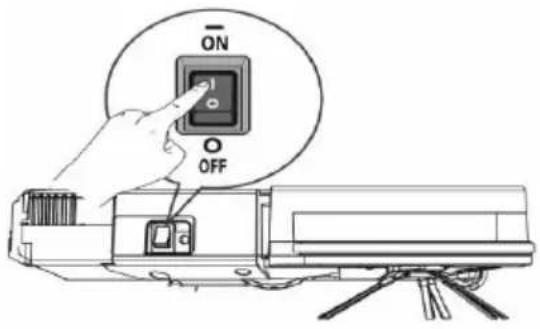
Turn ON
switch the switch to ON (I), the "AUTO" button on the vacuum cleaner lights up in green.
Turn OFF
switch the switch to OFF (0).
6 Place the vacuum cleaner in the charging station.
7 The vacuum cleaner battery will start charging automatically.
8 While charging, the "AUTO" button blinks orange colour, while the battery is fully charged, the "AUTO" button lights up in a green color.
9 Before putting the vacuum cleaner into operation, prepare the room so there are no objects on the floor that may prevent the vacuum cleaner to operate properly (bigger sheets of paper, cables, stickers, small items, inappropriately placed carpet, etc.).
10 Remove the chairs and other larger items so the vacuum cleaner can easily reach inaccessible places.
11 Switch the ON/OFF button („2“) on the on the vacuum cleaner to the ON "O" position."
12 Press the "AUTO" button on the vacuum cleaner or on the remote control button "7" to place the unit in "Standby mode".
13 To start up, press again the "AUTO" button on the top of the device or the button "7" on the remote control.
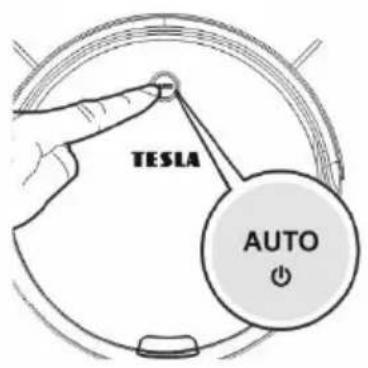
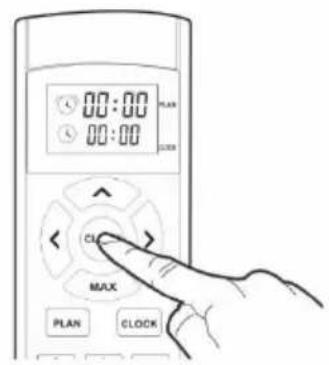
14 To stop/pause the vacuum cleaner, press the "AUTO" button on the top of the appliance or the "7" button on the remote control.
15 If the vacuum cleaner is stopped for more than 45 seconds, it automatically switches to "Sleep" mode to save the battery. The "AUTO" button on the robot will not blink and the buttons on the remote control will not respond. To wake up the vacuum cleaner press the "AUTO" button on the top of the device or push button "7" on remote control.
RETURN TO THE CHARGING STATION
After pressing the button, the vacuum cleaner searches for the charging station and starts charging.
TIME SETTING
- Push the „9“ (CLOCK) button on the remote control to enter the "Time Setting" mode
- The time will flash on the bottom line of the display.
- Use the directional buttons to adjust the time (HH: MM).
- Push the „9“ (CLOCK) button again to confirm and save the set time.
- Successful time setting will be confirmed by a beep sound on the vacuum cleaner.
SCHEDULE CLEANING
- The vacuum cleaner can be programmed to clean automatically once a day at a specified time, even when there is no one at home. The current cleaning time and time is set using the remote control.
- Make sure the "AUTO" mode button on the vacuum cleaner flashes green. If not, press the "AUTO" mode button on the vacuum cleaner or the "7" button on the remote control.
- When programming the vacuum cleaner with the remote control, point the remote toward the robot. Each step in setting the cleaning time of the vacuum cleaner with the remote will be confirmed by a beep. If the beep does not hear, the step has not been saved.
- Press the „4“ (PLAN) button on the remote control to enter the "Schedule Cleaning" mode.
- Use the directional buttons at the top half of the remote control display (HH: MM) to set the start for the schedule cleaning.
- Setting the scheduled cleaning time is possible within a 15-minute interval.
- Press the „4“ (PLAN) button again to confirm the set time of the "Schedule Cleaning".
- To erase the scheduled cleaning, set the time in the bottom line on the remote control display to "00:00" and save it.
- Successful schedule cleaning setting will be confirmed by a beep sound on the vacuum cleaner.
VIRTUAL WALL
The TESLA RoboStar T60 supports the TESLA RoboStar W20 virtual wall, which is not included in the robotic vacuum cleaner package.
The virtual wall creates an invisible wall that the robotic vacuum cleaner can not cross. You can, for example, prevent passage to the next room, prevent climbing on high-pitched carpets, protect fragile objects, or define the area with cables.
For more information visit www.tesla-electronics.eu.
WET MOPPING
After dust cleaning, the dirt container can be replaced by the water tank. For best results, we recommend using this feature in one room and then moving with wet mopping to the next room.
natural_image
Technical line drawing of a mechanical component with an arrow indicating downward motion (no text or symbols)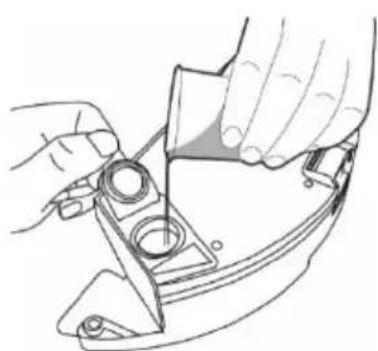
natural_image
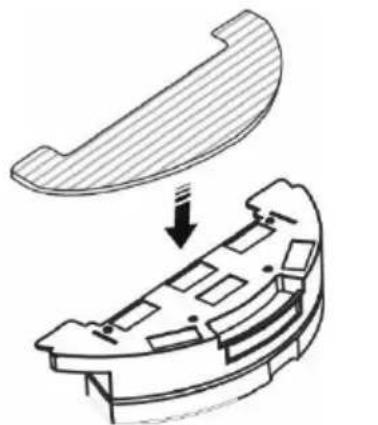
Line drawing of hands using a tool to adjust or install a mechanical component (no text or symbols visible)Install the blue mop cloth on the bottom with the water tank. Lightly dampen the mop cloth with water for faster and smoother wiping with water. When removing the mop from the holder, be careful not to damage the Velcro on the holder with a quick movement. If the mop is dirty after cleaning, you can carefully wash it in lukewarm water.
Open the plastic cover and draw water into the plastic water tank. Only add water to the wiping container after removing the container from the vacuum cleaner. When handling the wiper container, there may be a slight leakage of eg residual water. In this case, wipe the spill immediately with a dry cloth. We recommend wiping the floor with clean water, the cleaning agent may cause foaming and thus worsen the dripping of water on the mop or cause smudges on the floor after it has dried.
natural_image
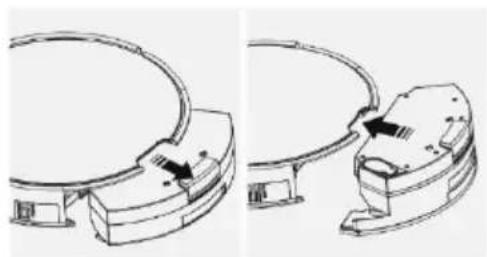
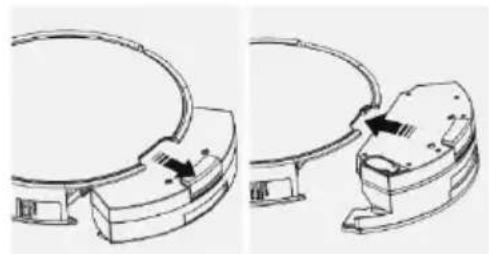
Technical line drawing of a mechanical component with curved surfaces and mounting holes (no text or symbols)Remove the dust tank from the unit and insert the water tank. Do not spill water into the vacuum cleaner or its inner part, the vacuum cleaner is not waterproof.
Press the "AUTO" button on the vacuum cleaner or "7" on the remote control to start wiping with water. In this mode, vacuuming is switched off, only side cleaning brushes work and main brush.
The water drips automatically, so do not let the vacuum cleaner stand in a place without movement or with any residual water in the water tank to prevent spillage of water on the floor.
- Do not use wet mopping on the carpet.
- Keep enough water in the water tank for water mopping.
- Remove the water tank after cleaning has finished.
- Do not charge the battery with the water tank for safety reasons.
DRY MOPPING
• Used to remove fine dust and polish the floor, use a dry mopping cloth.
- Do not use the microfiber mop for wiping on carpets and uneven surfaces.
MAINTENANCE
Wipe the top of the vacuum cleaner with a soft, dry or slightly moistened cloth. Do not use detergents to clean the surface of the top cover, you may damage the surface.
Before cleaning and maintenance, switch off the vacuum cleaner with the main switch.
Dust tank
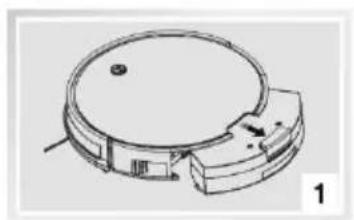
• Regularly empty the dust tray.
- The filling of the dust container greatly affects the suction power of the vacuum cleaner and the quality of the cleaning.
- Spread the contents of the magazine after cleaning into the trash.
- If you use water to clean the dustbin, carefully dry it before re-installing it in the vacuum cleaner.
natural_image
Technical line drawing of a circular mechanical component with internal components and a small protrusion (no text or symbols)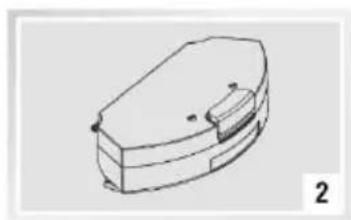
natural_image
Line drawing of a mechanical component or housing with a small protrusion and label '2' (no text or symbols on the object itself)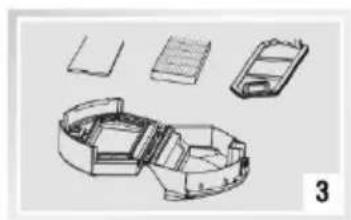
natural_image
Technical line drawing of a mechanical housing assembly with multiple components (no text or symbols)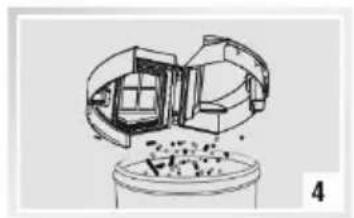
natural_image
Diagram of a mechanical assembly with internal components and a base plate (no text or symbols)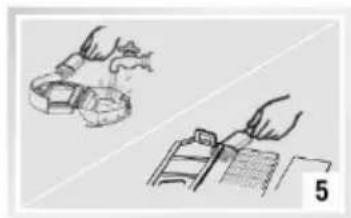
natural_image
Illustration of two hands performing a manual task with tools and a ruler (no text or symbols)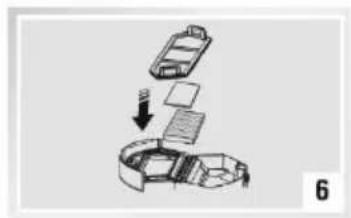
natural_image
Diagram showing a mechanical assembly with a component being lifted by a load (no text or symbols present)Primary filter
- Wash with clean water the primary filter mesh ("1") every 14 days, dry it and install it back.
HEPA filter
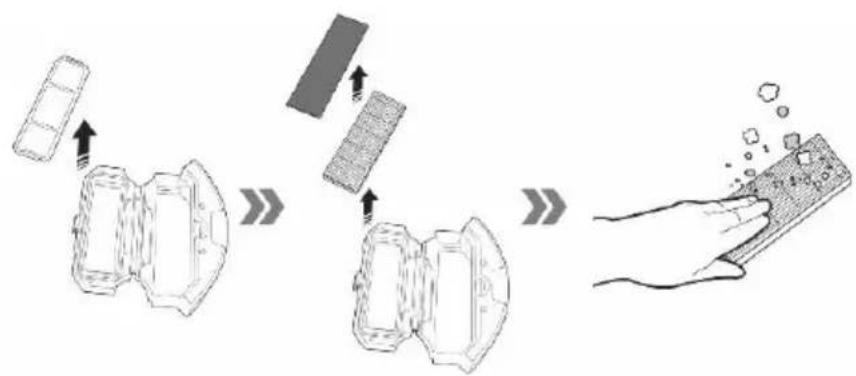
- Clean the filter every 14 days by tapping, dusting or vacuuming with a classic vacuum cleaner
- Do not wash HEPA filter with the water
• We recommend replacing the HEPA filter every 6 months - Vacuuming with a dirty HEPA filter or without an inserted HEPA filter can damage the vacuum cleaner
Water tank and mopping fabric cloth
- remove the water tank from the vacuum cleaner, pour the remaining water and let it dry - rinse and dry the mopping fabric
Center cleaning brush and side cleaning brushes
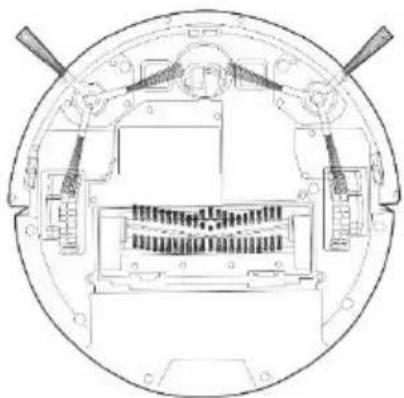
Keep a central cleaning brush without a lot of hair, dust, cotton etc.
natural_image
Technical line drawing of a mechanical assembly with internal components (no text or symbols)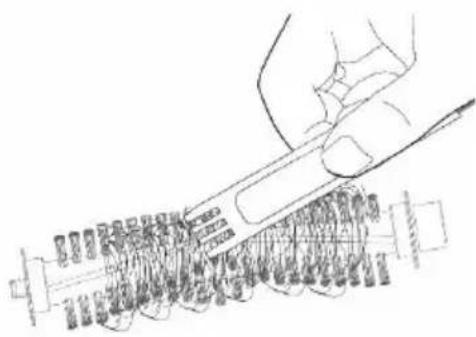
natural_image
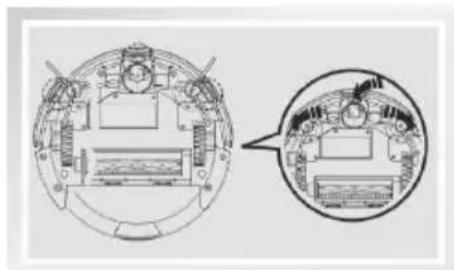
Hand holding a pen over a mechanical component with threaded pins (no visible text or symbols)Check at least once a week both side brushes together with the air intake and remove the worn hair and other dirt. Remove the side cleaning brush from the vacuum cleaner by unscrewing the crosshead screw.
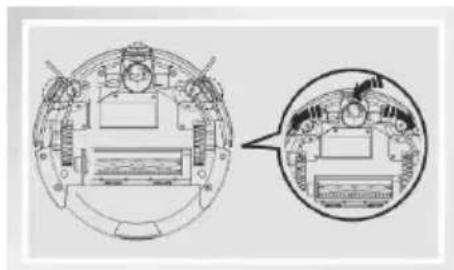
Anti-bumper sensors
Keep the sensor on bottom side clean to prevent damage to the vacuum cleaner.
Keep the nose wheel without hair and dust. Remove the nose wheel from the vacuum cleaner and clean the rotary wheel sensor located underneath it.
natural_image
Technical diagram of a circular mechanical component with internal components and a magnified inset showing internal structure (no text or labels)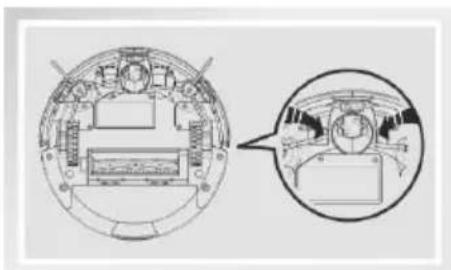
natural_image
Technical diagram of a mechanical component with cross-sectional view (no text or labels)Keep clean the front bumper underneath the sensor for detecting objects.
Charging contacts and charging base
Clean the contacts on the bottom of the vacuum cleaner and the charging base with a soft cloth.
DESCRIPTION OF STATUS
| Status | Button „AUTO“ |
| The vacuum cleaner is charging | Blinking orange light |
| The vacuum cleaner is 100% charged | Solid green light |
| The vacuum cleaner is ON and is in Standby mode | Flashing green light |
| The vacuum cleaner needs to be checked, a problem has arisen | Solid red light |
| Low battery charge | Solid orange light |
DESCRIPTION OF AUDIO SIGNALS
| Short tone | Cause | Solution |
| 1x beep | The front wheel or the side brushes do not work. | Check the front wheel and the side brushes and clean them. |
| 2x beep | Cliff sensor or front bumper sensor failure. | Clean cliff sensor and shake bumper slightly, check whether there is any obstacle. |
| 3x beep | The vacuum cleaner got jammed. | Check the front wheel and the side brushes and clean them. |
| 4x beep | Error of main center brush. | Clean the main center brush, see chapter "Maintenance". |
TROUBLESHOOTING
| Problem | Cause | Solution | |
| 1 | The vacuum cleaner battery can not be charged. | The vacuum cleaner is not properly parked in the charging base. | Ensure that the charging contacts are properly connected when parked in the charging base. |
| The charging base is not connected to the mains and the vacuum cleaner is turned on by the main switch. | The charging base should always be connected to the mains, do not switch it off. The vacuum cleaner is then always ready for further cleaning with a fully charged battery. | ||
| The battery is completely discharged. | Activate the battery. Place the vacuum cleaner manually in the charging dock, then disconnect it from the dock after 3 minutes. Repeat 3 times and then let the battery recharge normally. | ||
| 2 | The vacuum cleaner has been trapped during cleaning. | The vacuum cleaner has been trapped in a small area, the loose brushes have been drilled on the cleaning brushes, such as power cords, curtains, carpets etc. | The vacuum cleaner automatically tries to release if it is not able to clear the obstacle yourself. |
| 3 | The vacuum cleaner interrupts cleaning and prematurelyreturns to the charging base. | If the battery level drops, the vacuum cleaner switches automatically to the recharge modedock and returns to the charging base. | Normal status, let the vacuum cleaner charge to full battery capacity and start cleaning again. |
| The operating time varies depending on the floor surface, room complexity and the selected cleaning mode. | Normal state, no need to deal with. | ||
| 4 | The vacuum cleaner does not start cleaning as planned. | The vacuum cleaner is off or the battery is running low. | Turn on the vacuum cleaner and recharge the battery. |
| You did not save the planned cleaning in the vacuum cleaner's memory. | Re-enter the time and day into the vacuum cleaner's memory and make sure the vacuum cleaner is fully charged. | ||
| The vacuum cleaner is blocked. | Turn off the vacuum cleaner and clean it. | ||
| 5 | Remote control does not work (RC working range is 5 meters) | Low batteries in the remote controller. | Replace the batteries, make sure to insert the correct polarity. |
| The vacuum cleaner is not turned on or does not have a sufficiently charged battery to start cleaning. | Make sure the vacuum cleaner is on and recharge the vacuum cleaner battery. | ||
| The infrared sensor of the remote control is dirty or the infrared sensor on the vacuum cleaner is dirty. | Clean the remote control and the vacuum cleaner. | ||
| There is interference between the remote control and the vacuum cleaner. | Avoid using in the vicinity of other infrared devices. |
If the problem still occurs, check whether the battery is fully charged if it is, turn the vacuum cleaner off and on again with the main switch.
BATTERY CARE
- In case of low battery detection during cleaning, the vacuum cleaner automatically searches the charging station and starts charging
- Keep the charging station switched on continuously, if it is not turned on, the vacuum cleaner can not find it.
- If you are carrying a robotic vacuum cleaner or you will not be using it for a long time, turn it off with the main switch.
• If you do not use the device for a long time, remove the batteries from the remote control.
• High-quality battery cells that do not require formatting are used to power the vacuum cleaner. - The vacuum cleaner is equipped with a special protection that stops supplying power after charging and prevents overcharging, so the battery does not require frequent replacement.
WARRANTY REPAIR
For warranty repair, contact the dealer where you purchased the TESLA product.
The warranty DOES NOT APPLY to:
• using the device for other purposes than it was designed to
- normal wear and tear
- failure to observe the „Important safety instructions“ stated in the user manual
• electrical or mechanical damage caused by improper use
- damage caused by natural elements such as water, fire, static electricity, power surges etcetera
• damage caused by an unauthorized repair
- unreadable serial number
- the battery capacity drops after 6 months of using (6-months battery life warranty)
DECLARATION OF CONFORMITY
We, INTER-SAT LTD, org. slozka, declare that this device complies with the essential requirements and other relevant provisions of the standards and regulations relevant to the type of equipment.


This product complies with the requirements of the European Community.
When this crossed-out wheeled bin symbol is attached to a product it means that the product is covered by the European Directive 2002/96/EC. Please inform yourself about the local separate collection system for electrical and electronic products. Please act according to your local rules and do not dispose of your old products with your normal household waste. Correct disposal of your old product helps to prevent potential negative consequences for the environment and human health.
Due to the fact that the product is being developed and improved, we reserve the right to edit the user manual. You can always find the current version of the this user manual at www.tesla-electronics.eu..
Design and specification may be changed without prior notice, print errors reserved.
Adaptor information (EU) 2019/1782
| Manufacturer's name or trade mark, commercial registration number and address. | HU NAN GIANTSUN POWER ELECTRONICS CO., LTD | Ten Pao Industrial Co., Ltd. |
| Building 16, 17, Taiwan Industrial Zone, Nonferrous Metals Industrial park, 423038, Chenzhou, Hunan, China | Room 10-11, 6/F., Kwong Sang Hong Centre, 151-153 Hoi Bun Road, Kwun Tong, Kowloon, Hong Kong | |
| Model identifier | GSCV0600S012V12E | S012DBV1900060 |
| Input voltage | 100–240 V~ | 100–240 V~ |
| Input AC frequency | 50/60 Hz | 50/60 Hz |
| Output voltage | 19 V | 19 V |
| Output current | 0.6 A | 0.6 A |
| Output power | 11.4 W | 11.4 W |
| Average active efficiency | 84.05% | 84.85% |
| Efficiency at low load | 76.87% | 76.32% |
| No-load power consumption | 0.06 W | 0.057 W |
| Percentage of nameplate output current: | ||
| Load condition 1 | 100%±2% | |
| Load condition 2 | 75%±2% | |
| Load condition 3 | 50%±2% | |
| Load condition 4 | 25%±2% | |
| Load condition 5 | 10%±2% | |
| Load condition 6 | 0%±1% | |
- Snímače nárazu
- Nádoba na vodu
- Primárny filter
- Filtr główny
- A portartály részei
- A "CLOCK" (9) gomb
- Elsódleges szúró
- Rezervoar za vodo
- Daljinski upravljalnik
- Primarni filter
- Senzorji udarca
- VAŽNA SIGURNOSNA UPOZORENJA
- Spremnik za vodu
- Glavni filtar
- Senzori za udarce
- Priključci za punjenje i baza za punjenje
- Rezervorul de apă
- Telecomanda
- ŞTERGEREA CU MOP USCAT
- Filtrul primar
- Senzori de impact
- IMPORTANT SAFETY WARNINGS
- PACKAGE CONTENT
- Dust tank
- Water tank
- Remote control
- The "CLEAN" (2) button
- Directional buttons (5) and "MAX" button
- The "PLAN" (4) button
- The "CLOCK" (9) button
- The "HOME" (6) button
- The "SPOT" (5) button
- The "AUTO" (7) button
- The "MAX" (8) button
- TURBO suction control
- Charging station
- FIRST CLEANING
- CLEANING MODE - SMART CLEANING FIRST START
- Ideal location of the charging base
- Turn ON
- Turn OFF
- RETURN TO THE CHARGING STATION
- TIME SETTING
- SCHEDULE CLEANING
- VIRTUAL WALL
- WET MOPPING
- DRY MOPPING
- MAINTENANCE
- Primary filter
- HEPA filter
- Water tank and mopping fabric cloth
- Center cleaning brush and side cleaning brushes
- Anti-bumper sensors
- Charging contacts and charging base
- DESCRIPTION OF STATUS
- BATTERY CARE
- WARRANTY REPAIR
- The warranty DOES NOT APPLY to:
- DECLARATION OF CONFORMITY
Brand : TESLA
Model : RoboStar T60
Category : Vacuum Cleaner