
CSM-8 - Mixer Citronic - Free user manual and instructions
Find the device manual for free CSM-8 Citronic in PDF.


| Product Type | Compact Mixing Console |
| Brand | Citronic |
| Model | CSM-8 |
| Dimensions | 275 x 165 x 66 mm |
| Weight | 1.416 kg |
| Power Supply | 5V DC, 1A (adapter included) |
| Power Consumption | Max. 5W |
| Inputs | 6 XLR/jack combo + 1 stereo jack (L/Mono, Right) |
| Mic Input Impedance | 2 kOhms |
| Line Input Impedance | 20 kOhms |
| Instrument Input Impedance | 1 MOhms |
| Gain Range | -14 to +40 dB |
| High EQ | ±15 dB at 80 Hz |
| Low EQ | ±15 dB at 12 kHz |
| Phantom Power | +48V, individually switchable (XLR inputs only) |
| Frequency Response | 20 Hz - 20 kHz (±0.5 dB) |
| THD+N | <0.03% @ 1 kHz |
| Dynamic Range | 102 dB |
| Stereo Crosstalk | 92 dB |
| Outputs | Left + Right balanced XLR |
| Max Output Level | 3 Vrms |
| Output Impedance | 120 Ohms |
| Bluetooth Version | 2.1 + EDR |
| USB Playback Formats | mp3, wma, ape, flac |
| Recording Format | mp3 (48 kHz, 128 kbps) |
| Cleaning | Use soft dry or slightly damp cloth; soft brush for controls; no solvents |
| Safety | Do not expose to rain or moisture; no user-serviceable parts; ensure proper earthing |
| Spare Parts | No user-serviceable parts; refer servicing to qualified personnel |
| Package Contents | Mixing console, mains adaptor, user manual |
Frequently Asked Questions - CSM-8 Citronic
User questions about CSM-8 Citronic
0 question about this device. Answer the ones you know or ask your own.
Ask a new question about this device
Download the instructions for your Mixer in PDF format for free! Find your manual CSM-8 - Citronic and take your electronic device back in hand. On this page are published all the documents necessary for the use of your device. CSM-8 by Citronic.
USER MANUAL CSM-8 Citronic
Caution: Please read this manual carefully before operating Damage caused by misuse is not covered by the warranty
Introduction
Thank you for choosing a CSM compact mixing console as part of your professional sound system. This product has been developed to provide a wide range of facilities for professional and reliable sound reinforcement. Please read and keep this manual to achieve the best results from your purchase and avoid damage through misuse.
Package Contents
• CSM compact mixing console
- Mains power adaptor
- User manual
If you find any accessory is missing or the product has arrived with any problems, please contact your retailer at once. This product contains no user-serviceable parts, so make no attempt to try to fix or modify this item yourself as this will invalidate the warranty. We recommend you keep the original package and proof of purchase for any possible replacement or return issues.
Warning
To prevent the risk of fire or electric shock, do not expose any of the components to rain or moisture. Avoid impact or heavy vibration to any of the components.
No user serviceable parts inside - refer servicing to qualified service personnel.
Safety
- Please observe the following warning conventions

CAUTION: RISK OF ELECTRIC SHOCK DO NOT OPEN


This symbol indicates that dangerous voltage constituting a risk of electric shock is present within this unit

This symbol indicates that there are important operating and maintenance instructions in the literature accompanying this unit.
- Ensure that the correct mains lead is used with adequate current rating and mains voltage is as stated on the unit
- Avoid ingress of water or particles into any part of the housing. If liquids are spilled on the console, stop using immediately, allow the unit to dry out and have checked by qualified personnel before further use
• Do not cover or obstruct cooling vents

Warning: this unit must be earthed
Placement
- Keep the console out of direct sunlight and away from heat sources.
- Do not place heavy objects on top of the control surface
- Allow adequate space for air-flow and keep the console away from damp or dusty environments.
Cleaning
• Use a soft dry or slightly damp cloth top clean surfaces of the console
• A soft brush can be used to clear debris from between controls without damaging them
- To avoid damage, do not use solvents to clean the components
Console layout
Each CSM compact mixing console has a bank of mono input channels which can accept a balanced microphone input or switchable line/instrument input. There is also a stereo input for playback devices or line level instruments.
All preamps have studio grade, low noise architecture for the cleanest possible path throughout the signal chain. Console layout is set out in distinct sections to simplify operation.
The following pages of this manual are divided up into these stages to explain the details and function of each control.
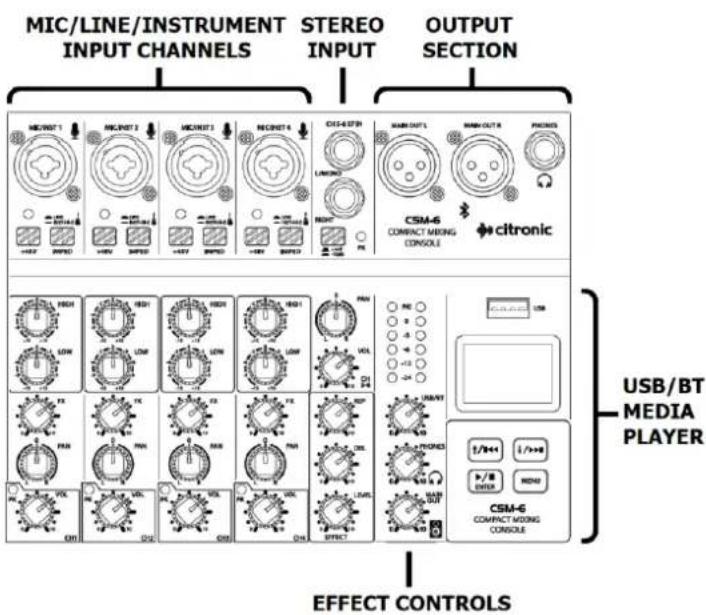
Channel inputs
Channel inputs are provided as XLR or 6.3mm jack on combo sockets.
If an XLR is plugged in, this will be connected as low impedance (microphone) level.
If a 6.3mm plug is used, this will be connected as either line or instrument level (switchable)
The connections for these inputs are assigned as follows.
Mic / Line / Instrument input
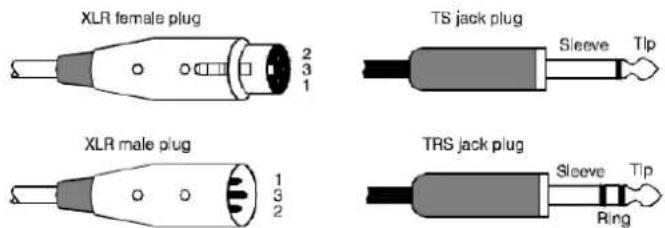
- Combo input
Connect a balanced microphone via XLR connection or a line level or instrument input via 6.3mm plug.
An unbalanced XLR can be connected provided
that +48V phantom power is not used. Wired as follows.
| Balanced | Pin 1 = Ground | Pin 2 = Signal + | Pin 3 = Signal - |
| Unbalanced | Pin 1 = Ground | Pin 2 = Signal + | Pin 3 = Ground |
-
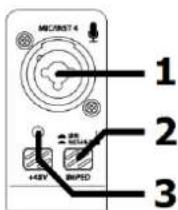
IMPED switch Press this button in to set the input impedance to instrument level or leave the button in the up position for a line level input. (instrument level is usually for pickups, such as those on a guitar. Electronic keyboards usually produce a line level output)
-
+48V phantom Press this button in to enable +48V phantom power to the XLR and the LED indicator will light. This provides power to some condenser microphones and DI boxes.
Do not use with unbalanced XLR connectors. This does not affect any jack inputs.
Channel controls
-
HIGH EQ This control can boost or cut the high frequencies by ±15dB (12 o'clock position is zero)
-
LOW EQ This control can boost or cut the low frequencies by ±15dB (12 o'clock position is zero)
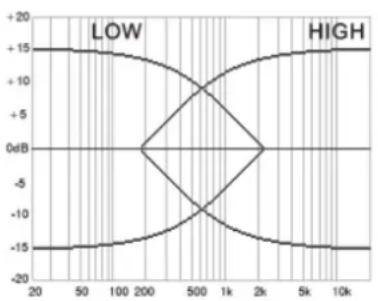
line
| x | y | | ---- | ----- | | 20 | +15 | | 50 | +15 | | 100 | +15 | | 200 | 0dB | | 500 | -15 | | 1k | -15 | | 2k | -15 | | 5k | -15 | | 10k | -15 |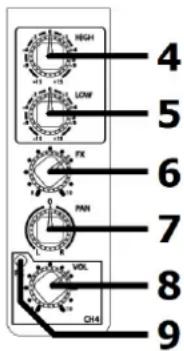
- FX This control regulates the amount of the channel signal that is fed to the digital delay effects section, varying the amount of delay effect (see Digital Delay below)
- PAN PAN is short for Panoramic, meaning the position that the signal appears in the stereo field. Moving the control clockwise fades the signal over to the right-hand output and moving the control anticlockwise fades the signal over to the left-hand output.
- VOL VOL is short for Volume. Moving this control clockwise increases the level of the signal to the output section.
- Peak LED The peak LED will light when the channel is overloaded. Take care to only allow this to happen very briefly on the loudest parts of the audio or not at all. If this LED lights continually for any length of time, reduce the input level, channel volume or EQ until it only lights momentarily.
Stereo input
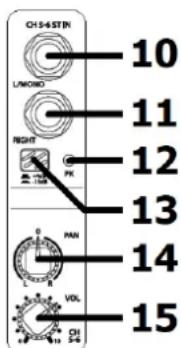
- L/MONO Line level 6.3mm jack input. mono if connected alone or left side if right side input is connected
- RIGHT Line level 6.3mm jack input for right side of stereo input
- Peak LED The peak LED will light when the channel is overloaded. Take care To only allow this to happen very briefly on the loudest parts of the audio or not at all. If this LED lights continually for any length of time, reduce the input level, channel volume or EQ until it only lights momentarily.
- Level switch Sets the line input level to -10dB if pressed in or +4dB if not pressed in.
- PAN PAN is short for Panoramic, meaning the position that the signal appears in the stereo field. Moving the control clockwise fades the signal over to the right-hand output and moving the control anticlockwise fades the signal over to the left-hand output. In the case of the stereo input, this will act like a balance control between left and right.
- VOL VOL is short for Volume. Moving this control clockwise increases the level of the stereo signal to the output section.
Digital delay
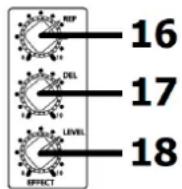
The internal effects section comprises a digital delay, which adds fast or slow fading repeats to the mono inputs with the amount of signal fed to the effects section determined by the FX control on each channel. This is useful for echo and slap-back effects for vocals and instruments.
- REP REP is short for Repeats, which controls the number of fading echo repeats and hence the duration of the effect.
- DEL DEL is short for Delay, which controls the length of time between each Repeat, changing the nature of the effect from slap-back to echo.
- LEVEL Controls the overall amount of delay effects mixed to the main output.
Output section
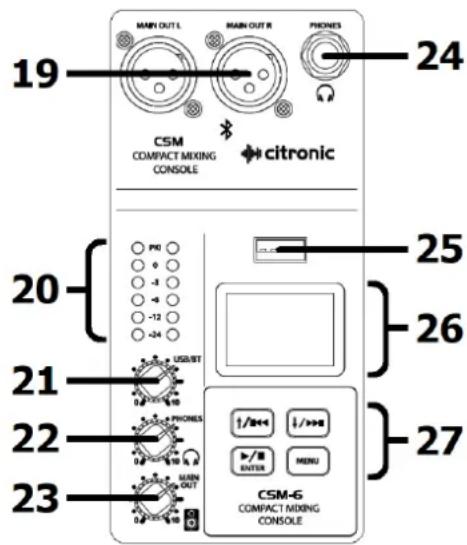
- MAIN OUT Left and Right main balanced line outputs via XLRM connectors to be fed onto amplification or recording equipment.
- VU Meters Left & Right LED main out level indicators.
- USB/BT Controls the level of the internal USB player or Bluetooth receiver to the main outputs.
- PHONES Controls the volume of the main output to the headphones socket.
- MAIN OUT Master level control for MAIN OUT L + R.
- PHONES 6.3mm stereo headphones jack output.
- USB port Connect a USB pen drive to this port for playback of stored audio files or to record the main output in mp3 format to the USB device.
- Display LCD display to show the mode and status of the USB/BT player.
- Media controls Press this button to enter the player menu

Press this button to play or pause current track or select an option

Press to navigate to previous track/option or hold for volume down

Press to navigate to next track/option or hold for volume up
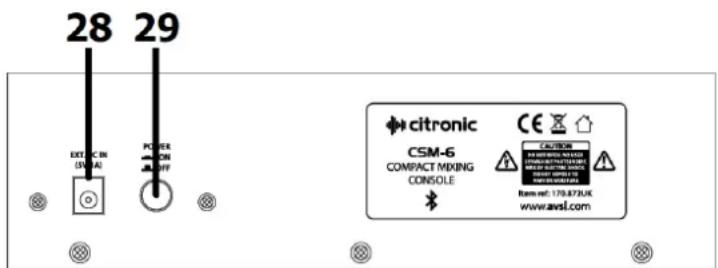
Rear Panel
- EXT DC IN 5.5 x 2.1mm DC jack input for 5V power adaptor
- POWER Power on/off button
Operation
Connect microphones to the Mic / Line / Instrument combo inputs (1) via XLR, ensuring that the +48V button (3) is pressed in for any condenser microphones or D.I. boxes that require phantom power to operate.
For line or instrument inputs (such as electric guitar), connect these via 6.3mm jack plug to the combo inputs (1), ensuring that the IMPED button (2) is pressed in if it is a Hi-Z instrument. (Hi-Z means high impedance, such as guitar pickups)
For stereo line level signals, such as CD or mp3 players, computer sound cards or electronic keyboards, connect these via 6.3mm jack plug to the stereo inputs (10, 11) or if the input device is mono, just connect to the L/MONO input (10)
If headphones are to be used for monitoring the main output, connect these to the PHONES 6.3mm stereo jack (24) and turn the PHONES control (22) down fully before listening through the headphones, gradually turning this control up to the required level to avoid damage to hearing.
(this control is pre-master fader, which means that it can also be used as an independent output) Finally, connect the MAIN OUT L + R XLR outputs (19) to the receiving amplifier or recording device.
Connect the supplied 5Vdc plug-in adaptor to the EXT DC IN jack (28) on the rear panel and the plug-top to a suitable mains outlet, ensuring the correct mains supply voltage. Turn the MAIN OUT control (23) fully down and press in the POWER button (29) on the rear panel and the LCD display (26) will light.
Check the output of any channel by starting with its VOL (8, 15) and FX (6) turned fully down. HIGH and LOW EQ controls and the PAN control should all be set in the mid position (12 o'clock). Turn up the MAIN OUT or PHONES (23, 22) up and listen whilst playing the signal (or speaking into the microphone) and increasing its VOL gradually. Stop when the desired output level is reached.
Avoid aiming the microphone or instrument pickup towards the loudspeaker(s), which can cause feedback, which is a loud whistling or howling sound caused when a mic hears its own output.
To adjust the tone characteristics of a Mic / Line / Instrument input signal, the high and low frequency content can be individually cut or boosted using the HIGH and LOW EQ controls (4, 5) Turning clockwise from 12 o'clock boosts the frequencies and turning anticlockwise cuts them.
Use these controls to make dull sounds clearer or reduce the harsh nature of some inputs. Boosting these too much can increase the chance of feedback, whereas cutting can sometimes help to reduce feedback, so experimentation is often necessary.
Adjust the PAN control towards left or right as desired. It is sometimes beneficial to bias individual channels to different sides of the stereo field to give separation and allow more detail in the mix.
Adding some echo effect to a mic or instrument can give a sense of dimension. To add the effect, turn the delay LEVEL control up (18) and gradually increase the FX control (6) on the input channel. Adjust REPEAT and DELAY controls (16, 17) to create the desired time characteristics for the effect.
USB/BT Player
The CSM mixers have an inbuilt digital USB audio player section combined with a Bluetooth receiver. If no USB device is inserted, the display will state "NO DEVICE" To step through the USB/BT player options, press the MENU button. Use the ◀ and ▶ buttons to navigate the 5 options: BT (Bluetooth), MSC (Music), REC (Record), PC and SYS (System). (PC is not currently functional on the CSM mixers – this is for future development)
USB Playback
To initiate playback of audio files from a USB pen drive, insert the pen drive into the USB port (25). Playback should start automatically. If not, press the Play/Pause button or remove the USB drive and check that the files stored are either .mp3, .wma, .ape or .flac format before re-inserting the drive.
During playback, the display will show the file name, elapsed time, playback mode and track number. Output to the main mix and/or headphones is controlled via the USB/BT control (21). To navigate through the tracks stored on the device, press the Previous ◀ and Next ▶ buttons. Press and hold the Previous or Next button to decrease or increase the media player volume.
Press the Play/Pause button ▶ / Ⅱ to temporarily stop or resume the current track.
Press the MENU button to see playback options for USB and use ◀ and ▶ buttons to select an option.
PLAY MODE: Select All Play, One Device, One Play or Random and press ▶ / Ⅱ to confirm.
All Play will play through all tracks stored on the USB drive and repeat.
One Device will play all tracks stored in the current folder and repeat.
One Play will repeat the current track.
Random Play will play through all tracks on the USB drive in a random order.
EQ Mode: Select Normal, Rock, Pop, Classic, Jazz or Country tone profile and press ▶ / Ⅱ to confirm.
Disk Root: Select root of device or individual folders stored on the device for playback
Delete File: Press ▶ / II to delete the current file from the device
Bluetooth Mode
To connect a smart phone or tablet to the CSM mixer via Bluetooth, firstly make sure no USB device is connected (USB takes priority over Bluetooth) and press the MENU button. Use the ◀ and ▶ buttons to navigate to BT (Bluetooth) and press ▶/Ⅱ to select. The display will show Bluetooth mode. Enable Bluetooth on the sending device and select to pair with a device called "Citronic".
Once paired and connected, the display will state "BLUETOOTH CONNECT" and "BT PAUSE" if a track is stopped or "BT PLAY" if a track is playing. The transport buttons ▶/Ⅱ, ◀◀ and ▶◀ will control tracks on the sending device as they would for a USB track.
Record Function
Insert a USB pen drive which is formatted to FAT32 in order to record the main output onto it. If there are any audio files already stored on the USB device, they will begin to play automatically. Press and hold the MENU button and this will enter the recording mode in a paused state.
Press ▶ / Ⅱ to begin recording and ▶ / Ⅱ to pause or continue. Hold ▶ / Ⅱ to stop and store the file. The recording will be stored as an mp3 file named "FILE****.mp3" where **** is the track number. Each recorded file will be stored onto the USB media in a folder named "JL_REC".
System Menu
Backlight Press ▶ / ∥ to select "Backlight" and use ◀◀ and ▶◀ to choose the time-out value for the display backlight - 10sec, 30sec, 1min, 5min, 10min or never. This is the time of no activity before the display backlight automatically switches off and then will switch on again when any button is pressed.
Contrast Press ▶ / □ to select "Contrast" and use ◀ and ▶ to choose the balance of LCD to backlight. This helps to set the optimum clarity of the display for reading.
Specifications
| Model | CSM-4 | CSM-6 | CSM-8 |
| Power supply | 5Vdc 1A (adaptor included) | ||
| Power consumption max. | 5W | ||
| Inputs | 2 XLR/jack + 1 stereo jack | 4 XLR/jack + 1 stereo jack | 6 XLR/jack +1 stereo jack |
| Gain | -14 to +40dB | ||
| EQ: high | ±15dB @ 80Hz | ||
| EQ: low | ±15dB @ 12kHz | ||
| Phantom power | +48V individually switchable (XLR inputs only) | ||
| Input impedance: mic | 2k Ohms | ||
| Input impedance: instrument | 1M Ohms | ||
| Input impedance: line | 20k Ohms | ||
| Audio source | Internal USB player/recorder & Bluetooth receiver | ||
| Audio format | USB playback mp3, wma, ape, flac / record mp3 (48kHz 128kB/s) | ||
| Bluetooth version | 2.1 + EDR | ||
| Frequency response | 20Hz - 20kHz (±0.5B) | ||
| THD +N | <0.03% @ 1kHz | ||
| Dynamic range | 102dB | ||
| Crosstalk: stereo | 92dB | ||
| Output | Left + Right balanced XLR | ||
| Output impedance | 120 Ohms | ||
| Max. output level | 3Vrms | ||
| Dimensions | 166 x 165 x 66mm | 220 x 165 x 66mm | 275 x 165 x 66mm |
| Weight | 0.89kg | 1.17kg | 1.416kg |
System block diagram
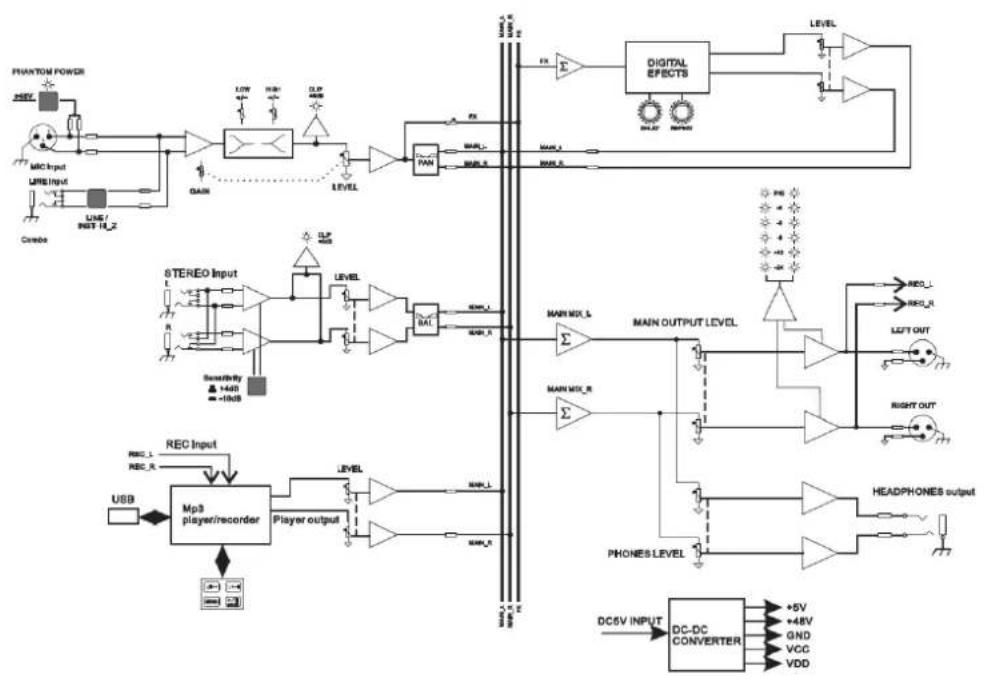
flowchart
graph TD
    A["PHANTOM POWER"] --> B["MFC Input"]
    B --> C["LINE/INST H_LZ"]
    C --> D["Gain"]
    D --> E["Level"]
    E --> F["TAN"]
    F --> G["Digital EFFECTS"]
    G --> H["LEVEL"]
    H --> I["Main OUTPUT LEVEL"]
    I --> J["REC_L"]
    I --> K["REC_R"]
    I --> L["LEFT OUT"]
    I --> M["RIGHT OUT"]
    I --> N["HEADPHONES OUTPUT"]
    O["USB"] --> P["Rec.1, REC_R"]
    P --> Q["Mp3 player/recorder"]
    Q --> R["Player output"]
    R --> S["LEVEL"]
    S --> T["MAN_L"]
    T --> U["MAN_R"]
    U --> V["MAIN MIX_L"]
    V --> W["MAIN MIX_R"]
    W --> X["PROCES LEVEL"]
    X --> Y["Headphones"]
    Y --> Z["DC-DC CONVERTER"]
    Z --> AA["+5V, +48V, GND, VCC, VDD"]
    AB["STEREO Input"] --> AC["Sensitivity: 14dB = -10dB"]
    AC --> AD["LEVEL"]
    AD --> AE["DAL"]
    AE --> AF["MAIN MIX_L"]
    AF --> AG["MAIN OUTPUT LEVEL"]
    AG --> AH["REC_L"]
    AG --> AI["REC_R"]
    AG --> AJ["LEFT OUT"]

- Introduction
- Package Contents
- Warning
- Safety
- CAUTION: RISK OF ELECTRIC SHOCK DO NOT OPEN
- Warning: this unit must be earthed
- Placement
- Cleaning
- Console layout
- Channel inputs
- Mic / Line / Instrument input
- Channel controls
- Stereo input
- Digital delay
- Output section
- Rear Panel
- Operation
- USB/BT Player
- USB Playback
- Bluetooth Mode
- Record Function
- System Menu
Brand : Citronic
Model : CSM-8
Category : Mixer