CM10-LIVE - Mixer Citronic - Free user manual and instructions
Find the device manual for free CM10-LIVE Citronic in PDF.


| Product Type | Compact mixing console with USB/SD player and delay effect (LIVE model) |
| Brand | Citronic |
| Model | CM10-LIVE |
| Stock Code | 170.803 |
| Power Supply | 12Vac 1000mA adapter (included) |
| Phantom Power | Switchable +48V via XLR inputs |
| Frequency Response | 20Hz - 20kHz |
| Mono Inputs (XLR/jack) | 8 XLR/jack combo inputs (bal/unbal) |
| Stereo Inputs | 6.3mm jack and RCA (unbal, -8 to +15dB / +13 to +60dB parallel) |
| EQ per Channel | 3-band (Low: 50Hz ±15dB, Mid: 700Hz ±15dB, High: 10kHz ±15dB) |
| Main Outputs | 6.3mm jack L+R (+28dBu balanced / +22dBu unbalanced) |
| Aux, Eff, Rec Outputs | Unbalanced 6.3mm jack (+22dBu) |
| Phones Output | +15dBu stereo 6.3mm jack |
| USB/SD Player | Playback of compressed digital audio files (LIVE models only) |
| Internal Delay Effect | DELAY and REPEAT controls, EFFECT output defeat jack |
| Dimensions (W x D x H) | 430 x 230 x 60 mm |
| Weight | 3.08 kg |
| Rack-Mountable | Yes (rack ears supplied) |
| Cleaning | Use soft cloth with neutral detergent; soft brush for debris; avoid solvents |
| Safety | Keep from rain/moisture; use correct adapter; no user-serviceable parts inside |
| Reparability | No user-serviceable parts; refer all servicing to qualified personnel |
Frequently Asked Questions - CM10-LIVE Citronic
User questions about CM10-LIVE Citronic
0 question about this device. Answer the ones you know or ask your own.
Ask a new question about this device
Download the instructions for your Mixer in PDF format for free! Find your manual CM10-LIVE - Citronic and take your electronic device back in hand. On this page are published all the documents necessary for the use of your device. CM10-LIVE by Citronic.
USER MANUAL CM10-LIVE Citronic
CM-series compact mixing consoles
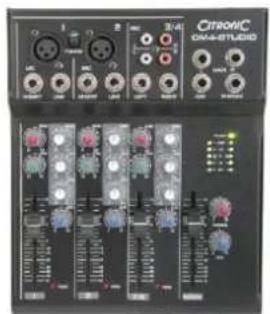
CM4-LIVE (170.800) CM4-STUDIO (170.810)
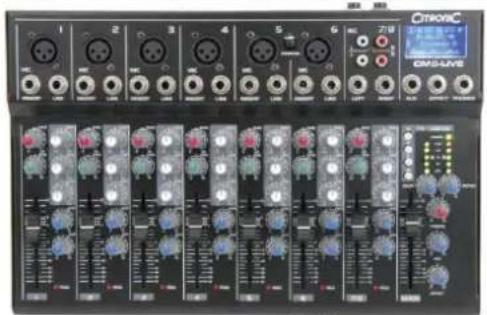
CM6-LIVE (170.801)
CM8-LIVE (170.802) CM8-STUDIO (170.812)
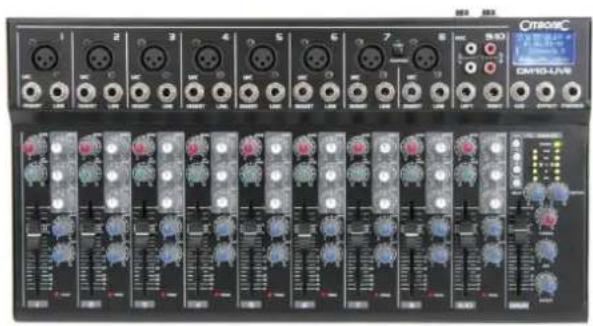
CM10-LIVE (170.803)
User Manual
natural_image
Front panel of a CMY0-UV8 audio recording device showing multiple audio channels and knobs (no readable text or symbols)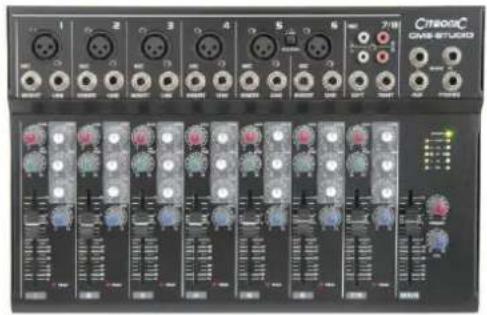
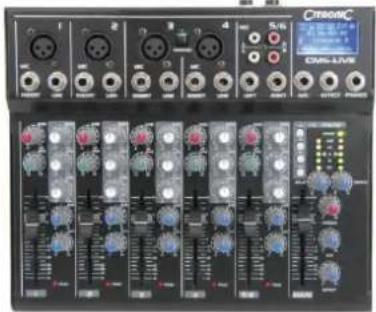
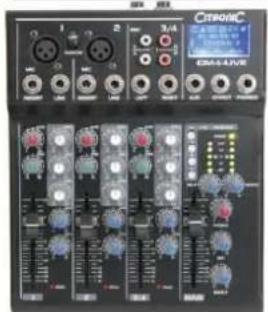
Features:
• 4 "LIVE" models with USB/SD player and delay effect
• 2 "STUDIO" models with USB audio input/output
• 3-band EQ per channel
• +48V phantom power
- 8 and 10 channel models are rack-mountable
• Channel inserts for mono inputs
- AUX feed from each channel
Introduction:
Thank you for choosing a Citronic CM series mixer. This product has been designed to offer reliable, high quality mixing for stage and/or studio applications with unfailing consistency. In order to gain the best results from this equipment and avoid damage through misuse, please read and follow these instructions and retain for future reference.
Warning:
To prevent the risk of fire or electric shock, do not expose any of the components to rain or moisture.
If liquids are spilled on the surface, stop using immediately, allow unit to dry out and have checked by qualified personnel before further use.
Avoid impact, extreme pressure or heavy vibration to the unit.
There are no user serviceable parts inside the mixer – refer all servicing to qualified service personnel.
Safety
• Check that the supplied adapter and connectors are in good condition and the mains supply voltage is correct.
• Ensure signal leads are of good condition without shorted connections (especially when using phantom power)
- Do not use the USB connector as a general purpose power source or charger.
• Do not allow any foreign particles to enter the console through connectors or control apertures
Placement
- Keep out of direct sunlight and away from heat sources.
- Keep away from damp or dusty environments.
- When rack-mounting, (CM8-LIVE, CM10-LIVE, CM8-STUDIO) use rack ears supplied, securing firmly.
- Ensure adequate access to controls and connections, including USB/SD player on rear panel (CM-LIVE)
Cleaning
- Use a soft cloth with a neutral detergent to clean the casing as required
- Use a soft brush to clear debris from the control surface
- Do not use strong solvents for cleaning the unit.
Control Panel
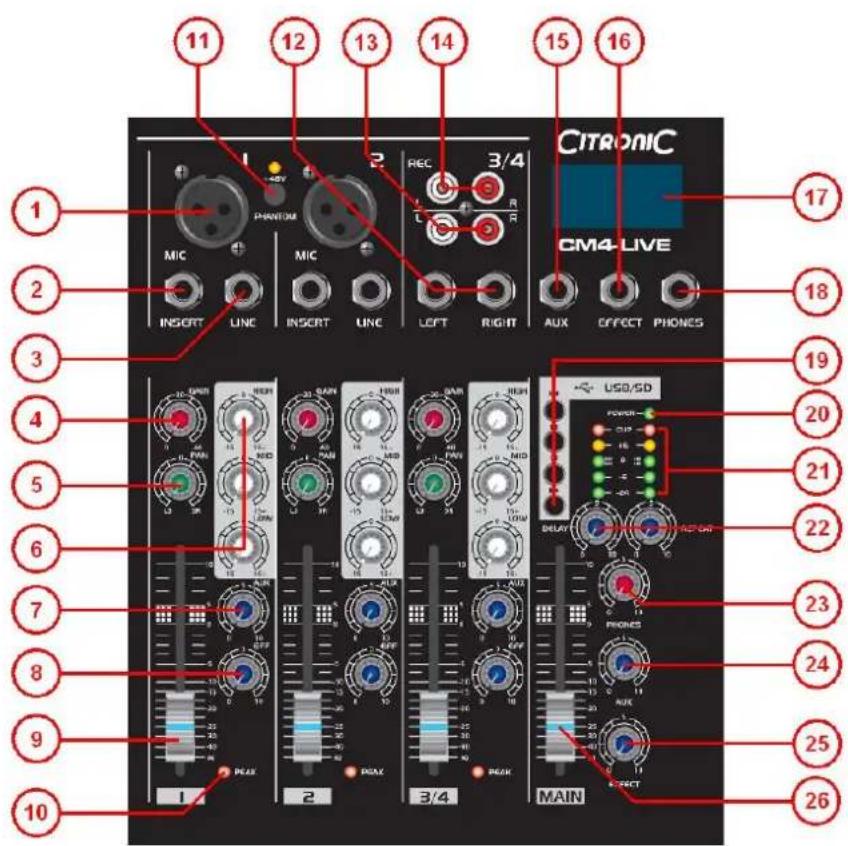
- XLR MIC input
- Channel INSERT - TRS 6.3mm jack
- LINE input 6.3mm jack
- Channel GAIN rotary
- PAN (L-R balance) control
- 3-band EQ (HIGH/MID/LOW) controls
- Channel AUX output level
- EFF rotary – internal delay or EFFECT out (CM-LIVE)
- Channel volume fader
- Channel PEAK LED
- +48V phantom power switch
- Stereo channel line input - 2 x 6.3mm jack
- Stereo channel line input - 2 x RCA
- REC output - record out on 2 x RCA
- AUX output - 6.3mm jack
- EFFECT output - 6.3mm jack (overrides Delay effect)
- USB/SD player display (CM-LIVE)
- PHONES output - stereo 6.3mm jack
- USB/SD player transport controls (CM-LIVE)
- Power LED
- VU and CLIP LEDs for L + R output
- DELAY and REPEAT controls (CM-LIVE)
- PHONES output level
- AUX output level
- EFFECT output level (CM-LIVE)
- MAIN fader - master volume control
Rear Panel
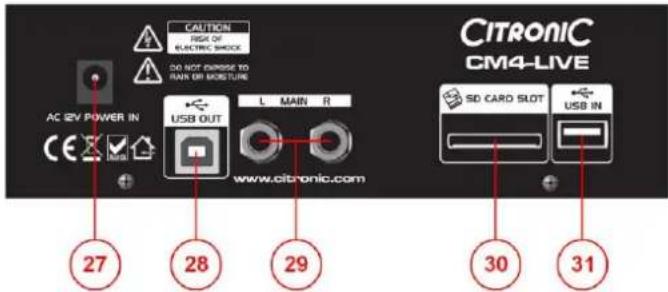
- 12Vac power input (adapter supplied)
- USB type B - output/monitoring input (CM-STUDIO only)
- L + R main output (on top control panel for CM-STUDIO)
- SD card slot (CM-LIVE only)
- USB type A input (CM-LIVE only)
Connection
Before connecting to amplifier or other equipment, turn down all volume controls to avoid loud noises which may cause damage to other equipment. Always switch amplifier power on last in line with volume levels down.
Using good quality 6.3mm jack leads (balanced or unbalanced), connect L + R outputs from the mixer to the amplifier, recorder or whichever equipment is to receive the main mix output.
If phantom power is to be used, press the "+48V" switch in.
Connect microphones, DI boxes and other balanced low impedance audio inputs to the mono channels using a quality XLR lead.
Connect high impedance and line level signals to the mono inputs using a 6.3mm jack lead.
For the stereo channel, connect left and right line level signals via 6.3mm jack or RCA leads (unbalanced).
Channel inserts may be connected to individual processing equipment like EQ or compressors. These connections completely interrupt the signal flow and divert to the external processor before returning to the channel for volume adjustment via the channel fader. This requires a stereo to 2 x mono jack lead – the 2 mono ends are send and return connections, the stereo connection is wired as per below.
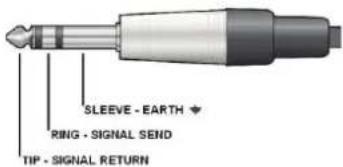
Recording equipment can be connected via the "REC" outputs using a twin RCA lead and the 6.3mm jack AUX output can be connected to monitoring or external processing equipment if required. Individual levels can be adjusted to the AUX output via the individual channel AUX controls.
For CM-LIVE models, if the internal delay effect is not required, a send can be connected from the "EFFECT" jack output to and external effect unit, whereby the EFF channel controls act as individual level controls to the EFFECT output (same as for AUX output)
With all faders down, connect the supplied AC adapter to the 12Vac input and to the mains supply (ensure correct supply voltage) – the power LED will illuminate (if phantom power is selected, this LED should light also)
Checking
Test each channel's gain level by making the loudest expected sound into it and increasing the GAIN control until the red PEAK LED starts to light. Then back the GAIN off slightly until the PEAK LED hardly lights at all.
Test the main mix output by increasing the MAIN fader and selected channel faders whilst making sound through the channel(s) - the L + R output LED ladders should begin to show the output as it varies up and down.
Connecting a pair of headphones to the PHONES stereo 6.3mm jack is a good way of checking the mix output, remembering to gradually increase the PHONES level control.
Turn down all faders and then switch power on to connected equipment (amplifier last in line) and increase volume levels. Gradually increase MAIN and channel faders again and the sound should be heard through the speakers or be indicated on the recording equipment.
Operation
Each channel has a 3-band EQ (LOW/MID/HIGH), which can be used to balance the mix of frequencies and emphasise certain aural characteristics in the signal. Adjust these as required, noting that and overall increase may require an equivalent reduction of the GAIN control to compensate (otherwise clipping may occur from EQ boost).
Use the PAN control to position the channel input either to the left or right side of the stereo field. This can be useful to help separate and define sounds within a mix but be aware that extreme settings can be counter-productive by removing the channel from certain listening positions.
Use the AUX control to feed the correct amount of the channel signal to the AUX output. This routing is “Pre-fader” and is independent from the channel fader setting.
For CM-LIVE models, there is an EFF control, which feeds a part of the signal to the internal delay effect. Overall controls for DELAY (time between repeats) and REPEAT (number of repeats) are on the right-hand side of the control surface - these can be adjusted as required. An EFFECT control adjusts the overall level of the delay effect.
If external effects are to be used, plugging a jack lead into the EFFECT output defeats the internal delay effect and acts as a mono line level "send" to the external effect unit. The output(s) from the external unit will need to be "returned" via a mono or stereo channel and added to the mix, whereby the channel fader takes the place of the overall EFFECT level control.
Channel faders should be used to adjust the individual levels in the mix and the MAIN fader is for overall level. Turn down amplifier levels when changing any connections or powering down the mixer to avoid speaker damage.
USB features
For the CM-LIVE models, The USB and SD card connection is for the internal media player, which can offer playback of compressed digital audio files through the stereo channel. When a USB pen drive or SD card with such files on is connected via the rear panel, the player recognises this and automatically begins playback through the stereo channel. The player status is indicated by a small backlit LCD screen, as shown below...
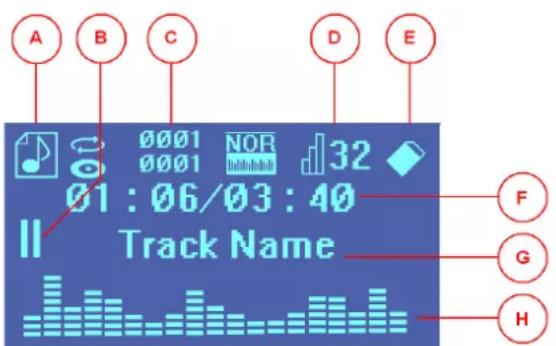
A. Indicates media type (music/audio)
B. Indicates Play status (Play / Pause)
C. File / Folder indication
D. Bit resolution of file
E. Media source (USB / SD card)
F. Elapsed / Total track time
G. Track name
H. Spectrum output display
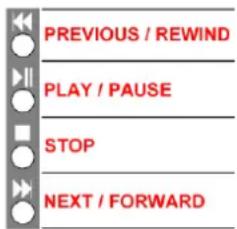
Transport controls allow navigation through tracks on the memory device. These are outlined below...
For CM-STUDIO models, connecting a USB A to B lead from the rear panel USB connector to a USB port on a PC or Mac computer allows audio to be transferred between the mixer and computer. The PC or Mac will recognise the CM-STUDIO mixer as an external USB audio device and the mixer can be selected as an audio source within recording software and as an output to the mixer, received as a main mix return. The firmware offers plug-and-play compatibility with Windows XP/Vista/7 and OS/X onward.
| SPECIFICATIONS | ||||||
| Model | CM4-LIVE | CM6-LIVE | CM8-LIVE | CM10-LIVE | CM4-STUDIO | CM8-STUDIO |
| (Stock Code) | (170.800) | (170.801) | (170.802) | (170.803) | (170.810) | (170.812) |
| Power Supply | 12Vac 1000mA (included) | |||||
| Phantom Power | Switchable +48V (XLR inputs) | |||||
| Frequency Response | 20Hz - 20kHz | |||||
| Mic/Line inputs (bal/unbal) | 2 x XLR/jack | 4 x XLR/jack | 6 x XLR/jack | 8 x XLR/jack | 2 x XLR/jack | 6 x XLR/jack |
| Stereo Input (unbal) | 6.3mm jack/RCA (-8 to +15dB / +13 to +60 parallel) | |||||
| SNR: Mic Inputs | 120dB E.I.N. | |||||
| SNR: Line Inputs | 95dB E.I.N. | |||||
| SNR: Stereo Input | 96dB E.I.N. | |||||
| EQ: High | 10kHz, ±15dB | |||||
| EQ: Mid | 700Hz, ±15dB | |||||
| EQ: Low | 50Hz, ±15dB | |||||
| Outputs: Main (L + R) | 6.3mm jack (+28dBu balanced / +22dBu unbalanced) | |||||
| Aux, EFF, REC out | unbalanced 6.3mm jack (+22dBu) | |||||
| Phones Output | +15dBu stereo 6.3mm jack | |||||
| Dimensions (mm) | 60 x 190 x 230 | 60 x 270 x 230 | 60 x 350 x 230 | 60 x 430 x 230 | 60 x 190 x 230 | 60 x 270 x 230 |
| Weight | 2.09kg | 2.42kg | 2.75kg | 3.08kg | 2.09kg | 2.42kg |
Troubleshooting
| No power LED on control panel | Ensure power adapter is working and connected properly |
| Ensure mains outlet voltage is as stated on adapter | |
| Power LED is on but no other LEDs and no output | Check input signals and condition of connection leads |
| Check jack is connected to input and not channel insert | |
| Check GAIN is not too low on channel input | |
| Check channel fader is not fully down | |
| Check MAIN fader is not fully down | |
| Disconnect channel insert (if used) and check for correct wiring | |
| For condenser mics, turn down MAIN fader and check phantom is on | |
| Power light and output LEDs lighting but no output | Check output connections to amplifier or recorder |
| Check amplifier or recorder levels are not turned fully down | |
| USB/SD player will not play audio from media (CM-LIVE models only) | Press PLAY on transport controls |
| Check memory device is connected properly (remove and re-insert) | |
| Check file types - standard compressed digital audio files required | |
| Check memory device works on a PC or Mac for standard playback | |
| USB device not recognised by PC or Mac (CM-STUDIO models only) | Check version and/or updates for operating system |
| Follow on-screen trouble-shooter or diagnostics in Windows or OS | |
| Check USB connection (disconnect then reconnect USB lead) | |
| Seek advice from your PC or Mac operating system provider | |
| Output is very loud or distorted | Check level of input signal is not too high |
| Reduce channel GAIN and EQ settings | |
| Reduce channel and MAIN faders levels | |
| Ensure Hi-Z line level input(s) not connected via XLR | |
| Check output levels of equipment connected via channel inserts | |
| Check AUX and EFFECT level controls and reduce if necessary | |
| Check for high gain recording of media files on USB/ SD (CM-LIVE) | |
| Check input gain level on recorder or recording software | |
| Output is working but at very low level | Check input audio source level is not too low |
| Ensure low impedance line or mic signal is not connected via jack | |
| Increase channel GAIN control and EQ settings if turned down | |
| Increase channel and MAIN faders levels | |
| Check output levels of equipment connected via channel inserts | |
| Check for quiet recording of media files on USB/ SD (CM-LIVE) | |
| Check input gain level on recorder or recording software | |
| Feedback (loud squealing or howling from mics) | Face microphone away from speakers and monitors |
| Reduce channel GAIN level and EQ level(s) | |
| Reduce AUX and/or EFFECT levels | |
| Reduce channel and/or MAIN fader levels |
Note: for further troubleshooting, refer equipment to qualified service personnel for testing


Brand : Citronic
Model : CM10-LIVE
Category : Mixer