
STX3CL1 - Dishwasher SMEG - Free user manual and instructions
Find the device manual for free STX3CL1 SMEG in PDF.


User questions about STX3CL1 SMEG
0 question about this device. Answer the ones you know or ask your own.
Ask a new question about this device
Download the instructions for your Dishwasher in PDF format for free! Find your manual STX3CL1 - SMEG and take your electronic device back in hand. On this page are published all the documents necessary for the use of your device. STX3CL1 by SMEG.
USER MANUAL STX3CL1 SMEG
- Description of the controls ____ 2
- Operating instructions 13
- Cleaning and maintenance 30
- Troubleshooting 37
Thank you for choosing one of our products.
You are advised to read this manual carefully; it contains all the information you need use your dishwasher safely, correctly and in the most satisfactory manner.
Following the cleaning instructions provided here will keep your dishwasher's performance at peak levels in the long term.
USER INSTRUCTIONS: these consist of recommendations for using the appliance, a description of its controls and of the correct cleaning and maintenance procedures.
1. Description of the controls
1.1 Upper panel
All the dishwasher controls are grouped on the upper panel. Switch-on, programming, switch-off, etc. procedures are only possible when the door is open.

text_image
2 3 4 5 9 8 7 6 1The panel shown is only a guideline example: the form of the lights and buttons may vary depending on the model.
| 1 | ON/OFF BUTTONPress this button to switch the dishwasher on/off. |
| 2 | SELECTED PROGRAM INDICATOR LIGHTS Illumination of this light denotes the program selected and the occurrence of a fault (troubleshooting). |
| 3 | PROGRAM SELECTION BUTTONUsed to select the washing program required. |
| 4 | SALT WARNING LIGHTIllumination denotes a regenerating salt warning level. |
| 5 | RINSE AID WARNING LIGHTIllumination of this light denotes a rinse aid warning level in the tank. |
| 6 | PROGRAM DELAY BUTTONPress this button to delay the start of the program. |
| 7 | INFORMATION DISPLAY (1 or 3 digits depending on model) |
| 8 | OPTIONS (on some models only) |
| 9 | CHILD SAFETY DEVICE (on some models only) |
 |  | Information displayed | ||
| no Scheduled program duration | yes | |||
| no Remaining program time | yes | |||
| 1 - 9 hours Delayed start 1 - 24 hours | ||||
| E Error message | Err | |||
<>
Depending on the model, this zone may contain one or more of the following options, identified by the relative symbols and described in more detail in the relevant sections of the manual.
It is not possible to select any options when the soak program is being used. All options except "Flexi Tabs" are disabled at the end of the wash cycle. To disable the "Flexi Tabs" option, press the relative button (the light goes out).

Flexi Tabs
Flexi Tabs
Option recommended for the use of multi-function tablet detergent.

Hyclean
HYCLEAN
Adds a final antibacterial rinse to the selected program.
Flexi Zone
Spread HALF LOAD WASH
Allows washing of just a few dishes placed in both baskets.

Delay
PROGRAM DELAY
Allows the program to be set to start with a delay of 9, 12 or 24 hours depending on the model.

QuickTime
QUICK TIME OPTION
Select this option together with any washing program (except the soak program) to SHORTEN the cycle.

EnerSave
ENERSAVE
Indicated option for save energy.
PROGRAMS TABLE
The manual contains the programs table for several models. To find the table for your dishwasher, compare the program symbols at the top of the table with those on your control panel.

text_image
2 3 4 5 9 8 7 6 1SETTING THE WASHING PROGRAM AND SWITCHING ON
After identifying the most suitable program with the aid of the programs table:
- Press the ON/OFF button (1) and wait for the PROGRAM INDICATOR LIGHT (2) to illuminate:
- Keep pressing the PROGRAM SELECTION button (3) until the indicator light corresponding to the desired program illuminates;
- select the option required (if any and if the model provides options);
- close the door; after about 2" the program will start LIGHT will flashing (indicating that the program is being executed).
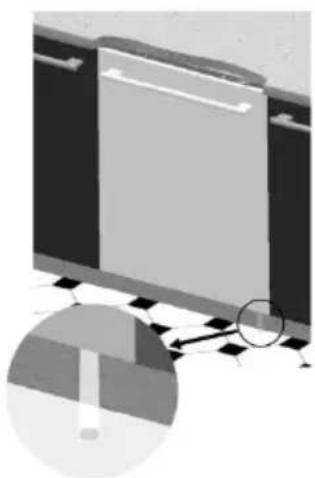
PROGRAM IN PROGRESS INDICATOR LIGHT (on some models only)
When a program is running, a flashing light is projected onto the floor under the right-hand corner of the door. At the end of the program, the light goes out to reduce sleep mode electricity consumption.
natural_image
3D rendering of a mechanical component with a circular inset showing a highlighted section (no text or symbols visible)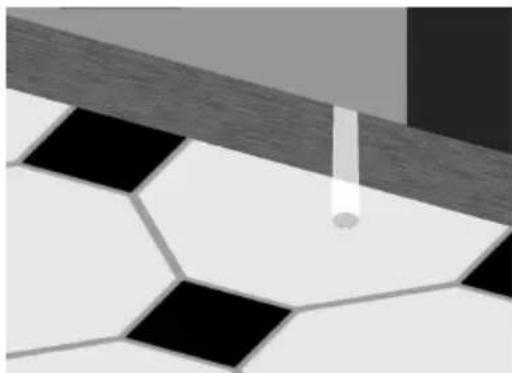
natural_image
Abstract geometric pattern with black and white hexagonal tiles and a vertical line (no text or symbols)PROGRAMS TABLE
 |  | Eco |  |  | |
| PROGRAMME NUMBER & SYMBOL | LOAD CROCKERY AND CUTLERY | PROGRAM PROGRESS | DURATION | CONSUMPTION | |
| MINUTES (1) | WATER LITRES | POWER KWh (1) | |||
| 1 SOAK | Pans and dishes awaiting completion of the load | Cold prewash | 15 | 3,5 | 0,02 |
| 2 GLASSES | Glass, china and mixed dishes with light dirt. | Wash at 45°C Cold rinse Rinse at 70°C Dry | 140/70 (3) | 9,5 | 1,10 |
| 3 (*) ECONOMICAL Eco EN 50242 | Dishes with normal dirt, even with dried-on residues | Wash at 45°C Cold rinse Rinse at 55°C Dry | **/135 (3) | ** | ** |
| 4 AUTOMATIC Auto 45°-65° IEC/DIN*** | Pans and dishes with normal dirt, even with dried-on residues. | When the "AUTO" program is selected, the dishwasher recognises the type of dirt and automatically adjusts the washing parameters as appropriate. | |||
| 5 ULTRA CLEAN **** | Very dirty pans and dishes, even with dried-on residues. | Hot prewash Wash at 70°C Cold rinse (2) Rinse at 70°C Dry | 155 | 15,5 | 1,70 |
IMPORTANT: see “NOTES AND REFERENCES” table on the following pages.
The ULTRA CLEAN program terminate with an extra anti-bacteria rinse that ensures a further reduction in the bacteria level. If the temperature falls during this stage of the program (e.g. because the door is opened or due to a power blackout), the program lights flash to warn that the anti-bacteria effect is not guaranteed.

If the dishwasher door is open or not properly closed, the washing cycle will not start.
QUICK TIME PROGRAMS
(see relevant section for explanation of functioning modes)
| PROGRAMME NUMBER E SYMBOL | LOAD CROCKERY AND CUTLERY | PROGRAM PROGRESS | DURATION | CONSUMPTION | |
| MINUTI (1) | WATER LITRES | POWER KWh (1) | |||
6 RAPID 27'  | Dishes with light dirt, washed immediately after use | Wash at 38°C Rinse at 50°C | 27 | 6,5 0,70 | |
7 QUICK DELICATE  | Delicate dishes with normal dirt. | Cold prewash Wash at 50°C Cold rinse Rinse at 70°C | 60 | 10,5 1,15 | |
8 QUICK ECO  | Dishes with normal dirt, washed immediately after use. | Cold prewash Wash at 60°C Cold rinse Rinse at 70°C | 80 | 12,5 1,25 | |
9 MIX EXPRESS 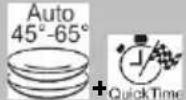 | Dishes with normal dirt, washed immediately after use. | Cold prewash Wash at 70°C Cold rinse Rinse at 70°C | 75 | 13 1,40 | |
10 FAST and STRONG  | Mixed dishes with normal dirt without dried-on residues. | Wash at 65°C Cold rinse Rinse at 70°C | 50 | 10 1,20 | |
IMPORTANT: see "NOTES AND REFERENCES" table on the following pages.

If the dishwasher door is open or not properly closed, the washing cycle will not start.
| NOTES AND REFERENCES | |
| Only run the soak program with half loads. Options cannot be used with the soak program. Enersave is activated automatically if the selected program is compatible with t option. | |
| * | Standard programme under EN 50242. The ENERSAVE option must be enabled |
| ** See information sheet provided | |
| *** | IEC/DIN reference programme. The ENERSAVE option must be enabled. |
| **** | Reference program for laboratories: Detergent: 20g in the dispenser + 10g in the door or tablet. Configuration: see photo in “Using the baskets”. |
| (1) Program consumption and duration figures have been measured in accordance with the EN 50242 standard. Values may vary depending on intake water and room temperatures and the type and quantity of dishes loaded. | |
| (2) 1 or 2 cold rinses depending on the model. | |
| (3) ENERSAVE option selected (default)/not selected | |
REFERENCES for the ENERGY LABEL supplied with the dishwasher:
- Annual energy consumption is based on 280 standard wash cycles with cold water and consumption of low-energy operating modes. Actual consumption depends on the way in which the appliance is used.
- Water consumption is based on 280 standard wash cycles. Actual consumption depends on the way in which the appliance is used.
- Information refers to the EN 50242 STANDARD programme (identified in the programmes table), which is the most effective in terms of combined energy and water consumption. The programme is recommended for dishes with a normal level of dirt.
- Drying efficiency class on a scale from "G" (minimum efficiency) to "A" (maximum efficiency).
Notice for testing institutes
Testing institutes are provided with guidelines for comparative tests (e.g. according to EN60436). If the form for the testing institutes is missing from the documentation, please request the guidelines by contacting us at the following e-mail address: dishwasher@test-domestic-appliances.com
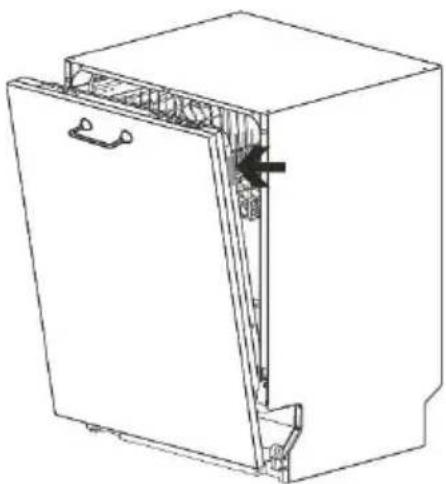
When making a request, please specify the model (MOD) and the serial number (S/N) indicated on the plate on the side of the door.
natural_image
Technical line drawing of a cabinet or enclosure with internal components and a black arrow indicating a specific part (no text or symbols present)1.2 Washing programs

Before starting a washing program make sure that:
• The water supply tap is open.
• The softener container contains regenerating salt.
- The correct amount of detergent has been added to the dispenser.
• The baskets have been correctly loaded.
- The spray arms are able to rotate freely and without obstruction.
- The dishwasher door is securely closed.
natural_image
Pure technical line drawing of a mechanical component with no text or symbols
Warning:
during the initial phase of the washing program, the operation of sprayers is not perceived because they start rotating about 5 minutes after the start. This is the normal operation of the washing cycle.

text_image
2 3 4 5 9 8 7 6 1
CHILD SAFETY DEVICE (on some models only)
Press the button to activate this device (the light comes on). When it is active, the beeper sounds three times to confirm that the door is about to open. So in this case, to open the door keep pressing until the 3rd beep, then release at once. If the pressure is continued after the third beep, the door does not open and the operation has to be repeated.
OPTION SELECTION
Options are selected by pressing the relative button by the symbol of the option required; the light comes on to confirm that the option has been activated.
- It is not possible to select any options when the soak program is being used.
- All options except "Flexi Tabs" are disabled at the end of the wash cycle. To disable the "Flexi Tabs" option, press the relative button (the light goes out).
- All options, including "Flexi Tabs" are disabled when a program is CANCELLED after it has begun.
ADDITIONAL OPTIONS
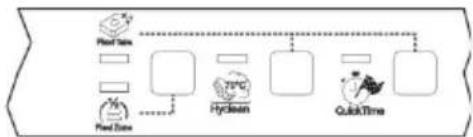
Some models feature additional options, activated by pressing two buttons simultaneously. In this case, two lines in the control panel graphics link the symbol of the additional option to the two buttons to be pressed simultaneously to enable it. (e.g. "Flexi Tabs" in this illustration)
flowchart
graph LR
    A["Read Time"] --> B["Hyd Clean"]
    C["Read Time"] --> D["QuickTime"]
    B --> E["Central Process Node"]
    D --> E
    E --> F["End"]

QUICK TIME OPTION
Select this option together with any washing program (except the soak program) to SHORTEN the cycle. To activate this option, press button (light comes on) after selecting the program required.
The option is automatically deactivated at the end of the program.

text_image
2 3 4 5 9 8 7 6 1ENERSAVE OPTION

This option further reduces energy consumption by opening the door at the end of the cycle for more effective drying. At the end of the wash an automatic device releases the door, which slowly opens by a few centimetres. This allows optimal drying even with low rinsing temperatures, for significant energy saving.
The dishwasher remains in an idle state between the rinse stage and the end of the cycle to allow proper drying (the display shows the time left until the end of the cycle). Opening the door at this stage causes the cycle to stop and ends the program.
The program end is signalled by a short beep and the flashing of the indicator lights for programs 4 and 5.
Enersave is activated automatically if the selected program is compatible with the option. It can be deactivated before the program is started.

When the function is activated, opening of the door must not be impeded in any way; do not leave anything in the necessary space in front of the door to allow it to open. Do not force the door lock before the end of the cycle is signalled, as this would damage the mechanism.

ULTRA CLEAN
The "ULTRA CLEAN" program prolongs the final hot rinse to ensure a further reduction in the bacteria level. If the temperature in the tank falls during this stage of the program (e.g. because the door is opened or due to a power blackout), the light of the option and the program lights (2) flash to warn that the additional washing phase has not been completed successfully. This does not mean that the wash program has been less effective than usual.

SPREAD HALF LOAD
Suitable when there are not many dishes to be washed, it saves energy and reduces the program duration. Place dishes in both baskets then load the detergent dispenser than less than the normal amount for a full load.

text_image
2 3 4 5 9 8 7 6 1
Flexi Tabs
Specifically for washing with combination detergents in tablets, which also contain salt and rinse aid (3in1) or other agents such as glass protector, steel rinse aids, etc. (4in1, 5in1...). When this option is selected, salt and rinse aid will not be dispensed even if the relative compartments contain them. If the containers are empty, the lights will remain on.
If the option is not provided, we recommend the use of conventional products (separate detergent, salt and rinse aid), because with conventional washing cycles, combined products might create problems such as a white deposit, poor drying results and residues left on dishes. For further information, refer to the detergent pack.
IMPORTANT:
when no longer required, the option must be deactivated by pressing the relative button (the light goes out).

These products are not suitable for use with excessively “hard” water. If the hardness level set is higher than H3, when the option is activated the relative light flashes to indicate that the product is being used incorrectly; the dishwasher will still work, but washing results may be poor.

DELAYED START
The start of the washing program can be delayed to program the dishwasher to operate at the preferred time of day (e.g. overnight). Press the PROGRAM DELAY button to activate the option and display a 1 hour delay. Keep pressing to select the delay required, which may be up to 9, 12 or 24 hours depending on the model.
When the door is closed, the appliance will prewash the dishes, after which the "program delay" set will come into effect.

text_image
2 3 4 5 9 8 7 6 1CANCELLING THE CURRENT PROGRAM
- To cancel the currently selected program open the door and hold down the PROGRAM SELECTION (3) button for a few seconds until the indicator lights for programs 4 and 5 illuminate simultaneously (marked "end").

- Close the door.
- After approximately 1 minute the dishwasher will advance to the end of cycle.
CHANGING THE PROGRAM
To change the program in progress, simply open the door and select a new program. When the door is closed the dishwasher will automatically select the new program.

TO SAVE ON ENERGY! ... AND PROTECT THE ENVIRONMENT
• Always use the dishwasher with a full load.
- Do not wash the dishes in running water.
- Use the washing program that is most appropriate for each type of load.
- Do not carry out any preliminary rinsing.
• If available, connect the dishwasher to a hot water supply up to 60^ C.
TO CUT DOWN ON DETERGENT CONSUMPTION! ... AND PROTECT THE ENVIRONMENT
The phosphates contained in dishwasher detergents are harmful to the environment. To avoid using excessive amounts of detergent and to save on electricity, observe the following:
- separate the more delicate items from dishes that are more resistant to aggressive detergents and high temperatures;
• do not pour the detergent directly on the dishes.

If the door has to be opened while washing is in progress, the program will be interrupted. The relative light will keep flashing and a beeper will signal that the cycle has not been completed. You must wait about 1 minute before closing the door to restart the program. When the door is closed the program will continue from where it was interrupted. This operation should only be carried out if strictly necessary, because it might cause problems in execution of the program.
SWITCHING OFF
At the end of the program the beeper sounds briefly and the lights of programs no. 4 and 5 (marked "end") flash.
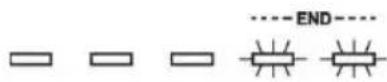
To switch off the dishwasher, open the door and press the ON/OFF button (1).
ENERGY MANAGEMENT
After 5 minutes of waiting (washing cycle completed, stopped or set but not started) the dishwasher switches to a standby state to reduce energy consumption.
In this state, the dishwasher indicator panel (lights or display depending on model) functions more slowly (switch-on once every 5 seconds).
REMOVING THE DISHES
At the end of the washing program, wait at least 20 minutes before removing the dishes, to allow them to cool. To ensure that any drops of water left in the top basket cannot drip onto the dishes still in the bottom basket, you are advised always to empty the bottom basket first.
2. Operating instructions
Once the dishwasher has been correctly installed, prepare for use as follows:
- Adjust the water softening system;
- Add the regenerating salt;
- Add the rinse aid and detergent.

2.1 Using the water softening system
The amount of scale contained in the water (water hardness index) can cause whitish staining on the dry dishes, which tend to become dull over time. The dishwasher is equipped with an automatic softening system which uses a special regenerating salt to reduce the hardness of the water.
text_image
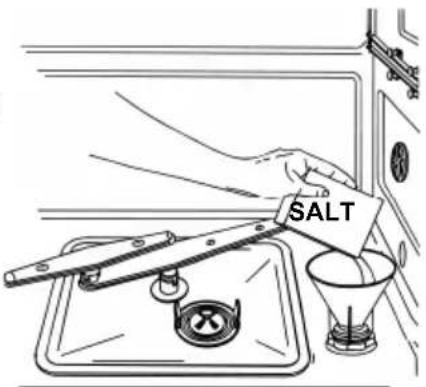
SALTWhen using water of medium hardness, the regenerating salt container should be refilled after approximately 20 washing cycles. The salt container can hold approximately 1.7 Kg of salt in grains. Some models are equipped with an optical no-salt indicator. In these models, the cap of the salt container contains a green float which descends as the salt concentration in the water drops. When the green float can no longer be seen through the transparent cap, the container must be topped up with regenerating salt. The container is situated at the bottom of the dishwasher. After removing the lower basket, unscrew the salt container cap by turning it anticlockwise and pour in the salt using the funnel supplied with the dishwasher. Before replacing the cap, remove any salt residues from around the opening.

- When using the dishwasher for the first time, in addition to the salt it is also necessary to add one litre of water to the container.
- Each time the salt container is refilled, make sure that the cap is securely closed. The mixture of water and detergent must never penetrate the salt container, as this would compromise the operation of the regeneration system. In the event of this occurring, the warranty will be invalidated.
- Only use regenerating salt specially formulated for domestic dishwashers. If using salt tablets, do not fill the container completely.

- Do not use table salt as it contains insoluble substances which, over time, may damage the water softening system.
- When necessary, refill the regenerating salt container before starting the washing program. In this way, the excess saline solution will be immediately removed by the water; the prolonged presence of salt water inside the tank may lead to corrosion.

Be careful not to confuse the salt and detergent packages; adding detergent to the salt container will damage the water softening system.
ADJUSTING THE WATER SOFTENER
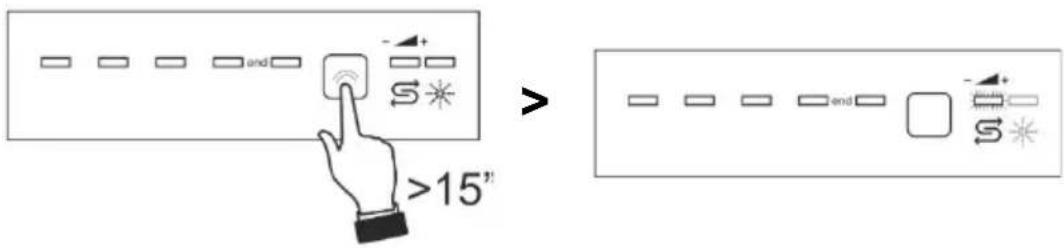
The setting can be adjusted using the PROGRAM SELECTION BUTTON (3). Keep the button pressed until the WATER HARDNESS ADJUSTMENT INDICATOR LIGHT (4) flashes. The SELECTED PROGRAM INDICATOR LIGHTS (2) indicate the current setting. Each press of the button modifies the setting according to the sequence in the following table:
text_image
and >15" >After carrying out the adjustment or displaying the current setting, if you do not touch the button for a few seconds the dishwasher will automatically exit from adjustment mode and return to the standard operating mode.
WATER HARDNESS TABLE
| WATER HARDNESS | SETTINGS | |||
| German degrees (°dH) | French degrees (°dH) | |||
| 0 – 6 0 – 11 | H0 | All lights off (no salt) |  | |
| 7 – 10 12 – 18 H1 | One light on |  | ||
| 11 – 15 19 – 27 H2 | Two lights on |  | ||
| 16 – 21 28 – 37 H3 | Three lights on |  | ||
| 22 – 28 38 – 50 H4 | Four lights on |  | ||
| 29 - 50 51 – 90 H5 | Five lights on |  | ||
Contact your local water board for information on the hardness of your water supply.
Default settings: H3 - 16-21°dH - 28-37°dF
2.2 Using the rinse aid and detergent dispensers
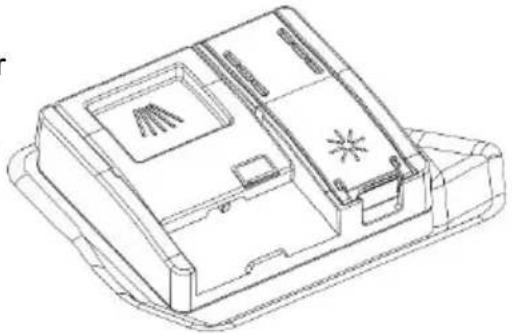
The detergent and rinse aid
dispensers are situated on the inner part of the door: the detergent dispenser is on the left, and the rinse aid dispenser is on the right.
natural_image
Technical line drawing of a device casing with internal compartments and mounting features (no text or symbols)
With the exception of the SOAK program, before every washing cycle it is necessary to add the required amount of detergent to the detergent dispenser. The rinse aid, on the other hand, should only be added as required.

ADDING THE RINSE AID
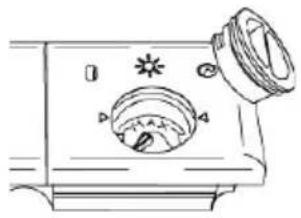
The rinse aid helps the dishes dry faster and prevents the formation of scale deposits and staining; it is automatically added to the water during the final rinse cycle, from the container situated on the inner side of the door.
natural_image
Line drawing of a washing machine with a dial and handle (no text or symbols)To add rinse aid:
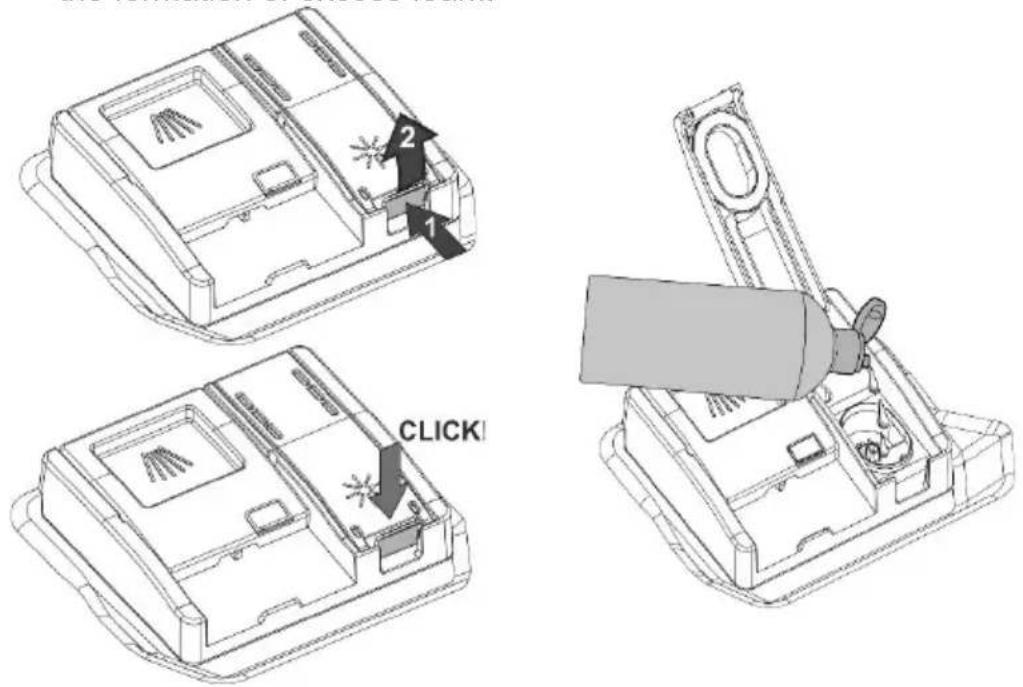
- Open the dispenser by pressing and lifting the tab on the cover.
- Fill the dispenser with rinse aid. Top up again when the rinse aid indicator light turns on.
- Close the cover, a click indicates when it is closed.
- Use a cloth to remove any spillage of rinse aid which might lead to the formation of excess foam.
text_image
2 1 CLICKADJUSTING THE RINSE AID DISPENSER MODE
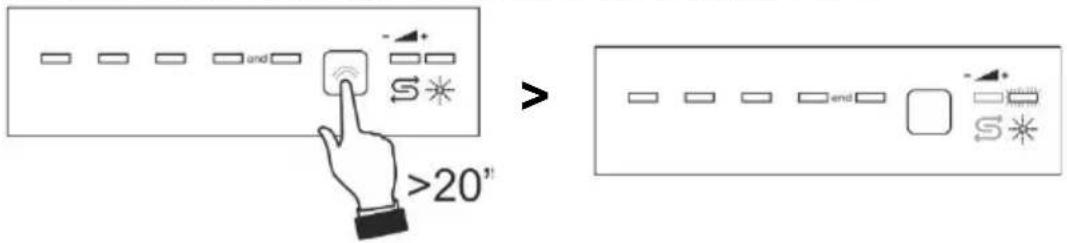
Press and hold the PROGRAM SELECTION (3) button, after approximately 15 seconds the salt light flashes, keep it pressed until the rinse aid light (5) flashes and the program indicator lights (2) indicate the current setting.
Then press the PROGRAM SELECTION (3) button several times to select the required dosage according to the following table:
text_image
and S* >20"After carrying out the adjustment or displaying the current setting, if you do not touch the button for a few seconds the dishwasher will automatically exit from adjustment mode and return to the standard operating mode.
RINSE AID ADJUSTMENT TABLE
| 0 – not dispensed | b0 All indicator lights off |  |
| Minimum. 2 ml | b1 One indicator light on |  |
| 3 ml | b2 Two indicator lights on |  |
| 4 ml | b3 Three indicator lights on |  |
| 5 ml | b4 Four indicator lights on |  |
| Maximum. 6 ml | b5 Five indicator lights on |  |
Default settings: b4 - 5 ml

- The amount of rinse aid must be increased if the washed dishes appear dull or feature circular stains.
- If, on the other hand, the dishes are sticky or have white streaks, it is necessary to reduce the rinse aid setting.
ADDING THE DETERGENT
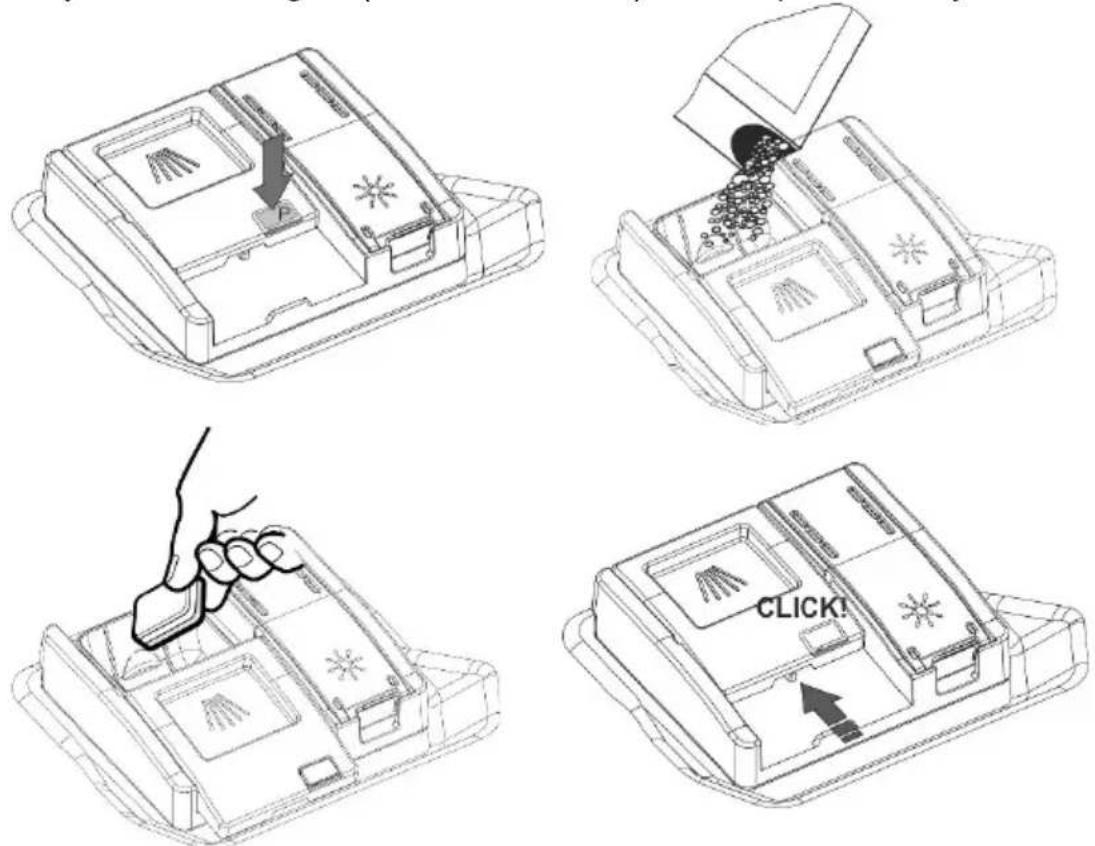
To open the detergent dispenser cover, lightly press button P. Add the detergent or tablet and close the cover by sliding it until it stops, indicated by a click.
The dispenser will open automatically during the wash cycle.
Only add the detergent (also in tablet form) if the dispenser is dry
text_image
Technical diagram showing four steps of a device's internal components with Chinese labels, including a hand pressing a button and a 'CLICK!' button.
- When a program with hot prewash is selected (see program table), extra detergent must be placed in the cavity G/H (depending on models).
- Use only detergents specially formulated for dishwashers. The detergent packs must be sealed and stored in a dry place to prevent the formation of lumps which may negatively affect washing results. Once opened the detergent packs should not be kept for too long, otherwise the detergent loses its effectiveness.
- Do not use detergents for washing dishes by hand because they may affect the operation of the dishwasher.
- Add the correct amount of detergent. An insufficient amount of detergent will result in a partial removal of dirt from the dishes, whereas an excessive amount is wasteful and does not improve the washing results.
- For the safeguarding of the environment we recommend the use of phosphate- and chlorine free detergents.

The introduction of detergent into the rinse aid dispenser, even in liquid form, will damage the dishwasher.
2.3 General warnings and recommendations

Before using the dishwasher for the first time, it is advisable to read the following recommendations concerning dish types to be washed and their loading.
There are generally no constraints on the washing of domestic dishes, but in certain cases it is necessary to take their characteristics into account.
Before loading the dishes into the baskets it is necessary to:
- remove coarse food remains: e.g. bones, fish-bones, etc. which may clog the filter or damage the wash pump.
- soak any pots or pans with burnt-on food remains on the bottom to facilitate removal, then load them into the LOWER BASKET.
There is no need to pre-wash the dishes under running water before loading them into the baskets since this only wastes water.
Correct loading of the dishes helps ensure optimal washing results.

WARNING!
- Make sure that the dishes are securely in place so that they cannot tip over or obstruct the rotation of the spray arms during the washing cycle.
- Do not place very small objects in the baskets as these could fall and obstruct the spray arms or the wash pump.
- Containers such as cups, bowls, glasses and pots should always be loaded with the opening facing downwards and with any cavities at an angle, to allow the water to drain out.
- Do not stack dishes or place them in such a way that they cover one other.
- Do not place glasses too close together because they may knock against each other and break, or there might be staining at the point where they touch.
MAKE SURE that the items being washed are dishwasher-safe.
Items which are not dishwasher-safe:
- Wooden dishes, pots or pans: these may be damaged by the high washing temperatures.
- Handcrafted items: these are rarely suitable for washing in a dishwasher. The relatively high water temperatures and the detergents used may damage them.
- Plastic dishes: heat resistant plastic dishes must be washed in the upper basket.
- Dishes and objects in copper, tin, zinc or brass: these tend to stain.
- Aluminium dishes: items made from anodised aluminium may lose their colour.
• Silverware: silver items may stain. - Glass and crystal: in general, glass and crystal objects can be washed in the dishwasher. However, certain types of glass and crystal may become dull and lose their clearness after many washings. Therefore, for these items we recommend using the least aggressive program available.
- Decorated items: the decorated objects available on the market are generally able to withstand washing in the dishwasher, although the colours may fade after a great many washes. If in doubt as to the fastness of the colours, it is advisable to wash just a few items at a time for approximately one month.
2.4 Using the baskets
The dishwasher has a capacity of 13 place-settings, including serving dishes.
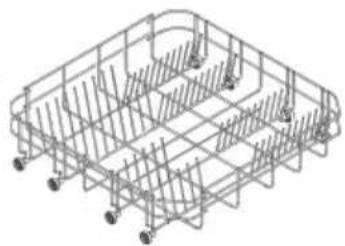
LOWER BASKET
The lower basket receives the full force of the lower spray arm, and should therefore be used for the "toughest" items with a heavier degree of soiling.
All types and combinations of loads are permitted, provided that the dishes, pots and pans are arranged with all the soiled surfaces exposed to the water jets coming from the bottom.
natural_image
Isometric line drawing of a modular container or rack structure with no text or symbolsWith fixed supports
To make the most of the space inside the basket when loading large items, certain models are equipped with tip-up supports for plates in 2 or 4 sections.
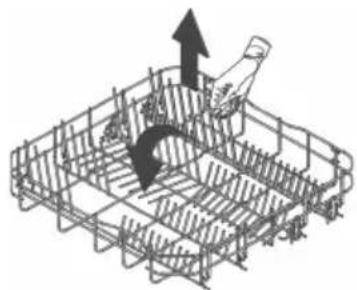
natural_image
Isometric line drawing of a mechanical cage with an upward arrow and a curved arrow indicating motion (no text or symbols)With tip-up supports
BOTTOM BASKET INSERTS
Some models are equipped with bottom basket inserts which improve the drying of dishes. The inserts are supplied in the accessories bag; to use them, simply fit them into place as shown.

natural_image
Technical illustration of a wire mesh cage with embedded rebar and a close-up of the mesh structure (no text or symbols)LOADING THE LOWER BASKET
Carefully load flat plates, soup plates, dessert and serving dishes, positioning them vertically. Pots, pans and their covers must be loaded upside down. When loading soup plates and dessert bowls, be sure to leave a gap between them.
Loading examples:
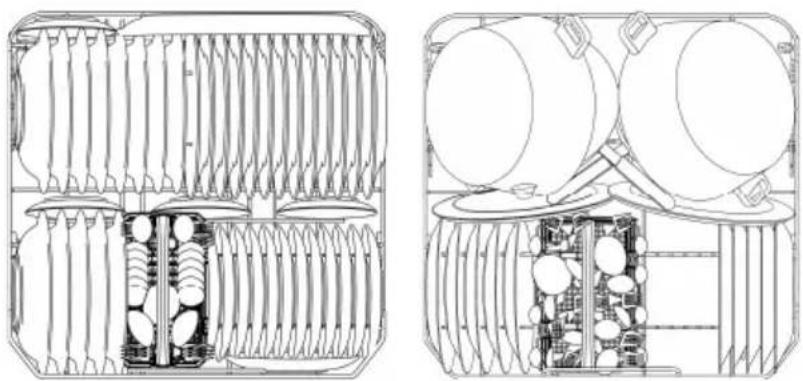
natural_image
Technical line drawings of two mechanical components with internal structural elements (no text or symbols)UPPER BASKET
The upper basket should be loaded with small or medium-sized items such as glasses, small plates and saucers, tea or coffee cups, shallow bowls and light objects. If the upper basket is used in the lowermost position, it can also be loaded with serving dishes, provided they are only lightly soiled.
LOADING THE UPPER BASKET
Load plates facing forward; cups, bowls etc. must always be facing downwards. The left side of the basket can be loaded with cups and glasses on two levels. In the centre section, plates and saucers can be loaded vertically into the supports provided.
Loading examples:
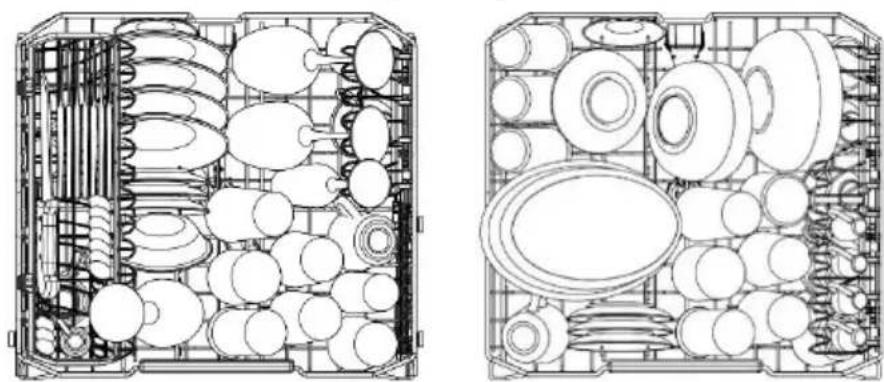
natural_image
Technical line drawing of a mechanical assembly with multiple circular components and internal channels (no text or symbols)CUTLERY BASKET
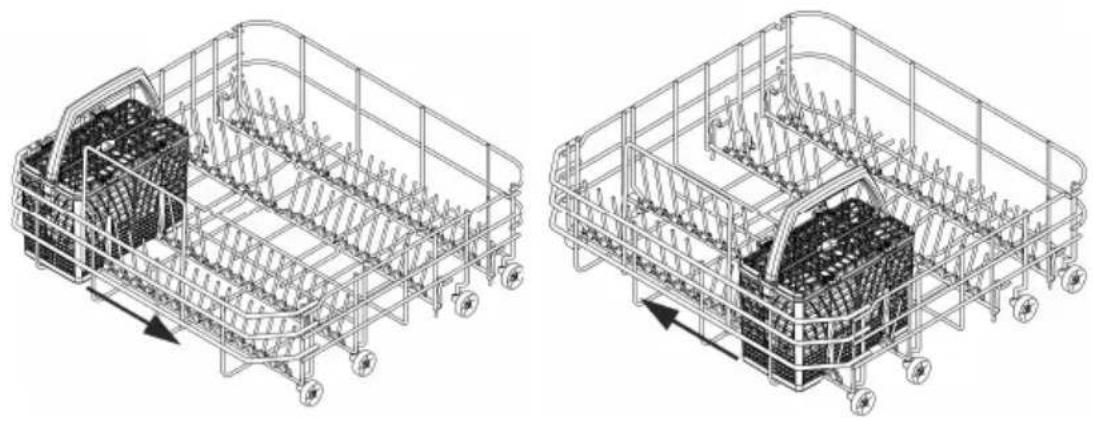
The basket is suitable for all types of cutlery, except long items that may interfere with the upper spray arm. The cutlery should be arranged in the spaces in the upper racks to allow the water to pass effectively between the items.
Forks and spoons should be positioned with the handle facing downwards, taking care not to injure yourself with the prongs of the forks. Knives should be placed in the tray on the upper rack or in the cutlery drawer, if present (depending on the model), otherwise position them with the handles facing upwards.
Ladies, wooden spoons and kitchen knives can be placed on the upper rack, making sure that the blades of the knives do not protrude from the basket. The upper racks can be opened in order to insert, for example, small items.
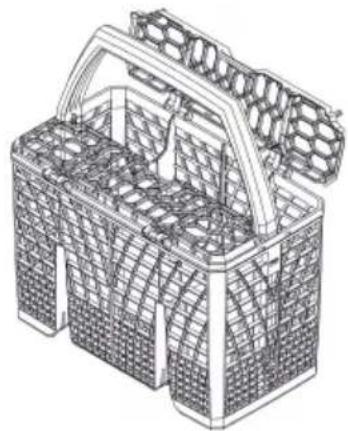
natural_image
Line drawing of a woven basket with handle and side panels (no text or symbols)The cutlery basket slides across the dishwasher and can be placed in any position to allow optimal use of the space in the bottom basket.
natural_image
Technical line drawings of two multi-cage agricultural processing units with visible feeders and machinery (no text or symbols)FLEXI DUO TOP RACK (on some models only)
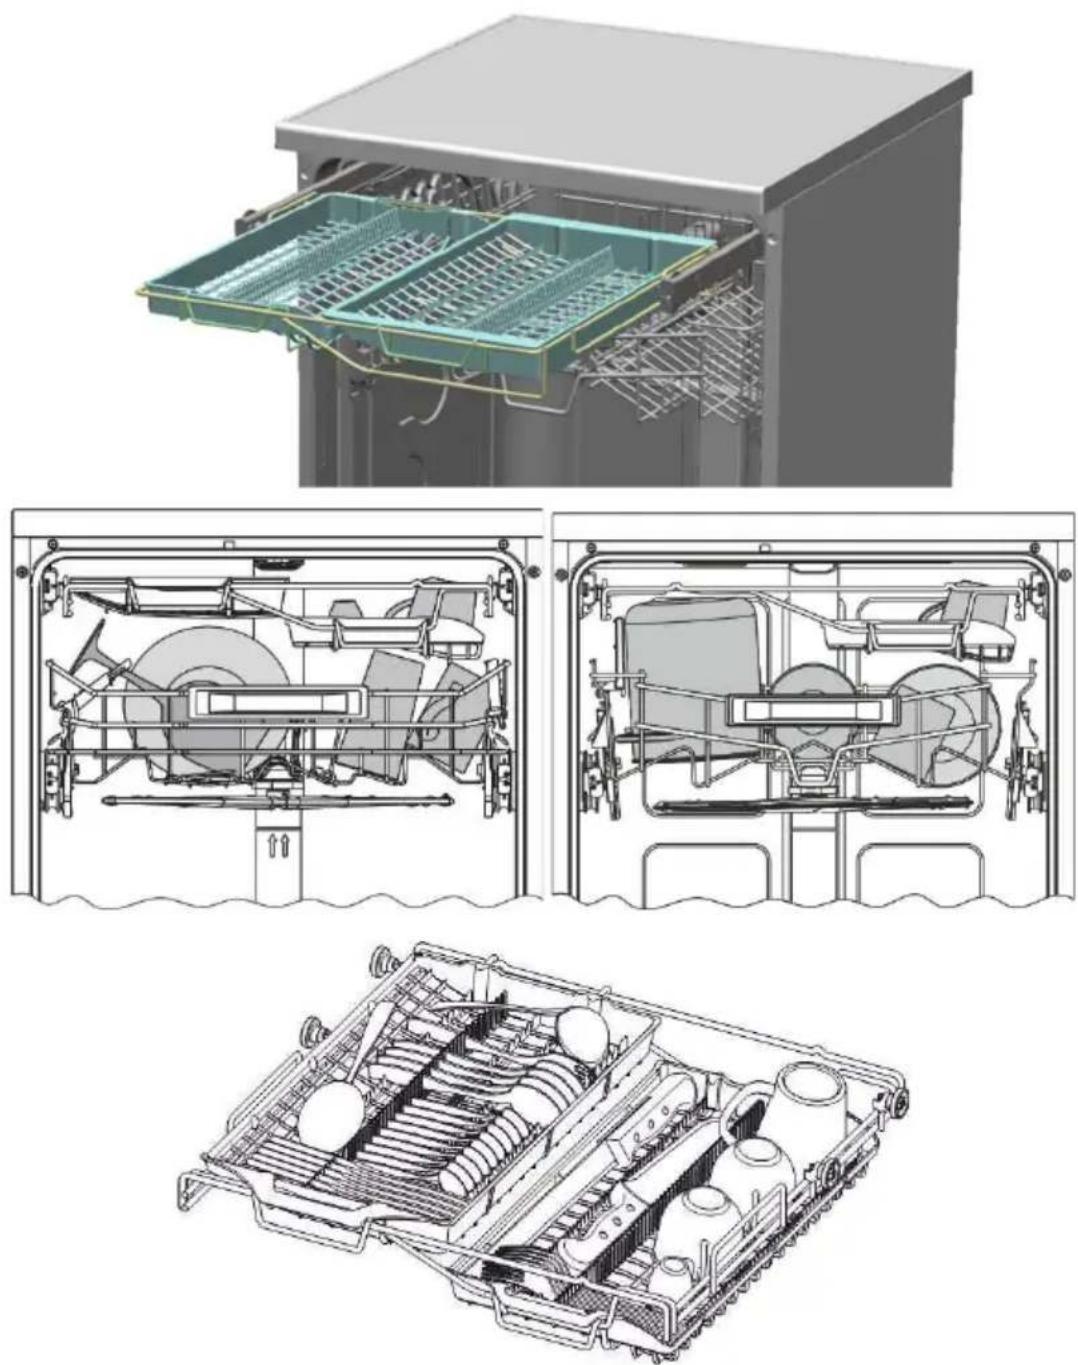
This comprises two independent sliding, pull-out tray racks for easier loading/unloading of cutlery. Various loading systems and configurations are possible. For example, tea cups can be loaded with the right-hand rack set in the low position, while the left-hand rack or both can be removed to allow large dishes to be put in the top basket.
In order to position the right hand basket in a low position, the upper basket has to be adjusted so that it is in the lowest position (see “adjusting the upper basket).
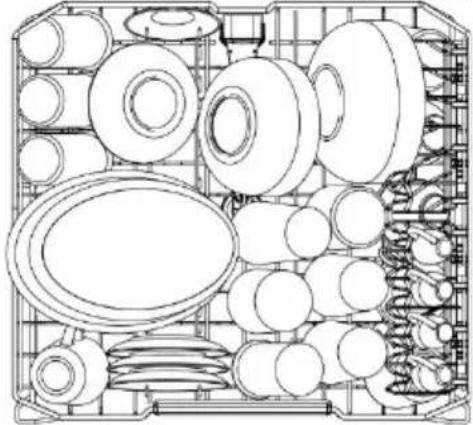
EXAMPLES OF LOADING FOR INTENSIVE DIRT
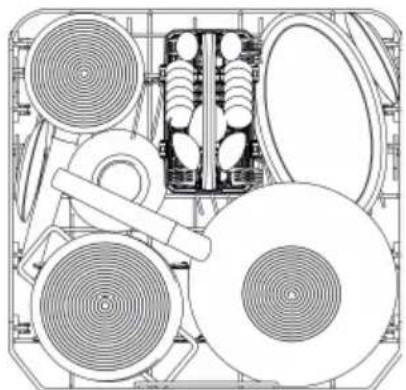
13 Standard place setting
natural_image
Technical line drawing of a mechanical assembly with multiple circular components and a central housing (no text or symbols)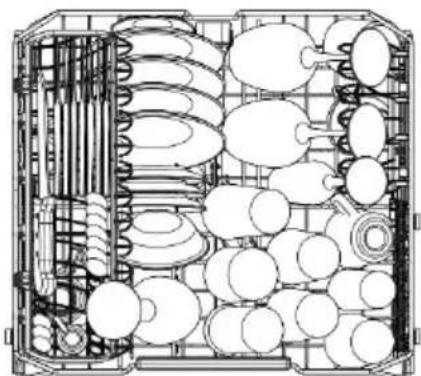
natural_image
Technical line drawing of a mechanical assembly with multiple circular components and internal channels (no text or symbols)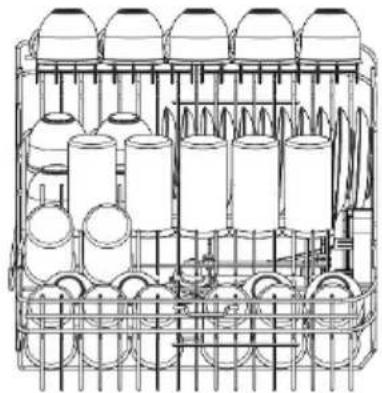
natural_image
Technical line drawing of a mechanical assembly with multiple cylindrical components and housing (no text or symbols)If the bottom basket inserts are of the fold-down type, they should be laid flat for easier loading.
13 Standard place setting
FLEXI DUO TOP RACK (on some models only)
natural_image
Technical line drawing of a mechanical assembly with multiple circular components and internal channels (no text or symbols)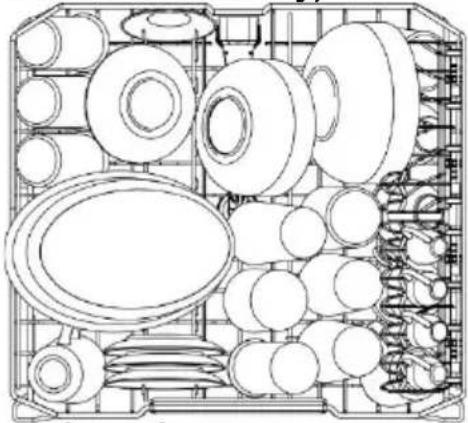
natural_image
Technical line drawing of a mechanical assembly with multiple circular components and internal channels (no text or symbols)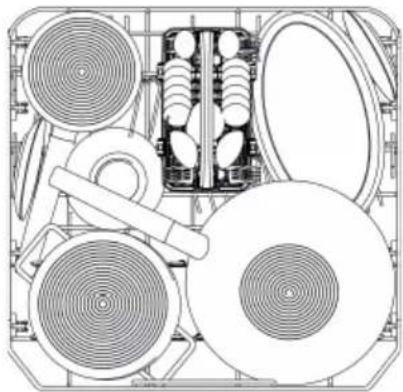
natural_image
Technical line drawing of a mechanical assembly with multiple circular components and a central housing (no text or symbols)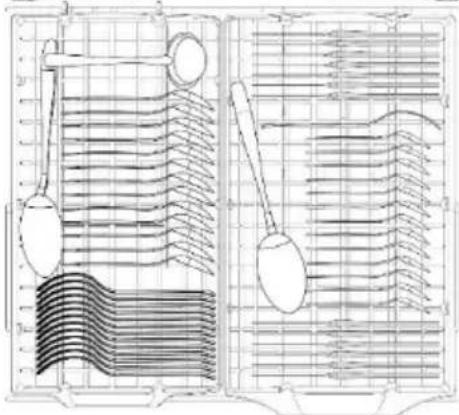
natural_image
Technical line drawing of a mechanical component with two views (top and side), showing internal layered structure and tool tips (no text or symbols)If the bottom basket inserts are of the fold-down type, they should be laid flat for easier loading.
UPPER BASKET EQUIPMENT (depending on the model)
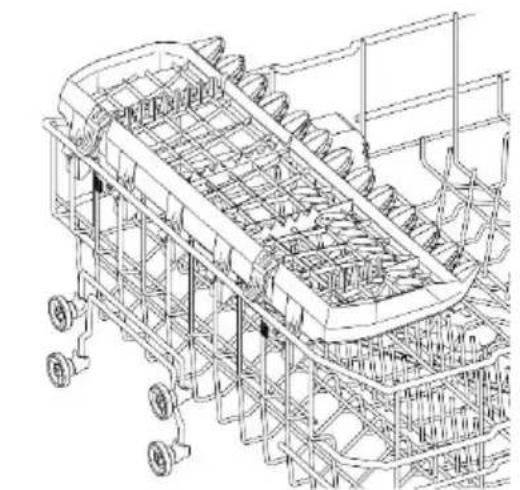
Cutlery tray
For knives, spoons (tea and dessert) and long objects. The ends are designed to hold long stemmed glasses.
- It can be removed by pressing and pushing the release levers (B) at the same time.
- It has to be lowered if the upper basket is in the topmost position. Press the catches (G) simultaneously.
natural_image
Technical line drawing of a mechanical conveyor system with rollers and guide rails (no text or symbols)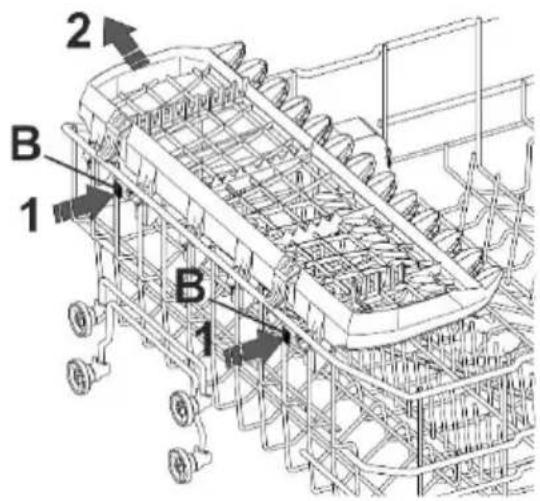
text_image
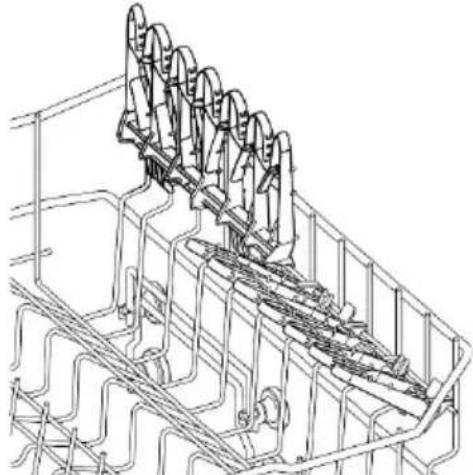
G 1 2 G 1Fold-down shelves
For mugs, cups and long objects. The ends are designed to hold lc stemmed glasses
When not used they can be moved to a vertical position (until a click is heard).
natural_image
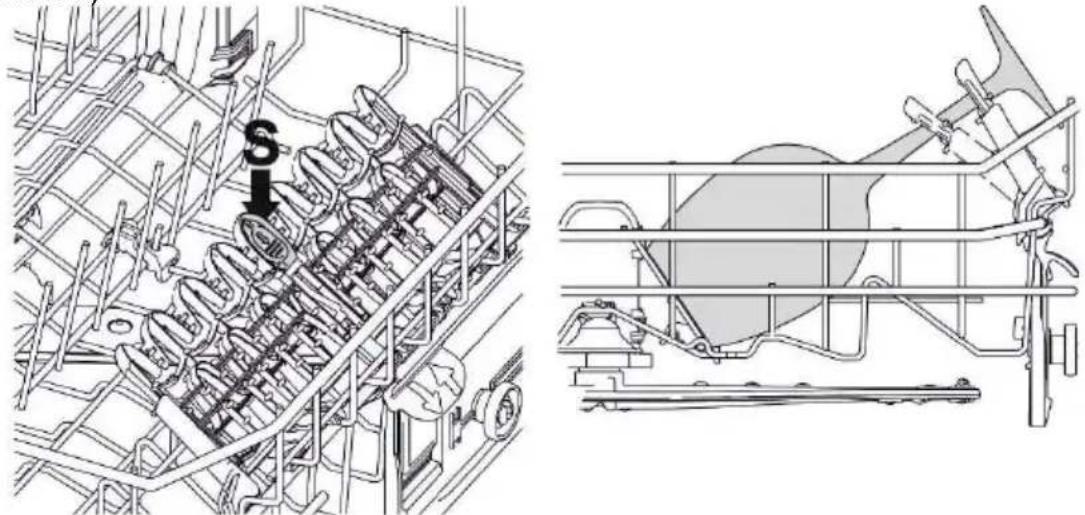
Technical line drawing of a mechanical assembly with multiple components (no text or symbols)Shelves with expandable wings
For small objects, mugs and cups.
They can be used either closed or open (pull the upper, sliding part). To close them, press the release device (S) and slide them downwards.
The ends are designed to hold long stemmed glasses (even when closed). When not used they can be moved to a vertical position (until a click is heard).
natural_image
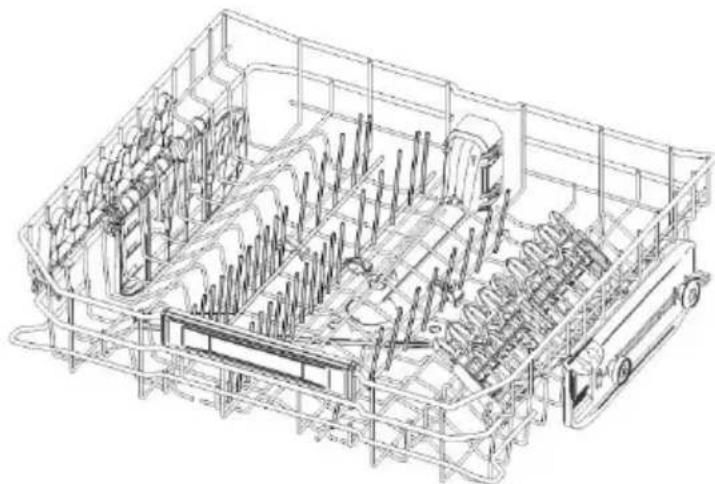
Technical line drawing of a mechanical assembly with no visible text or symbolsFold-down tines
These can be secured in a vertical position, resting on the bottom of the basket if unused, or placed in an intermediate position, as required. The single tine on the right is ideal for supporting long stemmed glasses.
natural_image
Technical line drawing of a vehicle chassis frame with structural components (no text or symbols)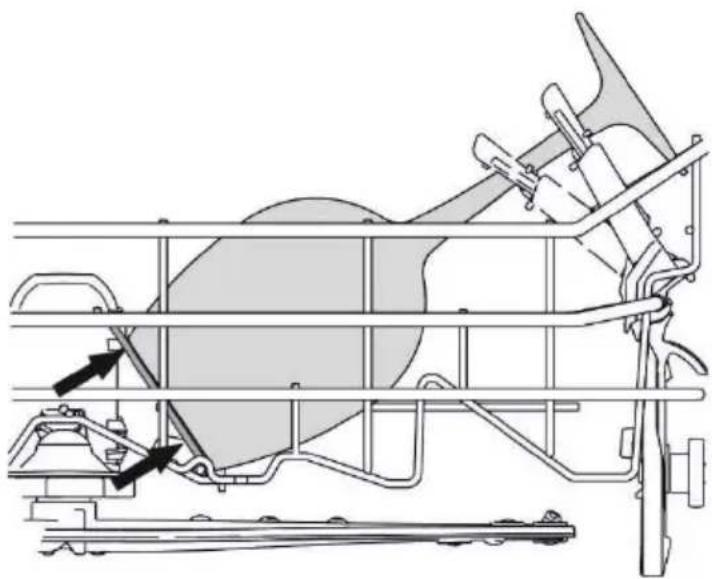
natural_image
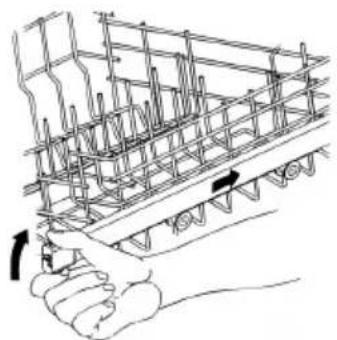
Technical line drawing of a vehicle chassis frame with structural components and directional arrows indicating motion (no text or labels)ADJUSTING THE UPPER BASKET
The height of the top basket can be adjusted to allow large dishes or pans to be placed in the bottom basket.
The adjustment procedure may be type A or B, depending on the dishwasher model purchased.
Version A: pull-out with adjustment in two positions.
- Pull out both the basket guides.
- Remove the stops, first releasing them as shown in the diagram.
- Pull out the basket.
- Fit the upper or lower pair of wheels into the guide, depending on the setting required;
- Return the stops to their original position.
The left hand and right hand sides of the basket must always be set at the same height.
natural_image
Line drawing of a hand holding a structural steel rebar assembly (no text or symbols)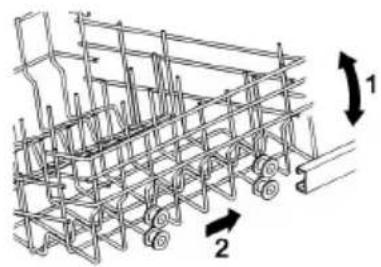
natural_image
Technical line drawing of a multi-level industrial container or storage unit with directional arrows indicating flow (no text or symbols present)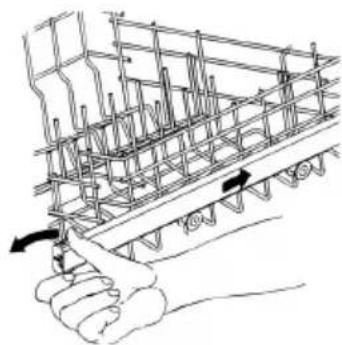
natural_image
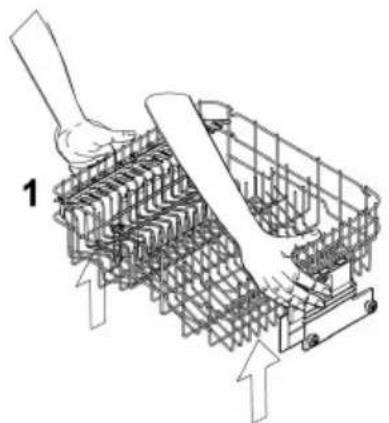
Hand holding a steel rebar structure with arrows indicating force application (no text or symbols)Version B: with adjustment in three positions on both sides.
The sides of the basket must always be set at the same height.
- Raise the basket by pulling on the top edge (1), to the first or second catch depending on the height required.
- To lower the basket, first release it by pulling the release lever (2). Adjustment is also possible with the basket loaded, but in this case when lowering the basket it should be held steady with one hand to avoid knocking the dishes.
natural_image
Technical line drawing of a mechanical assembly with no visible text or symbols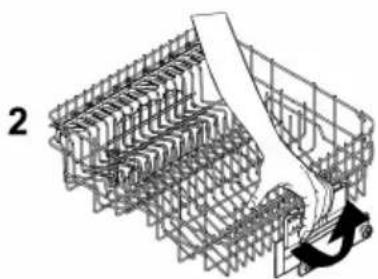
natural_image
Diagram of a mechanical assembly with a curved component and directional arrow (no text or symbols)3. Cleaning and maintenance
Before carrying out any work, always unplug the appliance from the electrical supply or switch off the all-pole disconnection device.
3.1 General warnings and recommendations
Avoid the use of acidic or abrasive detergents.
Clean the outer surfaces and door-lining of the dishwasher regularly using a soft cloth moistened with water or with a normal detergent suitable for painted surfaces. Clean the door gaskets with a damp sponge. Periodically (once or twice a year) it is advisable to clean the tank and gaskets, using a soft cloth and water to remove any deposits.
text_image
Technical diagram showing a valve assembly with labeled component A and directional arrowCLEANING THE WATER INTAKE FILTER
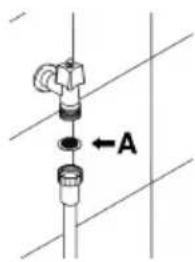
The water intake filter A located at the outlet of the water supply tap needs to be cleaned periodically.
After having closed the water supply tap, unscrew the end of the water intake hose, remove the filter A and clean it delicately under running water. Reassemble filter A in its seat and carefully screw the water intake hose back into position.
CLEANING THE SPRAY ARMS
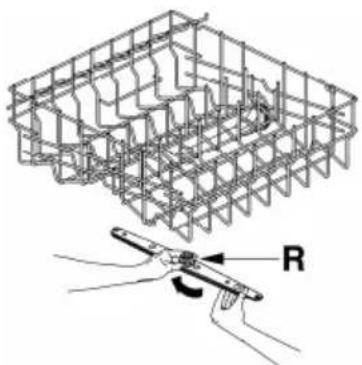
The spray arms can be easily removed for periodic cleaning of the nozzles, to prevent possible clogging. Wash them under running water and carefully replace them in their seats, checking that their rotary movement is in no way impeded.
• To remove the upper spray arm, unscrew locking ring R.
natural_image
Technical line drawing of a structural framework with a tool and labeled component 'R' (no text or symbols beyond label)- To remove the lower spray arm, simply lift it up, pulling by the central part.
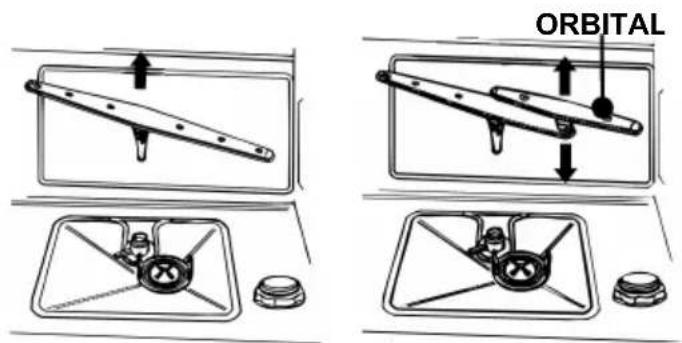
- To remove the orbital spray arm assembly, take hold of the longer arm and pull the orbital unit upward. Wash the arms under a jet of running water and return them carefully to their seat. After reassembly, check that the spray arms turn freely. Otherwise, check that they have been installed correctly.
- To remove and clean the planetarium sprayer follow the instructions provided.
text_image
ORBITAL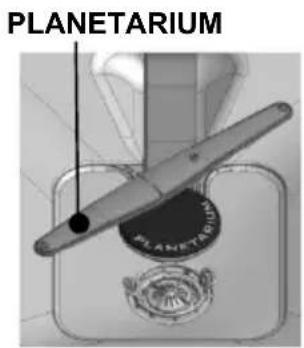
text_image
PLANETARIUM PLANETARIUMCLEANING THE FILTER UNIT
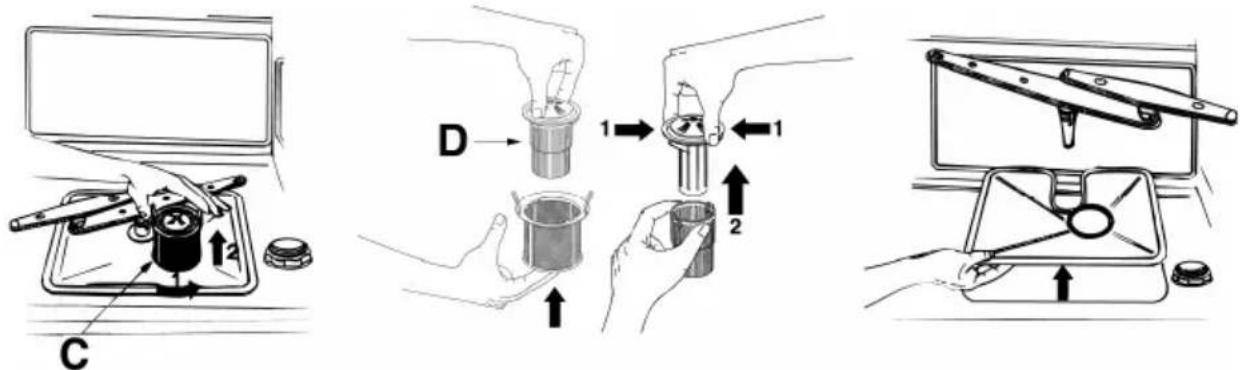
- It is advisable to periodically inspect the centre filter C and, if necessary, to clean it. To remove the filter, grip the tabs, turn them anticlockwise and lift upwards;
- push the centre filter D from the underside to remove it from the microfilter:
- separate the two parts which make up the plastic filter by pressing the body of the filter in the zone shown by the arrows;
- remove the centre filter by lifting it upwards.
text_image
Technical diagram showing three steps of a mechanical device with labeled components and directional arrows indicating movement.CLEANING THE FILTER UNIT (models with planetarium sprayer)
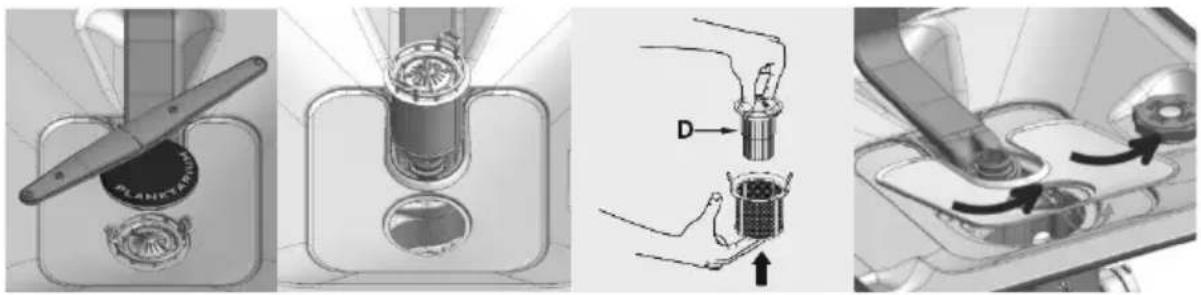
- It is advisable to periodically inspect the centre filter and, if necessary, to clean it.
- remove the planetarium sprayer follow the instructions provided.
- push the centre filter D from the underside to remove it from the microfilter:
- separate the two parts which make up the plastic filter by pressing the body of the filter in the zone shown by the arrows;
- remove the centre filter by lifting it upwards.

GENERAL WARNINGS AND RECOMMENDATIONS FOR CORRECT MAINTENANCE:
- The filters should be cleaned under running water using a stiff brush.
- When removing the filter, take care that there are no food residues on it. If any residues fall into the washing pit they might block hydraulic components, or foul the spray arm nozzles.
- It is essential to thoroughly clean the filters according to the above instructions: the dishwasher cannot function if the filters are clogged.
- Carefully replace the filters in their seats, to avoid damaging the wash pump.
PROLONGED DISUSE:
- Run the soak program twice in succession.
- Unplug the power cord from the socket.
- Leave the door slightly open, in order to prevent the formation of unpleasant odours inside the washing tank.
- Fill the rinse aid dispenser.
- Shut off the water supply tap.

BEFORE STARTING THE DISHWASHER AFTER PROLONGED DISUSE:
- Check that there are no deposits of sludge or rust inside the water pipe: if there are, allow the water to run from the water supply tap for a few minutes.
- Plug the power cord back into the socket.
- Reconnect the water intake hose and open the tap again.
TROUBLESHOOTING MINOR PROBLEMS
In some cases it is possible to remedy minor problems by referring to the following instructions:
If the program fails to start, check that:
- the dishwasher is connected to the electrical power supply;
• there is no power failure;
• the water tap is open; - the dishwasher door is properly closed.
- the door won't close > the door latch was released > use greater strength to close the door.
If water remains inside the dishwasher, check that:
• the drain hose is not kinked;
• the drain siphon is not obstructed;
- the dishwasher filters are not clogged.
If the dishes are not being cleaned properly, check that:
- the correct amount of detergent has been added;
- there is regenerating salt inside the special container;
• the dishes are being loaded correctly; - the selected program is suitable for the dish types and their degree of soiling;
- all the filters are clean and positioned correctly;
- the spray arm nozzles are not obstructed;
• there is no object obstructing the rotation of the spray arms.

If the dishes fail to dry or remain dull, check that:
• there is rinse aid inside the special container;
- the rinse aid dispenser setting is correct;
- the detergent used is of good quality and has not lost its effectiveness (for example, through incorrect storage, with the box left open).
• Non-dry synthetic dishes.
Synthetic material has a lower heat storage capacity and is therefore harder to dry.
If the dishes show signs of streaking, staining, etc., check that:
- the rinse aid dispenser setting is not too high.
If there are visible traces of rust inside the tank:
- the tank is made of steel, and therefore any rust marks are due to external elements (fragments of rust from the water pipes, pots, cutlery, etc.). Special products are commercially available to remove such marks;
- check that the amount of detergent being used is correct. Certain detergents can be more corrosive than others.
- check that the cap of the salt container is securely closed, and that the water softening setting is correct.
If the door does not close:
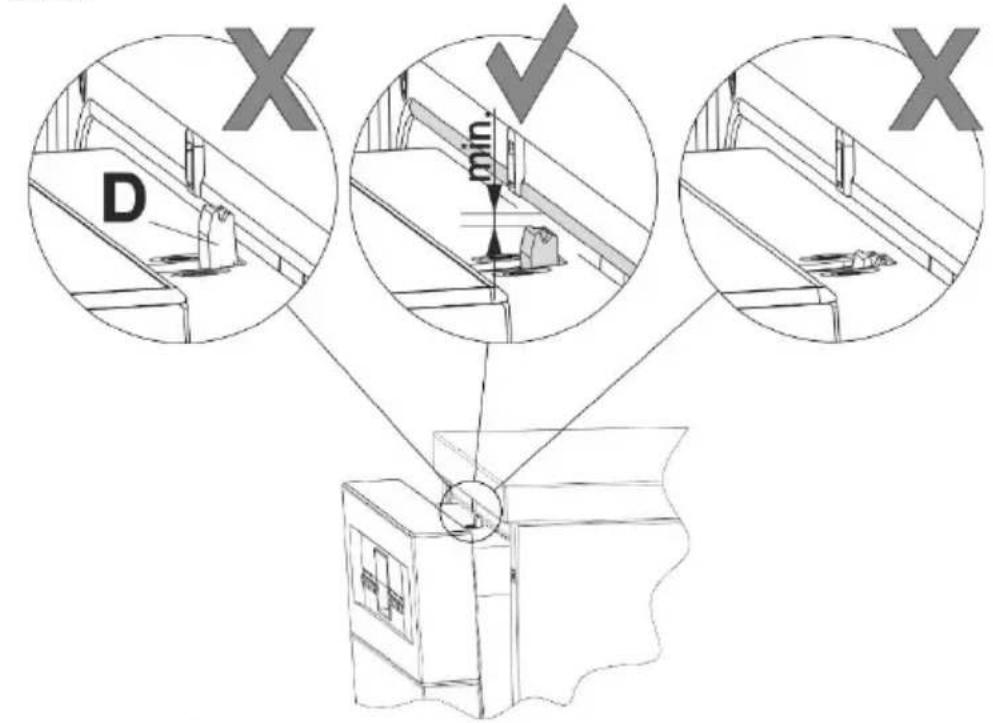
1 - Check the position of the door lock catch (D)
2 - If necessary, raise it by adjusting the plastic screw (V) next to the catch.
3 - Check the condition of the lock hook (G); if it has not triggered (reference N), the door opens and closes normally. If it has triggered (reference S), close the door with force until it resets; open and close the door.
text_image
D min. X X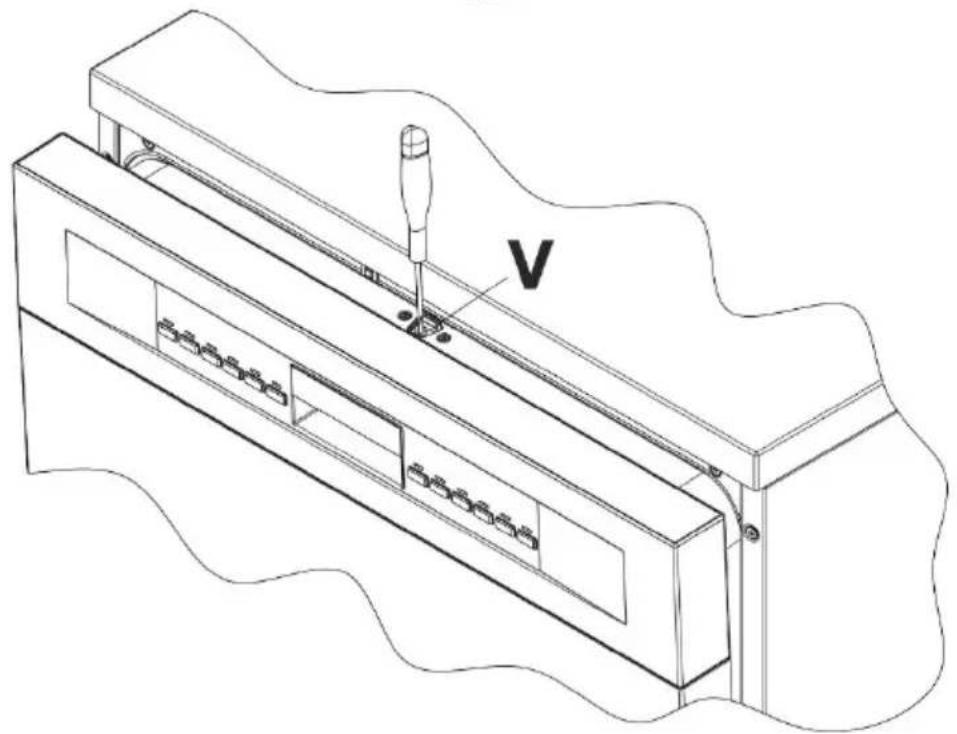
natural_image
Technical line drawing of a mechanical assembly with labeled component 'V' (no text or symbols beyond label)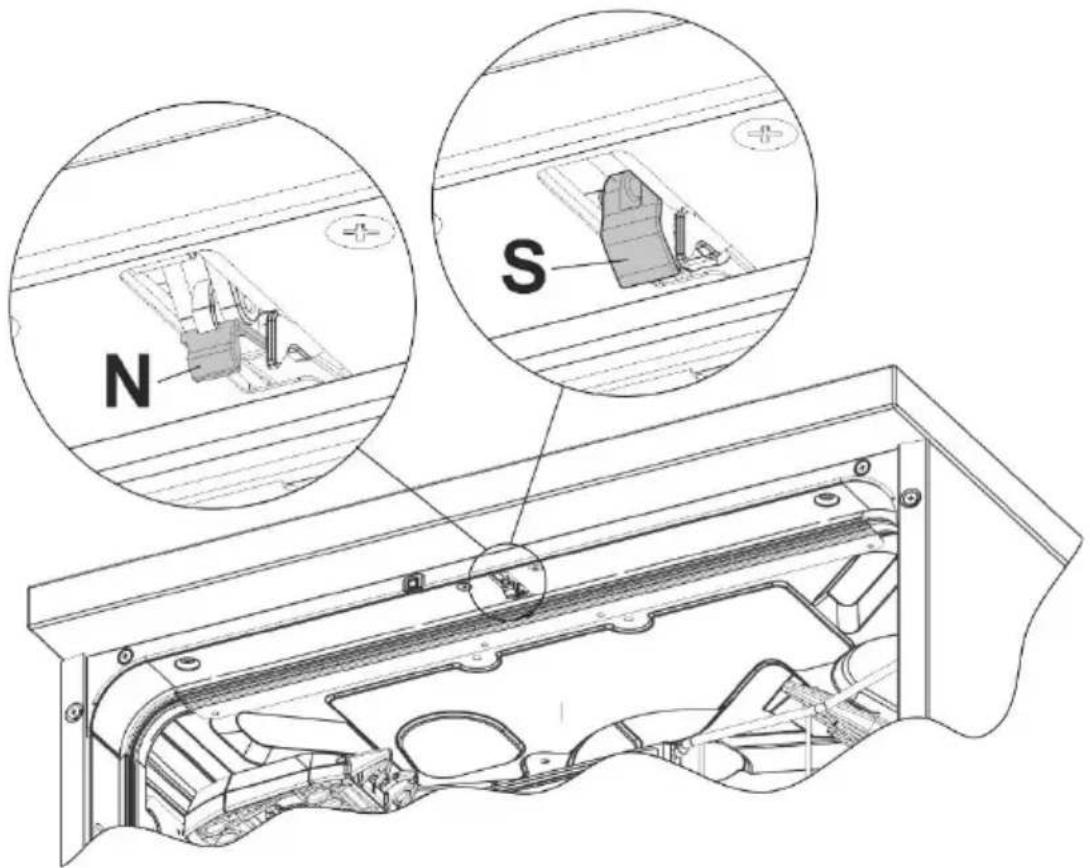
text_image
Technical diagram of a mechanical assembly with labeled components N and S, showing internal components and assembly details.
If after following the above troubleshooting instructions the problem persists, call the nearest After-Sales Centre.
WARNING: any operations performed on the appliance by unauthorised persons are not covered by the warranty and shall be paid for by the user.
4. Troubleshooting
The dishwasher is capable of signalling a number of faults through the simultaneous illumination of several indicator lights, with the following meanings:
| FAULT | DESCRIPTION | |
| E1 |  | Acquastop failureThe anti-flooding system has been activated (for the relevant models only). The system is tripped in case of water leaks. Contact the after-sales service. |
| E2 |  | Safety levelThe system which limits the water level inside the dishwasher has been tripped. Interrupt the program and switch off the dishwasher. Switch the dishwasher back on, program it again and start the washing cycle. If the problem persists, contact the after-sales service. |
| E3 |  | Water heating malfunctionThe water is not heated or the heating parameters are not correct. Repeat the washing program; if the problem persists, contact the after-sales service. |
| E4 |  | Water temperature monitoring malfunctionInterrupt the program and switch off the dishwasher. Switch the dishwasher back on, program it again and start the washing cycle. If the problem persists, contact the after-sales service. |
| E5 |  | Water intake malfunctionThe appliance does not take in water or does not do so correctly. Check that the water connections are correct, the water intake tap is turned on and the filter is not fouled. If the problem persists, contact the after-sales service. |
| E6 |  | Water pump-out malfunctionThe appliance does not pump out the water or does not do so correctly. Check that the drain hose is not kinked or crushed and that the siphon and filter are not fouled. If the problem persists, contact the after-sales service. |
| E7 | 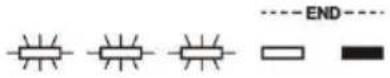 | Turbine flow-regulator malfunction(for the relevant models only)The appliance is not able to "measure" the amount of water loaded accurately. Interrupt the program and switch off the dishwasher. Switch the dishwasher back on, program it again and start the washing cycle. If the problem persists, contact the after-sales service. |
| E8 | 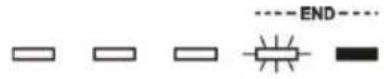 | Alternate washing system malfunctionInterrupt the program and switch off the dishwasher.Switch the dishwasher back on, program it again and start the washing cycle. If the problem persists, contact the after-sales service. |
| E9 | 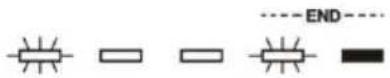 | Water intake system malfunctionContact the after-sales service. |
| E11 | Wash motor pump does not work | |
 |   | |
If an alarm occurs the appliance interrupts the program in progress and signals a fault.
- Alarms E1, E2, E3, E4, E8 and E9 interrupt the current program immediately.
- The E5, E6 alarms interrupts the running program once the cause is resolved, it will bring bach the execution of the program.
- The alarm E7 is visualized at the end of the cycle that comes, however, brought to the end since the operation of the dishwasher is not harmed.
• E11: Contact the after-sales service.
To "reset" an alarm is necessary:
- Open and close the door, or turn off and on the machine. At this point is possible to program the dishwasher again.
If the malfunction persists, contact your authorised Service Centre.