
MT-90S - Uncategorized ROLAND - Free user manual and instructions
Find the device manual for free MT-90S ROLAND in PDF.


| Product Type | Music Player with built-in speaker and floppy disk drive |
| Dimensions | 165 mm (W) x 186 mm (D) x 270 mm (H) / 6.5 x 7.375 x 10.6875 inches |
| Weight | 2.4 kg / 5.3 lbs |
| Power Supply | AC 117V/230V/240V, 2000 mA; includes AC adaptor |
| Max Polyphony | 64 voices |
| Tones | 369 variations (including 8 drum sets, 1 SFX set) |
| Master Tuning | 415.3 Hz to 466.2 Hz (0.1 Hz steps) |
| Transpose | Playback transpose: -24 to +24 semitones |
| Effects | Reverb, Chorus |
| Metronome | Beats: 2/2, 0/4, 2/4, 3/4, 4/4, 5/4, 6/4, 7/4, 3/8, 6/8, 9/8, 12/8; Volume: 10 levels; Patterns: 11; Sounds: 5 types |
| Tracks | 5 or 16 tracks |
| Tempo | Quarter note = 20 to 250 BPM |
| Display | 16 x 2 character LCD with beat indicator |
| Disk Drive | 3.5-inch floppy disk (720 KB / 1.44 MB) |
| Playable Formats | Standard MIDI File (Format 0/1), Roland Original Format (i-Format) |
| Rated Power Output | 5 W x 1 |
| Speaker | 10 cm (approx. 4 inches) x 1 |
| Connectors | Output jacks (stereo RCA), Microphone jack (with echo), Headphones jack (stereo mini), MIDI IN, Start/Stop pedal jack |
| Accessories | Owner's manual, power cord, AC adaptor, ferrite core, music file disk |
| Safety Notes | Use only supplied AC adaptor; avoid moisture, extreme temperatures, and strong impact; unplug during lightning |
| Cleaning | Wipe with soft, dry cloth; do not use benzine, thinners, alcohol, or solvents |
Frequently Asked Questions - MT-90S ROLAND
User questions about MT-90S ROLAND
0 question about this device. Answer the ones you know or ask your own.
Ask a new question about this device
Download the instructions for your Uncategorized in PDF format for free! Find your manual MT-90S - ROLAND and take your electronic device back in hand. On this page are published all the documents necessary for the use of your device. MT-90S by ROLAND.
USER MANUAL MT-90S ROLAND
natural_image
Simple line drawing of a headset connected to a circular earbell (no text or symbols)1: My Song
1 4/4 J = 80
- [ マーク) ] ボタンを押します。
マーク画面が表示されます。
- [ マーク ) ] ボタンを押します。
マーク画面が表示されます。
| MarkerResolutionMeas |
| Lyric Language ➕Japanese |
Factory Reset # Sure?
SMF with Lyric SMF LYRICS
- [ + ] ボタンを押します。
Thank you, and congratulations on your choice of the Roland MT 90s Music Player.
Before using this unit, carefully read the sections entitled: "USING THE UNIT SAFELY" and "IMPORTANT NOTES" (p. 2; p. 4). These sections provide important information concerning the proper operation of the unit. Additionally, in order to feel assured that you have gained a good grasp of every feature provided by your new unit, Owner's manual should be read in its entirety. The manual should be saved and kept on hand as a convenient reference.
Main Features
■ Easy operation
You can enjoy music files as easily as on a CD player.
■ Convenient functions for practicing
You can adjust the tempo and use features such as the metronome, count-in, and repeat playback to efficiently practice your musical instrument.
■ Compact design includes built-in speaker
Since the speaker is built in, troublesome connections are not required.
■ Play or mute specific individual tracks
For example you might use this to learn just the piano part by listening to it by itself. Alternatively, you could mute just the piano part and play along with the orchestra part.
■ Compatible with SMF (Standard MIDI Files)
Since the MT 90s is compatible with Standard MIDI Files, you can enjoy a wide selection of music files.
■ Sound generator supports both General MIDI System 2 and GS Format
Music files bearing either the General MIDI, General MIDI 2 or GS logo can be reliably played back.
Standard MIDI File music files you created on your personal computer for GM/GM2/GS sound module can also be played.
■ Connect a microphone and sing along with music files
An echo processor is built-in—enhancing the excitement of "karaoke" sing-alongs accompanied by music files.
IMPORTANT: THE WIRES IN THIS MAINS LEAD ARE COLOURED IN ACCORDANCE WITH THE FOLLOWING CODE.
BLUE: NEUTRAL
BROWN: LIVE
As the colours of the wires in the mains lead of this apparatus may not correspond with the coloured markings identifying the terminals in your plug, proceed as follows:
The wire which is coloured BLUE must be connected to the terminal which is marked with the letter N or coloured BLACK. The wire which is coloured BROWN must be connected to the terminal which is marked with the letter L or coloured RED.
Under no circumstances must either of the above wires be connected to the earth terminal of a three pin plug.
USING THE UNIT SAFELY
INSTRUCTIONS FOR THE PREVENTION OF FIRE, ELECTRIC SHOCK, OR INJURY TO PERSONS
About ⚠️ WARNING and ⚠️ CAUTION Notices
| WARNING | Used for instructions intended to alert the user to the risk of death or severe injury should the unit be used improperly. |
| CAUTION | Used for instructions intended to alert the user to the risk of injury or material damage should the unit be used improperly.* Material damage refers to damage or other adverse effects caused with respect to the home and all its furnishings, as well to domestic animals or pets. |
About the Symbols
| The △ symbol alerts the user to important instructions or warnings. The specific meaning of the symbol is determined by the design contained within the triangle. In the case of the symbol at left, it is used for general cautions, warnings, or alerts to danger. | |
| The ⊙ symbol alerts the user to items that must never be carried out (are forbidden). The specific thing that must not be done is indicated by the design contained within the circle. In the case of the symbol at left, it means that the unit must never be disassembled. | |
| The ● symbol alerts the user to things that must be carried out. The specific thing that must be done is indicated by the design contained within the circle. In the case of the symbol at left, it means that the power-cord plug must be unplugged from the outlet. |
ALWAYS OBSERVE THE FOLLOWING
WARNING
- Before using this unit, make sure to read the instructions below, and the Owner's Manual.

- Do not open (or modify in any way) the unit or its AC adaptor.

- Do not attempt to repair the unit, or replace parts within it (except when this manual provides specific instructions directing you to do so). Refer all servicing to your retailer, the nearest Roland Service Center, or an authorized Roland distributor, as listed on the "Information" page.

- Never use or store the unit in places that are:
- Subject to temperature extremes (e.g., direct sunlight in an enclosed vehicle, near a heating duct, on top of heat-generating equipment); or are
- Damp (e.g., baths, washrooms, on wet floors); or are
- Humid; or are
- Exposed to rain; or are
- Dusty; or are
- Subject to high levels of vibration.
WARNING
- Make sure you always have the unit placed so it is level and sure to remain stable. Never place it on stands that could wobble, or on inclined surfaces.

- Be sure to use only the AC adaptor supplied with the unit. Also, make sure the line voltage at the installation matches the input voltage specified on the AC adaptor's body. Other AC adaptors may use a different polarity, or be designed for a different voltage, so their use could result in damage, malfunction, or electric shock.

- Do not excessively twist or bend the power cord, nor place heavy objects on it. Doing so can damage the cord, producing severed elements and short circuits. Damaged cords are fire and shock hazards!

- This unit, either alone or in combination with an amplifier and headphones or speakers, may be capable of producing sound levels that could cause permanent hearing loss. Do not operate for a long period of time at a high volume level, or at a level that is uncomfortable. If you experience any hearing loss or ringing in the ears, you should immediately stop using the unit, and consult an audiologist.

WARNING
- Do not allow any objects (e.g., flammable material, coins, pins); or liquids of any kind (water, soft drinks, etc.) to penetrate the unit.


- Immediately turn the power off, remove the AC adaptor from the outlet, and request servicing by your retailer, the nearest Roland Service Center, or an authorized Roland distributor, as listed on the "Information" page when:

- The AC adaptor, the power-supply cord, or the plug has been damaged; or
- Objects have fallen into, or liquid has been spilled onto the unit; or
- The unit has been exposed to rain (or otherwise has become wet); or
- The unit does not appear to operate normally or exhibits a marked change in performance.
- In households with small children, an adult should provide supervision until the child is capable of following all the rules essential for the safe operation of the unit.

- Protect the unit from strong impact. (Do not drop it!)

- Do not force the unit's power-supply cord to share an outlet with an unreasonable number of other devices. Be especially careful when using extension cords—the total power used by all devices you have connected to the extension cord's outlet must never exceed the power rating (watts/amperes) for the extension cord. Excessive loads can cause the insulation on the cord to heat up and eventually melt through.

- Before using the unit in a foreign country, consult with your retailer, the nearest Roland Service Center, or an authorized Roland distributor, as listed on the "Information" page.

CAUTION
- The unit and the AC adaptor should be located so their location or position does not interfere with their proper ventilation.

• Always grasp only the plug on the AC adaptor cord when plugging into, or unplugging from, an outlet or this unit.

- Whenever the unit is to remain unused for an extended period of time, disconnect the AC adaptor.

- Try to prevent cords and cables from becoming entangled. Also, all cords and cables should be placed so they are out of the reach of children.

- Never climb on top of, nor place heavy objects on the unit.

- Never handle the AC adaptor or its plugs with wet hands when plugging into, or unplugging from, an outlet or this unit.

- Before moving the unit, disconnect the AC adaptor and all cords coming from external devices.

- Before cleaning the unit, turn off the power and unplug the AC adaptor from the outlet (p. 10).

- Whenever you suspect the possibility of lightning in your area, disconnect the AC adaptor from the outlet.

In addition to the items listed under "USING THE UNIT SAFELY" on page 2 and 3, please read and observe the following:
Power Supply
- Do not use this unit on the same power circuit with any device that will generate line noise (such as an electric motor or variable lighting system).
- The AC adaptor will begin to generate heat after long hours of consecutive use. This is normal, and is not a cause for concern.
- Before connecting this unit to other devices, turn off the power to all units. This will help prevent malfunctions and/or damage to speakers or other devices.
Placement
- Using the unit near power amplifiers (or other equipment containing large power transformers) may induce hum. To alleviate the problem, change the orientation of this unit; or move it farther away from the source of interference.
- This device may interfere with radio and television reception. Do not use this device in the vicinity of such receivers.
-
Observe the following when using the unit's floppy disk drive. For further details, refer to "Before Using Floppy Disks" (p. 5).
-
Do not place the unit near devices that produce a strong magnetic field (e.g., loudspeakers).
• Install the unit on a solid, level surface. -
Do not move the unit or subject it to vibration while the drive is operating.
-
Do not expose the unit to direct sunlight, place it near devices that radiate heat, leave it inside an enclosed vehicle, or otherwise subject it to temperature extremes. Excessive heat can deform or discolor the unit.
• To avoid possible breakdown, do not use the unit in a wet area, such as an area exposed to rain or other moisture.
Maintenance
- For everyday cleaning wipe the unit with a soft, dry cloth or one that has been slightly dampened with water. To remove stubborn dirt, use a cloth impregnated with a mild, non-abrasive detergent. Afterwards, be sure to wipe the unit thoroughly with a soft, dry cloth.
- Never use benzine, thinners, alcohol or solvents of any kind, to avoid the possibility of discoloration and/or deformation.
Additional Precautions
• Unfortunately, it may be impossible to restore the contents of data that was stored on a floppy disk once it has been lost. Roland Corporation assumes no liability concerning such loss of data.
- Use a reasonable amount of care when using the unit's buttons, sliders, or other controls; and when using its jacks and connectors. Rough handling can lead to malfunctions.
- Never strike or apply strong pressure to the display.
- A small amount of noise may be heard from the display during normal operation.
- When connecting / disconnecting all cables, grasp the connector itself—never pull on the cable. This way you will avoid causing shorts, or damage to the cable's internal elements.
- To avoid disturbing your neighbors, try to keep the unit's volume at reasonable levels. You may prefer to use headphones, so you do not need to be concerned about those around you (especially when it is late at night).
- When you need to transport the unit, package it in the box (including padding) that it came in, if possible. Otherwise, you will need to use equivalent packaging materials.
- Use a cable from Roland to make the connection. If using some other make of connection cable, please note the following precautions.
- Some connection cables contain resistors. Do not use cables that incorporate resistors for connecting to this unit. The use of such cables can cause the sound level to be extremely low, or impossible to hear. For information on cable specifications, contact the manufacturer of the cable.
Before Using Floppy Disks
Handling the Floppy Disk Drive
- Install the unit on a solid, level surface in an area free from vibration. If the unit must be installed at an angle, be sure the installation does not exceed the permissible range: upward, 25^ ; downward, 35^ .
- Avoid using the unit immediately after it has been moved to a location with a level of humidity that is greatly different than its former location. Rapid changes in the environment can cause condensation to form inside the drive, which will adversely affect the operation of the drive and/or damage floppy disks. When the unit has been moved, allow it to become accustomed to the new environment (allow a few hours) before operating it.
- To insert a disk, push it gently but firmly into the drive—it will click into place. To remove a disk, press the EJECT button firmly. Do not use excessive force to remove a disk which is lodged in the drive.
- Never eject a disk while reading or writing is in progress, since that can damage the magnetic surface of the disk, rendering it unusable. (The disk drive's indicator will light up at full brightness when the drive is busy reading or writing data. Ordinarily, the indicator will be less brightly lighted, or be extinguished.)
- Remove any disk from the drive before powering up or down.
- To prevent damage to the disk drive's heads, always try to hold the floppy disk in a level position (not tilted in any direction) while inserting it into the drive. Push it in firmly, but gently. Never use excessive force.
- To avoid the risk of malfunction and/or damage, insert only floppy disks into the disk drive. Never insert any other type of disk. Avoid getting paper clips, coins, or any other foreign objects inside the drive.
Handling Floppy Disks
- Floppy disks contain a plastic disk with a thin coating of magnetic storage medium. Microscopic precision is required to enable storage of large amounts of data on such a small surface area. To preserve their integrity, please observe the following when handling floppy disks:
- Never touch the magnetic medium inside the disk.
- Do not use or store floppy disks in dirty or dusty areas.
- Do not subject floppy disks to temperature extremes (e.g., direct sunlight in an enclosed vehicle). Recommended temperature range: 10 to 50^ (50 to 122^ ).
- Do not expose floppy disks to strong magnetic fields, such as those generated by loudspeakers.
- Floppy disks have a “write protect” tab which can protect the disk from accidental erasure. It is recommended that the tab be kept in the PROTECT position, and moved to the WRITE position only when you wish to write new data onto the disk.
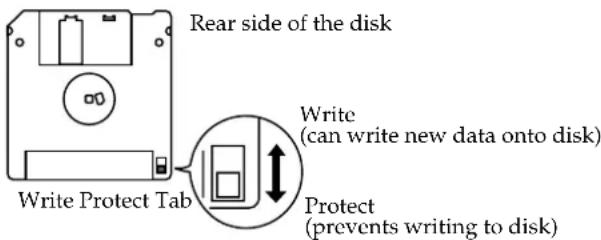
- The identification label should be firmly affixed to the disk. Should the label come loose while the disk is in the drive, it may be difficult to remove the disk.
- Store all disks in a safe place to avoid damaging them, and to protect them from dust, dirt, and other hazards. By using a dirty or dust-ridden disk, you risk damaging the disk, as well as causing the disk drive to malfunction.
* GS () is registered trademark of Roland Corporation.
Contents
USING THE UNIT SAFELY 2
IMPORTANT NOTES ....4
Contents......6
Panel Descriptions....7
Front Panel....7
Rear Panel....8
About the Screen....9
Chapter 1 Easy Operation of the MT 90s Preparation....10
Connecting the AC Adaptor....10
Turning the Power On and Off....10
Adjusting the Volume 10
Connecting a Headphones....11
Connecting the Microphone....11
Adjusting the pitch to other instruments (Tuning).....12
Listening to the Music ....14
Inserting and Ejecting a Floppy Disk....14
Playing Back Songs....14
Repeated Listening of One Song....16
Listening to Continuous Repeated Playback of All Songs (All Song Play)....17
Changing the Tempo....18
Changing the Tempo by Pressing the Button in Time (Tap Tempo)....18
Sounding the Metronome....19
Changing the Metronome Tempo ....19
Changing the Metronome Volume....20
Changing the Beat of the Metronome....20
Practicing Along With a Song (Track Buttons)......21
Matching the Timing of the Performance....22
Chapter 2 More Convenient Functions..23
Placing Markers at the Section You Want to Practice
Repeatedly....23
Playback from a Marker Location 24
Erasing a Marker....24
Repeating Playback Between Two Markers.....25
Moving a Marker......26
Practice without Tempo Changes......27
Changing the Key....28
Changing the Reverberation (Reverb Effect) .....29
Listening to Specific Instruments.... 30
Playing Back a Single Part (Solo)....30
Preventing a Selected Part from Sounding (Mute) .....31
Displaying the Names of Tones Assigned to Parts.....31
Chapter 3 Other Functions.... 32
Changing the Metronome's Settings 32
Changing the Count Sound Settings 33
Placing a Marker in the Middle of a Measure...... 34
Changing the Lyric Setting 34
Removing Lyrics from the Screen.... 35
Playing Back All Songs in Random Order.... 35
Restoring the Factory Settings (Factory Reset) ...... 36
Playback/Stop using a Pedal Switch.... 36
Connect Your MIDI Instrument.... 37
Connecting to Audio Devices and
Other Equipment 37
Chapter 4 About Music Files...... 38
Music Files that can be Used with the MT 90s...... 38
About the MT 90s's Sound Generator.... 38
Using Computer-Created Song Data on the MT 90s (Disk Format)....39
Appendices...... 40
Troubleshooting 40
Error Messages/Other Messages.... 41
Disk Song List....42
MIDI Implementation Chart.... 44
Main Specification.... 45
Index....46
Panel Descriptions
Front Panel
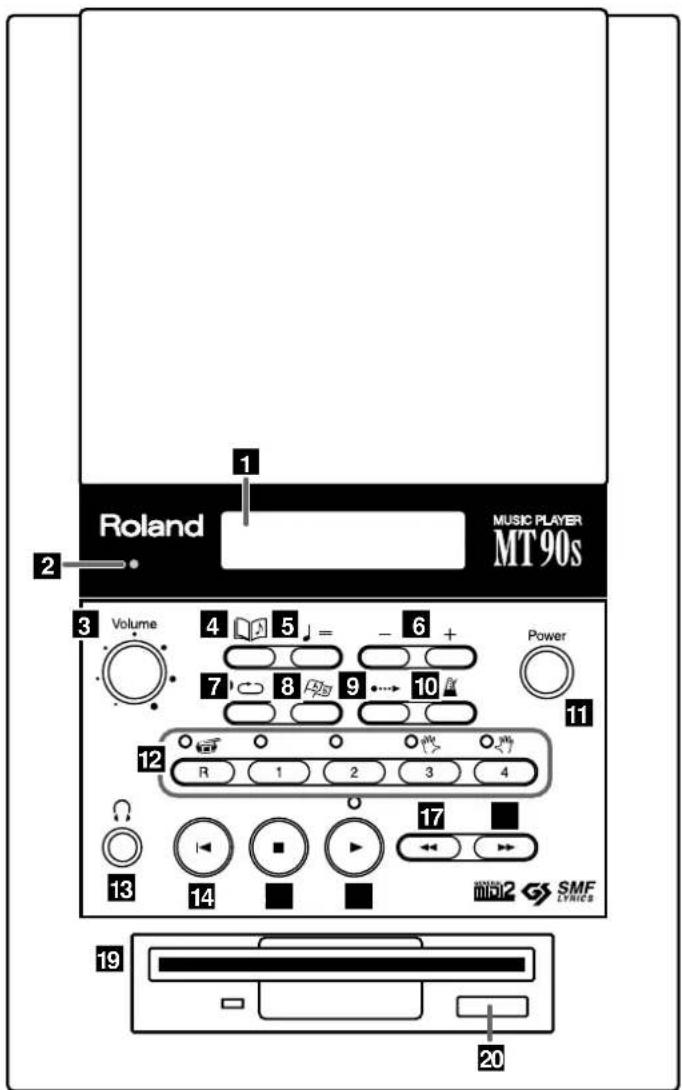
1 Display
This displays information regarding the operation you are performing (p. 9).
2 Beat Indicator
Flashes in time with the beat of the song or metronome.
3 [Volume] Knob
You can adjust the overall volume level (p. 11).
4 [ (Song)] Button
This is used to select a song (p. 14).
Pressing this displays the Basic screen (p. 9).
5 [ (Tempo)] Button
Adjusts the tempo (p. 18).
6 [-]/[+] Buttons
These change the value of the selected parameter or setting.
Pressing both the [-] and [+] buttons simultaneously returns the setting of a particular item to its original value.
7 [ (Repeat)] Button
Repeats playback of the specified song or section (p. 16, p. 25).
8 [ (Mark)] Button
Places a marker within a song (p. 23).
Pressing this displays the Marker screen (p. 9).
9 [ (Count-in)] Button
Plays the Count-In sound before a song is played back, or at the end of the intro (p. 22).
10 [ (Metronome)] Button
Activates the built-in metronome (p. 19).
11 [Power] Button
This is used to switch the power on and off (p. 10).
12 Track Buttons
The five buttons below are called Track buttons.
You can use these buttons to select and play back a song's performance parts (tracks) (p. 21).
[R] Button
[1] Button
[2] Button
[3] Button
[4] Button
13 Phones Jack
Headphones (sold separately) are connected here (p. 11).
14 [ (Reset)] Button
Returns to the beginning of the song.
15 [ (■top)] Button
Stops playback.
16 [ (Play)] Button
Start playback.
17 [ (Bwd)] Button
Rewinds the song.
18 [ (Ewd)] Button
Fast-forwards the song.
19 Disk Drive
Insert a floppy disk here (p. 14).
20 Eject Button
Ejects a floppy disk from the disk drive.
Rear Panel
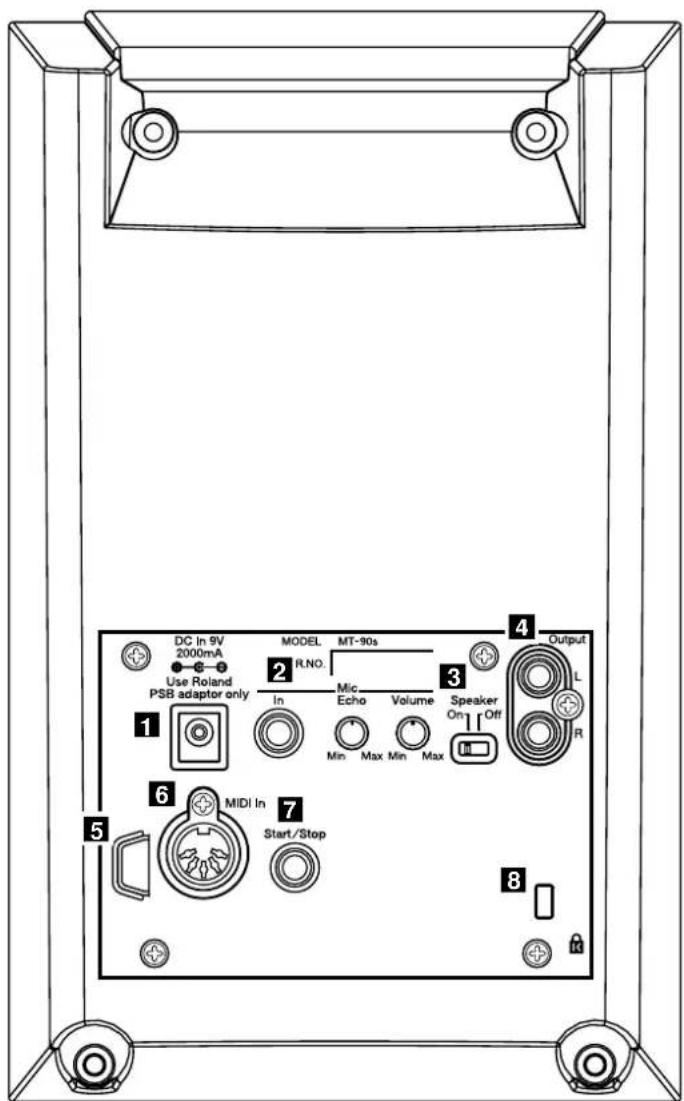
1 DC In jack
Connect the included AC adaptor to this jack (p. 10).
2 Mic
Mic In jack
Microphone (sold separately) are connected here (p. 11).
Mic Echo Knob
Adjusts the amount of echo applied to the sound from the microphone (p. 11).
Mic Volume Knob
Adjusts the volume of the microphone (p. 11).
3 Speaker Switch
Switches the sound from the MT 90s's speaker on and off (p.37).
4 Output R/L Jacks
Using optional audio cables, you can connect external instruments such as digital pianos here (p. 37).
5 Cord Hook
Hook the cord of the included AC adapter (p. 10).
This will prevent problems such as unintentional loss of power due to the power cord being accidentally unplugged, and will keep the DC In jack from being damaged.
6 MIDI In Connector
Using an optional MIDI cable, you can connect MIDI devices here (p. 37).
7 Start/Stop Jack
By connecting a pedal switch (optional) here, you can then use the pedal to start and stop performances (p. 36).
8 MicroSaver Security Slot ()
MicroSaver and Kensington are registered trademarks of Kensington Microwave Limited.
© 1997 Kensington Microwave Limited
Kensington Microwave Limited
2855 Campus Drive
San Mateo, CA 94403 U.S.A.
Web:www.kensington.com
About the Screen
■ Basic Screen
When you turn on the power to the MT 90s, the following screen appears.
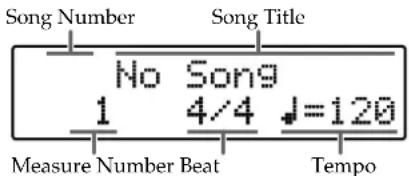
If a different screen appears, pressing the [ (long)] button once or a number of times returns you to the basic screen.
■ Marker Screen (p. 23–p. 26)
This screen appears by pressing the [ (Mark)] Button. You can then set the markers.
![Marker 1 [A] 5 [B] 9](/content/2026/05/763565/images/1258d1c2697305bd733c024ea1d3759024110c013453119f0dc3eeffcf217624.jpg)
Measure Number Marker A Marker B
■ 16-track Screen (p. 30–p. 31)
This screen appears by pressing the [2] button while holding down the [ (Song)] button.
You can then work on each Part individually. Settings made in this screen become ineffective once you return to the Basic screen.
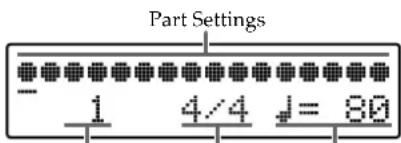
Measure Number Beat Tempo
■ Setting Screen
(p. 32–p. 36 and other pages)
Make the various settings in this screen.
Arrows appear in the upper right of the display with settings containing more than one parameter that can be changed.
Press [ (Fwd)] or [ (Fwd)] button to switch the screen. Change the value with the [-] and [+] buttons.
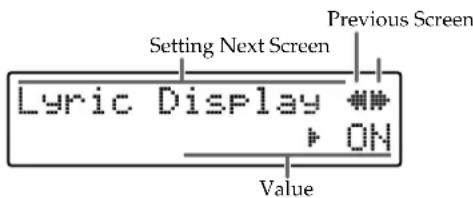
MEMO
If "E.00" or another number prefixed with an E appears on screen, take a look at "Error Messages/Other Messages" (p. 41).
Chapter 1 Easy Operation of the MT 90s Preparation
■ Connecting the AC Adaptor
- Attach the ferrite core to the included AC power cord.
Be sure to attach the ferrite core before using this product.
① Attach it to the AC power cord close to where the AC power cord connects to the AC adapter.
② Wind the cord around one turn.
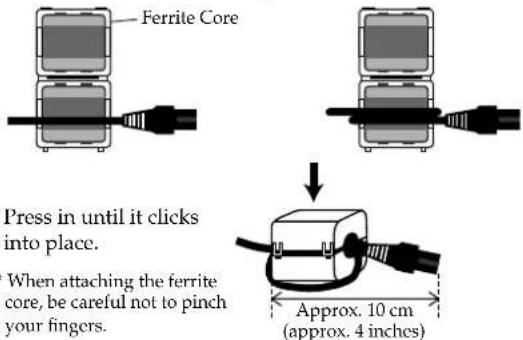
③ Press in until it clicks into place.
* When attaching the ferrite core, be careful not to pinch your fingers.

When closing the ferrite core, do not squeeze the cord excessively. Damaged cords can easily become a shock or fire hazard.
-
Connect the AC cord to the AC adaptor provided with the MT 90s.
-
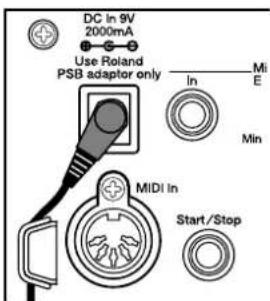
Connect the AC adaptor to the DC In connector on the rear panel.
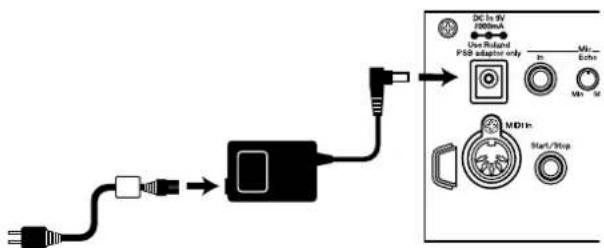
flowchart
graph LR
    A["Power Source"] --> B["Switch"]
    B --> C["Device with Switch"]
    C --> D["MDIn Start/Stop"]
    D --> E["User Roland PSS adapter only"]
    E --> F["DC In 400mA"]
- As shown in the diagram, loop the AC cord around the cord hook to fasten it in place. This will prevent problems such as unintentional loss of power due to the power cord being accidentally unplugged, and will keep the AC adaptor jack from being damaged.
- Plug the AC cord into a power outlet.
NOTE
Use only the ferrite core, AC adaptor and AC cord that are supplied with the MT 90s.
■ Turning the Power On and Off
Be sure to follow the steps below when turning the power on or off. Carrying out this procedure incorrectly may result in malfunctioning or in damage to the speakers and other parts.
Turning On the Power
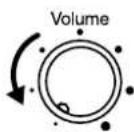
- Turn the [Volume] knob completely to the left to lower the volume to the minimum level.
Always make sure to have the volume level turned down before switching on power. Even with the volume all the way down, you may still hear some sound when the power is switched on, but this is normal, and does not indicate a malfunction.
- Press the MT 90s's [Power] button to turn on the power.

Adjust the volume at appropriate levels.
NOTE
This unit is equipped with a protection circuit. A brief interval (a few seconds) after power up is required before the unit will operate normally.
Turning Off the Power
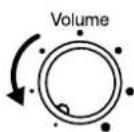
- Turn the [Volume] knob completely to the left to lower the volume to the minimum level.
- Turn off the MT 90s by pressing the [Power] button.
■ Adjusting the Volume
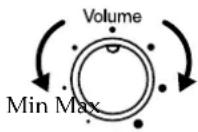
- Adjust the volume with the [Volume] knob.
Rotating the knob toward the right will increase the volume, and rotating it toward the left will decrease the volume.
■ Connecting a Headphones
Front Panel
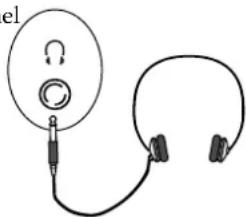
- Connect your headphones to the Phones jack.
The sound from the built-in speaker stops. Now, sound is heard only through the headphones.
Use the [Volume] knob on the MT 90s to adjust the volume of the headphones.

Use Stereo headphones.
Some Notes on Using Headphones
- To prevent damage to the cord, handle the headphones only by the headset or the plug.
- Connecting the headphones when the volume of connected equipment is turned up may result in damage to the headphones. Lower the volume on the MT 90s before plugging in the headphones.
- Listening at excessively high volume levels will not only damage the headphones, but may also cause hearing loss. Use the headphones at a moderate volume level.
■ Connecting the Microphone
You can connect a microphone into the Mic In jack, and enjoy karaoke with the MT 90s.
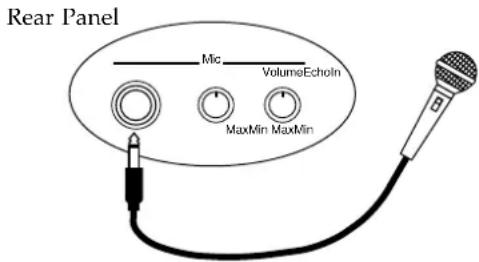
- Connect a microphone to the Mic In jack on the rear panel.
- Use the Mic Volume knob to adjust the volume level for the microphone.
- Use the Mic Echo knob to adjust the amount of echo for the microphone.

The mic volume cannot be adjusted with the [Volume] knob on the front panel.

Consult your Roland dealer when purchasing a microphone for use with the MT 90s.
Some Notes on Using a Microphone
- Be careful of high volume levels when using mikes late at night or early in the morning.
- When connecting a microphone to the MT 90s, be sure to lower the volume. If the volume control is too high when the microphone is plugged in, noise may be produced by the speaker.
- Howling could be produced depending on the location of microphones relative to speakers. This can be remedied by:
- Changing the orientation of the microphone.
- Relocating microphone at a greater distance from speakers.
- Lowering volume levels.
■ Adjusting the pitch to other instruments (Tuning)
Here's how to tune your instrument to the MT 90s's reference pitch, allowing you to enjoy the rich sonorities of the music you play.
Matching these standard pitches is called "tuning."
What is the standard pitch?
In general, the pitch at Middle A on the piano is what is referred to as the standard pitch.
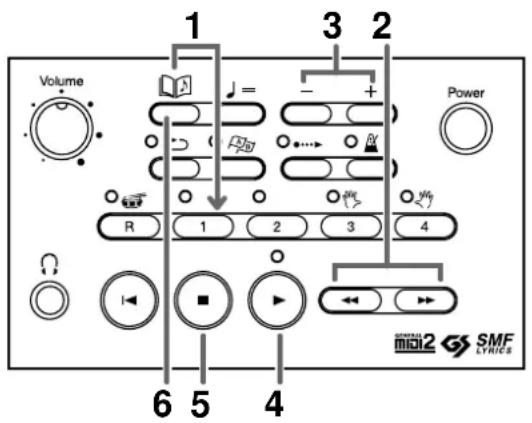
1. Hold down the [ (Song)] button and press the [1] button.
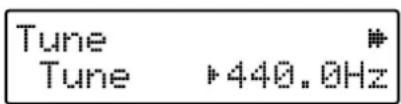
A Tuning Screen like the one shown below appears.
2. Press the [ (Bwd)] or [ (Fwd)] button to select the parameter you want to set.
Parameter names appear at the bottom left of the display.
| Display Description Value | ||
| Tune Changes the standard pitch. | 415.3 Hz–466.2 HzSet to “440.0 Hz” when the power is turned on. | |
| Key | Changes the key of the tuning reference sound. | A3–A5Set to “A4” when the power is turned on. |
| Sound | Selection for the sound used for tuning. | Sine, Oboe. |
3. Use the [+] and [-] buttons to change the value.
Pressing both the [-] and [+] buttons simultaneously returns the setting to its original value.
4. Press the [ (Play)] button to play the tuning sound.
When playing back a song, first press the [■Stop)] button to stop the song, then press the [▶Play)] button to play the tuning sound. Play your instrument to see if it is in tune with the MT 90s.
5. To stop the tuning sound, press the [ (S■p)] button.
The tuning sound stops.
6. When you've finished tuning, press the [ (Song)] button.
The Basic Screen appears.
This setting is remembered, and will still be in effect the next time the MT 90s is switched on. Please refer to “Restoring the Factory Settings (Factory Reset)” (p. 36) if you wish to restore the original settings.
The standard pitch can also be adjusted by the following method.
- While holding down the [Sing] button, press the [-] or [+] button.
The Tuning screen is displayed while the [ (\$ong)] button is held down.
Pressing the [-] button lowers the pitch. To raise the pitch, press the [+] button.
When you release the button, the previous screen reappears.
Listening to the Music
Using the MT 90s's internal disk drive, try listening to some of the songs on the Music Files Disk included with the unit.
The Music Files Disk contains recordings of piano songs and other performance data.
■ Inserting and Ejecting a Floppy Disk
1. With the label side facing up, insert the floppy disk into the disk drive until you hear it click firmly into place.
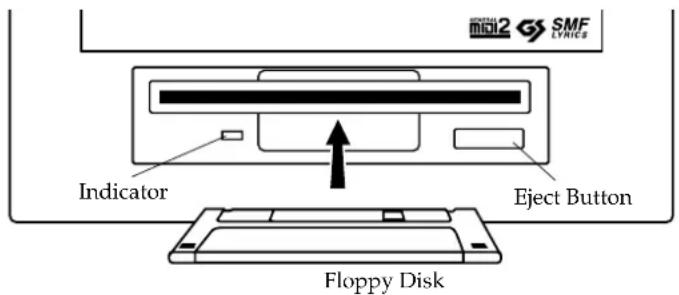
2. To remove a disk, press the EJECT button.
The end of the floppy disk comes out of the slot. Gently grasp the end of the floppy disk and pull it out.
■ Playing Back Songs
Try playing a song and then stopping it. Playing a song on the MT 90s is referred to as "playback."
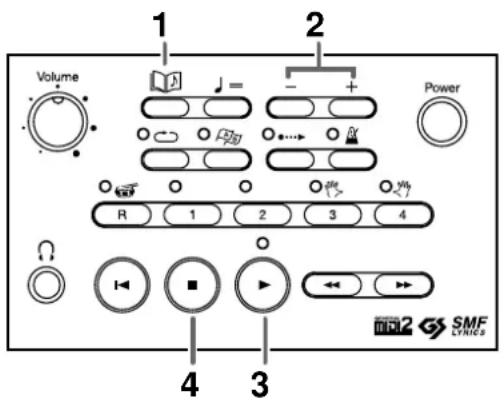
1. Press the [ (Song)] button.
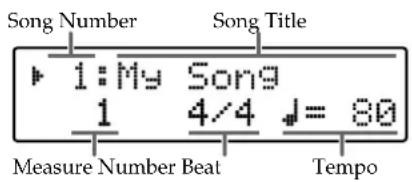
The song number and song title appear on the upper portion of the screen. This screen is called Basic Screen.
NOTE
If you're using the disk drive for the first time, be sure to read the important notes on p. 5.
NOTE
Don't try to eject the disk or turn off the power while reading or formatting is in progress. Attempting to do so may damage the magnetic surface of the disk, rendering it unusable. (The indicator light for the disk drive lights up at full brightness when reading or formatting a disk. Ordinary, the indicator will be less brightly lighted, or be extinguished.)
MEMO
If you press a [ ] (Song)] button while playing back music files that contains lyrics, the display will switch, and the lyrics will no longer be displayed. To re-display the lyrics, press the [ ▶ (Play)] button once again.
- Press the [+] and [-] buttons to select a song.
- Press the [ (Play)] button.
The song will begin playing back.
The song is played to its end, at which point it automatically stops.
- To stop playback of the song, press the [ (S■p)] button.
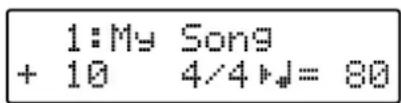
If a song ends at some point within a measure, instead of at the end of the measure, a “+” appears before the measure number.
Forward and Backward
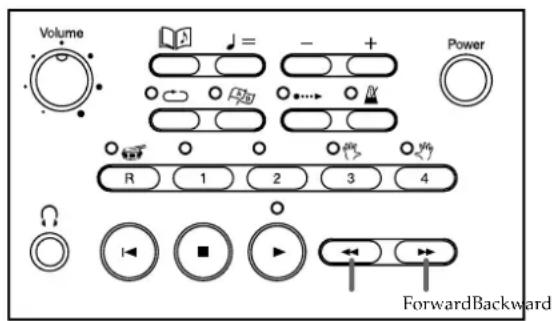
- Press the [ (B→d)] and [ (Fwd)→buttons to move to the bar you want to hear.
Pressing the button once moves your position by one measure. Hold down the button to move forward or backward continuously.
You can also use rewind and fast-forward during playback.
Moving to the Beginning or End of a Song
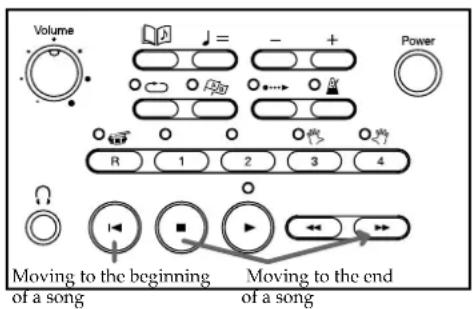
- Pressing the [ (Reset)] button returns you to the beginning of the song.
- Pressing the [ (Fwd)] button while holding down the [ (Stop)] button moves you to the end of the song.

When you play a song with an upbeat (in other words, a song that starts before the first beat), the screen shows PU, 1, 2, and so on as the measure numbers.

By connecting an optional pedal switch (such as Roland's model DP-2) to the MT 90s's Start/Stop jack, you can start and stop playback and recording of songs by pressing on the pedal (p. 36).

When playback of the song begins, the measure number in the lower left of the display flashes. This flashing indicates that the MT 90s is reading performance data from the floppy disk. While this is in progress, you cannot rewind or fast forward. Wait until processing finishes.
■ Repeated Listening of One Song
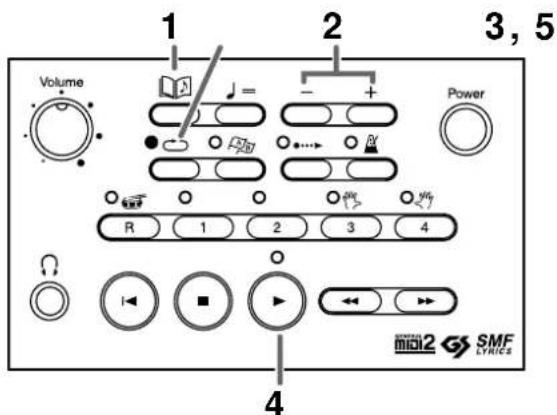
- Press the [ (Song)] button.
- Press the [+] and [-] buttons to select a song.
- Press the [ (Repeat)] button, getting it to light up.
This sets repeat playback of the selected song. - Press the [ (Play)] button.
Repeat playback begins. - When you press the [ (Repeat)] button once more, the button's indicator turns off, and the Repeat function is removed.
■ Listening to Continuous Repeated Playback of All Songs (All Song Play)
This function will play back all songs on disk in succession. When the last song has been played, playback will continue from the first song. This function is called "All Song Play."
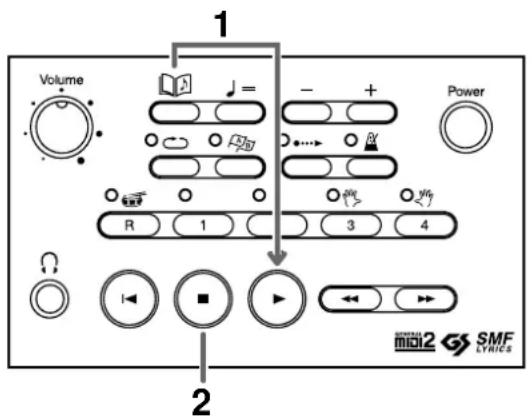
1. While holding down the [ (Song)] button, press the [ (Play)] button.
Playback of the selected song starts. When the last song has finished playing, playback then repeats after returning to the first song.
During All Song Play, the song number and "ALL" are alternately displayed at the top of the screen.
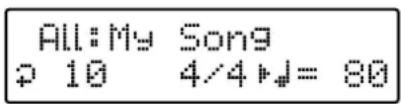
2. Press the [ (Sop)] button to stop playback.
All Song Play is exited when the performance is stopped.
![ROLAND MT-90S - Press the [ (Sop)] button to stop playback. - 1](/content/2026/05/763565/images/55405f81ff21f977b48ff9e67778ef52817977b72de0cd77d9cdf08e6ec1a717.jpg)
You can have songs play in random order, regardless of the song sequence registered on the disk. For more detailed instructions, refer to "Playing Back All Songs in Random Order" (p. 35).
Changing the Tempo
With songs that are difficult to play because their tempo is too fast, you may find it helpful to first practice the song with the tempo slowed down. Then, after becoming more familiar with the song, you can practice it at a gradually faster tempo.
Changing the tempo has no effect on the pitch of the notes. And you can change the tempo even when the song is in progress.
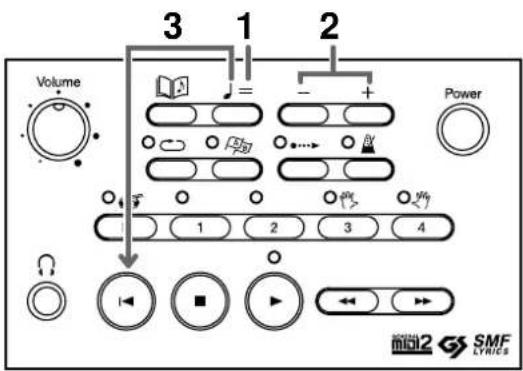
1. Press the [ (Tempo)] button.
The screen cursor ( moves to the indication for the tempo.
$$ \begin{array}{l l} 1: \text { My } & \text { Song } \ 1 & 4 / 4 \text { ♦ } = 8 0 \end{array} $$
2. Use the [-] and [+] buttons to adjust the tempo.
Pressing the [+] button once increases the tempo by one unit. Holding down the button makes the tempo change (speed up) continuously.
Pressing the [-] button once decreases the tempo by one unit. Holding down the button makes the tempo change (slow down) continuously.
3. To restore the original tempo, hold down the [ (Tempo)] button and press the [I(Reset)] button.
Pressing both the [-] and [+] buttons simultaneously also restores the original tempo.
■ Changing the Tempo by Pressing the Button in Time (Tap Tempo)
You can determine the tempo by the timing with which you press the button. This feature is called "Tap Tempo."
1. Tap the [ (Tempo)] button several times at the desired speed.
The tempo is set to the timing you used when tapping the button.
Sounding the Metronome
You can turn the metronome sound on and off with the press of a single button.
Use the metronome when you are having difficulty in getting a feel for the tempo.
You can also have the metronome play the tempo of a song while the song is played.
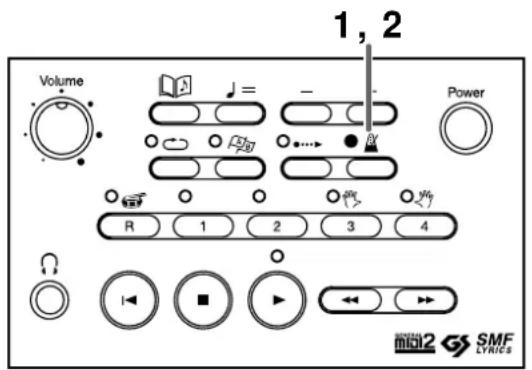
- Press the [ (Metronome)] button, getting it to light up.
The metronome will sound.
- To stop the metronome, press the [ (Metronome)] button, extinguishing its indicator.
■ Changing the Metronome Tempo
- Press the [ (Tempo)] button.
The cursor ( moves to the indication for the tempo.
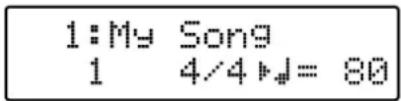
- Press the [-] and [+] buttons to choose a tempo.
Pressing both the [-] and [+] buttons simultaneously restores the original tempo.
- Press the [ (Metronome)] button, getting it to light up.
The metronome plays at the tempo you've chosen.

You can change the sound or the beat division pattern. For more information, see "Changing the Metronome's Settings" (p. 32).
■ Changing the Metronome Volume
1. While holding down the [ (Metronome)] button, press the [-] or [+] button.
The "Metronome Setting screen" below is displayed while the [ ] (Metronome)] button is held down.
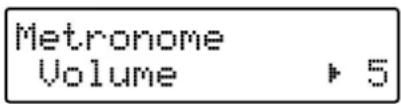
Pressing the [-] button lowers the volume of the sound. To raise the volume, press the [+] button.
When you release the button, the previous screen reappears.
■ Changing the Beat of the Metronome
1. While holding down the [ (Metronome)] button, press the [◀Bwd)] button or the [ (Fwd)] button, and select a beat.
If you currently have a song playing, first press the [■stop)] button to stop the song before continuing.
The Metronome Setting screen below is displayed while the [ (Metronome)] button is held down.
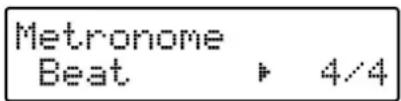
Beat selections:
2/2, 0/4 (only weak beats sound), 2/4, 3/4, 4/4, 5/4, 6/4, 7/4, 3/8, 6/8, 9/8, 12/8
When you release the button, the previous screen reappears.
The beat of the metronome can also be changed by the following method.
- Press the [ (Metronome)] button.
If you currently have a song playing, first press the [■stop)] button to stop the song before continuing.
The screen cursor ( moves to the indication for the beat.
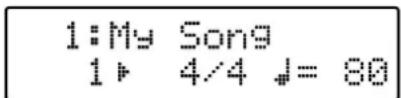
- Press the [-] and [+] buttons to choose a beat.

The volume setting of the metronome is also applied to the volume of the count sound (p. 22).
NOTE
You cannot change the beat of a song while it is being played back. In addition, the metronome sound is played at the beats of the song.
Practicing Along With a Song (Track Buttons)
Each part of the piano songs on the Music Files Disk included with the MT 90s can be played separately. So, whether you want to play the right-hand part, following along with the song's right hand; or play the left-hand part, following along the song's right hand, you can practice each hand's part individually.
The songs on the Music Files Disk included with the MT 90s are assigned to the five Track buttons as follows.
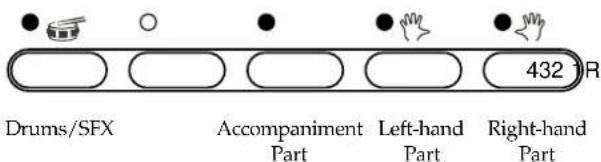
Button indicators for Track buttons to which sounds are assigned shine in green.
Indicators for buttons to which no sounds are assigned are not lit.
1. Press any of the Track buttons, turning off the button indicator.
Example: When practising the right-hand part...
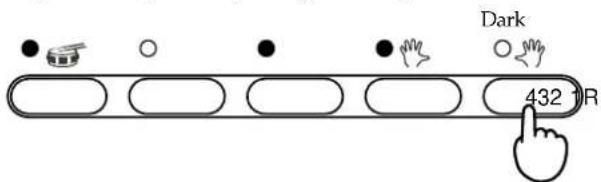
The right-hand part is not played back
2. Press the [ (Play)] button.
The sounds for the illuminated Track buttons are played, but no notes are played for the Track button that is dark.
Temporarily preventing the sounds of a specified part from playing is called "muting."
3. Pressing Track buttons with indicators that are not lit then turns on those indicators.
The sound plays.
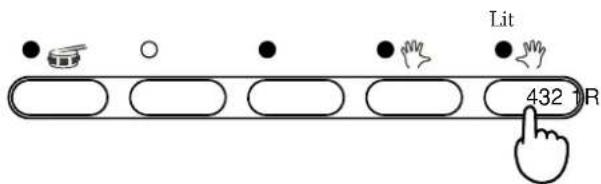
The right-hand part is played back
4. To stop playback of the song, press the [ (Sop)] button.
This feature can be used to practice one-handed parts.
![ROLAND MT-90S - To stop playback of the song, press the [ (Sop)] button. - 1](/content/2026/05/763565/images/3e20cd7d1ac201a0af2c911f7d9c96d08fd6ec301296310dc14535df7b979933.jpg)
Until a song is played back once, all Track buttons are lit. When the song is played back, the Track buttons to which sounds are assigned are lit.
![ROLAND MT-90S - To stop playback of the song, press the [ (Sop)] button. - 2](/content/2026/05/763565/images/0eb285ec2263f9ac65b871f7f05ddd12b73e1d66895998e200eb6f7eb3cf3b55.jpg)
When in the 16-Track screen (p. 30) and screens other than the Basic screen, you may be unable to use the Track buttons to place mutes and carry out other operations.
Matching the Timing of the Performance
This audible count before the playback of a song is called a "Count-In." You can also have the count sound be played at the end of a song's intro. This function is called "Intro Countdown."
When you're playing along with a song, you can make sure that your playing is in time with the song by sounding a count before the song starts playing.
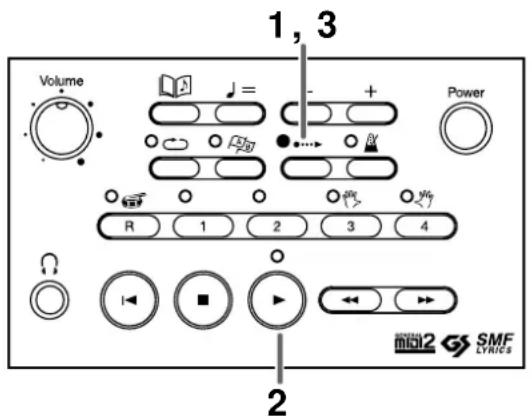
- Press the [ (Count-In)] button, getting it to light up.
- Press the [ (Play)] button.
After two measures of count sound, playback begins.
If the song does have an intro, then Intro Countdown is played at the end of the intro.
- When you press the [ (Count-In)] button once more, the button's indicator turns off, and the count sound is removed.

You can make the setting determining whether the Count-In or Intro Countdown is played. Take a look at "Changing the Count Sound Settings" (p. 33).

Intro Countdown is not played if the song has no intro.

Intro Countdown detects the beginning of the melody and then plays a count sound. If you find that Intro Countdown is not playing correctly, change the Melody Track (or part) that is specified. Take a look at “Changing the Count Sound Settings” (p. 33).

You can change the number of measures counted and the sound that you hear. Please refer to "Changing the Count Sound Settings" (p. 33).

The volume setting of the metronome (p. 20) is also applied to the volume of the count sound.
Chapter 2 More Convenient Functions
Placing Markers at the Section You Want to Practice Repeatedly
By placing markers for the section you want to practice repeatedly, you can quickly and easily go to those measures, and have the portion between the two markers repeat automatically.
You can set two markers (A and B) within a song.
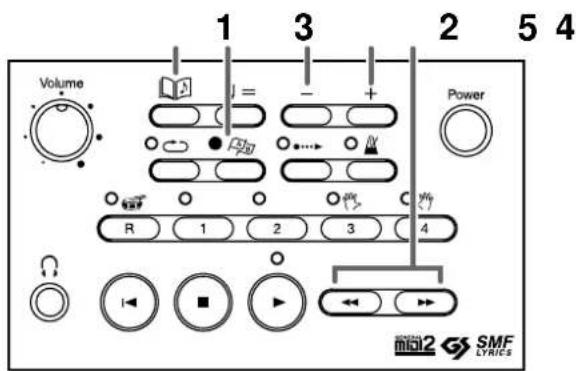
- Press the [ (Marker)] button.
A Marker Screen like the one shown below appears.
![Marker 1 [A] [ B ] ---- ---- Measure Number Marker A Marker B](/content/2026/05/763565/images/76c7d78e637e3bb96a05a8661d13028b62486d6e76c1c62beac4051726da0eec.jpg)
- Using the [ (Bwd)] and [ (Fwd) ] buttons, move to the location where you want to place the marker.
- Pressing the [-] button sets Marker A at that point in the song.
- In the same manner, move the measure, then press the [+] button to place Marker B.
You cannot place Marker B at the same point as Marker A, or at any point before Marker A.
![Marker 1 [A] 5 [B] 9](/content/2026/05/763565/images/e20cd96515a80617a0cfb7181d432ed72fde76a05be7b96c78a04248563f0c2a.jpg)
You can also press the [-] or [+] button to place a marker during playback of the song.
When you place a marker, the [ (Marker)] button's indicator lights.
- Pressing the [ (Song)] button returns you the Basic Screen.

The management of markers is done in the Marker screen. When you have finished working with the markers, press the
[ (Song)] button, and go back to the basic screen.

A marker is normally placed at the start of the selected measure, but you can also place a marker at a position part way through a measure. Take a look at "Placing a Marker in the Middle of a Measure" (p. 34).

Markers are removed when you select a different song.
■ Playback from a Marker Location
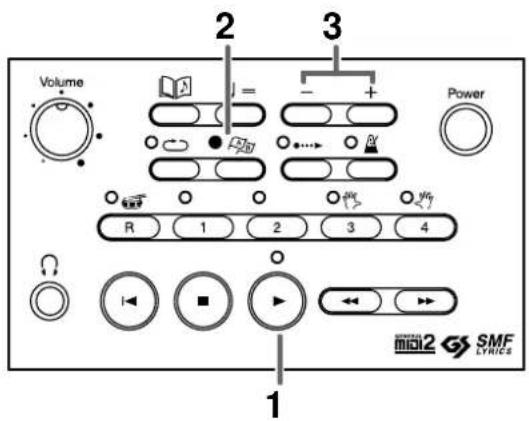
- Press the Play [ (Play)] button to start playback.
- Press the [ (Marker)] button.
A Marker Screen like the one shown below appears.
Determine Markers A and B beforehand.
![Marker 1 [A] 5 [B] 9](/content/2026/05/763565/images/d7b1697604dd2c00af49374a822ab4d9293c850487ea4fd45bb94cbeaa947d91.jpg)
- Press the [-] button to move to Marker A and start playback from there. Press the [+] button to move to Marker B and start playback from that point.
■ Erasing a Marker
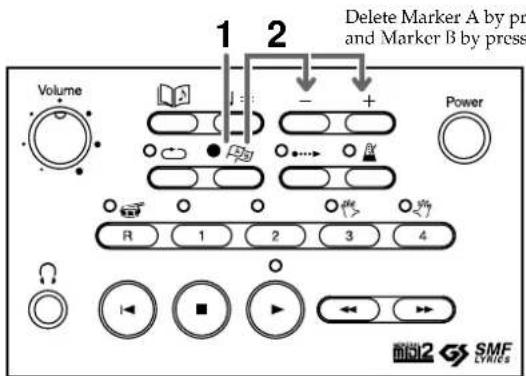
- Press the [ (Marker)] button.
The Marker Screen appears.
- Pressing the [-] button while pressing the [ (Marker)] button deletes Marker A. Pressing the [+] button while pressing the [ (Marker)] button deletes Marker B.
■ Repeating Playback Between Two Markers
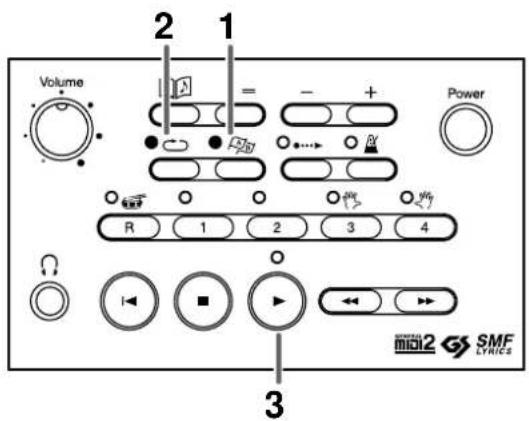
- Press the [ (Marker)] button.
The Marker Screen appears.
Determine Markers A and B beforehand.
- Press the [ (Repeat)] button; the button's indicator lights.
The section is set to be repeated.
- Press the Play [ (Play)] button to start playback.
The performance between Marker A and Marker B is repeated.
If you repeat playback with only Marker A placed...
Playback repeats between the Marker A and the end of the song.
If you repeat playback with only Marker B placed...
Playback repeats between the beginning of the song and the Marker B.
MEMO
While the indicator of the [Count-In] button is lit, the count-in sound will be played only for the first one of the repetitions. If desired, you can have it so the count sound is played throughout the repeated playback. Please refer to "Changing the Count Sound Settings" (p. 33).
■ Moving a Marker
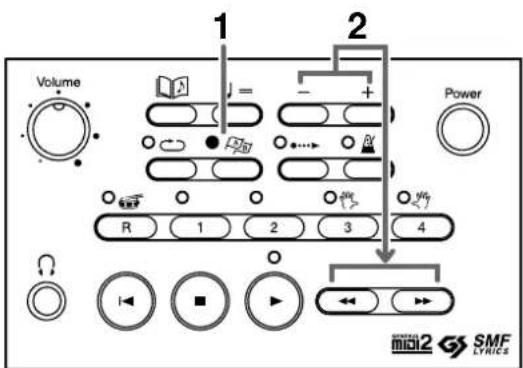
- Press the [ (Marker)] button.
The Marker Screen appears.
- To move marker A, hold down the [-] button and press the [◀Bwd)] or [ (Fv◆) ] button. To move marker B, hold down the [+] button and press the [◀Bwd)] or [ (Fv◆) ] button.
You can move backward or forward one measure at a time with each press of the [ (Bvd)] or [ (Fwd)] button, respectively. Hold down the buttons to make the marker move continuously.
Simultaneously Moving Markers A and B
- Hold down the [ (Marker)] button and press the [ (Bwd)] or [ ▶Fwd] button.
The Marker Screen appears.
For example, with Marker A set at the beginning of Measure 5 and Marker B at the beginning of Measure 9:
- Press the [ (Bvd)] button once to shift marker A to the beginning of the first measure and marker B to the beginning of the fifth measure.

- Press the [ (Fwd)] button once to shift marker A to the beginning of the ninth measure and marker B to the beginning of the thirteenth measure.

You can also use the following procedure to move Markers A and B simultaneously.
- In the Marker Screen, while holding down the [-] button and the [+] button simultaneously, press the [ (Bvd)] or [ (Fwd)] button. Marker A and marker B move at the same time.
Practice without Tempo Changes
Practicing at a fixed tempo a song that incorporates tempo changes.
Playing back songs at a fixed tempo after suspending any tempo changes is called "Tempo Mute."
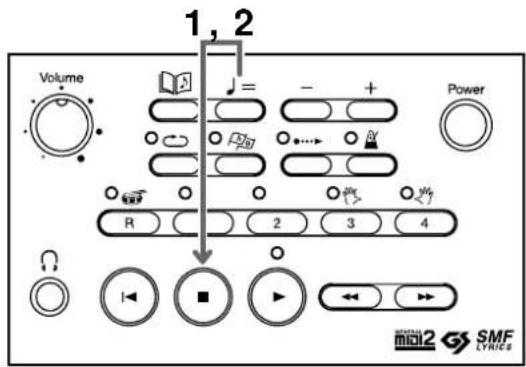
1. Hold down the [ (Tempo)] button and press the [ (Stop)] button.
A screen like the one shown below appears, and the song will be played back at a fixed tempo.
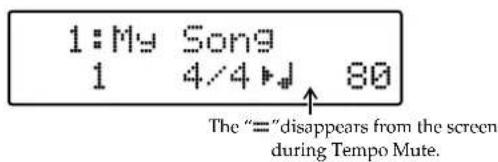
Try practicing after setting an easy tempo.
2. To release Tempo Mute, hold down the [ (Tempo)] button and press the [ ■Stop)] button.
You can also release Tempo Mute by holding down the [◀Tempo)] button and pressing the [▶Play)] button.
![ROLAND MT-90S - To release Tempo Mute, hold down the [ (Tempo)] button and press the [ ■Stop)] button. - 1](/content/2026/05/763565/images/f1fbe9b2875111af7ecd5f8f809d6a967986cf4d4370b1ed76044cd813dd7a81.jpg)
When you choose a different song, the tempo mute still stays off.
Changing the Key
You can transpose a song for playback.
Even if your score and the music file is in a different key, you can easily match it by transposing the performance on the MT 90s.
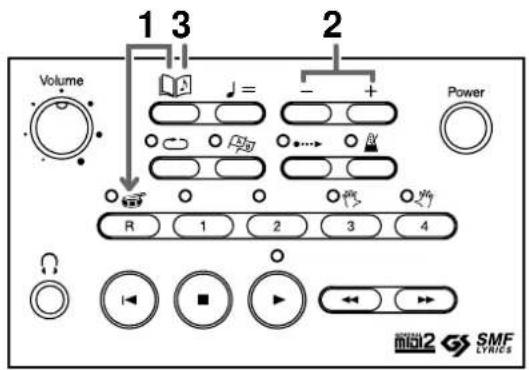
- While pressing the [ (Song)] button, also press the [R] button.
A screen like the one shown below appears.
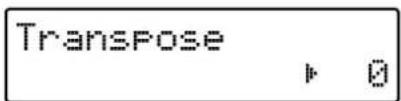
- Press the [-] or [+] button to set the transposition value.
You can transpose the song within a range from -24 to +24 (in semitone steps).
Pressing both the [-] and [+] buttons simultaneously returns the setting to "0."
If you want a song in "D" to play back in "C" for example, make a setting of -2.
- Pressing the [ (Song)] button returns you the Basic Screen.

The transposition setting returns to its original value when you switch off the power, or choose another song.
Changing the Reverberation (Reverb Effect)
You can choose the way the reverb effect is applied to the performance when playing back music files.
What is the reverb effect?
Reverberation is provided by the reverb effect. With the reverb effect, you can get a pleasant reverberation, making it sound as if you were performing in a concert hall or similar space.
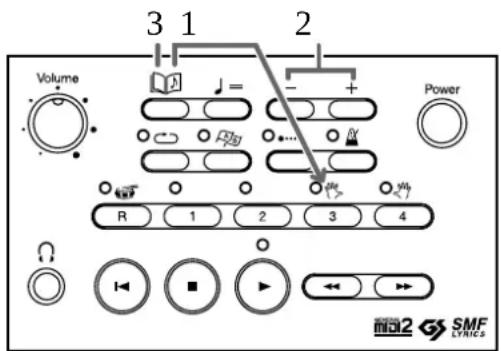
- While pressing the [ (Song) Button, also press the [3] button.
A Reverb Setting Screen like the one shown below appears.
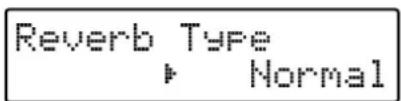
- Press the [-] or [+] button to select how the reverb effect is applied.
| Indication Description | |
| Listening | Adds an amount of reverb appropriate for music appreciation. |
| Normal | The song is played with the reverb settings set in the music file left unchanged. |
| Lesson | Adds an amount of reverb appropriate for practicing piano and other such times. |
- Pressing the [ (Song) button returns you the Basic Screen.
The reverb effect can also be changed by the following method.
- While holding down the [ (Song)] button, press the [ (Bwd)]
or [▶(Fwd)] button to select the way the reverb is to be applied.
The Reverb settings screen is displayed while the [ (Song)] button is held down.
When you release the button, the previous screen reappears.
NOTE
Some music files do not allow the reverb settings to be changed.
MEMO
When you select a different song, the reverb reverts to its original settings.
Listening to Specific Instruments
Commercial SMF music file ordinarily is composed of sixteen parts, with each individual part containing a recording of a different instrument.
You can select specific parts and play them individually, and you can mute the selected parts as well (muting of a single part during playback is referred to as "Minus One").
■ Playing Back a Single Part (Solo)
You can select a part and have only that part play. This is convenient for practice, as you can select the sound of an accompaniment instrument to listen to.
Playback of a single selected part is called "Solo."
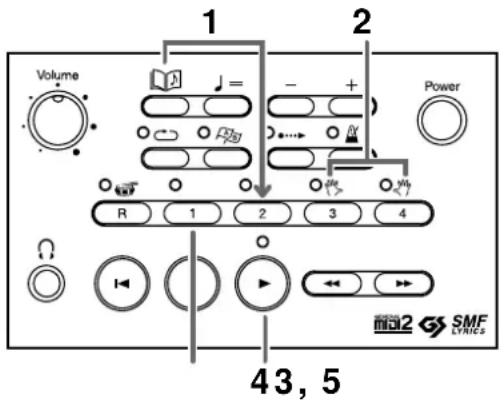
1. While holding down the [ (Song)] button, press the [2] button.
The 16-Track screen, shown below, appears in the display.
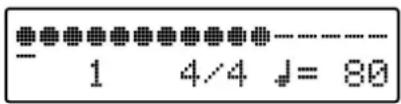
| Indication Description | |
| ● This Part is played back | |
| ○ This Part is not played back | |
| — There is no sound on this Part |
2. Press the [3] or [4] button to move the cursor () in-the upper part of the screen to the part you want to have played.
3. Press the [1] button.
A dot (●) appears only at the part indicated by the cursor, and only that part is selected for playback.
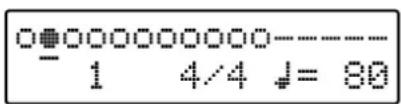
When you press the [3] or [4] button, the Solo part moves with the cursor.
MEMO
Working with individual parts is done in the "16 Track screen." When you have finished working with the parts, press the [ ] (Song)] button, and go back to the basic screen. However, Solo and Mute settings are discarded when you bring up a screen other than the 16-Track screen.
- Press the Play [ (Play)] button to play back the song.
Only the selected Part is played back.
- To release the Solo function, press the [1] button once more.
The sounds for all parts are then played.
■ Preventing a Selected Part from Sounding (Mute)
You can select for each part whether or not that part is to be played back.
- While pressing the [ (Song)] button, also press the [2] button.
A 16-track screen like the one below appears.
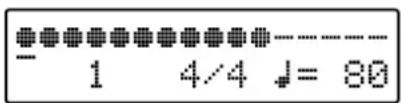
- Press the [3] or [4] button to move the cursor () in the upper part of the screen to the part you want to set.
- Using the [2] button or [+]/[-] buttons, select • (play back) or ○ (do not play back).
Use the [2] button to switch between • and O.
Press the [-] button to have the part played back (●), and press the [+] button to mute the part (○).
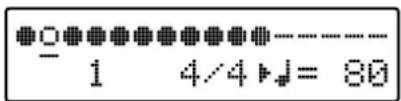
- Press the [ (Play)] button to play back the song.
The sounds of parts designated by a “O (not played back)”, are not played. Try playing those parts yourself.
■ Displaying the Names of Tones Assigned to Parts
You can display the names of the tones assigned to each part.
- While pressing the [ (Song)] button, also press the [2] button.
The 16-Track screen is displayed.
- Press the [R] button; the tone name is displayed.
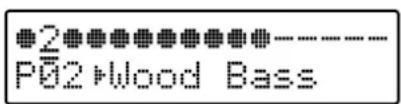
The tone name appears for several seconds, then the original screen automatically reappears.
NOTE
Solo and Mute settings are discarded when you bring up a screen other than the 16-Track screen.
MEMO
You can also use the [3] or [4] buttons to momentarily display the name of the tone assigned to the part indicated by the cursor.
Chapter 3 Other Functions
Changing the Metronome's Settings
You can change the metronome settings, including the metronome sound and volume settings.
1. While holding down the [ (Song)] button,
press the [ Metronome)] button.
The Metronome Setting screen appears.
| Metronome Volume | 5 |
2. Press the [ (Bvd)] or [ (Fwd) button to select the parameter to be set.
| Parameter Description |
| Volume Metronome volume |
| Beat Beat |
| Sound Metronome sound (tone) |
| Pattern Beat division pattern |
3. Press the [+] and [-] buttons to change the value.
The values that can be set for each parameter are shown below.
| Parameter Value Description | ||
| Volume 0–10 | Increasing the value will raise the volume. With a setting of “0,” no sound is produced.The setting is at “5” when the MT 90s is powered up. | |
| Beat 2/2, | 0/4,2/4,3/4,4/4,5/4,6/4,7/4,3/8,6/8,9/8,12/8 | When 0/4 is selected, only the weak beats sound. |
| Sound Click | Conventional metronome sound | |
| Elec. | Electronic metronome sound | |
| Voice J | A voice counting (“one, two, three...”) in Japanese | |
| Voice E | A voice counting (“one, two, three...”) in English | |
| Animal | Dog and cat cries | |
| Parameter Value | Description |
| Pattern Normal | The metronome sounds in the ordinary way. |
| Counting starts at the beginning of the measure, in intervals of dotted half-note upbeats. | |
| Counting starts at the beginning of the measure, in intervals of half-note upbeats. | |
| Counting starts at the beginning of the measure, in intervals of dotted quarter-note upbeats. | |
| Counting starts at the beginning of the measure, in intervals of quarter-note upbeats. | |
| Counting starts at the beginning of the measure, in intervals of dotted eighth-note upbeats. | |
| Counting starts at the beginning of the measure, in intervals of eighth-note upbeats. | |
| Counting starts at the beginning of the measure, in intervals of sixteenth-note upbeats. | |
| +Doubl | The metronome plays with a backbeat added to each beat. |
| +Tripl | Counting is with triplets for each beat. |
| +Shufl | The added sounds are shuffled. |
4. Press the [Song)] button to display the Basic Screen.
→ Take a look at "Sounding the Metronome" (p. 19).
* Metronome sound settings remain stored in memory even while the power is turned off. Please refer to "Restoring the Factory Settings (Factory Reset)" (p. 36) if you wish to restore the original settings.
* When “+Double” is selected for the triplet patterns (6/8, 9/8, and 12/8), the additional sound is played as triplets.
→ The volume setting of the metronome is also applied to the volume of the count sound (p. 22).
Changing the Count Sound Settings
You can change the Count-In and Intro Countdown sound setting.
- While holding down the [ (Song)] button, press the [ (Count-In)] button.
The Count-In/-down Setting screen appears.
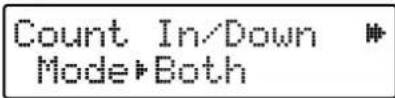
- Press the [ (Bvd)] or [ (Fwd)] button to select the parameter to be set.
| Parameter Description | |
| Count In/Down Mode | Determines when the count sound is played. |
| Count Down Sound | Sets the tone of the count sound when Intro Countdown is used. |
| Count Down Trk/Part | Specifies the track (or part) to be used for detecting the melody when Intro Countdown is used. |
| Count In Sound | Sets the tone of the count sound when Count-in is used. |
| Count In Measure | Number of measures to be counted for the count-in |
| Count In Repeat | Repeat setting for the count-in |
- Press the [+] and [-] buttons to change the value.
The values that can be set for each parameter are shown below.
| Parameter Value Notes | |
| Count In/Down Mode | Both The count sound is played both before the performance and at the end of the intro. |
| Count In The count sound is played only before the performance. | |
| Count Down The count sound is played only at the end of the intro. |
| Parameter Value Notes | |
| Count Down Sound | VoiceJ A voice counting ("one, two, three...") in Japanese |
| VoiceE A voice counting ("one, two, three...") in English | |
| Count Down Trk/Part (When you choose a different song, this item returns to "Trk 3+4.") | Trk 3+4 Left-hand and right-hand parts of piano songs. This is the setting selected when the power is turned on. |
| Trk4 Right-hand parts of piano songs. | |
| Part1-16 | |
| Count In Sound | Sticks Sound of tapping with a stick |
| Click A bell and a clicking sound | |
| Elec. Electronic sound | |
| Voice J A voice counting ("one, two, three...") in Japanese | |
| Voice E A voice counting ("one, two, three...") in English | |
| Animal Dog and cat cries | |
| Count In Measure | 1, 2 Set to "2" (two measures) when the power is turned on. |
| Count In Repeat | First The count is sounded only during the first playback. This is the setting selected when the power is turned on. |
| Every The count is sounded each time the song is played. |
- Press the [Song)] button to display the Basic Screen.
→ Refer to "Matching the Timing of the Performance" (p. 22), "Repeating Playback Between Two Markers" (p. 25).
* Count sound settings are saved even when the power is turned off and then later turned on again (except the setting of "Count Down Trk/Part"). Please refer to "Restoring the Factory Settings (Factory Reset)" (p. 36) if you wish to restore the original settings.
* If you change the setting for the "Count Down Sound" while the measure number indication is flashing in the basic or other screens (while importing song data), the song may play again from the beginning.
Placing a Marker in the Middle of a Measure
Usually, a marker is place at the beginning of the selected measure, but you can change the settings for placing the marker so that it is set at another point within a measure (but on a beat).
- While holding down the [Song] button, press the [Mark] button.
A screen like the one shown below appears.
MarkerResolution Meas
- Press the [+] and [-] buttons to change the value.
| Indication Description |
| Meas The marker is placed at the beginning of the measure. |
| Beat The marker is placed at the beginning of the beat. |
- Press the [ (Song)] button to display the Basic Screen.
→ When placing a marker somewhere other than at the beginning of the measure (when set to "Beat"), place the marker during playback of the song.
→ Refer to "Placing Markers at the Section You Want to Practice Repeatedly" (p. 23).
Changing the Lyric Setting
You can set the language in which song lyrics are shown for music files that includes lyrics data.
You can change this setting when lyrics are not indicated properly in the display.
This setting is also applied to the display of the song title.
- While pressing the [Song)] button, also press the [4] button.
The Function screen is displayed.
- Press the [ (Bvd)] or [ (Fwd) button until "Lyric Language" is displayed.
A screen like the one shown below appears.
Lyric Language * English
- Press the [-] or [+] button to select a value.
| Indication Description |
| Japanese Lyrics are displayed in Katakana. |
| English Lyrics are indicated with special character like “ü.” |
- Press the [Song)] button to display the Basic Screen.
→ This setting is remembered, and will still be in effect the next time the MT 90s is switched on. Please refer to "Restoring the Factory Settings (Factory Reset)" (p. 36) if you wish to restore the original settings.
Removing Lyrics from the Screen
Some music files used for karaoke include lyric data, with song lyrics being displayed on the screen. You can hide the on-screen lyrics displayed by such music files.
- While pressing the [Song)] button, also press the [4] button.
The Function screen is displayed.
- Press the [ (Bvd)] or [ (Fwd) button until "Lyric Display" is displayed.
A screen like the one shown below appears.
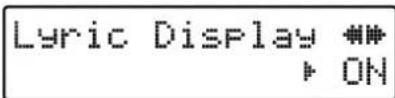
- Press the [-] or [+] button to select a value.
| Value Description |
| ON The lyrics are displayed (if the music file being played back includes the lyrics) |
| Off Lyrics are not displayed. |
- Press the [Song)] button to display the Basic Screen.
→ If you press a [ang)] button while playing back music files that contains lyrics, the display will switch, and the lyrics will no longer be displayed. To re-display the lyrics, press the
[▶lay)] button once again.
Playing Back All Songs in Random Order
The function which plays all of the songs on a disk in sequence, and then returns to the first after the last song is played is called "All Song Play."
With "All Song Play," you can also have the roster of songs played in random order.
- While pressing the [Song)] button, also press the [4] button.
The Function screen is displayed.
- Press the [ (Bvd)] or [ (Fwd) button until "All Song Play" is displayed.
A screen like the one shown below appears.
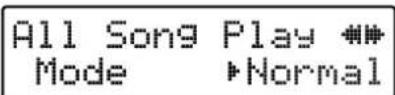
- Press the [-] or [+] button to select a value.
| Value Description |
| Normal The songs are played back in the order in which they are registered on the disk. |
| Random The songs are played back in random order. |
- Press the [Song)] button to display the Basic Screen.
→ Refer to "Listening to Continuous Repeated Playback of All Songs (All Song Play)" (p. 17).
Restoring the Factory Settings (Factory Reset)
The following do not revert to their original settings, even when the MT 90s is turned off and then on again. You can return these settings to the original values set when the unit was shipped from the factory.
Restoring these factory settings is called "Factory Reset."
Stored Settings
Tuning settings (p. 12)
Metronome sound (p. 32)
Count sound settings (except the setting of "Count Down Trk/Part") (p. 33)
Lyric language setting (p. 34)
- While pressing the [Song)] button, also press the [4] button.
The Function screen is displayed.
- Press the [ (Bvd)] or [ (Fwd) button until "Factory Reset" is displayed.
A screen like the one shown below appears.
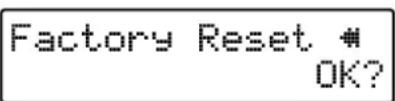
To cancel Factory Reset, press the [ (Song)] button to return to the original screen.
- Press the [+] button.
The following screen appears, and the [Play)] button's indicator begins flashing.
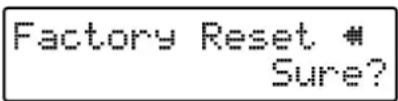
To cancel Factory Reset, press the [■top)] button.
- Press the [Play)] button to execute Factory Reset.
- Turn off the power, then on again.
Playback/ Stop using a Pedal Switch
You can connect a pedal switch (the optional DP-2) to the MT 90s, then depress the pedal to start and stop playback of performances.
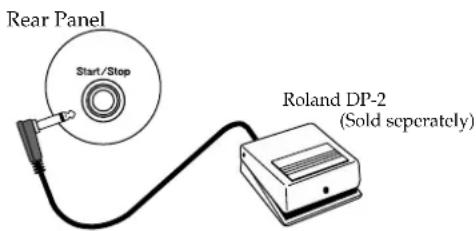
- Connect the pedal switch to the Start/Stop jack on the rear panel.
- Playback will begin when you press the pedal.
- Press the pedal once more to stop playback.
* For the above application, you will first need to purchase the Roland DP-2 Pedal Switch. Please consult the dealer where you purchased these products when using them with the MT 90s.
Connect Your MIDI Instrument
You can connect a MIDI keyboard, MIDI pad controller, or other such external MIDI device and use it to play sounds from the MT 90s's sound generator (the internal part that creates musical instrument sounds).
* When operating the MT 90s with an external MIDI device connected, you must make the MIDI settings for the connected MIDI device. For more detailed instructions, refer to the owner's manual for the device you are using.
About MIDI
MIDI stands for Musical Instrument Digital Interface, an international standard which allows performance information to be communicated among electronic musical instruments and computers. By using a MIDI cable to connect devices that are equipped with MIDI connectors, these devices are then able to send and receive data.
* A separate publication titled "MIDI Implementation" is also available. It provides complete details concerning the way MIDI has been implemented on this unit. If you should require this publication (such as when you intend to carry out byte-level programming), please contact the nearest Roland Service Center or authorized Roland distributor.
■ Connectors
Rear Panel
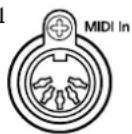
MIDI In Connector
Connect this to the MIDI Out connector on an external MIDI device using a MIDI cable (sold separately).
Performance messages from an external MIDI device are received here. These incoming messages may instruct the receiving MIDI instrument to play sounds or switch Tones.
Connecting to Audio Devices and Other Equipment
When you connect the MT 90s to audio equipment, you can play the sounds from the MT 90s through the speakers on the audio equipment or record your performances on a tape recorder or other recording device.
When connecting, please use an audio cable with a RCA pin plug, such as the PJ-1M (sold separately).
■ Connectors
Rear Panel
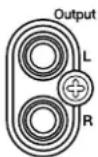
Output Jacks
You can connect the MT 90s to other audio devices with a regular audio cable, and play the sounds through the speakers of the connected system.
When you don't want the sound to be played through the MT 90s's speaker, set the Speaker switch to "Off."
■ When Connecting to an Electronic Piano
Making the Connections
When the MT 90s is connected to an electronic piano, you can have the MT 90s's sound be played through the piano's speakers.
* To prevent malfunction and/or damage to speakers or other devices, always turn down the volume, and turn off the power on all devices before making any connections.
- Using a commercially available audio cable, connect the Output R/L jack of the MT 90s to the digital piano's Input R/L jack.
This lets you play the sound from the MT 90s through the digital piano speakers as well as from the MT 90s's own speaker.
- Set the Speaker switch on the MT 90s's rear panel to "Off."
Sound from the MT 90s speaker now stops.
When the Speaker switch is set to "On," sound is heard through the MT 90s's speaker.
Chapter 4 About Music Files
What Are Music Files?
Music files contain information describing the details of a musical performance, such as “the C3 key on a keyboard was pressed for this amount of time, using this amount of force.” By inserting the floppy disk into the disk drive on the MT 90s, the performance information is sent from the floppy disk to the piano, and played faithfully by the piano. This is different than a CD, since the music file does not contain a recording of the sound itself. This makes it possible to erase certain parts, or to change instruments, tempos and keys freely, allowing you to use it in many different ways.
Regarding Copyright
Use of the song data contained on the data disk supplied with this product for any purpose other than private, personal enjoyment without the permission of the copyright holder is prohibited by law. Additionally, this data must not be copied, nor used in a secondary copyrighted work without the permission of the copyright holder.
Be aware that any other use may constitute copyright infringement. Roland Corporation assume no responsibility whatever for any copyright infringement that may result from a work that you create.
Music Files that can be Used with the MT 90s
- Floppy disks saved on a Roland MT Series, or Roland Piano Digital HP-G/KR Series instrument
- Roland Digital Piano Compatible music files
Roland's original music file is made specifically for practicing the piano.
Some follow an instructional curriculum, allowing for a complete range of lessons, such as “practicing each hand separately” or “listening to only the accompaniment.”
• SMF Music files (720 KB/1.44 MB format)
SMFs (Standard MIDI Files) use a standard format for music file that was formulated so that files containing music file could be widely compatible, regardless of the manufacturer of the listening device. An enormous variety of music is available, whether it be for listening, for practicing musical instruments, for Karaoke, etc.
* If you wish to purchase SMF music files, please consult the retailer where you purchased your MT 90s.
SMF with Lyric SMF LYRICS
"SMF with Lyrics" is SMF song data that includes song lyrics. When music data showing the "SMF with Lyrics" mark is played back on a similarly marked device, the lyrics can then be shown in the device's display.
About the MT 90s's Sound Generator
The MT 90s is equipped with a GM2/GS compatible sound generator.
General MIDI

The General MIDI system is a set of recommendations which seeks to provide a way to go beyond the limitations of proprietary designs, and standardize the MIDI capabilities of sound generating devices. GM-compatible sound generating devices and music data are marked with the GM logo. Music data marked with the GM logo can be played nearly identically on any sound generating device that also bears the GM logo.
General MIDI 2

The upwardly compatible General MIDI 2 recommendations pick up where the original General MIDI left off, offering enhanced expressive capabilities, and even greater compatibility. Issues that were not covered by the original General MIDI recommendations, such as how sounds are to be edited, and how effects should be handled, have now been precisely defined. Moreover, the available sounds have been expanded. General MIDI 2 compliant sound generators are capable of reliably playing back music files that carry either the General MIDI or General MIDI 2 logo.
In some cases, the conventional form of General MIDI, which does not include the new enhancements, is referred to as "General MIDI 1" as a way of distinguishing it from General MIDI 2.
GS Format

The GS Format is Roland's set of specifications for standardizing the performance of sound generating devices. GS Format, a set of specifications surpassing those of GM, not only expands the number of tones, but increases compatibility by including detailed specifications for tone editing, effects (chorus and reverb), and other functions. Designed with the future in mind, the GS Format can readily include new sounds and support new hardware features when they arrive. Since it is upwardly compatible with the General MIDI System, Roland's GS Format is capable of reliably playing back GM Scores equally as well as it performs GS Music Data (music data that has been created with the GS Format in mind).
Using Computer-Created Song Data on the MT 90s (Disk Format)
When using the MT 90s to play back song data created with a computer, first save the SMF data on a floppy disk formatted by the MT 90s.
■ Floppy Disk Formats
Formatting a floppy disk erases all information stored on the disk, and puts it in a format that is acceptable for the device in which it will be used. Floppy disks cannot be used on the MT 90s without changing the disk's format to that of the MT 90s.
* Formatting a disk destroys all data previously stored on the disk. If you're formatting a used floppy disk for reuse, be sure to check first to make sure the disk doesn't contain any data you don't want to lose.
* If you're using the disk drive for the first time, be sure to read the important notes on p.5.
1. Confirm that the disk's protect tab is in the "Write" position.
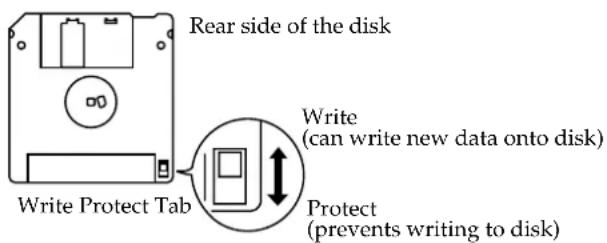
-
Insert the floppy disk into the disk drive.
-
While pressing the [Song] button, also press the [4] button.
The Function screen is displayed.
- Press the [ (Back)] or [ (Forward)] button until "Disk Format" is displayed.
A screen like the one shown below appears.
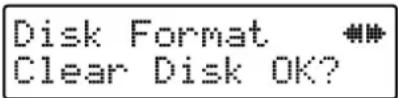
5. Press the [+] button.
The following screen appears, and the [Play] button's indicator begins flashing.
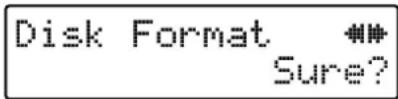
If you do not want to format the disk, press the [ ] (Song)] button several times to return to the previous screen.
6. Press the [Play)] button to begin formatting.
The following message appears in the display: "Formatting...."
When the formatting is done, the previous screen is displayed.
* Never switch off the power while this operation is in progress.
7. Save the song data on the MT 90s-formatted disk to your computer.
Please observe the following when saving the data.
- Save the song data in SMF format.
- Name files using no more than eight alphanumeric characters.
- Add the extension ".MID" at the end of file names. If the filename extension is not added or if it is incorrect, the MT 90s will not be able to recognize that file.
- Convert to SMF Format 0. If the data is in format 1, it may not be played correctly.
Now the data can be played back on the MT 90s.
* It may not be possible to play back excessively large files.
* Roland cannot recover nor provide any guarantee regarding data that may be lost or erased by a malfunction of the MT 90s.
Troubleshooting
If you are encountering any problems with the equipment, please read the section below determining that there has been any malfunction.
| Case Cause/ | What to do |
| The MT 90s does not switch on. | Is the power cord properly connected? (p. 10) |
| No sound is produced. | Is the [Volume] knob completely to the left (turn-completely down)? (p. 11) |
| Are headphones connected? (p. 11) | |
| Is the Speaker switch turned to “Off?” (p. 37) | |
| Are the MT 90s and other devices properly connected? (p. 37) | |
| Is the power to all equipment turned on? | |
| Some notes are missing. | The MT 90s can play a maximum of 64 notes simultaneously. When performing with a song on a floppy disk, or when using the damper pedal a lot during a performance, the number of notes being expressed at any one moment may exceed 64. When the total exceeds 64 notes, then some will be omitted. |
| The song does not play. | Is the Track button indicator off? (p. 21) Sounds on buttons whose indicators are off are not played. Press the desired buttons to turn on their indicators. |
| Have you inserted the floppy disk containing the desired song into the disk drive? | |
| I can’t play back songs on floppy disks right away. | There are two types of SMFs, Format 0 and Format 1. It can take a while for Format 1 data to begin playback. To determine the format of the music files you are using, please refer to the documentation that came with the data. |
| Certain instrument sounds are missing. | Have you selected the “Minus One” function? (p. 30) |
| You cannot forward or rewind data. | While the MT 90s is loading data from a floppy disk, you cannot fast-forward or rewind data (p. 15). |
| When the size of a song is too large, it cannot be forwarded or rewound. | |
| The song doesn’t go the beginning, even if the [ [Reset)] button is pressed. | Some music files contain songs that are set to stop before the song finishes. With such songs, pressing the [ [Reset)] button returns you to the point where the performance stops. However, by pressing the button again a number of times, you can get back to the beginning of the song. |
| Case Cause/ | What to do |
| The song goes out of tune, or the pitch drifts. | Has the song been transposed? (p. 28) |
| Is the “Tuning” setting correct? (p. 12) | |
| The Track buttons don’t work. | Is the 16 Track screen displayed (p. 30)? When the 16 Track screen is displayed, the Track buttons do not work. |
| The pedals are not functioning. | Are the pedals connected properly? (p. 36) Make sure that the cord from the pedal switch is connected securely to the Start/Stop jack. |
| Lyrics are not indicated properly in the display. | With some music files, the lyrics cannot be displayed correctly. |
| When the lyrics are displayed, pressing the [Song)] button or other buttons removes the lyrics from the screen. If you want the lyrics displayed again, press the [Play)] button once more. | |
| Changing the setting of the “Lyric Language” (p. 34) may display the lyrics correctly. |
Error Messages/ Other Messages
| Indication Meaning | |
| PU | When a song with a pickup (a song that does not start on the first beat) is played back, the measure numbers will be indicated in the display as PU, 1, 2, and so forth. |
| E.02: Protected | The protect tub on the floppy disk is set to the Protect position. Change it to the Write position (p.5). |
| E.03: Master Disk This floppy disk cannot store the format. | |
| E.10: No Disk No floppy disk is connected to the disk drive. | |
| E.12: Unknown Disk | This floppy disk is not formatted or the songs stored on this floppy disk cannot be played in the MT 90s. |
| E.13: Disk Ejected | The floppy disk has been disconnected during operation, repeat the procedure from the beginning. |
| E.14: DamagedDisk This floppy disk is damaged and cannot be used. | |
| E.15: Can't Read This song cannot be read into the piano. | |
| E.16: Can't Play | The MT 90s cannot read the floppy disk quickly enough. Press the [ (Stop)] button, then press the [ (Reset)] button and [ (Play)] button to play the song. |
| E.30: Memory Full Because there is no more free space in the MT 90s, operations other than playback (such as rewind and fast forward) are not possible. | |
| E.40: Buffer Full The MT 90s cannot deal with the excessive MIDI data sent from the external MIDI device. Reduce the amount of MIDI data sent to the MT 90s. | |
| E.41: Comm.Error A MIDI cable or computer cable has been disconnected. Connect it properly and securely. | |
| E.43: MIDI.I/F Err | Check the connections with MIDI devices, and the MIDI cable itself (p. 37). |
| E.51: Memory Error | There is something wrong with the system. Repeat the procedure from the beginning. If it is not solved after you have tried several times, contact the Roland service center. |
Disk Song List
| No. | Title Composer Copyright | ||
| 1 | Piano Concerto in A Minor Op. 16 1st Mov. (Excerpt) E. Grieg © 1994 Roland Corporation | ||
| 2 | Mazurka No.5 Op. 7-1 F. Chopin © 1995 Roland Corporation | ||
| 3 | Für Elise L. v. Beethoven © 1996 Roland Corporation | ||
| 4 | Golliwog's Cakewalk from Suite "Children's Corner" | C. Debussy | © 1996 Roland Corporation |
| 5 | Sonatine Op. 36, No. 3 in C Major 1st Mov. | M. Clementi | © 1996 Roland Corporation |
| 6 | The Entertainer | S. Joplin | © 1994 Roland Corporation |
| 7 | Merrily We Roll Along | American Folk Song | © 1998 Roland Corporation |
| 8 | Etude No. 88 from "Beyer Piano Textbook" | Beyer | © 1996 Roland Corporation |
| 9 | Etude No. 14 "La Styrienne" from "25 Etudes" Op.100 | F. Burgmüller | © 1996 Roland Corporation |
| 10 | Etude No.1 from "Czerny 30 Etudes De Mécanisme" | C. Czerny | © 1994 Roland Corporation |
| 11 | Greensleeves | English Folk Song | © 1993 Roland Corporation |
| 12 | Romance D'Amour | Spanish Folk Song | © 1996 Roland Corporation |
| 13 | 3rd Mov. Menuet from "Quintet for Strings No. 5 Op.11" | L. Boccherini | © 1996 Roland Corporation |
| 14 | Gavotte from Opera "Rosine" | F. Gossec | © 1994 Roland Corporation |
| 15 | Menuet from "L'Arlésienne" 1st Suite | G. Bizet | © 1994 Roland Corporation |
| 16 | Meditation from "Thaïs" | J. Massenet | © 1998 Roland Corporation |
| 17 | Scene from "The Swan Lake" Op. 20 | P. Tcshaikovsky | © 1998 Roland Corporation |
| 18 | Scrambled Eggs | Masashi Hirashita & Kazuko Hirashita | © 1992 Roland Corporation |
| 19 | Milky Way | Masashi Hirashita & Kazuko Hirashita | © 1992 Roland Corporation |
| 20 | Amazing Grace | American Folksong | © 1998 Roland Corporation |
| 21 | When The Saints Go Marching In | American Folksong | © 1993 Roland Corporation |
| 22 | Little Brown Jug | American Folksong | © 1998 Roland Corporation |
| 23 | A Maiden's Prayer | T.Badarzewska | © 1996 Roland Corporation |
| 24 | Turkisch March (Piano Sonate No. 11 in A Major, 3rd Movement "Alla Turca") | W.A.Mozart | © 1993 Roland Corporation |
| 25 | Mondschein Sonata | L.v.Beethoven | © 1994 Roland Corporation |
| 26 | Nocturne No. 2 in E-flat Major, Op. 9-2 | F. Chopin | © 1993 Roland Corporation |
| 27 | Le Coucou [Rondeau] | L.C.Daquin | © 1996 Roland Corporation |
| 28 | Summertime | G.Gershwin | © 1994 Roland Corporation |
| 29 | Ave Maria | C.Gounod | © 1993 Roland Corporation |
| 30 | Londonderry Air | Irish Folksong | © 1993 Roland Corporation |
| 31 | Amapola | J.M.Lacalle | © 1993 Roland Corporation |
| 32 | Licbestraume III | F.Liszt | © 1993 Roland Corporation |
| 33 | "Promenade" from "Tableaux d'une exposition" | M.Musorgsky | © 1995 Roland Corporation |
| 34 | Csikos Post | H.Necke | © 1996 Roland Corporation |
| 35 | Canon | J.Pachelbel | © 1993 Roland Corporation |
| 36 | Clarinet Polka (Excerpt) | Polish Folksong | © 1998 Roland Corporation |
| No. | Title | Composer | Copyright |
| 37 Gymnopedie No. 1 E.Satie © 1997 Roland Corporation | |||
| 38 Radetzky March J.Strauss © 1996 Roland Corporation | |||
| 39 Air sul G J.S.Bach © 1993 Roland Corporation | |||
| 40 Les Patineurs, Valse, Op.183 E.Waldteufel © 1998 Roland Corporation | |||
| 50 Twinkle Twinkle Little Star (English Lyric) French Folksong © 1998 Roland Corporation | |||
| 51 Guess Note (English) © 2000 Roland Corporation | |||
| 52 Guess Phrase (English) | © 2000 Roland Corporation | ||
| 53 Guess Chord (English) | © 2000 Roland Corporation | ||
| 70 Butterfly (Japanese Lyric) | Spanish Folksong | © 2000 Roland Corporation | |
| 71 Guess Note (Japanese) | © 2000 Roland Corporation | ||
| 72 Guess Phrase (Japanese) | © 2000 Roland Corporation | ||
| 73 Guess Chord (Japanese) | © 2000 Roland Corporation | ||
* Use of the song data supplied with this product for any purpose other than private, personal enjoyment without the permission of the copyright holder is prohibited by law. Additionally, this data must not be copied, nor used in a secondary copyrighted work without the permission of the copyright holder.
Note Guessing Game (No.51 to 53: English, No.71 to 73: Japanese)
Recorded on the disk included with the MT 90s are the note guessing games that use the MT 90s's sounds.
Select the number below and press the [▶ (Play)] button to start the game.
You can change the pace of the game by changing the tempo.
The game progress through each problem as shown below. Each game has ten tries.
1 The reference sound is played.
2 The new note or chord is played twice.
Listen carefully and think of the name of the note or chord.
3 "Answer is..." appears in the display, showing the correct answer.
* In addition to the MT 90s, this game can also be used with the Roland MT 300, MT 300s, Roland Digital Piano KR-277, and KR-375 models.
MIDI Implementation Chart
Date : Sep. 1, 2000
Version : 1.00
| Function... | Transmitted Recognized Remarks | |||
| Basic Channel | Default Changed | x x | 1-16 1-16 | |
| Mode | Default Messages Altered | x x********** | Mode 3 Mode 3, 4(M=1) | *2 |
| Note Number : True Voice | x********** | 0-127 0-127 | ||
| Velocity | Note ON Note OFF | x x | O x | |
| After Touch | Key's Ch's | x x | O *1 O *1 | |
| Pitch Bend | x | O *1 | ||
| Control Change | 0, 32 1 5 6, 38 7 10 11 64 65 66 67 84 91 93 98, 99 100, 101 | x x x x x x x x x x x x x x x x x x x x x x x x x x x x x x x x x x x x x x x x x x x x x x x x x x x x x x x x x x x x x x x x x x x x x x x x x x x x x x x x x x x x x x x x x x x x x x x x x x x x x | O *1 O *1 O *1 O *1 O *1 O *1 O *1 O *1 O *1 O *1 O *1 O *1 O *1 O *1 O *1 O *1 O *1 O *1 O *1 O *1 O *1 O *1 O *1 O *1 O *1 O *1 O *1 O *1 O *1 O *1 O *1 O *1 O *1 O *1 O -127 | Bank select Modulation Portamento time Data entry Volume Panpot Expression Hold 1 Portamento Sostenuto Soft Portamento control Effect1 depth Effect3 depth NRPN LSB, MSB RPN LSB, MSB |
| Prog Change : True # | x********** | O *1 O -127 | Program number 1-128 | |
| System Exclusive | x | O | ||
| System Common : Song Pos Common : Song Sel : Tune | x x x | x x x | ||
| System Real Time : Clock Commands | x x | x x | ||
| Aux Message : All sound off Reset all controllers : Local Control : All Notes OFF : Active Sensing : Reset | x x x x x x | O (120, 126, 127) O x O (123-125) O x | ||
| Notes | *1 O x is selectable by SysEx. *2 Recognized as M=1 even if M≠1. | |||
Mode 1 : OMNI ON, POLY Mode 2 : OMNI ON, MONO
O: Yes
Mode 3 : OMNI OFF, POLY Mode 4 : OMNI OFF, MONO
X : No
Main Specification
MT-90s: Music Player
Conforms to GM2/GS
• Max.Polyphony 64 voices
- Tones 369 variations (including 8 drum sets, 1 SFX set)
- Master Tuning 415.3 Hz–466.2 Hz (0.1 Hz step)
- Transpose Playback Transpose (-24 to +24 Half-steps)
- Effects Reverb Chorus
-
Metronome
Beat: 2/2, 0/4, 2/4, 3/4, 4/4, 5/4, 6/4, 7/4, 3/8, 6/8, 9/8, 12/8
Volume:10 levels
Pattern: 11 patterns
Sounds: 5 types -
Tracks
5 or 16 tracks -
Tempo
Quarter note = 20 to 250 -
Resolution
120 ticks per quarter note -
Control
Reset, Stop, Play, Bwd, Fwd
Track Select, Repeat, Marker, Count In,
Metronome, Song Select, Tempo, +, -
< Disk Drive >
3.5 inch Micro Floppy Disk
- Disk Format
720 K bytes (2DD)
1.44 M bytes (2HD)
- Playable Software
Standard MIDI File (Format0/1) Roland Original Format (i-Format)
- Rated Power Output 5 W x1
- Speakers 10 cm x 1
- Display Beat Indicator 16 x 2 Character LCD
- Lyrics Yes (Built-in Display)
- Control Volume Microphone Volume, Microphone Echo Speaker switch
- Connectors Output jacks (Stereo, RCA-Pin) Microphone jack (with echo) Headphones jack (Stereo Mini) MIDI IN connector Start/Stop jack
• Power supply AC117 V/AC230 V/AC240 V
• Power Consumption 2000 mA
- Dimensions 165 mm (W) x 186 mm (D) x 270 mm (H) 6-1/2 (W) x 7-3/8 (D) x 10-11/16 (H) inches
• Weights 2.4 kg 5 lbs 5 o
- Accessories Owner's manual, Power cord, AC Adaptor, Ferrite Core, Music File Disk
* In the interest of product improvement, the specifications and/or appearance of this unit are subject to change without prior notice.
Index
A
All Song Play 17
Random 35
B
Backward 15
Basic Screen 9
Beat 20
C
Connecting
Audio Devices 37
Electronic Piano 37
MIDI Instrument 37
Count Sound 22
Measure 33
Sound 33
Trk/Part 33
Count-In 22
D
Disk Drive 14
E
Echo
Mic 11
F
Factory Reset 36
Floppy Disk 14
Format 39
Format 39
Forward 15
G
General MIDI/General MIDI 2 38
GS Format 38
H
Headphones 11
|
Intro Countdown 22
L
Lyric
Language 34
Remove 35
M
Marker 23
Erase 24
Move 26
Placing in the middle of a measure 34
Playback 24
Repeating playback 25
Metronome 19
Beat 20,32
Pattern 32
Sound 32
Tempo 19
Volume 20,32
Microphone 11
MIDI 37
Minus One 30
Music Files 38
Mute 21,31
P
Part 30
16-Track screen 30
Mute 31
Pedal Switch 36
Pitch 12
Playback 14
Between two Markers 25
Each part 21
From a Marker location 24
Repeat All Songs 17
Repeat one song 16
Single Part (Solo) 30
Power 10
R
Random 35
Repeat 16
Reverb Effect 29
S
SMF Music Files 38
Solo 30
Sound Generator 38
Standard Pitch 12
T
Tap Tempo 18
Tempo 18
Tempo Mute 27
Track Buttons 21
Transpose 28
Tuning 12
V
Volume
Headphones 11
Master 10
Metronome 20
Mic 11
Display
+ 15
ALL 17
PU 15

For EU Countries
This product complies with the requirements of European Directive 89/336/EEC.
For the USA-
FEDERAL COMMUNICATIONS COMMISSION RADIO FREQUENCY INTERFERENCE STATEMENT
This equipment has been tested and found to comply with the limits for a Class B digital device, pursuant to Part 15 of the FCC Rules. These limits are designed to provide reasonable protection against harmful interference in a residential installation. This equipment generates, uses, and can radiate radio frequency energy and, if not installed and used in accordance with the instructions, may cause harmful interference to radio communications. However, there is no guarantee that interference will not occur in a particular installation. If this equipment does cause harmful interference to radio or television reception, which can be determined by turning the equipment off and on, the user is encouraged to try to correct the interference by one or more of the following measures:
– Reorient or relocate the receiving antenna.
– Increase the separation between the equipment and receiver.
- Connect the equipment into an outlet on a circuit different from that to which the receiver is connected.
- Consult the dealer or an experienced radio/TV technician for help.
Unauthorized changes or modification to this system can void the users authority to operate this equipment. This equipment requires shielded interface cables in order to meet FCC class B Limit.
For Canada
NOTICE
This Class B digital apparatus meets all requirements of the Canadian Interference-Causing Equipment Regulations.
AVIS
When you need repair service, call your nearest Roland Service Center or authorized Roland distributor in your country as shown below.
AFRICA
EGYPT
Al Fanny Trading Office P.O. Box 2904.
El Horrieh Heliopolos, Cairo, EGYPT
TEL.: (02) 4185531
REUNION
That Other Music Shop
(PTY) Ltd.
11 Melle Street (Cnr Melle and
Juta Street)
Braamfontein, 2001,
Republic of SOUTH AFRICA
TEL: (011) 403 4105
Paul Bothner (PTY) Ltd.
17 Wermuller Centre Claremont
7700
Republic of SOUTH AFRICA
P.O. Box 23032
Claremont, Cape Town
SOUTH AFRICA, 7735
TEL: (021) 64 4030
ASIA
CHINA
Beijing Xinghai Musical
Instruments Co., Ltd.
6 Huangmuchang Chao Yang
District, Beijing, CHINA
TEL:(010)6774 7491
HONG KONG
Tom Lee Music Co., Ltd.
Service Division
22-32 Pun Shan Street, Tsuen
Wan, New Territories,
HONG KONG
TEL: 2415 0911
INDIA
Rivera Digitec (India) Pvt. Ltd.
409, Nirman Kendra Mahalaxmi
Flats Compound Off. Dr. Edwin
Moses Road, Mumbai-40011, INDIA
INDIA
TEL: (022) 498 3079
IN DONESIA
PT Citra IntiRama
J1. Cideng Timur No. 15J-150
Jakarta Pusat
INDONESIA
TEL:(021)6324170
KOREA
Cosmos Corporation
1461-9, Seocho-Dong,
Seocho Ku, Seoul, KOREA
TEL: (02) 3486-8855
MALAYSIA
Bentley Music SDN BHD
G.A. Yupangco & Co. Inc.
339 Gil J. Puyat Avenue
Makati, Metro Manila 1200,
PHILIPPINES
TEL: (02) 899 9801
SINGAPORE
Swee Lee Company
150 Sims Drive,
SINGAPORE 387381
TEL: 748-1669
CRISTOFORI MUSIC PTE
LTD
Blk 3014, Bedok Industrial Park E,
02-2148, SINGAPORE 489980
TEL.: 243 9555
TAIWAN
ROLAND TAIWAN
ENTERPRISE CO., LTD.
Room 5, 9fl. No. 112 Chung Shan
N.Road Sec.2, Taipei, TAIWAN,
R.O.C.
TEL: (02) 2561 3339
THAILAND
Theera Music Co., Ltd.
330 Verng NakornKasem, Soi 2,
Bangkok 10100, THAILAND
TEL: (02) 2248821
VIETNAM
Saigon Music
138 Tran Quang Khai St.,
District 1
Ho Chi Minh City
VIETNAM
TEL: (08) 844-4068
AUSTRALIA/ NEW ZEALAND
AUSTRALIA
Roland Corporation
Australia Pty., Ltd.
38 Campbell Avenue
Dee Why West, NSW 2099
AUSTRÁLIA
TEL: (02) 9982 8266
NEW ZEALAND
Roland Corporation (NZ) Ltd.
Auckland 3, NEW ZEALAND
TEL: (09) 3098 715
CENTRAL/ LATIN AMERICA
ARGENTINA
Instrumentos Musicales S.A.
Florida 656 2nd Floor
Office Number 206A
Buenos Aires
ARGENTINA, CP1005
TEL: (54-11) 4-393-6057
BRAZIL
Roland Brasil Ltda.
R. Coronel Octaviano da Silveira
203 05522-010
Sao Paulo BRAZIL
TEL: (011) 3743 9377
COSTA RICA
JUAN Bansbach
Instrumentos Musicales
Ave.1. Calle 11, Apartado 10237,
San Jose, COSTA RICA
TEL:(506)258-0211
CHILE
Comercial Fancy S.A.
Avenida Rancagua #0330
Boulevard Andrews, Albrook,
Panama City
REP. DE PANAMA
TEL: (507) 315-0101
PARAGUAY
Distribuidora De
Instrumentos Musicales
J.E. Olear y ESQ. Manduvira
155, New National Road
26422 Patras, GREECE
TEL: 061-435400
HUNGARY
Intermusica Ltd.
Warehouse Area 'DEPO' Pf.83
H-2046 Torokbalint, HUNGARY
TEL: (23) 511011
IRELAND
Roland Ireland
Audio House, Belmont Court,
Donnybrook, Dublin 4.
Republic of IRELAND
TEL: (01) 2603501
ITALY
Roland Italy S. p. A.
Danvik Center 28, 2 tr.
S-131 30 Nacka SWEDEN
TEL: (08) 702 0020
SWITZERLAND
Roland (Switzerland) AG
Musitronic AG
Gerberstrasse 5, CH-4410 Liestal,
SWITZERLAND
TEL: (061) 921 1615
UKRAINE
TIC-TAC
Mira Str. 19/108
P.O. Box 180
295400 Munkachevo, UKRAINE
TEL: (03131) 414-40
UNITED KINGDOM
Roland (U.K.) Ltd.
Atlantic Close, Swansea
Enterprise Park, SWANSEA
SA7 9FJ
UNITED KINGDOM
TEL: (01792) 700139
MIDDLE EAST
BAHRAIN
Moon Stores
- SMF with Lyric SMF LYRICS
- Main Features
- USING THE UNIT SAFELY
- INSTRUCTIONS FOR THE PREVENTION OF FIRE, ELECTRIC SHOCK, OR INJURY TO PERSONS
- ALWAYS OBSERVE THE FOLLOWING
- WARNING
- CAUTION
- Power Supply
- Placement
- Maintenance
- Additional Precautions
- Before Using Floppy Disks
- Handling the Floppy Disk Drive
- Handling Floppy Disks
- Contents
- Chapter 1 Easy Operation of the MT 90s Preparation....10
- Chapter 2 More Convenient Functions..23
- Chapter 3 Other Functions.... 32
- Chapter 4 About Music Files...... 38
- Appendices...... 40
- Panel Descriptions
- Front Panel
- Display
- Beat Indicator
- [Volume] Knob
- [ (Song)] Button
- [ (Tempo)] Button
- [-]/[+] Buttons
- [ (Repeat)] Button
- [ (Mark)] Button
- [ (Count-in)] Button
- [ (Metronome)] Button
- [Power] Button
- Track Buttons
- Phones Jack
- [ (Reset)] Button
- [ (■top)] Button
- [ (Play)] Button
- [ (Bwd)] Button
- [ (Ewd)] Button
- Disk Drive
- Eject Button
- Rear Panel
- DC In jack
- Mic
- Mic In jack
- Mic Echo Knob
- Mic Volume Knob
- Speaker Switch
- Output R/L Jacks
- Cord Hook
- MIDI In Connector
- Start/Stop Jack
- MicroSaver Security Slot ()
- About the Screen
- ■ Basic Screen
- ■ Marker Screen (p. 23–p. 26)
- ■ 16-track Screen (p. 30–p. 31)
- ■ Setting Screen
- (p. 32–p. 36 and other pages)
- MEMO
- Chapter 1 Easy Operation of the MT 90s Preparation
- ■ Connecting the AC Adaptor
- NOTE
- ■ Turning the Power On and Off
- Turning On the Power
- Turning Off the Power
- ■ Adjusting the Volume
- ■ Connecting a Headphones
- Some Notes on Using Headphones
- ■ Connecting the Microphone
- Some Notes on Using a Microphone
- ■ Adjusting the pitch to other instruments (Tuning)
- What is the standard pitch?
- Hold down the [ (Song)] button and press the [1] button.
- Press the [ (Bwd)] or [ (Fwd)] button to select the parameter you want to set.
- Use the [+] and [-] buttons to change the value.
- Press the [ (Play)] button to play the tuning sound.
- To stop the tuning sound, press the [ (S■p)] button.
- When you've finished tuning, press the [ (Song)] button.
- Listening to the Music
- ■ Inserting and Ejecting a Floppy Disk
- With the label side facing up, insert the floppy disk into the disk drive until you hear it click firmly into place.
- To remove a disk, press the EJECT button.
- ■ Playing Back Songs
- Press the [ (Song)] button.
- Forward and Backward
- Moving to the Beginning or End of a Song
- ■ Repeated Listening of One Song
- ■ Listening to Continuous Repeated Playback of All Songs (All Song Play)
- While holding down the [ (Song)] button, press the [ (Play)] button.
- Press the [ (Sop)] button to stop playback.
- Changing the Tempo
- Press the [ (Tempo)] button.
- Use the [-] and [+] buttons to adjust the tempo.
- To restore the original tempo, hold down the [ (Tempo)] button and press the [I(Reset)] button.
- ■ Changing the Tempo by Pressing the Button in Time (Tap Tempo)
- Tap the [ (Tempo)] button several times at the desired speed.
- Sounding the Metronome
- ■ Changing the Metronome Tempo
- ■ Changing the Metronome Volume
- While holding down the [ (Metronome)] button, press the [-] or [+] button.
- ■ Changing the Beat of the Metronome
- While holding down the [ (Metronome)] button, press the [◀Bwd)] button or the [ (Fwd)] button, and select a beat.
- Beat selections:
- Practicing Along With a Song (Track Buttons)
- Press any of the Track buttons, turning off the button indicator.
- Press the [ (Play)] button.
- Pressing Track buttons with indicators that are not lit then turns on those indicators.
- To stop playback of the song, press the [ (Sop)] button.
- Matching the Timing of the Performance
- Chapter 2 More Convenient Functions
- Placing Markers at the Section You Want to Practice Repeatedly
- ■ Playback from a Marker Location
- ■ Erasing a Marker
- ■ Repeating Playback Between Two Markers
- ■ Moving a Marker
- Simultaneously Moving Markers A and B
- Practice without Tempo Changes
- Hold down the [ (Tempo)] button and press the [ (Stop)] button.
- To release Tempo Mute, hold down the [ (Tempo)] button and press the [ ■Stop)] button.
- Changing the Key
- Changing the Reverberation (Reverb Effect)
- Listening to Specific Instruments
- ■ Playing Back a Single Part (Solo)
- While holding down the [ (Song)] button, press the [2] button.
- Press the [3] or [4] button to move the cursor () in-the upper part of the screen to the part you want to have played.
- Press the [1] button.
- ■ Preventing a Selected Part from Sounding (Mute)
- ■ Displaying the Names of Tones Assigned to Parts
- Chapter 3 Other Functions
- Changing the Metronome's Settings
- While holding down the [ (Song)] button,
- Press the [ (Bvd)] or [ (Fwd) button to select the parameter to be set.
- Press the [+] and [-] buttons to change the value.
- Press the [Song)] button to display the Basic Screen.
- Changing the Count Sound Settings
- Placing a Marker in the Middle of a Measure
- Changing the Lyric Setting
- Removing Lyrics from the Screen
- Playing Back All Songs in Random Order
- Restoring the Factory Settings (Factory Reset)
- Stored Settings
- Playback/ Stop using a Pedal Switch
- Connect Your MIDI Instrument
- About MIDI
- ■ Connectors
- MIDI In Connector
- Connecting to Audio Devices and Other Equipment
- Output Jacks
- ■ When Connecting to an Electronic Piano
- Making the Connections
- Chapter 4 About Music Files
- What Are Music Files?
- Regarding Copyright
- Music Files that can be Used with the MT 90s
- About the MT 90s's Sound Generator
- Using Computer-Created Song Data on the MT 90s (Disk Format)
- ■ Floppy Disk Formats
- Confirm that the disk's protect tab is in the "Write" position.
- Press the [+] button.
- Press the [Play)] button to begin formatting.
- Save the song data on the MT 90s-formatted disk to your computer.
- Troubleshooting
- Error Messages/ Other Messages
- Disk Song List
- Note Guessing Game (No.51 to 53: English, No.71 to 73: Japanese)
- Main Specification
- MT-90s: Music Player
- < Disk Drive >
- - Playable Software
- Index
- A
- B
- C
- D
- E
- F
- G
- H
- |
- L
- M
- P
- R
- S
- T
- V
- Display
- FEDERAL COMMUNICATIONS COMMISSION RADIO FREQUENCY INTERFERENCE STATEMENT
- NOTICE
- AVIS
- AFRICA
- EGYPT
- REUNION
- Paul Bothner (PTY) Ltd.
- ASIA
- CHINA
- HONG KONG
- INDIA
- IN DONESIA
- KOREA
- MALAYSIA
- SINGAPORE
- CRISTOFORI MUSIC PTE
- LTD
- 02-2148, SINGAPORE 489980
- TAIWAN
- THAILAND
- VIETNAM
- AUSTRALIA/ NEW ZEALAND
- AUSTRALIA
- NEW ZEALAND
- CENTRAL/ LATIN AMERICA
- ARGENTINA
- BRAZIL
- COSTA RICA
- CHILE
- PARAGUAY
- HUNGARY
- IRELAND
- ITALY
- SWITZERLAND
- UKRAINE
- UNITED KINGDOM
- MIDDLE EAST
- BAHRAIN
Brand : ROLAND
Model : MT-90S
Category : Uncategorized