
TurboBooster - Child car seat GRACO - Free user manual and instructions
Find the device manual for free TurboBooster GRACO in PDF.


| Product Type | Child Car Seat (Booster) |
| Brand | Graco |
| Model | TurboBooster |
| Weight Limits (Booster with Back) | 30-100 lb (14-45 kg) |
| Weight Limits (Booster without Back) | 40-100 lb (18.1-45 kg) |
| Height Limits (Booster with Back) | 38-57 in (97-145 cm) |
| Height Limits (Booster without Back) | 43-57 in (110.1-145 cm) |
| Minimum Age | 4 years |
| Modes | Highback Booster, Backless Booster |
| Adjustable Head Support | Yes, with adjustment lever |
| Armrests | Adjustable height |
| Cup Holders | Yes (on select models) |
| Headrest Pillow and Body Pillow | Available (on select models) |
| Belt Positioning Clip | Included for backless mode |
| Compatible Seat Belts | Vehicle lap/shoulder belt only |
| Safety Standards | FMVSS 213 |
| Airplane Use | Not certified (no shoulder belts on aircraft) |
| Useful Life | 10 years from date of manufacture |
| Cleaning Seat Pad | Machine wash cold, delicate cycle, drip dry. No bleach. |
| Replacement Parts | Contact Graco or visit www.gracobaby.com |
Frequently Asked Questions - TurboBooster GRACO
User questions about TurboBooster GRACO
0 question about this device. Answer the ones you know or ask your own.
Ask a new question about this device
Download the instructions for your Child car seat in PDF format for free! Find your manual TurboBooster - GRACO and take your electronic device back in hand. On this page are published all the documents necessary for the use of your device. TurboBooster by GRACO.
USER MANUAL TurboBooster GRACO
Read This Instruction Manual
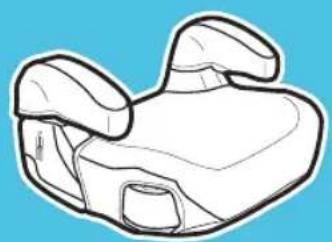
natural_image
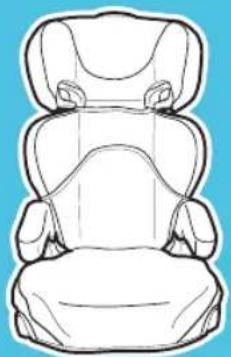
Line drawing of a car seat with front and rear panels against a solid blue background (no text or symbols)PD348952D 4/16
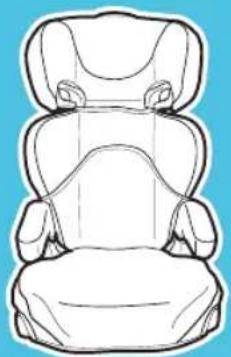
natural_image
Line drawing of a car seat with front and back views (no text or symbols)Do not install or use this child restraint until you read and understand the instructions in this manual.
FAILURE TO PROPERLY USE THIS CHILD RESTRAINT INCREASES THE RISK OF SERIOUS INJURY OR DEATH IN A SUDDEN STOP OR CRASH.
1 Important Pages 5-19
1-A Quick Guide to Your Manual
1-B Welcome to the Graco Family
1-C Before You Begin
Register This Car Seat
If You Need Help
Certification
Car Seat's Useful Life
Vehicle Seat Protection
Warm Weather Use
1-D Safety Warnings
2 Features Pages 20-23
2-A Car Seat Features
3 Booster Pages 24-27
3-A Booster Use
3-B Install Booster
3-C Install Backless Booster
4 Securing Child Pages 28-37
4-A Securing Child Backed Booster
4-B Securing Child Backless Booster
5 Accessories Page 38
6 Vehicle Information Pages 39-42
6-A Choosing Vehicle Seat Location
6-B Unsafe Vehicle Seat Location
6-C Vehicle Seat Belts
7 Care & Cleaning Pages 43
7-A Cleaning Seat Pad
1-A Quick Guide to Your Manual
This car seat is for children: Booster: 30-100 lb (14-45 kg) 38-57 in (97-145 cm)
Car Seat Assembly (On Select Models)
Adult Assembly Required
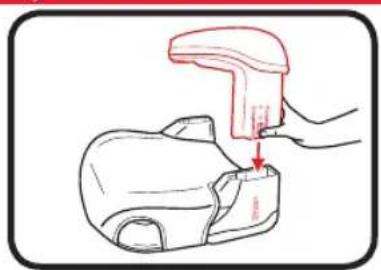
1.Armrests
Insert armrest into base as shown until buttons snap into slots on side of base.
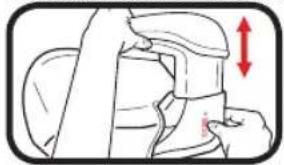
Select the desired armrest height for your child, then insert the height adjustment screw and tighten. Repeat for other armrest.
To adjust armrests, remove screw and press in button on side of base as shown to raise or lower. Reinsert screw and tighten. CHECK to make sure armrests are securely attached by pulling up on them.
natural_image
Illustration of a mechanical device with a red double-headed arrow indicating motion or force (no text or symbols)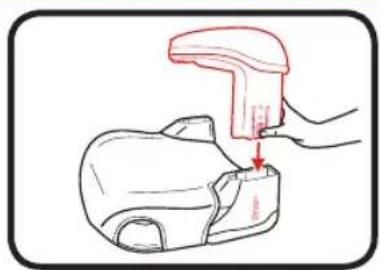
natural_image
Illustration of a hand using a handheld device to lift a small object (no text or symbols present)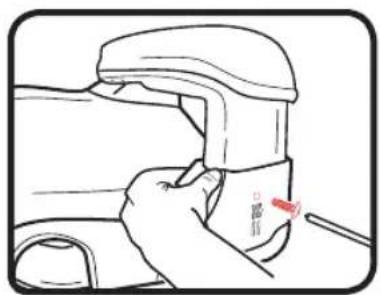
natural_image
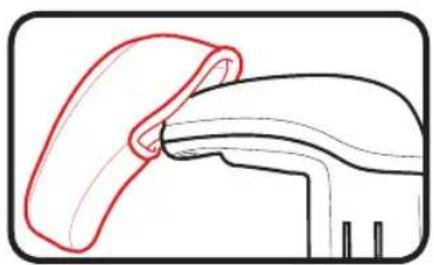
Diagram showing a red curved object interacting with a black curved object, both without any text or symbols.2. Armrest Covers
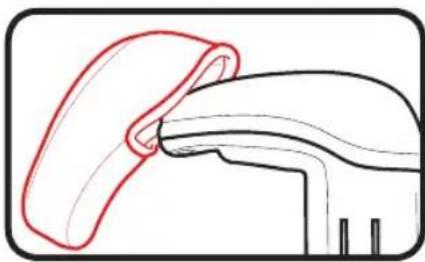
Slip armrest covers onto armrests as shown. (on certain models)
natural_image
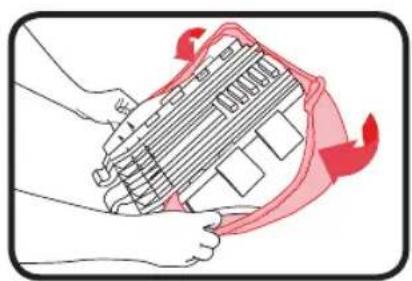
Illustration of hands holding a mechanical component with red arrows indicating motion or force (no text or symbols)3. Back support pad
On certain models, your lower back support pad may not be attached to the back support. Place
lower back support pad around edges of support as shown. Then fasten lower elastic strap to the metal hook on the other side of the seat pad.
natural_image
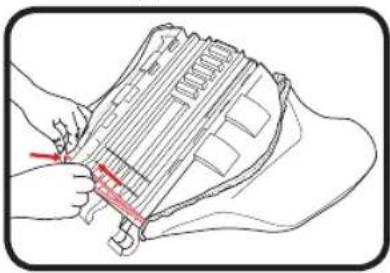
Line drawing of a hand holding a device with red annotation lines (no text or symbols)4. Head support
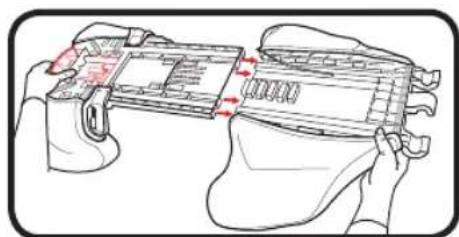
Flip head support and lower back support over as shown.
Squeeze red adjustment button and slide two pieces together until they snap into place.
CHECK to make sure two pieces are securely snapped together by pulling on them.
Attach elastic strap to metal hook on other side of seat pad as shown.
natural_image
Illustration of hands holding a device with arrows indicating movement or process (no text or symbols present)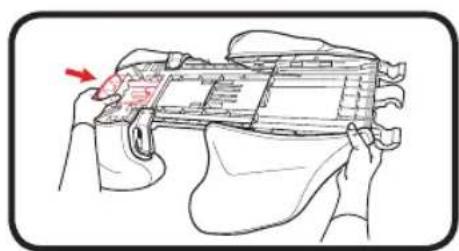
natural_image
Illustration of a hand holding a device with a red arrow pointing to a component (no text or symbols present)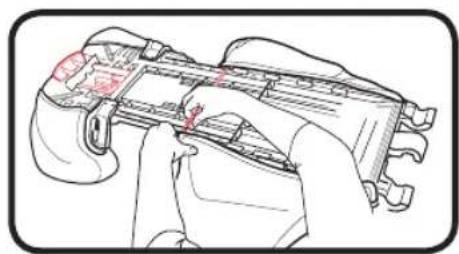
natural_image
Illustration of hands assembling or adjusting a mechanical component (no text or symbols visible)1 Important
natural_image
Anatomical illustration of a joint with a red arrow indicating a specific area (no text or labels present)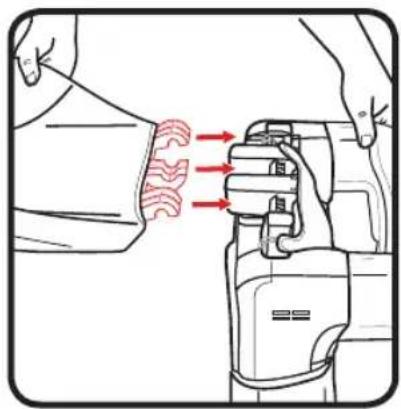
natural_image
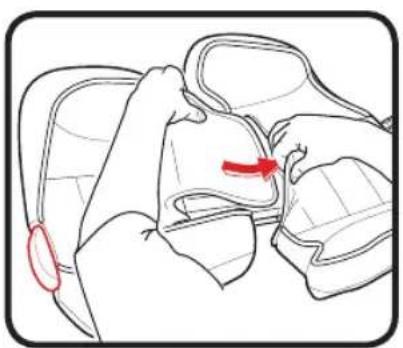
Diagram of a person using a medical device to interact with a bandage, showing red arrows indicating movement or force (no text or symbols present)5. Head support pad
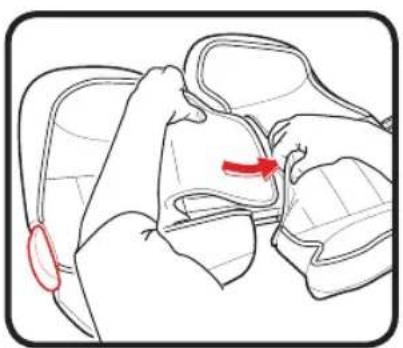
Flip seat over and insert the fabric from the head support underneath the fabric on the lower back support as shown.
To make insertion of fabric easier, slide the upper and lower back pieces apart by squeezing the red adjustment button.
6. Backrest
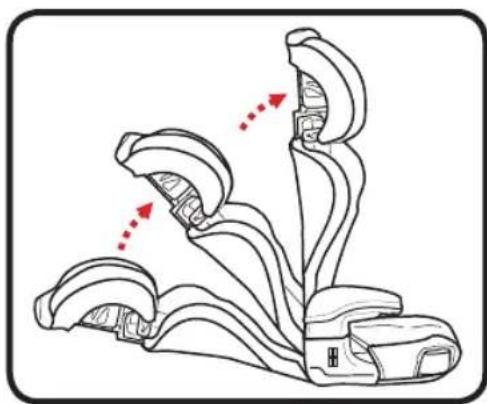
Attach backrest to base. "U"-shaped hooks on bottom of backrest will interlock with bars on base.
Make sure that no part of the seat covering interferes when attaching backrest to the base.
Once backrest is securely attached to the base, push backrest up as shown.
natural_image
Line drawing of a mechanical device with red arrows indicating motion or movement (no text or symbols)1 Important
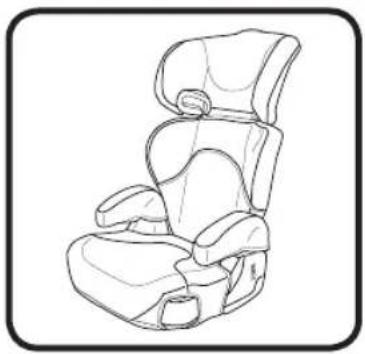
Your Graco booster seat is now ready to use.
natural_image
Line drawing of a car seat with adjustable seat, no text or symbols presentGet to Know Your Car Seat
Review section 2-A to see all of the features of this booster seat.
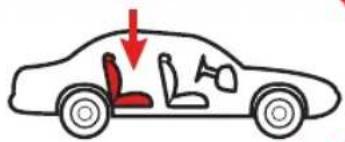
What Seating Location Should I Use?
The best seating location for this booster seat is one that:
- Is recommended by your vehicle owner's manual, and
• Results in a secure installation of this booster seat.
Some vehicles have specific requirements for where the booster seat can be installed, so be sure to check your vehicle owner's manual for available seating positions, if any. For example, sometimes the center rear seat has a lap belt only vehicle seat belt, which cannot be used with this booster seat.
Review section 6-B, 6-C, of this manual AND your vehicle owner's manual.
According to accident statistics, the safest place for your child in any vehicle is the back seat. The center of the back seat can be the safest during a possible side impact.
natural_image
Diagram of a car showing seat, driver, and passenger seat with a red arrow indicating downward motion (no text or symbols)Using The Car Seat Correctly
To make sure your child is secured properly, review section 3 and 4 to fit your child.
When Installing As a Booster
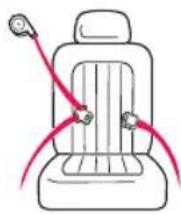
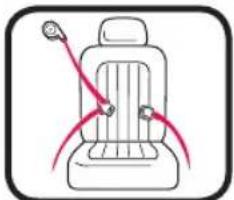
Vehicle Seat Belt
There is one type of vehicle seat belt that can be used: Lap/Shoulder Seat Belt.
Review section 3 of this manual AND your vehicle owner's manual.
natural_image
Line drawing of a car seat with red cable connectors (no text or symbols)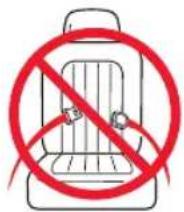
Booster Installation
Use Lap/Shoulder Belt Only
Review section 3
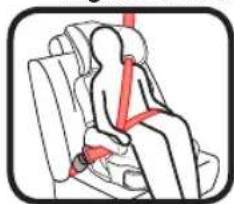
Position Lap Belt
Lap belt must go under armrest and lie low across your child's hips and thighs.
Review section 3
Position Shoulder Belt
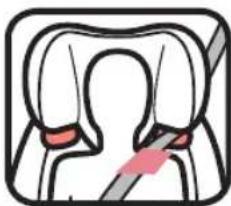
Shoulder best lies across shoulder between neck and edge of shoulder in the red zone as shown.
Review section 3
natural_image
Line drawing of a car seat with two red cable connectors (no text or symbols)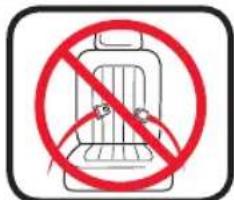
Highback Backless
natural_image
Illustration of a person seated in a car seat with a red belt and seatbelt (no text or symbols)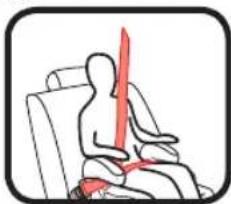
natural_image
Illustration of a person sitting in a chair holding a red sword, no text or symbols present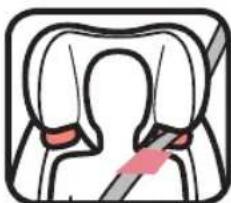
natural_image
Diagram of a dental implant or implant device with no visible text or symbols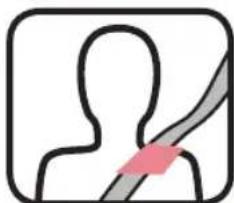
natural_image
Simple line icon of a human silhouette with a diagonal band and a pink highlight (no text or symbols)1-B Welcome to the Graco Family!
Your child's safety depends on you. No car seat can guarantee protection from injury in every situation, but proper use helps reduce the risk of serious injury or death. Even if this car seat seems easy to figure out on your own, you must follow the detailed instructions in this instruction manual to ensure the steps below are performed correctly.
1-C Before You Begin
Register This Child Restraint
Please fill out the prepaid registration postcard attached to the seat pad and mail it in today or register online at www.gracobaby.com/carseatregistration.
Child restraints could be recalled for safety reasons. You must register this restraint to be reached in a recall. Send your name, address, and the restraint's model number and manufacturing date to:
Graco Children's Products, Inc.
Attn: Customer Service
P.O. Box 169, Elverson, PA 19520-9901
or register online at www.gracobaby.com/carseatregistration
or call 1-800-345-4109
For recall information, call the U.S. Government's Vehicle Safety Hotline at
1-888-327-4236
(TTY: 1–800–424–9153), or go to http://www.NHTSA.gov.
For future reference or if you change addresses, record the model name, model number, date of manufacture and purchase date of this car seat on the below. You can find this information either on the registration card if you still have it or on the date label located on the back of the car seat.
Model Name
Model Number
Date of Manufacture ____
Date of Purchase
If You Need Help
In the U.S.A, please contact our Customer Service Department with any questions you may have concerning parts, use, or maintenance. When you contact us, please have your product's model number and date of manufacture ready so that we may help you efficiently. These numbers can be found on a sticker on the back side of your car seat.
For additional resources or to get your car seat checked by a child passenger safety technician, please visit the following web sites:
www.nhtsa.gov • www.seatcheck.org • www.safekids.org
Certification
This child restraint meets or exceeds all applicable requirements of Federal Motor Vehicle Safety Standard 213 for use in motor vehicles.

This child restraint is NOT certified for use in aircraft when used as a booster seat because aircrafts do not have shoulder belts.
Car Seat's Useful Life
STOP using this car seat and throw it away 10 years after the date of manufacture. Look for date of manufacture label on back of the car seat.
Graco Children's Products Inc. advises against loaning or passing along a car seat unless you know the complete history of the product. We also advise against purchasing a car seat second hand.
Vehicle Seat Protection
Protect vehicle seat. Use a car seat mat, towel, or thin blanket under and behind car seat.
Warm Weather Use
Car seat parts can get very hot in the sun or warm weather. To avoid burns, always check before putting child in car seat.
1-D Safety Warnings
No car seat can guarantee protection from injury in every situation, but proper use helps reduce the risk of serious injury or death. READ THIS MANUAL CAREFULLY.
!WARNING!
Failure to follow these instructions and child restraint's labels can result in child striking the vehicle's interior during a sudden stop or crash.
! Review your vehicle owner's manual for more information about air bags and car seat use.
! If your vehicle does not have a back seat, review your vehicle owner's manual.
! Select a suitable location for the car seat in your vehicle.
! Always secure car seat with the vehicle seat belt, even when unoccupied. In a crash, an unsecured car seat can injure occupants.
! If car seat is in a crash, it must be replaced. DO NOT use it again! A crash can cause unseen damage and using it again could result in serious injury or death.
! DO NOT use car seat if it is damaged or missing parts.
! DO NOT use accessories or parts other than those provided by Graco. Their use could alter the performance of the car seat.
! Never leave child unattended, even when sleeping.
2-A Car Seat Features

2 Features
20
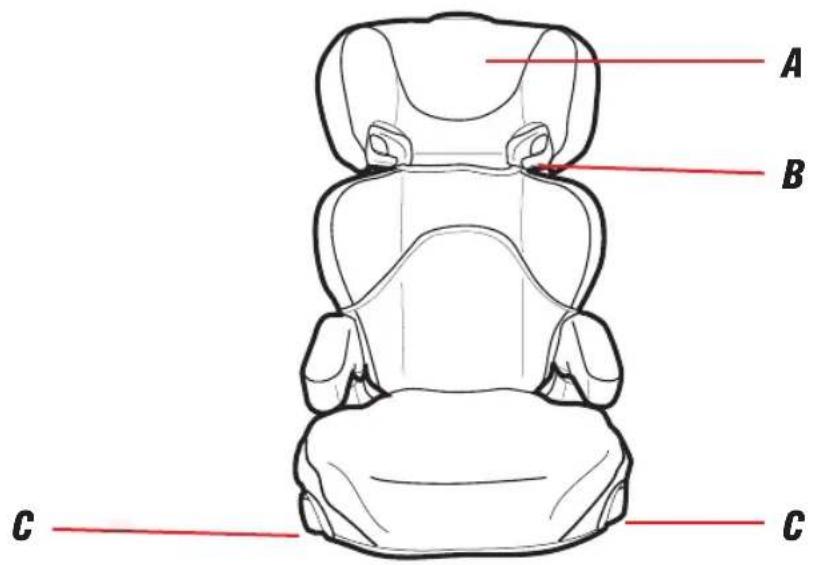
A Head Support
B Shoulder Belt Guide
C Cup Holder
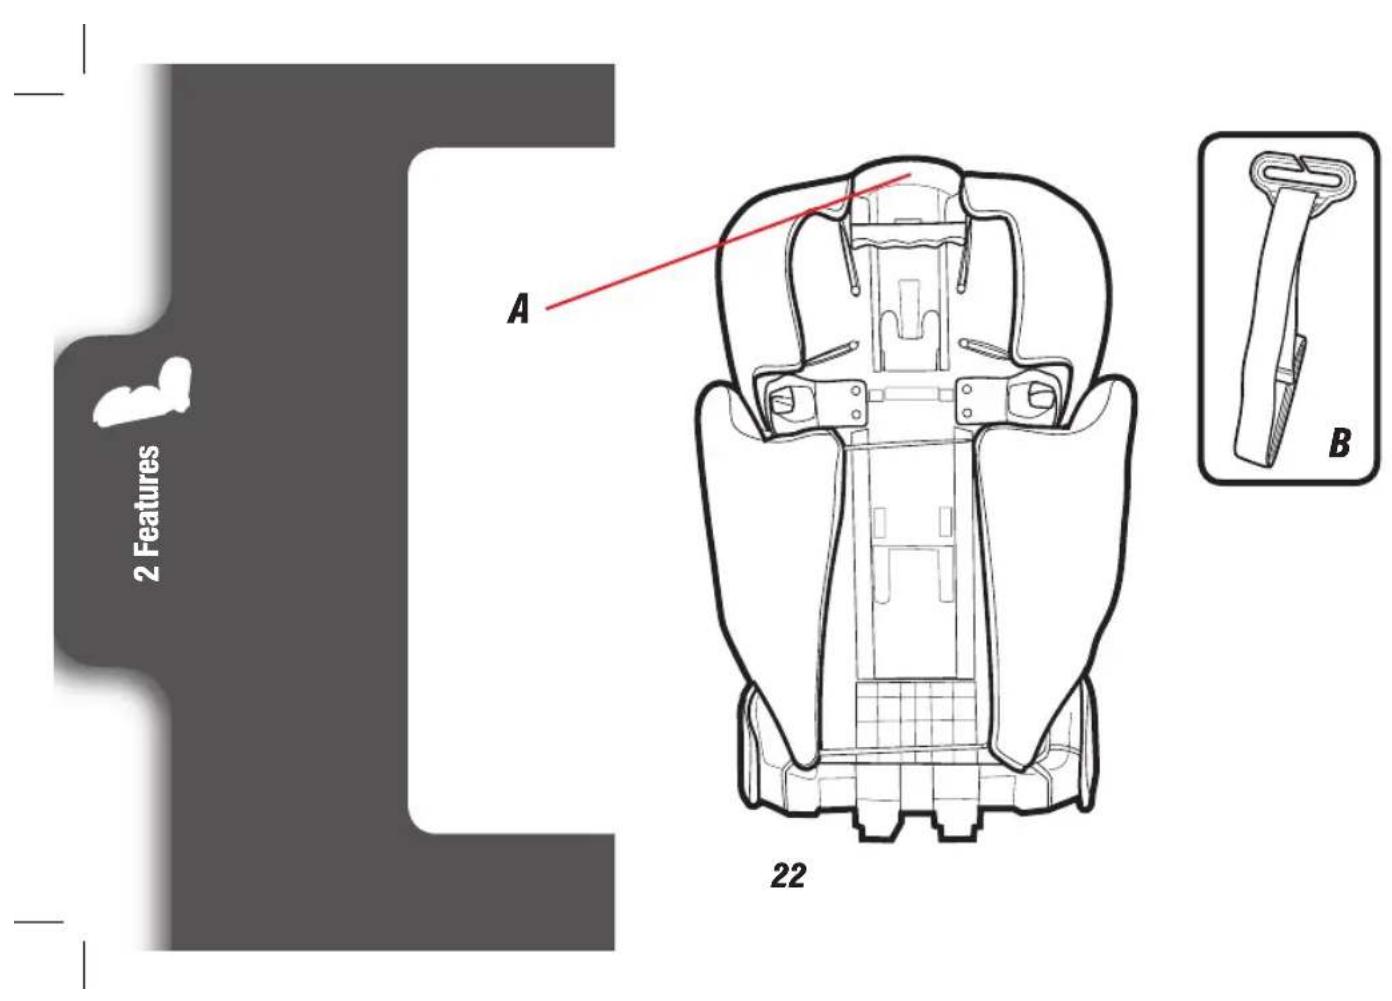
A Head Support Adjustment Lever
B Belt Positioning Clip (Inset)
3-A Booster Use
natural_image
Illustration of a person sitting in a car seat with a red belt and seatbelt (no text or symbols)Vehicle Lap/Shoulder
Seat Belt
natural_image
Illustration of a human car seatbelt with red straps (no text or symbols)Vehicle Seat Lap/Shoulder Belt
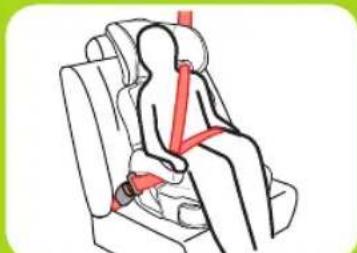
Booster Use With Back: 30-100 lb (14-45 kg) 38-57 in. (97-145 cm) at least 4 years old
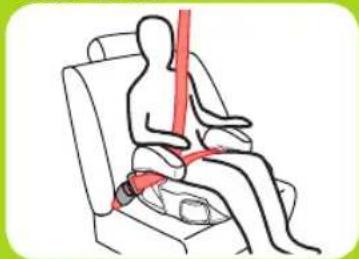
Booster Use Without Back: 40-100 lb (18.1-45 kg) 43-57 in. (110.1-145 cm) at least 4 years old
- Place car seat forward-facing in the vehicle back seat.
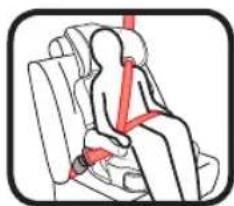
- Make sure vehicle seat's lap belt is adjusted snugly and lays low on the child's hip and is routed under the armrest in the booster's belt path.
- Vehicle belts MUST lie flat against child and MUST NOT be twisted.
-
Vehicle seat's shoulder belt is adjusted snugly and should lie between child's neck and edge of shoulder.
-
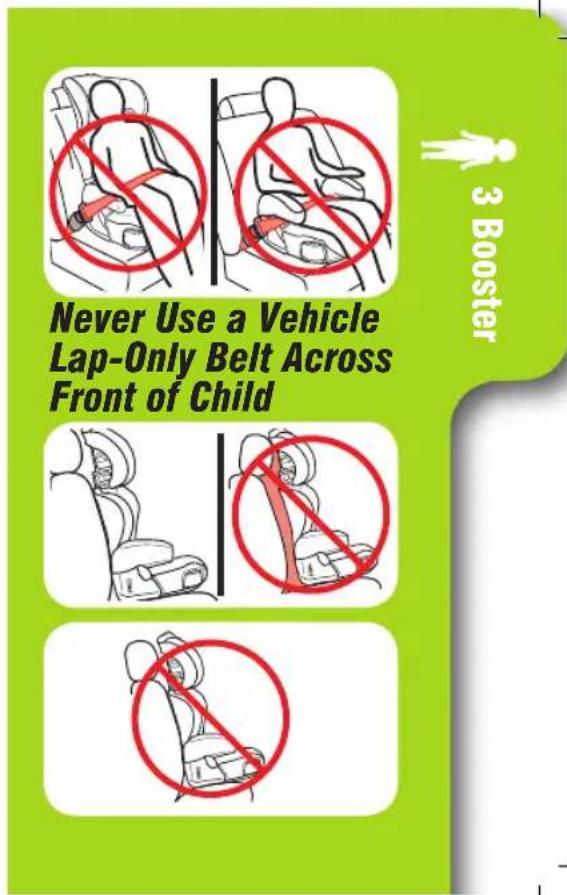
Never use a vehicle lap-only belt across front of child.
- DO NOT position vehicle shoulder belt under the child's arm or back.
- DO NOT allow child to slouch or slide down in the booster seat.
• DO NOT position vehicle belt over top of armrests. - Vehicle's seat headrest SHOULD NOT create a gap between vehicle seat and booster seat.
- The front of booster seat MUST NOT hang over front of vehicle seat.
- If child will not keep vehicle belt properly positioned, DO NOT use this booster seat. Use a different car seat.

3 Booster
3-B Install Booster
natural_image
Line drawing of a car seat with seat covers and seatbelt (no text or symbols)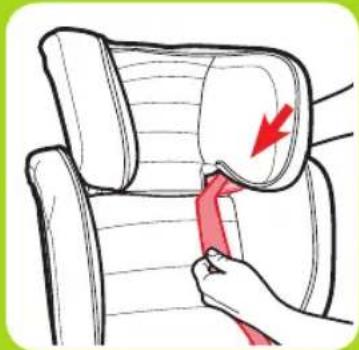
natural_image
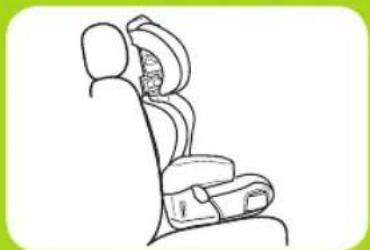
Illustration of a hand inserting a red ribbon into a car seatbelt (no text or symbols)- Place Car Seat Forward-Facing in Back Seat of the Vehicle
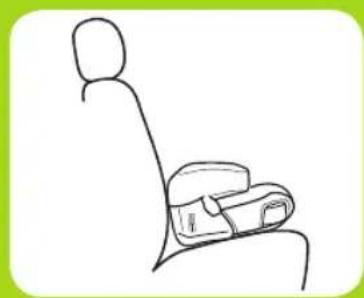
Place forward-facing in vehicle seat. The bottom of the seat should sit as flat as possible on the vehicle seat.
- Thread the Vehicle Seat Shoulder Belt Through Seat Belt Guide on the Headrest
See section 4-A to secure your child.
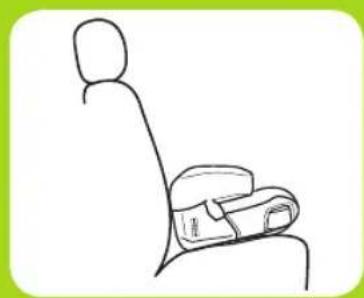
3-C Install Backless Booster
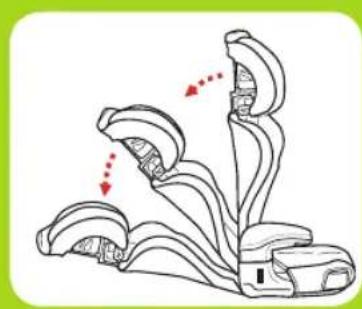
1. Remove the Back Support (on select models)
Recline seat back then remove from base.
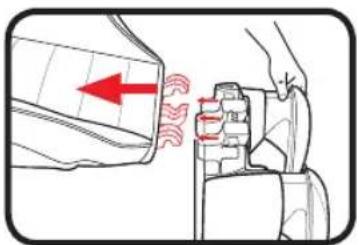
2. Place the Booster Seat Forward-Facing in the Back Seat of Vehicle
Place forward-facing on a vehicle seat that has a lap/shoulder seat belt. The base should sit as flat as possible on the vehicle seat.
See section 4-B to secure your child.
natural_image
Illustration of a car seatbelt with red arrows indicating movement or change (no text or symbols)
natural_image
Line drawing of a person sitting in a chair, no text or symbols present
4 Securing Child
natural_image
Line drawing of a person seated in a car seat (no text or symbols)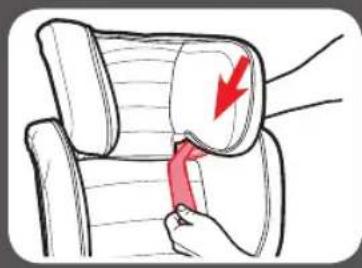
natural_image
Illustration of a hand pressing down on a car seatbelt with a red arrow indicating the pressure point (no text or symbols present)4-A Securing Child Backed Booster
!WARNING!
Use only the vehicle lap and shoulder belt system when restraining the child in the booster seat.
1. Place Child In Seat
Have your child sit in the booster seat, with his/her back flat against the back of the booster seat.
2. Thread Vehicle's Shoulder Belt Into Seat Belt Guide in the Headrest
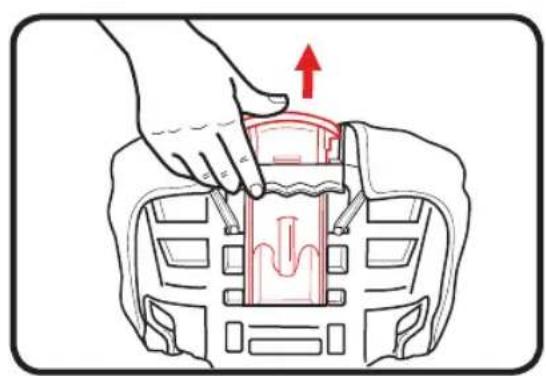
3. To Raise or Lower Headrest Support
Lift adjustment lever and lift or lower headrest.
natural_image
Illustration of a hand pressing down on a mechanical component with a red arrow indicating upward motion (no text or symbols)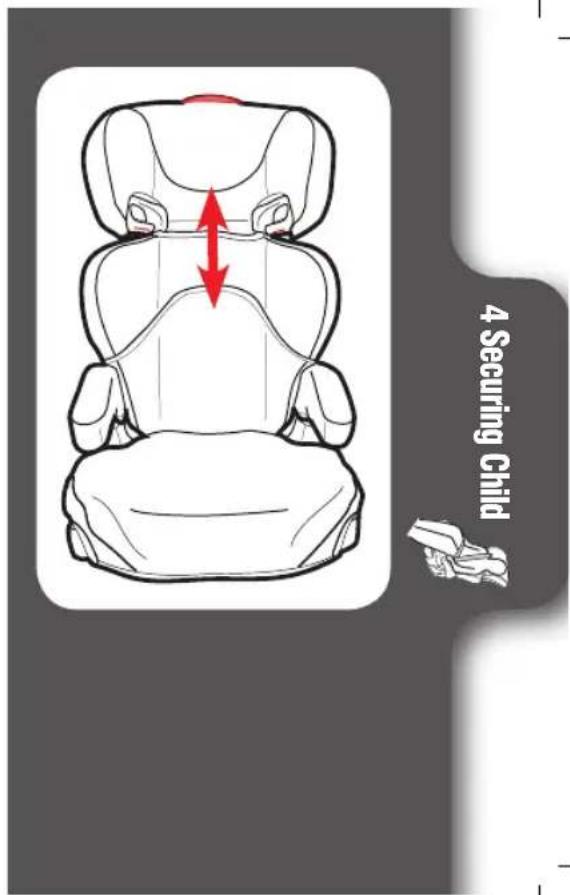
4. Buckle the Vehicle Lap/Shoulder Seat Belt
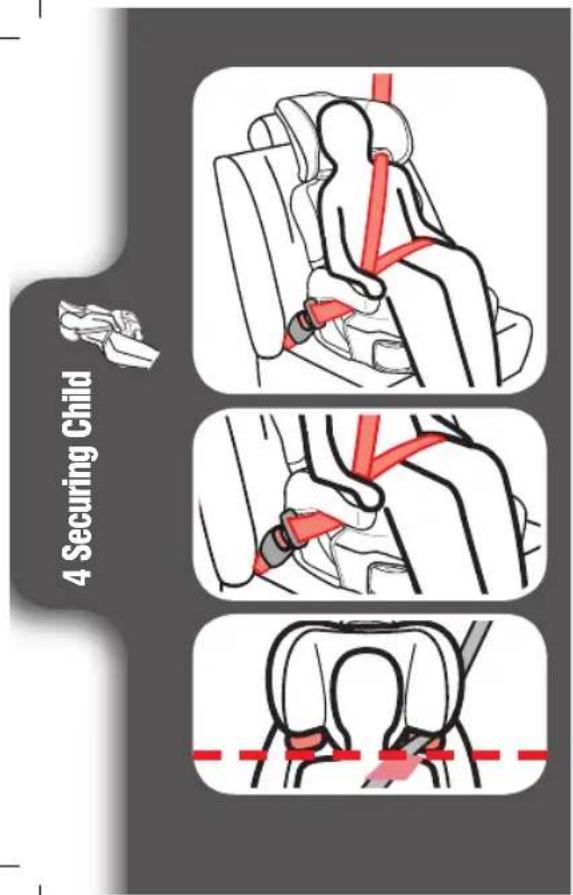
Be sure the lap portion of the vehicle seat belt goes under both armrests and the shoulder belt goes under the armrest on the buckle side.
Be sure the lap portion of the vehicle seat belt lies low across your child's hips.
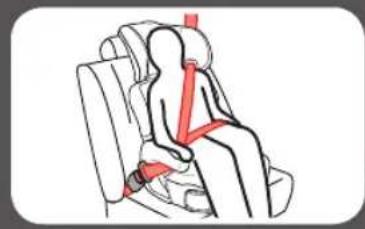
Be sure the shoulder belt lies across your child's shoulders, in the red zone between the neck and edge of shoulder by raising or lowering the head support. The belt guides should be even with or just above the shoulders.
Is Everything Correct?
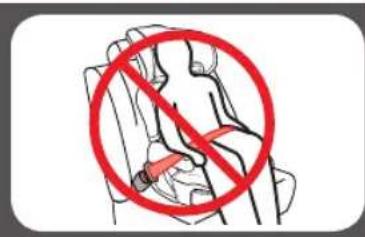
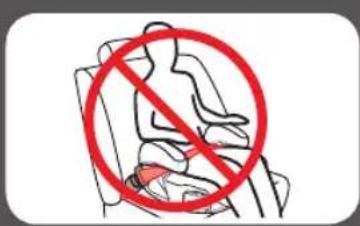
Never Use Lap Belt Only
Lap Belt under Armrest and Lies Low Across Hips and Thighs
Shoulder Belt Lies On the Shoulder in the red zone, Between the Neck and Edge of Shoulders
natural_image
Illustration of a person seated in a car seat with red belt and seatbelt (no text or symbols)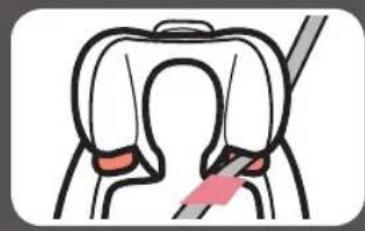
natural_image
Illustration of a dental implant or implant procedure (no text or symbols present)4-B Securing Child Backless Booster
4 Securing Child
natural_image
Line drawing of a person seated in a car seat, no text or symbols present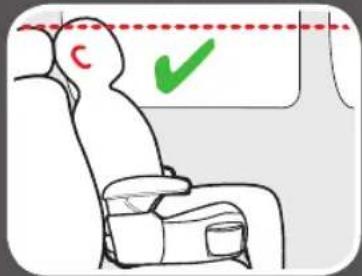
!WARNING!
Use only the vehicle lap and shoulder belt system when restraining the child in the booster seat.
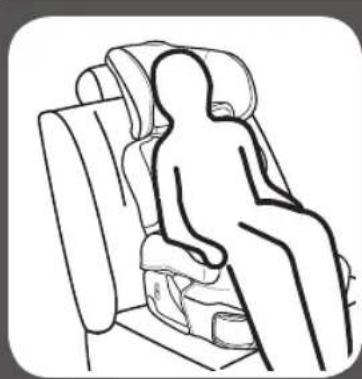
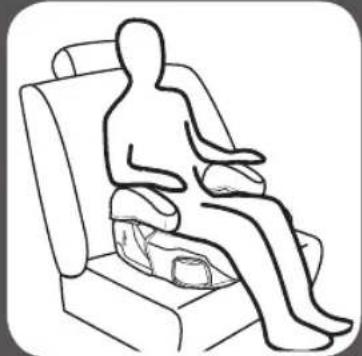
1. Place Child In Seat
Have your child sit in the booster seat, with his/her back flat against the back of the vehicle seat.
2. Ears Must Be Below the Top of the Vehicle Seat Back or Headrest.
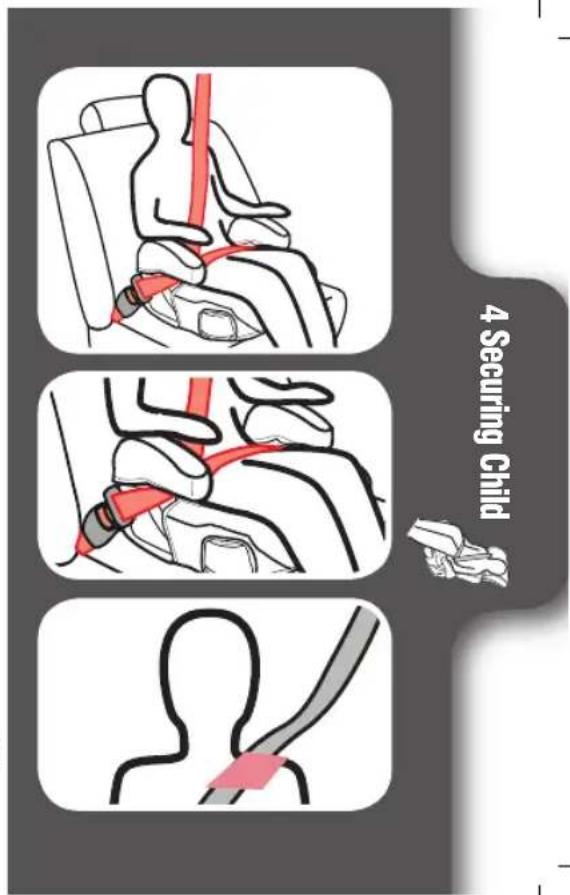
3. Buckle the Vehicle Lap/Shoulder Seat Belt
Be sure the lap portion of the vehicle seat belt goes under both armrests and the shoulder belt goes under the armrest on the buckle side.
Be sure the lap portion of the vehicle seat belt lies low across your child's hips.
Be sure the shoulder belt lies across your child's shoulders, in the red zone between the neck and edge of shoulder.
You may need to use the belt positioning clip to help get a good fit. See "Using Belt Positioning Clip"
4 Securing Child
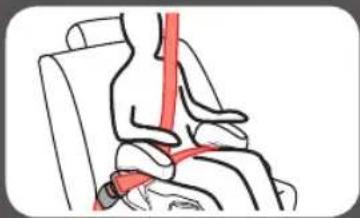
Is Everything Correct?
natural_image
Illustration of a person seated in a chair with a red belt and seatbelt (no text or symbols)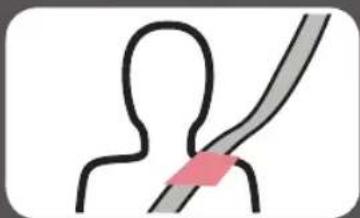
natural_image
Simple line drawing of a human silhouette with a diagonal line and a pink highlight (no text or symbols)Never Use Lap Belt Only
Lap Belt under Armrest and Lies Low Across Hips and Thighs
Shoulder Belt Lies On the Shoulder, in the red zone Between the Neck and Edge of Shoulders
Using Belt Positioning Clip
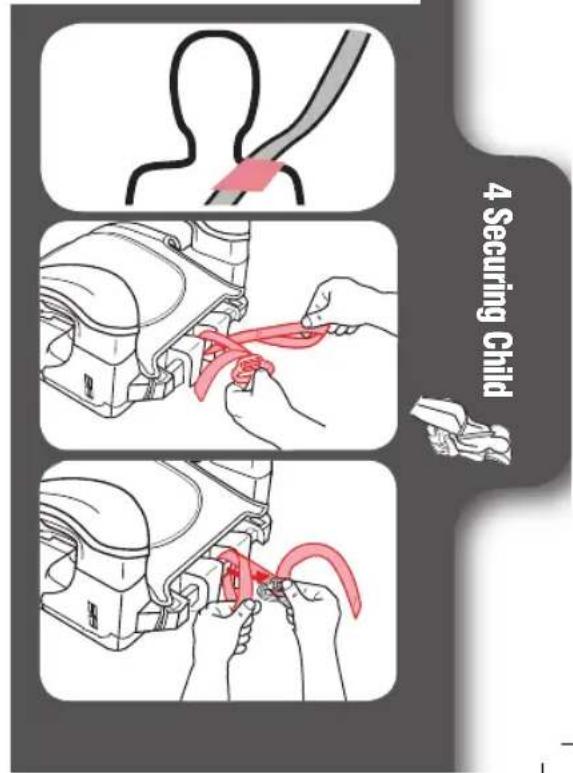
1. Make Sure Vehicle's Seat Shoulder Belt Lays in the Red Zone As Shown
If the vehicle's seat shoulder belt lays outside this zone, you MUST use the belt positioning clip.
2. Attach Belt Positioning Clip
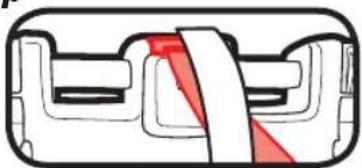
The shoulder belt positioning clip MUST be attached to the slot on the bottom of the base. Insert the loop end of strap through the slot on bottom of s
natural_image
Cross-sectional diagram of a mechanical component with red highlighted areas (no text or symbols)3. Push Clip and Strap Through Loop
Pass the clip and the strap through the loop end as shown and pull strap up.
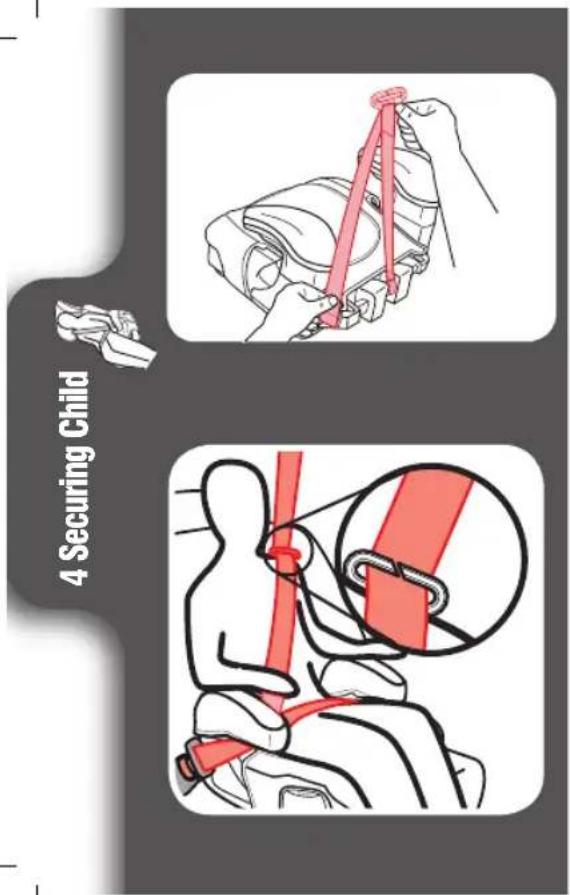
4. Free End of Strap Should Face Front of Seat
5. Place Child in Seat, Buckle Child In Seat and Attach Belt Positioning Clip
With child's back flat against the back of the vehicle seat, buckle child in. Then slide the clip onto the vehicle's seat shoulder belt as shown.
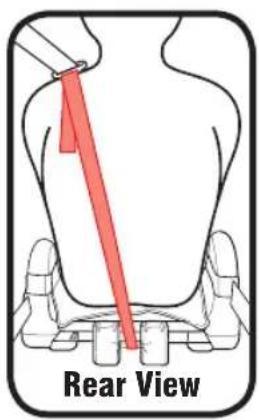
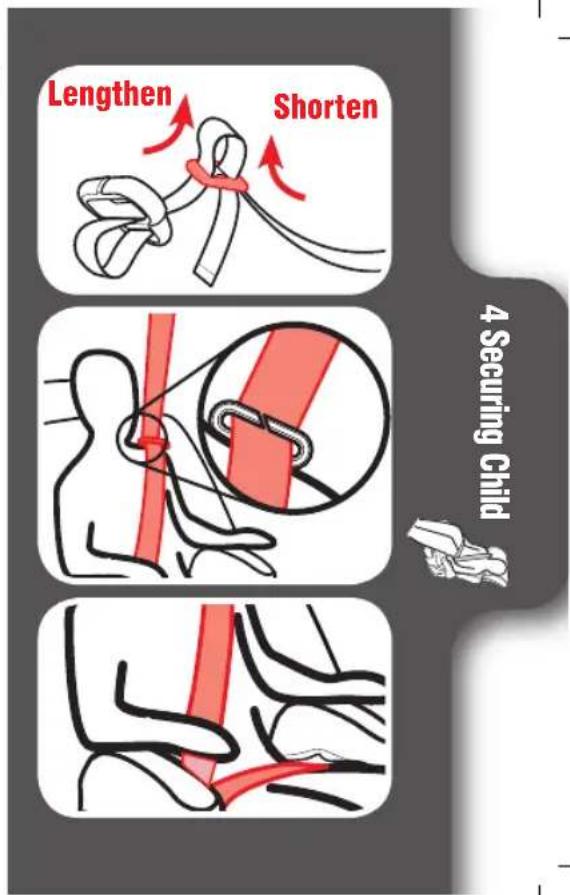
6. Adjust the Belt Positioning Clip to Fit Your Child
Lengthen or shorten the belt length as shown.
Clip should fit right at the top of shoulder as shown.
Be sure the lap portion of the vehicle seat belt lies low across your child's hips.
5 Accessories (on select models)
5 Accessories
natural_image
Line drawing of a seated car with hands placed on the seat, showing red directional arrows indicating movement or pressure points (no text or symbols)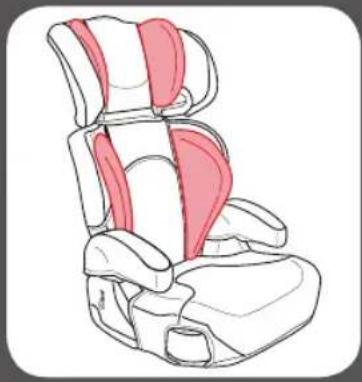
natural_image
Line drawing of a car seat with red and white sections (no text or symbols)Cup Holders
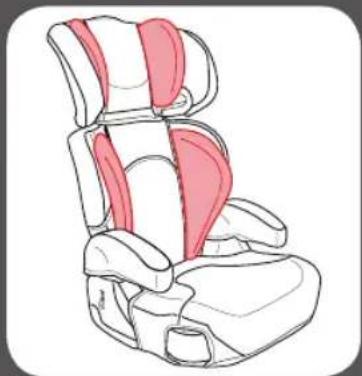
Headrest Pillow and Body Pillow
To remove, pull the pillow out.
Reinsert as shown.
6-A Choosing Vehicle Seat Location
Review your vehicle's owner manual for Seating Locations
The best seating location for this car seat is one that:
- Is recommended by your vehicle owner's manual, and
• Results in a secure installation of this car seat
In the event there is no available back seat and / or you have no other option, the National Highway Traffic Safety Administration (NHTSA) recommends that you take the following steps:
- Ensure the child is properly restrained according to their age and size
- Move the seat as far back as possible
- Make sure the child is not leaning out of position, such as leaning forward into the deployment path of the air bag
- Set the air bag ON-OFF switch, if available, to the OFF position
6-B Unsafe Vehicle Seat Location
Never install this car seat in any of the following vehicle seating locations:
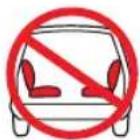
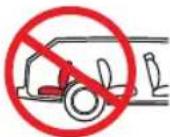
rear-facing or side-facing vehicle seats
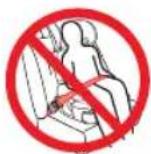
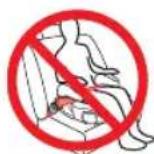
booster mode with vehicle lap belt only seat belt
6-C Vehicle Seat Belts
Review your vehicle's owner manual for vehicle seat belt use
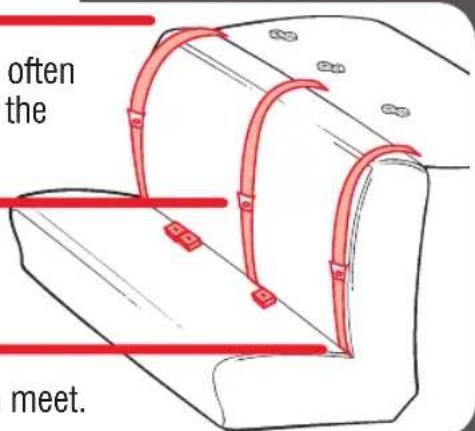
Vehicle Seat Belt Terms
Retractor
A device that winds up the unused vehicle seat belt. It is often hidden inside the panels on the walls of the vehicle or in the vehicle seatback.
Latch Plate
The male end of the seat belt with the silver tongue.
Seat Bight
The crease where the vehicle seat back and seat bottom meet.
Identify Your Seat Belt Type
There is one type of vehicle seat belt that can be used with this car seat:
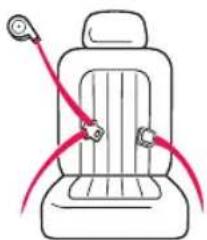
natural_image
Line drawing of a car seat with red cable connectors (no text or symbols)Lap/Shoulder Belt 3 connections points. Can be used in all car seats modes of use.
The following types of vehicle seat belts CANNOT be used safely with this car seat:
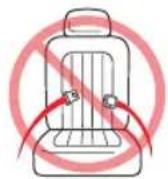
Lap Belt Only 2 connection points.
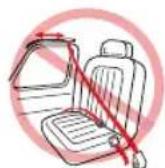
Lap Belt with Motorized Shoulder Belt
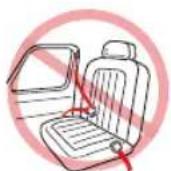
Lap Belt or Shoulder Belt Mounted on Door
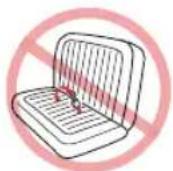
Belts Forward of the Seat Bight
7-A Cleaning Seat Pad
Refer to seat pad care tag for washing instructions.
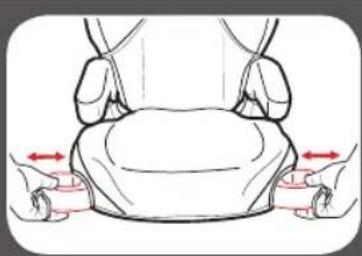
To Remove Seat Cover
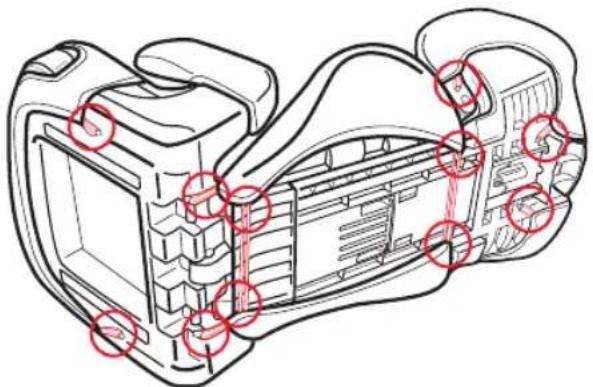
Remove elastic loops and hooks from seat as shown.
Clean with a damp sponge using mild soap and cool water. If needed, head support cover may be removed for cleaning.
Machine wash cover in cold water on delicate cycle and drip-dry. DO NOT USE BLEACH.
To reattach the seat pad see section 1 and reattach elastic straps as shown.
natural_image
Technical line drawing of a mechanical component with red circular annotations indicating features (no text or symbols present)43
Cleaning
7 Care &
Replacement Parts
To purchase parts or accessories in the United States, please contact us at the following:
www.gracobaby.com
or 1-800-345-4109
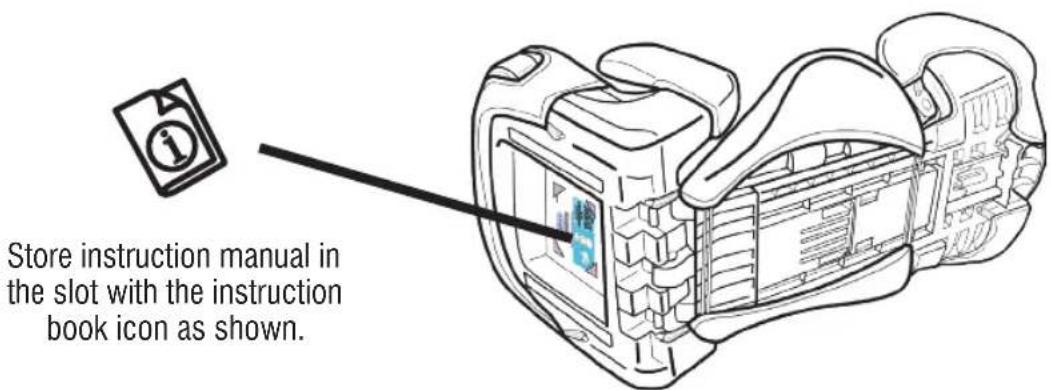
Store instruction manual in the slot with the instruction book icon as shown.

www.gracobaby.com
TURBOBOOSTER
natural_image
Line drawing of a car seat with front and rear panels, no text or symbols presentPD348952D 4/16
natural_image
Line drawing of a car seat with front and back views (no text or symbols)natural_image
Diagram of a car seatbelt mechanism with red directional arrows indicating movement (no text or symbols)5
natural_image
Illustration of a hand using a tool to lift a small object, no text or symbols present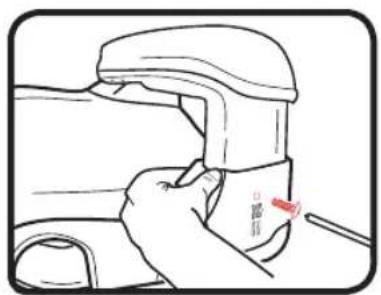
natural_image
Diagram of a mechanical component with red outline and black outline, no visible text or symbolsnatural_image
Illustration of hands holding a mechanical component with red arrows indicating motion or force (no text or symbols)natural_image
Line drawing of a hand holding a mechanical component with red annotation lines (no text or symbols)4. Apoyacabeza
natural_image
Illustration of hands holding a device with arrows indicating movement or assembly (no text or symbols present)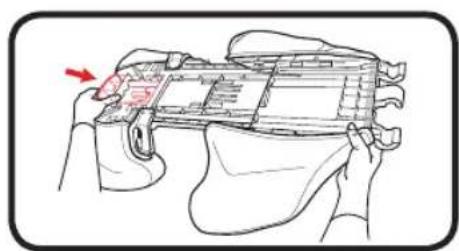
natural_image
Illustration of a hand holding a device with a red arrow pointing to a component (no text or symbols present)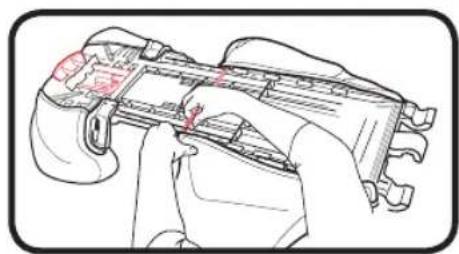
natural_image
Illustration of a hand holding a mechanical component with a red highlighted area (no text or symbols)1 Importante
natural_image
Anatomical illustration of a human head and neck with a red arrow indicating a specific area (no text or labels present)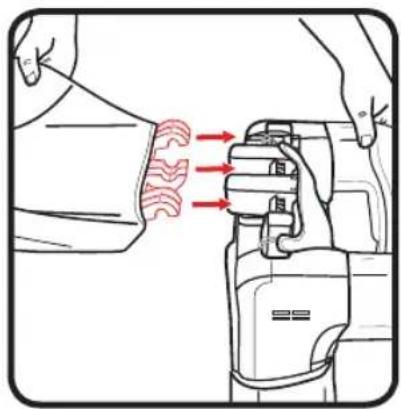
natural_image
Diagram of a person using a device to interact with a mechanical component, showing red arrows indicating motion or force direction (no text or symbols present)natural_image
Line drawing of a car seatbelt with red arrows indicating movement or force (no text or symbols)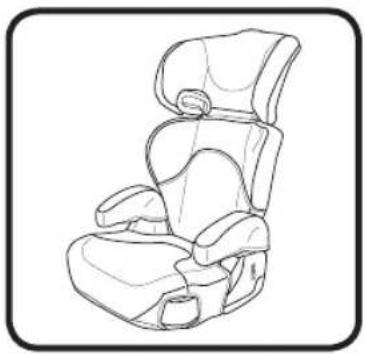
natural_image
Line drawing of a car seat with adjustable seat, no text or symbols presenti 1 importante
natural_image
Diagram of a car showing seat, seatbelt, and dashboard with red arrows indicating direction (no text or symbols)natural_image
Line drawing of a car seat with a red cable and attached seatbelt (no text or symbols)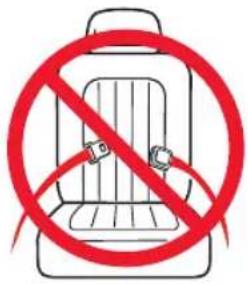
natural_image
Illustration of a car seat with two red cable connectors (no text or symbols)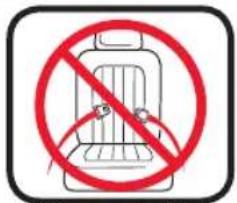
natural_image
Illustration of a person seated in a car seat with red safety belt (no text or symbols)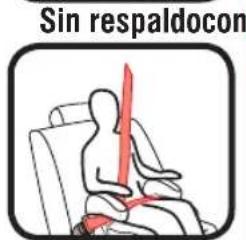
natural_image
Diagram of a dental implant or implant device showing tooth structure and highlighted area (no text or labels)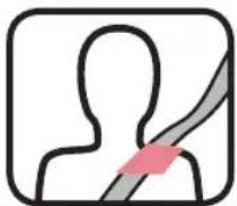
natural_image
Simple line icon of a human silhouette with a diagonal line and a pink highlight (no text or symbols)Graco Children's Products, Inc.
Attn: Customer Service
P.O. Box 169, Elverson, PA 19520-9901
natural_image
Illustration of a person seated in a car seat with a red belt and seatbelt (no text or symbols)natural_image
Illustration of a person seated in a car seat with a red belt and seatbelt (no text or symbols)natural_image
Line drawing of a car seat with seats and seatbelt (no text or symbols)natural_image
Illustration of a hand inserting a red ribbon into a car seatbelt (no text or symbols)natural_image
Illustration of a mechanical device with curved blades and a base, showing motion direction (no text or symbols)
natural_image
Line drawing of a person sitting in a chair, showing seatbelt and armrest (no text or symbols)natural_image
Line drawing of a person seated in a car seat (no text or symbols)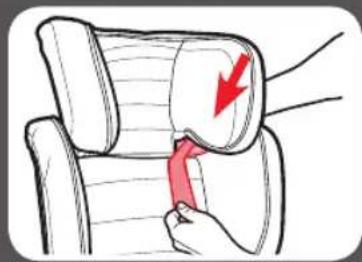
natural_image
Illustration of a hand pressing down on a car seatbelt with a red arrow indicating compression (no text or symbols)iADVERTENCIA!
natural_image
Illustration of a hand pressing down on a mechanical component with a red arrow indicating upward motion (no text or symbols)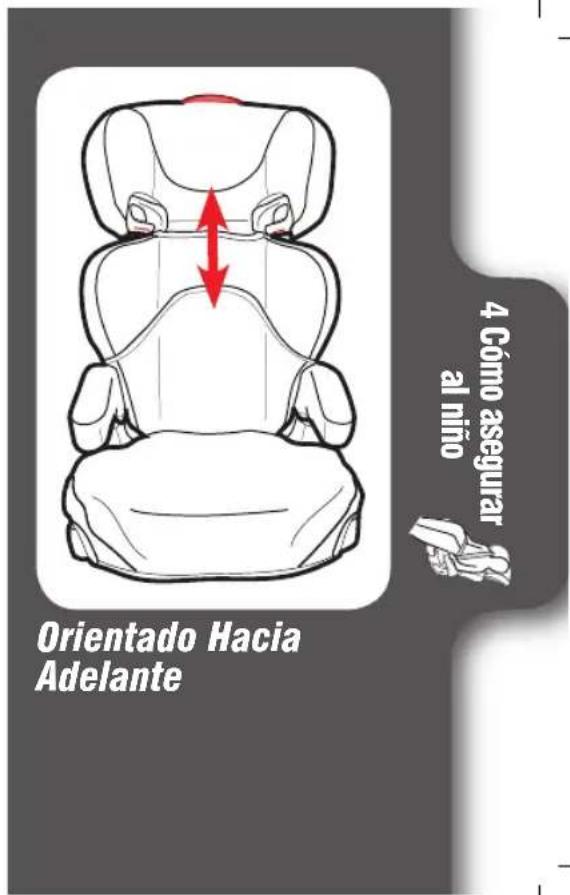
natural_image
Illustration of a car seatbelt with red straps and a red belt (no text or symbols)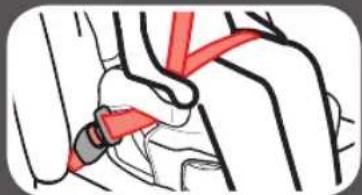
natural_image
Illustration of a hand using a red belt buckle to lift a seatbelt (no text or symbols present)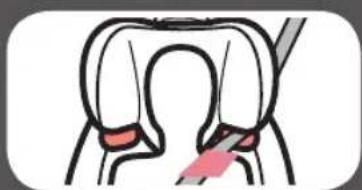
natural_image
Diagram of a tooth with highlighted areas and a tool, no text or symbols present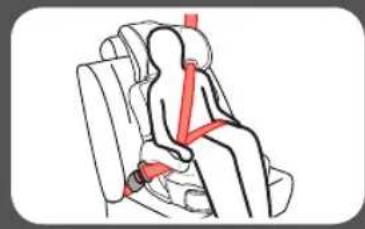
natural_image
Illustration of a person seated in a car seat with red arrows indicating seatbelt or pressure point (no text or symbols)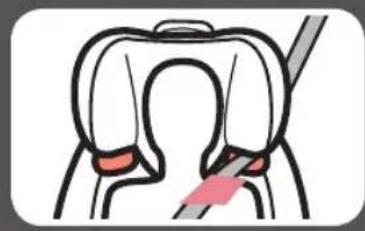
natural_image
Diagram of a dental implant or implant procedure showing two components with red areas, no text or symbols presentnatural_image
Line drawing of a seated human figure in a car seat (no text or symbols)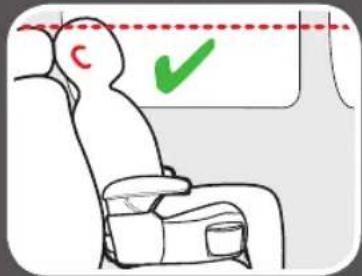
iADVERTENCIA!
natural_image
Cross-sectional diagram of a mechanical component with red highlighted section (no text or symbols)natural_image
Illustration of hands using a red tool to adjust or install a mechanical component (no text or symbols visible)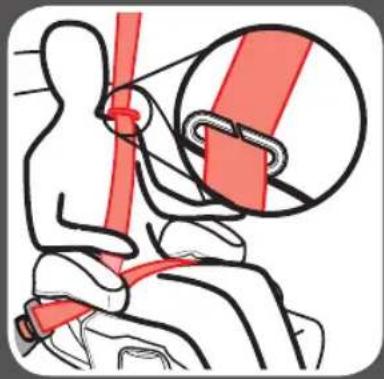
natural_image
Illustration of a person wearing a red belt and seatbelt, with no visible text or symbolsnatural_image
Illustration of a seated figure with hands placed on the back and two red arrows indicating movement or pressure points (no text or symbols)Apoyavasos
natural_image
Line drawing of a car seat with red and white sections (no text or symbols)natural_image
Line drawing of a car seat with red cable connectors (no text or symbols)natural_image
Technical line drawing of a mechanical component with red circular annotations highlighting specific parts (no text or symbols present)Piezas de repuesto
natural_image
Line drawing of a digital camera module with internal components and a screen (no text or symbols)
- Read This Instruction Manual
- Important Pages 5-19
- Features Pages 20-23
- Booster Pages 24-27
- Securing Child Pages 28-37
- Accessories Page 38
- Vehicle Information Pages 39-42
- Care & Cleaning Pages 43
- 1-A Quick Guide to Your Manual
- Adult Assembly Required
- 1.Armrests
- Armrest Covers
- Back support pad
- Head support
- Head support pad
- Backrest
- Get to Know Your Car Seat
- What Seating Location Should I Use?
- The best seating location for this booster seat is one that:
- Using The Car Seat Correctly
- When Installing As a Booster
- Vehicle Seat Belt
- Booster Installation
- Use Lap/Shoulder Belt Only
- Position Lap Belt
- Position Shoulder Belt
- 1-B Welcome to the Graco Family!
- 1-C Before You Begin
- Register This Child Restraint
- If You Need Help
- Certification
- Car Seat's Useful Life
- Vehicle Seat Protection
- Warm Weather Use
- 1-D Safety Warnings
- !WARNING!
- 3-A Booster Use
- Booster Use Without Back: 40-100 lb (18.1-45 kg) 43-57 in. (110.1-145 cm) at least 4 years old
- 3-B Install Booster
- 3-C Install Backless Booster
- Remove the Back Support (on select models)
- Place the Booster Seat Forward-Facing in the Back Seat of Vehicle
- 4-A Securing Child Backed Booster
- Place Child In Seat
- Thread Vehicle's Shoulder Belt Into Seat Belt Guide in the Headrest
- To Raise or Lower Headrest Support
- Buckle the Vehicle Lap/Shoulder Seat Belt
- Is Everything Correct?
- 4-B Securing Child Backless Booster
- Ears Must Be Below the Top of the Vehicle Seat Back or Headrest.
- Buckle the Vehicle Lap/Shoulder Seat Belt
- Never Use Lap Belt Only
- Using Belt Positioning Clip
- Make Sure Vehicle's Seat Shoulder Belt Lays in the Red Zone As Shown
- Attach Belt Positioning Clip
- Push Clip and Strap Through Loop
- Free End of Strap Should Face Front of Seat
- Place Child in Seat, Buckle Child In Seat and Attach Belt Positioning Clip
- Adjust the Belt Positioning Clip to Fit Your Child
- Accessories (on select models)
- Cup Holders
- Headrest Pillow and Body Pillow
- 6-A Choosing Vehicle Seat Location
- Review your vehicle's owner manual for Seating Locations
- The best seating location for this car seat is one that:
- 6-B Unsafe Vehicle Seat Location
- 6-C Vehicle Seat Belts
- Retractor
- Latch Plate
- Seat Bight
- Identify Your Seat Belt Type
- 7-A Cleaning Seat Pad
- To Remove Seat Cover
- Replacement Parts
- TURBOBOOSTER
- Apoyacabeza
- iADVERTENCIA!
- Apoyavasos
- Piezas de repuesto
Brand : GRACO
Model : TurboBooster
Category : Child car seat