
AXM-P8000 - Car stereo PIONEER - Free user manual and instructions
Find the device manual for free AXM-P8000 PIONEER in PDF.

| Brand | Pioneer |
| Model | AXM-P8000 |
| Product type | Multi-channel processor controller for car audio |
| Power supply | 14.4 V DC (10.8 – 15.1 V acceptable), negative ground |
| Maximum current consumption | 0.25 A |
| Compatible sources | DVD player, CD changer, TV tuner, digital and analog sources (up to 6 analog sources) |
| Built-in audio processor | Digital signal processor (DSP) with Dolby Pro Logic II, DTS (with Pioneer multi-channel processor) |
| DSP functions | Sound field control (SFC), position selector, time alignment, automatic and manual equalization (3-band parametric), crossover frequency adjustment |
| CD playback functions | Repeat (MCD, TRK, DISC), random play, scan, pause, ITS programming (instant track selection), CD TEXT |
| DVD functions | Play, pause, skip, fast forward/reverse, track selection, bookmark, angle change, subtitles, audio language |
| TV tuner | Manual and automatic tuning, storing 12 stations (6 per band), BSSM function (best stations sequential memory) |
| Remote control | Remote control unit with DVD, DEQ, AUDIO modes; CR2025 (3 V) lithium battery |
| Initial settings | Clock, dimmer, brightness, distortion correction (Digital ATT), phone/navigation mute/attenuation, auxiliary input (AUX), digital/analog sources |
| Inputs | Speaker input connector, RCA input connector, optical input (OPT IN 1 and 2), microphone for TA and auto EQ |
| TA and auto EQ function | Automatic time alignment and automatic equalization via supplied microphone (requires multi-channel processor) |
| Maintenance | Clean discs with a soft cloth; replace remote control battery if necessary |
| Safety | Maintain moderate listening level to protect hearing; do not use metal objects with battery; follow installation precautions |
| Compatibility | Compatible with Pioneer multi-channel processor (DEQ-P8000), DVD player (XDV-P90), CD changer, television, Pioneer head units |
| Included accessories | Remote control unit, CR2025 battery, microphone for TA and auto EQ, instruction manual |
| Warranty | See the Limited Warranty document provided with the device |
Frequently Asked Questions - AXM-P8000 PIONEER
User questions about AXM-P8000 PIONEER
0 question about this device. Answer the ones you know or ask your own.
Ask a new question about this device
Download the instructions for your Car stereo in PDF format for free! Find your manual AXM-P8000 - PIONEER and take your electronic device back in hand. On this page are published all the documents necessary for the use of your device. AXM-P8000 by PIONEER.
USER MANUAL AXM-P8000 PIONEER
Multi-channel processor controller unit
Thank you for buying this Pioneer product.
Please read through these operating instructions so you will know how to operate your model properly. After you have finished reading the instructions, keep this manual in a safe place for future reference.
01 Before You Start
Information to User 5
About this manual 5
About this unit 5
After-sales service for Pioneer products 5
Product registration 6
About digital and analog source 6
Precautions 6
Use and care of the remote control 7
Using the remote control operation mode switch 7
Reverse mode 8
Dolby Digital/DTS compatibility 8
02 What's What
Display unit 9
Remote control 9
03 Basic Operations
Turning the unit on 12
Selecting a source 12
Adjusting the volume 12
Turning the unit off 12
04 DVD Player
Function menu switching 13
Repeating play 13
Playing tracks in a random order 13
Scanning tracks of a CD 13
Pausing playback 13
Resume playback (Bookmark) 13
05 TV tuner
Using the TV tuner 15
Storing and recalling broadcast stations 15
Storing the strongest broadcast stations sequentially 15
06 Multi-CD Player
Playing a CD 16
50-disc multi-CD player 16
Introduction of advanced multi-CD player operation 17
Repeating play 17
Playing tracks in a random order 17
Scanning CDs and tracks 18
Pausing CD playback 18
Using ITS playlists 18
Using disc title functions 20
Using CD TEXT functions 20
Using compression and bass emphasis 21
07 Digital Signal Processor
Introduction of DSP adjustments 22
Using the sound field control 23
Using the position selector 24
Using balance adjustment 24
Adjusting source levels 24
Using the dynamic range control 25
Using the direct control 25
Using the Dolby Pro Logic II 25
Using the down-mix function 26
Setting the speaker setting 26
Selecting a cross-over frequency 27
Adjusting the speaker output levels 28
Adjusting the speaker output levels using a test tone 28
Using the time alignment 29
Using the auto-equalizer 30
Auto TA and EQ (auto-time alignment and auto-equalizing) 30
Using the equalizer 32
08 Initial Settings
Adjusting initial settings 35
Setting the clock 35
Switching the dimmer setting 35
Adjusting the brightness 36
Correcting distorted sound 36
Switching the sound muting/attenuation 36
Switching the auxiliary setting 36
Switching the digital source setting 37
Switching the analog input setting 37
Resetting the audio functions 37
09 Other Functions
Turning the clock display on or off 38
Using different entertainment displays 38
Setting the digital source title 38
Setting the analog source title 38
Using the AUX source 38
Setting remote control code type 39
Title input 39
Using the PGM button 40
Additional Information
Troubleshooting 41
Error messages 41
Understanding auto TA and EQ error
messages 42
Specifications 43
Dear Customer:
Selecting fine audio equipment such as the unit you've just purchased is only the start of your musical enjoyment. Now it's time to consider how you can maximize the fun and excitement your equipment offers. This manufacturer and the Electronic Industries Association's Consumer Electronics Group want you to get the most out of your equipment by playing it at a safe level. One that lets the sound come through loud and clear without annoying blaring or distortion—and, most importantly, without affecting your sensitive hearing.
Sound can be deceiving. Over time your hearing “comfort level” adapts to higher volumes of sound. So what sounds “normal” can actually be loud and harmful to your hearing. Guard against this by setting your equipment at a safe level BEFORE your hearing adapts.
To establish a safe level:
- Start your volume control at a low setting.
- Slowly increase the sound until you can hear it comfortably and clearly, and without distortion.
Once you have established a comfortable sound level:
- Set the dial and leave it there.
Taking a minute to do this now will help to prevent hearing damage or loss in the future. After all, we want you listening for a lifetime.
We Want You Listening For A Lifetime
Used wisely, your new sound equipment will provide a lifetime of fun and enjoyment. Since hearing damage from loud noise is often undetectable until it is too late, this manufacturer and the Electronic Industries Association's Consumer Electronics Group recommend you avoid prolonged exposure to excessive noise. This list of sound levels is included for your protection.
Decibel
| Level | Example |
| 30 | Quiet library, soft whispers |
| 40 | Living room, refrigerator, bedroom away from traffic |
| 50 | Light traffic, normal conversation, quiet office |
| 60 | Air conditioner at 20 feet, sewing machine |
| 70 | Vacuum cleaner, hair dryer, noisy restaurant |
| 80 | Average city traffic, garbage disposals, alarm clock at two feet |
THE FOLLOWING NOISES CAN BE DANGEROUS UNDER CONSTANT EXPOSURE
| 90 | Subway, motorcycle, truck traffic, lawn mower |
| 100 | Garbage truck, chain saw, pneumatic drill |
| 120 | Rock band concert in front of speakers, thunderclap |
| 140 | Gunshot blast, jet plane |
| 180 | Rocket launching pad |
Information courtesy of the Deafness Research Foundation.
Information to User
Alteration or modifications carried out without appropriate authorization may invalidate the user's right to operate the equipment.

About this manual
This unit features a number of sophisticated functions ensuring superior reception and operation. All the functions have been designed for the easiest possible use, but many are not self-explanatory. This operation manual will help you benefit fully from this unit's potential and to maximize your listening enjoyment. We recommend that you familiarize yourself with the functions and their operation by reading through the manual before you begin using this unit. It is especially important that you read and observe precautions noted on the next page and in other sections.
About this unit
This unit can control separately sold Pioneer multi-channel processor (e.g. DEQ-P8000). Also, supplied remote control can control the functions of separately sold Pioneer DVD player (e.g. XDV-P90), Pioneer multi-CD player, Pioneer television and the part of functions of Pioneer head units.
Also, this unit has universal connector for your car-stereo or other equipment, allowing you to connect to this unit and to enjoy the high quality sound of DEQ-P8000. If you want to connect them, use either the speaker input connector or the RCA input connector. You can connect six sources at a time for speaker input connector and RCA input connector as analog source. You can change the setting of each analog source between speaker input or RCA input. (Refer to Switching the analog input setting on page 37.)

Note
Instructions in this operation manual use DEQ-P8000 as an example multi-channel processor. If multi-channel processor other than DEQ-P8000 is connected to this unit, some functions in this manual may not be available. In this case, refer to multi-channel processor's operation manual for concerning operation.
After-sales service for Pioneer products
Please contact the dealer or distributor from where you purchased this unit for after-sales service (including warranty conditions) or any other information. In case the necessary information is not available, please contact the companies listed below:
Please do not ship your unit to the companies at the addresses listed below for repair without advance contact.
U.S.A.
Pioneer Electronics (USA) Inc. CUSTOMER SUPPORT DIVISION P.O. Box 1760 Long Beach, CA 90801-1760 800-421-1404
CANADA
Pioneer Electronics of Canada, Inc. CUSTOMER SATISFACTION DEPARTMENT 300 Allstate Parkway Markham, Ontario L3R OP2 1-877-283-5901
For warranty information please see the Limited Warranty sheet included with this unit.
Product registration
Visit us at the following site:

text_image
http://www.pioneerelectronics.com1 Register your product. We will keep the details of your purchase on file to help you refer to this information in the event of an insurance claim such as loss or theft.
2 Receive updates on the latest products and technologies.
3 Download owner's manuals, order product catalogues, research new products, and much more.
About digital and analog source
This unit features two digital sources and six analog sources.
By connecting a Pioneer DVD player to this unit with IP-BUS cable, you can use it as the digital source.
Digital1 and Digital2 are automatically occupied by the Pioneer DVD player when it is connected to this unit only via the optical cable. And each digital source is assigned according to the media which is playing on Pioneer DVD player, such as DVD, Video CD and CD.
Devices which are connected to this unit with speaker input connector or RCA input connector can be used as analog sources. For example, when Pioneer head unit with tuner and cassette player is connected to this unit, you can use Analog1 for tuner and Analog2 for cassette player as independent source.
Furthermore, audio function of DEQ-P8000 can be used independently for each analog source, if each analog source is used properly. The title displayed for digital sources and analog sources can be changed. This is useful
when you use such sources. To input the titles, refer to Title input on page 39.

Notes
- If equipment which is connected to this unit as analog source has multiple sources, be sure to change sources both for this unit and the connected equipment. Also, this unit cannot control equipment which is connected as analog source.
- When the volume level of the equipment which is connected to this unit as analog source is too high, sound may be produced incorrectly. Also, sound controls (e.g. loudness, equalizer and so on) should be off to prevent incorrect sound.
Precautions
WARNING:
Handling the cord on this product or cords associated with accessories sold with the product will expose you to lead, a chemical known to the State of California and other governmental entities to cause cancer and birth defects or other reproductive harm. Wash hands after handling.
CAUTION: USE OF CONTROL OR ADJUSTMENT OR PERFORMANCE OF PROCEDURES OTHER THAN THOSE SPECIFIED HEREIN MAY RESULT IN HAZARDOUS RADIATION EXPOSURE.
CAUTION: THE USE OF OPTICAL INSTRUMENTS WITH THIS PRODUCT WILL INCREASE EYE HAZARD.
- Keep this manual handy as a reference for operating procedures and precautions.
Before You Start
- Always keep the volume low enough so that you can hear sounds from outside the vehicle.
- Protect this unit from moisture.
- If the battery is disconnected or discharged, the preset memory will be erased and must be reprogrammed.
Use and care of the remote control
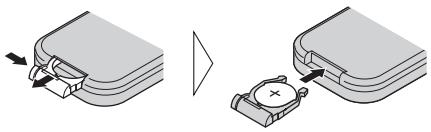
Installing the battery
Slide the tray out on the back of the remote control and insert the battery with the plus (+) and minus (−) poles pointing in the proper direction.
- When using for the first time, pull out the film protruding from the tray.
natural_image
Diagram showing two mechanical components with arrows indicating movement, one being folded and the other holding a device (no text or symbols present)
WARNING
Keep the battery out of the reach of children. Should the battery be swallowed, immediately consult a doctor.

CAUTION
• Use only one CR2025 (3 V) lithium battery.
- Remove the battery if the remote control is not used for a month or longer.
- Do not recharge, disassemble, heat or dispose of the battery in fire.
- Do not handle the battery with metallic tools.
- Do not store the battery with metallic materials.
- In the event of battery leakage, wipe the remote control completely clean and install a new battery.
- When disposing of used batteries, please comply with governmental regulations or environmental public institutions' rules that apply in your country/area.
- Always check carefully that you are loading the battery with its plus (+) and minus (−) poles facing in the proper directions.
Using the remote control
Point the remote control in the direction of the front panel to operate.
- The remote control may not function properly in direct sunlight.

Important
- Do not store the remote control in high temperatures or direct sunlight.
- Do not let the remote control fall onto the floor, where it may become jammed under the brake or accelerator pedal.
Using the remote control operation mode switch
There are three remote control operation modes on the remote control. In order to control every function of connected equipment properly, be sure to change settings as follows:
- DVD mode – This mode can control Pioneer DVD player. Every function of Pioneer DVD player can be controlled by this remote control. Although some operations may differ slightly from your DVD player's remote control, use corresponding buttons to control them properly.
- DEQ mode – This mode controls Pioneer multi-channel processor (DEQ-P8000). Every function of DEQ-P8000 can be controlled by this remote control. Also, some functions for connected sources can be controlled. If Pioneer multi-CD player or television is connected to this unit, you can control their functions by using supplied remote control.
- AUDIO mode – This mode can control Pioneer head unit. Although not every function of Pioneer head unit can be controlled by this remote control, most of the basic functions can be controlled. If you connect Pioneer head unit to this unit, supplied remote control can operate it.

Note
Supplied remote control cannot control equipment connected to speaker input connector and RCA input connector. To control them, use the appropriate buttons on the equipment.
Reverse mode
If you do not perform an operation within about 30 seconds, screen indications start to reverse, and then continue reversing every 10 seconds. Pressing button 5 when power to this unit is turned off while the ignition switch is set to ACC or ON cancels the reverse mode. Press button 5 again to start the reverse mode.
Dolby Digital/DTS compatibility
When using this unit with a Pioneer multi-channel processor, you can enjoy the atmosphere and excitement provided by DVD movie
and music software featuring 5.1 channel recordings.
- Manufactured under license from Dolby Laboratories. "Dolby" and the double-D symbol are trademarks of Dolby Laboratories.

- “DTS” is a registered trademark of Digital Theater Systems, Inc.


Note
This product incorporates copyright protection technology that is protected by method claims of certain U.S. patents and other intellectual property rights owned by Macrovision Corporation and other rights owners. Use of this copyright protection technology must be authorized by Macrovision Corporation, and is intended for home and other limited viewing uses only unless otherwise authorized by Macrovision Corporation. Reverse engineering or disassembly is prohibited.
natural_image
Diagram of a rectangular object with two labeled parts (① and ②), no text or symbols present.
text_image
DVD A DVD B 1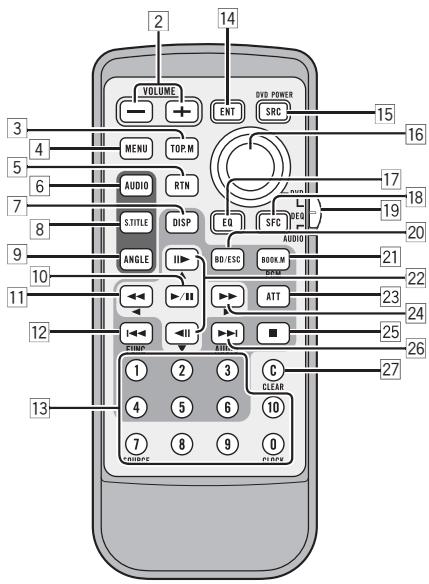
text_image
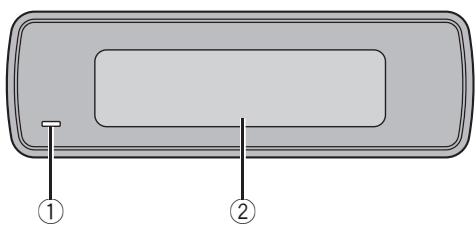
VOLUME ENT SRC DVD POWER 3 4 MENU TOP.M AUDIO RTN STITLE DISP EQ SFC REG AUDIO 17 18 20 9 10 ANGLE BD/ESC BOOK.M BRM ATT 21 22 23 24 25 26 12 13 1 2 3 C CLEAR 4 5 6 10 7 8 9 0 ORANGEDisplay unit
① Power indicator
It lights up when power is on.
② Information display
Displaying information for each connected source and settings.
Remote control
1 Remote control selection switch
- DVD mode – Switch to change the setting of the remote control. For details, refer to Setting remote control code type on page 39.
- DEQ mode –Not used.
• AUDIO mode – Not used.
2 VOLUME button
Press to increase or decrease the volume.
3 TOP MENU button
- DVD mode – Press to return to the top menu during DVD playback.
- DEQ mode – Press to select the video source when you connect a Pioneer television to this unit.
- AUDIO mode – Press to select the video source when you connect a Pioneer television to this unit.
4 MENU button
This is effective only when controlling Pioneer DVD player. Press to display the DVD menu during DVD playback.
5 RETURN button
This is effective only when controlling Pioneer DVD player. Press to return to the previous display when the SET-UP MENU is displayed.
6 AUDIO button
This is effective only when controlling Pioneer DVD player. Press to change the audio language during DVD playback.
7 DISP button
- DVD mode – Press to change the information display on the separately sold display while the DVD player is playing as the source.
- DEQ mode – Press to display information on the information display.
- AUDIO mode – Press to display information on the head unit display.
8 SUBTITLE button
This is effective only when controlling Pioneer DVD player. Press to change the subtitle language during DVD playback.
9 ANGLE button
This is effective only when controlling Pioneer DVD player.
Press to change the viewing angle during DVD playback.
10 PLAY/PAUSE (▶/II) button
- DVD mode – Press to switch sequentially between play and pause.
- DEQ mode –Not used.
• AUDIO mode – Not used.
11 REVERSE (◀◀) button
- DVD mode – Press to perform fast reverse.
- DEQ mode – Press to control functions.
- AUDIO mode – Press to control functions.
12 PREVIOUS (◀◀) button
- DVD mode – Press to return to the previous track (chapter).
- DEQ mode – Press to select functions.
• AUDIO mode – Press to select functions.
13 NUMBER buttons
- DVD mode – Press to directly select the desired track, chapter and disc.
- DEQ mode
1-6 buttons – Press to operate disc number search for the multi-CD player when you connect a Pioneer multi-CD player to this unit.
7 button – Press to select a source when controlling Pioneer head unit.
0 button – Press to change the information display to the clock display.
- AUDIO mode
1-6 buttons - Not used.
7 button – Press to select a source when controlling Pioneer head unit.
0 button – Press to change the information display to the clock display.
14 ENTERTAINMENT button
Press to change to the entertainment display.
15 SOURCE button
This unit is turned on by selecting a source. Press to cycle through all the available sources.
16 Joystick
This is effective only when controlling Pioneer DVD player.
- DVD mode – Move to select the setting. Click to set the setting or select on or off.
- DEQ mode – Move to select the setting. Click to set the setting or select on or off.
• AUDIO mode – Not used.
17 EQ button
Press to select various equalizer curves.
18 SFC button
Press to select a sound field control.
19 Remote control operation mode switch
Switches the operation mode between DVD mode, DEQ mode and AUDIO mode. (Refer to Using the remote control operation mode switch on page 7.)
20 BAND button
- DVD mode – Not used.
- DEQ mode – Press to cancel the control mode of functions.
- AUDIO mode – Press to cancel the control mode of functions.
21 BOOK.M button
- DVD mode – When a Pioneer DVD player which features Bookmark function (refer to Resume playback (Bookmark) on page 13) is connected to this unit, press to turn Bookmark function on or off.
- DEQ mode –Press to operate the preprogrammed functions for each source when controlling Pioneer head unit. (Refer to Using the PGM button on page 40.)
- AUDIO mode – Press to operate the pre-programmed functions for each source when controlling Pioneer head unit.
(Refer to Using the PGM button on page 40.)
22 STEP (||►/◄||) button
- DVD mode – Press to move ahead one frame at a time during DVD/Video CD playback. Press and hold for one second to activate slow playback.
- DEQ mode – Press to control functions.
- AUDIO mode – Press to control functions.
23 ATT button
Press to quickly lower the volume level, by about 90%. Press once more to return to the original volume level.
24 FORWARD (▶▶) button
- DVD mode – Press to perform fast forward.
- DEQ mode – Press to control functions.
- AUDIO mode – Press to control functions.
25 STOP (■) button
- DVD mode – Press to stop playback.
- DEQ mode –Not used.
• AUDIO mode – Not used.
26 NEXT (▶▶) button
- DVD mode – Press to skip to the next track (chapter).
- DEQ mode – Press to select various sound quality controls.
- AUDIO mode – Press to select various sound quality controls.
27 CLEAR button
- DVD mode – Press to cancel the input number while NUMBER are used.
- DEQ mode –Not used.
• AUDIO mode – Not used.
Turning the unit on
- Press SOURCE to turn the unit on.
When you select a source the unit is turned on.
Selecting a source
● Press SOURCE to select a source.
Press SOURCE repeatedly to switch between the following sources:
Digital source 1—Digital source 2—Television—DVD player/multi-DVD player—Multi-CD player—External unit 1—External unit 2—AUX—Analog source 1—Analog source 2—Analog source 3—Analog source 4—Analog source 5—Analog source 6

Notes
- DVD source (DVD player/multi-DVD player) and Digital sources (Digital source1 and 2) can exist simultaneously. However, DVD player which is connected to the multi-channel processor (DEQ-P8000) via the IP-BUS and optical cable should be connected to OPT IN. 1 connector. Also, equipment which is connected to the multi-channel processor only via the optical cable should be connected to OPT IN. 2 connector. If not, this may not operate properly.
- When no source is connected, short beep will sound when you try to select a source.
- In the following cases, the sound source will not change:
— When there is no unit corresponding to the selected source connected to this unit.
— When there is no magazine in the multi-CD player.
— When there is no magazine in the multi-DVD player.
— When there is no disc in the DVD player.
— When the AUX (auxiliary input) is set to off (refer to page 36).
— When the analog sources are set to off (refer to page 37).
- External unit refers to a Pioneer product (such as one available in the future) that, although incompatible as a source, enables control of basic functions by this unit. Two external units can be controlled by this unit. When two external units are connected, the allocation of them to external unit 1 or external unit 2 is automatically set by this unit.
Adjusting the volume
● Use VOLUME to adjust the sound level.
Press to increase or decrease the volume.
Turning the unit off
- Press SOURCE and hold until the unit turns off.
You can use this unit with a separately sold DVD player or multi-DVD player.
For details concerning operation, refer to the DVD player's or multi-DVD player's operation manual. This section provides information on DVD operations with this unit which differs from that described in the DVD player's or multi-DVD player's operation manual.

Important
You can use the following functions only when the remote control is set to DEQ mode.
Function menu switching
● During DVD playback, press ◀◀◀ to display the function names.
Press I◀◀ repeatedly to switch between the following functions:
Repeat (repeat play)—Pause (pause)
● During Video CD playback, press ◀◀◀ to display the function names.
Press ◀◀◀ repeatedly to switch between the following functions:
Repeat (repeat play)—Pause (pause)
● During CD playback, press ◀◀◀ to display the function names.
Press I▶▶ repeatedly to switch between the following functions:
Repeat (repeat play)—Random (random play)—Scan (scan play)—Pause (pause)
Repeating play
- Press ◀◀◀ to select Repeat.
- During DVD playback, press ◀◀ or ▶▶ to select the repeat range.
- During Video CD or CD playback, press ▶ or ◀ to turn repeat play on or off.
Playing tracks in a random order
1 Press ◀◀◀ to select Random.
2 Press ||► to turn random play on.
■ Press ◀ to turn random play off.
Scanning tracks of a CD
1 Press ◀◀◀ to select Scan.
2 Press ||► to turn scan play on.
- When you find the desired track press ◀II to turn scan play off.
■ If the display has automatically returned to the playback display, select Scan again by pressing ◀◀◀.
Pausing playback
1 Press ◀◀◀ to select Pause.
2 Press ||► to turn pause on.
■ Press ◀ to turn pause off.
Resume playback (Bookmark)

Important
You can use this function only when the remote control is set to DVD mode.
The Bookmark function lets you resume play-back from a selected scene the next time the disc is loaded.
- This function can be operated only when the DVD disc is playing on the Pioneer DVD player which features Bookmark function.
● During playback, press BOOK.M at the point you want to resume playback next time.
The selected scene will be bookmarked so that playback resumes from that point next time. You can bookmark up to five discs. After that, the oldest bookmark is replaced by the new one.
■ To clear the bookmark on a disc, press and hold BOOK.M during playback.
You can use this unit with a separately sold TV tuner.
For details concerning operation, refer to the TV tuner's operation manuals. This section provides information on TV operations with this unit which differs from that described in the TV tuner's operation manual.

Important
You can use the following functions only when the remote control is set to DEQ mode.
Using the TV tuner
1 Press SOURCE to select the Television.
2 Use VOLUME to adjust the sound level.
3 Press BAND to select a band.
4 To perform manual tuning, press ◀◀ or ▶▶ with quick presses.
5 To perform seek tuning, press and hold ◀◀ or ▶▶ for about one second and release.
Storing and recalling broadcast stations
- When you find a station that you want to store in memory press one of preset tuning buttons 1–6 and hold until the preset number stops flashing.
The number you have pressed will flash in the preset number indicator and then remain lit. The selected station has been stored in memory.
The next time you press the same preset tuning button the station is recalled from memory.

Notes
- Up to 12 stations, six for each of two TV bands can be stored in memory.
- You can also recall station assigned to preset tuning buttons 1–6 by pressing ◀ or ▶.
Storing the strongest broadcast stations sequentially
1 Press ◀◀◀ to select BSSM.
Press ◀◀◀ until BSSM appears in the display.
2 Press ||► to turn BSSM on.
BSSM begins to flash. While BSSM is flashing the 12 strongest broadcast stations will be stored in order from the lowest channel up. When finished, BSSM stops flashing.
■ To cancel the storage process, press ◀II.

Note
Storing broadcast frequencies with BSSM may replace broadcast frequencies you have saved using 1–6.
Playing a CD
text_image
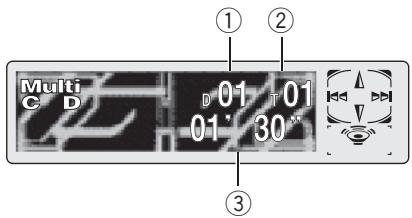
Multi C D 01 01 01' 30" ① ② ③You can use this unit to control a multi-CD player, which is sold separately.
These are the basic steps necessary to play a CD with your multi-CD player. More advanced CD operation is explained starting on the next page.

Important
You can use the following functions only when the remote control is set to DEQ mode.
① Disc number indicator
Shows the disc currently playing.
② Track number indicator
Shows the track currently playing.
③ Play time indicator
Shows the elapsed playing time of the current track.
1 Press SOURCE to select the multi-CD player.
Press SOURCE until you see Multi-CD displayed.
2 Select a disc you want to listen to with the 1–6 buttons.
For discs located at 1 to 6, press the corresponding button number.
If you want to select a disc located at 7 to 12, press and hold the corresponding numbers,
such as 1 for disc 7, until the disc number appears in the display.
- You can also sequentially select a disc by pressing ◀ or ▶.
3 To perform fast forward or reverse, press and hold ◀◀ or ▶▶.
4 To skip back or forward to another track, press ◀◀ or ▶▶.
Pressing ▶▶ skips to the start of the next track. Pressing ◀◀ once skips to the start of the current track. Pressing again will skip to the previous track.

Notes
- When the multi-CD player performs the preparatory operations, Ready is displayed.
- If the multi-CD player does not operate properly, an error message such as ERROR-11 may be displayed. Refer to the multi-CD player owner's manual.
- If there are no discs in the multi-CD player magazine, NO DISC is displayed.
50-disc multi-CD player
Only those functions described in this manual are supported for 50-disc multi-CD players. This unit is not designed to operate disc title list functions with a 50-disc multi-CD player. About the disc title list funtions, please refer to Selecting discs from the disc title list on page 20.
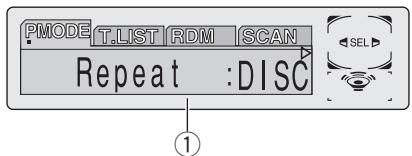
Introduction of advanced multi-CD player operation
text_image
PMODE T.LIST RDM SCAN Repeat :DISC① Function display
Shows the function status.

Important
You can use the following functions only when the remote control is set to DEQ mode.
- Press ◀◀◀ to display the function names.
Press I◀◀ repeatedly to switch between the following functions:
Repeat (repeat play)—Disc title list—Random (random play)—Scan (scan play)—ITS Play (ITS play)—Pause (pause)—Comp (compression and DBE)
■ To return to the playback display, press BAND.

Note
If you do not operate the function within about 30 seconds, the display is automatically returned to the playback display.
Repeating play
There are three repeat play ranges for the multi-CD player: MCD (multi-CD player repeat), TRK (one-track repeat) and DISC (disc repeat).
1 Press ◀◀◀ to select Repeat.
Press ◀◀ until Repeat appears in the display.
2 Press ◀◀ or ▶▶ to select the repeat range.
Press ◀◀ or ▶▶ until the desired repeat range appears in the display.
- MCD – Repeat all discs in the multi-CD player
- TRK – Repeat just the current track
• DISC – Repeat the current disc

Notes
- If you select other discs during repeat play, the repeat play range changes to MCD.
- If you perform track search or fast forward/reverse during TRK, the repeat play range changes to DISC.
Playing tracks in a random order
Random play lets you play back tracks in a random order within the repeat range, MCD and DISC.
1 Select the repeat range.
Refer to Repeating play on this page.
2 Press ◀◀◀ to select Random.
Press ◀◀◀ until Random appears in the display.
3 Press ||► to turn random play on.
Random :ON appears in the display. Tracks will play in a random order within the previously selected MCD or DISC ranges.
4 Press ◀ll to turn random play off.
Random:OFF appears in the display. Tracks will continue to play in order.

Note
If you turn random play on during DISC and then return to the playback display, D.RANDOM appears in the display.
Scanning CDs and tracks
While you are using DISC, the beginning of each track on the selected disc plays for about 10 seconds. When you are using MCD, the beginning of the first track of each disc is played for about 10 seconds.
1 Select the repeat range.
Refer to Repeating play on the previous page.
2 Press ◀◀◀ to select Scan.
Press ◀◀ until Scan appears in the display.
3 Press ||► to turn scan play on.
Scan:ON appears in the display. The first 10 seconds of each track of the current disc (or the first track of each disc) is played.
4 When you find the desired track (or disc) press ◀ll to turn scan play off.
Scan:OFF appears in the display. The track (or disc) will continue to play.
■ If the display has automatically returned to the playback display, select Scan again by pressing ◀◀◀.

Notes
- After track or disc scanning is finished, normal playback of the tracks will begin again.
- If you turn scan play on during DISC and then return to the playback display, T.SCAN appears in the display.
Pausing CD playback
Pause lets you temporarily stop disc playback.
1 Press ◀◀◀ to select Pause.
Press ◀◀◀ until Pause appears in the display.
2 Press ||► to turn pause on.
Pause :ON appears in the display. Play of the current track pauses.
3 Press ◀ll to turn pause off.
Pause :OFF appears in the display. Play will resume at the same point that you turned pause on.
Using ITS playlists
ITS (instant track selection) lets you make a playlist of favorite tracks from those in the multi-CD player magazine. After you have added your favorite tracks to the playlist you can turn on ITS play and play just those selections.
Creating a playlist with ITS programming
You can use ITS to enter and play back up to 99 tracks per disc, up to 100 discs (with the disc titles). (With multi-CD players sold before the CDX-P1250 and CDX-P650, up to 24 tracks can be stored in the playlist.)
1 Play a CD that you want to program.
Press ◀ or ▶ to select a CD.
2 Press ◀◀◀ and hold until TITLE appears in the display, then press ◀◀◀ to select ITS.
After TITLE is displayed, press I repeatedly, the following functions appear in the display: TITLE (disc title input)—ITS (ITS programming)
3 Select a desired track by pressing ◀◀◀ or ▶▶.
4 Press ||► to store the currently playing track in the playlist.
ITS Input is displayed briefly and the currently playing selection is added to your playlist. The display then shows ITS again.
5 Press BAND to return to the playback display.

Note
After data for 100 discs has been stored in memory, data for a new disc will overwrite the oldest one.
Playback from your ITS playlist
ITS play lets you listen to the tracks that you have entered into your ITS playlist. When you turn on ITS play, tracks from your ITS playlist in the multi-CD player will begin to play.
1 Select the repeat range.
Refer to Repeating play on page 17.
2 Press ◀◀◀ to select ITS Play.
Press ◀◀◀ until ITS Play appears in the display.
3 Press ||► to turn ITS play on.
ITS Play :ON appears in the display. Playback begins of those tracks from your playlist within the previously selected MCD or DISC ranges.
■ If no tracks in the current range are programmed for ITS play then ITS Empty is displayed.
4 Press ◀ to turn ITS play off.
ITS Play :OFF appears in the display. Playback will continue in normal order from the currently playing track and CD.
Erasing a track from your ITS playlist
To delete a track from your ITS playlist, make sure ITS play is on.
If ITS play is already on, skip to step 2.
1 Play the CD that contains the track you want to delete from your ITS playlist and turn ITS play on.
Refer to Playback from your ITS playlist on this page.
2 Press ◀◀◀ and hold until TITLE appears in the display, then press ◀◀◀ to select ITS.
After TITLE is displayed, press ◀◀◀ until ITS appears in the display.
3 Select a desired track by pressing ◀◀◀ or ▶▶.
4 Press ◀ll to erase the track from your ITS playlist.
The currently playing selection is erased from your ITS playlist and playback of the next track from your ITS playlist begins.
■ If there are no tracks from your playlist in the current range, ITS Empty is displayed and normal play resumes.
5 Press BAND to return to the playback display.
Erasing a CD from your ITS playlist
To delete all tracks of a CD from your ITS playlist, make sure ITS play is off.
1 Play the CD that you want to delete.
Press ◀ or ▶ to select a CD.
2 Press ◀◀◀ and hold until TITLE appears in the display, then press ◀◀◀ to select ITS.
After TITLE is displayed, press ◀◀◀ until ITS appears in the display.
3 Press ◀ to erase all tracks on the currently playing CD from your ITS playlist.
All tracks on the currently playing CD are erased from your playlist and ITS Clear is displayed.
4 Press BAND to return to the playback display.
Using disc title functions
You can input CD titles and display the titles. Then you can easily search for and play a desired disc.
Entering disc titles
Use the disc title input feature to store up to 100 CD titles (with ITS playlist) into the multi-CD player. Each title can be up to 10 characters long.
1 Play the CD with the title you want to enter.
Press ◀ or ▶ to select a CD.
2 Input the title.
To input the titles, refer to Title input on page 39.

Notes
- Titles remain in memory, even after the disc has been removed from the magazine, and are recalled when the disc is reinserted.
- After data for 100 discs has been stored in memory, data for a new disc will overwrite the oldest one.
- When playing a CD TEXT disc on a CD TEXT compatible multi-CD player, you cannot switch to TITLE. The disc title will have already been recorded on a CD TEXT disc.
Displaying disc titles
You can display the title of any disc that has had a disc title entered.
- Press DISPLAY.
Press DISPLAY repeatedly to switch between the following settings:
Play time—Disc Title (disc title)
When you select Disc Title, the title of the currently playing disc is shown in the display.
■ If no title has been entered for the currently playing disc, No Disc Title is displayed.
Selecting discs from the disc title list
Disc title list lets you see the list of disc titles that have been entered into the multi-CD player and lets you select one for playback.
1 Press ◀◀◀ to select T.LIST.
Press ◀◀◀ until T.LIST appears in the display.
2 Press ◀◀ or ▶▶ to scroll through the list of titles that have been entered.
■ If no title has been entered for a disc, title is not displayed.
3 Press ||► to play your favorite CD title.
That selection will begin to play.
Using CD TEXT functions
You can use these functions only with a CD TEXT compatible multi-CD player.
Some discs have certain information encoded on the disc during manufacture. These discs may contain such information as the CD title, track title, artist's name and playback time and are called CD TEXT discs. Only these specially encoded CD TEXT discs support the functions listed below.
Displaying titles on CD TEXT discs
- Press DISPLAY.
Press DISPLAY repeatedly to switch between the following settings:
Play time—Disc Title (disc title)
—DiscArtist Name (disc artist name)
—Track Title (track title)—TrackArtist Name (track artist name)
■ If specific information has not been recorded on a CD TEXT disc, NO XXXX will be displayed (e.g., NO Disc Title).
Scrolling titles in the display
This unit can display the first 16 letters only of Disc Title, DiscArtist Name, Track Title and TrackArtist Name. When the recorded information is longer than 16 letters, you can scroll the text to the left so that the rest of the title can be seen.
- Press DISPLAY and hold until the title begins to scroll to the left.
The rest of the title will appear in the display.
Using compression and bass emphasis
You can use these functions only with a multi-CD player that supports them.
Using COMP (compression) and DBE (dynamic bass emphasis) functions lets you adjust the sound playback quality of the multi-CD player. Each of the functions has a two-step adjustment. The COMP function balances the output of louder and softer sounds at higher volumes. DBE boosts bass levels to give playback a fuller sound. Listen to each of the effects as you select them and use the one that best enhances the playback of the track or CD that you are listening to.
1 Press ◀◀◀ to select Comp.
Press ◀◀◀ until Comp appears in the display.
■ If the multi-CD player does not support COMP/DBE, No Comp is displayed when you attempt to select it.
2 Press ◀ll or ||► to select your favorite setting.
Press ◀II or III▶ repeatedly to switch between the following settings:
Comp OFF—Comp 1—Comp 2—Comp OFF—DBE 1—DBE 2
Introduction of DSP adjustments

Important
- You can use the following functions only when the remote control is set to DEQ mode.
- Following functions are effective only when you connected a Pioneer multi-channel processor (DEQ-P8000) to this unit.
By carrying out the following settings/adjustments in the order shown, you can create a finely-tuned sound field effortlessly.
1 Setting the speaker setting
2 Using the position selector
3 Auto TA and EQ (auto-time alignment and auto-equalizing)
4 Adjusting the time alignment
5 Adjusting the speaker output levels using a test tone
6 Selecting a cross-over frequency
7 Adjusting the speaker output levels
8 Adjusting 3-band parametric equalizer
Operating the DSP menu
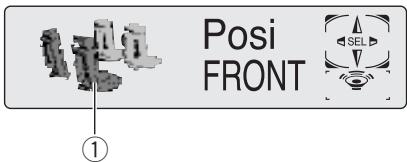
text_image
Posi FRONT ①① DSP display
Shows the DSP status.
- Press ▶▶▶ to display the DSP function names.
Press ▶▶▶I repeatedly to switch between the following DSP functions:
Posi (position selector)—Fad (balance adjustment)—SLA (source level adjustment)—DRC (dynamic range control)—DIRECT (direct)—Dolby PLII (Dolby Pro Logic II)—Downmix (down mix)
■ To return to the display of each source, press BAND.

Notes
- If you do not operate the DSP function within about 30 seconds, the display is automatically returned to the source display.
- If both the center and the rear speakers are set to OFF in the DSP details menu (refer to Setting the speaker setting on page 26), you cannot use Dolby PLII.
Operating the DSP details menu
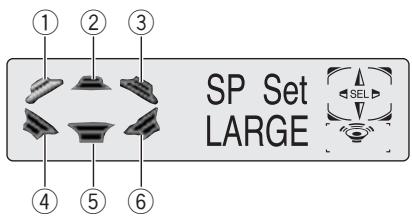
text_image
① ② ③ SP Set LARGE ④ ⑤ ⑥① Front left speaker
② Center speaker
③ Front right speaker
④ Rear left speaker
⑤ Subwoofer
⑥ Rear right speaker
- Press ▶▶l and hold until SP Set appears in the display, then press ▶▶l to display the DSP function names.
After SP Set is displayed, press ▶▶I repeatedly, the following DSP functions appear in the display:
SP Set (speaker setting)—C.Over (cross-over frequency)—SP Lev (speaker output level)—T Tone (test tone)—TA MODE (time alignment mode)—Time A (time alignment adjustment)—AUTO EQ (auto-equalizer on/off)—PEQ (3-band parametric equalizer)
■ When neither F/L nor F/R is selected in Posi, you cannot switch to Time A.
- When neither CUSTOM1 nor CUSTOM2 is selected as an equalizer curve, you cannot switch to PEQ.
■ To return to the display of each source, press BAND.
Using the sound field control
The SFC function creates the sensation of a live performance.
- The acoustics of different performance environments are not the same and depend on the extent and contour of space through which sound waves move and on how sounds bounce off the stage, walls, floors and ceilings. At a live performance you hear music in three stages: direct sound, early reflections, and late reflections, or reverberations. Those factors are programmed into the SFC circuitry to recreate the acoustics of various performance settings.
- Press SFC to select the desired SFC mode.
Press SFC repeatedly to switch between the following mode:
Musical (musical)—Drama (drama)—Action (action)—Jazz (jazz)—Hall (hall)—Club (club)—OFF (off)

Note
If the source is a 2-channel LPCM audio or a 2-channel Dolby Digital audio and you select SFC effects that are most applicable for 5.1-channel audio (i.e., Musical, Drama or Action), we recommend turning Dolby Pro Logic II on. On the other hand, when selecting SFC effects that are intended for use with 2-channel audio (i.e., Jazz, Hall or Club), we recommend turning Dolby Pro Logic II off.
Using the position selector
One way to assure a more natural sound is to accurately position the stereo image, putting you right in the center of the sound field. The position selector function lets you automatically adjust the speaker output levels and inserts a delay time to match the number and position of occupied seats. When used in conjunction with the SFC, the feature will make the sound image more natural and offer a panoramic sound that envelops you.
1 Press ▶▶ to select Posi.
Press ▶▶I until Posi appears in the display.
2 Press ◀◀/▶▶/◀II/III▶ to select a listening position.
Press one of these, ◀◀/▶▶/◀II/III▶, to select a listening position as listed in the table.
| Button | Display | Position |
| ◀◀ | F/L | Front seat left |
| ▶▶ | F/R | Front seat right |
| II▶ | FRONT | Front seats |
| ◀II | ALL | All seats |
■ To cancel the selected listening position, press the same button again.

Note
When you make adjustments for listening position, the speakers are automatically set for appropriate output levels. You can tailor them if you want as discussed under the heading of Adjusting the speaker output levels using a test tone or Adjusting the speaker output levels.
Using balance adjustment
You can select a fader/balance setting that provides an ideal listening environment in all occupied seats.
1 Press ▶▶ to select Fad.
Press ▶▶▶I until Fad appears in the display.
■ If the balance setting has been previously adjusted, Bal will be displayed.
2 Press ◀ or ||► to adjust front/rear speaker balance.
Each press of ◀ or ▶ moves the front/rear speaker balance towards the front or the rear. Fad F 25 – Fad R 25 is displayed as the front/rear speaker balance moves from front to rear. ■ Fad F/R 0 is the proper setting when only two speakers are used.
3 Press ◀◀ or ▶▶ to adjust left/right speaker balance.
When you press ◀◀ or ▶▶, Bal L/R 0 is displayed. Each press of ◀◀ or ▶▶ moves the left/right speaker balance towards the left or the right.
Bal L 25 – Bal R 25 is displayed as the left/right speaker balance moves from left to right.
Adjusting source levels
SLA (source level adjustment) lets you adjust the volume level of each source to prevent radical changes in volume when switching between sources.
1 Press ▶▶▶ to select SLA.
Press ▶▶▶I until SLA appears in the display.
Digital Signal Processor
2 Press ◀ll or ||► to adjust the source volume.
Each press of ◀II or III▶ increases or decreases the source volume.
SLA +4 – SLA -4 is displayed as the source volume is increased or decreased.

Notes
- DVD, Video CD, CD and MP3/WMA are set to the same source level adjustment volume automatically.
- Analog5 and Analog6 are set to the same source level adjustment volume automatically.
Using the dynamic range control
The dynamic range refers to the difference between the largest and softest sounds. The dynamic range control compresses this difference so that you can clearly hear sounds even at low volume levels.
- The dynamic range control is effective only on Dolby Digital sounds.
1 Press ▶▶ to select DRC.
Press ▶▶▶I until DRC appears in the display.
2 Press ||► to turn the dynamic range control on.
DRC ON appears in the display. Dynamic range control is now on.
■ To turn dynamic range control off, press

Using the direct control
You can override audio settings to check for effectiveness of your audio settings.
1 Press ▶▶▶ to select DIRECT.
Press ▶▶▶I until DIRECT appears in the display.
2 Press ||► to turn the direct control on.
DIRECT ON appears in the display. Direct control is now on.
■ To turn direct control off, press ◀II.

Notes
- All audio functions are locked out during DIRECT ON except VOLUME and Dolby PLII.
- If the source is a 2-channel LPCM audio or a 2-channel Dolby Digital audio and you select DIRECT ON, audio is heared only over front left/right speakers.
Using the Dolby Pro Logic II
Dolby Pro Logic II creates five full-bandwidth output channels from two-channel sources to achieve high-purity matrix surround.
- If both the center and the rear speakers are set to OFF, you cannot use this function.
- Dolby Pro Logic II supports up to 48kHz sampling rate stereo source and has no effect on other types of source.
1 Press ▶▶▶ to select Dolby PLII.
Press ▶▶▶I until Dolby PLII appears in the display.
2 Press ◀ll or ||► to select your favorite setting.
• MOVIE – The Movie mode suitable for movie playback
- MUSIC – The Music mode suitable for music playback
- MATRIX – The Matrix mode for when FM radio reception is weak
• OFF – Turn Dolby Pro Logic II off
■ You can operate MUSIC only when MUSIC has been selected.
Adjusting the Music mode
You can adjust the Music mode with the following three controls.
- Panorama (Panorama) extends the front stereo image to include the surround speakers for an exciting “wraparound” effect.
- Dimension (Dimension) allows you to gradually adjust the sound field either towards the front or the rear.
- Center Width Control (Center W Control) allows center-channel sounds to be positioned between the center speaker and the left/right speakers. It improves the left-center-right stage presentation for both the driver and the front passenger.
1 Press ▶▶I until MUSIC appears in the display.
2 Press ▶▶ to select Panorama.
3 Press ◀ll or ||► to turn Panorama on/off.
4 Press ▶▶ again to select Dimension.
5 Press ◀ll or ||▶ to select your favorite setting.
Each time you press ◀ or ▶ it moves the sound towards the front or the surrounds.
3 – -3 is displayed as the front/surround speaker balance moves from front to surrounds.
6 Press ▶▶ again to select Center W Control.
7 Press ◀ll or ||► to select your favorite setting.
Each time you press ◀II or III▶ it gradually spreads the center channel sound into the front left and right speakers over a range 0–7.
3 is the default and it's recommended for most recordings. 0 places all center sound in the center speaker. 7 places all center sound equally in the left/right speakers.
Using the down-mix function
The down-mix function allows you to play back multi-channel audio in 2 channels.
1 Press ||► to select Downmix.
Press II▶ until Downmix appears in the display.
2 Press |◀◀ or ▶▶| to switch the down mix settings.
- Lt/Rt – Down mix so that the surround components can be restored ( decoded).
- Lo/Ro – Stereo mix the original audio that do not contain channel modes such as surround components.
Setting the speaker setting
You need to make with/without (or yes/no) and size (bass reproducing capacity) selection/adjustments depending on the installed speakers. The size needs to be set to LARGE (large) if the speaker is capable of reproducing sounds of about 100 Hz or below. Otherwise select SMALL (small).
- Low frequency range is not output if the subwoofer is set to OFF and the front and rear speakers set to SMALL or OFF.
- It is imperative that non-installed speakers be set to OFF.
- Set the front or rear speaker to LARGE if the speaker is capable of reproducing bass content, or if no subwoofer is installed.
Digital Signal Processor
1 Press ▶▶ and hold until SP Set appears in the display.
2 Press ◀◀ or ▶▶ to select the speaker to be adjusted.
Each press of ◀◀ or ▶▶ selects the speaker in the following order:
Front speakers—Center speaker—Rear speakers—Subwoofer—S.W (subwoofer setting)
- You can switch to S.W only when the subwoofer has been set to ON.
3 Press ◀ or ||► to select the correct size for the selected speaker.
Each press of ◀ or ▶ selects the size in the following order:
LARGE (large)—SMALL (small)—OFF (off)
- You cannot select OFF, when the front speakers have been selected.
- You can turn ON or OFF, when the subwoofer has been selected.
■ You can switch Rev. (reverse phase) or Normal (normal phase), when S.W (subwoofer setting) has been selected.
4 Press BAND to return to the playback display.
Correcting the subwoofer's phase
If trying to boost the bass output of the subwoofer doesn't do much or rather makes you feel that the bass gets more murky, this may indicate that the subwoofer's output and bass content you hear over other speakers cancel each other out. To remove this problem, try changing the phase setting for the subwoofer.
1 Press ▶▶ and hold until SP Set appears in the display.
2 Press ◀◀ or ▶▶ to select the subwoofer.
Each press of ◀◀ or ▶▶ selects the speaker in the following order:
Front speakers—Center speaker—Rear speakers—Subwoofer—S.W (subwoofer setting)
3 Press ||► to turn the subwoofer output on.
4 Press ▶▶ to select S.W (subwoofer setting).
5 Press ◀ or ||► to select the subwoofer output phase.
Press II▶ to select Normal (normal phase).
Press ◀ to select Rev. (reverse phase).
6 Press BAND to return to the playback display.

Note
When playing a 2-channel mono source with Pro Logic II turned on, there may be occasions when the following will occur:
- No audio is outputted if the center speaker setting is SMALL or LARGE and no center speaker is installed.
- Audio is heard only over the center speaker if installed and the center speaker setting is SMALL or LARGE.
Selecting a cross-over frequency
You can select a frequency, under which sounds are reproduced through the subwoofer. If the installed speakers include one whose size has been set to SMALL, you can select a frequency, under which sounds are reproduced through a LARGE speaker or subwoofer.
Digital Signal Processor
1 Press ▶▶l and hold until SP Set appears in the display, then press ▶▶l to select C.Over.
After SP Set is displayed, press ▶▶▶1 until C.Over appears in the display.
2 Press ◀◀ or ▶▶ to select the speaker to be adjusted.
Each press of ◀◀ or ▶▶ selects the speaker in the following order:
Front speakers—Center speaker—Rear speakers—Subwoofer
3 Press ◀ or ||► to select cross-over frequency for the selected speaker.
Each press of ◀ or ▶ selects cross-over frequencies in the following order:
4 Press BAND to return to the playback display.

Note
Selecting a cross-over frequency is to set a cross-over frequency of the subwoofer's L.P.F. (low-pass filter) and that of the SMALL speaker H.P.F. (high-pass filter). The cross-over frequency setting has no effect if the subwoofer is set to OFF and other speakers are set to LARGE or OFF.
Adjusting the speaker output levels
You can readjust the speaker output levels using a test tone while listening to music.
1 Press ▶▶l and hold until SP Set appears in the display, then press ▶▶l to select SP Lev.
After SP Set is displayed, press ▶▶▶I until SP Lev appears in the display.
2 Press ◀◀ or ▶▶ to select the speaker to be adjusted.
Each press of ◀◀ or ▶▶ selects the speaker in the following order:
Front speaker left—Center speaker—Front speaker right—Rear speaker right—Rear speaker left—Subwoofer
■ You cannot select speakers whose size is set at OFF.
3 Press ◀ll or ||▶ to adjust the speaker output level.
Each press of ◀II or III▶ increases or decreases the speaker output level. +10 - -10 is displayed as the level is increased or decreased.
4 Press BAND to return to the playback display.

Note
To adjust the speaker output levels in this mode is the same as making the speaker output levels at T Tone. Both provide the same results.
Adjusting the speaker output levels using a test tone
A convenient test tone allows you to easily get the overall balance right among the speakers.
1 Press ▶▶l and hold until SP Set appears in the display, then press ▶▶l to select T Tone.
After SP Set is displayed, press ▶▶▶I until T Tone appears in the display.
2 Press ▶▶ to start the test tone output.
The test tone is outputted. It rotates from speaker to speaker in the following sequence at intervals of about two seconds. The current
Digital Signal Processor
settings for the speaker over which you hear the test tone are shown in the display. Front speaker left—Center speaker—Front speaker right—Rear speaker right—Rear speaker left—Subwoofer
- Check each speaker output level. If no adjustments are needed, perform step 4 to stop the test tone.
■ The settings do not appear for speakers whose size is set OFF.
3 Press ◀ll or ||▶ to adjust the speaker output level.
Each press of ◀II or II▶ increases or decreases the speaker output level. +10 - -10 is displayed as the level is increased or decreased.
■ The test tone rotates to the next speaker after about two seconds from the last operation.
4 Press ◀◀ to stop the test tone output.
5 Press BAND to return to the playback display.

Notes
- If needed, select speakers and adjust their ‘absolute’ output levels. (Refer to Adjusting the speaker output levels on the previous page.)
- To adjust the speaker output levels in this mode is the same as making the speaker output levels at SP Lev. Both provide the same results.
Using the time alignment
The time alignment lets you adjust the distance between each speaker and the listening position.
1 Press ▶▶l and hold until SP Set appears in the display, then press ▶▶l to select TA MODE.
2 Press ◀◀ or ▶▶ to select the time alignment.
- INIT – Initial time alignment (factory setting)
- CUSTOM – Adjusted time alignment that you can create for yourself
- AUTO TA – Time alignment created by auto TA and EQ. (Refer to Auto TA and EQ (auto-time alignment and auto-equalizing) on the next page.)
• OFF – Turn the time alignment off
■ To turn time alignment off, select TA:OFF. - You cannot select AUTO TA if auto TA and EQ has not been carried out.
■ You cannot select ADJUSTMENT when neither F/L nor F/R is selected in Posi.
3 Press BAND to cancel the time alignment mode.
Adjusting the time alignment
By adjusting the distance between each speaker and a selected listening position, you can insert delay times into the speaker output to obtain a correct sound image and overall level balance. Although this is automatically achieved when you set the listening position, the time alignment feature provides a fine adjustment.
1 Press ▶▶l and hold until SP Set appears in the display, then press ▶▶l to select Time A.
After SP Set is displayed, press ▶▶▶I until Time A appears in the display.
■ You cannot select Time A when neither F/L nor F/R is selected in Posi.
2 Press ◀◀ or ▶▶ to select the speaker to be adjusted.
Each press of ◀◀ or ▶▶ selects the speaker in the following order:
Front speaker left—Center speaker—Front speaker right—Rear speaker right—Rear speaker left—Subwoofer
- You cannot select speakers whose size is set at OFF.
3 Press ◀ or ||► to adjust the distance between the selected speaker and the listening position.
Each press of ◀II or III▶ increases or decreases the distance. 200inch–0inch is displayed as the distance is increased or decreased.
4 Press BAND to return to the playback display.
Using the auto-equalizer
The auto-equalizer is the equalizer curve created by auto TA and EQ (refer to Auto TA and EQ (auto-time alignment and auto-equalizing) on this page).
You can turn the auto-equalizer on or off.
1 Press ▶▶l and hold until SP Set appears in the display, then press ▶▶l to select AUTO EQ.
- You cannot use this function if auto TA and EQ has not been carried out.
2 Press ||► to turn the auto-equalizer on. AUTO EQ ON appears in the display.
■ To turn auto-equalizer off, press ◀II.
Auto TA and EQ (auto-time alignment and auto-equalizing)
Only when the multi-channel processor (e.g., DEQ-P8000) is connected to this unit, you can operate this function.
The auto-time alignment is automatically adjusted for the distance between each speaker and the listening position.
The auto-equalizer automatically measures the car interior acoustic characteristics, and then creates the auto-equalizer curve based on that information.

WARNING
To prevent accidents, never carry out auto TA and EQ while driving. When this function measures the car interior acoustic characteristics to create an auto-equalizer curve, a loud measurement tone (noise) may be outputted from the speakers.

CAUTION
- Carrying out auto TA and EQ under the following conditions may damage the speakers. Be sure to check the conditions thoroughly before carrying out auto TA and EQ.
— When speakers are incorrectly connected. (e.g., When a rear speaker is connected to a subwoofer output.)
— When a speaker is connected to a power amp delivering output higher than the speaker's maximum input power capability.
- If the microphone is placed in an unsuitable position the measurement tone may become loud and measurement may take a long time, resulting in a drain on battery power. Be sure to place the microphone in the specified location.
Before operating the auto TA and EQ function
- Carry out auto TA and EQ in as quiet a place as possible, with the car engine and air conditioning switched off. Also cut power to car phones or portable telephones in the car, or remove them from the car before carrying out auto TA and EQ. Sounds other than the measurement tone (surrounding sounds, engine sound, telephones ringing etc.) may prevent correct measurement of the car interior acoustic characteristics.
- Be sure to carry out auto TA and EQ using the supplied microphone. Using another microphone may prevent measurement, or result in incorrect measurement of the car interior acoustic characteristics.
- When front speaker is not connected, auto TA and EQ cannot be carried out.
- When this unit is connected to a power amp with input level control, auto TA and EQ may not be possible if you lower power amp input level. Set the power amp's input level to the standard position.
- When this unit is connected to a power amp with an LPF, turn off the LPF on the power amp before carrying out auto TA and EQ. In addition, the cross-over frequency for built-in LPF of an active subwoofer should be set to the highest frequency.
- The time alignment value calculated by auto TA and EQ may differ from the actual distance in the following circumstances. However, the distance has been calculated by computer to be the optimum delay to give accurate results for the circumstances, so please continue to use this value.
— When the reflected sound within a vehicle is strong and delays occur.
— When delays occur for low sounds due to the influence of the LPF on active subwoofers or external amps.
- Auto TA and EQ changes the audio settings as below:
— The fader/balance settings return to the center position. (Refer to page 24.)
— The graphic equalizer curve switches to FLAT. (Refer to the next page.)
— When a subwoofer is connected to this unit, it will be adjusted automatically to both subwoofer output and high pass filter setting for rear speaker.
- If you carry out auto TA and EQ when a previous setting of this already exists, the setting will be replaced.
Carrying out auto TA and EQ
1 Stop the car in a place that is as quiet as possible, close all doors, windows and the sun roof, and then turn the engine off.
If the engine is left running, engine noise may prevent correct auto TA and EQ.
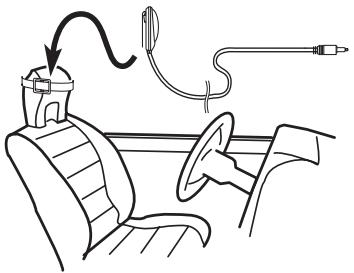
2 Fix the supplied microphone in the center of the headrest of the driver's seat, facing forward, using the belt (sold separately).
The auto TA and EQ may differ depending on where you place the microphone. If desired, place the microphone on the front passenger seat to carry out auto TA and EQ.
natural_image
Line drawing of a car interior with a seatbelt, steering wheel, and medical tubing (no text or symbols)Digital Signal Processor
3 Turn the ignition switch to ON or ACC.
If the car's air conditioner or heater is turned on, turn it off. Noise from the fan in the air conditioner or heater may prevent correct auto TA and EQ.
- Press SOURCE to turn the source on if this unit is turned off.
4 Select the position for the seat on which the microphone is placed.
Refer to Using the position selector on page 24.
■ If no position is selected before you start auto TA and EQ, FL is selected automatically.
5 Press SOURCE and hold until the unit turns off.
6 Press and hold ▶▶▶ to enter the auto TA and EQ measurement mode.
7 Plug the microphone into the microphone input jack on this unit.
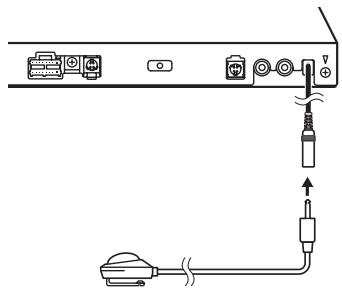
natural_image
Diagram of a device with ports and cables, showing connections without any text or symbols8 Press ||► to start the auto TA and EQ.
9 Get out of the car and close the door within 10 seconds when the 10-second count-down starts.
The measurement tone (noise) is outputted from the speakers, and auto TA and EQ begins.
■ When all speakers are connected, auto TA and EQ is completed in about six minutes.
■ To stop auto TA and EQ, press any keys.
■ To cancel auto TA and EQ part way through, press BAND.
10 When auto TA and EQ is completed, COMPLETE is displayed.
When correct measurement of car interior acoustic characteristics is not possible, an error message is displayed. (Refer to Understanding auto TA and EQ error messages on page 42.)
11 Press BAND to cancel the auto TA and EQ mode.
12 Store the microphone carefully in the glove compartment.
Store the microphone carefully in the glove compartment or any other safe place. If the microphone is subjected to direct sunlight for an extended period, high temperatures may cause distortion, color change or malfunction.
Using the equalizer
The equalizer lets you adjust the equalization to match car interior acoustic characteristics as desired.
Recalling equalizer curves
There are seven stored equalizer curves which you can easily recall at any time. Here is a list of the equalizer curves:
| Display | Equalizer curve |
| SUPER BASS | Super bass |
| POWERFUL | Powerful |
| NATURAL | Natural |
Digital Signal Processor
| Display | Equalizer curve |
| VOCAL | Vocal |
| FLAT | Flat |
| CUSTOM1 | Custom 1 |
| CUSTOM2 | Custom 2 |
- CUSTOM1 and CUSTOM2 are adjusted equalizer curves.
- When FLAT is selected no supplement or correction is made to the sound. This is useful to check the effect of the equalizer curves by switching alternatively between FLAT and a set equalizer curve.
- Press EQ to select the equalizer.
Press EQ repeatedly to switch between the following equalizers:
SUPER BASS—POWERFUL—NATURAL—VOCAL—FLAT—CUSTOM1—CUSTOM2
Adjusting 3-band parametric equalizer
For CUSTOM1 and CUSTOM2 equalizer curves, you can adjust the front, rear and center equalizer curves separately by selecting a center frequency, an equalizer level and a Q factor for each band.
- A separate CUSTOM1 curve can be created for each source.
- A CUSTOM2 curve can be created common to all sources.
- The center speaker largely determines the sound image and getting the balance right isn't easy. We recommend reproducing a 2-ch. audio (a CD for example) and getting the balance right among the speakers except for the center, and then reproducing a 5.1-ch. audio (Dolby Digital or DTS) and adjusting the center speaker output to the balance you have already got among the other speakers.
1 Press ▶▶| and hold until SP Set appears in the display, then press ▶▶| to select PEQ.
After SP Set is displayed, press ▶▶I until PEQ appears in the display.
2 Press ◀◀ or ▶▶ to select the desired item.
Each press of ◀◀ or ▶▶ selects the item in the following order:
FRONT (speakers)—Low (bands)—Low (center frequency)—L (equalizer level)—Q.WIDE (Q factor)
3 Press ◀ or ||► to select the speaker to be adjusted.
Each press of ◀ or ||▶ selects the speaker in the following order:
FRONT (front speakers)—CENTER (center speaker)—REAR (rear speakers)
- You cannot select speakers whose size is set at OFF.
4 Press ▶▶ and then press ◀ll or ||▶ to select the equalizer band to be adjusted.
Each press of ◀ or ▶ selects equalizer bands in the following order:
Low (low)—Mid (mid)—High (high)
5 Press ▶▶ and then press ◀ll or ||▶ to select the center frequency of selected band.
Each press of ◀ or ||▶ selects the frequency in the following order:
6 Press ▶▶ and then press ◀ll or lll▶ to adjust the equalizer level.
Each press of ◀II or III▶ increases or decreases the equalizer level. +6 – -6 is displayed as the level is increased or decreased.
7 Press ▶▶ and then press ◀ll or ||▶ to select the desired Q factor.
Each press ◀II or III▶ switches between the following Q factor:
Q.WIDE (wide)—Q.NAR. (narrow)
- You can adjust parameters for each band of the other speakers in the same way.
8 Press BAND to return to the playback display.

Note
You can select a center frequency from among 26 frequencies for each band. You can change the center frequency in 1/3-octave steps, but you cannot select frequencies that have intervals shorter than 1 octave among the center frequencies of the three bands.
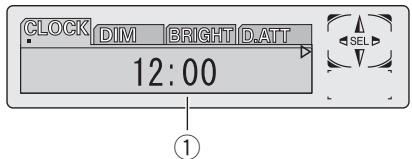
Adjusting initial settings
text_image
CLOCK DIM BRIGHT D.ATT 12:00 ①Initial settings lets you perform initial setup of different settings for this unit.

Important
You can use the following functions only when the remote control is set to DEQ mode.
① Function display
Shows the function status.
1 Press SOURCE and hold until the unit turns off.
2 Press I◀◀ and hold until the clock appears in the display.
3 Press ◀◀◀ to select one of the initial settings.
Press ◀◀ repeatedly to switch between the following settings:
Clock—Dimmer (dimmer)—Brightness (brightness)—Digital ATT (digital attenuation)
—Tel/Navi (telephone muting/attenuation)
—AUX (auxiliary setting)—Digital1 (digital source 1)—Digital2 (digital source 2)
—Analog1 (analog source 1)—Analog2 (analog source 2)—Analog3 (analog source 3)
—Analog4 (analog source 4)—Analog5 (analog source 5)—Analog6 (analog source 6)
—Audio Reset (audio reset)
■ To cancel initial settings, press BAND.
- You can also cancel initial settings by holding down ◀◀◀ until the unit turns off.
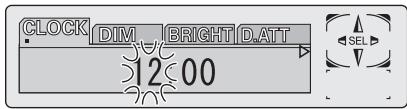
Setting the clock
Use these instructions to set the clock.
1 Press ◀◀◀ to select clock.
Press ◀◀◀ repeatedly until clock appears in the display.
2 Press ◀◀ or ▶▶ to select the segment of the clock display you wish to set.
Pressing ◀◀ or ▶▶ will select one segment of the clock display:
Hour—Minute
As you select segments of the clock display the segment selected will blink.
text_image
CLOCK DIM BRIGHT D.ATT 12:00 SEL3 Press ◀ or ||► to set the clock.
Pressing ▶ will increase the selected hour or minute. Pressing ◀ will decrease the selected hour or minute.
Switching the dimmer setting
To prevent the display from being too bright at night, the display is automatically dimmed when the car's headlights are turned on. You can turn the dimmer on or off.
1 Press ◀◀◀ to select Dimmer.
Press I repeatedly until Dimmer appears in the display.
2 Press ||► to turn dimmer on.
Dimmer:ON appears in the display.
■ To turn dimmer off, press ◀II.
Adjusting the brightness
You can adjust the display brightness. Initially this mode is set to 12.
1 Press ◀◀◀ to select Brightness.
Press I▶▶ repeatedly until Brightness appears in the display.
2 Press ◀◀ or ▶▶ to adjust the brightness level.
Each press of ◀◀ or ▶▶ increases or decreases the brightness level. 0 – 15 is displayed as the level is increased or decreased.
Correcting distorted sound
You can minimize distortion that may be caused by the equalizer curve settings.
- Setting an equalizer level high can cause distortion. If high sound is crippled or distorted, try switching to Low. Normally, leave the setting at High to ensure quality sound.
1 Press ◀◀◀ to select Digital ATT.
Press I◀◀ repeatedly until Digital ATT appears in the display.
2 Press ◀◀ or ▶▶ to select Low or High.
Pressing ◀◀ or ▶▶ will switch between High (high) and Low (low) and that status will be displayed.
Switching the sound muting/attenuation
Sound from this system is muted, attenuated or mixed automatically in the following cases:
- When a call is made or received using a cellular telephone connected to this unit.
- When the voice guidance is output from a Pioneer navigation unit connected to this unit.
1 Press ◀◀◀ to select Tel/Navi.
Press I◀◀ repeatedly until Tel/Navi appears in the display.
2 Press ◀◀ or ▶▶ to switch the telephone muting/attenuation.
Press ◀◀ or ▶▶ until the desired setting appears in the display.
- Tel/Navi:MUTE – Muting
- Tel/Navi:ATT2 – Attenuation
(Tel/Navi:ATT2 has a stronger effect than Tel/Navi:ATT1) - Tel/Navi:ATT1 – Attenuation

Notes
- The sound is turned off, MUTE or ATT is displayed and no audio adjustment is possible.
- Operation returns to normal when the phone connection is ended.
Switching the auxiliary setting
It is possible to use auxiliary equipment with this unit. Activate the auxiliary setting when using auxiliary equipment connected to this unit.
1 Press ◀◀◀ to select AUX.
Press I▶▶ repeatedly until AUX appears in the display.
2 Press ||► to turn auxiliary setting on.
AUX :ON appears in the display.
■ To turn auxiliary setting off, press ◀II.
Switching the digital source setting
It is possible to connect DVD player to this unit. Activate the digital source when using DVD player connected to this unit. Initially, both Digital1 and Digital2 are set to off.
1 Press ◀◀◀ to select Digital.
Press ◀◀◀ until Digital (e.g., Digital1) appears in the display.
2 Press ||► to turn digital setting on.
■ To turn digital setting off, press ◀II.
Switching the analog input setting
It is possible to connect various equipment to this unit's speaker input or RCA input. Activate the analog setting when using such equipment connected to this unit, and select the input according to the connecting method.
1 Press ◀◀◀ to select Analog.
Press ◀◀◀ until Analog (e.g., Analog1) appears in the display.
2 Press ||► to turn analog setting on.
Connection method (e.g., SP) appears in the display.
3 Press ◀◀ or ▶▶ to select a desired connection method.
Pressing ◀◀ or ▶▶ will switch between SP and RCA and that status will be displayed.
■ To turn analog input setting off, press ◀II.
Resetting the audio functions
You can reset all audio functions except volume.
1 Press F to select Audio Reset.
Press FUNC repeatedly until Audio Reset appears in the display.
2 Press ||► to display Reset OK?.
Reset OK? appears in the display.
■ To cancel resetting the audio functions, press BAND/ESC.
3 Press ▶▶ to display Really?.
Really? appears in the display.
4 Press ||► to reset audio functions.
Complete appears in the display.
Turning the clock display on or off
You can turn the clock display on or off.
- Press 0 to turn the clock display on or off.
Each press of 0 turns the clock display on or off.
■ The clock display disappears temporarily when you perform other operations, but the clock display appears again after 25 seconds.

Note
Even when the sources are off, the clock display appears on the display. Pressing 0 turns the clock display on or off.
Using different entertainment displays
You can enjoy entertainment displays while listening to each sound source.
- These are different ways of displaying the spectrum and do not affect sound output.
● Press ENTERTAINMENT.
Each time you press ENTERTAINMENT the display changes in the following order: Source icon display—Back ground visual 1—Back ground visual 2—Back ground visual 3—Back ground visual 4—Movie screen 1—Movie screen 2—Entertainment clock—display off
Setting the digital source title
The title displayed for the digital sources (e.g., Digital1) can be changed.
1 After you have selected digital sources as the source, press ◀◀◀ and hold until TITLE appears in the display.
2 Input the title.
To input the titles, refer to Title input on the next page.
Setting the analog source title
The title displayed for the analog sources (e.g., Analog1) can be changed.
1 After you have selected analog sources as the source, press ◀◀◀ and hold until TITLE appears in the display.
2 Input the title.
To input the titles, refer to Title input on the next page.
Using the AUX source
An IP-BUS-RCA Interconnector such as the CD-RB20/CD-RB10 (sold separately) lets you connect this unit to auxiliary equipment featuring RCA output. For more details, refer to the IP-BUS-RCA Interconnector owner's manual.
Selecting AUX as the source
- Press SOURCE to select AUX as the source.
Press SOURCE until AUX appears in the display.
■ If the auxiliary setting is not turned on, AUX cannot be selected. For more details, see Switching the auxiliary setting on page 36.
Setting the AUX title
The title displayed for the AUX source can be changed.
1 After you have selected AUX as the source, press ◀◀◀ and hold until TITLE appears in the display.
2 Input the title.
To input the titles, refer to Title input on this page.
Setting remote control code type
When the remote control operation switch is set to DVD, changing the remote control code type enables you to operate the Pioneer DVD player by the supplied remote control. There are two remote codes, code type DVD A and code type DVD B. When using this unit with a multi-DVD player (e.g. XDV-P90), select code DVD A. When using this unit with a DVD navigation unit, select code DVD B.
1 Set the remote control selection switch on the left side of the remote control to the appropriate position with a pen tip or other pointed instrument.
- If you select DVH mode, there is no need to take the following procedure.
- If you select DVD A/DVD B mode, take the following procedure and change the code type to the appropriate type.
2 Press 7 and 0 on the remote control simultaneously to change the code type.
Initially, the code type is set to DVD A. Each time you press 7 and 0 simultaneously on the remote control the code type switches between DVD A and DVD B.
Title input
You can input titles for discs, digital sources, analog sources and AUX sources. Refer to the following procedure and input your desired titles.

Important
You can use this function only when the remote control is set to DEQ mode.
1 Press ◀◀◀ and hold until TITLE appears in the display.
2 Press button 1 to select the desired character type.
Press button 1 repeatedly to switch between the following character types:
Alphabet (upper case), numbers and symbols —Alphabet (lower case)—European letters, such as those with accents (e.g. á, à, ä, ç)—Numbers and symbols
- You can select to input numbers and symbols by pressing button 2.
3 Press ◀ or ||► to select a letter of the alphabet.
Each press of Ⅲ▶ will display a letter of the alphabet in A B C ... X Y Z, numbers and symbols in 1 2 3 ... | }⁻ order. Each press of ◀ll will display a letter in the reverse order, such as Z Y X ... C B A order.
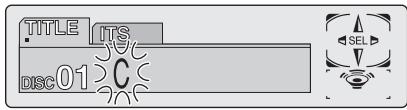
text_image
TITLE ITS DISC01 C SEL4 Press ▶▶ to move the cursor to the next character position.
When the desired letter is displayed, press ▶▶ to move the cursor to the next position and then select the next letter. Press ◀◀ to move backwards in the display.
5 Move the cursor to the last position by pressing ▶▶ after entering the title.
When you press ▶▶ one more time, the entered title is stored in memory.
6 Press BAND to return to the playback display.
Using the PGM button
You can operate the preprogrammed functions for each source by using BOOK.M when controlling Pioneer head unit.
- Press BOOK.M to turn pause on when selecting the following sources:
• S-DVD – DVD player/multi-DVD player
- Multi-CD – Multi-CD player
■ To turn pause off, press BOOK.M again.
- Press BOOK.M and hold to turn BSM on when selecting TUNER as the source.
Press BOOK.M and hold until the BSM turns on.
■ To cancel the storage process, press BOOK.M again.
- Press BOOK.M and hold to turn BSSM on when selecting TV as the source.
Press BOOK.M and hold until the BSSM turns on.
■ To cancel the storage process, press BOOK.M again.
Additional Information
Troubleshooting
Common
| Symptom | Cause | Action (See) |
| Power doesn't turn on. The unit doesn't operate. | Leads and connectors are incorrectly connected. | Confirm once more that all connections are correct. |
| The fuse is blown. | Rectify the reason for the fuse blowing, then replace the fuse. Be very sure to install the correct fuse with the same rating. | |
| Noise and other factors are causing the built-in microprocessor to operate incorrectly. | Turn the unit off and then on. | |
| Operation with the remote control isn't possible. The unit does not operate correctly even when the appropriate remote control buttons are pressed. | The remote control operation mode is incorrect. | Switch to the correct remote control mode. (Page 7) |
| The remote control code is incorrect. | Make sure the remote control selection switch setting and code type setting are the same. (Page 39) | |
| Battery power is low. | Load new battery. (Page 7) | |
| No sounds are heard. The volume level will not rise. | Cables are not connected correctly. | Connect the cables correctly. |
| There is no sound. Volume level is low. | The volume level is low. | Adjust the volume level. |
| The attenuator is on. | Turn the attenuator off. |

Error messages
When problems occur with disc playback, an error message appears on the display. Refer to the table below to identify the problem, then take the suggested corrective action. If the error persists, contact your dealer or your nearest PIONEER Service Center.
Error messages
| Message | Cause | Action (See) |
| ERROR-02 | Dirty disc | Clean disc. |
| Scratched disc | Replace disc. | |
| TEMP | The temperature of this unit is outside the normal operating range | Wait until the unit's temperature returns to within normal operating limits. |
| ERROR-10 | The disc does not have the same region number as this unit | Replace the DVD video with one bearing the correct region number. |
| NON PLAY | This type of disc cannot be played by this unit | Replace the disc with one this unit can play. |
| The disc is loaded upside down | Check that the disc is loaded correctly. |
Additional Information
| Message | Cause | Action (See) |
| ERROR-05 | Electrical or mechanical | Turn the ignition ON and OFF, or switch to a different source, then back to the DVD player. |

Understanding auto TA and EQ error messages
When correct measurement of car interior acoustic characteristics is not possible using the auto TA and EQ, an error message may appear on the display. If an error message appears, refer to the table below to see what the problem is and the suggested method of correcting the problem. After checking, try again.
| Message | Cause | Action |
| ERR MIC | Microphone is not connected. | Plug the supplied microphone securely into the jack. |
| ERR FSP, ERR FLSP, ERR FRSP, ERR CSP, ERR RLSP, ERR RRSP, ERR SW | The microphone cannot pick up the measuring tone of a speaker. | · Confirm that the speakers are connected correctly.· Correct the input level setting of the power amp connected to the speakers.· Set the microphone correctly. |
| ERR NOIS | The surrounding noise level is too high. | · Stop your car in a place that is as quiet as possible, and switch off the engine, air conditioner or heater.· Set the microphone correctly. |

Additional Information
Specifications
General
Power source .... 14.4 V DC (10.8 – 15.1 V allowable)
Grounding system ...... Negative type
Max. current consumption 0.25 A
Display unit:
$$ \begin{array}{l} \text { Dimensions } (W \times H \times D) \ \dots 1 1 9 \times 3 7 \times 2 0 \mathrm{mm} \ (4 - 5 / 8 \times 1 - 1 / 2 \times 3 / 4 \text {in.}) \ \end{array} $$
Weight 0.1 kg (0.2 lbs)
Hideaway unit:
$$ \begin{array}{l} \text { Dimensions } (W \times H \times D) \ \dots 1 0 0 \times 2 8 \times 1 3 6 \mathrm{mm} \ (3 - 7 / 8 \times 1 - 1 / 8 \times 5 - 3 / 8 \text {in.}) \ \end{array} $$
Weight 0.3 kg (0.6 lbs)

Note
Specifications and the design are subject to possible modifications without notice due to improvements.
text_image
http://www.pioneerelectronics.comnatural_image
Diagram showing two mechanical components with arrows indicating movement, no text or symbols present
ATTENTION
natural_image
Diagram of a rectangular object with two labeled parts (① and ②), no text or symbols present.
text_image
DVD A DVD B 1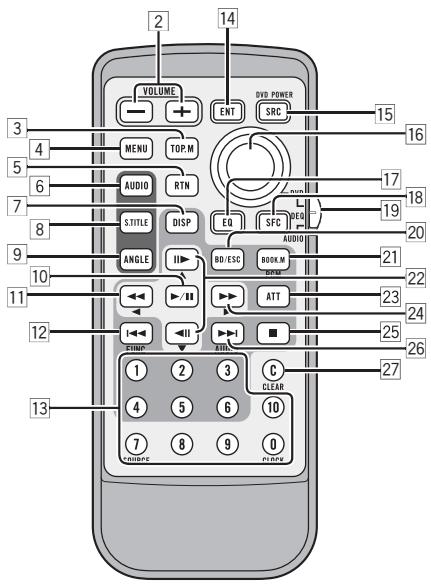
text_image
VOLUME ENT SRC DVD POWER 3 4 MENU TOP.M AUDIO RTM S. TITLE DISP EU SPC AUDIO 21 5 6 7 8 9 10 11 12 13 14 2 3 4 5 6 7 8 9 10 11 12 13 14 15 15 16 17 18 19 20 21 22 23 24 25 26 27 28 29 30 31 32 33 34 35 36 37 38 39 40 41 42 43 44 45 46 47 48 49 50Unité d'affichage
text_image
PMODE T.LIST RDM SCAN Repeat :DISC ①Musical (musical)—Drama (drame)—Action (action)—Jazz (jazz)—Hall (hall)—Club (club)—OFF (hors service)

Remarque
LARGE (grande)—SMALL (petite)—OFF (hors service)
natural_image
Diagram of a car interior showing a seatbelt, steering wheel, and cable connector (no text or symbols)natural_image
Diagram of a device with ports and cables, showing connections without any text or symbolsDimensions (L × H × P) ..... 119 × 37 × 20 mm
Poids 0,1 kg
Unité cachée :
Dimensions (L x H x P) 100 × 28 × 136 mm
Poids 0,3 kg

Remarque
Register your product at
http://www.pioneerelectronics.com
See "Product registration" page
PIONEER ELECTRONICS (USA) INC.
P.O. Box 1540, Long Beach, California 90801-1540, U.S.A.
TEL: (800) 421-1404
PIONEER EUROPE NV
Haven 1087, Keetberglaan 1, B-9120 Melsele, Belgium
TEL: (0) 3/570.05.11
PIONEER ELECTRONICS ASIACENTRE PTE. LTD.
253 Alexandra Road, #04-01, Singapore 159936
TEL: 65-6472-7555
PIONEER ELECTRONICS AUSTRALIA PTY. LTD.
178-184 Boundary Road, Braeside, Victoria 3195, Australia
TEL: (03) 9586-6300
PIONEER ELECTRONICS OF CANADA, INC.
300 Allstate Parkway, Markham, Ontario L3R OP2, Canada
TEL: 1-877-283-5901
PIONEER ELECTRONICS DE MEXICO, S.A. de C.V.
Blvd.Manuel Avila Camacho 138 10 piso
Col.Lomas de Chapultepec, Mexico, D.F. 11000
TEL: 55-9178-4270
先鋒股份有限公司
總公司:台北市中山北路二段44號13樓
電話:(02) 2521-3588
先鋒電子(香港)有限公司
香港九龍尖沙咀海港城世界商業中心
9樓901-6室
電話:(0852) 2848-6488
Published by Pioneer Corporation.
Copyright © 2004 by Pioneer Corporation.
All rights reserved.