
BM1000 - Baby monitor VTECH - Free user manual and instructions
Find the device manual for free BM1000 VTECH in PDF.


| Product Type | Baby Monitor |
| Brand | VTech |
| Model | BM1000 |
| Communication | Digital 2.4 GHz FHSS |
| Range (outdoor) | Up to 450 ft (137 m) |
| Parent Unit Power | Rechargeable battery (Li-Ion 3.7V, 500mAh) |
| Baby Unit Power | AC adapter (5V DC, 1A) |
| Battery Life (Parent Unit) | Up to 10 hours (standby), 4 hours (continuous use) |
| Display | Color LCD 2.8 inches |
| Audio | Two-way talk, sound-level indicator, volume control |
| Night Vision | Infrared (automatic activation) |
| Temperature Sensor | Yes (baby unit) |
| Additional Features | Eco-mode, lullabies, zoom, VOX mode |
| Dimensions (Parent Unit) | 11.0 x 7.0 x 4.0 cm |
| Dimensions (Baby Unit) | 8.0 x 6.0 x 10.0 cm |
| Weight (Parent Unit) | 150 g |
| Weight (Baby Unit) | 100 g |
| Warranty | 1 year limited |
| Cleaning | Wipe with a dry, soft cloth. Do not use liquid cleaners. |
| Safety | Not a toy. Keep power cords out of reach of children. |
| Reparability | Contact VTech customer service or authorized service center. |
Frequently Asked Questions - BM1000 VTECH
User questions about BM1000 VTECH
0 question about this device. Answer the ones you know or ask your own.
Ask a new question about this device
Download the instructions for your Baby monitor in PDF format for free! Find your manual BM1000 - VTECH and take your electronic device back in hand. On this page are published all the documents necessary for the use of your device. BM1000 by VTECH.
USER MANUAL BM1000 VTECH
natural_image
White vtech power supply device with red handle and green indicator button (no text or symbols on device body)Congratulations
On purchasing your new VTech product. Before using this product, please read Important safety instructions on the next page of this manual.
This manual has all the feature operations and troubleshooting necessary to install and operate your new VTech product. Please review this manual thoroughly to ensure proper installation and operation of this innovative and feature rich VTech product.
Important safety instructions
When using your equipment, basic safety precautions should always be followed to reduce the risk of fire, electric shock and injury, including the following:
- Follow all warnings and instructions marked on the product.
- Adult setup is required.
- This product is intended as an aid. It is not a substitute for responsible and proper adult supervision and should not be used as such.
- This product is not intended for use as a medical monitor.
- Do not use this product near water. For example, do not use it next to a bath tub, wash bowl, kitchen sink, laundry tub or swimming pool, or in a wet basement or shower.
- CAUTION: Use only the batteries indicated in this manual. There may be a risk of explosion if a wrong type of battery is used for the parent unit. Use only the supplied rechargeable battery.
- Use only the adapters included with this product. Incorrect adapter polarity or voltage can seriously damage the product. Baby unit power adapter: Input 100-240V AC 50/60 Hz; output: 6V DC 450 mA; Parent unit power adapter: Input 100-240V AC 50/60 Hz; output: 6V DC 450 mA.
- The power adapters are intended to be correctly oriented in a vertical or floor mount position. The prongs are not designed to hold the plug in place if it is plugged into a ceiling, under-the-table or cabinet outlet.
- Unplug this product from the wall outlet before cleaning. Do not use liquid or aerosol cleaners. Use a damp cloth for cleaning.
- Unplug the power cords before replacing batteries.
- Do not cut off the power adapters to replace them with other plugs, as this causes a hazardous situation.
- Do not allow anything to rest on the power cords. Do not install this product where the cords may be walked on or crimped.
- This product should be operated only from the type of power source indicated on the marking label. If you are not sure of the type of power supply in your home, consult your dealer or local power company.
- Do not overload wall outlets or use an extension cord.
- Do not place this product on an unstable table, shelf, stand or other unstable surfaces.
Important safety instructions
- This product should not be placed in any area where proper ventilation is not provided. Slots and openings in the back or bottom of this product are provided for ventilation. To protect them from overheating, these openings must not be blocked by placing the product on a soft surface such as a bed, sofa or rug. This product should never be placed near or over a radiator or heat register.
- Never push objects of any kind into this product through the slots because they may touch dangerous voltage points or create a short circuit. Never spill liquid of any kind on the product.
- To reduce the risk of electric shock, do not disassemble this product, but take it to an authorized service facility. Opening or removing parts of the product other than specified access doors may expose you to dangerous voltages or other risks. Incorrect reassembling can cause electric shock when the product is subsequently used.
- You should test the sound reception every time you turn on the units or move one of the components.
- Periodically examine all components for damage.
- Be aware of possible loss of privacy while using public airwaves. Conversations may be picked up by other nursery monitors, cordless phones, scanners, etc.
- Children should be supervised to ensure that they do not play with the product.
- The product is not intended for use by persons (including children) with reduced physical, sensory or mental capabilities, or lack of experience and knowledge, unless they have been given supervision or instruction concerning use of the appliance by a person responsible for their safety.
SAVE THESE INSTRUCTIONS
Important safety instructions
Cautions
- Use and store the product at a temperature between 10^ C and 39^ C.
- Do not expose the product to extreme cold, heat or direct sunlight. Do not put the product close to a heating source.
- Batteries should not be exposed to excessive heat such as bright sunshine or fire.
- Make sure the baby unit(s) and the adapter cord(s) are always out of reach of the baby, at least 1 metre away from the baby or crib, to avoid a possible strangulation hazard.
- Never place the baby unit(s) inside the baby's crib or playpen.
- Never cover the baby unit(s) or parent unit with anything such as a towel or a blanket.
- Other electronic products may cause interference with your audio monitor. Try installing your audio monitor as far away from these electronic devices as possible: wireless routers, radios, cellular telephones, intercoms, room monitors, televisions, personal computers, kitchen appliances and cordless telephones.
Table of contents
Getting started ....1
Parts checklist ....1
Baby unit installation ....2
Parent unit installation ....3
Baby unit overview 4
Parent unit overview ....5
Parents unit lights 6
Positioning and operating range ....7
Position the audio monitor ......7
Test your audio monitor before use ......7
Using your baby monitor ....8
Power the baby unit on or off 8
Power the parent unit on or off ....8
Adjust speaker volume ....8
Appendix 9
Troubleshooting 9
Customer service & Product warranty ......12
Technical specifications 14
Getting started
Parts checklist
Check to make sure the package contains the following items. Save your sales receipt and original packaging in the event warranty service is necessary.
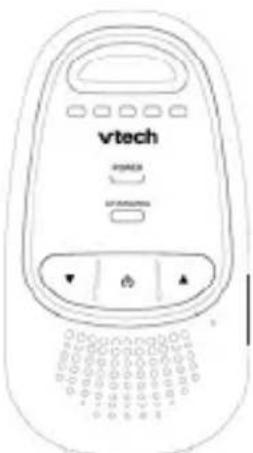
Parent unit (BM1000 PU)
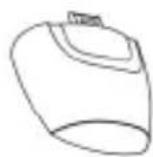
Parent unit
battery
compartment
cover
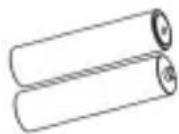
2 batteries for parent unit
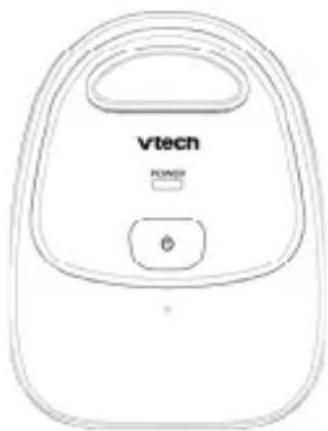
natural_image
Line drawing of a Vtech appliance with control buttons (no text or symbols on the device itself)(BM1000 BU)
natural_image
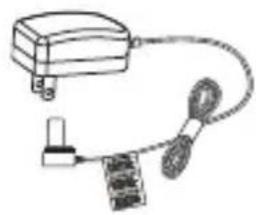
Simple line drawing of a device with a bulb, plug, and cable (no text or symbols)2 power adapters

User guideBaby unit
note
To purchase replacement batteries or power adapters, please contact VTech on 1300 369 193.
Getting Started
Baby unit installation
The baby unit is powered by mains power. To connect the baby unit to the mains power:
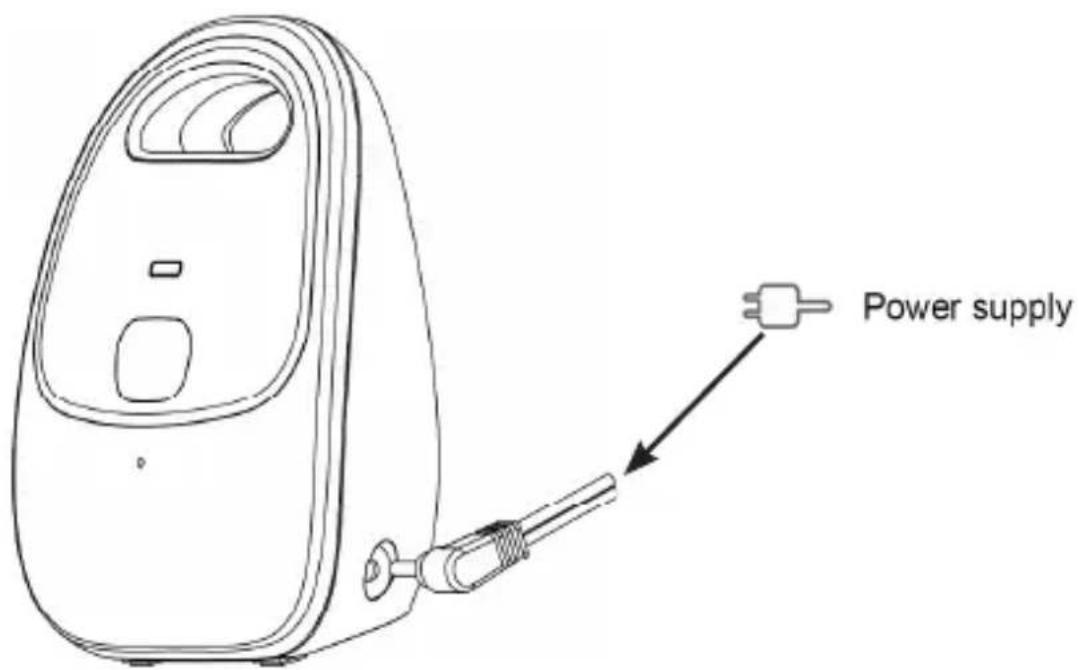
- Choose either power adapter that comes with the package. Insert the DC plug of the power adapter into the DC socket on the side of the baby unit.
- Connect the other end of the power adapter to a suitable mains power socket.
Getting Started
Parent unit installation
The package comes with two rechargeable batteries. You can power up the parent unit by using two rechargeable batteries or by connecting it to the mains power. However, even if the parent unit is connected to the mains power, we recommend you to also install the rechargeable batteries. This guarantees the continual operation in case of a power outage.
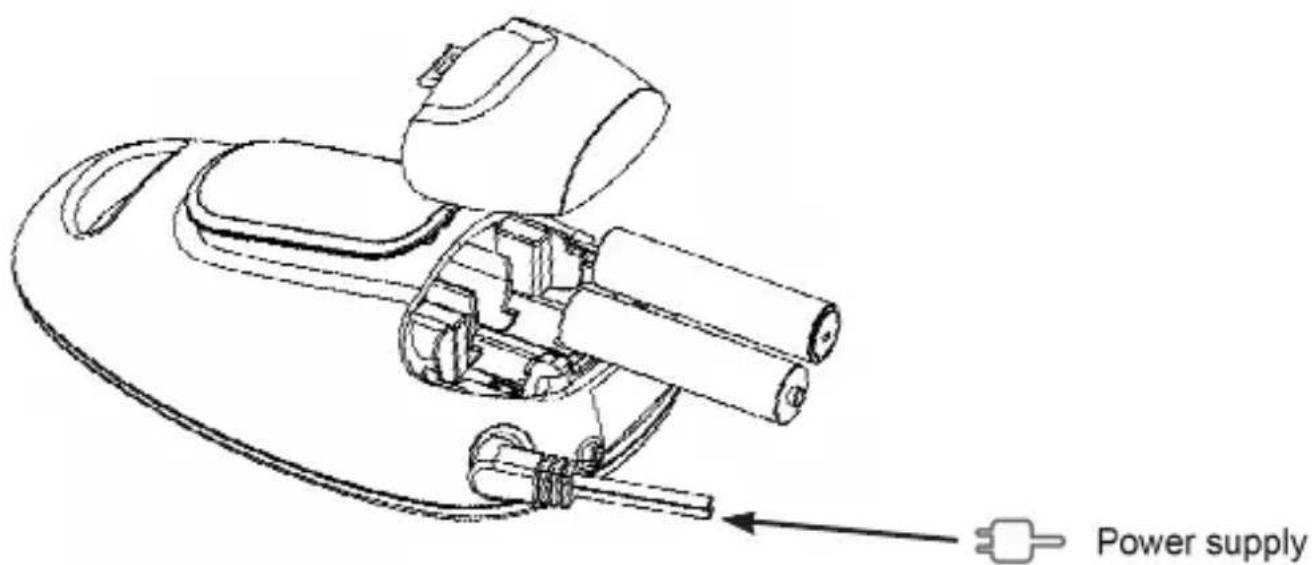
To set up the parent unit:
- Remove the battery compartment cover.
- Install the supplied rechargeable batteries into the battery compartment, matching the polarity markings (+ and -).
- Replace the battery compartment cover.
- Insert the DC plug of the other power adapter into the DC socket on the side of the parent unit.
- Connect the other end of the power adapter to a suitable mains power socket.
- The Charging LED lights up indicating the parent unit is charging.
Getting started
Baby unit overview
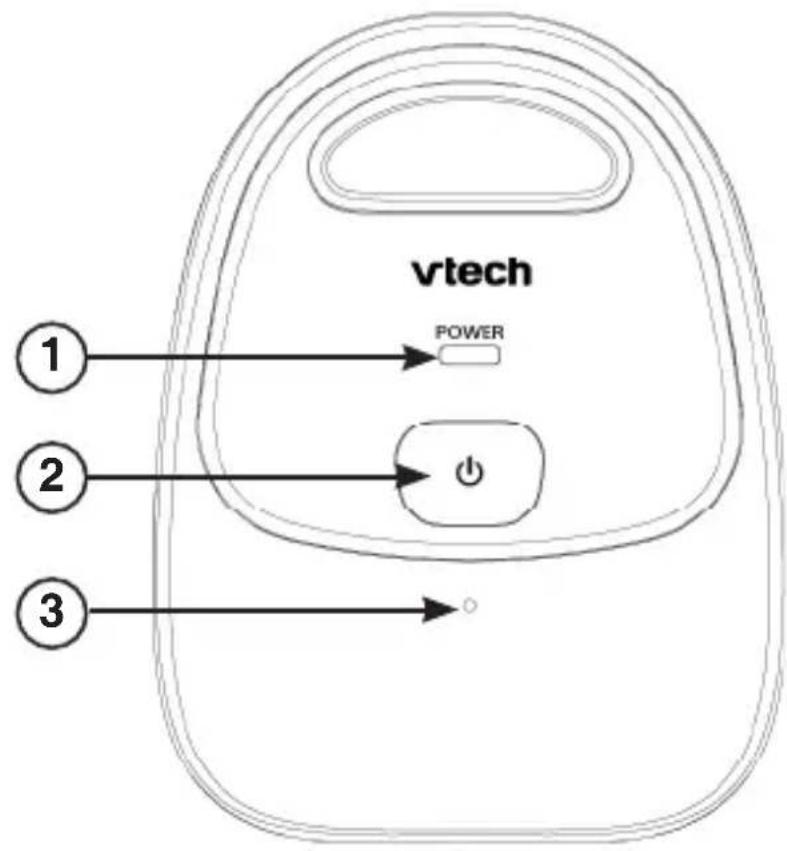
1 – Power indicator
On when the baby unit is switched on.
Off when the baby unit is switched off.
2 - ⏻(On/off)
Press and hold to turn on/off the baby unit.
3 - Microphone
Getting started
Parent unit overview
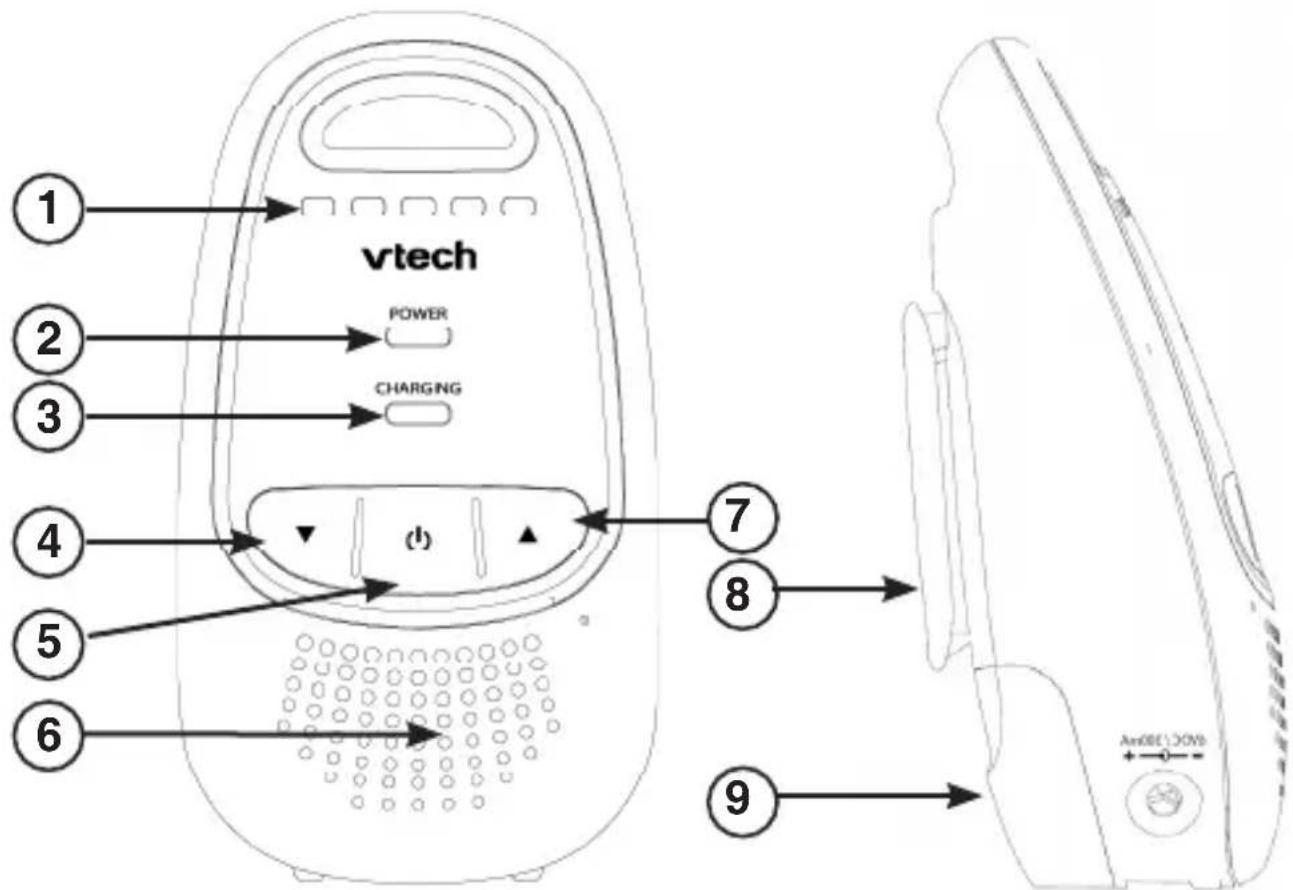
1 – Sensitivity LEDs
2 – Power Indicator Light
3 – Low Battery / Charging Indicator Light
4 - ▼ (Volume down)
Press to decrease the speaker volume.
5 - ⏻(On/off)
Press and hold to turn on or off.
6 - Speakerphone
7 - ▲ (Volume up)
Press to increase the speaker volume.
8 - Belt Clip
9 – Battery Compartment Cover
Getting started
Parent unit overview (continued)
Parents unit lights
| 3 green lights and 2 red lights indicating the sound level detected by the baby unit.Green lights indicate a moderate level of sound is detected.Red lights indicate a higher level of sound is detected.More lights turn on when the sound level detected increases. | |
 | Off when the parent unit is off.On in green steadily when the parent unit is on and is linked to the baby unit.Flashes in green when there is no link between the baby unit and parent unit. |
 | On in red steadily when the parent unit is charging.Flashes in red when the battery is low. |
Getting Started
Positioning and operating range
Position the audio monitor
Place the parent unit within the operating range of the baby unit. We recommend the parent unit is at least 1.5 metres away from the baby unit to avoid audio feedback. If you still experience audio feedback, move the parent unit and the baby unit farther apart.
note
- If the signal is poor, try moving the parent and/or the baby unit to different positions in the rooms.
- It is the caregiver's responsibility to stay close enough to take care of any eventuality.
Test your audio monitor before use
It is important to test the audio monitor when it is installed initially, and at regular times thereafter. Test your parent unit and baby units if they have not been used for a long time or you suspect they are defective.
To test your audio monitor:
- Place the parent unit and the baby unit in the same room to test the product. Make sure the baby unit is at least 1.5 metres away from the parent unit.
- Press and hold on the baby unit until the Power indicator light turns on.
- Press and hold on the parent unit until the Power indicator turns on steadily. The parent unit plays sound detected from the baby unit. Your audio monitor is now ready for use.
note
If no connection can be established, the Power indicator light on the parent unit flashes in green.
Using your baby monitor
Power the baby unit on or off
- Press and hold ⏻ for 2 seconds to turn on the baby unit. The Power indicator light turns on.
- Press and hold ⏻ for 2 seconds again to turn off the baby unit. The Power indicator light turns off.
Power the parent unit on or off
- Press and hold for 2 seconds to turn on the parent unit. The Power indicator light turns on.
- Press and hold ⏻ for 2 seconds again to turn off the parent unit. The Power indicator light turns off.
Adjust speaker volume
There are five volume levels (Level 1 to Level 5) plus volume off on parent unit. When adjusting speaker volume, the sensitivity indicator LED(s) light(s) up briefly to indicate the current volume level. To adjust the speaker volume:
Press ▲ to increase and ▼ decrease the volume of the parent unit.
note
You will hear two beeps when the volume level has reached the minimum or maximum level.
Appendix
Troubleshooting
If you have difficulty with your audio monitor, please try the suggestions below.
My audio monitor does not work at all.
- Make sure the baby unit, parent unit and the batteries are installed and charged correctly. For optimum daily performance, charge the parent unit when it is not in use.
- Make sure the power adapters are securely plugged into the outlet not controlled by a wall switch.
- Make sure the adapter cords are plugged firmly into the baby unit and parent unit.
• Make sure the baby unit and the parent unit are turned on. - The parent unit may be too far away from the baby unit. Move the parent unit closer to the baby units (but not less than 1.5 metres).
- Unplug the electrical power to the baby unit and parent unit. Wait for approximately 15 seconds, then plug it back in. Turn on the baby unit and the parent unit. Allow up to one minute for the baby unit and the parent unit to synchronise.
- Charge the batteries in the parent unit for up to 12 hours.
- If the parent unit batteries are completely depleted, they may take up to 30 minutes to charge the parent unit before it can be used for a short time.
- Remove the batteries and then install them again. If that still does not work, it may be necessary to purchase new batteries.
- Large obstructions may impact the reception. Try to relocate the baby unit, away from large obstructions such as walls and doors.
- Other electronic products may cause interference with your audio monitor. Try installing your audio monitor as far away from these electronic devices as possible: wireless routers, radios, cellular telephones, intercoms, room monitors, televisions, personal computers, kitchen appliances and cordless telephones.
The audio monitor produces high-pitched noise.
- The parent unit may be too close to the baby unit. Make sure the parent unit and the baby unit are at least 1.5 metres away from one another.
Appendix
Troubleshooting (continued)
The parent unit plays any sounds from the baby unit and I think it is too noisy.
- You may need to adjust the speaker volume on the parent unit.
The parent unit does not play any sound when there is noise from the baby unit.
- Make sure the parent unit is powered up by connecting it to mains power or to the rechargeable batteries provided.
- Make sure the parent unit is turned on and the speaker volume is not set to off.
- The parent unit may be too far away from the baby unit. Move the parent unit closer to the baby unit (but not less than 1.5 metres).
- If the parent unit is powered by the provided batteries, make sure there is sufficient charge. Charge the battery in the parent unit for up to 12 hours.
- Large obstructions may impact the reception. Try to relocate the baby unit, away from large obstructions such as walls and doors.
- Remove the batteries and then install it again. Turn on the baby unit and the parent unit. Allow up to one minute for the parent unit and the baby unit to synchronise.
- Other electronic products may cause interference with your audio monitor. Try installing your audio monitor as far away from these electronic devices as possible: wireless routers, radios, cellular telephones, intercoms, room monitors, televisions, personal computers, kitchen appliances and cordless telephones.
Battery low at the Parent Unit.
- Charge the battery in the parent unit for up to 12 hours.
- The volume level of the parent unit may be set too high which consumes power. Decrease the volume level of the parent unit. Refer to Adjust speaker volume (p. 8) for volume level settings.
- Remove the battery and then install it again. Use it until fully depleted, then recharge it in the parent unit for up to 12 hours.
- If the above measures do not correct the problem, replace the battery.
Appendix
Troubleshooting (continued)
The battery does not charge in the parent unit or the parent unit battery does not accept charge.
- Make sure the batteries are installed in the parent unit battery compartment correctly. The Charging indicator light on the parent unit should be on when charging.
- Remove the battery and then install it again, then charge for up to 12 hours.
- If the battery is completely depleted, it may take up to 30 minutes to charge the parent unit before it can be used for a short time.
- Purchase new batteries. Refer to Parent unit battery installation and Parent unit battery charging.
The parent unit beeps.
- Move the parent unit closer to the baby units (but not less than 1.5 metres). The parent unit may be out of range.
- The batteries may be running low, Connect the parent unit to the mains power with the supplied power adaptor for recharging.
- The baby unit may be switched off. Press and hold key to switch on the baby unit.
Common cure for electronic equipment.
- If the audio monitor is not responding normally, try the following (in the order listed):
- Disconnect the power to the baby unit and the parent unit.
- Remove the batteries in the parent units and then install the batteries again.
- Wait a few minutes before connecting power back to the baby unit and the parent unit.
- Turn on the baby unit and the parent unit.
- Wait for the parent unit to synchronise with the baby unit. Allow up to one minute for this to take place.
Appendix
Customer service & Product warranty
IMPORTANT
Please retain this booklet with your sales receipt as proof of the date of purchase.
Customer Service
If you require assistance in operating this product, please call the TecHelp Information Line on 1300 369 193 or contact VTech by e-mail at: tcpsupport_au@vtech.com.
Voluntary Product Warranty
In addition to your Statutory Rights and subject to the conditions below, VTech warrants that this product will be free from any defect in materials or workmanship under conditions of normal use for a period of 24 months from date of purchase.
VTech does not warrant that the product will be free from defects if defects are caused by an accident, misuse, abuse, improper installation or operation, vermin infestations, lack of reasonable care, unauthorised modification, loss of parts, tampering or attempted repair by a person not authorised by VTech; or where the product has been damaged by lightning or a mains power surge.
To make a claim under this Voluntary Product Warranty you must call the TecHelp Information Line on 1300 369 193 or contact VTech by e-mail at: tcpsupport_au@vtech.com where a Customer Service Representative will inform you of the product return process. You will need to ensure that:
- You provide proof of purchase;
- Your product is suitably packaged (original packaging is not required); and
- You have included all components from the original purchase.
For your records
Date of purchase:
Place of purchase:
Serial number:
Appendix
Customer service & Product warranty
For Voluntary Product Warranty purposes proof of purchase is required, so please keep your receipt.
The benefits conferred by this Voluntary Product Warranty are in addition to other rights and remedies that are available to you under law, which cannot be excluded. The processes for this Voluntary Product Warranty in no way limit your rights which arise as a result of your Statutory Rights.
This Voluntary Product Warranty is given by:
VTech Telecommunications (Australia) Pty Ltd ABN 70 136 672 627
Address: 24 Gilby Road, Mount Waverley 3149
IMPORTANT NOTE: THIS IS NOT A PRODUCT RETURN OR SERVICE ADDRESS – PLEASE CONTACT TECHELP BY PHONE OR EMAIL FOR PRODUCT AND WARRANTY SUPPORT. NO LIABILITY WILL BE ACCEPTED BY VTECH FOR PRODUCTS RETURNED TO THIS ADDRESS UNDER THIS VOLUNTARY PRODUCT WARRANTY.
Phone number: 1300 369 193
Email address: tcpsupport_au@vtech.com
Statutory Rights
Our goods come with guarantees that cannot be excluded under the Australian Consumer Law. You are entitled to a replacement or refund for a major failure and compensation for any other reasonably foreseeable loss or damage. You are also entitled to have the goods repaired or replaced if the goods fail to be of acceptable quality and the failure does not amount to a major failure.
Appendix
Technical specifications
| No. of channels: 120 | |
| Frequency: 1881.792 - 1897.344 MHz | |
| Power supply Use only adaptor listed below:Electrical power:Baby unit: Ten Pao - S004LS0600045Input: 100 - 240VAC 50/60Hz 150mAOutput: 6VDC 450mAParent unit: Ten Pao - S004LS0600045Input: 100 - 240VAC 50/60Hz 150mAOutput 6VDC 450mUse only battery listed below:Battery Information:Parent unit: GPI - VTHC043C00,2 x 1.2V AAA size 400mAh NiMHCORUN - Ni-MHAAAJ400,2 x 1.2V AAA size 400mAh NiMH | |
| Transmitting power: | Max. 250mW |
| Operating temperature: | 10°C to 39°C |
VTECH TELECOMMUNICATIONS LTD.
A member of THE VTECH GROUP OF COMPANIES.
Copyright © 2012 for VTECH TELECOMMUNICATIONS LTD.
All rights reserved. Printed in China.

- Congratulations
- Important safety instructions
- SAVE THESE INSTRUCTIONS
- Cautions
- Table of contents
- Getting started ....1
- Using your baby monitor ....8
- Appendix 9
- Getting started
- Parts checklist
- Baby unit installation
- Parent unit installation
- Baby unit overview
- – Power indicator
- - ⏻(On/off)
- - Microphone
- Parent unit overview
- Parent unit overview (continued)
- Parents unit lights
- Positioning and operating range
- Position the audio monitor
- note
- Test your audio monitor before use
- To test your audio monitor:
- Using your baby monitor
- Power the baby unit on or off
- Power the parent unit on or off
- Adjust speaker volume
- Appendix
- Troubleshooting
- My audio monitor does not work at all.
- The audio monitor produces high-pitched noise.
- Troubleshooting (continued)
- Battery low at the Parent Unit.
- The parent unit beeps.
- Common cure for electronic equipment.
- Customer service & Product warranty
- IMPORTANT
- Customer Service
- Voluntary Product Warranty
- For your records
- Statutory Rights
Brand : VTECH
Model : BM1000
Category : Baby monitor