IQ Quattro 44 MFP2GO - To scan Contex - Free user manual and instructions
Find the device manual for free IQ Quattro 44 MFP2GO Contex in PDF.


| Product Type | Wide Format Color Scanner |
| Model | Contex IQ Quattro 44 MFP2GO (IQ Quattro 4400 Series) |
| Scanning Width | 44 inches (1118 mm) |
| Dimensions (Approx.) | Height: 300 mm, Width: 1200 mm, Depth: 500 mm |
| Weight (Approx.) | 45 kg |
| Power Supply | 100-240 V AC, 50/60 Hz |
| Power Consumption | Typical: 120 W, Sleep: < 10 W |
| Interface | USB 2.0, Gigabit Ethernet |
| Scanning Speed | Up to 12 inches per second (color, 200 dpi) |
| Optical Resolution | Up to 1200 dpi |
| Input Size Detection | Automatic, Standard sizes, Manual |
| Loading Options | Automatic, Manual, Soft Handling |
| One-Touch Buttons | Scan, Copy, Email (configurable via WIDEsystem) |
| Sleep Mode | Automatic after idle time (default 15 min), manual activation |
| Maintenance Tasks | Cleaning scan area, Calibration (Camera Alignment & Full), Glass plate replacement |
| Cleaning Method | Dry lint-free cloth with mild glass cleaner (spray on cloth, not directly) |
| Calibration | Via WIDEsystem calibration wizard; requires calibration sheet |
| Glass Plate Replacement | User-replaceable; 2 latches, release buttons, tool for first latch |
| Safety Features | Grounding plug, main power switch, EMC compliance (FCC Part 15, CE) |
| Compatible OS | Windows (latest versions per Microsoft Lifecycle Policy) |
| Software Included | WIDEsystem TOOLS (drivers, maintenance), compatible scan/copy apps |
| Energy Star | Compliant |
Frequently Asked Questions - IQ Quattro 44 MFP2GO Contex
User questions about IQ Quattro 44 MFP2GO Contex
0 question about this device. Answer the ones you know or ask your own.
Ask a new question about this device
Download the instructions for your To scan in PDF format for free! Find your manual IQ Quattro 44 MFP2GO - Contex and take your electronic device back in hand. On this page are published all the documents necessary for the use of your device. IQ Quattro 44 MFP2GO by Contex.
USER MANUAL IQ Quattro 44 MFP2GO Contex
Wide Format Scanners

text_image
le contex IQ QuattroModels: IQ Quattro series
January 2014
About this Guide
2
Contents
Contents 2
About this Guide ....2
Overview of the Scanner 4
Scanner front view: 4
Installation....6
System requirements 6
Installation step by step....6
Turning the Scanner ON and OFF 23
Main power switch.... 23
Sleep and wake modes.... 24
Automatic shut down after idle time.... 25
Loading Originals into the Scanner 26
Load, face up, at the scanner's center 26
Automatic loading.... 26
Manual loading....27
Unloading the original after scan.... 28
Soft Handling.... 29
Setting the input size.... 29
Scanning 30
Software applications for scanning.... 30
Running applications from the scanner panel 30
Batch scanning.... 30
Monitoring your scanner with WIDEsystem.... 31
Maintenance....33
About scanner maintenance 33
Cleaning the scan area 33
Overview - Key maintenance points - Cleaning.... 34
Calibration 41
Replacing the glass plate 45
Replacing the glass plate 45
Replacing the glass plate – Overview of key parts.... 47
Downloading New Firmware 53
What is Firmware? 53
When do I need new firmware? 53
How to identify the firmware version running in the scanner? ..... 53
How to install new firmware?......53
Trouble Shooting 54
How are errors reported on your system....54
Correcting common errors ....54
Technical assistance....54
Problems Related to Scanner Installation....55
Problems Related to Operation of the Scanner....56
Problems Related to the Scanning Results....59
Appendixes....60
Important safety instructions....60
Regulations....61
About this Guide
This guide explains how to operate and maintain your wide format scanner.
The guide assumes basic knowledge of your computer and operating system and does not repeat material from their documentation.
Be sure to refer to:
- The Installation section – describes correct installation of your scanner drivers.
- The readme.htm file in the ws folder on the WIDEsystem TOOLS CD-ROM. Contains the most current installation and OS compatibility issues.
About this Guide
3
- WIDEsystem TOOLS Help – After installing your drivers, open WIDEsystem and press F1. Contains information on using the WIDEsystem application and Scanner Maintenance software.

All above models are ENERGY STAR ^® compliant.

IMPORTANT: Be sure to use the WIDEsystem TOOLS CD-ROM that be with your scanner or a newer version. Out-of-date versions of Esystem software may not detect your scanner model.

NOTE: Windows Compatibility - Your scanner and drivers are tested developed to support the most current active Microsoft Windows on OS systems. Drivers and interface support in regard to specific flows versions will follow the Microsoft Support Lifecycle Policy. The compatibility specifications can therefore change accordingly. The most recent OS compatibility specifications and drivers will be available on your manufacturer's website.
This user's guide covers the following models:
| Scanner Model | Description |
| IQ Quattro 2400 Series | 24" color scanner |
| IQ Quattro 4400 Series | 44" color scanner |
Overview of the Scanner
Below: The parts, buttons and areas you need to recognize for using the scanner.
Scanner front view:
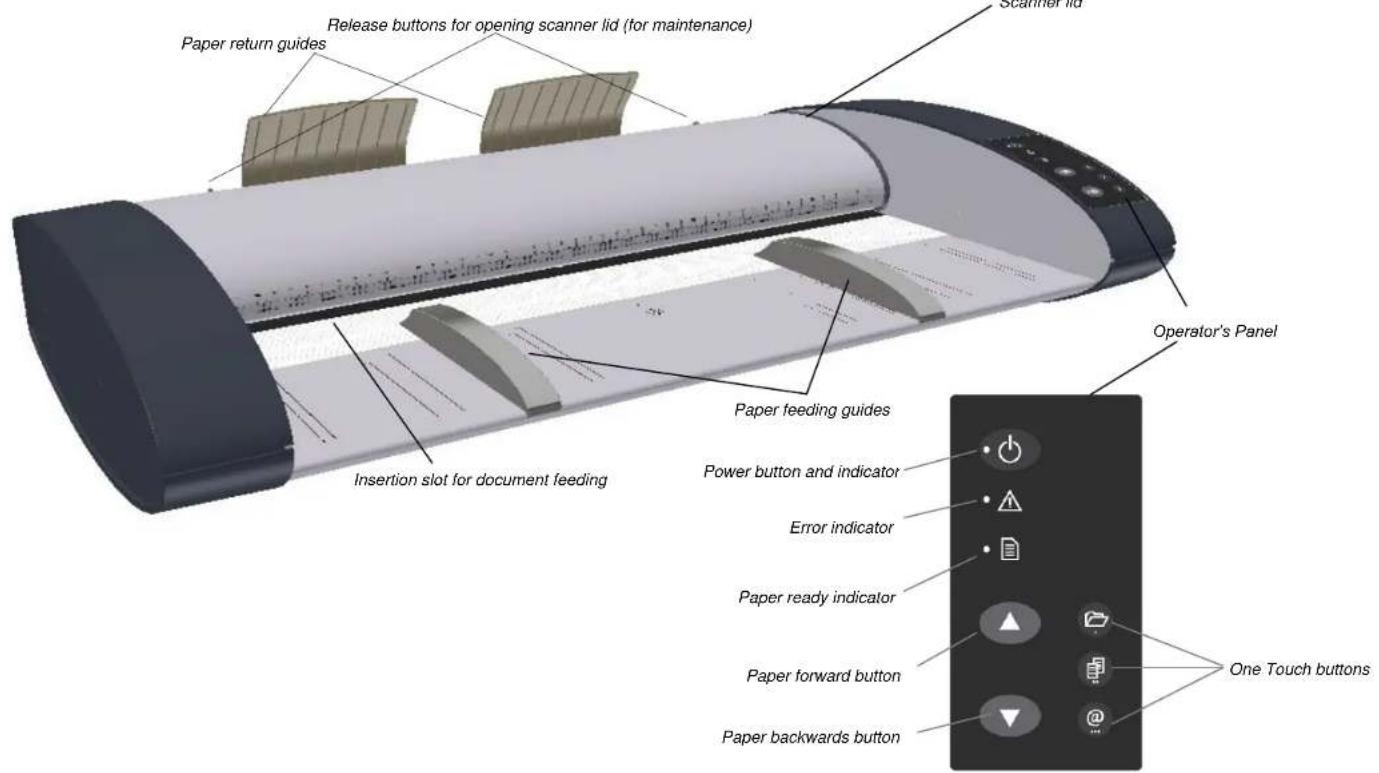
text_image
Paper return guides Release buttons for opening scanner lid (for maintenance) Scanner lid Operator's Panel Paper feeding guides Insertion slot for document feeding Power button and indicator Error indicator Paper ready indicator Paper forward button Paper backwards button One Touch buttonsScanner rear view:
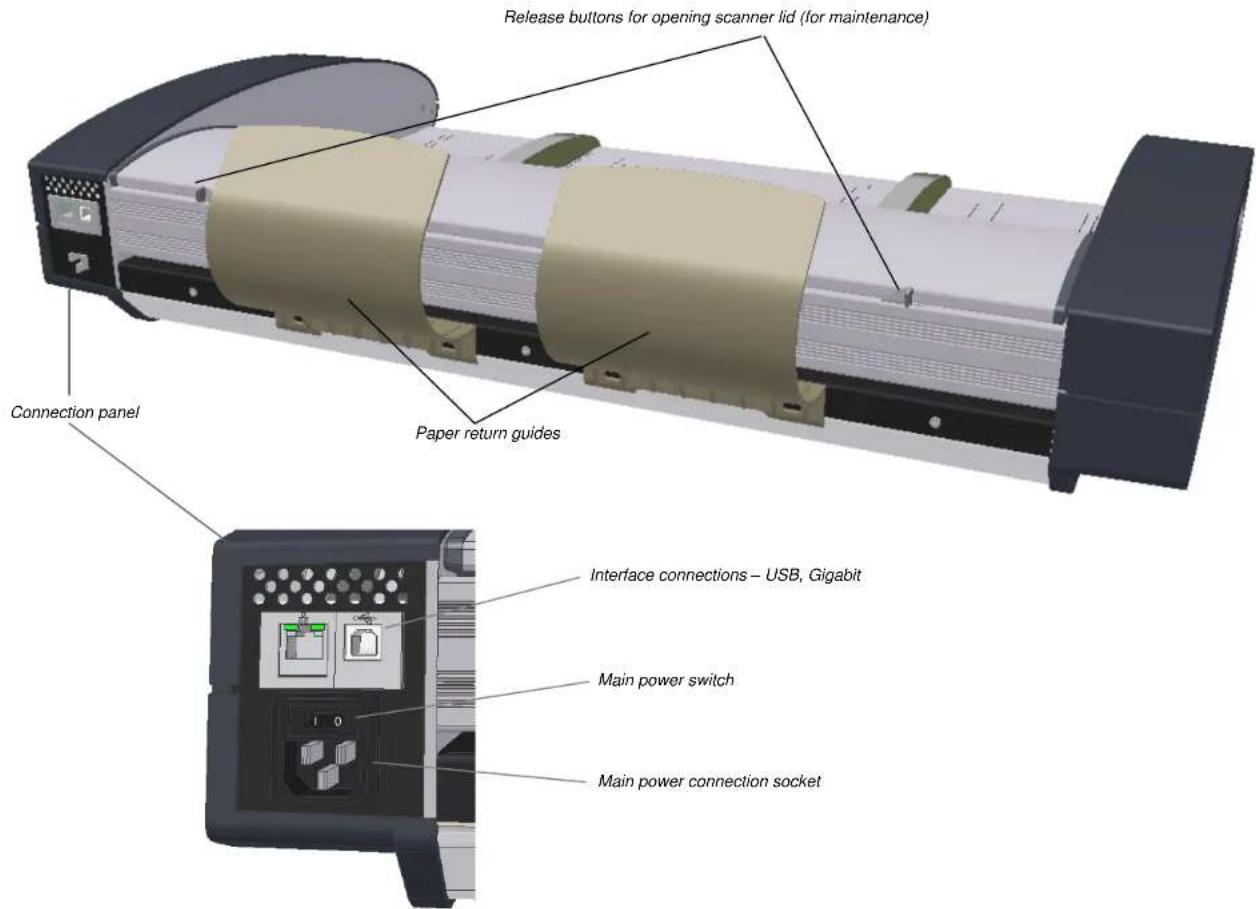
text_image
Release buttons for opening scanner lid (for maintenance) Paper return guides Connection panel Interface connections – USB, Gigabit Main power switch Main power connection socketInstallation
Follow the steps below for quick and easy installation of your scanner and scanner drivers.
System requirements
• PC or supported workstation. Recommended requirements: Core 2 processor, 2 GB RAM, 5 GB of available hard drive space, USB 2.0 interface.
- Compatible Windows operating system – View the ws/readme.htm file on the WIDEsystem TOOLS CD-ROM.
- Enabled USB port on your PC.
• The WIDEsystem TOOLS CD supplied with your scanner.
• Scanning software and/or compatible third party software. See the section on Software Applications for Scanning »
• Grounded power outlet.
- PC with USB port or enabled Gigabit port.

NOTE: Gigabit interface compatibility and speeds depend on your scanner model.
Installation step by step

Set up the scan station
Your scanner should be placed either on the specially designed stand-alone floor stand or on a sturdy table. Make sure there is enough space behind the scanner to allow the media to run out.

IMPORTANT: DO NOT YET CONNECT THE SCANNER TO ER OR PC.

See also the Safety Instructions at the end of this operator's

Install WIDEsystem and scan/copy software on your PC

IMPORTANT: WIDEsystem contains your essential scanner drivers. You must install Esystem before you connect the scanner or install any scanner software applications.
- Insert the WIDEsystem TOOLS CD-ROM into your PC. Normally the setup program interface will start automatically. If it does not, locate the setup.exe file on the CD and start it manually.
- Follow the instructions on your screen to install the WIDEsystem software and scanner drivers. Reboot the PC when asked to do so to complete installation.
- Remove the CD when done with installation.
- To verify correct installation of WIDEsystem: the WIDEsystem icon will be visible in your system tray.
- After installing WIDEsystem, install the Scan & Copy software you will be using with the scanner. Select the required installation options for the Scan & Copy software from the WIDEsystem TOOLS CD or from a third-party installation CD.

IMPORTANT: During all installation steps, be sure to select "YES" if Windows asks you to allow software to access the network.

CAUTION: DO NOT YET CONNECT THE SCANNER TO POWER OR TO THE PC. This is to ensure your own personal safety and to help protect your device from potential damage during cleaning in the next steps
- After installing software, leave the PC ON as you perform the next steps to prepare and setup the scanner.
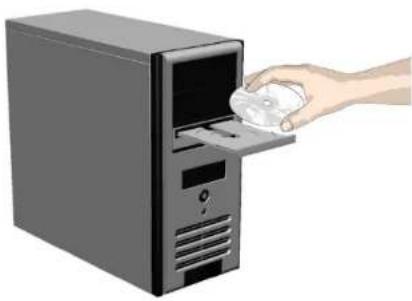
natural_image
Illustration of a hand inserting a CD into a desktop computer tower (no text or symbols)3
Clean the scanner feeding bed
This is the flat surface in front of the insertion slot. Wipe thoroughly so dirt and dust are not dragged into the scan area with the original.
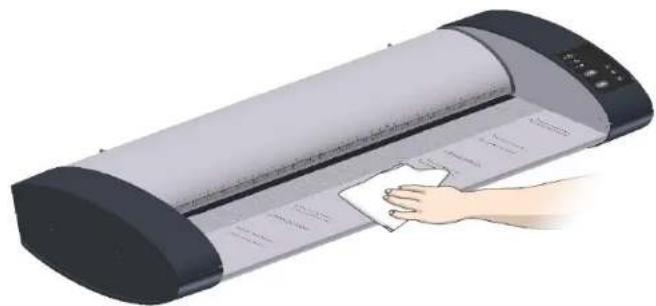
natural_image
Illustration of a hand cleaning a paper roll with a cloth (no text or symbols visible)4
Open the scanner lid –
Press the lid release buttons
The internal scan area should be wiped clean for any dust accumulated during packaging and shipping. The scan area is under the scanner lid so you have to open it. The scanner lid release buttons are at the back of the lid.
- Stand at the front of the scanner.
- Push down on the lid and simultaneously slide both release buttons towards the scanner's center with your fingers until you feel them unlock.
- Use your other fingers to grip the edge of the lid.
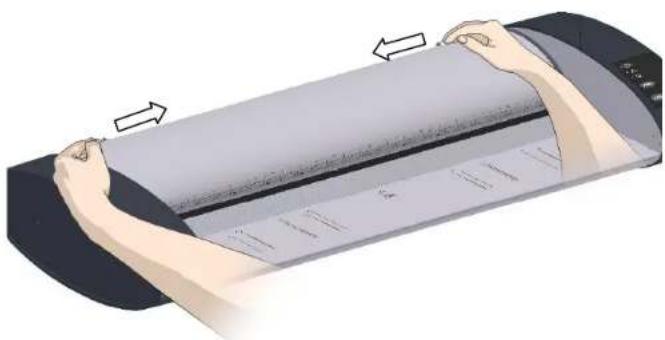
natural_image
Illustration of a person holding a rolled-up document or scroll, with arrows indicating movement or assembly (no text or symbols present)5
Open the scanner lid – Pull the lid back
Retain pressure on the lid release buttons and your grip on the lid edge as you pull the lid backwards towards your body. Open the scanner lid all the way back.
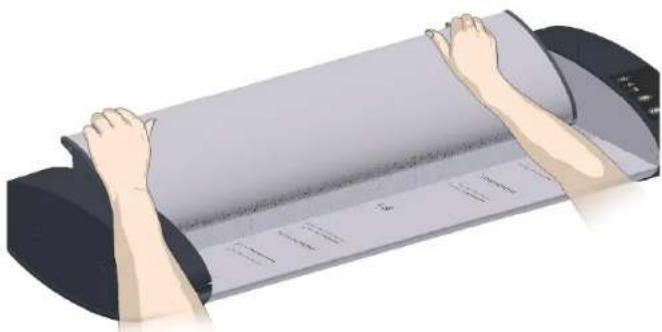
natural_image
Illustration of hands holding a rolled-up document or scroll, no text or symbols visible6
Clean the internal scan area
Wipe the internal scan area free of dust. Use a dry lint-free cloth.
If you detect smudges on the glass that cannot be wiped clean with a dry cloth, refer to this guide's section Cleaning the scan area for instructions on thoroughly cleaning the scan area in connection with scanner maintenance.
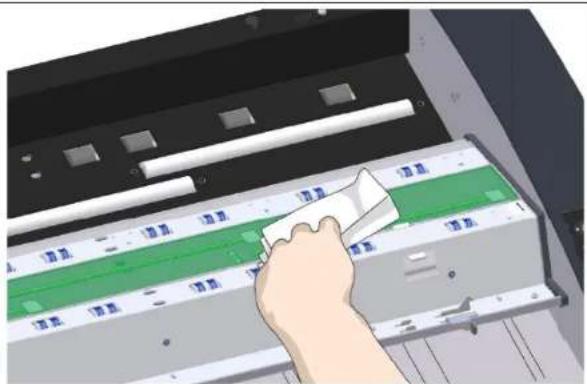
natural_image
Hand using a power tool to press or install electronic components (no visible text or symbols)7
Connect the power cable to the scanner
Connect the scanner power cable to the scanner's main power connection socket. The main power connection socket is at the scanner's back.
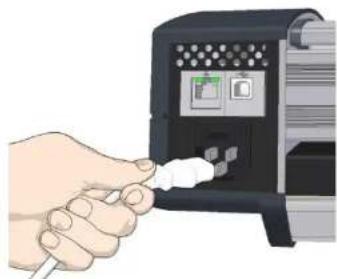
natural_image
Illustration of a hand inserting a cable into a device with a connector (no text or symbols visible)8
Connect power to the wall outlet
Connect the other end of the scanner power cable to the power outlet.

CAUTION: The scanner is equipped with a three-wire (pin) grounding type plug. If cannot insert the plug into your outlet, contact your electrician to replace the plug or not to ensure a grounded power connection. Do not try to defeat or ignore the purpose of grounding-type plug.


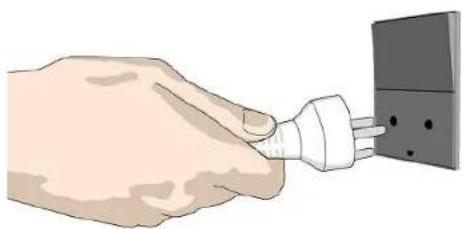
natural_image
Illustration of a hand inserting power into an electrical outlet (no text or symbols)Installation
9
Turn on the scanner
Turn on the main power switch at the back of the scanner
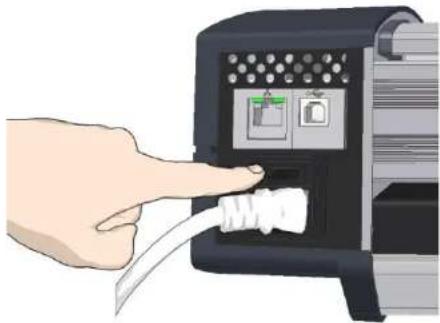
natural_image
Hand inserting a cable into a device with two switches (no text or symbols visible)10
Connect the USB interface cable to the scanner
Initial installation and activation of the scanner is easiest using the USB connection. This applies also for Gigabit enabled models.
- The interface-connection-panel is found at the back of the scanner – on its left side when facing the back.
- Connect the B-connector end (square shaped) end to a USB port on the scanner.

NOTE: For Gigabit enabled scanner models: The installation wizard will instruct on installation and activation of the gigabit interface later in the installation process. Now – only connect the USB.

Regulatory Notice: Your scanner product has been tested to comply with the EMC Standards 022 and FCC, Part 15. To maintain compliance, only use the interface cables supplied with the other.
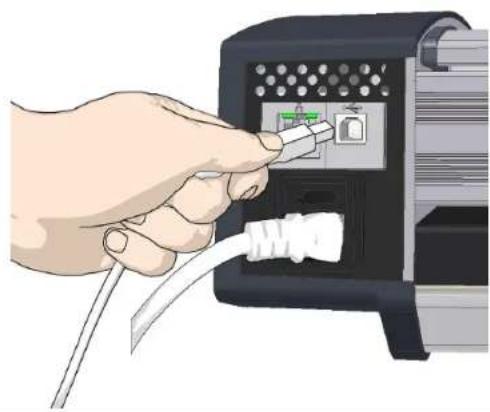
natural_image
Hand inserting a USB into a device with a white cable (no text or symbols visible)11
Connect the USB interface cable to the PC
- On the PC, verify that WIDEsystem is running – the WIDEsystem icon should be visible in your system tray.
- If WIDE system is not running, locate the WIDE system entry under your Programs menu and start it manually.
- Make sure the USB cable is connected to the scanner as instructed in a previous step.
- Connect the A-connector end (flat end) to a USB port on your computer.

NOTE: It is recommended to use an available USB port on the back of the PC. The USB ports on the front can affect performance on some PC models.
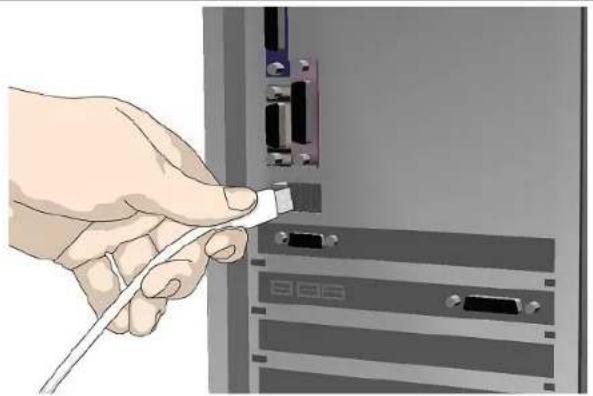
natural_image
Illustration of a hand inserting a USB into a server rack (no text or symbols visible)Scanner installation
12
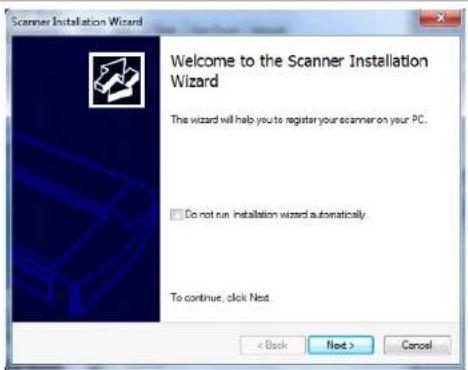
The Installation Wizard starts up
- The driver will detect the scanner and start the scanner installation wizard.
- On first time installations, the WIDEsystem Scanner Installation Wizard should start after 20 seconds.
- If the installation wizard does not start up, perform one or more of the following:
a. Unplug and reinsert the USB connections to scanner and PC.
b. Ensure the USB cable is connected firmly at both ends.
c. Try a different USB port on the PC.
d. Make sure the USB is inserted into the port marked for USB at the back of the scanner (and not, for example, the Ethernet port).
Scanner installation
13
Windows installs the scanner
- Click Next and follow the instructions on your screen to install the scanner on your PC.
- Most of the scanner installation process is automatic.
- Wait until the completion message appears
- Press Next when done.

IMPORTANT: During all installation steps, be sure to select "YES" if Windows you to allow the software to access the network.
text_image
Scanner Installation Wizard Welcome to the Scanner Installation Wizard The wizard will help you to register your scanner on your PC. □ Do not run installation wizard automatically. To continue, click Next. < Back Next > Cancel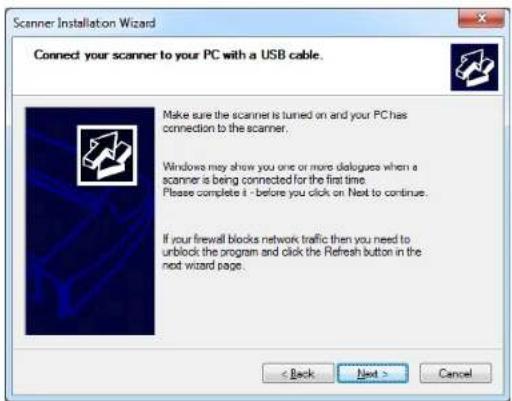
text_image
Scanner Installation Wizard Connect your scanner to your PC with a USB cable. Make sure the scanner is tuned on and your PC has connection to the scanner. Windows may show you one or more dialogues when a scanner is being connected for the first time. Please complete it - before you click on. Next to continue. If your firewall blocks network traffic then you need to unlock the program and click the Refresh button in the next wizard page. < Back Next > CancelScanner Installation
14
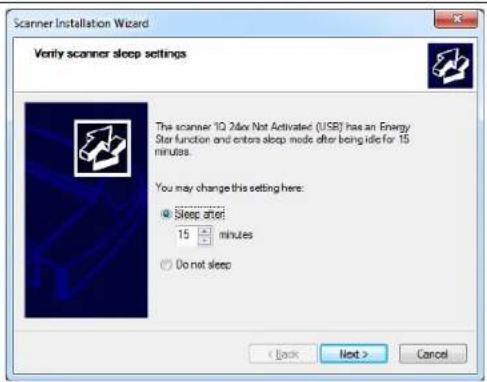
Set energy-star idle time preference
On delivery, the scanner is set for automatic entry into sleep mode after a preset idle time, i.e., the length of time the scanner is not active. The default idle time setting for energy star compliancy is 15 minutes.
You may wish to prolong it to avoid frequent automatic shutdowns.
Set a new idle time or select do not sleep to deactivate automatic entry into sleep mode.
text_image
Scanner Installation Wizard Verify scanner sleep settings The scanner 10.24x Not Activated (USB) has an Energy Star function and enters sleep mode after being idle for 15 minutes. You may change this setting here: Sleep after 15 minutes Do not sleep < Back Next > CancelScanner Activation
15
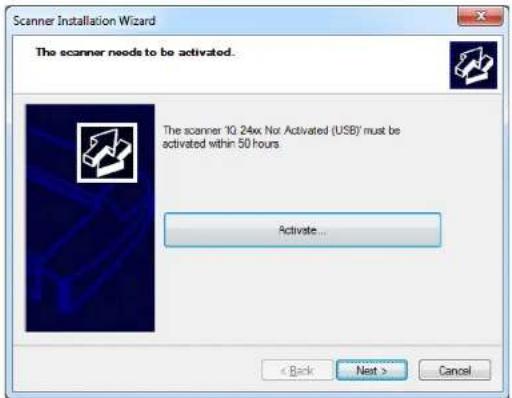
Activate the scanner
You must activate your scanner with its licence before you can use it. Please follow the Scanner Activation Wizard's instructions.

NOTE: Your supplier may have pre-activated the scanner for you. If the scanner is pre-activated, the wizard will skip this step and following steps 16a, 16b.
About license keys and activation codes:
• You will need to enter your license key that came with your scanner.
- Contact you dealer if you do not have a license key.
• Online activation will only require the license key.
- Manual activation will additionally require an activation code. Activation codes can be obtained from your dealer or through the manufacturer's License website. Follow the instructions Manual Activation (below) to obtain an activation code through the manufacturer's License website.
To activate the scanner:
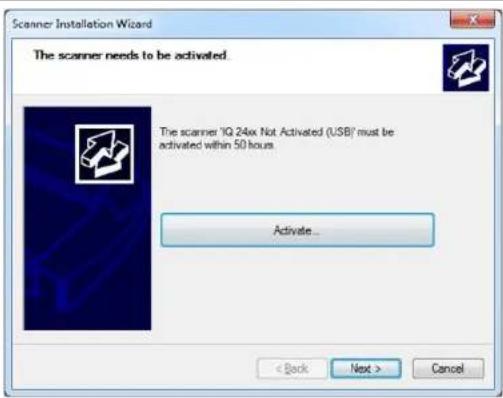
- Press the Activate button to start the activation wizard.
- You are presented with 2 ways to activate the scanner – Online and Manual.
- If your PC is connected to the Internet, choose Online activation, otherwise choose Manually
- If you chose Online, proceed to the instructions in step 16a (and skip 16b). If you chose Manual, proceed to the instructions in step 16b (skip 16a).

IMPORTANT: During all installation steps, be sure to select "YES" if Windows asks you to allow the software to access the network.
text_image
Scanner Installation Wizard The scanner needs to be activated. The scanner '10.24x Not Activated (USB)' must be activated within 50 hours. Activate... < Back Next > Cancel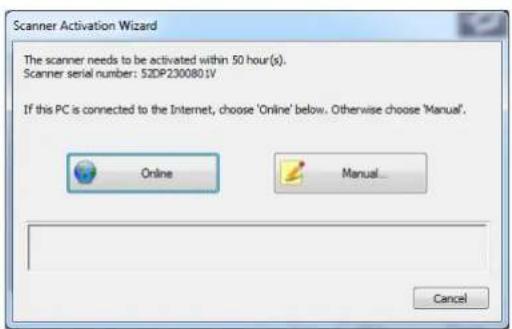
text_image
Scanner Activation Wizard The scanner needs to be activated within 50 hour(s). Scanner serial number: SZDP2300801V If this PC is connected to the Internet, choose 'Online' below. Otherwise choose 'Manual'. Online Manual... CancelScanner Activation - Online
16a
Online activation
Online activation is very easy. You only need your license key.
When you choose Online as the activation method, the dialog shown on the top right appears.
- Enter you license key in the designated field.
- The key will be authenticated online right after it is entered and if valid, a green tick will appear as shown in the dialog shown on the right-middle.
- Press the Activate button to continue.
- The Success dialog will indicate successful activation.
text_image
Scanner Installation Wizard The scanner needs to be activated. The scanner "IQ 24x Not Activated (USB)" must be activated within 50 hours. Activate... < Back Next > Cancel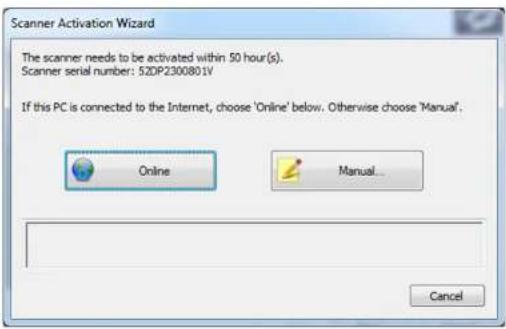
text_image
Scanner Activation Wizard The scanner needs to be activated within 50 hour(s). Scanner serial number: 52DP2300801V If this PC is connected to the Internet, choose 'Online' below. Otherwise choose 'Manual'. Online Manual... CancelScanner Activation - Manual
16b
Manual activation
- Have your license key ready before proceeding. If you don't have one, contact you dealer.
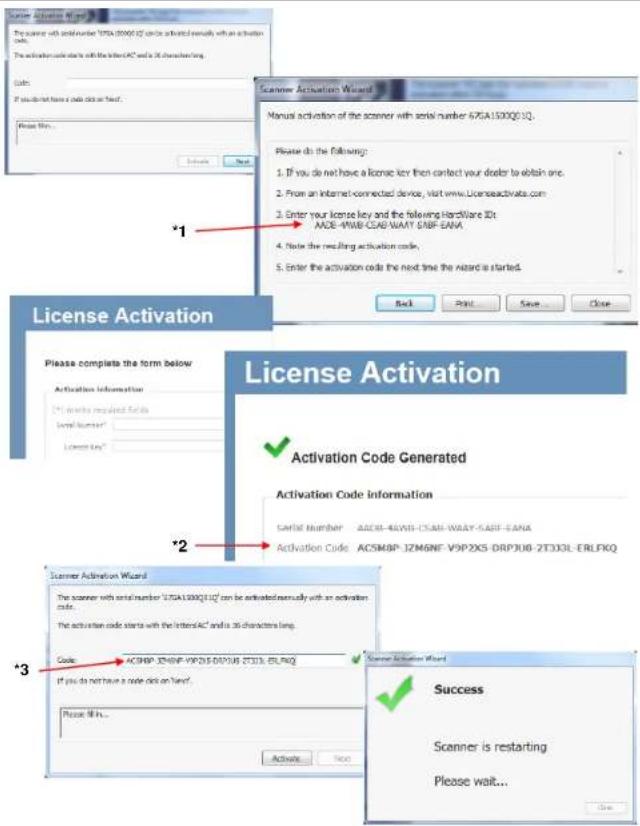
- Manual activation uses an Activation Code. To produce an activation code, you will need your license key and the scanner's ID which is a serial number or hardware ID. The scanner's ID is read off the scanner and displayed by the wizard (*1).
- You will need to access the internet (from any device). Here you can enter the 2 values - license key and ID to get an activation code.
-
Follow the instructions below:
-
When you choose Manual as the activation method, you will be asked to enter an activation code in the empty field. Click Next to obtain an activation code.
- The Manual activation wizard will display instructions. Please note the actual scanner's ID - hardware ID or S/N (serial number) supplied by the wizard (*1). You will need this ID to obtain the activation code in the next steps.
- Go to www.Licenseactivate.com.
- In the web interface titled License Activation, enter your license key in the designated field.
- Enter the scanner's ID - hardware ID or S/N that is supplied by the wizard as describe in step 2.
- Note or copy the Activation Code produced by the Licenseactivate.com website (*2).
- Enter or paste the activation code in the manual activation wizard dialog (^3) and press Next.
- The system will activate the scanner. Upon completion, the system will display the success message.
text_image
Scanner Activation Wizard The scanner will install number "LTA1000112" code activated manually with an activation code. The activation code is still the letterAC and is 35 charactering. Code: If you do not have a code click on Text? Please file... Scanner Activation Wizard Manus activation of the scanner with serial number 670A1000Q11Q. Please do the following: 1. If you do not have a license key then contact your dealer to obtain one. 2. From an internet-connected device, visit www.LicenseactivData.com 3. Enter your license key and the following Hardware Kit: MODE-4MVB-CSAB-WAY-SABF-EANA 4. Note the resulting activation code, 5. Enter the activation code the next time the Wizard is started. Back Print... Save... Close License Activation Please complete the form below Activation Information *1 works required fields Serial Number License Line License Activation ✓ Activation Code Generated Activation Code information Serial Number: ACDSI-RAVB-CSAB-WAY-SABF-EANA Activation Code: AC5M8NP-JZM6NF-V9P2XS-DRP3UB-2T3X3L-ERLFKQ *2 Scanner Activation Wizard The scanner with serial number "LTA1000112" can be activated manually with an activation code. The activation code starts with the letterAC and is 35 characters long. Code: AC5M8NP-JZM6NF-V9P2XS-DRP3UB-2T3X3L-ERLFKQ If you do not have a code click on Text? Please file... Scanner Activation Wizard ✓ Success Scanner is restarting Please wait... Active... Save...Scanner Installation – Change network name
17
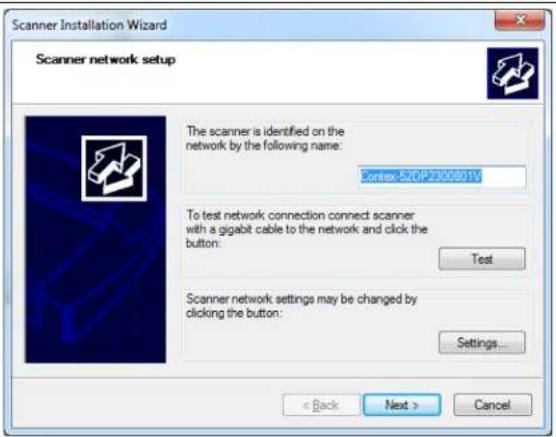
Change the scanner's network name (optional)

NOTE: This step only appears with licensed Ethernet supported scanners as acted during activation.
You may wish to change the default name of the scanner to comply with your organization.
Test network connection using the "Test" Button. Use "Settings..." to change network configuration.
Click Next when done.
text_image
Scanner Installation Wizard Scanner network setup The scanner is identified on the network by the following name: Context-571P2300801V To test network connection connect scanner with a gigabit cable to the network and click the button: Test Scanner network settings may be changed by clicking the button: Settings... < Back Next > Cancel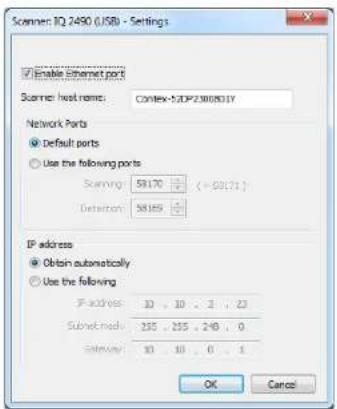
text_image
Scaner IQ 2490 (USB) - Settings Enable Ethernet port Scaner host name: COMEX-5JDP2380831Y Network Ports Default ports Use the following ports Sanning: 58170 (-58171) Definition: 58169 IP address Obtain automatically Use the following F address: 10, 10, 2, 23 Subnet mode: 255, 255, 240, 0 Saturn: 10, 10, 0, 1 OK CancelScanner Installation
18
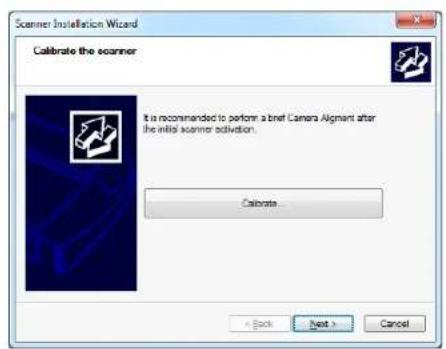
Calibrate the scanner – camera alignment
Transportation of your scanner could have slightly moved the cameras and they need to be realigned.
- Press Calibrate to start the wizard.
- Follow the wizard's instructions to perform camera alignment.
- If you did not clean the internal scan area/glass as instructed in the previous installation steps, then do so now.
- You will be asked to insert your calibration sheet that came with the scanner.
- Be sure to align the sheet arrow with the scanner middle arrow.
- Press the Camera Alignment button. The system will do the rest.
- The wizard will notify you when calibration has completed successfully.
- Upon successful completion, remove the calibration sheet.
- See also the Scanner Maintenance and Calibration Guide for complete and illustrated instructions.
text_image
Scanner Installation Wizard Calibrate the scanner It is recommended to perform a brief Camera Alignment after the initial scanner activation. Calibrate < Back Next > Cancel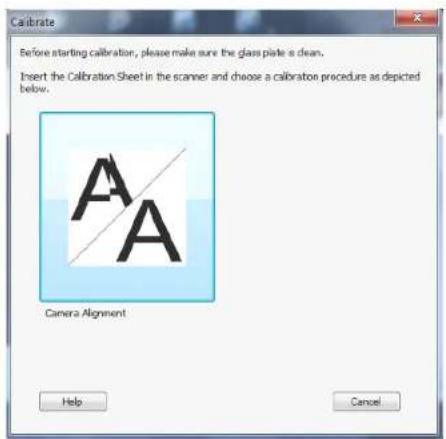
text_image
Calibrate Before starting calibration, please make sure the glass plate a clean. Insert the Calibration Sheet in the scanner and choose a calibration procedure as depicted below. Camera Alignment Help CancelScanner Installation
19
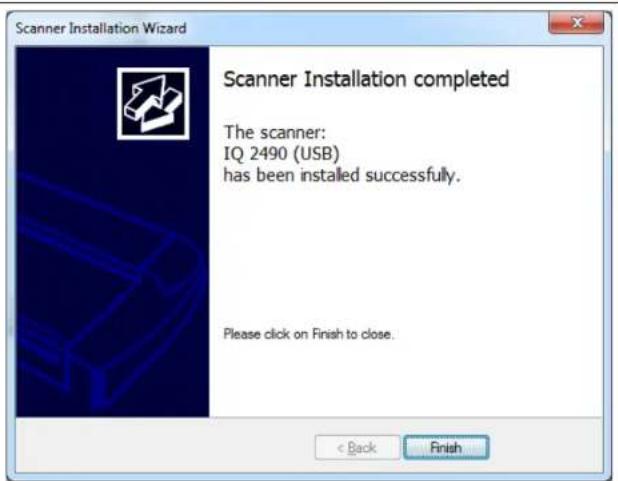
Installation complete
The scanner has been installed correctly when you see this message.
For models that supports Gigabyte, proceed to the steps for enabling gigabyte on the scanner plus sharing it on the network.
For USB only scanners - you can also choose to share the scanner on the network. Instructions for sharing USB scanners on the network follow below.
text_image
Scanner Installation Wizard Scanner Installation completed The scanner: IQ 2490 (USB) has been installed successfully. Please click on Finish to close. < Back FinishEnabling Gigabit Interface
20
Enable Gigabit Ethernet Interface (optional)
For scanner models with gigabit interface support
For gigabit enabled scanners - Optimal speed according to specifications may require you connect the scanner to a gigabit connection. If network installation was skipped earlier here is how to add the scanner manually.
To enable gigabit interfacing:
- Disconnect the USB connection to your PC
- Connect an approved gigabit cable to the scanner Ethernet interface socket at the scanner's back.
- Connect the other end of the gigabit cable to your LAN.
-
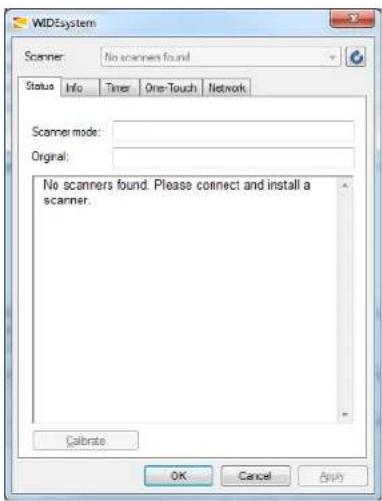
Open WIDEsystem – if not already open, double--click the WIDEsystem icon in the system tray.
-
Press the Refresh Scanner List button
- The system will automatically include and share the scanner on the network and enable scanning at gigabit speeds.

NOTE: Use only an approved gigabit cable. Full specified performance cannot guaranteed with other cables or normal LAN cables.

NOTE: WIDEsystem will provide a warning if you are running on a gigabit ner without a gigabit connection.
text_image
WIDESystem Scanner: No scanners found Status Info Timer One-Touch Network Scanner mode: Original: No scanners found. Please connect and install a scanner. Calibrate OK Cancel ApplySet up USB connected scanner for sharing on the network
21
Set USB scanner for sharing on the network (Optional)
For USB only (non-gigabit) scanner models
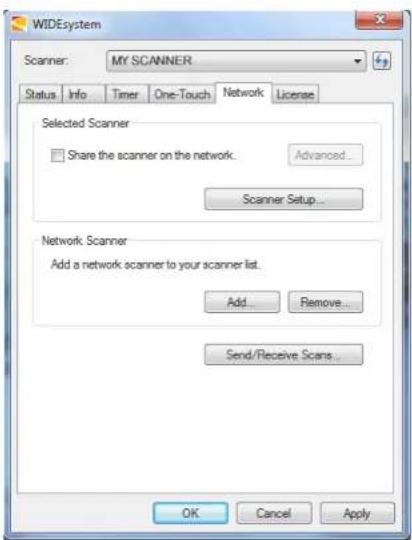
You can enable other PCs on the LAN to use the USB connected scanner. This is called "Sharing". After activating the scanner, You can set it up as a "shared scanner" through WIDEsystem.

NOTE: These instructions apply only for scanners using USB interfacing to PCs. Gigabit scanners will be shared automatically. See the previous instructions for enabling gigabit on models that support it.
- Make sure your PC with the scanner connected via USB is connected to the LAN.
- Double -click on the WIDEsystem program icon and select the Network tab.
- Select the option: Share the scanner on the network.
- Press the OK button to accept the settings.
On most LAN systems, this is all you have to do. However, some systems will require Advanced settings, such as specific communication port numbers. Contact your LAN administrator for information regarding Advanced settings.

NOTE: Open WIDE system and press the

NOTE: PCs on the LAN that will use the scanner must be installed with WIDEsystem and compatible scan/copy software.
text_image
WIDEsystem Scanner: MY SCANNER Status Info Timer One-Touch Network License Selected Scanner Share the scanner on the network. Advanced... Scanner Setup... Network Scanner Add a network scanner to your scanner list. Add... Remove... Send/Receive Scans... OK Cancel ApplyTurning the Scanner ON/OFF
23
Turning the Scanner ON and OFF
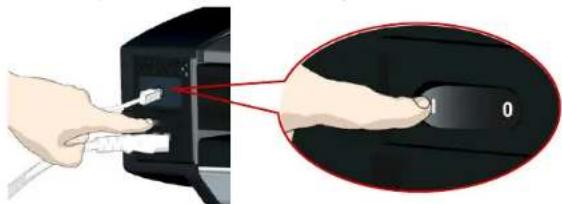
Main power switch
The main power switch is at the back of the scanner. Press the left side of the switch (marked "I") to turn the main power to ON. Press the right side of the switch (marked "0") to turn the main power to OFF.
natural_image
Illustration of hands inserting a device into a black box, with an inset showing a hand holding a labeled tag (no text or symbols present)Main power switch is at the back of the scanner. Press "I" for ON and "0" for OFF.
Self test procedure
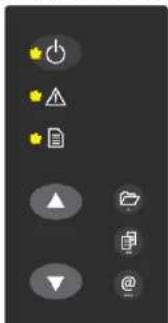
When you turn the main power ON, the scanner runs a short self-test procedure. This takes less than one minute. The 3 LEDs on the panel will be on during the self-test procedure.
text_image
User interface toolbar with icons for zoom, warning, file, folder, and navigation controlsAll LEDs are on during self-test
Scanner ready to scan
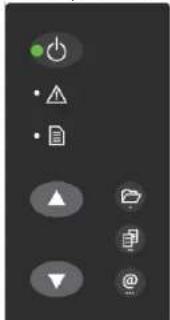
The scanner is ready for scanning when the power LED turns green. The scanner starts up in Wake mode (see next section).
text_image
User interface toolbar with navigation and function icons including play, triangle, document, folder, photo, and @ symbolsScanner ready – in Wake mode.
You can leave the main power switch permanently ON and control scanner power through its Sleep and Wake modes.
Turning the Scanner ON/OFF
Sleep and wake modes
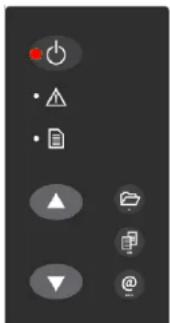
With the main power switch ON, scanner power can be set in Sleep mode and Wake mode. Sleep mode is the energy saving mode. The scanner cannot scan when in the Sleep mode. Wake mode is the full power ON mode for scanner operation.
The scanner will go from Wake mode into Sleep mode:
• Automatically: after a set idle time (see Sleep mode options below).
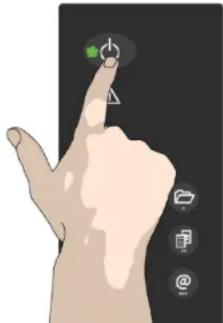
- Manually: when you hold the power button down for 3 seconds.
natural_image
Illustration of a hand with a finger pointing at a touchscreen device (no text or symbols visible)Hold down the power button to enter Sleep mode.
text_image
User interface toolbar with control buttons and navigation iconsScanner in Sleep mode – Power LED is red
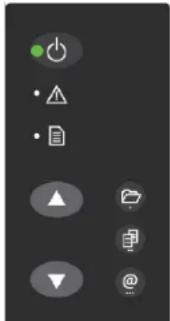
The scanner will go into Wake mode from Sleep mode:
- When you feed a document into the scanner.
- When you press the power button.
text_image
User interface toolbar with navigation and edit icons, including play, document, folder, and @ symbolsScanner in Wake mode – Power LED is green
Turning the Scanner ON/OFF
25
Automatic shut down after idle time
On delivery, the scanner is set for automatic entry into sleep mode after a preset default idle time, i.e. the length of time the scanner is not active. You can prolong or shorten the idle time value to match your normal workflow.

NOTE: You will be prompted to change the idle time during installation.
If you have done this you can omit this step unless you wish to reset.
To change/set the sleep mode options:

- Open WIDEsystem - double-click the WIDEsystem icon system tray.
- Select the Timer Tab.
- Select or deselect the Enter Sleep mode automatically option.
- If you do not select the Enter Sleep mode automatically option, you will need to use the manual method for entering sleep mode by holding the power button down for 3 seconds.
- If you do select Enter Sleep mode automatically option, proceed to the next step to set the Idle time value.
- Set the value Idle time before entering sleep. This is the number of minutes the scanner can stand idle before entering the sleep mode on its own.
- Press Apply to download your settings into the scanner's memory.

Enter Sleep mode automatically
Idle time before entering Sleep (minutes):

Sleep Mode options in the WIDEsystem program - Timer tab

NOTE: With the scanner main power ON, the scanner can be also be brought into Wake-up and Sleep modes manually even while the Enter sleep mode automatically option is selected.
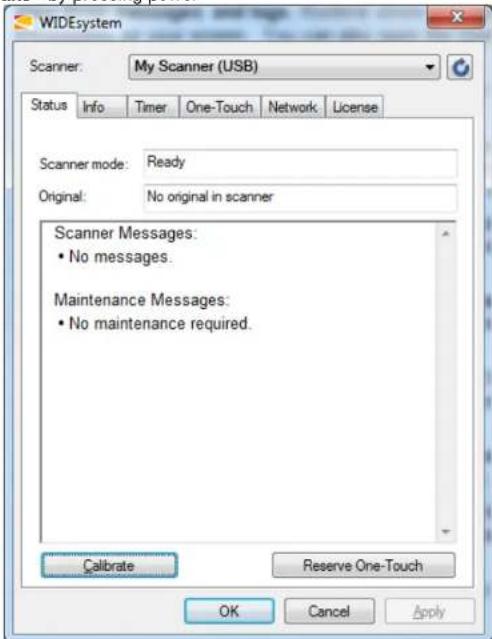
- Wake - by pressing power
text_image
WIDEsystem Scanner: My Scanner (USB) Status Info Timer One-Touch Network License Scanner mode: Ready Original: No original in scanner Scanner Messages: • No messages. Maintenance Messages: • No maintenance required. Calibrate Reserve One-Touch OK Cancel Applybutton on
the panel or inserting a document for scanning.
- Sleep – by pressing and holding down the power button for 3 seconds.
You can choose to disable automatic entry into Sleep mode entirely if you want only manual activation of the sleep mode or, you can leave it enabled and retain both manual and automatic functions.
Loading Originals into the Scanner
Load, face up, at the scanner's center
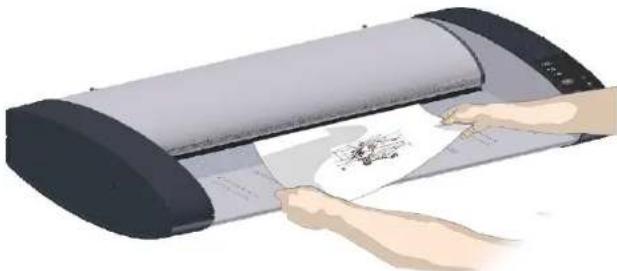
Load your document with the image side facing upwards. Align the center of the document with the center arrow marking on the scanner bed.

Use the standard size markings to help align the document for a straight scan path.
You can use automatic loading or manual loading. These loading options are available in the scan/copy application.

NOTE: The availability of the automatic and manual loading options
will depend on your scan/copy software and its level of compatibility with the scanner model.
natural_image
Illustration of a hand holding a paper with a printed document, next to a large cylindrical device (no visible text or symbols)Load the paper, face up. Hold with both hands and align the document's center with the scanner center marking.
Automatic loading
With automatic loading, the scanner takes the original as soon as you insert it in the paper slot. Automatic loading is reliable for most jobs and especially useful for batch scanning jobs.
-
Make sure the Paper handling option "Auto load" is set in your scanning application.
-
Align the center of the document with the center arrow marking on the scanner bed.
-
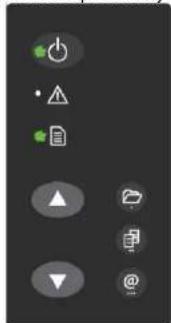
Push the original into the insertion slot until you feel it contact the rollers and the Paper Ready LED lights green.
text_image
User interface toolbar with icons for battery, alarm, file, folder, and navigation controlsPaper Ready LED green just before the paper feeds
-
The scanner will grab the original automatically and move it into start-scan position.
-
A delay factor can be set in the scanning application. The delay will give you time to control straight positioning of the document if you feel the scanner is grabbing the original too fast.
Manual loading
- Make sure the Paper handling option "Manual" is set in your scanning application.
- Align the center of the document with the center arrow marking on the scanner bed.
- Push the original into the insertion slot until you feel it contact the rollers and the Paper Ready LED lights green.
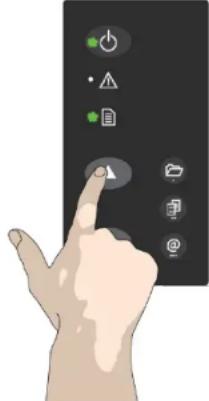
- While holding the original in place with one hand, use the other hand to press and hold down the Paper Forward button on the scanner.
text_image
Illustration of a hand pressing a button on a device interface with icons for power, warning, file, and other functions.When Paper Ready LED is green – press the Paper Forward button
- The original moves into the start-scan position.
Unloading the original after scan
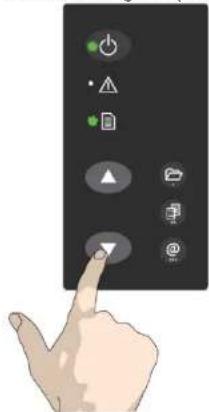
- Press the Paper Backward button to eject the original back to the scanner feeding bed (towards you).
natural_image
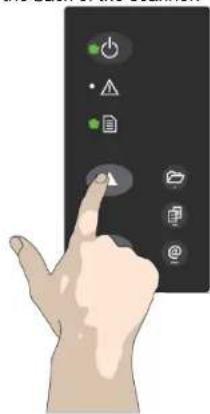
Hand pointing at a black control panel with icons (no text or symbols visible)- Press the Paper Forward button if you wish to eject the original out the back of the scanner.
text_image
Illustration of a hand interacting with a touchscreen device displaying icons for battery, power, triangle, and document functions.Soft Handling
The Soft-handling option can be selected in your scan application. Soft-handling means that feeding and scanning are slowed down. You can use the option with both Manual and Automatic loading.

NOTE: The availability of the soft handling load option depends on scan/copy software and its level of compatibility with the scanner el.
Use Soft-handling with
- Old, curled or creased originals that trigger a paper jam. See Trouble Shooting – Paper Jam error for correcting a paper jam error.
- Fragile originals you want passed delicately through the drive system.
Setting the input size
The Input size defines the scan area. You enter the input size in your application's input size dialogs.

NOTE: The availability of the Input size options described below will end on your scan/copy software and its level of compatibility with the other model.
3 ways to set find and set the input size:
- Use automatic size detection - The scanner will detect the edges of the document and calculate the input size for you.
- Set a standard size - common standard sizes are marked on the scanner bed. Use these markings to determine which standard size matches the original and then select that size in the application's input size dialog.
- Set the size manually for irregular sizes. Measure your document with the inch/cm ruler on the scanner bed. Enter your width measurement in the width setting field in your application's input size setup dialog. You can also measure and set a length value or choose automatic length detection.
Scanning
Software applications for scanning
Your scanner is controlled through scan, copy or imaging software installed on your PC.
Optimal full featured scanning functionality is obtainable through scan and copy software specifically developed for compatibility with your scanner model. See the scanner manufacturer's website for information on scanner software and compatible third-party applications.
Running applications from the scanner panel
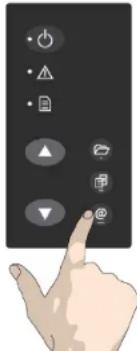
Normally you would control the scanner from your PC through your scan software user interface. However, your scanner also supports one-touch buttons that enable you to trigger scanner compatible software from the scanner panel. Configuration of your one-touch buttons is controlled through WIDEsystem. Please refer to the on-line help in WIDEsystem and your compatible scanner software for instructions.
text_image
Hand interacting with a touchscreen device displaying various function icons including power, triangle, folder, and document.The one touch buttons "Scan", "Copy" or "Email"
Batch scanning
Batch scanning involves jobs where you want to feed and scan a whole set of originals that require equal scan settings. The basic steps are:
- Set your scan settings (size, type, image adjustments..) for the batch. Your settings will apply to ALL the documents in the batch.
- Set the scan software into Batch Mode. This will tell the scanner to start scanning as soon as the document is fed so you don't need to trigger the scan.
- Choose Automatic loading (optional) - for fast and effective loading. Read you scan software's on-line help pages for specific information on batch scanning with the application.

NOTE: The availability of Batch scanning options will depend on your /copy software and its level of compatibility with the scanner model.
Monitoring your scanner with WIDEsystem
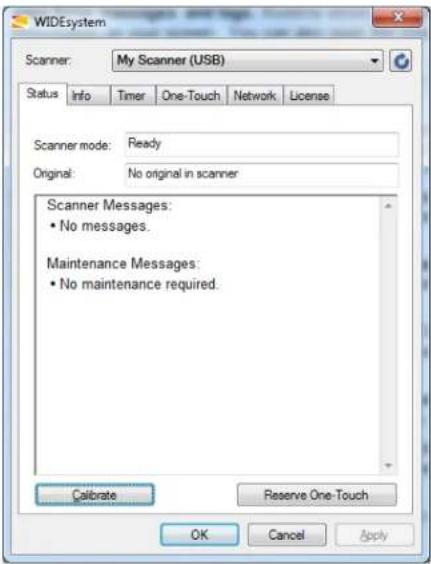
You installed WIDE system with the scanner drivers. WIDE system contains an application that monitors the scanner and reports on its functionality.
Double left click the system tray's WIDEsystem icon to open the WIDEsystem control interface.
text_image
WIDESystem Scanner: My Scanner (USB) Status Info Timer One-Touch Network License Scanner mode: Ready Original: No original in scanner Scanner Messages: • No messages. Maintenance Messages: • No maintenance required. Calibrate Reserve One-Touch OK Cancel ApplyWIDE system program control interface
With WIDEsystem you can:
View the scanner's status. Move the mouse over the scanner icon on the system tray. Status messages include whether or not the scanner is detected, connection and runtime errors and readiness for scanning.

Scanner status message on Windows system tray
- View Error messages and logs. Runtime errors are reported immediately on your screen. You can also open the Status tab and Log tab for viewing error messages.
- View information about the scanner device in relation to firmware and hardware revisions. Open the Info tab.
- Install new firmware – You download new firmware to a folder on your machine. Then right click on the scanner icon, select Advanced Options > Update Scanner Firmware to install it on your scanner.
- Initiate a scan of the system's hardware bus for re-establishing the interface. Right click on the scanner icon, select Advanced Options > Rescan Hardware Bus.
- Assign/reassign applications to the scanner's one-touch-scan buttons, or disable the one-touch-scan buttons altogether. Open the One-Touch tab to make settings.
- Set up your scanner so it can be shared by other PC's on the network. Open the Scan to Net tab to make settings. See also Installation - Share the scanner on the LAN.
- Set up your scan software so it can access shared scanners on the network. Open the Scan to Net tab to make settings.
- Launch the WIDEsystem on-line help. To find instructions on trouble shooting and using WIDEsystem with your scanner. Open WIDEsystem and press the F1 key.
- Activate and upgrade your scanner. Open the License tab. You will need to have a valid license for the activation/upgrade
Scanning
- Launch the scanner calibration wizard. Right click on the scanner icon, select Calibrate.
- Launch the WIDEsystem on-line help. To find instructions on trouble shooting and using WIDEsystem with your scanner. Open WIDEsystem and press the F1 key.
Maintenance
About scanner maintenance
Scanner maintenance will ensure optimal performance of your scanner. There are three basic maintenance tasks.
- Cleaning
Keep your scanner clean – the next section describes how to thoroughly clean the internal scan area. How often you need to clean will depend on how often and the types of media you scan. If your work primarily involves scanning newspapers and old blueprints you may need to clean more often than users who only scan brochures and new drawings. Be sure to clean the scanner when results are not optimal. Particles of dust in the scan area can sometimes be the sole cause of streaks in the end result.
See more under the section Cleaning the scan area
- Calibration
Calibrate the scanner if your output is not optimal and cleaning (above) does not remedy the problem. Calibration will renew the scanner's original color and BW precision. Scanner Calibration is easy to perform. To run, you insert a Calibration Sheet, and start the Scanner Maintenance program. The rest is done by the program. Make sure the scanner is clean before calibrating.
See more under the section Calibration – Scanner Maintenance program.
- Replacing the glass plate
This should be carried out when a worn glass plate affects your results. You may need a new glass plate if streaks still appear on the image even after cleaning the glass. See more under the section Replacing the glass plate.
Cleaning the scan area
How often you should clean your scanner will largely depend on how much you use the scanner and the condition of your documents. Generally, be sure to clean at least once a month and always right before important jobs that require a high degree of precision.
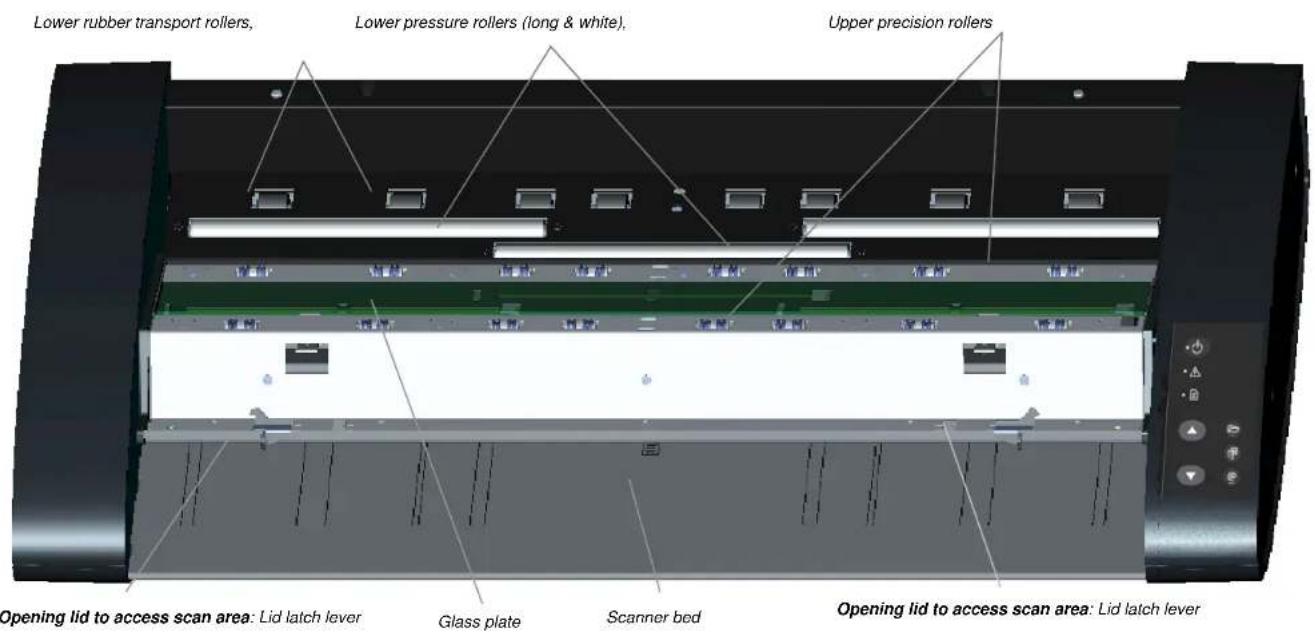
You must clean the following scanner parts/areas:
- The scanner bed
- Glass plate
- Upper precision rollers
- Lower pressure rollers
- Lower rubber transport rollers

NOTE: To help locate these parts on the scanner, see the Overview of key maintenance points – Cleaning on the next page.
Overview - Key maintenance points - Cleaning
The illustration below shows the scanner from above with its lid open. The illustration indicates the key points (parts and areas) you need to recognize when cleaning the scanner. Instructions regarding the cleaning tasks that involve these points follow below.
text_image
Lower rubber transport rollers, Lower pressure rollers (long & white), Upper precision rollers Opening lid to access scan area: Lid latch lever Glass plate Scanner bed Opening lid to access scan area: Lid latch leverTo clean your scanner:
1
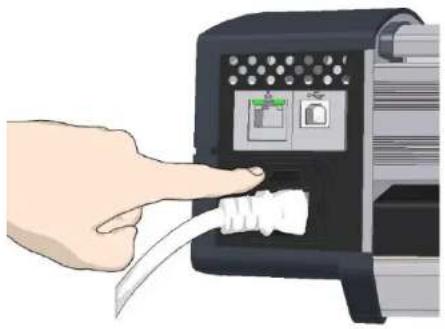
Turn the main power to OFF
Press the main power switch at the back of the scanner to the OFF position ("0").
natural_image
Hand inserting a cable into a device with a connector (no text or symbols visible)2
Disconnect the scanner's power plug

CAUTION: Always disconnect power before cleaning the scanner. This step is unsure your own personal safety and to help protect your device from initial damage.

natural_image
Illustration of a hand inserting a plug into an electrical outlet (no text or symbols)3
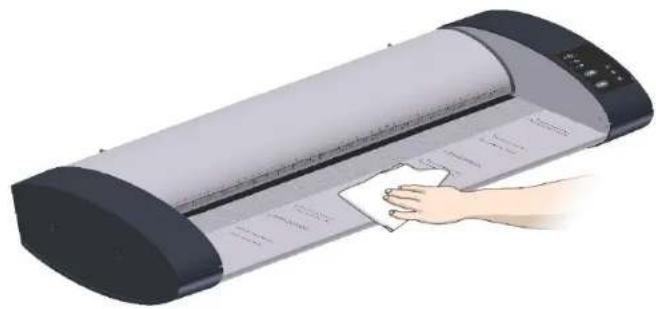
Clean the scanner surface
Clean your scanner's flat surface so dirt and dust are not dragged into the scan area with the original.
natural_image
Illustration of a hand cleaning a large paper roll with a cloth (no text or symbols visible)4
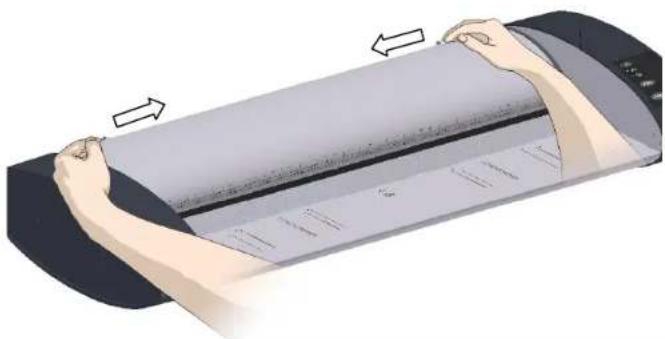
Open the scanner lid –
Press the lid release buttons
The next steps involve cleaning the scan area under the scanner lid so you have to open it. The scanner lid release buttons are at the back of the lid.
- Stand at the front of the scanner.
- Push down on the lid and simultaneously slide both release buttons towards the scanner's center with your fingers until you feel them unlock.
- Use your other fingers to grip the edge of the lid.
natural_image
Illustration of hands holding a rolled-up document or scroll with arrows indicating motion (no text or symbols)5
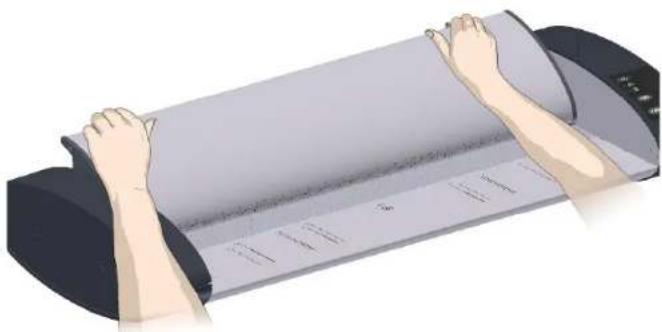
Open the scanner lid – Pull the lid back
Retain pressure on the lid release buttons and your grip on the lid edge as you pull the lid backwards towards your body. Open the scanner lid all the way back.
natural_image
Illustration of hands holding a rolled-up document or scroll, no text or symbols visible6
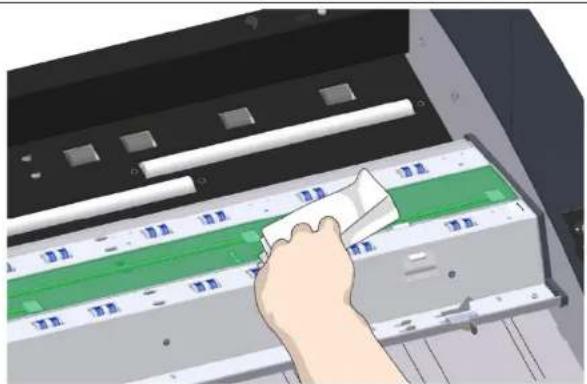
Clean the scanner's glass plate
Make sure you use 2 fresh and clean lint-free cloths for cleaning the glass plate. Do not reuse the cloth you used to wipe the scanner bed.
- Spray/apply a mild, streak-free, glass cleaner onto a lint-free cloth.
- Gently wipe the glass clean.
- Dry the glass completely using the other clean, dry lint-free cloth.
- Make sure that fluids to not get under the glass and that you leave the area dry.

CAUTION: Do not spray/apply cleaner fluids directly on the glass plate ywhere else in the scan area.
natural_image
Hand using a tool to clean or store items on a machine (no visible text or symbols)7
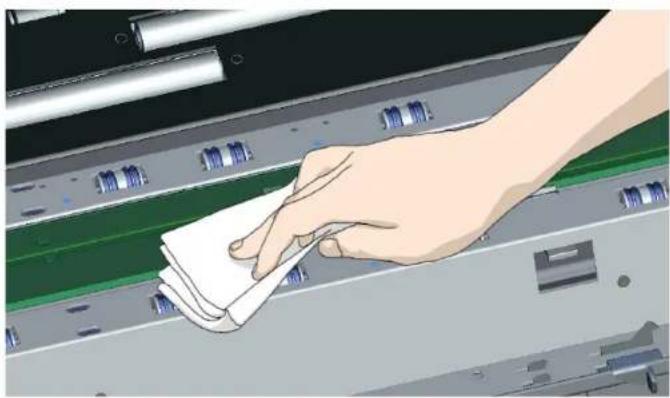
Clean the upper precision rollers
The upper precision rollers are in the lid, aligned in two rows on each side of the glass plate. Their function to keep the document on a straight path as it moves forward in the scanner. The upper precision rollers are in direct contact with the original's ink side and thus may require extra care when cleaning.
- Spray/apply a mild, streak-free, glass cleaner onto a lint-free cloth.
- Gently wipe the rollers surface.
- Use the cloth to turn the rollers so you wipe all sides.
- Dry the rollers completely using another clean, dry lint-free cloth.
- Make sure that you leave the area dry.

CAUTION: Do not spray/apply cleaner fluids directly to the rollers or where else in the scan area.
natural_image
Illustration of a hand cleaning or cleaning a mechanical component with a cloth (no text or symbols visible)8
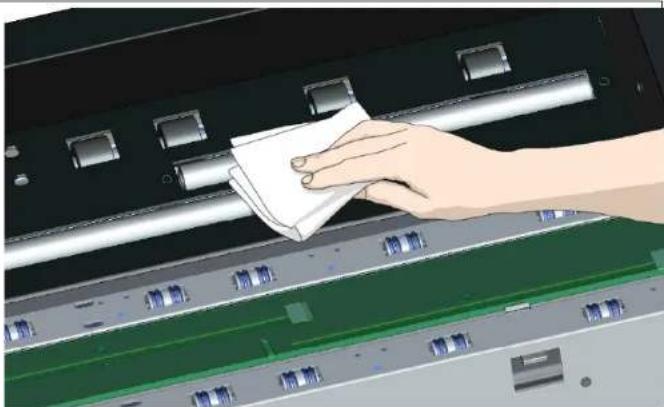
Clean the white pressure rollers
The white pressure rollers are the long rollers between the transport rollers. They function to hold documents flat in the scanner.
- Spray/apply a mild, streak-free, glass cleaner onto a lint-free cloth.
- Gently wipe the white roller's surface.
- Use the cloth to turn the rollers so you wipe all sides.
- Dry the rollers completely using another clean, dry lint-free cloth.
- Make sure that you leave the area dry.

CAUTION: Do not spray/apply cleaner fluids directly to the rollers or where else in the scan area.
natural_image
Illustration of a hand cleaning a vehicle's door panel with a cloth (no text or symbols visible)9
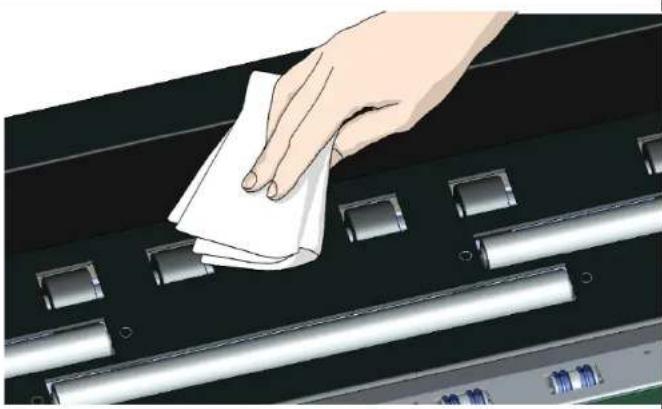
Clean the transport rollers
The transport rollers are placed in two rows on each side of the white pressure rollers. The black transport rollers are motorized and function to move the document through the scanner.
- Spray/apply a mild, streak-free, glass cleaner onto a lint-free cloth.
- Gently wipe the transport roller's surface.
- Use the cloth to turn the rollers so you wipe all sides. The transport rollers are all connected on the axels so you only need to turn one to turn them all.
- Dry the transport rollers completely using another clean, dry lint-free cloth.
- Make sure that you leave the area dry.

CAUTION: Do not spray/apply cleaner fluids directly to the rollers or where else in the scan area.
natural_image
Hand cleaning a mechanical component with a white cloth (no text or symbols visible)10
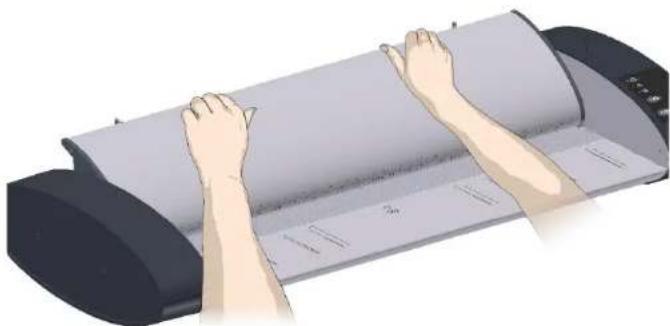
Close the lid
- Close the scanner lid all the way down until you hear the lid latches "click".
- Gently try to pull open the lid to ensure it is locked in the "closed" position in both sides.
- Plug in the scanner and turn the main power switch to ON.
natural_image
Illustration of hands operating a roll of paper or document, no text or symbols visible11
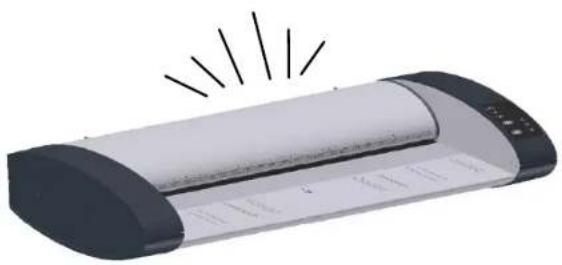
Your scanner is clean
You have completed the steps required for cleaning your scanner and the scan area.
natural_image
Illustration of a paper roller with motion lines indicating vibration or explosion (no text or symbols)Calibration
Scanner calibration is very easy to perform. Calibration is carried out using the WIDEsystem program you installed with your drivers. After manually cleaning the scan area, you just start the Calibration wizard and let it take over. The wizard will ask you to insert a calibration sheet. Other than that, scanner calibration is completely automatic.

NOTE: Cleaning and calibration are tied together. Cleaning the scanner creates the need for renewed calibration and correct calibration will always require an scan area.
To calibrate your scanner:

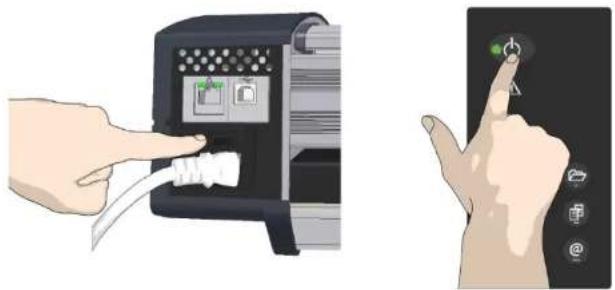
Turn the scanner power ON
If the main power is OFF, press the main power switch at the back of the scanner to the ON position. If the scanner is in Sleep mode, press any button to set it in Wake mode.
The scanner is ready for calibration when the power LED lights green.
natural_image
Illustration showing a hand inserting a USB into a device while the other hand press a finger on a touchscreen (no text or symbols present)Calibration

Launch the scanner calibration wizard
-
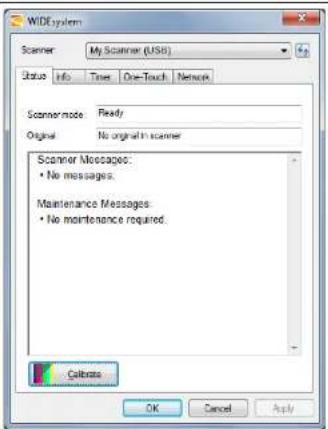
On your PC – Double-click on the WIDEsystem icon in the system tray to open the WIDEsystem program.
-
Press the Calibrate button.

text_image
WIDESystem Scanner: My Scanner (USB) Status Info Times One-Touch Network Scanner mode Ready Original No original scanner Scanner Messages: • No messages. Maintenance Messages: • No maintenance required. Calculate OK Cancel ApplyCalibration

Select the Calibration type
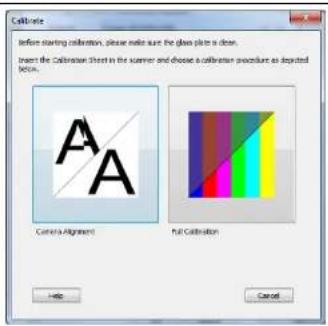
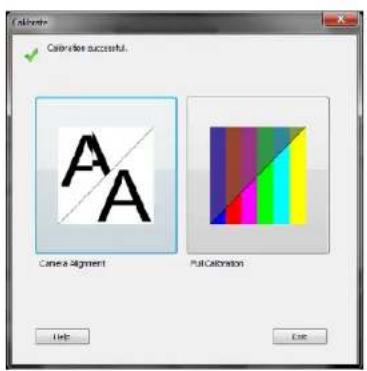
Select either Camera Alignment or Full Calibration.
- Camera Alignment will align horizontal capture for correct image stitching
• Full Calibration will perform Camera Alignment, B&W calibration and Color calibration
text_image
Cellulose Before starting collation, please make sure the glass plate is clear. Insert the Colalation Sheet in the summer and choose a collation procedure as depicted below. Center A Alignment Full Calibration Help Cancel4
Insert the calibration sheet
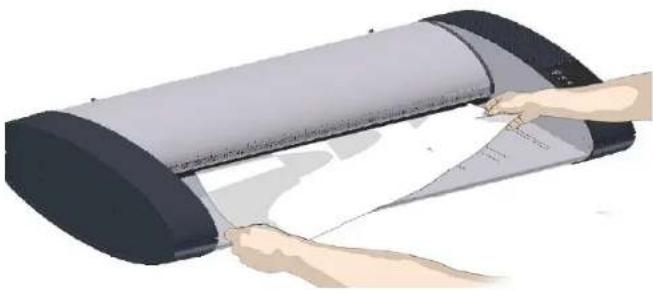
During the process, the wizard will ask you to insert the Calibration Sheet that came with your scanner. The sheet's printed side must be inserted face up. Align the sheet's midpoint arrow with the scanner's midpoint arrow and feed the sheet into the scanner.
natural_image
Illustration of hands operating a cylindrical device with a curved blade (no text or symbols visible)Calibration

The program calibrates the scanner
The program works in steps to analyze and correct the status of the sensors, calibrate black and white values and calibrate color (on color scanners). The calibration sheet will be rescanned a number of times as the program processes data.
Let the program complete the calibration steps you requested (Alignment or Complete).
The wizard will tell you when the process is finished.
After Calibration:
- Remove the Scanner Calibration Sheet from the scanner.
- Return the Scanner Calibration Sheet to its protective tube.
- Store the folder in a dry place and out of direct light.
text_image
Calculate successful. Close Alignment Pull Calibration Help ExitReplacing the glass plate
Replacing the glass plate: Your documents move against the glass plate as they pass the scanner's sensors. After long-term use, the glass plate can become worn or scratched and this can affect image capture precision. Changing the glass will renew your scanner and ensure optimal results.
To replace a worn glass plate:

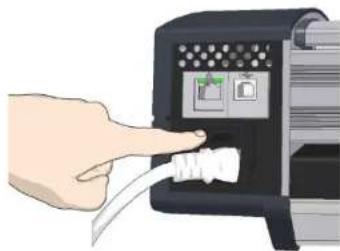
Turn the main power to OFF
Press the main power switch at the back of the scanner to the OFF position.
natural_image
Hand inserting a cable into a printer device (no text or symbols visible)
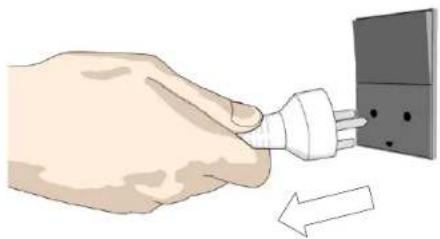
Disconnect the scanner's power plug

CAUTION: This step is to ensure your own personal safety and to help protect your device from potential damage.
natural_image
Illustration of a hand inserting a plug into an electrical outlet (no text or symbols)3
Open the scanner lid –
Press the lid release buttons
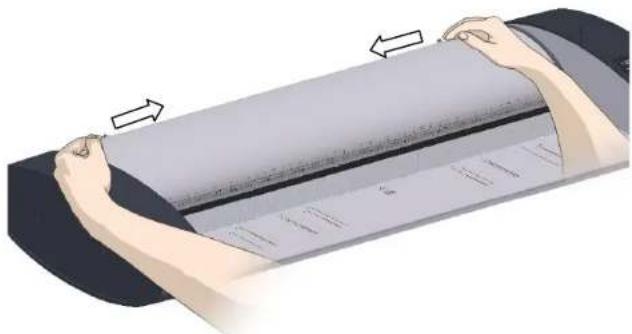
The glass plate is in the scan area under the scanner lid. You need to open the lid to replace it.
- The scanner lid release buttons are at the back of the lid.
- Stand at the front of the scanner.
- Push down on the lid and simultaneously slide both release buttons towards the scanner's center with your fingers until you feel them unlock.
- Use your other fingers to grip the edge of the lid.
natural_image
Illustration of hands holding a rolled-up sheet of paper with arrows indicating direction (no text or symbols)4
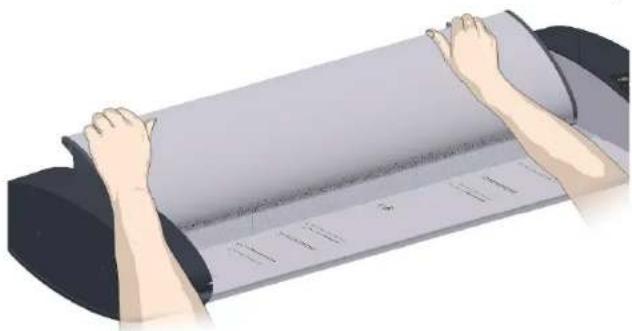
Open the scanner lid – Pull the lid back
- Retain pressure on the lid release buttons and your grip on the lid edge as you pull the lid backward towards your body.
- Open the scanner lid all the way back.
You will need to locate and recognize the key parts you will use for replacing the glass plate. See the overview of key parts below.
natural_image
Illustration of hands rolling a rolled document or scroll (no text or symbols visible)Replacing the glass plate – Overview of key parts
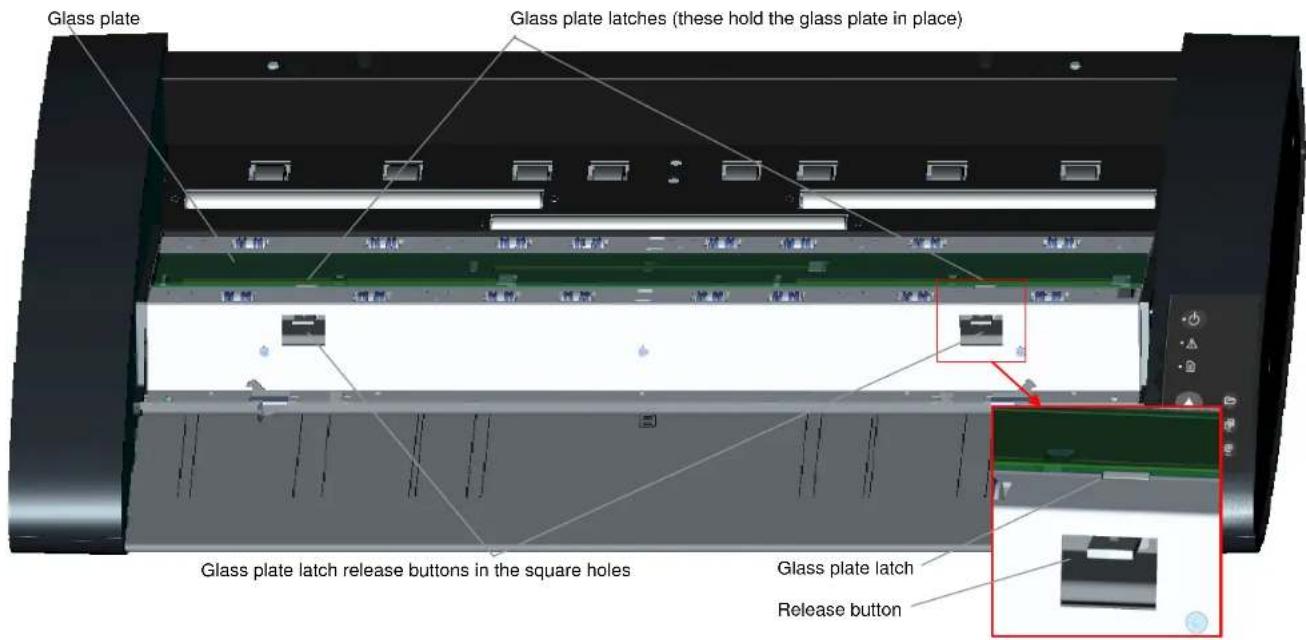
The illustration below shows the scanner from above with its lid open. The illustration indicates the key parts and buttons you need to recognize when replacing a worn glass plate.
The glass plate is held and locked in place with 2 small white-colored latches. Each latch can be released from the glass plate by pressing down on its corresponding latch release button. Each latch release button is placed in a square hole just under the latch it releases.
text_image
Glass plate Glass plate latches (these hold the glass plate in place) Glass plate latch release buttons in the square holes Glass plate latch Release button5
Detaching the glass plate – free the 1^st latch
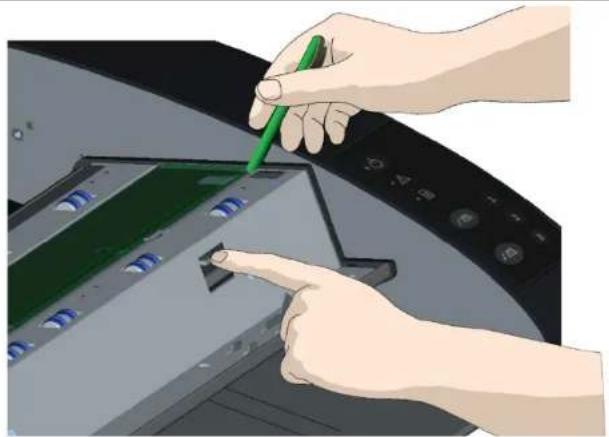
Stand at the front of the scanner. You start at the scanner's right side.
- Detaching the first (rightmost) latch requires a sharp, flat tool such as a pen or a small screwdriver.

NOTE: Detaching the remaining latch will not require use of a tool.
- Locate the arrow label at the scanner's right side.
- Position the tool just under the glass plate edge where the arrow label indicates. At the same time; press down on the latch release button in the first (rightmost) square hole.
- Carefully, use the tool to flip the edge of the glass upwards until it comes above and free of the white latch that held it down.
- Release the latch release button.
natural_image
Illustration of hands using a green tool to interact with a device panel (no text or symbols visible)6
Detaching the glass plate – free the 2^nd latch
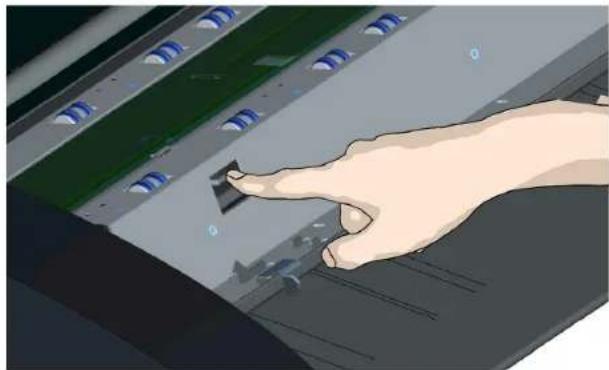
After freeing the first latch in the previous step, freeing the 2nd latch is easy.
- Press down on the latch release button in the 2nd square hole.
- The 2nd latch will release its grip and the glass will pop up over the latch.
- Let go of the latch release button.
natural_image
Illustration of a hand pressing down on a mechanical component with no visible text or symbols
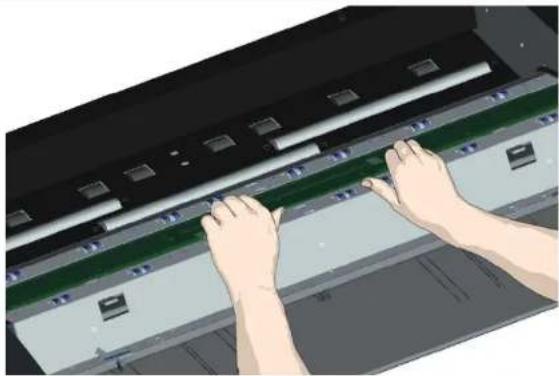
Detaching the glass plate – the glass plate edge upwards
After releasing the latches, the glass plate is now free for removal.
- Stand at the front side of the scanner.
- Insert you thumbs under the glass plate edge around the middle area as shown in the illustration on the right.
NOTE: If you can't get your thumbs under the glass - use the sharp, flat tool from 5 to tip the glass high enough to get a thumb underneath. - Tip the glass back and up so its two ends are free.

natural_image
Illustration of hands pressing down on a computer monitor (no text or symbols visible)
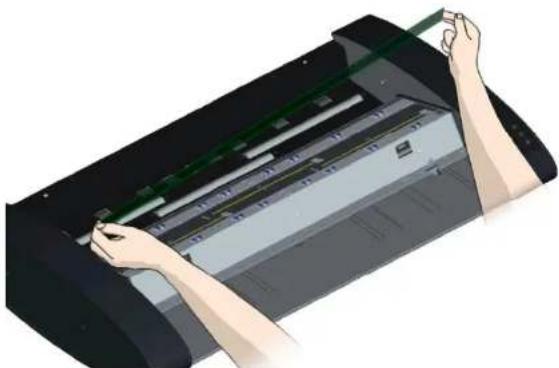
Detaching the glass plate – the glass plate edge out of the scanner
- Move your hands, one at a time, to each end of the glass.
- Apply light pressure with each hand as you lift the glass out of the scanner.

CAUTION: The glass plate is long and thin and thus fragile. Take care not to break t.
natural_image
Illustration of hands installing or adjusting a green panel inside a device (no text or symbols visible)9
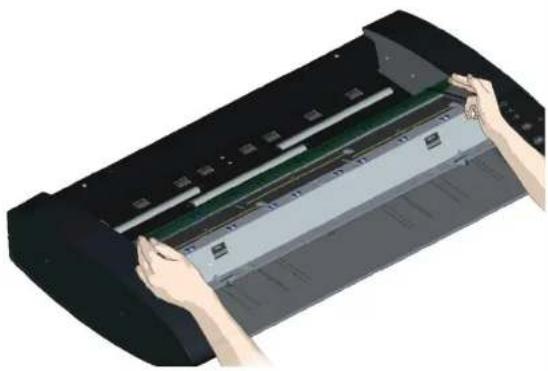
Insert a new glass plate –
lower a new glass plate into the scanner
- Pick up the new glass plate in the same manner as you removed the old one - with two hands holding the glass on each end so you avoid touching the glass surface.
- Take special care to avoid touching the glass plate's bottom surface which normally will not be cleaned during maintenance.
- Stand at the front of the scanner as you hold the glass.
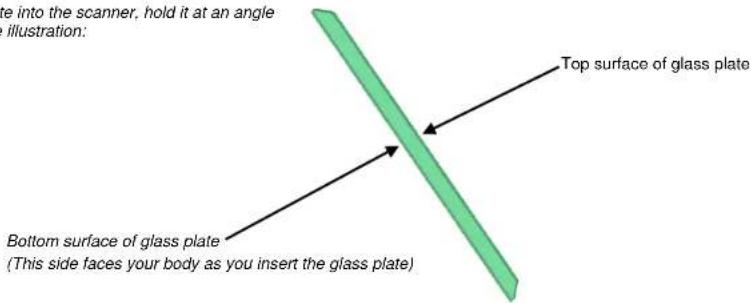
- Make sure you hold the glass for insertion with the correct surface facing down. Note the direction of the faceted edges that indicate which is the bottom surface of the glass. See the illustration of the glass plate's profile below.
- Hold the glass so that the bottom side surface faces your body as indicated in the glass plate's profile view below.
- Lower the new glass plate into the scanner at an angle, as shown in the glass plate's profile view below, so that the glass's lower edge meets the scanner's bottom position groove (see next step).

CAUTION: The glass plate is long and thin and thus fragile. Take care not to break it.
natural_image
Illustration of hands installing or adjusting a green electronic device into a black paper liner (no text or symbols visible)Glass Plate Profile View:
As you lower the glass plate into the scanner, hold it at an angle similar to that shown in the illustration:
text_image
e into the scanner, hold it at an angle illustration: Top surface of glass plate Bottom surface of glass plate (This side faces your body as you insert the glass plate)10
Insert a new glass plate – to bottom position groove
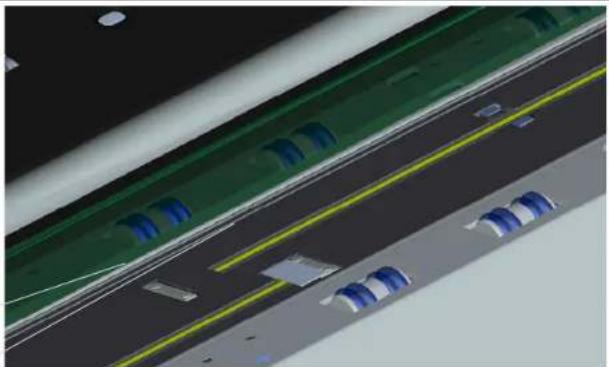
- The glass plate will rest in the scanner's lid between the bottom and top position grooves. Locate the glass plate's bottom position groove in the lid. This is the groove furthest from your body when you stand at the scanner's front.
- Place the lower edge of the glass plate so it rests in the glass plate's bottom position groove.
- Carefully tilt the upper edge (the edge closest to your body) down until the glass plate rests in the scanner lid between the 2 grooves (top/bottom position grooves).
Glass plate lower edge
Bottom position groove
natural_image
3D rendering of a multi-lane highway with lane markings and vehicle silhouettes (no visible text or symbols)11
Lock the new glass plate in place
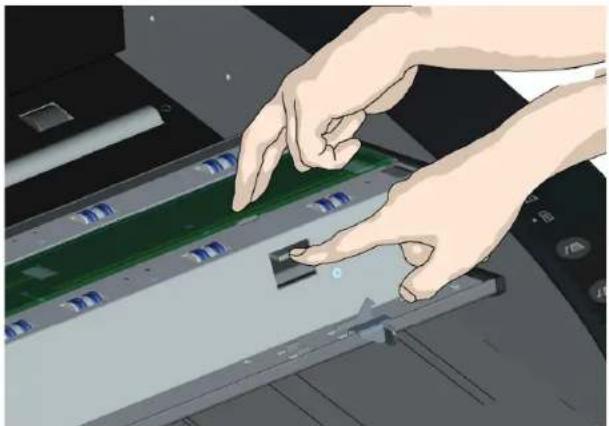
The glass needs to be locked in place with the two latches. At this point, the latches are under the glass plate and they need to be brought above so they grip the glass plate's edge.
- Start at the right side.
- Press down on the first (rightmost) latch release button.
- With your other hand, press down on the glass plate near the latch so the glass plate's edge snaps down under the latch.
- Repeat the process with the other latch.
- Ensure that both latches are gripping the glass plate's edges.
natural_image
Illustration of hands inserting a component into a computer drive (no text or symbols visible)12
Clean the new glass plate
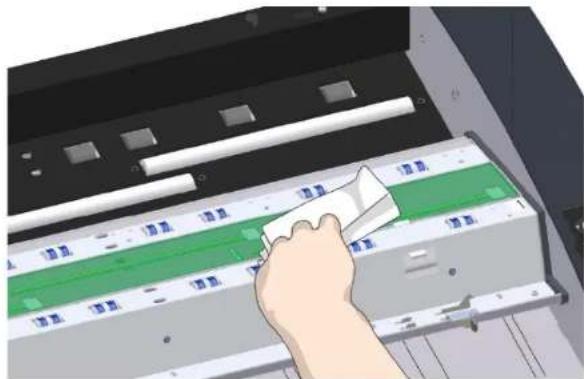
Make sure you use 2 fresh and clean lint-free cloths for cleaning your new glass plate.
- Spray/apply a mild, streak-free, glass cleaner onto a lint-free cloth.
- Gently wipe the glass clean. Look for fingerprints and smudges that may have been applied to the glass during replacement.
- Dry the glass completely using the other clean, dry lint-free cloth.
- Make sure that fluids to not get under the glass and that you leave the area dry.

CAUTION: Do not spray/apply cleaner fluids directly on the glass plate or where else in the scan area.
natural_image
Hand using a power tool to press or install a green-labeled electronic device (no visible text or symbols)13
Glass plate replaced successfully
- Close the scanner lid all the way down until you here the lid latches "click". Gently try to pull open the lid to ensure it is locked in the "closed" position.
- Plug in the scanner and turn the main power switch to ON.
- NOTE: If your results are not optimal after changing the glass plate, try to calibrate the scanner to tune it to its new glass plate.
natural_image
Illustration of a paper<|im_start|> Puerto Rico printer with radiating lines indicating printing (no text or symbols visible)Downloading New Firmware
What is Firmware?
Like a computer, your scanner needs an operating system in order to work. This operating system is called "Firmware". Firmware runs inside the scanner and links its processors with the PC applications running the scanner.
When do I need new firmware?
Your scanner is shipped with the latest firmware available. You can afterwards upgrade your original firmware with newer firmware and continue to do so as they are released. Firmware upgrades can be downloaded from your manufacture's website or obtained through your dealer.
Upgrade your firmware when:
- One or more new features are released or other improvements are made to the scanner though its firmware.
- An error is discovered in the firmware version you have in the scanner and your manufacturer recommends installation of new firmware in which the error is corrected.

NOTE: Your manufacture's website specifies improvements for every firmware release.
How to identify the firmware version running in the scanner?
-
Start WIDEsystem –double-click on the system tray's WIDEsystem icon.
-
Select the Info tab.
- The Info tab displays useful data about your scanner firmware.
- Firmware release - Upgradeable firmware version.
- Firmware download time - The date/time the current firmware was downloaded.
You can upgrade your firmware if the Firmware Release number is lower than the newest firmware version number on your manufacture's website.
How to install new firmware?
New firmware is installed by opening the firmware .exe file. The firmware .exe file must first reside on your machine. Select the Save target (or Save Link) option if downloading from the web.
To install the firmware file on your scanner:
- Go to your manufacture's website and locate the new firmware for your scanner.
- Download/save the firmware .exe file in a folder on your machine.
- Double click the .exe file to start the installation wizard.
- Follow the wizard's instructions on your screen.
- Installation can take up to 1 minute depending on the scanner model and firmware version. The WIDE system scanner icon on your system tray blinks red during the process.

NOTE: Update WIDEsystem - When upgrading firmware, always ate WIDEsystem to the latest version. WIDEsystem is available on your manufacturer's website.
Trouble Shooting
This section describes trouble-shooting procedures for the most common issues that can arise with your scanner. Please look for a problem description that matches your actual situation. If found, perform the recommended trouble-shooting procedures before requesting a service call.
How are errors reported on your system
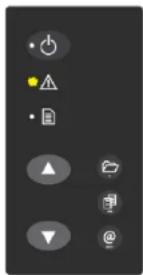
The scanner panel's Error Indicator will blink when the scanner detects an error. WIDE system will report the nature of the error on your screen.
Correcting common errors
- The actual nature and cause of the error may be reported immediately through a message on your screen. If not, open WIDEsystem (double--click the WIDEsystem icon 📋 on your system tray) and select the Status tab to view additional information about the error.
- The information on your screen may include instructions and actions to remedy the error. Follow the instructions on your screen.
- Look for a description of the error and remedy in this users guide's trouble shooting section. Follow the instructions provided.
text_image
User interface toolbar with control buttons and navigation iconsTechnical assistance
In some cases you may need technical assistance. You should contact your service provider if one or more of the following cases is true:
a. ... the error cannot be remedied through the action suggested on your PC screen.
b. ... the error and its remedy is not described in this users guide.
c. ... the system fails to report the error on your screen.
Before calling technical assistance prepare the following:
- Write down your scanner model number and serial number printed on a label on the back of the scanner.
- Write down your Firmware version. See the section How to identify the firmware version running in the scanner?.

text_image
MODEL NO: MN52D SERIAL NO: 52DNYMnnnROC CE ME01 c US LISTED LTE E125496 contex Made in Denmark 丹麦康泰科所有限公司
NOTE: Your manufacture's website contains service provider contact information
Problems Related to Scanner Installation
| Problem | Possible Causes and Remedies |
| “Unknown device is found” message. | Your interface is not enabled on the PC or set up correctly. Go through the installation steps for your interface board and its driver and control that the Windows device manager lists the interface option.WIDEsystem drivers were not installed before connecting the scanner. Shut down the scanner and PC, unplug power and USB connections and restart the installation from step 1 as described in the installation section of this guide. If you continued installation before installing WIDEsystem, see the troubleshooting instructions below.Loose interface connection – on both ends, unplug and then firmly plug-in the interface cable.System needs rebooting - shut down the scanner and PC, unplug power and USB connections. Then plug in the USB connections and turn on the PC. When Windows is loaded, plug in the scanner power and turn on the scanner main power switch. |
| No functional drivers found – yellow error icon on scanner in Device Manager | If you connected and tried to install the scanner before installing WIDEsystem, the “unknown device found message” will appear. If you ignored this and continued to step through the dialogs from there, the scanner will be entered on the system as a new device without functional drivers. If this is the case, the scanner will be displayed in the Windows Device Manager with a yellow error icon. The scanner entry must be removed from the Device manager before re-installing correctly.In the Device Manager - remove the scanner entry.Shut-down the PC, shut down and unplug the scanner, disconnect the scanner from the PC.Perform the installation from step 1 as described in the installation section of this guide. Be sure to install WIDEsystem before connecting the scanner. |
| WIDEsystem does not detect the scanner. | The WIDEsystem driver version installed on your PC is older than your scanner model. Install the WIDEsystem drivers from the WIDEsystem TOOLS CD-ROM that came with your scanner. If not available, download the newest version from your manufacturer’s website or contact your dealer to obtain the right WIDEsystem version.WIDEsystem drivers were not installed before connecting the scanner. Shut down the scanner and PC, unplug the connections and restart the installation from step 1 as described above.Loose interface connection – on both end, unplug and then firmly plug-in the interface cable.System needs rebooting - shut down the scanner and PC, unplug the connections. Then plug in the interface connections, turn on the PC and when Windows is loaded, turn on the scanner. |
Problems Related to Operation of the Scanner
| Problem | Possible Causes and Remedies |
Error Indicator LED blinking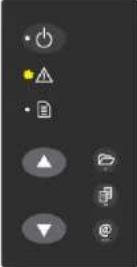 | An error was detected.The error may be reported immediately through a message on your screen. If not, open WIDEsystem (scanner icon on your system tray) and select the Status tab to view additional information about the error. Perform one of the following:The information on your screen may include instructions and actions to remedy the error. Follow the instructions on your screen.Look for a description of the error in this users guide. Follow the instructions provided.In some cases you may need technical assistance. You should contact your service provider if one or more of the following cases is true:a. ... the error cannot be remedied through the action suggested on your PC screen.b. ... the error and its remedy is not described in this users guide.c. ... the system fails to report the error on your screen. |
| Need to contact Technical assistance | In order to get the best and fastest solution to your problem, you should prepare as much information as possible before calling your service provider for technical assistance. Your manufacture's website contains service provider contact information.See instructions above. |
Error message: Paper Jam
You know a Paper jam error has occurred when the scanner stops scanning and the Paper-Ready LED shuts OFF (from blinking) while the document is still engaged in the drive system. Your software will report the Paper Jam error. To remedy:
- Eject the document from the scanner. Press and hold down the Paper-Backwards or the Paper-Forward key.
- If the document does not eject/respond to pressing the keys, you will need to open the scanner lid to remove it.
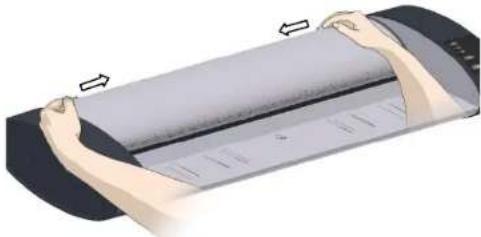
- Simultaneously press the lid release buttons towards the scanner's center with your fingers until you feel them unlock. Use your other fingers to grip the edge of the lid.
natural_image
Illustration of hands holding a rolled-up document or scroll (no text or symbols visible)Open the lid – Press the lid release buttons.
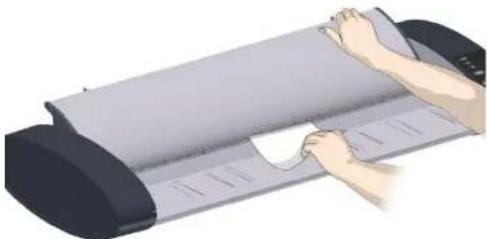
- With one hand, pull the lid backwards to open and use the other hand to pull out the document so it comes completely free of the scanning area.
natural_image
Illustration of a hand pressing down on a rolled paper or sheet metal (no text or symbols visible)Hold the lid open and remove the document.
- Close the lid.
- When the scanner is ready again, reload the document again to scan.
- If you still get a paper jam error, repeat the steps above but select the Soft-handling option in your software before reloading.
Trouble Shooting
| Scanner Maintenance error message: Stitching .... failed | This message may appear when running the Scanner Maintenance program.1. The most common cause is a dirty or smudged glass plate. Clean the scanning area, reboot the scanner and then complete the calibration steps as described in the section Maintenance in this guide.2. If the problem persists after cleaning the scanning area - The problem could be caused by a loose object in the optical path. Remove any torn pieces of paper or other loose objects from the scanning area. Even the smallest loose objects will disturb the scanner's adjustment function.3. Summon your technical service provider if the problem persists. |
| Application control keys (one touch) do not work | 1. Check the One Touch setup entries in WIDEsystem. Click on the scanner icon to open WIDEsystem and select the One Touch tab. View WIDEsystem Help for instructions.2. Check that the applications defined in the WIDEsystem One Touch setup entries are installed on your PC3. Make sure you have clicked "Reserve One-Touch" in WIDEsystem.4. Make sure that the applications defined in the WIDEsystem One Touch setup entries are actually designed to work with (compatible with) your scanner's application control keys. See the application's documentation or contact the application software dealer. |
| Can't operate or contact scanner after Firmware upgrade failure. | A power failure could interrupt an ongoing firmware upgrade process. The scanner will not run correctly after an interrupted firmware update process. Only part of the intended firmware may be loaded, rendering the scanner inaccessible. You need reboot the scanner to Safe Mode to reapply the firmware.Restart the scanner. If the scanner detects corrupted firmware, it will start up in Safe Mode.Confirm Safe Mode: Open WIDEsystem – Right-double-click the WIDEsystem scanner icon on your system tray. The "Scanner:" field should show "Scanner is in Safe Mode".Follow the steps for firmware installation.NOTE: Safe Mode is only for repairing a corrupted or interrupted firmware installation. Do not attempt to use the scanner when it is in Safe Mode. |
Problems Related to the Scanning Results
| Problem | Possible Causes and Remedies |
| Entire image is not scanned | 1. Check in your scanning application that your size settings are either for Auto detection or correspond to the size of the whole original.2. Check in your scanning application that you are loading the original correctly. Be sure to align the center of the original with the scanner's center arrow marking. |
| Stitching problems – Image sections misaligned (at points between the sensors -overlapping pixels) | 1. Remove the original from the scanner and calibrate the scanner with the Scanner Maintenance program. Calibration includes correction of stitching errors.2. If the problem persists after calibration – Your sensors may need readjusting. Summon your technical service provider. |
| One or more thin vertical lines (in the direction of paper feeding) show up in the scanned image, but not in the original drawing. | This is often caused by an unclean glass plate. Even a single spec of dirt in the wrong spot on the glass plate can apply a streak along your entire scan. To remedy:1. Clean your glass plate and rollers as described in this users' guide.2. Most dirt on the glass plate is introduced by the documents that are passed against it. Wipe clean the document with a dry lint-free cloth before feeding the document into the scanner.3. If the problem persists after cleaning, calibrate the scanner with the scanner maintenance program. The scanner may have memorized dirt specs and you need to recalibrate after dirt-removal.4. If the problem persists after cleaning and calibration –Check the glass plate for scratches. A damaged glass plate should be replaced. Obtain a new glass plate from your service provider. Follow the steps in the user's guide to replace the glass plate with a new one. |
Appendixes
Important safety instructions

Read all of these instructions and save them for later use. Follow all things and instructions marked on the scanner.
A. Do not place the scanner on an unstable surface, stand, cart or table. Serious damage can be caused if the unit falls.
B. When cleaning, do not spray/apply liquid cleaners directly onto the scanner parts. Apply liquids to your cloth and then use the dampened cloth to clean.
C. Before cleaning or replacing any user-replaceable parts, be sure to turn the scanner power off and disconnect the power plug.
D. The scanner should be operated from the power source type indicated on the marking label. If you are unsure of the type of power available, consult your dealer or local power company.
E. The scanner is intended for use on IT, TT and TN power distribution systems, and is equipped with a three-wire grounding type plug. This plug will fit only into a grounding-type power outlet. This is a safety feature which relies on building installation. If you are unable to insert the plug into the outlet contact your electrician to replace your obsolete outlet. Do not defeat or ignore the purpose of the grounding-type plug.
F. Do not allow anything to rest on the power cord. Do not locate the scanner where persons will walk on the cord.
G. If an extension cord is used with the scanner, make sure that the total ampere ratings of the products plugged into the extension cord does not exceed the extension card ampere rating. Make sure that the total rating of *+ all products plugged into the wall outlet does not exceed 15 amperes.
H. Slots or openings in the cabinet at the back or bottom are provided for ventilation. This ensures reliable operation of the product and protects it from overheating. These openings must never be blocked or covered. The openings should never be blocked by placing the unit on a bed, sofa, rug, or other similar soft surface. This product should never be placed near or over a radiator or heat register. This product should not be placed in a built-in installation unless proper ventilation is provided.
I. Never push objects of any kind into the scanner through cabinet slots since they may touch dangerous voltage points or short out parts that could result in a risk of fire or electrical shock. Avoid any possibility of spilling liquid of any kind on the scanner.
J. Do not attempt to service the scanner yourself. Opening or removing those covers requiring tools may expose you to dangerous voltage points or other risks. Refer all servicing in those compartments to authorized service personnel.
K. Unplug the scanner from the wall outlet and refer servicing to authorized service personnel under the following conditions:
- When the power cord or plug is damaged or frayed.
- If liquid has been spilled into the scanner.
- If the scanner has been exposed to rain or water.
- If the scanner does not operate normally when operating instructions are followed then adjust only those controls covered by the instructions in this manual. Improper adjustment of controls other than those mentioned in this manual may result in permanent damage and will at best require extensive work by a qualified technician to restore this product to its normal operation.
- If the scanner has been dropped or the cabinet has been damaged.
- If the scanner exhibits a distinct change in performance, indicating a need for service.
Regulations
FCC Regulations
USA
This equipment has been tested and found to comply with the limits for a Class A digital device, pursuant to Part 15 of the FCC Rules. These limits are designed to provide reasonable protection against harmful interference in a residential installation. This equipment generates uses and can radiate radio frequency energy and, if not installed and used in accordance with the instructions, may cause harmful interference to radio communal-use. The equipment is not guaranteed by the other side of FCC rules in a particular installation. If this equipment does cause harmful interference to radio or television reception, which can be determined by turning the equipment off and on, the user is encouraged to try to correct the interference by one or more of the following measures:
• Reorient or relocate the receiving antenna.
• Increase the separation between the equipment and receiver.
- Connect the equipment into an outlet on a circuit different from that to which the receiver is connected.
• Consult the dealer or an experienced radio/TV technician for help.
CE Regulations
EU
This equipment has been tested and found to comply with the limits for a Class A product according to EN55022.
VCCI Regulations
Japan
This equipment has been tested and found to comply with the limits for a Class A product according to Agreement of VCCI2008 (CISPR 22).
Toxic or Hazardous Substances or Elements 有毒有害物质或无菌名称及含量
| Part Name 部件名称 | Toxic or hazardous Substances and Elements 有毒有害物质或元素 | |||||
| Lead(Pb)粗 | Mercury(Hg)汞 | Cadmium(Cd)糖 | HexavalentChromium(Cr(VI))六价格 | Polybrominated biphenyls(PBS)多溴联苯 | Polybrominated diphenyl ethers(PBDE)多溴二苯醚 | |
| Scanner 荧光灯管 | ○ | ○ | ○ | ○ | ○ | ○ |