
Rebel Q Air - Stroller Valco Baby - Free user manual and instructions
Find the device manual for free Rebel Q Air Valco Baby in PDF.


User questions about Rebel Q Air Valco Baby
0 question about this device. Answer the ones you know or ask your own.
Ask a new question about this device
Download the instructions for your Stroller in PDF format for free! Find your manual Rebel Q Air - Valco Baby and take your electronic device back in hand. On this page are published all the documents necessary for the use of your device. Rebel Q Air by Valco Baby.
USER MANUAL Rebel Q Air Valco Baby
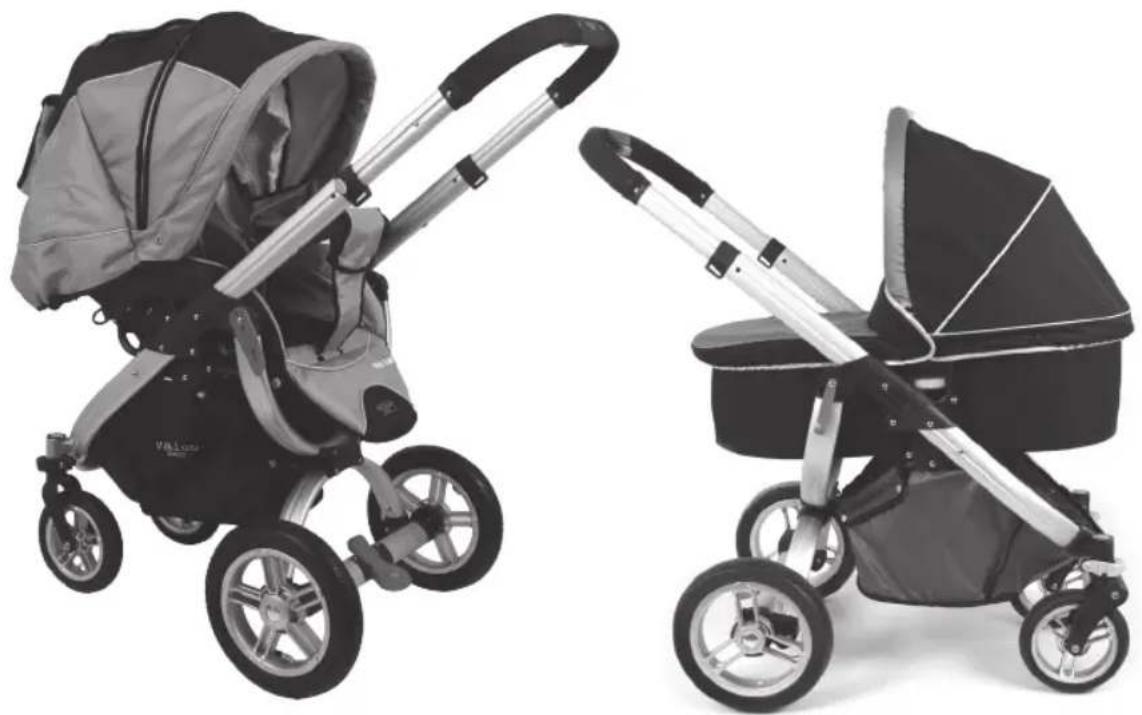
STROLLER WITH OPTIONAL BASSINET ACCESSORY
PRODUCT REFERENCE GUIDE
Thank you for purchasing a quality VALCO BABY product. Please read and follow the instructions outlined in this guide carefully. Familiarise yourself with the construction and safety features; be sure that you understand all the warnings and safety guidelines before use.
Retain this guide in a safe place for future reference.
natural_image
Two baby strollers with black and gray designs, displayed side by side (no text or symbols visible)Due to our policy of continuous product development, this product is constantly evolving. It is possible that some features or procedures outlined here have changed since this document was written.
If you are unsure of any procedure shown here, please contact us via the web at info@valco.com.au to obtain the most up to date information before use. Include the batch number, which can be found on a sticker on the frame.
All pictures and diagrams herein are provided for illustration purposes only. Actual product, colour or fabric may vary. VALCO BABY reserves the right to modify or alter any specification or colour without notice or obligation to modify any product previously purchased
FURTHER INFORMATION
valcobaby.com.au
Find us on:


natural_image
Technical line drawing of a mechanical device with red directional arrow indicating motion (no text or symbols)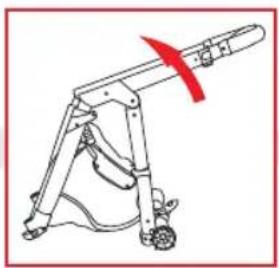
natural_image
Technical line drawing of a mechanical device with a red tool and wheels (no text or symbols)B
natural_image
Technical line drawing of a mechanical device with a bracket and base, showing no text or symbols.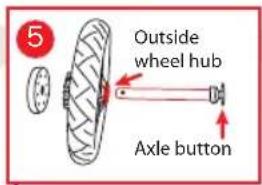
text_image
5 Outside wheel hub Axle buttonC
text_image
PRESS 6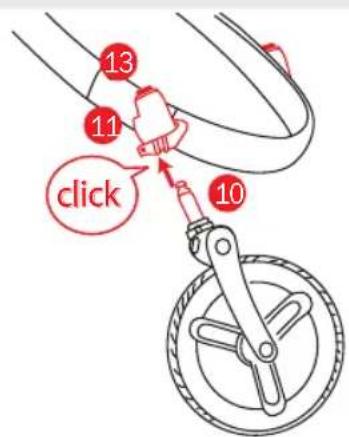
text_image
13 11 click 10ASSEMBLY
- Remove the stroller from the carton and dispose of all packaging responsibly. The front wheels, rear wheels, seat, bumper bar and hood all need to be installed prior to use
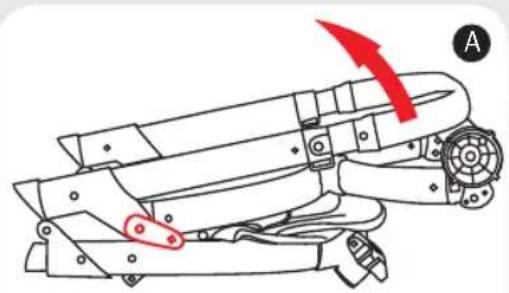
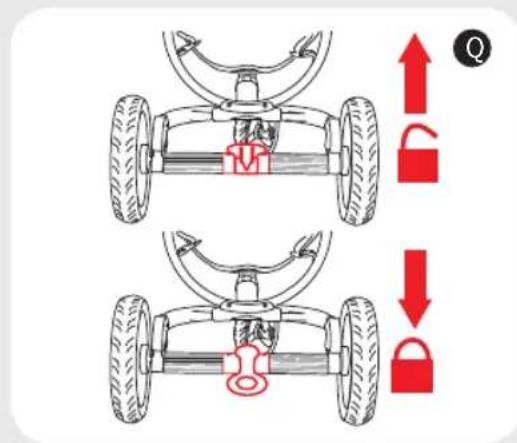
- Lay the stroller frame flat on the ground with the handle facing upwards. Release the frame lock if engaged (see Diagram Q)
- Lift the handle upward to a vertical position. You will feel the chassis unfolding as you lift.
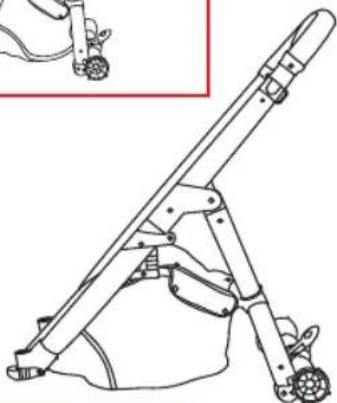
FIGURE B
- Continue to lift the handle until you feel the chassis lock into the open position.
IMPORTANT WARNING: ALWAYS TEST THAT ALL LATCHES ARE SECURELY ENGAGED BEFORE USE.
INSTALLING/REMOVING THE WHEELS
FIGURE C - REAR WHEELS
- Pressing on the axle release button, insert the axle through the outside of the metal hub and through the nylon brake cog.
IMPORTANT: INSERT THROUGH OUTSIDE OF THE WHEEL - THE SIDE WHICH DOES NOT HAVE THE BRAKE COG SPROCKETS
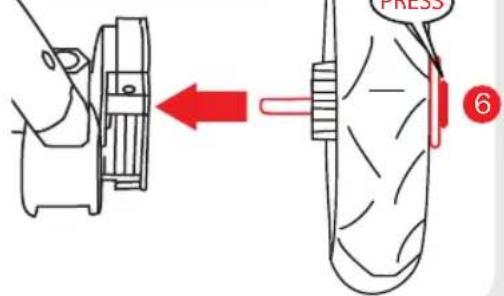
- While pressing the axle release button (6), insert the wheel axle into the wheel housing of the frame at the rear of the stroller chassis.
- Keeping the axle release button depressed, insert the wheel as far as it will go into the channel. Release the button and pull the wheel slightly back toward you to ensuring that it has locked securely into place.
- Repeat this procedure for the other wheel.
- To remove a rear wheel, firmly grasp the wheel spokes while pressing the axle release button. Gently pull the wheel free of the wheel housing.
FIGURE D - FRONT WHEELS
- Line each front wheel pin (10) with the corresponding front wheel housing (11).
- Insert wheel pin into the wheel housing and push it up until it clicks into place.
- To remove the front wheel, firmly grasp the wheel while pressing the wheel release button (13) and gently pull the wheel free of the wheel housing.
For optimum wheel performance ensure that the tyres are always inflated to:
REAR TYRES: maximum 195Kpa
FRONT TYRES: maximum 195Kpa
text_image
14E
text_image
click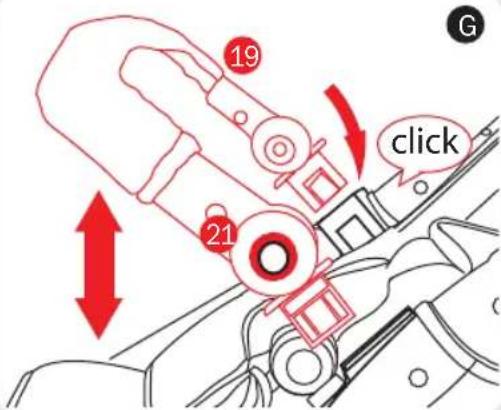
text_image
19 21 click G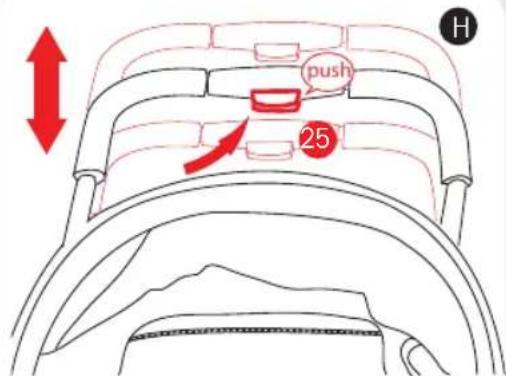
text_image
push 25FIGURE E - FRONT WHEEL LOCK
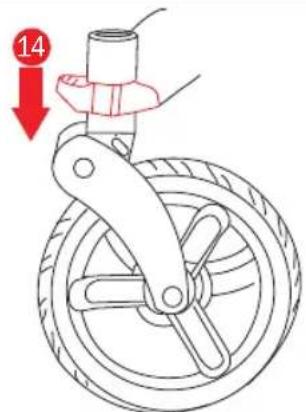
- The front wheels of your stroller offer either a full, 360^ swivel action or a locked position.
- To lock the front wheel, turn the wheel so that the bulk of it is beneath the stroller and push down on the wheel lock (14) until it locks into position.
- Repeat this procedure for the other side.
IMPORTANT WARNING: ALWAYS TEST THAT THE LOCKS ARE FULLY ENGAGED BEFORE USE.
INSTALLING THE SEAT
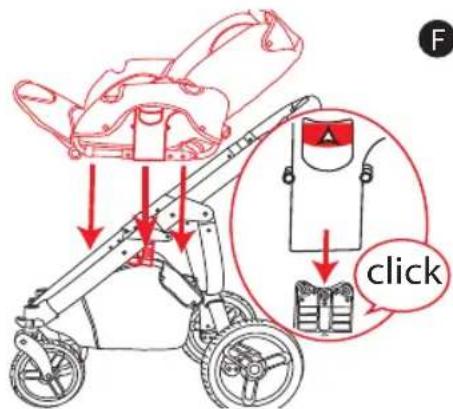
FIGURE F
- Line up the seat housing with the corresponding connectors located on either side of the stroller frame.
- Lower the seat onto the connectors and gently push the seat down until it clicks securely into place.
NOTE: YOUR SEAT CAN BE INSTALLED EITHER FORWARD OR REARWARD FACING.
- To remove the seat, simultaneously depress both buttons in the seat housing on either side of the seat unit and lift the seat unit from the frame.
IMPORTANT WARNING: NEVER REMOVE/RELEASE THE SEAT WITH A CHILD IN IT.
INSTALLING THE BUMPER BAR
FIGURE G - BUMPER BAR
- Insert the front bar ends into the nylon housings located on either side of the frame. Be sure that the bar is securely engaged.
- Wrap the crotch strap around the installed bumper bar and snap into position
- The front bar is not adjustable.
- To remove the front bar: Feeling the side of the nylon housing that sits below the frame at each side (facing inward), locate the release button.
- Press each release button inward while simultaneously pulling upward on the bar housing. Repeat for the other side. Note that this may be difficult to do as the bar is secured firmly as a safety precaution.
IMPORTANT WARNING: THE FRONT BAR IS NEITHER A RESTRAINING NOR CARRYING DEVICE.
USING THE ADJUSTABLE HANDLE
FIGURE H - ADJUSTABLE HANDLE
- Your handle can be adjusted to multiple positions.
- Press the centre locking button while simultaneously moving the handle up or down.
- Releasing the locking button will allow the handle to lock into the next position.
text_image
push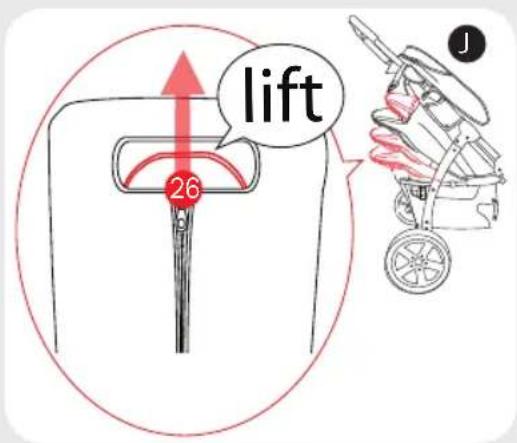
text_image
lift 26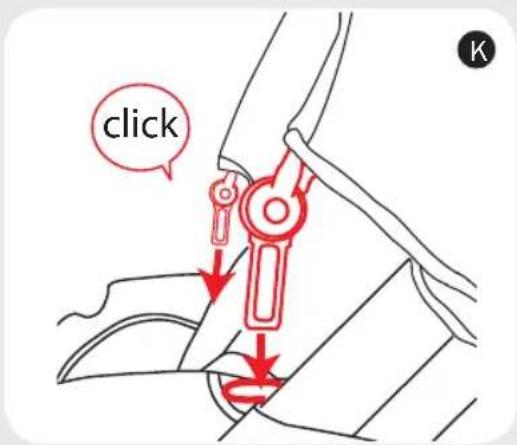
text_image
click K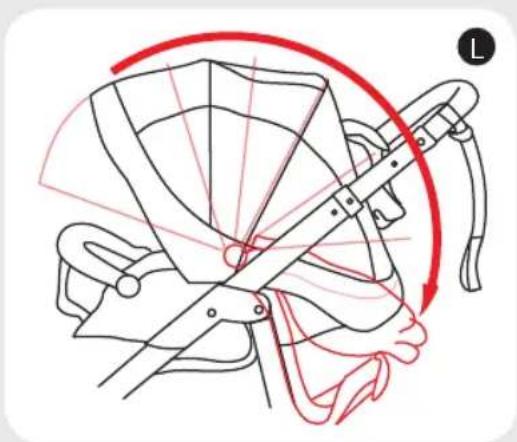
natural_image
Diagram of a hand using a tool to lift a fan, with red curved arrows indicating motion (no text or symbols)FOOTREST ADJUSTMENT
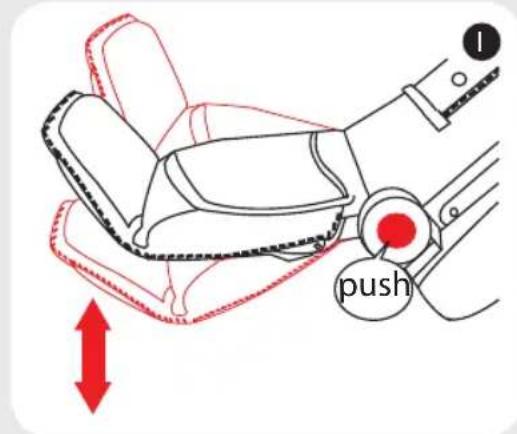
FIGURE I - FOOTREST ADJUSTMENT
- To adjust your footrest, simultaneously press the two adjusting buttons on either side of the footrest and move it up or down to the desired position.
SEAT ADJUSTMENT
FIGURE J - SEAT ADJUSTMENT
-
Your stroller seat has 4 recline positions.
-
To recline the seat simply lift the recline handle located on the back of the seat and ease the seat down into the required position.
-
For seat incline, gently push the seat upward into the desired upright position. It is not necessary to lift the recline handle.
Please see figure M for information on folding your seat forward for stroller folding and storage.
NOTE: SPECIAL CARE MUST BE TAKEN WHEN ADJUSTING THE SEAT POSITION WITH A CHILD IN THE STROLLER.
HOOD
FIGURE K- HOOD INSTALLATION
-
Insert the plastic hood legs into the corresponding housing on either side of the stroller frame.
-
To remove your hood; Feeling the side of the nylon housing that sits below the frame at each side (facing inward), locate the hood release tabs.
-
Press the hood release tabs inward while simultaneously lifting the hood upward. Repeat for the other side.
FIGURE L- USING THE HOOD
The Expanda hood unzips, increasing the size of your standard hood to give greater coverage and protection from the sun and weather for your child.
To open the Expanda Hood:
- Locate the zip in the center of the Expanda Hood and unzip completely. Gently pull the Expanda Hood forward until it reaches its full extension
To close the Expanda Hood
- Gently push the Expanda Hood back, allowing the middle section to fold in on itself. Carefully zip the Expanda Hood closed.
IMPORTANT: always take care when closing the Expanda Hood to avoid the zipper catching on the ENCLOSED fabric
text_image
d. lift recline handle b. Remove hood c. Forward seat release e. Push seat forward a. Remove bumper bar M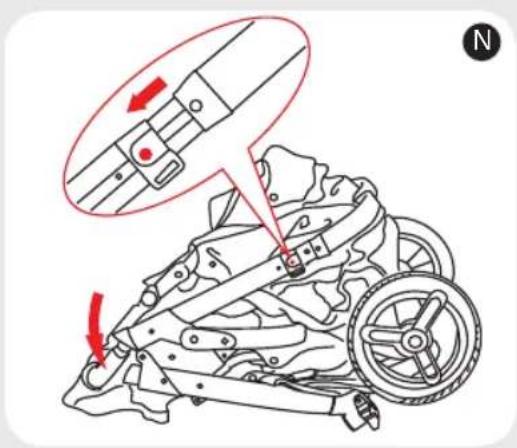
text_image
Technical diagram showing mechanical assembly with red arrows indicating directional movement, labeled 'N' in corner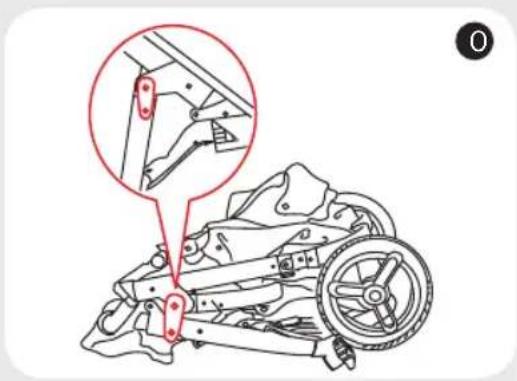
natural_image
Technical diagram of a mechanical assembly with a magnified inset showing a detail (no text or symbols present)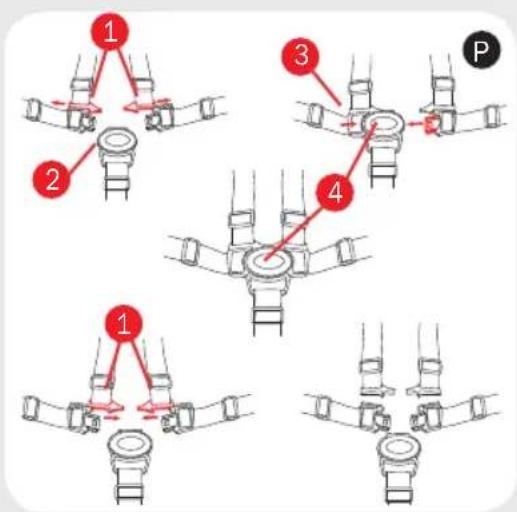
text_image
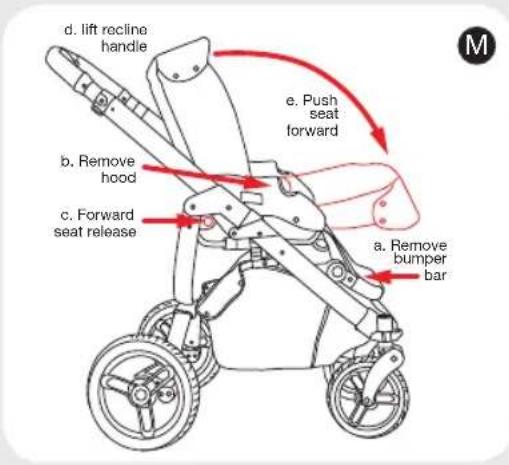
Diagram illustrating a mechanical or electrical assembly with numbered components and directional arrows indicating motion or force.FIGURE M and N - FOLDING
- Note, step b is not required for folding, but will create the most compact folded unit.
a. Remove bumper bar from housing (store for future use)
b. Remove hood for the most compact fold
c. Press seat recline release button located at rear of seat and simultaneously
d. Lift the recline handle while
e. gently pushing seat forward as far as possible
- Fold hood either back against the frame or all the way forward after folding.
- Squeeze the centre locking button on the handle.
- While keeping the centre locking button depressed, press the frame lock button firmly and push the handle inward, with a firm downward action, past the frame lock until it engages the lock spring. This will unlock the frame.
- Continue to ease the chassis downward until it is fully collapsed.
FIGURE O-FRAME LOCK
- Locate the locking clasp on the side of the stroller frame.
- With your stroller in the closed position, swivel the clasp into position and secure the catch over the frame rivet.
- Your stroller is now ready for storage or transport.
HARNESS
FIGURE P - USING YOUR HARNESS
YOUR STROLLER IS FITTED WITH OUR UNIQUE MULTI POINT SAFETY
HARNESS SYSTEM. ALWAYS USE THE HARNESS, CORRECTLY FITTED AND
ADJUSTED, WITH YOUR CHILD IN THIS SEAT
TO SECURE YOUR CHILD IN THE HARNESS:
- Slide the shoulder strap buckle (1) into the housing of the waist strap buckle (2), forming a complete buckle
- Repeat for the opposite side.
- Insert the completed buckle (3) in the buckle housing (4) until it engages securely in place.
- Repeat for the opposite side.
- Carefully adjust the harness straps to snugly fit your child by adjusting the Sliders located on all Shoulder Straps, Waist Straps and the Crotch Strap (5).
Your harness can be adjusted for even more comfort for smaller or larger children by threading the harness webbing through the adjusting 'sliders' in either direction, you can change the length of the webbing thus making them tighter or looser over your child's torso.
The harness should be snugly fitted to the baby's body, tight enough so that the baby cannot wriggle itself free of the straps but loose enough so as not to cause the baby any discomfort.
TO OPEN YOUR HARNESS
- Press down firmly on the button in the center of the buckle housing (4). The waist and shoulder strap sections will spring free of the buckle housing.
- If they do not automatically release, slide the shoulder strap buckles (1) free from the waist strap sections. This is to ensure that they do not form a potential entrapment area.
- Your harness will separate into 5 sections
IMPORTANT WARNING: WHEN NOT IN USE DISCONNECT SHOULDER
STRAPS FROM THE WAIST STRAP AND/OR BUCKLE.
text_image
Diagram showing two car chassis configurations with red arrows indicating lock and padlock actions, labeled with Chinese characters.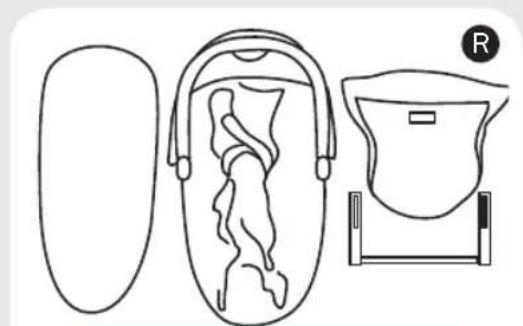
natural_image
Line drawing of three anatomical or mechanical components: oval, internal body with curved lines, and a rectangular device (no text or symbols)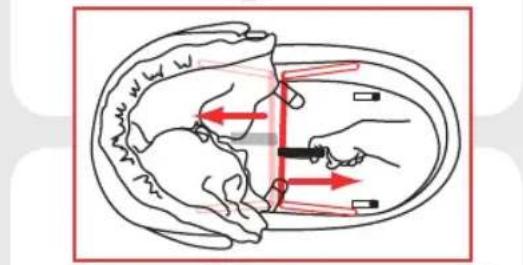
text_image
Diagram illustrating hand placement and movement of a device in a brain, with red arrows indicating direction and control points.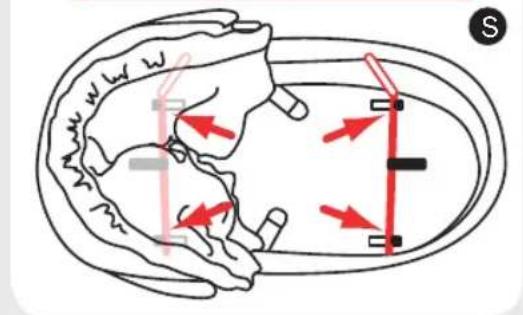
text_image
Diagram of a brain with directional arrows indicating movement or force, labeled 'S' in top-right corner.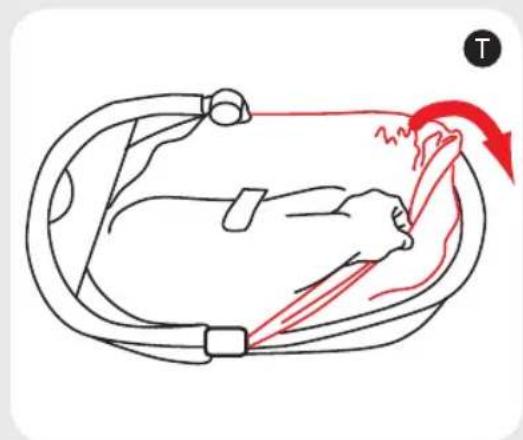
natural_image
Line drawing of a person in a bathtub with red motion arrows indicating movement (no text or symbols)BRAKES
FIGURE P - USING YOUR BRAKES
- Press down on the red brake lever located on the rear axle to simultaneously engage the brake in both rear wheels.
- To release, simply lift the red brake lever with your foot.
IMPORTANT WARNING: ALWAYS TEST THAT THE BRAKES ARE SECURELY ENGAGED BEFORE USE.
TETHER STRAP
- Your stroller comes equipped with a Safety Tether. Secure the strap to your wrist to stop the stroller rolling away.
NOTE: ALWAYS USE THE TETHER STRAP WHEN A CHILD IS IN THE STROLLER
OPTIONAL BASSINET
BASSINET ASSEMBLY
FIGURE R - CONTENTS
- Remove the Rebel Q Bassinet from the carton and dispose of all packaging thoughtfully.
- Lie the bassinet on a flat surface, 'bottom' down.
PLEASE NOTE THAT THE HOOD OF YOUR REBEL Q BASSINET IS ATTACHED TO THE BASSINET BODY AND CANNOT BE REMOVED.
FIGURE S - CREATING THE BASSINET BODY
- Inset: pull back the inner lining and locate the wire support frames.
- Lifting the top bassinet frame slightly and using the finger loop on each support frame, pull each outward to create the bassinet body
- Be sure to pull each frame as far as it can go and lock into the stoppers found on the base of the bassinet.
FIGURE T - DRESSING THE BASSINET
- Fold fabrics inside out. Line up each of the press studs.
- Pull the harness through the slits.
- Straighten the inner lining in the bassinet neatly.
- Secure by wrapping the end of the lining over the bassinet sides and end. Straighten the fabric.
natural_image
Simple line drawing of a bag with a handle and a bag attached, showing red motion arrows indicating movement (no text or symbols)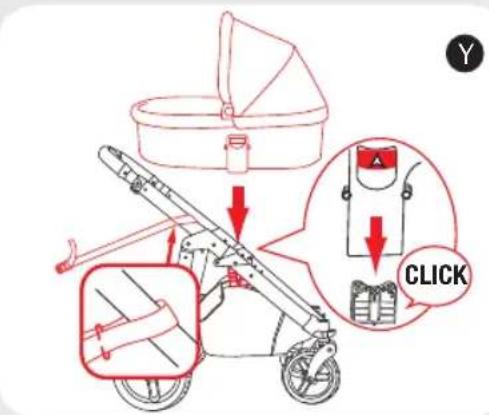
text_image
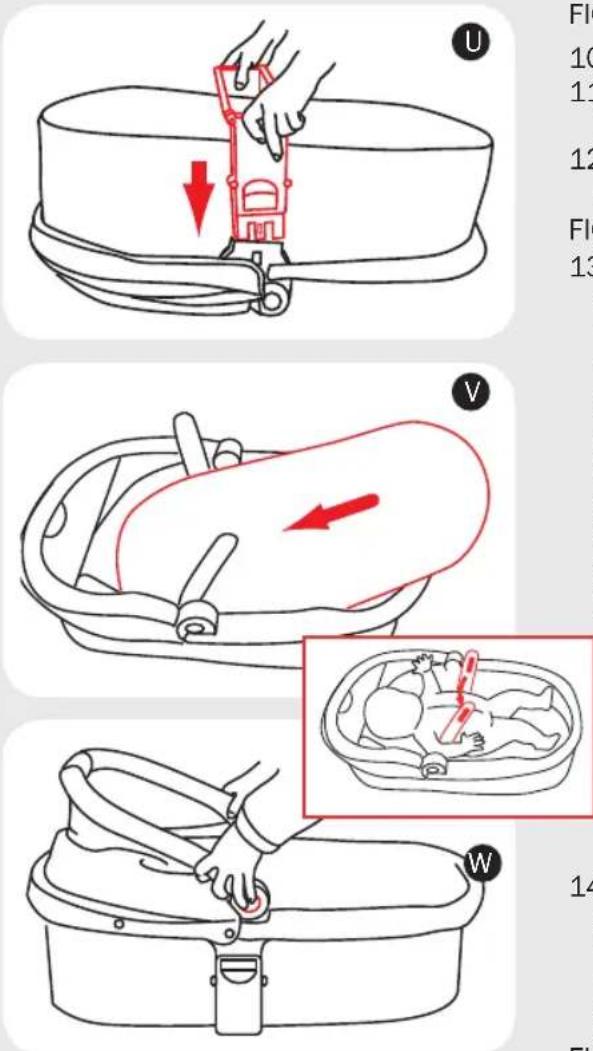
Y CLICKFIGURE U - ATTACHING THE FIXING FRAME
-
Turn the bassinet over.
-
Align the fixing frame with the corresponding housing located on either side of the bassinet.
-
Insert the fixing frame connectors into the housing until the seat is securely 'clicked' into place.
FIGURE V - INSERTING THE MATTRESS
- The Rebel Q mattress pad is a contoured, wedge shape to fit the shape of the bassinet. Insert the mattress into the bassinet with the thicker, wider end to the front of the bassinet. For your baby's extra security and safety, The Rebel Q Bassinet comes equipped with waist straps. To Use: Make sure that the lap straps remain on top of the mattress when you assemble the bassinet. Place your baby carefully into the assembled Rebel Q Bassinet. Always place your baby's head at the forward (hood) end of the bassinet. Fold the lap straps over your baby's waist, leaving arms free. Secure the lap strap snugly, but not overly tight, by gently pressing the opposing Velcro strips together.
WARNING!: ALWAYS USE THE WAIST STRAPS WHEN CARRYING YOUR BABY IN THE BASSINET TO AVOID BABY SLIDING OR ROLLING.
FIGURE F - ADJUSTING THE HOOD
- To adjust your canopy, simultaneously press the two grey buttons on the outside of the hood frame and move to the desired position. NOTE: When the hood is fully extended, it is in 'carrying mode', and must be tested to ensure that it is fully engaged.
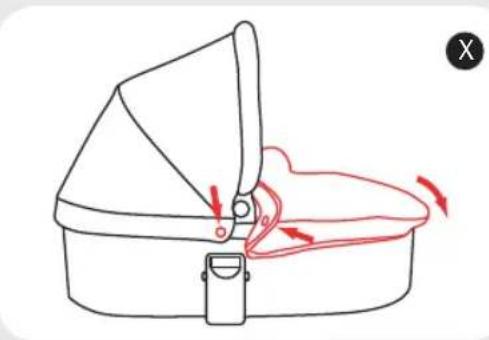
FIGURE G - BASSINET COVER
- The bassinet cover is easily attached by wrapping it over the bassinet sides and securing in position with the snaps found on the sides of the hood.
FIGURE H
-
To fix your bassinet to your Rebel Q frame, line up the fixing housing with the corresponding connectors located on either side of the stroller frame.
-
Insert the connectors into the housing and push downwards until the bassinet is securely in place and you hear it 'click'. Attach each security strap to either side of the frame. Pass each security strap up and over the infant car seat. Click and engage the buckle in the corresponding housing of the security strap and tighten by pulling the adjusting strap.
-
To remove your bassinet, Release the security straps by squeezing firmly on either side of the buckle to release. Simultaneously press the grey release buttons on either side of the fixing frame housing and lift the bassinet from the frame.
IMPORTANT WARNING: ALWAYS TEST THAT ALL LATCHES ARE SECURELY ENGAGED BEFORE USE.
WARNING: TO AVOID INJURY OR DEATH
• ALWAYS APPLY THE BRAKES WHENEVER THE PRAM/STROLLER IS STATIONARY
• DO NOT LEAVE CHILDREN UNATTENDED.
• SECURE THE CHILD IN THE HARNESS AT ALL TIMES.
• DO NOT CARRY EXTRA CHILDREN OR BAGS ON THIS PRAM/STROLLER.
- MAKE SURE CHILDREN ARE CLEAR OF ANY MOVING PARTS IF YOU ADJUST THE PRAM/
- STROLLER. OTHERWISE THEY MAY BE INJURED.
WARNING: USE THIS HARNESS AT ALL TIMES. WHEN NOT IN USE DISCONNECT SHOULDER STRAPS FROM THE WAIST STRAP AND/OR BUCKLE.
• FOLLOW THE MANUFACTURER'S INSTRUCTIONS.
Remember: Your child's safety is your responsibility
- Never use on stairs or on an escalator.
- The correct use and maintenance of this vehicle are essential
- When in the stroller, your child must always wear the safety harness, correctly fitted and adjusted, at all times.
• Always use the harness, correctly fitted and adjusted, with your child in this seat.
• Always use the tether strap when the stroller is in use.
- Check all parts before use for breakage or fatigue. Discontinue use immediately if any part is found to be damaged or broken.
• We recommend a rust inhibiting product should be used to prevent rust & fatigue on metal parts.
• Maximum load of baskets: 3.5kgs.
- Always be aware of the risks provided by fire and other significant sources of heat such as radiators, etc. which may be in the immediate vicinity of your stroller.
- It may be unsafe to use any accessories other than Valco approved ones.
- Be sure that all clamps and buckles are securely fixed and in place before use.
- Can be used from a newborn baby onwards. A bassinet or cocoon, specially designed to be used with a stroller, is recommended when any fully reclining stroller is used with a newborn.
- Always hold the bassinet in such a way that you keep the bassinet balanced and the bassinet with the child remains in the horizontal position.
- The bassinet is only suitable for a child that cannot sit up on its own or roll onto its side and cannot support itself on its hands and knees.
- Only place the bassinet down on a firm, horizontal and dry surface.
- Do not allow other children to play near the bassinet unattended
- Do not use the bassinet or the stroller if any parts are broken, torn or missing
- The maximum weight of a child for which this stroller was intended is 32 kgs.
- The maximum weight of a child for which this bassinet was intended is 9kgs.
- Never run with a newborn baby in any pram or stroller until the child can sit up unassisted (approximately 6 months).
- Do not hang shopping bags from the handle as this may affect the stroller's stability.
- This product is intended for domestic use only. It is not intended for commercial use.
AVOID SUFFOCATION HAZARDS:
- Unlike cribs that have rigid sides, the bassinet mattress is specially designed to prevent suffocation. The mattress is designed to be a snug fit and should not exceed 30mm in thickness. Using a thicker or different sized mattress may allow a child's head to be trapped between the mattress and the side of the bassinet causing suffocation. To help prevent suffocation from entrapment, USE ONLY THE MATTRESS PROVIDED.
- NEVER use additional mattress or padding. Use only the fitted sheet provided.
CARE & MAINTENANCE
Continued and extended exposure to sunlight and the elements can change the colours of many materials. To avoid fading, always cover and store in a shaded area. • DO NOT use any bleach based products to clean the Rebel Q. • The Rebel Q can be cleaned using a damp sponge and mild detergent. • The mattress sheet and the inner lining are both removable and may be gentle machine washed. Line dry only. • To prevent mould or mildew always allow fabrics to dry COMPLETELY before storing. Always store in a well ventilated area. • Should the chassis become wet, dry off promptly before storing. If this pram is used near the ocean or salted roads, spray the chassis and seat frame with water and dry. We recommend a rust inhibiting product should be used to prevent rust and fatigue on metal parts. • We recommend that you wipe down axles and lubricate the wheels every 3 months. Sand and dirt can grind down axles, if you live near the beach or in a dusty environment you must wipe down the axles and wheels then lubricate them monthly.
AXLES ARE BEST LUBRICATED WITH GREASE OR PETROLEUM JELLY. MOVING PARTS ARE BEST LUBRICATED WITH SILICONE BASED PRODUCTS. DO NOT USE OIL BASED PRODUCTS.
FURTHER INFORMATION:
valcobaby.com.au
Find us on: