
GC-L247KQDV - Fridge LG - Free user manual and instructions
Find the device manual for free GC-L247KQDV LG in PDF.


User questions about GC-L247KQDV LG
0 question about this device. Answer the ones you know or ask your own.
Ask a new question about this device
Download the instructions for your Fridge in PDF format for free! Find your manual GC-L247KQDV - LG and take your electronic device back in hand. On this page are published all the documents necessary for the use of your device. GC-L247KQDV by LG.
USER MANUAL GC-L247KQDV LG
Before beginning installation, read these instructions carefully. This will simplify installation and ensure that the product is installed correctly and safely. Leave these instructions near the product after installation for future reference.
ENGLISH
MFL70583743
Rev.00_083120
www.lg.com
Copyright © 2020 LG Electronics Inc. All Rights Reserved.
TABLE OF CONTENTS
This manual may contain images or content that may be different from the model you purchased.
This manual is subject to revision by the manufacturer.
SAFETY INSTRUCTIONS
READ ALL INSTRUCTIONS BEFORE USE....4
WARNING....4
CAUTION 9
INSTALLATION
Before Installation ....11
Removing the Fridge and Freezer Door....12
Connecting the Water Line 13
Levelling and Door Alignment....14
Turning on the Power....15
Moving the Appliance for Relocation 16
OPERATION
Before Use 17
Product Features....19
Control Panel 21
Ice and Water Dispenser....22
Automatic Icemaker 23
Door in Door....24
Drawer....25
Shelf 26
Icemaker 26
Door Basket 27
SMART FUNCTIONS
LG ThinQ Application....29
Smart Diagnosis ....29
MAINTENANCE
Cleaning 31
Water Filter 32
natural_image
Pure geometric lines and shapes without any text, numbers, or symbols
natural_image
Pure geometric diagram with intersecting lines and shapes, no text or symbols present
natural_image
Pure electrical circuit lines without any symbolsglobal_main.book.book Page 3 Monday, August 31, 2020 1:42 PM
natural_image
Pure geometric diagram with intersecting lines and circles, no text or symbols presentTROUBLESHOOTING
Before Calling for Service....34
natural_image
Pure geometric lines and shapes without any text, numbers, or symbols
natural_image
Pure geometric diagram with intersecting lines and shapes, no text or symbols present4 SAFETY INSTRUCTIONS
SAFETY INSTRUCTIONS
READ ALL INSTRUCTIONS BEFORE USE
The following safety guidelines are intended to prevent unforeseen risks or damage from unsafe or incorrect operation of the appliance. The guidelines are separated into 'WARNING' and 'CAUTION' as described below.
Safety Messages

This symbol is displayed to indicate matters and operations that can cause risk. Read the part with this symbol carefully and follow the instructions in order to avoid risk.

WARNING
This indicates that the failure to follow the instructions can cause serious injury or death.

CAUTION
This indicates that the failure to follow the instructions can cause the minor injury or damage to the product.
WARNING
WARNING
To reduce the risk of explosion, fire, death, electric shock, injury or scalding to persons when using this product, follow basic precautions, including the following:
Technical Safety
- This appliance is not intended for use by persons (including children) with reduced physical, sensory or mental capabilities, or lack of experience and knowledge, unless they have been given supervision or instruction concerning use of the appliance by a person
SAFETY INSTRUCTIONS
5
responsible for their safety. Children should be supervised to ensure that they do not play with the appliance.
- This appliance is intended to be used in household and similar applications such as:
- staff kitchen areas in shops, offices and other working environments;
- farm houses and by clients in hotels, motels and other residential type environments;
- bed and breakfast type environments;
- catering and similar non-retail applications.
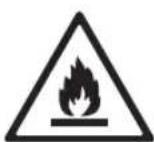
This symbol alerts you to flammable materials that can ignite and cause a fire if you do not take care.
- This appliance contains a small amount of isobutane refrigerant (R600a), but it is also combustible. When transporting and installing the appliance, care should be taken to ensure that no parts of the refrigerating circuit are damaged.
- The refrigerant and insulation blowing gas used in the appliance require special disposal procedures. Consult with service agent or a similarly qualified person before disposing of them.
- Do not damage the refrigerant circuit.
- If the power cord is damaged or the hole of the outlet socket is loose, do not use the power cord and contact an authorized service centre.
- Do not locate multiple portable outlet sockets or portable power supplies at the rear of the appliance.
- Securely plug the power plug in the outlet socket after completely removing any moisture and dust.
- Never unplug the appliance by pulling on the power cable. Always grip the power plug firmly and pull straight out from the outlet socket.
- Keep ventilation openings, in the appliance enclosure or in the built-in structure, clear of obstruction.
natural_image
Pure geometric lines and shapes without any text, numbers, or symbols
natural_image
Pure geometric diagram with intersecting lines and shapes, no text or symbols present6 SAFETY INSTRUCTIONS
- Do not store explosive substances such as aerosol cans with a flammable propellant in this appliance.
- Do not tilt the appliance to pull or push it when transporting.
- When positioning the appliance, ensure the supply cord is not trapped or damaged.
- Do not use mechanical devices or other means to accelerate the defrosting process.
- Do not use a hair drier to dry the inside of the appliance or place a candle inside to remove the odours.
- Do not use electrical appliances inside the refrigerator.
• Make sure not to get a body part such as a hand or foot stuck while moving the appliance. - Disconnect the power cord before cleaning the appliance interior or exterior.
- Do not spray water or inflammable substances (toothpaste, alcohol, thinner, benzene, flammable liquid, abrasive, etc.) over the interior or exterior of the appliance to clean it.
- Do not clean the appliance with brushes, cloths or sponges with rough surfaces or which are made of metallic material.
- Only qualified service personnel from LG Electronics service centre should disassemble, repair, or modify the appliance. Contact an LG Electronics customer information centre if you move and install the appliance in a different location.
Risk of Fire and Flammable Materials
- If a leak is detected, avoid any naked flames or potential sources of ignition and air the room in which the appliance is standing for several minutes. In order to avoid the creation of a flammable gas air mixture if a leak in the refrigerating circuit occurs, the size of the room in which the appliance is used should correspond to the amount of refrigerant used. The room must be 1 ~m^2 in size for every 8 g of R600a refrigerant inside the appliance.
- Refrigerant leaking out of the pipes could ignite or cause an explosion.
- The amount of refrigerant in your particular appliance is shown on the identification plate inside the appliance.
Installation
- This appliance should only be transported by two or more people holding the appliance securely.
• Install the appliance on a firm and level floor. - Do not install the appliance in a damp and dusty place. Do not install or store the appliance in any outdoor area, or any area that is subject to weathering conditions such as direct sunlight, wind, rain, or temperatures below freezing.
- Do not place the appliance in direct sunlight or expose it to the heat from heating appliances such as stoves or heaters.
- Be careful not to expose the rear of the appliance when installing.
• Install the appliance in a place where it is easy to unplug the power plug of the appliance. - Be careful not to let the appliance door fall during assembly or disassembly.
- Be careful not to pinch, crush, or damage the power cable during assembly or disassembly of the appliance door.
- Be careful not to point the power plug up or let the appliance lean against the power plug.
- Do not connect a plug adapter or other accessories to the power plug.
- Do not modify or extend the power cable.
- Ensure that the outlet socket is properly grounded, and that the earth pin on the power cord is not damaged or removed from the power plug. For more details on grounding, inquire at an LG Electronics customer information centre.
- This appliance is equipped with a power cord having an equipment-grounding conductor and a grounding power plug. The power plug must be plugged into an appropriate outlet socket that is installed and grounded in accordance with all local codes and ordinances.
natural_image
Pure geometric lines and crosshair symbols without any text or labels
natural_image
Pure geometric diagram with intersecting lines and shapes, no text or symbols present8 SAFETY INSTRUCTIONS
- Never start up an appliance showing any signs of damage. If in doubt, consult your dealer.
- Dispose of all packaging materials (such as plastic bags and styrofoam) away from children. The packaging materials can cause suffocation.
- Do not plug the appliance into a multi socket adapter which does not have a power cable (mounted).
- The appliance should be connected to a dedicated power line which is separately fused.
- Do not use a multi socket outlet which is not properly grounded (portable). In case of using a properly-grounded multi socket outlet (portable), use the multi socket outlet with the current capacity of the power cord rating or higher and use the multi socket outlet only for the appliance.
Operation
- Do not use the appliance for any purpose (storage of medical or experimental materials or shipping) other than any domestic household food storage use.
- If water penetrates electrical parts of the appliance, disconnect power plug and contact an LG Electronics customer information centre.
- Unplug the power plug during a severe thunderstorm or lightening or when not in use for a long period of time.
- Do not touch the power plug or the appliance controls with wet hands.
- Do not bend the power cable excessively or place a heavy object on it.
- Immediately unplug the power plug and contact an LG Electronics customer information centre if you detect a strange sound, odour, or smoke coming from the appliance.
- Do not place hands or metallic objects inside the area emitting the cold air, cover or heat releasing grille on the back.
- Do not apply excessive force or impact to the back cover of the appliance.
SAFETY INSTRUCTIONS
9
- Be careful of nearby children when you open or close the appliance door. The door may bump the child and cause injury.
- Avoid the danger of children getting trapped inside the appliance. A child trapped inside the appliance can cause suffocation.
- Do not put animals, such as pets into the appliance.
- Do not place heavy or fragile objects, containers filled with liquid, combustible substances, flammable objects (such as candles, lamps, etc.), or heating devices (such as stoves, heaters, etc.) on the appliance.
- Do not place any electronic appliance (such as heater and mobile phone) inside the appliance.
- If there is a gas leakage (isobutane, propane, natural gas, etc.), do not touch the appliance or power plug and ventilate the area immediately. This appliance uses a refrigerant gas (isobutane, R600a). Although it uses a small amount of the gas, it is still combustible gas. Gas leakage during appliance transport, installation or operation can cause fire, explosion or injury if sparks are caused.
- Do not use or store flammable or combustible substances (ether, benzene, alcohol, chemical, LPG, combustible spray, insecticide, air freshener, cosmetics, etc.) near the appliance.
Disposal
- When discarding the appliance, remove the door gasket while leaving the shelves and baskets in place and keep children away from the appliance.
CAUTION

CAUTION
To reduce the risk of minor injury to persons, malfunction, or damage to the product or property when using this product, follow basic precautions, including the following:
10 SAFETY INSTRUCTIONS
Operation
- Do not touch frozen food or the metal parts in the freezer compartment with wet or damp hands. It may cause frostbite.
- Do not place glass containers, bottles or cans (especially those containing carbonated drinks) in the freezer compartment, shelves or ice bin that will be exposed to temperatures below freezing.
- The tempered glass on the front side of the appliance door or the shelves can be damaged by an impact. If it is broken, do not touch it with hands.
- Do not hang from the appliance doors, storage room, shelf or climb up into it.
- Do not store an excessive amount of water bottles or containers for side dishes on the door baskets.
- Do not open or close the appliance door with excessive force.
- If the hinge of the appliance door is damaged or operates improperly, stop using the appliance and contact an authorized service centre.
- Prevent animals from nibbling on the power cable or water hose.
- Never eat frozen foods immediately after they have been taken out in the freezer compartment.
- Make sure not to get a hand or foot stuck upon opening or closing the appliance door or door in door.
Maintenance
- Do not clean glass shelves or covers with warm water when they are cold. They may shatter if exposed to sudden temperature changes.
- Do not insert the shelves upside down. The shelves may fall.
• To remove frost from the appliance, contact an LG Electronics customer information centre. - Dispose of the ice inside the ice bin in the freezer compartment during an extended power outage.
natural_image
Pure geometric lines and shapes without any text, numbers, or symbols
natural_image
Pure geometric diagram with intersecting lines and shapes, no text or symbols presentINSTALLATION
Before Installation
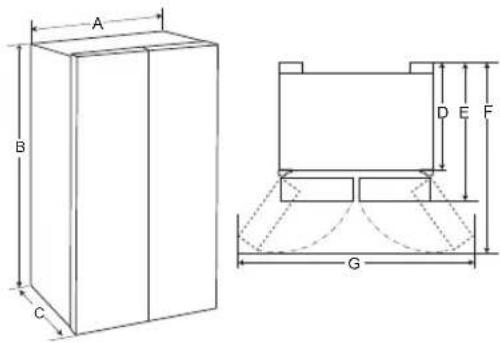
Dimensions and Clearances
Too small of a distance from adjacent items may result in the degradation of freezing capability and increased electricity costs. Allow over 50 mm of clearance between the back of the appliance and the wall when installing the appliance.
text_image
A B C D E F G| - Size (mm) | |
| A | 912 |
| B | 1 |
| C | 717 |
| D | 615 |
| E | 717 |
| F | 1 |
| G | 1 |
NOTE
- You can determine what type of appliance it is by looking at the label inside the appliance.
Ambient Temperature
- The appliance is designed to operate within a limited range of ambient temperatures, depending on the climate zone.
- The internal temperatures could be affected by the location of the appliance, the ambient temperature, the frequency of door opening and so on.
• The climate class can be found on the rating label.
| Climate Class Ambient Temperature Range °C | |
| SN (Extended Temperate) | +10 - +32 |
| N (Temperate) +16 - | -32 |
| ST (Subtropical) +16 - | +38 / +18 - +38** |
| T (Tropical) +10 - +43* | / +16 - +43 / +18 - +43** |
* Australia, India, Kenya

Argentina

0
NOTE
- The appliances rated from SN to T are intended to be used at an ambient temperature between 10 °C and 43 °C.

text_image
0 6 4 4 0 0Accessories
*1 This feature is only available on some models.
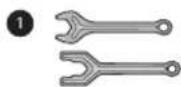
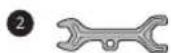
① Spanner A*1
② Spanner B*1
natural_image
Pure geometric lines and shapes without any text, numbers, or symbols
natural_image
Pure geometric diagram with intersecting lines and shapes, no text or symbols present12 INSTALLATION
Removing the Fridge and Freezer Door
If your entrance door is too narrow for the appliance to pass through, remove the appliance doors and pass the appliance laterally.
WARNING
- Disconnect the power cord, house fuse or circuit breaker before installing, removing the doors, or cleaning the appliance. Failure to follow these instructions may result in death, fire or electric shock.
Removing the Freezer Door
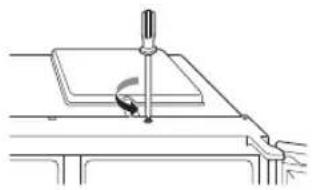
1 Remove the screw from the hinge cover at the top of the appliance. Lift the hook, located at the bottom of the front side of the cover, with a flat-head screwdriver.
natural_image
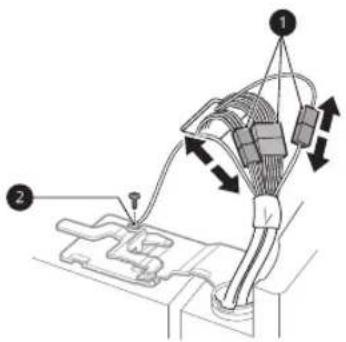
Technical line drawing of a mechanical assembly with a tool and base (no text or symbols)2 Disconnect all wire harnesses ①. Unscrew the ground wire ②.
text_image
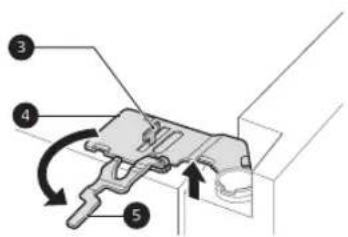
Diagram illustrating a medical or surgical procedure with labeled components and directional arrows indicating movement or force.3 Rotate the hinge lever 5 counterclockwise. Lift the top hinge 4 free of the hinge lever latch 3
text_image
Technical diagram showing labeled mechanical components with numbered parts and directional arrows indicating motion or assembly.CAUTION
- When lifting the hinge free of the latch, be careful that the door does not fall forward. It is recommended that two or more people carry out the door removal and refitting.
4 Lift the freezer door until it is free of the bottom hinge assembly.
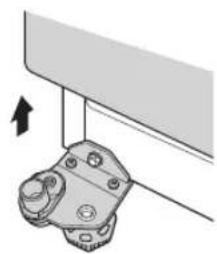
natural_image
Mechanical component diagram showing a bracket with mounting holes and a directional arrow (no text or symbols)CAUTION
- Place the door on a non-scratching surface with the inner side facing up.
Removing the Fridge Door
1 Disconnect all wire harnesses ①.
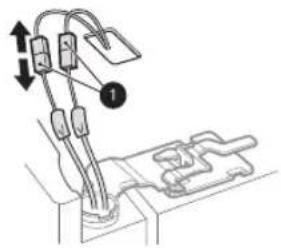
text_image
Diagram showing cable installation with labeled components and directional arrows indicating movement or force2 Rotate the hinge lever ② clockwise. Lift the top hinge ③ free of the hinge lever latch ④.
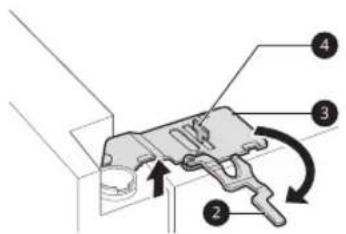
text_image
Technical diagram showing labeled mechanical components with numbered parts and directional arrows indicating motion or assembly.CAUTION
- When lifting the hinge free of the hinge lever latch, be careful that the door does not fall forward. It is recommended that two or more people carry out the door removal and refitting.
3 Lift the fridge door until it is free of the bottom hinge assembly.
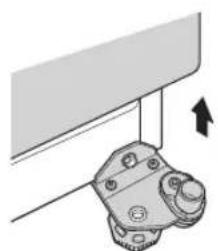
natural_image
Mechanical assembly diagram showing a bracket with mounting holes and a rotating arm (no text or symbols)CAUTION
- Place the door on a non-scratching surface with the inner side facing up.
Refitting the Fridge and Freezer Door
Refit the doors in the reverse sequence of their removal once the appliance has been passed through all access doors.
Connecting the Water Line
This section is applied only to models with plumbed water or ice dispenser.
Water Supply Requirements
A cold water supply with water pressure between 138 kPa and 827 kPa (1.4-8.4 kgf/cm ^2 ) is required to operate the water dispenser. If the refrigerator is installed in an area with low water pressure (below 138 kPa), you can install a booster pump to compensate for the low pressure.
If a reverse osmosis water filtration system is connected to your cold water supply, the water pressure to the reverse osmosis system needs to be a minimum of 138 kPa to 827 kPa (1.4-8.4 kgf/cm²)
WARNING
- Unplug the appliance before carrying out any work on connecting the water line. Failure to do so may cause electric shock.
- Only connect the water line to a cold water supply. Failure to do so may cause the water filter to malfunction. Water hammer (water banging in the pipes) in house plumbing can cause damage to appliance parts and can lead to water leakage or flooding.
- Connect to potable water supply only.
- Connecting the water line must only be installed by a qualified plumber and in accordance with local legislation and regulations governing water quality.
NOTE
- This water line installation is not covered by the appliance warranty.
14 INSTALLATION
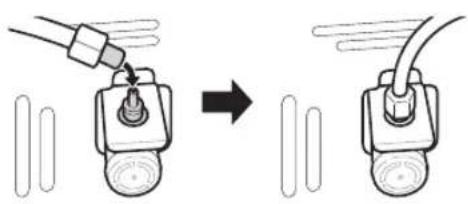
Connecting Water to the Appliance
1 Unscrew the metal threaded collar nut at the back of the appliance and place it over one end of the water tube.
2 Firmly push the water tube onto the water inlet valve and tighten up the collar nut.
natural_image
Diagram showing a mechanical device being adjusted to its base, with no visible text or symbolsConnecting to the Water Tap
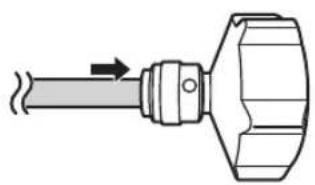
This feature is only available on some models.
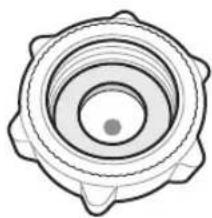
1 Push the water tube into the hole of the tap connector supplied in the accessories. The pipe should be held firmly whilst the connector is pushed onto the pipe.
natural_image
Pure mechanical component diagram without any text, numbers, or symbols2 Ensure that the rubber washer is fitted to the inside of the tap connector before screwing it onto the tap.
- A separate connector or adaptor may need to be purchased if your tap fitting does not match the thread size of the connector provided.
natural_image
Top-down view of a mechanical component with concentric circular grooves and central dot (no text or symbols)Checking the Water Connection
1 Turn on the water supply and switch on the appliance. Carefully check all fittings for possible leaks due to poorly fitted hoses.
2 Press and hold the Water Filter button for three seconds. The new water filter has been activated.
3 Place a cup under the water dispenser to verify that water is flowing through the appliance.
4 Check the connecting tube and joints for leaks once again.
Levelling and Door Alignment
Before Beginning
When the appliance doors appear to be uneven, follow the instructions below to align the doors.
NOTE
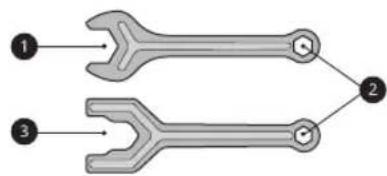
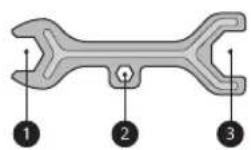
- The spanner may differ depending on the model. You will be provided with either spanner type A or B.
- Spanner Type A
text_image
① ② ③- Spanner Type B

natural_image
Pure geometric lines and shapes without any text, numbers, or symbols
natural_image
Pure geometric diagram with intersecting lines and shapes, no text or symbols presentLevelling the Appliance
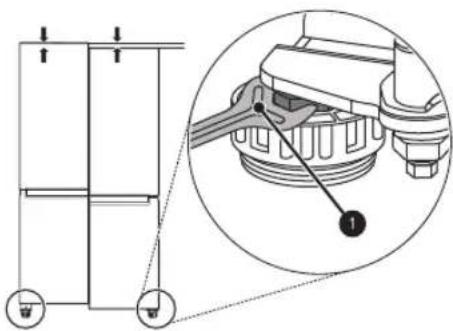
The appliance has two front levelling legs. Adjust the legs to alter the tilt from front to back or side to side. If the appliance seems unsteady, or the doors do not close easily, adjust the appliance's tilt using the instructions below.
Use the spanner ① to adjust the height by turning the levelling leg to the left to raise it or to the right to lower it.
text_image
Technical diagram showing a mechanical assembly with labeled components and an inset close-up of the component detail.Door Alignment for Freezer and Fridge Door
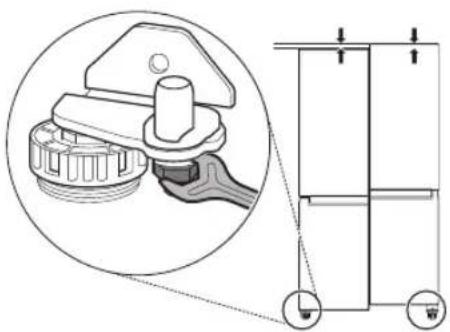
If the door of the appliance is not level, adjust the difference in the height of appliance door.
natural_image
Technical diagram showing a mechanical assembly with a magnified inset of a component (no text or symbols present)1 Open the door and use the spanner ① to loosen the keeper nut by turning it to the left.
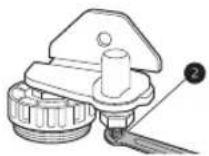
2 Use the spanner ^② to adjust the height by turning the adjustment hinge pin to the left or to the right.
CAUTION
- Do not adjust the height of the appliance door more than 3 mm.
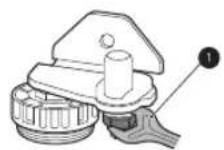
3 Use the spanner ① to fasten the keeper nut by turning it to the right.
NOTE
- Leveling the doors may not be possible when the floor is not leveled, or is of weak or poor construction.
- The refrigerator is heavy and should be installed on a rigid and solid surface.
- Some timber flooring may cause levelling difficulties if it flexes excessively.
Turning on the Power
Connecting the Appliance
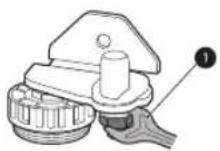
After installing the appliance, connect the power plug into the outlet socket.
natural_image
Pure geometric lines and crosshair symbols without any text or labels
natural_image
Pure geometric diagram with intersecting lines and shapes, no text or symbols present16 INSTALLATION
NOTE
• After connecting the power supply cord (or plug) to the outlet, wait 3 or 4 hours before you put food into the appliance. If you add food before the appliance has cooled completely, your food may spoil.
Moving the Appliance for Relocation
Preparing for Relocation
1 Remove all food from inside the appliance.
2 Pull the power plug out, insert and fix it into the power plug hook at the rear or on top of the appliance.
3 Tape parts such as shelves and the door handle to prevent from falling off while moving the appliance.
4 Move the appliance with more than two people carefully. When transporting the appliance over a long distance, keep the appliance upright.
5 After installing the appliance, connect the power plug into a mains outlet socket and switch it on.
natural_image
Pure geometric lines and shapes without any text, numbers, or symbols
natural_image
Pure geometric diagram with intersecting lines and shapes, no text or symbols presentOPERATION
Before Use
Notes for Operation
- Users should keep in mind that frost can form if the door is not closed completely or if the humidity is high during the summer.
- Ensure there is sufficient space between food stored on the shelf or door basket to allow the door to close completely.
- Opening the door for long periods can cause a significant increase of the temperature in the compartments of the appliance.
- If the refrigerating appliance is left empty for long periods, switch off, defrost, clean, dry, and leave the door open to prevent mould developing within the appliance.
Door Open Alarm
The alarm sounds 3 times in 30 second intervals if the door is left open or not completely closed for 1 minute.
NOTE
- Contact the LG Electronics customer information centre if the alarm sound continues even after closing all doors.
Failure Detection
The appliance can automatically detect problems during the operation.
NOTE
- If a problem is detected, the appliance may not operate and an error code is displayed even when any button is pressed.
- If an error code is indicated on the display, do not turn off the power. Immediately contact the LG Electronics customer information centre and report the error code. If you turn off the power,
the repair technician from the our information centre may have difficulty finding the problem.
Suggestion for Energy Saving
- For the most efficient use of energy, make sure that door bins, drawers and shelves are assembled properly.
- Ensure there is sufficient space between stored foods. This allows cold air to be circulated evenly and lowers electricity bills.
- Store hot food only after it has cooled in order to prevent dew or frost.
- When storing food in the freezer compartment, set the freezer temperature lower than the temperature indicated on the food.
- Do not set the temperature of the appliance lower than needed.
- Do not put food near the temperature sensor of the fridge compartment. Keep a distance of at least 3 cm from the sensor.
• Note that a temperature rise after defrosting has a permissible range in the appliance specifications. If you wish to minimise the impact on the food storage due to a temperature rise, seal or wrap the stored food in several layers. - The automatic defrosting system in the appliance ensures that the compartment remains free of ice buildup under normal operating conditions.
Storing Foods Effectively
- Food may freeze or spoil if stored at the wrong temperature. Set the refrigerator to the correct temperature for the food being stored.
- Store frozen food or refrigerated food inside sealed containers.
- Check the expiration date and label (storage instructions) before storing food in the appliance.
18 OPERATION
- Do not store food for a long period of time if it spoils easily at a low temperature.
- Do not place unfrozen food in direct contact with food that is already frozen. It could be necessary to reduce the quantity to be frozen if freezing every day is anticipated.
- Place the refrigerated food or frozen food in each fridge or freezer compartment immediately after purchasing.
- Store raw meat and fish in suitable containers in the refrigerator, so that it is not in contact with or drip onto other food.
• Refrigerated foods and other food items can be stored on top of the vegetable drawer.
- Avoid refreezing any food which has been completely thawed. Freezing any food which has been completely thawed again will lower its taste and nutrition.
- Do not overfill the appliance. Cold air can not circulate properly if the appliance is overfilled.
- Cool hot food before storing. If too much hot food is placed inside, the internal temperature of the appliance can increase and negatively affect other foods stored in the appliance.
- If you set an excessively low temperature for food, it may become frozen. Do not set a temperature lower than the required temperature for the food to be stored correctly.
- If there are chill compartments in the appliance, do not store vegetables and fruits with higher moisture content in the chill compartments as they may freeze due to the lower temperature.
• In the event of a blackout, call the electricity company and ask how long it is going to last.
- You should avoid door openings while the power is off.
-
When the power supply gets back to normal, check the condition of the food.
-
Express Freeze must be switched on for 7 hours before fresh products are placed in the freezer compartment.
• To get better air circulation, insert all inner parts like baskets, drawers, and shelves.
Freezing the Maximum Amount of Food
If large quantities of food are to be stored, all the freezer drawers should be taken out of the appliance and the food should be stacked directly on the freezer shelves in the freezer compartment.
CAUTION
• To remove the drawers, first remove the food from drawers and then pull out the drawers carefully. Not doing so could cause injury or damage to the drawers.
NOTE
- The shape of each drawer may be different, insert in the right position.
Two Star Compartment
- Two star ( ** ) basket or drawer can be used to store ice and food from -12 °C to -18 °C for short periods.
- Two star frozen food compartments are suitable for storing pre-frozen food, storing or making icecream and making ice cubes.
- Two star compartments are not suitable for the freezing of fresh food.
Max Freezing Capacity
- Express Freeze function will allow the freezer to reach its maximum freezing capacity. This generally takes up to 24 hours and automatically switches off.
natural_image
Pure geometric lines and shapes without any text, numbers, or symbols
natural_image
Pure geometric diagram with intersecting lines and shapes, no text or symbols presentProduct Features
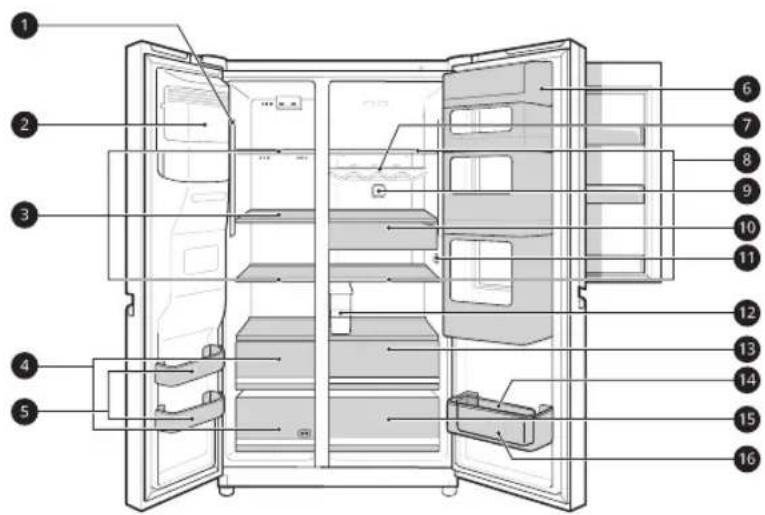
The appearance or components of the appliance may differ from model to model.
Interior (Two Star \*\*)
*1 This feature is only available on some models.
text_image
Labeled diagram of a refrigerator interior showing numbered compartments and doorways1 LED Lamp
The LED lamps inside the appliance light up when you open the door.
2 Automatic Icemaker*1
This is where ice is automatically produced and stored.
3 Freezer Shelf*1
This is where frozen foods such as meat, fish, and ice cream can be stored.
4 Freezer Drawer*1
This is for long-term storage of frozen items.
5 Freezer Door Basket
This is where small packaged frozen food or frequently used foods can be stored.
6 Door in Door Compartment*1
This is where foods which are taken out frequently such as beverages and snacks are stored.
⑦ Bottle Rack*1
This is where drinks tall bottles or containers are stored.
CAUTION
- Do not store short bottles or containers. The items may fall and cause an injury or appliance damage.
8 Fridge Shelf
natural_image
Pure geometric lines and crosshair symbols without any text or labels
natural_image
Pure geometric diagram with intersecting lines and shapes, no text or symbols present20 OPERATION
This is where refrigerated foods and other items are stored. Store the foods with higher moisture content at the front of the shelf.
The shelf height can be adjusted by inserting the shelf in another groove of different height.
The actual number of shelves will differ from model to model.
9 Air Filter*1
This reduces odours inside the fridge compartment.
10 Snack Drawer*1
This is where small packages of refrigerated foods are stored.
⑪ Temperature Sensor ^*1
This sensor senses the temperature of the fridge compartment.
- Maintain the distance between the sensor and food to accurately sense the temperature.
12 Water Tank*1
This is where water to supply the dispenser or the automatic icemaker is stored. It requires manual filling.
13 Fresh Vegetable Drawer*1
This is where fruits and vegetables are stored to help maintain freshness by adjusting the humidity controller.
14 Egg Box*1
This is where eggs are stored.
- Do not use it as the ice bin or place it on the shelf on top of the fridge or the vegetable drawer.
15 Vegetable Drawer
This is where fruits and vegetables are stored to remain fresh for as long as possible.
16 Fridge Door Basket
This is where small packages of refrigerated foods, drinks and sauce containers are stored.
Control Panel
The actual control panel may differ from model to model.
Control Panel and Functions
*1 This feature is only available on some models.
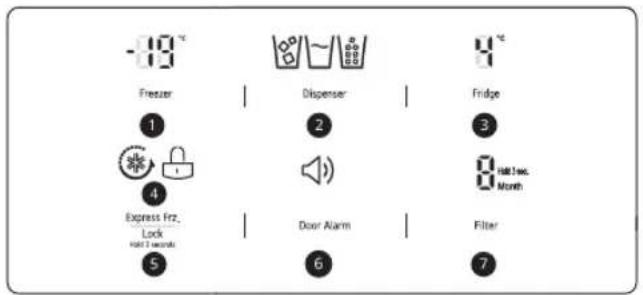
text_image
-10°C Freezer 1 4 Express Frz, Lock Hold 3 seconds 5 Disperser 2 Door Alarm 6 Fridge 3 Hill 1 sec. Month Filter 7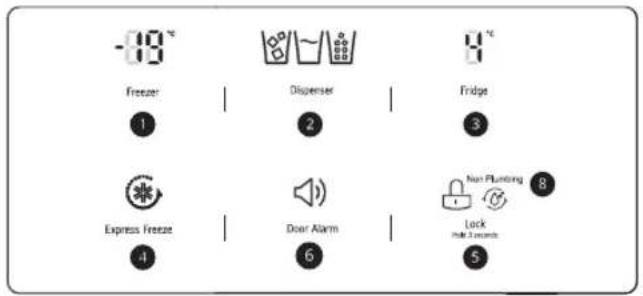
text_image
-10°C Freezer ① Disperser ② Fridge ③ Express Freeze ④ Door Alarm ⑥ Non Plumbing ⑧ Lock 3 times ⑤1 Freezer
Press this button repeatedly to select a desired temperature between -24 °C and -14 °C.
• The initial freezer temperature is -19 °C.
② Dispenser
Select a desired dispenser mode from the buttons on the control panel. Press the dispenser switch with a glass or other container to dispense cubed ice, water or crushed ice.
3 Fridge
Press this button repeatedly to select a desired temperature between 1 °C and 7 °C.
• The initial fridge temperature is 4^ C.
NOTE
- The actual inner temperature varies depending on the food status, as the indicated setting temperature is a target temperature, not actual temperature within the appliance.
4 Express Freeze / Express Frz.
This function can quickly freeze a large amount of ice or frozen foods.
- This function is enabled and disabled in turn each time you press the button.
- This function automatically terminates after a specific period has passed.
natural_image
Pure geometric lines and shapes without any text, numbers, or symbols
natural_image
Pure geometric diagram with intersecting lines and shapes, no text or symbols present22 OPERATION
5 Lock
This locks the buttons on the control panel.
- To lock the control panel buttons, press and hold the Lock button for 3 seconds until the 🔊 icon appears and the function is activated.
- To disable the function, press and hold the Lock button for 3 seconds until the 🔔 icon appears and the function is deactivated.
6 Door Alarm\*1
This sets the alarm sound which is activated when the appliance door is opened.
⑦ Filter\*1
This shows the replacement period of the water filter automatically.
NOTE
• After changing the filter, push and hold the Filter button for three seconds to reset the filter.
8 Non Plumbing\*1
The Non Plumbing icon is illuminated when the water dispenser tank is installed correctly.
NOTE
- The control panel automatically turns off for energy saving.
- If there is any finger or skin contacts to the control panel while cleaning it, the button function may operate.
Ice and Water Dispenser
Before Using the Ice and Water Dispenser
CAUTION
- Keep children away from the dispenser to prevent children playing with or damaging the controls.
- Throw away the first few batches of ice (about 20 cubes and 7 cups of water). This is also necessary if the appliance has not been used for a long time.
- Clean the water dispensing system if they have not been used for 48 hours. Flush the water system connected to a water supply if water has not been drawn for 5 days.
• To clean the water dispensing system, flush the water through the dispenser about 5 minutes and throw away the first few batches of ice.
- Do not use a thin crystal cup or chinaware when dispensing water or ice.
NOTE
- If you open the freezer door while water is being dispensed, the water dispensing will stop.
- If you open the fridge door while water, cubed ice or crushed ice is being dispensed, dispensing will be paused. When you close the door, the selected item will continue to be dispensed.
- If the cup rim is small, water may splash out of the glass or miss it completely.
- Use a cup with a rim of over 68 mm in diameter when dispensing water, cubed ice or crushed ice.
natural_image
Pure geometric lines and shapes without any text, numbers, or symbols
natural_image
Pure geometric diagram with intersecting lines and shapes, no text or symbols present- When the ice maker produces smaller ice cubes, or the cubes become lumped together, the amount of water supplied to the ice maker may be low due to insufficient water in the water tank. If ice is not used frequently or the freezer set temperature is too warm, it may also lump together.
- It is normal for milky / cloudy water to be dispensed after replacing the water filter. This air in the water will eventually clear and is safe to drink during this transition.
Using the Ice and Water Dispenser
Press the dispenser selection button repeatedly until the light above the icon that you want illuminates.
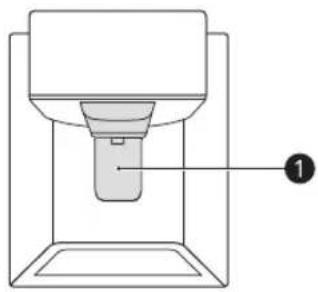
Press the dispenser paddle ① with a glass or other container to dispense cubed ice, water or crushed ice.
natural_image
Diagram of a mechanical device with a central component and labeled part (1), no text or symbols present.Cleaning the Dispenser
Cleaning the Ice and Water Outlet
Wipe the water outlet ① or ice outlet ② frequently with a clean cloth as it may get dirty easily.
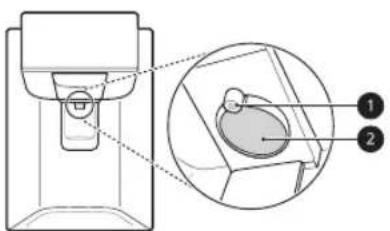
text_image
Technical diagram of a device with labeled parts, showing a close-up view and detail view.NOTE
- Lint from a cloth may adhere to the outlets.
Cleaning the Dispenser Tray
Wipe the entire area with a damp cloth. The dispenser tray may become wet easily due to spilled ice or water.
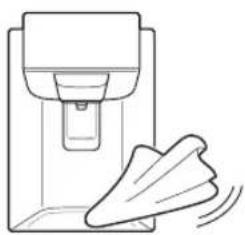
natural_image
Simple line drawing of a device with a funnel and a leaf-like object below (no text or symbols)Automatic Icemaker
This feature is only available on some models. This feature may vary depending on model purchased.
Before Using the In-Door Icemaker
- The icemaker produces ice normally when approximately 48 hours have passed after the appliance is initially installed.
- If the ice bin is completely filled with ice, ice production will stop.
• Sound of ice dropping into the ice bin is normal. - If ice cubes are stored in the ice bin for a long period of time, they may clump together and may not be separated easily. In such a case, empty the ice bin and allow fresh ice to be made.
CAUTION
- It is normal for milky or cloudy water to be dispensed after replacing the water filter. This air in the water will clear eventually and is safe to drink.
- The first ice and water dispensed may include particles or odour from the water supply line or the water tank.
natural_image
Pure geometric lines and shapes without any text, numbers, or symbols
natural_image
Pure geometric diagram with intersecting lines and shapes, no text or symbols present24 OPERATION
CAUTION
- If discolored ice is dispensed, check the water tank and the water supply for a possible source. If the problem continues, contact the LG Electronics customer information centre. Do not use the ice or water until the problem is corrected.
- Do not touch the ice outlet or the automatic icemaker with your hand or a tool.
- Dispense ice into a glass before filling it with water or other beverages. Splashing will occur if ice is dispensed into a glass that already contains liquid.
- Never use a glass that is exceptionally narrow or deep. Ice may jam in the ice passage, affecting the performance of the appliance.
- Keep the glass at a proper distance from the ice outlet. A glass held too close to the outlet may prevent ice from dispensing.
- Dispose of the ice inside the ice bin if you go on vacation or if an extended power outage occurs. Water from melting ice may drop from the dispenser onto the floor.
In-Door Icemaker
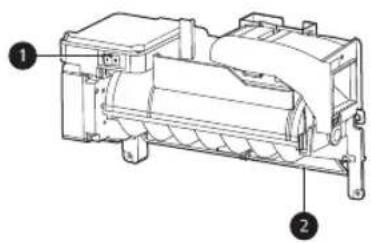
The automatic icemaker can automatically make 70 - 182 cubes at a time, within a 24-hour period if conditions are favorable. This amount may vary according to the environment (ambient temperature around the appliance, frequency of the door being opened, amount of food stored in the appliance, etc.).
text_image
Technical diagram of a mechanical device with numbered components, likely an electrical or mechanical assembly.① Power Switch
2 Auto Shutoff (feeler arm)
In-Door Icemaker
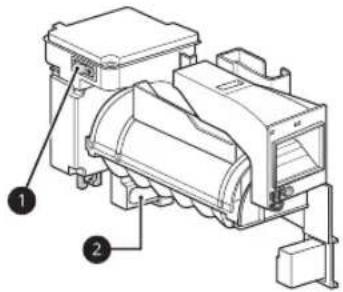
The automatic icemaker can automatically make 70 - 182 cubes at a time, within a 24-hour period if conditions are favorable. This amount may vary according to the environment (ambient temperature around the appliance, frequency of the door being opened, amount of food stored in the appliance, etc.).
text_image
Technical diagram of a mechanical device with numbered components, likely an engine or motor assembly.1 Power Switch
2 Ice-detecting Sensor
Door in Door
This feature is only available on some models.
Using the Door in Door
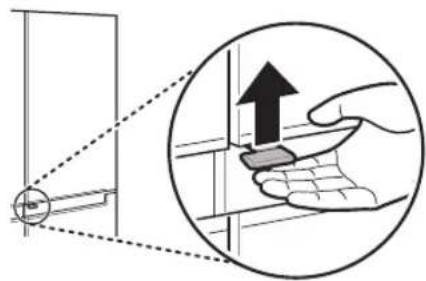
Pull the lever at the bottom of the door upwards until the door in door opens.
There is plenty of storage space inside the door in door and its surrounding baskets, allowing you to store food in an organized manner.
text_image
Diagram illustrating a hand holding a tool with an upward arrow, alongside a magnified view of the tool's tip.CAUTION
- Do not open the door of the appliance with the door in door open, or do not open the door in door while the door of the appliance is open. The
door in door may be struck by the edge of the appliance and damaged.
Removing/Refitting the Door in Door Case
CAUTION
- Remove contents from the Door in Door compartment before removal.
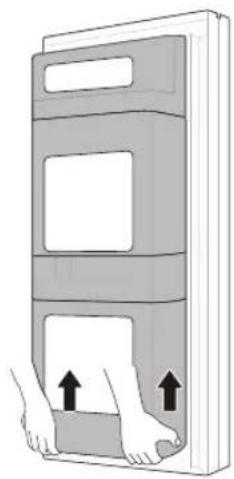
1 Open the doors completely and remove the contents of the Door in Door case. Lift up and pull out the Door in Door case.
natural_image
Illustration of a hand pressing down on a multi-tiered storage unit with arrows indicating force or movement (no text or symbols)2 Mount them in the reverse order of the removal process.
Drawer
CAUTION
• Always empty the drawers before removing them, and use both hands when removing and refitting them.
• Make sure that the fridge doors are fully open before removing and refitting the drawers.
Using the Vegetable Drawer
*1 This feature is only available on some models.
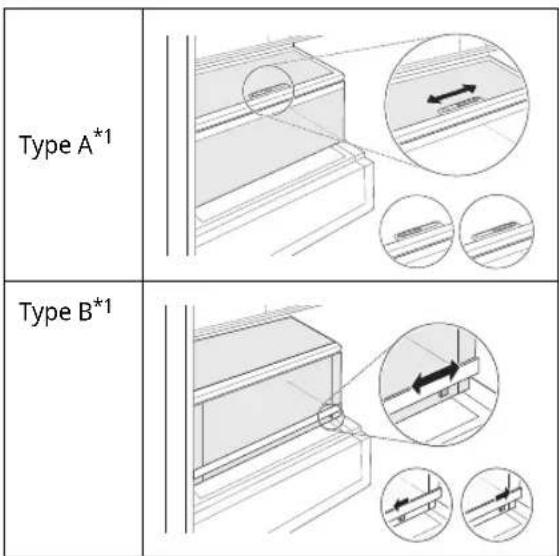
The humidity in the vegetable crisper drawer can be controlled by sliding the lever in either direction.
- If moved to the left side, the air guide will be open and allow air to circulate through the drawer for reduced humidity.
- If moved to the right side, the air guide will be closed and will maintain any humidity that is currently in the crisper drawer.
text_image
Type A*1 Type B*1Removing/Refitting the Drawers
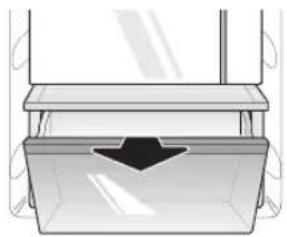
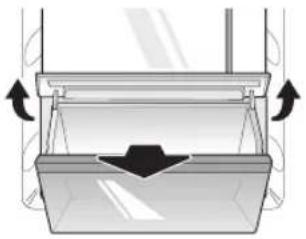
1 Remove the contents of the drawer. Hold the handle of the vegetable drawers and gently pull them out.
natural_image
Diagram of a container with a handle and arrow symbol, no text or labels present
natural_image
Pure geometric lines and crosshair symbols without any text or labels
natural_image
Pure geometric diagram with intersecting lines and shapes, no text or symbols present
natural_image
Pure electrical circuit lines without any symbols
natural_image
Pure geometric diagram with intersecting lines and circles, no text or symbols present26 OPERATION
2 Lift the vegetable drawer up and remove it by pulling it out.
natural_image
Diagram of a mechanical device with arrows indicating rotation or force direction (no text or symbols)3 Mount them in the reverse order of the removal process.
CAUTION
• Always empty the drawers before removing them, and use both hands when removing and refitting them.
• Make sure that the fridge doors are fully open before removing and assembling the drawers.
Shelf
CAUTION
• Glass shelves are heavy. Use special care when removing them.
- Do not clean glass shelves with warm water while they are cold. Shelves may break if exposed to sudden temperature changes or impact.
Removing/Refitting the Shelf
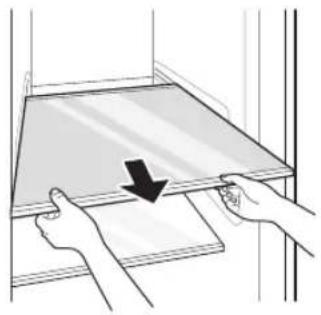
1 Tilt up the front of the shelf and then lift the shelf straight up.
2 Pull the shelf out.
natural_image
Illustration of hands holding a transparent rectangular object with a black arrow pointing to it (no text or symbols)3 Mount them in the reverse order of the removal process.
CAUTION
• Glass shelves are heavy. Use special care when removing them.
- Do not clean glass shelves with warm water while they are cold. Shelves may break if exposed to sudden temperature changes or impact.
• Make sure that shelves are level from one side to the other. Failure to do so may result in the shelf falling or food spilling.
Icemaker
Before Using the Icemaker
WARNING
- Fill with potable water only into icemaker or dispenser water tank.
NOTE
- The icemaker produces ice normally once approximately 48 hours have passed after the appliance is initially installed.
- If half-frozen ice is put into the ice storage bin, it will cause the exiting ice cubes to lump together. It takes about 4 hours at - 20 °C for ice production.
natural_image
Pure geometric lines and shapes without any text, numbers, or symbols
natural_image
Pure geometric diagram with intersecting lines and shapes, no text or symbols present
natural_image
Pure electrical circuit lines without any symbolsOPERATION
27
- If the freezer door is frequently opened, warm air enters the freezer compartment. It may take a longer time to freeze ice.
- Be careful not to twist the ice maker with force since it can break.
- Do not freeze the ice in the ice storage bin. This could break it and cause appliance damage or injury.
Using the Icemaker
*1 This feature is only available on some models.
Icemaker Type A ^*1
1 Hold the handle of ice tray and pull it out.

2 Fill the ice tray with potable water up to the water line.
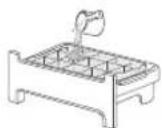
3 Place the ice tray back to its position carefully.
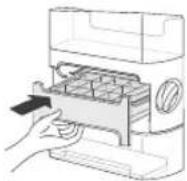
4 Rotate the icemaker handle clockwise.
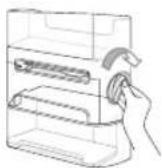
5 Lift and remover the ice storage bin slightly.
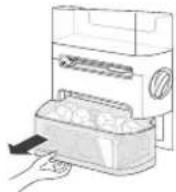
Icemaker Type B\*1
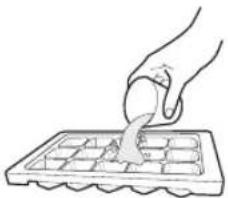
1 Fill the ice tray with potable water and place it in the freezer compartment.
natural_image
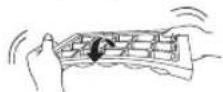
Hand using a tool to cut or spread a grid of small objects (no text or symbols visible)2 After the water is frozen, hold the ice tray at its ends and twist gently.
NOTE
- You can remove the icemaker or ice storage bin to create more space inside the freezer if you do not use it.
Door Basket
Removing/Refitting the Door Basket
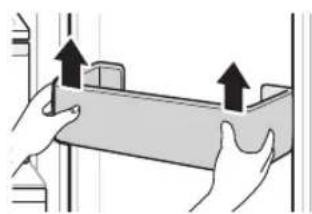
1 Hold both edges of the basket and remove it by lifting it upward.
natural_image
Illustration of two hands holding a rectangular object with upward arrows indicating motion or force (no text or symbols)
natural_image
Pure geometric lines and crosshair symbols without any text or labels
natural_image
Pure geometric diagram with intersecting lines and shapes, no text or symbols present
natural_image
Pure electrical circuit lines without any symbolsglobal_main.book.book Page 28 Monday, August 31, 2020 1:42 PM
natural_image
Pure geometric diagram with intersecting lines and circles, no text or symbols present28 OPERATION
2 Refit the door baskets in the reverse order of the removal process.
3 Mount them in the reverse order of the removal process.
natural_image
Pure geometric lines and crosshair symbols without any text or labels
natural_image
Pure geometric diagram with intersecting lines and shapes, no text or symbols presentSMART FUNCTIONS
LG ThinQ Application
This feature is only available on models with the Ⓧ or Ⓧ logo.
The LG ThinQ application allows you to communicate with the appliance using a smartphone.
LG ThinQ Application Feature
Smart Diagnosis
If you experience a problem while using the appliance, this smart diagnosis feature will help you diagnose the problem.
NOTE
- The application is subject to change for product improvement purposes without notice to users.
Installing the LG ThinQ Application
Search for the LG ThinQ application from the Google Play Store or Apple App Store on a smartphone. Follow instructions to download and install the application.
Smart Diagnosis
This feature is only available on models with the ⚙ or ⚙ logo.
Use this feature to help you diagnose and solve problems with your appliance.
NOTE
- For reasons not attributable to LGE's negligence, the service may not operate due to external factors such as, but not limited to, Wi-Fi unavailability, Wi-Fi disconnection, local app store policy, or app unavailability.
• The feature may be subject to change without prior notice and may have a different form depending on where you are located.
Using LG ThinQ to Diagnose Issues
If you experience a problem with your Wi-Fi equipped appliance, it can transmit troubleshooting data to a smartphone using the LG ThinQ application.
- Launch the LG ThinQ application and select the Smart Diagnosis feature in the menu. Follow the instructions provided in the LG ThinQ application.
Using Audible Diagnosis to Diagnose Issues
Follow the instructions below to use the audible diagnosis method.
- Launch the LG ThinQ application and select the Smart Diagnosis feature in the menu. Follow the instructions for audible diagnosis provided in the LG ThinQ application.
1 Press the Lock button to activate the lock function.
- If the display has been locked for over 5 minutes, you must deactivate the lock and then reactivate it.
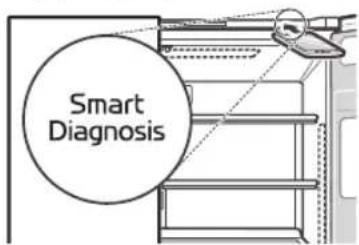
2 Open the fridge door and then hold the phone on the upper right speaker hole.
text_image
Smart Diagnosis
natural_image
Pure geometric lines and shapes without any text, numbers, or symbols
natural_image
Pure geometric diagram with intersecting lines and shapes, no text or symbols present
natural_image
Pure electrical circuit lines without any symbolsglobal_main.book.book Page 30 Monday, August 31, 2020 1:42 PM
natural_image
Pure geometric diagram with intersecting lines and circles, no text or symbols present30 SMART FUNCTIONS
3 Press and hold the Freezer button for three seconds or longer while holding your phone to the speaker until the data transfer is complete.
4 After the data transfer is complete, the diagnosis will be displayed in the application.
NOTE
- For best results, do not move the phone while the tones are being transmitted.
natural_image
Pure geometric lines and shapes without any text, numbers, or symbols
natural_image
Pure geometric diagram with intersecting lines and shapes, no text or symbols presentMAINTENANCE
Cleaning
General Cleaning Tips
- Performing manual defrosting, maintenance or cleaning of the appliance while food is stored in the freezer can raise the temperature of the food and reduce its storage life.
• Regularly clean any surfaces that can come in contact with food. - When cleaning the inside or outside of the appliance, do not wipe it with a rough brush, toothpaste, or flammable materials. Do not use cleaning agents containing flammable substances. This may cause discolouration or damage to the appliance.
- Flammable substances: alcohol (ethanol, methanol, isopropyl alcohol, isobutyl alcohol, etc.), thinner, bleach, benzene, flammable liquid, abrasive, etc.
• After cleaning, check if the power cable is damaged.
Cleaning the Exterior
- When cleaning the outside air vents of the appliance by means of vacuuming, then the power cord should be unplugged from the outlet to avoid any static discharge that can damage the electronics or cause an electric shock. Regular cleaning of the rear and side ventilation covers is recommended to maintain reliable and economical operation of the unit.
- Keep the air vents on the exterior of the appliance clean. Blocked air vents can cause fire or appliance damage.
- For the appliance exterior, use a clean sponge or soft cloth and a mild detergent in warm water. Do not use abrasive or harsh cleaners. Dry thoroughly with a soft cloth. Do not use contaminated cloths when cleaning the stainless steel doors. Always use a dedicated cloth and wipe in the same direction as the grain. This helps reduce surface staining and tarnishing.
Cleaning the Interior
- When removing a shelf or drawer from inside the appliance, remove all stored foods from the shelf or drawer to prevent injury or damage to the appliance. Otherwise, injury may occur due to the weight of stored foods.
- Detach the shelves and drawers and clean them with water, and then dry them sufficiently, before replacing them.
- Regularly wipe the door gaskets with a wet soft towel.
- Door basket spills and stains should be cleaned as they can compromise storage ability of the basket and could even be damaged.
- Never clean the shelves or containers in the dishwasher. The parts may become deformed due to the heat.
Cleaning the Condenser Cover
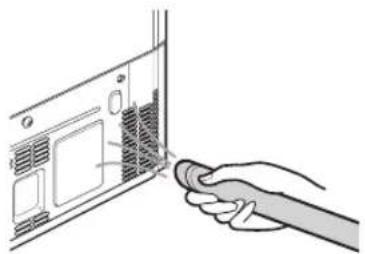
Use a vacuum cleaner with a brush to clean the condenser cover and vents. Do not remove the panel covering the condenser coil area.
We recommend that this be done every 12 months to maintain operating efficiency.
natural_image
Hand inserting a button into a computer drive (no text or symbols visible)
natural_image
Pure geometric lines and shapes without any text, numbers, or symbols
natural_image
Pure geometric diagram with intersecting lines and shapes, no text or symbols present32 MAINTENANCE
Water Filter
Before Replacing the Water Filter
WARNING
- Do not allow children to have access to small parts during the installation of this product.
- Do not use with water that is microbiologically unsafe or of unknown quality without adequate disinfection before or after the system. Systems certified for cyst reduction may be used on disinfected water that may contain filterable cysts.
CAUTION
- Do not install if water pressure exceeds 827 kPa. If your water pressure exceeds 827 kPa, you must install a pressure limiting valve. Contact a plumbing professional if you are uncertain how to check your water pressure.
- Do not install where water hammer conditions may occur. If water hammer conditions exist, you must install a water hammer arrester. Contact a plumbing professional if you are uncertain how to check for this condition.
- Do not install on hot water supply lines. The maximum operating water temperature of this filter system is 37.8 °C.
- Protect filter from freezing. Drain filter when temperatures drop below 4.4 °C.
- The disposable filter cartridge MUST be replaced every 6 months, at the rated capacity or if a noticeable reduction in flow rate occurs.
- Where a backflow prevention device is installed on a water system, a device for controlling pressure due to thermal expansion must be installed.
- Ensure all tubing and fittings are secure and free of leaks.
NOTE
- While the testing was performed under standard laboratory conditions, actual performance may vary.
- It is essential that the manufacturer's recommended installation, maintenance and filter replacement requirements be carried out for the product to perform as advertised.
| Application Guidelines/Water Supply Parameters | |
| Service Flow 1.9 lpm | |
| Water Supply Community or Private Well - Potable Water | |
| Water Pressure 138 - 827 kPa | |
| Water Temperature | 0.6 - 37.8°C |
| Capacity 1892 litres | |
Replacing the Water Filter (Plumbed Model)
*1 This feature is only available on some models.
The filter must be changed every 6 months or when the indicator lights turns on or the water dispenser output decreases.
• To purchase a replacement water filter:
- Use replacement cartridge: ADQ736939**
- Visit your local dealer or distributor or contact the LG Electronics Customer Information Centre. For further assistance, visit our website at lg.com
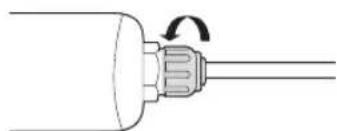
Thread Nut Type ^*1
1 Loose the screw cap.
natural_image
Simple line drawing of a mechanical component with a rotating arrow (no text or symbols)
natural_image
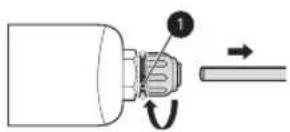
Pure electrical circuit lines without any symbols2 Pull the pipe out from the water filter cap until the colored line ① is visible.
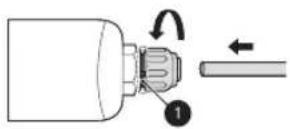
3 Push the pipe into the water fitler cap, making sure the end is fully sealed.
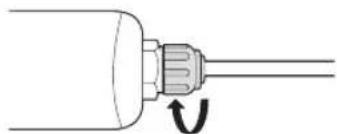
4 Tighten the screw cap until the colored line in the water filter is no longer visible.
natural_image
Simple line drawing of a mechanical component with a curved arrow indicating rotation (no text or symbols)5 Press and hold the Water Filter button for three seconds. That resets the Replacement Filter icon. The new water filter has been activated.
6 Dispense water for approximately 5 minutes to remove trapped air and contaminants from the system.
Push fit connector type ^*1
1 Remove the screw cap.
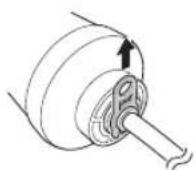
2 Pull the pipe out from the water fitler.
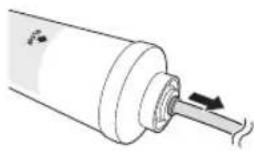
3 Push the pipe into the water fitler, making sure the end is fully sealed.
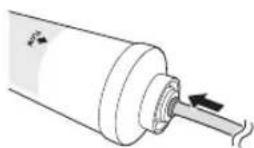
4 Insert the screw cap until the colored line in the water filter is no longer visible.
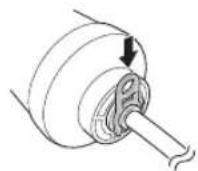
5 Press and hold the Water Filter button for three seconds. That resets the Replacement Filter icon. The new water filter has been activated.
6 Dispense water for approximately 5 minutes to remove trapped air and contaminants from the system.
CAUTION
- Failure to replace filters when required or using non LG authorised water filters can cause the filter cartridge to leak and result in property damage.
natural_image
Pure geometric lines and crosshair symbols without any text or labels
natural_image
Pure geometric diagram with intersecting lines and shapes, no text or symbols present34 TROUBLESHOOTING
TROUBLESHOOTING
Before Calling for Service
Cooling
| Symptoms Possible Cause & Solution | |
| There is no refrigeration or freezing. | Is there a power interruption?Check the power of other appliances. |
| Check the power of other appliances.Plug the power plug in the outlet properly. | |
| A fuse in your home may be blown or the circuit breaker tripped. Or the appliance is connected to a GFCI (Ground Fault Circuit Interrupter) outlet, and the outlet's circuit breaker has tripped.Check the main electrical box and replace the fuse or reset the circuit breaker. Do not increase fuse capacity. If the problem is a circuit overload, have it corrected by a qualified electrician.Reset the circuit breaker on the GFCI. If the problem persists, contact an electrician. | |
| There is poor refrigeration or freezing. | Is the fridge or freezer temperature set to its warmest setting?Set the fridge or freezer temperature to a colder setting. |
| Is the appliance in direct sunlight, or is it near a heat generating object such as cooking oven or heater?Check the installation area and reinstall it away from heat generating objects. | |
| Did you store hot food without cooling it first?Cool the hot food first before putting it in the fridge or freezer compartment. | |
| Did you put in too much food?Maintain an appropriate space between food. | |
| Are the appliance doors completely closed?Completely close the door and make sure that stored food is not obstructing in the door. | |
| Is there enough space around the appliance?Adjust the installation position to make enough space around the appliance. | |

natural_image
Pure geometric lines and shapes without any text, numbers, or symbols
natural_image
Pure geometric diagram with intersecting lines and shapes, no text or symbols present| Symptoms Possible Cause & Solution | |
| The appliance contains a bad smell. | Is the fridge or freezer temperature set to 'Warm'?Set the fridge or freezer temperature to a colder setting. |
| Did you put in food with a strong smell?Store foods with strong smells in sealed containers. | |
| Vegetables or fruit may have spoiled in the drawer.Strow away rotten vegetables and clean the vegetable drawer. Do not store vegetables too long in the vegetable drawer. | |

natural_image
Pure geometric lines and shapes without any text, numbers, or symbols
natural_image
Pure geometric diagram with intersecting lines and shapes, no text or symbols present36 TROUBLESHOOTING
Ice & Water
| Symptoms Possible Cause & Solution | |
| The automatic icemaker does not produce ice or produces a small amount of ice. | Did you install the appliance recently?The ice maker produces ice normally when approximately 48 hours have passed after the appliance is installed.If the fridge compartment temperature is too cold, the water filter can freeze and block the water flow to the ice maker. |
| Did you connect the water supply pipe to the appliance and open the supply valve?Connect the water supply pipe to the appliance and open the supply valve completely. | |
| Is the water supply hose bent?If the water supply hose is bent, the water flow could be compromised. | |
| Have you dispensed a large amount of ice recently?It takes approximately 24 hours to produce more ice in the automatic icemaker. Please wait. | |
| Did you set the ice maker switch or the automatic icemaker button on the control panel to ON?Press I on the automatic icemaker switch or set ON for the automatic icemaker button on the control panel. (For more details on how to use, visit LG Electronics website or use your smart device.) | |
| Is the temperature of the freezer compartment set too high?If the set temperature is too warm, ice will be produced slowly or not at all. Set the Freezer temperature to -18 °C for normal operation of the automatic icemaker. | |
| Have you been opening the appliance door frequently?If you open the appliance door frequently, cold air will escape, lowering the speed of ice production. Do not open and close the appliance door frequently. | |
| Is the appliance door completely closed?If the appliance door is not completely closed, the temperature of the freezer compartment will increase, slowing down the ice production speed. Close the appliance door completely. | |
| Ice is not dispensed. Unable to hear the sound of ice coming out?In the control panel, select the modes for cubed ice and crushed ice alternately to dispense the ice. | |
natural_image
Pure geometric lines and shapes without any text, numbers, or symbols
natural_image
Pure geometric diagram with intersecting lines and shapes, no text or symbols present| Symptoms Possible Cause & Solution | |
| Water does not come out. | The supply valve may be turned off. (For Plumbed models Only)Open the water supply valve.Check if the fridge compartment temperature is too cold, as the water filter can freeze and block the water flow to the dispenser. |
| The water dispenser tank may be empty. (Non plumbed models only)Fill the water dispenser tank. | |
| Is the water supply valve closed? (For Plumbed models Only)Open the water supply valve. | |
| Are you using unfiltered water?Unfiltered water can contain a large amount of various heavy metals or foreign substances, so the filter may be clogged in the early stage regardless of the life of the filter. | |
| Water tastes strange. | Is the taste of water different when comparing it with the taste of water from the previous water purifier?Has the purified water or cold water not been used for an extended period of time? |
| Has it been a long time since you installed and replaced the filter?If an expired filter is used, the purification performance may decline. It is recommended to replace the filter according to the filter replacement period. | |
| Have you flushed out the filter properly in the initial stage after installing it?When you install or replace the filter for the first time, you need to remove air and activated carbon residue from inside the filter. Use the appliance after dispensing and discharging approximately 5 litres of purified water from the dispenser by pressing the water dispensing lever. (Activated carbon is harmless to humans.) | |
| Has the purified water or cold water not been used for an extended period of time?The taste of old water may change due to bacterial growth. Use the product after dispensing and discharging approximately 5 litres (approximately three minutes) from the water dispenser. | |
natural_image
Pure geometric lines and shapes without any text, numbers, or symbols
natural_image
Pure geometric diagram with intersecting lines and shapes, no text or symbols present38 TROUBLESHOOTING
Condensation & Frost
| Symptoms Possible Cause & Solution | |
| There is condensation inside the appliance or on the bottom of the vegetable drawer cover. | Did you store hot food without cooling it first?Cool the hot food first before putting it inside the fridge or freezer. |
| Did you leave the appliance door open?Although the condensation will disappear soon after you close the appliance door, you can wipe it with a dry cloth. | |
| Do you open and close the appliance door too frequently?Condensation can form due to the temperature difference from the outside. Wipe out the dampness with a dry cloth. | |
| Did you put warm or moist food inside without sealing it in a container?Store food in a covered or sealed container. | |
| Frost has formed in the freezer compartment. | Doors may not be closed properly.Check if the food item inside the appliance is blocking the door and make sure that the door is tightly closed. |
| Did you store hot food without cooling it first?Cool the hot food first before putting it in the fridge or freezer compartment. | |
| Is the air entry or exit of the freezer compartment blocked?Make sure that air entry or exit is not blocked so that the air can circulate inside. | |
| Is the freezer compartment overfilled?Maintain an appropriate space between items. | |
| Frost or condensation has formed inside or outside the appliance. | Did you open and close the appliance door frequently or is the appliance door improperly closed?Frosts or condensation can form if the outside air penetrates inside the appliance. |
| Is the installation environment humid?Condensation can appear on the exterior of the appliance if the installation area is too humid or on a humid day such as a rainy day. Wipe off any moisture with a dry cloth. | |
| The side or front of the appliance is warm. | There are anti condensation pipes fitted to these areas of the appliance to reduce condensation forming from around the door area.The heat releasing pipe to prevent condensation is installed on the front and side of the appliance. You may feel it particularly hot right after the appliance is installed or during the summer. You can be assured that this is not a problem and is quite normal. |
natural_image
Pure geometric lines and shapes without any text, numbers, or symbols
natural_image
Pure geometric diagram with intersecting lines and shapes, no text or symbols present| Symptoms Possible Cause & Solution | |
| There is water inside or outside of the appliance. | Is there water leakage around the appliance?Check if the water has leaked from a sink or another place. |
| Is there water on the bottom of the appliance?Check if the water is from the thawed frozen food or a broken or dropped container. | |
Parts & Features
| Symptoms Possible | Cause & Solution |
| The appliance door is not closed tightly. | Is the appliance leaning forward?Adjust the front feet to raise the front side slightly. |
| Were the shelves properly assembled?Refit the shelves if needed. | |
| Did you close the door with excessive force?If you apply too much force or speed when closing the door, it may remain briefly open before closing. Make sure that you do not slam the door closed. Close the door gently. | |
| It is difficult to open the appliance door. | Did you open the door right after you closed it?If you try to open the appliance door within one minute after you closed it, you may have difficulties because of the pressure inside the appliance. Try to open the appliance door again in a few minutes so that the internal pressure stabilizes. |
| Door mullion does not fold in and out properly. | Are front levelling legs extended, the appliance level, and doors aligned?Once the door baskets are filled, the doors may become misaligned, preventing the door mullion or the Auto Open Door function from working properly. Extend both front levelling legs fully so they are in firm contact with the floor. Follow the instruction in the Door Alignment section to raise the left fridge door until the door mullion is once again working properly. Adjust the right fridge door so it aligns with the left fridge door. |
| The inside lamp in the appliance does not turn on. | Lamp failureClose the door and re-open. If the lamp does not turn on, please contact the LG Electronics customer information centre. Do not attempt removal of the lamp. |
natural_image
Pure geometric lines and shapes without any text, numbers, or symbols
natural_image
Pure geometric diagram with intersecting lines and shapes, no text or symbols present40 TROUBLESHOOTING
Noises
| Symptoms Possible Cause & Solution | |
| The appliance is noisy and generates abnormal sounds. | Is the appliance installed on a weak floor or improperly levelled?• Install the appliance on a solid and flat area. |
| Does the rear of the appliance touch the wall?• Adjust the installation position to allow enough clearance around the appliance. | |
| Are objects scattered behind the appliance?• Remove the scattered objects from behind the appliance. | |
| Is there an object on top of the appliance?• Remove the object on top of the appliance. | |
| Clicking noises The defrost control will click when the automatic defrost cycle begins and ends. The thermostat control (or appliance control on some models) will also click when cycling on and off.• Normal Operation | |
| Rattling noises Rattling noises may come from the flow of appliance, the water line on the back of the unit (for plumbed models only), or items stored on top of or around the appliance.• Normal Operation | |
| Whooshing noises Evaporator fan motor is circulating air through the fridge and freezer compartments.• Normal Operation | |
| Gurgling noises Appliance flowing through the cooling system.• Normal Operation | |
| Popping noises Contraction and expansion of the inside walls due to changes in temperature.• Normal Operation | |
natural_image
Pure geometric lines and shapes without any text, numbers, or symbols
natural_image
Pure geometric diagram with intersecting lines and shapes, no text or symbols present| Symptoms Possible Cause & Solution | |
| Vibrating If the side or back of the appliance is touching a cabinet or wall, some of the normal vibrations may make an audible sound.· To eliminate the noise, make sure that the sides and back do not make any contact with any wall or cabinet. |
natural_image
Pure geometric lines and shapes without any text, numbers, or symbols
natural_image
Pure geometric diagram with intersecting lines and shapes, no text or symbols presentMemo
Memo
global_main.book.book Page 44 Monday, August 31, 2020 1:42 PM
LG
Life's Good