UX-F327S - Hi-Fi System JVC - Free user manual and instructions
Find the device manual for free UX-F327S JVC in PDF.

User questions about UX-F327S JVC
0 question about this device. Answer the ones you know or ask your own.
Ask a new question about this device
Download the instructions for your Hi-Fi System in PDF format for free! Find your manual UX-F327S - JVC and take your electronic device back in hand. On this page are published all the documents necessary for the use of your device. UX-F327S by JVC.
USER MANUAL UX-F327S JVC
natural_image
Black JVC audio equipment setup with two speakers and a control panel (no visible text or labels)Table des matières
natural_image
Pure electrical circuit lines without any symbolsnatural_image
Diagram of an electronic device rear panel showing internal components and wiring (no text or labels)natural_image
Diagram of a device control panel with an inset showing a device inserted into a slot (no text or symbols visible)flowchart
graph LR
    A["Device"] --> B["Audio OUT"]
    B --> C["Control Unit"]
Hotline Darty France
natural_image
Black JVC audio equipment setup with two speakers and a control panel (no visible text or symbols)Inhoudsopgave
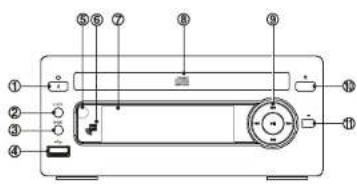
- Stand-byknop
- CLOCK knop
- MODE knop
- USB-aansluiting
- Afstandssensor
- NFC (Near Field Communication) gebied
- Display
- Disclade
- ▶ Afspelen/Pauze knop
▶▶ Volgende knop
Vorige knop
natural_image
Diagram of an electronic device showing front and side views with components like connectors and a central cable (no text or symbols)flowchart
graph LR
    A["Input Device"] --> B["Audio Out"]
    B --> C["Device"]
natural_image
Black JVC audio equipment setup with two speakers and a control panel (no visible text or labels)Índice de materias
natural_image
Diagram of an electronic device chassis showing internal components and wiring (no text or labels)natural_image
Diagram of a CD-ROM device with an open rear panel and a close-up view of its internal components (no text or symbols)natural_image
Black JVC audio equipment setup with two black audio blocks and a central JVC audio amplifier, connected to a remote control (no visible text or symbols)Índice
Darty Holdings SAS © 14 route d'Aulnay 93140 Bondy, France
Avisos de segurança
natural_image
Diagram of an electronic device showing internal components and wiring (no text or labels visible)Ligue o fio de controlo da energia entre o leitor de CDs e o amplificador.
PT-13
natural_image
Black JVC audio equipment setup with two speakers and a control panel (no visible text or symbols)Table of Contents
Safety Warnings....3
Battery Safety Guidelines....6
Pack Contents 7
Product Overview 8
Remote Control Overview 9
Installation of Battery 10
Handling the Remote Control....10
Remote Control Operation Range....11
Connections 12
Connecting the Speakers 13
Connecting the FM Antenna 13
Connecting the Power Control Cable 13 Connecting the AG Power Cord 14
Connecting the AC Power Cord....14
ECO-Power/Standby Features....14
Switching ON/OFF 14
Switching the system to ECO Power/Standby mode....14
Setting the Clock 14
Setting the Clock Manually 14
Setting the Clock Automatically 15
Display the Clock 15
Sound Quality....15
Adjusting the Volume 15
Mute sound 15
Adjusting the Super Bass 15
Adjusting the Bass....15
Adjusting the Treble....15
Controlling the Loudness....15 Pregotting Equalizer....15
Presetting Equalizer....15 Changing the Front Panel Darkness....16
16 Listen through headphone
Listening to Radio Broadcasts....16
Tuning in to a Station 16
Presetting Stations 16
To change the FM Reception Mode 17
Show RDS information....17
CD Operation 18
CD Playing 18
Direct Select track 18
To Skip Search and Play 18
To Search 18
Text Display During Playback 18
Programme Play 18
Playing the Beginning (Intro) of each Track....19
CPlaying Repeatedly (CD)....19
MP3/WMA Disc Playing 19
Playing Repeatedly (MP3 disc)....20
Use the USB 20
Play from USB 20
Access a folder 21
About NFC 21
Play from Bluetooth device....21
Set the alarm timer 22
Activate / deactivate alarm timer....22
Set sleep timer 22
Play from an external device 23
Maintenance 23
Cleaning the Unit 23
Handling Discs....23
Cleaning Discs 23
Storing Discs 24
Troubleshooting....24
Specifications 26
[European Union]
Dear Customer, This apparatus is in conformance with the valid European directives and standards regarding electromagnetic compatibility and electrical safety.
European representative of the manufacturer is: Darty Holdings SAS © 14 route d'Aulnay 93140 Bondy, France
Safety Warnings
This appliance is intended for domestic household use only and should not be used for any other purpose or in any other application, such as for non domestic use or in a commercial environment
Ventilation
Allow at least a 10 cm gap all around the product.
The ventilation should not be impeded by covering the ventilation openings with items, such as newspapers, table-cloths, curtains, etc.
❖ No naked flame sources, such as lighted candles, should be placed on the apparatus.
- Attention should be drawn to the environmental aspects of battery disposal. Don't throw used batteries in dustbin. Please contact your retailer in order to protect the environment.
- This apparatus is not suitable for use in a tropical climate.
The apparatus shall not be exposed to dripping or splashing and that no objects filled with liquids, such as vases, shall be placed on the apparatus.
To protect the environment, use local recycling facilities for battery disposal.
✿ Batteries (battery pack or batteries installed) shall not be exposed to excessive heat such as sunshine, fire or the like.
Where the MAINS plug or an appliance coupler is used as the disconnect device, the disconnect device shall remain readily operable.
Bluetooth The Bluetooth word mark and logos are registered trademarks owned by Bluetooth SIG, Inc. and any use of such marks by Zhongshan City LITAL Electronic Industrial Co., Ltd. is under license.
- Read all the instructions carefully before using the unit and keep them for future reference. - Retain the manual. If you pass the unit onto a third party make sure to include this manual.
Damage
- Please inspect the unit for damage after unpacking
- Do not continue to operate the unit if you are in any doubt about it working normally, or if it is damaged in any way-switch off, withdraw the mains plug and consult your dealer.
Location of Unit
- The unit must be placed on a flat stable surface and should not be subjected to vibrations.
- Do not place the unit on sloped or unstable surfaces as the unit may fall off or tip over.
- The mains socket must be located near the unit and should be easily accessible.
Temperature
- Avoid extreme degrees of temperature, either hot or cold. Place the unit well away from heat sources such as radiators or gas/electric fires.
- Avoid exposure to direct sunlight and other sources of heat.
Naked Flames
- Never place any type of candle or naked flame on the top of or near the unit.
Moisture
- To reduce the risk of fire, electric shock or product damage, do not expose this unit to rain, moisture, dripping or splashing. No objects filled with liquids, such as vases, should be placed on the unit.
- If you spill any liquid into the unit, it can cause serious damages. Switch it off at the mains immediately. Withdraw the mains plug and consult your dealer.
Ventilation
- To prevent the risk of electric shock or fire hazard due to overheating, ensure that curtains and other materials do not obstruct the ventilation vents.
- Do not install or place this unit in a bookcase, built-in cabinet or in another confined space. Ensure the unit is well ventilated.
Safety
- Always disconnect the unit from the mains supply before connecting/disconnecting other devices or moving the unit.
- Unplug the unit from the mains socket before a lightning storm.
Mains Cable
- Make sure the unit or the unit stand is not resting on top of the mains adapter cable, as the weight of the unit may damage the cable and create a safety hazard.
- Where the MAINS plug or an appliance coupler is used as the disconnect device, the disconnect device shall remain readily operable.
Interference
- Do not place the unit on or near appliances which may cause electromagnetic interference. If you do, it may adversely affect the operating performance of the unit, and cause a distorted picture or sound.
Batteries
- Batteries used in the remote control for this unit are easily swallowed by young children and this is dangerous.
- Keep loose batteries away from young children and make sure that the battery holder tray is secure in the remote control. Seek medical advice if you believe a cell has been swallowed.
- Please dispose of batteries correctly by following the guidance in this manual.
- Batteries (battery pack or batteries installed) shall not be exposed to excessive heat such as sunshine, fire or the like.
Supervision
- Children should be supervised to ensure that they do not play with the unit and the remote control.
- Never let anyone especially children push anything into the holes, slots or any other openings in the case - this could result in a fatal electric shock.
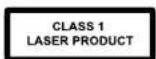
Class 1 Laser Product
- This unit utilizes a laser. Use of controls, adjustments or performance of procedures other than those specified herein may result in hazardous radiation exposure.
- Before moving the unit, ensure the disc tray isempty.
- Always remove the disc when the unit is not in use.
- Failure to do so will risk severely damaging the disc and the unit.
- Do no tstack devices, heat from other devices may affect the performance of the unit.

long periods.

The lightning flash with arrowhead symbol, within an equilateral triangle, is intended to alert the user to the presence of uninsulated "dangerous voltage" within the unit's enclosure that may be sufficient magnitude to constitute a risk of electric shock.

The exclamation point within an equilateral triangle is intended to alert the user to the presence of important operating and maintenance (servicing) instructions in the manual accompanying the unit.
Service
- To reduce the risk of electric shock, do not remove screws. The unit does not contain any user-serviceable parts. Please leave all maintenance work to qualified personnel.
- Do not open any fixed covers as this may expose dangerous voltages.
Maintenance
- Ensure the unit is fully unplugged from the power supply before cleaning.
- Do not use any type of abrasive pad or abrasive cleaning solutions as these may damage the unit's surface.
- Do not use liquids to clean the unit.
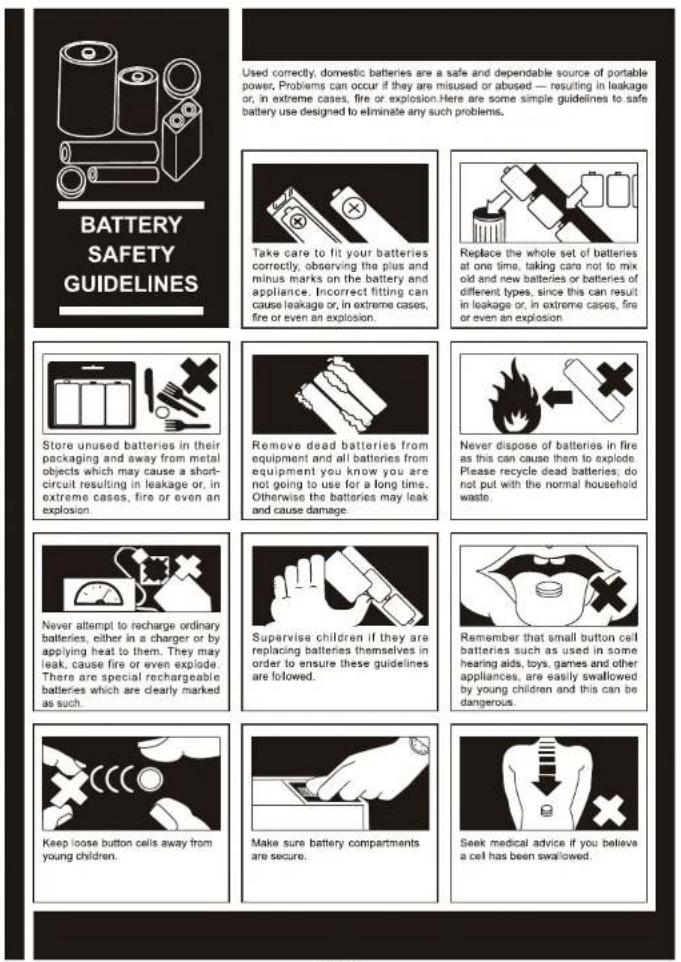
Used correctly, domestic batteries are a safe and dependable source of portable power. Problems can occur if they are misused or abused — resulting in leakage or, in extreme cases, fire or explosion. Here are some simple guidelines to safe battery use designed to eliminate any such problems.
Pack Contents
Make sure all of the following contents are included

The Unit
Speakers x 2
Remote Control (battery included)
FM Aerial
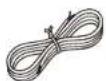
Speaker Line x 2
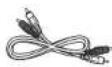
Audio Cable

Power Control Cable
Stand
Instruction Manual
Product Overview
CD Player
1 Standby Button
CLOCK
2. CLOCK Button
3. MODE Button
4. USB Socket
4. SSD Socket
5. Remote Sensor
6. NEC (Near Field Communication) area
7. Display Lens
8. Disc Tray
9. ▶ Play/Pause Button
Next Button
Previous Button
Fast Forward Button
Fast Backward Button
-
▲ Open/Close Button
-
■ Stop Button
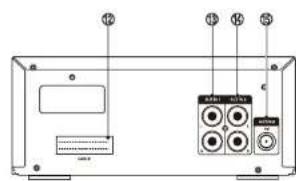
- Power Control Cable Socket
- AUX IN 1 Input Socket (L&R)
- AUX IN 2 Input Socket (L&R)
- FM Antenna Socket
Amplifier
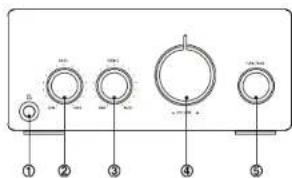
- Headphone Socket
- BASSKnob
- TREBLE Knob
-
VOLUME Control Knob
-
FUNCTION Knob
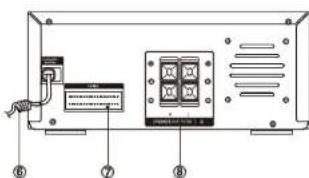
- AC Power Cord
- Power Control Cable Socket
- Speaker Output Sockets (L&R)
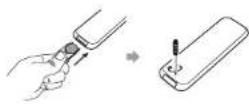
Remote Control Overview
- Standby Button (⏻)
- CD Function Button (CD)
- Tuner Function Button (FM)
- Mode Button (MODE)
Stereo/mono Select Button (MODE) - Intro Button (INTRO)
- Loudness Button (LOUDNESS)
- Preset Equalizer Button (P-EQ)
- Clock Button (CLOCK)
- Next Button (▶▶)
Preset Up Button - Search Backward Button (◀◀)
Tuning Backward Button (◀◀) - Previous Button (◀◀)
Preset Down Button - Play/Pause Button (▶II)
- Album Up Button (ALB+)
- Album Down Button (ALB-)
- Mute Button (MUTE)
- Number Button (0-9, 10+)
- Open/Close Button (▲)
- USB Function Button (USB)
- Bluetooth Function Button (Bluetooth)
AUX Function Button (AUX) - Repeat A-B Button (A-B)
- Dimmer Button (DIM)
- Super Bass Button (S-BASS)
- Sleep Button (SLEEP)
- Timer Button (TIMER)
- Display Button (DISPLAY)
RDS Display Button (DISPLAY) - Search Forward Button (▶▶)
Tuning Forward Button (▶▶) - Stop Button (■)
Pairing Cleared Button (PAIRING) - Volume Up Button (VOL +
- Volume Down Button (VOL-)
- Program Button (PROG)
Memory Button (PROG)
Installation of Battery
- Remove the insulating my lar strip from the battery. It is located at the bottom back side of the remote control.
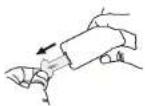
- Loosen the screw on the battery compartment cover with a screwdriver. Pull out the battery compartment with your fingernails.
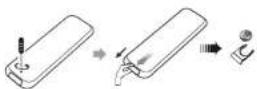
- Replace a new battery (size 2025) correctly and fully insert the battery compartment back to the original position. Tighten the screw with a screwdriver.
Handling the Remote Control
- Remove the batteries if the remote control is not going to be used for an extended period of time.
- To avoid possible failure, read the following instructions and handle the remote control properly.
- Do not drop or cause impact to the remote control.
- Do not spill water or any liquid on the remote control.
- Do not place the remote control on a wetobject.
- Do not place the remote control under the direct sunlight or near sources of excessive heat.
- Do not use caustic cleaners (porcelain, stainless steel, toilet, or oven cleaner etc.) on the remote, as it may suffer damage.
Note:
Remove the battery from remote control handset when it is not to be used for a long period. Otherwise it can be damaged due to leakage of battery.
Remote Control Operation Range
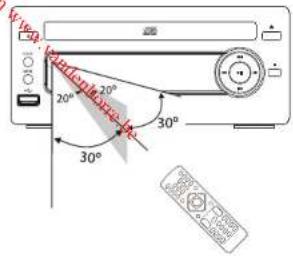
Point the remote control to the unit no more than 6 meters from the remote control sensor and within 60° horizontally and 40° vertically of the front of the unit. The operating distance may vary according to the brightness of the room.
Note:
- Make sure that there is no obstacle between the infrared remote sensor of the unit and remote control. If you install the unit on rack, etc., the remote controllable range may decrease depending on the thickness or colour of glass door ofrack.
- Do not expose the infrared remote sensor to direct sunlight or other strong light, such as inverter fluorescent light.
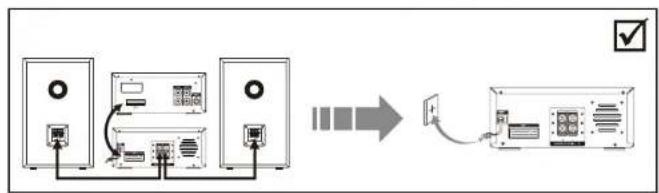
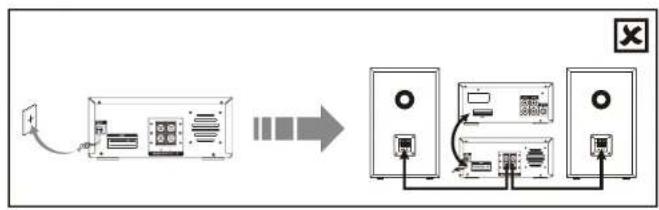
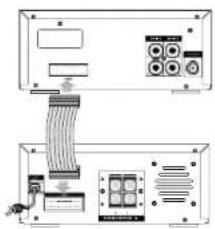
Connections
Caution: Make all connections before plugging the unit into the AC Power outlet.
Please note the correct steps for setting up the unit are as follows:
1. The speaker wires, control cable between CD player and amplifier are to be connected first.
2. After the above cables are correctly connected, the AC power cord can then be connected to power outlet.
Caution:
i) Reversing the steps by connecting the AC power cord first will cause malfunction of the unit.
ii) During operation, if the control cable requires to be reconnected, the AC power supply must be disconnected first. Otherwise, damages to the unit may be caused.
flowchart
graph LR
    A["Audio Device"] --> B["Data Input"]
    B --> C["Display Unit"]
    C --> D["Output Display Unit"]
    style A fill:#f9f,stroke:#333
    style B fill:#ccf,stroke:#333
    style C fill:#cfc,stroke:#333
    style D fill:#fcc,stroke:#333
flowchart
graph LR
    A["Device"] --> B["Input"]
    B --> C["Server 1"]
    C --> D["Server 2"]
    D --> E["Output"]
EN-12
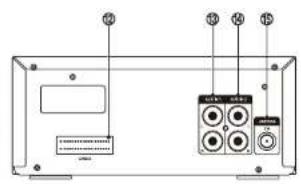
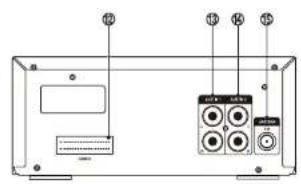
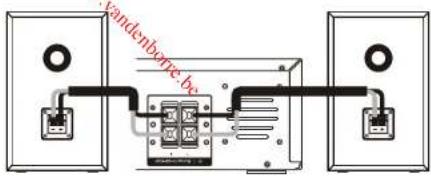
Connecting the Speakers
Connect the speaker cords between the terminals as shown below.
Connect the cable with a black head to the (-) terminals and cable with a red head to the (+) terminals.
Connecting the FM Antenna
-
Connect the supplied FM Antenna to the FM Antenna socket on the rear of the unit.
-
For better FM stereo reception, connect an outdoor FM antenna to the FM Antenna socket.

Caution: To avoid noise, keep aerials away from the system, the connecting cord and the AC power cord.
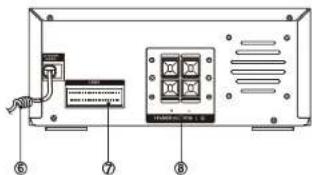
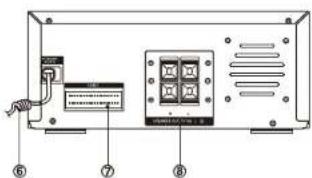
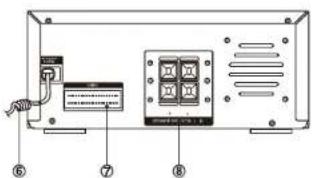
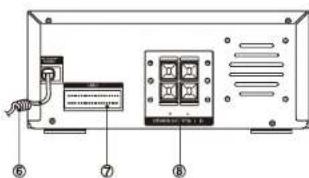
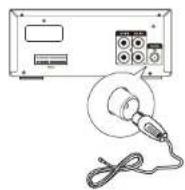
Connecting the Power Control Cable
natural_image
Technical diagram of an electronic device showing internal components and wiring (no text or labels)Connect the power control cable between the CD player and the amplifier.
EN-13
Connecting the AC Power Cord
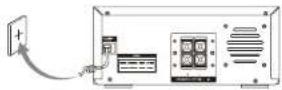
Insert the AC power cord into a wall outlet, then your unit is ready to use.
Caution:
* Be sure to unplug the power plug from the wall outlet when going out or when the unit is not in use for an extended period of time.
ECO-Power/Standby Features
Switching ON/OFF
When you insert the AC Power cord into a wall outlet, the unit will be in standby mode.
- Press the button to switch the unit on. The word "HELLO" will scroll across in the display.
- Press the ⏻ button to switch the unit back to standby mode. The words "BYE BYE" will scroll across in the display.
Switching the system to ECO Power/Standby mode
Press and hold the ⏻ button for 2 seconds or more to switch to ECO Power Standby or normal standby.
* ECO Power standby mode
The clock will not be displayed. Press the CLOCK button to display the clock on the display.
* Normal standby mode
clock display on the display.
Setting the Clock
Setting the Clock Manually
-
Set the unit in ECO power standby mode.
-
Press and hold the CLOCK button, the display lens will display CLOCK SET and CLOCK 24 begins to blink.
- Set the hour using ◀◀◀/▶▶
- Press the CLOCK button, the minute indicator will blink.
- Set the minute using ◀◀◀/▶▶
- Press the CLOCK button, the built-in clock starts operating.
Note: If a power failure occurs or the unit is disconnected from the mains, the clock setting will be lost.
Setting the Clock Automatically
Tune into a RDS station and wait for few minutes. To confirm, press the CLOCK button.
Display the Clock
In standby mode, press the CLOCK button.
Sound Quality
Adjusting the Volume
To increase or decrease the volume, rotate the -VOLUME + knob on the unit or press the VOL+/- buttons on the remote control.
Mute sound
During play, press the MUTE button to mute or unmute sound.
Note: If you change the volume or source when the sound is muted, muting is cancelled.
Adjusting the Super Bass
You can reinforce the bass sound to maintain rich, full bass at low volume.
Press the S-BASS button on the remote control to get the effect, the word "DBB" will lit on the front panel. Press the S-BASS button again to cancel the effect.
Adjusting the Bass
Rotate the BASS knob clockwise or counter clockwise on the Amplifier to adjust the intensity of the bass output sound.
Adjusting the Treble
Rotate the TREBLE knob clockwise or counter clockwise on the Amplifier to adjust the intensity of the treble output sound.
Controlling the Loudness
This unit has a loudness function, which can automatically increase the bass sound effect at low volume. It can also increase the bass sound effect at high volume, but it will be relatively less when it is at high volume. Press the LOUDNESS button on the remote control to obtain the loudness function, the icon "◀" will display on the front panel, press again will disappear.
Presetting Equalizer
You can adjust the sound reproduced simply by choosing from 5 preset equalizers. Press the P-EQ button repeatedly to scroll through the following options:

Changing the Front Panel Darkness
This unit has three brightness levels for you to adjust the clock display. Press the DIM button on the front panel or the remote control repeatedly to choose the desired brightness.
Listen through headphone
Plug a headphone into the socket on the rear of the unit.
Listening to Radio Broadcasts
You can listen to FM stations. Stations can be tuned in manually, automatically or from preset memory storage.
Caution:
Before listening to the radio, please check that the FM Antenna is correctly connected and adjusted for length and direction.
Tuning in to a Station
- Rotate the FUNCTION knob on the unitor press the FM button on the remote control. The word "TUNER" will be displayed on the front panel.
- Select a station using one of the following methods.
• Auto Tuning
Press and hold ◀◀/▶▶ for one second or more, the frequency changes down or up automatically until a station is found.
- Manual Tuning
Repeatedly press ◀◀/▶▶ to change the frequency until you find the station youwant.
- Preset Tuning (Available only after the stations are preset)
Repeatedly press ◄◀◀/▶▶ to select the desired preset number. Its band and frequency are displayed on the front panel.
Presetting Stations
You can manually preset up to 20 FM stations. To tune in to the desired station:
-
Press the PROG button on there mote control, the preset number will be displayed.
-
Press ◀◀◀/▶▶ to select the preset number.
Note: If you select more than 20, the preset number will be changed to "1" automatically.
-
Press the PROG button again to store the station. The display will return to the broadcast frequency display.
-
Repeat above steps 1 to 3 for each station you want to store in memory with a preset number.
Note: If the unit is unplugged or if a power failure occurs, the preset stations will not be erased after being stored.
To change the FM Reception Mode
Press the MODE button to select the Stereo or Mono channel to receive the best FM reception mode.
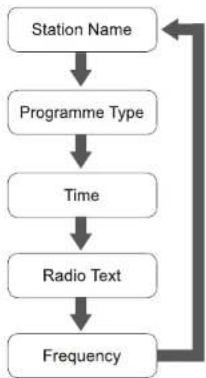
Show RDS information
Every time you press the DISPLAY button, the display will cycle through the following display modes: Station Name, Frequency, Programme Type, Radio Text, Date / Clock. The information is displayed on the lower segment of the display.
Station Name
When an RDS station is received, the name of that station will be displayed.
Programme Type
Programme type identification signal (Example: News, Rock, Classical music.)
Time
The RDS CLOCK system may not properly operate in areas where RDS CLOCK service is not available. Once RDS CLOCK service is available, the RDS CLOCK system will commence operation.
Radio Text
This displays a station description.
Frequency
This shows the frequency of the current station, e.g.89.80MHz.
flowchart
graph TD
    A["Station Name"] --> B["Programme Type"]
    B --> C["Time"]
    C --> D["Radio Text"]
    D --> E["Frequency"]
    E --> A
CD Operation
CD Playing
- Rotate the FUNCTION knob on the unit or press the CD button on the remote control. The word "DISC" will be displayed on the front panel.
- Press ▲ to open the disc door and place the disc on the disc tray (with the printed side up).
- Press ▲ to close the disc door, the unit will read the disc and play it automatically.
Note: If in stop mode, please press ▶II to start playing the disc.
- Press ▶II to pause the playing, press again to continue play.
- Press ■ to stop the disc playing.
Direct Select track
Load a disc, upon finishing reading the disc, you can select tracks by using 0-9,10+ buttons on the remote control and play.
• If the song number is less than 10, press the 0-9 buttons.
- If the song number is over 10, press the 10+ button and press the one of the 0-9 buttons. Each press of 10+ increases the tens by 1 e.g. 10, 20, 30, so for track '22' press '10+' twice then '2'.
To Skip Search and Play
- Press ◀◀◀ once or more to skip previous one or more tracks on the disc.
- Press ▶▶| once or more to skip forward one or more tracks on the disc.
To Search
Press and hold ◀◀ or ▶▶ to search for the position that you intend to start playing.
Text Display During Playback
Press the DISPLAY button to show the current track number and remaining playback time.
Programme Play
You can programme up to 20 tracks to play in any desired order. The player must be in STOP mode only with a CD inserted.
-
Insert a disc and press ■ when it starts playing
-
Press the PROG button and the display will show "01-P-01".
- Press the 0-9, +10 buttons or ◄◄◄/►►Ion the remote control to select the desired track number.
- Press the PROG button to confirm the track number to bestored.
- Repeat steps 3-4 to select and store all desired tracks.
- Press ▶II to start programme play.
- Press ■ once to stop the programme play. Press the ■ button twice to clear programme.
EN-18
Playing the Beginning (Intro) of each Track
Press the INTRO button on the remote control to play the beginning of each track consecutively. The playing time of each track is 10 seconds. When you hear the desired track, press the INTRO button.
Playing Repeatedly (CD)
- ONE and ALL Repeat Play can be set by pressing the MODE button.
First press : To repeat the same track, the words "TRK" and "REP" will blink.
Second press : To repeat playing all tracks on a disc, the words "TRK" will stay lit and "REPALL" will blink.
Third press : To play tracks randomly, the words "TRK" will stay lit and "SHUF" will blink.
Fourth press : To cancel the repeat playing, the word "SHUF" will disappear.
- Repeat A-B can be set by pressing the A-B button.
First press : Select the start point, the words "A-" will stay lit.
Second press : Select the end point, the words "A-B" will stay lit
Third press : To cancel repeat play, the words "A-B" will disappear.
Note: A-B repeat function can only be used within the same track.
MP3/WMA Disc Playing
Note: MP3/WMA music playback from CD maybe be affected due to the type and format of disc or condition of the recording. If you are having trouble playing a certain disc, it is recommended to use USB input instead for best MP3/WMA playback.
When selecting tracks the player will automatically display the album and track number. For example: track number 21 may be from album 3, track 7.
- Rotate the FUNCTION knob on the unit or press the CD button on the remote control. The word "DISC" will be displayed on the front panel.
- Press ▲ to open the disc door and place the MP3/WMA discon the disc tray.
- Press the DISPLAY button on the remote control, ID3 information (song title and artist) will be displayed or "NO ID3" if there is no ID3 information. Press this button again, and the album, track and playing time will be displayed.
- When playing MP3/WMA discs, the current album and track will be displayed
- Press ◀◀▶▶ to select the previous/next track. When pressing ◀◀/▶▶ buttons for a few seconds, it will search backward or search forward.
- Press the ALB+/- buttons on the remote control to select the next / previous album, and play the first track of this album.
If the playing has ended, press the ALB+/- buttons on the remote control to select the next/previous album
Then choose the track with ◀◀/▶▶
EN-19
-
Press the ▶|| button to start playing the disc.
-
Press ■ to stop playback.
Note: Play will continue to the final track when the selected tracks have been played. The first 2 digits of the display is the album number, the next 3 digits is the track number and the remaining digits display the minutes and seconds.
Playing Repeatedly (MP3 disc)
- ONE,ALB and ALL repeat play can be set by pressingt he MODE button.
First press : To repeat the same track, the words *
TRK ^2 and "REP" will blink.
Second press : To repeat playing album, the words "blink.
TRK" will stay lit and "REPALB" will
Third press : To repeat playing all tracks on a disc, the words "
TRK" will
stay lit and
REP ALL ^® will blink.
Fourth press : To play tracks randomly, the words 'blink.
TRK" will stay lit and "SHUF" will
Fifth press : To cancel the repeat playing, the word "
SHUF" will disappear.
- Repeat A-B can be set by pressing the A-B button.
First press : Select the start point, the words "
A-" will stay lit.
Second press : Select the end point, the words "
A-B" will stay lit.
Third press : To cancel repeat play, the words "
A-B" will disappear.
Note: A-B repeat function can only be used within the same track.
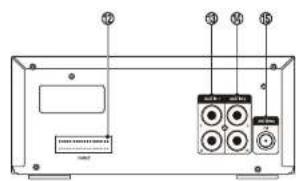
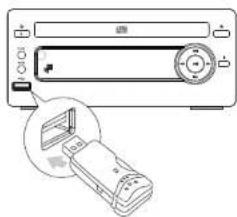
Use the USB
Play from USB
natural_image
Diagram of a device with a control panel and an open folder, showing no text or symbols.-
Insert the USB device's USB plug into the socket on the rear of unit.
-
Rotate the FUNCTION knob on the unit or press the USB button on remote control to select the USB
function. The word "USB" will display on the display lens.
-
The device's stored music will be played automatically.
-
In stop mode, press the ▶|| button to start playing thedisc.
During playing, press the ▶|| button to temporarily stop the playing, press the button again, it will continue to play.
- Press ■ to stop the disc playing. Note: The player support the USB music file format of MP3, WMA only.
EN-20
Access a folder
- During playing, press the ALB+/- buttons on the remote control to select a folder.
- In stop mode, press the AltB +/- buttons on the remote control to select a folder and press << >> to select a file, and then press the ▶|| button to start play.
About NFC
Pair your NFC (Near Field Communication) enabled mobile device directly with this unit by just a single tap.
-
Activate NFC on your mobile device.
-
Tap the mobile device on the NFC area of the unit.
-
Operate your mobile device directly for playback features.
-
Tap again on the NFC area of the unit to disconnect.
Note: This function only works with mobile devices that support NFC technology.
Play from Bluetooth device
The unit has a Bluetooth function that can receive a signal within 10 meters. Pairing the unit with a Bluetooth device to listen to music:
-
Rotate the FUNCTION knob on the unit or press the ⚙ button on the remote control to select the bluetooth source. The word "BT" will display on the display lens.
-
Activate the Bluetooth function in your Bluetooth device (see the device user manual).
-
Select "UX-F327S" on your device for pairing.
- For elder devices, you need to input "0000" as pairing pass word.
- Start music play on your Bluetooth device, you can use this unit to control the function to your Bluetooth device.
- To pause/resume play, press▶II.
- To skip to a track, press ◀◀◀/▶▶.
- To increase or decrease the volume, press VOL+/-
- Long pressing the PAIRING button on the remote control for 2 seconds or more to disable the Bluetooth function from your Bluetooth device.
Note:
* The operational range is approximately 10 meters.
* Any obstacle can reduce the operational range.
* The device will also be disconnected when the device is moved beyond the operation range.
* If you want to reconnect the device to the unit, place it within the operational range.
* This unit supports A2DP (Advanced Audio Distribution Profile).
* Compatibility with all Bluetooth devices is not guaranteed.
EN-21
Set the alarm timer
Note: Ensure that you have set the clock correctly.
- In clock state, press and hold the TIMER button until [TIMER SET] (set timer) scrolls on the display.
- Press ◀◀/▶▶/◀◀/▶▶ to select source.
- Press TIMER button to confirm. The hour digits will flash.
- Press ◀◀/▶◀/◀◀/▶▶ to set hour, and then press TIMER again. The minute digits will flash.
- Press ◀◀/▶◀/◀◀ /▶▶ to set minute, and then press TIMER to confirm.
- Press ALB+/- to adjust volume, and then press TIMER to confirm. A clock icon will appear on the display.
Activate / deactivate alarm timer
In the standby mode, press TIMER repeatedly.
* If timer is activated, the Ⓞ icon is displayed.
* If timer is deactivated, the Ⓞ icon disappears on the display. Note:
■ The alarm timer is not available when the source is set as "AUX".
■ If the USB source is selected but no device connected, the unit switches to TUNER automatically.
Set sleep timer
When the unit is turned on, repeatedly press SLEEP on the remote control to select a set period of time (in minutes): 120, 90, 60, 45, 30, 15
When sleep timer is activated, the display will show ZZ.
To deactivate sleep timer
Press SLEEP repeatedly until [OFF] is displayed. When sleep timer is deactivated, "ZZ" will disappear from the display.
Play from an external device
- Connect the AUX IN 1 or 2 sockets on the rear of the unit to the AUX output sockets on the auxiliary equipment with an audio cable illustrated below.

- Rotate the FUNCTION knob on the unit or repeatedly press AUX on the remote control to select AUX 1 or 2 source. The word "AUX 1" or "AUX 2" will display on the display lens.
- Start to play on the device (see the user manual of the external device).
Maintenance
Cleaning the Unit
Note: Ensure the unit is fully unplugged from the mains socket before cleaning.
- To clean the unit, wipe the case with a slightly moist, lint-free cloth.
- Do not use any cleaning fluids containing alcohol, ammonia or abrasives.
- Do not spray an aerosol at or near the unit
Handling Discs

Playback side

- Do not touch the playback side of the disc.
- Do not attach paper or tape to the disc.
Cleaning Discs

EN-23
- Fingerprints and dust on the disc cause picture and sound deterioration. Wipe the disc from the center outwards with a soft cloth. Always keep the disc clean.
- If you cannot wipe off the dust with a soft cloth, wipe the disc lightly with as lightly moistened cloth and finish with a dry cloth.
- Do not use any type of solvent such as thinner, benzene, commercially available cleaners or antistatic spray. They may damage the disc.
Storing Discs
- Do not store discs in places subjected to direct sunlight or near heat sources.
- Do not store discs in places subjected to moisture and dust such as a bathroom or near a humidifier.
- Storing discs vertically in a case, stacking discs or placing objects on discs outside of their cases may cause warping.
Troubleshooting
If you are having a problem with your unit, check this list for a possible solution before calling for service.
If you cannot solve the problem from the hints given here, or the unit has been physically damaged, call a qualified person, such as your dealer, for service.
No power
- Ensure that the AC power plug of the unit is connected properly.
- Ensure that there is power at the AC outlet.
- To save power, the unit switches to standby automatically 15 minutes after a play reaches the end and no control is operated.
Remote control does not work
- Before pressing any function button, first select the correct source with the remote control instead of the main unit.
- Reduce the distance between the remote control and the unit.
- Insert the battery with its polarities (+/- signs) aligned as indicated.
- Replace the batteries.
- Aim the remote control directly at the sensor on the front of the unit.
No disc detected
- Insert adisc.
- Check if the disc is inserted with the print side facing inward.
- Wait until the moisture condensation at the lens has cleared.
- Replace or clean the disc.
- Use a finalized CD or correct format disc.
No sound or poor sound
- Adjust the volume.
- Check that the speakers are connected correctly.
- Check if the stripped speaker wires are clamped.
Disc does not play
- Insert a readable disc and ensure that the label side faces up.
- Check for any scratches or smudges on the disc.
- Moisture has condensed inside the
EN-24
system. Remove the disc and leave the system turned on for about an hour. Disconnect and reconnect the AC power plug, and then turn on the system again.
- As a power-saving feature, the system turns off automatically 15 minutes after disc play reaches the end and no control is operated.
Poor radio reception
Fully extend and adjust the FM aerial.
Cannot display some files in USB device
- The number of folders or files in the USB device has exceeded a certain limit. This phenomenon is not a malfunction.
- The formats of these files are not supported.
USB device not supported
- The USB device is incompatible with the unit. Try another one.
Music playback is unavailable on this unit even after successful Bluetooth connection.
- The device cannot be used to play music through this unit wirelessly.
The audio quality is poor after connection with a Bluetooth-enabled device.
- The Bluetooth reception is poor. Move the device closer to this unit or remove any obstacle between them.
Cannot connect with this unit.
- The device does not support the profiles required for this unit.
-
The Bluetooth function of the device is not enabled. Refer to the user manual of the device to find out how to enable the function.
-
This unit is not in pairing mode.
- This unit is already connected with another Bluetooth-enabled device. Disconnect that device and then try again.
Timer does not work
- Set the clock correctly.
- Switch on the timer.
Clock/timer setting erased
- Power has been interrupted or the power cord has been disconnected.
- Reset the clock/timer.
EN-25
Specifications
| Unit Specification | |
| Power Requirements | 220-240V ~50/60Hz |
| FM Tuning Range | 87.5~108 MHz |
| Power Consumption | 28W (ECO Standby 0.5W) |
| Output Power | 50W x 2 |
| THD | ≤1% |
| Dimensions | (CD) 160(W) x 78(H) x 250(D)mm(Amplifier) 160(W) x 78(H) x 250(D) mm |
| Speaker Specification | |
| Impedance | 6Ω |
| Power Consumption | 50W |
| Dimensions | 130(W) x 182(H) x 203(D)mm |
| Bluetooth Specification | |
| Communicationsystem | Bluetooth Standard version 2.1and EDR specification |
| Output | Bluetooth Standard Power Class 2 |
| Maximum communication Range | approx.10m |
| Frequency band | 2.4 GHz Band (2.4000 GHz - 2.4835GHz) |
| Compatible Bluetooth profiles | Advanced Audio Distribution Profile (A2DP) |
| Supported Multidevices pairing | up to 8devices |
| Supported codecs (Receive) | SBC (Sub Band Codec) |
| (Transmit) | SBC (Sub Band Codec) |
| Frequency range | 2400 - 2483.5MHz |
| Transmitting power | <100mW |
| Remote Control | |
| Distance | 6m |
| Angle | ±30° |
Note: Design and specifications are subject to change without prior notice.
Disposal


As a responsible company, we care about the environment.
As such we urge you to follow the correct disposal procedure for the product, packaging materials and if applicable, accessories and batteries. This will help conserve natural resources and ensure that the materials are recycled in a manner that protects health and the environment.
You must follow laws and regulations about disposal. Waste electrical products and batteries must be disposed of separately from household waste when the product reaches the end of its life. Contact the store where you bought the product and your local authority to learn about disposal and recycling. The batteries must be disposed of at your local recycling point.
We apologise for any inconvenience caused by minor inconsistencies in these instructions, which may occur as a result of product improvement and development.
Darty Holdings SAS © 14 route d'Aulnay 93140 Bondy, France 07 / 07 / 2017
This product is manufactured, distributed, serviced and warranted exclusively Etablissement DARTY et Fils.
"JVC" is the trademark of JVC KENWOOD Corporation, used by Etablissement DARTY et Fils under license.
FNAC DARTY
DARTY Holdings SAS
14 Route D'Auinay
93140 Bondy
France
EU Declaration of Conformity
Product Description—
CD/Bluetooth®/FM Radio/Hifi system
Chaine Hifi CD / Bluetooth® / Raido FM
We declare that the above product has been evaluated and deemed to comply with the requirements of the listed European Directives and standards:
RoHS 2 Directive (2011/65/EU) - Directive RoHS 2 (2011/65/UE)
RoHS-2 richtlijn (2011/65/EU) Directiva RoHS 2 (2011/65/UE)
ETSI EN 301 489-1 V2.1.1 (2017-02)
Final Draft ETSI EN 301 489-3 V2.1.1 (2017-03)
ETSI EN 301 489-17 V3.1.1 (2017-02)
ETSI EN 300 328 V2.1.1 (2016-11)
EN 55032:2015
EN 61000-3-2:2014
EN 61000-3-3:2013
EN 55020:2007+A11:2011
Final Draft ETSI EN 303 345 V1.1.7 (2017-03)
EN 62479:2010
ETSI EN 300 330 V2.1.1 (2017-02)
EN 60065:2014
Notified Body: SGS
Organisme Notifié
Aangemeide instantie
The person responsible for this declaration is:
Position - Poste: General Manager Direct Sourcing
Signature - Signature: Po François Lennup
Date : 27 ^th July, 2017

Elvire JOMBART