
TL-WPA7517 - Network adapter TP-LINK - Free user manual and instructions
Find the device manual for free TL-WPA7517 TP-LINK in PDF.

User questions about TL-WPA7517 TP-LINK
0 question about this device. Answer the ones you know or ask your own.
Ask a new question about this device
Download the instructions for your Network adapter in PDF format for free! Find your manual TL-WPA7517 - TP-LINK and take your electronic device back in hand. On this page are published all the documents necessary for the use of your device. TL-WPA7517 by TP-LINK.
USER MANUAL TL-WPA7517 TP-LINK
Chapter 2. Initial Use....7
2.1. To Set Up a New Secure Wireless Network 8
2.2. To Extend the Existing Wireless Network 9
Chapter 3. Configuring via Web Management Interface.... 12
3.1. Management Interface....13
3.1.1. Log In 13
3.2. Manage Powerline Network....14
3.2. 1. Add a New Device to the Powerline Network....14
3.2. 2. Change Powerline Network Name....14
3.3. Wi-Fi Move 15
3.4. Wi-Fi Clone 15
3.5. Wireless Network....17 3.5.1. Customize Wireless Settings....17 3.5.2. Wireless Clients....19
3.6. LED Schedules 19
3.7. Schedule Your Wireless Function 20
3.8. Parental Controls 22
3.9. Guest Network....23
3.10. MAC Filter 24
3.11. Administration....26
-
-
- LAN IP Address.....26
-
-
-
- Set Up System Time....26
-
-
-
- Upgrade the Firmware ..... 28
-
-
-
- Back Up and Restore Configuration Settings....28
-
-
-
- Change Login Password .... 30
-
-
-
- System Log .... 30
-
Chapter 4. OneMesh ^TM with Seamless Roaming.... 31
4.1. What's a OneMesh ^TM Network....32
Unified OneMesh ^TM Network....32
4.2. How to Set Up a OneMesh ^TM Network ...... 33
About This Guide
This guide is a complement to Quick Installation Guide. The Quick Installation Guide provides instructions for quick Internet setup, while this guide contains details of each function and demonstrates how to configure them in typical scenarios.
When using this guide, please notice that features of the powerline adapter and extender may vary slightly depending on the model and software version you have, and on your location and language. All images, parameters and descriptions documented in this guide are used for demonstration only.
Conventions
In this guide the following conventions are used:
| Convention | Description |
| Powerline extender | Stands for AV1000 Powerline Wi-Fi Extender without any explanation. |
| Teal Underlined | Hyperlinks are in teal and underlined. You can click to redirect to a website or a specific section. |
| Teal | Key information appears in teal, including management page text such as menus, items, buttons and so on. |
| > | The menu structures to show the path to load the corresponding page. For example, Wireless > MAC Filter means the MAC Filter function page is under the Wireless menu. |
| Note: | Ignoring this type of note might result in a malfunction or damage to the device. |
| Tips: | Indicates important information that helps you make better use of your device. |
| Symbols on the web page | click to edit the corresponding entry.click to delete the corresponding entry.click to enable or disable the corresponding entry. |
More Info
- The latest software, management app and utility are available from the Download Center at https://www.tp-link.com/support/download/.
- The Quick Installation Guide (QIG) can be found where you find this guide or inside the product packaging.
- Specifications can be found on the product page at https://www.tp-link.com.
- Our Technical Support contact information can be found at the Contact Technical Support page at https://www.tp-link.com/support.
- TP-Link Community is provided for you to discuss our products and share knowledge at https://community.tp-link.com/.
Compatibility Disclaimer
- *Compatible with all HomePlug AV and AV2 Standard Powerline adapters. This product may not be compatible with routers or gateways with firmware that has been altered, is based on open source programs, or are non-standard or outdated.
Wi-Fi Speed/Coverage Disclaimer
- *Maximum wireless signal rates are the physical rates derived from IEEE Standard 802.11 specifications. Actual wireless data throughput and wireless coverage are not guaranteed and will vary as a result of 1) environmental factors, including building materials, physical objects, and obstacles, 2) network conditions, including local interference, volume and density of traffic, product location, network complexity, and network overhead, and 3) client limitations, including rated performance, location, connection, quality, and client condition.
Chapter 2
Get to Know Your Powerline Extender
This chapter introduces the powerline extender by detailing its main features and appearance.
It contains the following sections:
• Product Overview
- Main Features
• Product Appearance
2.1. Product Overview
TP-Link's Powerline Wi-Fi Extender is a combined wired/wireless network expansion device. With the help of your home's existing electrical circuitry, it can extend your Wi-Fi to wherever you want in your house.
Ethernet ports and built-in antennas enable the powerline Wi-Fi extender to provide wired and wireless access for multiple computers and mobile devices.
With an array of additional features, the powerline Wi-Fi extender is the perfect choice for your home or business network.
2.2. Main Features
- HomePlug AV2 Standard Compliant: Provides users with stable, high-speed data transfer rates of up to 1000 Mbps on a line length of up to 300 meters.
- One-Touch Wi-Fi Configuration: With just a tap, copy your router's wireless settings onto the extender to share the same SSID and password.
- Gigabit Ethernet for Reliable Connections: Provide warp-speed wired connections for 4K HD streaming, lag-free gaming, and more.
- Easy Setup and Management: Quickly set up a secured Powerline network with Plug & Play and easily manage it via the tpPLC app, Utility, and/or Web Interface.
2.3. Product Appearance
Your powerline extender may differ in appearance slightly from that depicted because of the region and product version. European version is used for demonstration in this guide.
2.3.1. LED Legend
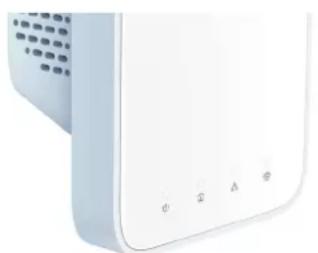
natural_image
Close-up of a white electronic device with control buttons labeled A, B, and C (no readable text or symbols beyond basic labels)LEDs indicate the powerline extender's working status. For more details, please refer to the following table.
Name Status Indication
| Power | On/Off The powerline extender is on or off. | |
| Blinking | Quickly: Pairing is in progress.Slowly: Power-saving Mode is on.*(TL-PA7017 Only) | |
| Powerline | On | The powerline extender is connected to the powerline network and is in a suitable location. |
| Off | The powerline extender is not connected to any powerline network. | |
| Ethernet | On | At least one Ethernet port is connected to a powered-on device. |
| Off No Ethernet port is connected to a powered-on device. | ||
| Wireless | On The wireless function is enabled. | |
| Off The wireless function is disabled. | ||
| Blinking | Slowly: The powerline extender is cloning wireless network settings from the main router. | |
| Quickly: The powerline extender is syncing wireless network settings. | ||
2.3.2. Physical Interface
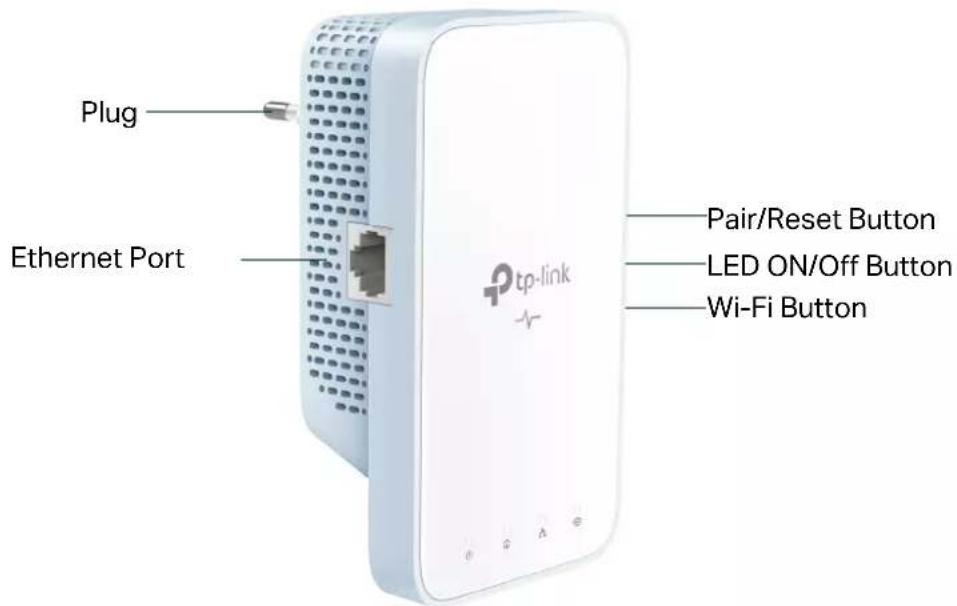
Ethernet Port
Connect the Ethernet ports to your wired devices, such as a computer, a router or a game console, via Ethernet cables.
Pair/Reset Button
Press and hold the button for 1 second to join a powerline network. Go to To Set Up a New Secure Wireless Network for more information.
Press and hold the Pair button for at least 6 seconds, then release the button to reset the adapter/extender to default settings.
LED On/Off Button
Press to turn on or off the LEDs.
Wi-Fi Button
Press and hold the button for 1 second to copy wireless settings from the main router to the extender. Go to Wi-Fi Clone for more information.
Press and hold the button for about 5 seconds to turn the wireless function on or off. The wireless function is on by default.
Plug
The powerline adapter has a Plug that can be connected to any standard power socket.
Note:
- The provided plug may differ from the picture due to different regional power specifications.
- Use the product in below directions.

- Plug the product directly into a wall socket instead of a power strip.

Wall Outlet Power Strip
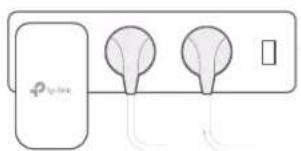
natural_image
Simple line drawing of a device with two circular components and a switch (no text or symbols)Chapter 2
Initial Use
This chapter guides you on how to use the powerline extender when you first open the package.
It contains the following sections:
• To Set Up a New Secure Wireless Network
• To Extend the Existing Wireless Network
2.1. To Set Up a New Secure Wireless Network
I want to:
Use the Powerline Wi-Fi Kit to set up a new secure wireless network in my house.
For example, I have a wireless router in my house, but the wireless signal cannot reach every corner. So I bought a Powerline Wi-Fi Kit to extend the wireless network. The Powerline Wi-Fi Kit includes a powerline adapter and a powerline extender.
How can I do that?
- Connect the powerline adapter to an available LAN port of the router.
- Plug the powerline adapter into a wall socket.
- Plug the powerline extender into a wall socket near the adapter.

flowchart
graph TD
    A["Powerline"] --> B["Router"]
    B --> C["Adapter TL-PA7017"]
    C --> D["Extensor Code"]
    D --> E["Internet"]
    F["Extensor TL-WPA7517"] --> C
    G["Wireless Signal"] --> C
- Pair the powerline devices.
a. Press the Pair button on the powerline adapter for 1 second. The Power LED starts blinking.
Note: If the Power LED does not blink, press the Pair button again.
a. Within two minutes, press the Pair button on the powerline extender for 1 second. The Power LED starts blinking. When the Powerline LED turns solid on, the pairing process is complete.
- Relocate the extender to the Wi-Fi "dead" zone. Use the SSID (network name) and password on the label at the top of the extender.
Note: A blinking Powerline LED indicates poor signal strength. Move the extender to another location.

Done!
Now enjoy the internet!
2.2. To Extend the Existing Wireless Network
I want to:
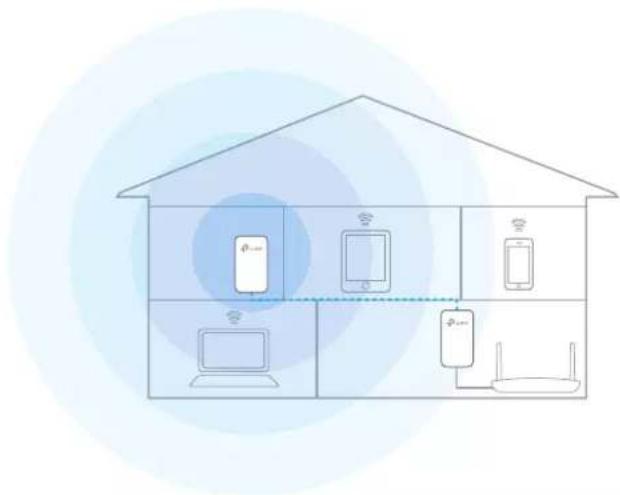
Extend the existing wireless network by adding a new powerline extender to the existing powerline network.
For example, I already set up a wireless network using powerline devices, but the wireless network is still not big enough to reach the top floor. So I bought a new powerline extender to extend the wireless network.
How can I do that?
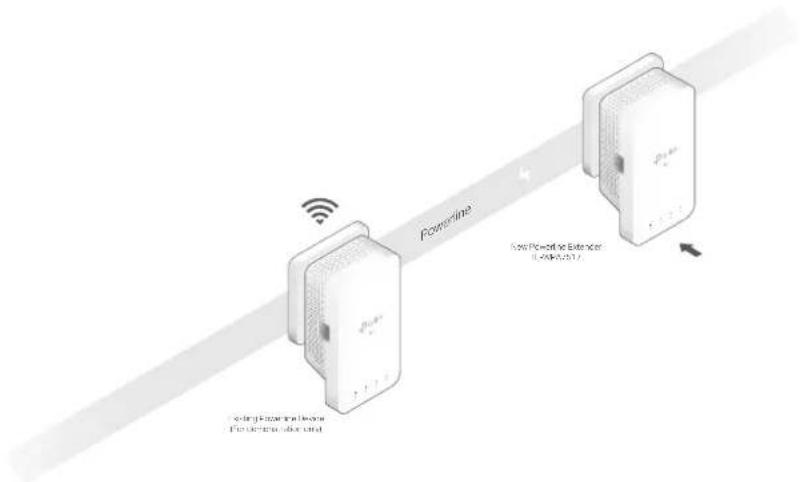
- Plug the new powerline extender into a wall socket near one of the existing powerline extender.
flowchart
graph LR
    A["Powerline"] -->|Wireless Signal| B["Network Packet Buffer (1.0kW)"]
    B --> C["Output"]
    style A fill:#f9f,stroke:#333
    style B fill:#bbf,stroke:#333
    style C fill:#dfd,stroke:#333
- Check the new extender's Powerline LED 📄is it on?
- If it is on, follow Step 4 > A.
- If it is off, follow Step 3 and Step 4 > B.
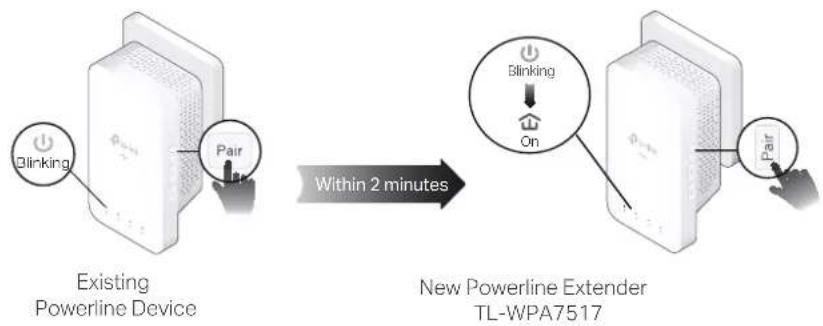
- Add the new powerline extender to the existing powerline network by pairing two powerline devices.
a. Press the Pair button on the existing powerline device for 1 second. The Power LED starts blinking.
Note: If the Power LED does not blink, press the button again.
b. Within two minutes, press the Pair button on the new powerline extender for 1 second. The Power LED starts blinking. When the Powerline LED turns solid on, the pairing process is complete.
flowchart
graph LR
    A["Existing Powerline Device"] -->|Within 2 minutes| B["New Powerline Extender TL-WPA7517"]
    A --> C["Blinking"]
    A --> D["Pair"]
    B --> E["Blinking"]
    B --> F["On"]
    B --> G["Pair"]
- Relocate the new extender to the Wi-Fi "dead" zone.
Note: A blinking Powerline LED indicates poor signal strength. Move the extender to another location.
A. Use the SSID (network name) and password on the label at the top of the extender to connect to the internet.
C. If you cannot find the default SSID in your Wi-Fi network list, this may mean the Wi-Fi Move feature has automatically copied over the existing wireless settings.
In this case, use the SSID and password of your existing powerline network to connect.
Done!
Enjoy the internet through your extended network!
Configuring via Web Management Interface
The powerline extender has a management interface to configure all settings. The management interface can be opened on any device that has a web browser, such as Internet Explorer, Chrome or Firefox. This chapter is going to give detailed information on what functions the powerline extender has and how to configure them.
It contains the following sections:
• Management Interface
- Manage Powerline Network
- Wi-Fi Move
- Wi-Fi Clone
- Wireless Network
- LED Schedules
• Schedule Your Wireless Function
- Parental Controls
- Guest Network
- MAC Filter
- Administration
3.1. Management Interface
3.1.1. Log In
There are two methods to log in to the management interface.
Method 1: Via web browser
Follow the steps below:
- Connect your device to the powerline extender wirelessly.
- Launch a web browser and type in http://tplinkplc.net to open the management interface.
- Create a password to log in.
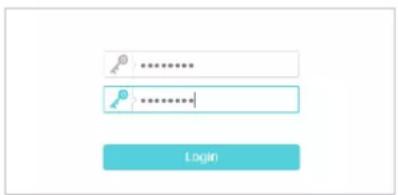
- Click Login.
Method 2: Via tpPLC utility
Follow the steps below:
- Connect your computer to the powerline extender via an Ethernet cable or wirelessly.
- Obtain and install the tpPLC Utility from the product's Support page at https://www.tp-link.com/support.
- Open the utility, move your mouse over your powerline extender, and click the icon that appears beside it.
- Create a password to log in.
Method 3: Via tpPLC app
- Connect your computer to the powerline extender wirelessly.
- Obtain and install the tpPLC app from App Store or Google Play, or simply scan the QR code.


-
Connect your phone to the wireless network of the extender. Then launch the app and you can see the extender you added on Device list.
-
Create a password to log in.
3.2. Manage Powerline Network
A powerline network is formed of powerline devices, including adapters and extenders. Powerline devices in the same powerline network share the same powerline network name.
3.2.1. Add a New Device to the Powerline Network
-
Connect to the powerline extender wirelessly. Visit http://tplinkplc.net, and log in with the password you set for the extender.
-
Go to the Status page and click the Powerline Network icon to open the Powerline Device List.
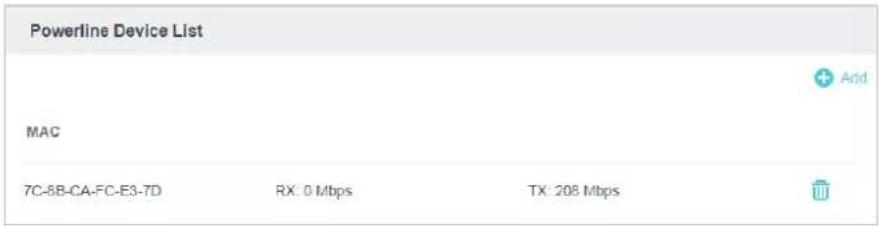
- Click the add icon and enter the Powerline Key of the device you want to add. The Powerline Key contains 16 capital letters, formed like XXXX-XXXX-XXXX-XXXX. It is printed on the back of the powerline device.
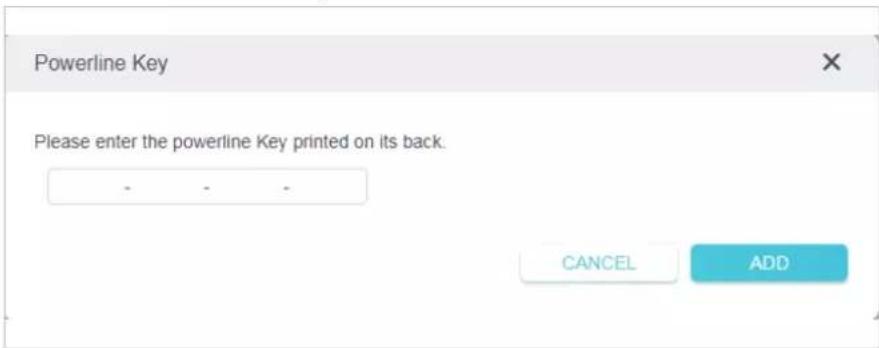
- Click ADD to add the device.
3.2.2. Change Powerline Network Name
You can change the extender's powerline network name to add it to or remove it from a powerline network.
Follow the steps below to change the name.
- Connect to the powerline extender wirelessly. Visit http://tplinkplc.net, and log in with the username and password you set for the extender.
- Go to Basic > Powerline.
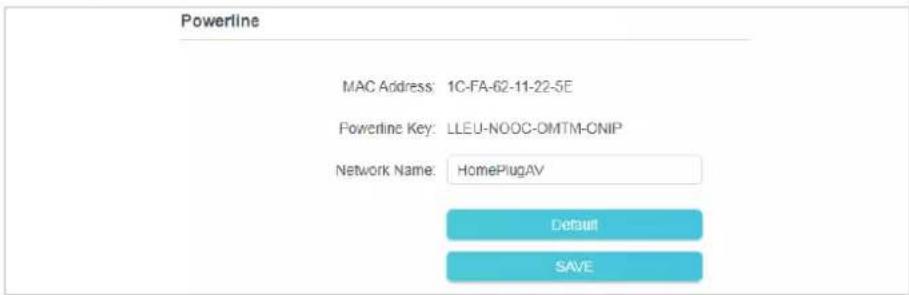
- Change the Network Name. You can also click Default to use the default network name, e.g. HomePlugAV. However, if the default name is used, the Wi-Fi Move function will be automatically disabled.
- Click Save to make the settings effective.
3. 3. Wi-Fi Move
Wi-Fi Move is enabled by default. With the feature enabled, any changes made to the Wi-Fi settings and LED schedules of one powerline extender will be automatically synchronized to other powerline extenders whose Wi-Fi Move feature is also enabled on the same powerline network.
Follow the steps below to enable the Wi-Fi Move feature:
- Connect to the powerline extender wirelessly. Visit http://tplinkplc.net, and log in with the username and password you set for the extender.
- Go to Advanced > Wireless > Wi-Fi Move.
- Toggle on WiFi Move to enable the feature.

Note:
When Wi-Fi Move is enabled, the following features will be synced: Wireless SSID & Password, Wireless Security, Wireless Mode, Wireless Radio Status, Wi-Fi Schedules, LED Schedules, Wi-Fi Clone Settings, MAC Filter Settings, Parental Controls, and Guest Network.
3.4. Wi-Fi Clone
I want to:
Copy wireless settings from my router to my extender, so I can use the same SSID and password to access the internet in my house.
How can I do that?
- Before cloning, make sure your router supports the same band as your extender. If you do not know how to check this, go to your router's User Guide for more information.
- Plug your extender near your router.
- Press the WPS button on your router.

Wireless Router
- Within two minutes, press the Wi-Fi button on the front panel of the extender for 1 second. The Wi-Fi LED starts blinking.
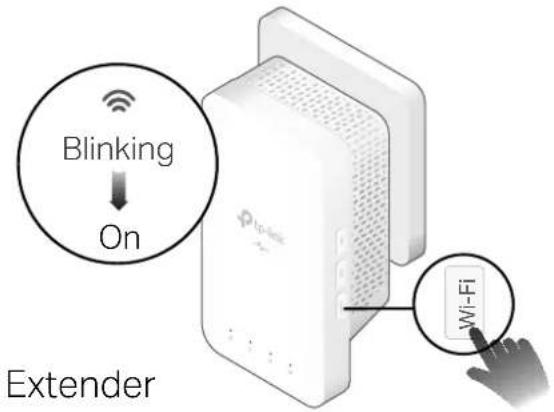
Done!
When the Wi-Fi LED blinks quickly for 3 seconds and then stays on, the Wi-Fi Clone process is complete.
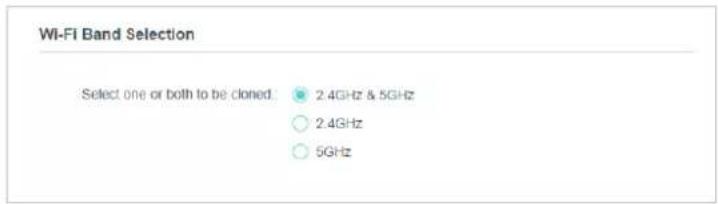
Note: By default, both band settings will be copied, but if you just want to copy one band settings, go to Advanced > Wireless > Wi-Fi Clone, and select the band you want to copy then follow the steps above.
3.5. Wireless Network
3.5.1. Customize Wireless Settings
The powerline extender's wireless network name (SSID), password, and security option are preset in the factory. The preset SSID and password can be found on the product label. You can customize the wireless settings according to your needs.
Connect to the powerline extender wirelessly. Visit http://tplinkplc.net, and log in with the username and password you set for the extender.
Go to Basic > Wireless Settings page.
To enable or disable the wireless function:
Select the box to enable the wireless function. Deselect the box to disable wireless function. If disabled, all wireless settings will be ineffective.

To change the wireless network name (SSID) or hide SSID :
The default SSIDs are TP-Link_XXXX and TP-Link_XXXX_5G, and the default password is printed on the product label. You can change the default ones by directly entering new ones in the field. SSID is up to 32 characters, and the value in both SSID and password is case-sensitive.
Select Hide SSID, and your SSID will not be broadcasted. It won't display when you scan for local wireless network list on your wireless device and you need to manually join the network.
Note:
Remember to write down the new SSIDs, for you will be disconnected when new settings are effective.

To customize more advanced settings
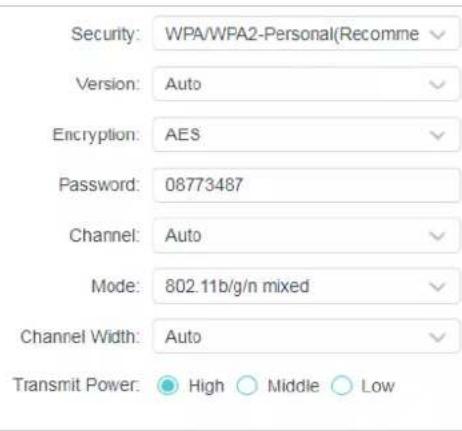
Security: Select an option from the Security drop-down list. The extender provides three options, No Security, WPA/WPA2 Personal (Recommended), and WEP. WPA2 uses the newest standard and the security level is the highest. Don't change the default settings unless necessary.
Version: You can select one of following versions.
- Auto (Recommended) - Select WPA-Personal or WPA2-Personal automatically based on the wireless station's capability and request.
• WPA-PSK - Pre-shared key of WPA.
Ecryption: You can select either Automatic(Recommended), TKIP or AES
Password: Set the password of the Wi-Fi network.
Channel: Select the channel you want to use from the drop-down list. This field determines which operating frequency will be used. It is not necessary to change the wireless channel unless you notice interference problems with another nearby access point.
Mode: Select the desired mode.
- 802.11n only: Select only if all of your wireless clients are 802.11n devices.
- 802.11g/n mixed: Select if you are using both 802.11g and 802.11n wireless clients.
- 802.11b/g/n mixed: Select if you are using a mix of 802.11b, 11g, and 11n wireless clients.
Note: When 802.11n only mode is selected, only 802.11n wireless clients can connect to the extender. It is strongly recommended that you select 802.11b/g/n mixed, so that all of 802.11b, 802.11g, and 802.11n wireless clients can connect to the extender.
Channel Width: Select the channel width. The default setting is Auto, which can adjust the channel width for your clients automatically.
Transmit Power: Select the level of transmit power. We recommend you choose High to have the best signal strength.
3.5.2. Wireless Clients
Follow the steps below to view detailed information of all wireless clients connected to the extender.
- Connect to the powerline extender wirelessly. Visit http://tplinkplc.net, and log in with the username and password you set for the extender.
- Go to Wireless > Clients page.
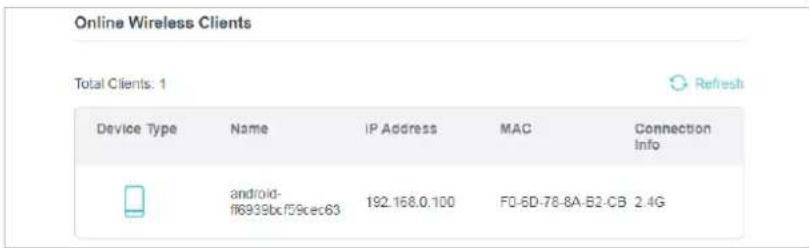
- Now you can view the detailed information, including device name, MAC address, connected wireless band, and IP address.
Tips: You can also see the wireless details by clicking the wireless clients icon on the Status > Wireless Clients page.
3.6. LED Schedules
I want to:
Automatically turn off LEDs at times when I do not want light in my room.
For example, I want to turn LEDs off from 21:00 to 08:00 every weekday.
How can I do that?
- Connect to the powerline extender wirelessly. Visit http://tplinkplc.net and log in with the username and password you set for the extender.
- Go to Wireless > Device Settings > LED Control.
- Enable LED Status to turn on the extender's LEDs.
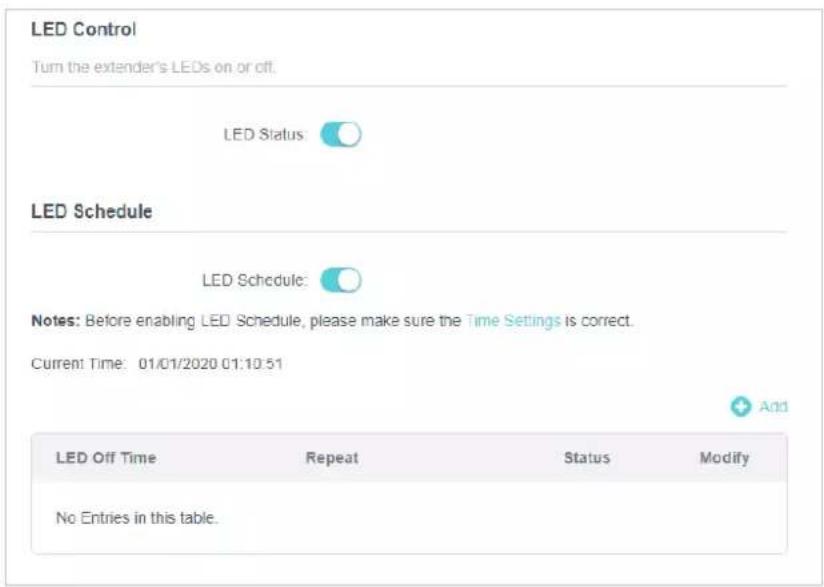
- Enable LED Schedule.
- Click Add and choose LED Off Time from 21:00 to 08:00 (next day). Note: Please make sure that the system time is correct before using this function.
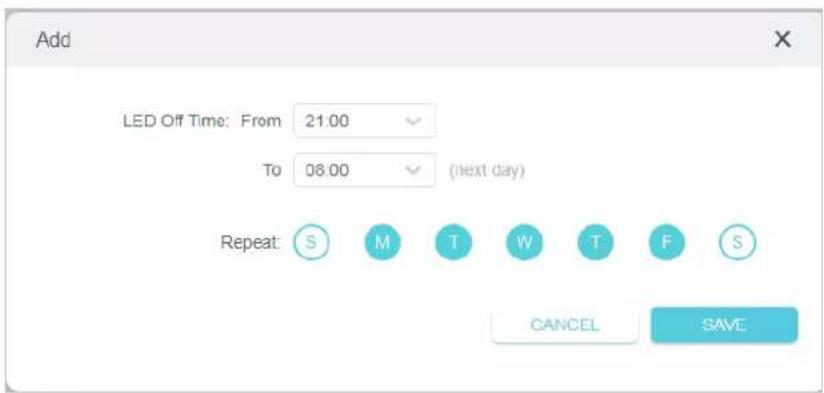
- Click SAVE.
Done!
Now your LEDs will be turned off automatically at 21:00 and turned on at 8:00am the next morning.
3.7. Schedule Your Wireless Function
I want to:
Automatically turn off my wireless network at times when I do not need the wireless connection.
For example, I want to turn them off from 21:00 to 09:00 every weekday.
How can I do that?
- Connect to the powerline extender wirelessly. Visit http://tplinkplc.net and log in with the username and password you set for the extender.
- Go to Advanced > Wireless > WiFi Schedule.
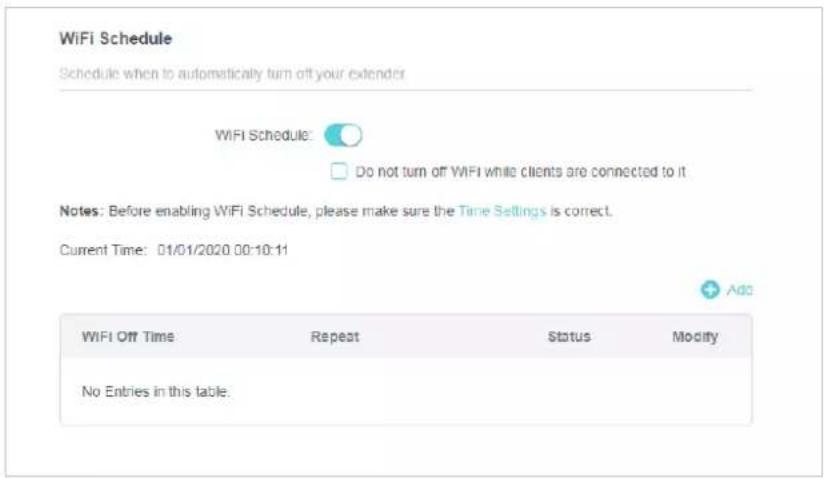
- Toggle on the WiFi Schedule.
Note: If you check the box of Do not turn off Wi-Fi while clients are connected to it, the WiFi schedule are not enabled when any clients are connected to your extender. - Click Add to add an entry.
- Choose WiFi Off Time from 21:00 to 09:00, and then check all boxes from Monday to Friday.
Note: Please make sure that the system time is correct before using this function.
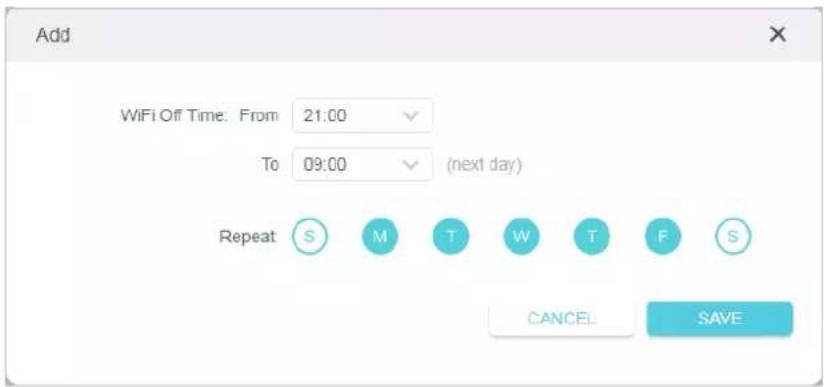
- Click SAVE to save the settings.

Done!
Now your Wi-Fi will be automatically turned off at 00:00 and turned on at 7:00am the next morning.
Note: The Wi-Fi LED will turn off if the wireless network is disabled.
3.8. Parental Controls
I want to:
Control when my children's wireless devices can access the internet.
For example, I want to allow my children's wireless devices to access only from 18:00 (6PM) to 22:00 (10PM) on weekdays and not other times.
How can I do that?
- Connect to the powerline extender wirelessly. Visit http://tplinkplc.net, and log in with the username and password you set for the extender.
- Go to Advanced > Parental Controls.
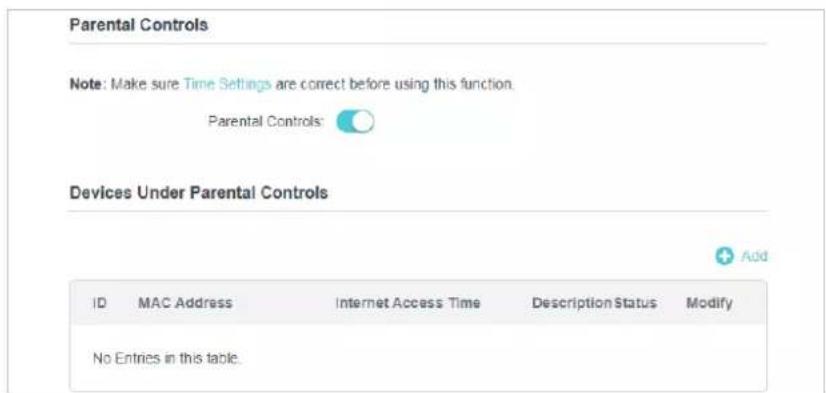
- Toggle on Parental Controls.
- Click Add.
- Click Select from Device List and select the device to be controlled. Or select Add Manually and enter the MAC address manually.
- Choose Internet Access Time from 18:00 to 22:00, and then check all boxes from Sunday to Saturday.
- Give a description to the device to be controlled.
- Click SAVE to save the settings.
Note: Please make sure that the system time is correct before using this function.
Done!
Now the controlled device can access only from 18:00 (6PM) to 22:00 (10PM) on weekdays and not other times.
3.9. Guest Network
I want to:
Create a network for my guests, providing internet access for them while at the same time limit the network authorities for guests to ensure network security and privacy.
How can I do that?
- Connect to the powerline extender wirelessly. Visit http://tplinkplc.net, and log in with the password you set for the extender.
- Go to Advanced > Guest Network.
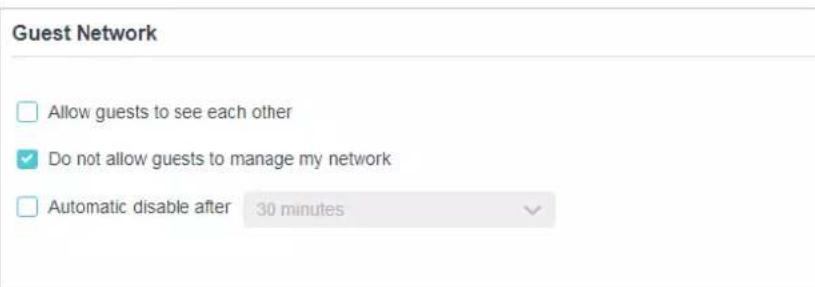
- Check the box of relative entry to limit network authorities.
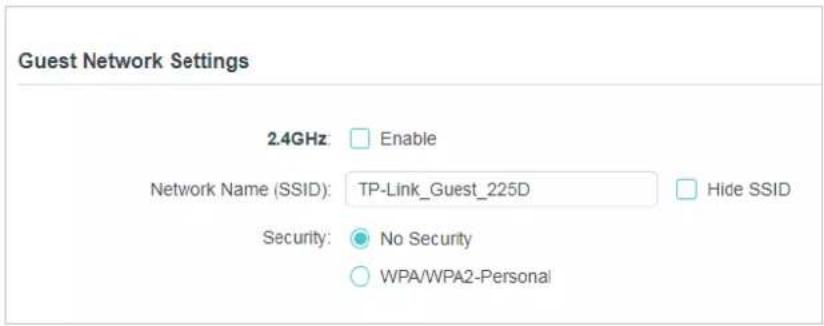
- Select 2.4GHz or 5GHz and configure the following settings.
To enable or disable the guest network function:
Select the box 2.4GHz or 5GHz to enable the guest network function. Deselect the box to disable guest network function. If disabled, all guest network settings of the corresponding band will be ineffective.
To change the guest network name (SSID) and password:
The default SSIDs are TP-Link_Guest_XXXX and TP-Link_Guest_XXXX_5G, and the default password is printed on the product label. You can change the default ones by directly entering new ones in the field. SSID is up to 32 characters, and the value in both SSID and password is case-sensitive.
Done!
Now you can tell your guests to connect to the guest network you created.
3. 10. MAC Filter
This function exploits the uniqueness of the MAC (Medium Access Control) address, a unique 12-digit hexadecimal address (for example, D8-5D-4C-B4-46-EA) of every network device, to determine if the device can or cannot access your wireless network.
I want to:
Prevent unauthorized users from accessing my wireless network by utilizing the network device's MAC address.
For example, I have a computer that is connected to my wireless network. Now, an unknown device (an intruder) is also using my wireless network, which affects my internet speed. I would like to control my wireless network with the following capabilities:
- My computer is always allowed to access the wireless network.
- The unknown device is not allowed to access the wireless network.
- I don't have to keep changing my wireless password as often.
How can I do that?
- Connect to the powerline extender wirelessly. Visit http://tplinkplc.net, and log in with the username and password you set for the extender.
- Go to Advanced > Wireless > MAC Filter.
- Toggle on MAC Filter.
- Select either of the filtering rules (here we select Black List).
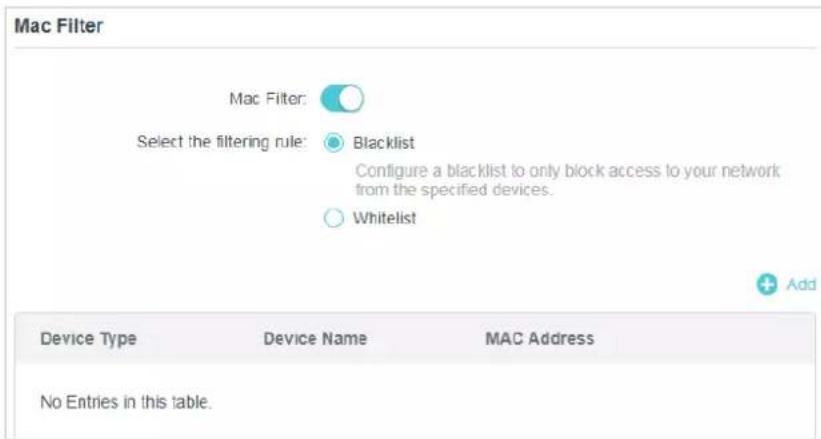
- Click Add to add devices to the list.
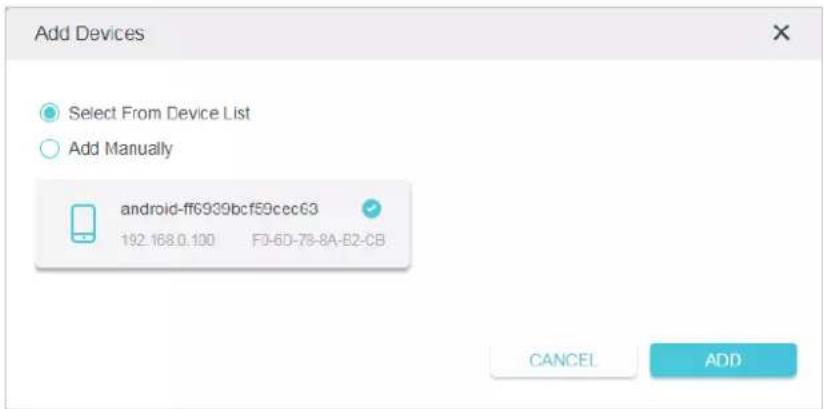
- Select Select From Device List to see how many devices are now connected to the network. Select a device and click ADD to finish the settings.
- You can also add devices manually. Select Add Manually, enter device name and the MAC address and click ADD to finish the settings.
Done!
Now MAC Filter is implemented to protect your wireless network.
3.11. Administration
3. 11. 1. LAN IP Address
Follow the steps below to configure LAN settings of the extender.
Connect to the powerline extender wirelessly. Visit http://tplinkplc.net, and log in with the username and password you set for the extender.
Go to Device Settings > LAN Settings.
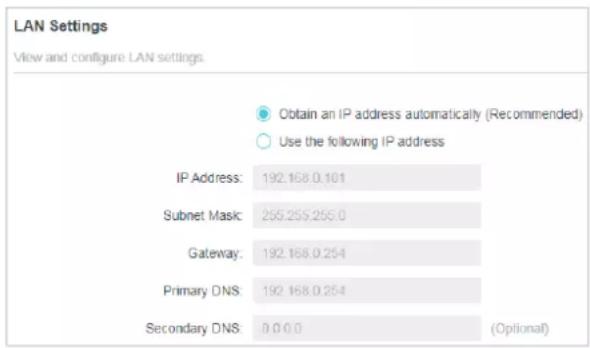
LANType: Select Obtain an IP address automatically to have your extender automatically obtain IP Address from the main router. Select Use the following IP address to manually configure the LAN parameters.
IP Address: The IP address of the powerline extender.
Subnet Mask: The subnet mask associated with IP address.
Gateway: The IP address of the gateway device.
Primary DNS: Input the DNS IP address provided by your ISP.
Secondary DNS: Input the IP address of another DNS server if your ISP provides two DNS servers.
3. 11. 2. Set Up System Time
System time is the time displayed while the extender is running. The system time you configure here will be used for other time-based functions like Parental Controls and Wi-Fi Schedules. You can manually set how to get the system time.
Connect to the powerline extender wirelessly. Visit http://tplinkplc.net, and log in with the username and password you set for the extender.
Go to Settings > Time Settings page.
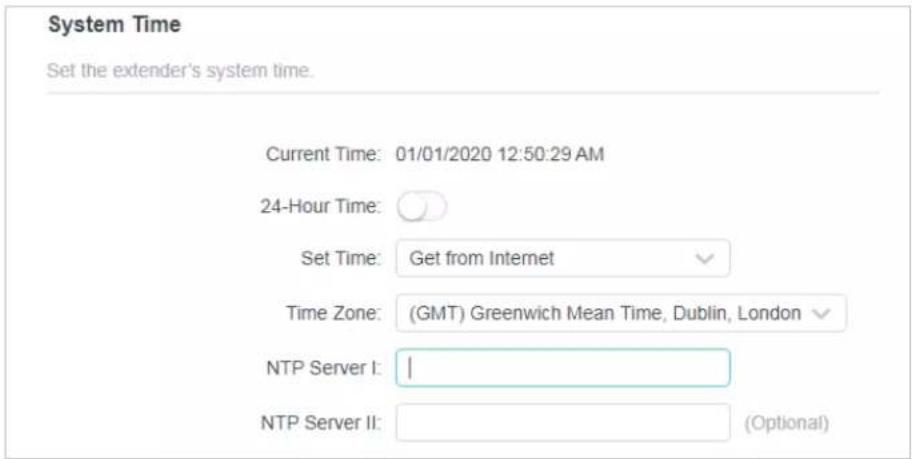
To automatically synchronize the time:
- Select Get from the Internet.
- Select your local Time Zone from the drop-down menu.
- In the NTP Server I field, enter the IP address or domain name of your desired NTP Server. (Optional)
- In the NTP Server II field, enter the IP address or domain name of the second NTP Server. (Optional)
- Click SAVE.
To manually set the date and time:
- Select Manually.
- Enter the current Date.
- Set the current Time (In 24-hour clock format, e.g. 16:00:00 is 04:00PM).
- Click SAVE.
To set up Daylight Saving time:
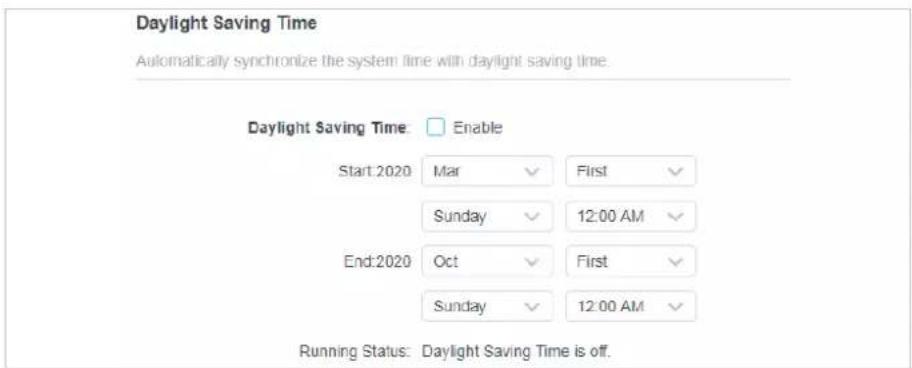
-
Check the box of Daylight Saving Time.
-
Select the correct Start date and time when daylight saving time starts at your local time zone.
- Select the correct End date and time when daylight saving time ends at your local time zone.
- Click SAVE.
3. 11. 3. Upgrade the Firmware
TP-Link is dedicated to improving and richening the product features, giving you a better network experience. We will release the latest firmware at our official website, you can download the latest firmware file from our website: www.tp-link.com and upgrade the firmware to the latest version.
- Connect to the powerline extender wirelessly. Visit http://tplinkplc.net, and log in with the username and password you set for the extender.
- Go to Settings > Firmware Upgrade page and confirm the Hardware Version.
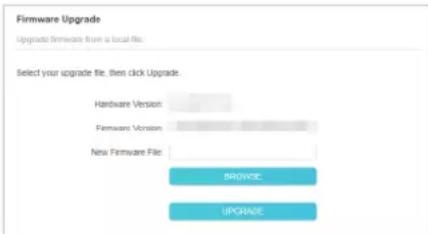
- Go to www.tp-link.com. Download the latest firmware file for the extender.
Note: The upgraded firmware version must correspond to the hardware.
-
Click BROWSE to locate the downloaded new firmware file, and click UPGRAGE.
-
Wait a few minutes for the upgrading and rebooting.
Note:
- Before upgrading the firmware, it's better to back up your current settings.
- During the upgrading process, do not turn off or reset the extender.
- If the upgrade is interrupted, it's possible your extender may stop working and its LEDs blink once a second. In this case, please connect your computer to the extender via an Ethernet cable, and set your computer to static IP 192.168.0.X and subnet mask 255.255.255.0. Then visit http://192.168.0.254 to complete the upgrade.
3. 11. 4. Back Up and Restore Configuration Settings
The configuration settings are stored as a configuration file in the extender. You can back up the configuration file to your computer for future use and restore the extender to a previous settings from the backup file when needed. Moreover, if needed, you can erase the current settings and reset the extender to the default factory settings.
To backup configuration settings:
- Connect to the powerline extender wirelessly. Visit http://tplinkplc.net, and log in with the username and password you set for the extender.
- Go to Settings > Backup & Restore page.

- Click BACK UP to save a copy of the current settings to your local computer. A config. bin file will be stored to your computer.
To restore configuration settings:
- Connect to the powerline extender wirelessly. Visit http://tplinkplc.net, and log in with the username and password you set for the extender.
- Go to Settings > Backup & Restore page.
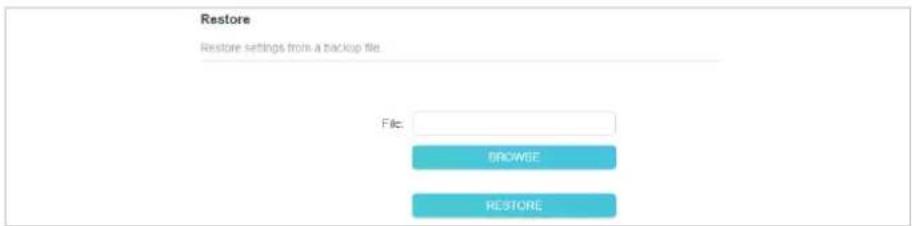
- Click BROWSE to locate the backup configuration file stored on your computer, and click RESTORE. The configuration file is config.bin.
- Wait a few minutes for the restoring and rebooting.
Note: During the restoring process, do not turn off or reset the extender.
To reset the extender to factory default settings:
- Connect to the powerline extender wirelessly. Visit http://tplinkplc.net, and log in with the username and password you set for the extender.
- Go to Settings > Factory Default Restore page.

- Click FACTORY RESTORE to reset the extender.
- Wait a few minutes for the resetting and rebooting.
Note:
-
During the resetting process, do not turn off the extender.
-
We strongly recommend you back up the current configuration settings before resetting the extender.
3. 11. 5. Change Login Password
Go to Settings > Change Login Password, and you can change the login password of the extender.
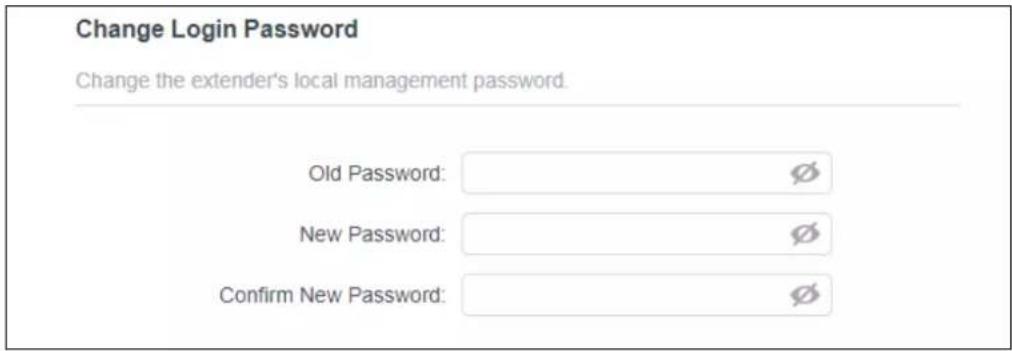
Note:
- The new password must be 6-32 characters long and not include any spacing.
3.11.6. System Log
When the extender does not work properly, you can save the system log and send it to the technical support for troubleshooting.
Follow the steps below to save the system log:
- Connect to the powerline extender wirelessly. Visit http://tplinkplc.net, and log in with the password you set for the extender.
- Go to Settings > System Log.
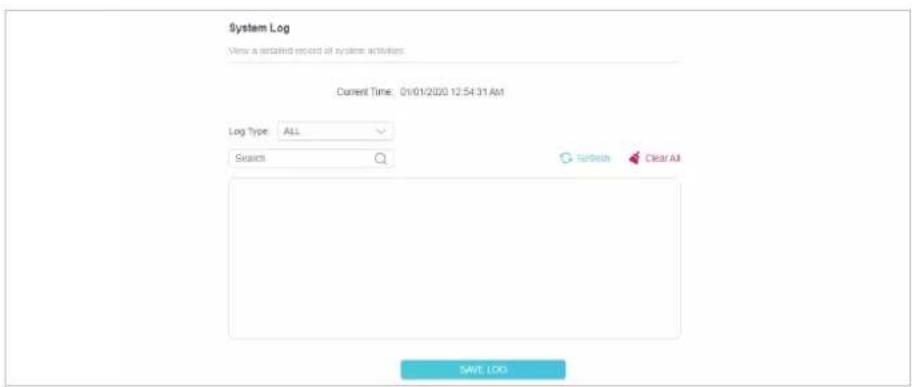
- Choose the type and level of the system log according to your need.
- Click SAVE LOG to save the system log to local.
OneMesh™ with Seamless Roaming
This chapter introduces the TP-Link OneMesh ^TM feature.
It contains the following sections:
• What's a OneMesh™ Network
• How to Set Up a OneMesh™ Network
4. 1. What's a OneMesh ^TM Network
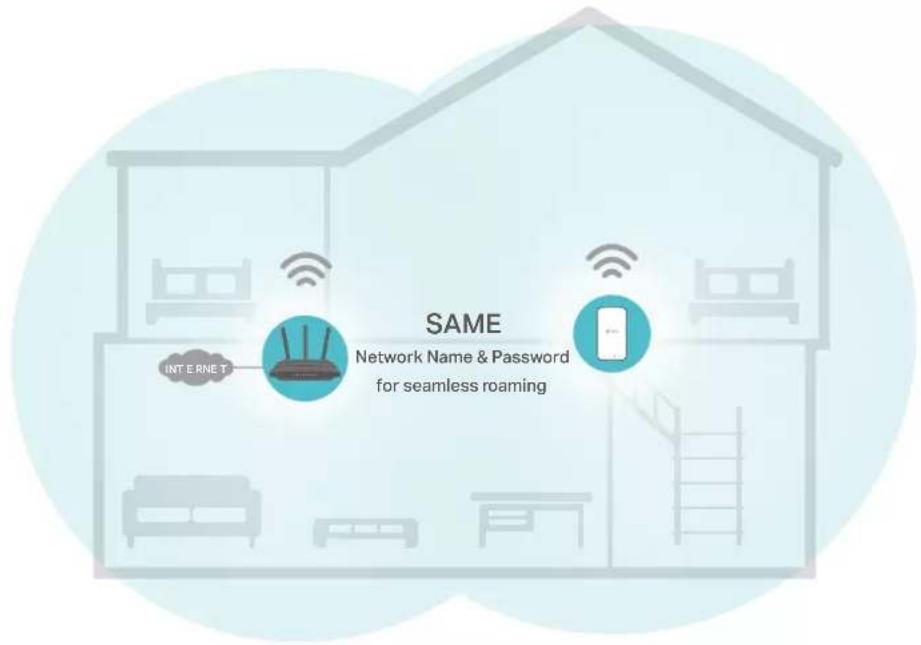
TP-Link OneMesh™ router and TP-Link OneMesh™ extenders work together to form one unified Wi-Fi network. Walk through your home and stay connected with the fastest possible speeds thanks to OneMesh's seamless coverage.

Unified Wi-Fi Network
Router and extenders share the same wireless settings, including network name, password and more.

Seamless Roaming
Devices automatically switch between your router and extenders as you move through your home for the fastest possible speeds.

Easy Setup and Management
Easily set up and manage a unified OneMesh ^TM network.
To check full list of TP-Link OneMesh™ devices, scan the QR code, or visit https://www.tp-link.com/One-Mesh/compatibility.

Unified OneMesh™ Network
4.2. How to Set Up a OneMesh ™ Network
You can manage all mesh devices in the OneMesh™ network all on your router's web page.
Follow the steps below to create a OneMesh ^TM network.
- Connect the extender to your computer wirelessly. Visit http://tplinkplc.net, and log in with the password you set for the extender.
- Go to 📍 OneMesh and toggle on Join OneMesh. When the extender's 2.4 GHz and 5 GHz Wi-Fi LEDs 📋 turn solid on, Wi-Fi settings are copied.
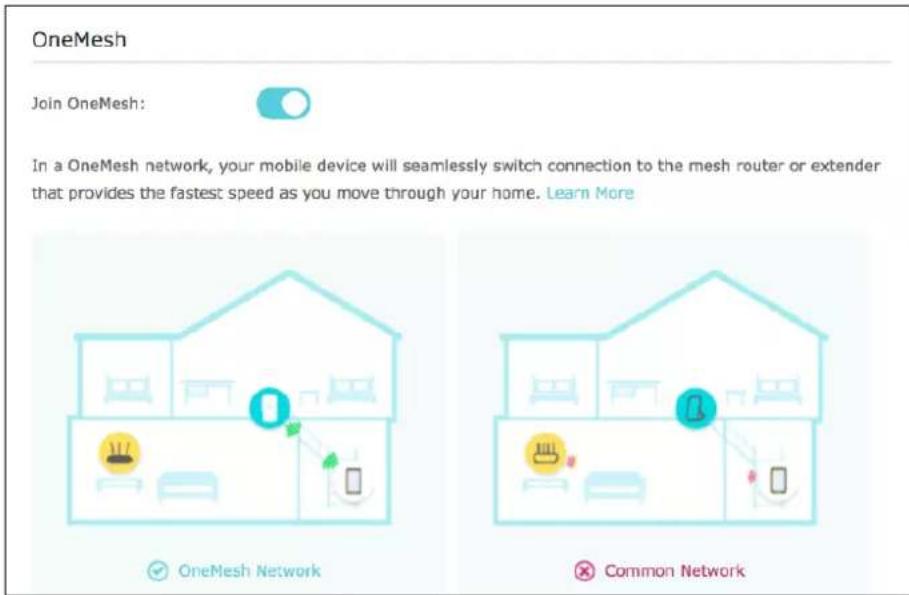
Note: This function is available only when your extender is connected to a OneMesh™ Router.
- Enjoy the internet using your router's SSID and password.
FCC STATEMENT

Product Name: AV1000 Gigabit Powerline ac Wi-Fi Extender
Model Number: TL-WPA7517
Responsible party:
TP-Link USA Corporation
Address: 10 Mauchly, Irvine, CA 92618
Website: http://www.tp-link.com/us/
Tel: +1 626 333 0234
This equipment has been tested and found to comply with the limits for a Class B digital device, pursuant to part 15 of the FCC Rules. These limits are designed to provide reasonable protection against harmful interference in a residential installation. This equipment generates, uses and can radiate radio frequency energy and, if not installed and used in accordance with the instructions, may cause harmful interference to radio communications. However, there is no guarantee that interference will not occur in a particular installation. If this equipment does cause harmful interference to radio or television reception, which can be determined by turning the equipment off and on, the user is encouraged to try to correct the interference by one or more of the following measures:
- Reorient or relocate the receiving antenna.
- Increase the separation between the equipment and receiver.
- Connect the equipment into an outlet on a circuit different from that to which the receiver is connected.
- Consult the dealer or an experienced radio/ TV technician for help.
This device complies with part 15 of the FCC Rules. Operation is subject to the following two conditions:
1) This device may not cause harmful interference.
2) This device must accept any interference received, including interference that may cause undesired operation.
Any changes or modifications not expressly approved by the party responsible for compliance could void the user's authority to operate the equipment.
Note: The manufacturer is not responsible for any radio or TV interference caused by unauthorized modifications to this equipment. Such modifications could void the user's authority to operate the equipment.
FCC RF Radiation Exposure Statement
This equipment complies with FCC RF radiation exposure limits set forth for an uncontrolled environment. This device and its antenna must not be co-located or operating in conjunction with any other antenna or transmitter.
"To comply with FCC RF exposure compliance requirements, this grant is applicable to only Mobile Configurations. The antennas used for this transmitter must be installed to provide a separation distance of at least 20 cm from all persons and must not be co-located or operating in conjunction with any other antenna or transmitter."
We, TP-Link USA Corporation, has determined that the equipment shown as above has been shown to comply with the applicable technical standards, FCC part 15. There is no unauthorized change is made in the equipment and the equipment is properly maintained and operated.
Issue Date: 2021.11.29
CE Mark Warning

This is a class B product. In a domestic environment, this product may cause radio interference, in which case the user may be required to take adequate measures.
OPERATING FREQUENCY(the maximum transmitted power)
2400 MHz -2483.5 MHz(20dBm)
5150 MHz -5250 MHz(23dBm)
EU declaration of conformity
TP-Link hereby declares that the device is in compliance with the essential requirements and other relevant provisions of directives 2014/53/EU, 2009/125/EC, 2011/65/EU and (EU)2015/863.
The original EU declaration of conformity may be found at
https://www.tp-link.com/en/ce

TP-Link hereby declares that the device is in compliance with the essential requirements and other relevant provisions of the Radio Equipment Regulations 2017.
The original UK declaration of conformity may be found at https://www.tp-link.com/support/ukca
RF Exposure Information
This device meets the EU requirements (2014/53/EU Article 3.1a) on the limitation of exposure of the general public to electromagnetic fields by way of health protection.
The device complies with RF specifications when the device used at 20 cm from your body.
National restrictions
Attention: This device may only be used indoors in all EU member states, EFTA countries and Northern Ireland.
Attention: This device may only be used indoors in Great Britain.
| AT | BE | BG | CH | CY | CZ | DE | DK | |||
| EE | EL | ES | FI | FR | HR | HU | IE | |||
| IS | IT | LI | LT | LU | LV | MT | NL | |||
| NO | PL | PT | RO | SE | SI | SK | UK | (IN) |
Canadian Compliance Statement
This device complies with Industry Canada license-exempt RSSs. Operation is subject to the following two conditions:
- This device may not cause interference, and
- This device must accept any interference, including interference that may cause undesired operation of the device.
- The device for operation in the band 5150–5250 MHz is only for indoor use to reduce the potential for harmful interference to co-channel mobile satellite systems;
Avertissement:
Radiation Exposure Statement:
This equipment complies with IC radiation exposure limits set forth for an uncontrolled environment. This equipment should be installed and operated with minimum distance 20cm between the radiator & your body.
Industry Canada Statement
CAN ICES-3 (B)/NMB-3(B)
CAN ICES-6/NMB-6
Korea Warning Statements:
| 設備名稱:AV1000 Gigabit Powerline ac Wi-Fi Extender 型號(型式):TL-WPA7517Equipment name Type designation (Type) | ||||||
| 單元Unit | 限用物質及其化學符號Restricted substances and its chemical symbols | |||||
| 鉛Lead(Pb) | 汞Mercury(Hg) | 鎘Cadmium(Cd) | 六價鉻Hexavalent chromium( Cr^+6 ) | 多溴聯苯Polybrominated biphenyls(PBB) | 多溴二苯醚Polybrominated diphenyl ethers(PBDE) | |
| PCB ○ ○ | ○○○○ | ○ | ||||
| 外殼 ○ | ○○○○ | ○ | ||||
| 電源供應板 | - ○○○ | ○○ | ||||
| 其他及其配件 | - ○ | ○○○○ | ||||
| 備考1. “超出0.1 wt %”及“超出0.01 wt %”係指限用物質之百分比含量超出百分比含量基準值Note 1: “Exceeding 0.1 wt %” and “exceeding 0.01 wt %” indicate that the percentage content of the restricted substance exceeds the reference percentage value of presence condition.備考2. “○”係指該項限用物質之百分比含量未超出百分比含量基準值。Note 2: “○” indicates that the percentage content of the restricted substance does not exceed th percentage of reference value of presence.備考3. “—”係指該項限用物質為排除項目。Note 3: The “—” indicates that the restricted substance corresponds to the exemption. | ||||||

- Keep the device away from water, fire, humidity or hot environments.
- Do not attempt to disassemble, repair, or modify the device.
- Do not use the device where wireless devices are not allowed.
- The socket-outlet shall be installed near the equipment and shall be easily accessible.
- Plug the powerline devices directly into the wall outlets but not the power strips.
- Make sure the power socket has a good contact with the ground.
Environment:
- Operating Temperature: 0^ 40^ (32°F \~104°F)
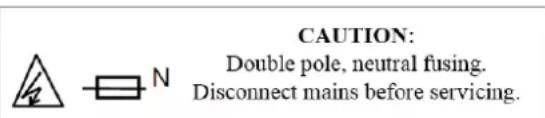
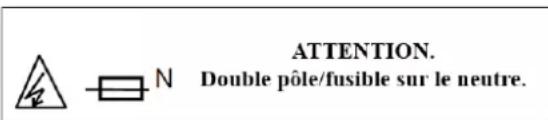
- Alert to service person
CAUTION NEUTRAL FUSING
Please read and follow the above safety information when operating the device. We cannot guarantee that no accidents or damage will occur due to improper use of the device. Please use this product with care and operate at your own risk.
Explanation of the symbols on the product label
| Symbol Explanation | |
 | Class II equipment |
| AC voltage | |
 | RECYCLINGThis product bears the selective sorting symbol for Waste electrical and electronic equipment (WEEE). This means that this product must be handled pursuant to European directive 2012/19/EU in order to be recycled or dismantled to minimize its impact on the environment.User has the choice to give his product to a competent recycling organization or to the retailer when he buys a new electrical or electronic equipment. |
 | Indoor use only |
 | Protection earth |
 | Warning electric shock |
 | Fuse is used in neutral N |