
Bronze 6G 100 - Pregnant MONITOR AUDIO - Free user manual and instructions
Find the device manual for free Bronze 6G 100 MONITOR AUDIO in PDF.

| Product Type | Bookshelf Speaker |
| Brand | Monitor Audio |
| Model | Bronze 100 (6G) |
| System Format | 2-way |
| Frequency Response (-6dB in room) | 37 Hz - 30 kHz |
| Sensitivity (2.83V @ 1m) | 87 dB |
| Nominal Impedance | 8 Ohms |
| Minimum Impedance | 4.5 Ohms |
| Maximum SPL | 110 dBA (pair) |
| Power Handling (RMS) | 100 W |
| Recommended Amplifier Power | 30 - 100 W |
| Bass Alignment | Bass reflex HiVe II port system |
| Crossover Frequency | 2.2 kHz |
| Drive Unit Complement | 1 x 8\" C-CAM mid-bass driver, 1 x 1\" (25mm) C-CAM Gold Dome tweeter with UD Waveguide |
| External Dimensions (H x W x D) including grille & terminals | 376 x 231 x 325 mm (14-13/16\" x 9-1/8\" x 12-13/16\") |
| Weight (each) | 7.8 kg (17 lb 3 oz) |
| Wiring Options | Single wiring, bi-wiring, bi-amping |
| Port Bungs Included | Yes |
| Cabinet Finish | Available in multiple finishes (check retailer) |
| Country of Origin | Made in China |
| Warranty | Check with authorized dealer or monitoraudio.com |
Frequently Asked Questions - Bronze 6G 100 MONITOR AUDIO
User questions about Bronze 6G 100 MONITOR AUDIO
0 question about this device. Answer the ones you know or ask your own.
Ask a new question about this device
Download the instructions for your Pregnant in PDF format for free! Find your manual Bronze 6G 100 - MONITOR AUDIO and take your electronic device back in hand. On this page are published all the documents necessary for the use of your device. Bronze 6G 100 by MONITOR AUDIO.
USER MANUAL Bronze 6G 100 MONITOR AUDIO
Attaching Feet and Spikes 2
For Carpeted Floors 2
For Wooden/ Hard Floors 2
Setting Up Your Loudspeakers 2
2 Channel Positioning 2
AV Positioning 3
Setting Up Bronze FX 3
Atmos 4
In-Ceiling 4
Bronze AMS Dolby Atmos® enabled speakers_4
Fixing Bronze FX & Bronze AMS to a Wall 4
Wiring 5
Single Wiring 5
Bi-Wiring 5
Bi-Amping 5
The Effects of Bi-Wiring and Bi-Amping 6
Port Bungs 6
Running-In Your Speakers 7
Retention Bolt Adjustment 7
Warranty 7
Owner Information 7
Specifications 8
Introduction:
The Bronze Series has been intricately engineered to optimise your audio experience, whether you're listening to your favourite album or watching the latest Hollywood blockbuster.
Consisting of eight different models, you can create the perfect sound system to suit your music or home cinema needs, from our compact bookshelf speakers to the powerful yet detailed performance of our larger floorstanding speakers. With the addition of our new Dolby Atmos® Enabled upward-firing speakers, you can add a whole new dimension to your favourite movie experiences.
Bronze Series is made for you, for your home, and for the performance you desire.
Attaching Feet and Spikes
For Carpeted Floors
(Bronze 200 and 500 only)
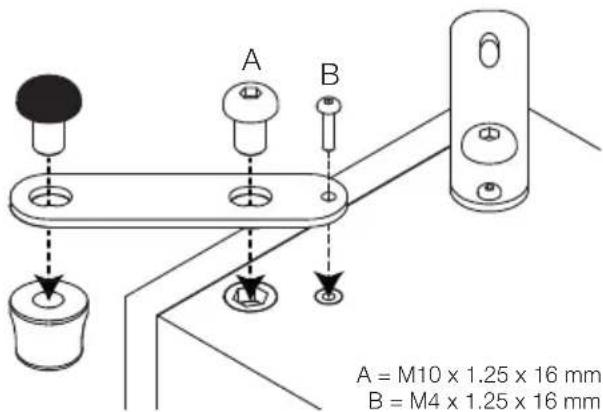
The spikes and ‘out-riggers’ are supplied assembled for use on carpeted floors or where spikes are appropriate. All that is required is to fix them to the speaker base using the supplied bolts (A & B).
You can check that the speaker is level on all sides by using a spirit level (not supplied). If it's slightly off-level, unscrew the spike and check again. Continue this process until the cabinet is fully level. Use the locking nuts on each foot to fix the spike in place and to stop any unwanted vibrations.

text_image
A = M10 x 1.25 x 16 mm B = M4 x 1.25 x 16 mm
Please ensure there are no hidden wires under the carpet that could be damaged by the spikes.
For Wooden/ Hard Floors
(Bronze 200 and 500 only)
Remove the spikes and replace with the supplied rubber feet. Fix the 'out-riggers' to the speaker base with the padded side touching the cabinet using the supplied bolts (A & B).
You can check that the speaker is level on all sides by using a spirit level (not supplied). If it's slightly off-level, unscrew the rubber foot and check again. Continue this process until the cabinet is fully level. Use the locking nuts on each foot to fix them in place and to stop any unwanted vibrations.
text_image
A = M10 x 1.25 x 16 mm B = M4 x 1.25 x 16 mmSetting Up Your Loudspeakers
2 Channel Positioning
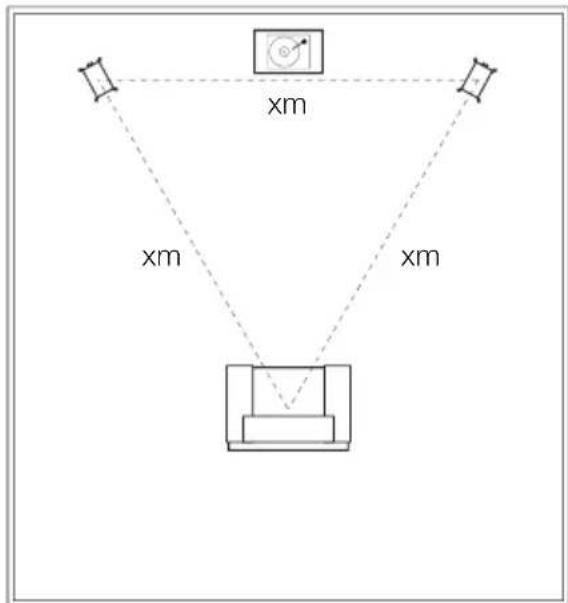
When arranging a 2 channel (stereo) system, the listening position and the loudspeakers should form an equilateral triangle. The speakers should be positioned approximately 6 - 10 feet (1.8 - 3 m) apart. The ideal distance from the rear wall varies depending on the speaker (see list below), however, for optimal performance they need to be a minimum of 3 feet (91 cm) from the side walls.
• Bronze 50 6 - 12 inches (15 - 30 cm)
• Bronze 100 & 200 8 - 14 inches (20 - 36 cm)
• Bronze 500 12 - 24 inches (30 - 61 cm)

NOTE: These are recommended distances for optimal performance. Actual results will vary dependant on room size and construction.
text_image
xm xm xmExperimentation is strongly advised when initially setting up the speakers, as environment and personal preference differ with every installation. If there is insufficient bass for example, try moving your speakers closer to a wall. The opposite approach is recommended if there is excess bass. Also see the information in the Port Bungs section. If stereo imaging is being lost, try ‘toeing’ them in slightly. The sound should appear to originate from the centre point between the speakers, not the actual speakers themselves.
AV Positioning
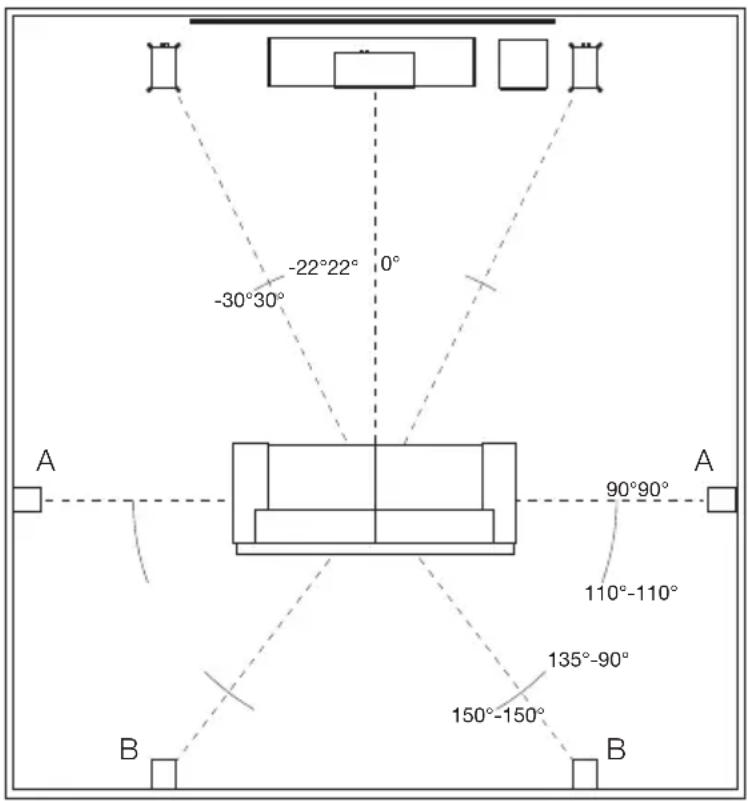
Please refer to the illustrations below for the ideal angles and positions of each speaker in your surround system. The speakers should be distanced from the wall according to the requirements of the speaker, which are listed in the 2-Channel Positioning section.
If the sound is too bass heavy or there is bass boom from the room when playing music (without a subwoofer), try moving the loudspeakers slightly further away from the wall(s). If this is not possible, then try the supplied port bungs. In a system with a subwoofer try adjusting the crossover frequency settings for the speakers and/or subwoofer or changing the subwoofer's position.
text_image
-22°22° 0° -30°30° A 90°90° A 110°-110° 135°-90° B 150°-150° BThe Bronze C150 centre speaker should be positioned so that it is pointing at approximate ear height of the main listening position. Included with the Bronze C150 are 4 adhesive feet, stick these to the bottom of the cabinet for protection and to help isolate the speaker.
NOTE: Images are for illustrative purposes only. If using the Bronze FX please refer to the 'Setting Up the Bronze FX' section for further information.
A. Side surround speakers
B. Rear surround speakers
A 7.1 surround system will make use of side (position A) and rear speakers (position B). If setting up a 5.1 system you can place your surrounds in position (A) or (B).
Setting Up Bronze FX
The Bronze FX features Di-Pole or Bi-Pole listening modes. In Bi-Pole mode, both the driver and tweeters are all in phase. In Di-Pole mode the tweeter on one side of the speaker is out of phase to the other tweeter and driver to create a diffused sound. The FX speakers should be wall mounted approximately 2 feet above ear height.
Di-Pole/ Bi-Pole switch: When used as part of 5.1 systems as a rear speaker, set the switch to Bi-Pole. Although there is nothing wrong with experimenting and trying the switch in the Di-Pole mode.
If part of a 7.1 system with 1 pair of Bronze FX's set the switch to Di-Pole. If using 2 pairs of Bronze FX's for side and rear effects, set them all to Di-Pole mode and swap the left and right handed side Bronze FX's. Keep the rear Bronze FX's handed correctly as illustrated here.

NOTE: Before adjusting any switches, please ensure that the amplifier is switched off. This will help to protect the amplifier.

text_image
Right Left RightLeftAtmos
In-Ceiling
When arranging the overhead channels in an Atmos system we would recommend using our three-way in-ceiling speakers. These employ a unique pivoting midrange/tweeter module which offers a wider dispersion characteristic, and are ideal for Atmos duties. More information can be found on our website: monitoraudio.com
Please see below for ideal positioning of 2 or 4 Atmos speaker setups.

text_image
65° 80° 100° 8 Ear Level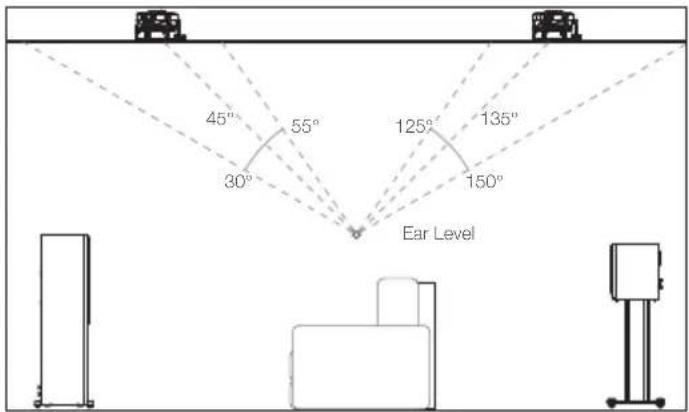
text_image
45° 55° 125° 135° 30° 150° Ear LevelBronze AMS Dolby Atmos ^® enabled speakers
Our new Bronze AMS speakers offer a dedicated solution and alternative to in-ceiling Atmos installations. They can be positioned directly on top of the front and/or rear speakers in a 2 or 4 Atmos speaker setup. Additionally and alternatively, the Bronze AMS can also be wall mounted for use as surround or height speakers.

natural_image
Diagram of three vertical structures emitting light beams from a central platform, no text or symbols present
Fixing Bronze FX & Bronze AMS to a Wall

CAUTION: Always determine where the Bronze FX or Bronze AMS will be fixed and the structure of the wall. For safety reasons, if unsure of your ability to provide a secure and safe fixing, do not attempt to fix these speakers to a wall. Instead, please obtain the services of a competent and qualified trades person.

CAUTION: Ensure that water pipes or electricity cables do not run behind where the speakers are going to be secured. Work from secure steps and avoid trailing wires.

NOTE: We do not supply wall fixing screws and plugs with the Bronze FX or Bronze AMS. Please only use suitable fixings for the type of wall construction the speakers will be fixed to.
The Bronze FX and Bronze AMS comes with keyhole inserts. To fix the speakers to the wall, we would recommend using the wall fixing template enclosed within the packaging carton.
Wiring
Single Wiring
Single wiring is achieved via a single set of cables to the terminals on the back of the loudspeaker. Internally the loudspeaker crossover guides the frequencies to the appropriate driver/tweeter. Low frequencies to the bass drivers, mid frequencies to the mid/bass drivers and high frequencies to the tweeter.
It is perfectly acceptable to connect to the top, bottom terminals or even diagonally (experimentation is advisable to achieve the preferred results).

text_image
RightIntegrated Amplifier
NOTE: When using this method you must keep the terminal links in place.
Bi-Wiring
Bi-wiring is accomplished by connecting separate pairs of speaker cables to the terminals on the loudspeaker from a single pair of connections on the amplifier. In the case of the Bronze Series, the bottom terminals connect to the bass driver(s) and the top terminals connect to the tweeter in 2 way loudspeakers, or the mid and tweeter in 2.5 way loudspeakers.

text_image
Right-Intergenatid Amplified
NOTE: When using this method the terminal links MUST be removed.
Bi-Amping
Bi-amping is the same as bi-wiring except you are introducing a second amplifier into the equation. In order to bi-amp you must connect a set of speaker cables to the top terminals on the loudspeaker from one amplifier and another set of speaker cables to the bottom terminals from the second amplifier.

text_image
Right-Integrated Amplifier RightPower Amplifier
NOTE: When wiring this method the terminal links MUST be removed.
The Effects of Bi-Wiring and Bi-Amping
Fundamentally a loudspeaker crossover varies the impedance seen by the speaker and by the power amplifier. When a full range audio signal is applied to the terminals of a full range speaker system, the bass driver(s) will only receive low frequency signals, the mid driver receives the mid band frequency signals and the tweeter only gets sent high frequency signals.
This means that if separate speaker cables are connected to the low and high frequency terminals, not only have the drive units had the frequency's directed and divided for them, but if using a bi-wire setup the two separate speaker cables will now also carry different signals due to the impedance. So the bass cables carry mostly the low frequencies, and the tweeter cable mostly the highs.
The effects of bi-wiring are subtle and depending on the cable construction and design it could be better to go for one better engineered cable than two for bi-wiring. Monitor Audio recommends experimenting with both configurations to find out which one works best in your system.
Bi-amping adds an additional amplifier to the system so that the one amplifier drives the low frequencies and the other amplifier drives the high frequencies. Bi-amping can therefore present a ‘cleaner’ signal at both the low frequency and high frequency speaker terminals, and because the high and low frequencies have already been separated, each has a minimal effect on the other - in essence the bass has less effect on the delicate treble. In order to best take advantage of bi-amping the amplifiers should be as independent from each other as possible. For instance, if using two stereo amplifiers you should use one stereo amplifier for the bass and the other for the treble, minimising the impact of the bass on the treble.
Port Bungs

WARNING: Care must be taken not to insert the port bungs too far into the port, as this may result in the foam bung being lost inside the cabinet.
If the loudspeaker is to be installed in a small room, typically 9 sqM (80 sqFT), or a room known to reproduce an accentuated bass response, it may be desirable to fit port bungs. However, experimentation is recommended with positioning of the loudspeaker in the room prior to fitting. To optimise performance from the loudspeaker it is important to ensure the loudspeaker is not positioned too close to a wall or near the corners of a room.
If the positioning of the loudspeaker is predetermined by room aesthetics or layout, you find you have accentuated bass or in the case speakers are to be sited in close proximity (less than the minimum suggested distances shown in the 2 Channel Positioning section) to a rear wall (such as on a bookshelf, positioned in a cabinet or on a stand close to a wall), we recommend fitting port bungs to the ports. This will reduce the bass ‘boom’ sometimes termed as overhang, and assist the loudspeakers to reproduce their best performance under these environmental conditions. ‘Boom’ is generally caused when bass energy from the loudspeaker ‘excites’ room modes and causes an accentuation at a particular frequency, or number of frequencies.
When fitting port bungs the overall bass extension will not be reduced, however bass energy/ output around the port tuning frequency will be reduced. This has the effect of reducing bass ‘boom’ while increasing bass clarity and apparent agility.
In all circumstances experimentation is highly recommended.
Running-In Your Speakers
Run your speakers in by playing music at low-mid listening levels for approximately 50-70 hours play time. You may find the sound will continue to improve even after the 70 hour mark.
This can be done naturally over time: like a fine wine the performance will improve with age.
Alternatively if you wish to run the speakers continuously on loop you can decrease the audible volume/presence by placing the speakers face-to-face so that the drivers/tweeters are directly aligned and as close as possible. Then connect the amplifier to your speakers so that one is as normal (in phase): positive to positive and negative to negative (red to red and black to black), and the other speaker out of phase: positive to negative and negative to positive inputs on the speaker.
Retention Bolt Adjustment
The Bronze Series has a bolt-through driver fixing to reduce cabinet colouration. Each bolt acts as a rigid brace, but also removes the need for conventional driver fixings as well, effectively decoupling the driver and front baffle to eliminate a further source of resonance.

NOTE: Should this bolt become loose over time, or has worked loose during transit, then please use the supplied hex key to tighten the bolt back up. This only needs to be a quarter turn after the strain has been taken by the bolt.
Warranty
Both the craftsmanship and the performance of this product is covered by the manufacturer's warranty against manufacturing defects provided that the product was supplied by an authorised Monitor Audio retailer under the consumer sale agreement. For the period of cover please refer to the product page on our website: monitoraudio.com for the product you have purchased.
When purchasing Monitor Audio products, please keep your receipt of purchase safe, as this validates your warranty.
Owner Information
Product Details
Model:
Product Serial No: ____
Date of Purchase: ____
Dealer Details
Dealer Name:
Address:
Post code:
E-mail address:
Specifications
| MODEL Bronze 50 Bronze | 100 Bronze 200 Bronze | 500 Bronze C150 Bronze FX Bronze AMS | ||||
| System Format | 2-way 2-way 2.5-way 2.5-way 2-way 2-way | |||||
| Frequency Response (-6dB in room) | 40 Hz - 30 kHz | 37 Hz - 30 kHz | 35 Hz - 30 kHz | 32 Hz - 30 kHz | 66 Hz - 30 kHz | 74 Hz - 30 kHz |
| Sensitivity (2.83v @ 1m) | 85 dB 87 dB | 88 dB 90 dB 88 dB 86 dB 86 dB | ||||
| Nominal Impedance | 8 Ohms | 8 Ohms | 8 Ohms | 8 Ohms | 8 Ohms | 8 Ohms |
| Minimum Impedance | 4.4 Ohms | 4.5 Ohms | 4.4 Ohms | 4.1 Ohms | 4.3 Ohms | 4 Ohms |
| Maximum SPL | 107 dBA (pair) | 110 dBA (pair) | 112 dBA (pair) | 116 dBA (pair) | 109 dBA (each) | 108 dBA (pair) |
| Power Handling (RMS) | 80 W | 100 W | 120 W | 200 W | 120 W | 80 W |
| Recommended Amplifier Requirements | 20 - 80 W | 30 - 100 W | 40 - 120 W | 60 - 200 W | 30 - 120 W | 20 - 80 W |
| Bass Alignment | Bass reflex HiVe II port system | Bass reflex HiVe II port system | Bass Reflex Dual HiVe II port system | Bass Reflex Dual HiVe II port system | Sealed cabinet | Sealed cabinet |
| Crossover Frequency | 2.5 kHz 2.2 kHz | L.F/M.F: 700 Hz M.F/H.F: 2.4 kHz | L.F/M.F: 550 Hz M.F/H.F: 2.7 kHz | 2.7 kHz | 2.8 kHz | |
| Drive Unit Complement | 1 × 5^1/2 C-CAM mid-bass driver 1 × 1 (25mm) C-CAM Gold Dome tweeter with UD Waveguide | 1 × 8 C-CAM mid-bass driver 1 × (25mm) C-CAM Gold Dome tweeter with UD Waveguide | 2 × 5^1/2 C-CAM mid-bass driver 1 × 1 (25mm) C-CAM Gold Dome tweeter with UD Waveguide | 2 × 8 C-CAM mid-bass driver 1 × 1 (25mm) C-CAM Gold Dome tweeter with UD Waveguide | 2 × 5^1/2 C-CAM mid-bass driver 1 × 1 (25mm) C-CAM Gold Dome tweeter with UD Waveguide | 1 × 5^1/2 C-CAM mid-bass driver 1 × 1 (25mm) C-CAM Gold Dome tweeter with UD Waveguide |
| External Dimensions Including Grille and Terminals (H x W x D) | 281 × 166 × 265 mm 11^1/16 × 6^9/16 × 10^7/16 | 376 × 231 × 325 mm 14^13/16 × 9^1/8 × 12^13/16 | 886 × 166 × 265 mm 34^13/16 × 6^9/16 × 10^7/16 | 951 × 231 × 325 mm 37^7/16 × 9^1/18 × 12^13/16 | 166 × 451 × 225 mm 6^9/16 × 17^3/4 × 8^8/16 | 287 × 284 × 124 mm 11^5/16 × 11^3/16 × 4^7/8 |
| External Dimensions including Outrigger Feet and Spikes (H x W x D) | N/A | N/A | 909 × 229 × 304 mm 35^13/16 × 9 × 11^15/16 | 974 × 294 × 364 mm 38^3/8 × 11^9/16 × 14^5/16 | N/A | N/A |
| Weight (Each) | 5.0 kg11 lb 0 oz | 7.8 kg17 lb 3 oz | 12.8 kg28 lb 4 oz | 18.0 kg39 lb 11 oz | 7.0 kg15 lb 7 oz | 3.9 kg8 lb 10 oz |
*waveguide optimised to comply with Dolby Atmos directivity targets.
Dolby, Dolby Atmos, and the double-D symbol are trademarks of Dolby Laboratories.

text_image
MONITOR AUDIOMonitor Audio Ltd.
24 Brook Road
Rayleigh, Essex
SS6 7XJ
England
Tel: +44 (0)1268 740580
Email: info@monitoraudio.co.uk
Web: monitoraudio.com
Designed & Engineered in the United Kingdom
Made In China
Version 1. 2020