
WS 6815 - Weather Station Techno Line - Free user manual and instructions
Find the device manual for free WS 6815 Techno Line in PDF.


| Product Type | Radio-controlled weather station with clock |
| Brand | Techno Line |
| Model | WS 6815 |
| Power supply (station) | 230V AC/DC power adapter + CR2032 backup battery |
| Power supply (outdoor sensor) | 2 AAA batteries (not included) |
| Indoor temperature range | 0°C to +50°C |
| Outdoor temperature range | -50°C to +70°C |
| Display resolution | 1°C |
| Alarm function | Yes, with 2-minute alarm and adjustable snooze (5 to 60 minutes) |
| Radio reception | DCF-77 signal (or equivalent), automatic daily synchronization |
| Transmission range | 30 meters in open field |
| Outdoor sensor channels | 3 selectable channels |
| Display | LED, adjustable brightness |
| Operating temperature | 0°C to +45°C |
| Maintenance and cleaning | Clean with a soft dry cloth. Do not use water or solvents. |
| Safety | Do not open, do not expose to water, fire, or extreme temperatures. |
| Spare parts and repairability | No spare parts available. In case of problem, reset or contact a professional. |
| General information | Weather station with wireless outdoor sensor, radio-controlled clock, alarm and snooze function. |
Frequently Asked Questions - WS 6815 Techno Line
User questions about WS 6815 Techno Line
0 question about this device. Answer the ones you know or ask your own.
Ask a new question about this device
Download the instructions for your Weather Station in PDF format for free! Find your manual WS 6815 - Techno Line and take your electronic device back in hand. On this page are published all the documents necessary for the use of your device. WS 6815 by Techno Line.
USER MANUAL WS 6815 Techno Line
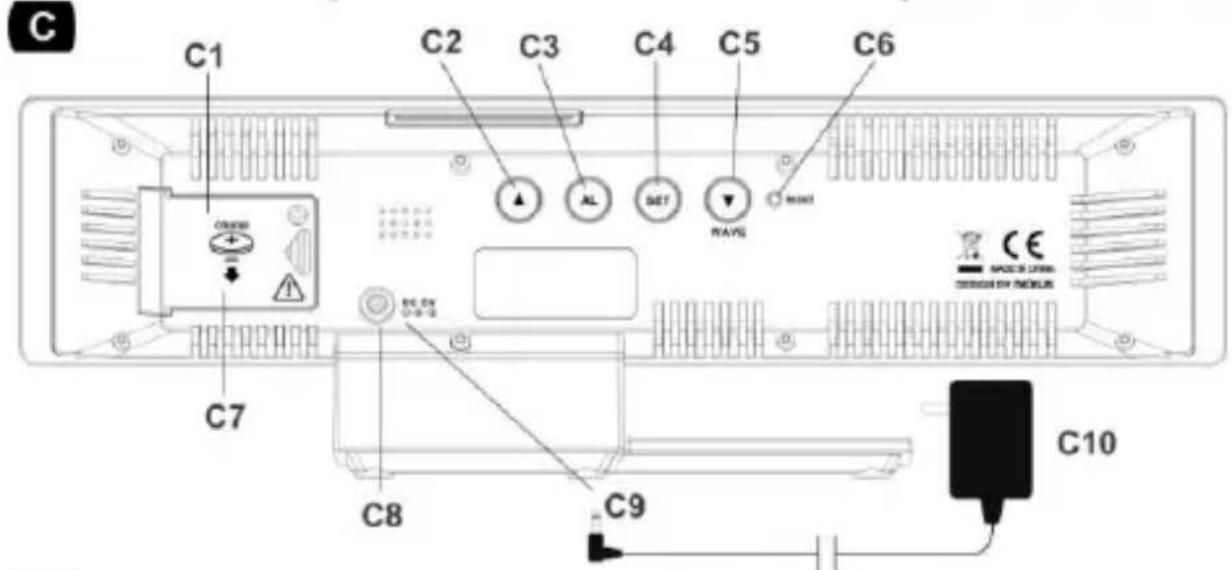
C3: ALARM Taste C4: SET Taste
C5: DOWN/WAVE Taste C6: RESET Taste
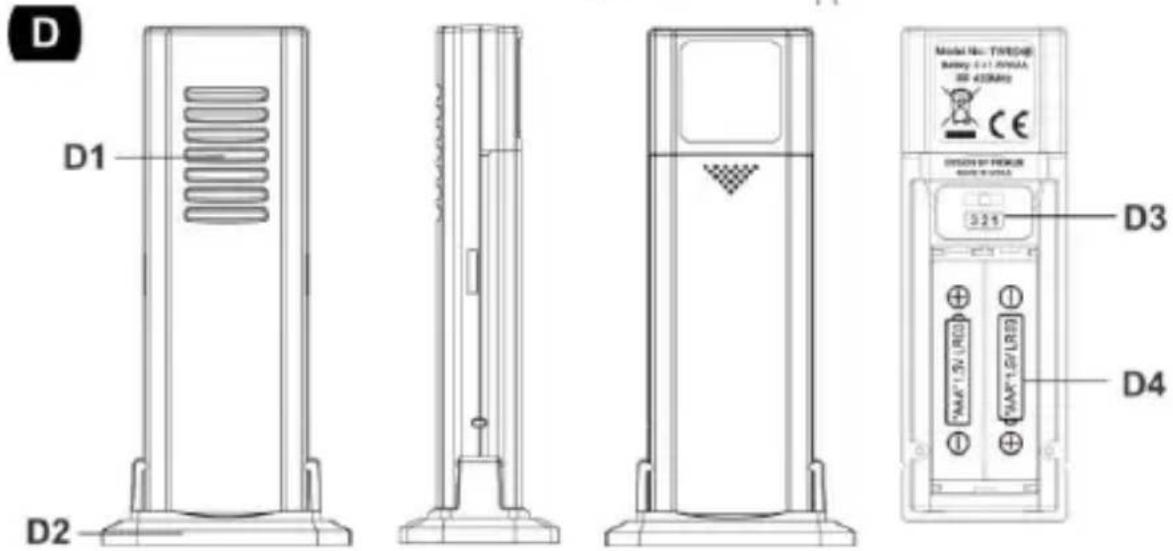
D- Outdoor temperature sensor
WS6815 - INSTRUCTION MANUAL
LED TEMPERATURE STATION WITH RADIO CONTROLLED CLOCK AND ALARM
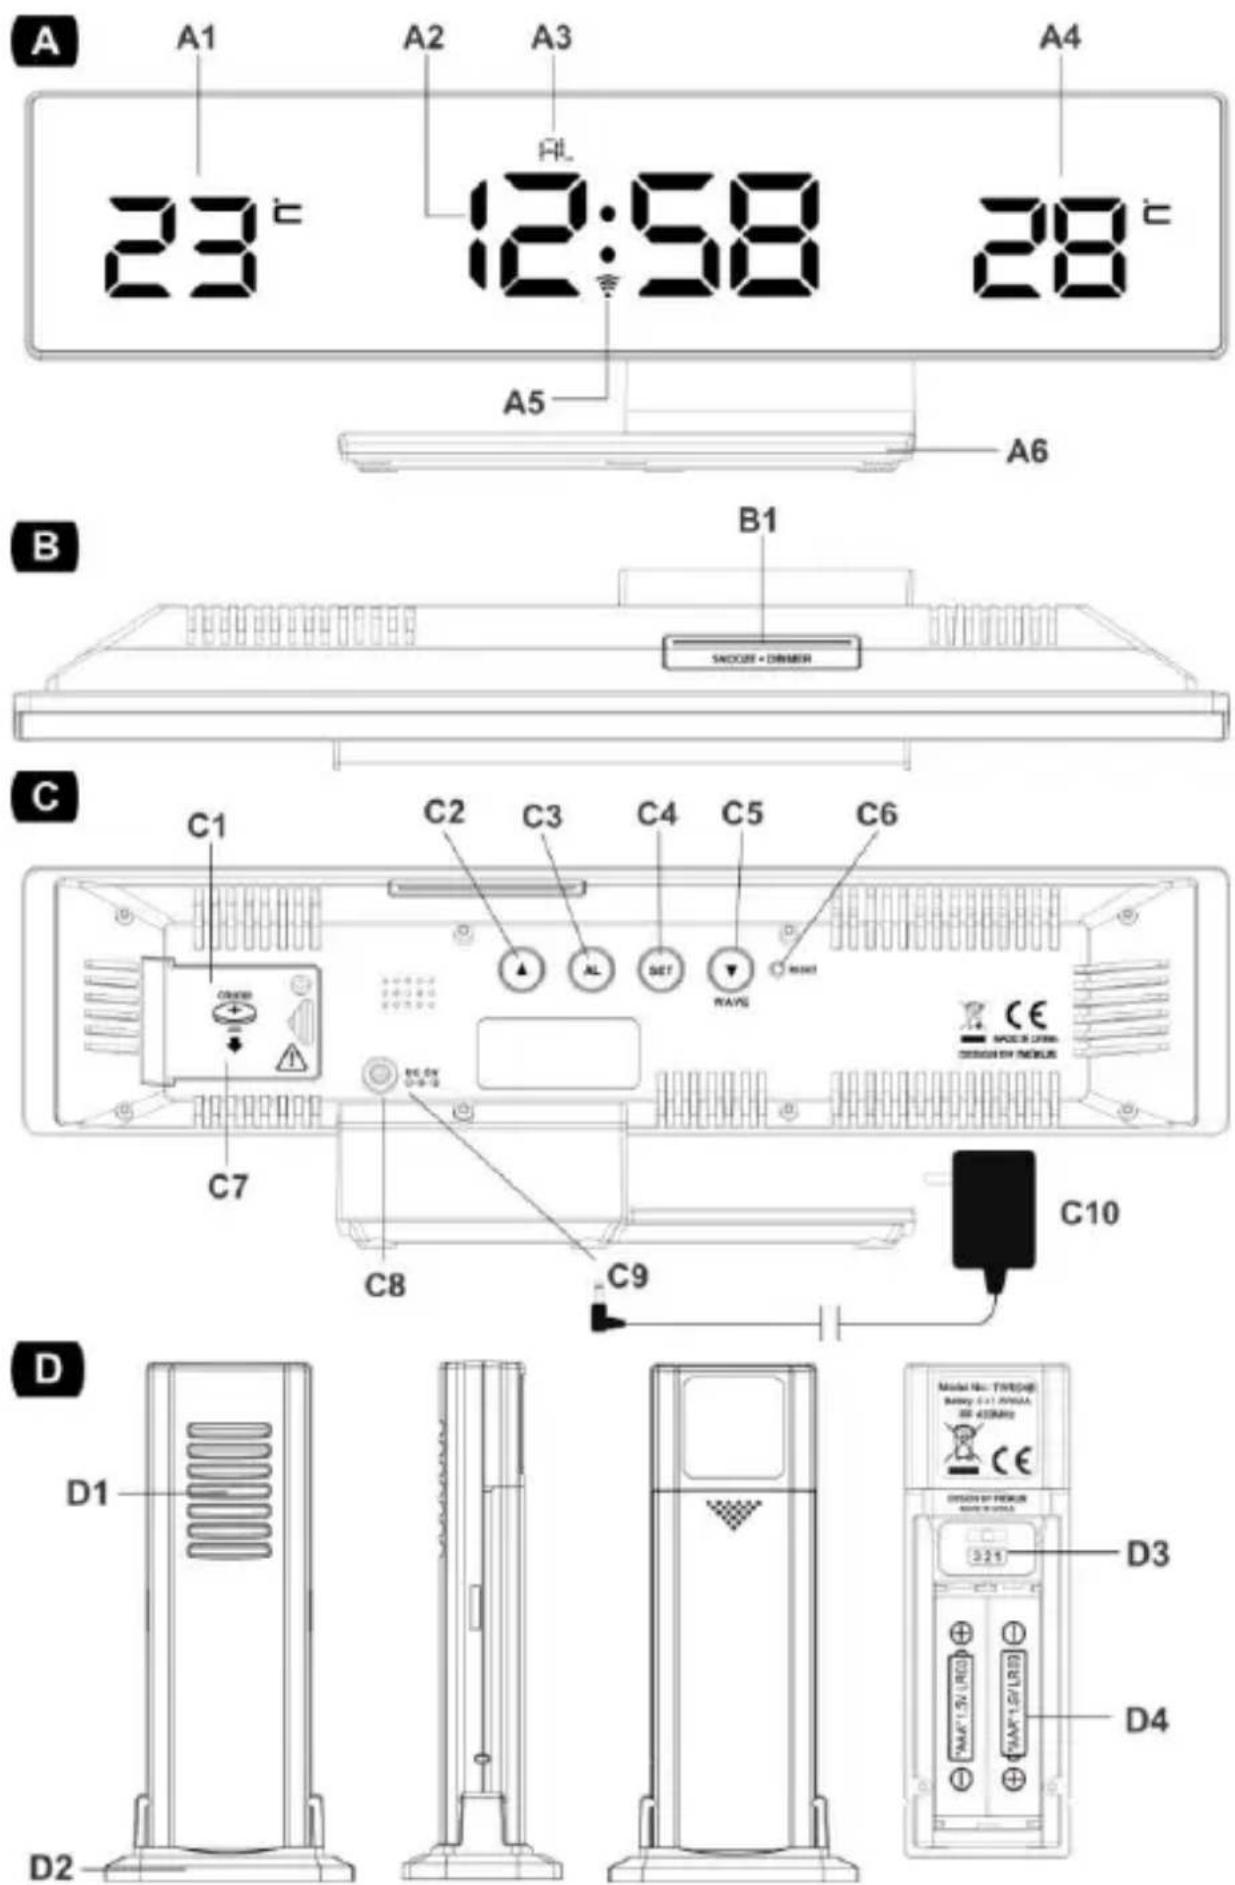
OVERVIEW
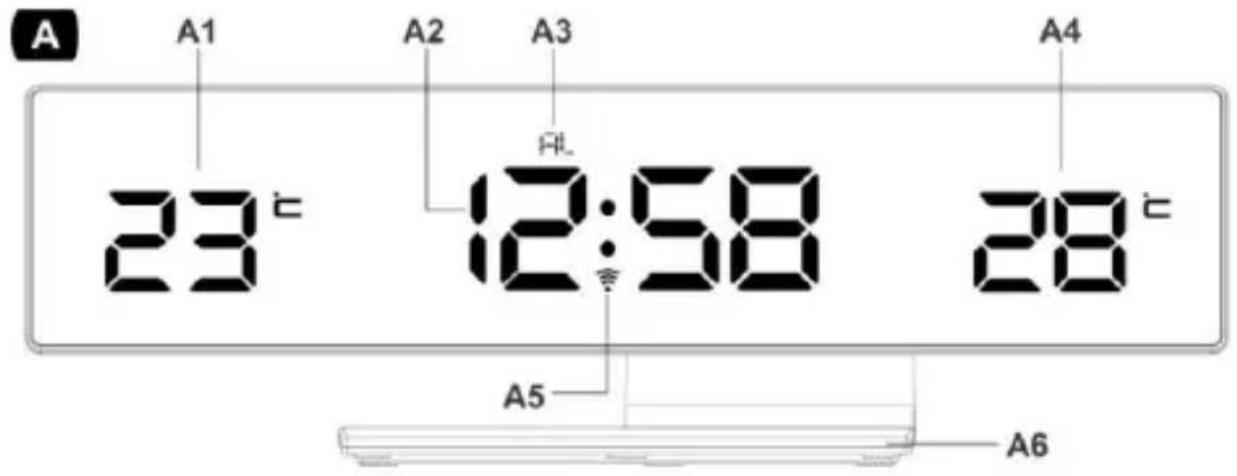
A - Front view
A1: Indoor temperature
A2: Time
A3: Alarm ON
A4: Outdoor temperature
A5: RCC indicator
A6: Stand
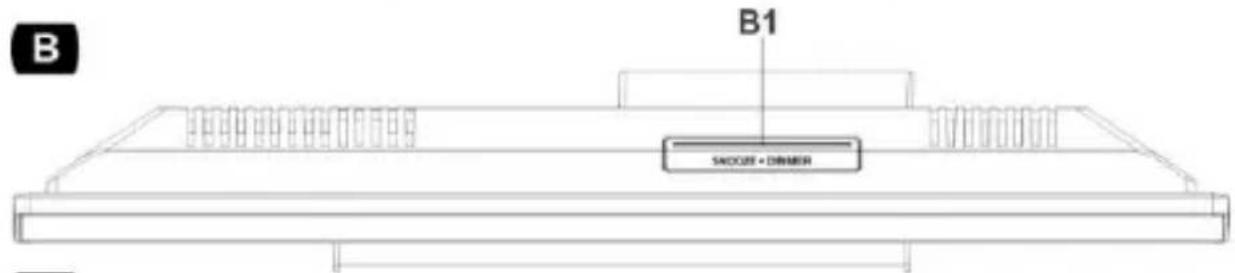
B- Top view
B1: SNOOZE / DIMMER button
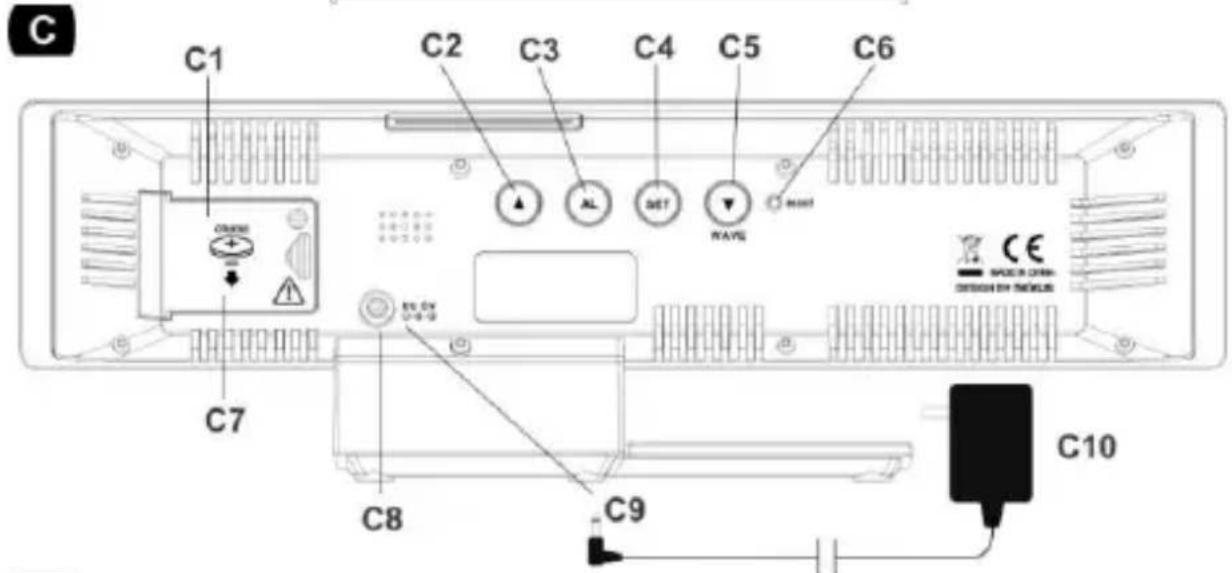
C - Back view
C1: Battery door
C2: UP button
C3: ALARM button
C4: SET button
C5: DOWN/WAVE button
C6: RESET button
C7: Insert 1 x CR2032 battery inside the battery compartment
C8: DC socket C9: Insert AC/DC adapter jack
C10: AC/DC adapter
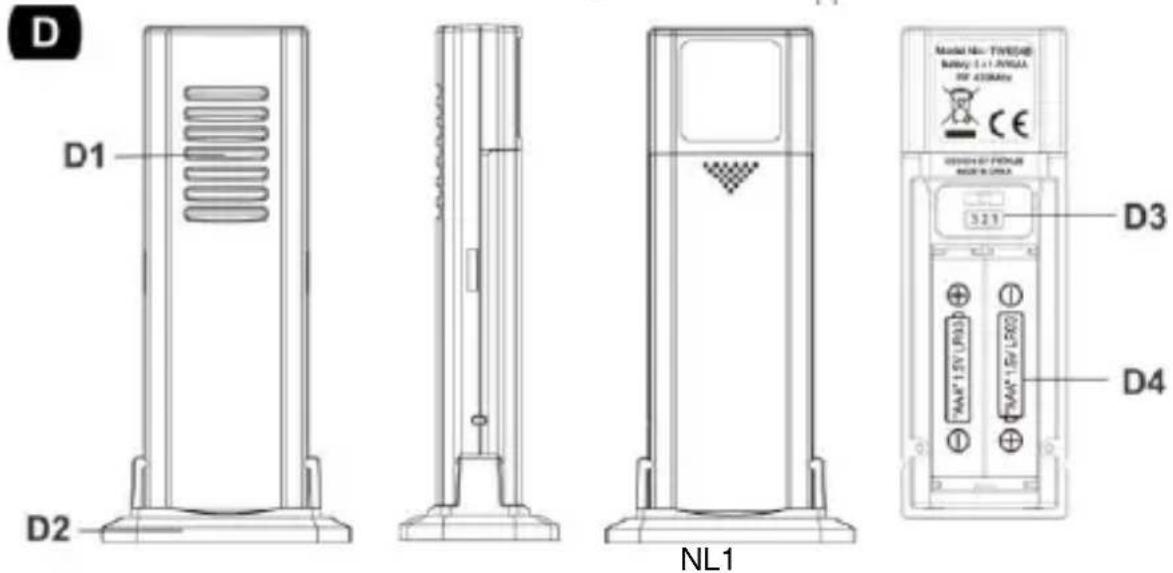
D- Outdoor temperature sensor
D1: LED indicator
D2: Holder
D3: Channel 1,2,3 selector switch
D4: Insert 2 x AAA batteries
ENVIRONMENTAL RECEPTION EFFECTS
The temperature station obtains the accurate time with wireless technology. Same as all wireless devices, the reception is maybe affected by the following circumstances:
- Long transmitting distance
• Nearby mountains and valleys - Among tall buildings
- Near freeway, railway, airports, high voltage cable etc.
- Near construction site
• Inside concrete buildings
• Near electrical appliances (computers, TV's, etc) - Inside moving vehicles
• Near metallic structures
Place the station at a location with optimal signal, i.e. close to a window and away from metal surfaces or electrical appliances.
QUICK SETUP
Step 1 Keep the station and outdoor sensor next to each other. Slide open the battery cover at the back of the outdoor sensor. Make sure the channel selector is set at position 1 (top position), then insert 2 x AAA batteries (not included) into the outdoor sensor by observing the correct “+/-” polarity signs inside the battery compartment. Replace the battery door.
Step 2 Insert the AC/DC adaptor to any 230V AC household outlet. Then insert the DC jack to the back case of the station. Insert the stand to the bottom of the temperature station.
Step 3 Peel off the protective label on the front. The temperature station is ready to work for you.
The station will receive data signal from the outdoor sensor in few seconds. Then place the outdoor
sensor in a dry and shaded area outdoor.
BACK-UP BATTERIES
When the power supply is not in use, the station will be powered by the back-up batteries. The LED display is turned off, but time and alarm time remain stored (also in the event of a power failure).
To change batteries:
- Place your unit face down on a flat and soft surface.
- Use screw driver to open the backup battery compartment door located on the back of the unit.
- Slide and remove the battery cover at the bottom of your unit.
- Insert one new CR2032 lithium battery into the battery compartment with the “+” side facing up as indicated.
- Close the battery compartment door and tighten the battery door screw.
DCF SIGNAL RECEPTION AND SIGNAL INDICATOR
After the station is powered up, it starts to receive DCF signal. The icon flashes.
Receiving DCF signal ( icon flashing)
Successful reception ( icon becomes static)
Failed reception ( icon disappear)
During reception, press the ▼ WAVE button will display reception mode and signal strength indication:
When strong DCF signal is detected, display shows with 3 bars
When weak or no DCF signal is detected, display shows ro
During reception, the signal strength may move from 1 bar to 2 bars to 3 bars. This is normal since the clock is detecting DCF signal and other signals in the air at the same time. Press the SET button to return to the time display with 📋con flashing.
Successful reception or failed reception
Icon becomes static on (stop blinking) when reception is successful.
Icon disappears when reception is failed.
Automatic reception and manual reception
The station starts automatic reception everyday at 1:00, 2:00, and 3:00. If it fails to receive the DCF signal at 3:00, it will start reception at 4:00. If it fails again, it will start reception at 5:00. If it fails again, it will start automatic reception at 1:00 again in the next day.
For manual reception simply press and hold the ▼/ WAVE button, the station will gives a short beep and starts manual reception. Press and hold the ▼/WAVE button to stop DCF reception.
When the temperature station is receiving the radio controlled time signal, the display will turn dimmer. It will resume to the brightness level which you originally selected after the radio controlled time reception is completed.
During DCF reception all buttons do not function and it does not take temperature measurement. The temperature readings will get stable and become more accurate after the station clock is powered up for around 30 minutes.
To cancel DCF reception permanently
Press and hold the ▼/ WAVE and the ▲ button at the same time for 2 seconds, the station will give 2 short beeps and the radio controlled function is permanently disabled.
To resume the radio controlled function, press and hold the ▼/ WAVE and the ▲button at the same time for 2 seconds, the station will give 2 short beeps and will start DCF reception immediately.
TIME SETTING
- Press and hold the SET button for 2 seconds, hour digits flash. Press the ▼ or the ▲ button to set the hours.
- Then press the SET button again, the minute digits flash. Press the ▼ or the ▲ button to set the minutes.
- Then press the SET button again, display shows 05 and flash. Press the ▼ or the ▲ button to set snooze duration from 5 minutes to 60 minutes.
- Then press the SET button again, display shows 00 and flash. Press the ▼or the ▲button to set the time zone:
"-01" GMT +0 (United Kingdom) "00" GMT +1 (Central European time) "01" GMT +2 (Eastern European time)
Note: Time zone can only set when the clock successfully receives a radio signal.
- Press the SET button again to store the settings and return to normal time display. The clock will return to normal mode in around 10 seconds if no further press of any other buttons.
Note: The time is displayed in 24-hour display format.
ALARM SETTING
(default alarm setting is 6:00 AM)
- Press and hold the ALM button until the AL icon appears on the display, the hour digits flash. Press the of the button to set the desired alarm hours.
- Press the ALM button again, the minute digits flash. Press the ▼ or the ▲ button to set the desired alarm minutes.
- Press the ALM button again to store the alarm settings and return to normal time display. The clock will return to normal mode in around 10 seconds if no further press of any other buttons.
To turn on or off the alarm
Single press the ALM button during normal time display to turn on or off the alarm. When the alarm function is turned on the AL icon appears on top of the time digits.
Note: Alarm duration is 2 minutes.
To use the snooze function
When time reaches the set alarm time, the station will give a beep sound to wake you up. The AL icon will flash.
- Press SNOOZE once to stop the alarm temporarily, AL icon keeps flashing. The alarm will beep again after the set snooze duration.
- To stop the alarm, press any button except the SNOOZE button when alarm is beeping. The alarm will stop and AL icon becomes static. The Alarm will beep again same time next day.
DIMMER FUNCTION
Press the SNOOZE / DIMMER button to adjust high or low brightness of the LED display.
TROUBLE SHOOTING
In case the station shows false digits, it may be affected by electrostatic discharge or interferences from other devices. Press the RESET button on the back of the station. The station will be reset to default setting of time and calendar and it will start to receive radio controlled time signal again.
If you lose the outdoor temperature
When the outdoor temperature digits show “--”, the wireless transmission is either interrupted or lost. Press and hold the ▲ button of the station, then bring in the outdoor sensor and take out the batteries and reinstall to your outdoor transmitter. If you continue to lose the outdoor temperature display, try placing the transmitter in a different location until you have smooth transmission of temperature data.
Note: Keep in mind that the outdoor transmitter only has a 30 meter transmission range in open area with no obstructions. Each obstruction between the transmitter and the station (roof, walls, floors, ceilings, thick trees, etc.) will effectively cut the transmission range in half.
Precautions
- Do not subject the unit to excessive force or shock.
- Do not expose the unit to extreme temperatures, direct sunlight, dust or humidity.
- Do not immerse in water.
- Avoid contact with any corrosive materials.
- Do not dispose this unit in a fire as it may explode.
- Do not open the inner back case or tamper with any components of this unit.
Batteries safety warnings
- Use only alkaline batteries, not rechargeable batteries.
• Install batteries correctly by matching the polarities (+/-). - Always replace a complete set of batteries.
- Never mix used and new batteries.
- Remove exhausted batteries immediately.
- Remove batteries when not in use.
- Do not recharge and do not dispose of batteries in fire as the batteries may explode.
- Ensure batteries are stored away from metal objects as contact may cause a short circuit.
- Avoid exposing batteries to extreme temperature or humidity or direct sunlight.
- Keep all batteries out of reach from children. They are a choking hazard.
Use the product only for its intended purpose!
SPECIFICATIONS
Operation temperature: 0°C to +45°C
Temperature measuring range:
Indoor: 0^ C to +50^ C
Outdoor: -50^ to +70^
(display shows HH.H / LL.L if out of this range)
(display shows HH.H / LL.L if out of this range)
Temperature resolution: 1°C
Alarm duration: 2 minutes
Snooze duration: 5 to 60 minutes
Consideration of duty according to the battery law
Old batteries do not belong to domestic waste because they could cause damages of health and environment. You can return used batteries free of charge to your dealer and collection points. As end-user you are committed by law to bring back needed batteries to distributors and other collecting points!
Consideration of duty according to the law of electrical devices
This symbol means that you must dispose of electrical devices separated from the General household waste when it reaches the end of its useful life. Take your unit to your local waste collection point or recycling centre. This applies to all countries of the European Union, and to other European countries with a separate waste collection system.
WS6815 - GUIDE D'INSTRUCTIONS
STATION DE TEMPÉRATURE À DEL AVEC HORLOGE RADIOCOMMANDÉE ET FONCTION RÉVEIL
VUE D'ENSEMBLE
A - Vue de face
OVERZICHT
A - Vooraanzicht
- D- Outdoor temperature sensor
- WS6815 - INSTRUCTION MANUAL
- OVERVIEW
- A - Front view
- B- Top view
- C - Back view
- ENVIRONMENTAL RECEPTION EFFECTS
- QUICK SETUP
- BACK-UP BATTERIES
- To change batteries:
- DCF SIGNAL RECEPTION AND SIGNAL INDICATOR
- Successful reception or failed reception
- Automatic reception and manual reception
- To cancel DCF reception permanently
- TIME SETTING
- ALARM SETTING
- (default alarm setting is 6:00 AM)
- To turn on or off the alarm
- To use the snooze function
- DIMMER FUNCTION
- TROUBLE SHOOTING
- If you lose the outdoor temperature
- Precautions
- Batteries safety warnings
- SPECIFICATIONS
- Consideration of duty according to the battery law
- Consideration of duty according to the law of electrical devices
- WS6815 - GUIDE D'INSTRUCTIONS
- VUE D'ENSEMBLE
- A - Vue de face
- OVERZICHT
- A - Vooraanzicht
Brand : Techno Line
Model : WS 6815
Category : Weather Station