Aristocrat - Uncategorized Oklahoma Sound - Free user manual and instructions
Find the device manual for free Aristocrat Oklahoma Sound in PDF.


User questions about Aristocrat Oklahoma Sound
0 question about this device. Answer the ones you know or ask your own.
Ask a new question about this device
Download the instructions for your Uncategorized in PDF format for free! Find your manual Aristocrat - Oklahoma Sound and take your electronic device back in hand. On this page are published all the documents necessary for the use of your device. Aristocrat by Oklahoma Sound.
USER MANUAL Aristocrat Oklahoma Sound
natural_image
Wooden podium with a black cover and microphone, no visible text or symbolsINTRODUCTION
Aristocrat Sound Lectern — Model 6010
Perfect for the smallest to largest venues. Executive style podium include 50 Watt Multimedia amplifier with two built in 8" speakers surrounded by gold appointments. Includes Microphones, Holders, Digital Timepiece & rolls on four casters. For audiences up to 2,500 people. Assembly required.
Colors: Walnut, Light Oak, Medium Oak, Mahogany/Black Edging
Dimensions: 25 ^1/4 "W x 46" H x 20 ^1/4 " D.
ASSEMBLY TIPS
- Do not use a sharp instrument such as a knife or a screwdriver to open the packaging, as this may scratch or possibly damage the unit.
- All assembly should be done on a clean protected surface such as carpet or similar.
- Make sure that you have all the required parts. A list of all the parts are listed.
- Read instructions carefully and follow diagrams to ensure easy & correct assembly.
CARE OF YOUR CABINET
- All exterior and interior exposed surfaces are melamine covered as well as edges in matching patterned melamine material. To refresh the appearance, wipe the surface with a cloth soaked lightly in furniture oil. Avoid speaker grill area. Your cabinet will look as good as new.
TECHNICAL SPECIFICATIONS
Power Output ..50W RMS at 10% THD
Mic ....Electret Condenser Mic (2)
Aux....150 mV>220K
Frequency.....100HZ-25KHZ
Response..... + 3dB
Power Supply ..110-120V ohms DC 10.8 12V
Fuse ......2A Normal
Output ......8 ohms
Accessories ..... Handheld mic; clip-on
mic; gooseneck;
Shockmount mic holder;
digital clock
Manufacturers Warranty
Our Lecterns undergo the most rigid and exacting tests for superior quality and performance before leaving the factory. Oklahoma Sound Corporation warrants this product to be free from defective material and workmanship on the electronic product speakers and microphones for two years from the date of resale by an authorized Oklahoma Sound distributor. Oklahoma Sound will replace defective parts and repair malfunctioning products under this warranty when the defect occurs under normal installation and use, provided the unit is returned to our factory via prepaid transportation after direct authorization and approval by Oklahoma Sound. This warranty provides that examination of the returned product must disclose in our judgement, a manufacturing defect. This warranty does not extend to any product which has been subject to misuse, neglect, accident, improper installation, or where the serial number has been removed or defected and is given in lieu of any other warranty implied or expressed and will not cover any consequential damages.
ASSEMBLY PARTS
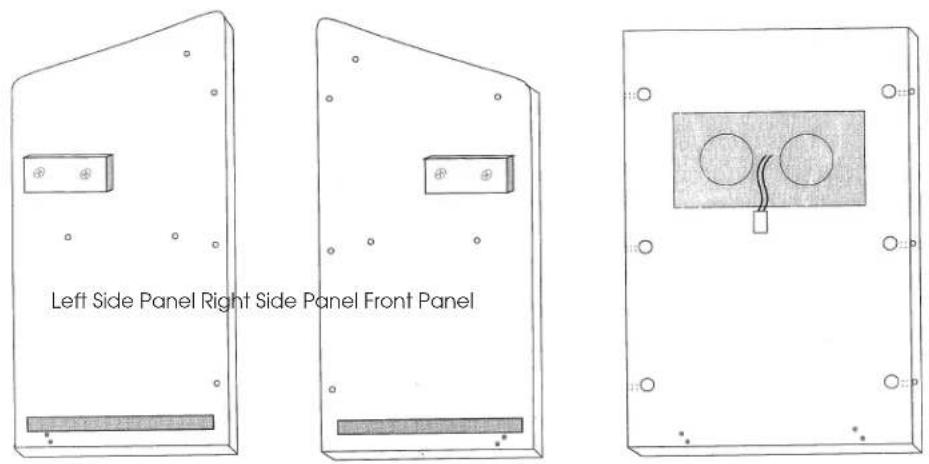
text_image
Left Side Panel Right Side Panel Front Panel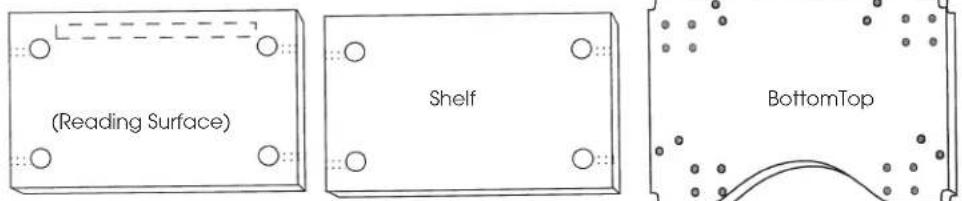
text_image
(Reading Surface) Shelf BottomTop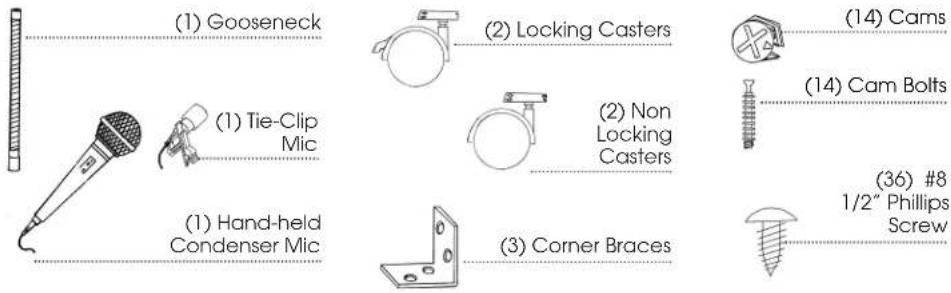
text_image
(1) Gooseneck (2) Locking Casters (14) Cams (1) Tie-Clip Mic (2) Non Locking Casters (14) Cam Bolts (36) #8 1/2" Phillips Screw (1) Hand-held Condenser Mic (3) Corner Braces
text_image
(1) Amplifier Series 700
text_image
Cam-Lock AssemblyTool Required
• #2 Phillips Head Screwdriver
INSTALLATION OF HARDWARE
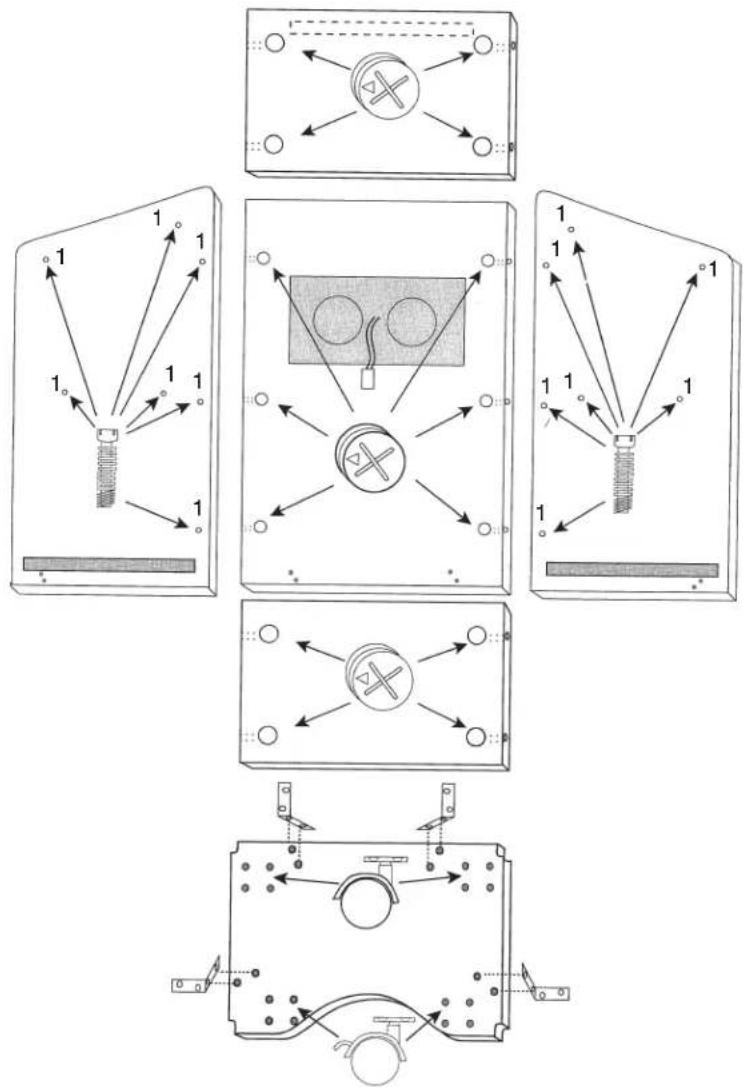
1) Lay out the wood panels as shown in diagram "A" (make sure the factory drilled holes are facing upwards). You can determine the top of the front panel by identifying the edge cut on an angle.
2) Identify the holes numbered "1" in Diagram A. Screw the bolts into the inserts with a #2 Phillips-head screwdriver. Be sure to tighten the screws all the way. Note: Be careful not to over-tighten the bolts as this will strip the wood!!
3) Insert the cams in the larger holes as shown on diagram. MAKE SURE THE ARROW ON THE CAM IS POINTING TO CLOSEST EDGE & ALIGNED WITH THE HOLE ON THE EDGE.
5) On the BOTTOM panel, screw in the four casters. The locking casters should screwed into the bottom closest to the T-Molded contoured edge. The second pair of non-locking casters should be screwed in closest to the unfinished edge.
6) The 4 corner braces should be screwed into the bottom panel. There are pre-drilled holes to guide you for proper placement. (Diagram A)
flowchart
graph TD
    A["Sensor 1"] --> B["Component 1"]
    C["Sensor 2"] --> D["Component 2"]
    E["Sensor 3"] --> F["Component 3"]
    G["Sensor 4"] --> H["Component 4"]
    I["Sensor 5"] --> J["Component 5"]
    K["Sensor 6"] --> L["Component 6"]
    M["Sensor 7"] --> N["Component 7"]
    O["Sensor 8"] --> P["Component 8"]
    Q["Sensor 9"] --> R["Component 9"]
    S["Sensor 10"] --> T["Component 10"]
Diagram A
ASSEMBLY OF LECTERN
It is important that the instructions on the assembly are followed carefully
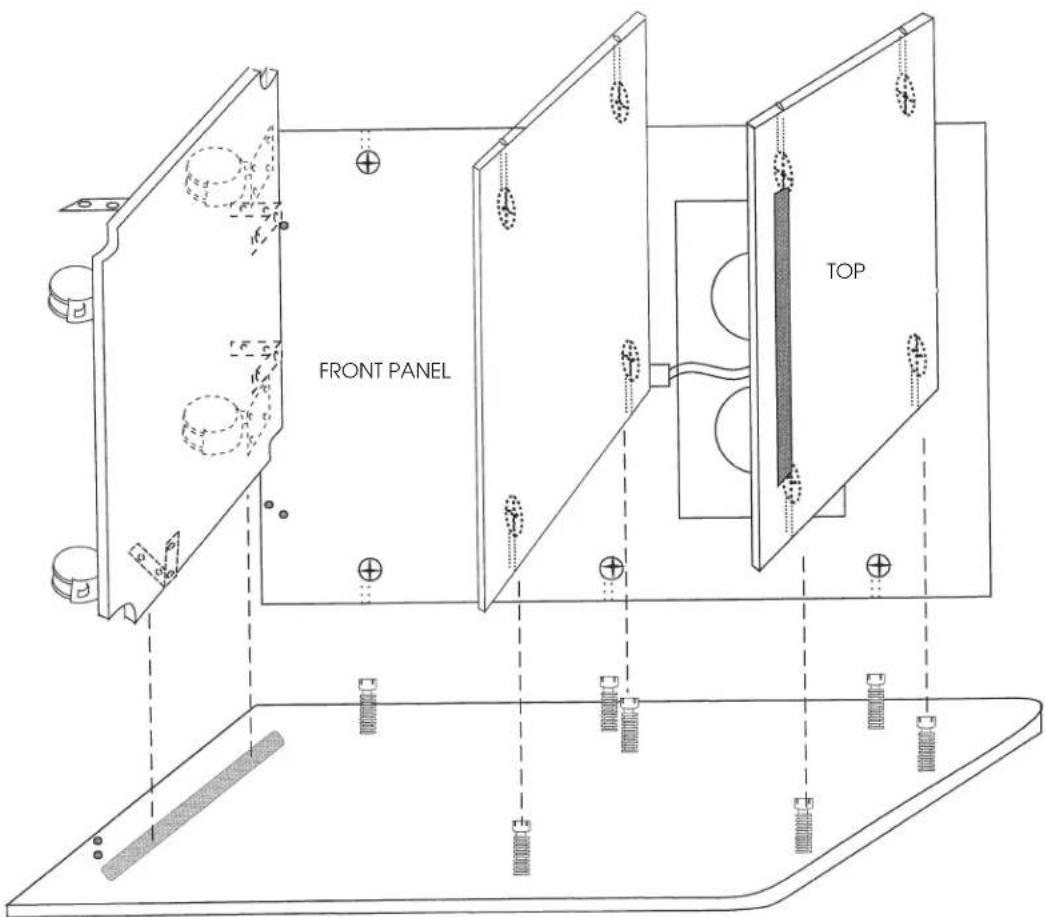
1) The first step of assembly will be to align the holes on the front panel edges with the three cam bolts on the side panel, tighten cams by turing clockwise until locked.
2) Next will be the Top and Shelf. Make sure the cams on the "TOP" & "SHELF" face the bottom of the lectern. The two highest bolts align with the two holes on the edge of the "TOP" (these holes reach until the cams). The two bolts in the center of the right side panel will align with the two holes on the edge of the shelf. Gently push the shelves down on to the cam bolts until the shelf is completely on the right side panel. Tighten.
3) Taking the "BOTTOM" panel, with the casters facing the bottom of the unit insert panel into the groove, make sure that the panel is all the way in the groove. Screw in the corner braces to the side and the front panel, there are pre-drilled holes to guide you. (Diagram B)
text_image
FRONT PANEL TOPDiagram B
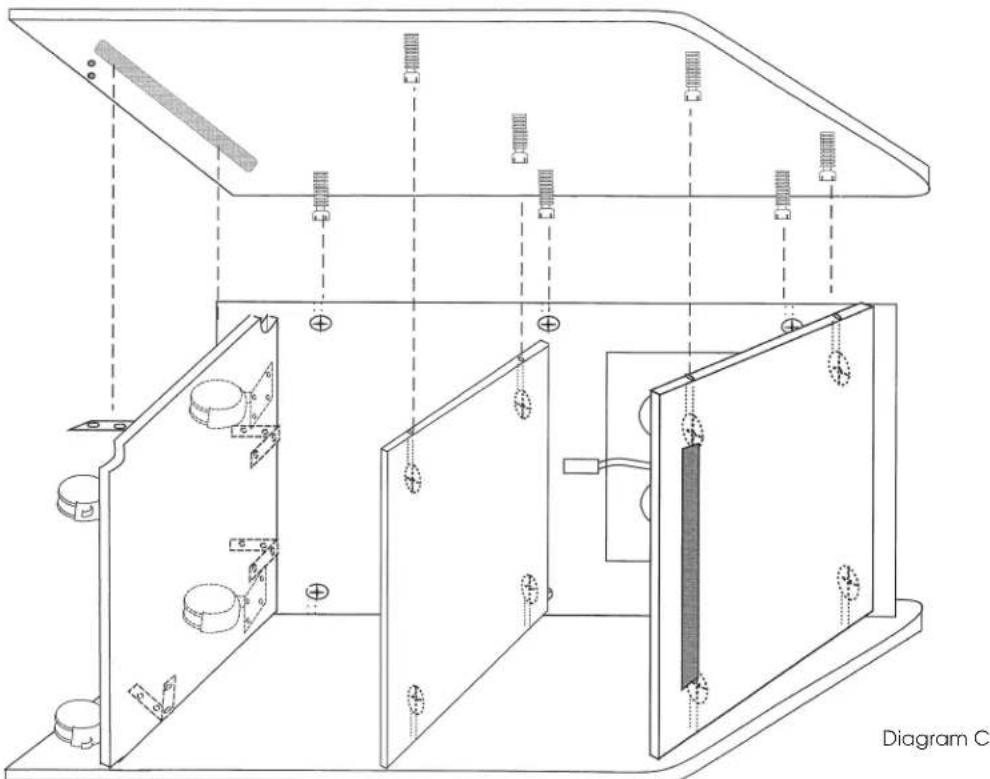
5) Now apply the left side panel to the semi assembled unit. Be sure to align the cam bolts to the holes on both the front panel & the shelf.. Be sure that the "BOTTOM" is securely in groove. Tighten cams. (Diagram C)
text_image
Diagram C6) Screw the Corner braces, on the bottom of lectern, into the "SIDE PANEL" & the "FRONT PANEL".
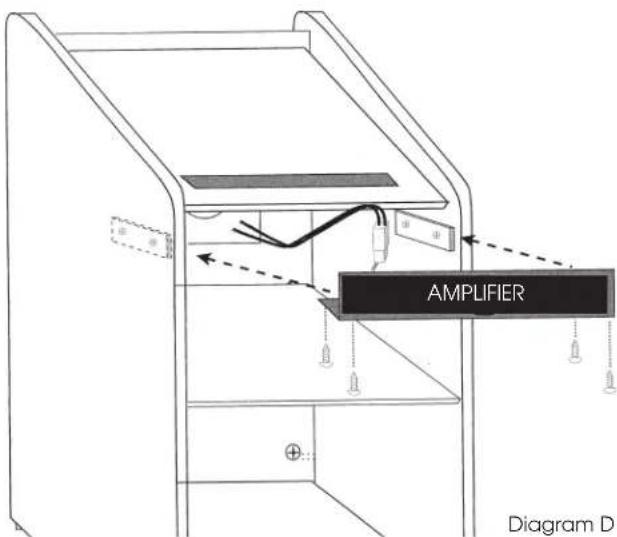
7) Connect the plug coming out of the speakers on the front panel to the plug coming out of the back of the amp. Fit
the amp between the two sides and bring the amp up until it reaches the cleats (wood stub) then from the bottom of the amp screw in four screws. (Diagram D)
8) Once again go over all the cams & check to make sure the lectern is sturdy.
9) Screw on gooseneck, mic holder and install microphone for sound use.
Congratulations! You have successfully assembled your lectern, which-if cared for correctly- should give you long & satisfactory usage.
text_image
AMPLIFIER Diagram D
text_image
MIO 1 MIO 2 Ldm Hdsm TONE/IEQUALIZATION AOK SERIES 700 NORTH USA Oklahoma SOUND CORPORATION (ORKELL NJ) RECHARGE 6VDC 114ND POWER700 SERIES AMPLIFIER OPERATING INSTRUCTIONS
Operating Precautions
Before operating the amplifier, be sure you fully understand all instructions and features of the amplifier. DO NOT turn amplifier on until all input and output connections have been made. NEVER replace fuses unless power is off.
Microphone Input Connection
The microphone input accepts 1/4" phone jack. Do not position microphone next to or facing speakers. This may cause acoustic feedback.
Auxiliary Input
One auxiliary input is provided for radio tuner, tape recorder, CD player or multi-media equipment. Output level is adjusted by the auxiliary volume control.
Tone / Equalization Controls
The Low and High frequency controls are similar to the bass and treble controls found on most stereo systems. Optimum tone is achieved by first setting both knobs halfway; adjust Low and High frequency controls to suit environment.
Auxiliary / Line Out
Connect additional speaker line to navy line out connector of the amplifier. For maximum power transfer and to avoid amplifier overload, be sure that the total impedance of the speaker line matches the output impedance setting on amplifier. Be sure that speaker terminals are not shorted together by speaker line connecting cables. Can also be used for a recording device.
Power Supply 12V DC Operation
Connect a 12 volt rechargeable battery 5 Amp (not included) to the battery input connector located on the panel of the amplifier (using 6' battery cable). Be sure that the positive pole of battery is connected to the white wire terminal (+) and the negative pole to the Brass wire (-). When lectern is plugged into a standard wall outlet, the battery will automatically recharge. Green indicator light illuminates during recharge mode.
Precautions
- Set Mic volume control on lowest when turning unit on.
- Insure correct polarity for D.C. supply connections.
- Reverse connection will blow the fuse and may damage internal circuitry.
• Always replace fuse with specified rating.
Removal and Installation of Amplifier
If your amplifier has to be removed for servicing — follow these simple steps:
1) Disconnect A/C wall plug.
2) Remove 4 side screws two on each side panel under amp top.
3) Disconnect speaker wire at rear of amplifier.
4) Pack it into a strong box with ample cushioning and return to factory.
5) To install new amplifier reverse the above procedure.
OPTIONAL/ADDITIONAL EQUIPMENT
BRASS READING LAMP / #BRL
Attach an elegant brushed brass reading lamp to the reading table of your new Speaker Stand. Not only will you shed light on the subject, but you will add pizzaz to your new stand.
REACHARGEABLE BATTERY / #PS12V
Connect this 12V 5 amp rechargeable battery pack with included cable to any of our lecterns for battery power. 20 hour life. Lecterns recharge battery overnight.
ARISTOCRAT CONTOUR
FLOOR LECTERN / #600
The perfect lectern for the most demanding, upscale look in your conference, training and formal meeting rooms. Contoured style with radius curves. Available in three woodgrain thermofused melamine laminate on MDF. Two built in shelves and our side mounted slide-out shelf for A/V presentation equipment. Accented by attractive T-Mold edging. Moves effortlessly on four easy roll castors, two locking. Ready to assemble.
Dimensions: 23" W x 46 ^1/2 " H x 16" D
Walnut, Lt. Oak, Med. Oak, Mahogany.
ARISTOCRAT CONTOUR
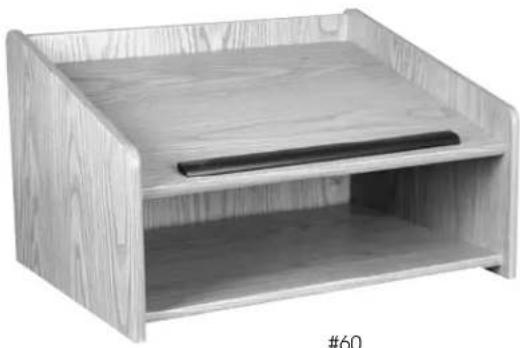
TABLE TOP LECTERN / #60
Same upscale styling as its full floor sister, but in an easy-go table top version. Move this attractive, affordable lectern from room to room and keep your notes in order and your audiences wowed. Made of thermofused laminate in four color selections with T-mold edging. Protective non marring glides included. Assembly required.
Dimensions: 25" W x 15" H x 20"D
Walnut, Lt. Oak, Med. Oak, Mahogany.
For these products please contact your dealer or Oklahoma Sound Corp.

natural_image
Close-up of a gray handheld device with a coiled cable and label '#BRL' (no other text or symbols visible)
text_image
POWERDSG SONGIC MODEL: PS-F021 SP-021-021-021 #PS12V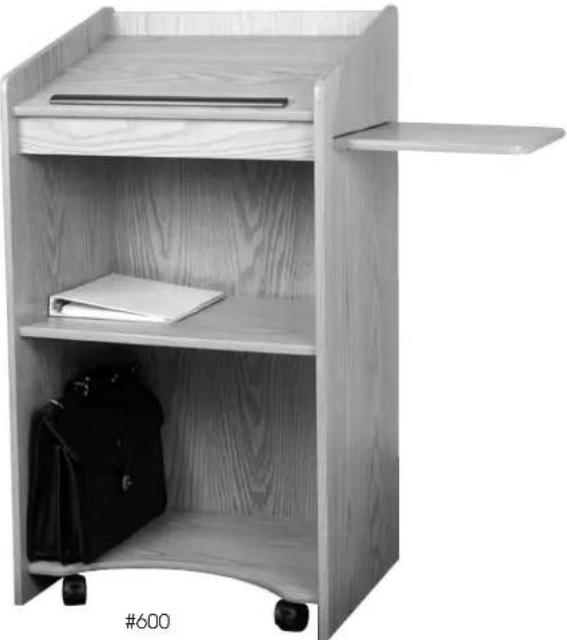
natural_image
Wooden cabinet with open shelves, a closed door, and a bag on wheels (no text or symbols visible)