Power Plus Lectern - Uncategorized Oklahoma Sound - Free user manual and instructions
Find the device manual for free Power Plus Lectern Oklahoma Sound in PDF.


User questions about Power Plus Lectern Oklahoma Sound
0 question about this device. Answer the ones you know or ask your own.
Ask a new question about this device
Download the instructions for your Uncategorized in PDF format for free! Find your manual Power Plus Lectern - Oklahoma Sound and take your electronic device back in hand. On this page are published all the documents necessary for the use of your device. Power Plus Lectern by Oklahoma Sound.
USER MANUAL Power Plus Lectern Oklahoma Sound
OPTIONAL/ADDITIONAL EQUIPMENT WITH WIRELESS AMPLIFIERS
Your lectern includes two corded microphones. For complete freedom of movement, use any of these wireless systems—
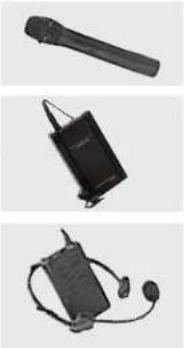
HAND-HELD WIRELESS MIC. / LWM-5
his wireless hand-held Mlc. Uses a 9-volt battery. Select channel A or B to eliminate outside frequency interruption. Move freely up to 200 ft. away!
TE-CLIP LAVELIER WIRELESS MIC. / LWM-6
Includes pocket-size transmitter with a clip-on mic. Uses a 9-volt battery. Select channel A or B to eliminate outside frequency interruption. Move freely up to 200 ft. away!
HEADSET WIRELESS MIC. / LWM-7
Includes pocket-size transmitter with a headset mic. Uses a 9 volt battery. Select channel A or B to eliminate outside frequency interruption. Move freely up to 200 ft. away!
USE WITH NON-WIRELESS AMP or ADDED WIRELESS USERS
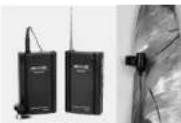
TIE CLIP LAVALIER WIRELESS MIC SYSTEM / #WM-190TC
A compact, pocket-size, wireless system with tle-clip, lovaller type microphone. Includes transmitter, receiver and tle clip mic. Move freely up to 200 ft. Operates on two 9V batteries.
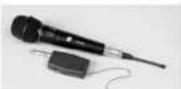
WIRED-WIRELESS MIC SYSTEM / #WM-100H
Hand-held wireless mic system. Receiver has antenna and on/off switch. Transmitter is built into mic. Move freely up to 50 ft. Mic uses AA battery; receiver uses AAA battery.
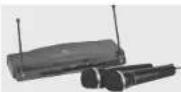
DUAL HAND-HELD WIRELESS MIC SYSTEM / #WM-200H
Offers freedom of movement for two people, Karaokee style or speaker/audience participation; up to 200 ft. away. Receiver operates on 110V AC. Each mic trans-mitter uses one PV battery (not included).
12V LANTERN STYLE RECHARGEABLE BATTERY / #PS12V
12V 5 amp rechargeable battery pack w/Included cable connects to any of our lectens for battery power. 20 hr life

For these and other OSC accessories, please contact your dealer, or:
OKLAHOMA SOUND CORP.
149 Entin Road, Clifton, NJ 07014
Tel: 973-594-9000 • Fax: 973-594-9339
Web-Site www.oklahomasound.com • e-mail: Info@oklahomasound.com

OKLAHOMA SOUND CORPORATION
Power Plus Lectern
INSTRUCTION MANUAL

natural_image
Black wooden podium with a microphone on top, no visible text or symbolsMODEL #111 PLS
INTRODUCTION
Congratulations! You are now the owner of the Power Plus Model #111PLS Lectern from Oklahoma Sound Corporation. Now also includes wireless options built in. We wish you long-lasting trouble-free usage for years to come. If you have any questions or experience any difficulty with the product, please feel free to call our Customer Service at 973-594-9000.
IMPORTANT SAFETY INFORMATION
As with any electric/electronic device, care should be taken during use. Always turn off amplifier before opening or servicing any part of the unit. Please handle your lectern with the care it deserves.
MANUFACTURER'S WARRANTY
Our Lecterns undergo the most rigid and exacting tests for superior quality and performance before leaving the factory. Oklahoma Sound Corporation warrants this product to be free from defective material and workmanship on the electronic product speakers and microphones for two years from the date of resale by an authorized Oklahoma Sound distributor. Oklahoma Sound will replace defective parts and repair malfunctioning products under this warranty when the defect occurs under normal installation and use, provided the unit is returned to our factory via prepaid transportation after direct authorization and approval by Oklahoma Sound. This warranty provides that examination of the returned product must disclose in our judgement, a manufacturing defect. This warranty does not extend to any product which has been subject to misuse, neglect, accident, improper installation, or where the serial number has been removed or defected and is given in lieu of any other warranty implied or expressed and will not cover any consequential damages.
AMPLIFIER OPERATING INSTRUCTIONS
Operating Precautions
Before operating the amplifier, be sure you fully understand all instructions and features of the amplifier. DO NOT turn amplifier on until all input and output connections have been made. NEVER replace fuses unless power is off;
Microphone Input Connection
The microphone input accepts 1/4" phone jack. Do not position microphone next to or facing speakers. This may cause acoustic feedback.
Wireless Operation
Turn on the power on both the wireless receiver and wireless micro-1 making sure both are set to matching channels, either "A" or "B".
Auxiliary Input
One auxiliary input is provided for radio tuner, tape recorder, cd player or multi-media equipment. Output level is adjusted by the auxiliary volume control.
Tone / Equalization Controls
The Low and High frequency controls are similar to the bass and treble controls found on most stereo systems. Optimum tone is achieved by first setting both knobs halfway; adjust Low and High frequency controls to suit environment.
Auxiliary / Line Out
Connect speaker line to navy line out connector of the amplifier. For maximum power transfer and to avoid amplifier overload, be sure that the total impedance of the speaker line matches the output impedance setting on amplifier. Be sure that speaker terminals are not shorted together by speaker line connecting cables. Can also be used for a recording device.
Power Supply 12V DC Operation
Connect a 12 volt rechargeable battery 5 Amp (not included) to the battery input connector located on the panel of the amplifier (using 6' battery cable). Be sure that the positive pole of battery is connected to the while wire terminal (1) and the negative pole to the Brass wire (-). When lectern is plugged into a standard wall outlet, the battery will automatically recharge. Green indicator light illuminates during recharge mode.
Precautions
- Set Mic volume control on lowest when turning unit on.
• Insure correct polarity for D.C. supply connections. - Reverse connection will blow the fuse and may damage internal circuitry.
• Always replace fuse with specified rating.
Removal and Installation of Amplifier
If your amplifier has to be removed for servicing — follow these simple steps: 1) Disconnect A/C wall plug.
2) Remove 2 side screws one on each side panel under podium top.
3) Disconnect speaker wire at rear of amplifier cord.
4) Remove 4 wood screws holding chassis to podium and remove amplifier.
5) Pack it into a strong box with ample cushioning and return to factory.
6) To install new amplifier reverse the above procedure.
text_image
SERIES 100 POWER 100 MHz 100 MHz 100 MHz 100 MHz 100 MHz 100 MHz 100 MHz 100 MHz 100 MHz 100 MHz 100 MHz 100 MHz 100 MHz 100 MHz 100 MHz 100 MHz 100 MHz 100 MHz 100 MHz 100 MHz 100 GHz 100 GHz 100 GHz 100 GHz 100 GHz 100 GHz 100 GHz 100 GHz 100 GHz 100 GHz 100 GHz 100 GHz 100 GHz 100 GHz 100 GHz 100 GHz 100 GHz 100 GHz 100 GHz 100 GHz 100 MHz 100 MHz 100 MHz 100 MHz 100 MHz 100 MHz 100 MHz 100 MHz 100 MHz 100 MHz 100 MHz 100 MHz 100 MHz 100 MHz 100 MHz 100 MHz 100 MHz 100 MHz 100 MHz 100 kHz 1.5V 2.5V 3.5V 4.5V 5.5V 6.5V 7.5V 8.5V 9.5V 1.5V 2.5V 3.5V 4.5V 5.5V 6.5V 7.5V 8.5V 9.5V 1.5V 2.5V 3.5V 4.5V 5.5V 6.5V 7.5V 8.5V 9.5V 1.5V 2.5VAMPLIFIER CONTROL PANEL
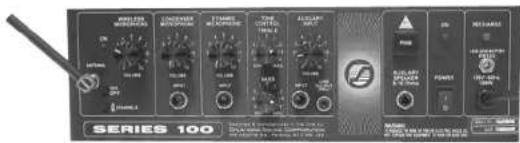
Microphone Inputs
Use either of the included condenser mics in the condenser jack for audio output; or you can purchase a dynamic mic for the dynamic input.
Volume Control
Adjusts from 0 -10 to suit your environment.
Tone/Base Control
-0 to -5= min/max tone control
+0 to +5= min/max base control
Auxiliary Input
For radio tuner, tape recorder, cd player or multi-media equipment Output level can be adjusted by the auxiliary volume control.
Fuse Box
Self contained sliding drawer holder for 2 amp fuse, with easy access.
Power Light
When in use red light comes on.
Output Jack
Use with 1/4" jack for auxiliary extension speaker to broaden audio coverage and volume. Also for recording device, to record speeches etc.
External Battery Jack
Plug in battery cable (not included) and attach to a 12V Lantern Battery.
Recharging Light
Illuminates when recharging.
On/Off Switch
Flick the switch for automatic power to the sound system.
Wireless Receiver
Select channel A or B.
The output stage is well protected against speaker short circuit/overload and has built in 'Thermal Shutdown' facility to guard against excessive temperatures.
TECHNICAL SPECIFICATIONS
| Power Output | 30 Watts |
| Microphones | Hand-Held Electret Condenser w/9' CableTie Clip/Lavalier type, w/10' Cable |
| Speakers | Four 8" Full Range |
| Inputs | Two Mic; One Aux |
| Outputs | 8 Ohm for additional Speaker and Recording |
| Power Supply | 117 Volt AC; 12V DC with Optional Battery |
| Wireless Frequency | 187,8275 MHz, 187,190 MHz |
TABLE OF CONTENTS
Introduction 2
Safety Information 2
Manufacturer's Warranty 2
Assembly Instructions — Diagram 4
Assembly Instructions 5
Amplifier Control Panel 6
Technical Specifications 6
Amplifier Operating — Instructions 7
Optional Equipment 8
text_image
GOOSENECK MOUNT BASE READING DESK 7" WOOD 2" PHILLIPS SCREWS 1-1/4" PHILLIPS SCREWS AMPLIFIER SPEAKER CABINET BASE 1-1/4" PHILLIPS SCREWSASSEMBLY INSTRUCTIONS
Assembly Tips
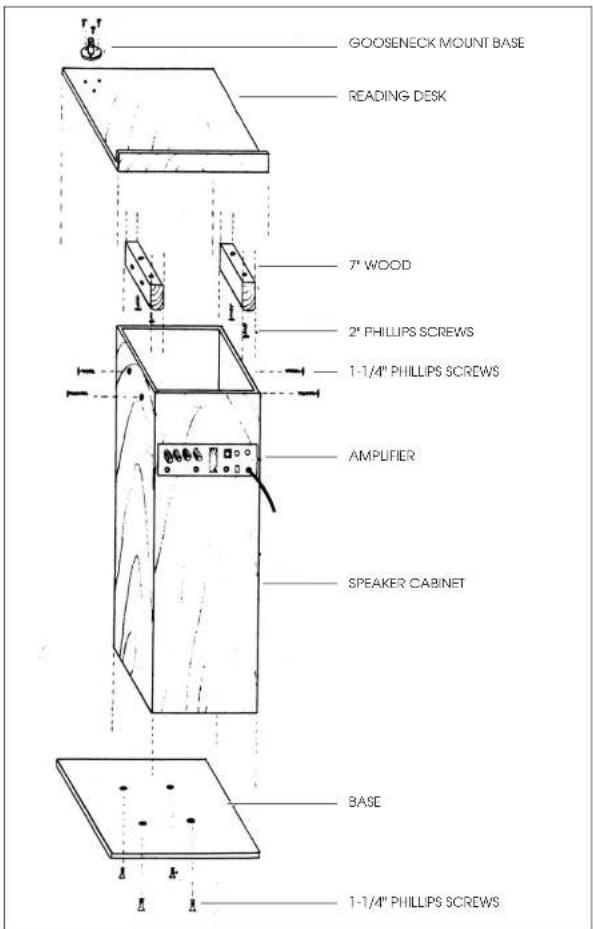
Assembly of the Model 111PLS is easy and should take no more than ten minutes. Please read all instructions before beginning assembly. We strongly recommend, to prevent damage to either yourself or the unit, that a crew of two people be used when moving the podium on or off your work table.
Parts
(1) Reading Desk (1) Speaker Cabinet
(2) 7" Wood Attachments (4) 1
(4) 1¼" Phillips Screws
^4 Phillips Bolts
(4) 2" Phillips Screws
Tools Required
Phillips-Head Screwdriver.
I. Assembling the Base
1) Gently place the speaker cabinet (speaker side down), on a dry, clean work surface.
2) Holding the base with the floor glides towards you, line up the holes in the base with the holes in the bottom of the speaker cabinet.
3) Starting with the upper left-hand hole, insert and hand tighten one of the 1/4 Phillips Bolts. Proceed to tighten the lower right-hand hole.
4) Insert and hand tighten the remaining two bolts. Finish tightening with screw driver. Warning—do not over-tighten, just screw until tight and snug.
5) Gently stand the lectem on the floor.
II. Assembling the Reading Desk
1) Take the Reading Desk, turn it over and you will see that there are four holes. Two of them are marked with red dots. Now take the two small pieces of wood out of the box, and you will see that they have two red dots on one side. Next, place each piece of wood with the red dot to face the red dot on the reading desk. Take the four 2" Phillips screws, insert and tighten one of them. Now do the same with the remaining three screws. Insert and tighten with screwdriver.
2) Slip Reading Desk over top of lectern. Make sure it slides all the way down into position.
3) Secure reading Desk with the four 1/4" Phillips screws provided.
Connection for Optional Battery
While cable from battery cord goes to Positive (+); Brass to Negative (-). IMPORTANT do not reverse!
Unit Dimensions 46"H x 22"W x 17"D; Weight 60 lbs.