V6 II - Remote trigger Cactus - Free user manual and instructions
Find the device manual for free V6 II Cactus in PDF.


User questions about V6 II Cactus
0 question about this device. Answer the ones you know or ask your own.
Ask a new question about this device
Download the instructions for your Remote trigger in PDF format for free! Find your manual V6 II - Cactus and take your electronic device back in hand. On this page are published all the documents necessary for the use of your device. V6 II by Cactus.
USER MANUAL V6 II Cactus
Wireless Flash Transceiver V6 II
Nomenclature
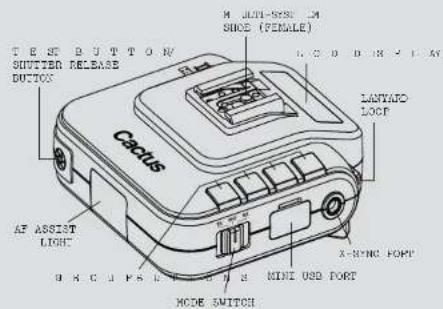
text_image
TEST BUTTON SUTTER RELEASE BUTTON Cactus M JUNT-KEY ON SHOE (FEMALE) LANYAID LOOP AF ASSIST LIGHT X-MYING PORT BUCUPES LUX S MINI USD PORT MODE SWITCH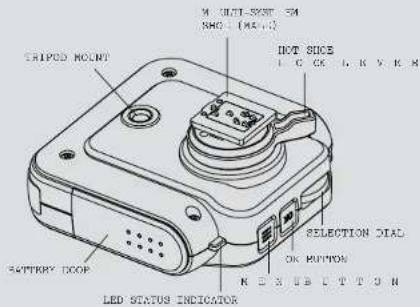
text_image
M OUT-RESET SIM RHO (MAX) HOT SIZES L C K L K V K R TRIPED MOUNT BATTERY DOOF SELECTION DIAO ON MPTION N EXHIB E T T O N LED STATUS INDICATORCautions and Warnings
Before using your V6 II, read the following safety precautions to ensure correct
Turn OFF all your equipment (e.g., Cactus units, flash units, camera s, et c.) be or e batteries. Observe the correct polarity when changing batteries. There is a danger of explosion if the batteries are installed in order to play.
- Switch off the transceiver and remove batteries during storage.
Do not disassemble.
Do not crush the V6 II and do not it expose to any shock forces such as hammering, or stepping on it.
Major Specifications
• Working radio frequency: 2.4GHz
• Number of channels: 16
• Number of groups: 4
• Supports sync speed up to 1/8,000 second
• AF Assist LED: 1W
• Maximum effective distance: 100 meters
• Operating temperature: -20°C to +50°C
• Camera voltage handling: up to 6V
- Flash voltage handling: up to 300V
- Dimensions: 79mm (L) x 77mm (W) x 48 mm (H)
• Weight: 96g
Power input: 2 x AA battery, 3V, 50mA, 0.15W; mini
US B 2.0, DC1 n put 5 V
Package Contents
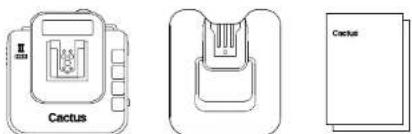
text_image
Cactus Cactus15 II Transeserve Stand & Album
Camera and Flash Compatibility
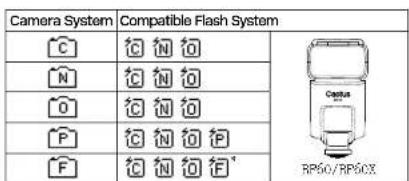
text_image
Camera System Compatible Flash System C N O P F RP60/RP60X"Fujifilm flashes do not support FSS capabilities.
LCD Panel
TX Mode
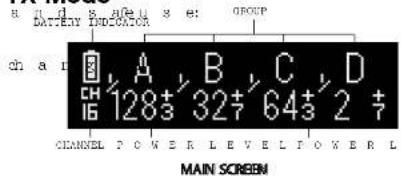
text_image
B DATTERY INDICATOR GROUP ch a l A B C D 128+ 32+ 64+ 2 + CHANNEL POWER LEVEL POWER L MAIN SCREEN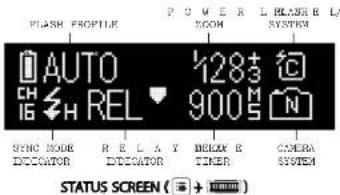
text_image
PLASH PROPILE POWER L HANB R L/ GKOM SYSTEM AUTO 128# REL 900# SYNC MODE RELAY MEDICAR C DECIDATOR EDCIDATOR TIMER CAMERA SYSTEM STATUS SCREEN ( → +)RX Mode
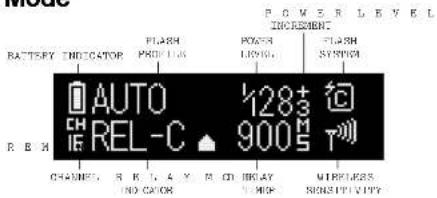
text_image
POWER LEVEL INCREMENT BATTERY INDICATOR FLASH PHOLOWS POWER LIVING FLASH SYMBOL AUTO 128t REL-C 900V CHANNEL RELAY BLOCK Display IND COLOR CHOP MATERIALS SIGNIFICITYCamera and Flash Indicators
| Canon | Fujifilm | Nikon | Olympus (M43) | Pentax | Others |
Installing the Batteries
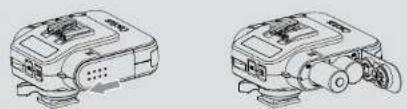
natural_image
Two technical line drawings of a projector device, one with an arrow indicating rotation or adjustment, the other with no visible text or symbols.Open the battery door by pushing it backward.
Flip open the latch and 1 n a er t two A A using the correct polarities. Then close the battery door by pushing it to the front.
Attaching to the Camera
text_image
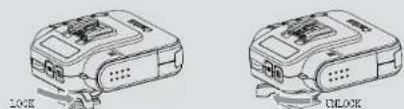
LOCK UNLOCKTurn the lock lever to test RIGHTetosLOCK them u it1- sy st e m the camera.
Turn the lock lever to the LEFT to UNLOCK the show ou title gy st e m show e t the camera.
Choose the Operation Mode
Set the V6 II transceiver to the correct mode (transmitter to "T X7, r oriv cr to" R sliding the mode switch to the or r e ct p ositic n.

Setting the Channel
Set all of your v6 11 transceivers to the same channel (e.g., channel 10):

Setting & Selecting the Group
TX: Activate any
on m 61 n atie n of
by pressing the group
buttons.
RX: Set each unit to
g o r u sA, B, C, or D
pressing the group
button. Each RX can
only be assigned to ONE
group.

text_image
A C C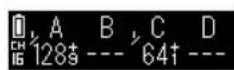
Camera Setup (TX)
Method 1: Auto-Detect
Half-press the shutter release of your camera while switching on the V6 II to TX mode.

Method 2: Manual Selection (e.g., Rent

Flash Setup (TX/RX)
Turn on your flash and switch it to the TTL mode.
Method 1: Auto-Detect
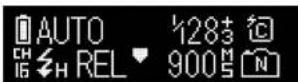
Use an Auto Flash Profile: switching on the V6 II to RX mode will cause the transceiver to detect and apply the Auto Flash Profile.
Method 2: Manual Selection
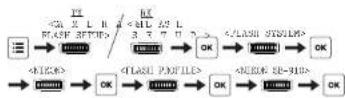
Choose a flash specific-profile from the menu (e.g., S B -910).
Remote Power Control
| Function Key | |
| A d j u s t i n g a s l l | g o u p e |
| A d j u s t i n g a s i n (e.g., g r o u p A) | g le g r o u p |
| E o |Ad , : | |
| Adjusting the on-camera flash | + |
Camera Shutter Release
- Connect the V6 IT 5X lo your camera u appropriate shutter release cable.
- Match the channel and the group of the TX and the RX.
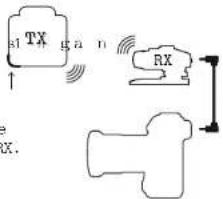
text_image
s1 TX g a n ↑ RX e x.| Functions | Status LED | |
| Half press | Auto focus | Orange |
| Full press | Release the shutter | Green |
TTL Pass-through
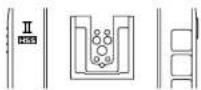
The V6 II transceiver comes with a multi-system shoe that supports TTL pass-through of Cenoo, Fujifilm, Nikon, Olympus, Pnaseonics and Pentaxx systems. Make sure that the camera and flash unit belong to the same TTL system.
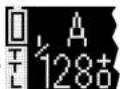
- Turn ON/OFF TTL pass-through: Hol车
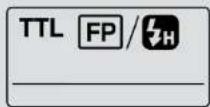
The LCD display will show the TTL pass-through indicator at the lower left corner in TTL pass-through mode.
Remote Zoom Control
| Function Key | |
| Toggling to and from the zoom control panel | |
| A d j u s t i n g a l l | |
| A d j u s t i n g a s i n (e.g. g r o u p A) | |
| k o ↓A1 , t### | |
| Adjusting the on-camera flash |
Relay Mode
Camera Shutter + Flash
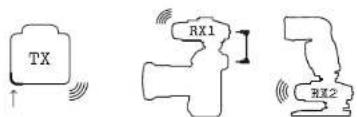
text_image
TX RX1 RX2| V6II Units | TX | RX1 | RX2 |
| Connection | Handheld | Mount on camera's hot shoe and connect using a corresponding shutter cable. | C o n n e ct f a sh u nt. |
| Setup | M o s c t u p required. | ||
Menu at a Glance
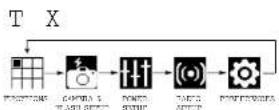
RX
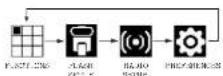
Normal HSS
- Turn on the HSS/FP setting of the remote TTL flashes attached to the V6 II RX.
- Choose Normal HSS from the V6 II TX menu.

Power Sync
- Choose Power Sync from the V6 IT TX menu.

- Adjust the sync time, if necessary.


- Turn the dial to the LEFT to expedite the syne time if you find a dark band at the BOTTOM of the picture.
- Turn the dial to the RIGHT to delay the sync time if you find a dark band at the TOP of the picture.
Notes:
- If dark bands appear at both the top and bottom of the picture, the flash duration of the p or ta ble flash may not be long en low er syn c.
- The flash fires full power in Power Sync, so check for an overheat warning from time to time. Frequent use of Power Sync may overheat the portable flash.
Forced HSS for Fujifilm
Fujifilm flashes do not support HSS flash exposure. However, Cactus V6 TT offers a workaround to support HSS flash with Fujifilm cameras.
1. Learn HSS.

- Turn ON/OFF Forced HSS by pressing once.
| POWER SETUP | TX | RX |
| P O W E H√X C U | - | A F A S S D T√L √/ √ |
| E V S T D√ | B A C K LIG H T√F √W | |
| L O P O W B/R | S A C K LIG H T√T √W | |
| RADIO SETUP | TX | RX |
| J C H A N √E L√ | - | D W LIO H T M √ √√E |
| R A DIO TD √ | S W A P C G N √T R | |
| MULIT-MASTEW √ | D T A LIC R C √√√√ | |
| W Q K R A/D 2 | TEMPORARY UNLOCK √ | |
| S L E √ √√ | ||
| EAC T OR Y R B/S √ |
* Shown only when a Fujifilm camera is used
Corporate Office:
H AR V ES T O N E L I M I E D 11 D, B L K 2, K O O N W A H V TR R OR B V C T O R Y (6) 7-9 H O T I N S T, T U E N M U N, H O N G K O N G
PLEASE CONTACT YOUR LOCAL DEALER FOR CUSTOMER SERVICE.
H AR V E S T O N E E M T I O N) 2 016 (1
www.cactus-image.com/v611.html
Visit our website to download the user manual and check for the latest firmware updates.
