
SI2M7643DW - Cooker SMEG - Free user manual and instructions
Find the device manual for free SI2M7643DW SMEG in PDF.


User questions about SI2M7643DW SMEG
0 question about this device. Answer the ones you know or ask your own.
Ask a new question about this device
Download the instructions for your Cooker in PDF format for free! Find your manual SI2M7643DW - SMEG and take your electronic device back in hand. On this page are published all the documents necessary for the use of your device. SI2M7643DW by SMEG.
USER MANUAL SI2M7643DW SMEG
Safety instructions 4
Installation 6
Product description 9
Daily use 11
Hints and tips 15
Care and cleaning 16
Troubleshooting 17
Technical data 19
Energy efficiency 19
Subject to change without notice.
⚠ SAFETY INFORMATION
Before the installation and use of the appliance, carefully read the supplied instructions. The manufacturer is not responsible for any injuries or damages that are the result of incorrect installation or usage. Always keep the instructions in a safe and accessible location for future reference.
Children and vulnerable people safety
- This appliance can be used by children aged from 8 years and above and persons with reduced physical, sensory or mental capabilities or lack of experience and knowledge if they have been given supervision or instruction concerning the use of the appliance in a safe way and understand the hazards involved.
- Children between 3 and 8 years of age and persons with very extensive and complex disabilities shall be kept away unless continuously supervised.
- Children of less than 3 years of age should be kept away unless continuously supervised.
- Do not let children play with the appliance.
- Keep all packaging away from children and dispose of it appropriately.
- Keep children and pets away from the appliance when it operates or when it cools down. Accessible parts are hot.
- If the appliance has a child safety device, it should be activated.
- Children shall not carry out cleaning and user maintenance of the appliance without supervision.
General Safety
- WARNING: The appliance and its accessible parts become hot during use. Care should be taken to avoid touching heating elements.
- Do not operate the appliance by means of an external timer or separate remote-control system.
- WARNING: Unattended cooking on a hob with fat or oil can be dangerous and may result in fire.
- NEVER try to extinguish a fire with water, but switch off the appliance and then cover flame e.g. with a lid or a fire blanket.
- CAUTION: The cooking process has to be supervised. A short term cooking process has to be supervised continuously.
- WARNING: Danger of fire: Do not store items on the cooking surfaces.
- Metallic objects such as knives, forks, spoons and lids should not be placed on the hob surface since they can get hot.
- Do not use a steam cleaner to clean the appliance.
- After use, switch off the hob element by its control and do not rely on the pan detector.
- If the glass ceramic surface / glass surface is cracked, switch off the appliance and unplug it from the mains. In case the appliance is connected to the mains directly using junction box, remove the fuse to disconnect the appliance from power supply. In either case contact the Authorised Service Centre.
- If the supply cord is damaged, it must be replaced by the manufacturer, an authorized Service or similarly qualified persons in order to avoid a hazard.
- WARNING: Use only hob guards designed by the manufacturer of the cooking appliance or indicated by the manufacturer of the appliance in the instructions for use as suitable or hob guards incorporated in the appliance. The use of inappropriate guards can cause accidents.
Installation

WARNING! Only a qualified person must install this appliance.

WARNING! Risk of injury or damage to the appliance.
- Remove all the packaging.
- Do not install or use a damaged appliance.
- Follow the installation instructions supplied with the appliance.
- Keep the minimum distance from other appliances and units.
• Always take care when moving the appliance as it is heavy. Always use safety gloves and enclosed footwear. - Seal the cut surfaces with a sealant to prevent moisture to cause swelling.
- Protect the bottom of the appliance from steam and moisture.
- Do not install the appliance adjacent to a door or under a window. This prevents hot cookware falling from the appliance when the door or the window is opened.
• Each appliance has cooling fans on the bottom. - If the appliance is installed above a drawer:
- Do not store any small pieces or sheets of paper that could be pulled in, as they can damage the cooling fans or impair the cooling system.
- Keep a distance of minimum 2 cm between the bottom of the appliance and parts stored in the drawer.
Electrical Connection

WARNING! Risk of fire and electric shock.
- All electrical connections should be made by a qualified electrician.
• The appliance must be earthed.
- Before carrying out any operation make sure that the appliance is disconnected from the power supply.
- Make sure that the parameters on the rating plate are compatible with the electrical ratings of the mains power supply.
- Make sure the appliance is installed correctly. Loose and incorrect electricity mains cable or plug (if applicable) can make the terminal become too hot.
- Use the correct electricity mains cable.
- Do not let the electricity mains cable tangle.
- Make sure that a shock protection is installed.
- Use the strain relief clamp on the cable.
- Make sure the mains cable or plug (if applicable) does not touch the hot appliance or hot cookware, when you connect the appliance to the near sockets.
- Do not use multi-plug adapters and extension cables.
- Make sure not to cause damage to the mains plug (if applicable) or to the mains cable. Contact our Authorised Service Centre or an electrician to change a damaged mains cable.
- The shock protection of live and insulated parts must be fastened in such a way that it cannot be removed without tools.
- Connect the mains plug to the mains socket only at the end of the installation. Make sure that there is access to the mains plug after the installation.
- If the mains socket is loose, do not connect the mains plug.
- Do not pull the mains cable to disconnect the appliance. Always pull the mains plug.
- Use only correct isolation devices: line protecting cut-outs, fuses (screw type fuses removed from the holder), earth leakage trips and contactors.
- The electrical installation must have an isolation device which lets you
disconnect the appliance from the mains at all poles. The isolation device must have a contact opening width of minimum 3 mm.
Use

WARNING! Risk of injury, burns and electric shock.
- Remove all the packaging, labelling and protective film (if applicable) before first use.
- This appliance is for household use only.
- Do not change the specification of this appliance.
- Make sure that the ventilation openings are not blocked.
- Do not let the appliance stay unattended during operation.
- Set the cooking zone to "off" after each use.
- Do not rely on the pan detector.
- Do not put cutlery or saucepan lids on the cooking zones. They can become hot.
- Do not operate the appliance with wet hands or when it has contact with water.
- Do not use the appliance as a work surface or as a storage surface.
- If the surface of the appliance is cracked, disconnect immediately the appliance from the power supply. This to prevent an electrical shock.
- Users with a pacemaker must keep a distance of minimum 30 cm from the induction cooking zones when the appliance is in operation.
- When you place food into hot oil, it may splash.

WARNING! Risk of fire and explosion
- Fats and oil when heated can release flammable vapours. Keep flames or heated objects away from fats and oils when you cook with them.
- The vapours that very hot oil releases can cause spontaneous combustion.
• Used oil, that can contain food remnants, can cause fire at a lower temperature than oil used for the first time.
- Do not put flammable products or items that are wet with flammable products in, near or on the appliance.

WARNING! Risk of damage to the appliance.
- Do not keep hot cookware on the control panel.
- Do not put a hot pan cover on the glass surface of the hob.
- Do not let cookware to boil dry.
- Be careful not to let objects or cookware fall on the appliance. The surface can be damaged.
- Do not activate the cooking zones with empty cookware or without cookware.
- Do not put aluminium foil on the appliance.
- Cookware made of cast iron, aluminium or with a damaged bottom can cause scratches on the glass / glass ceramic. Always lift these objects up when you have to move them on the cooking surface.
- This appliance is for cooking purposes only. It must not be used for other purposes, for example room heating.
Care and cleaning
- Clean the appliance regularly to prevent the deterioration of the surface material.
- Deactivate the appliance and let it cool down before you clean it.
- Disconnect the appliance from the electrical supply before maintenance.
- Do not use water spray and steam to clean the appliance.
- Clean the appliance with a moist soft cloth. Only use neutral detergents. Do not use any abrasive products, abrasive cleaning pads, solvents or metal objects.
Service
• To repair the appliance contact an Authorised Service Centre.
- Use original spare parts only.
Disposal

WARNING! Risk of injury or suffocation.
INSTALLATION

WARNING! Refer to Safety chapters.
Before the installation
Before you install the hob, write down the information bellow from the rating plate. The rating plate is on the bottom of the hob.
Serial number ....
Built-in hobs
Only use the built-in hobs after you assemble the hob into correct built-in units and work surfaces that align to the standards.
Connection cable
- The hob is supplied with the connection cable.
-
Replace the damaged mains cable only with the spare parts cable. Speak to your local Authorised Service Center.
-
Contact your municipal authority for information on how to discard the appliance correctly.
- Disconnect the appliance from the mains supply.
- Cut off the mains electrical cable close to the appliance and dispose of it.

WARNING! All electrical connections must be made by a qualified electrician.

CAUTION! Do not drill or solder the wire ends. This is strictly forbidden!

CAUTION! Do not connect the cable without cable end sleeve.
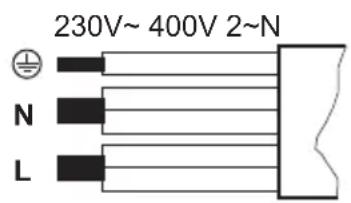
Two-phase connection
- Remove the cable end sleeve from black and brown wires.
- Remove an insulation of the brown and black cable ends.
- Apply a new wire end sleeve of 1.5 mm ^2 on each cable end. (special tool required).
Cable cross section
text_image
230V~ 400V 2~N N L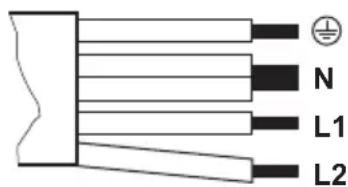
text_image
N L1 L2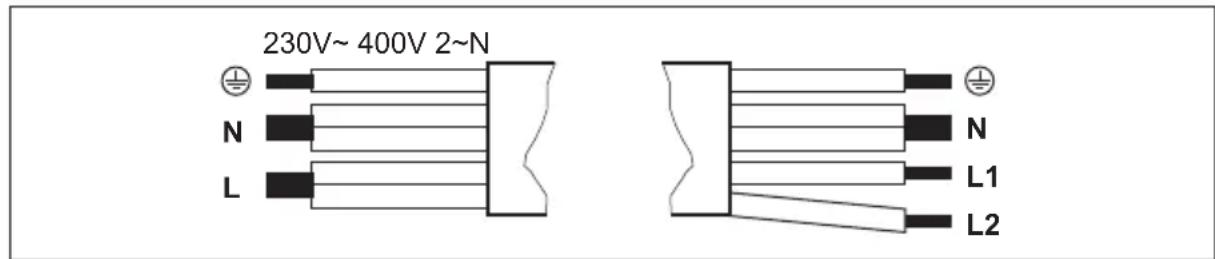
text_image
230V~ 400V 2~N N L N L1 L2| One-phase connection - 230 V~ Two-phase connection - 400 V 2 ~ N | ||
| Green - yellow Green - yellow | ||
| One-phase connection - 230 V~ Two-phase connection - 400 V 2 ~ N | |||
| N Blue and blue Blue | and blue N | ||
| L Black and brown Black L1 | |||
| Brown L2 | |||
Attaching the seal - On-top installation
- Clean the worktop around the cut out area.
- Attach the supplied 2x6mm seal stripe to the lower edge of the hob, along the outer edge of the glass ceramic. Do not stretch it. Make sure that the ends of the seal stripe are located in the middle of one side of the hob.
- Add some millimetres to the length when you cut the seal stripe.
- Join the two ends of the seal stripe together.
Attaching the seal - Integrated installation
- Clean the rabbets in the worktop.
- Cut the supplied 3x10mm seal stripe into 4 stripes. The stripes must have the same length as the rabbets.
- Cut the ends of the stripes at an angle of 45^ . They should fit in the corners of the rabbets accurately.
- Attach the stripes to the rabbets. Do not stretch the stripes. Do not bond the ends of the stripes one over the other. After you assemble the hob, seal the remaining gap between the glass ceramic and the worktop with silicone. Make sure the silicone does not get under the glass ceramic.
Assembly
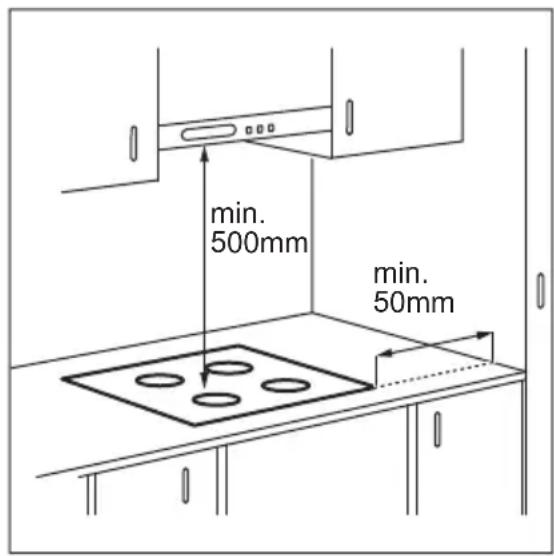
If the appliance is installed above a drawer, the hob ventilation can warm up the items stored in the drawer during the cooking process. You can install a separation panel but it is not mandatory.
On-top installation
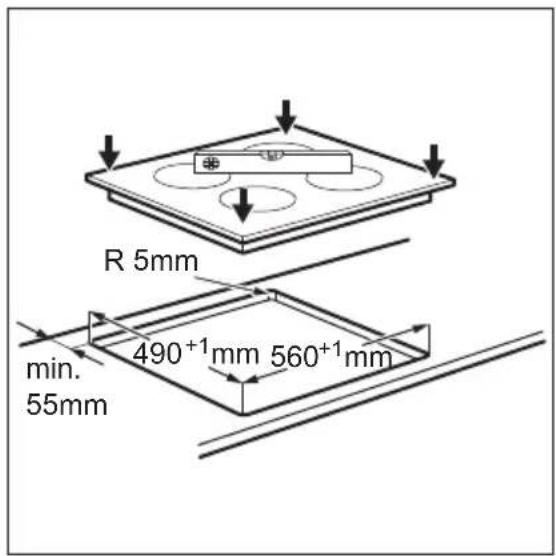
text_image
R 5mm min. 55mm 490⁺¹mm 560⁺¹mm2.
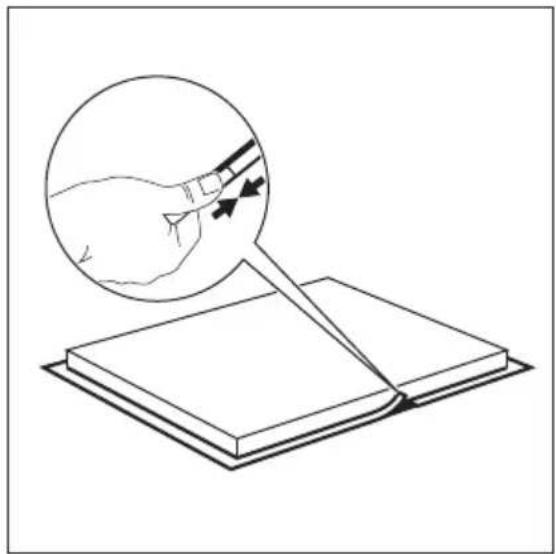
natural_image
Illustration of a hand holding a pen over an open book, with a magnified inset showing the anatomical detail (no text or symbols present)3.
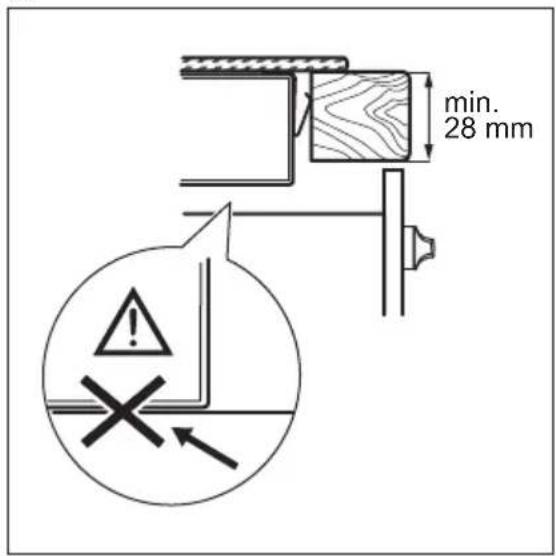
text_image
min. 28 mm !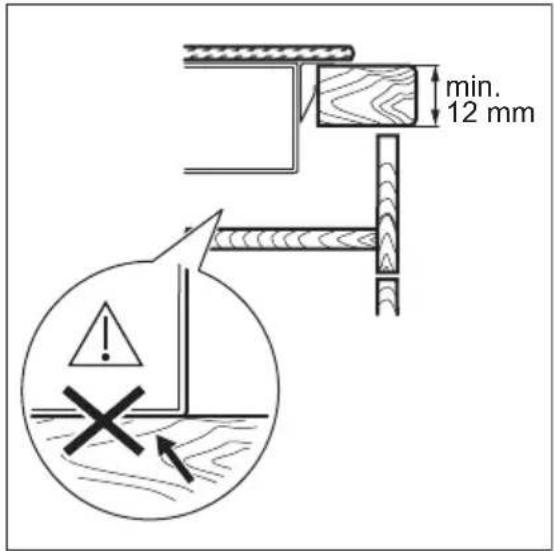
text_image
min. 12 mm !Integrated installation
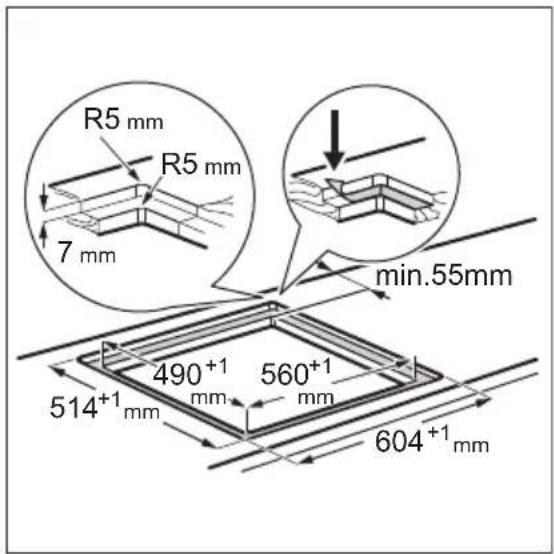
text_image
R5 mm R5 mm 7 mm min.55mm 490+1 mm 560+1 mm 514+1 mm 604+1 mm2.
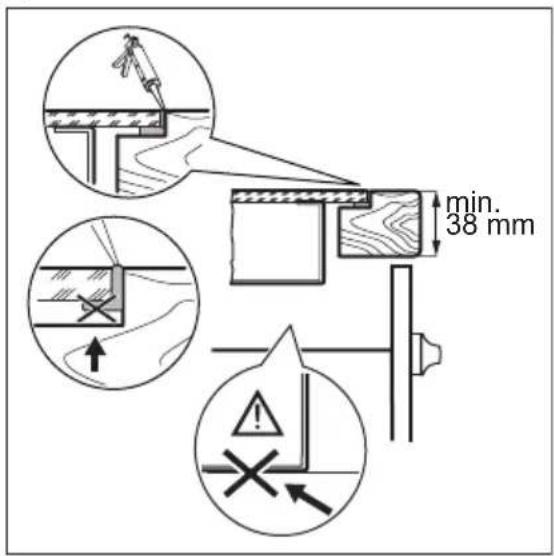
text_image
min. 38 mm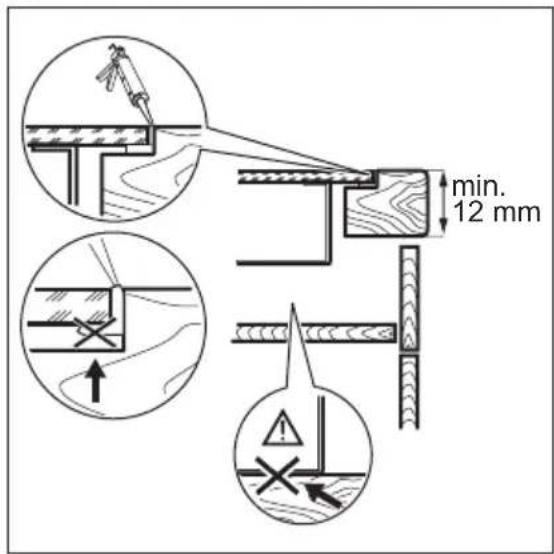
text_image
min. 12 mmPRODUCT DESCRIPTION
Cooking surface layout
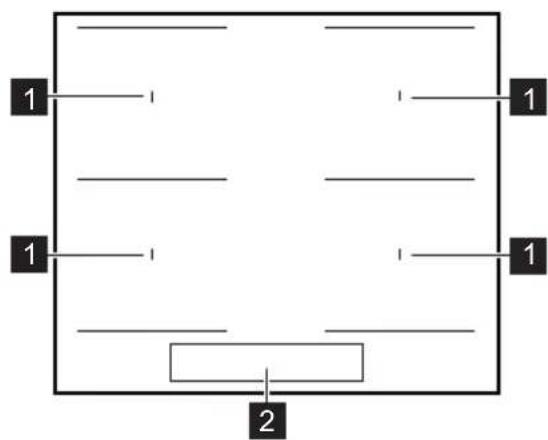
text_image
1 1 1 1 21 Induction cooking zone
2 Control panel
Control panel layout
text_image
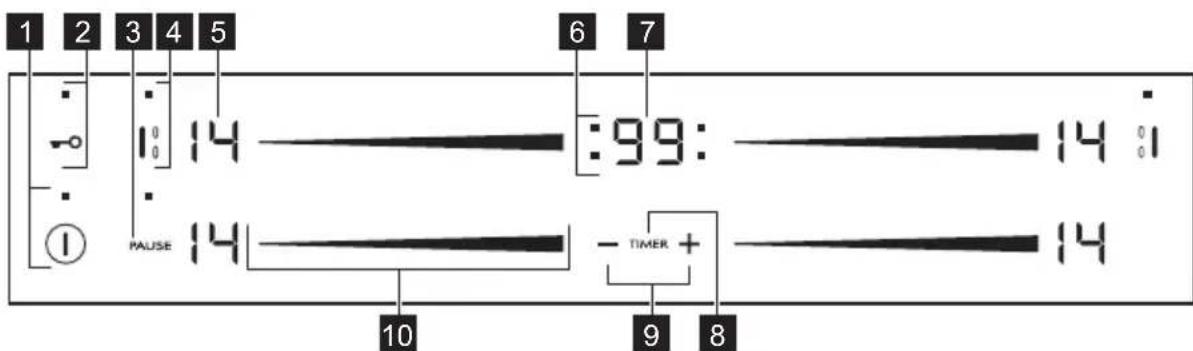
1 2 3 4 5 6 7 :99: 14 : 14 - TIMER + 10 9 8Use the sensor fields to operate the appliance. The displays, indicators and sounds tell which functions operate.
| Sensor field | Function Comment | ||
| 1 |  | ON / OFF To activate and deactivate the hob. | |
| 2 |  | Lock / Child Safety Device | To lock / unlock the control panel. |
| 3 | PAUSE | Pause To activate and deactivate the function. | |
| 4 |  | MultiZone To activate and deactivate the function. | |
| 5 | - Heat setting display To show the heat setting. | ||
| 6 | - Timer indicators of cooking zones | To show for which zone you set the time. | |
| 7 | - Timer display To show the time in minutes. | ||
| 8 | TIMER | - To select the cooking zone. | |
| 9 | [YW8G] | - To increase or decrease the time. | |
| 10 | - Control bar To set a heat setting. | ||
Heat setting displays
| Display Description | |
| 0 | The cooking zone is deactivated. |
| 1 - 14 | The cooking zone operates. |
| u | Pause operates. |
| A | Accelerator operates. |
| P | Power function operates. |
| E + digit | There is a malfunction. |
| ≡ / ≠ ≈ | Eco-Heat (3-step Residual heat indicator): continue cooking / keep warm / residual heat. |
| L | Lock / Child Safety Device operates. |
| F | Incorrect or too small cookware or no cookware on the cooking zone. |
| - | Automatic Switch Off operates. |
Eco-Heat (3 step Residual heat indicator)

WARNING! / There
is a risk of burns from residual heat. The indicators show the level of the residual heat for the cooking zones you are currently using. The indicators may also come on for the neighbouring cooking zones even if you are not using them.
The induction cooking zones produce the heat necessary for the cooking process directly in the bottom of the cookware. The glass ceramic is heated by the heat of the cookware.
DAILY USE

WARNING! Refer to Safety chapters.
Activating and deactivating
Touch ① for 1 second to activate or deactivate the hob.
Automatic Switch Off
The function deactivates the hob automatically if:
- all cooking zones are deactivated,
- you do not set the heat setting after you activate the hob,
- you spill something or put something on the control panel for more than 10 seconds (a pan, a cloth, etc.). An acoustic signal sounds and the hob deactivates. Remove the object or clean the control panel.
- the hob gets too hot (e.g. when a saucepan boils dry). Let the cooking zone cool down before you use the hob again.
- you use incorrect cookware. The symbol F comes on and the cooking zone deactivates automatically after 2 minutes.
- you do not deactivate a cooking zone or change the heat setting. After some time comes on and the hob deactivates.
The relation between the heat setting and the time after which the hob deactivates:
| Heat setting The hob deactivates after | |
| 1 - 3 6 hours | |
| 4 - 7 5 hours | |
| 8 - 9 4 hours | |
| 10 - 14 1.5 hour | |
The heat setting
To set or change the heat setting:
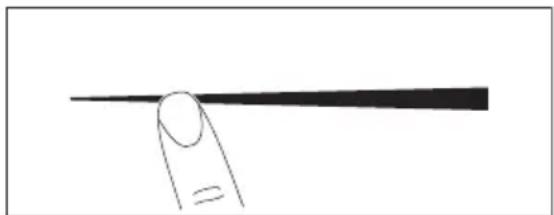
Touch the control bar at the correct heat setting or move your finger along the control bar until you reach the correct heat setting.
natural_image
Simple line drawing of a finger pointing to a horizontal line (no text or symbols)Using the cooking zones
Place the cookware in the centre of the selected zone. Induction cooking zones adapt to the dimension of the bottom of the cookware automatically.
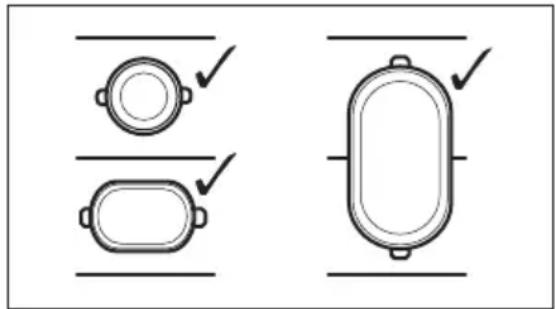
You can cook with large cookware placed on two cooking zones at the same time.
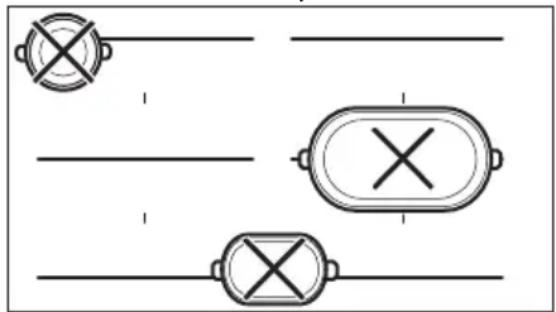
The cookware must cover the centres of both zones. Correct cookware positions:
natural_image
Pure electrical circuit lines without any symbolsIncorrect cookware positions:
natural_image
Pure electrical circuit lines without any symbolsMultiZone

The function operates when the pot covers the centres of the two zones.
This function connects two cooking zones and they operate as one.
First set the heat setting for one of the cooking zones.
To activate the function for left / right cooking zones: touch | 0 & 0 0 & 0 | To set or change the heat setting touch one of the left / right control sensors.
To deactivate the function: touch 12 The cooking zones operate independently.
Accelerator
Activate this function to get a desired heat setting in a shorter time. When it is on, the zone operates on the highest setting in the beginning and then continues to cook at the desired heating setting.

To activate the function the cooking zone must be cold.
To activate the function for a cooking zone: touch the end of the control bar on the right (P comes on). Immediately touch a desired heat setting. After 3 seconds P comes on.
To deactivate the function: change the heat setting.
Power function
This function makes more power available to the induction cooking zones. The function can be activated for the induction cooking zone only for a limited period of time. After this time the induction cooking zone automatically sets back to the highest heat setting.

Refer to "Technical data" chapter.
To activate the function for a cooking zone: touch the end of the control bar on the right. R comes on.
To deactivate the function: change the heat setting.
Timer
Count Down Timer
You can use this function to set how long the cooking zone should operate for a single cooking session.
First set the heat setting for the cooking zone then set the function.
To set the cooking zone: touch TIMER again and again until the indicator of a necessary cooking zone comes on.
To activate the function: touch + of the timer to set the time (00 - 99 minutes). When the indicator of the cooking zone starts to flash slowly the time counts down.
To see the remaining time: set the cooking zone with TIME indicator of the cooking zone starts to flash quickly. The display shows the remaining time.
To change the time: set the cooking zone with TITMERCH or . + -
To deactivate the function: set the cooking zone with T and touch. The remaining time counts back to 00. The indicator of the cooking zone goes out.

When the time comes to an end, the sound operates and 00 flashes. The cooking zone deactivates.
To stop the sound: touch TIMER
CountUp Timer (The count up timer) You can use this function to monitor how long the cooking zone operates.
To set the cooking zone: touch TIMER again and again until the indicator of a necessary cooking zone comes on.
To activate the function: touch of the timer. UP comes on. When the indicator of the cooking zone starts to flash slowly the time counts up. The display switches between UP and counted time (minutes).
To see how long the cooking zone operates: set the cooking zone with TIMER. The indicator of the cooking zone starts to flash quickly. The display shows how long the zone operates.
To deactivate the function: set the cooking zone with Tave touch or + 一. The indicator of the cooking zone goes out.
Minute Minder
You can use this function as a Minute Minder when the hob is activated and the cooking zones do not operate. The heat setting display shows
To activate the function: touch TIMER Touch for of the timer to set the time. When the time comes to an end, the sound operates and 00 flashes.
To stop the sound: touch TIMER.

The function has no effect on the operation of the cooking zones.
Pause
This function sets all cooking zones that operate to the lowest heat setting.
When the function operates, all other symbols on the control panels are locked.
The function does not stop the timer functions.
Touch PAUSE to activate the function.
u comes on. The heat setting is lowered to 1.
To deactivate the function, touch PAUSE
The previous heat setting comes on.
Lock
You can lock the control panel while cooking zones operate. It prevents an accidental change of the heat setting.
Set the heat setting first.
To activate the function: touch comes on for 4 seconds. The Timer stays on.
To deactivate the function: touch 🔍 The previous heat setting comes on.

When you deactivate the hob, you also deactivate this function.
Child Safety Device
This function prevents an accidental operation of the hob.
To activate the function: activate the hob with ①Do not set the heat setting. Touch → for 4 seconds. ≡ comes on.
Deactivate the hob with ①
To deactivate the function: activate the hob with ①Do not set the heat setting.
Touch for 4 seconds. comes on. Deactivate the hob with
To override the function for only one cooking time: activate the hob with ⏻ comes on. Touch for 4 seconds. Set the heat setting in 10 seconds. You can operate the hob. When you deactivate the hob with ⏻ the function operates again.
OffSound Control (Deactivating and activating the sounds)
Deactivate the hob. Touch for 3 seconds. The display comes on and goes out. Touch for 3 seconds. or comes on. Touch of the timer to choose one of the following:
- the sounds are off
- the sounds are on
To confirm your selection wait until the hob deactivates automatically.
When the function is set to by you can hear the sounds only when:
- you touch ①
- Minute Minder comes down
- Count Down Timer comes down
- you put something on the control panel.
Power limitation
Originally the hob is at its highest possible power level.
To decrease or increase the power level:
- Deactivate the hob.
- Touch ① for 3 seconds. The display comes on and goes off.
- Touch for 3 seconds. or comes on.
- Touch .TPM2R comes on.
- Touch 7 of the Timer to set the power level.
Power levels
Refer to "Technical data" chapter.
• P 72 — 7200 W
• P 15 — 1500 W
• P 20 — 2000 W
• P 25 — 2500 W
• P 30 — 3000 W
• P 35 — 3500 W
• P 40 — 4000 W
• P 45 — 4500 W
• P 50 — 5000 W
• P 60 — 6000 W

CAUTION! Make sure that the selected power fits to the house installation fuses.
Eco-Logic
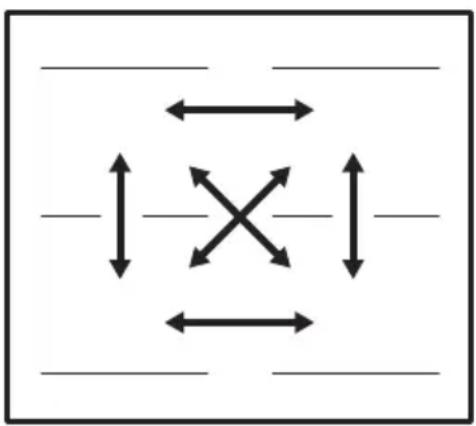
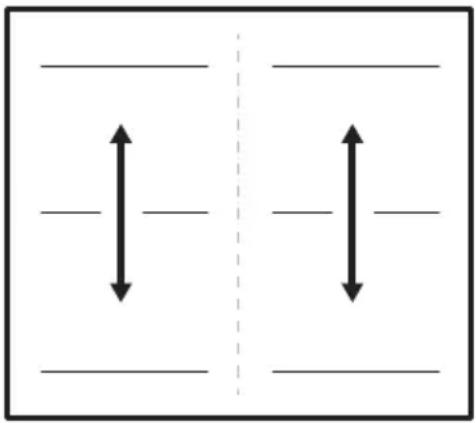
- Cooking zones are grouped according to the location and number of the phases in the hob. See the illustration.
• Each phase has a maximum electricity loading of 3600 W. - The function divides the power between cooking zones connected to the same phase.
- The function activates when the total electricity loading of the cooking zones connected to a single phase exceeds 3600 W.
- The function decreases the power to the other cooking zones connected to the same phase.
- The last selected heat setting has the priority. As a consequence, the heat setting of the other zones may automatically reduce. The previous heat setting, and the new one adjusted by the function, alternate on the display for 60 seconds.
When you set the Power limitation function to 6.0 kW or less, power of the hob is divided between all cooking zones.
natural_image
Pure diagram of bidirectional arrows around a central cross symbol, no text or labels presentWhen you set the Power limitation function to more than 6.0 kW, power of the hob is divided between two cooking zones in a pair.
natural_image
Pure diagram of two vertical arrows with horizontal lines inside a dashed rectangle (no text or symbols)HINTS AND TIPS

WARNING! Refer to Safety chapters.
Cookware

For induction cooking zones a strong electro-magnetic field creates the heat in the cookware very quickly.

Use the induction cooking zones with suitable cookware.
Cookware material
- correct: cast iron, steel, enamelled steel, stainless steel, multi-layer bottom (with a correct marking from a manufacturer).
- not correct: aluminium, copper, brass, glass, ceramic, porcelain.
Cookware is suitable for an induction hob if:
• water boils very quickly on a zone set to the highest heat setting.
- a magnet pulls on to the bottom of the cookware.

The bottom of the cookware must be as thick and flat as possible.
Ensure pan bases are clean and dry before placing on the hob surface.
Cookware dimensions
Induction cooking zones adapt to the dimension of the bottom of the cookware automatically.
The cooking zone efficiency is related to the diameter of the cookware. The cookware with a diameter smaller than the minimum receives only a part of the power generated by the cooking zone.

Refer to "Technical data".
The noises during operation
If you can hear:
- crack noise: cookware is made of different materials (a sandwich construction).
• whistle sound: you use a cooking zone with a high power level and the cookware is made of different materials (a sandwich construction). - humming: you use a high power level.
- clicking: electric switching occurs.
- hissing, buzzing: the fan operates.
The noises are normal and do not indicate any malfunction.
Eco-Off (Eco Timer)
To save energy, the heater of the cooking zone deactivates before the count down timer sounds. The difference in the operation time depends on the heat setting level and the length of the cooking operation.
Examples of cooking applications
The correlation between the heat setting of a zone and its consumption of power is not linear. When you increase the heat setting, it is not proportional to the increase of the consumption of power. It
means that a cooking zone with the medium heat setting uses less than a half of its power.

The data in the table is for guidance only.
| Heat setting Use to: Time | (min) | Hints | |
| 1 Keep cooked food warm. as | necessary | Put a lid on the cookware. | |
| 1 - 3 Hollandaise sauce, melt: butter, chocolate, gelatine. | 5 - 25 Mix from time to time. | ||
| 1 - 3 Solidify: fluffy omelettes, baked eggs. | 10 - 40 | Cook with a lid on. | |
| 3 - 5 Simmer rice and milkbased dishes, heat up ready-cooked meals. | 25 - 50 | Add at least twice as much liquid as rice, mix milk dishes halfway through the procedure. | |
| 5 - 7 Steam vegetables, fish, meat. 20 - | 45 | Add a couple of tablespoons of liquid. | |
| 7 - 9 Steam potatoes. 20 - | 60 | Use max. 1⁄4 l of water for 750 g of potatoes. | |
| 7 - 9 Cook larger quantities of food, stews and soups. | 60 - 150 | Up to 3 l of liquid plus ingredients. | |
| 9 - 12 Gentle fry: escalope, veal cor-don bleu, cutlets, rissoles, sausages, liver, roux, eggs, pancakes, doughnuts. | as necessary | Turn halfway through. | |
| 12 - 13 Heavy fry, hash browns, loin steaks, steaks. | 5 - 15 Turn halfway through. | ||
| 14 Boil water, cook pasta, sear meat (goulash, pot roast), deep-fry chips. | |||
| P | Boil large quantities of water. Power function is activated. | ||
CARE AND CLEANING

WARNING! Refer to Safety chapters.
General information
-
Clean the hob after each use.
• Always use cookware with a clean base. -
Scratches or dark stains on the surface have no effect on how the hob operates.
- Use a special cleaner suitable for the surface of the hob.
- Use a special scraper for the glass.
Cleaning the hob
- Remove immediately: melted plastic, plastic foil, sugar and food with sugar, otherwise, the dirt can cause damage to the hob. Take care to avoid burns. Use a special hob scraper on the glass
surface at an acute angle and move the blade on the surface.
- Remove when the hob is sufficiently cool: limescale rings, water rings, fat stains, shiny metallic discoloration. Clean the hob with a moist cloth and a non-abrasive detergent. After cleaning, wipe the hob dry with a soft cloth.
- Remove shiny metallic discoloration: use a solution of water with vinegar and clean the glass surface with a cloth.
TROUBLESHOOTING

WARNING! Refer to Safety chapters.
What to do if...
| Problem Possible cause Remedy | ||
| You cannot activate or operate the hob. | The hob is not connected to an electrical supply or it is connected incorrectly. | Check if the hob is correctly connected to the electrical supply. Refer to the connection diagram. |
| The fuse is blown. Make sure that the fuse is | the cause of the malfunction. If the fuse is blown again and again, contact a qualified electrician. | |
| You do not set the heat setting for 10 seconds. | Activate the hob again and set the heat setting in less than 10 seconds. | |
| You touched 2 or more sensor fields at the same time. | Touch only one sensor field. | |
| Pause function operates. Refer to "Daily use". | ||
| There is water or fat stains on the control panel. | Clean the control panel. | |
| An acoustic signal sounds and the hob deactivates. An acoustic signal sounds when the hob is deactivated. | You put something on one or more sensor fields. | Remove the object from the sensor fields. |
| The hob deactivates. You put something on the sensor field ➊ | Remove the object from the sensor field. | |
| Residual heat indicator does not come on. | The zone is not hot because it operated only for a short time or the sensor is damaged. | If the zone operated sufficiently long to be hot, speak to an Authorised Service Centre. |
| Accelerator does not operate. | The zone is hot. Let the zone become sufficiently cool. | |
| The highest heat setting is set. | The highest heat setting has the same power as the function. | |
| The heat setting changes between two levels. | Power management operates. | Refer to "Daily use". |
| The sensor fields become hot. | The cookware is too large or you put it too near to the controls. | Put large cookware on the rear zones if possible. |
| There is no sound when you touch the panel sensor fields. | The sounds are deactivated. Activate the sounds. Refer to "Daily use". | |
| - comes on. | Automatic Switch Off operates. | Deactivate the hob and activate it again. |
| L comes on. | Child Safety Device or Lock operates. | Refer to "Daily use". |
| F comes on. | There is no cookware on the zone. | Put cookware on the zone. |
| The cookware is unsuitable. | Use suitable cookware. Re- | fer to "Hints and tips". |
| The diameter of the bottom | of the cookware is too small for the zone. | Use cookware with correct dimensions. Refer to "Technical data". |
| E and a number come on. | There is an error in the hob. Deactivate the hob and activate it again after 30 seconds. If E comes on again, disconnect the hob from the electrical supply. After 30 seconds, connect the hob again. If the problem continues, speak to an Authorised Service Centre. | |
| You can hear a constant beep noise. | The electrical connection is incorrect. | Disconnect the hob from the electrical supply. Ask a qualified electrician to check the installation. |
If you cannot find a solution...
If you cannot find a solution to the problem yourself, contact your dealer or an Authorised Service Centre. Give the data from the rating plate. Give also three digit letter code for the glass ceramic (it is in the corner of the glass surface) and an
error message that comes on. Make sure, you operated the hob correctly. If not the servicing by a service technician or dealer will not be free of charge, also during the warranty period. The instructions about the Service Centre and conditions of guarantee are in the guarantee booklet.
TECHNICAL DATA
Rating plate
Model SI2M7643DW PNC 949 594 490 00
Typ 61 B4A 04 AD 220 - 240 V / 400 V 2N 50 - 60 Hz
Induction 7.2 kW Made in Germany
Ser.Nr. 7.2 kW
SMEG
Cooking zones specification
| Cooking zone | Nominal power (maximum heat setting) [W] | Power function [W] | Power function maximum duration [min] | Cookware diameter [mm] |
| Left front 2300 | 3200 10 125 - 210 | |||
| Left rear 2300 | 3200 10 125 - 210 | |||
| Right front 2300 | 3200 10 125 - 210 | |||
| Right rear 2300 | 3200 10 125 - 210 |
The power of the cooking zones can be different in some small range from the data in the table. It changes with the material and dimensions of the cookware.
For optimal cooking results use cookware no larger than the diameter in the table.
ENERGY EFFICIENCY
Product information according to EU 66/2014
Model identification SI2M7643DW
| Type of hob Built-In Hob | ||
| Number of cooking areas 2 | ||
| Heating technology Induction | ||
| Lenght (L) and width (W) of the cooking area | Left L 39.2 cm | W 19.5 cm |
| Lenght (L) and width (W) of the cooking area | Right L 39.2 cm | W 19.5 cm |
| Energy consumption of the cooking area (EC electric cooking) | Left 183.9 Wh / kg | |
| Energy consumption of the cooking area (EC electric cooking) | Right 183.9 Wh / kg | |
| Energy consumption of the hob (EC electric hob) | 183.9 Wh / kg |
EN 60350-2 - Household electric cooking appliances - Part 2: Hobs - Methods for measuring performance
Energy saving
You can save energy during everyday cooking if you follow below hints.
- When you heat up water, use only the amount you need.
- If it is possible, always put the lids on the cookware.
- Before you activate the cooking zone put the cookware on it.
- Put the smaller cookware on the smaller cooking zones.
- Put the cookware directly in the centre of the cooking zone.
- Use the residual heat to keep the food warm or to melt it.
ENVIRONMENTAL CONCERNS
Recycle materials with the symbol Put the packaging in relevant containers to recycle it. Help protect the environment and human health by recycling waste of electrical and electronic appliances. Do
not dispose of appliances marked with the symbol ☒ with the household waste.
Return the product to your local recycling facility or contact your municipal office.