
M105-77XC - Lawn mower MCCULLOCH - Free user manual and instructions
Find the device manual for free M105-77XC MCCULLOCH in PDF.

| Product type | Walk-behind lawn mower |
| Cutting width | 51 cm (20 inches) |
| Engine type | 4-stroke petrol engine |
| Engine power | 2.8 kW (3.8 hp) |
| Fuel type | Unleaded petrol (min. 95 RON) |
| Fuel tank capacity | 1.2 liters |
| Cutting height adjustment | Central, 6 positions (25-75 mm) |
| Grass collector capacity | 60 liters |
| Weight | 28 kg |
| Dimensions (L x W x H) | 85 x 56 x 41 cm |
| Drive system | Rear-wheel drive |
| Blade brake clutch | Yes |
| Mulching capability | Yes (with plug) |
| Side discharge | Yes |
| Engine oil capacity | 0.5 liters |
| Air filter type | Paper element |
| Spark plug type | NGK BPR6ES or equivalent |
| Noise level (LwA) | 96 dB(A) |
| Vibration level (ah) | 4.5 m/s² |
| Warranty | 2 years |
Frequently Asked Questions - M105-77XC MCCULLOCH
User questions about M105-77XC MCCULLOCH
0 question about this device. Answer the ones you know or ask your own.
Ask a new question about this device
Download the instructions for your Lawn mower in PDF format for free! Find your manual M105-77XC - MCCULLOCH and take your electronic device back in hand. On this page are published all the documents necessary for the use of your device. M105-77XC by MCCULLOCH.
USER MANUAL M105-77XC MCCULLOCH
natural_image
Black and white photo of a motorized golf cart with visible wheels and front panel (no text or symbols)M105-77XC

Instruction manual
Please read these in struc tions care ful ly and make sure you under stand them before using this ma chine.
Anleitungshandbuch
We reserve the right to make changes without prior notice.
Original Instructions in English, all others are translations.
DANGER: THIS CUTTING MACHINE IS CAPABLE OF AMPUTATING HANDS AND FEET AND THROWING OBJECTS. FAILURE TO OBSERVE THE FOLLOWING SAFETY INSTRUCTIONS COULD RESULT IN SERIOUS INJURY OR DEATH.

WARNING: In order to prevent acci den tal starting when setting up, transporting, adjusting or making repairs, always disconnect spark plug wire and place wire where it can not contact spark plug.

WARNING: Do not coast down a hill in neutral, you may lose control of the riding mower.

WARNING: This unit is not intended for towing, or use of wheel weights. Only use attachments designed specifically for this riding mower.
I. GENERAL OPERATION
- Read, understand, and follow all instructions on the machine and in the manual before starting.
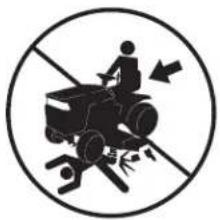
- Do not put hands or feet near rotating parts or under the machine. Keep clear of the discharge opening at all times.
- Only allow responsible adults, who are familiar with the instructions, to operate the machine.
- Clear the area of objects such as rocks, toys, wire, etc., which could be picked up and thrown by the blade.
- Be sure the area is clear of bystanders before operating. Stop machine if anyone enters the area.
- Never carry passengers.
- Do not mow in reverse unless absolutely necessary. Always look down and behind before and while backing.
- Never direct discharged material toward anyone. Avoid discharging material against a wall or obstruction. Material may ricochet back toward the operator. Stop the blade when crossing gravel surfaces.
- Do not operate machine without the entire grass catcher, discharge chute, or other safety devices in place and working.
- Slow down before turning.
- Never leave a running machine unattended. Always turn off blade, set parking brake, stop engine, and remove keys before dismounting.
- Disengage blade when not mowing. Shut off engine and wait for all parts to come to a complete stop before cleaning the machine, removing the grass catcher, or unclogging the discharge chute.
- Operate machine only in daylight or good artificial light.
- Do not operate the machine while under the influence of alcohol or drugs.
- Watch for traffic when operating near or crossing roadways.
- Use extra care when loading or unloading the machine into a trailer or truck.
• Always wear eye protection when operating machine.
- Data indicates that operators, age 60 years and above, are involved in a large percentage of riding mower-related injuries. These operators should evaluate their ability to operate the riding mower safely enough to protect themselves and others from serious injury.
- Keep machine free of grass, leaves or other debris build-up which can touch hot exhaust / engine parts and burn. Do not allow the mower deck to plow leaves or other debris which can cause build-up to occur. Clean any oil or fuel spillage before operating or storing the machine. Allow machine to cool before storage.
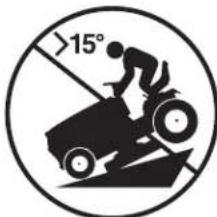
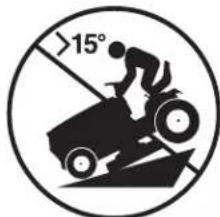
II. SLOPE OPERATION
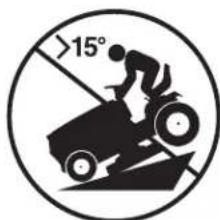
Slopes are a major factor related to loss of control and tip-over accidents, which can result in severe injury or death. Operation on all slopes requires extra caution. If you cannot back up the slope or if you feel uneasy on it, do not mow it.
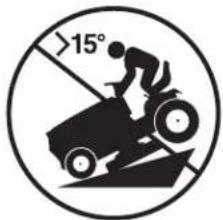
- Mow up and down slopes (15° Max), not across.
- Watch for holes, ruts, bumps, rocks, or other hidden objects. Uneven terrain could overturn the machine. Tall grass can hide obstacles.
- Choose a low ground speed so that you will not have to stop or shift while on the slope.
- Do not mow on wet grass. Tires may lose traction.
• Always keep the machine in gear when going down slopes. Do not shift to neutral and coast downhill. - If machine stops while going uphill, disengage blade, shift into reverse and back down slowly.
- Avoid starting, stopping, or turning on a slope. If the tires lose traction, disengage the blade and proceed slowly straight down the slope.
- Keep all movement on the slopes slow and gradual. Do not make sudden changes in speed or direction, which could cause the machine to roll over.
- Use extra care while operating machine with grass catchers or other attachments; they can affect the stability of the machine.
- Do no use on steep slopes.
- Do not try to stabilize the machine by putting your foot on the ground.
- Do not mow near drop-offs, ditches, or embankments. The machine could suddenly roll over if a wheel is over the edge or if the edge caves in.
III. CHILDREN

WARNING: CHILDREN CAN BE INJURED BY THIS EQUIPMENT. The American Academy of Pediatrics recommends that children be a minimum of 12 year of age before operating a pedestrian controlled lawn mower and a minimum of 16 years of age before operating a riding lawn mower.
Tragic accidents can occur if the operator is not alert to the presence of children. Children are often attracted to the machine and the mowing activity. Never assume that children will remain where you last saw them.
- Keep children out of the mowing area and in the watchful care of a responsible adult other than the operator.
- Be alert and turn machine off if a child enters the area.
• Before and while backing, look behind and down for small children. - Never carry children, even with the blade shut off. They may fall off and be seriously injured or interfere with safe machine operation. Children who have been given rides in the past may suddenly appear in the mowing area for another ride and be run over or backed over by the machine.
- Never allow children to operate the machine.
- Use extra care when approaching blind corners, shrubs, trees, or other objects that may block your view of a child.
natural_image
Prohibition sign depicting a person riding a vehicle with a diagonal line crossing through, no text or symbols present.
natural_image
Symbolic illustration of a person riding a truck with a crossed-out arrow and broken debris, enclosed in a circle (no text or symbols)
natural_image
Symbolic illustration of a person using a platform to lift a block, enclosed in a circle (no text or symbols)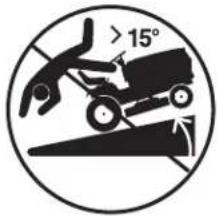

IV. SERVICE
SAFE HANDLING OF GASOLINE
To avoid personal injury or property damage, use extreme care in handling gasoline. Gasoline is extremely flammable and the vapors are explosive.
- Extinguish all cigarettes, cigars, pipes, and other sources of ignition.
- Use only approved gasoline container.
- Never remove gas cap or add fuel with the engine running. Allow engine to cool before refueling.
- Never fuel the machine indoors.
- Never store the machine or fuel container where there is an open flame, spark, or pilot light such as on a water heater or other appliances.
- Never fill containers inside a vehicle or on a truck or trailer bed with plastic liner. Always place containers on the ground away from your vehicle when filling.
- Remove gas-powered equipment from the truck or trailer and refuel it on the ground. If this is not possible, then refuel such equipment with a portable container, rather than from a gasoline dispenser nozzle.
- Keep the nozzle in contact with the rim of the fuel tank or container opening at all times until fueling is complete. Do not use a nozzle lock-open device.
- If fuel is spilled on clothing, change clothing immediately.
- Never overfill fuel tank. Replace gas cap and tighten securely.
GENERAL SERVICE
- Never operate machine in a closed area.
- Keep all nuts and bolts tight to be sure the equipment is in safe working condition.
- Never tamper with safety devices. Check their proper operation regularly.
- Keep machine free of grass, leaves, or other debris build-up. Clean oil or fuel spillage and remove any fuel-soaked debris. Allow machine to cool before storing.
- If you strike a foreign object, stop and inspect the machine. Repair, if necessary, before restarting.
- Never make any adjustments or repairs with the engine running.
- Check grass catcher components and the discharge chute frequently and replace with manufacturer's recommended parts, when necessary.
- Mower blade is sharp. Wrap the blade or wear gloves, and use extra caution when servicing them.
- Check brake operation frequently. Adjust and service as required.
- Maintain or replace safety and instruction labels, as necessary.
- Be sure the area is clear of bystanders before operating. Stop machine if anyone enters the area.
- Never carry passengers.
- Do not mow in reverse unless absolutely necessary. Always look down and behind before and while backing.
- When loading or unloading this machine, do not exceed the maximum recommended operation angle of 15^ .
- Wear proper Personal Protective Equipment (PPE) while operating this machine, including (at a minimum) sturdy footwear, eye protection, and hearing protection. Do not mow in shorts and/or, open toed footwear.
• Always let someone know you are outside mowing.
natural_image
Symbolic illustration of a person riding a vehicle with a diagonal line crossing through, no text or symbols present.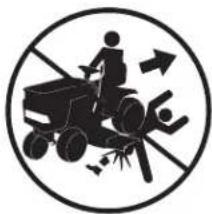
natural_image
Symbolic illustration of a person riding a tractor with a crossed-out arrow and broken debris, enclosed in a circle (no text or symbols)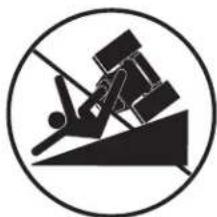
natural_image
Symbolic illustration of a person using a lever to lift a block on an inclined plane, enclosed in a circle (no text or symbols)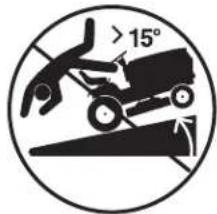
natural_image
Silhouette of a person riding a vehicle with a 15-degree angle marked, enclosed in a circle (no text or symbols beyond the angle)natural_image
Symbolic illustration of a person riding a tractor with a diagonal line and a lightning bolt, crossed out by a diagonal line (no text or symbols present)
natural_image
Symbolic illustration of a person riding a tractor with a crossed-out arrow and broken legs, no text or numbers present.
natural_image
Symbolic illustration of a person using a platform to lift a block, enclosed in a circle (no text or symbols)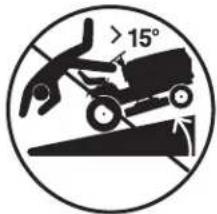
natural_image
Circular icon depicting a person riding a vehicle with a 15-degree angle marker (no text or symbols beyond the angle)natural_image
Symbolic illustration of a person riding a tractor with a crossed-out arrow, no text or numbers present.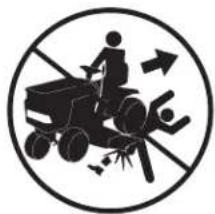
natural_image
Symbolic illustration of a person riding a tractor with a crossed-out arrow and broken legs, no text or numbers present.
natural_image
Symbolic illustration of a person using a platform to lift a block, enclosed in a circle (no text or symbols)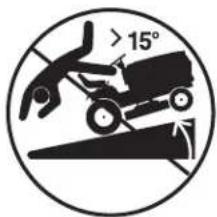
natural_image
Symbolic illustration of a person riding a tractor with a diagonal line crossing through it, no text or symbols present.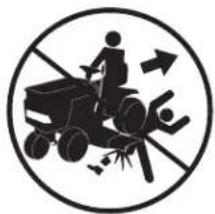
natural_image
Symbolic illustration of a person riding a tractor with a broken tool and arrows indicating no movement or damage (no text present)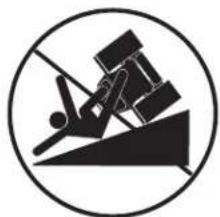
natural_image
Symbolic illustration of a person using a platform to lift an object, enclosed in a circle (no text or symbols)
natural_image
Silhouette of a person riding a car with a 15-degree angle marker (no text or symbols beyond the angle)natural_image
Symbolic illustration of a person riding a tractor with an arrow indicating motion, enclosed in a circle (no text or symbols)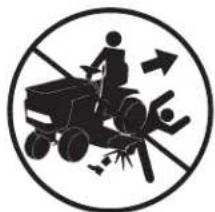
natural_image
Symbolic illustration of a person riding a tractor with a crossed-out arrow and broken legs, no text or numbers present.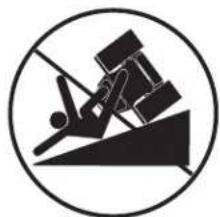
natural_image
Symbolic illustration of a person using a lever to lift a block on an inclined plane, enclosed in a circle (no text or symbols)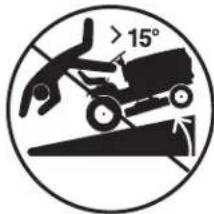

*As rated by the engine manufacturer
Notified Body
SNCH
11, Route de Luxembourg
L-5230 Sandweiler
TUV Rheinland
No. 0499
GB These symbols may appear on your machine or in the literature supplied with the product. Learn and understand their meaning.
Diese Symbole finden Sie auf Ihrer Maschine oder in Unterlagen, die mit dem Produkt ausgehändigt wurden. Bitte machen Sie sich mit deren Bedeutung vertraut.
FR Ces symboles peuvent figurer sur tracteur ou dans les publications fournies avec le produit. Apprenez à comprendre la signification de ces symboles.
ES Estos símbolos pueden aparecer sobre su unidad o en la literatura proporcionada con el producto. Aprenda y comprenda sus significados.
IT Simboli utilizzati sull'apparato di taglio o nella documentazione fornita unitamente al prodotto. E' importante conoscerne bene il significato.
Deze symbolen kunnen op uw machine of in de bij het produkt geleverde documentatie aanwezig zijn. Lees en begrijp de betekenis.

REVERSE RÜCKWÄRTSFAHRT MARCHE ARRIÈRE MARCHA ATRÁS RETROMARCIA ACHTERUIT-RIJDEN

NEUTRAL LEERLAUF POSITION NEUTRE PUNTO NEUTRO FOLLA NEUTRAALSTAND

HIGH HOCH HAUT ALTO AUMENTARE HOOG

LOW NIEDRIG BAS BAJO DIMINUIRE LAAG

FAST SCHNELLFAHRT VITESSE RAPIDE MARCHA RÁPIDA AVANZAMENTO VELOCE VELOCE

SLOW LANGSAMFAHRT VITESSE LENTE MARCHA LENTA AVANZAMENTO LENTO LANGZAAM RIJDEN

LIGHTS ON LICHT AN PHARES ALLUMÉS LUCES ENCENDIDAS LUCI ACCESE LICHTEN AAN

IGNITION ZÜNDUNG ALLUMAGE IGNICIÓN AVVIAMENTO ONTSTEKING

ENGINE OFF MOTOR AUS MOTEUR ARRÊTÉ MOTOR APAGADO MOTORE SPENTO MOTOR UIT

ROS ON ROS AN ROS ON ROS ON ROS ON ROS ON

ENGINE ON MOTOR LÄUFT MOTEUR EN MARCHE MOTOR ENCENDIDO MOTORE ACCESO MOTOR AAN

ENGINE START ANLASSEN DES MOTORS DÉMARRAGE DU MOTEUR ARRANQUE DEL MOTOR AVVIAMENTO DEL MOTORE HET STARTEN VAN DE MOTOR

PARKING BRAKE FESTSTELLBREMSE FREIN DE PARKING RENO DE ESTACIONAMIENTO FRENO DI PARCHEGGIO PARKEERREM

UNLOCKED ENTRIEGELT DEVERROUILLÉ ABIERTO DISINNESTATO GEDEBLOKKEERD

PARKING BRAKE LOCKED FESTSTELLBREMSE VERRIEGELT FREIN DE PARKING VERROUILLE FRENO DE ESTACIONAMIENTO CERRADO FRENO DI PARCHEGGIO INNESTATO PARKEERREM GEBLOKKEERD

EUROPEE PER MACCHINARI
VEILIGHEIDSRICHTLIJN VOOR
EUROPESE MACHINES

Consult manual for safe
operation practices.
due to debris buildup.
DANGER, KEEP HANDS AND FEET AWAY
CAUTION: DEFLECTOR SHIELD OR ENTIRE GRASS CATCHER MUST BE IN PLACE WHILE MOWING
WARNING: Read Engine Owner's Manual –
Fire hazard – Poisonous fumes or toxic gases
CAUTION: Fingers or hand entanglement – belt drive
KEEP OUT OF THE REACH OF CHILDREN.
DO NOT TIP. DO NOT OPEN BATTERY!
01738
MAINTENIR HORS DE LA PORTÉE D'ENFANTS
NE RENVERSEZ PAS. N'OUVREZ PAS LA BATTERIE!


GEFAHR
AUGEN SCHÜTZEN
EXPLOSIVE GASE
KÖNNEN ERBLINDUNG
UND KORPERVERLET-
ZUNGEN VERURSAC-
HEN
ZU VERMEIDEN:
- FUNKEN
FEUER
• RAUCHEN
SCHWEFELSÄURE
KANN ERBLINDUNG
ODER SCHWERE VERÄT-
ZUNGEN VERURSACHEN.
AUGEN UNVER-
ZÜGLICH MIT WASSER
AUSSPULEN. SOFORT
ÄRZTLICHE HILFE
AUFSUCHEN.

GEVAAR
OGEN BESCHERMEN
EXPLOSIEVE GASSEN
KUNNEN BLINDHEID
OF LETSEL VERO-
ORZAKEN.
GEEN
• VONKEN
- VUUR
- ROKEN
ZWAVELZUUR
KAN BLINDHEID OF ERN-
STIGE BRANDWONDEN
VER-OORZAKEN.
OGEN ONMIDDELLIJK
MET WATER SPOELEN.
SNEL MEDISCHE HULP
INROE-PEN.

PELIGRO
PROTEJE SUS OJOS
GASES EXPLOSIVOS
PUEDEN CAUSAR
CEGUE-DAD O LE-
SIONES.
NO
CHISPAS
- LLAMAS
• FUMAR
ÁCIDO SULFÚRICO
PUEDEN CAUSAR CE-
GUE-DAD O QUEMADU-
RAS MUY GRAVES.
LÍMPIESE LOS OJOS
CON UN CHORRO DE
AGUA.OBTENGA AYU-
DAMÉDICA RÁPIDAM-
ENTE.

PERICOLO
RIPARARE GLI OCCHI
VAPORI ESPLOSIVI
PUO' PROVOC
CECITA' O LESIONI
DIVIETO
• SCINTILLE
• FIAMME
- SIGARETTE
ACIDO SOLFORICO
PUO' PROVOCARE LA
CECITA' OD USTIONI
GRAVI.
LAVARE IMMEDIATA-
MENTE GLI OCCHI
CON ACQUA. SOT-
TOPORRE AL PIU
PRES TO ALLE CURE
DEL MEDICO.

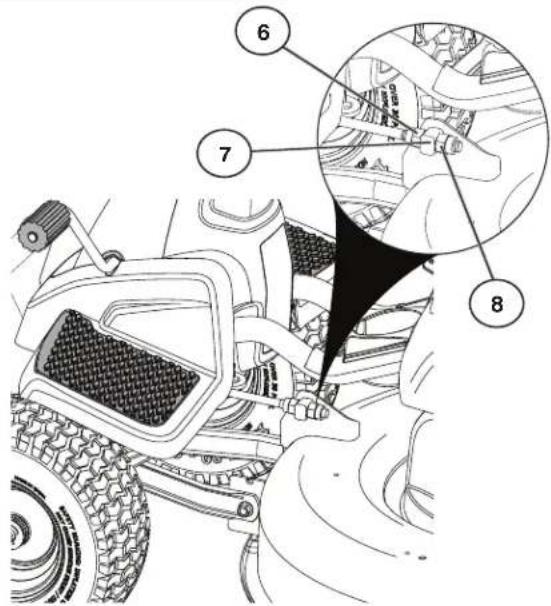
- Slide extension shaft (9) onto steering shaft (10).
- Slide steering shaft protective foam cover (8) over steering shaft (10).
- Place steering boot (7) over steering shaft (10) and push down to secure.
- Position front wheels of the riding mower so they are pointing straight forward.
- Remove steering wheel adapter (6) from steering wheel (5) and slide adapter (6) onto steering shaft (10).
- Press steering wheel (5) into position on shaft (10), install large washer (4), lock washer (3), bolt (2) and tighten securely.
- Snap steering wheel insert (1) into center of steering wheel (5) securely.
DE EINBAU DES LENKRADS


INSTALL SEAT
- Remove bolt (1) and flat washer (2) se cur ing seat (8) to cardboard packing and set aside for as sem bly of seat to riding mower. Remove the cardboard packing and discard.
- Place seat (8) on seat pan (3) so all three bottom pads (5) are positioned over large slotted holes (4) in seat pan (3).
- Push down on seat (8) to engage pads (5) in slots (4) and pull seat (8) towards rear of riding mower.
- Raise seat (8) and tighten bolt (1) and large flat washer (2) securely.
- Remove tape (6) and discard.
- Lower seat (8) into operating position and sit on seat (8). Press clutch/brake pedal all the way down. If operating position is not comfortable, adjust seat (8).
TO ADJUST SEAT
Front and back -
- Sit in seat (8).
- Lift up adjustment lever (10) and slide seat (8) until a comfortable position is reached which allows you to press clutch/brake pedal all the way down.
- Release adjustment lever (10) to lock seat (8) in position.
Lumbar Support -
- Loosen lumbar adjustment knob (9).
- Slide seat (8) back up or down to most comfortable position for lower back support.
• Tighten lumbar adjustment knob (9).

EINBAU DES SITZES
GB CHECK BATTERY
Make sure battery is securely fastened, and that all wires are securely connected.
- Battery (2) is located under the seat (1).
- Battery has been fully charged from the factory, before installation.
DE BATTERIEKONTROLLE

TO ATTACH FRONT BUMPER
NOTE: For ease of assembly, you may wish to obtain the assistance of another person for mounting bumper to riding mower.
- Remove two screws (1) from front chassis (3) of riding mower.
- Tilt the front bumper (5) so that the bumper tabs (2) catch the slots (4) on the front of the chassis (3) and lower the bumper (5) in to place.
- Attach the bumper (5) to front of chassis (3) with screws (1) previously removed.
- Tighten the two screws (1) se cure ly.

FIXATION DU PARE-CHOC AVANT

TO ATTACH REAR BUMPER
NOTE: For ease of assembly, you may wish to obtain the assistance of another person for mounting bumper to riding mower.
- Remove four screws (1) from rear chassis (2) of riding mower.
- Position bumper (3) as shown and assemble to rear chassis (2) with screws (1) previously removed.
- Tighten the four screws (1) se cure ly.

FIXATION DU PARE-CHOC ARRIÈRE
- Unhook the (1) bungees from deck (2) to the mulch cover (3).
- Lift the mulch cover (3).
- Attach the deflector (4) to the hinge bracket (5).
• Rest the mulch cover (3) on the deflector (4) - Attach the bungees (1) from the deflector (4) to the deck (2).
WARNING!
Do not operate the mower without either the en tire grass catcher, on mowers so equipped, mulch cover, or the deflector shield in place.

Positioning Of Controls
- Throttle/Choke Control
- Brake and Clutch Pedal
- Motion Control Lever
- Deck Clutch Lever
- Height Adjustment Lever
- Ignition Lock
- Parking Brake Lever


natural_image
Diagram of a laboratory apparatus with a funnel, beaker, and scale tool (no text or labels)
natural_image
Diagram of a laboratory apparatus with a funnel, bulb, and scale (no text or labels)
natural_image
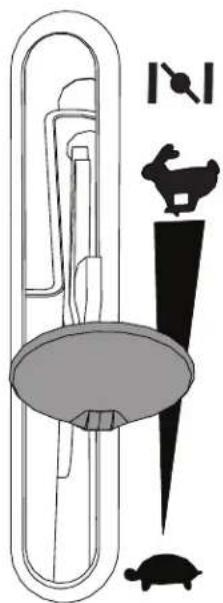
Illustration of a paperclip with a tray, accompanied by silhouette icons of a bird and a turtle (no text or symbols)GB 1. Throttle/Choke control
The throttle/choke control regulates the motor speed and also the speed of the blades. If the lever is in its forward position the choke function is connected.

natural_image
Technical line drawing of a mechanical device with a hammer and gear mechanism (no text or symbols)GB 2. Brake and Clutch Pedal
When the pedal is pushed down the brake is applied and the motor is disengaged.

3. Motion Control Lever
There are four different positions for this lever:
3 = Fastest Forward Speed
2 = Middle Forward Speed
1 = Slowest Forward Speed
N = Neutral (no drive)
R = Reverse
The lever can be moved steplessly between 1 and 3 to ensure the required speed.

3. Antriebshebel
N = Neutre (point mort)
R = Marche arrière
natural_image
Technical line drawing of a vehicle tire assembly with mechanical components (no text or symbols)
4. Deck Clutch Lever
Move the deck clutch lever forward to engage the mower blade, whereby the drive belt is tensioned and the blade begins to rotate. If the deck clutch lever is moved backwards the drive belt will be disengaged and the rotation of the blade slowed down by the action of the brake shoes on the pulley.


5. Height Adjustment Lever
The position of the height adjustment lever determines the cutting height.
- Grasp lift le ver (1).
- Press lift lever plunger (2) with thumb and move lift lever (1) to desired position.

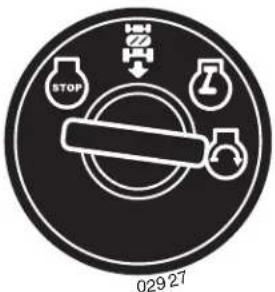
There are four different positions for the ignition key:
OFF All electric current bro ken.
ROS ON Reverse Operation System (ROS) connected
ON Electric current connected.
START Start motor connected.
Reverse Operation System (ROS) - Allows operation of mower deck or other powered attachment while in reverse (See section 5 - "Driving").
WARNING!
Never leave the key in the ignition lock when leaving the machine on its own.
DE 6. Zündschloß

7. Parking brake
Connect the parking brake in the following way:
- Press down the brake pedal to bottom position (1).
- Move the parking brake lever upwards and hold in this position (2).
- Release the brake pedal.
To release the parking brake all that is nec es sary is to push down the brake pedal.

7. Feststellbremse
The en gine should be run of pure (not oil mixed) un lead ed petrol. Do not fill beyond the lower edge of the filling hole. Do not fill over max level.
WARNING!
Petrol is highly flam ma ble. Proceed with care and fill up with petrol out doors. Do not smoke when filling with petrol or fill up when the en gine is warm. Do not overfill the tank since the petrol can expand and overflow. Make sure that the petrol cap is securely tight ened after fill ing. Store petrol in a cool place in an appropriate container for engine fuel. Check the petrol tank and pipes.

Tanken
The combined oil refilling cap and the oil stick is ac ces si ble when the bonnet is lifted for wards. The oil level in the engine should be checked before each run. Make sure that the tractor is horizontal. Unscrew the oil stick and wipe clean. Replace the oil stick and screw tight. Remove again and check the level.

Ölstand

The oil level should lie between the two markings on the oil stick. If more oil is needed add SAE 30 oil to the "FULL" marking. SAE 5W-30 oil should be used during the winter (below freezing point).


Tire air pressure
Check the tire pressure regularly. The pressure in the front tire should be 0.8 bar (12 PSI) and 0.8 bar (12 PSI) in the back tires.

Nivel de aceite
GB Starting of motor
Make sure that the mower height adjustment (2) is in the transport position (top position) and the deck clutch lever (1) is in the disengaged position.
natural_image
Diagram of a car interior showing a lever mechanism with a black arrow indicating direction (no text or symbols present)GB Press down the clutch/brake pedal completely and hold down. Make sure that the motion control lever is in neu tral "N".
natural_image
Diagram of a laboratory apparatus with a funnel, scale, and silhouette figures (no text or labels)GB Cold motor: Push the gas control up to end positon choke (N)
DE Bei kaltem Motor: Gashebel in die Endstellung choke (|A| schieben.
FR Avec un moteur froid: pousser l'accélérateur vers le haut à la limite du starter choke (|)
(ES) Con el motor frío: Empuje el acelerador hacia arriba hasta la posición choke (| estrangulación).
IT Motore freddo: Portare il comando del gas su choke (IX)
NL Bij een koude motor: Schuif de gashendel naar boven tot de eindpositie choke (|N)
natural_image
Illustration of a paperclip with abstract symbols including a bird, a dog, a turtle, and a funnel (no text or labels)GB Warm motor: Push gas control half way to full gas position "⚡".
DE Bei warmem Motor: Gashebel in die Vollgasstellung "schieben.
FR Si le moteur est chaud: pousser la commande des gaz à mi-distance de sa position d'accélération maximale"
ES Moter caliente: Empuje el acelerador hasta la mitad de su recorrido hacia la posición de plenos gases "
IT Motore caldo: Portare il comando del gas sul massimo "
NL Bij een warme motor: Schuif de gashendel halverwege naar de volgaspositie "
GB Turn the ignition key to "START position".
NOTE
Do not run the start motor more than 5 seconds at once. If the engine will not start, wait about 10 seconds before the next try.
GB Let the ignition key return to the "ON" position when the engine has started.
GB Driving
Lower the mower deck by moving the height adjustment lever (1) forward. Engage mower blade by moving the deck clutch lever (2) forward. Choose a driving speed which suits the terrain and required cutting results. Release the brake/clutch pedal slowly.
DE Betrieb

Engine "ON" (Normal Operating) Motor "AN" (Normalbetrieb) Moteur "ON" (Fonctionnement normal) Motor "ON" (Funcionamiento Normal) Motore "ON" (Funzionamento normale) Motor "ON" (normaal functioneren)
Your riding mower is equipped with a Reverse Operation System (ROS). Any attempt by the operator to travel in the reverse direction with the deck clutch engaged will shut off the engine unless ignition key is placed in the ROS "ON" position.
WARNING: Backing up with the deck clutch engaged while mowing is strongly discouraged. Turning the ROS "ON", to allow reverse operation with the deck clutch engaged, should only be done when the operator decides it is necessary to reposition the machine with the attachment engaged. Do not mow in reverse unless absolutely necessary.
Only use if you are certain no children or other bystanders will enter the mowing area.
- Move motion control lever to neutral (N) position.
- With engine running, turn ignition key counterclockwise to ROS "ON" position.
- Look down and behind before and while backing.
- Slowly move motion control lever to reverse (R) po si tion to start movement.
- When use of the ROS is no longer needed, turn the ignition key clockwise to engine "ON" position.
DE RÜCKWÄRTSFAHRT (ROS)
natural_image
Circular industrial control knob with indicator lights and a rotary dial (no text or symbols)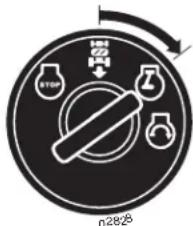
Engine "ON" (Normal Operating)
- Clear the lawn from stones and other objects which can be thrown away by the blades.
- Localize and mark stones and other fixed objects to avoid collision.
- Begin with a high cutting height and reduce until the required cutting result is obtained.
- If the grass is not too long and thick the drive speed can be increased by selecting a higher gear without affecting the cutting result.
- The best lawn is achieved if the grass is cut often. Cutting becomes more even and the cut grass is more evenly dis trib ut ed over the surface. Total time taken is not greater, since higher drive speed can be selected without affecting the cutting results.
- Avoid cutting wet grass. The cutting results will be worse since the wheels will sink into the soft lawn.
- Spray the cutting unit with water underneath after use.

Mähtipps
natural_image
Illustration of a person riding a tractor on a slope (no text or symbols)GB
WARNING!
- Do not drive in terrain at an angle of more than max. 15°. The risk for roll-over back wards is large.
• In steep terrain the risk for tipping is considerable. - Avoid stopping and starting in sloping terrain.
DE
WARNUNG!
Drive in right turns so that the cut grass is thrown away from flower beds and paths, etc. For larger lawns the drive di rec tion should be changed after 2-3 turns so that the cut grass is thrown towards the area that has already been cut as shown in the illustration.
DE
Use the left side of the machine to cut close to trees, bushes and paths, etc. The blade cuts about 15 mm inside the edge of the cover.
DE
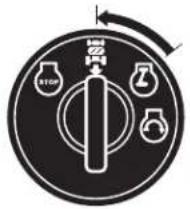
GB Switching off the engine
Move the deck clutch lever to disengaged position. Move the throttle control between half and full speed (fast) position. Lift up the cutting unit and turn the ignition key to "STOP" position.
Do not leave the ignition key in the machine when not in use to prevent children and other unauthorized persons starting the en gine.
DE WARNUNG!
Before servicing the engine or cutting unit the fol low ing shall be carried out:
- Press down the clutch/brake pedal and engage the parking brake lever.
- Move motion control lever to neutral position.
- Move deck clutch lever to disengaged position.
- Switch off engine.
- Remove the ignition cable from the plug.

WARNUNG!
NOTE: Periodic maintenance should be performed on a regular basis in order to keep your riding mower in good running condition.
!
WARNING: Disconnect spark plug wire to prevent ac ci-den tal starting before attempting any repair, inspection, or main te nance.
Before each use:
- Check oil, lubricate pivot points as necessary.
- Check to see all bolts, nuts, and cotter pins are in place and secure.
- Check the battery, terminals and vents.
- Recharge slowly at 6 amperes if needed.
- Clean air screen.
- Keep riding mower free of dirt and chaff to prevent engine damage or overheating.
- Check brake operation.
Cleaning
Do not use high pressure washer for cleaning. Water can enter engine and transmission and shorten the useful life of the machine.
DE
Wartung

TO CHANGE ENGINE OIL
Determine temperature range expected before oil change. All oil must meet API service classification SG-SL.
- Be sure riding mower is on level surface.
- Oil will drain more freely when warm.
- Catch oil in a suitable container.

WARNING: If engine has been operated for an extended period of time immediately prior to draining oil, oil will be hot. - Lift engine cover (3).
- Remove oil fill cap/dipstick (2). Be careful not to allow dirt to enter the engine when changing oil.
- Position a container to catch oil.
- Remove drain plug (1) and drain oil into container.
• After oil has drained completely, replace oil drain plug (1) and tighten securely.
- Refill engine with oil through oil fill dipstick tube (4). Pour slowly.
- Use gauge on oil fill cap/dipstick (2) for checking level. For accurate reading, tighten dipstick cap securely onto the tube before removing dipstick. Keep oil at "FULL" line on dipstick. Tighten cap onto the tube securely when finished.
• Lower engine cover (3).

MOTORÖLWECHSEL

CAMBIO DEL ACEITE DEL MOTOR
Fill in dates as you complete regular service
| As Every 8 Needed | Every Every hours | Every 25 hours | Every 50 hours | 100 hours | 200 hours | |
| Change engine oil | ||||||
| Lubricate Axles and Spindles | ||||||
| Check brake operation | ||||||
| Clean air screen | ||||||
| Clean air filter and pre-cleaner | ||||||
| Replace air cleaner paper cartridge | ||||||
| Clean engine cooling fins | ||||||
| Replace spark plug | ||||||
| Check tire pressure | ||||||
| Clean battery and terminals | ||||||
| Check muffler |

WARTUNGSNACHWEIS
Operator Presence System and Reverse Operation System (ROS)
Be sure operator presence and reverse operation sys tems are working properly. If your riding mower does not function as described, repair the problem immediately.
- The engine should not start unless the brake pedal is fully de pressed, and the attachment clutch con trol is in the dis en gaged position.
CHECK OPERATOR PRESENCE SYSTEM:
- When the engine is running, any attempt by the operator to leave the seat without first setting the parking brake should shut off the engine.
- When the engine is running and the at tach ment clutch is engaged, any attempt by the operator to leave the seat should shut off the engine.
- The attachment clutch should never operate unless the operator is in the seat.

- When the engine is running with the ignition switch in the Engine "ON" position and the attach ment clutch engaged, any attempt by the operator to shift into reverse should shut off the engine.
- When the engine is running with the ignition switch in the ROS "ON" position and the at tach ment clutch engaged, any attempt by the operator to shift into reverse should NOT shut off the engine.

CONTROLLARE IL SISTEMA PER OPERAZIONI IN RETROMARCIA (ROS):
GB Axle and Spindles
- Front wheel axles (1) and front spindles (2) should be properly lubricated with grease.
GB Blade Removal
- Raise mower to highest position to allow access to blade.
NOTE: Protect your hands with gloves and/or wrap blade with heavy cloth.
- Remove blade bolt (1) by turning coun ter clock wise.
- Install new blade (2) with stamped "This Side Up" facing deck and mandrel assembly (3).
IMPORTANT: To ensure proper assembly, center hole (5) in blade must align with star (4) on mandrel assembly (3).
• Install and tighten blade bolt (1) securely (45-55 Ft. Lbs.).
IMPORTANT: Special blade bolt (1) is heat treated.
If riding mower requires more than four (4) feet to stop at highest speed in highest gear on a level, dry concrete or paved surface, then brake must be serviced.
You may also check brake by:
- Park riding mower on a level, dry concrete or paved surface, depress clutch/brake pedal all the way down and engage parking brake.
- Place motion control lever in neutral position.
The rear wheels must lock and skid when you try to manually push the riding mower forward. If the rear wheels rotate, then the brake needs to be serviced. Contact a qualified service center.

PRÜFUNG DER BREMSEN

To Remove Mower Deck
- Place deck clutch lever in "DISENGAGED" position.
- Move mower height adjustment lift lever forward to lower mower to its lowest po si tion.
- Remove mandrel cover (4).
- Remove pins (1) holding left and right front mower suspension arms (11) in place.
- Remove bolt (3) holding deck front to rear leveling rod (2) in place.
- Remove (7) pin holding deck lift link arm (8) in place.
- Remove bolt (6) holding deck side to side leveling rod (5) in place.
- Remove belt (10) from around pulleys (9).
- Slide deck out from under side of mower.

Ausbau des Mähdecks
Install in reverse order following instructions in "To Remove Mower" section.

Einbau des Mähwerks
Adjust the mower while riding mower is parked on level ground or driveway. Make sure tires are properly inflated (See side of tire for proper PSI). If tires are over or underinflated, you will not properly adjust your mower.
Side-To-Side Adjustment
- Raise mower to its highest position.
- Measure distance "A" from bot tom edge of mower (2) to ground level at front corners of mower.
- To raise the right side of the mower, tighten lift link adjustment nut (1).
• To lower the right side of the mower, loosen lift link adjustment nut (1).
NOTE: Each full turn of lift link adjustment nut (1) will change mower height about 3/16".
• Recheck measurements after ad just ing.
Front-To-Back Adjustment
IMPORTANT: Deck must be level side-to side.
To obtain the best cutting results, the mower housing should be adjusted so that the front is approximately 1/8" to 1/2" lower than the rear when the mower is in its highest position.
Check adjustment on right side of riding mower. Measure distance "F" directly in front (3) and behind (4) the mandrel at bottom edge of mower housing as shown.
- To lower front of mower housing turn nut (8) and nut (6) counterclockwise.
- When distance of "F" is 1/8" to 1/2" higher at front than rear, loosen nut (8) and nut (6) on front link.
- To raise front of mower housing turn nut (6) and nut (8) clockwise.
- When distance of "F" is 1/8" to 1/2" lower at front than rear, tighten nut (6) and nut (8) on front link.
NOTE: Each full turn of nut (8) will change "F" by approximately about 3/8".
- Recheck side-to-side adjustment.


GB TO REPLACE MOWER BLADE DRIVE BELT MOWER DRIVE BELT REMOVAL
- Park riding mower on a level surface.
- Set parking brake.
- Lower mower to its lowest position.
- Remove mandrel cover (1) from mower deck.
- Remove rear engine plate from unit.
- Remove rear belt keeper (2) from unit.
- Carefully roll belt over (3) the top of the mower blade mandrel.
- Remove belt from idler pulleys (4).
- Check idler pulleys (4) to see that they rotate freely.
- Remove belt from rear drive pulley.
DE AUSTAUCH DES TREIBRIEMENS DES MÄHWERKS
AUSBAU DES TREIBRIEMENS
GB MOWER DRIVE BELT INSTALLATION Install in reverse order following instructions in "MOWER DRIVE BELT REMOVAL" section.
Your tractor's deck is equipped with a washout port on its surface as part of its deck wash system. It should be utilized after each use.
- Drive the tractor to a level, clear spot on your lawn, near enough to a water spigot for your garden hose to reach.
IMPORTANT: Make certain the tractor's discharge chute is directed AWAY from your house, garage, parked cars, etc. Remove bagger chute or mulch cover if attached.
- Make sure the attachment clutch control is in the "DIS EN-GAGED" position, set the parking brake, and stop the engine.
- Pull back the lock collar of the nozzle adapter on your garden hose (A) and push the adapter onto the deck washout port (B) at the left end of the mower deck. Release the lock collar to lock the adapter on the nozzle.
IMPORTANT: Tug hose ensuring connection is secure.
- Turn the water on.
- While sitting in the operator's position on the tractor, restart the engine and place the throttle lever in the Fast "⚡" position.
IMPORTANT: Recheck the area making certain the area is clear.
- Move the tractor's attachment clutch control to the "Engaged" position. Remain in the operator's position with the cutting deck engaged until the deck is cleaned.
- Move the tractor's attachment clutch control to the "DIS ENGAGED" position. Turn the ignition key to the STOP position to turn the tractor's engine off. Turn the water off.
- Pull back the lock collar of the nozzle adapter to disconnect the adapter from the nozzle washout port.
- Move the tractor to a dry area, preferably a concrete or paved area. Place the attachment clutch control in the "Engaged" position to remove excess water and to help dry before putting the tractor away.
WARNING: A broken or missing washout fitting could expose you or others to thrown objects from contact with the blade.
- Replace broken or missing washout fitting immediately, prior to using mower again.
- Plug any holes in mower with bolts and locknuts.

TO REMOVE WHEEL FOR REPAIRS FRONT WHEEL
- Block up front axle securely.
- Remove dust cover (1), retaining ring (2), and washer (3) to allow wheel removal.
• Repair tire and reassemble. - Replace washer and retaining ring securely in axle groove.
• Block up Rear axle securely. - Remove dust cover (1), retaining ring (2), washer (3), and square key (4) while pulling tire off.
• Repair tire and reassemble.
REAR WHEEL

AUSBAU DER RÄDER ZUR REPARATUR ORDERRAD
GB TO ADJUST CLUTCH
To ensure proper drive performance, periodic adjustment of the clutch will be needed. This adjustment is only necessary when there is a reduction or loss of drive. Refer to the maintenance section in this manual for recommended intervals.
• Park riding mower on a level surface.
- Set parking brake.
- Remove rear transaxle cover (1).
• Using a 9/16th wrench, tighten the clutch adjustment nut (2) by 1/8th of a turn.
WARNING: Do not over-tighten the clutch adjustment nut. Only make as many 1/8th turns as needed.
- Test riding mower where it will be used to cut grass.
- If further adjustment is needed, return to step 4.
• After adjustment is completed, replace rear transaxle cover (1).
If the clutch adjustment procedure is not effective, take your riding mower to a qualified service center for repair and/or adjustment.

CLEANING FRICTION SURFACES
To ensure proper drive performance keep the friction surfaces free from dirt, chaff and excess rubber at all times.
- Park riding mower on a level surface.
- Set parking brake.
- Remove rear transaxle cover (1).
- Clean friction surfaces (2) with isopropyl alcohol or other non-filming cleaner.
NOTE: Every 25 hours of operation, the friction surfaces need to be cleaned.

Engine will not start
- No fuel in fuel tank.
- Plug defective.
- Plug connection defective.
- Dirt in carburetor or fuel pipe.
Start motor will not turn engine
- Battery low of charge.
- Poor contact between cable and battery pole.
- Connection/disconnection level in wrong position.
- Main fuse defective.
- Ignition lock defective.
- Safety contact for clutch/brake pedal defective.
- Clutch/brake pedal not pushed down.
Engine runs unevenly
- Plug defective.
- Carburetor incorrectly set.
- Air filter blocked.
- Fuel tank ventilation blocked.
- Ignition setting defective.
- Dirt in fuel pipe.
Engine feels weak
- Air filter blocked.
- Plug defective.
- Dirt in carburetor or fuel pipe.
- Carburetor incorrectly set.
Engine overheats
- Engine overloaded.
- Air inlet or cooling fins blocked.
- Fan damaged.
- Too little or no oil in engine.
- Ignition setting defective.
- Plug defective.
Battery does not charge
- Fuse defective.
- One or several cells defective.
- Poor contact between battery poles and cables.
The machine vibrates
- Blades loose.
- Engine loose.
- Unbalance in one or both blades resulting from damage or poor balancing after sharpening.
Uneven cutting results
- Blades blunt
- Cutting unit skew.
- Long or wet grass.
- Grass stuck under cover.
- Different air pressures in tires on left and right side.
- Drive belt slipping.

The following steps should be taken when mowing season is over:
- Clean the entire machine, especially underneath the cutting unit cover. Do not use high pressure washer for cleaning. Water can enter engine and transmission and shorten the useful life of the machine.
- Touch up all chipped paint surfaces in order to avoid corrosion.
- Change engine oil.
- Drain the fuel tank. Start the engine and allow it to run until it is out of fuel.
- Remove the spark plug and pour one table spoon of engine oil into the cylinder. Pull the engine over in order to distribute the oil. Return the spark plug.
- Remove the battery. Recharge and store it in a cool, dry place. Protect the battery from low temperatures.
- The machine should be stored indoors in a dry, dust-free place.
WARNING!
Never use gasoline when cleaning. Use degreasing deter gent and warm water in stead.
Service
When ordering, we need the following information:
Date of purchase, model, type and serial number of the mower. Always use original spare parts. Contact your local dealer of distributor for warranty ser vice and repairs.


- M105-77XC
- Instruction manual
- Anleitungshandbuch
- GENERAL OPERATION
- SLOPE OPERATION
- CHILDREN
- SERVICE
- SAFE HANDLING OF GASOLINE
- GENERAL SERVICE
- DE EINBAU DES LENKRADS
- INSTALL SEAT
- TO ADJUST SEAT
- Front and back -
- Lumbar Support -
- EINBAU DES SITZES
- GB CHECK BATTERY
- DE BATTERIEKONTROLLE
- TO ATTACH FRONT BUMPER
- FIXATION DU PARE-CHOC AVANT
- TO ATTACH REAR BUMPER
- FIXATION DU PARE-CHOC ARRIÈRE
- WARNING!
- Positioning Of Controls
- GB 1. Throttle/Choke control
- GB 2. Brake and Clutch Pedal
- Motion Control Lever
- Antriebshebel
- Deck Clutch Lever
- Height Adjustment Lever
- DE 6. Zündschloß
- Parking brake
- Feststellbremse
- Tanken
- Ölstand
- Tire air pressure
- Nivel de aceite
- GB Starting of motor
- NOTE
- GB Driving
- DE Betrieb
- DE RÜCKWÄRTSFAHRT (ROS)
- Mähtipps
- GB
- DE
- WARNUNG!
- GB Switching off the engine
- DE WARNUNG!
- !
- Before each use:
- Cleaning
- Wartung
- TO CHANGE ENGINE OIL
- MOTORÖLWECHSEL
- CAMBIO DEL ACEITE DEL MOTOR
- WARTUNGSNACHWEIS
- Operator Presence System and Reverse Operation System (ROS)
- GB Axle and Spindles
- GB Blade Removal
- PRÜFUNG DER BREMSEN
- To Remove Mower Deck
- Ausbau des Mähdecks
- Einbau des Mähwerks
- Side-To-Side Adjustment
- Front-To-Back Adjustment
- GB TO REPLACE MOWER BLADE DRIVE BELT MOWER DRIVE BELT REMOVAL
- DE AUSTAUCH DES TREIBRIEMENS DES MÄHWERKS
- AUSBAU DES TREIBRIEMENS
- WARNING: A broken or missing washout fitting could expose you or others to thrown objects from contact with the blade.
- TO REMOVE WHEEL FOR REPAIRS FRONT WHEEL
- REAR WHEEL
- AUSBAU DER RÄDER ZUR REPARATUR ORDERRAD
- GB TO ADJUST CLUTCH
- WARNING: Do not over-tighten the clutch adjustment nut. Only make as many 1/8th turns as needed.
- CLEANING FRICTION SURFACES
- Engine will not start
- Start motor will not turn engine
- Engine runs unevenly
- Engine feels weak
- Engine overheats
- Battery does not charge
- The machine vibrates
- Uneven cutting results
- The following steps should be taken when mowing season is over:
- Service
Brand : MCCULLOCH
Model : M105-77XC
Category : Lawn mower