
Ease 44 Connect - Baby monitor MOTOROLA - Free user manual and instructions
Find the device manual for free Ease 44 Connect MOTOROLA in PDF.

| Product Type | Wi-Fi Video Baby Monitor |
| Brand | Motorola |
| Model | Ease 44 Connect (EASE44CONNECT, EASE44CONNECT-2, EASE44CONNECT-3, EASE34-4) |
| Parent Unit Display | 4.3" diagonal TFT LCD, 16.7M colors |
| Camera Image Sensor | Color CMOS, 2M pixels |
| Night Vision | 8 infrared LEDs for black & white viewing in low light |
| Wireless Frequency | 2.4 GHz (2400-2483.5 MHz) |
| Wi-Fi Internet Viewing | Yes, via Hubble Connected App (iOS/Android) and PC/Mac web browser |
| Audio Features | Two-way talk, lullabies/soothing sounds, audio books (English), sound sensitivity adjustment |
| Temperature Sensor | Displays room temperature; red alert if above 29°C/84°F or below 14°C/57°F |
| Zoom & Brightness | Zoom 1X/2X, brightness 8 levels |
| Volume Control | 8 levels |
| Alarm Timer | 2h, 4h, 6h, OFF |
| Power Saving Mode | Screen auto-off after 5/30/60 minutes on battery |
| Multi-Camera Support | Up to 4 cameras (split screen, scan) |
| Parent Unit Battery | Built-in rechargeable Li-Ion Polymer 3.8V, 2000mAh (approx. 4-5 hours talk time) |
| Camera Power | 5V DC/1000mA adapter (included); no internal battery |
| Operating Temperature | 41°F - 104°F (5°C - 40°C) |
| Dimensions (Parent Unit) | Approx. 140 x 90 x 60 mm (estimated, not specified) |
| Dimensions (Camera) | Approx. 70 x 60 x 60 mm (estimated, not specified) |
| Weight (Parent Unit) | Approx. 200 g (estimated, including battery) |
| Weight (Camera) | Approx. 100 g (estimated) |
| Cleaning | Use slightly damp or anti-static cloth; no solvents |
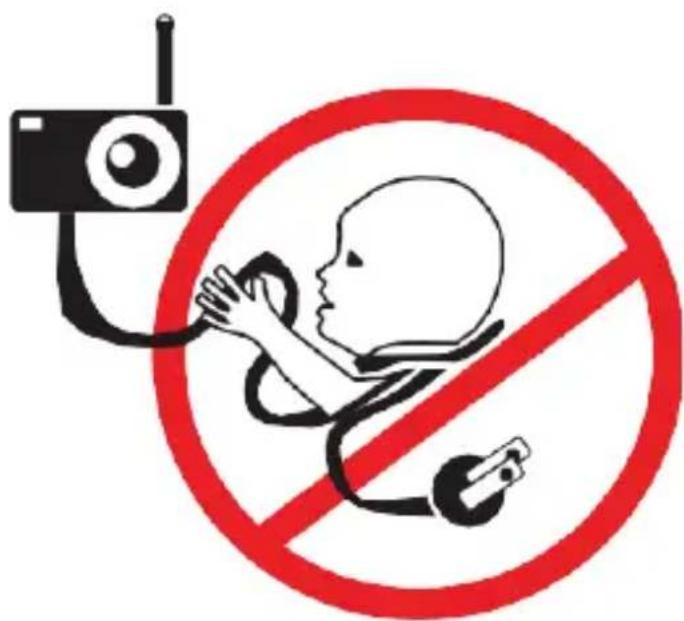
| Safety | Strangulation hazard: keep cords >3 ft from child; adult assembly; not a toy |
| Warranty | See sales receipt; contact support via motorolastore.com |
Frequently Asked Questions - Ease 44 Connect MOTOROLA
User questions about Ease 44 Connect MOTOROLA
0 question about this device. Answer the ones you know or ask your own.
Ask a new question about this device
Download the instructions for your Baby monitor in PDF format for free! Find your manual Ease 44 Connect - MOTOROLA and take your electronic device back in hand. On this page are published all the documents necessary for the use of your device. Ease 44 Connect by MOTOROLA.
USER MANUAL Ease 44 Connect MOTOROLA
natural_image
Red circular logo with a white stylized letter 'M' (no text or symbols)motorola
natural_image
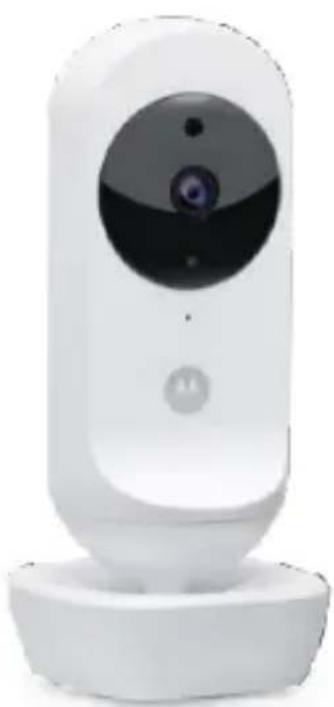
White smart home security camera with a circular lens and control buttons (no visible text or symbols)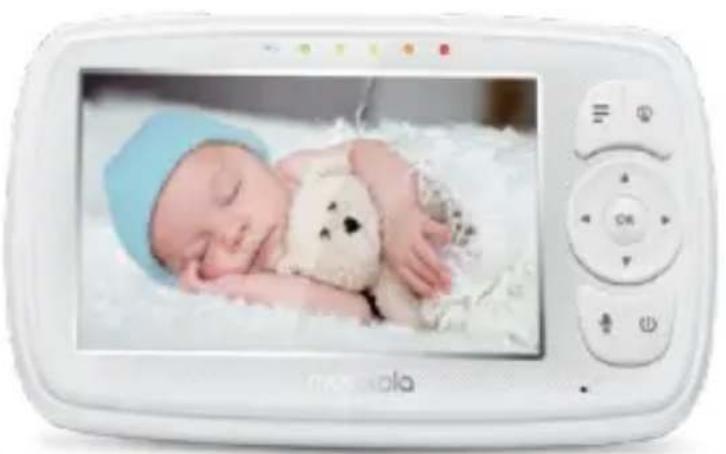
natural_image
Newborn baby resting on a white blanket next to a digital camera module (no visible text or symbols)USER'S GUIDE
4.3 "Wi-Fi® Video Baby Monitor
MODELS: EASE44CONNECT, EASE44CONNECT-2,
EASE44CONNECT-3, EASE34-4
Welcome...
to your new Motorola Wi-Fi ^® Video Baby Monitor!
Thank you for purchasing the Wi-Fi® Video Baby Monitor. Now you can see and hear your baby sleeping in another room
or you can monitor your older children in their play room. Our Connected Baby Monitor let you see your baby from the hand-held viewer, or from your smartphone. Watch over and communicate with your baby from anywhere in the world.
Please keep your original dated sales receipt for your records. For warranty service of your Motorola product, you will need to provide a copy of your dated sales receipt to confirm warranty status. Registration is not required for warranty coverage.
For questions, warranty, support or service related to the product, please contact us by
Live Chat: motorolastore.support/en. Email:
support@motorolastore.com
On the Web: www.motorolastore.com/support
This User's Guide has all the information you need to make the most out of your product.
Please read the Safety Instructions on pages 8-9 before you install the unit.
Inside the Box
- 1 x Parent Unit
- 1 x Baby Unit (Camera)
- 2 x Power adapter (Parent Unit and Baby Unit)
- 1 x Quick Start Guide
In multi-camera packs, you will find one or more additional Camera Units with power adapters.
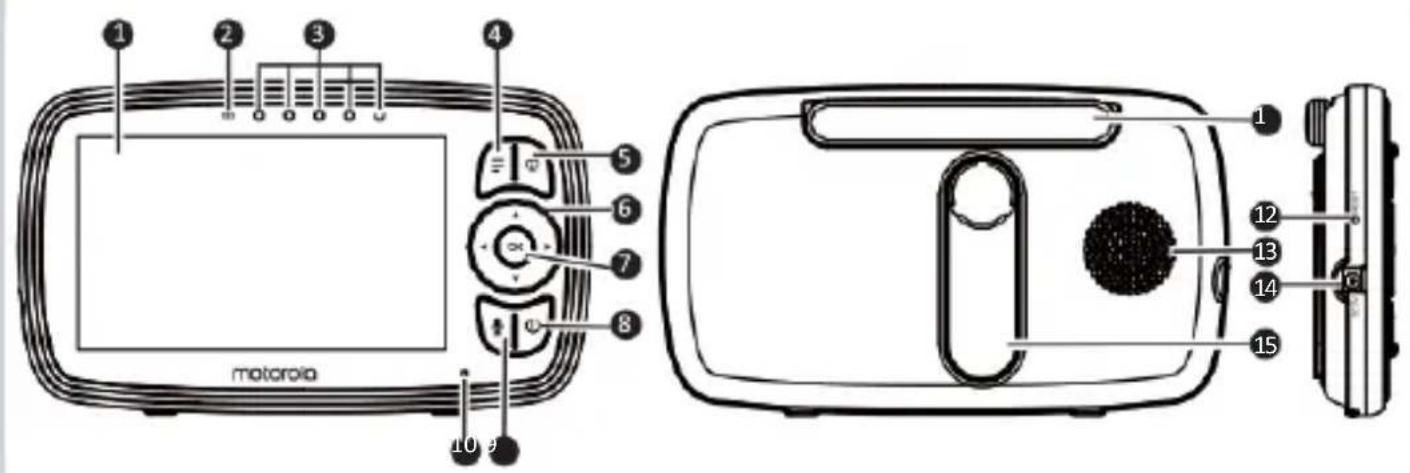
Overview of the Parent Unit
-
Display (LCD screen)
-
Parent Unit ON/OFF and
Charging LED
Red when the parent unit is ON.
Purple when electrical outlet connected.
Blue when off and connected to electrical outlet.
-
Audio Level LEDs (Green, Green, Amber, Red, Red)
-
MENU button

Press to open / close the Menu options.
- VIDEO ON/OFF button

Press to
turn the LCD screen ON/OFF (Note: audio is maintained.)
- Navigation button


Move Up/Down/Right/Left menu options.
Adjust Volume level and Brightness
-
OK button
-
Power button
Press and Hold to turn the Parent Unit ON/OFF.
- TALK button

Press and hold to speak to your baby.
-
Mocrophone
-
Antenna
-
RESET button (recessed - use small pin)
-
Speaker
-
Power Socket
-
Stand
Parent Unit menu icons
 | Signal Level (5 Levels) |
| [S4H4] | Night Vision Mode (Video also changes to Black/White). |
| [4862] | Talk Mode On. |
| [48C7] | Indicates the screen off timer is set. |
| [48A4] | Volume Level Control (8 Levels). |
| [50K4] | No Baby Unit detected. |
| [52E04] | Battery Level Indication (4 Levels). |
| [7A17] | Zoom Level Control (1X, 2X). |
| [7A2] | LCD Brightness Level Control (8 Levels). |
| [01C7] | Lullaby Control (5 Song Selections). |
| [XGK4] | Alarm Setting (6h, 4h, 2h, OFF)On status bar, indicates alarm set, and when flashing, that alarm time has been reached or missed. |
| [1C78] | Temperature scale select (°C/°F)Readings display in BLUE, but turn RED if >29 °C / 84 °F or < 14 °C / 57 °F.Displays HH °C / °F if >36 °C / 97 °F. Displays LL °C / °Fif < 1 °C / 34 °F. |
| [39A5] | Camera Control (scan , view , add , del ). |
| [4427] | Set Screen Off Timer (Off 5 mins, 30 mins, 60 mins). |
| [5487] | View multiple cameras on screen. Available when you have more than 1 Baby Unit (Camera). |
| [5342] | Home page of Hubbleconnect, Scan the QR code to download the Hubble Connected App on Smartphone or tablet. |
Overview of Your Baby Unit
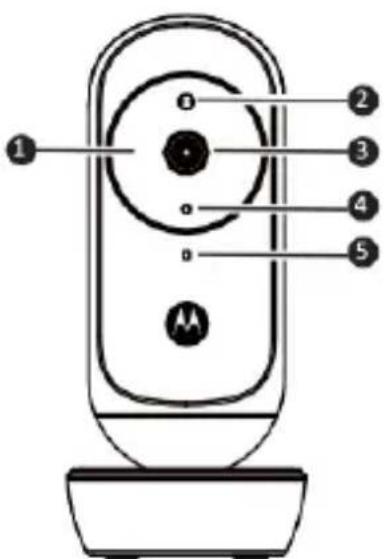
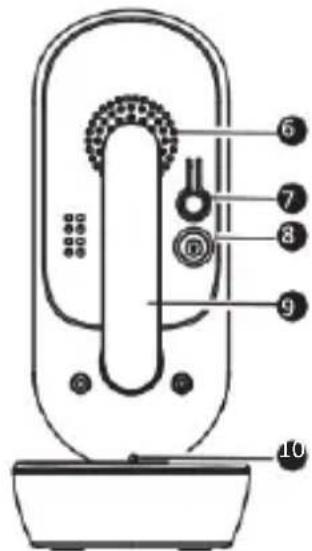
- Infrared LEDs (x 8, for night vision)
- Photo Sensor (Night Vision Mode)
- Camera Lens
-
Power/Link indicator
-
High Sense Microphone
- Speaker
- PAIR button
- Power Socket
- Antenna
- Temperature Sensor
Important guidelines for installing your Digital Video Baby Monitor
- To use your Baby Unit and Parent Unit together, you must be able to establish a radio link between them, and the range will be affected by environmental conditions.
- Any large metal object, like a refrigerator, a mirror, a filing cabinet, a metallic door or reinforced concrete, between the Baby Unit and Parent Unit may block the radio signal.
- The signal strength may also be reduced by other solid structures, like walls, or by radio or electrical equipment, such as TVs, computers, cordless or mobile phones, fluorescent lights or dimmer switches.
- Other 2.4GHz products, such as wireless networks (Wi-Fi® routers), Bluetooth™ systems, microwave ovens or other Baby Monitors, may cause interference with this product, so keep the Baby Monitor at least 5ft(1.5m) away from these types of product, or switch them off if they appear to be causing interference.
- If the signal is weak, try moving the Parent and/or the Baby Unit to different positions in the rooms.
Table of contents
- Safety Instructions ....8
- Getting Started....10
2.1 Connecting the Power Supply for the Baby Unit....10
2.2 Connecting the Power Supply of the Parent Unit.... 10
2.3 Desktop Stand of the Parent Unit ....11
2.4 Registration (Pairing)....12
- Using the Baby Monitor 13
3.1 Setting Up ....13
3.2 Night Vision Mode ....13
3.3 Talk Mode....13
3.5 Video ON/OFF....13
3.6 Temperature Display (HH °C / °F or LL °C / °F)....14
- Parent Unit Menu Options....14
4.1 Volume....14
4.2 Zoom....14
4.3 Brightness ....14
4.4 Audio Playlist.... 14
4.5 Alarm....15
4.6 Camera Control.... 15
4.6.1 Add (pair) a camera 15
4.6.2 View a camera....16
4.6.3 Delete a camera....16
4.6.4 Scan camera....17
4.7 Temperature.... 17
4.8 Power Saving mode....18
4.9 View multiple cameras on screen 18
- Wi-Fi® Internet Viewing 19
- Camera Functions.... 24
- Working with PC/Notebook 26
8 Procedure for Resetting the Camera 26
9 Disposal of the Device (environment)....27
10 Cleaning....27
11 Help 28
12. General Information....36
13. Technical Specifications....42
1. Safety Instructions

WARNING:
Strangulation Hazard: Children have STRANGLED in cords. Keep this cord out of the reach of children (more than 3ft (1m) away). Never use extension cords with AC Adapters. Only use the AC Adapters provided.
Wi-Fi® CAMERA UNIT SET UP & USE:
- Choose a location for the Baby Unit that will provide the best view of your baby in his/her crib.
- Place the Baby Unit on a flat surface, such as a dresser, bureau or shelf, or mount the Baby Unit on a wall securely using the keyhole slots in the underside of the stand.
• NEVER place the Baby Unit or cords within the crib.
WARNING
This Baby Monitor is compliant with all relevant standards regarding electromagnetic fields and is, when handled as de-scribed in the User's Guide, safe to use. Therefore, always read the instructions in this User's
Guide carefully before using the device.
- Adult assembly is required. Keep small parts away from children when assembling.
• This product is not a toy. Do not allow children to play with it.
• This Baby Monitor is not a substitute for responsible adult supervision. - Keep this User's Guide for future reference.
- Keep the cords out of reach of children.
• Do not cover the Baby Monitor with a towel or blanket. - Test this monitor and all its functions so that you are familiar with it prior to actual use.
• Do not use the Baby Monitor in damp areas or close to water. - Do not install the Baby Monitor in extreme cold or heat, direct sunlight, or close to a heat source.
- Only use the chargers and power adapters provided. Do not use other chargers or power adapters as this may damage the device and battery pack.
- Do not touch the plug contacts with sharp or metal objects.
- Connect the power adapters to easily accessible electrical sockets.
CAUTION
There is a risk of explosion if the battery is replaced by an incorrect type. Dispose of used batteries according to their instructions. Use only the rechargeable battery pack with rating: 3.7V 1200mAh.
2. Getting Started
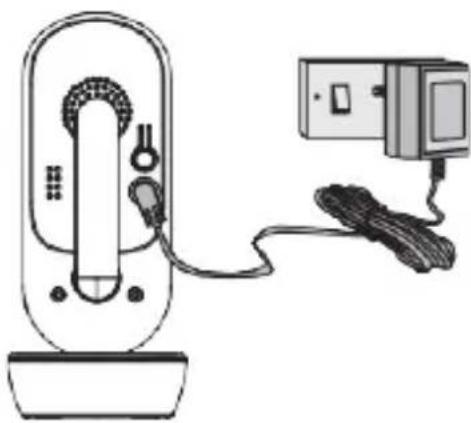
2.1 Connecting the Power Supply for the Baby Unit
natural_image
Line drawing of a handheld device connected to an electrical outlet (no text or symbols)- Insert the DC plug of the power adapter into the DC socket on the back of the Baby Unit.
- Connect the other end of the power adapter to a suitable electrical outlet.
- The baby unit turns on and the power indicator lights in Blue colour.
Note
Only use the supplied power adapter (DC5V/1000mA).
2.2. Connecting the Power Supply of the Parent Unit.
A rechargeable battery (Lithium ion battery 2000mAh) inside the Parent Unit allows you to move it without losing the link and picture from the Baby Unit. We recommend charging the for at least 16 hours before first use, and when the Parent Unit indicates the battery is low.

natural_image
Line drawing of a vintage camera with attached cable and display screen (no text or symbols)- Connect the small plug of the power adapter to the parent unit and the other end to the electrical outlet. Only use the enclosed adapter (5VDC/1000mA).
- Press and hold the O button to turn the Parent unit on, the Parent unit and Baby unit are automatically linked and ready to use.
NOTE:
When the Baby and Parent Units are both turned on and within range, the Parent Unit should show a color image from the Baby Unit camera, but if the room is dark, the image will be in black and white, with an 📧icon showing, due to the infra-red illumination by the Baby Unit.
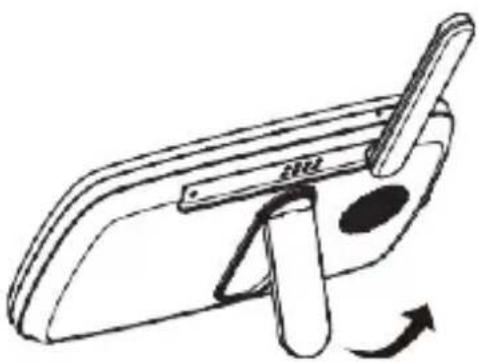
2.3. Desktop Stand of the Parent Unit
- The parent unit comes with a desktop stand attached to the back of the parent unit.
- To place the parent unit on a desk, simply pull out the stand as shown.
natural_image
Line drawing of a mechanical device with a lever and rotating arrow (no text or symbols)NOTE
Place the parent unit on a flat, even surface.
2.4 Registration (Pairing)
The Baby Monitor is pre-registered to your Parent Unit. You do not need to register it again unless the Baby Unit loses its link with the Parent Unit.
To re-register your Baby Unit, or register a new Baby Unit, follow the procedures below:
- Press the M button and the menu bar will pop up.
-
Press the < LEFT button or > RIGHT button until is highlighted, and the del/ + add/ view/ scan menu will pop up.
-
Press the UPbuttonor—DOWNbuttontoselect +add, and press the O button to confirm.
-
Camera x_1 / 2 / 3 / 4 will pop up. Press the + UP button or - DOWN button to select the desired Camera, and press the O button to start searching for a camera unit.
Note: If a camera is currently paired with the Parent Unit, its camera location (with a * against it) cannot be selected for a new registration.
- Press and hold the PAIR button on the back of the Baby Unit until the Parent Unit finds the camera, beeps and PAIR OK appears on the screen. The video from the camera will then appear.
NOTE
A camera can only be registered to one Parent Unit at any one time.
3. Using the Baby Monitor
3.1 Setting Up
Place the Baby Unit in a convenient location (e.g. on a table) and point the camera lens towards the area you want to monitor.
Adjust the angle of the Baby Unit's camera until you are satisfied with the image shown on the Parent Unit.
NOTE
Do not place the Baby Unit within the baby's reach! If there is inter-ference with the picture or sound, try moving the units to different locations, and ensure they are not close to other electrical equipment.
3.2 Night Vision Mode
The Baby Unit has 8 high-intensity infrared LEDs for picking up clear images in the dark. When the built-in photo sensor on the top of the Unit detects a low level of ambient light, the LEDs will automatically activate and the screen on the Parent Unit will display in black and
white. The 📄 icon will be displayed at the top of thescreen.
3.3 Talk Mode
Press and hold the TALK button T on the Parent Unit to talk to your baby through the Baby Unit's loudspeaker.
The T icon will be displayed at the top of the LCD screen.
3.4 Video ON/OFF
Press VVIDEO On/Off button to turn the LCD screen on or off, whilst still leaving the audio monitor on.
3.5 Temperature Display (HH °C / °F or LL °C / °F)
The temperature reading from the temperature sensor at the back of the Baby Unit will be displayed at the top of the LCD screen. The readings will turn RED if the temperature goes above 29^ C / 84^ F or below 14^ C / 57^ F. The reading will change to HH ^ C / ^ F if the temperature goes above 36^ C / 97^ F. The reading will change to LL
°C / °F if the temperature goes below 1°C / 34°F.
4. Parent Unit Menu Options
4.1 Volume
Press the Left or Right button to adjust the volume level.
The icon will pop up and you can select the desired volume from level 0\~8. (The default volume level setting is level 5, and level 0 is OFF.)
4.2 Zoom
-
Press the M button and the menu bar will pop up with highlighted.
-
Press the + UP button or - DOWN button to select 1X or 2X zoom. (The default setting is 1X.)
4.3 Brightness
Press the UPbuttonor—DOWNbuttontoselectthedesired brightness from level1\~8.(Thedefaultbrightnessislevel4.)
4.4 Audio Playlist
You can playback audio content - Lullabies, Soothing Sounds and Audio Book (English only) on the Baby Unit. The audio content can be downloaded and stored in the Baby Unit via Hubble App. You have 10 preloaded lullabies/soothing sounds and 10 audio books in the Baby Unit.
4.4.1 Lullaby/Soothing Sounds Playback
- Tap on M button then Scroll Left/Right to select ➕ option at the menu bar.
- Scroll Up or Down to select 📞 then confirm with ⬦ button.
- Press+UPbuttonor-DOWNbuttontoviewthedesired Lullaby/SoothingSounds. The song names appear on the screen.
- Press O button to play the selection.
4.4.2 Audio Book (English only) Playback
- Tap on M button then Scroll Left/Right to select the menu bar.

option at
- ScrollUpor Downtoselect
then confirm with O button.
- Press+ UPbuttonor—DOWNbuttontoviewthedesiredAudio Book. The book titles appear on the screen.
- Press O button to play the selection.
4.4.3 Stop Playback
- Tap on M button then Scroll Left/Right to select ➕ option at the menu bar.
- ScrollUp or Down to select 📄 or 🌘 then confirm with Ⓧ button.
- Press+ UPbuttonor – DOWN buttonuntil"PressOKtostop playing" appearsonscreenthenconfirmwithO button to stop.
- Press M button to exit.
4.5 Alarm
-
Press the M button and the menu bar will pop up.
-
Press the
RIGHTbuttonuntilis highlighted. -
Press the+UPbuttonor-DOWNbuttontoselectthealarm time (6h, 4h, 2h). (The default setting is Alarm OFF.)
-
If an alarm time is selected, the Parent Unit will beep for about 45 seconds after every 6, 4 or 2 hour period.
4.6 Camera Control
4.6.1 Add (pair) a camera
- Press the M button and the menu bar will pop up.
- Press the < LEFT button or > RIGHT button until is highlighted, and the del/ + add/ view/ scan menu will pop up.
- Press the UPbuttonor-DOWNbuttontoselect + add, andpress the O button to confirm.
- Camera *1 / 2 / 3 / 4 will pop up. Press the + UP button or
- DOWN button to select the desired Camera, and press the O button to start searching for a camera unit.
Note: If a camera is currently paired with the Parent Unit, its camera location (with a * against it) cannot be selected for a new registration.
- Press and hold the PAIR button on the underside of the Baby Unit until the Parent Unit finds the camera, beeps and PAIR OK appears on the screen. The video from the camera will then appear.
NOTE
A camera can only be registered to one Parent Unit at any one time.
4.6.2 View a camera
- Press the M button and the menu bar will pop up.
- Press the < LEFT button or > RIGHT button until is highlighted, and the x del/ + add/ view/ scan menu will pop up.
- Press the+UPbuttonor- DOWNbuttontoselect add, and press the O button to confirm.
- Camera *1 / 2 / 3 / 4 will pop up. Press the + UP button or - DOWN button to select the desired Camera, and press the O button to view the picture from that camera.
Note:
Only camera locations with a * can be selected.
TIP
You can also press the OK button repeatedly to select the available camera options from *1 / 2 / 3 / 4, scan.
4.6.3 Delete a camera
- Press the M button and the menu bar will pop up.
-
Press the
RIGHTbuttonuntil highlighted, and the del/ + add/ view/ pop up. scan menu will -
Press the+ UPbuttonor- DOWNbuttontoselect press the O button to confirm.
x del, and
-
Camera *1/2/3/4 will pop up, press the + UP button or - DOWN button to select the desired Camera, and press the O button.
-
Press the+ UPbuttonor- DOWNbuttontoselect pressthe X, then O buttonto delete that registration.
NOTE
You are not allowed to delete the camera if there is only one registered camera in the system.
4.6.4 Scan camera
This function is only available when you have more than 1 Baby Unit (Camera).
-
Press the M button and the menu bar will pop up.
-
Press the
RIGHTbutton until is highlighted, and the X del/ + add/ view/ pop up. scan menu will -
Press the+ UPbuttonor- DOWNbuttontoselect scan, and press the O button to confirm.
-
The screen will then display images from different registered cameras in a loop of Camera x_1 / 2/ 3/ 4 every, changing about 12 seconds.
TIP:
You can also press the O button repeatedly to select the available camera options from *1/2/3/4, scan.
4.7 Temperature
- Press the M button and the menu bar will pop up.
- Press the
RIGHTbuttonuntil is highlighted. - Press O, then +UP / -DOWN to select °C or °F.
4.8 Power Saving mode
- Press the M button and the menu bar will pop up.
-
Press the
RIGHTbuttonuntil V is highlighted. -
Press the + UP button or - DOWN button to select auto video off after 5 mins, 30 mins or 60 mins (if operating on batteries only).
NOTE
The audio will remain and you can press any key to switch the video back on.
4.9 View multiple cameras on screen
This function is only available when you have more than 1 Baby Unit (Camera). When the Split Screen function is On, you can view multiple cameras on the screen.
- Press the M button and the menu bar will pop up.
-
Press the< LEFTbuttonor>RIGHTbuttonuntil is highlighted.
-
Press+ UP button or — DOWN button to select Split Screen On

- WhentheSplitScreenfunctionisOn,youcanpressthe
RIGHT button/+ UP button/−DOWN button to switchbetweencameras toheartheaudiofromtheselected camera.
5. Wi-Fi® Internet Viewing
5.1 Minimum System Requirements
Android™ System
• Version 5.0 or above
iPhone®/iPad® iOS
• Version 9.0 or above
High Speed (Wi-Fi®) Internet
- At least 0.6 Mbps upload bandwidth per camera (you can test your internet speed on this site: http://www.speedtest.net)
5.2 Getting started - ConnectingDevices
How does it work?
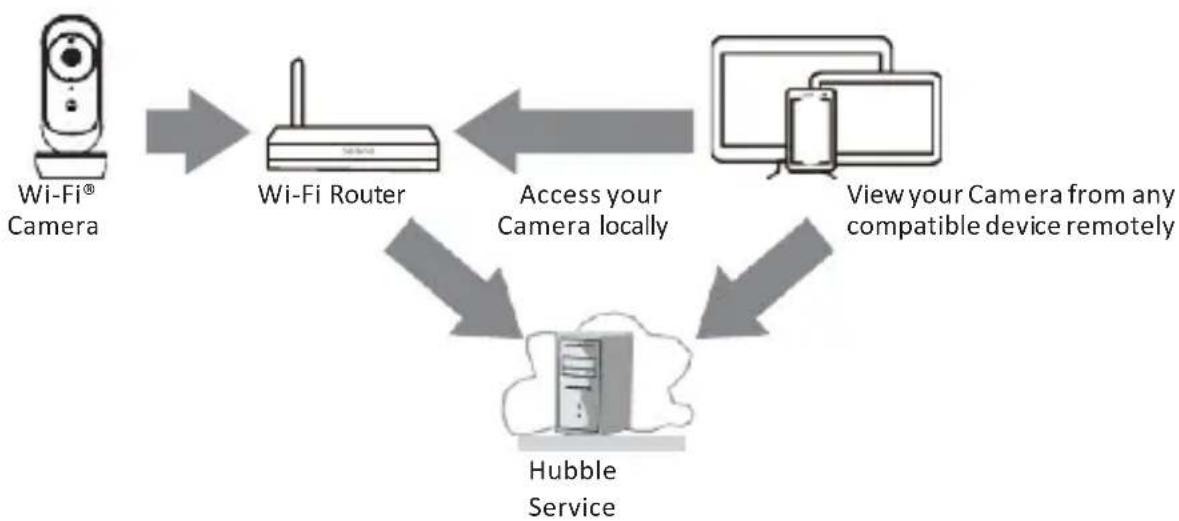
flowchart
graph TD
    A["Wi-Fi® Camera"] --> B["Wi-Fi Router"]
    B --> C["Access your Camera locally"]
    C --> D["Hubble Service"]
    D --> E["View your Camera from any compatible device remotely"]
When a user tries to access the Camera, our Hubble server authenticates the user's identity and permits access to the Camera.
5.3 Setup
Connect the Wi-Fi® Camerato the PowerAdapter, then plug into mains power. The Camera must be within range of the Wi-Fi® router with which you want to connect. Make sure the password of the router is available for entering during the in-app setup process.
Status of LED Indication:
- Pair / Setup state: LED is Blue and Flashing.
- Unconnected state: LED is Red and Flashing.
- Connected state: LED is Blue and always on.
- Video streaming: LED is Blue and Flashing.
Note: You can only setup via a compatible smartphone or tablet and not via a PC.
5.4 UserAccount and Camera Setup on Compatible Devices What you need
- Wi-Fi ^ Camera Unit
• Power adapter for the Camera
• Device with Android™ or iOS system
5.4.1 Power ON and Connect the Camera
- Switch the parent unit off before connect the camera to Wi-Fi®.
- Connect the power adapter to mains power and insert the plug into the power socket on the back of the Camera Unit, the unit turns on.
5.4.2 Download Hubble Connected App

natural_image
QR code with a central logo of six colorful dots (no text or symbols)
- Scan the QR code with your smart device and download Hubble Connected App from the App Store for iOS devices or from the Google Play™ Store for Android™ devices.
• Install Hubble Connected App on your device.
5.4.3 Sign up with Hubble on your smart device
- Ensure that your smart device is connected to your Wi-Fi ^ router.
- Run Hubble Connected App, tap Sign Up with Hubble (fig. A1), read through the Privacy Policy, Terms and Conditions, by signing up you agree to our terms of service before tap Done (fig. A2), enter your account information to sign up with Hubble.
Note:
If you already have a Hubble App account, please tap Log in with Hubble to go to the next steps.

A1
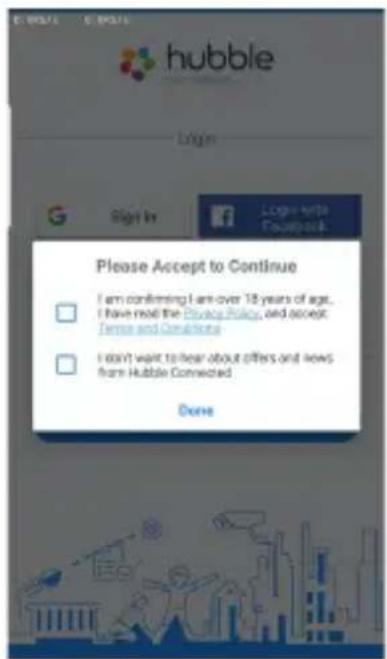
A2
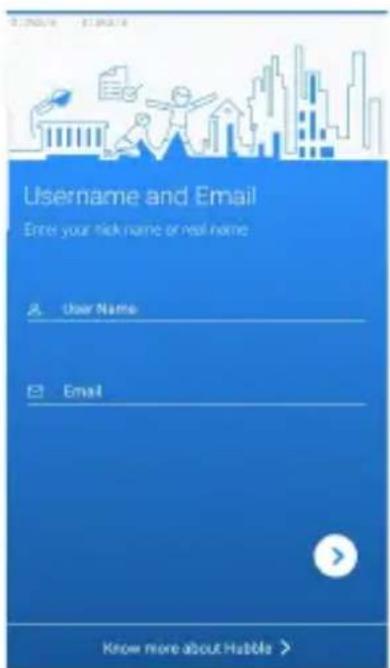
5.4.4 Add the Camera to your account
- Log in your Hubble Account by entering "User Name" and "Password" (fig. A3).
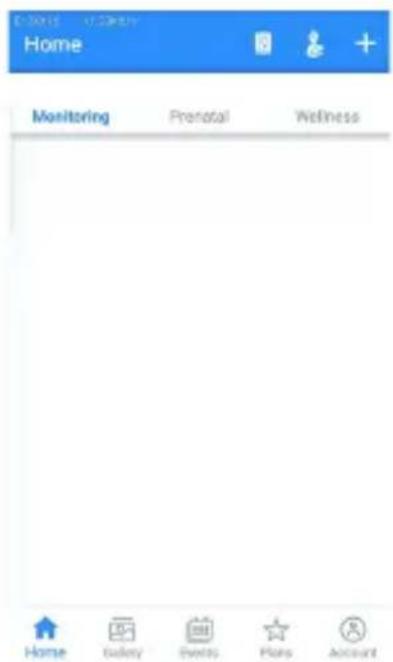
- Tap ⊕ on the screen of your device to add new Camera (fig. A4)
A3
A4
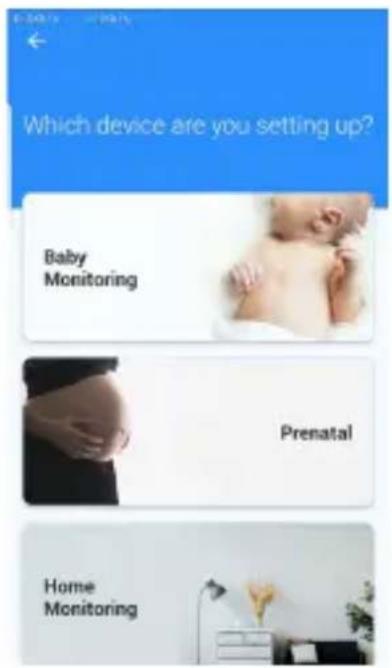
• To select your device for setting up by tapping Baby Monitoring (fig. A5).
- Tap EASE44CONNECT to add the new camera (fig. A6).
A5 A6
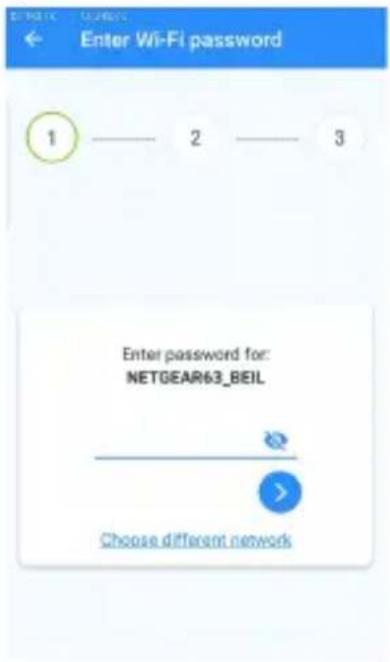
- The following setup instructions will appear on the screen, select your Wi-Fi network and enter "Password" (fig. A7).
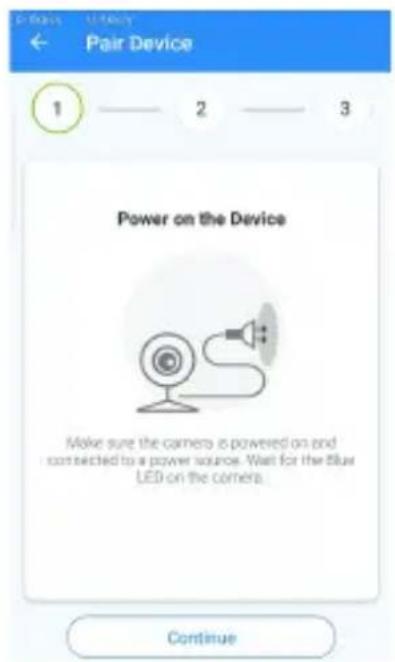
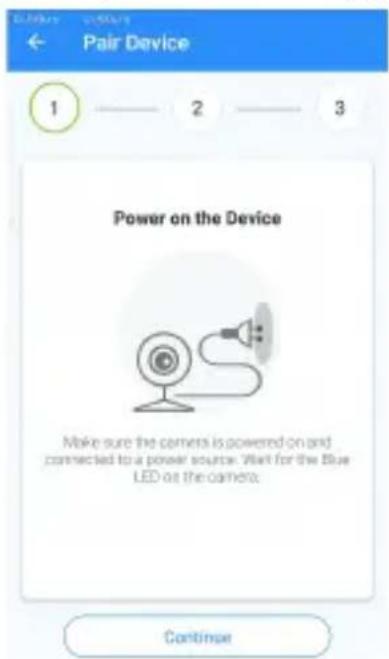
• Power on your camera and wait for the Blue LED flashing on the camera (fig. A8)
A7 A8
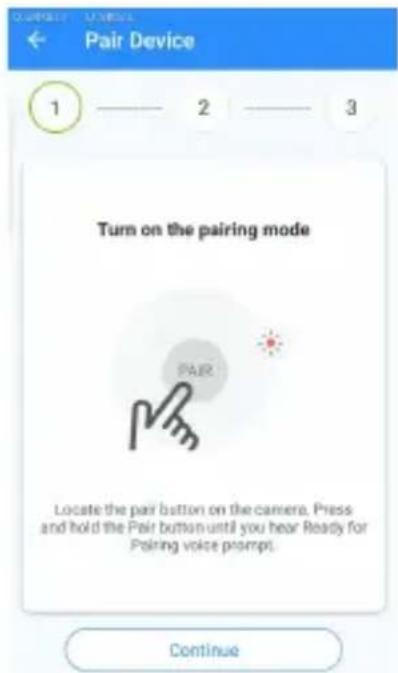
- PressandholdthePAIRbuttonatthesideofCamera,youwillhearavoice prompt "ReadyforPairing" then tapContinue (fig. A9)
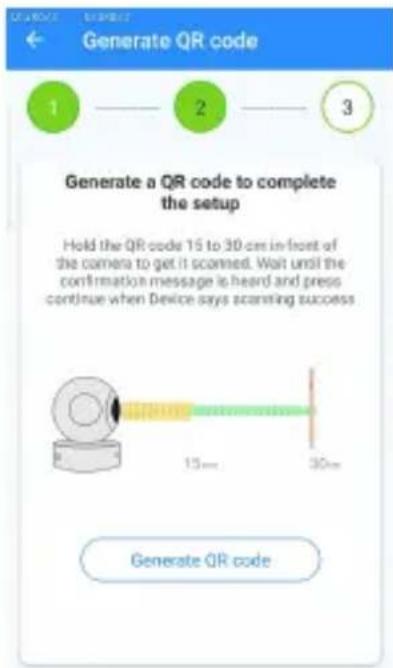
- TapGenerateQRcodeonyourdeviceandholdtheQRcode15to30 cminfront of Camera togetscannedtillyouwillhearconfirmation message "Scanning Success" from your device.(fig. A10)
A9 A10
- It will take a few minutes for the Camera to connect to the Wi-Fi® network before showing the connection status (fig. A11).
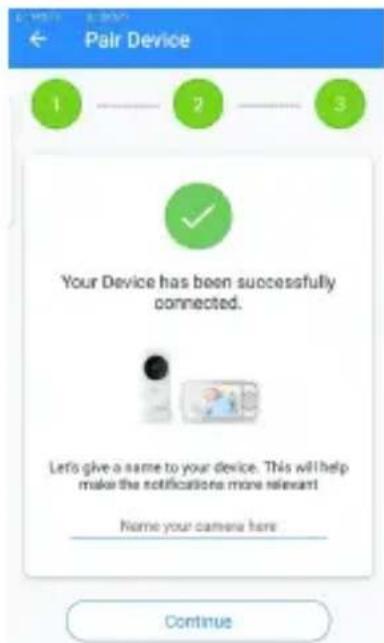
• The Camera has been successfully connected, name your Camera (fig. A12).
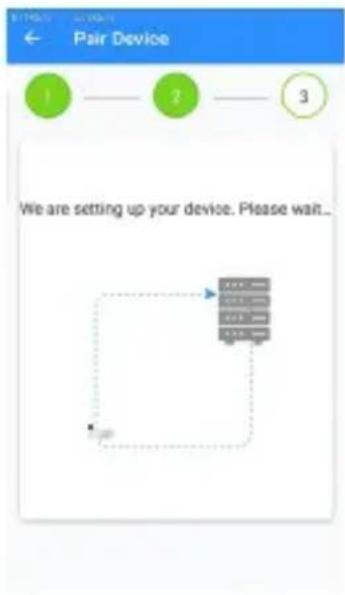
flowchart
graph TD
    A["1"] --> B["2"]
    B --> C["3"]
    style A fill:#99ccff,stroke:#333
    style B fill:#99ccff,stroke:#333
    style C fill:#99ccff,stroke:#333
    note right of A: We are setting up your device. Please wait...
A11 A12
6. Camera Functions
6.1 Connecting the Camera Unit to power
- Connect the power adapter to mains power and insert the plug into the power socket on the back of the Camera Unit.
- The Blue LED will illuminate after approximately 30 seconds if the camera is set up. The Red LED will flash if the camera is not set up. (Note: To switch off the device, unplug the power supply.)
• Run the Hubble for Motorola Monitors App on your smart device.
6.2 Overview of the Features on Hubble App
 | Event History | Tap Event History to access the video record list that is triggered by Motion or Sound detection.Delete Events Tap to delete selected event(s). |
 | Photo/Video | Take a photo or record a video from your Camera.Tap the Video icon to activate Video function. Tap and hold the red button  to start recording and release to stop.Tap the Camera icon to start recording and release to stop.Tap the Camera icon  witch to Camera mode. You can capture photos from Camera view.Note:Photos and videos will be stored in the internal flash memory of your smart de-vice, and can be accessed via the Galleryor Media Player (Android Device). Toplay videos, please use the Hubble App. witch to Camera mode. You can capture photos from Camera view.Note:Photos and videos will be stored in the internal flash memory of your smart de-vice, and can be accessed via the Galleryor Media Player (Android Device). Toplay videos, please use the Hubble App. |
 | Lullabies | Tap to access the Melody menu and select one of the 10 pre-set melodies you wish to play on your Camera Unit.Tap to access the Soothing sounds/Audio books or Personal recordings. |
 | Talkback | Tap to activate the function. Press the round button once to speak through the Camera Unit. Toggle the button again to listen to the audio feedback from the Camera Unit. |
 | Speaker | Tap to toggle speaker on or off. |
 | Setting | You can change the Camera settings bytapping on the Settings icon. |
 | Add Camera | Enter Add Camera procedures. |
7. Working with PC/Notebook
- Go tohttp://www.hubbleconnected.com/motorola/login/
- Enter your User Name and Password and then click Login if you have already created an account.
- Click on the Camera list paired in your account via Android™ device or iPhone®/iPad® and the Camera view will appear on screen. You can easily stay connected with your favorite people, places and pets with live video streaming.
- On the website, you can change the Settings by following the Menu instructions.
8. Procedure for Resetting the Camera
Note: If your Camera is moved from one router (e.g. home) to another (e.g. office) or you have Camera setup issues, then the Camera must be reset. Please reset the Camera with the following procedures:
- Press and hold the PAIR button approximately 20 seconds, you will hear a long beep thence release PAIR button, wait for the Camera Unit to complete an internal reset procedure. The Red LED will begin to flash when the Camera Unit is reset successfully.
- You can add your Camera again by following the steps in section 5.4.3 for Android™ devices or in section 5.5.3 for iOS devices.
9. Disposal of the Device (environment)
At the end of the product life cycle, you should not dispose of this product with normal household waste. Take this product to a collection point for the recycling of electrical and electronic equipment. The symbol on the product, user's guide and/or box indicates this.

Some of the product materials can be re-used if you take them to a recycling point. By reusing some parts or raw materials from used products you make an important contribution to the protection of the environment.
Please contact your local authorities in case you need more information on the collection points in your area.
The internal battery should be disposed of with the Parent unit in an environmentally-friendly manner according to your local regulations.
10. Cleaning
Clean the Baby Monitor with a slightly damp cloth or with an anti-static cloth. Never use cleaning agents or abrasive solvents.
Cleaning and care
- Do not clean any part of the product with thinners or other solvents and chemicals – this may cause permanent damage to the product which is not covered by the warranty.
- Keep the Baby Monitor away from hot, humid areas or strong sunlight, and don't let it get wet.
- Every effort has been made to ensure high standards of reliability for your Baby Monitor. However, if something does go wrong, please do not try to repair it yourself – contact Customer Service for assistance.
IMPORTANT
Always switch off and disconnect the power adapter before cleaning your baby monitor.
11. Help
Display
• Try recharging the battery pack.
- Reset the Units. Unplug both the Units' electrical power, then plug them back in.
• Is the Unit switched on?
- Press and hold the ON/OFF button O on the Parent Unit for 3 seconds to switch it ON.
- Is the correct camera selected? Change the camera number, if necessary.
- Is the video display turned on? Press the VIDEO ON/OFF button V to turn it ON.
- When operating using batteries only, the display will go blank after 5 minutes or 30 minutes or 60 minutes to save power (depending on video settings). The Unit is still active and will give you audio alerts. You can reactivate the screen by pressing any button.
Registration
If the Baby Unit has lost its link with the Parent Unit
- If the Baby Unit is too far away it may be going out of range, so move the Baby Unit closer to the Parent Unit.
- Reset both the Parent Unit and Baby Unit by disconnecting them from the electrical power. Wait about 15 seconds before reconnecting. Allow up to one minute for the Baby Unit and the Parent Unit to synchronize.
• See 2.3 Registration (Pairing), if there is a need to re-register the Units.
Interference
Noise interference on your Parent Unit
- Your Baby and Parent Units may be too close. Move them further apart.
- Make sure there is at least 1 to 2m between the 2 Units to avoid audio feedback.
-
If the Baby Unit is too far away, it may be out of range. Move the Baby Unit closer to the Parent Unit.
-
Make sure that the Baby and Parent Units are not near other electrical equipment, such as a television, computer or cordless/ mobile telephone. Move the Baby Unit or Parent Unit 1.5 metre away from other electrical equipment.
- Use of other 2.4 GHz products, such as wireless networks (Wi-Fi® routers), Bluetooth™ systems, or microwave ovens, may cause interference with this product. Keep the Baby Unit or ParentUnit at least 1.5 metre away from these types of products, or switch them off if they appear to be causing interference.
- If the signal is weak, try moving the Parent and/or Baby Unit to different positions in the rooms.
Noise interference on your device
- To avoid background noise or echoes, ensure that there is enough distance between your device and the Wi-Fi® Camera Unit.
- Use of other 2.4 GHz products, such as Bluetooth™ systems or microwave ovens, may cause interference with this product. Keep the Wi-Fi® Camera Unit at least 1.5 metre away from these types of products, or switch them off if they appear to be causing interference.
Lost connection
- Check your Wi-Fi® settings. If necessary, reconnect your Wi-Fi®. Ensure that the Wi-Fi® Camera Unit is switched ON. Wait a few minutes to make the connection with the Wi-Fi® system.
If you forgot your password
- If you do not remember your password, tap Forgot Password and submit your e-mail address. A new password will be sent to your e-mail address immediately.
Troubleshooting for Wi-Fi® Internet Viewing
| Category | ProblemDescription / Error | Solution |
| Account | I am unable to login even after registra- tion. | Please check your user name and password. |
| Account | I receive an error message saying: “Email ID is not registered”. | Please ensure that you have registered with us. Tap Create Account to create an account. |
| Account | What do I do if I forgot my pass-word? | Click on the “Forgot Password” link on https://app.hubblecon- nected.com/#lostpassword OR on your AndroidTM or iOS appli- cation. An email will be sent to your registered email address. |
| Account | I am unable to receive a new password although I have used the “Forgot password” option. | 1. The e-mail might have been sent to your Junk Mail Fold- er. Please check your Junk Mail Folder.2. There might be a delay in getting your e-mail. Please wait a few minutes and refresh your email account. |
| Connectivi- ty Issues | I get a message: We are having problems access- ing your camera. This could be due to lack of internet connection. Please wait and try again later. | 1. Please try again in a few minutes.This could be be- cause of any issue with your internet connection.2. If the problem remains, please restart your Camera to check if this fixes the problem.3. Please restart your Wireless Router. |
| Viewing Camera | When I am in “re- mote mode”, the video stops after 5 minutes. How do I view for longer? | When you are accessing your Camera via a network different from your home network (over the internet) your video times out after 5 minutes.You can click on the Camera again from the AndroidTM/iOS application to start streaming again.If you are accessing from your webbrowser, then you can press on the Reload button to start viewing your Camera video stream again. |
| Features | The sound alert setting threshold is not right. | You can Adjust Sound Sensitivi- ty to trigger notifications under Camera Setting menu. |
| Setting Up | While I am adding a new Camera to my account, I am not able to find any Cameras to add. | If you are trying to add a Camera which has previously been added into your account or another account, you will first have to reset the Camera. This can be done by following the re-setting procedure stated in section 6 of this guide.Switch the parent unit off before connecting the camera to Wi-Fi®. |
| General | What are the supported browsers for accessing from my PC/ Mac? | We recommend using Google Chrome 24 or above. However the following browsers are also supported: Internet Explorer 9.0 or above (for PC), Safari 6.0 or above (for Mac) or Firefox 18.0 or above (both PC or Mac). |
| General | What is the significance of the camera LED? | The LED indicates the following status:LED flashing Red: Your Camera is booting up. After a voice prompt the camera is booted up and ready for pairing.LED Cycling Blue/Red: Your camera is in pairing mode.LED Solid Blue: The camera is paired and set up to your account.LED Flashing Blue: The camera is live streaming.LED Off - No Power to camera. |
| Connectivi- ty issues | I am not able to access my Camera. | Please check if the Camera is within Wi-Fi® range. Please try to move the Camera closer to the router for better Wi-Fi® connectivity and try again. |
| Setting Up | During setup on devices for AndroidTM and iOS, I am not able to find my Camera during the last step and the setup fails. | Please reset the Camera to setup mode and try again. Press and hold the PAIR button on the side of the camera until you hear a beep and voice prompt ‘Ready for pairing’. When the Camera LED is off, this indicates that it is in setup mode. Now restart the setup from your smartphone again. |
| Connec- tivity Issues | Even though I am accessing myCamera from the same Wi-Fi® network, I still find my Camera is shown as remote. I can only access it for 5 minutes at a time. | Please check your wireless router settings. For example, for Buffalo brand routers there is an option called Wireless Isolation. Please disable this option. |
| Camera | When I try to view the Camera, I get a prompt for Camera firmware upgrade. What should I do? | Please upgrade your firmware. This takes around 5 minutes. We push upgrades from time to time to improve the Camera features. |
| General | Which platforms are supported for accessing my Camera? | Minimum requirement: Windows® 7* *Java browser plug-in needed Mac OS® version 10.7 ChromeTM version 24 Internet Explorer® version 9 Safari® version 6 JavaTM version 7 Firefox® version 18.0 Adobe® Flash® Player 15.0 AndroidTM 5.0 iPhone® /iPad® iOS version 9.0 |
| General | I do not hear any sound when I am accessing a remote Camera. | You can tap on the speaker icon in the video stream screen to hear audio. By default the audio is not ON when you are accessing a remote Camera. |
| General | What is the meaning of “Local Camera” and “Remote Camera”? | When you are accessing your Camera from the same wireless network (Home) in which it is configured, it is a Local Camera. When you are accessing your Camera away from your home it is a Remote Camera. You may be using 3G, 4G or 4G LTE or a Wi-Fi® connection outside of your home. |
| General | How do I down- load the App for AndroidTM and iOS devices? | AndroidTM: - Open the Google Play Store on your AndroidTM device. - Select Search - Type in “Hubble for Motorola Monitors” - The results will show the Hub-ble App - Select to install it iOS Device: - Open the App StoreTM - Select Search - Type in “Hubble for Motorola Monitors” - The results will show the Hub-ble App - Select to install it |
| Setting up | When the video is cut off, the application attempts to reconnect and this results in lost sound and choppy video. | You will need to turn off the Auto Lock function of your device to ensure continuous video/audio streaming. |
| Features | How many users can access the Camera at one time? | If you are accessing in Local Mode, two users are supported, after two users all streaming will go through the remote server. This allows for unlimited user access to a single Camera at one time. |
| Connectivi- ty issues | I found interference caused by my other webcam devices. | Video streaming performance is related to internet bandwidth, especially if you have 2 or more video streaming devices that are working through the same router. |
12. Technical Specifications
BABY UNIT
| Frequency | 2400 MHz to 2483.5 MHz |
| Image sensor | color CMOS 2M Pixels |
| IR LED | 8 pcs |
| Operating Temperature | 41°F - 104°F |
| Power Adapter: | Input: 100-240V AC, 50/60Hz, 300mA; Out-put: 5.0V DC, 1000mA |
PARENT UNIT
| Frequency | 2400 MHz to 2483.5 MHz |
| Display | 4.3” diagonal TFT LCD |
| Display Colors | 16.7M color LCD |
| Brightness Con- trol | 5 steps |
| Volume Control | 8 steps |
| Power Adapter: | Input: 100-240V AC, 50/60Hz, 300mA; Out-put: 5.0V DC, 1000mAWARNINGUse only with provided power supply. |
| Battery (built-in) | Lenovo (BL253)3.8V, 2000mAh Lithium-Ion Polymer, rechargeable battery pack WARNINGDo not attempt to replace the battery, but contact customer Service if it needs replacing. |
Specifications are subject to change without prior notice.

motorola
Manufactured, distributed or sold by Binatone Electronics International LTD., official licensee for this product. MOTOROLA and the Stylized M logo are trademarks or registered trademarks of Motorola Trademark Holdings, LLC. and are used under license. Apple logo and Safari are trademarks of Apple Inc., registered in the U.S. and other countries. App Store is a service mark of Apple Inc. Google Play, Android, and Chrome are trademarks of Google Inc. Wi-Fi is a trademark of the Wi-Fi Alliance. All other trademarks are the property of their respective owners. © 2020 Motorola Mobility LLC. All rights reserved.

ersion 1.0
Printed in China

- motorola
- USER'S GUIDE
- "Wi-Fi® Video Baby Monitor
- Welcome...
- Inside the Box
- Overview of the Parent Unit
- Parent Unit menu icons
- Overview of Your Baby Unit
- Table of contents
- Safety Instructions
- WARNING:
- Wi-Fi® CAMERA UNIT SET UP & USE:
- WARNING
- CAUTION
- Getting Started
- Connecting the Power Supply for the Baby Unit
- Connecting the Power Supply of the Parent Unit.
- NOTE:
- Desktop Stand of the Parent Unit
- NOTE
- Registration (Pairing)
- Using the Baby Monitor
- Setting Up
- Night Vision Mode
- Talk Mode
- Video ON/OFF
- Temperature Display (HH °C / °F or LL °C / °F)
- Parent Unit Menu Options
- Volume
- Zoom
- Brightness
- Audio Playlist
- Lullaby/Soothing Sounds Playback
- Audio Book (English only) Playback
- Stop Playback
- Alarm
- Camera Control
- Add (pair) a camera
- View a camera
- TIP
- Delete a camera
- Scan camera
- TIP:
- Temperature
- Power Saving mode
- View multiple cameras on screen
- Wi-Fi® Internet Viewing
- Minimum System Requirements
- Getting started - ConnectingDevices
- Setup
- Status of LED Indication:
- UserAccount and Camera Setup on Compatible Devices What you need
- Power ON and Connect the Camera
- Download Hubble Connected App
- Sign up with Hubble on your smart device
- Add the Camera to your account
- A9 A10
- Camera Functions
- Connecting the Camera Unit to power
- Overview of the Features on Hubble App
- Working with PC/Notebook
- Procedure for Resetting the Camera
- Disposal of the Device (environment)
- Cleaning
- Cleaning and care
- IMPORTANT
- Help
- Display
- Registration
- If the Baby Unit has lost its link with the Parent Unit
- Interference
- Noise interference on your Parent Unit
- Noise interference on your device
- Lost connection
- If you forgot your password
- Technical Specifications
Brand : MOTOROLA
Model : Ease 44 Connect
Category : Baby monitor