
Pro Tools HD Native - Hi-Fi System Avid - Free user manual and instructions
Find the device manual for free Pro Tools HD Native Avid in PDF.


| Type | Professional Audio Interface PCIe Card |
| Dimensions (approx.) | 167.6 mm x 111.2 mm (standard PCIe card) |
| Weight (approx.) | 200 g |
| Power | Via PCIe slot |
| Audio Channels | Up to 64 input and output channels |
| Sample Rate Support | Up to 192 kHz, 24-bit |
| Compatibility | Mac and Windows, Pro Tools HD/Pro Tools software, Core Audio (Mac), ASIO (Windows) |
| Supported Audio Interfaces | HD OMNI, HD I/O, HD MADI (up to 4 interfaces total) |
| Connectivity Ports | 2x DigiLink Mini (for audio interfaces), 1x DigiSerial (for SYNC peripheral) |
| Low Latency Monitoring | Yes, with Pro Tools software |
| Synchronization | Loop Sync input and output for multi-interface setups |
| Included Accessories | 12 ft (3.6 m) DigiLink Mini cable, Registration Card, Installation Guide, Health & Safety Guide |
| Maintenance | Keep vents clear; clean with dry cloth; avoid moisture |
| Safety | Follow all instructions; unplug during storms; service by qualified personnel |
| Repairability | No user-serviceable parts; refer to Avid technical support |
Frequently Asked Questions - Pro Tools HD Native Avid
User questions about Pro Tools HD Native Avid
0 question about this device. Answer the ones you know or ask your own.
Ask a new question about this device
Download the instructions for your Hi-Fi System in PDF format for free! Find your manual Pro Tools HD Native - Avid and take your electronic device back in hand. On this page are published all the documents necessary for the use of your device. Pro Tools HD Native by Avid.
USER MANUAL Pro Tools HD Native Avid
HD Native Installation Guide
Legal Notices
This guide is copyrighted ©2011 by Avid Technology, Inc., (hereafter "Avid"), with all rights reserved. Under copyright laws, this guide may not be duplicated in whole or in part without the written consent of Avid.
003, 96 I/O, 96i I/O, 192 Digital I/O, 192 I/O, 888|24 I/O, 882|20 I/O, 1622 I/O, 24-Bit ADAT Bridge I/O, AudioSuite, Avid, Avid DNA, Avid Mojo, Avid Unity, Avid Unity ISIS, Avid Xpress, AVoption, Axiom, Beat Detective, Bomb Factory, Bruno, C|24, Command|8, Control|24, D-Command, D-Control, D-Fi, D-fx, D-Show, D-Verb, DAE, Digi 002, DigiBase, DigiDelivery, Digidesign, Digidesign Audio Engine, Digidesign Intelligent Noise Reduction, Digidesign TDM Bus, DigiDrive, DigiRack, DigiTest, DigiTranslator, DINR, DV Toolkit, EditPack, Eleven, EUCON, HD Core, HD I/O, HD MADI, HD OMNI, HD Process, Hybrid, Impact, Interplay, LoFi, M-Audio, MachineControl, Maxim, Mbox, MediaComposer, MIDI I/O, MIX, MultiShell, Nitris, OMF, OMF Interchange, PRE, ProControl, Pro Tools, Pro Tools|HD, Pro Tools LE, Pro Tools M-Powered, Pro Tools MP, QuickPunch, Recti-Fi, Reel Tape, Reso, Reverb One, ReVibe, RTAS, Sibelius, Smack!, SoundReplacer, Sound Designer II, Strike, Structure, SYNC HD, SYNC I/O, Synchronic, TL Aggro, TL AutoPan, TL Drum Rehab, TL Everyphase, TL Fauxlder, TL In Tune, TL MasterMeter, TL Metro, TL Space, TL Utilities, Transfuser, Trillium Lane Labs, Vari-Fi, Velvet, X-Form, and XMON are trademarks or registered trademarks of Avid Technology, Inc. Xpand! is Registered in the U.S. Patent and Trademark Office. All other trademarks are the property of their respective owners.
Product features, specifications, system requirements, and availability are subject to change without notice.
Guide Part Number 9320-65048-00 REV A 10/11
Documentation Feedback
At Avid, we are always looking for ways to improve our documentation. If you have comments, corrections, or suggestions regarding our documentation, email us at techpubs@avid.com.
Contents
Chapter 1. Welcome to HD Native....1
HD Native Package 1
HD Native Systems 1
Registration....2
System Requirements and Compatibility....2
Conventions Used in This Guide....2
About www.avid.com 3
Chapter 2. HD Native Hardware Overview .... 5
HD Native PCIe Card....5
DigiLink Mini Cables 5
Avid HD Audio Interfaces 6
Chapter 3. Installing HD Native Hardware 9
Installing the HD Native Card in a Mac Pro 9
Installing the HD Native Card in a Windows Computer.... 11
Connecting Audio Interfaces....12
Installing and Authorizing Pro Tools Software 14
Installing HD Native Hardware Drivers 14
Chapter 4. Configuring Core Audio (Mac OS X Only)....15
Avid Core Audio Driver Capabilities 15
Installing the Core Audio Driver 15
Avid Core Audio Manager 16
Configuring Avid HD Audio Interfaces for Third-Party Applications ..... 19
Configuring the Apple Sound Preferences or Apple Audio MIDI Setup 19
Chapter 5. Configuring ASIO (Windows Only) ...... 21
ASIO Driver Capabilities....21
Installing the ASIO Driver....21
ASIO Driver Control Panel 22
Chapter 6. Low Latency Monitoring with Pro Tools.... 25
Using Low Latency Monitoring.... 25
Configuring Low Latency Monitoring in the I/O Setup 25
Low Latency Monitoring and Bounce To Disk 26
Appendix A. Compliance Information 27
Environmental Compliance 27
EMC (Electromagnetic Compliance).... 28
Safety Compliance 29
ASIO Driver Control Panel 52
Chapter 1: Welcome to HD Native
The HD Native PCIe card provides connectivity for high-definition digital audio recording, editing, signal processing, mixing, and I/O capabilities with Avid Pro Tools ^* software and Avid HD audio interfaces and synchronization peripherals.
HD Native hardware with HD audio interfaces can also be used with Core Audio and ASIO-compatible digital audio software with support for up to 64 channels of I/O.
This guide covers installation of HD Native hardware on Mac and Windows platforms.

For information about installing and authorizing Pro Tools software, see the Pro Tools Installation Guide that came with your Pro Tools software package.
HD Native Package
The HD Native package includes the following:
• H D N at i ve P C I e c a r d
- 12' DigiLink Mini cable for connecting the HD Native card to an audio interface
• Registration Information Card
- This Install Guide, covering installation and configuration of HD Native hardware
- HD Native Quick Setup, covering basic hardware installation
• Health and Safety Guide
HD Native Systems
All HD Native systems consist of the following:
- One of the following software packages (sold separately):
• Pro Tools HD software
• Pro Tools software
- Third-party Core Audio ASIO-compatible software
• H D N at i ve P C I e c a r d
- At least one (up to four) of the following Avid HD audio interfaces (sold separately):
• H D O M N I
• H D I / O
• H D M A D I

Only one HD OMNI can be used in an HD Native system.
Registration
Review the enclosed Registration Information Card and follow the instructions on it to quickly register your purchase online. This is one of the most important steps you can take as a new user. Registering your purchase is the only way you can be eligible to receive:
• Information regarding technical support
• Future upgrade offers
- Limited warranty on hardware
Hardware Warranty
Your warranty can be found on the Registration Information Card.
System Requirements and Compatibility
HD Native hardware can be used with a qualified Mac or Windows computer running Pro Tools HD software, Pro Tools software, or third-party Core Audio- or ASIO-compatible software.
Avid can only assure compatibility and provide support for hardware and software it has tested and approved.
For complete system requirements and a list of qualified computers, operating systems, hard drives, and third-party devices, refer to the latest information on our website:
www.avid.com/compatibility

You can test your HD Native hardware using Avid DigiTest. For more information, see the Avid DigiTest Guide.pdf (available online and also installed with Pro Tools).
Conventions Used in This Guide
All Pro Tools guides use the following conventions to indicate menu choices and key commands:
| Convention Action | |
| File > Save Choose Save from the File menu | |
| Control+N Hold down the Control key and press the N key | |
| Control-click Hold down the Control key and click the mouse button | |
| Right-click Click with the right mouse button | |
The names of Commands, Options, and Settings that appear on-screen are in a different font.
The following symbols are used to highlight important information:

User Tips are helpful hints for getting the most from your Pro Tools system.

Important Notices include information that could affect your Pro Tools session data or the performance of your Pro Tools system.

Shortcuts show you useful keyboard or mouse shortcuts.

Cross References point to related sections in the Pro Tools Guides.
About www.avid.com
The Avid website (www.avid.com) is your best online source for information to help you get the most out of your Pro Tools system. The following are just a few of the services and features available.
Product Registration Register your purchase online.
Support and Downloads Contact Avid Customer Success (technical support); download software updates and the latest online manuals; browse the Compatibility documents for system requirements; search the online Knowledge Base or join the worldwide Pro Tools community on the User Conference.
Training and Education Study on your own using courses available online or find out how you can learn in a classroom setting at a certified Pro Tools training center.
Products and Developers Learn about Avid products; download demo software or learn about our Development Partners and their plugins, applications, and hardware.
News and Events Get the latest news from Avid or sign up for a Pro Tools demo.
Chapter 2: HD Native Hardware Overview
HD Native PCIe Card
The HD Native PCIe card supports up to 64 channels of I/O for direct-to-disk recording and playback, and supports up to 24-bit and up to 192 kHz audio streams. Additionally, the on-board FPGA provides dedicated processing power for mixer configurations and low latency monitoring with Pro Tools.
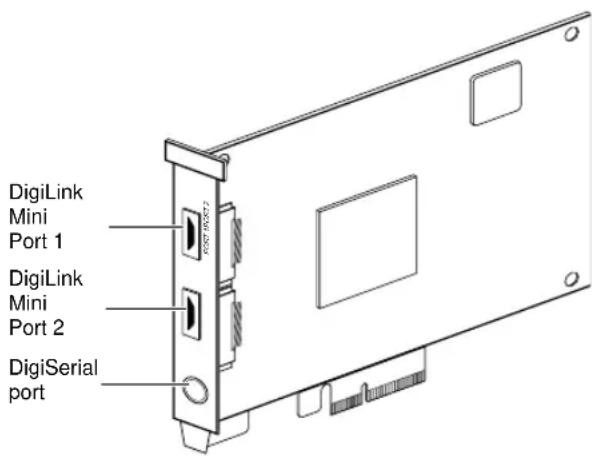
HD Native PCIe card
DigiLink Mini Ports
The HD Native PCIe card includes two DigiLink Mini ports for connecting to Avid HD audio interfaces. Each port provides up to 32 channels of audio input and output for your audio software.
DigiSerial Port
You can connect a SYNC peripheral to the DigiSerial port on the HD Native PCIe card. This connector is an 8-pin mini-DIN.
The DigiSerial port on an HD Native PCIe card does not support MachineControl connections.
DigiLink Mini Cables
Use DigiLink Mini cables to connect HD I/O, HD OMNI, and HD MADI audio interfaces to your HD Native card. There are five different lengths of DigiLink Mini cables:
- 18" (0.46m) (included with HD I/O, HD OMNI, and HD MADI audio interfaces)
- 12' (3.6m) (one included with the HD Native card)
- 25^ (7.62m) (sold separately)
- 50' (15.25m), the maximum length supported for 176.4 kHz and 192 kHz sessions (sold separately)
- 100' (30.5m), the maximum length supported by 88.2 kHz and 96 kHz sessions (sold separately)
Avid HD Audio Interfaces
To record and play audio with Pro Tools, or with a qualified third-party Core Audio-compatible or ASIO-compatible application, you must have at least one Avid HD audio interface connected to the first port of the HD Native card.
HD Native supports up to 4 Avid HD audio interfaces for up to 64 simultaneous channels of audio input and output.
HD OMNI Audio Interface
HD OMNI is a professional digital audio interface designed for use with HD Native systems. HD OMNI provides a compact preamp, monitoring, and I/O solution for music production and recording, and post production studios.

For more information, see the HD OMNI Guide.

Only one HD OMNI can be used in an HD Native system.
HD OMNI Features
HD OMNI provides up to 8 discrete channels of Pro Tools input and output, with 4-segment LED meters for input or output (selectable).
Analog I/O
- 24-bit analog-to-digital (A/D) and digital-to-analog (D/A) converters, with support for sample rates up to 192 kHz
- 2 high-quality Mic/DI preamps (Channels 1–2)
-
2 combined XLR and 1/4-inch TRS front panel inputs for microphone and instrument level input
• 2 XLR back panel microphone inputs -
2 1/4-inch TRS Send and 2 1/4-inch TRS Return back panel jacks for hardware inserts on channels 1 and 2
- 4 analog TRS line level back panel inputs (Channels 1–4)

HD OMNI provides multiple analog input connections, but only provides up to four channels of simultaneous analog input.
- Soft Clip and Curv limiting circuits to protect against clipping on analog input
- 8 channels of analog back panel output using a DB-25 breakout cable (sold separately) with variable output gain
- 2 channels of analog back panel output using TRS (Mirrors channels 1–2 or 7–8 on DB-25 connector)
- Front panel stereo 1/4" headphone jack
Digital I/O
- 8 channels of AES/EBU output (up to 192 kHz Single Wire) using a DB-25 breakout cable (sold separately)
• 2 channels of AES/EBU XLR input (up to 192 kHz Single Wire)
• 2 channels of S/PDIF RCA input and output (up to 192 kHz)
• 8 channels of ADAT TOSLINK input and output
• Support for ADAT S/MUX Optical for sample rates of 88.2 kHz, 96 kHz, 176.4 kHz, and 192 kHz
• Support for two channels of S/PDIF Optical with sample rates of up to 96 kHz
• Real-time sample rate conversion (SRC) on Digital Inputs 1–2 of either AES/EBU, S/PDIF, or Optical (S/PDIF)

SRC is not supported with ADAT S/MUX.
Monitoring
- An additional stereo “CUE” output path in Pro Tools for headphone monitoring from the front panel headphone jack
- Front panel Control Room (MAIN/ALT) and Headphone monitoring volume control
- Flexible monitoring with fold-down from all stereo and surround formats (up to 7.1 surround)
- Input mixer for low latency direct monitoring of a variety of incoming signals (configured in the Pro Tools Hardware Setup)
Synchronization
- Loop Sync input and output for connecting additional Avid HD audio interfaces and peripherals
- External Clock input and output for synchronizing HD OMNI with external Word Clock devices
HD I/O Audio Interface
HD I/O is a multichannel digital audio interface designed for use with HD Native systems. HD I/O features extremely high quality 24-bit analog-to-digital (A/D) and digital-to-analog (D/A) converters, and supports sample rates of up to 192 kHz.
HD I/O comes in three standard configurations:
- 8 x 8 x 8 (8 analog in, 8 analog out, and 8 digital in and out)
- 16 x 16 analog in and out
- 16 x 16 digital in and out
You can also add or remove HD I/O Analog Expansion cards (ADC and DAC) and HD I/O Digital Expansion cards for custom configurations.

See the HD I/O Guide for more information.
HD I/O Features
HD I/O provides up to 16 discrete channels of Pro Tools input and output, with 4-segment LED meters for input and output.
Analog I/O
- Up to 16 channels of 24-bit D/A and A/D converters for superior analog input and output at sample rates of 44.1kHz , 48kHz , 88.2kHz , 96kHz , 176.4kHz , and 192kHz with Analog In and Analog Out HD I/O cards
- Soft Clip and Curv limiting circuits to protect against clipping on analog input
Digital I/O
- Up to 16 channels of 24-bit digital I/O, using AES/EBU, TDIF DB-25, or Optical at sample rates of 44.1kHz , 48kHz , 88.2kHz , 96kHz , 176.4kHz , and 192kHz with a Digital HD I/O card
• Real-time sample rate conversion on digital inputs with a Digital I/O card (up to 16 channels of AES/EBU, Optical, or TDIF) - Support for S/MUX Optical for sample rates of 88.2 kHz and higher
- Support for 2 channels of S/PDIF Optical (enclosed) with sample rates of up to 96kHz
- 2 channels of AES/EBU I/O (enclosed) with support for sample rates up to 192kHz
- 2 channels of 24-bit-capable S/PDIF I/O (enclosed) with support for sample rates up to 192 kHz
Synchronization
- Loop Sync input and output for connecting additional Avid HD audio interfaces and peripherals
- External Clock input and synchronizing HD I/O with external Word Clock devices
Expandability
- Optional addition of I/O cards to expand analog or digital I/O
- Simultaneous use of multiple Avid HD audio interfaces to further expand system input and output (for more information see the Expanded Systems Guide)
HD MADI Digital Audio Interface
HD MADI is a 64-channel, digital audio interface designed for use with HD Native systems. HD MADI supports the Multichannel Audio Digital Interface (MADI) format and sample rates of up to 192 kHz. HD MADI provides simplified connectivity between your HD Native system and MADI-compatible audio equipment, such as routers, digital mixing consoles, and converters.

For more information about HD MADI, see the HD MADI Guide.

To use the full channel capacity of HD MADI, only a single HD MADI can be connected to an HD Native card using two DigiLink Mini cables. No additional I/O may be used with this configuration.
HD MADI Features
- 2 MADI Optical and Coaxial inputs and 2 MADI Optical and Coaxial outputs for up to 64 discrete channels of digital input and output (32 channels per DigiLink Mini port)
• Supports sample rates of 44.1 kHz, 48 kHz, 88.2 kHz, 96 kHz, 176.4 kHz, and 192 kHz
• 24- or 16-bit resolution
- Sample Rate Conversion (SRC) on input or output
- Front panel clock and SRC indicators
- Front panel signal present LEDs for input and output
- BNC Word Clock I/O for synchronizing HD MADI with external 1x Word Clock
- B N C Loop Sync I / O for synchron MADI with additional Avid HD audio interfaces and peripherals (such as HD I/O, HD OMNI, or SYNC HD)
• Dedicated BNC Word Clock input and XLR AES/EBU input (clock input only) for external MADI synchronization (when using SRC on output)
- Clock support for the following formats: Internal, Loop Sync, Word Clock, AES/EBU, and MADI
- Varispeed modes (supports both 64- and 56-channel standards)
Chapter 3: Installing HD Native Hardware
This chapter provides information on installing and connecting the HD Native card and Avid HD audio interfaces. If you are installing Pro Tools, install your HD Native hardware before installing Pro Tools software.
Install the HD Native card first. Once the card is installed, connect Avid HD audio interfaces.
Installing the HD Native Card in a Mac Pro
The HD Native card is a 4x PCIe card. For optimum performance, install the HD Native card in a 4x or higher PCIe card slot in your computer.

Follow these instructions carefully to avoid damaging the card and its components.
If you are installing the HD Native card in the slot furthest from the video card, you may need to remove the SATA drive trays first to avoid damaging the card when installing it.
To install the HD Native card:
1 Turn off your computer and any peripherals. Leave your computer's power cable plugged in so that the computer is grounded.
2 Disconnect all cables attached to the computer (such as hard drives, displays, and USB and FireWire devices) except for the power cable.
3 Lay the computer on its side so the access panel is facing up.
4 Open the computer case using the latch located on the back of the computer.
5 Remove the clamp that secures the metal access port covers to the chassis.
6 Remove the metal access port covers for first available 4x or higher PCIe slot.
Before handling the card, discharge static electricity from your clothes or body by touching a grounded metal surface, such as the power supply case inside your computer with the power cable connected.
7 Install the HD Native PCIe card into the corresponding PCIe slot in the computer. With the card's PCIe connectors facing down, carefully insert the card straight down and firmly seat the card's PCIe connector into the PCIe slot.

natural_image
Isometric technical diagram of a computer RAM module with labeled components and directional arrows indicating assembly steps (no text or symbols present)Inserting the HD Native card into a PCIe slot
8 Ensure that all cards are properly installed in your system:
- Display card for your computer monitor
• HD Native PCIe card - Avid-approved video capture card (optional)
- Avid-approved Host-Bus Adapter card (optional)
9 Reattach the clamp that secures the cards and the slot covers to the chassis.
The card's PCIe connectors will not seat completely until you have replaced the clamp that secures the cards and the metal access port covers to the chassis.
Installing the HD Native Card in a Windows Computer
The HD Native card is a 4x PCIe card. For optimum performance, install the HD Native card in a 4x or higher PCIe card slot in your computer.
To install the HD Native card:
1 Turn off your computer and any peripherals. Leave your computer's power cable plugged in so the computer is grounded.
2 Disconnect all cables attached to the computer (such as hard drives, displays, and USB and FireWire devices) except for the power cable.
3 Open the computer case.
4 Remove the metal access port cover behind the first available 4x or higher PCIe card slot (typically, this will be the slot right next to the video card) by removing the screw and sliding the cover out from the access port.
Before handling any card, discharge static electricity from your clothes or body by touching a grounded metal surface, such as the power supply case inside your computer.
5 Install the HD Native card in the corresponding PCIe slot.

natural_image
Isometric technical diagram of a computer RAM module with labeled components and directional arrows indicating assembly steps (no text or symbols present)Inserting the HD Native card into a PCIe slot
6 Secure the card in place with the slot access port screw you removed earlier.
7 Ensure that all cards are properly installed for your system:
• Display card for your computer monitor
• H D N at i ve c a r d ( f or P C I e
- Avid - approved Host - Bus (optional)
Connecting Audio Interfaces
Each Avid HD audio interface provides several different input and output options. For example, HD OMNI supplies up to 8 channels of input and output to your Pro Tools system, HD I/O supplies up to 16 channels of input and output, and HD MADI provides up to 64 channels. Audio interfaces can be connected directly to the HD Native card, or through the Expansion ports on other HD audio interfaces.
The HD Native card supports up to 64 channels of audio input and output. To get a full 64 channels of I/O, you can connect up to 4 HD I/O to the HD Native card. Two of the interfaces connect directly to DigiLink Mini Ports 1 and 2, and the other 2 interfaces connect to the Expansion ports on those audio interfaces.
You can also get a full 64 channels of I/O with HD MADI connected to the HD Native card using 2 DigiLink Mini cables. However, HD MADI will be the only audio interface in the system.
Refer to the HD OMNI Guide, HD I/O Guide, or HD MADI Guide for specific details regarding:
- Front and back panel connectors and indicators
- Installation of optional expansion I/O cards (HD I/O only)
To connect HD audio interfaces:
1 If you are using a single HD audio interface (such as HD OMNI), connect the Primary Port to DigiLink Mini Port 1 on the HD Native card with the included DigiLink Mini cable.
2 Connect an additional audio interface by doing one of the following:
- Connect the Primary Port of the secondary interface to the Expansion Port of the primary interface with an additional DigiLink Mini cable.
- or -
- Connect the Primary Port of the secondary interface to DigiLink Mini Port 2 on the HD Native card.
3 Make the necessary Loop Sync connections.
Connecting Loop Sync
If you are using two (or more) Avid HD audio interfaces or a SYNC peripheral, Loop Sync must be connected to maintain proper clock among the devices.
To make Loop Sync connections:
1 Connect the Loop Sync Out of each interface to the Loop Sync In of the next interface with the BNC cables included in your I/O packaging.
2 Connect the Loop Sync Out of the last interface to the Loop Sync In of the primary interface or SYNC peripheral.

Making DigiLink Mini and Loop Sync connections
Maximum I/O Configuration
HD Native supports up to a maximum combination of up to four total of the following audio interfaces:
- HD OMNI (only one HD OMNI is supported in a single HD Native system)
- HD I/O (up to four HD I/O can be used simultaneously)
- HD MADI (full connectivity with one HD MADI is possible when both DigiLink Mini ports of the HD MADI are connected to both DigiLink Mini ports on the HD Native card)
For an example of connecting multiple Avid HD audio interfaces, see Figure on page 13.

HD audio interfaces need room at their sides to maintain proper air flow for cooling. Do not block the sides of the unit or disconnect the internal fan. If the units are rack-mounted in a case, remove the case lids or doors before operating the system. Failure to do so can result in the units overheating very quickly, which can permanently damage sensitive components.
Installing and Authorizing Pro Tools Software
Once you have installed your HD Native hardware in your computer, you can install and authorize your Pro Tools or Pro Tools HD software (sold separately).

For complete installation and authorization instructions, see the Pro Tools Installation Guide that came with your Pro Tools software package.
Installing HD Native Hardware Drivers
HD Native hardware drivers are required for your HD Native system to support digital audio software, such as Pro Tools, and Core Audio (Mac) or ASIO (Windows) compatible digital audio software (such as Logic, Live, or Cubase). If you install Pro Tools software, these drivers are installed automatically. If you are not installing Pro Tools, you can download the driver installers from the Avid website (www.avid.com)

For instructions on installing the Core Audio driver, see "Installing the Core Audio Driver" on page 15.

For instructions on installing the ASIO driver, see "Installing the ASIO Driver" on page 21.
Chapter 4: Configuring Core Audio (Mac OS X Only)
Avid Core Audio Driver Capabilities
The Avid Core Audio Driver is a multi-client, multichannel sound driver that lets Core Audio-compatible applications record and play back through HD Native hardware.
Full-duplex recording and playback of 24-bit audio is supported at sample rates up to 96 kHz, depending on your HD Native hardware and CoreAudio client application.
The Avid Core Audio Driver provides up to 64 channels of I/O with an HD Native card.

Visit www.avid.com for the latest Avid Core Audio drivers for HD Native hardware, as well as current known issues.
Limitations of the CoreAudio Driver
The Avid Core Audio Driver has the following limitations:
- The Avid Core Audio Driver cannot be used to preview sound files from the Mac Finder. When a sound file is located in the Mac OS X navigation window, a QuickTime transport bar is displayed next to it. The QuickTime transport bar lets you audition the sound file. The sound will always play back though the Mac's built-in audio controller (through the Mac speaker or
headphone jack). However, if you double-click a sound file, the QuickTime application will launch, and can use the Avid Core Audio Driver for playback.
◆ The Avid Core Audio Driver cannot be used for playback of Mac System Sounds.
◆ Low Latency Monitoring is not available with Core Audio software on HD Native hardware.
Installing the Core Audio Driver
The Avid Core Audio Driver is installed by default when you install Pro Tools.
The Avid Core Audio Driver can also be installed as a standalone driver on Mac systems that do not have Pro Tools software installed. The installer for the standalone Avid Core Audio Driver is available on the Drivers Installer disc that came with your Pro Tools Software package, or from our website (www.avid.com).

If you uninstall Pro Tools, the Avid Core Audio Driver is automatically uninstalled at that time.
To install the standalone Avid Core Audio Driver:
1 Ensure that your HD Native hardware is correctly installed.
2 Do one of the following:
- Insert the Driver Installers Disc that came with your Pro Tools Software package in your computer.
- or -
- Download the standalone Avid Core Audio driver installer from our website (www.avid.com).
3 Locate and double-click the Install HD Family Driver.mpkg.
4 Follow the on-screen instructions to complete the installation.
5 When the installation is complete, click Restart.
Avid Core Audio Manager
You can configure the Avid Core Audio Driver using CoreAudio Manager, or from within most third-party CoreAudio-compatible client applications (such as BIAS Peak or Logic). Refer to the manufacturer's documentation for more information.
Some applications (such as Apple's iTunes or QuickTime Player), also require that you configure either the Apple Sound Preferences or Apple Audio MIDI Setup (AMS) to use the Avid Core Audio Driver.
The Avid Core Audio Manager is configured to auto-hide when first launched. To bring it to the foreground, click on its icon in the dock.
The Avid Core Audio Manager is not used by Pro Tools. It is only used by other Core Audio applications.
Accessing the Avid Core Audio Manager
The Avid Core Audio Manager application launches automatically when the first client application accesses the Avid Core Audio Driver.

Avid Core Audio Manager (HD Native shown)
Avid Core Audio Manager cannot be accessed under the following circumstances:
- When Pro Tools is running
- When another application is using Direct IO
To ensure proper playback with the Avid Core Audio Driver, launch the Avid Core Audio Manager first, making sure that its status is "Connected."
Preventing an Application from Accessing the Avid Core Audio Driver
You can prevent an application from accessing the Avid Core Audio Driver by holding down the Shift key just before the application would access the Avid Core Audio Driver, typically when launching the application. Certain applications (such as Apple Mail and iChat), do not access the Avid Core Audio Driver until they first play a sound, so you will need to hold down the Shift key just prior to sound playback in order to prevent the use of your Avid hardware for playback.
Using the Avid Core Audio Manager
Use the Avid Core Audio Manager to change the Core Audio Buffer Size setting, access the Hardware Setup dialog for your Avid hardware and control volume and mute for the Avid Core Audio Driver. The Avid Core Audio Manager also identifies your Avid hardware, the supported number of Input and Output Channels and the number of attached clients (applications).
Buffer Size
You can select from the following buffer sizes (depending on your Avid hardware):
- 64 samples
• 128 samples
• 256 samples - 512 samples
• 1024 samples
• 2048 samples
Changing the Buffer Size for the Avid Core Audio Driver does not affect the H/W Buffer Size setting in the Pro Tools Playback Engine dialog.
To configure Avid Core Audio Hardware Buffer Size:
1 Double-click the Avid Core Audio Manager file (located in /Applications/Avid/).
2 From the Buffer Size pop-up menu, select the desired Core Audio buffer size (in samples). Generally, smaller buffer sizes are preferable. However, if you experience any problems with performance (such as clicks and pops during recording or playback), try increasing the Core Audio Buffer Size setting.
3 You can also change the buffer size from within the client application if it is the only client attached to the Core Audio Driver. Once two or more clients are active, you will not be able to change the sample rate or the buffer size.
HW Setup Button
The HW Setup button opens the Hardware Setup dialog for your Avid hardware. The HW Setup button is only available when no clients are using the Core Audio Driver.
To configure the Avid Core Audio HW Setup:
1 Quit any Core Audio client applications.
2 Double-click the Avid Core Audio Manager file (located in /Applications/Avid/).
3 Click the HW Setup button to open the Hardware Setup dialog.
4 Configure the Hardware Setup dialog for your Avid hardware.

Hardware Setup dialog, HD I/O shown
For more information on the Hardware Setup dialog, refer to the Pro Tools Reference Guide.
5 When you are finished, click OK to close the Hardware Setup dialog.
Prefs Button
The Prefs button opens the Avid Core Audio Manager Preferences dialog. There are several options available configuring the Manager application. When finished setting these options, click OK to close the Avid Core Audio Manager Preferences window.

CoreAudio Manager Preferences
Hide Manager if Auto-Launched by Client Enable this option to hide the Manager panel after the first client application accesses the Avid Core Audio Driver. To open the Manager panel, click on the Avid Core Audio Manager application icon in the Dock.
Auto-Quit Manager when Last Client Quits
Enable this option to make the Manager application quit when there are no longer any clients using the Avid Core Audio Driver.
Use C|24 Stereo Routing (L/R to 1/3) When using C|24, enable this option to configure the Avid Core Audio Driver to output through the C|24 standard stereo routing (outputs 1 and 3).
Use XMON Stereo Routing (L/R to 1/5) When using D-Control or D-Command, enable this option to configure the Avid Core Audio Driver to output through the D-Control or D-Command standard stereo routing (outputs 1 and 5).
Mirror Analog Outs 1 & 2 to Digital Outs (002/003)
This option is grayed out for systems using an HD Native card. When using 003, 003 Rack, 003 Rack+, Digi 002, or Digi 002 Rack, enable this option to mirror the main outputs through the digital outputs that are selected in the Hardware Setup dialog.
Connect Button
The Connect button is available when the Avid Core Audio Manager is launched and cannot connect with the Pro Tools hardware (such as when Pro Tools is launched and the hardware is disconnected or disabled). Before trying to connect, make sure to quit Pro Tools and make sure that your hardware is connected and turned on. You can then click on the Connect button to acquire the hardware.
If any application is launched prior to pressing the Connect button and you want that application to use the Avid Core Audio Driver for playback, you will need to quit and relaunch the application for it to connect properly to the CoreAudio Manager.
Quit Button
Use the Quit button to quit the Avid Core Audio Manger. Be sure to quit any client applications before using the Quit button in the Manager. If any applications are currently attached to the Manager application when quitting, you may get an error message indicating that the Pro Tools hardware is no longer available. You may have to change the application's preferences to use different hardware for playback or possibly quit and relaunch the application for proper playback to be resumed.
Configuring Avid HD Audio Interfaces for Third-Party Applications
When using an HD Native card with an application other than Pro Tools (such as Apple GarageBand), you can configure hardware settings using the audio preference settings available in that application.
To configure hardware settings through a Core Audio application (such as Apple GarageBand):
1 Select Avid HW (HD Native) for Audio Output and Audio Input.
2 Select a buffer size for your system from one of the following options:
• Maximum / Large buffer
- or -
• Minimum/Small buffer size

For more information about the hardware settings options for your specific Core Audio application, refer to the manufacturer's documentation.
Configuring the Apple Sound Preferences or Apple Audio MIDI Setup
(Required for Using Avid Audio Interfaces with Apple iTunes or QuickTime Player)
To use your Avid audio interface with certain Core Audio-compatible playback applications (such as Apple iTunes or QuickTime Player), you will need to configure either Sound Preferences or Audio MIDI Setup in addition to Avid Core Audio Manager. However, for most Core Audio-compatible client applications (such as BIAS Peak or Ableton Live) this is
unnecessary since you can configure the Core Audio Buffer Size setting and audio input and output channels from within the client application.
Apple Sound Preferences
To configure the Apple Sound Preferences:
1 Launch System Preferences (Apple menu > System Preferences).
2 Click Sound.
3 Click Output and select Avid HW (HD Native) as the device for sound output.

Sound Preferences, Output settings
4 Click Input and select Avid HW (HD Native) as the device for sound input.
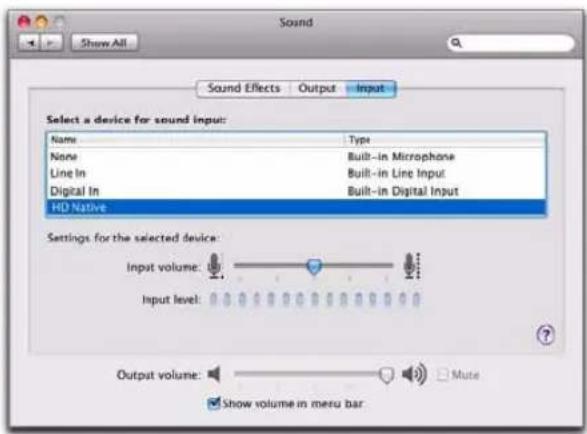
Sound Preferences, Input settings
5 Quit System Preferences.
Apple Audio MIDI Setup
To configure the Apple Audio MIDI Setup:
1 Launch Audio MIDI Setup (located in Home/Applications/Utilities).
2 In the Audio Devices window, click the Input tab.

Apple Audio MIDI Setup application, Audio Devices Input settings
3 From the Audio Devices list on the left, select HD Native.
4 In the Audio Devices window, click the Output tab.

Apple Audio MIDI Setup application, Audio Devices Output settings
5 From the Audio Devices list on the left, select HD Native.
Leave System Output set to Built-in Audio. The Avid Core Audio Driver cannot be used for system sounds.
6 In the Audio Input or Audio Output page, select the Format (sample rate). Note that the input sample rate and output rate are linked.
7 Choose Audio MIDI Setup > Quit Audio MIDI Setup.
Chapter 5: Configuring ASIO (Windows Only)
ASIO Driver Capabilities
The ASIO Driver is a single-client, multichannel sound driver that allows third-party audio programs that support the ASIO Driver standard to record and play back through qualified Avid HD audio interfaces.
Full-duplex playback of 24- and 16-bit audio are supported at sample rates up to 96 kHz, depending on your Pro Tools hardware and ASIO-client program used (such as Cubase or Reason).
The ASIO Driver provides up to 64 channels of input and output with a HD Native card.

Visit www.avid.com for the latest ASIO drivers for hardware, as well as current known issues.
Limitations of the ASIO Driver
The Avid ASIO Driver has the following limitations:
- It cannot be used with multiple applications at the same time. Only one application at a time can use the ASIO Driver, so be sure to disable the Windows system sounds.
◆ Low Latency Monitoring is not available with Core Audio software on HD Native hardware. - It is recommended that you use a separate sound card for games or other general work.
Installing the ASIO Driver
The ASIO Driver is installed by default when you install Pro Tools.
The ASIO Driver can also be installed as a standalone driver on Windows systems that do not have Pro Tools software installed. The installer for the standalone ASIO Driver is available on the Drivers Installer disc that came with your Pro Tools Software package, or from our website (www.avid.com).

If you uninstall Pro Tools, the ASIO Driver is automatically uninstalled at that time.
To install the standalone ASIO Driver:
1 Ensure that your HD Native card is correctly installed.
2 Do one of the following:
- Insert the Driver Installers Disc that came with your Pro Tools Software package in your computer.
- or -
- Download the standalone ASIO driver installer from our website (www.avid.com).
3 Locate and double-click the HD Family Driver Setup.exe.
4 Follow the on-screen instructions to complete the installation.
5 When the installation is complete, click Finish to quit the installer and restart your computer.
ASIO Driver Control Panel
Configuring ASIO Driver settings can be done using the ASIO Control Panel, which is accessed within some third-party ASIO-compatible client applications.
Accessing the ASIO Driver Control Panel
To access the ASIO Driver Control Panel from a third-party application:
- Refer to your ASIO-client program's documentation.
The ASIO Driver Control Panel cannot be accessed under the following circumstances:
- When Pro Tools is running.
- When playing or recording in an audio program that does not support the ASIO Driver.
- When using a third-party audio program that has an option to keep the ASIO Driver open even when you are not playing or recording. (You must close the audio program before you can open the ASIO Driver Control Panel.)
Example with Propellerheads Reason
To configure Propellerheads Reason:
1 Click the select ASIO Avid Driver from the Audio Card Driver selector in the Audio Preferences.
2 Click the Control Panel button to open the Avid ASIO Control Panel.

Setup Example, using Propellerheads Reason
Using the ASIO Driver Control Panel
From the ASIO Driver Control Panel, you can change the Buffer Size setting or access the Hardware Setup dialog for your Avid hardware.

ASIO Control Panel
Buffer Size
◆ Small buffers have the advantage of low latency in the record monitor path. (Latency is the time delay between a signal entering the audio inputs and leaving the outputs during recording.)
◆ Larger buffers have the advantage of making the ASIO Driver more immune to audio dropouts during playback and recording.
In some ASIO-compatible audio programs, performing various tasks will interrupt the ASIO Driver and may result in clicks and pops in audio playback or recording. Choosing medium or large buffers (such as 256, 512, or 1024) can help alleviate this problem.
Changing the Buffer Size setting for the ASIO Driver does not affect the H/W Buffer Size settings in the Pro Tools Playback Engine dialog.
Device
The Device setting is always set to your installed Avid hardware.
Advanced Button
The Advanced button opens the Hardware Setup dialog for the Avid hardware that you are using.

For more information on the Hardware Setup dialog, see the Pro Tools Reference Guide.

Hardware Setup dialog
Chapter 6: Low Latency Monitoring with Pro Tools
Using Low Latency Monitoring
HD Native systems with Pro Tools can use the Low Latency Monitoring option to record with an extremely small amount of monitoring latency, to as many tracks as the system supports. Only tracks with input from an audio interface (not an internal mix bus) use Low Latency Monitoring.
Low Latency Monitoring is not available with Core Audio or ASIO-compatible software.
To use Low Latency Monitoring:
1 From the Output Path selector, assign each track to the selected Low Latency Monitoring Path (as set in the I/O Setup Output page). Only tracks assigned to these outputs use Low Latency Monitoring.
2 Record enable audio tracks by clicking their Record Enable buttons.
3 Select Options > Low Latency Monitoring.
When Low Latency Monitoring is enabled, any plug-ins and sends assigned to record-enabled tracks (routed to the selected Low Latency Monitoring Path) are automatically bypassed, and must remain bypassed. Also, these tracks do not register on meters for Master Faders.
Configuring Low Latency Monitoring in the I/O Setup
The Output page of the I/O Setup lets you enable (or disable) Low Latency Monitoring. It also lets you specify any available Output path for Low Latency Monitoring. The Output path for Low Latency Monitoring can be of any channel width (from Mono to 7.1). Low Latency Monitoring uses Outputs 1–2 by default.
To configure Low Latency Monitoring in the I/O Setup:
1 Open the I/O Setup dialog (Setup > I/O).
2 Click the Output tab.
3 Enable the Low Latency Monitoring option.
4 From the Low Latency Monitoring pop-up menu, select the Output path you want to use for Low Latency Monitoring.

Selecting the Output path for Low Latency Monitoring
5 Click OK to save changes and close I/O Setup.
Low Latency Monitoring and Bounce To Disk
With Low Latency Monitoring enabled, only audio tracks are included with the Bounce to Disk command—Auxiliary Input and Instrument tracks are ignored. To include Auxiliary Input and Instrument tracks, disable Low Latency Monitoring before using Bounce to Disk.

External input cannot be recorded during a Bounce to Disk. To include external input in your bounce, it must be recorded to new audio tracks before using Bounce to Disk.
Appendix A: Compliance Information
Environmental Compliance
Disposal of Waste Equipment by Users in the European Union

This symbol on the product or its packaging indicates that this product must not be disposed of with other waste. Instead, it is your responsibility to dispose of your waste equipment by handing it over to a designated collection point for the recycling of waste electrical and electronic equipment. The separate collection and recycling of your waste equipment at the time of disposal will help conserve natural resources and ensure that it is recycled in a manner that protects human health and the environment. For more information about where you can drop off your waste equipment for recycling, please contact your local city recycling office or the dealer from whom you purchased the product.
Proposition 65 Warning
This product contains chemicals, including lead, known to the State of California to cause cancer and birth defects or other reproductive harm. Wash hands after handling.
Perchlorate Notice
This product may contain a lithium coin battery. The State of California requires the following disclosure statement: "Perchlorate Material – special handling may apply, See www.dtsc.ca.gov/hazardouswaste/perchlorate."
Recycling Notice

EMC (Electromagnetic Compliance)
Avid declares that this product complies with the following standards regulating emissions and immunity:
• FCC Part 15 Class A
• EN55103-1 E4
• EN55103-2 E4
• AS/NZS CISPR 22 Class A
• CISPR 22 Class A
FCC Compliance for United States
Communication Statement
Note: This equipment has been tested and found to comply with the limits for a Class A digital device, pursuant to part 15 of the FCC Rules. These limits are designed to provide reasonable protection against harmful interference when the equipment is operated in a commercial environment. This equipment generates, uses, and can radiate radio frequency energy and, if not installed and used in accordance with the instruction manual, may cause harmful interference to radio communications. Operation of this equipment in a residential area is likely to cause harmful interference in which case the user will be required to correct the interference at his own expense.
Any modifications to the unit, unless expressly approved by Avid, could void the user's authority to operate the equipment.
Australia and New Zealand EMC Regulations

N1709
Canadian Compliance
This Class A digital apparatus meets all requirements of the Canadian Interference-Causing Equipment Regulations.
European Union Declaration of Conformity
(EMC and Safety)

Avid is authorized to apply the CE (Conformité Europénne) mark on this compliant equipment thereby declaring conformity to EMC Directive 2004/108/EC and Low Voltage Directive 2006/95/EC.
Korean EMC Regulations
This equipment has been tested to comply with USA and Canadian safety certification in accordance with the specifications of UL Standards: UL 60950-1, 2nd Ed 2007/IEC 60950-1, 2nd Ed and CSA C22.2 No. 60950-1-07, 2nd Ed 2007-03. Avid Inc., has been authorized to apply the appropriate UL & CUL mark on its compliant equipment.
Warning




Important Safety Instructions
1) Read these instructions.
2) Keep these instructions.
3) Heed all warnings.
4) Follow all instructions.
5) Do not use this equipment near water.
6) Clean only with dry cloth.
7) Do not block any ventilation openings. Install in accordance with the manufacturer's instructions.
8) Do not install near any heat sources such as radiators, heat registers, stoves, or other equipment (including amplifiers) that produce heat.
9) Do not defeat the safety purpose of the polarized or grounding-type plug. A polarized plug has two blades with one wider than the other. A grounding type plug has two blades and a third grounding prong. The wide blade or the third prong are provided for your safety. If the provided plug does not fit into your outlet, consult an electrician for replacement of the obsolete outlet.
10) Protect power cords from being walked on or pinched particularly at plugs, convenience receptacles, and the point where they exit from the equipment.
11) Only use attachments/accessories specified by the manufacturer.
12) For products that are not rack-mountable: Use only with a cart, stand, tripod, bracket, or table specified by the manufacturer, or sold with the equipment. When a cart is used, use caution when moving the cart/equipment combination to avoid injury from tip-over.
13) Unplug this equipment during lightning storms or when unused for long periods of time.
14) Refer all servicing to qualified service personnel. Servicing is required when the equipment has been damaged in any way, such as power-supply cord or plug is damaged, liquid has been spilled or objects have fallen into the equipment, the equipment has been exposed to rain or moisture, does not operate normally, or has been dropped.
15) For products that are a Mains powered device: The equipment shall not be exposed to dripping or splashing and no objects filled with liquids (such as vases) shall be placed on the equipment.
Warning! To reduce the risk of fire or electric shock, do not expose this equipment to rain or moisture.
16) For products containing a lithium battery: CAUTION! Danger of explosion if battery is incorrectly replaced. Replace only with the same or equivalent type.
17) The equipment shall be used at a maximum ambient temperature of 40^ C.
18) Use only with Listed ITE equipment.
第1章:HD Nativeへようこそ
www.avid.com/compatibility

natural_image
Isometric technical diagram showing a mechanical assembly with a component inserted into a housing, and a base structure below (no text or symbols)natural_image
Isometric technical diagram showing a mechanical assembly with a bracket and base, no text or symbols presentAvid Core Audio Manager (HD Nativeの例)
[サウンド] 環境設定、出力設定
[サウンド] 環境設定、入力設定
5 システム環境設定を終了します。
Appleの [Audio MIDI] 設定
ASIO Driver Control Panel
Propellerheads Reasonの設定例
ASIO Control Panel
Buffer Size
[ハードウェア設定] ダイアログ
Technical Support (USA)
Visit the Online Support Center at
www.avid.com/support
Product Information
For company and product information,
visit us on the web at www.avid.com


- Legal Notices
- Documentation Feedback
- Contents
- Chapter 1. Welcome to HD Native....1
- Chapter 2. HD Native Hardware Overview .... 5
- Chapter 3. Installing HD Native Hardware 9
- Chapter 4. Configuring Core Audio (Mac OS X Only)....15
- Chapter 5. Configuring ASIO (Windows Only) ...... 21
- Chapter 6. Low Latency Monitoring with Pro Tools.... 25
- Appendix A. Compliance Information 27
- Chapter 1: Welcome to HD Native
- HD Native Package
- HD Native Systems
- Registration
- Hardware Warranty
- System Requirements and Compatibility
- Conventions Used in This Guide
- About www.avid.com
- Chapter 2: HD Native Hardware Overview
- HD Native PCIe Card
- DigiLink Mini Ports
- DigiSerial Port
- DigiLink Mini Cables
- Avid HD Audio Interfaces
- HD OMNI Audio Interface
- HD OMNI Features
- Analog I/O
- Digital I/O
- Monitoring
- Synchronization
- HD I/O Audio Interface
- HD I/O Features
- Expandability
- HD MADI Digital Audio Interface
- HD MADI Features
- Chapter 3: Installing HD Native Hardware
- Installing the HD Native Card in a Mac Pro
- To install the HD Native card:
- Installing the HD Native Card in a Windows Computer
- Connecting Audio Interfaces
- To connect HD audio interfaces:
- Connecting Loop Sync
- To make Loop Sync connections:
- Maximum I/O Configuration
- Installing and Authorizing Pro Tools Software
- Installing HD Native Hardware Drivers
- Chapter 4: Configuring Core Audio (Mac OS X Only)
- Avid Core Audio Driver Capabilities
- Limitations of the CoreAudio Driver
- Installing the Core Audio Driver
- To install the standalone Avid Core Audio Driver:
- Avid Core Audio Manager
- Accessing the Avid Core Audio Manager
- Preventing an Application from Accessing the Avid Core Audio Driver
- Using the Avid Core Audio Manager
- Buffer Size
- To configure Avid Core Audio Hardware Buffer Size:
- HW Setup Button
- To configure the Avid Core Audio HW Setup:
- Prefs Button
- Auto-Quit Manager when Last Client Quits
- Mirror Analog Outs 1 & 2 to Digital Outs (002/003)
- Connect Button
- Quit Button
- Configuring Avid HD Audio Interfaces for Third-Party Applications
- Configuring the Apple Sound Preferences or Apple Audio MIDI Setup
- Apple Sound Preferences
- Apple Audio MIDI Setup
- To configure the Apple Audio MIDI Setup:
- Chapter 5: Configuring ASIO (Windows Only)
- ASIO Driver Capabilities
- Limitations of the ASIO Driver
- Installing the ASIO Driver
- To install the standalone ASIO Driver:
- ASIO Driver Control Panel
- Accessing the ASIO Driver Control Panel
- Example with Propellerheads Reason
- To configure Propellerheads Reason:
- Using the ASIO Driver Control Panel
- Device
- Advanced Button
- Chapter 6: Low Latency Monitoring with Pro Tools
- Using Low Latency Monitoring
- To use Low Latency Monitoring:
- Configuring Low Latency Monitoring in the I/O Setup
- To configure Low Latency Monitoring in the I/O Setup:
- Low Latency Monitoring and Bounce To Disk
- Appendix A: Compliance Information
- Environmental Compliance
- Proposition 65 Warning
- Perchlorate Notice
- Recycling Notice
- EMC (Electromagnetic Compliance)
- FCC Compliance for United States
- Communication Statement
- Australia and New Zealand EMC Regulations
- Canadian Compliance
- European Union Declaration of Conformity
- Korean EMC Regulations
- Warning
- Important Safety Instructions
- 第1章:HD Nativeへようこそ
- Avid Core Audio Manager (HD Nativeの例)
- Appleの [Audio MIDI] 設定
Brand : Avid
Model : Pro Tools HD Native
Category : Hi-Fi System