
UR22 MKII - Hi-Fi STEINBERG - Free user manual and instructions
Find the device manual for free UR22 MKII STEINBERG in PDF.


| Product Type | USB Audio Interface |
| Brand | Steinberg |
| Model | UR22 MKII |
| Channels | 2 Inputs / 2 Outputs |
| Bit Depth | 24-bit |
| Sample Rate | Up to 192 kHz |
| Input Connectors | 2 Combo XLR/TRS (Mic/Line/Instrument) |
| Output Connectors | 2 TRS Line Outputs, 1 Headphone Output |
| MIDI I/O | 1 MIDI Input, 1 MIDI Output |
| USB Connection | USB 2.0 Type-B |
| Power Supply | USB Bus Powered (5V DC) |
| Phantom Power | +48V Switchable per Channel |
| Dimensions (W x D x H) | 159 mm x 44 mm x 159 mm |
| Weight | 0.6 kg |
| Monitoring | Zero-Latency Direct Monitoring |
| Compatibility | Windows, macOS, iOS (with Camera Connection Kit) |
| Driver | Class-Compliant (no driver needed on macOS/iOS) |
| Included Software | Cubase AI, Cubasis LE (iPad), dspMixFx |
| Care & Cleaning | Wipe with a soft, dry cloth. Avoid liquids. |
| Safety | Keep away from moisture and extreme temperatures. |
| Spare Parts & Repairability | Contact Steinberg support for service. No user-serviceable parts inside. |
Frequently Asked Questions - UR22 MKII STEINBERG
User questions about UR22 MKII STEINBERG
0 question about this device. Answer the ones you know or ask your own.
Ask a new question about this device
Download the instructions for your Hi-Fi in PDF format for free! Find your manual UR22 MKII - STEINBERG and take your electronic device back in hand. On this page are published all the documents necessary for the use of your device. UR22 MKII by STEINBERG.
USER MANUAL UR22 MKII STEINBERG
Message from the Development Team..2
Panel Controls and Terminals ....3
Front Panel....3
Rear Panel 5
Software 7
Using the UR22mkII ....10
Connections....10
Configuring Audio Driver Settings on the DAW
Software 12
Recording/Playback 12
Using the UR22mkII with connected MIDI device ....15
Troubleshooting......16
Appendix....19
Block Diagrams ...... 19
Message from the Development Team
Thank you for choosing the UR22mkII USB Audio Interface.
Since the introduction of the MR816CSX and MR816X in 2008, the Steinberg audio interface lineup has expanded to cover a wide range of applications with the UR824 and UR28M released in 2011, the UR22 in 2013, the UR44 and UR12 in 2014, and the UR242 in 2015. The UR22, a model that was adopted by a broad spectrum of users, has now been refined, updated, and released as the UR22mkII.
As implied by the "mkII" designation, the UR22mkII is an evolved descendant of the UR22. The most prominent new features are iOS support and a loopback function. The extensive adoption of mobile recording by today's creators meant that iOS support would be essential, but hardware limitations in the original UR22 design made it impossible to offer that functionality as a simple update. That was an issue we were determined to resolve, and now with this new release the entire UR series supports the three major platform: Windows, Mac, and iOS. In addition to USB bus power it is now possible to use a USB mobile battery, allowing high-quality recording even where reliable mains power is not available. Loopback has been included in response to the growing need for easy distribution of high-quality audio content via the Internet. The UR22mkII provides loopback functionality that, like other UR series models, allows a convenient distribution environment to be set up quickly and easily.
Of course the basics have not been overlooked, and the refinements do not end with the new features mentioned above. The UR22mkll has gone through the same rigorous testing and tuning for optimum audio quality as all new models, ensuring that it delivers solid, punchy lows with detailed midrange and extended, open highs. We are confident that the sublime balance with which our D-PRE microphone preamplifiers capture the entire audio spectrum will contribute to smoother, more enjoyable mixing and production as well. Detailed adjustments have also been applied to ensure that the sound delivered to the monitor speakers is faithful to the musical nuances of each recorded source.
The UR22mkII was developed to bring a popular model to the forefront of cutting edge production trends. We are dedicated to giving our users the tools they need when they need them, and are determined to stay at the forefront. Our greatest satisfaction is knowing that we contribute to the creative output of our users, wherever they are and whatever their artistic goals might be.
The Steinberg Hardware Development Team
Panel Controls and Terminals
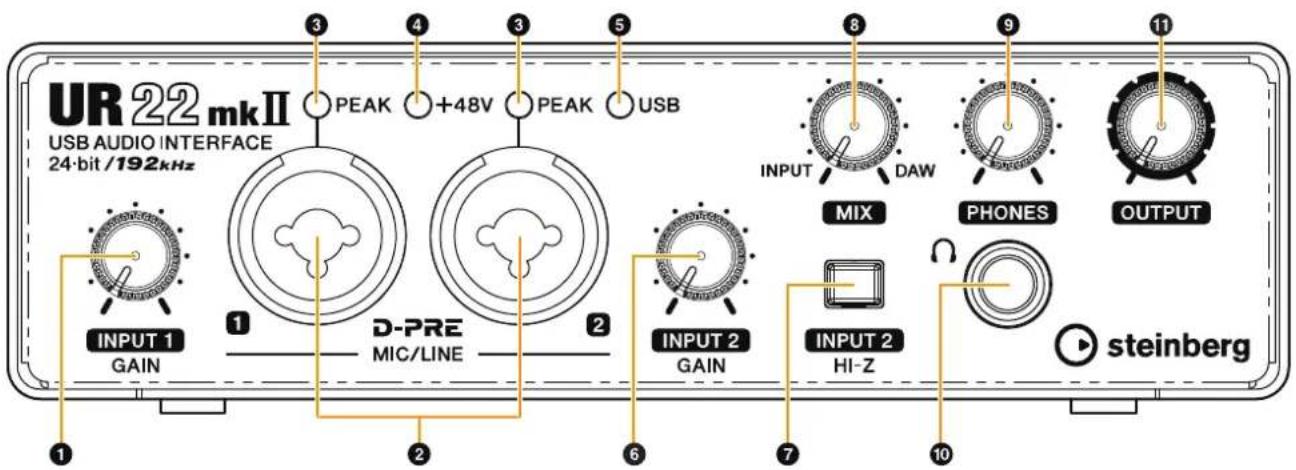
Front Panel
text_image
UR 22 mkII USB AUDIO INTERFACE 24-bit /192kHz INPUT 1 GAIN 1 D-PRE MIC/LINE 2 INPUT 2 GAIN 3 PEAK +48V 5 PEAK USB 6 7 INPUT 2 HI-Z 8 MIX DAW 9 PHONES OUTPUT 10 steinberg① [INPUT 1 GAIN] knob
Adjusts the input signal level of the [MIC/LINE 1] jack.
② [MIC/LINE 1/2] jacks
For connection to a microphone or digital instrument. This jack can be connected to both XLR-type and phone-type (balanced/unbalanced) plugs ^*1 . The XLR-type is set to the optimum level for microphone connection and phone type is for line connection.
*1 Plug types
![STEINBERG UR22 MKII - ② [MIC/LINE 1/2] jacks - 1](/content/2026/05/760247/images/d51eee15c1357c52f7a37ab06d9303667787521ceb23f0917de79f3023139790.jpg)
XLR-type (balanced)
![STEINBERG UR22 MKII - ② [MIC/LINE 1/2] jacks - 2](/content/2026/05/760247/images/4fb318695ec59644e461294491a354295767deadf19bb741ae1680e13a583b7e.jpg)
![STEINBERG UR22 MKII - ② [MIC/LINE 1/2] jacks - 3](/content/2026/05/760247/images/63f16d6989bb379d1560db798fb4172d6d7f2a2bd121f02cfe03b911a5cdbfcf.jpg)
Phone-type (balanced)
![STEINBERG UR22 MKII - ② [MIC/LINE 1/2] jacks - 4](/content/2026/05/760247/images/b50fd6ceac59535bd5d79b6a22e3598a68ab3b209e48fd4551966083d8397032.jpg)
Phone-type (unbalanced)
③ [PEAK] indicator
Lights up according to the input signal. Lights up when the input signal is 3 dB below the clipping level.
HINT
Setting optimum recording levels
Adjust the gain knobs so that the [PEAK] indicator flashes briefly at the loudest input volume.
④ [+48V] indicator
Lights up when the [+48V] switch (phantom power) is turned on.
⑤ [USB] indicator
Lights up when the power is turned on. This flashes continuously if a connected computer or iPad does not recognize the device, or if the power supply voltage falls below the standard level.
⑥ [INPUT 2 GAIN] knob
Adjusts the input signal level of the [MIC/LINE 2] jack.
⑦ [INPUT 2 HI-Z] switch
Switches the input impedance (on _/off). Turn this switch on when connecting high impedance instruments, such as an electric guitar or electric bass, directly to the [MIC/LINE 2] jack. When you turn this switch on, use an unbalanced phone plug for connection between the instruments and the [MIC/LINE 2] jack. If you use a balanced phone plug, this device will not work correctly.
![STEINBERG UR22 MKII - ⑦ [INPUT 2 HI-Z] switch - 1](/content/2026/05/760247/images/f89a56a0bae004266f072bd4fa9ecf5eebed6460d28e71de1379ccceaf02f8b3.jpg)
CAUTION
To protect your speaker system, leave the monitor speakers turned off when turning the [INPUT 2 HI-Z] switch on/off. It's also a good idea to turn all output level controls down to their minimum. Neglect of these precautions may result in loud noise bursts that may damage your equipment, your ears, or both.
NOTICE
Do not connect or disconnect any cables while turning on the [INPUT 2 HI-Z] switch. Doing so can damage the connected device and/or the unit itself.
8 [MIX] knob
Adjusts the signal level balance between the input signal to the [MIC/LINE 1/2] jacks and the signal from an application, such as DAW software. Both of the signals to the [MIC/LINE 1/2] jacks are mixed as a mono signal. Operation of this control knob does not affect the signal sent to a computer.
HINT
Using the Mix knob
Turn the [MIX] knob to the [DAW] side if the input volume is high and to the [INPUT] side if the input volume is low. When the knob is turned fully to the [DAW] side, only the input sound from DAW can be heard.
⑨ [PHONES] knob
Adjusts the output signal level of the [PHONES] jack. Operation of this control knob is independent from that of the [OUTPUT] knob.
10 [PHONES] jack
For connection to a set of stereo headphones.
⑪ [OUTPUT] knob
Adjusts the output signal level of the [LINE OUTPUT] jacks.
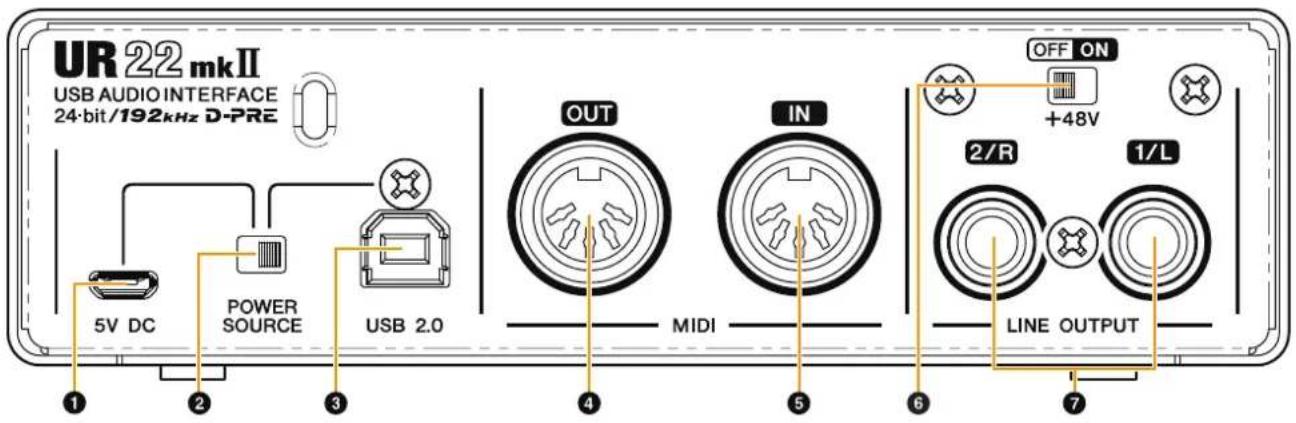
Rear Panel
text_image
UR 22 mkII USB AUDIO INTERFACE 24-bit/192kHz D-PRE 5V DC POWER SOURCE USB 2.0 OUT IN MIDI OFF ON +48V 2/R 1/L LINE OUTPUT① [5V DC] port
For connecting a USB power adapter or USB mobile battery. Use a Micro USB B connector for connection. Use a power supply when connecting the UR22mkII to a device that does not supply sufficient bus power, such as an iPad. (The UR22mkII does not include a USB power adapter or USB mobile battery.)
NOTICE
- Read the safety precautions for the USB power adapter or USB mobile battery that you use.
- Use a USB power adapter or USB mobile battery that can supply power in compliance with USB standards with a 5-pin micro USB plug.
Output voltage: 4.8 V to 5.2 V
Output current: 0.5 A or greater
HINT
Using the [5V DC] port
Even when the UR22mkII is connected to a computer, you can supply power via the [5V DC] port by external power supply if the [POWER SOURCE] switch is set to the [5V DC] side. Using an external power supply can help to prevent noise and other audio degradation caused by drawing power from the USB terminal of a computer.
② [POWER SOURCE] switch
For selecting the port for supplying power to the UR22mkII. To supply bus power via the [USB2.0] terminal, set this switch to the [USB2.0] side. To supply power via the [5V DC] port, set this switch to the [5V DC] side. When using an iPad, set this switch to the [5V DC] side. Even if you set the power supply to [5V DC], the power to the UR22mkII will not come on unless it is connected to a computer or an iPad by the [USB 2.0] terminal.
NOTE
When using a USB mobile battery, if the power of a computer or iPad connected to the [USB 2.0] terminal is off, the power supplied via the [5V DC] port is also stopped to prevent wasteful consumption of the battery.
③ [USB2.0] terminal
For connection to a computer or an iPad.
NOTICE
Be sure to observe the following points when connecting the device to the computer's USB interface. Failing to do so may result in the computer freezing or shutting down, as well as corruption or even loss of data. If the device or computer does freeze, restart the application or computer.
- Use an AB type USB cable. USB 3.0 cables are not supported.
- Be sure to wake the computer from sleep/suspended/standby mode before connecting it to the UR22mkll with a USB cable.
- Before connecting/disconnecting the USB cable, quit all open software applications on the computer.
- Before connecting or disconnecting the USB cable from the [USB2.0] terminal, be sure to set all output level controls to the minimum.
- Do not connect/disconnect the USB cable in rapid succession. Wait at least six seconds between connecting/disconnecting the USB cable.
④ [MIDI OUT] jack
For connection to the MIDI IN jack of the MIDI device. Transmits MIDI signals from the computer.
⑤ [MIDI IN] jack
For connection to the MIDI OUT jack of the MIDI device. Receives and inputs MIDI signals to the computer.
⑥ [+48V] switch
Turns on and off the phantom power. When you turn this switch on, phantom power will be supplied to the XLR jack connected to the [MIC/LINE 1/2] jacks. Only turn this switch on/off after connecting a phantom powered condenser microphone to the device. Always turn the phantom power switch to OFF when it is not required.
NOTICE
When using phantom power, observe the following to prevent noise and possible damage to UR22mkII or connected equipment.
- Do not connect or disconnect any devices while the phantom power switch is turned to ON.
- Set all output level controls to the minimum before turning the phantom power switch to ON or OFF.
- When connecting devices not requiring phantom power to the [MIC/LINE 1/2] jacks, make sure to turn the phantom power switch to OFF.
NOTE
When the phantom power switch is turned on and off, all inputs/outputs will be muted for a few seconds.
⑦ [LINE OUTPUT 2/R 1/L] jacks
For connecting to monitor speakers or external devices with line level signals. These jacks can be connected to phone-type (balanced/unbalanced).
Software
Yamaha Steinberg USB Driver is a software program that allows communication between the UR22mkII and a computer. In Control Panel, you can configure the basic settings for the audio driver (Windows) or confirm the audio driver information (Mac).
NOTE
Installing the Yamaha Steinberg USB Driver is not necessary when connecting the device to an iPad.
Windows
How to Open the Window
Use the following two methods.
- Select [Control Panel] [Hardware and Sound] or [Sounds, Speech, and Audio Devices] [Yamaha Steinberg USB Driver].
- From the Cubase series menu, select [Devices] → [Device Setup...] → [Yamaha Steinberg USB ASIO] → [Control Panel].
How to Select Windows
Click the upper tabs to select the desired window.
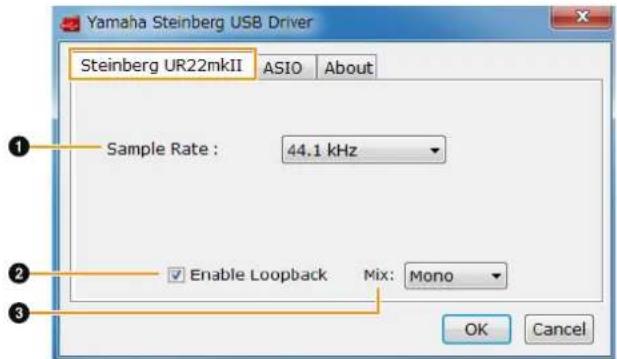
Steinberg UR22mkII Window
This window is for selecting the sample rate and for setting the loopback function.
text_image
Yamaha Steinberg USB Driver Steinberg UR22mkII ASIO About Sample Rate : 44.1 kHz Enable Loopback Mix: Mono OK Cancel① Sample Rate
Lets you select the sample rate of the device.
Options: 44.1 kHz, 48 kHz, 88.2 kHz, 96 kHz, 176.4 kHz, 192 kHz
NOTE
The available sample rates may differ depending on the particular DAW you're using.
② Enable Loopback
Turns the loopback function on and off with check box. Check the check box to set the loopback function on and off.
HINT
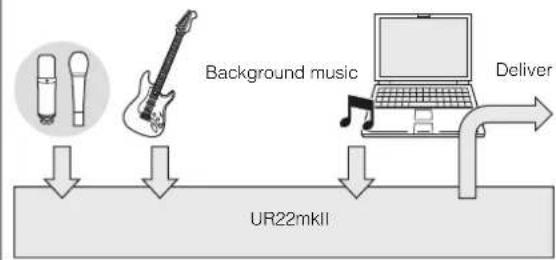
What is loopback?
Loopback is a convenient function for broadcasting over the Internet. It mixes the input audio signals (such as microphone and guitar) with the audio signals playing back in the software in the computer into two channels in the UR22mkII, and sends them back to the computer.
flowchart
graph TD
    A["Background music"] --> B["UR22mkII"]
    C["Deliver"] --> D["User interface"]
    style A fill:#f9f,stroke:#333
    style B fill:#ccf,stroke:#333
    style C fill:#cfc,stroke:#333
    style D fill:#fcc,stroke:#333
NOTE
When using the loopback function, turn off the monitor functions on your DAW software. If the loopback function is on while you are monitoring input signals form the UR22mkII via DAW software, it will cause loud noise. This is because an infinite loop of the audio signal is generated between the UR22mkII and the DAW software.
3 Mix
When Enable Loopback is set to on, select the input signal to Mono or Stereo.
Options: Mono, Stereo
Mono: [MIC/LINE 1/2] inputs will be recorded as mono.
Stereo: [MIC/LINE 1/2] inputs will be recorded as stereo. The [MIC/LINE 1] input will be L-channel. The [MIC/LINE 2] input will be R-channel.
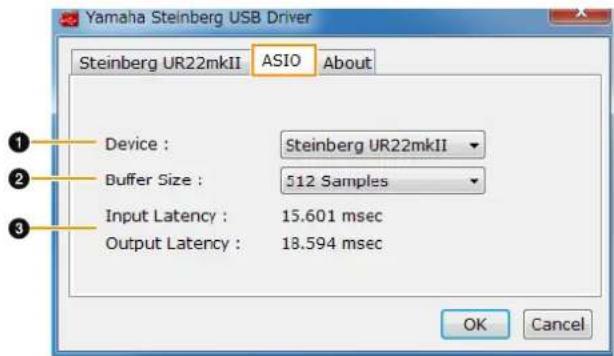
ASIO window
For selecting the ASIO driver settings.
text_image
Yamaha Steinberg USB Driver Steinberg UR22mkII ASIO About Device : Steinberg UR22mkII Buffer Size : 512 Samples Input Latency : 15.601 msec Output Latency : 18.594 msec OK Cancel① Device
Lets you select the device for use with the ASIO driver. (This function is available when connecting two or more devices that are compatible with the Yamaha Steinberg USB Driver to the computer.)
② Buffer Size
Lets you select the buffer size for the ASIO driver. The range varies depending on the specified sample rate. The lower the value of the ASIO buffer size, the lower the value of audio latency.
| Sample Rate Range | |
| 44.1 kHz/48 kHz 64 Samples – 2048 Samples | |
| 88.2 kHz/96 kHz 128 Samples – 4096 Samples | |
| 176.4 kHz/192 kHz 256 Samples – 8192 Samples | |
NOTE
The available sample rates may differ depending on the particular DAW you're using.
③ Input Latency/Output Latency
Indicates the latency (delay time) for the audio input and output in millisecond units.
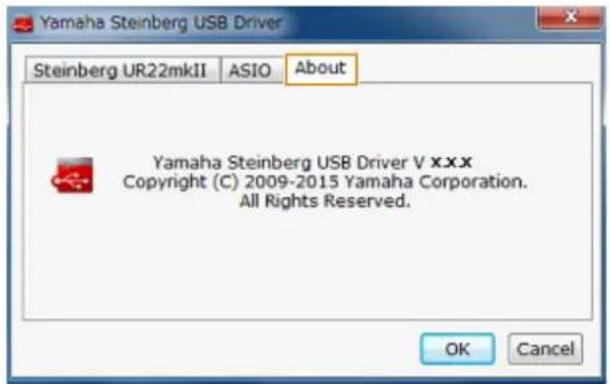
About window
Indicates the version and copyright information of the audio driver.
text_image
Yamaha Steinberg USB Driver Steinberg UR22mkII ASIO About Yamaha Steinberg USB Driver V XXXX Copyright (C) 2009-2015 Yamaha Corporation. All Rights Reserved. OK CancelMac
How to Open the Window
Use the following two methods.
- Select [System Preferences] → [Yamaha Steinberg USB].
- From the Cubase series menu, select [Devices] → [Device Setup...] → [Steinberg UR22mkII] → [Control Panel] → [Open Config App].
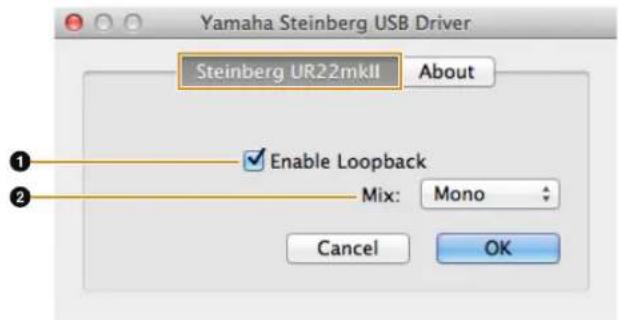
Steinberg UR22mkII Window
This window is for setting the loopback function.
text_image
Yamaha Steinberg USB Driver Steinberg UR22mkII About Enable Loopback Mix: Mono Cancel OK① Enable Loopback
Turns the loopback function on and off with check box. Check the check box to set the loopback function on and off.
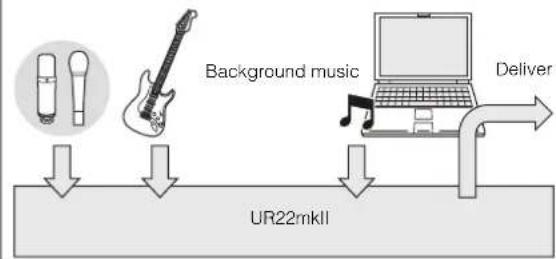
HINT
What is loopback?
Loopback is a convenient function for broadcasting over the Internet. It mixes the input audio signals (such as microphone and guitar) with the audio signals playing back in the software in the computer into two channels in the UR22mkII, and sends them back to the computer.
flowchart
graph TD
    A["Background music"] --> B["UR22mkII"]
    C["Delivery"] --> D["User with musical notes"]
    style A fill:#f9f,stroke:#333
    style B fill:#ccf,stroke:#333
    style C fill:#cfc,stroke:#333
    style D fill:#fcc,stroke:#333
NOTE
When using the loopback function, turn off the monitor functions on your DAW software. If the loopback function is on while you are monitoring input signals form the UR22mkII via DAW software, it will cause loud noise. This is because an infinite loop of the audio signal is generated between the UR22mkII and the DAW software.
③ Mix
When Enable Loopback is set to on, select the input signal to Mono or Stereo.
Options: Mono, Stereo
Mono: [MIC/LINE 1/2] inputs will be recorded as mono.
Stereo: [MIC/LINE 1/2] inputs will be recorded as stereo. The [MIC/LINE 1] input will be L-channel. The [MIC/LINE 2] input will be R-channel.
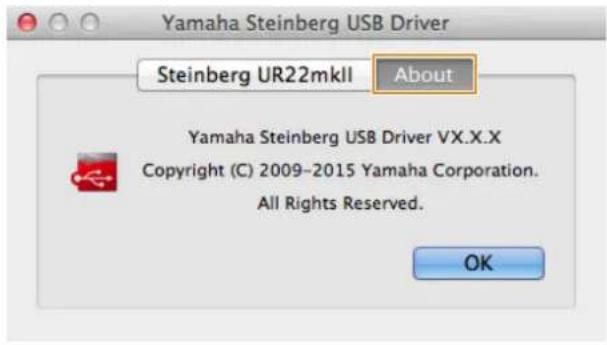
About Window
Indicates the version and copyright information of the audio driver.
text_image
Yamaha Steinberg USB Driver Steinberg UR22mkII About Yamaha Steinberg USB Driver VX.X.X Copyright (C) 2009-2015 Yamaha Corporation. All Rights Reserved. OKHINT
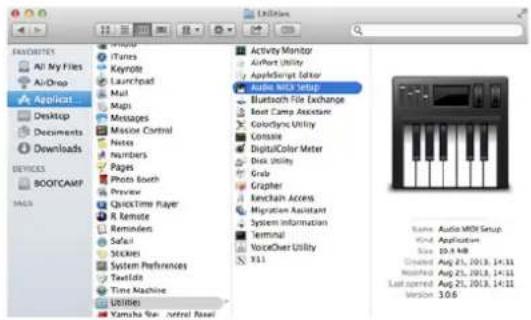
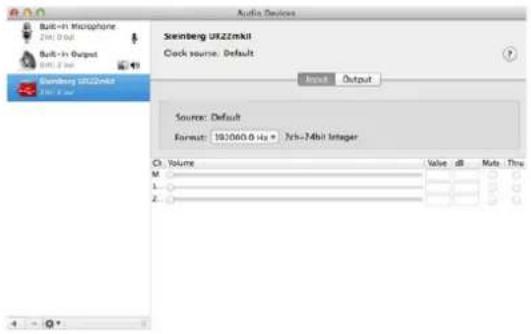
How to Select the Sample Rate
Select the sample rate in [Audio MIDI Setup] window.
- Select [Applications] → [Utilities] → [Audio MIDI Setup].
text_image
FADRIDERS All My Files Ai-Hop Applicet Desktop Documents Downloads DEVICES BOOTCAMP MADS iTunes Keynote Launchpad Mail Maps Messages Mission Control Notes Numbers Pages Photo Touch Preview QuickTime Player R Remote Reminders SafeL Stickers System Preferences TextInfo Time Machine Utilities Yamaha Spin - Control Base Activity Monitor Airport Utility Applications Editor Bluetooth File Exchange Boot Camp Assistant Golodyc Utility Controls DigitalColor Meter Disk Utility Grab Griopher Kenchain Access Migration Assistant System Information Terminal VoiceOver Utility 9.11 Audio Music Setup Kind Application Box 10.6 MB Created Aug 21, 2013, 14:11 Recorded Aug 21, 2013, 14:11 Last opened Aug 21, 2013, 14:11 Version 3.0.6- Select the sample rate from the [Format] menu.
text_image
Audio Devices Built-in Microphone 2041.0 dB Built-in Output 2041.0 dB Seimberg Ukzzmkit Clock source: Default Input Output Source: Default Format: 191060.0 Hz + 7ch=34bit Integer Ct: Volume M 1 2 Value dB Mute ThruHINT
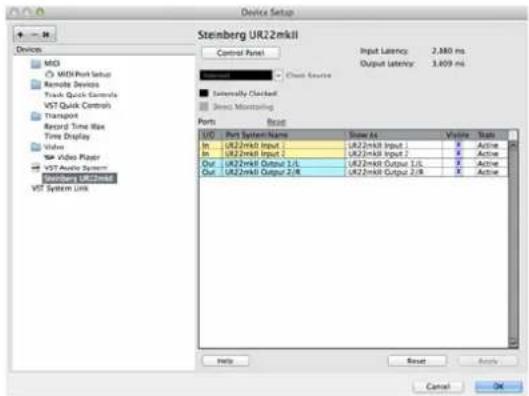
How to Select the Buffer Size
Select the buffer size in the settings window for each application (DAW software, etc.).
NOTE
The method for opening the settings window is different for each application.
- From the Cubase series menu, select [Devices] → [Device Setup...].
- Click [Control Panel] in [Steinberg UR22mkII] in the menu on the left side of the window.
text_image
Device Setup Steinberg UR22mkii Control Panel Input Latency: 2.880 ms Output Latency: 3.609 ms MOS MOS Port Setup Remote Devices Track Quick Controls VST Quick Controls Transport Record Time Rate Time Display Value Video Player VST Audio System Steinberg UR22mkii VST System Link Port Reset U/D Port System Name Snow AS Volume Status In UR22mkII Input U22mkII Input X Active In UR22mkII Input U22mkII Input 2 X Active Our UR22mkII Output 1/5 U22mkII Output 1/5 X Active Our UR22mkII Output 2/8 U22mkII Output 2/8 X Active Help Reset Apply Cancel OKThe window for selecting the buffer size appears.
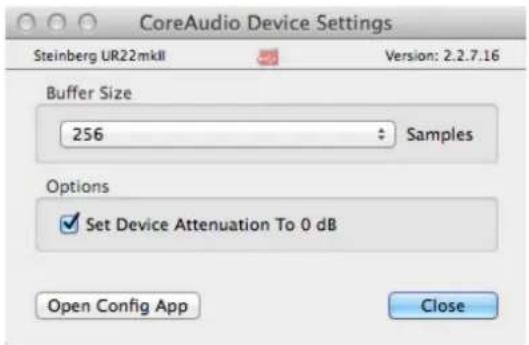
text_image
CoreAudio Device Settings Steinberg UR22mkll Version: 2.2.7.16 Buffer Size 256 Samples Options ✓ Set Device Attenuation To 0 dB Open Config App CloseUsing the UR22mkII
Connections
This section covers instructions for connecting a microphone and an electric guitar to the UR22mkII with a computer.
- Confirm that the output level of the [OUTPUT] and [PHONES] knobs are set to the minimum.
CAUTION
Make sure that you set all volume levels to minimum before connecting or disconnecting the external device. Otherwise, high-volume output may damage your hearing or the equipment.
- Confirm that the [+48V] and [INPUT 2 HI-Z] switches are off.
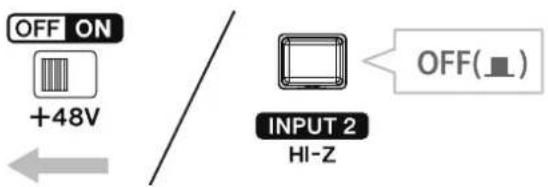
text_image
OFF ON +48V INPUT 2 HI-Z OFF(■)NOTICE
Do not connect or disconnect any cables while turning on the [+48V] switch and the [INPUT 2 HI-Z] switch. Doing so can damage the connected device and/or the unit itself.
- Move the [POWER SOURCE] switch on the rear panel to the [USB2.0] side.
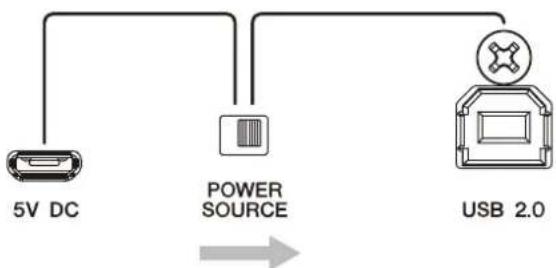
flowchart
graph TD
    A["5V DC"] --> B["POWER SOURCE"]
    B --> C["USB 2.0"]
- Connect the device directly to the computer by using the included USB cable.
NOTE
- Make sure that only one device compatible with Yamaha Steinberg USB Driver is connected.
-
(Windows only) Connect the USB cable to the same USB terminal that you used when installing the Yamaha Steinberg USB Driver. If you connect the USB cable to a different USB terminal, the Yamaha Steinberg USB Driver will be installed again.
-
Connect a microphone to the [MIC/LINE 1] jack.
-
Connect an electric guitar to the [MIC/LINE 2] jack.
- Turn the [INPUT 2 HI-Z] switch on.

text_image
ON(=) INPUT 2 HI-Z- Turn the [+48V] switch on when using a condenser microphone which requires phantom power.

The connection for a microphone and an electric guitar are now complete. For the connection for other devices such as an iPad, refer to the connection examples.
Connection examples
Connecting to a Computer Connecting to an iPad
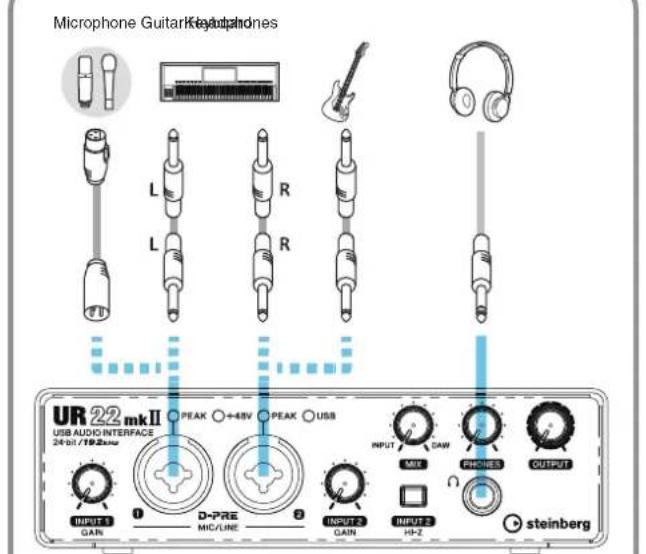
text_image
Microphone Guitar Keyphones UR 22 mkII USB AUDIO INTERFACE 24bit/192Hz INPUT 1 GAIN 1 D-PRE MIC/LME 2 INPUT 2 GAIN 3 INPUT 3 H-Z OUTPUT PHONES SteinbergFront Panel
Rear Panel
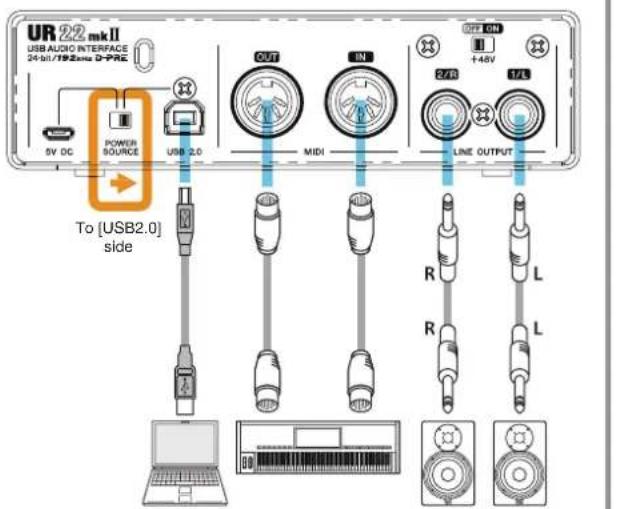
text_image
UR 22 mkII USB AUDIO INTERFACE 24-bit/192mm D-FRE 5V DC POWER SOURCE USB 2.0 To [USB2.0] side OUT IN MIDI LINE OUTPUT R L R LComputer
Synthesizer/MIDI Keyboard
Monitor speakers Synthesizer/
Microphone Guitar Keyphones
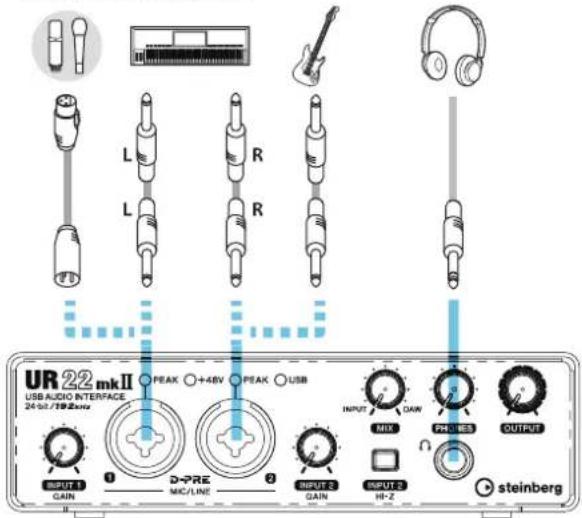
text_image
UR 22 mkII USB AUDIO INTERFACE 24-02/19-2xxx INPUT 1 GAIN 1 D-PRE MIC/LINE 2 PEAK ○+48V R R PEAK ○USB INPUT 2 GAIN INPUT 3 HI-Z MIX DAW PHONES OUTPUT steinbergFront Panel
Rear Panel
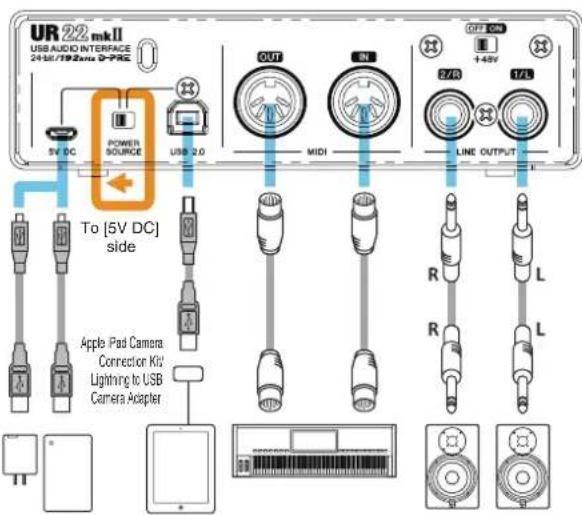
text_image
UR 22 mkII USB AUDIO INTERFACE 2416/792max S-785 5V DC POWER SOURCE USB 2.0 To [5V DC] side Apple Pad Camera Connection KV Lighting to USB Camera Adapter OUT MIDI LINE OUTPUT OFF ON 144V 17A R L R LMIDI Keyboard
NOTE
- The Apple iPad Camera Connection Kit or Lightning to USB Camera Adapter are required when connecting the UR22mkII with an iPad.
- A USB mobile battery or a power adapter is required when connecting the UR22mkII with an iPad.
- The loopback function is unavailable when connecting the UR22mkII with an iPad.
- For the latest information on compatible iOS devices, refer to the Steinberg website below.
http://www.steinberg.net/
Configuring Audio Driver Settings on the DAW Software
This section provides examples of connecting the UR22mkII to a computer. The explanations in this section assume that the Yamaha Steinberg USB Driver has been properly installed according to the "Getting Started" instructions included with the package.
Cubase Series Programs
- Make sure that all applications have been closed.
- Launch the Cubase series DAW.
- When the [ASIO Driver Setup] window appears while the Cubase series program is launching, confirm that the UR22mkII is selected, then click [OK].
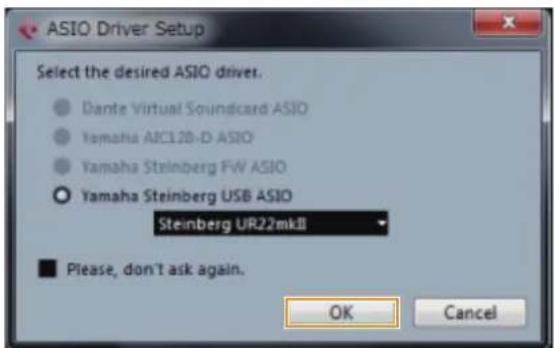
text_image
ASIO Driver Setup Select the desired ASIO driver. Dante Virtual Soundcard ASIO Yamaha AIC12B-D ASIO Yamaha Steinberg FW ASIO Yamaha Steinberg USB ASIO Steinberg UR22mkII Please, don't ask again. OK CancelThe audio driver settings are now complete.
Programs other than Cubase Series
- Make sure that all applications have been closed.
- Launch the DAW software.
- Open the audio interface settings window.
- (Windows only) Select the ASIO Driver for the audio driver settings.
- Set the ASIO Driver for Windows and audio interface for Mac as follows.
Windows
Set the ASIO Driver settings to [Yamaha Steinberg USB ASIO].
Mac
Set the UR22mkII to the appropriate audio interface settings.
The audio driver settings are now complete.
Recording/Playback
This section explains simple recording/playback operations for using a microphone and an electric guitar, using an existing template in Cubase (default settings).
Cubase Series Programs
- Launch the Cubase series DAW.
The [steinberg hub] window appears.
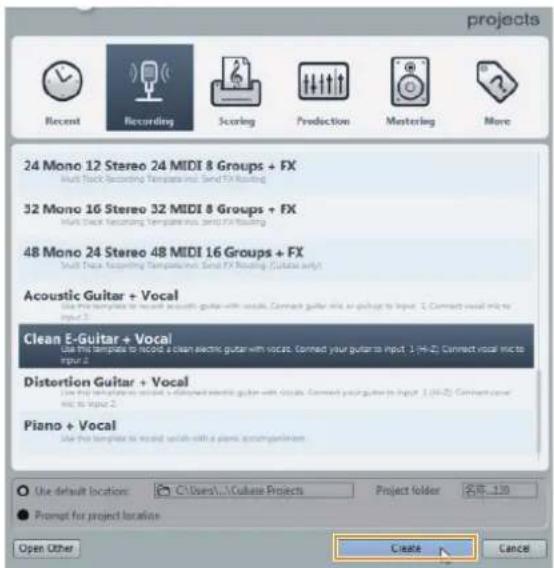
- Select a project template in [Recording], then click [Create].
The following example uses the [Clean E-Guitar + Vocal] template. This template already includes some tracks for recording a clean electric guitar and vocals.
text_image
projects Recent Recording Scoring Production Mastering More 24 Mono 12 Stereo 24 MIDI 8 Groups + FX Multi-Track Recording Template and Send FX Rating 32 Mono 16 Stereo 32 MIDI 8 Groups + FX Multi-Track Recording Template and Send FX Rating 48 Mono 24 Stereo 48 MIDI 16 Groups + FX Multi-Track Recording Template and Send FX Rating (Catala only) Acoustic Guitar + Vocal Use the template to record acoustic guitar with vocal. Connect guitar into a guitar to input 1. Connect vocal into input 2. Clean E-Guitar + Vocal Use the template to record a clean electric guitar with vocal. Connect your guitar to input 1. (19:42) Connect vocal into input 2. Distortion Guitar + Vocal Use the template to record a disordered electric guitar with vocal. Connect your guitar to input 1. (19:42) Connect vocal into input 2. Piano + Vocal Use the template to record vocal with a piano spring/phone Use default location: C:\Users\Cullase Projects Project folder 名: 139 Prompt for project location Open Other Create CancelNOTE
- If the [Missing Ports] window appears, select a UR22mkII port for each [Mapped ports].
-
Check [Map Always], and then click [OK]. By checking [Map Always], the [Missing Ports] window will not appear again.
-
Select [Devices] → [VST Connections] and open [VST Connections] window.
Sets the input/output between Cubase and UR22mkII.
4. Select UR22mkll ports for [Device Port] on both the inputs and outputs tabs.
Inputs Tab
![STEINBERG UR22 MKII - Select UR22mkll ports for [Device Port] on both the inputs and outputs tabs. - 1](/content/2026/05/760247/images/73840ef98e76df15b893ff2cbf203805660d552ab7e366be83693cf8f59d157d.jpg)
text_image
VST Connections - Input Inputs Outputs Group/FX All Add Bus Presets Bus Name Speakers Audio Device Device Port Stereo In 1 Stereo Not Connected Left Right Mono In 1 Mono Yamaha Steinberg USB ASIO Mono In 2 Mono Yamaha Steinberg USB ASIO Mono Mono UR22mkB Input 1 UR22mkB Input 2Outputs Tab
![STEINBERG UR22 MKII - Select UR22mkll ports for [Device Port] on both the inputs and outputs tabs. - 2](/content/2026/05/760247/images/bc22da103b8df7414cee81af5fa0b0a9ea74c614adf39bb88965620824a4c5fb.jpg)
text_image
VST Connections - Outputs Inputs Outputs Group/FX Enter All Add Bus Presets Bus Name Speakers Audio Device Device Port Stereo Out Stereo Yamaha Steinberg USB ASIO Left Right UR22mkII Output 1/L UR22mkII Output 2/R5. Set the [MIX] knob of the device to the center position between [INPUT] and [DAW].
6. Adjust the input signal level of the microphone or guitar with the [INPUT GAIN] knob on the device.
If you have a microphone connected to the [MIC/LINE 1] jack, adjust the [INPUT 1 GAIN] knob. If you have a guitar connected to the [MIC/LINE 2] jack, adjust the [INPUT 2 GAIN] knob.
HINT
Setting optimum recording levels
Adjust the gain knobs so that the [PEAK] indicator flashes briefly at the loudest input volume.
7. While singing into the microphone or playing the guitar, adjust the output signal level of the headphones with the [PHONES] knob on the device.
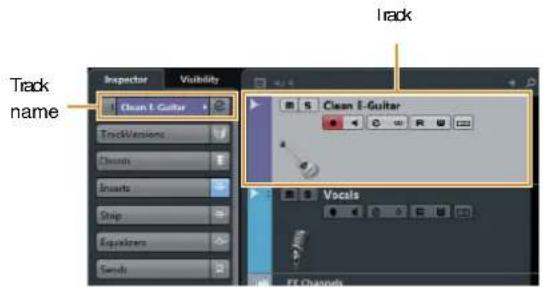
8. Select desired track for recording.
Click the [Clean E-Guitar] track or [Vocals] track in this template. The recording is ready when clicking the track.
text_image
Track name Inspector Visibility Clean I-Guitar Track/Versions Chords Inserts Strip Equalizers Sends Track Clean I-Guitar Vocals FF Channels9. Select the input routing in the inspector.
When a microphone is connected to the [MIC/LINE 1] jack:
Click the track name on the left side of the project window.
![STEINBERG UR22 MKII - When a microphone is connected to the [MIC/LINE 1] jack: - 1](/content/2026/05/760247/images/a2c51e5d0368f45947212d32864d48d8a3ef6427b6d03c6eef07a62191e36bc2.jpg)
text_image
Track name Inspector VisibilityVecans
TrackVersions Chords Inserts Skip Equalizers Sends Direct Rotation In the window that appears below, select [Mono-In 1]. Inspector VisibilityVecans
0.80 40% 0.80 Mono-Back Last Vecls Mono-In 1 No Bus Stereo In 1 Looks Right Mono-In 1 Mono-In 2 Sends Direct RotationWhen a guitar is connected to the [MIC/LINE 2] jack:
Click the track name on the left side of the project window.
![STEINBERG UR22 MKII - When a guitar is connected to the [MIC/LINE 2] jack: - 1](/content/2026/05/760247/images/848a0545a0025be7d02577ec225f8d651a3584c26d1ae5e16188b2842d720598.jpg)
text_image
Track name Inspector Visibility 1 Clean E-Guitar TrackVersions Chords Inserts Strip Equals Sends Direct RunningIn the window that appears below, select [Mono-In 2].
![STEINBERG UR22 MKII - When a guitar is connected to the [MIC/LINE 2] jack: - 2](/content/2026/05/760247/images/cb9f0a21a9289342f82b51f62556a95ad7d2a4af13a08acfa260a7d8b13f9639.jpg)
text_image
Inspector Visibility Clean E-Guitar 0.00 0.00 No Track Presed Mono In 2 + - No Bus Stereo In 1 Mono In 1 Mono In 2 FX - FX 1-Recordwork- Click [●] at the top of the screen to start recording.
![STEINBERG UR22 MKII - When a guitar is connected to the [MIC/LINE 2] jack: - 3](/content/2026/05/760247/images/ab839f3e27e7148b70f7f9e45664d517265b55aa9771a440f709a39c1e5f958f.jpg)
natural_image
User interface button with play, pause, and stop symbols (no text or numbers visible)- Click [■] at the top of the screen to stop recording.
![STEINBERG UR22 MKII - When a guitar is connected to the [MIC/LINE 2] jack: - 4](/content/2026/05/760247/images/9e826320f98f68f6c9d2e1bc8b754189dfe8326210b89ae0d5e388b365f45cfd.jpg)
natural_image
User interface button with play, play triangle, and circle buttons (no text or symbols)- Click the Ruler to move the project cursor to the desired point for starting playback.
![STEINBERG UR22 MKII - When a guitar is connected to the [MIC/LINE 2] jack: - 5](/content/2026/05/760247/images/e9224509ae712ea34d6c2eb649b7c7b3b825e96aae471dfb3058a40b9ef57c2b.jpg)
text_image
11 13- Click [▶] at the top of the screen to check the recorded sound.
When listening to the sound over monitor speakers, adjust the output signal level by the [OUTPUT] knob on the device.
![STEINBERG UR22 MKII - When a guitar is connected to the [MIC/LINE 2] jack: - 6](/content/2026/05/760247/images/dff724e1862d1e2469033b654f7de87f1d78ddb122b035a7316f869281c6b224.jpg)
The recording and playback operations are now complete.
For more detailed instructions on using Cubase series programs, refer to the PDF manual, available from [Help] in the Cubase series menu.
Programs other than Cubase Series
-
Launch the DAW software.
-
Adjust the input signal level of the microphone or guitar with the [INPUT GAIN] knob on the device.
HINT
Setting optimum recording levels
Adjust the gain knobs so that the [PEAK] indicator flashes briefly at the loudest input volume.
-
Set the [MIX] knob of the device to the center position between [INPUT] and [DAW].
-
While singing into the microphone or playing the guitar, adjust the output signal level of the headphones with the [PHONES] knob on the device.
-
Start recording on your DAW software.
-
After finishing recording, stop it.
-
Playback the newly recorded sound to check it.
The recording and playback operations are now complete.
For more detailed instructions on using the DAW software, refer to your particular DAW's software manual.
Using the UR22mkII with connected MIDI device
This section explains the Cubase settings for using the VST instrument HALion Sonic SE with connected MIDI device.
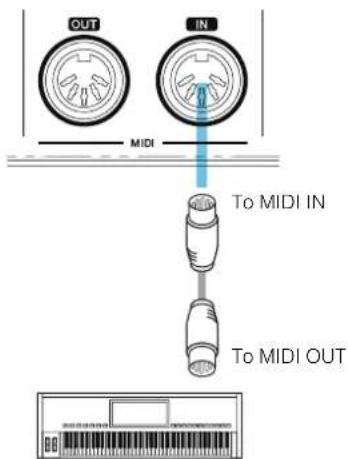
1. Confirm the connection between the MIDI device and UR22mkII.
Connect the MIDI IN of the UR22mkII to the MIDI OUT jack of the MIDI device with a MIDI cable.
text_image
OUT IN MIDI To MIDI IN To MIDI OUTSynthesizer/MIDI keyboard
2. Open the Instrument track in the project window.
[Project] → [Add Track] → [Instrument...]

text_image
File Edit Project Audio MIDI Scores Media Transport Devices Workspaces Window Add Track Audio... Duplicate Tracks Instrument... Remove Selected Tracks MIDI...3. In the window that appears below, select HALion Sonic SE and click [Add Track].
![STEINBERG UR22 MKII - In the window that appears below, select HALion Sonic SE and click [Add Track]. - 1](/content/2026/05/760247/images/ee570de09723b62dc3ac9679b1daa3abecc1baf3c57f3486144ba62fc48b388a.jpg)
text_image
Add Instrument Track Browse 1 HAlon Sonic SE Add Track Cancel Default No VST Instrument Drum Groupe Agent SE System HAlon Sonic SE LoopMatch Myrist Pushing Prologue Refringler Spangler![STEINBERG UR22 MKII - In the window that appears below, select HALion Sonic SE and click [Add Track]. - 2](/content/2026/05/760247/images/594075c801fd9b0caf1a3b83238552e24676ca8b6d1a28bfcda32b73bd51b89f.jpg)
The appropriate instrument track will be added to the template.
![STEINBERG UR22 MKII - In the window that appears below, select HALion Sonic SE and click [Add Track]. - 3](/content/2026/05/760247/images/060e84c0e8a7a22ab5898ef2009b04e7aaae7020b19659c9587990f214564e08.jpg)
text_image
m s HALion Sonic SE 01 FX Channels 01 - HALion Sonic HALION SONIO4. Select the input routing in the inspector.
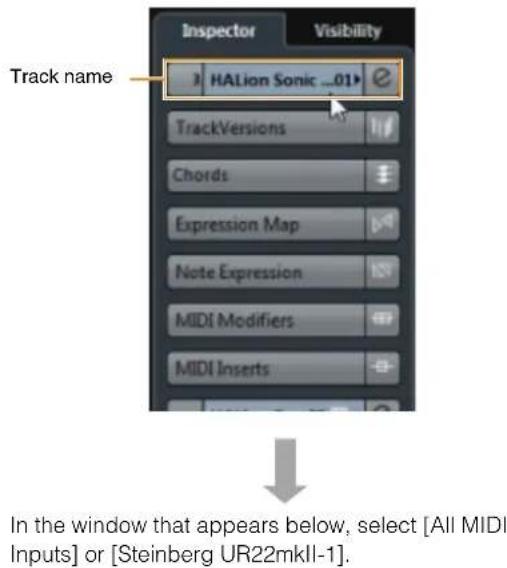
Click the track name on the left side of the project window.
text_image
Inspector Visibility Track name HALion Sonic _01 TrackVersions Chords Expression Map Note Expression MIDI Modifiers MIDI Inserts In the window that appears below, select [All MIDI Inputs] or [Steinberg UR22mkII-1]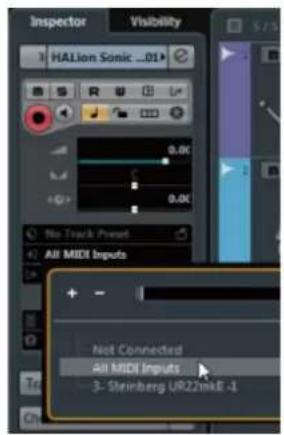
text_image
Inspector Visibility HALion Sonic _01 0.0K 0.0K No Track Preset All MIDI Inputs - Not Connected All MIDI Inputs 3- Steinberg UR22mA E -1The settings are now complete.
For more detailed instructions on using the DAW software, refer to your particular DAW's software manual.
Troubleshooting
| Power does not turn on.(The USB indicator is off or flashing continuously, even though the UR22mkll is connected to a computer.) | Has the Yamaha Steinberg USB Driver been installed properly?Refer to the Getting Started instructions to complete the Yamaha Steinberg USB Driver installation.To confirm the installation, follow these steps:1. Connect the device directly to the computer by using a USB cable.Make sure not to connect it to a USB hub.2. Open the Device Manager windows (Windows) or Audio MIDI Setup window (Mac) as follows.WindowsSelect [Control Panel] → [Device Manager].Click on the [+] mark or [>] mark next to “Sound, video and game controllers.”MacSelect [Applications] → [Utilities] → [Audio MIDI Setup].3. Confirm that the device name is listed. |
| Confirm whether or not a proper USB cable is being used.If the USB cable is broken or damaged, replace the USB cable with a new one.Make sure to use a USB cable no longer than 3 meters. | |
| Is the [POWER SOURCE] switch set properly?Set the power source switch accordingly: to [USB2.0] when using bus-powered operation, or to [5V DC] when connecting to a USB AC adapter or USB portable battery. | |
| No sound | Has the Yamaha Steinberg USB Driver been installed properly?Refer to the Getting Started instructions to complete the Yamaha Steinberg USB Driver installation. |
| Confirm whether or not a proper USB cable is being used.If the USB cable is broken or damaged, replace the USB cable with a new one.Make sure to use a USB cable no longer than 3 meters. | |
| Are the volume controls of the device set to appropriate levels?Confirm the levels of the [OUTPUT] knob and [PHONES] knob. | |
| Are the microphones and monitor speakers connected to the device properly?Refer to the section “Connection Examples” (page 11) to confirm the connection. | |
| Are the audio driver settings on DAW software set properly?Refer to the section “Configuring the Audio Driver Settings on DAW Software” (page 12) to set it. |
No sound
Is the [ASIO Driver] setting on the Cubase series program set properly?
From the Cubase series menu, open the [Devices] → [Device Setup...] → [VST Audio System], then confirm that the [Yamaha Steinberg USB ASIO] (Windows) or [Steinberg UR22mkII] (Mac) is selected on the [ASIO Driver].
Windows
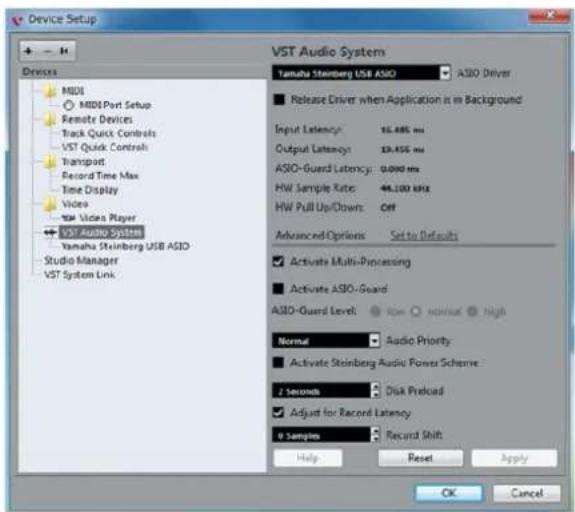
text_image
Device Setup + - 4 Devices MDI MIDI Port Setup Remote Devices Track Quick Controls VST Quick Controls Transport Record Time Max Time Display Videos Video Player + VST AUDIO SYSTEM Yamaha Steinberg USB ASIO Studio Manager VST System Link VST Audio System Tamaha Steinberg USB ASIO ASIO Driver Release Driver when Application is in Background Input Latency: 15.485 ms Output Latency: 13.456 ms ASIO-Guard Latency: 0.000 ms HW Sample Rate: 44.200 kHz HW Pull Up/Down: Off Advanced Options Set to Defaults Activate Multi-Processing Activate ASIO-Guard ASIO-Guard Level: Low Normal High Normal Audio Priority Activate Steinberg Audio Power Scheme: 2 Seconds Disk Preload Adjust for Record Latency 0 Samples Record Shift Help Reset Apply OK CancelMac
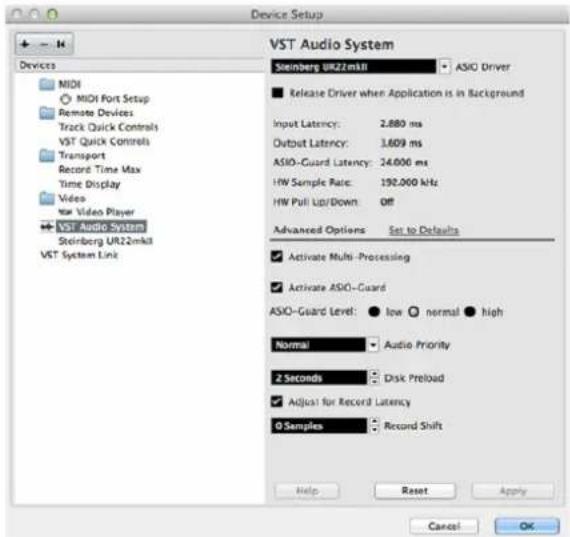
text_image
Device Setup + - + - Devices MIDI MIDI Port Setup Remote Devices Track Quick Controls VST Quick Controls Transport Record Time Max Time Display Video New Video Player VST Audio System Steinberg UR22mkl VST System Link VST Audio System Steinberg UR22mkl ASIO Driver ■ Release Driver when Application is in Background Input Latency: 2.880 ms Output Latency: 3.609 ms ASIO-Guard Latency: 24.000 ms HW Sample Rate: 192.000 kHz HW Pull Up/Down: Off Advanced Options Set to Defaults ✓ Activate Multi-Processing ✓ Activate ASIO-Guard ASIO-Guard Level: low normal high Normal Audio Priority 2 Seconds Disk Preload ✓ Adjust for Record Latency 0 Samples Record Shift Help Reset Apply Cancel OKWas the power of the device turned on before starting the DAW software?
Before starting the DAW software, connect the device to a computer and turn on the power of the device.
Is the input/output routing set properly?
Refer to the section "Recording/Playback" (page 13) to check the input/output routing in the DAW.
Is the monitor speaker switch turned on?
Confirm that the monitor speaker switch is turned on.
Is the buffer size set too low?
Increase the buffer size compared to the current settings. For instructions, refer to the section "Yamaha Steinberg USB Driver (Windows)" (page 8) or "How to Select the Buffer Size (Mac)" (page 9).
| Unusual sound (noise, interruption, or distortion) | Does your computer satisfy the system requirements? Confirm the system requirements. For the latest information, see the Steinberg website below. http://www.steinberg.net/ |
| Are you recording or playing long continuous sections of audio? The audio data processing capabilities of your computer will depend on a number of factors including CPU speed and access to external devices. Reduce the audio tracks and check the sound again. | |
| Are the microphones properly connected to the device? Connect a microphone with an XLR plug to the device. If you use a phone plug, the volume may be insufficient. | |
| Is the [MIX] knob set properly? Turn the [MIX] knob fully to the [DAW] side if both the input signal to the device and the output signal from DAW software are being output. | |
| Is the loopback function set properly? Set Enable Loopback to off when not using the Loopback function. For instructions, refer to the section “Steinberg UR22mkII Window (Windows)” (page 7) or “Steinberg UR22mkII Window (Mac)” (page 8). |
For the latest support information, refer to the Steinberg website below.
http://www.steinberg.net/
Appendix
Block Diagrams
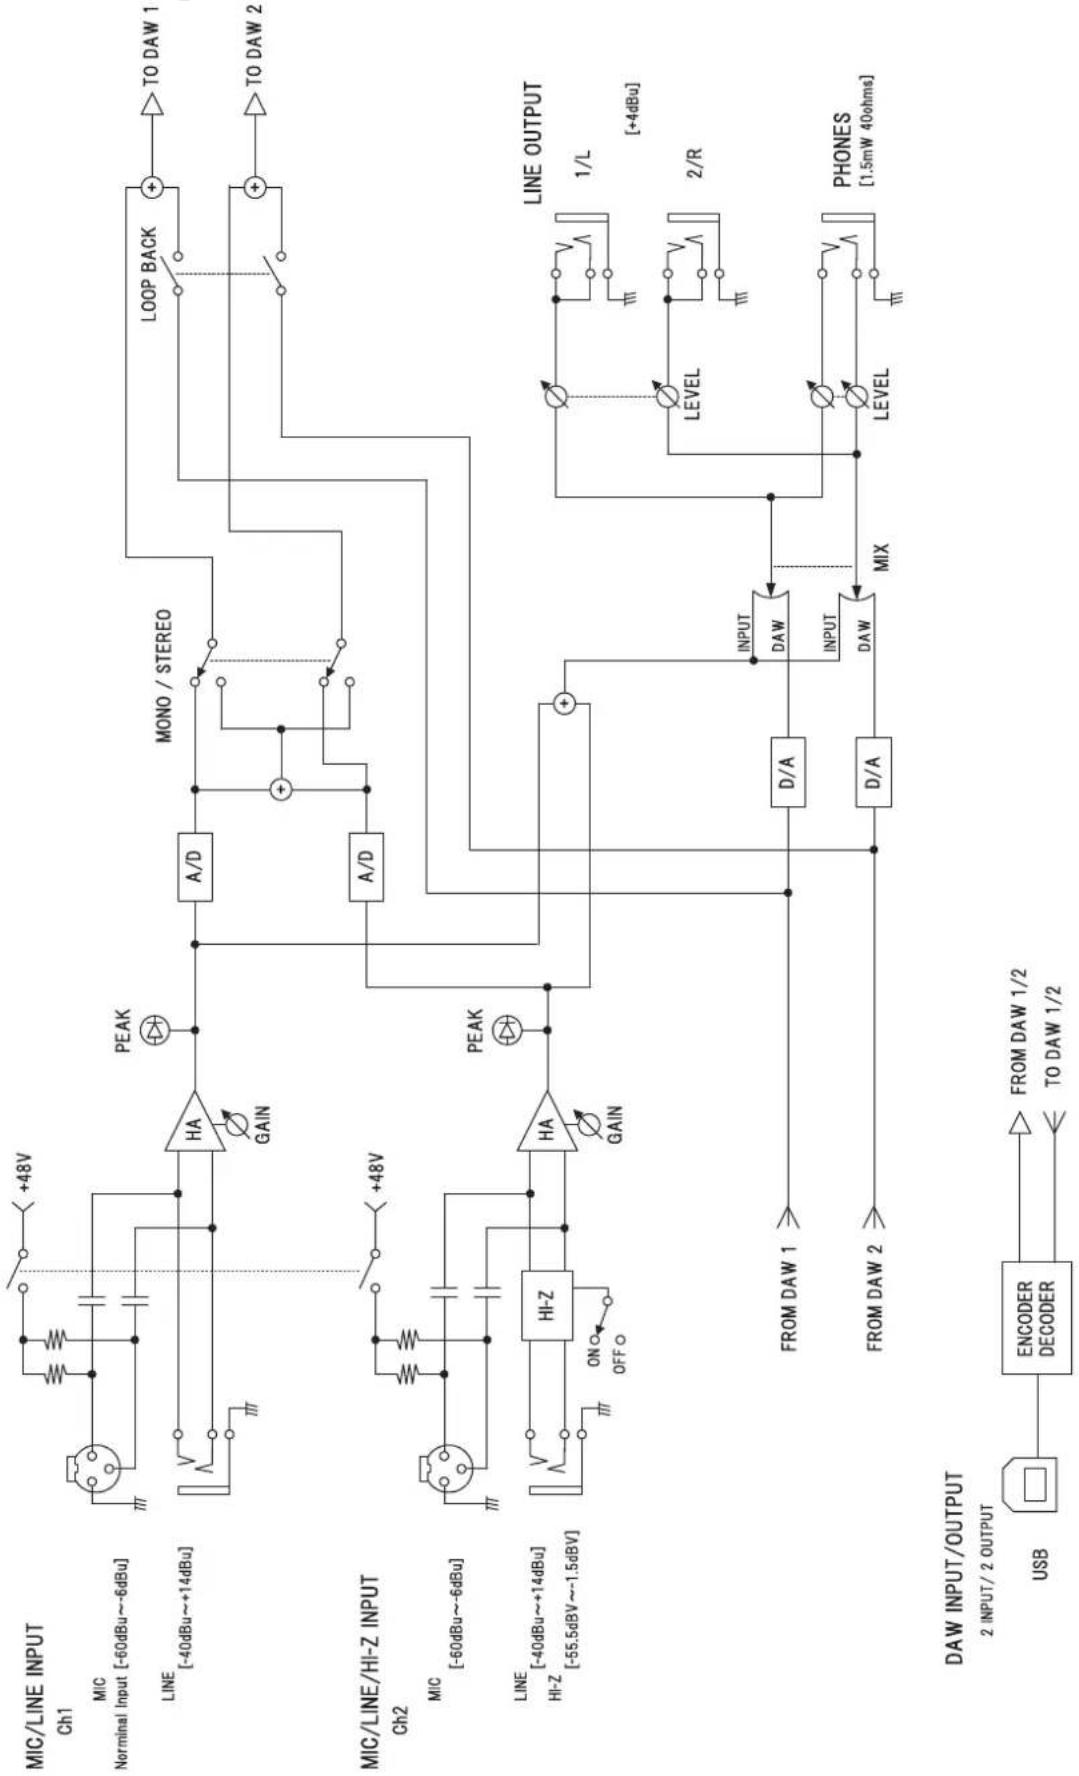
flowchart
graph TD
    subgraph_MIC_LINE_INPUT["Ch1"]
        A["+48V"] --> B["Line [-40dBu~+14dBu"]]
        C["PEAK"] --> D["HA"]
        E["GAIN"] --> F["A/D"]
        G["MONO / STEREO"] --> H["A/D"]
        I["LOOP BACK"] --> J["TO DAW 1"]
        K["TO DAW 2"] --> L["TO DAW 2"]
    end

    subgraph MIC_LINE/HI-Z_INPUT["Ch2"]
        M["+48V"] --> N["Line [-60dBu~-6dBu"]]
        O["PEAK"] --> P["HI-Z"]
        Q["OPEN"] --> R["HA"]
        S["ON/OFF"] --> T["HI-Z"]
        U["OPEN"] --> V["HI-Z"]
        W["OPEN"] --> X["HI-Z"]
        Y["OPEN"] --> Z["HI-Z"]
    end

    subgraph_LINE_OUTPUTS["LINE OUTPUT 1/L 1L 2/R"]
        AA["INPUT D/A"] --> AB["D/A"]
        AC["INPUT D/A"] --> AD["D/A"]
        AE["MIX"] --> AF["D/A"]
        AG["LEVEL"] --> AH["D/A"]
        AI["PHONES 1.5mW 40ohms"] --> AJ["D/A"]
    end

    subgraph DAW_INPUT/OUTPUT["DAW INPUT/2 OUTPUT USB"]
        AK["ENCODER DECODER"] --> AL["FROM DAW 1/2 TO DAW 1/2"]
    end
Steinberg Website
http://www.steinberg.net/
Manual Development Department
© 2015 Yamaha Corporation
Published 9/2015 MW-A0