
Platform M+ - Mixer icon - Free user manual and instructions
Find the device manual for free Platform M+ icon in PDF.


| Product Type | MIDI/Audio Control Surface |
| Brand | ICON ProAudio |
| Model | Platform M+ |
| Dimensions | 395 x 196 x 58 mm (15.6 x 7.7 x 2.3 in) |
| Weight | 1.855 kg (4.1 lb) |
| Power Supply | 12V / 2.5A DC (adapter included) |
| Current Consumption | 2.0A or less |
| Connectivity | USB 2.0 (MIDI), 3 x Extension ports, Platform D/D2 port, 4 expansion device ports |
| Faders | 8+1 touch-sensitive motorized faders (100mm, 10-bit resolution) |
| Knobs | 8 dual-function encoder knobs (rotate and enter) |
| Jog Wheel | Yes, with shuttle and scrubbing functions |
| Transport Controls | Play, Stop, Rec, Rewind, Fast Forward, Loop (illuminated) |
| Channel Controls | SEL, Mute, Solo, Record (illuminated buttons per channel) |
| Zoom Controls | Illuminated Left/Right and Up/Down buttons (used with jog wheel) |
| Bank/Track Navigation | 2 Bank buttons (8-channel shift), 2 Track buttons (1-channel shift) |
| DAW Protocols | Mackie Control and HUI (universal control) |
| Compatible DAWs | Cubase, Nuendo, Logic Pro, Ableton Live, Pro Tools, Samplitude, Reaper, Studio One, Reason, Bitwig, Sonar, Audition, FL Studio, Digital Performer |
| Software | iMap (for MIDI mapping and firmware upgrade) |
| Firmware Upgrade | Via USB and iMap software |
| Construction | Robust metal casing with Kensington lock port |
| Operating Systems | Windows XP/Vista/7/8/10 (32/64-bit), Mac OS X (Intel-Mac) |
| Accessories Included | Quick Start Guide, USB 2.0 cable, AC adapter |
| Cleaning Instructions | Use a dry or slightly damp soft cloth. Do not expose to rain or moisture. |
| Safety Features | Polarized/grounding plug, ventilation openings, no exposed wiring |
| Spare Parts / Repairability | Service by qualified personnel; contact ICON support for repairs |
Frequently Asked Questions - Platform M+ icon
User questions about Platform M+ icon
0 question about this device. Answer the ones you know or ask your own.
Ask a new question about this device
Download the instructions for your Mixer in PDF format for free! Find your manual Platform M+ - icon and take your electronic device back in hand. On this page are published all the documents necessary for the use of your device. Platform M+ by icon.
USER MANUAL Platform M+ icon
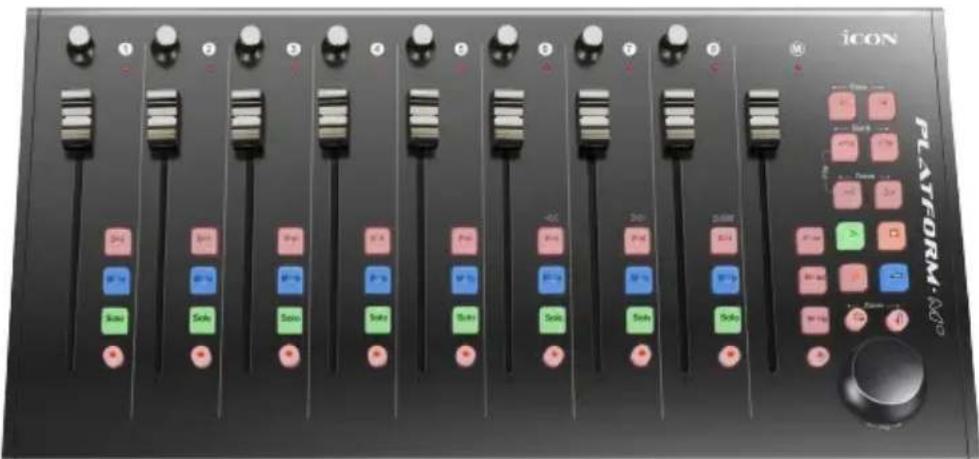
MIDI/Audio control surface with motorized faders

The lightning flash with arrowhead symbol within an equilateral triangle, is intended to alert the user to the presence of uninsulated dangerous voltage within the product's enclosure, that may be of sufficient magnitude to electric shock to persons. Le symbol clair avec point de fl che l'int rieur d'un triangle quillat ral est utilis pour alerter l'utilisateur de la pr sence l'int rieur du coffret de voltage dangereux non isol d'ampleur suff
Important Safety Instructions
-
Read this manual thoroughly before using this unit.
-
Keep this manual for future reference.
-
Take notice of and comply with all warnings included in the user's manual or indicated on the appliance.
-
Follow all instructions included in this manual.
-
Do not expose this unit to rain or moisture. Avoid having water or other liquids spilled on this unit.
-
When cleaning the cabinet or other parts of this appliance, use only a dry or slightly damp soft cloth.
-
Do not block any ventilation openings or interfere with the proper ventilation of this unit. Install in accordance with the manufacturer's instructions.
-
Do not use or store near any heat sources such as radiators, heat registers, stoves, or other heat-producing appliances.
-
Do not interfere with the safety purpose of the polarized or grounding-type plug. A polarized plug has two blades with one wider than the other. A grounding-type plug has two blades and a third grounding prong. These are designated for your safety. If the provided plug does not fit into your outlet, consult an electrician.
-
Protect the power cord from being walked on or otherwise damaged by items placed on or against them. Particular attention should be given to the plugs, receptacles, and the point where the cord exits the appliance.
-
To avoid the risk of electrical shock, do not touch any exposed wiring while the unit is in operation.
-
Only use attachments/accessories specified by the manufacturer.
-
Unplug this unit and all connected electrical equipment during lightning storms or when left unused a long period of time.
-
Refer all servicing to qualified service personnel. Servicing is required when the appliance has been damaged in any way or fails to operate normally.
WARNING: To reduce the risk of fire or electric shock, do not expose this unit to rain or moisture
Contents
Introduction......4
What's in the package? 4
Register your ICON ProAudio product to your personal account ....5
Features 6
Layout Deckplatte....7
Rear Panel Layout....9
Getting Started ....10
Connecting Your Platform M+ Controller....10
(Expander \~ use with Platform X+). 11
Cubase 14
Ableton Live....16
Logic Pro 17
Samplitude....19
Pro Tools....21
(Standalone)....23
Cubase 23
Nuendo....24
Logic Pro 25
Samplitude....26
Bitwig....28
Reason 29
Reaper....30
Studio One....31
Ableton Live....32
Pro Tools....33
Download the Mac iMap from your Personal....35
User Page at www.iconproaudio.com....35
Installing iMap TM Software for Windows 37
Assigning DAW mode (Mackie Control/HUI)....39
or self define MIDI functions with iMap™ 39
Assigning DAW mode (Mackie control/HUI)....40
with iMap TM 40
Assigning MIDI message with User Define mode at iMap TM .....42
Control element setup at User defines mode 44
Other Functions in iMap TM 46
Firmware upgrade 47
Restore the factory default settings....51
Connecting expansion modules ....51
Specifications ....52
Services....53
Introduction
Thank you for purchasing the ICON Platform M+ Midi/Audio control surface. We sincerely trust this product will provide years of satisfactory service, but if anything is not to your complete satisfaction, we will endeavor to make things right.
In these pages, you'll find a detailed description of the features of the Platform M+, as well as a guided tour through its front and rear panels, step-by-step instructions for their setup and use, and full specifications.
Please register the product on our website at the below link www.iconproaudio.com/registration:
Please follow the step by step procedures starting from input the device's serial number to your personal information etc. By registering your product online, you will entitle to several different services and after-sales supporting at our ACS help center by visiting our website at www.iconproaudio.com. Also, all the registered products under your account will be listed on your personal product page where you could get update information such as firmware/driver upgrade, software bundle and user manual download etc for your device.
As with most electronic devices, we strongly recommend you retain the original packaging. In the unlikely event the product must be returned for servicing, the original packaging (or reasonable equivalent) is required.
With proper care and adequate air circulation, your Platform M+ will operate without any trouble for many years. We recommend that you record your serial number in the space provided below for future reference.
What's in the package?
- Platform M+ USB-MIDI Controller x 1pc
- Quick Start Guide x 1
- USB2.0 Cable x 1
- AC adaptor x 1pc
Register your ICON ProAudio product to your personal account
1. Check serial number of your device
Please go to http://iconproaudio.com/registration or scan the QR code below.

Input your device's serial number and the other information on the screen. Click "Submit".
A message will pop up showing your device information such as model name and its serial number - Click "Register this device to my account" or if you see any other message, please contact our after-sales service team
2. Log in to your personal account page for existing user or sign up for new user
Existing user: Please log into your personal user page by inputing your user name and password.
New user: Please click "Sign Up" and fill in all the information.
3. Download all useful materials
All your registered devices under your account will show on the page. Each product will be listed along with all its available files such as drivers, firmware, user manual in different languages and bundled software etc. for download. Please make sure you have download the necessary files such as driver before you begin device installation.
Features

• Extremely compact, durable and versatile
- Customize the perfect setup with a variety of Platform extension modules
• 8+1 touch-sensitive motorized faders with 10-bit resolution
• 8 dual-functions encoder knobs (Rotate and enter)
• Jog wheel shuttle for fast search and control
- Illuminated buttons for each channel including Sel, Mute, Solo and Record
- 6 illuminated transport buttons including Play, Stop, Rec, Rewind, Fast forward and Loop
- Illuminated "Zoom" buttons with 2 directional keys (Left/Right & Up/Down) used in combination with the jog wheel
- 2 illuminated "Track" buttons for easy selection of different channels
• 2 illuminated "Bank" buttons for shifting 8-channels
• 3 x Extension ports equipped for extension modules
- Universal Mackie Control and HUI DAW remote control for studio & live applications.
• Supports HUI and Mackie Control protocols for seamless intergartion with every compatible music production software
- iMapsoftware included for easy mapping of MIDI functions
- Firmware upgrade available simply via USB connection and iMap software
- Class-compliant with Windows XP, Vista (32-bit & 64-bit), Windows 7/8/10 (32-bit & 64-bit) and Mac OS X (IntelMac)
• USB 2.0 high speed connectivity
• Superior build quality and robust metal casing with Kensington lock port
• 12V/2. 5A power adapter included
Layout Deckplatte
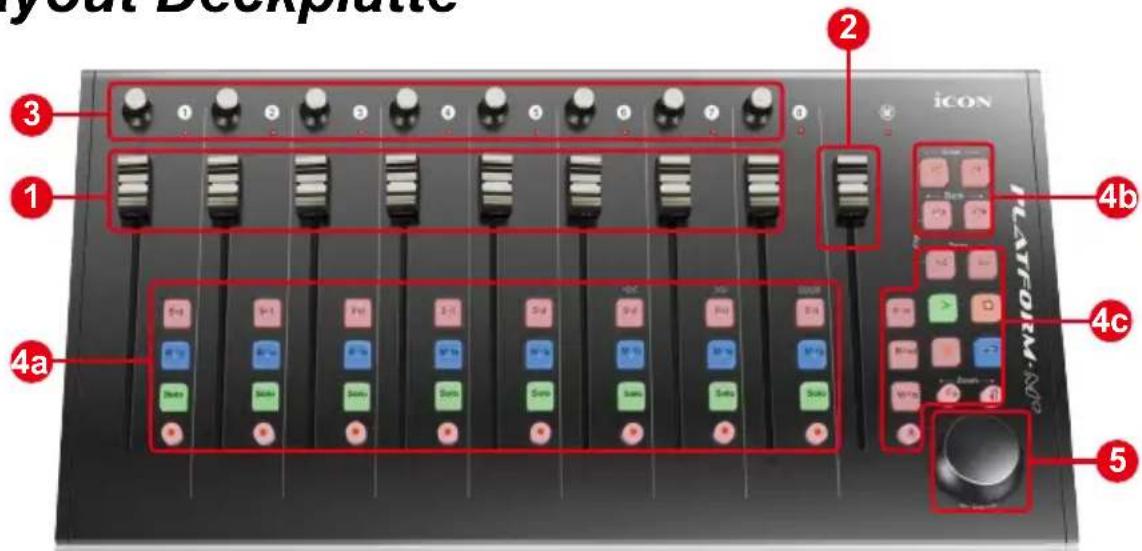
Note: Function operates slightly difference between DAWs. Please refer to your DAW manual for each function. The following description is based on the functions that operate in Apple Logic Pro.
1. Channel faders
The eight 100mm motorized faders are generally used for controlling the track volume of your DAW. They are all touch sensitive to allow override automation the moment you touch a fader. Also, they are motorized; they will automatically move to reflect the current level of the selected channels in your DAW application. Any automation recorded in a project will be reflected by the fader positions.
2. Master fader
This 100mm motorized fader operates the same as the other 8 faders. It controls your DAW software's master channel fader.
Note: Except Pro Tools – Pro Tools software is designed in such a way that the fader next to your last channel fader always acts as the master channel fader.
3. Knobs
The eight rotary encoder knobs are generally used for controlling the track pan position, aux send levels and EQ of your DAW. You may also preset them to adjust specific parameters within plug-ins and virtual instruments.
4. Control buttons
4a) Recording channel control buttons section
REC buttons - Activate and deactivate the recording state of the associated channel. The switch will light red when the channel is armed.
SOLO buttons - Turn On and Off the solo state of the associated channel. The switch will light red when the channel solo state is on and other channels will be muted. You could solo multiple channel by pressing SOLO buttons on additional channels.
MUTE buttons - Activate and deactivate the mute state of the associated channel. The switch will light red when the channel is muted.
SEL buttons - The SEL buttons activate the associated channels in the DAW software in order to perform a specific operation (for example, when adjusting EQ with the ASSIGNABLE ENCODERS, the SEL switch will be used to choose the channel you want to adjust). When a channel is selected, the associated SEL switch's red LED will light up.
4b) Motorized fader control buttons section
| Chan < button - | Shift “one” channel up for all faders (except the master channel). |
| Chan > button - | Shift “one” channel down for all faders (except the master channel). |
| BANK < button - | Shift “eight” channels up for all faders (except the master channel). |
| BANK > button - | Shift “eight” channels down for all faders (except the master channel). |
4c) Transport and Zoom control buttons section
| PLAY button - | Activate the play function of the DAW. |
| STOP button - | Activate the stop function of the DAW. |
| REC button - | Activate the record function of the DAW. |
| REWIND button - | Activate the rewind function of the DAW. |
| FAST FORWARD button - | Activate the fast forward function of the DAW. |
| LOOP button - | Activate the loop function of the DAW. |
| Zoom L/R button - | Zoom in horizontally to the Graphical User Interface (GUI) of the DAW application. Activate the button and rotate the jog wheel to zoom in and out. |
| Zoom U/D button - | Zoom in vertically to the Graphical User Interface (GUI) of the DAW application. Activate the button and rotate the jog wheel to zoom in and out. |
| READ button - | Press the READ button to activate the read function of the current audio track. |
| WRITE button - | Press the WRITE button to activate the write function of the current audio track. |
| LOCK button - | Activate to lock all motorized faders. |
MIXER button -
| DAW | Function |
| Logic Pro, Samplitude, Reaper, Studio One, Bitwig Studio, Sonar | Marker |
| Nuendo/Cubase, Live, Reason | Left |
| FI Studio | Shift |
| Audition | Play |
| DP | RTZ |
5. Jog wheel
The jog wheel is used for various purposes specific to the DAW application, including shuttle and scrubbing functions.
Rear Panel Layout
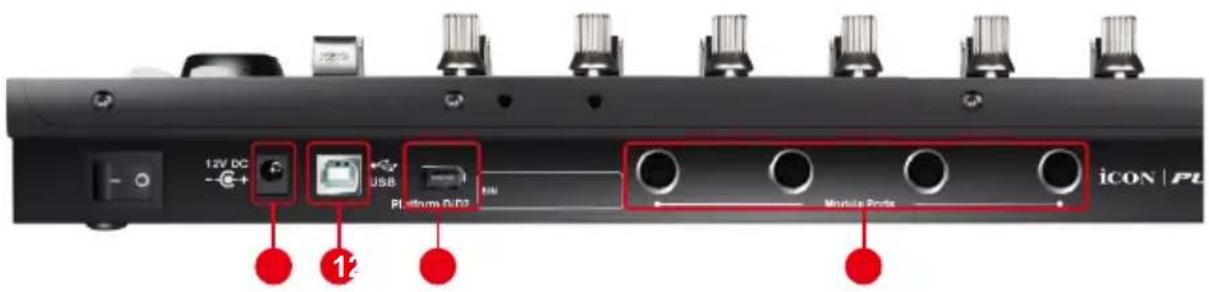
1. USB port
Functions as a MIDI port to your notebook (or computer) and compatible software.
2. Extension ports
These extension ports are equipped for connecting dedicated Platform series control module such as Platform B (button module).
3. Plattform D / D2 LCD module port
Connect the Platform D / D2 to this port with the provided cable.
4. Platform series expansion device connection ports
Four expansion ports for connecting other Platform series expansion devices such as Platform B+.
Getting Started Connecting Your Platform M+ Controller

2 Connect the Platform M+ to your Mac/PC via the USB port
Choose a USB port on your Mac/PC and insert the wide (flat) end of the USB cable. Connect the cable's other end to the Platform M+. Your Mac/PC should automatically "detect" the new hardware and notify you that it is ready to use.
14 Select the DAW at Platform M+.
Press << (channel 6's "Sel" button)/>> (channel 7's "Sel" button) to scroll through the control-mode list, and then press the "DAW" (channel 8's "Sel" button) button to make the selection.
The control-mode name will display on the LCD while you are scrolling through the list to make the selection if Platform D / Platform D2 (optional) is installed.
Otherwise, the 9 channel's LED indicator lights located on the top will indicate the DAW. The sequence is as follows:
Channel 1 LED: MCP (Nuendo / Cubase / Samplitude / Ableton Live / Reaper /
Studio One / Reason / Bitwig / Sonar / Audition / FL Studio / Digital Performer)
Channel 2 LED: Logic Pro
Channel 3 LED: HUI (Pro Tools)
Channel 4 LED: User define
Tip: Platform M+ will memorise your last selected DAW mode and re-enter the
same mode a few seconds after it has been switched on. (i. e. DAW mode selection is not needed if the last mode is being used.)
5. Setup your DAW
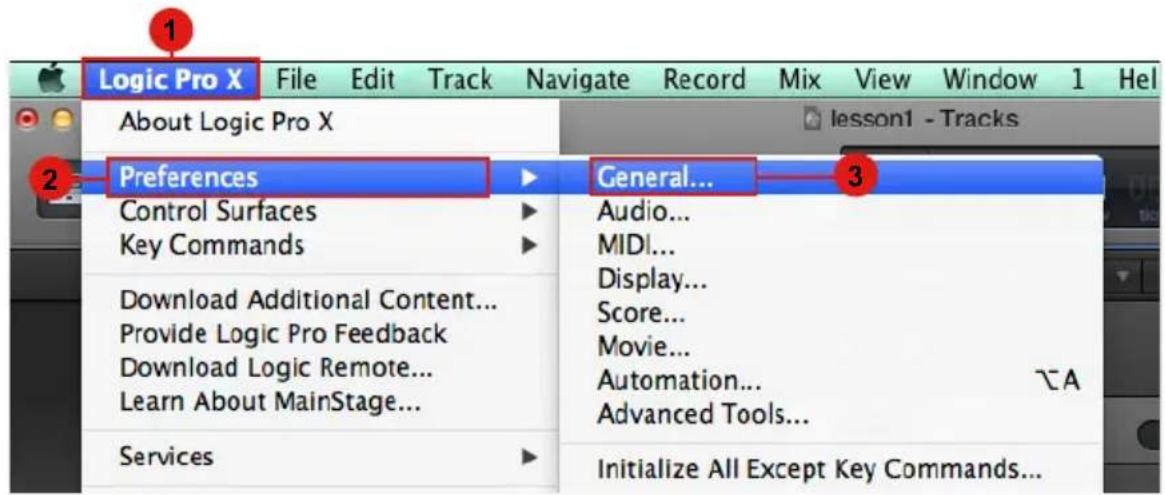
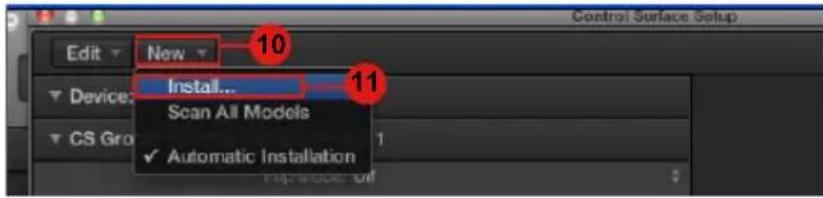
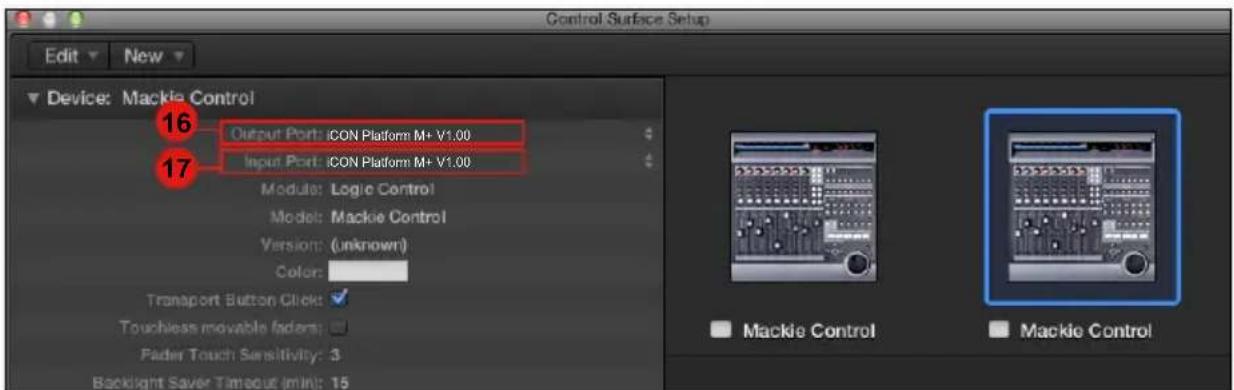
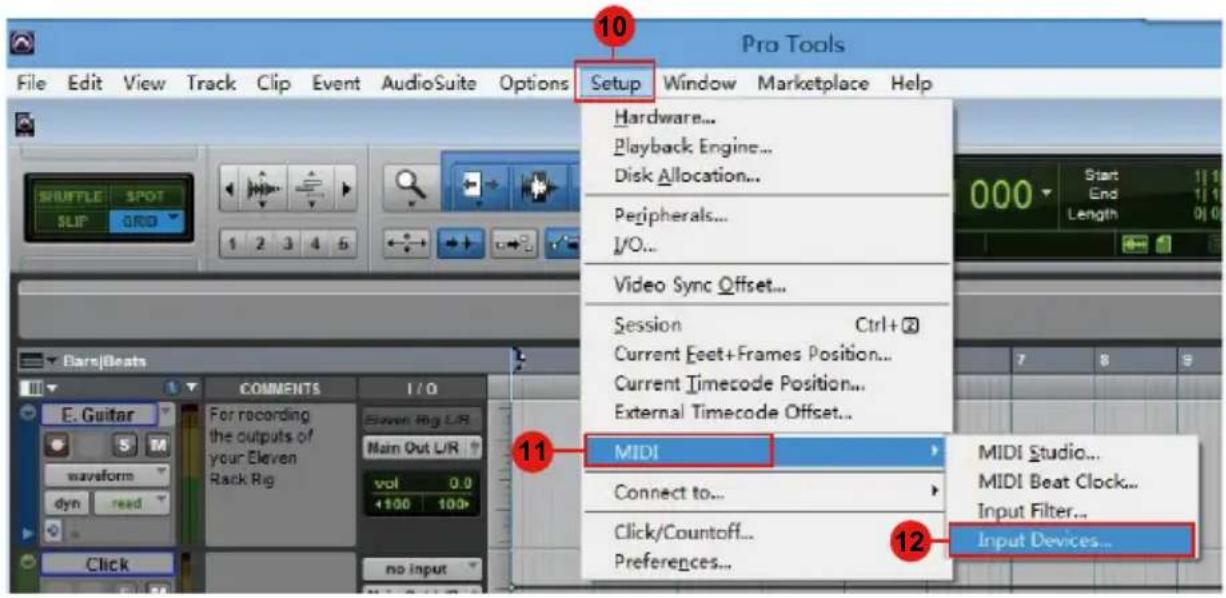
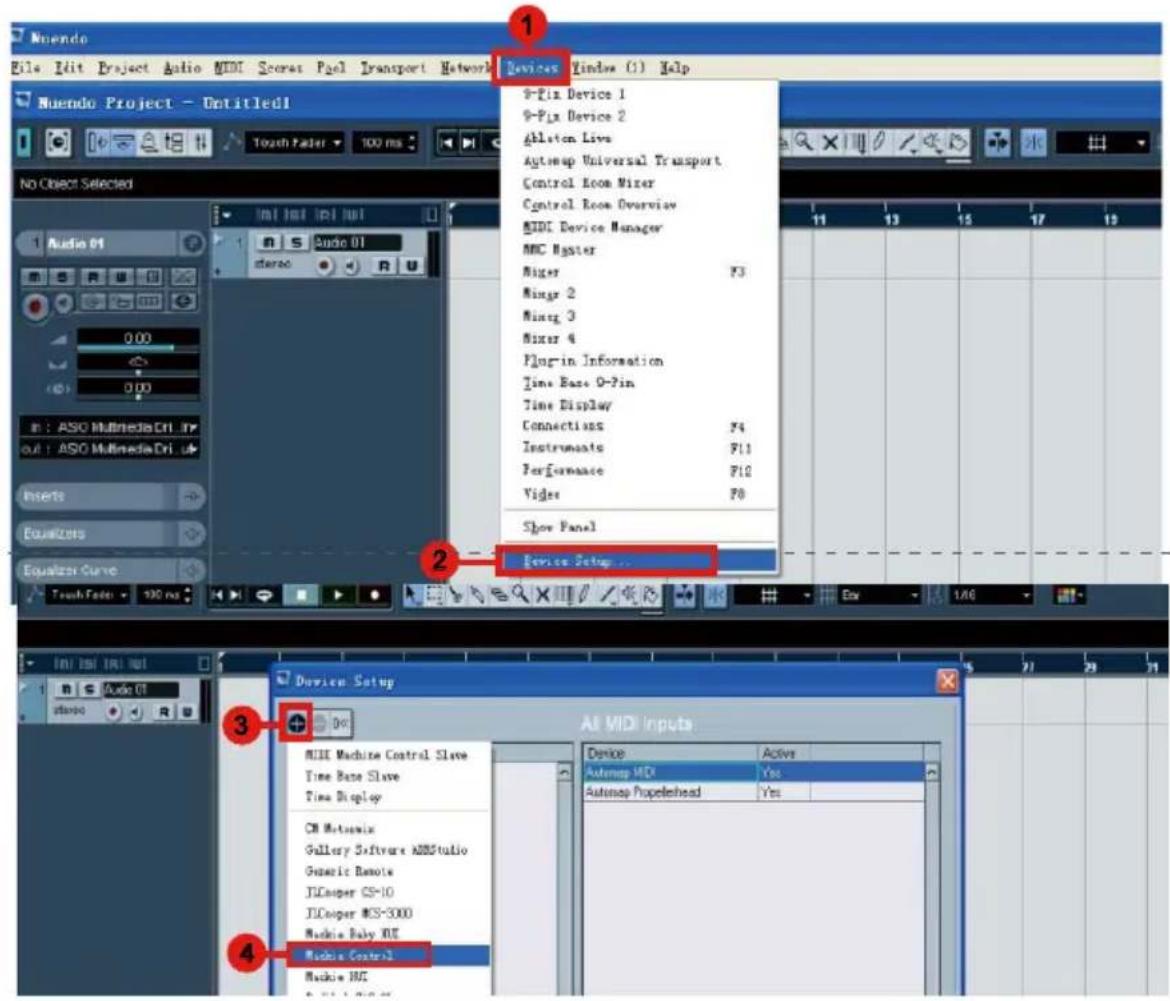
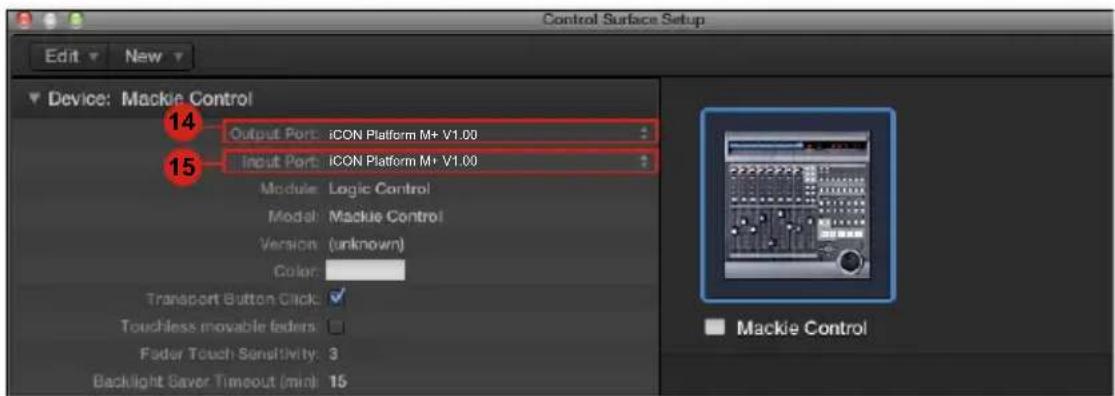
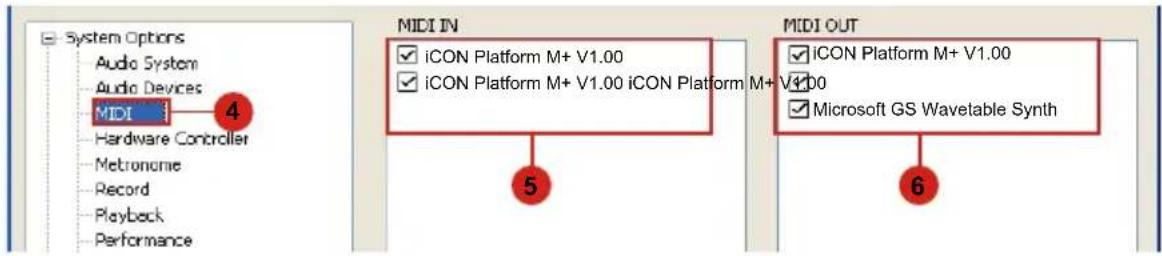
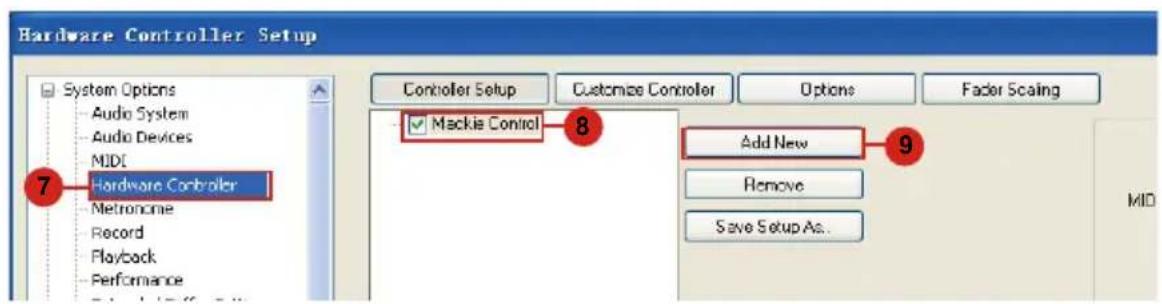
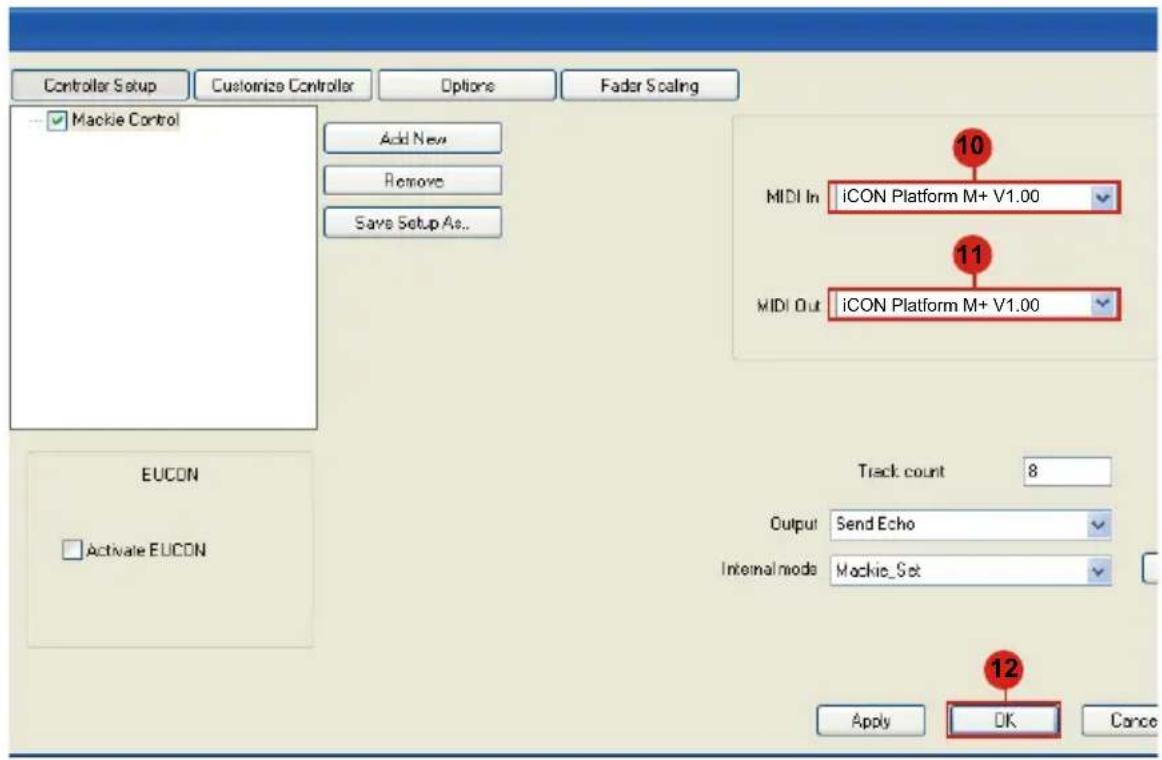
Activate the ICON Platform M+ controller in your DAW or MIDI software using "MIDI Setup" or "MIDI Devices".
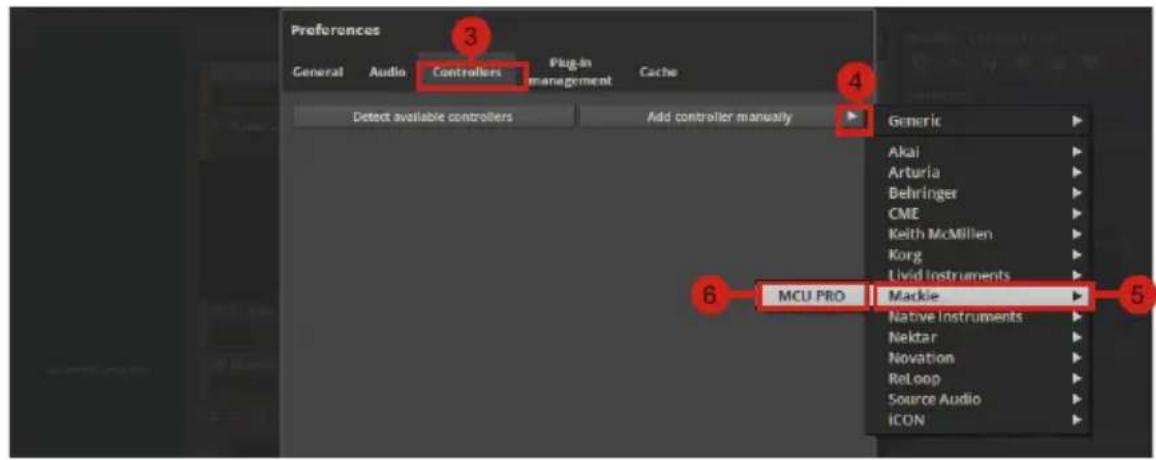
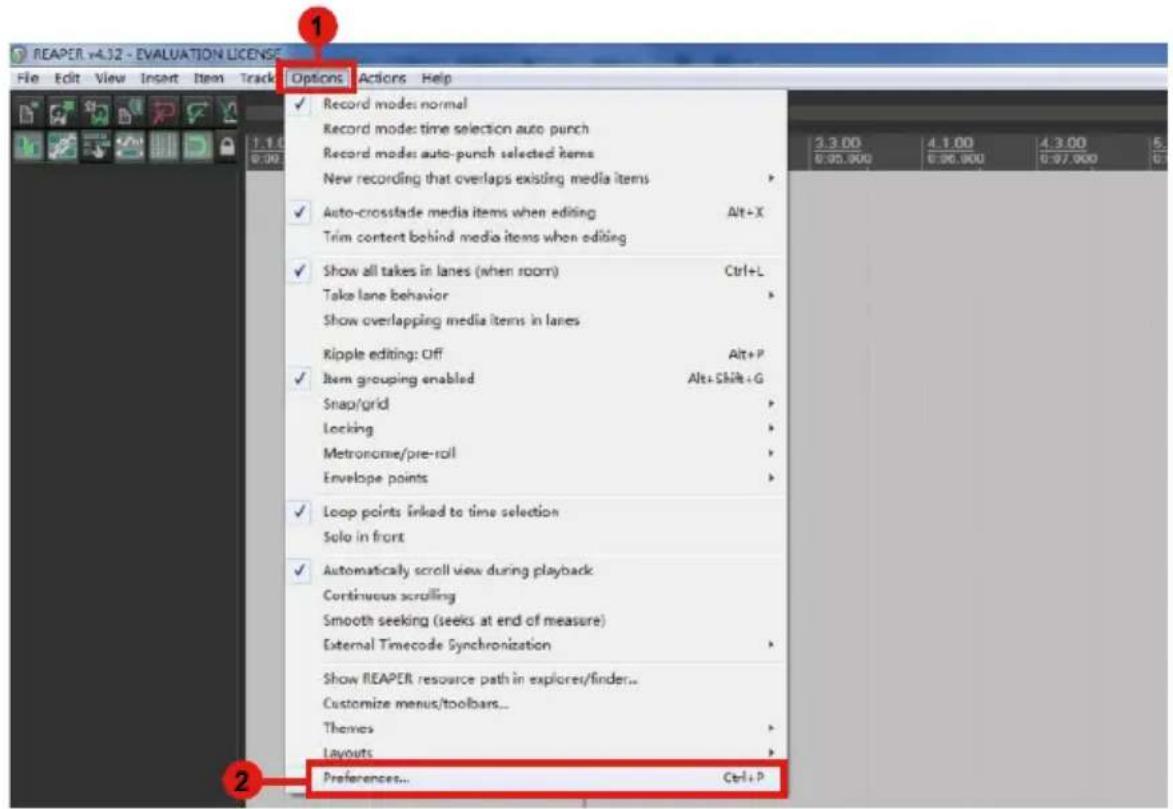
For LogicPro, Cubase/Nuendo, Samplitude, Ableton Live, Reaper, Studio One, Reason, Bitwig, Sonar, Audition, FL Studio, Digital Performer select Mackie Control.
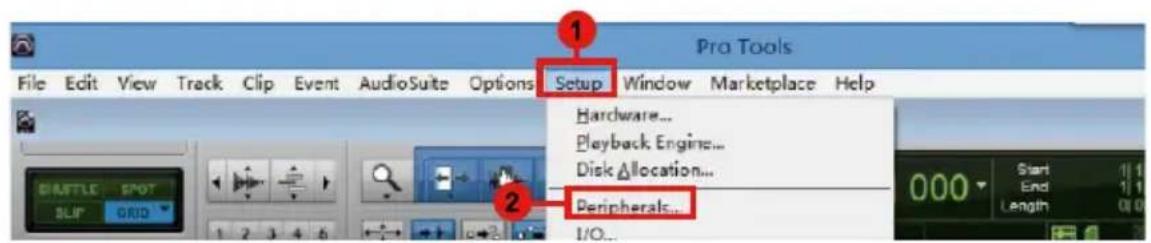
For Pro Tools select HUI
(Tip: You may also refer to our website at www. iconproaudio. com, at each controller (Platform M+) product page's "Setup demo" section for different DAW set up illustrations.
For DAW that not on our setup demo list, please refer to your software user manual for the hardware setup.)
(Expander \~ use with Platform X+)
![graph TD A["Laptop"] --> B["+"] A --> C["+ (X+1) Platform X"] A --> D["+ (X+2) Platform MPlatform X* (X+3) Platform"] B --> E["or"] C --> E D --> E style A fill:#f9f,stroke:#333 style B fill:#ccf,stroke:#333 style C fill:#ccf,stroke:#333 style D fill:#ccf,stroke:#333](/content/2026/05/760223/images/eb9d3780b01ae3625e09f179401b6061d1e1a277fc2cbb7e3415390e93384473.jpg)

![graph TD A["1: Platform M+"] --> B["2: Platform X+ (X+1)"] B --> C["Channel 1 LED: MCP\nChannel 2 LED: Logic Pro\nChannel 3 LED: HUI\nChannel 4 LED: User define"] C --> D["MCP Mode Selected"] D --> E["Cubase/Nuendo Samplitude\nBitwig Reason Digital Performer\nFL Studio Reaper Sonar\nAudition Studio…](/content/2026/05/760223/images/6de1ec84c8878349449957b8745c295160c252c89ab8c2f803e95ab177cffdc5.jpg)
![graph TD A["1: Channel 1 LED: MCP"] --> B["2: Channel 2 LED: Logic Pro"] B --> C["3: Channel 3 LED: HUI"] C --> D["4: Channel 4 LED: User define"] D --> E["5: Channel 5 LED: Sel"] E --> F["6: Channel 6 LED: Sel"] F --> G["7: Channel 7 LED: Sel"] G --> H["8: Channel 8 LED: Sel"] H --> I["9: Channel 9…](/content/2026/05/760223/images/265aa738dead005eb0fc7c42d5783e69a1e86543ca868f0f6a2b9aaa5b90c1d2.jpg)
![graph TD A["1: Select"] --> B["2: Select"] B --> C["3: Select"] D["Channel 1 LED: MCP"] --> E["Channel 2 LED: Logic Pro"] E --> F["Channel 3 LED: HUI"] F --> G["Channel 4 LED: User define"] G --> H["Channel 5: Select"] H --> I["Channel 6: Select"] I --> J["Channel 7: Select"] J --> K["Channel 8: Sel…](/content/2026/05/760223/images/c44635bc8bfc13914d1e22b4987b68676cb5249ca7ddad598b7c220cb4aa7e99.jpg)
Cubase

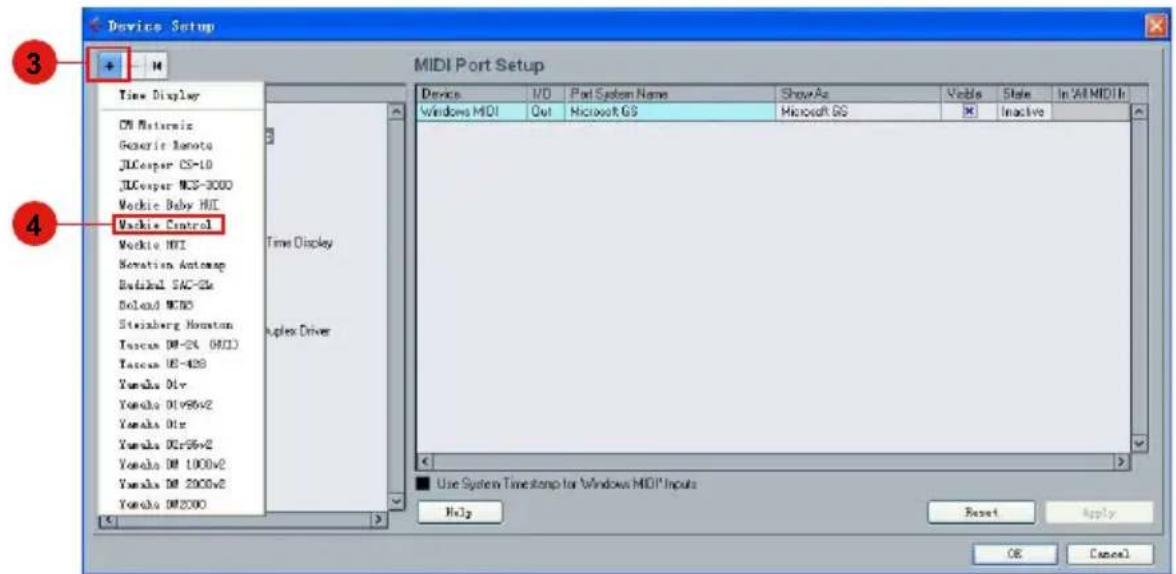
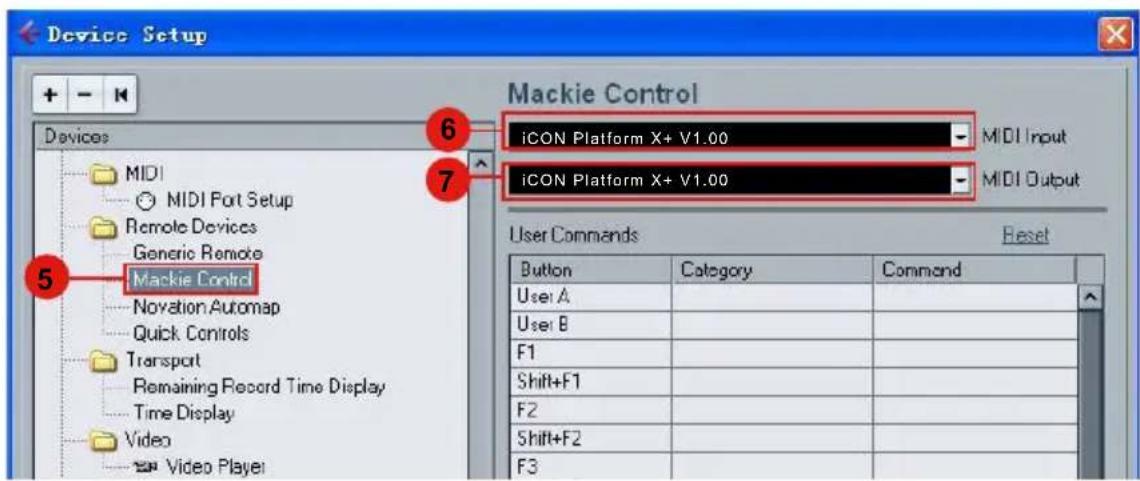
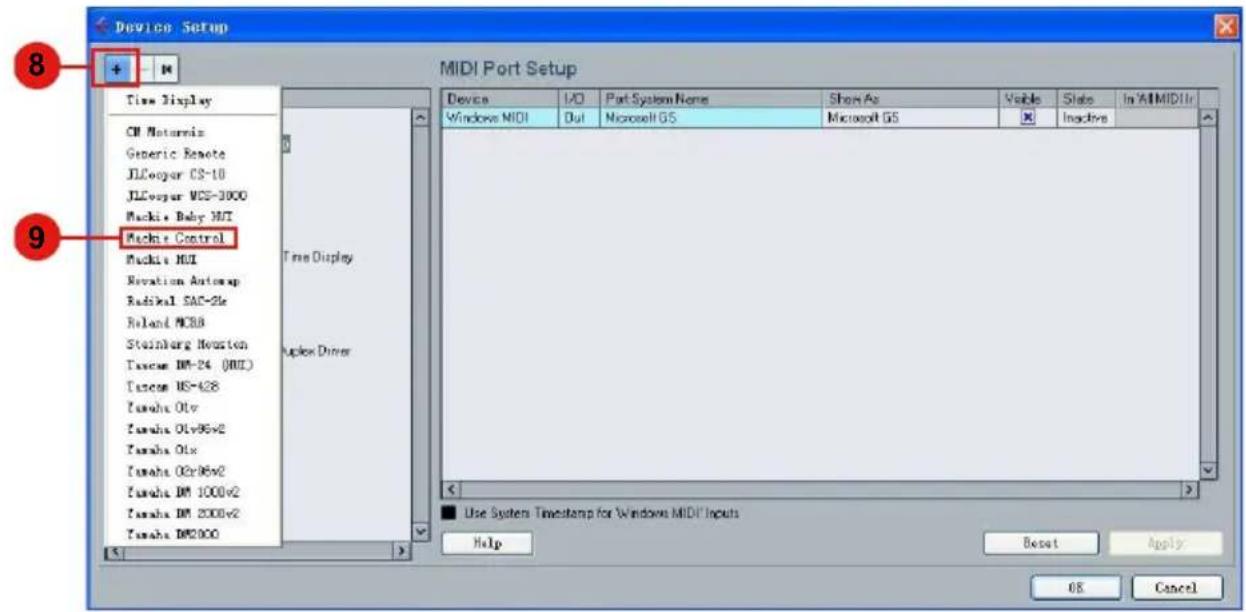

Ableton Live
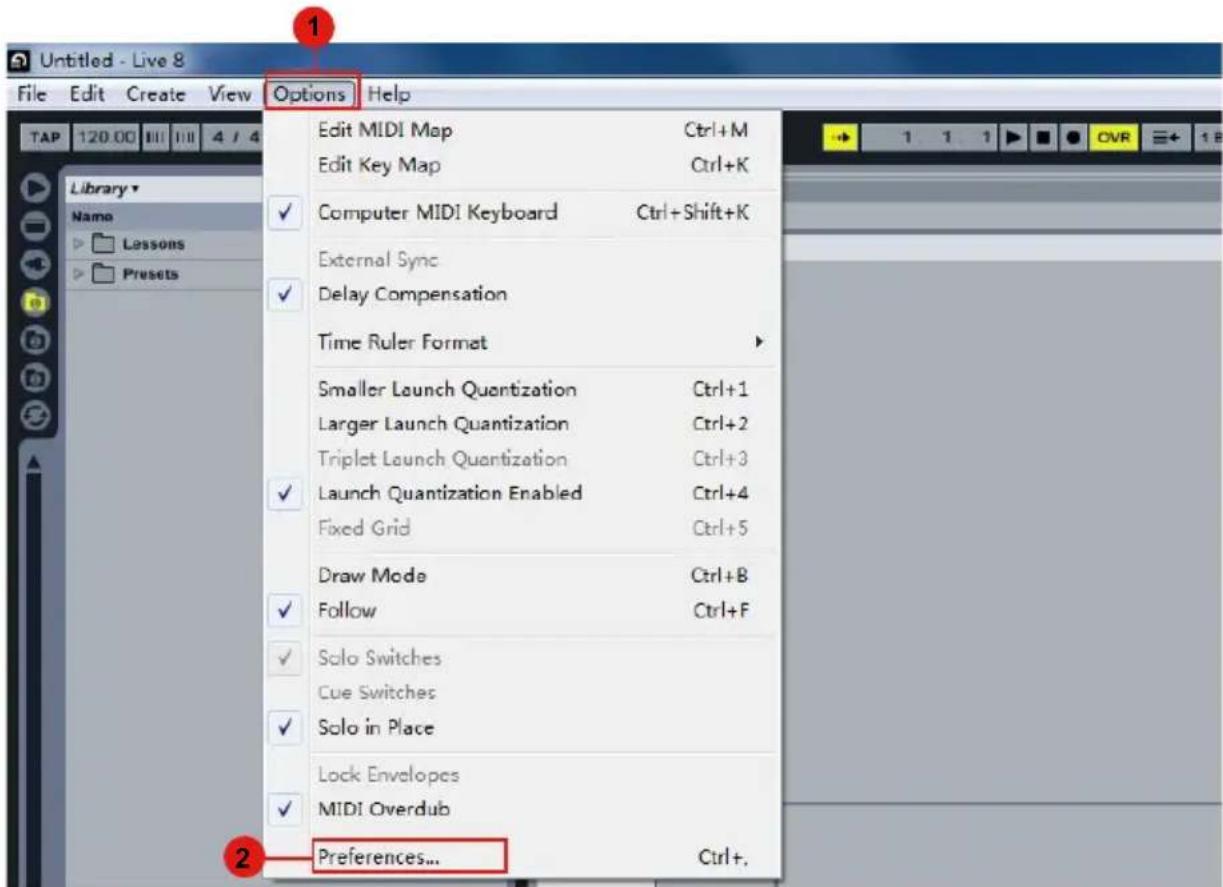

Logic Pro




![1 plitude Pro & Download Version - [NEW2.VIP 44100 Hz L: 00:01:00:00] File Edit Track Object Fley / Rec Automation Effects CD/DVD View Help New Virtual Project (VIP)... I Open... Import... Save Project Ctrl+S Save Project as... Shift+S Save Project Copy Ctrl+Alt+S Save Project as Template... Save Pr…](/content/2026/05/760223/images/92c9ba425a53d9b0b4a7be17a9428a1c04b4ac26574d88ee5bec54ac13882b4f.jpg)
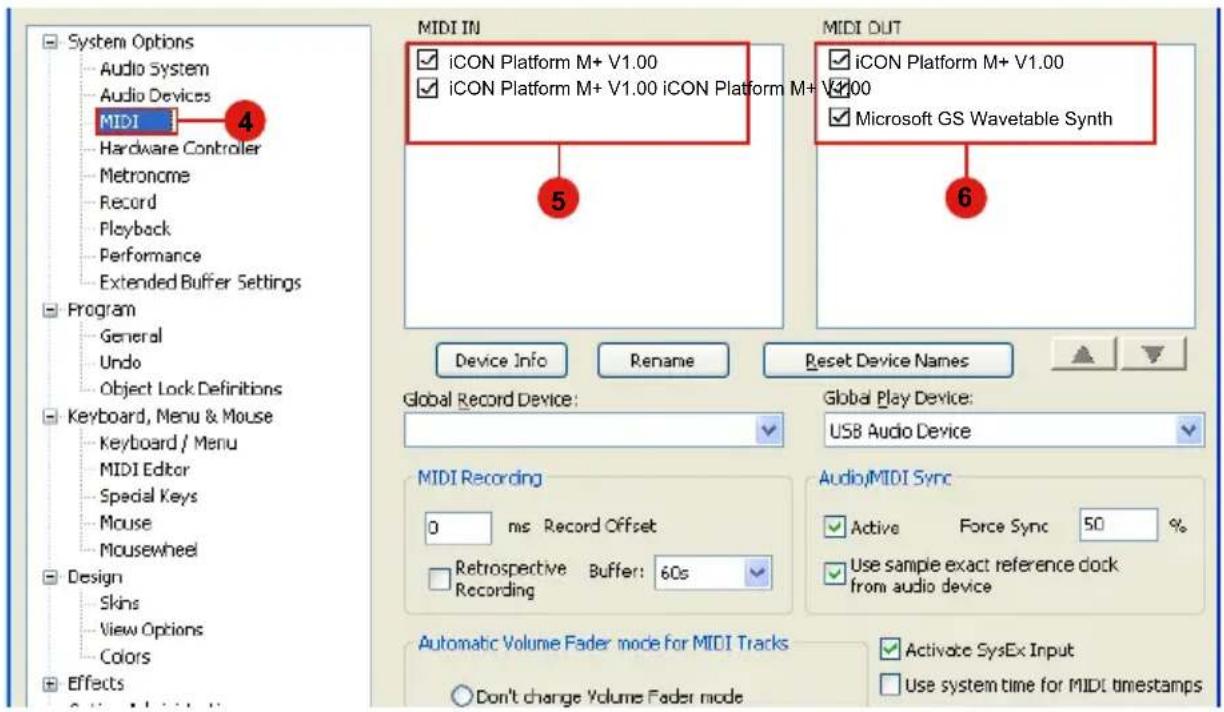
Hardware Controller Setup


Pro Tools
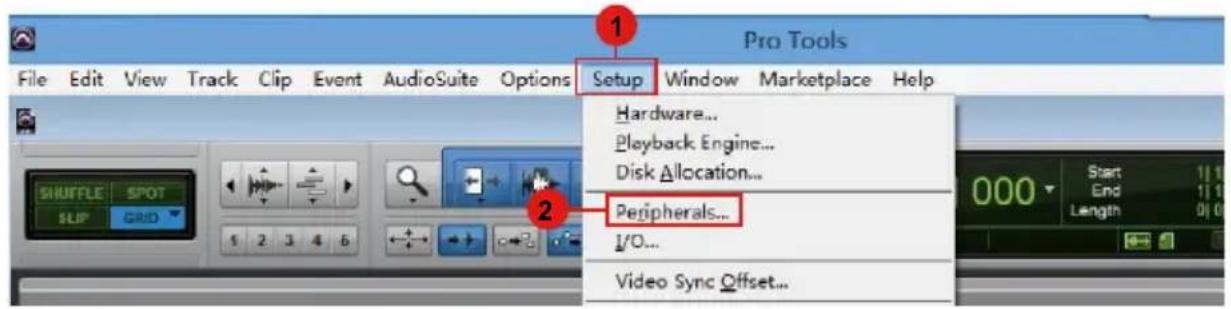



(Standalone)
Cubase


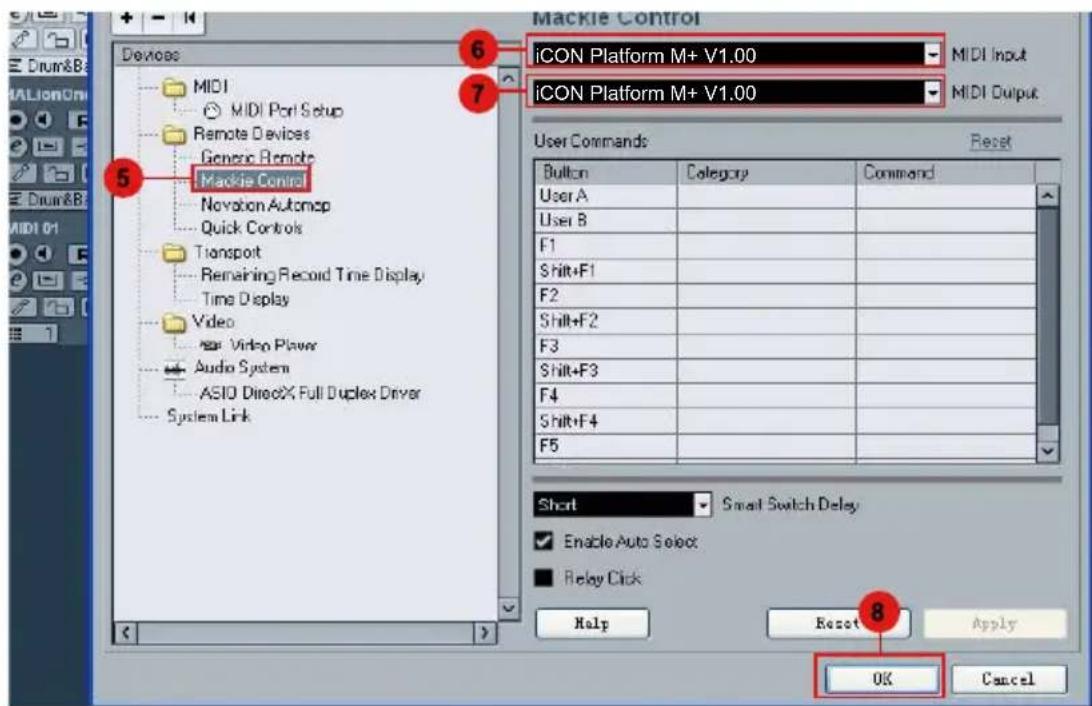
Nuendo

Logic Pro
1


Samplitude
![Plitude Pro X Download Version - [NEW2.VIP 44100 Hz L: 00:01:00:00] File Edit Track Object Play / Rac Automation Effects CD/DVD View Help New Virtual Project (VIP)... Open... Import... Save Project Ctrl+S Save Project as... Shift+S Save Project Copy Ctrl+Alt+S Save Project as Template... Save Projec…](/content/2026/05/760223/images/50c8732eb488814a6ac316c1ce9937fa003abaf55b99cca4be41f17dd373c137.jpg)
Bitwig


Reason


Reaper


Studio One


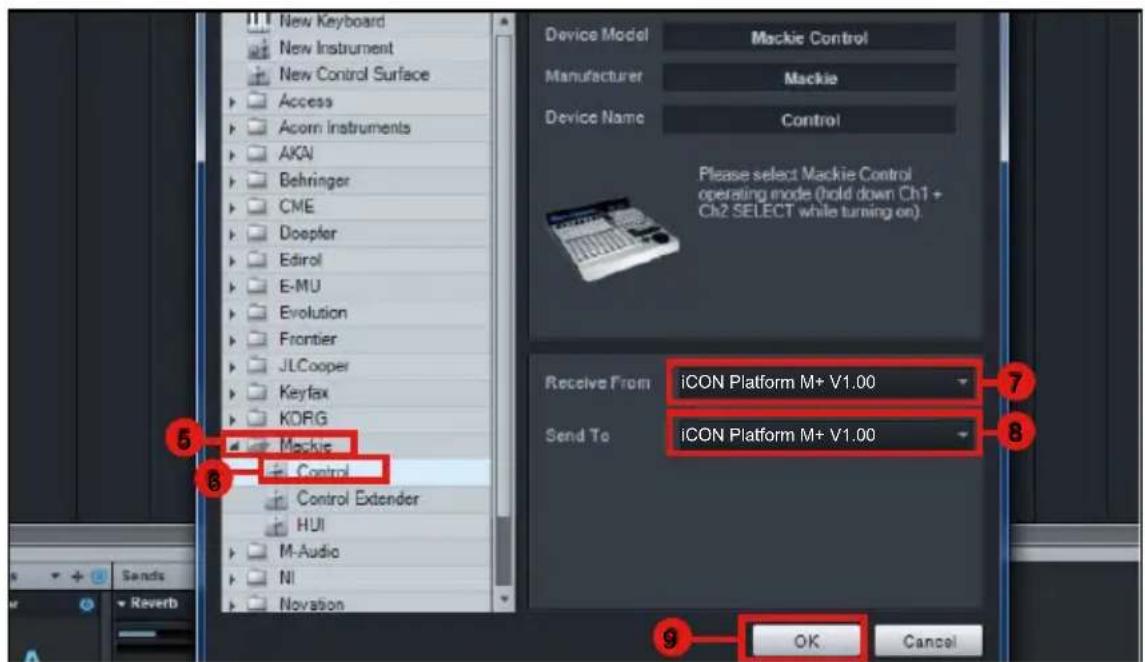
Ableton Live


Pro Tools


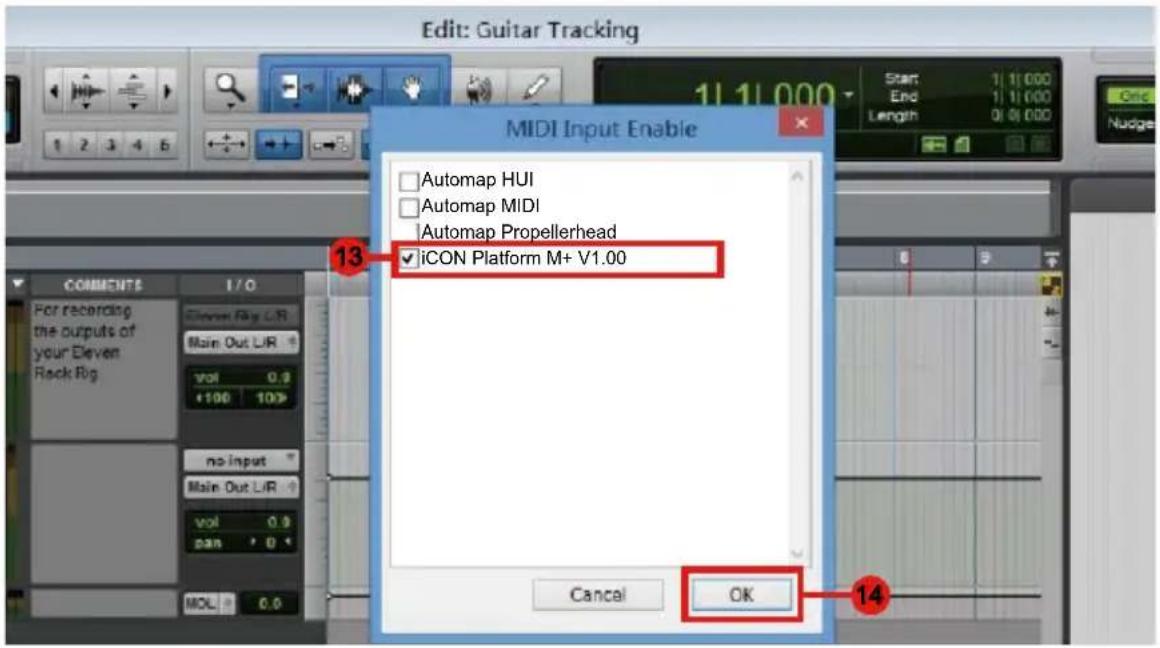
Download the Mac iMap from your Personal User Page at www.iconproaudio.com
After you downloaded the file, please click it to start the installation process.
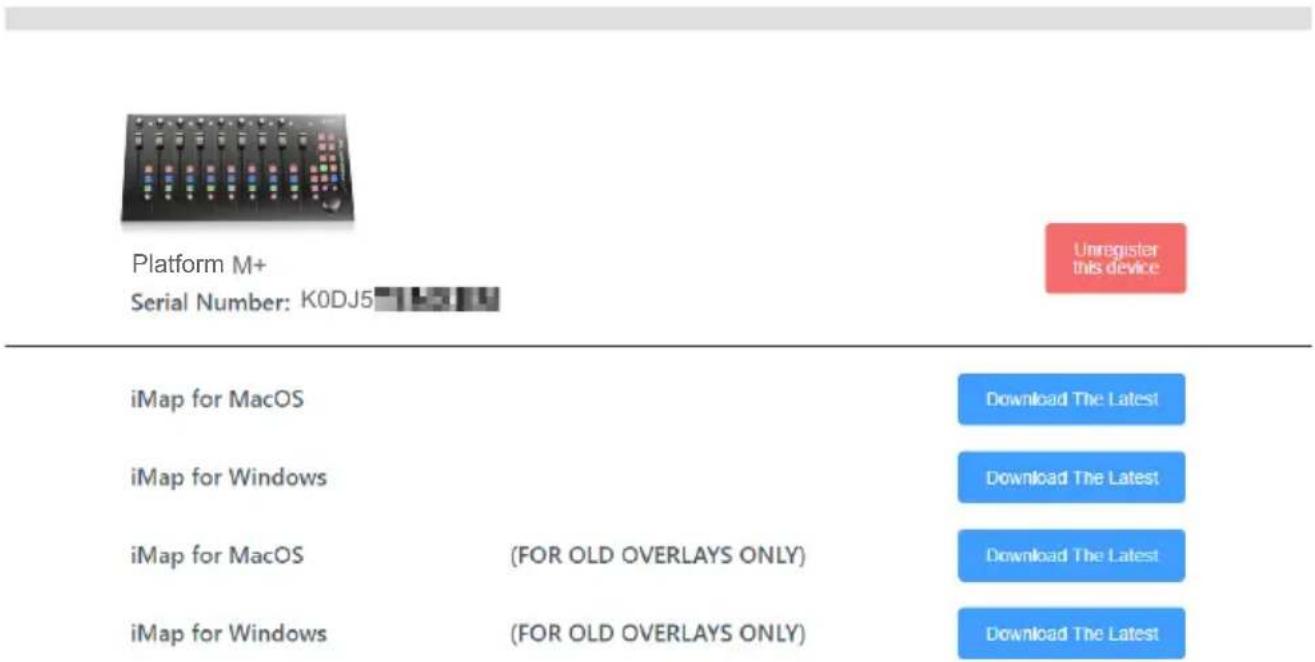
Diagram 1
1. iMap TM Software for Mac OS X.
Please follow the procedures below step-by-step to launch your iMap TM software to Mac OS X.
2. Click Continue".
3. Click "Install".
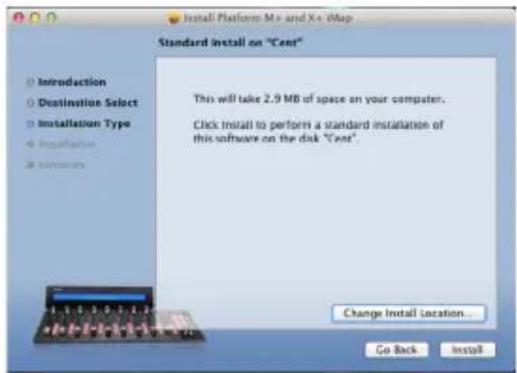
Diagram 2
-
Input your password to allow the installation to start.
-
When the installation is complete, click "Close".
-
You could find the Platform_M + _and_X + application inside the "Spotlight" and click to run it.
Or you coudle open the "Applications" folder in Finder and run the iMap.
- User-interface of the iMap.
Tip: By "drag and drop" the Platform-M+" icon into the "Applications" folder, you could create a "iMap" shortcut on your Mac's desktop.

Diagram 3

Diagram 4
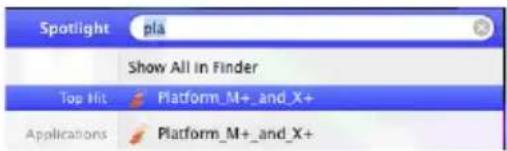

Diagram 5

Diagram 6
Installing iMap TM Software for Windows
Please follow the procedures below step-by-step to install your iMap™ software.
-
Turn on your PC.
-
Download the Windows iMap from your Personal User Page at www.iconproaudio.com
After you downloaded the file, please click it to start the installation
3. Choose Install Location
Choose your preferred install location for iMap TM or use the default location and click “Next”.

Diagram 7
4. Select shortcut
Select the start menu folder in which you would like to create the iMap TM shortcut. Then click "Next".

Diagram 8
5. Create a shortcut on your desktop
Please untick the box if you do not want to place a shortcut icon on your desktop for iMap™, otherwise click "Next".

7. Click the iMap logo on your desktop to launch the iMap software.
 Diagram 11Assigning DAW mode (Mackie Control/HUI) or self define MIDI functions with iMap TM
There are two different methods for setting your Platform M+ according to your need. In general, it would be much simpler and faster to set the device with Mackie Control/HUI protocol depended on your using DAW. Or you could self define each control element on your Platform M+ with your own MIDI messages that provided on the iMap's function pull-down menu. However, unless you are fully understood the MIDI structure of your using DAW otherwise this would be a real hassles task for the set up. Actually we strongly recommend you to use the Mackie Control or HUI control mode as they are programmed according to a lot of user preferences and it will most likely suit your need.Assigning DAW mode (Mackie control/HUI) with iMap TM
 Diagram 12iMap™ Platform M+ software panel
To begin the DAW mode setup, let make the connection of your Platform M+ with iMap. Please follow the below steps: 1. Connect Platform M+ to your Mac/PC. 2. Launch iMap and click "Connect Device". Note: If your Platform M+ is not connected to your Mac/PC, the message "There are no MIDI input devices" will appear. Please connect Platform M+ to your Mac/PC with the provided USB cable. 3. Select "Platform M+" at the pop-up menu as your MIDI out device.  Diagram 134. According to your using DAW, select the DAW Mackie/HUI protocol mode at the “Mode” pull-down menu.
 Diagram 14 Note: In DAW mode (Mackie Control/HUI), you cannot change any MIDI message settings for any control on Platform M+. Tip: You may also use the hardware to select DAW mode instead of iMap. Please refer to P. 9 for instructions. 5. After you have finished all settings, click on "Send Data" button. 6. Close iMap.Assigning MIDI message with User Define mode at iMap TM
 Diagram 15iMap™ Platform M+ Software panel
To begin the DAW mode setup, let make the connection of your Platform M+ with iMap. Please follow the below steps: 1. Connect Platform M+ to your Mac/PC. 2. Launch iMap and click "Connect" button. 3. Select "Platform M+" at the pop-up menu as your MIDI out device.  Diagram 16 4. Select "User-Defined Mode" at the "Control Mode" pull-down menu. Please see below (P43) for each control element setting in User-Defined Mode.  Diagram 17 5. After you have finished creating all settings, click "Send Data". 6. Close iMap.Control element setup at User defines mode
iMap™ Platform M+ Software panel  Diagram 18 There are controls including faders, knobs, buttons, and a jog wheel on Platform M+ for which you may set your own MIDI messages. The four types of message include "Pitch", "Note", "Program", and "CC" values you may adjust depending on the control element. Please refer to the table below for available control setting values. "Control elements chart"| ElementControl | Available MIDI message setting values | ||||
| Controller type | Protocol Channel | Message | |||
| MCP | Faders | Slid | Note 1-16 C(-1) to G(9) | ||
| CC 1-16 Bank MB to Poly Mode On | |||||
| Pitch | 1-16 0-127 | ||||
| Touch sensitive | Note 1-16 C(-1) to G(9) | ||||
| CC 1-16 Bank MB to Poly Mode On | |||||
| Pitch | 1-16 0-127 | ||||
| MCP Knobs | Rotate | Note 1-16 C(-1) to G(9) | |||
| CC 1-16 Bank MB to Poly Mode On | |||||
| Pitch | 1-16 0-127 | ||||
| Enter | Note 1-16 C(-1) to G(9) | ||||
| CC 1-16 Bank MB to Poly Mode On | |||||
| Pitch | 1-16 0-127 | ||||
| MCP | JogWheel | Rotate counter-clockwise | Note 1-16 C(-1) to G(9) | ||
| CC 1-16 Bank MB to Poly Mode On | |||||
| Pitch | 1-16 0-127 | ||||
| Rotate clockwise | Note 1-16 C(-1) to G(9) | ||||
| CC 1-16 Bank MB to Poly Mode On | |||||
| Pitch | 1-16 0-127 | ||||
| Enter | Note 1-16 C(-1) to G(9) | ||||
| CC 1-16 Bank MBto Poly Mode On | |||||
| Pitch | 1-16 0-127 | ||||
| MCP | Buttons | All buttons except "Lock" button | Note 1-16 C(-1) to G(9) | ||
| CC 1-16 Bank MB to Poly Mode On | |||||
| Pitch | 1-16 0-127 | ||||
Other Functions in iMap™
1. "Save file" button
Click this button to save your current settings for the Platform M+. The file is an. "Platform M+" file.2. "Load file" button
Click this button to load a previously saved “. Platform M+” setting file for your Platform M+.3. "Firmware Upgrade" button
Click this button to enter into the firmware upgrade window for Platform M+. Please refer to P. 45 for the firmware upgrade procedure.Firmware upgrade
Platform M+ functional firmware upload procedure   Warning:
The firmware upload process "MUST" be completed and not be interrupted during the file upload process, otherwise the may not be able to restore again and as a result service center service will be required to restore the device.  Step 1: Please click the first "Connect" button to select Platform M+ as the MIDI output device.   Note: If Platform M+ does not appear on the pull-down menu, select "USB Audio Device" as the MIDI In/Out device. Step 2: Click the "Erase" button to erase the firmware. Step 3 will only be enabled if the firmware has erased successfully.  Step 3: Please wait a few seconds to ensure the unit has recycled completely, and then click the third button "Activate" and select "Firmware Upgrade V1.00" to activate the firmware upgrade mode.   Step 4: Click the "Select version" or "Open File" button to browse the new firmware such as "Platform _M+_V2.00.bin".  Step 5: Click the "Upgrade" button to upgrade the firmware, and wait until its completion.
 Restore the factory default settings
To restore your Platform M+ settings to factory default, simply launch iMap and import the original setting (i. e. without making any changes) to the device by the following steps. 1. Connect Platform M+ with the provided USB cable and launch iMap software. 2. Click the "Connect" button and select "Platform M+" as the MIDI input and output device. Note: If Platform M+ does not appear on the pull down menu, select USB audio as the MIDI I/O device. 3. Click "Send Data" to upload the setting to your Platform M+. 4. Close iMap, and then turn the Platform M+ power of off & on again.Connecting expansion modules
You to connect up to three dedicated platform serise control modules such as Platform B+ to the these extension ports. These modules will be recognized as Platform M+ in your DAW setting as Platform M+. Note: Platform X+ has equipped its own USB connection for connecting to the PC/Mac directly.  Platform M+ & Platform B+Specifications
Connector: To computer USB connector Power supply: 12V/2. 5A DC Current consumption: 2.0A or less Weight: 1.855kg (4.1lb) Dimensions: 395(L) x 196(W) x 58(H)mm 15. 6"(L) × 7. 7"(W) × 2. 3"(H)Services
If your Platform M+ needs servicing, follow these instructions. Check our online help centre at http://support.iconproaudio.com/hc/en-us, for information, knowledge, and downloads such as: 1. FAQ 2. Download 3. Learn More 4. Forum Very often you will find solutions on these pages. If you don't find a solution, create a support ticket at our online Help Center at the link below, and our technical support team will assist you as soon as we can. Navigate to http://support.iconproaudio.com/hc/en-us and then sign in to submit a ticket. As soon as you have submitted an inquiry ticket, our support team will assist you to resolve the problem with your ICON ProAudio device as soon as possible. To send defective products for service: 1. Ensure the problem is not related to operation error or external system devices. 2. Keep this owner's manual. We don't need it to repair the unit. 3. Pack the unit in its original packaging including end card and box. This is very important. If you have lost the packaging, please make sure you have packed the unit properly. ICON is not responsible for any damage that occurs due to non-factory packing. 4. Ship to the ICON tech support center or the local return authorization. See our service centers and distributor service points at the link below: If you are located in North America Send the product to: ICON Service Centre 611 Potomac PL Ste 102 Smyrna, 37167-5655 Tennessee. United States Tel.: +1 615 540 989 If you are located in Hong Kong Send the product to: ASIA OFFICE: Unit F, 15/F., Fu Cheung Centre, No. 5-7 Wong Chuk Yueng Street, Fotan, Sha Tin, N.T., Hong Kong. If you are located in Europe Send the product to: Sound Service GmbH European HeadquarterMoriz-Seeler-Straße 3D-12489 Berlin Telephone: +49 (0)30 707 130-0 Fax: +49 (0)30 707 130-189 E-Mail: info@sound-service.eu 5. For additional update information please visit our website at: ICON ProAusia          中国地区用户 Twitter  www.twitter.com/iconproaudio Instagram  www.instagram.com/iconproaudio Facebook  www.facebook.com/iconproaudio Youtube  www.youtube.com/iconproaudio Website  www.iconproaudio.com Support  support.iconproaudio.com Dashboard  iconproaudio.com/dashboard/ www.iconproaudio.com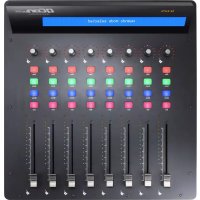

- IMPORTANT SAFETY INSTRUCTIONS
- CONTENTS
- INTRODUCTION
- WHAT'S IN THE PACKAGE
- REGISTER YOUR ICON PROAUDIO PRODUCT TO YOUR PERSONAL ACCOUNT
- CHECK SERIAL NUMBER OF YOUR DEVICE
- LOG IN TO YOUR PERSONAL ACCOUNT PAGE FOR EXISTING USER OR SIGN UP FOR NEW USER
- DOWNLOAD ALL USEFUL MATERIALS
- FEATURES
- LAYOUT DECKPLATTE
- CHANNEL FADERS
- MASTER FADER
- KNOBS
- CONTROL BUTTONS
- 4A) RECORDING CHANNEL CONTROL BUTTONS SECTION
- 4B) MOTORIZED FADER CONTROL BUTTONS SECTION
- 4C) TRANSPORT AND ZOOM CONTROL BUTTONS SECTION
- JOG WHEEL
- REAR PANEL LAYOUT
- USB PORT
- EXTENSION PORTS
- PLATTFORM D / D2 LCD MODULE PORT
- PLATFORM SERIES EXPANSION DEVICE CONNECTION PORTS
- GETTING STARTED CONNECTING YOUR PLATFORM M+ CONTROLLER
- 2 CONNECT THE PLATFORM M+ TO YOUR MAC/PC VIA THE USB PORT
- 14 SELECT THE DAW AT PLATFORM M
- SETUP YOUR DAW
- CUBASE
- ABLETON LIVE
- LOGIC PRO
- PRO TOOLS
- CH'S
- (STANDALONE)
- NUENDO
- SAMPLITUDE
- BITWIG
- REASON
- REAPER
- STUDIO ONE
- DOWNLOAD THE MAC IMAP FROM YOUR PERSONAL USER PAGE AT WWW.ICONPROAUDIO.COM
- IMAP TM SOFTWARE FOR MAC OS X
- CLICK CONTINUE
- CLICK "INSTALL
- INSTALLING IMAP TM SOFTWARE FOR WINDOWS
- CHOOSE INSTALL LOCATION
- SELECT SHORTCUT
- CREATE A SHORTCUT ON YOUR DESKTOP
- IMAP TM STARTED TO INSTALL
- CLICK THE IMAP LOGO ON YOUR DESKTOP TO LAUNCH THE IMAP SOFTWARE
- ASSIGNING DAW MODE (MACKIE CONTROL/HUI) OR SELF DEFINE MIDI FUNCTIONS WITH IMAP TM
- ASSIGNING DAW MODE (MACKIE CONTROL/HUI) WITH IMAP TM
- IMAP™ PLATFORM M+ SOFTWARE PANEL
- ACCORDING TO YOUR USING DAW, SELECT THE DAW MACKIE/HUI PROTOCOL MODE AT THE “MODE” PULL-DOWN MENU
- ASSIGNING MIDI MESSAGE WITH USER DEFINE MODE AT IMAP TM
- CONTROL ELEMENT SETUP AT USER DEFINES MODE
- OTHER FUNCTIONS IN IMAP™
- SAVE FILE" BUTTON
- LOAD FILE" BUTTON
- FIRMWARE UPGRADE" BUTTON
- FIRMWARE UPGRADE
- WARNING
- STEP 5: CLICK THE "UPGRADE" BUTTON TO UPGRADE THE FIRMWARE, AND WAIT UNTIL ITS COMPLETION
- RESTORE THE FACTORY DEFAULT SETTINGS
- CONNECTING EXPANSION MODULES
- SPECIFICATIONS
- SERVICES
Brand : icon
Model : Platform M+
Category : Mixer