
WMS5 - Speaker Stands SANUS - Free user manual and instructions
Find the device manual for free WMS5 SANUS in PDF.


| Product Type | Speaker Wall Mount |
| Brand | Sanus |
| Model | WMS5 |
| Weight Capacity | 3.62 kg (8 lbs) |
| Recommended Wall Types | Wood stud walls and concrete block |
| Ceiling Mountable | Yes (when attached to ceiling joists) |
| Included Components | Speaker plate, wall plate, arm, hardware kit (screws, washers, anchors) |
| Installation Method | Manual drilling required |
| Safety Factor | Wall must support at least 5x combined weight |
| Compatible Speakers | Satellite speakers up to 8 lbs |
| Hardware Included | Assorted machine screws, wood screws, concrete anchors |
| Tool Requirements | Drill, level, Phillips screwdriver, Allen wrench |
| Maintenance | Wipe with a damp cloth; do not use harsh chemicals |
| Warning | Not for use without proper mounting surface |
| Product Documentation | 12-page manual available |
Frequently Asked Questions - WMS5 SANUS
User questions about WMS5 SANUS
0 question about this device. Answer the ones you know or ask your own.
Ask a new question about this device
Download the instructions for your Speaker Stands in PDF format for free! Find your manual WMS5 - SANUS and take your electronic device back in hand. On this page are published all the documents necessary for the use of your device. WMS5 by SANUS.
USER MANUAL WMS5 SANUS
EN Thank you for choosing the Sanus Systems WMS wall mount. The Sanus Systems WMS wall mount is designed to support speakers weighing up to 3.62 kg (8 lbs.).

CAUTION
This product is designed for use in wood stud and concrete block applications only! The wall or ceiling must be capable of supporting up to five times the weight of the speaker and mount combined. If you have any doubts about the ability of the surface to support the monitor, contact Sanus Systems Customer Service, or a qualified contractor.
This product contains small items that could be a choking hazard if swallowed. Keep these items away from young children!

CAUTION
Do not use this product for any purpose not explicitly specified by Sanus Systems. Improper installation or use may cause personal injury and/or property damage. If you do not understand these instructions, or if you have doubts about the safety of the installation, contact Sanus Systems Customer Service. Sanus Systems is not liable for injury or damage caused by incorrect installation or use.

Hardware and procedures for multiple mounting configurations are included. When you see this symbol, choose the correct configuration to suit your needs. Not all hardware included will be used.

ADVERTENCIA
natural_image
Line drawing of a handheld electric drill (no text or symbols)EN Supplied Parts and Hardware
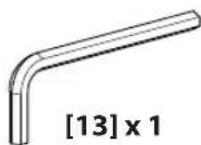
Before starting assembly, verify all parts are included and undamaged. If any parts are missing or damaged, do not return the item to your dealer; contact Sanus Systems Customer Service. Never use damaged parts!
natural_image
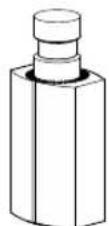
Technical line drawing of a mechanical component with a cylindrical shaft and flange (no text or symbols)WMS3 [01] x 4
WMS5 [01] x 10
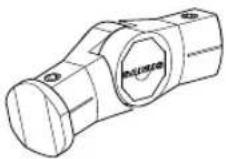
WMS3 [02] x 2
WMS5 [02] x 5
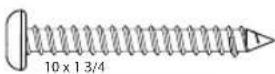
WMS3 [03] x 2
WMS5 [03] x 5
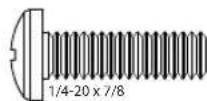
WMS3 [04] x 4
WMS5 [04] x 10
WMS3 [05] x 2
WMS5 [05] x 5
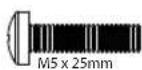
WMS3 [06] x 2
WMS5 [06] x 5
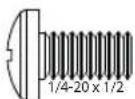
WMS3 [07] x 4
WMS5 [07] x 10
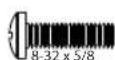
WMS3 [08] x 2
WMS5 [08] x 5

WMS3 [09] x 2
WMS5 [09] x 5

WMS3 [10] x 2
WMS5 [10] x 5

WMS3 [11] x 2
WMS5 [11] x 5
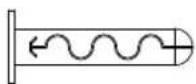
WMS3 [12] x 4
WMS5 [12] x 10
6901-300150 <05>
![1 OPT [07] [01]](/content/2026/05/760157/images/b01d29e243d71538093398803f668ead5424d05bdaacbe9a29d5043d81cb9126.jpg)
EN 1: Mount the Speaker Plate
ES 1: Montar la placa para parlante
FR 1: Montage de la plaque du haut-parleur
1.1
![OPT [10] [05, 06, 08]](/content/2026/05/760157/images/6851786992a650b5171f1ee725de972cea31365867708d7ce2f64fde99ad2109.jpg)

1.1: Mounting to the Satellite Speaker Adapter
NOTE
Bose speakers may require screw [09].
![[11] [10] [08] OPT](/content/2026/05/760157/images/c4375ce547cdc6f315dbe398d624eba9ce5b8ac35e23d4870654667babcf8bcc.jpg)
Bose speakers may require screw [09].
NOTE
![[09]](/content/2026/05/760157/images/549a0e783f6094e9a492b13ef6d876d50bca24e77c886e075aeef4a257266d6f.jpg)
![1/8 in. 2 [01] 1 3/4" 6901-300150 <05>](/content/2026/05/760157/images/b35ce5dc00ab9c38e45c8aab7ad24c1829fa69c27697a987ac9ef349ebdbf3b1.jpg)
EN 2: Mounting to Wood Stud Walls and Ceiling Joists
ES 2: Montaje en paredes con pernos de madera y vigas de cielos rasos
FR 2: Installation sur des murs en montants de bois ou sur des poutrelles de plafond
6901-300150 <05>
![1/4 in. 2.1 EN 2.1: Mounting to Poured Concrete or Concrete Block Walls or Ceilings ES 2.1: Montaje en paredes o cielos rasos de concreto vaciado o bloques de concreto FR 2.1: Installation sur des murs ou des plafonds en béton coulé ou en blocs de béton [01] 13/4" [12] [04] 6901-300150 <05>](/content/2026/05/760157/images/a83c614e5a096be4a4581c6f80960ccb858b6edce068f1334ac007475679e2fb.jpg)
3

3: Install Arm

CAUTION
Do not overtighten. Continuing to tighten the Allen set screw once it is snug will not make the connection stronger.

Do not overtighten. Continuing to tighten the Allen set screw once it is snug will not make the connection stronger.
EN Milestone AV Technologies and its affiliated corporations and subsidiaries (collectively, "Milestone"), intend to make this manual accurate and complete. However, Milestone makes no claim that the information contained herein covers all details, conditions, or variations. Nor does it provide for every possible contingency in connection with the installation or use of this product. The information contained in this document is subject to change without notice or obligation of any kind. Milestone makes no representation of warranty, expressed or implied, regarding the information contained herein. Milestone assumes no responsibility for accuracy, completeness or sufficiency of the information contained in this document.
Brand : SANUS
Model : WMS5
Category : Speaker Stands