
LC15A22IX - Dishwasher VOX - Free user manual and instructions
Find the device manual for free LC15A22IX VOX in PDF.


| Brand | VOX |
| Model | LC15A22IX |
| Product Type | Freestanding Dishwasher |
| Capacity | 15 place settings |
| Dimensions (Height × Width × Depth) | 850 × 598 × 598 mm |
| Net Weight | 53 kg |
| Operating Voltage / Frequency | 220-240 V, 50 Hz |
| Total Current | 10 A |
| Total Power | 1900 W |
| Water Supply Pressure (Min / Max) | 0.03 MPa / 1 MPa |
| Energy Efficiency Class | A++ |
| Annual Energy Consumption (AEc) | 270 kWh/year (based on 280 standard cycles) |
| Energy Consumption per Cycle (Eco programme) | 0.94 kWh |
| Annual Water Consumption (AWc) | 2520 L/year (based on 280 standard cycles) |
| Drying Efficiency Class | A |
| Standard Programme (Eco) | Duration: 171 minutes |
| Programmes | Prewash, Quick 30', Delicate, Eco, Daily, Super 50', Intensive |
| Control Panel | Touch buttons with LED indicators |
| Display | Remaining time indicator, programme indicators |
| Delay Start | 1-24 hours |
| Rinse Aid and Salt Indicators | Yes |
| Child Lock | Yes |
| Water Softener | Adjustable levels (1-6) |
| Filters | Micro filter, Coarse filter, Metal filter (clean weekly) |
| Turbo Drying Unit | Included for better drying |
| Safety | Aquastop on some models, child lock, auto-stop on door opening |
| Installation | Freestanding; can be fitted under counter (remove top panel) |
| Noise Level | 47 dB(A) re 1 pW |
Frequently Asked Questions - LC15A22IX VOX
User questions about LC15A22IX VOX
0 question about this device. Answer the ones you know or ask your own.
Ask a new question about this device
Download the instructions for your Dishwasher in PDF format for free! Find your manual LC15A22IX - VOX and take your electronic device back in hand. On this page are published all the documents necessary for the use of your device. LC15A22IX by VOX.
USER MANUAL LC15A22IX VOX
natural_image
Abstract black-and-white geometric pattern with diagonal stripes (no text or symbols)VOX
ELECTRONICS
GBR
SRB
MKD
SVN
HRV
PRT
LC-15A22 IX
OPERATING INSTRUCTIONS DISHWASHER UPUTSTVO ZA UPOTREBU MAŠINA ZA SUDOVE УПАТСТВА ЗА РАКУВАНЬЕ МАШИНА ЗА МИЕНЬЕ САДОВИ NAVODILA ZA UPORABO POMIVALNI STROJ UPUTE ZA UPORABU PERILICA POSUĐA MANUAL DO USUÁRIO MÁQUINA DE LAVAR LOUÇA

natural_image
Abstract black-and-white geometric pattern with diagonal stripes (no text or symbols)VOX
ELECTRONICS
GBR
LC-15A22 IX
OPERATING INSTRUCTIONS DISHWASHER
natural_image
Simple line drawing of a rectangular container with a horizontal bar inside (no text or symbols)Thank you for choosing this product.
This User Manual contains important information on safety and instructions intended to assist you in the operation and maintenance of your appliance.
Please take the time to read this User Manual before using your appliance and keep this book for future reference.
| Icon Type Meaning | ||
 | WARNING Serious injury or death risk | |
 | RISK OF ELECTRIC SHOCK Dangerous voltage risk | |
 | FIRE Fire risk | |
 | CAUTION Injury or property damage risk | |
 | IMPORTANT / NOTE Operating the system correctly | |
CONTENTS
1.SAFETY INSTRUCTIONS .... 1
1.1. General Safety Warnings .... 1
1.2. Installation Warnings .... 1
1.3. During Use....2
2.INSTALLATION....6
2.1. Machine Positioning ....6
2.2. Water Connection....6
2.3. Water Inlet Hose....6
2.4. Drain Hose....6
2.5. Electrical Connection ....7
2.6. Fitting the Machine Undercounter....7
3.TECHNICAL SPECIFICATIONS......8
3.1. General Appearance....8
3.2. Technical Specifications 8
4.BEFORE USING THE APPLIANCE....9
4.1.Preparing your Dishwasher for first use 9
4.2. Fill the Salt....9
4.3. Test Strip 10
4.4. Water Hardness Table 10
4.5. Water Softener System 10
4.6. Setting 10
4.7. Detergent Usege 10
4.8. Filling the Detergent 11
4.9. Using Combined Detergents ...... 11
4.10. Rinse-aid Usege 11
4.11. Filling the Rinse-aid and Setting.... 11
5.LOADING YOUR DISHWASHER 12
5.1. Recommendations....12
5.2. Alternative Basket Loads....13
6.PROGRAMME TABLE....14
7. THE CONTROL PANEL.... 16
7.1. Changing a Programme.... 17
7.2. Cancelling a Programme.... 17
7.3. Switching the Machine Off....17
8.CLEANING AND MAINTENANCE 18
8.1. Cleaning the Machine and Filters.... 18
8.2. Spray Arms.... 18
9.TROUBLESHOOTING....19
10.PRACTICAL INFORMATION......21
11. THE PRODUCT FICHE....22
1.1. General Safety Warnings
- Read these instructions carefully before using your appliance and keep this manual for future reference.
⚠️ Please check the packaging of your machine before installation and the outer surface of the machine once the packaging has been removed. Do not operate the machine if it appears damaged or if the packaging has been opened.
- Packaging materials protect your machine from any damage that might occur during transportation. The packaging materials are environmentally friendly as they are recyclable. Use of recycled material reduces raw material consumption and decreases waste production.
This appliance can be used by children aged from 8 years and above, and by persons with reduced physical, sensory or mental capabilities or lack of experience and knowledge if they have been given supervision or instruction concerning the use of the appliance in a safe way and understand hazards involved. Children should not be allowed to play with the appliance.
⚠️ Remove packaging and keep it out of reach of children.
⚠️ Keep children away from detergents and rinse aids.
There may be some residue left in the machine after washing. Keep children away from the machine when it is open.
1.2. Installation Warnings
- Choose a suitable and safe place to install your machine.
- Only original spare parts should be used with the machine.
⚠️! Unplug the machine before installation.
⚠️ Your machine must only be installed by an authorised service agent. Installation by anyone other than an authorised agent may cause your warranty to be void.
⚠️ Check that the indoor electrical fuse system is connected in line with safety regulations.
All electrical connections must match the values on the plate.
⚠️! Ensure the machine does not stand on the electrical supply cable.
⚠️ Never use an extension cord or a multiple socket connection.
⚠️ The plug should be accessible after the machine is installed.
- After installation, run your machine unloaded for the first time.
The machine must not be plugged in during positioning.
⚠️ Always use the coated plug supplied with your machine.
△△! If the electrical cable is damaged, it should only be replaced by a qualified electrician.
1.3. During Usege
- This machine is for domestic use only; do not use
- it for other purposes. Commercial use will void the guarantee.
Do not stand, sit or place loads on the open door of the dishwasher.
⚠️ Only use detergents and rinse aids produced specifically for dishwashers. Our company is not responsible for any damage that may occur due to misuse.
⚠️Do not drink water from the machine.
Due to the danger of explosion, do not place any chemical dissolving agents into the machine's washing section.
- Check the heat-resistance of plastic items before washing them in the machine.
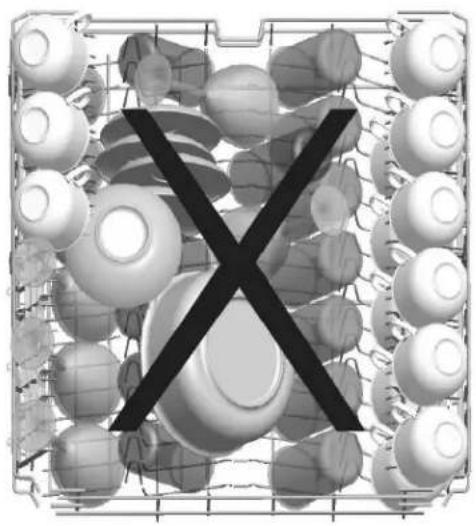
⚠️ Only put items in the machine which are suitable for dishwashing, and take care not to overfill the baskets.
⚠️Do not open the door while the machine is in operation, hot water may spill out. Safety devices ensure the machine stops if the door is opened.
⚠️The machine door should not be left open. It may cause accidents.
⚠️Place knives and other sharp objects in the cutlery basket in a blade-down position.
⚠️! For models with the automatic door-opening system, when the EnergySave option is active, the door will open at the end of a program. To prevent damage to your dishwasher, do not attempt to close the door for one minute after it has opened. For effective drying, keep the door open for 30 minutes after a programme has ended. Do not stand in front of the door after the auto-open signal sounds.
⚠ In the case of a malfunction, repair should only
be performed by an authorised service company, otherwise the warranty will be void.
△! Before repair work, the machine should be disconnected from the mains. Do not pull the cable to unplug the machine. Switch off the water tap.
Operation at a low voltage will cause a decline in performance levels.
⚠️For safety, disconnect the plug once a program has finished.
To avoid an electric shock, do not unplug the machine with wet hands.
⚠️! Pull the plug to disconnect the machine from the mains, never pull on the cord.
RECYCLING
- Some machine components and packaging consist of recyclable materials.
- Plastics are marked with the international abbreviations: (>PE<, >PP<, etc.)
- The cardboard parts consist of recycled paper. They can be put into waste paper containers for recycling.
- Material unsuitable for domestic waste must be disposed of at recycling centres.
- Contact a relevant recycling centre to obtain information about disposal of different materials.
PACKAGING AND THE ENVIRONMENT
- Packaging materials protect your machine from damage that may occur during transportation. The packaging materials are environmentally friendly as they are recyclable. The use of recycled material reduces raw material consumption and therefore decreases waste production.
CE Declaration of Conformity
We declare that our products meet the applicable European Directives, Decisions and Regulations and the requirements listed in the standards referenced.
Disposal of your old machine
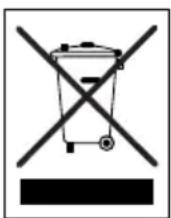
The symbol on the product or on its packaging indicates that this product may not be treated as household waste. Instead, it shall be handed over to the applicable collection point for the recycling of electrical and electronic equipment. By ensuring this product is disposed of correctly, you will help prevent potential negative consequences for the environment and human health, which could otherwise be caused by inappropriate waste handling of this product. For more detailed information about recycling of this product,
please contact your local city office, your household waste disposal service or the shop where the product was purchased.
2. INSTALLATION
2.1. Machine positioning
When positioning the machine, place it in an area where dishes can be easily loaded and unloaded. Do not put the machine in an area where the ambient temperature falls below 0^ C.
Read all warnings located on the packaging before removing the packaging and positioning the machine.
Place the machine close to a water tap and drain. Take into consideration that the connections will not be altered once the machine is in position.
Do not hold the machine by its door or panel.
Leave an adequate distance around the machine to allow ease of movement when cleaning.

Ensure the water inlet and outlet hoses are not squeezed or trapped
and that the machine does not stand on the electrical cable while positioning.
Adjust the feet so the machine is level and balanced. The machine should be placed on flat ground otherwise it will be unstable and the door of the machine will not close properly.
2.2. Water connection
We recommend fitting a filter to your water inlet supply in order to prevent damage to your machine due to contamination (sand, rust, etc.) from indoor plumbing. This will also help prevent yellowing and deposit formation after washing.
2.3. Water inlet hose
natural_image
Illustration of a hand holding a faucet with a valve, no text or symbols present
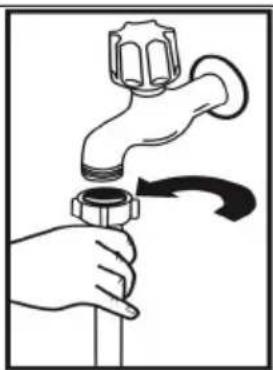
WARNING: Use the new water inlet supplied with your machine, do not an old machine's hose.

WARNING: Run water through the new hose before connecting.

WARNING: Connect the hose ly to the water inlet tap. The pressure ied by the tap should be a minimum 3 MPa and a maximum of 1 MPa. If pressure exceeds 1 MPa, a pressure valve must be fitted between the ection.

WARNING: After the connections are made, turn the tap on fully and check for water leaks. Always turn off the inlet tap after a wash program has ed.
natural_image
Diagram of a faucet with a valve and base, showing electrical connections (no text or labels)
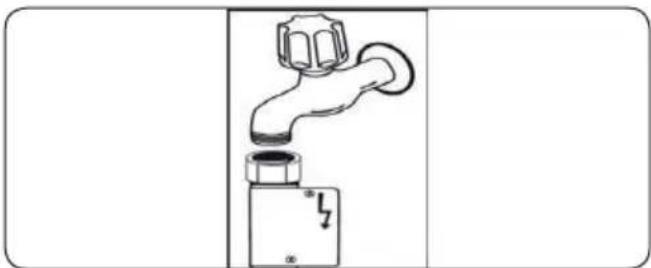
An Aquastop water spout is available with some models. Do not damage it or allow it to become kinked or
2.4. Drain Hose
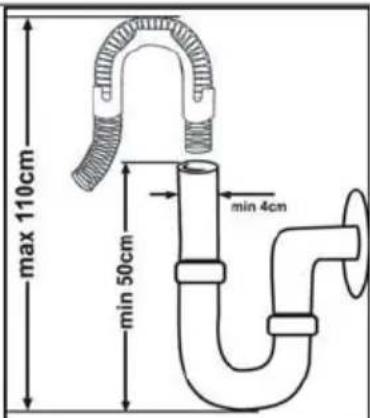
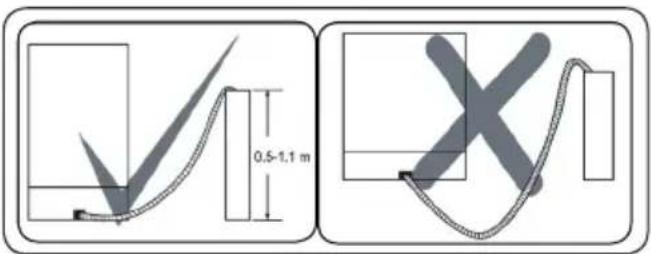
Connect the water drain hose directly to water drain hole or to the sink outlet spigot. This connection should be minimum 50 cm and maximum 110 cm from flor plane.

IMPORTANT: Items will not wash properly if a drain hose longer than 4 m is used.
2.5. Electrical connection

WARNING: Your machine is set to operate at 220-240 V. If the mains voltage supply to your machine is 110 connect a transformer of 110/220 V and W between the electrical connection.

The earthed plug of the must be connected to an outlet supplied by suitable and current.

In the absence of earthing installation, an authorised electrician should carry out an earthing installation. In the case of use without earthing installed, we will not be responsible for any loss of use that may occur.

The indoor fuse current value should be 10-16 A.
2.6. Fitting the machine undercounter
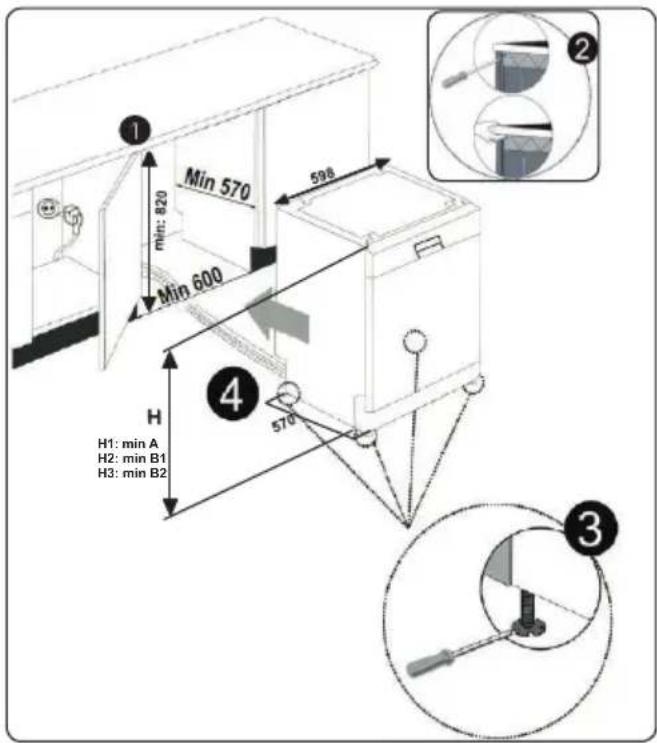
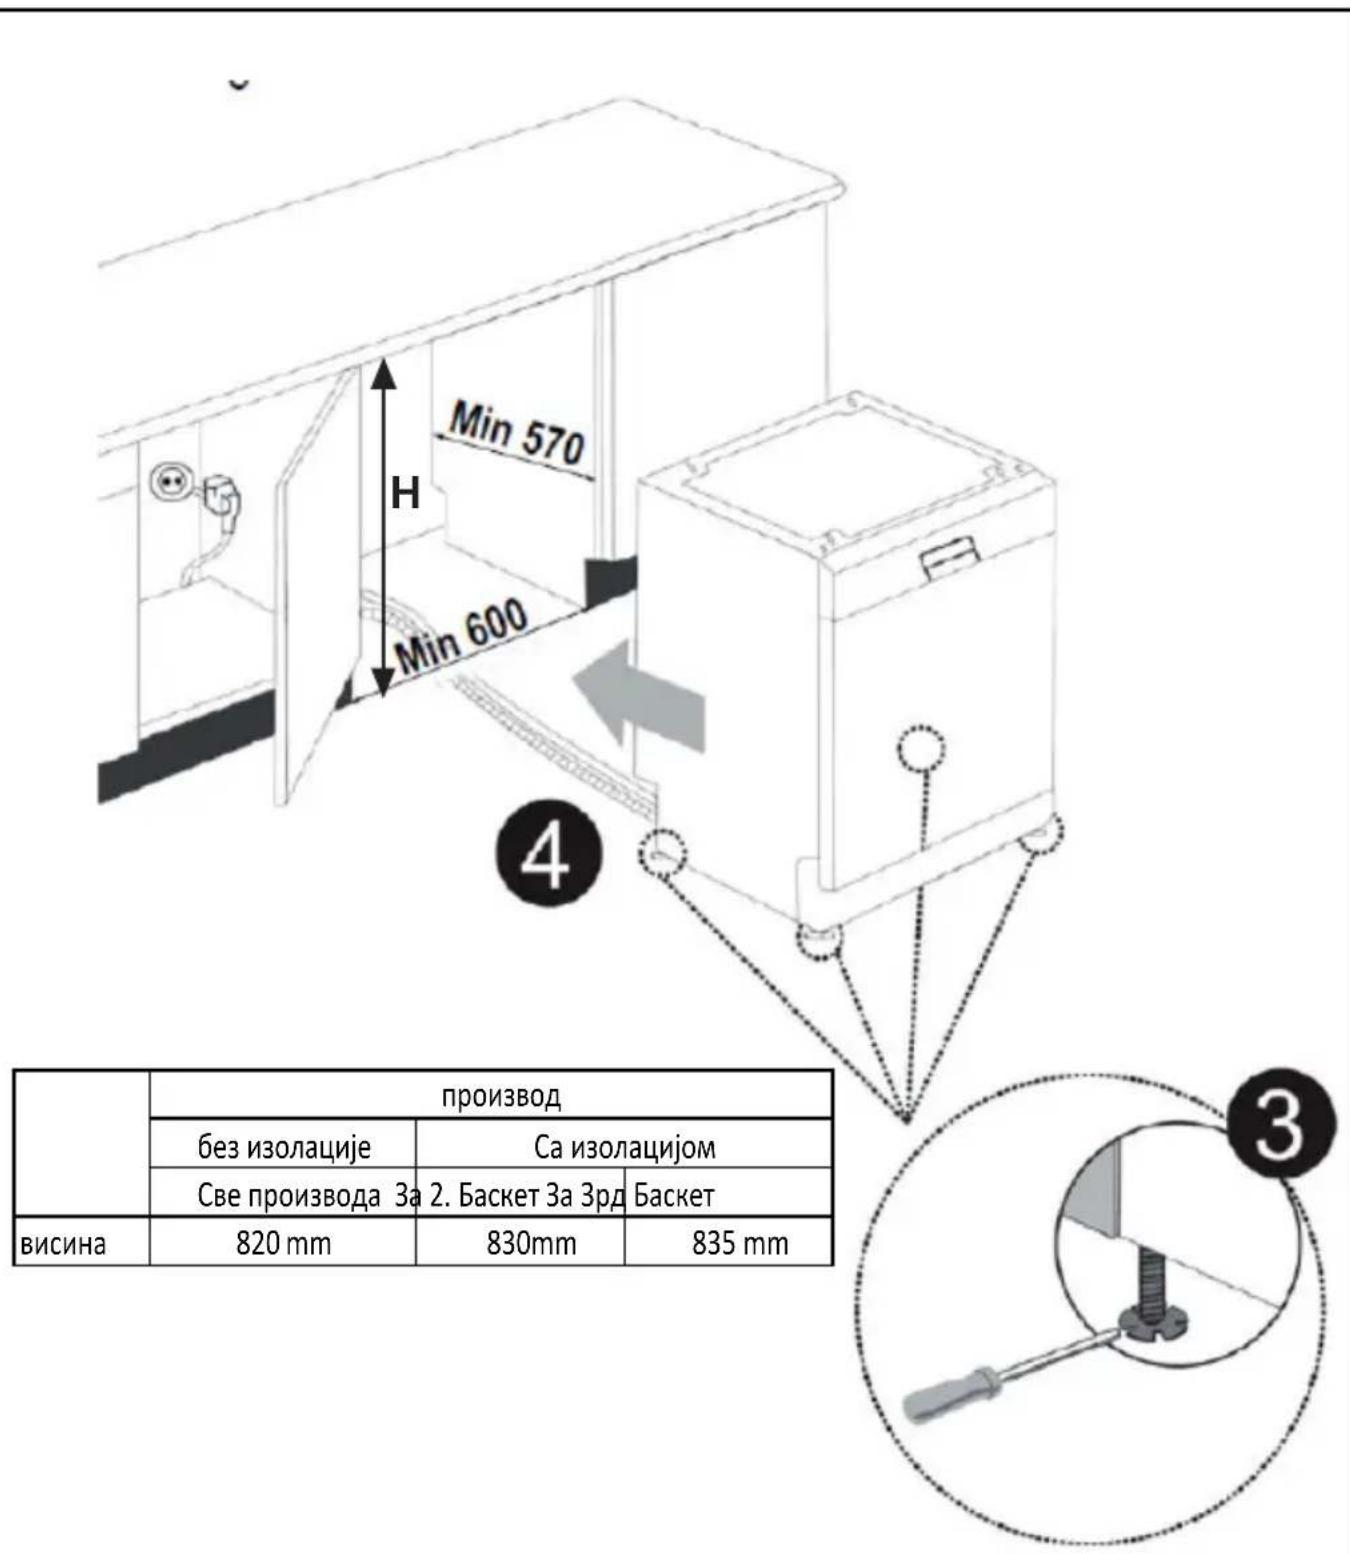
If you wish to fit your machine undercounter, there must be sufficient space to do so and the wiring-plumbing must be suitable to do so (1). If the space under the countertop is suitable for fitting your machine, remove the worktop as shown in the illustration (2).

WARNING: The countertop, of which machine will be placed under, must be in order to prevent imbalance.
The top panel of the dishwasher must be removed to fit the machine under the countertop.
To remove the top panel, remove the screws that hold it on, located at the rear of the machine. Then, push the panel 1 cm from the front towards the rear and lift it. Adjust the machine feet according to the slope of the floor (3).
Fit your machine by pushing it under the counter taking care not to crush or bend the hoses (4).

WARNING: After removing the top of your dishwasher, the machine d be placed in a space of the nsions shown in the figure below.
| A | B | ||
| All Products | B_1 | B_2 | |
| Product's Height (±2 mm) 820 mm | 30 mm 835 mm | ||
A: If there is no felt on the top of the product; you should take into account this product's height.
B1: If there is felt on the top of the product with 2nd basket; you should take into account this product's height.
B2: If there is felt on the top of the product with 3rd basket; you should take into account this product's height.
3. TECHNICAL SPECIFICATIONS
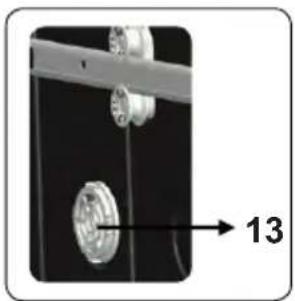
natural_image
Close-up of a mechanical component with a numbered arrow pointing to a circular component (no text or symbols visible)3.1. General appearance
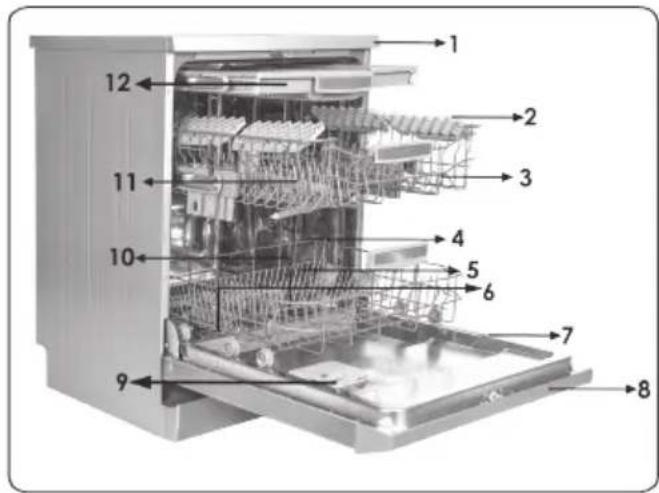
- Worktop
- Upper basket with racks
- Upper spray arm
- Lower basket
- Lower spray arm
- Filters
- Rating plate
- Control panel
- Detergent and rinse-aid dispenser
- Salt dispenser
- Upper basket track latch
- Upper Cutlery Basket
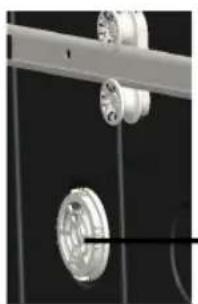
- Turbo Drying Unit: This system provides better drying performance for your dishes.
3.2. Technical specifications
| Capacity | 15 place settings |
| Dimensions (mm) | |
| Height | 850(mm) |
| Width | 598(mm) |
| Depth | 598(mm) |
| Net weight 53 kg | |
| Operating voltage / frequency | 220-240V50 Hz, |
| Total current (A) | 10(A) |
| Total power (W) | 1900(W) |
| Water supply pressure | Maximum:1 (Mpa)Minimum:0.03 (Mpa) |
4. BEFORE USING THE APPLIANCE
4.1. Preparing your Dishwasher for first use
• Make sure the electricity and supply water specifications match the values indicated in the installation instructions for the machine.
- Remove all packaging material inside the machine.
- Set the water softener level.
• Fill the rinse aid compartment.
4.2. Fill the salt (IF AVAILABLE)
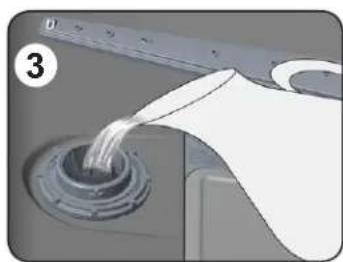
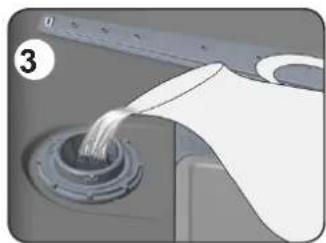
To add softener salt, open the salt compartment cap by turning it counter clockwise. (1) (2) At first use, fill the compartment with 1 kg salt and water (3) until it is almost overflowing. If available, using a funnel (4) will make filling easier. Replace the cap and close it. After every 20-30 Cycles add salt into your machine until it fills up (approx. 1 kg).
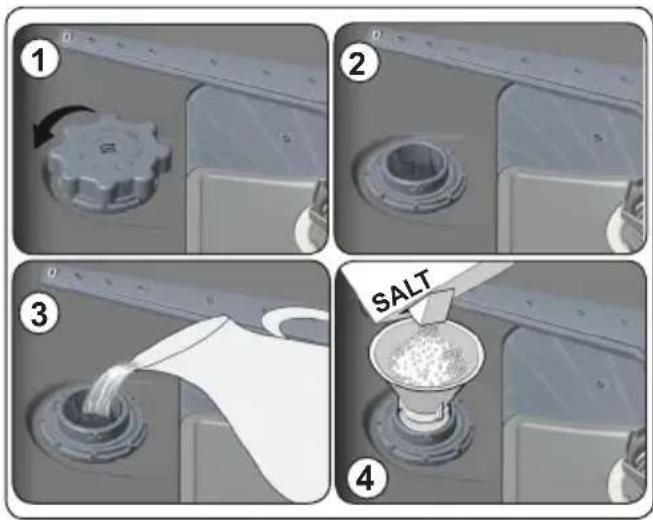
Only add water to the salt compartment on first use.E
Use softener salt specifically produced for use in dishwashers.
When you start your dishwasher, the salt compartment is filled with water, therefore put the softener salt in prior to starting your machine.
If the softener salt has overflowed and you do not start the machine immediately, run a short washing program to protect your machine against corrosion.
4.3. Test Strip
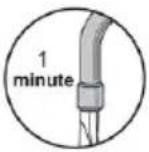
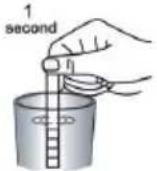
| Run water through the tap (1min.) | Keep the strip in the water (1sec) | Shake the strip. | Wait (1min.) | Set the hardness level of your machine. |
 |  | 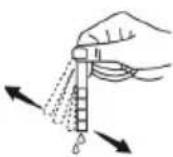 | 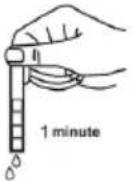 | 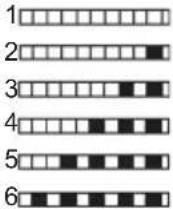 |
NOTE: The level is set to 3 as default. If the water is well water or has a hardness level above 90 dF, we recommend that you use filter and refinement devices.
4.4. Water Hardness Table
| Level | German dH | French dF | British dE | Indicator |
| 1 0-5 | 0-9 0-6 | L1 is seen on the display. | ||
| 2 6-11 | 10-20 7-14 | L2 is seen on the display. | ||
| 3 12-17 | 21-30 15-21 | L3 is seen on the display. | ||
| 4 18-22 | 31-40 22-28 | L4 is seen on the display. | ||
| 5 23-31 | 41-55 29-39 | L5 is seen on the display. | ||
| 6 32-50 | 56-90 40-63 | L6 is seen on the display. |
4.5. Water Softener System
The dishwasher is equipped with a water softener which reduces the hardness in the mains water supply. To find out the hardness level of your tap water, contact your water company or use the test strip (if available).
4.6. Setting
- Turn the machine on by pressing the On/Off button.
- Press the Program button for at least 3 seconds immediately after the machine is turned on.
- Release the Program button when "SL" is shown. Next, the last setting level is displayed.
- Press the program button to set the desired level. Each press of the program button increases the level. Once level 6 has been reached, the next press returns the level to 1.
- The last selected water hardness level is stored in the memory by turning the machine off with the On/Off button.
4.7. Detergent usage
Only use detergents specifically designed for domestic dishwashers.
Add the recommended amount of detergent for the selected programme to ensure the best performance.
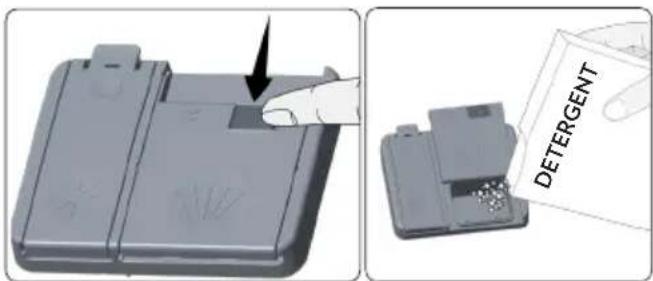
4.8. Filling the detergent
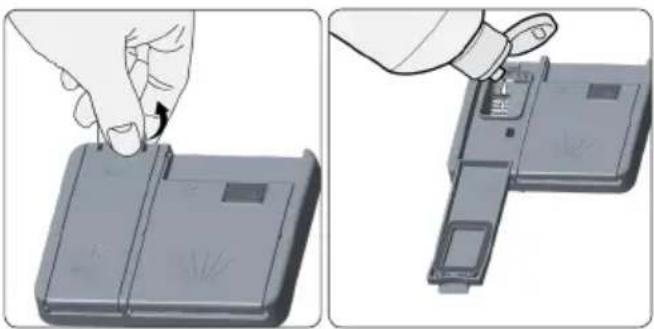
Push the latch to open the dispenser and pour in the detergent.
Close the lid and press it until it locks in place. The dispenser should be refilled just before the start of each programme. If the dishes are heavily soiled, place additional detergent in the pre-wash detergent chamber.
4.9. Using combined detergents
These products should be used according to the manufacturer's instructions.
Never put combined detergents into the interior section or the cutlery basket.
Combined detergents contain not only the detergent but also rinse-aid, salt replacement substances and additional components depending on the combination.
We recommend you do not use combined detergents in short programmes.
Please use powder detergents in such programmes.
If you encounter problems when using combined detergents, please contact the detergent manufacturer.
When you stop using combined detergents, make sure that water hardness and rinse aid settings are set to correct level.
4.10. Rinse-aid usage
Rinse-aid makes dishes sparkle and helps them to dry without spotting. Rinse-aid is required for stain-free utensils and clear glasses. Use only rinse-aid for domestic dishwashers.
4.11. Filling the rinse-aid and setting
To fill the rinse aid compartment, open the rinse-aid compartment cap. Fill the compartment with rinse aid to the MAX level and then close the cap. Be careful not to overfill the rinse aid compartment and wipe up any spills.
In order to change the rinse aid level, follow the below steps before turning on the machine:
- Turn on the machine by pressing the On/Off button.
- Press the Programme button for at least 5 seconds immediately after the machine is turned on.
- Release the Programme button when "rA" is shown. Rinse aid level setting follows water hardness level setting. Next, the last setting level is displayed.
- Set the level by pushing the programme button.
- Switch off the machine to save the setting.
- The factory setting is "4".
If the dishes are not drying properly or are spotted, increase the level. If blue stains form on your dishes, decrease the level.
natural_image
Illustration showing a hand inserting a component into a device, with no visible text or symbols| Level Brightener Dose Indicator | ||
| 1 Rinse | e-aid not dispensed | r1 is shown on the display. |
| 2 1 dose | is dispensed | r2 is shown on the display. |
| 3 2 doses | are dispensed | r3 is shown on the display. |
| 4 3 doses | are dispensed | r4 is shown on the display. |
| 5 4 doses | are dispensed | r5 is shown on the display. |
5. LOADING YOUR DISHWASHER
For best results, follow these loading guidelines.
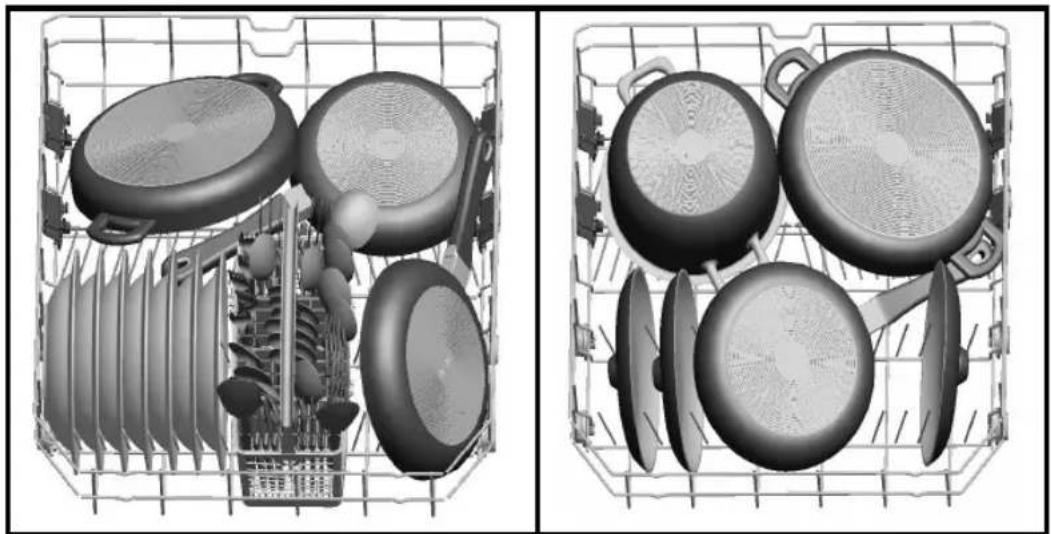
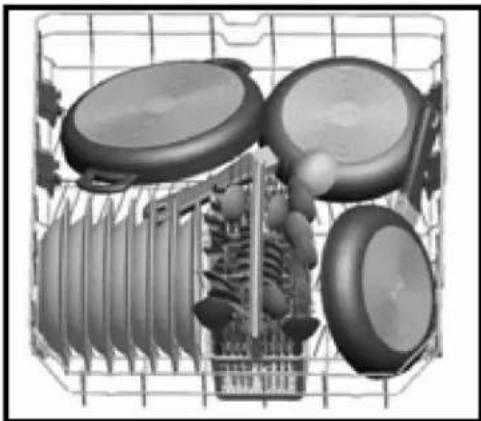
We recommend that you place lare items (pots, pans, lids, plates and bowls) which are heavily soiled in the lower basket.
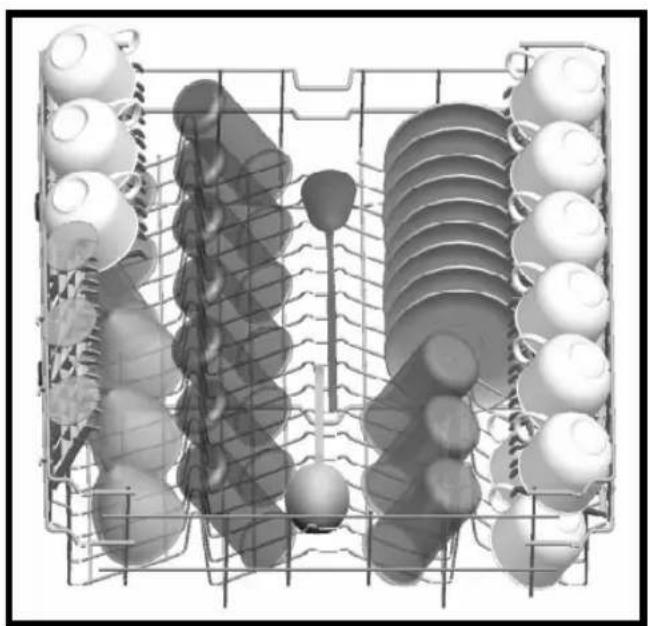
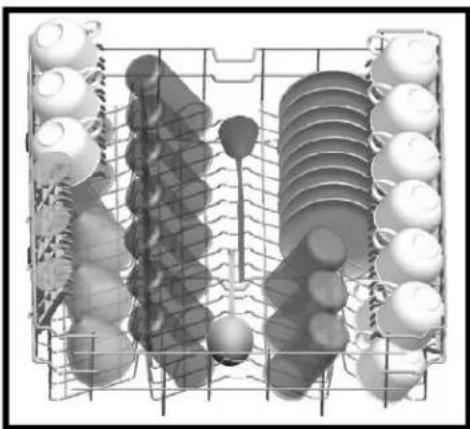
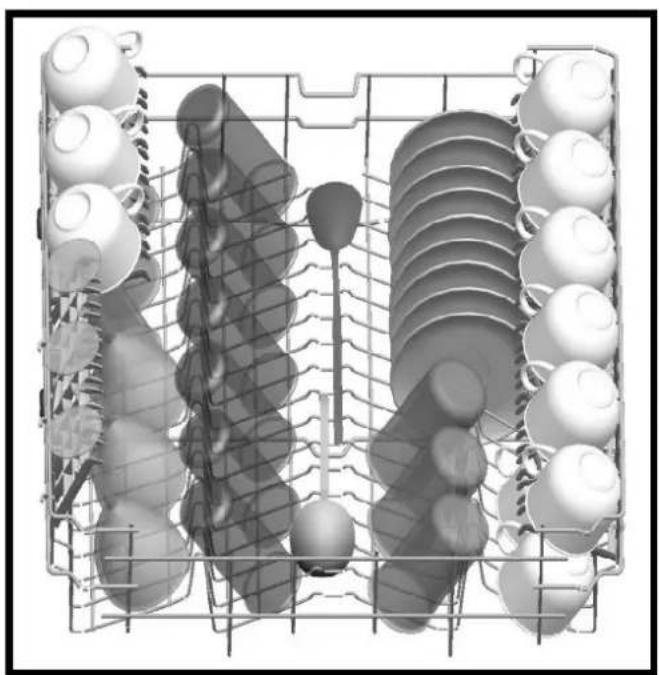
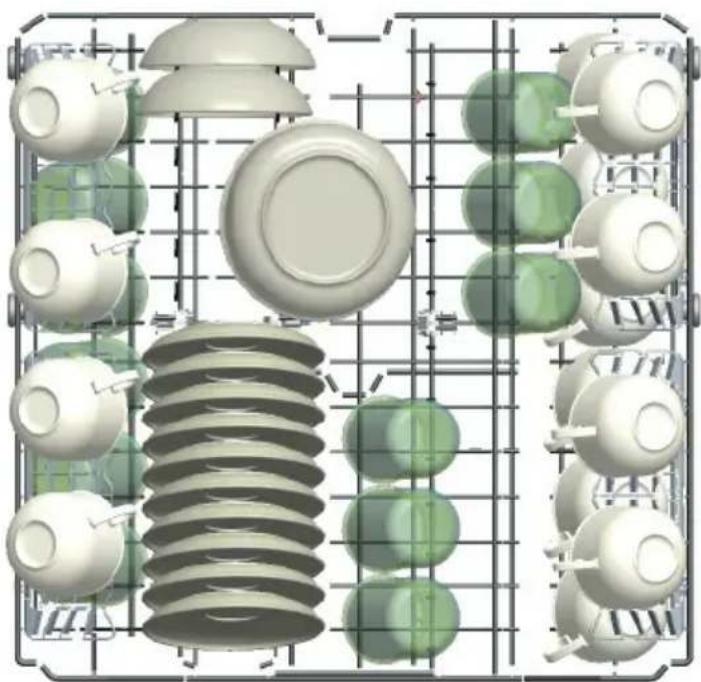
The upper basket is designed for delicate and lighter dishware such as glasses, coffee and tea cups and saucers. Position the dishes so that they will not get moved by the spray of water.
Cutlery should be placed in the cutlery basket. Items should be loaded individually into the appropriate slots with their handles downwards. Long utensils should be placed horizontally on the baskets.

WARNING: Take care not to obstruct rotation of spray arms.
5.1. Recommendations
Remove any coarse residue on dishes before placing the dishes in the machine. Start the machine with full load.

NOTE: Do not overload the drawers or e dishes in the wrong basket.

WARNING: Always place sharp sils with the sharp point down and open sils with their openings down.
Height Adjustable Rack (peg type)
The height adjustable racks enable glasses and cups to be placed on or under the racks. The racks can be adjusted to 2 different heights. Cutlery and utensils can also be placed on the racks horizontally.
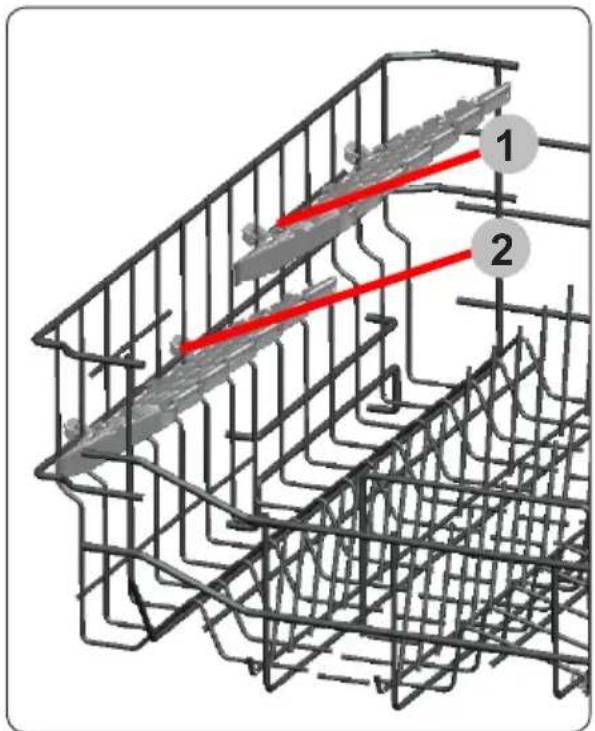
Upper Basket
Height adjustment
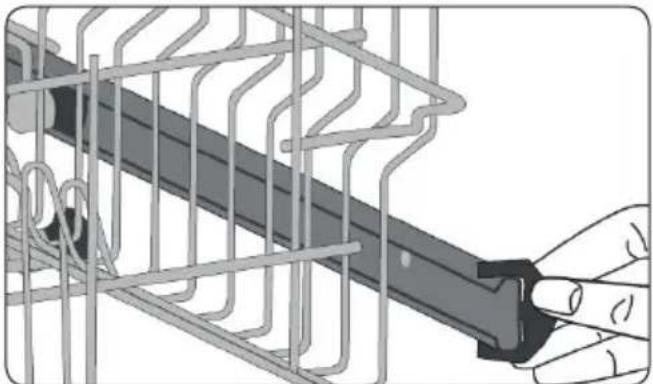
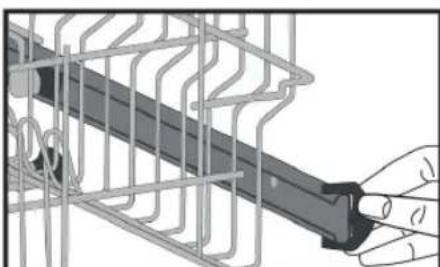
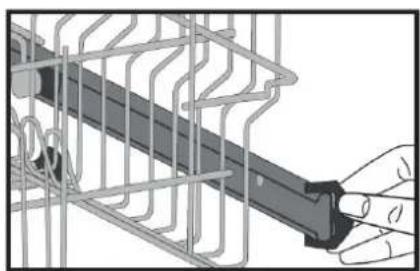
Turn the Rail Stop Clips, at the ends of the rails, to the sides to open them (as shown in the image below), then pull out and remove the basket. Change the position of the wheels, then reinstall the basket to the rail, making sure to close the Rail Stop Clips. When the upper basket is in the higher position, large items such as pans can be placed on the lower basket.
natural_image
Illustration of a hand holding a mechanical component inside a wire cage (no text or symbols visible)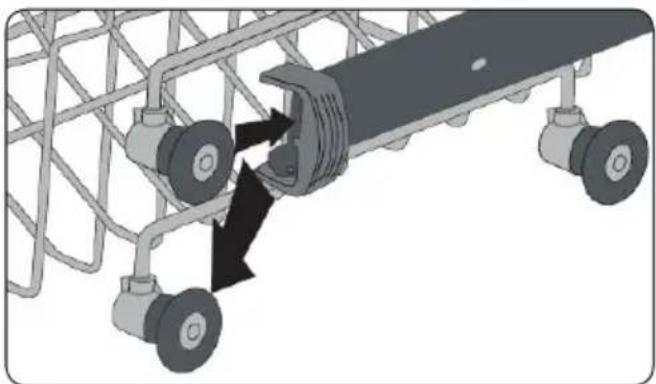
natural_image
Diagram of a mechanical assembly with two wheels and a central component, showing directional arrows (no text or symbols)Four Folding Racks
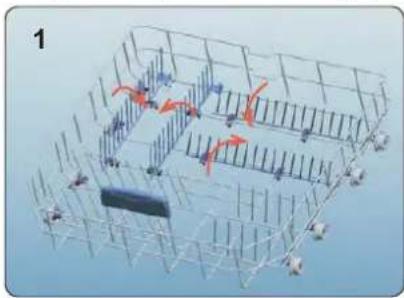
(15 pc)
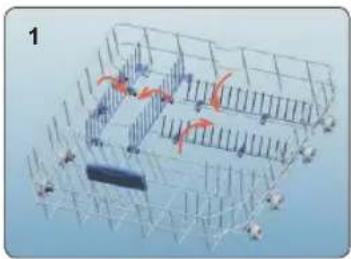
The folding racks allow easier placement of larger items, such as pots and pans. Each section can be folded separately. The racks can be raised up, or folded down, as shown in the images.
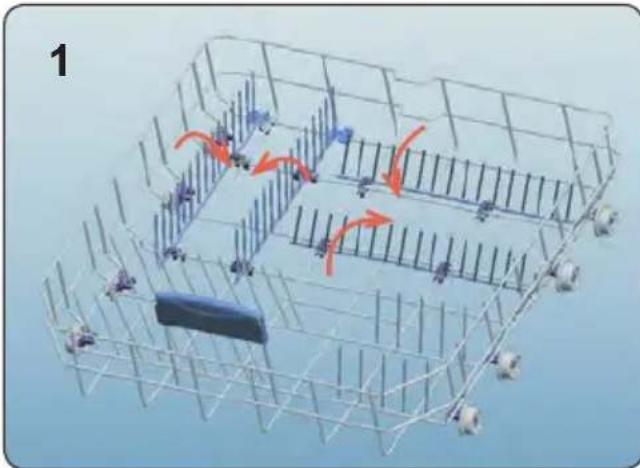
natural_image
3D wireframe diagram of a warehouse or storage facility with workers and equipment, no visible text or symbols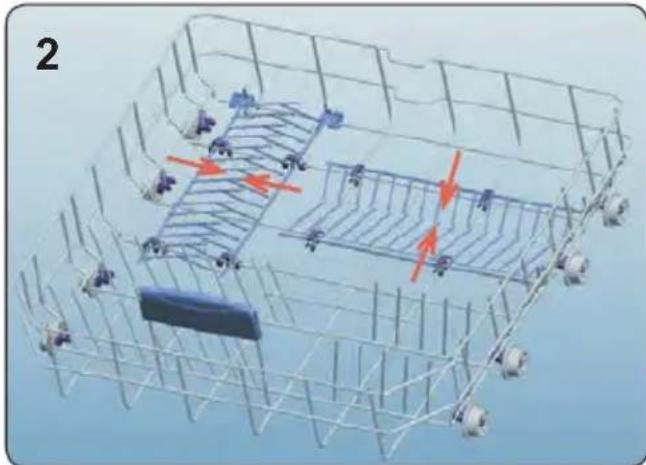
natural_image
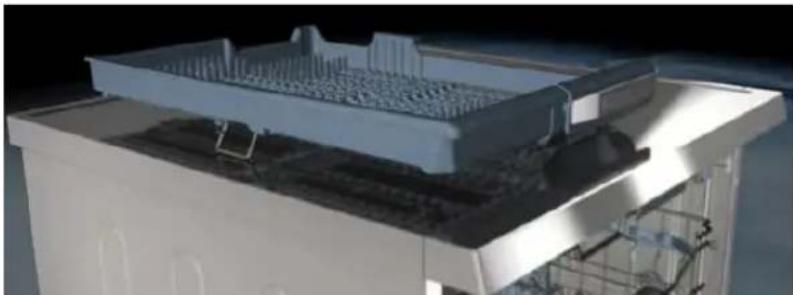
3D wireframe diagram of a mechanical or structural assembly with multiple components and directional arrows (no text or symbols)Upper Cutlery Basket
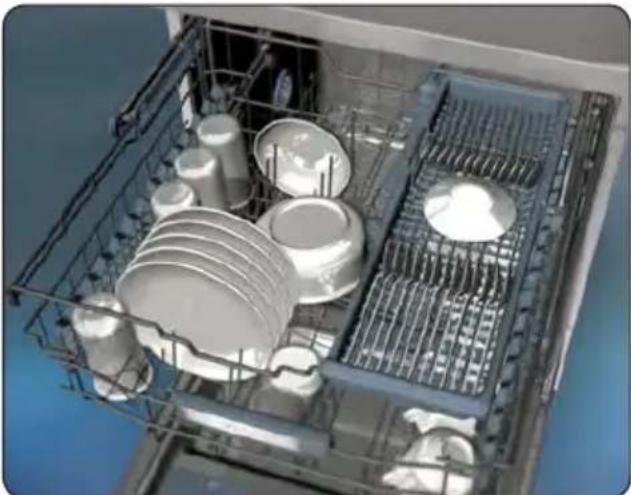
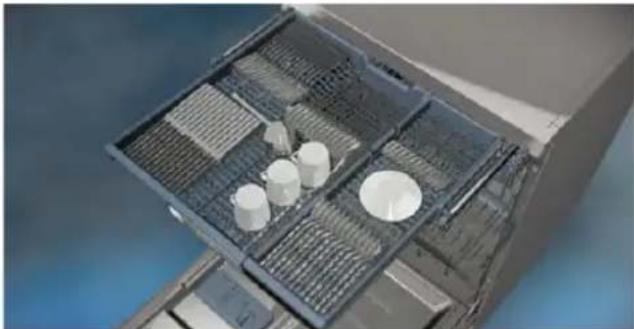
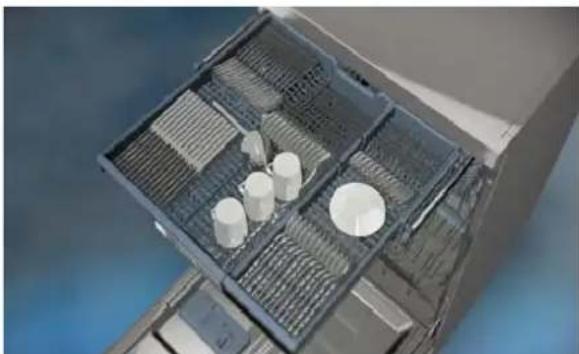
The upper cutlery basket is designed for the placement of large and small cutlery and utensils.
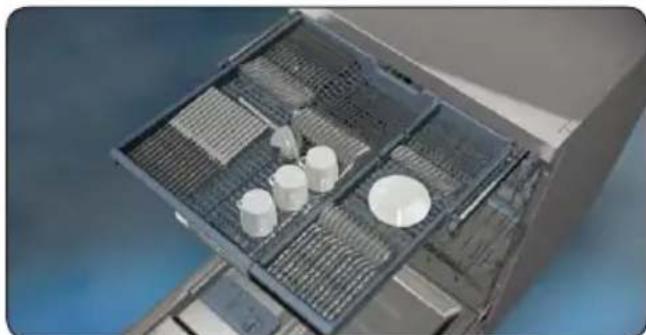
natural_image
Close-up of a mechanical device with a grid-patterned tray and several white cylindrical components (no visible text or symbols)The basket is easily removed from the dishwasher, therefore allows ease of use when removing your items, along with the
basket, after washing.
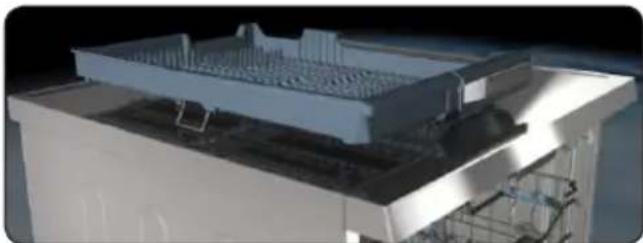
natural_image
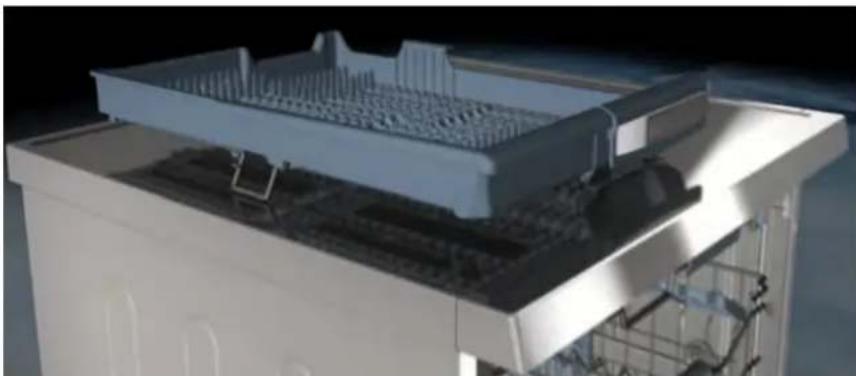
3D rendering of a mechanical assembly with layered components and mounting brackets (no visible text or symbols)The upper cutlery basket is composed of two pieces that can be separately removed. Remove the left or right section of the cutlery basket in order to obtain more space for items in the upper basket.
natural_image
Interior view of a kitchen appliance showing multiple white kitchenware and a rack-mounted sink (no text or symbols visible)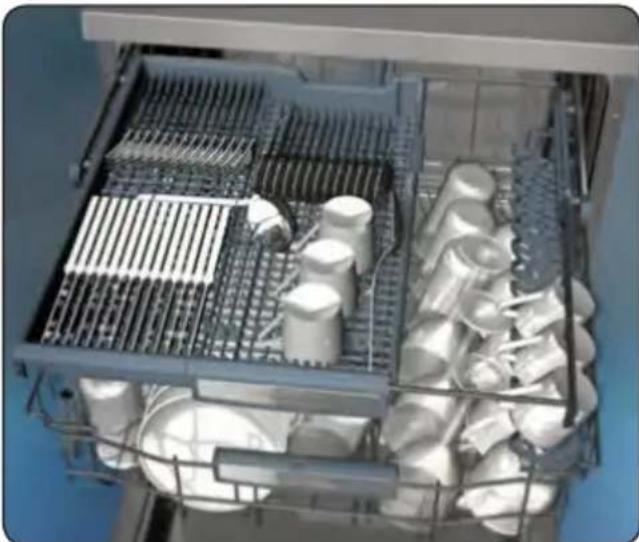
natural_image
Interior view of a kitchen appliance with stainless steel grilles and various kitchenware (no visible text or labels)WARNING: Knives and other sharp objects must be placed horizontally in the cutlery basket.
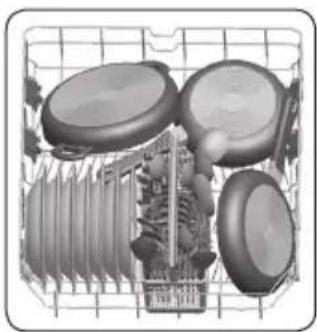
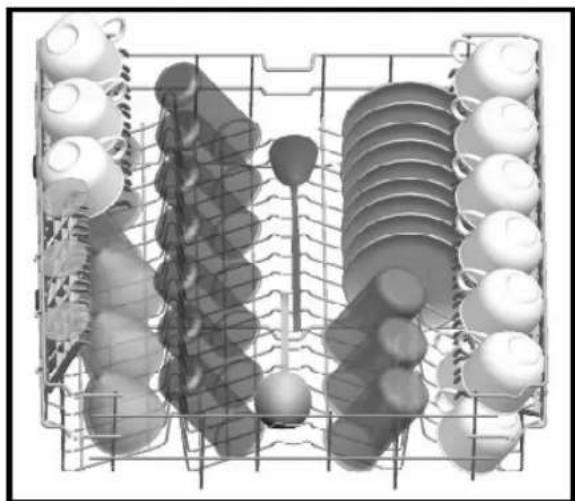
5.2. Alternative basket loads
Lower basket
natural_image
Black-and-white illustration of a grid-based appliance with cutouts and accessories (no text or symbols)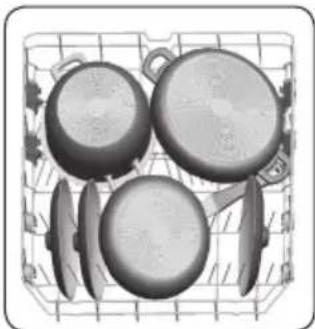
natural_image
Illustration of kitchen utensils arranged in a grid (no text or symbols)Upper basket
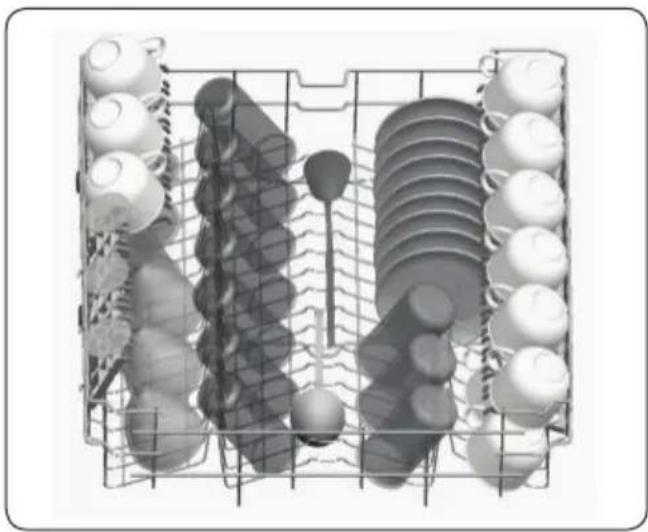
natural_image
3D rendering of a multi-tiered industrial machine with multiple cylindrical components and a central knob (no text or symbols visible)Incorrect loads
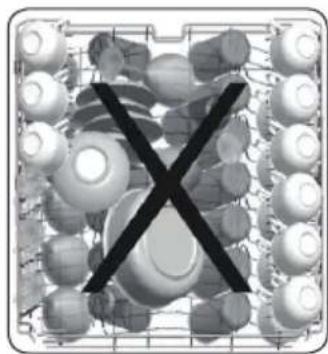
natural_image
Black X symbol crossed over a grid of spherical objects, no text or symbols present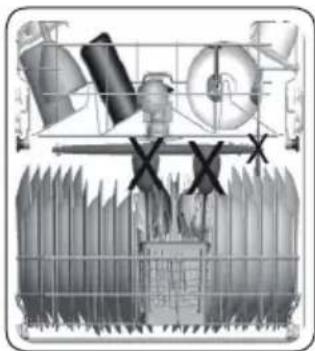
natural_image
Cross-sectional diagram of a mechanical or industrial component with no visible text or symbols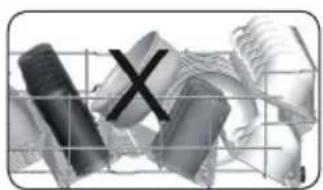
natural_image
Abstract grayscale graphic with fragmented shapes and a central 'X' mark, no readable text or symbols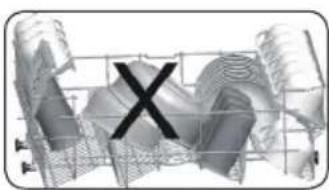
natural_image
Abstract 3D wireframe structure with a large 'X' symbol overlay (no text or symbols present)Unsuitable items for dishwashing
- Cigarette ashes, candle leftovers, polish, paint, chemical substances, iron-alloy materials.
- Forks, spoons and knives with wooden, bone, ivory or nacrecoated handles; glued items, items soiled with abrasive, acidic or base chemicals.
• Temperature-sensitive plastics, copper or tincoated containers.
• Aluminium and silver objects. - Some delicate glasses, ornamental printed porcelains; some crystal items, adhered cutlery, lead crystal glasses, cutting boards, synthetic fibred items.
- Absorbent items such as sponges or kitchen rugs.

IMPORTANT: In future, purchase
dishwasher-proof kitchenware.
Important Note for Test Laboratories
For detailed information required for tests according to EN normatives and a softcopy of the manual, please send the model name and serial number to the following address: dishwasher@standardtest.info
6. PROGRAMME TABLE
| Programme | Duration (min) | Description |
| Prewash 15 To rinse dishes that you plan to wash later. | ||
| Quick 30' 30 For lightly soiled dishes and a quick wash. | ||
| Delicate 74 For lightly soiled, delicate dishes. | ||
| Eco (Reference) 171 | Standard programme for normally soiled, daily-used dishes. | |
| Daily 94 | Standard programme for normally soiled, daily-used dishes. | |
| Super 50' 50 | A faster programme for dishes which are used daily but are not heavily soiled. | |
| Intensive 114 For heavily soiled dishes. | ||

NOTE: THE PROGRAMME DURATION MAY CHANGE ACCORDING TO THE COUNT OF DISHES, THE WATER TEMPERATURE, THE AMBIENT TEMPERATURE SELECTED ADDITIONAL FUNCTIONS.
- Only use powder detergent for short programmes.
- Short programmes do not include drying.
- To assist drying, we recommend slightly opening the door after a cycle is complete.
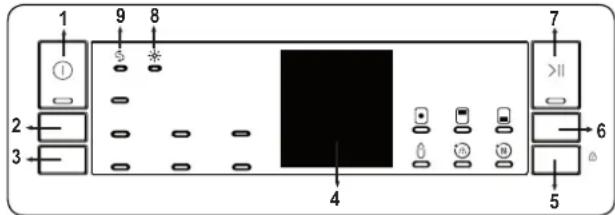
7. THE CONTROL PANEL
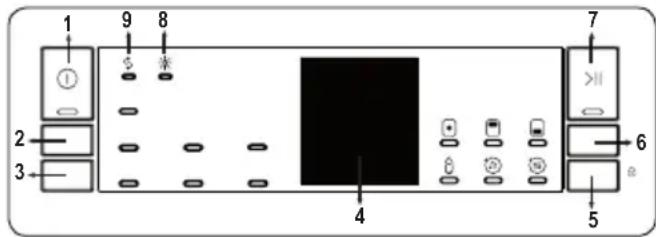
1. On/Off Button
Switch the machine on by pressing the On/Off button. The On/Off lamp lights as long as the machine is on.
2. Program Selection Button
Select a suitable programme by pressing the Programme button.
3. Delay Button
You can delay the start time of the programme for 1-2...24 hours by pressing the delay button (3) before the programme starts. If you want to change the delay time, first press the Start/Pause button and then the delay button to select a new delay time. To activate the new delay time, press the Start/Pause button. To cancel the delay, you need to switch to 0 hour by using the delay when the machine is paused.
4. Remaining Time Indicator
Programme flow can be monitored via the Wash,Rinse, Dry, End lamps and Remaining Time Indicator. The machine remains silent for about 40-50 minutes with respect to the flow of the programme you have selected.
5. Select Button
Options can be selected by pressing the Options button repeatedly. The chosen option will be indicated by a blinking LED. Select the option by pressing the Select button. The LED for the chosen option will then remain lit.
6. Options Button
If you have used an extra feature on the latest washing programme, this feature will remain active on the next washing programme. If you want to cancel this feature on the newly selected washing programme, press the options button to browse the options and press the select button to deactivate the related option or turn the machine off with the on/off button. If you would like to use an extra feature with a newly selected programme, select the desired function.
7. Start/Pause Button
Press the Start/Pause button to start the programme. The wash lamp turns on and the Remaining Time Indicator shows the programme duration. It also indicates the remaining time during the programme flow. If you open the door of your machine when the programme is running the duration of the programme pauses, and the Start/Pause led blinks.
8. Rinse Aid Indicator
When the rinse aid level is low, the rinse aid lack warning indicator turns on and you should fill the rinse aid chamber.
9. Salt Indicator
When there is insufficient softening salt, the salt lack warning indicator turns on and you should fill up the salt chamber.

NOTE: By selecting the half load on, three sorts of washing can be cuted: both baskets, upper basket and other basket. These options are ideal for smaller loads, allowing the dishwasher perform smaller washes with reduced assumption.

NOTE: Select the Tablet option when g combined detergent that contains rinse aid and extra functions.

NOTE: You may select Hygiene in order to obtain a more hygienic and a shorter washing process by altering the other temperature and washing time of the programme you have selected.

NOTE: If the Rinse option is selected, thin-rinsing steps will be added into selected programme, so you can ensure your dishes will be extra clean and

NOTE: If the Drying lamp is on, extra ing and drying steps will be added into selected programme, so your dishes will ried more thoroughly.

NOTE: Child lock is activated/deacted by pressing the select button (5) for at 3 seconds. When it is activated, all blink and "CL" is shown on the Re

NOTE: If you switch the machine to off action after selecting the delay time and programme has started, the delayed is cancelled.
7.1. Changing a programme
If you would like to change the programme when the machine is already running.
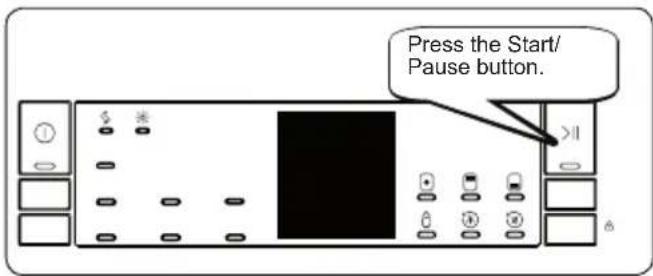
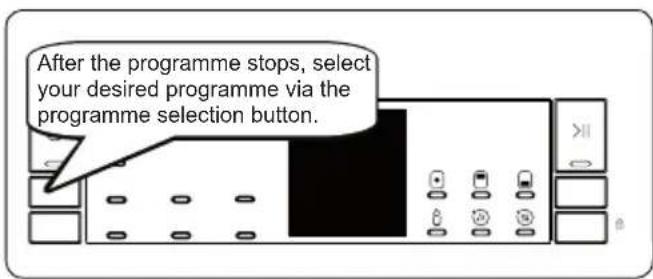
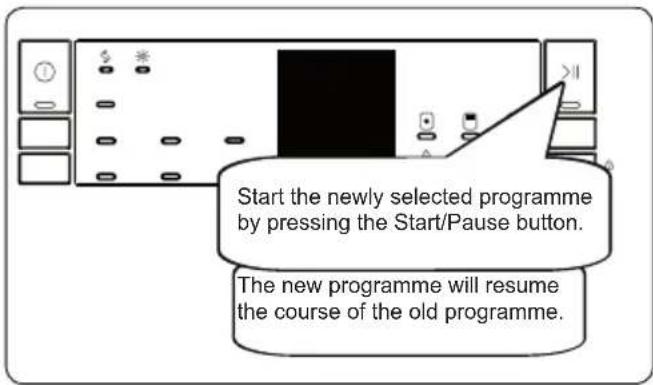
7.2. Cancelling a programme
If you would like to cancel a programme when it is running.
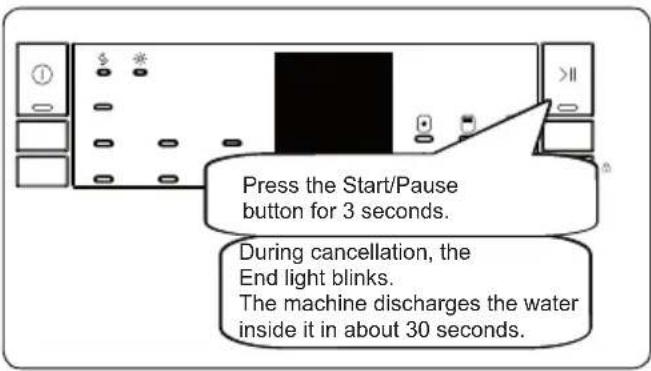
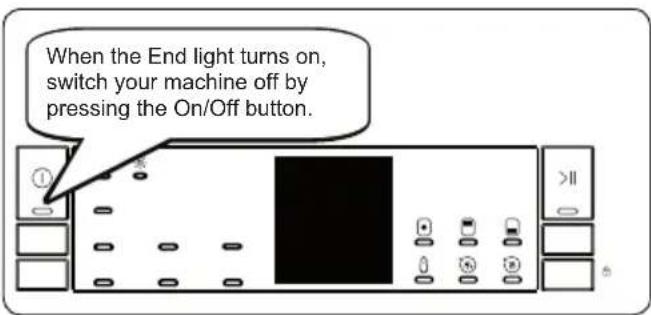
7.3. Switching the Machine Off
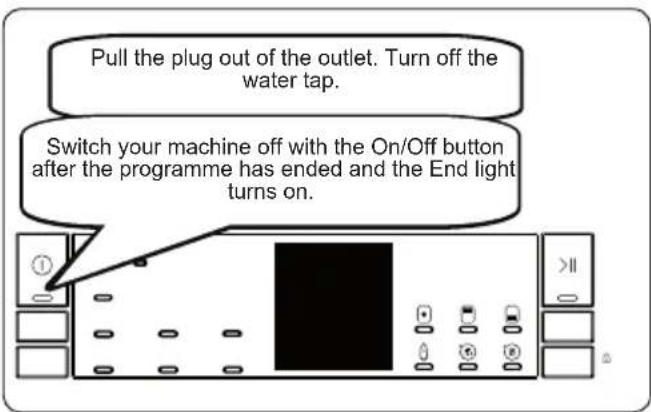

NOTE: Do not open the door before the ramme ends.

NOTE: At the end of washing program-you can leave the door of your machine to hasten the drying.

NOTE: If the door of machine is open or power is cut off during washing, the ramme will continue when the door is red or the power is restored.
8. CLEANING AND MAINTENANCE
Cleaning your Dishwasher is important to maintain the machine's service life.
Oil and lime may build up in your Dishwasher over time. If this occurs:
- Fill the detergent compartment but do not load any dishes. Select a programme which runs at high temperature and run the Dishwasher empty. If this does not clean your Dishwasher sufficiently, use a cleaning agent designed for use with dishwashers.
- Wipe the door seals regularly with a damp cloth to remove any accumulated residue.
8.1. Cleaning machine and filters
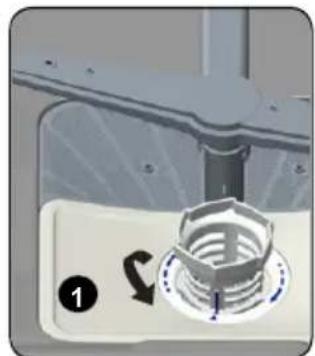
Clean the filters and spray arms at least once a week. If any food waste remains on the coarse and fine filters, remove them and clean them thoroughly with water.
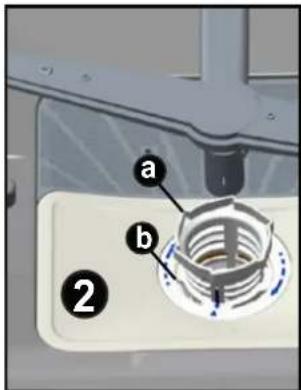
a) Micro Filter
b) Coarse Filter
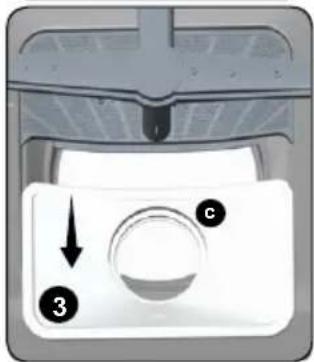
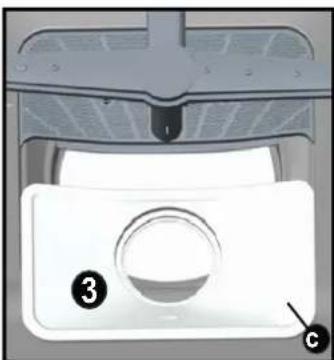
c) Metal Filter
natural_image
Close-up of a mechanical component with a circular dial and directional arrow, no visible text or symbols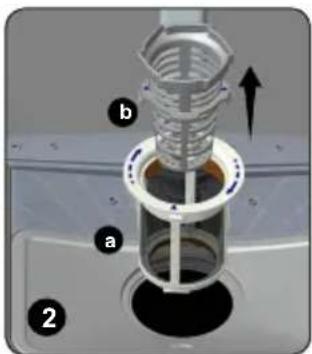
natural_image
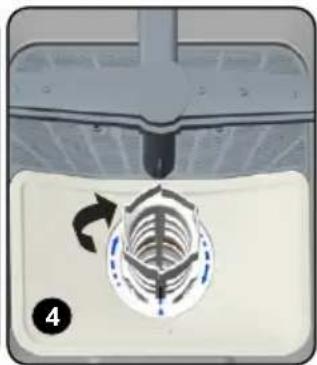
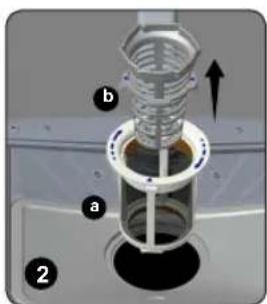
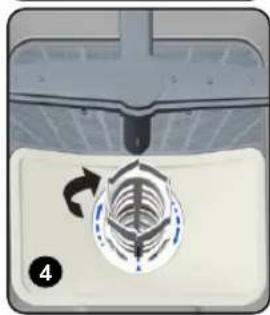
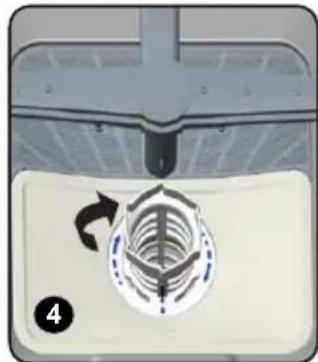
Close-up of a mechanical component with a circular component and directional arrow, no visible text or symbolsTo remove and clean the filter combination, turn it counter clockwise and remove it by lifting it upwards (1). Pull the coarse filter out of the micro filter (2). Then pull and remove the metal filter (3). Rinse the filter with lots of water until it is free of residue. Reassemble
the filters. Replace the filter insert, and rotate it clockwise (4).
- Never use your Dishwasher without a filter.
- Incorrect fitting of the filter will reduce the washing effectiveness.
- Clean filters are necessary for proper running of the machine.
8.2. Spray arms
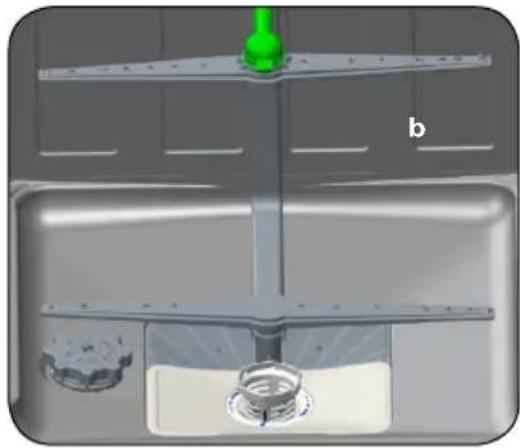
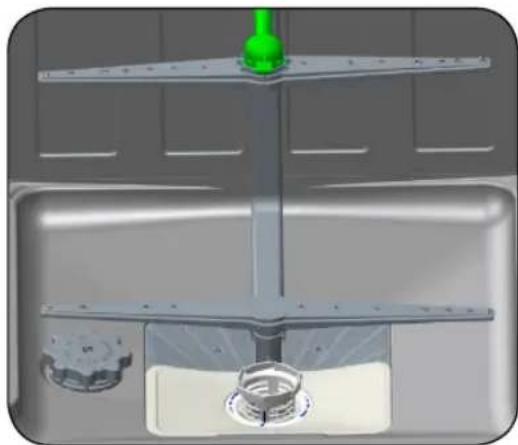
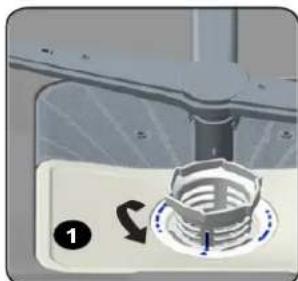
Make sure that the spray holes are not clogged and that no food waste is stuck to the spray arms. If there is any clogging, remove the spray arms and clean them under water. To remove the upper spray arm undo the nut holding it in position by turning it clockwise and pulling it downwards. Make sure that the nut is properly tightened when refitting the upper spray arm.
natural_image
3D rendering of a mechanical component with a green handle and labeled part 'b' (no text or symbols on the main structure)9. TROUBLESHOOTING
| FAULT POSSIBLE CAUSE TROUBLESHOOTING | ||
| The programme does not start. | Your Dishwasher is not plugged in. Plug your Dishwasher in. | |
| Your Dishwasher is not switched on. | Switch your Dishwasher on by pressing the On/Off button. | |
| Fuse blown. Check your indoor fuses. | ||
| Water inlet tap is closed. Turn on the water inlet tap. | ||
| Your Dishwasher door is open. Close the Dishwasher door. | ||
| Water inlet hose and machine filters are clogged. | Check the water inlet hose and machine filters and make sure they are not clogged. | |
| Water remains inside the machine. | Water drain hose is clogged or twisted. | Check the drain hose, then either clean or untwist it. |
| The filters are clogged. Clean the filters. | ||
| The programme is not finished yet. Wait until the programme is finished. | ||
| Machine stops during washing. | Power failure. Check mains power. | |
| Water inlet failure. Check water tap. | ||
| Shaking and hitting noises are heard during a wash operation. | The spray arm is hitting the dishes in the lower basket. | Move or remove items blocking the spray arm. |
| Partial food wastes remain on the dishes. | Dishes placed incorrectly, sprayed water not reaching affected dishes. | Do not overload baskets. |
| Dishes leaning each another. | Place dishes as instructed in the section on loading your dishwasher. | |
| Not enough detergent used. | Use the correct amount of detergent, as instructed in the programme table. | |
| Wrong wash programme selected. | Use the information in the programme table to select the most appropriate programme. | |
| Spray arms clogged with food waste. | Clean the holes in the spray arms with thin objects. | |
| Filters or water drain pump clogged or filter misplaced. | Check the drain hose and filters are correctly fitted. | |
| Whitish stains remains on dishes. | Not enough detergent used. | Use the correct amount of detergent, as instructed in the programme table. |
| Rinse aid dosage and/or water softener setting set too low. | Increase rinse aid and/or water softener level. | |
| High water hardness level. Increase water softerner level and add salt. | ||
| Salt compartment cap not closed properly. | Check that the salt compartment cap is closed properly. | |
| Dishes do not dry. | Drying option is not selected. Select a programme with a drying option. | |
| Rinse aid dosage set too low. Increase rinse aid dosage setting. | ||
| Rust stains form on the dishes. | Stainless-steel quality of the dishes is insufficient. | Use only dishwasher-proof sets. |
| High level of salt in wash water. | Adjust the water hardness level using water hardness table. | |
| Salt compartment cap not closed properly. | Check that the salt compartment cap is closed properly. | |
| Too much salt spilled in the Dishwasher while filling it with salt. | Use funnel while filling salt to the compartment to avoid spillage. | |
| A poor mains grounding. Consult a qualified electrician immediately. | ||
| Detergent remains in the detergent compartment. | Detergent was added when the detergent compartment was wet. | Make sure detergent compartment is dry before use. |
AUTOMATIC FAULT WARNINGS AND WHAT TO DO
| TROUBLE CODE | POSSIBLE FAULT WHAT TO DO | |
| F5 Insufficient water | Make sure the water inlet tap is open and water is flowing. | |
| Separate the inlet hose from the tap and clean the filter of the hose. | ||
| Contact for service if the error continues. | ||
| F3 Continuous water input Close the tap and contact for service. | ||
| F2 Inability to discharge water | Water discharge hose and filters may be clogged. | |
| Cancel the program. | ||
| If the error continues, contact for service. | ||
| F8 Faulty heater Contact for service. | ||
| F1 Overflow | Unplug the machine and close the tap. | |
| Contact for service. | ||
| F7 Overheating failure Contact for service. | ||
| F6 | Faulty temperature sensor | Contact for service. |
| FE | Faulty electronic card | Contact for service. |
10. PRACTICAL INFORMATION
- When the machine isn't in operation:
- Disconnect the plug and close the tap.
- Leave the door slightly open to prevent odour formation.
- Select the dry option to remove water droplets.
- Place dishes in the machine properly to achieve the best energy consumption, washing and drying performance. Please see the programme and consumption table for more information.
- Rinse dirty dishes before placing them in the dishwasher.
- Only use the Prewash programme when necessary.
- Do not place the machine near a refrigerator because it will reach high temperatures.
- If the machine is located in an area that is at risk of freezing, close the tap, disconnect the inlet hose from the tap and drain the water inside the hose and the machine completely.
11. THE PRODUCT FICHE
| Supplier's trade mark | VOX |
| Supplier's model | LC15A22-IX |
| Capacity of dishwasher 15 | |
| The energy efficiency class A++ | |
| Annual energy consumption in kWh per year (AEc) (280 Cycle)* 270 | |
| Energy consumption (Et) (kWh per cycle) 0,94 | |
| Off-mode power consumption (W) (Po) 0,50 | |
| Left-on mode power consumption (W) (Pi) 1,00 | |
| Annual water consumption in litres per year (AWc) (280 Cycle)** 2520 | |
| Drying efficiency class*** A | |
| Standard programme name**** Eco | |
| Programme time for standard cycle (min) 171 | |
| Duration of the left-on mode (Ti) (min) - | |
| Airborne acoustical noise emissions (dB(A) re 1 pW) | 47 |
| Freestanding/Built-in Freestanding |
* Energy consumption 270 kwh per year, based on 280 standard cleaning cycles using cold water fill and the consumption of low power modes. Actual energy consumption will depend on how the appliance is used.
** Water consumption 2520 litres per year based on 280 standard cleaning cycles. Actual water consumption will depend on how appliance is used.
*** Drying efficiency class A on a scale from G (least efficient) to A (most efficient).
**** The “Eco” is the standard cleaning cycle to which the information in the label and the fiche relates. This programme is suitable to clean normally soiled tableware and it is the most efficient programme in terms of combined energy and water consumption.

52268311 R35

natural_image
Abstract black and white geometric pattern with diagonal stripes (no text or symbols)VOX
ELECTRONICS
SRB
LC-15A22 IX
UPUTSTVO ZA UPOTREBU MAŠINA ZA SUDOVE
natural_image
Simple line drawing of a rectangular container with a horizontal bar inside (no text or symbols)SADRŽAJ
- Tehničke karkateristike 3
Preporuke i mere bezbednosti ....5
- Gornji radni deo
- Gornja korpa sa držačima
- Gornja ručka za sprej
- Donja korpa
- Donja ručka za sprej
-
Filteri
-
Ploča za oznaku
- Kontrolna ploča
- Dozator za deterdžent i pomoć ispiranju
- Dozator za so
- Gornja bravica korpe za praćenje
- Gornja korpa za escajg
natural_image
Close-up of mechanical components including a shaft and two circular components with a connecting rod (no visible text or symbols)13 Jedinica za turbo sušenje:
Upozorenje: Do not stand in front of the door after the signal sounds belonging auto-open.
Bezbednost dece
natural_image
Illustration of a hand holding a faucet with a valve, showing a curved arrow indicating rotation (no text or symbols)Crevo za dovod vode
Preporučujemo upotrebu creva za dovod vode koje ste dobili sa mašinom; nemojte da koristite crevo za dovod vode od stare mašine. Ukoliko spajate mašinu na dovod vode koji niste koristili duži period vremena, pre spajanja pustite vodu Crevo za dovod vode spojite direktno na priključak. Preporučeni pritisak na priključku je od minimalnih 0,03 Mpa do maksimalnih 1 Mpa. Ukoliko je pritisak vode veći od 1 Mpa potrebno je da između creva i priključka postavite sigurnosni ventil koji se otvara na povišeni pritisak-.
natural_image
Diagram showing two different pipe fittings: one with a handle and the other with a valve, both without any text or symbols.Running in low voltage will cause a decline in washing quality.
Eventualna promena kabla za napajanje mora da bude izvedena od strane kvalifikovanog električara. U suprotnom, može doći do nesrećnih slučajeva.
For safety purposes, always make sure to disconnect the plug when a wash programme is finished.
Kako bi izbegli opasnost od strujnog udara, ne iskopčavajte uređaj sa napajanja ukoliko su vam ruke mokre.
Upozorenje: The stand part which we will settle our machine under it by removing its worktop has to be stable in such a way not to allow balance disorder.
Deo, ispod kojeg postavljamo mašinu nakon skidanja njene radne ploče, mora biti stabilan, tako da eventualno izbacivanje iz ravnoteže bude onemoguceno.
Nivelirajuće nogice mašine podesite zavisno od kosine poda.3 Najbolji položaj za smeštaj mašine je ispod radne ploče. Pritom pazite da ne savijete odvodno crevo i priključak napajanja.4
natural_image
Close-up of a mechanical component with a gear-like knob and a curved arrow indicating rotation (no text or symbols visible)natural_image
Close-up of a mechanical component with a circular recessed part and a side-mounted shaft (no visible text or symbols)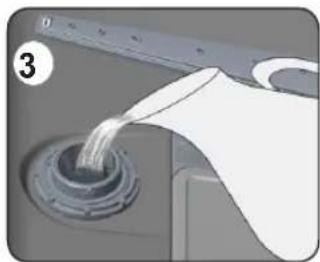
natural_image
Close-up of a mechanical component with a pipe pouring into a circular tank (no visible text or symbols)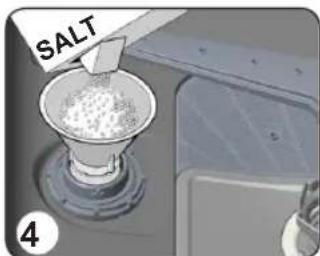
Odeljak za sol napunite vodom samo prilikom prve upotrebe mašine.
natural_image
Illustration of a hand pressing a button on a device component (no text or symbols visible)Kombinovani deterdženti
Proizvođači deterdženata za mašine osim običnih proizvode i kombinacije deterdženata nazvanih "2 u 1", "3 u 1" ili "5 u 1" itd.
"2 u 1" deterdženti sadrže deterdžent u kombinaciji sa soli ili sredstvom za ispiranje. Pre korištenja ovih deterdženta proverite specifikacije i sadržaj na pakovanju.
natural_image
Two-step illustration showing a hand inserting a component into a device, with no visible text or symbols.natural_image
3D wireframe diagram of a mechanical assembly with two red arrows pointing to components (no text or symbols)Gornja korpa
Podešavanje pozicije gornje korpe
U slučaju kada se gornja korpa nalazi u višem položaju, u donju korpu možete da stavljate npr. dublje posude. Međutim, kada gornju korpu stavite na niži položaj tada u nju možete da stavite dublje i veće posude.
Visinu pozicije gornje korpe menjajte uz pomoć kotačića. Skinite štitnike na krajevima vodilica (kao što je prikazano na slikama) i izvucite korpu. Promenite poziciju kotačića; vratite košaru u vodilice i ponovo zatvorite štitinicima. Na taj način ste promenili poziciju gornje korpe.
natural_image
Illustration of a hand holding a metal bracket with internal wiring (no text or symbols)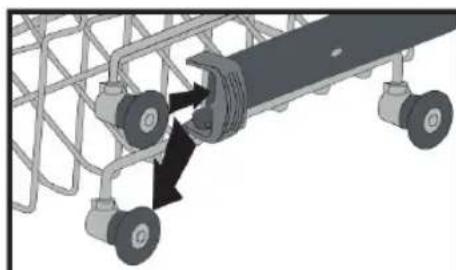
natural_image
Mechanical assembly diagram showing a conveyor belt and wheel components (no text or symbols)Donja korpa
Stalci na sklapanje
Na donjoj korpi mašine, postoji četiri stalka za sklapanje koji su dizajnirani da vam dopuste da lakše stavite velike stvari kao što su činije, tiganji, itd. Ako je potrebno, svaki deo može odvojeno da se sklopi, ili sve može da se sklopi i veći prostor može da se dobije. Da biste ih prilagodili, podignite ih na gore ili ih sklopite.
natural_image
3D architectural or engineering diagram showing structural framework with red arrows indicating flow or movement (no text or symbols)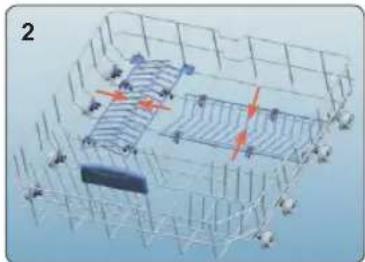
natural_image
3D diagram of a grid structure with directional arrows and components, no visible text or symbolsGornja korpa za escajg
Gornja korpa za escajg je dizajnirana za viljuške, kašike i noževe, duge posude i male stvari
natural_image
Close-up of a mechanical device with a grid of plastic components and a white cylindrical component on its side (no visible text or symbols)Jer lako može da se izvadi iz mašine, to dopušta posuđu da se izvadi iz mašine zajedno sa korpom nakon pranja.
natural_image
3D cutaway view of a mechanical assembly showing internal components and mounting base (no text or symbols visible)natural_image
Interior view of a kitchen appliance showing multiple kitchenware and dish units (no visible text or labels)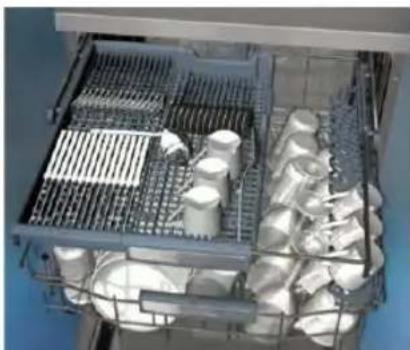
natural_image
Interior view of a laboratory or storage unit with metal grating and white cylindrical containers (no visible text or symbols)Upozorenje: Viljuške i drugi oštri objekti moraju da se stave horizontalno u korpu za escajg.
Donja korpa
natural_image
Two technical diagrams showing a grid of kitchen utensils and cooking pots, no text or symbols present.Gornja korpa
natural_image
3D rendering of a grid with rows of objects and columns, no visible text or symbolsnatural_image
Abstract 3D grid pattern with a large 'X' symbol overlay (no text or symbols present)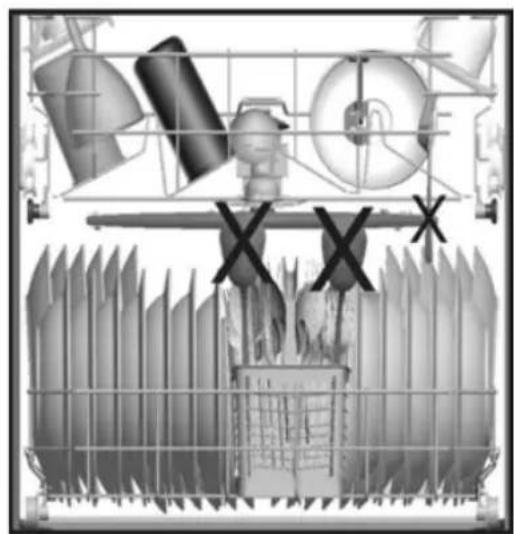
natural_image
Industrial machinery diagram showing workers, pipes, and a fence with no visible text or symbols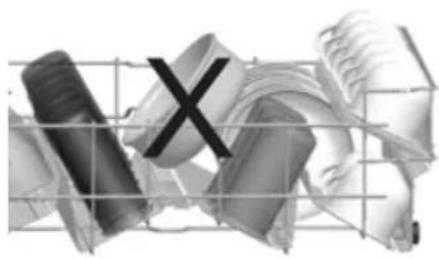
natural_image
Abstract 3D rendered mechanical parts with a grid overlay and a black 'X' mark (no text or symbols)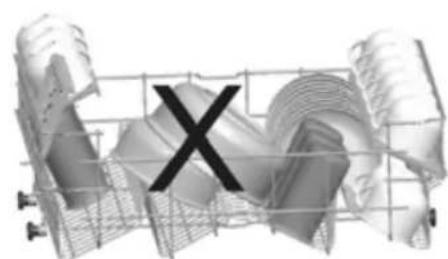
natural_image
3D wireframe model of a mechanical assembly with a large 'X' symbol overlay (no text or labels)Važna napomena za testiranje labaratorije.
natural_image
Close-up of a mechanical component with a circular dial and directional arrow indicator (no text or symbols)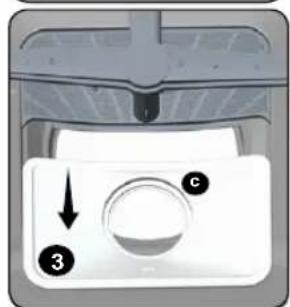
Odstranite metalno/plastični filter (slika 3). Nakon toga odstranite grubi filter iz mikro filtera kao što je prikazano na slici 2. Operite ih pod jakim mlazom vode. Vratite grubi filter u mikro filter. Umetnite grubi filter u mikro filter na način da oznake odgovaraju jedne drugima. Pričvrstite mikro filter na metalno/plastični filter i okrenite u smeru strelice kao što je prikazano na slici 4. Filter je u pravilnom položaju i zaključan kada je preko njega vidljiva strelica mikro filtera.
natural_image
Close-up of a mechanical component with a circular component and arrow indicating rotation (no text or symbols)- Nikada ne koristite mašinu bez bilo kojeg od filtera.
- Nepravilno postavljeni filteri smanjuju efikasnost pranja mašine.
- Čišćenje filtera je vrlo važno za pravilan i efikasan rad mašine.
natural_image
3D rendering of a stainless steel kitchen sink with a green piping bag and a circular component (no text or symbols visible)natural_image
Abstract black and white geometric pattern with diagonal stripes (no text or symbols)VOX
ELECTRONICS
MKD
LC-15A22 IX
УПАТСТВА ЗА РАКУВАНЬЕ МАШИНА ЗА МИЕНЬЕ САДОВИ
natural_image
Simple line drawing of a rectangular container with a horizontal bar at the top (no text or symbols)СОДРЖИНА
natural_image
Close-up of mechanical components with a central shaft and circular component (no visible text or symbols)natural_image
Illustration of a hand holding a faucet with a valve, showing the process (no text or symbols)Црево за довод
natural_image
Diagram showing two different pipe fittings: one with a handle and cap, the other with a valve and screw (no text or symbols)natural_image
Abstract diagram with a curved line and shaded X shape, no text or symbols presentnatural_image
Close-up of a mechanical knob with a circular dial indicator (no text or symbols visible)natural_image
Close-up of a mechanical component with a circular flange and bolted edge (no visible text or symbols)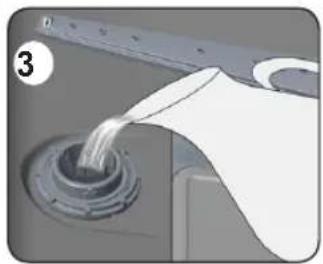
natural_image
Close-up of a mechanical component with a paper roll pouring liquid into a circular opening (no visible text or symbols)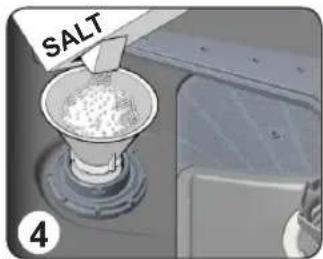
natural_image
Illustration of a hand pressing a button on a gray electronic device (no text or symbols visible)natural_image
Illustration showing a hand inserting a component into a device, with no visible text or symbolsГорна корпа
natural_image
Technical illustration of a mechanical assembly with a hand holding a tool (no text or symbols visible)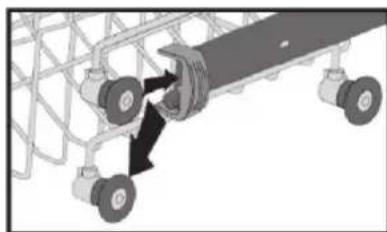
natural_image
Mechanical assembly diagram showing a vehicle chassis with wheels and a central mechanical component (no text or symbols)Долна корпа
natural_image
3D diagram of a grid-based structure with colored arrows indicating flow or movement, no visible text or symbols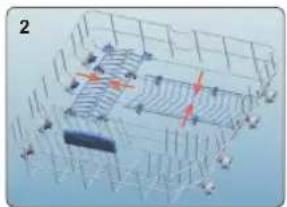
natural_image
3D wireframe diagram of a grid structure with directional arrows and components (no text or symbols)natural_image
Industrial machine with a metal tray containing white cylindrical components and mesh grating (no visible text or symbols)natural_image
3D rendering of a mechanical assembly with a grid-like component and housing (no visible text or symbols)natural_image
Interior view of a kitchen appliance showing multiple circular fixtures and a rack (no visible text or labels)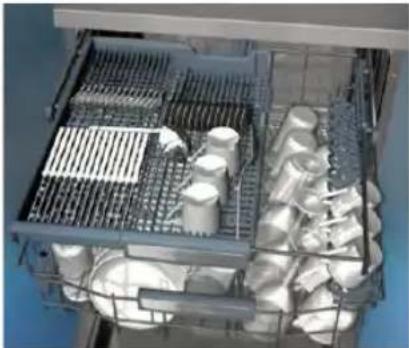
natural_image
Interior view of a stainless steel kitchen appliance with shelves, cups, and storage (no visible text or symbols)natural_image
Two-panel illustration of a kitchen appliance grid with cutaway views showing internal components (no text or symbols)Горна корпа
natural_image
3D rendered diagram of a grid with mechanical components and spherical elements (no text or symbols)natural_image
Close-up of a mechanical component with a circular dial indicator and numbered label (1), no readable text or symbols present.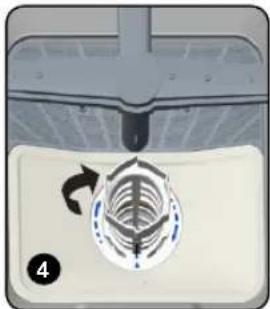
natural_image
Close-up of a mechanical component with a circular feature and arrow indicator (no text or symbols)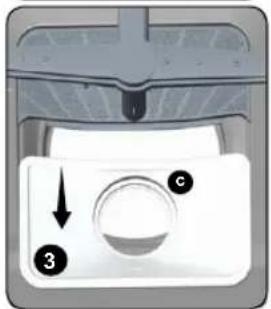
natural_image
3D rendering of a stainless steel kitchen sink with a green piping bag and a circular tank (no text or symbols visible)natural_image
Abstract black and white geometric pattern with diagonal stripes (no text or symbols)VOX
ELECTRONICS
SVN
LC-15A22 IX
NAVODILA ZA UPORABO POMIVALNI STROJ

natural_image
Simple line drawing of a rectangular container with a horizontal bar inside (no text or symbols)VSEBINA
natural_image
Close-up of mechanical components with no visible text or symbolsnatural_image
Illustration of a hand holding a faucet with a valve, showing a curved arrow indicating rotation (no text or symbols)Dovodna cev za vodo
natural_image
Line drawing of a faucet with a flanged handle and a base pipe (no text or symbols)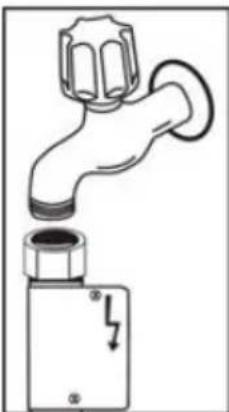
natural_image
Simple line drawing of a faucet with a valve and a base component (no text or symbols)natural_image
Close-up of a mechanical component with a gear-like knob and a ruler, no visible text or symbolsnatural_image
Close-up of a mechanical component with a circular bolt and flange (no visible text or symbols)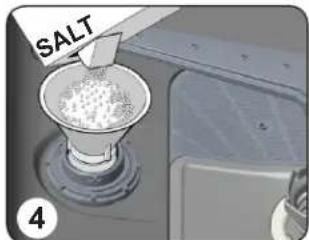
natural_image
Close-up of a mechanical component with a cylindrical inlet and a curved handle, no visible text or symbolsOb vklopu pomivalnega stroja se rezervoar za sol napolni z vodo, zato dodajte sol, preden stroj vklopite.
natural_image
Illustration of a device with a finger pressing a button, showing no text or symbols on the device itself.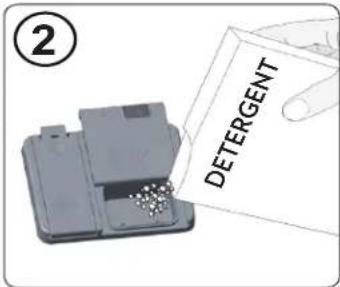
natural_image
Illustration of a hand pressing down on a device component (no text or symbols visible)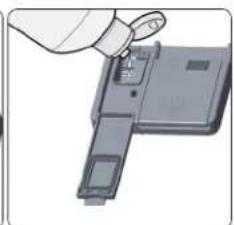
natural_image
Illustration of a hand holding a small object into a device component (no text or symbols visible)natural_image
Illustration of a hand holding a tool interacting with a mechanical component (no text or symbols visible)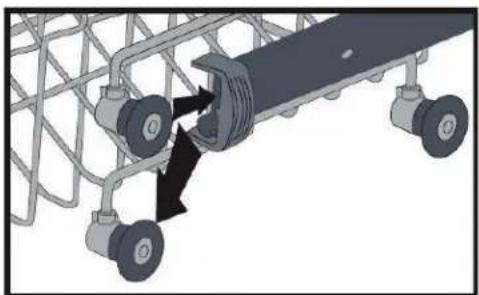
natural_image
Mechanical assembly diagram showing a conveyor belt system with two wheels and a central cable (no text or symbols)Spodnja košara
Zložljive mreže
natural_image
3D architectural or engineering diagram showing structural framework with arrows indicating flow or movement (no readable text or symbols)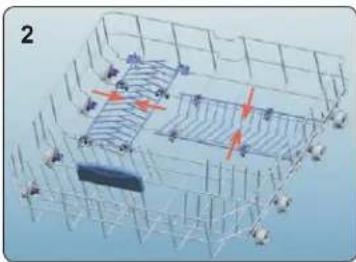
natural_image
3D structural diagram of a grid-like framework with directional arrows and components (no text or symbols)Zgornja košara za jedilni pribor
natural_image
3D rendering of a mechanical device with internal compartments and white cylindrical components (no visible text or symbols)natural_image
3D cutaway view of a white appliance with internal components and ventilation grilles (no text or symbols visible)natural_image
Interior view of a kitchen appliance with multiple compartments and a rack (no visible text or symbols)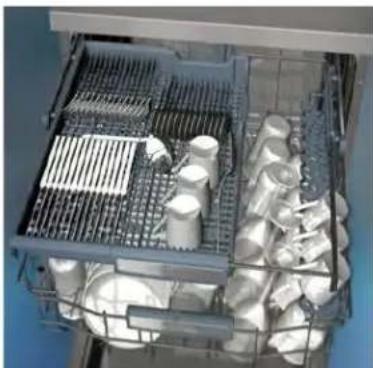
natural_image
Interior view of a multi-level kitchen appliance with plastic cups and grilles (no visible text or labels)Opozorilo: Nože in druge ostre predmete morate v košaro za jedilni pribor postaviti vodoravno.
Različni načini zlaganja posode v košaro
Spodnja košara
natural_image
Cross-sectional diagram of a washing machine showing internal components and fan structure (no text or labels)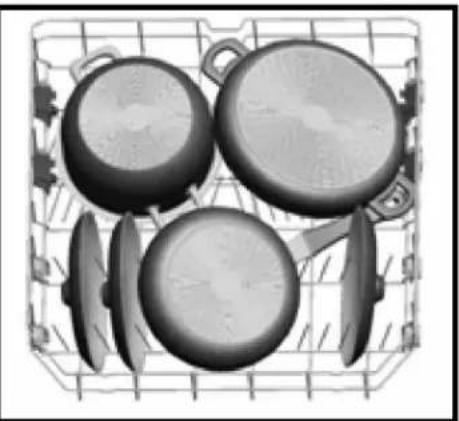
natural_image
Black-and-white illustration of a grid-patterned kitchen appliance with four panes and kitchen utensils (no text or symbols)Zgornja košara
natural_image
3D rendered diagram of a grid with multiple circular objects and layered structures, no text or symbols presentNapačno zlaganje
natural_image
Abstract 3D rendering of white spherical objects with a black 'X' symbol overlay, enclosed in a wireframe grid (no text or symbols)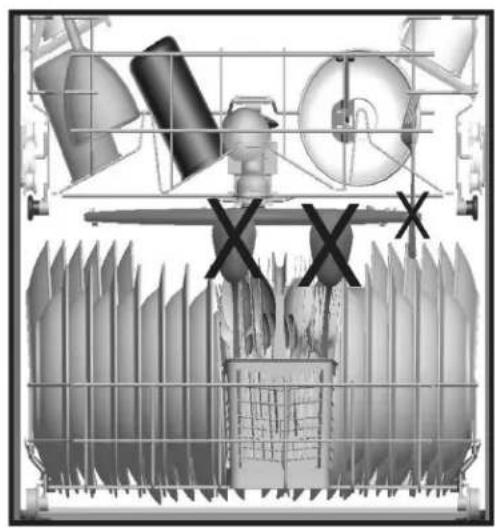
natural_image
Cross-sectional view of a mechanical assembly with no visible text or symbols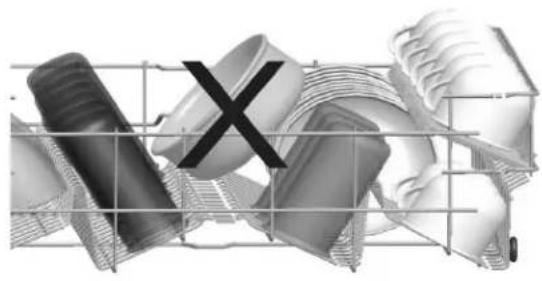
natural_image
Abstract 3D rendered geometric shapes with a black 'X' overlay, no text or symbols present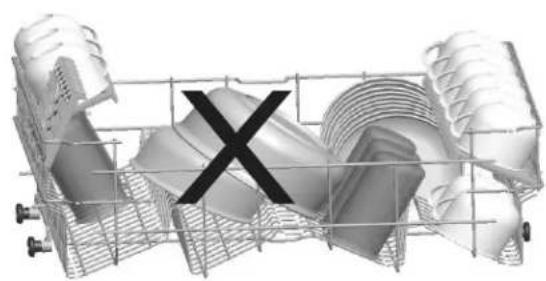
natural_image
3D rendered mechanical component with a central X mark, no visible text or symbolsPomembno obvestilo za testne laboratorije
natural_image
Mechanical component diagram showing a rotating arm and spring mechanism (no text or symbols)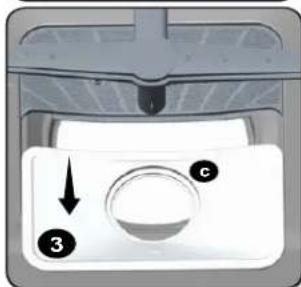
machine.
natural_image
Close-up of a mechanical component with a circular dial and directional arrow, no visible text or symbols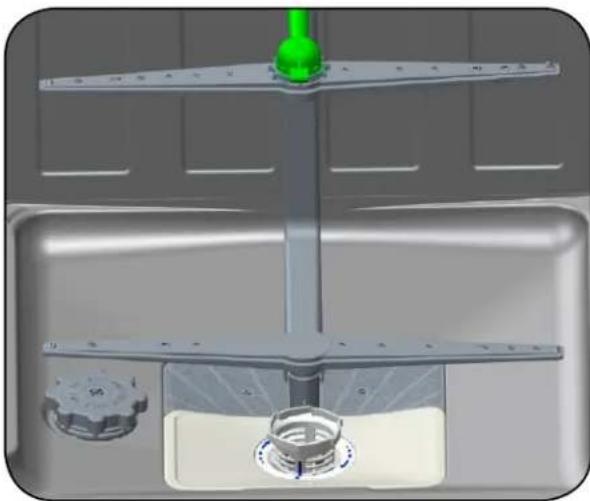
natural_image
3D rendering of a mechanical assembly with a green handle and central shaft, showing internal components (no text or symbols visible)Pršilni ročici
natural_image
Abstract black and white geometric pattern with diagonal stripes (no text or symbols)VOX
ELECTRONICS
HRV
LC-15A22 IX
UPUTE ZA UPORABU PERILICA POSUĐA

natural_image
Simple line drawing of a rectangular box with a horizontal bar inside (no text or symbols)SADRŽAJ
- Tehničke karakteristike .... 3
Sigurnosne informacije i preporuke.... 4
- Odlaganje otpada 4
- Sigurnosne informacije 4
- Preporuke 7
- Neprikladni predmeti za pranje u perilici....8
Instalacija perilice za posuđe 9
natural_image
Close-up of mechanical components with a numbered arrow pointing to a circular component (no text or symbols visible)Turbo jedinica za sušenje: Ovaj
natural_image
Illustration of a hand holding a faucet with a valve, showing a curved arrow indicating rotation (no text or symbols)Cijev za dovod vode
Preporučujemo uporabu crijeva za dovod vode koje ste dobili sa perilicom; nemojte koristiti crijevo za dovod vode od stare perilice. Ukoliko spajate perilicu na dovod vode koji niste koristili duži period vremena, prije spajanje pustite vodu. Crijevo za dovod vode spojite direktno na priključak. Preporučeni pritisak na priključku je od minimalnih 0,03 MPa do maksimalnih 1 MPa. Ukoliko je pritisak vode veći od 1 Mpa potrebno je između crijeva i priključka postaviti sigurnosni ventil koji se otvara na povišeni pritisak (pretlačni ventil).
natural_image
Diagram showing two different pipe fittings: one with a handle and the other with a valve, both without any text or symbols.natural_image
Abstract diagram with a curved line and shaded X shape, no text or symbols presentnatural_image
Close-up of a mechanical knob with a circular dial and a ruler, no visible text or symbolsnatural_image
Close-up of a mechanical component with a circular recess and flange (no visible text or symbols)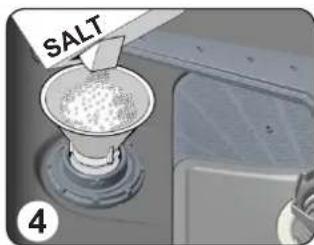
natural_image
Close-up of a mechanical component with a paper roll and a cylindrical shaft inserted into a circular opening (no visible text or symbols)natural_image
Illustration of a device with a hand pointing to a button, showing no text or symbols on the device itself.Kombinirani deterdženti
Proizvodači deterdženata za perilice osim običnih proizvode i kombinacije deterdženata nazvanih "2 u 1", "3 u 1" ili "5 u 1" itd.
"2 u 1" deterdženti sadrže deterdžent u kombinaciji sa soli ili sredstvom za ispiranje. Prije korištenja ovih deterdženta provjerite specifikacije i sadržaj na pakiranju.
Ostale tablete sadrže deterdžent s dodatkom sredstva za ispiranje, soli i dodatnih posebnih sredstava koji pospješuju pranje vašeg posuđa.
Generalno, kombinirani deterdženti daju zadovoljavajuće rezultate pranja prilikom posebnih uvjeta uporabe.
Obratite pažnju na slijedeće prilikom korištenja takve vrste proizvoda:
natural_image
Two-step illustration showing a hand inserting a small component into a device, with no visible text or symbols.| Razina Količina sredstva za izbjeljivanje Indikator | |
| 1 Sredstvo za ispiranje nije dozirano Na prikazu se pojavljuje r1. | |
| 2 1 doza je ispuštena Na prikazu se pojavljuje r2. | |
| 3 2 doze su ispuštene Na prikazu se pojavljuje r3. | |
| 4 3 doze su ispuštene Na prikazu se pojavljuje r4. | |
| 5 4 doze su ispuštene Na prikazu se pojavljuje r5. |
PUNJENJE PERILICE SUDEM
natural_image
3D wireframe diagram of a mechanical or structural component with two labeled parts (1 and 2), no readable text or symbols present.Podešavanje visine gornje košare
GORNJA košara u perilici podešena je na gornju razinu. Kada je na toj razini, tada je moguće u DONJU košaru postaviti veliko posuđe kao što su tave, lonci i slično. Rabite kotačiće kako bi se podesila visina košare. Otvorite držače na krajnjim gornjim dijelovima vodilice tako da ih okrenete na stranu te izvadite košaru van. Promijenite poziciju kotačića, ponovno složite košaru na vodilicu, te zatvorite držače. Na ovaj je način gornja košara spuštena na nižu razinu (slike na drugoj strani).
natural_image
Illustration of a hand holding a tool interacting with a grid-like structure (no text or symbols visible)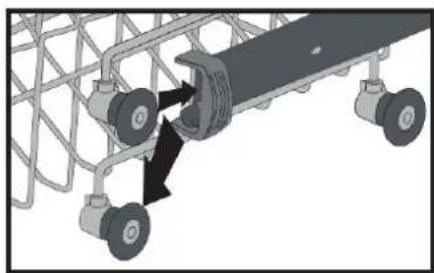
natural_image
Mechanical assembly diagram showing a vehicle chassis with wheels and a mechanical component (no text or symbols)Donja košara
Preklopni držači
U donjoj košari perilice suđa nalaze se četiri preklopna držača koja omogućuju stavljanje većih predmeta, npr. lonaca, tava itd. Ako je potrebno, svaki preklopni držač može se zasebno preklopiti ili preklopite sve držače i dobit ćete još više mjesta. Podešavanje preklopnih držača moguće je dizanjem prema gore ili spuštanjem prema dolje.
natural_image
3D architectural or engineering diagram showing structural framework with colored arrows indicating flow or movement (no readable text or symbols)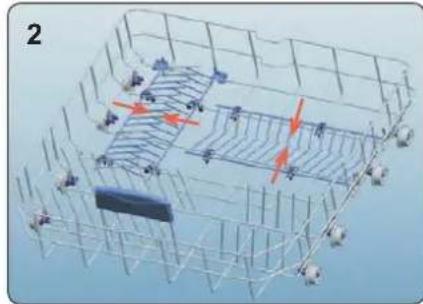
natural_image
3D wireframe diagram of a mechanical or structural assembly with no visible text, numbers, or symbolsGornja košara za pribor za jelo
U gornju košaru za pribor za jelo možete staviti vilice, žlice i noževe, pribor sa dugom drškom i manje predmete.
natural_image
Interior view of a mechanical device with a metal tray holding white cylindrical components (no visible text or symbols)Zbog jednostavnog vađenja iz perilice tu košaru možete nakon pranja izvaditi zajedno s priborom koji se oprao.
natural_image
3D cutaway view of a mechanical assembly showing internal components and mounting base (no text or symbols visible)natural_image
Interior view of a kitchen appliance with multiple white kitchen plates and a mesh rack (no visible text or symbols)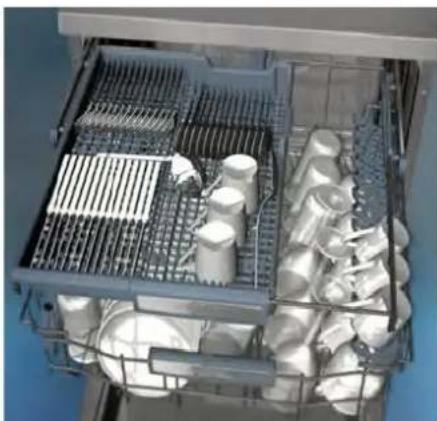
natural_image
Interior view of a kitchen appliance with metal grilles and plastic containers (no visible text or symbols)Upozorenje: Noževe i pribor s oštrim vrhovima stavite vodoravno u gornju košaru za pribor za jelo.
natural_image
Two grayscale images showing a food basket with various kitchen utensils and cooking pots, no text or symbols visible.Gornja košara
natural_image
3D rendering of a multi-tiered storage rack with circular components and a central rod (no text or symbols visible)natural_image
Abstract 3D rendering of white spherical objects arranged in a grid with a black X symbol overlay (no text or symbols present)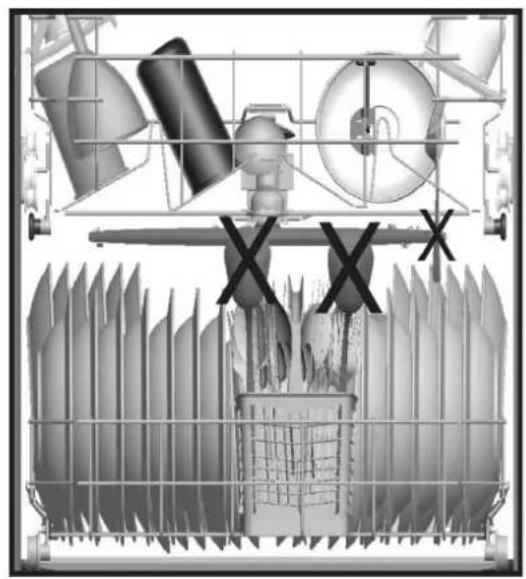
natural_image
Cross-sectional diagram of a mechanical assembly with no visible text or symbols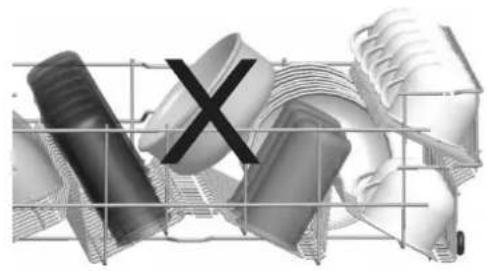
natural_image
Abstract 3D wireframe grid with metallic and mechanical components, no text or symbols present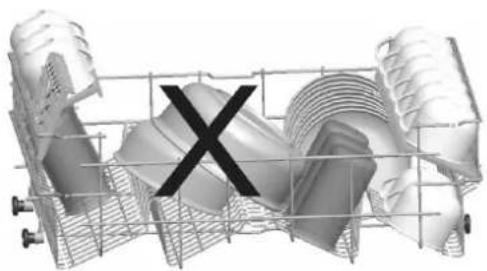
natural_image
3D wireframe model of a mechanical assembly with a black 'X' symbol overlay (no text or labels)TABELA SA PROGRAMIMA
| Programa | Trajanje (min) | Opis |
| Pretpranje 15 Za ispiranje posuđa koje kasnije namjeravate oprati. | ||
| Brzo pranje 30 minuta 30 Za lagano zaprljano posuđe i brzo pranje | ||
| Osjetljivo pranje 74 Za lagano zaprljano, delikatno posuđe. | ||
| Eko (referenca ) 171 Standardni program za normalno zaprljano posuđe koje rabite dnevno. | ||
| Dnevno 94 | Standardni program za normalno zaprljano posuđe koje rabite dnevno. | |
| Super pranje 50 minuta 50 Brži program za posuđe koje rabite dnevno ali nije puno zaprljano. | ||
| Intenzivno pranje 114 Za jako zaprljano posuđe. | ||

NAPOMENA: TRAJANJE PROGRAMA MOŽE SE PROMIJENITI SUKLADNO
KOLIĆINI POSUĐA, TEMPERATURI VODE, TEMPERATURI AMBIJENTA I ODABRANIM DODATNIM FUNKCIJAMA.
- Za kratke programe jedino koristite praškaste deterdžente.
- Kratki programi ne uključuju sušenje.
- Za bolje sušenje, preporučamo blago odškrinuta vrata nakon završetka ciklusa.
7. UPRAVLJAČKA PLOČA
natural_image
Close-up of a mechanical component with a circular dial and numbered label (1), no readable text or symbols present.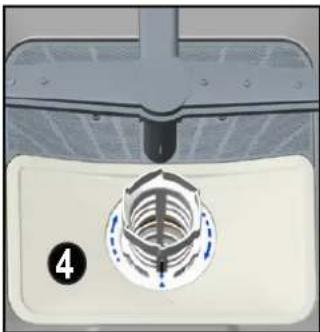
natural_image
Close-up of a mechanical component with a circular base and internal structure, no visible text or symbolsUklonite metalno/plastični filtar (slika 3). Nakon toga uklonite grubi filtar iz mikro filtra kao što je prikazano na slici 2. Operite ih pod jakim mlazom vode. Vratite grubi filtar u mikro filtar. Umetnite grubi filtar u mikro filtar na način da oznake odgovaraju jedne drugima. Pričvrstite mikro filtar na metalno / plastični filtar i okrenite u smjeru strelice kao što je prikazano na slici 4. Filtar je u pravilnom položaju i zaključan kada je preko njega vidljiva strelica mikro filtra.
natural_image
Close-up of a white appliance interior with a circular vent and labeled parts (no text or symbols visible)- Nikada ne koristite perilicu bez bilo kojeg od filtra.
- Nepravilno stavljeni filtri umanjuju efikasnost pranja perilice.
- Čišćenje filtra vrlo je važno za pravilan i učinkovit rad perilice.
natural_image
3D rendering of a mechanical assembly with a green valve and a central component (no text or symbols visible)Provjerite da li su otvori na donjim i gornjim mlaznicama perilice začepljeni. Ukoliko postoji začepljenje otvora, uklonite mlaznice i očistite ih pod mlazom vode.
Donju mlaznicu možete ukloniti na način da ju povučete prema gore, dok gornju mlaznicu uklanjate na način da pričvrsnu plastičnu maticu okrenete u lijevo.
Prikom vraćanja gornje mlaznice u perilicu, provjerite da li ste pravilno pričvrstili maticu mlaznice.
Filtar cijevi
natural_image
Abstract black and white geometric pattern with diagonal stripes (no text or symbols)VOX
ELECTRONICS
PRT
LC-15A22 IX
MANUAL DO USUÁRIO MÁQUINA DE LAVAR LOUÇA
natural_image
Simple line drawing of a rectangular container with a horizontal bar inside (no text or symbols)CONTEÚDOS
natural_image
Close-up of mechanical components with a numbered arrow pointing to a circular component (no text or symbols visible)natural_image
Illustration of a hand holding a faucet with a valve, showing a curved arrow indicating rotation (no text or symbols)natural_image
Diagram showing two different pipe fittings: one with a handle and the other with a valve, both without any text or symbols.natural_image
Abstract diagram with a curved line and shaded X shape, no text or symbols presentLigação eléctrica
natural_image
Diagram showing a tool inserted into a circular component with a numbered label (3), no readable text or symbols present.natural_image
Close-up of a mechanical knob with a circular dial and a ruler, no visible text or symbols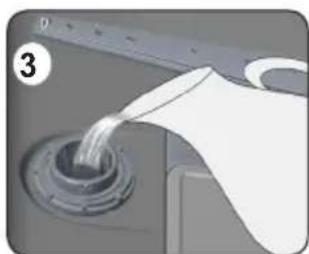
natural_image
Close-up of a mechanical component with fluid flowing through a circular opening (no visible text or symbols)natural_image
Close-up of a mechanical component with a circular recessed part and flange (no visible text or symbols)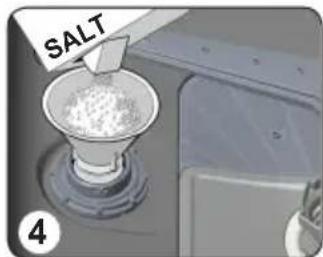
natural_image
Illustration of a hand pressing down on a device component with a black arrow indicating the process (no text or symbols present)Detergente combinado
natural_image
Two-step illustration showing a hand inserting a component into a device, with no visible text or symbols.natural_image
3D wireframe diagram of a mechanical or structural component with two red lines labeled 1 and 2, no readable text or symbols.natural_image
Illustration of a hand holding a mechanical component inside a wire cage (no text or symbols visible)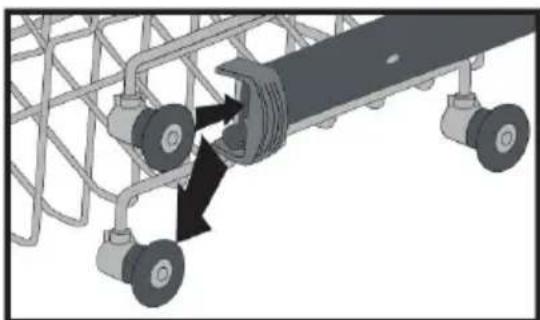
natural_image
Mechanical assembly diagram showing a conveyor belt system with two wheels and a central shaft (no text or symbols)Cesto inferior
Grelhas dobráveis
natural_image
3D architectural or engineering diagram showing structural framework with arrows indicating flow or movement (no text or symbols)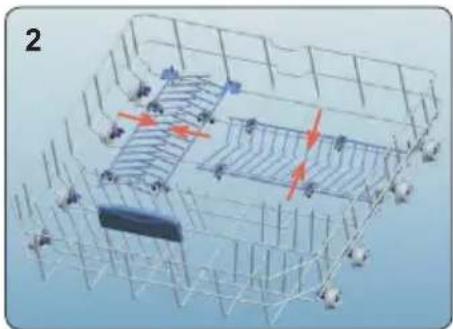
natural_image
3D wireframe diagram of a mechanical or structural assembly with no visible text, numbers, or symbolsnatural_image
Close-up of a mechanical component with a mesh tray and white cylindrical components (no visible text or symbols)natural_image
3D cutaway view of a mechanical assembly with internal components and mounting base (no visible text or symbols)natural_image
Interior view of a modern kitchen appliance with multiple circular compartments and metal grilles (no visible text or labels)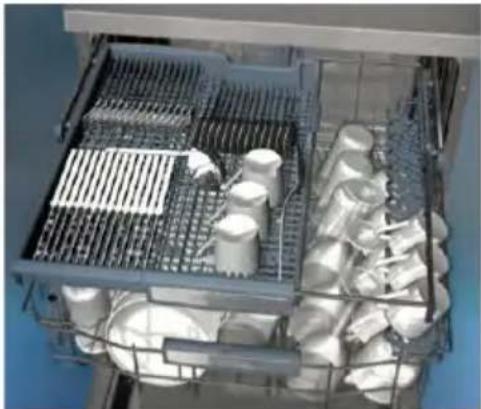
natural_image
Interior view of a stainless steel kitchen appliance with metal grilles and scattered plastic containers (no visible text or symbols)natural_image
Cutaway illustration of a multi-camera kitchen sink with multiple fans and dish holders (no text or symbols visible)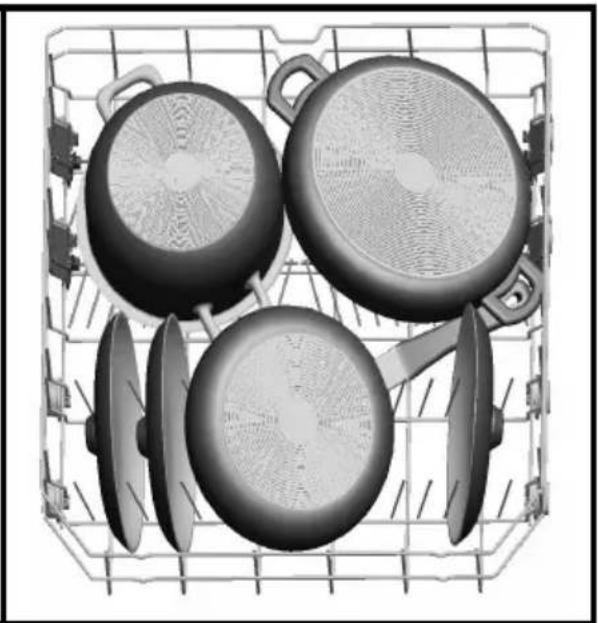
natural_image
Black-and-white photo of a metal basket containing four cooking pots (no text or symbols visible)Bandeja superior
natural_image
3D rendering of industrial equipment components including insulators, coils, and housing (no text or symbols visible)natural_image
3D rendered image of a grid with circular objects and a large 'X' symbol overlay (no text or symbols present)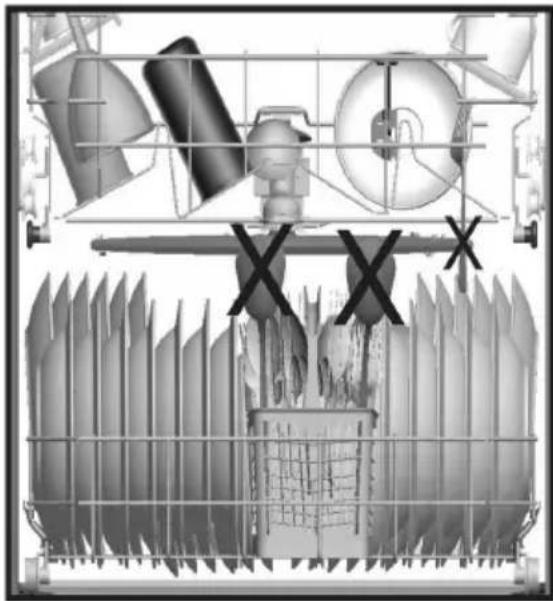
natural_image
Industrial equipment layout with workers, pipes, and a storage bin (no visible text or symbols)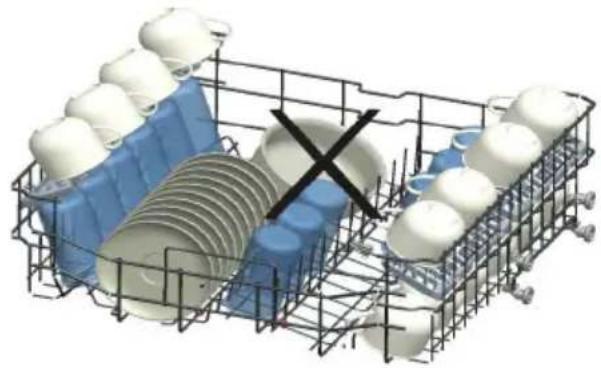
natural_image
3D wireframe model of a storage or warehouse unit with blue and white plastic containers, no visible text or symbols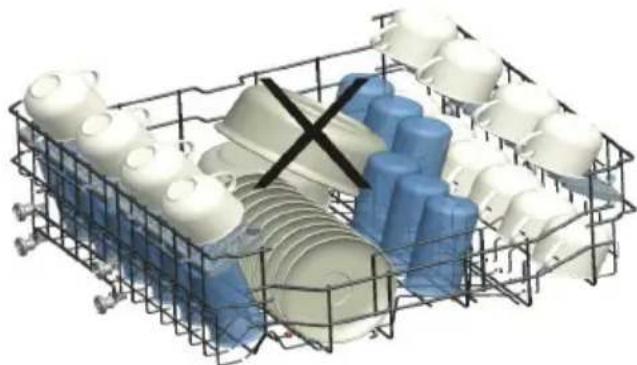
natural_image
3D wireframe model of a shopping basket filled with white and blue plastic products, featuring a black X mark (no text or symbols)natural_image
Mechanical component diagram showing a rotating knob with directional arrow (no text or symbols)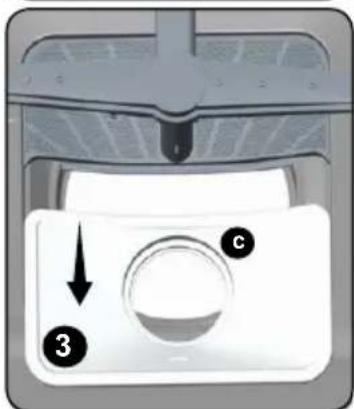
natural_image
Close-up of a mechanical component with a circular feature and directional arrow (no text or symbols)natural_image
3D rendering of a mechanical component with a green handle and central hub, no visible text or symbolsFICHA DO PRODUTO(Spect)
- VOX
- ELECTRONICS
- LC-15A22 IX
- Thank you for choosing this product.
- CONTENTS
- 1.SAFETY INSTRUCTIONS .... 1
- 2.INSTALLATION....6
- 3.TECHNICAL SPECIFICATIONS......8
- 4.BEFORE USING THE APPLIANCE....9
- 5.LOADING YOUR DISHWASHER 12
- 6.PROGRAMME TABLE....14
- THE CONTROL PANEL.... 16
- General Safety Warnings
- Installation Warnings
- During Usege
- RECYCLING
- PACKAGING AND THE ENVIRONMENT
- CE Declaration of Conformity
- Disposal of your old machine
- INSTALLATION
- Machine positioning
- Water connection
- Water inlet hose
- Drain Hose
- Electrical connection
- Fitting the machine undercounter
- TECHNICAL SPECIFICATIONS
- General appearance
- Technical specifications
- BEFORE USING THE APPLIANCE
- Preparing your Dishwasher for first use
- Fill the salt (IF AVAILABLE)
- Only add water to the salt compartment on first use.E
- Test Strip
- Water Hardness Table
- Water Softener System
- Setting
- Detergent usage
- Filling the detergent
- Using combined detergents
- Rinse-aid usage
- Filling the rinse-aid and setting
- In order to change the rinse aid level, follow the below steps before turning on the machine:
- LOADING YOUR DISHWASHER
- Recommendations
- Height Adjustable Rack (peg type)
- Upper Basket
- Height adjustment
- Four Folding Racks
- (15 pc)
- Upper Cutlery Basket
- Alternative basket loads
- Lower basket
- Incorrect loads
- Unsuitable items for dishwashing
- Important Note for Test Laboratories
- PROGRAMME TABLE
- THE CONTROL PANEL
- On/Off Button
- Program Selection Button
- Delay Button
- Remaining Time Indicator
- Select Button
- Options Button
- Start/Pause Button
- Rinse Aid Indicator
- Salt Indicator
- Changing a programme
- Cancelling a programme
- Switching the Machine Off
- CLEANING AND MAINTENANCE
- Cleaning machine and filters
- Spray arms
- TROUBLESHOOTING
- PRACTICAL INFORMATION
- THE PRODUCT FICHE
- SADRŽAJ
- Preporuke i mere bezbednosti ....5
- Jedinica za turbo sušenje:
- Bezbednost dece
- Crevo za dovod vode
- Odeljak za sol napunite vodom samo prilikom prve upotrebe mašine.
- Kombinovani deterdženti
- Gornja korpa
- Donja korpa
- Stalci na sklapanje
- Gornja korpa za escajg
- Važna napomena za testiranje labaratorije.
- СОДРЖИНА
- Црево за довод
- Горна корпа
- Долна корпа
- NAVODILA ZA UPORABO POMIVALNI STROJ
- VSEBINA
- Dovodna cev za vodo
- Spodnja košara
- Zložljive mreže
- Zgornja košara za jedilni pribor
- Napačno zlaganje
- Pomembno obvestilo za testne laboratorije
- Pršilni ročici
- Sigurnosne informacije i preporuke.... 4
- Instalacija perilice za posuđe 9
- Cijev za dovod vode
- Kombinirani deterdženti
- Obratite pažnju na slijedeće prilikom korištenja takve vrste proizvoda:
- PUNJENJE PERILICE SUDEM
- Podešavanje visine gornje košare
- Donja košara
- Preklopni držači
- Gornja košara za pribor za jelo
- Gornja košara
- UPRAVLJAČKA PLOČA
- Filtar cijevi
- MANUAL DO USUÁRIO MÁQUINA DE LAVAR LOUÇA
- CONTEÚDOS
- Ligação eléctrica
- Detergente combinado
- Cesto inferior
- Grelhas dobráveis
Brand : VOX
Model : LC15A22IX
Category : Dishwasher