
Z 1650 - Camera Maginon - Free user manual and instructions
Find the device manual for free Z 1650 Maginon in PDF.


| Product Type | Digital Camera |
| Image Sensor | 1/2.3" CCD, 16 Megapixels |
| Optical Zoom | 5x Wide Angle (26-130mm equivalent) |
| Digital Zoom | 5x (recording), 12x (playback) |
| Display | 2.7" Color TFT LCD |
| Storage Media | SD/SDHC/SDXC up to 64 GB (optional) |
| File Formats | JPEG (EXIF 2.2), AVI (Motion JPEG), WAV |
| Video Resolution | 720p30 (1280x720), VGAp30 (640x480) |
| Focus Range (Normal) | 0.05 m (W) to infinity, 0.6 m (T) to infinity |
| Shutter Speed | 2 - 1/2000 sec (Normal); 15 - 1/2000 sec (Night) |
| ISO Sensitivity | Auto, 100-6400 |
| Power Supply | Rechargeable Li-Ion battery DS-5370 (3.7V, 700 mAh) |
| Dimensions (W x H x D) | Approx. 93.3 x 55.4 x 20.2 mm |
| Weight | Approx. 103 g (without battery and card) |
| Interface | USB/AV combo, PictBridge compatible |
| Features | Face Detection, Smile Capture, Blink Detection, Scene Modes, Artistic Effects, Stabilizer |
| Care | Clean with soft dry cloth; avoid corrosive cleaners |
| Safety | Keep away from children; do not expose to water or heat; use only specified battery |
| Spare Parts / Repairability | Battery replacement possible; contact service for repairs |
| Warranty | 3 years (camera), 6 months (battery) |
Frequently Asked Questions - Z 1650 Maginon
User questions about Z 1650 Maginon
0 question about this device. Answer the ones you know or ask your own.
Ask a new question about this device
Download the instructions for your Camera in PDF format for free! Find your manual Z 1650 - Maginon and take your electronic device back in hand. On this page are published all the documents necessary for the use of your device. Z 1650 by Maginon.
USER MANUAL Z 1650 Maginon
Congratulations on purchasing a high quality MAGINON® product.
You have acquired a modern digital camera with excellent technical features and respective accessories, which is particularly easy to operate.
Please study this information in detail observing, in particular, the safety instructions.
The device comes with a 3-year warranty. You will need the enclosed warranty card and your sales receipt in the event of the camera developing a fault.
Keep these in a safe place together with the Instruction Manual.
Please include the Instruction Manual when passing on the camera to a third party.
1. Contents of box
Carefully unpack camera and check that all of the following components are contained in the box:
- MAGINON® Z 1650
- Lithium-Ion battery DS-5370
- USB power adapter
- USB cable
- Software CD-ROM
- Bag and carry strap
- Instruction Manual

Note:
- Remove the protective foil from the camera display by pulling the protruding tabs.
- Caution! Keep plastic foil and bags away from babies and small children, as otherwise danger of suffocation.
After Sales Support

00 800 - 78 77 23 68
MODEL: Z 1650

YEARS WARRANTY
MAGINON
2. Contents
- INTRODUCTION AND CONTENTS OF BOX 1
- CONTENTS 2
- HAZARD, SAFETY AND WARNING NOTICES 5
- YOUR CAMERA 8
Front view of camera 8
Rear view of camera 8
Monitor display.10
Photo mode 10
Video mode 12
Playback mode - Photo playback 12
Playback mode - Video playback 13
Playback mode - Audio playback 13
- START 14
Preparation 14
Charging the battery 16
Initial settings 17
Setting data and time 18
Language selection....19
Formatting a memory card 20
- PHOTO MODE 21
Taking photos....21
Setting the photo mode 22
Taking photos with the Adapted scene mode 25
Back light photos 25
Soft skin tone mode 26
Photos for online auctions 26
Taking photos with smile capture switched on 27
Self-portrait functions 28
After Sales Support
00 800-78 77 23 68
MODEL: Z 1650

YEARS
WARRANTY
MAGINON
7. FUNCTIONS OF THE CONTROL BUTTONS 29
Locking the exposure and auto focus setting 29
Focus settings 30
Continuous shooting 3.1
Flash settings 32
8. FUNCTION MENUB3
Use of Function menu 33
"My mode" function 33
Setting the aspect ratio 34
Setting the image size 34
Exposure compensation 35
White balance 36
ISO value 37
Exposure measurement 37
Locking settings 37
Colour mode 38
Artistic effects 39
Photos with fisheye effect 39
Miniature effect photos 40
Photos with Sketch effect 41
- CAMERA MENU 42 Self-timer 42
Setting the Auto focus range 43
Setting up the date stamp 44
Setting up the stabiliser 44
- VIDEO MODE 45 Recording video clips 45
Setting the video size 46
Setting of Wind noise reduction 46
PIV function 46
After Sales Support
00 800 - 78 77 23 68
MODEL: Z 1650

YEARS WARRANTY
MAGINON
Deleting one or more photos 51
Deleting using the delete button 53
Playback as slideshow 54
Protecting photos....55
Red-eye correction 56
Recording voice memos....56
Playback of voice memos 57
Cropping of photos 57
DPOF settings....58
12. MENU OPTIONS9
Recording menu 59
Playback menu....62
Setup menu 65
13. CONNECTING TO COMPUTER, PRINTER AND TV 68
Downloading files 68
Connecting to a printer 69
Connecting to a TV 70
Installation of software 71
-
TECHNICAL SPECIFICATIONS 72
-
MAXIMUM NUMBER OF PHOTOS 73
-
PROBLEM SOLVING 75
-
SYSTEM INFORMATION, SERVICING AND DISPOSAL 76
-
INDEX 79
After Sales Support
00 800-78 77 23 68
MODEL: Z 1650

YEARS
WARRANTY
MAGINON
3. Hazard, safety and warning notices
Incorrect use of the camera and accessories can be dangerous for you and others and can damage or destroy the camera. We therefore ask you to read and strictly observe the following Hazard, safety and warning notices.
Intended use
This camera is intended for taking digital photos and video clips. It has been designed for private use and is not suitable for commercial purposes.
Hazards for children and persons with limited ability to operate electronic equipment
■ Caution! Danger of suffocation! The packaging is not a toy. Plastic bags, foil and polystyrene parts can cause children to suffocate. Packaging material should always be kept away from children.
The camera is not designed to be used by persons (including children) with restricted physical, sensory or cognitive abilities or lack of experience and/or insufficient know-how, unless they are supervised by a person responsible for their safety or are instructed in the use of the device by this person. Children should be supervised to ensure that they are not playing with the camera.
Electrocution hazard in wet and humid conditionst
■ Do not expose camera and its components to dripping or spray water. Also do not place any containers filled with liquid, such as vases or glasses on top or immediately next to the device. Danger of fire and electrocution. Protect camera in particular in case of rain, snow, at the beach or near water against moisture and humidity.
■ Do not use camera and its components in areas exposed to high humidity, a lot of steam, smoke or dust. Danger of fire and electrocution.
Electrical hazard
■ Switch off camera and remove battery if a foreign body or liquid has entered the camera. Wait until completely dry, as otherwise danger of fire and electrocution.
■ Switch off camera and remove batteries if camera has been dropped or housing is damaged, as otherwise danger of fire and electrocution.
■ The camera may not be dismantled, modified or repaired, as otherwise danger of fire and electrocution.
MAGINON
■ Only us the supplied USB power adapter with the mains voltage specification on the rating plate as otherwise danger of fire and electrocution. Disconnect from power by pulling power adapter out of socket. A plugged in power adapter can continue to use power and represents a hazard source.
■ The power supply may not be used during thunderstorms, as danger of electrocution.
Damage for heat - fi re hazard
■ Do not leave camera in places that are susceptible to considerable increases in temperature (e.g. a vehicle). The housing and internal parts may be damaged, which in turn could cause a fire.
■ Do not wrap up camera or place on textiles. This could produce a build-up of heat in the camera that can cause deformation of the housing and may represent a fire hazard
Hazards of using the Lithium-Ion battery
■ Remove battery from camera if camera is not used for some time.
■ Do not remove battery immediately after camera has been used for a longer period of time. Batteries may become hot during use.
Risk of explosion in case of incorrect changing of battery or use of wrong type of battery. Always check correct polarity when inserting the battery. Only use 1 Lithium-Ion battery NP45, 3.7V, 700MAH, VG0376122700003 (battery name DS-5370) or a Lithium-Ion battery with the same specification.
■ Never expose battery to excessive heat, such as direct sunlight, fire, etc., as otherwise danger of fire.
- Keep battery out of reach of children.
■ Consult doctor immediately if battery has been swallowed.
■ Do not throw battery into fire, short-circuit battery or take battery apart. Danger of explosion.
■ Battery must be disposed of in line with the Battery Directive.
■ If leaking, remove battery from the camera using a cloth and dispose of correctly.
■ Avoid battery acid coming into contact with eyes. In case of contact with eyes, rinse eyes with plenty of water and contact doctor immediately.
■ Remove battery prior to disposing of camera.
After Sales Support

00 800 - 78 77 23 68
MODEL: Z 1650

YEARS
WARRANTY
MAGINON
Injuries and material damage
■ Only place camera on sturdy surfaces. The camera could otherwise fall or topple over, causing damage or injury.
■ Do not operate camera whilst running or driving. You could fall or cause a traffic accident.
■ Only use USB power adaptor specified for the camera. No liability shall be accepted for damage caused by the use of an incorrect USB power adaptor.
■ The 230V socket used for the power supply must be accessible at all times so that the power supply can be quickly disconnected from the mains if necessary.
■ Ensure adequate ventilation and do not cover the power supply (not supplied) to prevent overheating.
■ Do not place any open ignition sources, such as lit candles onto or close to the device.
■ Ensure that the LCD display is not subjected to impacts or concentrated pressure. This could damage the glass of the display or cause the display liquid to leak out. In case of the liquid coming into contact with eyes or skin, rinse immediately with clean water. In case of contact with eyes, consult doctor immediately.
■ Damage to the electronics, display or lens caused by external influences, such as electric shocks, falls or others are not covered by the warranty and shall thus be charged for.
■ Do not activate flash close to other persons' eyes, as this could damage eyes.
■ Do not drop or bump camera and always handle with due care as the camera could otherwise be damaged.
After Sales Support

00 800 - 78 77 23 68
MODEL: Z 1650

YEARS WARRANTY
MAGINON
4. Your camera
Front view of camera

- Shutter release
- Zoom button
- Flash
- On/Off button
- Self-timer LED
- Microphone_
- Lens
Rear view of camera

A. LCD display
B. Status LED
C. USB/AV connection
D. Strap fastening
E. Battery / memorycard
compartment
F. Loudspeaker
G. Tripod thread
After Sales Support
00 800-78 77 23 68
MODEL: Z 1650
3
YEARS
WARRANTY
MAGINON
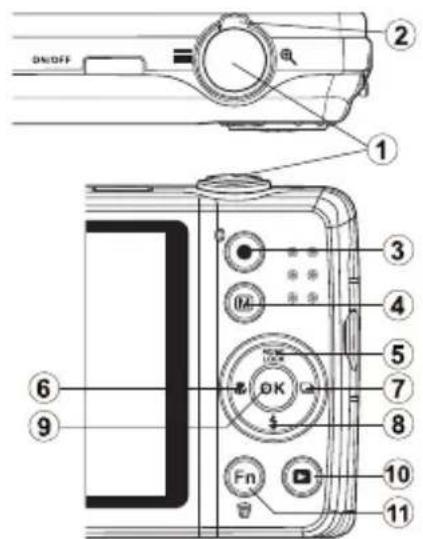

The buttons of the control pad are used to navigate through the menus. OK always confirms the selection.
| Element | Function | |||
| Button Photo mode Video mode Playback mode | ||||
| 1 --- Shutter release - Change to recording mode | ||||
| 2 | [36DX] | Zoom out Zoom out Zoom out | ||
| [3CCKS] | Zoom in Zoom in Zoom in | |||
| 3 | [KA40] | Start video recording Start video recording Change to recording mode | ||
| 4 |  | Menu | -- Menu | |
| 5 | [SD7X]LOCK | AE/AF lock -- Photo: rotate image | ||
| 6 | [223A] | Focus setting | -- | Previous photo |
| 7 |  | Series picture setting -- Next photo | ||
| 8 |  | Flash | -- | -- |
| 9 OK Confirm OTAT) ction -- Video clip: start playback | ||||
| 10 | [SATK] | Change to playback mode | Change to playback mode | Change to recording mode |
| 11 |  | Function menu/Delete | -- | Delete |
After Sales Support

00 800 - 78 77 23 68
MODEL: Z 1650

YEARS WARRANTY
MAGINON
Monitor display Photo mode
- Recording mode
[ ] Auto
[ P ] Program
[ ] Intelligent scene
[ ] Portrait
[ ] Landscape
[ ] Sunset
[ ] Backlight
[ ] Kids
[ ] Night Scene
[ ] Stylish
[ ] Fireworks
[ ] Snow
[ ] Sports
[ ] Party
[ ] Candlelight
[ ] Night Portrait
[ ] Soft Skin
[ ] Flowing Water
[ ] Food
[ ] Building
[ ] Text
[ ] Foliage
[ ] Auction
[😊] Smile Capture
[ ] Blink Detection
[ ] Pre-Composition
[ ] Love Portrait
[ ] Self Portrait
[ ] D-Lighting
[ ] Voice REC

- Flash mode
[ \$A ] Auto Flash
[5] Red-eye Reduction
[ ♣ ] Forced on
[SL] Slow Sync
[∅] Forced off
- Self-timer sequence
[OFF] Off
[Go] 10 sec.
[ ] 2 sec.
[2] Double
-
Zoom display
-
Number of available photos
-
Battery charge
[ ] Battery fully charged
[ ] Battery half charged
[ ] Battery nearly empty
[ ] Battery empty
- Storage medium
[ ] internal memory
[ ] SD/SDHC memory card

MAGINON
-
[Wind noise]
-
Video resolution
![[ HD ] 720p30 (1280 x 720) [ VGAP30 (640 x 480) [ ] 720p30 (Painting) (1.280 x 720)](/content/2026/05/759692/images/00ad18b3d0aa5e59b26556b847964268ef4a85e8843484aa50b32938158cbabf.jpg)
-
[ ! ] Camera/shake warning
-
[ ] Date stamp
-
[ ] Stabilizer
-
[ ] Histogramm
-
ISO setting
![[ISO] Auto [ISO] ISO 100 [ISO] ISO 200 [ISO] ISO 400 [ISO] ISO 800 [ISO] ISO 1600 [ISO] ISO 3200 [ISO] ISO 6400](/content/2026/05/759692/images/cab4f2d8d58cf08756e360aeee6fb03c83b10986adb11cb48edfcb94ca253f5d.jpg)
-
Focus range
-
Shutter speed
-
Aperture value
-
[ Sharpness
-
[ ] Saturation
-
[ ] Contrast
-
Lighting
-
Focus setting
![[AF] Auto Focus [IS] Super Macro [PF] Pan Focus [A] Infi nity [MF] Manual Focus](/content/2026/05/759692/images/31de45588e6e30d8bef8deb3b7a8b3ceae66f51a2b25db78b0fc3d14272851bc.jpg)
-
[ ] Face recognition
-
White balance
![[AWB] Auto White Balance [★] Daylight [★] Cloudy [★] Tungsten [★] Fluorescent_1 [★] Fluorescent_2 [★] Custom](/content/2026/05/759692/images/c25dc8120c815fe57a9423660c73b1ea5daea723b79ad2d5a51311f5068f244c.jpg)
- Metering

- Image quality

- Image size
![[16M] 4608 x 3456 [2M] 3264 x 2448 [SM] 2560 x 1920 ] 2048 x 1536 [VGA] 640 x 480](/content/2026/05/759692/images/14a383b1f3809ba340673bebcee0d3d27032f8b7d877711eb850116e0f0967a7.jpg)
- AE/AF lock

- [ ] AF tracking
After Sales Support
00 800 - 78 77 23 68
MODEL: Z 1650

MAGINON
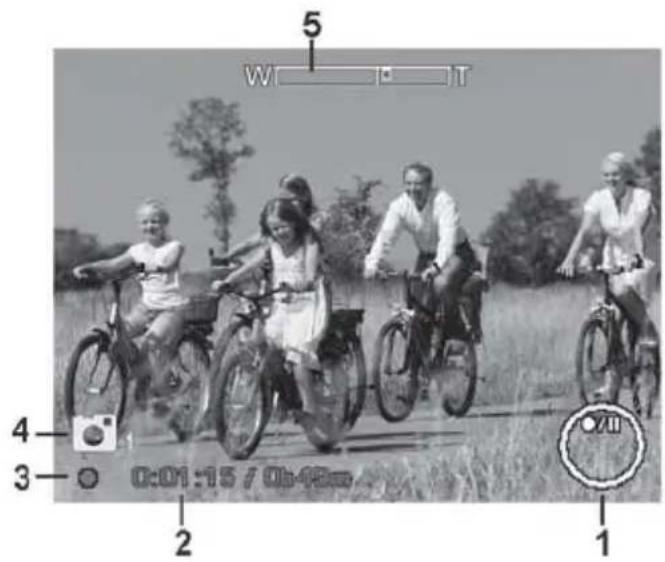
Video mode
- Button display
- Recorded time / maximum Recording duration
- Recording status
- [图标] Photos
- Zoom display
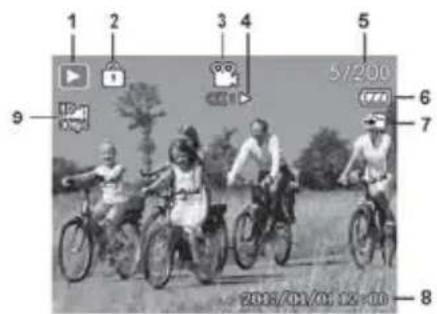
Playback mode – Photo playback
- Playback mode
- Deletion protection
- Voice memo
- Button instructions Voice memo
- File number / total number
- Battery level
- Storage medium
- Capture information
- DPOF
- Image size


MAGINON
Playback mode – Video playback
- Playback mode
- Deletion protection
- Video clip
- Button instructions Video
- File number / total number
- Battery level
- Storage medium
- Recording date and time
- Video size
- Volume
- Video length
- Playback time
- Playback status
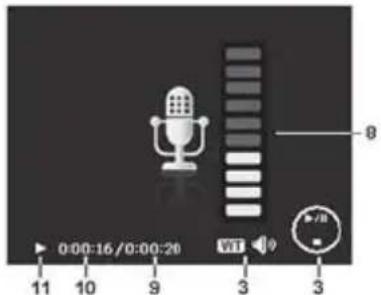
Playback mode – Audio playback
- Playback mode
- Deletion protection
- Button instructions Voice memo
- File number / total number
- Battery level
- Storage medium
- Recording information
- Volume
- Audio length
- Playback time
- Playback status


After Sales Support
00 800 - 78 77 23 68
MODEL: Z 1650

MAGINON
5. Start
Preparation
- Where applicable, remove protective foil from display by pulling at the protruding edge. Secure carrying strap. The supplied carrying strap is secured to the respective fixing on the side of the camera. First pull the short loop of the strap through the lug and then the strap itself.
- The bottom of the camera contains the compartment housing the battery and memory card. Open the compartment by lightly pressing the cover and sliding it outwards. The flap opens automatically.
- Insert the battery. Slide battery into battery compartment with gold contacts facing forwards and the printed side facing the lens until it engages.

natural_image
Diagram of a pulley system with a black arrow indicating direction (no text or symbols)
natural_image
Diagram of a device's internal structure showing a rectangular component inserted into a housing, with an arrow pointing to the component (no text or symbols present)After Sales Support
00 800-78 77 23 68
MODEL: Z 1650
3
YEARS
WARRANTY
MAGINON
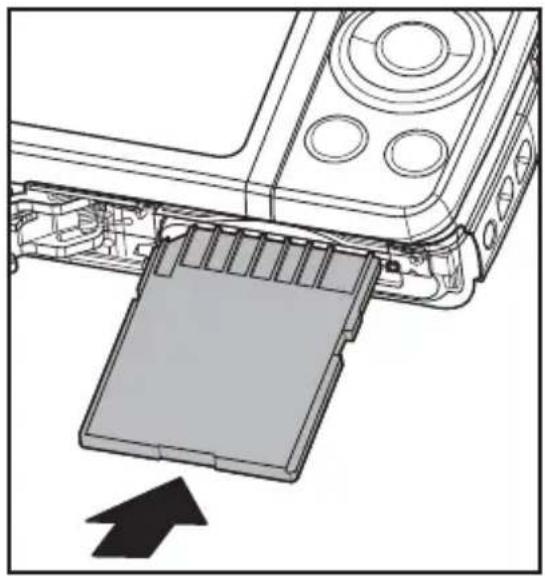
- The memory card (SD/SDHC card) is inserted into the small compartment next to the battery. Slide memory card into card compartment with gold contacts facing forwards and the printed side facing the lens until it engages.
■ Format the memory card using the camera function before using the memory card in the camera for the first time (see page. 20, Formatting the memory card).
- Once the battery and memory card has been inserted, cold down cover and slide under light pressure towards the tripod thread. The cover locks into position and is securely closed.
natural_image
Diagram of a device's internal structure showing a card slot inserted into a housing, with an arrow indicating the direction (no text or symbols present)
Note:
- To prevent important data from being accidentally deleted from the SD/SDHC-memory card, write protection (on side of SD/ SDHC memory card) can be set to the "LOCK" position.
• To save, edit or delete data on the SD/SDHC memory card, deactivate the write protection.
- In order to prevent damage to the memory card, switch camera off before inserting or removing memory card. The camera is automatically switched off if the SD/SDHC memory card is inserted or removed whilst the camera is switched on.

After Sales Support

00 800 - 78 77 23 68
MODEL: Z 1650

YEARS WARRANTY
MAGINON
Charging the battery
At the time of purchase the battery is not fully charged. Fully charge the battery and use battery for the first time until completely discharged in order to maximise its performance and service life.
- Connect the camera to the USB power adapter using the USB cable.
- Plug the power adapter into a socket with an AC voltage as shown on the rating plate of the USB power adapter.
- Charging of the battery commences automatically.

The battery can also be charged from the USB connection of the computer:
- Switch off camera.
- Using the USB cable, connect camera to computer.
- Charging of the battery commences automatically.
The status display LED on the back of the camera shows the following charging states:
| Status display LED Description | |
| Green (fl ashes slowly) Normal charging | |
| Green (fl ashes quickly) Charging fault | |
| Off | Charging completed |
The camera cannot be used during charging.
Where charging ist started without the battery being inserted or with an unsuitable battery having been inserted, the LED display is switched off.

MAGINON

Note:
• The supplied power supply differs depending on the region in which the camera is purchased.
- The charging duration depends on the ambient temperature and the remaining charge of the battery. An empty battery is fully charged in approx. 3–4 hours.
• The supplied Lithium-Ion battery comes with a 6 months warranty.
Initial settings
Language, date and time must be reset in the following situations:
■ When the camera is switched on for the first time.
■ When the camera is switched on again after it has not been supplied with battery power for a certain time.
- Press the ON/OFF button to switch on the camera.
- Use the ◀/▶/▲/▼ buttons to select the desired language and then press the OK button.
- You can then set the date and time.
- Use the ◀ / ▶ buttons to select the date, date format or time function you wish to enter and change the values with the ▲ / ▼ buttons.
- Once the date and time have been set correctly press the OK button to save.
- The camera then changes to the recording mode.

Note:
- If the recording mode is already activated when the camera is switched on, set date, time and language as described in the following sections.
After Sales Support

00 800 - 78 77 23 68
MODEL: Z 1650

YEARS WARRANTY
MAGINON
Setting date and time
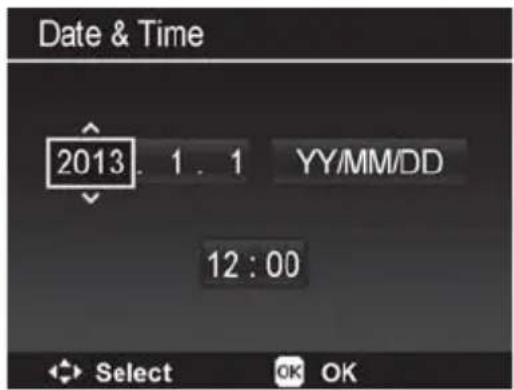
Follow the below steps to set the date and time.
- In Photo or Playback mode press the menu button 📂.
- Use the ◀/▶ buttons in the menu to select the Setup menu[J].
- Use the ▲ / ▼ buttons to select [Date / Time] and press OK button to confirm.
Now determine the order in which the day, month and year are displayed in the date.
- Use the ◀/▶ buttons to select the date format and use the ▲/▼ buttons to select the order „YY/MM/DD“, „MM/DD/YY“ or „DD/MM/YY“.
- Next set the date and time.
- Use the ◀ / ▶ buttons to select the date and time value to be entered and change it using the ▲ / ▼ buttons.
- Press OK button to save the settings.
- Return to capture mode by pressing the Ⓜ button.



MAGINON
Language selection
Select the language in which menus and messages will be displayed on the LCD display.
- In Photo or Playback mode press the menu button Ⓜ.
-
Using the ◀/▶ buttons select the Setup menu [ ]
-
Select [language] using ▲ / ▼ buttons and press SET button.
-
Select the desired language using ◀/▶/ ▲/▼ buttons.
■ The following languages are available: English, Spanish, Italian, Portuguese, Dutch French, German.
-
Press OK button to save settings.
-
To exit the Setup menu press Ⓜ button.

After Sales Support

00 800 - 78 77 23 68
MODEL: Z 1650

YEARS WARRANTY
MAGINON
Formatting a memory card
This function formats the memory card and deletes all images contained thereon.

Note:
-
Caution: Formatting irretrievably deletes all photos and films on the memory card – even photos that are protected against deletion (see page 55). Prior to formatting, all important data should therefore be backed up to a computer.
• Write-protect cards cannot be formatted. -
In Photo or Playback mode press Menu button 📂.
- Using the ◀/▶ buttons select the Setup menu [ ]
- Select [Memory Kit] using the ▲ / ▼ buttons and then confirm by pressing the OK button.
- Select [Format] using the ▲ / ▼ buttons and then confirm by pressing the OK button.
- Select [Yes] using the ▲ / ▼ buttons and press OK button again.
■ Select [Cancel] and press the OK button to cancel the operation.
- To exit the Setup menu press MENU button.



MAGINON
6. Photo mode
Taking photos
The camera features a 2.7" colour LCD-TFT display, allowing the set-up photos, playback of recorded photos/video clips or changing of menu settings.
- Press ON/OFF button to switch on camera.
- Ensure that the recording mode [P] is activated.
- Arrange recording on LCD screen.
■ Press right zoom button to zoom in and enlarge the image.
■ Press left zoom button to zoom out and show a larger area of the image.
- Press shutter release.
If the release shutter is half pressed, the image is automatically focussed and the correct lighting is set. If the release shutter is fully pressed, the picture is taken.
■ The frame for the focussed area appears in green if the focus of the camera is set and the lighting has been calculated.
If the focus is unsuitable, the frame for the focussed area becomes red. In this case, let the camera refocus after slightly changing the orientation or adjusting the settings.

After Sales Support

00 800 - 78 77 23 68
MODEL: Z 1650

YEARS WARRANTY
MAGINON
Setting the photo mode
Select one of the available photo modes to take a photo with the most suitable settings.
- In Photo mode press the Ⓗ button.
- Select [Photo mode] using ▲ / ▼ buttons and confirm by pressing the OK button.
- Using the ◀ / ▶ dbuttons select the desired recording mode and confirm by pressing the OK button.

Most of the Photo modes can also be changed from the Function menu by pressing the Fn button.
| Scene mode Description | |
| Auto | Select this mode to take photos without having to set up special functions or manually enter settings. |
| Program | In this mode, most parameters can be set manually. |
| Intelligent scene | Select this mode if you want the camera to automatically select an ideal photo mode based on the surroundings. |
| Portrait | Select this mode if you want to take a photo of a person against a blurred background. |
| Landscape | Select this mode if you want to take a photo with infi nity focus, high in sharpness and saturation. |
| Sunset | Select this mode if you want to take a photo of a sunset. This mode provides deep hues for the image |
After Sales Support
00 800-78 77 23 68
MODEL: Z 1650
3
YEARS
WARRANTY
MAGINON
| Scene Mode Description | |
 cklight cklight | This function is used for taking photos of a subject against a back light, by changing the exposure measurement. |
 Kids Kids | This function is used for taking photos of moving children. |
 Night Scene Night Scene | Use this mode for taking photos of persons at dusk or night. |
 lish lish | This function is used for taking photos with oversaturated colours, uneven lighting or blurred effect. |
| [ASKW]Fireworks | Use this mode for taking photos of fi reworks with best possible exposure. We recommend using a tripod as the shutter speed is slower. |
 Snow Snow | Use this mode for taking photos in the snow or on the beach without persons appearing dark or photos developing a blue cast. |
 Sports Sports | Use this mode for taking photos of fast moving objects. |
 Party Party | This function can be used for weddings or parties inside buildings. |
 Candlelight Candlelight | Use this mode for taking photos by candle light without interfering with the mood. |
 Night Portrait Night Portrait | Use this mode for taking photos at night. |
 Soft Skin Soft Skin | This function highlights skin tones, so that the skin appears to be softer. |
 Flowing water Flowing water | Use this mode for taking photos of soft flowing water. |
 Food Food | This function is used for taking photos of food items. The increased saturation in this mode makes the image more appealing. |
| [54WS]Building | This function enhances the edges in photos. |
After Sales Support

00 800 - 78 77 23 68
MODEL: Z 1650

YEARS WARRANTY
MAGINON
| Scene Mode Description | |
 | Use this mode for taking photos consisting of black and white parts, e.g. a printed document. |
| [ZXCH] Foliage | This function enhances colour saturation of green hues to give leaves a rich colour. |
 Auction Auction | This function combines up to 4 photos to one single photo and offers 4 templates for selection and use in online auctions. |
 Smile Capture Smile Capture | This function uses face recognition to automatically detect faces for the photo. Photos are continuously taken when a smile is detected. |
| [74SH] Blink Detection | This function detects whether the person blinked when the photo was taken and offers the user the option to save or delete the image. |
 Pre-Composition Pre-Composition | This function takes a preliminary photo as reference. Depress the shutter release fully once you have connected the subject of the photo with the reference point. |
 Love Portrait Love Portrait | This function uses face recognition to automatically take portrait photos without assistance. Where more than two faces are detected, AF is automatically activated. The camera starts a count down and automatically takes a photo after two seconds. |
 If Portrait If Portrait | This function sets the zoom to wide angle. When a face is detected, AF is automatically activated and an audible confirmation signal is generated. The camera starts a count down and automatically takes a photo after two seconds. |
 D-Lighting D-Lighting | This function improves the dark and light areas of a photo. |
 Voice REC Voice REC | This mode is used for recording audio clips. |

Note:
When the camera is switched on, the last used Scene Mode is always active.
After Sales Support

00 800 - 78 77 23 68
MODEL: Z 1650

YEARS
WARRANTY
MAGINON
Taking photos with the Intelligent scene mode
In the "Intelligent Scene" mode the camera is able to detect ambient conditions and automatically selects an ideal photo mode.
- In Photo mode press the Ⓗ button.
- Select the [Photo mode] using the ▲ / ▼ buttons and press the OK button.
- Using the ◀/▶ buttons select the mode [Intelligent scene] and press the OK button to confirm.
■ The camera can automatically select the best mode for the photo scene from [Portrait] / [Scenery] / [Sunset] / [Macro] / [Text] / [Snow] / [Back light] / [Back light portrait] / [Night scene] / [Night photo] / [Foliage].
Back light photos
When photographing persons into the sun or another strong light source, faces can be underexposed. This is prevented by the "Backlight" photo mode.
- In Photo mode select Ⓜ.
- Select the [Photo mode] using the ▲ / ▼ buttons and press the OK button.
- Using the ◀/▶ buttons select the [Back light] mode and press the OK button to confirm.

Note:
- When the Back light mode has been selected, only the settings "Always on" and "Always off" are available for the flash option.
After Sales Support

00 800 - 78 77 23 68
MODEL: Z 1650

YEARS WARRANTY
MAGINON
Soft skin tone mode
To make photographed faces look better and younger, the soft skin tone mode allows any flaws to be removed from faces and the skin tone to be optimised.
- In Photo mode press the Ⓜ button.
- Select the [Photo mode] using the ▲ / ▼ buttons and press the OK button.
- Using the ◀/▶ buttons select the [Soft Skin] mode and press the OK button to confirm.
- Align the image and fully depress shutter release.
Photos for online auctions
Using the "Auction" photo mode, up to 4 images can be directly combined to a
640 x 480 Pixel image. This function provides optimum images, for instance for online auctions.
- In Photo mode press the Ⓜ button.
- Select the [Photo mode] using the ▲ / ▼ buttons and press the OK button.
- Using the ◀/▶ buttons select the [Auction] mode and press the OK button.
- Using the ◀ / ▶ buttons select the image template you wish to produce.
- Take a single photo. This is shown in the selected frame and can be accepted by pressing OK or can be deleted by selecting OK.
- After all individual photos have been added, the produced image is stored.
- To produce another auction image, select a new photo template by pressing the OK button.


natural_image
Black-and-white photo of a knitted sheep toy with textured skin (no text or symbols visible)
natural_image
Close-up of textured, bulbous objects resembling a coiled or porous material (no visible text or symbols)
natural_image
Close-up of a textured, cloud-like surface with two dark circular eyes (no text or symbols visible)
After Sales Support
00 800-78 77 23 68
MODEL: Z 1650
3
YEARS WARRANTY
MAGINON
Taking photos with smile capture switched on
If the camera function "Captivate smile" has been activated, the camera detects a smiling face and automatically takes a photo. This ensures that in future you will not miss the special moments in your life.
- In Photo mode press the Ⓜ button.
- Select the [Photo mode] using the ▲ / ▼ buttons and press the OK button.
- Using the ◀/▶ buttons select the [Smile Capture] mode and press the OK button to confirm.
- As soon as the camera detects a smile in the image, this is marked by a white frame. The camera then focuses automatically and takes a photo.
■ When in the "Smile Capture" mode you can also manually take a photo at any time by using the shutter release as usual to focus and then take the photo.
■The "Smile Capture" mode is constantly active until a new Photo mode is selected.

natural_image
Black-and-white photo of a child sitting inside a spacecraft cockpit with a dog, no visible text or symbols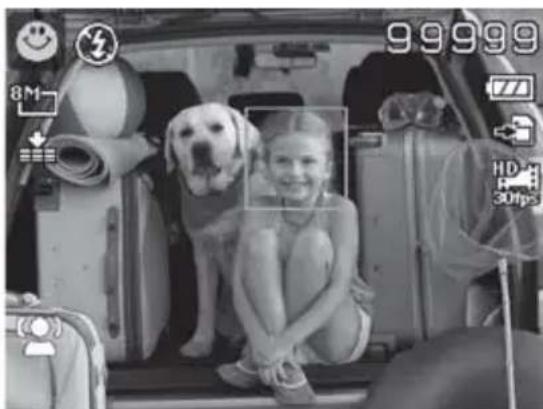
natural_image
Black-and-white photo of a smiling child sitting inside a vehicle, with a dog and camera interface overlays (no readable text or symbols)After Sales Support

00 800 - 78 77 23 68
MODEL: Z 1650

YEARS WARRANTY
MAGINON
Self-portrait functions
The camera offers the option of automatically taking self-portraits of persons. For this option, the Photo modes "Love Portrait" for several persons and "Self-portrait" for a single person is available. In this mode, the camera focuses automatically and takes a photo as soon as faces are detected.
- In Photo mode press the Ⓜ button.
- Select the [Photo mode] using the ▲ / ▼ buttons and then press the OK button.
- Using the ◀/▶ buttons, , select the [Love Portrait] or [Self-portrait] mode and press the OK button to confirm.
- As soon as the camera detects a face (for "Self-portrait") or several faces (for "Love Portrait") in the image, this is marked by a white frame.
- The camera then focuses automatically and takes a photo after a 2 second delay.
- When in the "Self-portrait" and "Love Portrait" mode you can also manually take a photo at any time by using the shutter release as usual to focus and then take the photo. - The Self-portrait mode is constantly active until a new Photo mode is selected.


natural_image
Black-and-white photo of three smiling people outdoors, surrounded by camera and home interface icons (no readable text or symbols)After Sales Support
00800-78772368
MODEL: Z 1650
3
YEARS
WARRANTY
MAGINON
7. Functions of the control buttons
Locking the exposure and auto focus setting
In order to maintain an existing exposure or auto focus setting, these settings can be individually or jointly locked.
Using the function menu it can first be determined whether only the exposure, only the auto focus or both shall be locked when the button is depressed.
- Change to the "Program" recording mode.
- In Photo mode press the Fn button.
- Using the ▲ / ▼ buttons select the option for setting AE-L and AF-L.
- Using the ◀ / ▶ buttons select "AE-L & AF-L" (both), "AE-L" (exposure) or "AF-L" (auto focus) and confirm the selection by pressing the OK button.
To only lock the Exposure, press button AE/AF LOCK in the Photo mode. To lock Auto focus first half depress the shutter release until focussing has been completed and press the button AE/ AF LOCK at the same time.
The Exposure and Auto focus lock is cancelled again if:
■ the button AE/AF LOCK is pressed
■ the zoom setting is changed
■ a function is changed by pressing the buttons MENU [◎], Fn [Fn], Video [●] or ON/OFF.
■ "Super Macro" or "Manual Focus" (for exposure only) is selected.
MAGINON
Focus settings
In many situations the camera can automatically select the required focus setting. For close-ups or remote scenes and photos of persons, the focussing can also be adapted to the special subject matter. Apart from Auto focus, the respective setting is shown in the display.
The camera features the following focus settings:
[ AFAuto Focus: The camera focuses automatically.
[ ] Super Macro: Use this mode for close-ups within a range of 5 - 60 cm.
[PF] Pan Focus: The main feature of this mode is "Depth of Field" (DOF); this feature is not suitable for close-ups.
[ ] Infinity: For capturing objects at great distance, i.e. scenery, mountain ranges and similar.
[MF] Manual Focus: When in Manual focus, the focal distance can be adjusted between 30cm and 100 cm by pressing the ▲ / ▼ buttons. Press the OK button to set the focus and close the Settings window.
To select the desired focus setting proceed as follows:
- In Photo mode press the [💡] button and, using the ◀ / ▶ buttons, select the desired mode.
- Confirm the selection by pressing the OK button.

Note:
- When switched on, the camera is always set to Auto focus.
• Not all focus settings are available in each capture mode.
After Sales Support
00 800-78 77 23 68
MODEL: Z 1650
3
YEARS
WARRANTY
MAGINON
Continuous shooting
The camera offers different continuous shooting modes, allowing photos to be taken in quick succession or to obtain the same photo shot at different exposure settings. The Continuous shooting modes are only available for photos.
- In Photo mode press the [ ] button to call up the continuous shooting settings.
- Using the ◀ / ▶ buttons select the desired Continuous shooting mode and confirm the selection by pressing the OK button.
The following Continuous shooting modes are available:
[ ] Off: Continuous shooting deactivated. When the shutter release is depressed, only single photos are taken
[BURST] Photos are continuously taken as long as the shutter release is depressed. Shooting also stops when the memory card is full or the battery is empty.
[動] Speedy Burst: As soon as the shutter release is depressed once, the camera takes 30 photos in succession with a resolution of 640 x 480 pixels.
[ ] AEB: As soon as the shutter release is depressed, three photos are taken in succession with different exposure values: standard light, underexposure and overexposure. The difference is in each case 1/3 aperture.
After Sales Support

00 800 - 78 77 23 68
MODEL: Z 1650

YEARS WARRANTY
MAGINON
Flash settings
The camera offers different flash settings to best adapt the camera to any light situation. The respective setting is always shown on the display.
The following flash modes are available:
[ ξA ] Auto. Flash: The camera activates the flash automatically in case of insufficient light.
[ ]Red-Eye Reduction: Eyes of persons and animals taken by fl ashlight can turn out red. This setting reduces the red-eye effect by means of a pre-fl ash.
[ ♣ ] Forced On: The flash is activated for every photo.
[5s] Slow Sync: The flash is synchronised with a longer shutter speed to brighten up the background.
The use of a tripod is recommended for this mode.
[②] Forced off: The flash has been deactivated.
To set the desired Flash mode, proceed as follows:
- In Photo mode press button [⚡] and, using the ▲ / ▼ buttons, select the desired mode.
- Press the OK button to save the Flash mode.

Note:
- The different Flash modes cannot be used in every Photo mode. Please note this when selecting a Photo mode.
- When switching on the camera, the last selected Flash mode is always active.
After Sales Support
00 800-78 77 23 68
MODEL: Z 1650

YEARS
WARRANTY
MAGINON
8. Function menu
Use of Function menu
The Function menu can be used to select the most common camera settings for photos and videos.
- Open the Function menu by pressing the Fn button. The settings of the available functions are then shown as a symbol in the menu bar.
- Select the individual functions using the ▲ / ▼ buttons.
- After selecting a function use the ◀/▶ buttons to toggle between the available options of the function.
- Once all settings have been entered, press the OK button to save the changes.
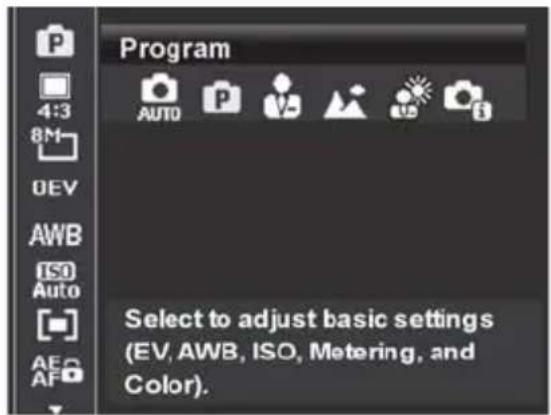
- To exit the Function menu without saving the changes, press one of the buttons[ Fn ] or 📂.
"My mode" function
The "My Mode" function shows the 5 Photo modes used last in order. The "Auto" Photo mode is also available at all times.
As soon as one of these Photo modes is selected, different functions appear in the menu bar. The bar only contains functions that are available in the respective Photo mode.


MAGINON
Setting the aspect ratio
Select the function "Aspect ratio" from the function menu to determine the width to height ratio of your photos. The following options are available: 4:3, 3:2, 16:9 and 1:1.
Depending on the selected settings the image size of the photo changes.
When selecting the aspect ratio, the Help text also shows the number of remaining photos.

Setting the image size
Image size refers to the resolution of a photo. This function allows you to set the resolution of photos to be taken. This affects the number of remaining photos. The higher the resolution, the more memory is required. As the resolution decreases so does, however, also the quality of a photo.
The below table shows the available aspect ratios and the resulting image sizes:


MAGINON
| Image size Aspect ratio | ||||
| 4:3 3:2 16:9 1:1 | ||||
| [DO2H] | 4608 x 3456 4608 | x 3072 4608 x 2592 4000 | x 4000 | |
 | 3264 x 2448 3264 | x 2176 3264 x 1832 2832 | x 2832 | |
| [GDA0] | 2560 x 1920 2560 | x 1696 2560 x 1440 2240 | x 2240 | |
 | 2048 x 1536 2048 | x 1360 2048 x 1152 1728 | x 1728 | |
| [GSDD] | 640 x 480 640 x | 424 640 x 360 480 x 480 | ||
Exposure compensation
When taking photos, the image can be manually brightened or darkened. This is achieved with the exposure compensation. Using this function, the brightness can be incrementally changed between very dark (EV value -2.0) to very bright (EV value +2.0).
Use ▲ / ▼ buttons in the Function menu to select Exposure compensation and use the ◀ / ▶ buttons to select the desired value. The change in brightness is shown directly on the display.
Press the OK button to save the settings

■ Exposure compensation is only available in the "Program" capture mode.
■ Exposure compensation menu does not appear if "AF tracking" mode has been activated.

Note:
- When switching on the camera, the last selected EV value is always active.
After Sales Support

00 800 - 78 77 23 68
MODEL: Z 1650

YEARS WARRANTY
MAGINON
White balance
White balance adjusts the camera to particular light situations in order to ensure a true-colour reproduction of the photo. Various automatic White balance settings are available:

[ AWE ] Auto White Balance: White balance is activated automatically.
[ ]Daylight: For bright, sunny conditions.
Cloudy: For photos during overcast conditions.
[◆Tungsten: For internal photos in dim light conditions.
[※] Fluorescent_1: For internal photos under blue Neon light.
[...] Fluorescent_2: For internal photos under red Neon light.
[ ] Custom: This option allows manual setting of the white balance.
To manually select White balance proceed as follows:
-
Use ▲ / ▼ buttons to select White balance from the function menu.
-
Use the ◀ / ▶ buttons to change to "User".
-
Point camera on a white or grey surface and press the shutter release. The camera then sets the White balance based on this surface.
-
Press the OK button to exit the Function menu.

Note:
- When switching on the camera, the last selected White balance option is always active.
After Sales Support
00 800-78 77 23 68
MODEL: Z 1650
3
YEARS
WARRANTY
MAGINON
ISO value
This determines the light sensitivity of photos. By increasing the light sensitivity (and increasing the ISO value), photos can even be taken in dark locations, although the photo appears to be grainier (noisy).
Apart from the camera's automatic ISO setting, the following ISO values are available:
■ 100 / 200 / 400 / 800 / 1600 / 3200 / 6400

Exposure measurement
You can determine the method used by the camera to measure the exposure. The following options are available:
[ ] Multi: Exposure is measured across the entire image area.
[ ] Center: Takes the average of the light measures within the entire frame but places more emphasis on objects at the centre.
[☐] Spot: A very small area at the centre of the image is measured to calculate the correct exposure value.
Locking settings
This option allows you to determine whether Exposure and/or Focussing can be locked at the push of a button. See also section "Lock Exposure and Auto focus" on page 29 of this Instruction manual.
The following settings are available:
■ AE-L: To lock/unlock Exposure.
■ AF-L: To lock/unlock Focus.
■ AE-L & AF-L: To lock/unlock Exposure and Focus.

MAGINON
Colour mode
The Colour mode function uses different colours and hues for photos or videos to produce a more artistic effect.
■ Whilst moving through the selection, the preview on the display changes at the same time.
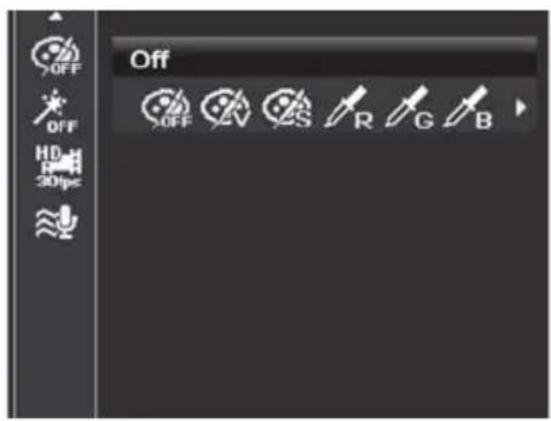
[ ] Off: The camera uses the normal tones.
[ ] Vivid: The camera takes the photo with more contrast and saturation to highlight richer colours.
[ ] Sepia: Photos are taken in Sepia colour tones.
[ ] Colour Accent (Red): Retains the red tone, whilst the rest of the image becomes black & white.
[16] Colour Accent (Green): Retains the green tone, whilst the rest of the image becomes black & white.
[ ] Colour Accent (Blue): Retains the blue tone, whilst the rest of the image becomes black & white.
[ GW ] B & W: Images are recorded in black & white.
[ ] Vivid Red: Red colour tones of the photo are emphasized.
[ ] Vivid Green: Green colour tones of the photo are emphasized.
[ ] Vivid Blue: Blue colour tones of the photo are emphasized.

Note:
- When switching on the camera, the last selected option for Colour mode is always active.
After Sales Support
00 800-78 77 23 68
MODEL: Z 1650
3
YEARS
WARRANTY
MAGINON
Artistic effects
Using Artistic effects, photos are artificially changed.
■ Whilst moving through the selection, the preview on the display changes at the same time.
Below, the different artistic effects are described in detail.
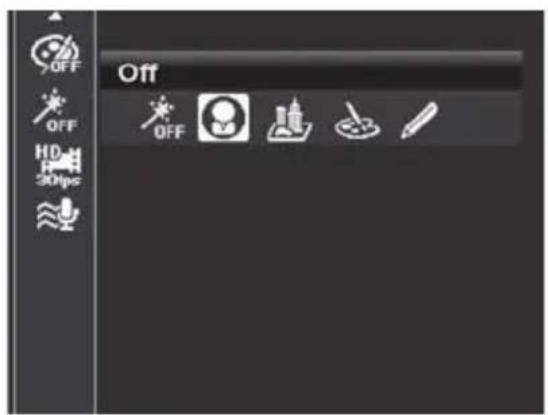
Photos with fi sheye eff ect
So-called fi sh-eye lenses distort photos to such an extent that a strong curvature always appears at the edge of a photo. The result is a drum effect for the images.
- Select one of the capture modes such as "Program" or "Scenery" that allow "Artistic effects".
- In Photo mode press the Fn button.
- Using the ▲ / ▼ buttons select the option "Artistic effects". ].
- Using the ◀/▶ [Fisheye Lens] [ ] and confirm the selection by pressing the OK button.
- Align the image and fully depress the shutter release.

natural_image
Black-and-white fisheye cityscape with skyscrapers and digital camera overlays (no readable text or symbols)
MAGINON
Miniature effect photos
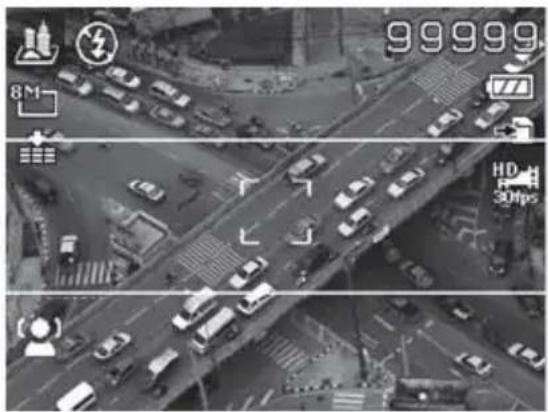
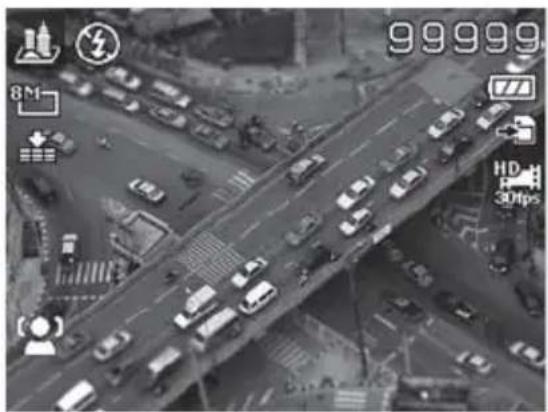
Produce photos in which persons, vehicles or entire towns look like a scene from a miniature village. This is achieved using the artistic "Miniature effect", in which only the centre third of the image is in focus and the top and bottom section of the image is out of focus. To enhance the effect, the photo should be taken from a higher position, such as a high-rise building or viewing towers.
- Select one of the capture modes such as "Program" or "Landscape" that allow "Artistic effects".
- In Photo mode press the Fn button.
- Using the ▲ / ▼ buttons select the option "Artistic eff ects".].
- Using the ◀ / ▶ buttons select [Miniature Effect] [ ] and confirm the selection by pressing the OK button.
■ The display now shows two horizontal lines marking the areas of the image in and out of focus.
■ Ensure that the subject matter to be high lighted is between the lines.
- Align the image and fully depress the shutter.
natural_image
Aerial view of a multi-lane highway interchange with vehicles and traffic (no visible text or symbols)After Sales Support
00 800-78 77 23 68
MODEL: Z 1650
3
YEARS WARRANTY
MAGINON
Photos with Sketch effect
To take photos that look like sketches of a subject matter, the options "Painting" and "Sketch" are available. When selecting the "Sketch" mode images are recorded like a pencil drawing in black & white, whilst in the "Painting" mode, shapes are also filled with colour.
- Select one of the capture modes such as "Program" or "Landscape" that allow "Artistic effects".
- In Photo mode press the Fn button.
- Using the ▲ / ▼ buttons select the option option "Artistic effects" [ ]
- Using the ◀ / ▶ buttons select [Painting] [ ] or [Sketch] [ ] and confirm the selection by pressing the OK button.
- Align the image and fully depress the shutter release.

natural_image
Exterior view of a modern building with parked cars and a tree, surrounded by icons for lighting, parking, and fuel efficiency (no readable text or symbols)
MAGINON
9. Camera menu
This section explains the different options of the camera menu. A detailed description of all options can be found in section12.
To set the options of the camera menu, proceed as follows:
- In Photo mode press the Ⓜ button.
- Select the desired option using the ▲ / ▼ buttons and press the OK button.
- Move through the available settings of the selected option using the ▲ / ▼ buttons and confirm the selection by pressing the OK button.
Self-timer
The camera offers various self-timer options to ensure that you, as the photographer, can always be part of a photo.
[OFF] Off: Photos are taken when the shutter release is pressed.
[ ]10 sec.: The camera takes a photo 10 seconds after the shutter release has been pressed.
[2 sec.: The camera takes a photo 2 seconds after the shutter release has been pressed.
[ Double: The camera takes two photos:
The first photo 10 seconds after pressing
the shutter release and the second photo
after a further 2 seconds.


Note:
When switching on the camera, the self-portrait and self-timer functions are always switched off.
After Sales Support
00800-78772368
MODEL: Z 1650

YEARS
WARRANTY
MAGINON
Setting the Auto focus range
The menu option "AF Area" is used to determine on which area the camera focuses.
[ ] Face Tracking: Using this setting, the camera automatically recognises up to 10 faces and focuses on the faces when the shutter release is depressed.
■ Recognised faces are surrounded by a white frame.
■ Subject matters not suited for this function:
Persons wearing glasses or sunglasses or whose faces are covered by hats, caps or hair.
Persons, whose heads are turned away.
[ ] Wide: The camera focuses within a wide frame.
[ ] Center: The camera focuses on the centre of the image.
[ ] Tracking AF: Use this option to take a photo of a moving object:
-
If AF tracking has been selected the [+] symbol appears at the centre of the display.
-
Point the frame at the centre of the subject matter to be followed and press the ▲ button.
■ The frame automatically follows the movement of the subject matter to continuously set the focus.
3. Fully depress shutter release to take the photo.
■ If the camera does not detect or cannot follow the subject matter, the message
"Tracking stopped" appears after a few seconds and the capture in the display is cancelled.
■ Press the ▲ button again to manually cancel the capture in the display.
After Sales Support

00 800 - 78 77 23 68
MODEL: Z 1650

YEARS WARRANTY
MAGINON
Setting up the date stamp
The date and time can be directly printed on the photo by activating the option "Date stamp" before a photo is taken. Once date and time have been printed on a photo they cannot be edited or removed.
You can choose whether the date or the date and time should be printed on the photo.
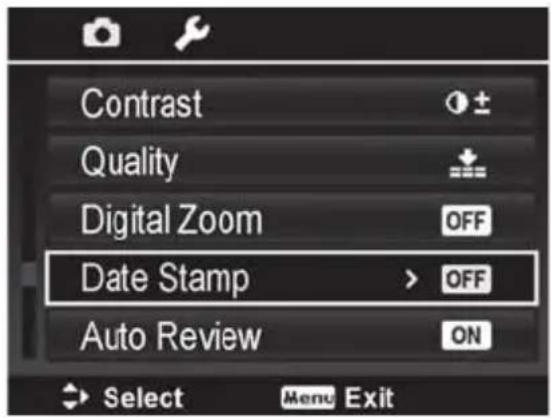
■ The option "Date stamp" is only available for Photos, not for videos.
■ The option can slow down the AEB/sequence modes.
■ On vertical or rotated photos the date and time still appear horizontally on the photos.
Setting up the stabiliser
In some capture modes a camera-shake warning [!] appears if light conditions do not suffi ce to ensure a good-quality photo. Various options are available to combat camera shake:
■ Improve light conditions.
■ Use the flash.
■ Use a tripod.

To a certain extent camera shake can also be prevented by the "Stabiliser" option. Set the camera menu to "On".

MAGINON
10. Video mode
Recording video clips
Using this mode you can record short video clips with a resolution of 1.280 x 720 or 640 x 480 with sound.
- Press the ON/OFF button to switch on camera.
- Align the image.
- Press the Video recording button to start recording.
■ Recording of the video clip commences. The duration of the recording is shown in red at the bottom of the display.
■ By pressing the Ⓞ button again the recording is ended.
■ Press the ▲ button during recording to interrupt or stop recording. To continue recording press the ▲ button again.
■ The maximum recording time depends on the free memory and subject matter.
■ The maximum recording time for a single video clip is limited to 29:00 minutes or 4 GB file size.
■ Using the camera menu, Auto focus and the Zoom buttons can be activated or deactivated (see section12).


Note:
- If the write speed of the SD/SDHC memory card is insufficient for recording video clips in the selected resolution and quality, the video recording is stopped. In this case select a lower quality or use a memory card of class 6 or higher.
• The pause mode is stopped after 5 minutes to prevent the camera from overheating.
After Sales Support

00 800 - 78 77 23 68
MODEL: Z 1650

YEARS WARRANTY
MAGINON
Setting the video size
The desired video size can be selected from the Function menu. The following resolutions are available:
[ HD ] 720p30: recording in HD quality at 1.280 x 720 pixels and 30 frames per second
[VGAp30: recording in VGA quality at 640 x 480 pixels and 30 frames per second
[ ] 720p30 (Painting): recording in HD quality per second with painting effect. The option "Continuous AF" is automatically set to "On".
The "720p" video sizes can then only be selected if a SDHC memory card of class 4 or higher is used.
Setting of Wind noise reduction
Select option "Wind noise" [ ] from the Function menu to reduce wind noise during video recording. Select the "On" setting.
PIV function
If the shutter release is depressed during video recording, a photo is also taken at the same resolution of the video. Above the recording time the Photo symbol [ ] and the number of photos then appears. Once the maximum number of possible photos has been reached, the symbol and number appear in red but the video recording continues.
The function is only available in video sizes 720p30 and VGAp30.
MAGINON
11. Playback mode
Playback of video clips
Any recorded video clips can be viewed immediately on the camera. The recorded sound is also played back through the integrated loudspeaker.
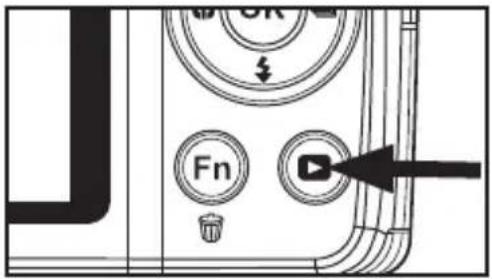
- Press button ▶.
■ The last recording is shown on the display.
-
Select the desired video clip using the ◀/▶ aus. Video recordings are identified by the video symbol [ ] at the top of the display.
-
Press the OK button to start playback.
■ By pressing the ▶ / ◀ buttons during playback you can fast forward and rewind the clip.
■ To stop video playback, press the ▼ button. The playback stops and you return to the beginning of the video.
■ To pause the playback press the ▲ button. Functions such as the video editing function will then be available (see next page). To continue playback press the ▲ button again.
■ During playback, the volume can be changed using the Zoom buttons.

Note:
• Video clips can neither be rotated nor enlarged.
- We recommend the use of Windows® Media Player or Apple® QuickTime Player for playing back video clips on a computer.
- Depending on the specifications of the computer, individual frames may be skipped during playback, playback may not be smooth and the sound could suddenly stop.
• Voice recordings (see page 24) are played back like video clips.
After Sales Support

00 800 - 78 77 23 68
MODEL: Z 1650

YEARS WARRANTY
MAGINON
Video editing
If playback of a video is stopped, the Video editing mode can be selected by pressing the button. An editing panel containing a timeline appears on the display.
The following editing options are available. Use the ▲ / ▼ buttons to move from one option to the next.
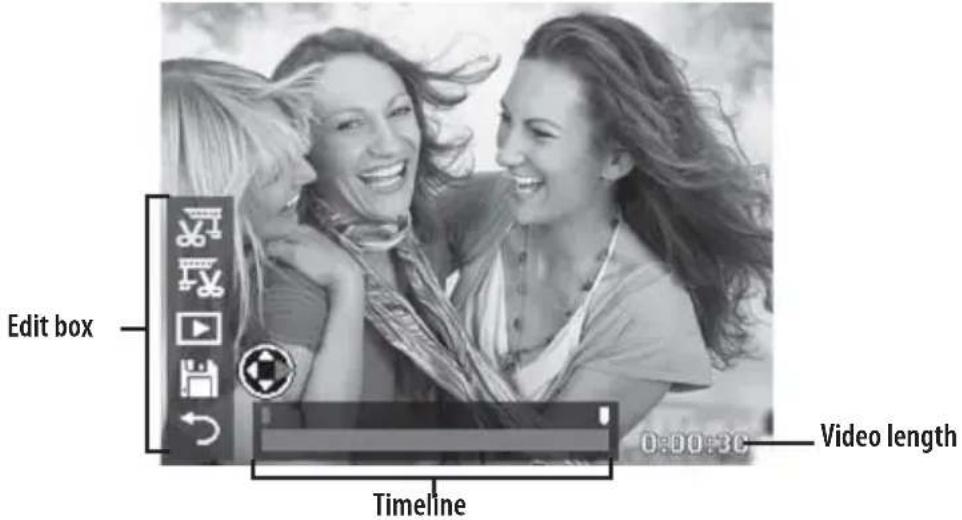
[ ] Start point: Select the start point for cutting, using the ◀/▶ buttons.
[ ] End point: Select the end point for cutting, using the ◀/▶ buttons.
[ ] Preview: Playback the edited video. Start and end playback by pressing the OK button.
[ ] Save: Save the edited video to a new file by pressing the OK button. This does not change the original video.
[2] Back: return to the original playback of the video clip by pressing the OK button.

natural_image
Black-and-white photo of two smiling women with long hair, no visible text or symbolsAfter Sales Support
00 800-78 77 23 68
MODEL: Z 1650
3
YEARS WARRANTY
MAGINON
Playback of photos
At all times, recorded photos can be directly viewed on the LCD display, provided with additional information, edited or deleted.
- Press button ▶.
■ The last photo will appear on the LCD display.
- Photos can be viewed in forward or reverse order using the ◀/▶ buttons.
■ Press the ◀ button to display the previous photo.
■ Press the ▶ button to display the next photo.
■ Press the left Zoom button [ ⊕ ] to enlarge the image.
■ Press the right Zoom button [ ] to reduce an enlarged photo again.
■ To return to the normal image size press the Menu button.

natural_image
Black-and-white photo of two smiling women holding feathered hair, with a play button icon on the left (no readable text or symbols in the main image)
Note:
• Photos captured with a voice comment are identified by the [ 🔥 ] symbol.
- An enlarged photo cannot be saved. After magnification the photo is available again in its original size.
After Sales Support

00 800 - 78 77 23 68
MODEL: Z 1650

YEARS WARRANTY
MAGINON
Thumbnails
During playback you have the option of displaying 9 photos at once as thumbnails. You can then select one of the photos and display it individually.
- Press button ▶.
■ The last photo will appear on the LCD display.
-
Rotate the Zoom wheel once anti-clockwise to enter Thumbnail view.
-
Move through the thumbnails using the ◀/▶/▲/▼ buttons. From the edge you always move to the next page of the view.
■ Where a scroll bar appears to the left of the thumbnails, several pages of thumbnails are available.
-
Press the OK button to select a photo and display it in full size.
-
Exit the thumbnail view by turning the Zoom wheel once in clockwise direction
Calendar mode
Apart from in the thumbnail view, existing photos can also be viewed in calendar view. Photos can be viewed by date. The first photo of a date is always shown as a thumbnail.
- Press button ▶.
■ The last photo is shown on the LCD display.
-
Rotate the Zoom wheel twice in anti-clockwise direction to enter the calendar view.
-
Move through the calendar using the ◀/▶/▲/▼ buttons. From the edge you always move to the next or previous month.
-
Press the OK button to select a photo.
MAGINON
Enlarging photos
Photos can be enlarged up to twelve times for viewing on the display. During playback rotate the Zoom wheel in clockwise direction until the desired magnifi cation has been reached. Using the
◀ / ▶ / ▲ / ▼ buttons you can then mark the area of the image to be enlarged.
To exit the Zoom view press button Ⓜ.

natural_image
Pure graphical interface element with no text, numbers, or symbols visibleDeleting photos
Deleting one or more photos
Using the Delete function, individual or all photos can be deleted from the camera.

Note:
• Caution: Deleted photos cannot be recovered!
- Press button ▶.
■ The last photo is shown on the LCD display. - Using the ◀/▶ buttons, select a photo to be deleted.
- Press Ⓜ button, select "Delete" from menu using ▲ / ▼ buttons and press OK.
- Using the ▲ / ▼ dbuttons select the desired Deletion option and press OK again.

After Sales Support

00 800 - 78 77 23 68
MODEL: Z 1650

YEARS WARRANTY
MAGINON
The following options are available for deleting photos:
Single: For deleting a single photo.
Photos are shown in individual view. Using the ◀/▶ buttons, select a photo to be deleted. Select "Delete" using ▲/▼ buttons and confirm by pressing the OK button. The next photo is then shown on the display.
Select "Cancel" to exit the Delete function and return to the Playback mode.
Voice Only: For deleting a Voice memo attached to a photo.
The "Voice" deletion option can only be selected if the photo contains a voice memo. The question "Delete voice" then appears. Using the buttons select "Yes" and confirm by pressing OK.
Multi: For deleting several photos simultaneously.
The photos appear in thumbnail view on the display Using the ◀/▶/▲/▼ buttons select a photo to be deleted and then press the OK button. The trash bin symbol appears on the photo. Mark all photos you wish to delete in this manner. To reinstate the photo press the OK button again.
Once all photos to be deleted have been marked, press button Ⓞ. The query "Delete selected files?" appears on the display. Using the ▲ / ▼ buttons change to "Yes" and confirm by pressing the OK button.
All: For deleting all photos.
The query "Delete all files?" appears on the display. Using the ▲ / ▼ buttons change to "Yes" and confirm by pressing the OK button.

Note:
Write protected files cannot be deleted by the Deletion function. See section "protecting photos" on page 55.
After Sales Support
00 800-78 77 23 68
MODEL: Z 1650

YEARS
WARRANTY
MAGINON
Deleting using the delete button
Single photos can also be deleted by pressing the delete button.

- Press button ▶.
■ The last photo is shown on the LCD display.
-
Using the ◀/▶ buttons, select the photo to be deleted.
-
Press Delete button F.
-
Using the ▲ / ▼ buttons, select "Delete" and confirm by pressing the OK button.
■ Select "Cancel" and press OK if you wish to keep the photo.


Note:
• Deleted photos cannot be recovered!
IWhere the option "File no." is set to "Series" in the menu, the deletion of photos does not affect the numbering of new photos. Numbering is continuous irrespective of existing or deleted photos even if the memory card is formatted or another memory card is used. To reset the numbering of photos back to 1, the "File number" must be set to "Reset" and the card must be formatted (see section 12).
After Sales Support
00 800-78 77 23 68
MODEL: Z 1650

YEARS WARRANTY
MAGINON
Playback as slideshow
The function "Slideshow" offers the option to automatically play back photos in order. You can specify the interval at which photos are changed and whether the slideshow should be
repeated indefinitely.
- Press button ▶.
■ The last photo is shown on the display.
-
Press 📂 button, select "Slideshow" from menu using ▲ / ▼ buttons and confirm by pressing the OK button.
-
Using the ▲ / ▼ buttons, select one of the following options:

Start: Select the option and then press the OK button to start a slideshow. A slideshow can be interrupted by pressing the OK button again. You can then either continue the slideshow by pressing "Continue" or terminate the slideshow by pressing "Cancel".
Cancel: Confirm by pressing the OK button to return to the Playback menu.
Interval: Using the ◀ / ▶ buttons, select one of the time intervals "1 sec.", "3 sec.", "5 sec." or "10 sec.".
Repeat: Select whether the slideshow is to be repeated [ ] or should only be played once [ ]
After Sales Support
00 800-78 77 23 68
MODEL: Z 1650
3
YEARS
WARRANTY
MAGINON
Protecting photos
Protect photos to prevent accidental deletion.
- Press button ▶.
■ The last photo is displayed.
- Using the ▲ / ▼ buttons, select whether single photos ("Single") or several photos simultaneously ("Multi") or all photos ("Protect all" or "Un protect all") are to be protected or unprotected.

Single: Using the ◀/▶ buttons select a photo to be protected or unprotected. If the photo is unprotected it can be protected by selecting „protect“. If the photo is protected it can be unprotected by selecting “Unprotect”. Confirm the selection in each case by pressing the OK button.
Select "Cancel" to return to the Playback mode.
Multi: Photos are displayed in thumbnail view. Using the ◀/▶/▲/▼ buttons select a photo whose protection status you wish to change. Press the OK button to mark the photo. Repeat the process to mark all desired fi les.
To complete the process press the Ⓜ button and select "Yes" to change the marked file. Lock all: Using this option, all photos can be protected. Select "Yes" and confirm the selection by pressing the OK button.
Unlock all: Using this option, all photos can be unprotected. Select "Yes" and confirm the selection by pressing the OK button.
■ The protection symbol [R] appears on protected photos.

Note:
- During formatting of a SD/SDHC memory card the write protection is cancelled and all photos are deleted whether they are protected or not.
After Sales Support
00 800 - 78 77 23 68
MODEL: Z 1650

YEARS WARRANTY
MAGINON
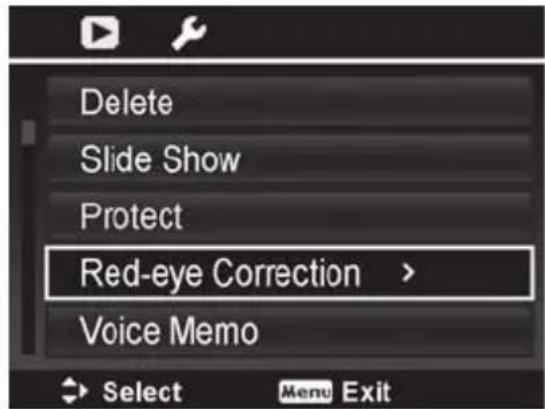
Red-eye correction
This function can be used to reduce the red-eye effect in saved photos. The red-eye correction can be used repeatedly for one photo. This can, however, adversely affect the quality.
- Press button ▶.
■ The last photo is shown on the display.
-
Select the photo to be edited using the ◀/▶ buttons.
-
Press the button Ⓜ and select the function "Red-eye Correction".
-
Select "Start" and the press the OK button to start the correction.
-
At the end of the correction, three options are displayed that can be confirmed by pressing the OK button:
■ Overwrite: Save and replace the existing image with the edited image.
■ Save as: Save the edited image to a new file.
■ Cancel: Cancel the correction without saving
Recording voice memos
Up to 30 seconds of voice recording can be added to existing photos as a "Voice memo". Only one Voice memo can be attached to each photo, which can, however, be replaced any number of times.
- Press button ▶.
■ The last photo is shown on the display.
- Select the photo to which the Voice memo is to be added, using the ◀/▶ buttons.
- Press the button Ⓜ and select "Voice memo".
- Select "Start" and then press the OK button to start recording.
- Press the OK button again to stop recording.

MAGINON
Playback of voice memos
Press the OK button to play back Voice memos of photos tagged with a Voice memo [ ] . The symbol [ ] appears in the image and the Voice memo is played back through the loudspeaker of the camera.
Cropping of photos
Using the cropping function, images can be cropped to a different size. This function is only available for photos.
- Press button ▶.
■ The last photo is shown on the display. - Using the ◀/▶ buttons, select the image to be cropped.
- Press the button Ⓜ and select "Trim". The Cropping window then appears in the display.
- Use the Zoom wheel to determine the cropping size.
- Use the ◀/▶/▲/▼ buttons to move the cropping area.
- Press the OK button to accept the cropped image. The following options will be displayed:
■ Overwrite: Save and replace the existing image with the edited image.
■ Save as: Save the edited image to a new file.
■ Cancel: Cancel the correction without saving.
- Press the OK button to accept the changes.


Note:
• Images in VGA resolution cannot be cropped.
• Cropping is only possible if aspect ratio 4:3 has been selected.
After Sales Support
00 800 - 78 77 23 68
MODEL: Z 1650

YEARS WARRANTY
MAGINON
DPOF settings
DPOF is the abbreviation for "Digital Print Order Format", which allows you to save printing information to a memory card. You can select photos to be printed and determine how many copies are to be printed by using the DPOF menu of the camera and then inserting
the memory card in a DPOF-compatible printer. After commencing the print operation, the printer reads the information embedded on the memory card and prints the specified photos.
- Press button ▶.
■ The last photo is shown on the display. - Press button <
- 3 options are available:
■ Single: DPOF settings for a single photo.
■ All: DPOF settings for all photos on the memory card.
■ Reset: Resets DPOF settings for all photos.
- Use the ◀/▶ buttons to select a single photo.
- Use the ▲ / ▼ buttons to specify the number of printed copies.
- Press Fn button to switch the date stamp on or off.
- Press OK button to save the DPOF settings.
- If "Reset" has been selected in the DPOF menu, select "Yes" and confirm the selection by pressing the OK button.


Note:
- The date generated when the photo was taken will be printed on the photo. To ensure that the correct date is printed, the date must be set in the camera prior to taking the photo.
After Sales Support
00800-78772368
MODEL: Z 1650
3
YEARS WARRANTY
MAGINON
12. Menu options Recording menu
This menu contains the settings for taking photos and recording video clips.
- In the Recording menu press the Ⓜ button.
- Using the ▲ / ▼ buttons select the desired option and press OK button to access the sub-menu.
■ The available settings differ for each selected recording mode.
- Using the ◀/▶/▲/▼ buttons select the desired setting.
- Confirm the selection by pressing the OK button or follow the notes on the display.
- Press the ☑ to exit the menu.
The default values are marked with an "asterisk" [*] in the below list.
![Scene Mode Self-timer OFF AF Area [ ] Sharpness ± Saturation + ± Select Menu Exit](/content/2026/05/759692/images/a91cc810e107e4b6aa5e5f54de258e38002778eb23dd7b001a9dbc5bf972d8f1.jpg)


Note:
• The selected menu point is highlighted by a yellow frame.
- Symbols for the already existing settings of an option already appear in the main menu.
- Options shown in grey cannot be changed with the present settings.
• All menu settings remain unchanged once the camera has been switched off.
After Sales Support

00 800 - 78 77 23 68
MODEL: Z 1650

YEARS WARRANTY
MAGINON
- Scene Mode
Determine the suitable recording mode for your photos. See also section "Scene Mode" starting on page 22.
- Self-timer
Select whether the self-timer function should be used. See also section "Self-timer" on page 42.
■ Off* / 10 sec. / 2 sec. / Double
- AF Area
The camera offers various options for determining the Auto focus range.
See also page 43.
■ Face recognition / Wide* / Centre / AF tracking
- Sharpness
This determines the image sharpness of the photo.
■ Hard / Normal* / Low
- Saturation
This function is used to set the colour saturation of the photo to be taken.
■ High / Normal* / Low
- Contrast
This function is used to set the contrast of the photo to be taken.
■ High / Normal* / Low
• Quality
This function is used to set the quality (compression) with which the photo is to be saved.
■ Extra fine / Fine* / Normal
After Sales Support
00 800-78 77 23 68
MODEL: Z 1650
3
YEARS
WARRANTY
MAGINON
- Digital Zoom
This function allows you to determine whether to use the digital zoom or not. The "Intelligent zoom" improves the quality of an enlarged photo.
■ Intelligent zoom* / Standard zoom / Off
- Date Stamp
The date and time of capture can be printed directly onto the photos. This function must be activated before a photo is taken.
■ Date / Date/Time / Off*
- Auto Review
This function allows you to determine whether a photo should be briefly shown on the display after it has been taken.
On*/Off
- Grid Line
The grid line function is used to display a frame grid in the preview mode for taking pictures.
On*/Off
- Stabilizer
The stabiliser can partly compensate for camera shake.
On*/Off
• Continuous AF (video)
This function is used to determine whether to activate Auto focus for video recordings.
On*/Off
- Zoom (video)
This function is used to determine whether to activate the Zoom control for video recordings. Sound recording is interrupted during zooming.
■ On (Quiet zooming)* / Off

MAGINON
Playback menu
In this menu, the settings for playing back photos and video clips are selected.
-
Press button ▶.
-
In the playback mode press the Ⓞ button.
-
Using the ▲ / ▼ buttons select the desired option and press OK to access the sub-menu. ■ The available elements differ depending on the selected recording mode.
-
Use the ◀/▶/▲/▼ buttons to select the desired setting.
-
Confirm your selection by pressing the OK button or follow the notes on the display.
-
Press the Ⓥ button to exit the menu.

- Delete
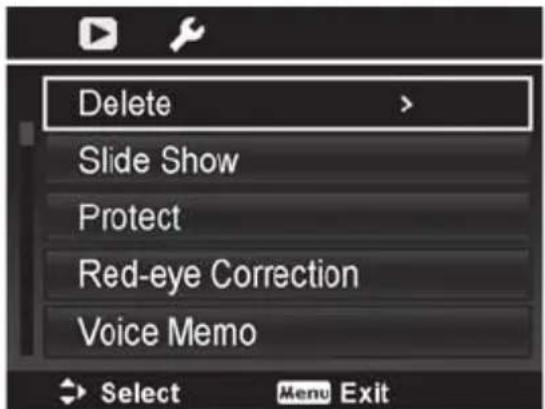
To delete photos see section "Deleting photos" starting on page 51.
■ Single / Voice Only / Multi / All
- Slide Show
Determine whether photos should be shown as a slide show. See also page 54 and following in this Instruction Manual.
■ Start / Cancel / Interval / Repeat

MAGINON
- Protect
See section "Protecting photos" (page 55) for further details.
■ Single / Multi / Protect all / Unprotect all
- Red-eye Correction
See section "Red-eye correction" (page 56) for further details.
Start / Cancel
• Voice Memo
See also section "Recording voice notes" (page 56) for further details.
- Colour Mode
Using the colour mode function, different colour shades can be applied to photos to produce an enhanced artistic effect. Images processed with this function are stored as a new file.
■ Off*/Sepia/B/W/Red/Green/Blue
- Art Effect
The function Artistic effects can only be used to create different special effects for photos. Images processed with this function are stored as a new file.
The options "Miniature effect", "Painting" and "Sketch" are described from page 39 onwards.
■ Off* / Negative / Mosaic / Astral / Miniature effect / Painting / Sketch
- Trim
For cropping photos see information starting on page 57.
After Sales Support
00 800 - 78 77 23 68
MODEL: Z 1650

MAGINON
- Resize
Reduce the size of a saved image. The original image can be replaced or the reduced image can be saved as a new file.
- Startup image
Use one of your photos as a start image or change back to the original image.
■ System / My photo / Off
· DPOF
Read section "DPOF settings"(page 58) for further information on this function.
■ Single / All / Reset
- Radial Blur
Radial blur is an effect, blurring areas around a point. The original image can be replaced or the edited image can be saved as a new file.
■ High / Normal / Low / Cancel
After Sales Support
00 800-78 77 23 68
MODEL: Z 1650
3
YEARS
WARRANTY
MAGINON
Setup menu
The Setup menu is used for selecting basic camera settings.
- In the Recording or Playback mode press the 📂 button.
- Using the ◀/▶ buttons, select Setup menu [ ]
- Using the ▲ / ▼ buttons, select the desired # option and press OK to access the sub menu.
- Using the ◀/▶ buttons. select the desired setting and press OK to confirm.
- Press the Ⓜ to exit the menu.

The default values are marked with an "asterisk" [*] in the below list.
•Sounds
Determine the sounds and volume of the sounds for certain operations.
■ Start sound / Shutter release / Volume

•Power Save
Under the Power save function, the time can be set after which the camera automatically moves into the Standby mode to save power. After one minute in the Standby mode, the camera is switched off completely.
Activate the LCD dimming function to automatically reduce LCD brightness to save battery power. The LCD screen is dimmed if the camera has not been used for 20 seconds. Press any button to return to normal brightness.
■ An*/Aus
- Date & Time
See section "Setting date and time" (page 18) for further details.
- Language
See section "Selecting language" (page 19) for further details..
- Display Mode
This function determines what symbols are shown on the display.
■ On*: Standard setting with little but important camera information.
■ Detailed information: Display showing all information.
■ Off: No camera information (allowing full focus on subject matter).
- File Numbering
This function allows you to choose the method with which file numbers are assigned to photos.
■ Series*: Assigns numbers to files in sequence, even if the file is changed.
■ Reset: Each time when the file is changed or the memory card is formatted, the file number starts at 0001.
•TV Out
This function is used to match the TV standard to the system used by the TV to which the camera is to be connected.
NTSC/PAL*
After Sales Support
00 800-78 77 23 68
MODEL: Z 1650
3
YEARS
WARRANTY
MAGINON
- LCD Brightness
Select the brightness of the LCD display.
■ Automatic*/Bright / Normal
- Memory Kit
Using this function, the internal memory of the camera or an inserted memory card can be formatted or images can be copied from the internal memory to the memory card. The two options are explained in detail below.
-Format
See section "Formatting of memory card" (Page 20) for further details.
- Copy to Card
Copy all fi les stored in the internal memory to the memory card.
If no memory card has been inserted or the internal memory is empty or the card is write-protected, the function Copying to memory card is deactivated.
- Reset All
This function resets all values of the camera to the default settings (*). Only date and time are not changed.
"Yes / Cancel*

MAGINON
13. Connecting to computer, printer and TV
System requirements
| Windows® Macintosh | |
| ■ Pentium® IV 1.6 GHz or higher■ Windows® XP/Vista/7/8■ 512 MB RAM■ 1GB available hard disk space■ CD-/DVD drive■ Available USB connection | ■ PowerPC G3/G4/G5■ OS 10.3.9 or later system■ 512 MB RAM■ 1GB available hard disk space■ CD-/DVD drive■ Available USB connection |
Downloading fi les
- Switch on camera.
- Using the USB cable, connect camera to computer.
- Using the ▲ / ▼ buttons select "Computer" and then press OK button.
- The camera is installed on the computer as an additional drive under the name "Removal storage device".
- Double click on this drive and locate the file "DCIM".

natural_image
Line drawing of a computer port with an attached USB cable and connector (no text or symbols)■ The recorded photos and videos are located in sub-folders of the "DCIM" folder.
■ You can copy or move the photo and video files to a folder on the computer.

Note:
On Mac computers an "Untitled" drive appears on the Desktop. By clicking on the drive, the programm "iPhoto" is startet automatically.
After Sales Support
00 800-78 77 23 68
MODEL: Z 1650
3
YEARS
WARRANTY
MAGINON
Connecting to a printer
Photos can be printed out directly on a printer compatible with PictBridge.
- Switch on printer.
- Check that the printer contains paper and displays no error message.
- Use the USB cable to connect the camera to the printer.
-
Use ▲ / ▼ buttons to select "Printer" and then press OK button.
-
The camera display shows the Print mode menu. Select whether a single image ("Print selection"), all images ("Print all") or all thumbnails images ("Print index") should be printed.
-
Where applicable, select the individual image and the number of copies.
-
Press Fn button, to switch on/off date stamp.
-
Press OK button.
-
Where applicable, select paper format and print quality and start printing operation by pressing the "Print" button.
-
During printing, the camera display shows "Now Printing..." and the number of images already printed.
The printing operation can be cancelled at any time by pressing the Ⓜ button.
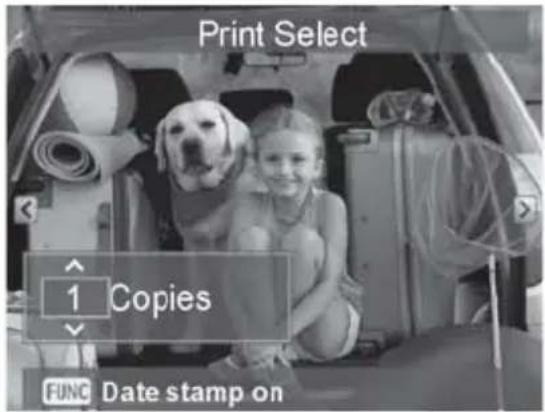

After Sales Support

00 800 - 78 77 23 68
MODEL: Z 1650

YEARS WARRANTY
MAGINON
Connecting to a TV
- Switch on camera.
- Connect AV cable to camera.
- Plug other end of cable into TV socket.
■ Insert yellow connector into Video input and white connector into one of the audio inputs of the TV. - Set the Video input source of the TV to the used AV socket


Note:
- Once the camera is connected to the TV, the LCD display of the camera is switched off. The functions are then controlled via the TV screen.
After Sales Support
00 800-78 77 23 68
MODEL: Z 1650
3
YEARS
WARRANTY
MAGINON
Installation of software
The enclosed CD ROM contains the following software for Windows XP, Vista, Windows 7 & 8:
MAGIX Photo Designer 7™ - With this software you can easily edit and optimize your photos in many different ways.
MAGIX Photo Manager MX™ - A software for fast archiving, editing and playback of photos on your computer.

Note:
- Please back up your data prior to installing the supplied software. The manufacturer is not responsible for any data loss.
-
The camera can also be connected to the computer for transferring photos/video clips without installing the software.
-
Insert the CD-ROM supplied with the camera in the CD-/DVD drive of your computer. A welcome screen appears.
- Click on the name of the desired software.
Follow the on-screen instructions to carry out the installation.

Note:
• To continue using the software for longer than the 7-day test period, register the software with the manufacturer for free.
• Further information about using the software can be found in the Help function of the respective program.
• If using Windows® XP, Vista, 7 or 8, install and use the software in the "Administrator" mode.
- If the CD does not start the installation automatically, the software installation can be activated manually from My Computer. Open the symbol of your CD/DVD drive by double clicking on it and start the "Setup" program.
After Sales Support

00 800 - 78 77 23 68
MODEL: Z 1650

YEARS WARRANTY
- Technical specifications
| Element Description | |
| Image sensor 1/2,3" CCD sensor (16 Mega pixels) | |
| Resolution | Photo: 16M, 8M, 5M, 3M, VGA (in various resolutions depending on existing formats 4:3, 3:2, 16:9, 1:1)Video: 720p30 (1.280x720), VGAp30 (640x480) |
| Display 6,85 cm (2,7") colour TFT-LCD | |
| Storage medium SD/SDHC/SDXC memory cards up to 64 GB (optional) | |
| File format DCF, JPEG (EXIF 2.2), DPOF, Motion JPEG (AVI), WAV | |
| Lens | 5x optical wide angle zoom; aperture range: 3.2 (W) - 6.4 (T); Focal length: 4.6 mm - 23.0 mm (corresponds 26 mm - 130 mm of a 35mm camera) |
| Focussing range | Normal: 0.05 m to infinity (W) / 0.6 m to infinity (D)Super Macro: 0.05 m (W) |
| Exposure Normal mode: 2 ~ 1/2000 sec.; Night: 15 ~ 1/2000 sec.; Fireworks: 2 sec. | |
| Digital zoom 5x (recording mode); 12x (playback mode) | |
| Connections USB/AV output (2-in-1 connection) | |
| Power supply | Battery: Rechargeable Lithium-Ion battery VG0376122700003 (Typ DS-5370)Specifikations: 3,7 V; 700 mAh; 2,6 WhMains adapter: Samya, Modell: TR-06EU-VInput: 100-240 V~, 50/60 Hz; 0,2 A Max.; Ausgang: 5,0 V---; 700 mA |
| Operating temperature Temperature 0°C to 40°C (32°F to 104°F) | |
| Dimensions | approx. 93.3 x 55.4 x 20.2 mm (without protruding parts) |
| Weight approx. | 103 g (without battery and memory card) |

Note:
Design und technical specifications can be changed without prior notice.
After Sales Support
00 800-78 77 23 68
MODEL: Z 1650

YEARS
WARRANTY
MAGINON
15. Maximum number of photos
Maximum number of stored photos
The table shows an approximate number of photos that can be stored depending on the respective setting and the capacity of the memory card. The table only shows the values for the 4:3 aspect ratio. Values for other formats vary accordingly.
| Resolution Quality | Quality | SD / SDHC memory capacity | |||||
| 1 GB 2 GB | 4 GB 8 GB | 16 GB 32 GB | |||||
 4608 x 3456 4608 x 3456 | Super fi ne 1 | 48 293 581 | 1165 2324 4 | 641 | |||
| Fine 236 466 | 923 1849 3 | 691 7372 | |||||
| Normal 348 | 686 1359 27 | 23 5438 108 | 66 | ||||
| [H6W2]3264 x 2448 | Super fi ne 2 | 90 576 114 | 2286 4565 | 9122 | |||
| Fine 455 898 | 1778 3563 | 7120 14231 | |||||
| Normal 670 | 1328 2629 5 | 268 10526 2 | 1038 | ||||
 2560 x 1920 2560 x 1920 | Super fi ne 4 | 69 926 1832 | 3671 7337 | 14659 | |||
| Fine 719 142 | 1 2813 5636 | 11261 225 | 11 | ||||
| Normal | 1023 | 2037 | 4032 | 8078 | 16144 | 32277 | |
| [H6ZK]2048 x 1536 | Super fi ne 7 | 02 1389 274 | 9 5507 110 | 3 21998 | |||
| Fine | 1064 210 | 7 4171 835 | 6 16698 333 | 81 | |||
| Normal | 1283 | 2546 | 5040 | 10097 | 20182 | 40347 | |
 640 x 480 640 x 480 | Super fi ne | 3405 679 | 1 13441 26 | 927 53841 | +99999 | ||
| Fine | 3831 764 | 0 15121 30 | 293 60569 | +99999 | |||
| Normal | 4377 873 | 1 17281 34 | 621 69227 | +99999 | |||
After Sales Support

00 800 - 78 77 23 68
MODEL: Z 1650

YEARS WARRANTY
MAGINON
Maximum video recording length
The following table shows the approximate maximum video recording length available depending on the settings and the capacity of the SD/SDHC memory card.
| Auflösung | SD / SDHC-Speicherkartenkapazität | |||||
| 1 GB 2 GB | 4 GB SDHC | 8 GB SDHC | 16 GB SDHC | 32 GB SDHC | ||
| 720p301280 x 720 | 00:05:21 | 00:10:37 00:21:08 00:42:28 01:26:44 | 02:54:17 | |||
| VGAp30640 x 480 | 00:12:44 | 00:25:14 00:50:14 01:40:55 03:21:03 | 06:42:41 | |||
■ The above table shows the total length for all videos. Video recording is automatically stopped if a video clip exceeds 4 GB or 29 minutes.
For recording videos we recommend a memory card of class 6 or higher to avoid automatic stopping or unexpected results. If using a slower SD/SDHC card causes a fault, set video recording of the camera to "VGA".
After Sales Support
00 800-78 77 23 68
MODEL: Z 1650
3
YEARS
WARRANTY
MAGINON
16. Problem solving
Prior to returning the camera for repair check the following list of symptoms and possible solutions. Please contact our Customer Service if the problem persists.
| Symptom Cause | Possible solutions | |
| Camera cannot be switched on. | Battery not or incorrectly inserted. Insert battery correctly. | |
| The battery is empty. Charge battery again. | ||
| The battery charge level drops quickly. | The battery is not fully charged After charging the battery has not been used for a longer period. | Fully charge battery and discharge it completely at least once prior to use to increase its performance and service life. |
| The battery or camera feels warm. | This can occur when camera/fl ash are used for a longer time. | |
| The camera does not take any photos despite pressing the shutter release. | The shutter release was not depressed fully. | Depress shutter release fully. |
| The memory does not have sufficient memory. | Insert a new memory card or delete unwanted fi les. | |
| The memory card is write protected. Remove write protection. | ||
| The LCD display shows no images. | Battery charge level too low. Charge battery again. | |
| The camera is set to Auto focus but the focus does not work. | The lens is dirty. | Wipe the lens using a soft, dry cloth or special lens paper. |
| The distance to the subject matter is greater than the effective range. | Ensure that the subject matter is within the effective range. | |
| The contents of the memory card cannot be viewed. | You are attempting to view the contents of a memory card that was not formatted with this camera. | Insert a memory card formatted by the camera and on which fi les were saved by the camera. |
| File cannot be deleted. | The fi le is protected. Remove deletion protection. | |
| The memory card is write protected. Remove write protection | ||
After Sales Support

00 800 - 78 77 23 68
MODEL: Z 1650

YEARS WARRANTY
MAGINON
| Symptom Cause Possible solution | ||
| Error message"Loading error, please check battery" appears when charging the battery. | The battery is faulty or not suitable for the camera. | Replace battery as per specifications in the Technical Specifications. |
| The buttons of the camera do not function. | The battery level is too low. Charge battery again. | |
| Date and time is incorrect. The date and time are not set correctly. Set the correct date and time. | ||
| No images can be downloaded. | Possibly insufficient space on the hard disk of the computer. | Ensure that there is enough space on the used drive. |
| The battery level is too low. Charge battery again. | ||
Service address:
Sertronics LTD
MAGINON® Service
45 Regal Drive, Walsall Enterprise Park
Walsall, WS2 9HQ
United Kingdom
Tel.: 00 800 - 78 77 23 68
Manufacturer's address:
supra
17. System information, servicing and disposal
Trademark information
■ Microsoft® and Windows® are trademarks of Microsoft Corporation registered in the US.
■ Pentium ® is a registered trademark of Intel Corporation.
■ Macintosh is a trademark of Apple Computer Inc.
SD ™ is a trademark.
■ MedialImpression is a trademark.
Other names and products can be trademarks or registered trademarks of the respective owners.
After Sales Support
00 800-78 77 23 68
MODEL: Z 1650

YEARS
WARRANTY
MAGINON
Conformity
This device was tested according to Part 15 of the FCC regulations and it was confirmed that the device complies with the limit values for class B digital devices. The aim of these limit values is to provide appropriate protection against adverse sources of interference in case of a domestic installation. If the device is not installed in accordance with the instructions, it may cause interference for TVs, radios and mobile radios.
This device may be operated provided that the following is being observed:
(1) This device may not cause any adverse interference.
(2) This device must accept any interference received, including interference that may cause undesired operation or operational faults.
In the event of radio or television reception being affected by this device – this can be easily tested by switching the device on and off – the user should try to remedy the fault by taking the following action:
- Turning the receiving aerial in another direction or changing its location.
- Increasing the distance between the device and the receiver.
- Contact your dealer or a radio/TV expert.
The Manufacturer hereby declares that the CE marking was applied to the product in accordance with the basic requirements and other relevant provisions of the following European Directives:
2011/65/EC RoHs Directive 2004/108/EG EMC Directive
The EC Declaration of Conformity can be requested from the address specified on the Warranty card.


MAGINON
Care
Do not use any corrosive cleaners, such as mentholated spirits, thinners, etc. to clean the camera housing and camera accessory. When required, clean system components with a soft dry cloth.
Storage
Always remove battery from housing if camera is not being used for some time and store battery separately. On a day-to-day basis and for longer periods the batteries can be kept at a dry location out of reach of children.
Disposal
For disposal, separate packaging into different types and dispose of in line with environmental regulations in supplied collection containers. Batteries and storage batteries may not be disposed of in domestic waste. Consumers are obliged by law to return used batteries to communal collection points or dealers selling batteries. Storage batteries and batteries do therefore contain the adjacent symbol.

Correct disposal of product:
The adjacent symbol indicates that electrical and electronic equipment may not be disposed of in domestic waste in the EU. Please use the returns and collection points of your local council or contact your dealer you purchased the product from.
This prevents potentially harmful effects on the environment and health as a result of incorrect disposal.
Dispose of the camera (without battery) and accessories in accordance with the currently valid regulations.
For further information contact the respective department of your local council.

natural_image
Symbol of a trash bin crossed with no text or numbers, representing waste sorting or restriction (no text present)
MAGINON
18. Index
A
Accessory 1
AF tracking mode 43
Artistic effects 39, 63
Aspect ratio 34
AV connection 8, 70
B
Battery compartment 8, 14
Battery status 10
Battery, charge16
Battery, charging 16
Battery, insert 14
Blur tool 64
C
Calendar mode 50
Camera shake protection 44
Change size 64
Colour mode 38, 63
Connection to computer 68
Connection to TV 70
Contents of box 1
Continuous AF 61
Continuous shooting 31
Control pad 9
Copying top memory card 67
Cropping photos 57, 63
D
Date stamp 61
Date, setting18
Default settings 67
Deletion protection 55
Digital zoom 61, 72 DPOF 58f
Display mode 66
Display, photo 10f
Display, playback 12f
Display, video 12
Disposal 78
Downloading fi le 68
E
Exposure compensation 35
Exposure measuring 37
F
Face recognition 28
File no. 66
Fisheye eff ect 39
Flash mode 10, 32
Focus adjustment 10, 30
Formatting 20, 67
Front view 8
Function menu 33f
G
Grid line 61
H
Hazard notes 4f
Hazard notices 4f
|
Image counter 53, 66
Image sensor 72
Image size 34
ISO values 37
L
Language, setting 19, 66
LCD dimming 66
LCD display 10
LCD display 8
Lens 8
Locking exposure/auto focus 29
Locking settings 37
Loudspeaker 8
M
Main focal range 10
Mains adapter 1, 16, 72
Manual white balance 36
Memory card 72
Memory card slot 8, 14
Memory card, format 20
Memory card, insert 15
Memory card, protection 15
Memory card, write protection 15
MENU button 9
Menu options, Playback 62f
Menu options, recording 59f
Microphone 8
Miniature effect 40
Miniature overview 50
N
Number of available photos 10, 73
0
On/Off button 8
Operating buttons 8, 9
After Sales Support

00 800 - 78 77 23 68
MODEL: Z 1650

YEARS WARRANTY
MAGINON
P
Photo protection 55f, 63
Photo, cropping 57
Photo, playback 49
Photo, quality, 60
Photo, resolution 35
Photo, shooting 21
Photo, zooming 51
Photos, deleting 51 f
PictBridge 69
PIV function 46
Playback, photo 49
Playback, Video 47
Playback, Voice memos 57
Power saving 65
Preview 61
Printer connection 69
Problem solving 75f
Protect photos 55f, 63
R
Rear view 8
Recording mode 21f
Recording mode, adapted scene 25
Recording mode, back light 25
Recording mode, online auctions 26
Recording mode, overview 22f
Recording mode, self-portrait 28
Recording mode, smile detection 27
Recording mode, soft skin tone 31
Red-eye correction 56
S
Safety notes 4f
Saturation 60
Saving tools 67
Self-portrait 28
Self-timer 28, 42
Self-timer LED 8
Service address 76
SET button 9
Sharpness 60
Shutter release 9, 21
Signal tone 65
Sketch look 41
Slideshow 54
Smile detection 27
Soft skin tones 27
Software 71
Software installation 71
Sounds 65
Start image 64
Status display LED 8
Strap fixing 8, 14
Super Macro 30
System requirements 68
T
Technical specifications 72
Time, setting 18
Tripod winding 8
TV output 66
TV, connection 70
U
USB cable 1, 8, 16, 68
USB connection 8, 16, 68
USB mains adapter 1, 16, 72
V
Video editing 48
Video output 70
Video, playback 47
Video, recording 45
Video, resolution 46, 72
Video, zoom 61
Voice memos 56f, 63
W
White balance 36
White balance, manual 36
Wind noise reduction 46
Z
Zoom switch 8
After Sales Support
00 800-78 77 23 68
MODEL: Z 1650
3
YEARS
WARRANTY
- Contents of box
- Note:
- MAGINON
- Contents
- FUNCTIONS OF THE CONTROL BUTTONS 29
- FUNCTION MENUB3
- MENU OPTIONS9
- CONNECTING TO COMPUTER, PRINTER AND TV 68
- Hazard, safety and warning notices
- Intended use
- Hazards for children and persons with limited ability to operate electronic equipment
- Electrocution hazard in wet and humid conditionst
- Electrical hazard
- Damage for heat - fi re hazard
- Hazards of using the Lithium-Ion battery
- Injuries and material damage
- Your camera
- Monitor display Photo mode
- Video mode
- Playback mode – Photo playback
- Playback mode – Video playback
- Playback mode – Audio playback
- Start
- Preparation
- Charging the battery
- Initial settings
- Setting date and time
- Language selection
- Formatting a memory card
- Photo mode
- Taking photos
- Setting the photo mode
- Taking photos with the Intelligent scene mode
- Back light photos
- Soft skin tone mode
- Photos for online auctions
- Taking photos with smile capture switched on
- Self-portrait functions
- Functions of the control buttons
- Locking the exposure and auto focus setting
- Focus settings
- Continuous shooting
- Flash settings
- Function menu
- Use of Function menu
- "My mode" function
- Setting the aspect ratio
- Setting the image size
- Exposure compensation
- White balance
- ISO value
- Exposure measurement
- Locking settings
- Colour mode
- Artistic effects
- Photos with fi sheye eff ect
- Miniature effect photos
- Photos with Sketch effect
- Camera menu
- Self-timer
- Setting the Auto focus range
- Setting up the date stamp
- Setting up the stabiliser
- Video mode
- Recording video clips
- Setting the video size
- Setting of Wind noise reduction
- PIV function
- Playback mode
- Playback of video clips
- Video editing
- Playback of photos
- Thumbnails
- Calendar mode
- Enlarging photos
- Deleting photos
- Deleting one or more photos
- Deleting using the delete button
- Playback as slideshow
- Protecting photos
- Red-eye correction
- Recording voice memos
- Playback of voice memos
- Cropping of photos
- DPOF settings
- Menu options Recording menu
- - Scene Mode
- - Self-timer
- - AF Area
- - Sharpness
- - Saturation
- - Contrast
- • Quality
- - Digital Zoom
- - Date Stamp
- - Auto Review
- - Grid Line
- - Stabilizer
- • Continuous AF (video)
- - Zoom (video)
- Playback menu
- - Delete
- - Slide Show
- - Protect
- - Red-eye Correction
- • Voice Memo
- - Colour Mode
- - Art Effect
- - Trim
- - Resize
- - Startup image
- · DPOF
- - Radial Blur
- Setup menu
- •Sounds
- •Power Save
- - Date & Time
- - Language
- - Display Mode
- - File Numbering
- •TV Out
- - LCD Brightness
- - Memory Kit
- -Format
- - Copy to Card
- - Reset All
- Connecting to computer, printer and TV
- Downloading fi les
- Connecting to a printer
- Connecting to a TV
- Installation of software
- Maximum number of photos
- Maximum number of stored photos
- Maximum video recording length
- Problem solving
- Service address:
- Sertronics LTD
- Manufacturer's address:
- supra
- System information, servicing and disposal
- Trademark information
- Conformity
- Care
- Storage
- Disposal
- Index
- A
- B
- C
- D
- E
- F
- G
- H
- |
- L
- M
- N
- 0
- P
- R
- S
- T
- U
- V
- W
- Z
Brand : Maginon
Model : Z 1650
Category : Camera