
ESC808 Edition - Scooter BLAUPUNKT - Free user manual and instructions
Find the device manual for free ESC808 Edition BLAUPUNKT in PDF.

| Product Type | Electric Scooter |
| Brand | Blaupunkt |
| Model | ESC808 Edition |
| Maximum Speed | 25 km/h (15.5 mph) |
| Range | Up to 30 km (18.6 miles) |
| Motor Power | 350 W |
| Battery Type | Lithium-ion, 36V / 10 Ah |
| Charging Time | 4-6 hours |
| Max Load | 100 kg (220 lbs) |
| Product Weight | 12 kg (26.5 lbs) |
| Dimensions (Folded) | 110 x 42 x 48 cm (43.3 x 16.5 x 18.9 in) |
| Dimensions (Unfolded) | 110 x 42 x 115 cm (43.3 x 16.5 x 45.3 in) |
| Wheel Size | 8.5 inches front and rear, pneumatic tires |
| Brake System | Front electronic brake + rear disc brake |
| Suspension | Front spring suspension |
| Lighting | LED headlight, rear reflector, side lights |
| Display | LED speedometer with battery indicator |
| Foldable | Yes, one-step folding mechanism |
| Water Resistance | IPX4 (splash resistant) |
| Terrain | Paved roads, light off-road |
| Recommended Age | 14+ years |
| Certification | CE, ROHS |
Frequently Asked Questions - ESC808 Edition BLAUPUNKT
User questions about ESC808 Edition BLAUPUNKT
0 question about this device. Answer the ones you know or ask your own.
Ask a new question about this device
Download the instructions for your Scooter in PDF format for free! Find your manual ESC808 Edition - BLAUPUNKT and take your electronic device back in hand. On this page are published all the documents necessary for the use of your device. ESC808 Edition by BLAUPUNKT.
USER MANUAL ESC808 Edition BLAUPUNKT
natural_image
White and blue BLAUPUNKT scooter with extended wheels and a flat body (no visible text or symbols on the scooter body)Enjoy it.
Električni skuter Нлектрико окоутер Електрическа тротинетка Trotineta electrica Elektrinis paspirtukas Tõukeratas Elektriskais skrejritenis
- Familiarize yourself with and comply with the local road traffic regulations.
• Always wear an approved helmet and other elbow, knee, and wrist protectors. - Check the battery charge status when the scooter is turned on. If the battery charge is less than 25%, do not drive for a long time.
- Check the appearance and condition of your electric scooter. Make sure that no parts are loose and that there are no abnormal noises.
- The user should be healthy, rested, sober and not take any sedatives or psychotropic drugs before driving.
- Remember that you are taller when driving, so be careful when driving through the door, beware of signs, branches and other upper obstacles to protect your head from injury.
- This equipment can be used by children aged 12 years and over under as long as supervision is provided. People with reduced physical or mental capabilities, as well as people with no previous experience of using this equipment must be supervised and made aware of the risks. The instruction manual should be used as a reference for the safe use of this equipment. Children should not play with the equipment. Children without ensured supervision should not be allowed to perform the cleaning and maintenance of equipment.
- Only Original accessories should be used, as well as accessories recommended by the manufacturer. Using accessories which are not recommended by the manufacturer may result in damage of the device and may render the device unsafe for use.
-
The AC adapter should be connected to an outlet with characteristics consistent with the values on the rating label.
-
If the cord or power plug or adaptor is damaged or the plug has a loose electrical outlet, do not charge the device and do not power it from the mains.
- Unplug the AC adapter from the electrical outlet when not in use.
- Do not connect or disconnect the adaptor from the power source with wet hands.
Completely prohibited
- Do not ride a scooter in areas prohibited by local or national law.
- It is forbidden to move on slopes whose angle of inclination exceeds 17 degrees, do not enter puddles or water reservoirs whose depth is greater than 5 cm.
- Do not ride a scooter on the stairs.
- It is not allowed to ride on roads intended for cars, roadsides or roads on which it is forbidden to ride.
- It is forbidden to move several people on the scooter or to transport children, also in appropriate carrying slings.
- It is forbidden to move on the scooter without holding the handlebar.
- It is forbidden for children under 12 or for people over 60 to move on their own on the scooter. They must be accompanied by other family members or carers. It is forbidden to ride on the scooter for pregnant women, drunk people, people with mental disorders or disabled people with limited steering abilities.
- Do not ride a scooter in dangerous or explosive locations.
- Do not make phone calls while driving the scooter.
- Avoid driving in bad weather such as heavy rain, snow, strong wind and on icy, slippery or muddy roads.
REMARKS BEFORE DRIVE!
- This scooter has an electric motor installed in the front wheel. Please take a note that riding the scooter in the rain or on wet surfaces may flood the engine and damage it. This malfunction is not covered by the warranty.
• The maximum scooter's range depends on many different factors, such as: user's weight, surface on which the scooter moves, terrain, style and driving mode, weather conditions and the proper air pressure level in the wheels.
• Also keep in mind that battery life drops over the time. This is natural process and should not be treated as a malfunction.

natural_image
Illustration of a car tire with a pressure gauge attached, symbolizing speed or pressure (no text or symbols present)• This scooter has inflatable tubeless wheels to absorb vibrations while driving but you have to ensure the correct air pressure in the wheels
- Check the tire pressure regularly to ensure optimum driving comfort as well as the best possible range on a fully-charged battery. The scooter has standard valves that allow to pump wheels using public compressors. A special adapter that helps to pump the front wheel is included.
- Riding the scooter with low tire pressure is prohibited as it may cause an accident and cause permanent damage of tires. Please note that this malfunction is not covered by the warranty.
The correct tire pressure range is -3 - 3.4 bar.
Instruction manual
Thank you for purchasing our BLAUPUNKT ESC808 electric scooter. Please read this manual and keep it for future reference. The information contained in this manual will help you get acquainted with the following issues:
- Basic operation and learning how to drive on an electric scooter.
• Safety when driving on an electric scooter. - Construction and maintenance of an electric scooter.
CE
The device complies with the requirements of the following European Union directives:
- Low-voltage electrical equipment - Low voltage directive (LVD)
- Electromagnetic compatibility (EMC)
The product is CE-marked on name plate
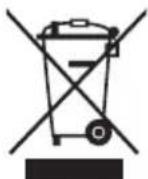
If a crossed-out waste bin symbol appears on the appliance, this indicates that the product is covered by European Directive 2012/19/EU. Familiarise yourself with the requirements of your local electrical and electronic waste collection system. Follow your local regulations. Do not dispose of this product with household waste. Proper disposal of the old product will prevent potential negative effects on the environment and human health.
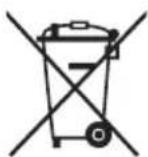
The device is equipped with batteries covered by the European Directive 2006/66/EC. Do not dispose of batteries with household waste. Please refer to your local regulations for separate collection of batteries, as proper disposal will prevent potential negative consequences for the environment and human health.
Information on environmental protection
The packaging contains only the necessary elements. Every effort has been made to ensure that the three packaging materials are easy to separate: cardboard (box), polystyrene foam (internal protection) and polyethylene (handbags, protective sheet). The device is manufactured from recyclable materials and can be used again after its disassembly by a specialized company. Observe local regulations for the disposal of packaging materials, waste batteries and unnecessary equipment.

The product is manufactured from high quality materials and components that can be recycled and reused.
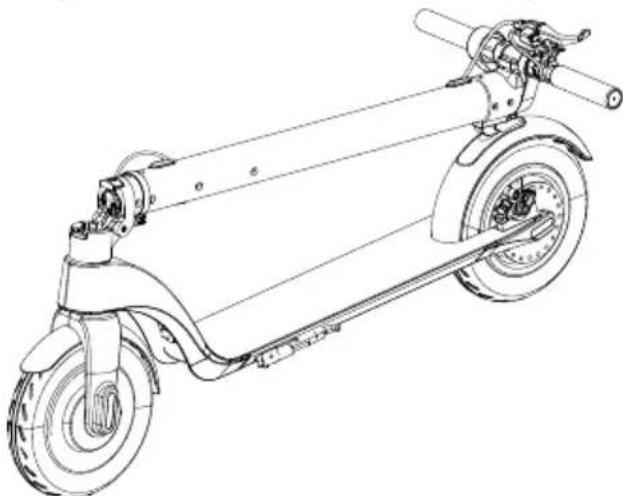
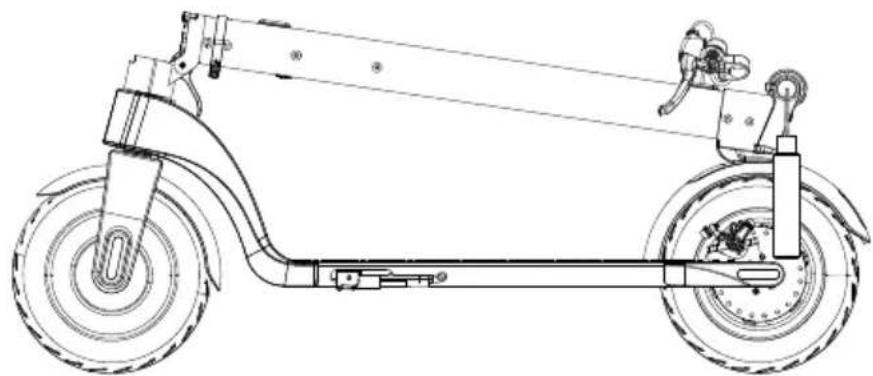
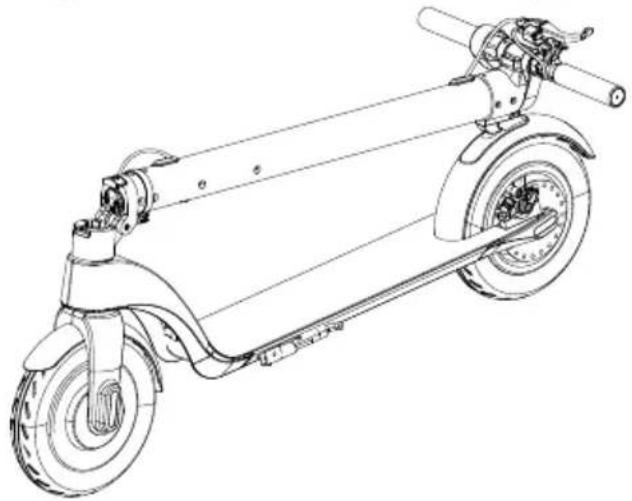
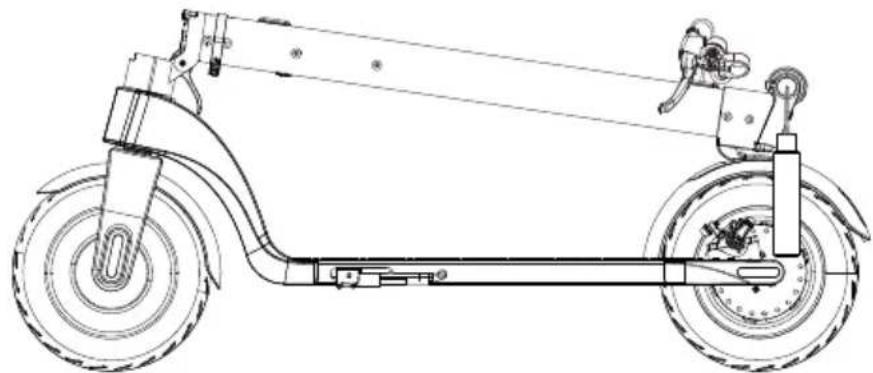
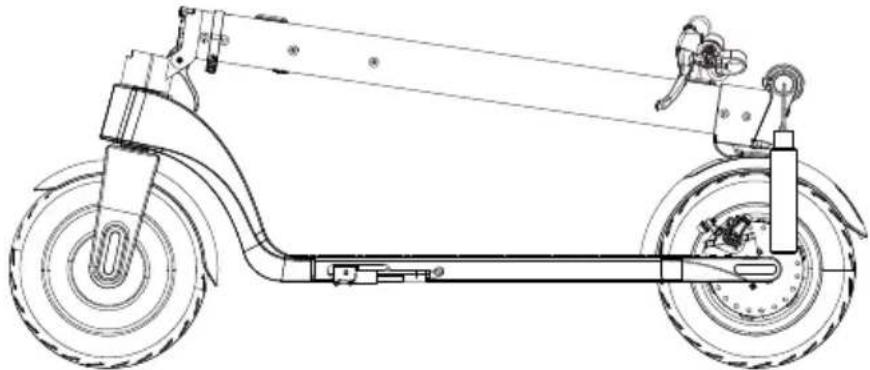
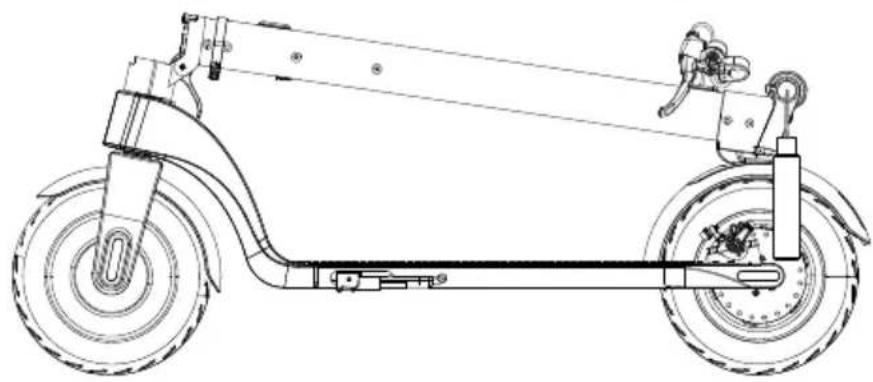
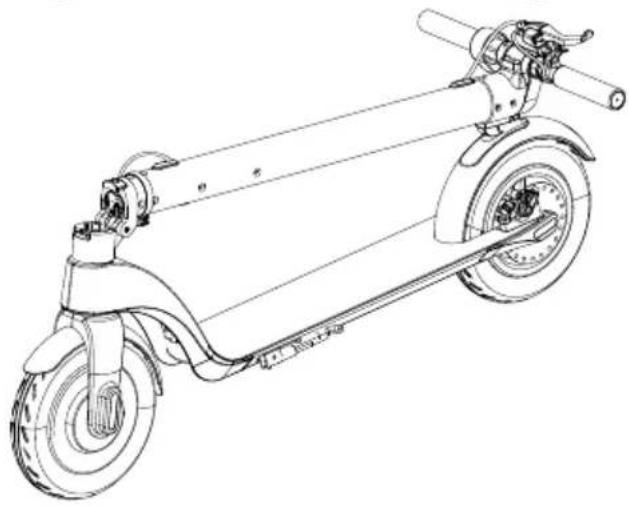
Main features of the electric scooter:
The Blaupunkt ESC808 is an innovative folding electric scooter. The user can stand on the scooter's platform and adjust the speed using the appropriate handle on the handlebar.
- The front and rear wheels are symmetrical and the front-wheel drive provides greater mobility safety. The 8.5-inch inflatable wheels enhance riding comfort.
- The Disc Brake, applied by a lever on the handlebar, and the Rear-Fender foot brake, ensure the shortest braking distance possible, to better protect the rider.
- The device uses a lithium-ion battery, maximum discharge current is more than 10A, high power without charging memory effect, no contamination.
- The total weight of the device is only 13.5kg. The foldable design with one key ensures an easy handling and storage.
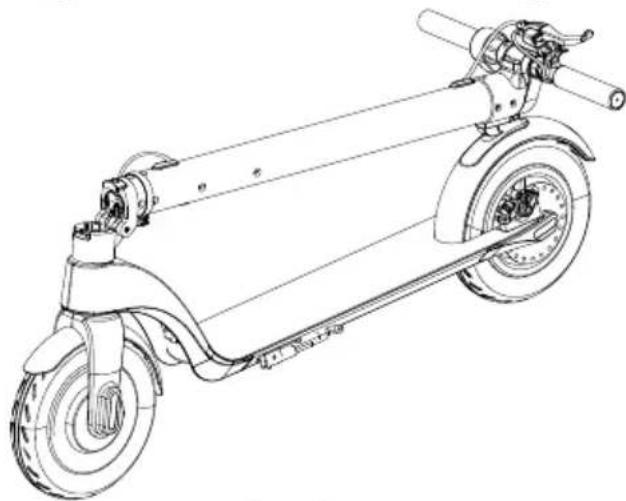
Design of an electric scooter:
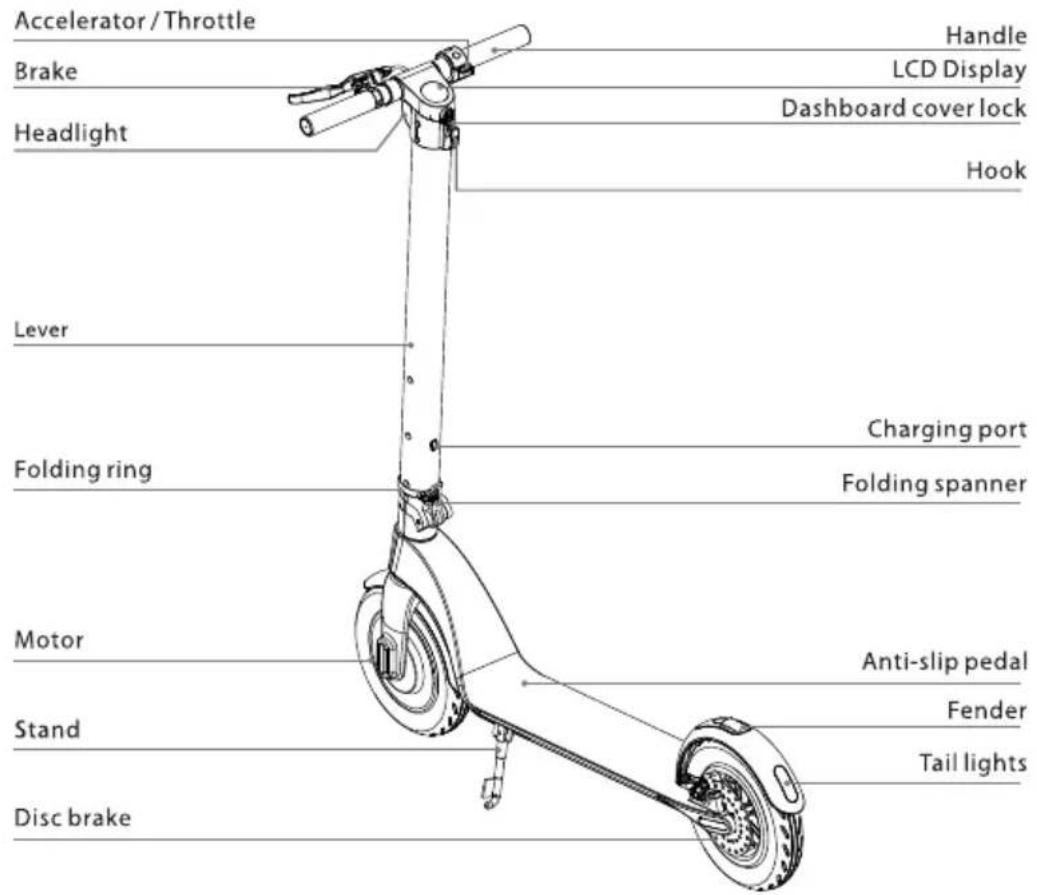
Control-System Components
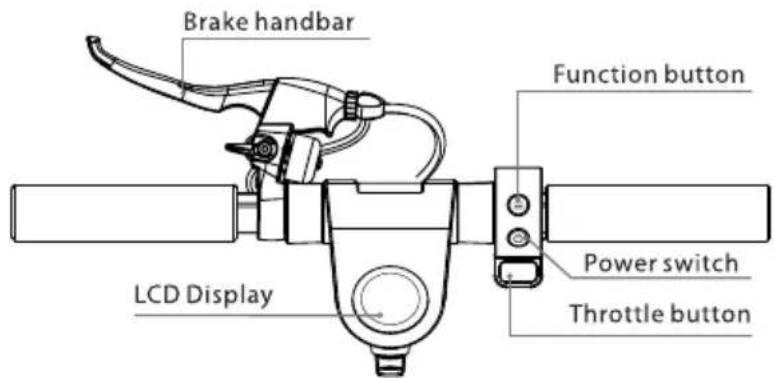
LCD
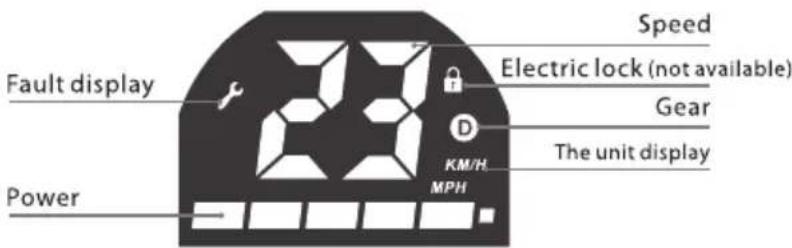
LCD display
Description of push buttons/features
- Power Push Button: press and hold the Power Push Button to turn the power on/off
- Thumb Throttle: press the Thumb Throttle to start and accelerate
- Brake: squeeze and hold the Brake Lever to work the Disc Brake. Press the Rear Fender slightly to assist the braking (during braking the rear LED lamp flashes)
- Function key: press the Function Key to select the speed mode
a. Beginner mode: "D" not displayed
b. Normal mode: "D" lights up white
c. Sports mode: "D" lights up red
- LED lighting: press the Function Key twice to turn on the front and rear LED lights on; press the Function Key twice again to turn the LED lights off.
- Cruise-Control Mode: maintain your current speed for approximately 6 seconds to enter the Cruise-Control Mode; press the Thumb Throttle or squeeze the Brake Lever to deactivate the Cruise Control.
Unpacking
After opening the cardboard box, first remove the scooter and make sure that all parts are complete. If anything is missing, contact your dealer. Check the condition of the unit and its appearance to ensure that the folding system is stable enough and that the platform is free from cracks. Check also that the display screen is not damaged.
Installation
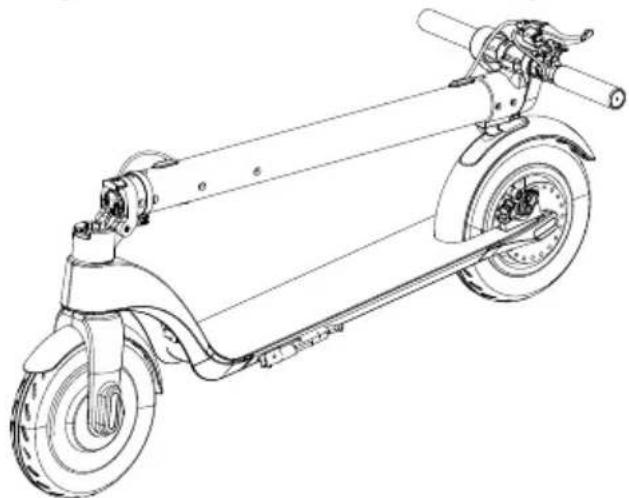
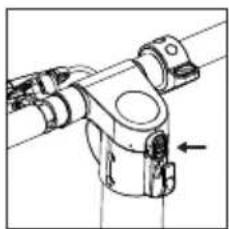
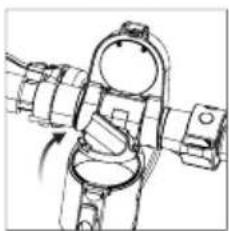
After unpacking and checking the condition of all components, you can start assembling the scooter. Follow the picture below:
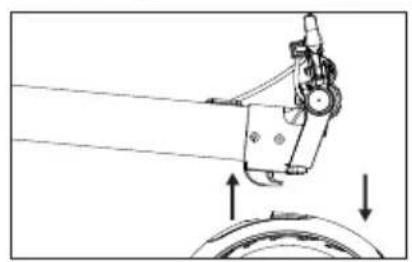
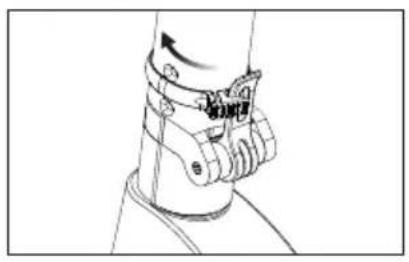
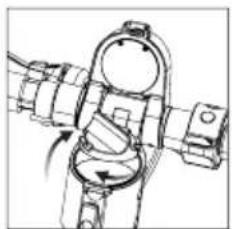
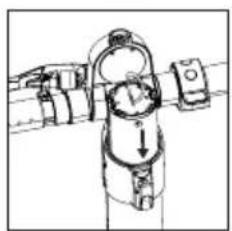
1. Assembly
natural_image
Mechanical diagram showing a lever mechanism with motion arrows indicating direction (no text or symbols)A

natural_image
Line drawing of a human leg with a wrist strap and wristpin, showing motion direction (no text or symbols)B

natural_image
Mechanical assembly diagram showing a valve mechanism with a black arrow indicating a specific component (no text or labels present)©

natural_image
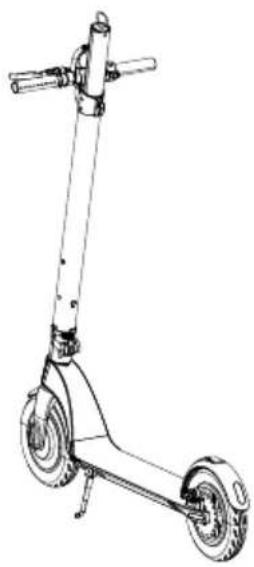
Technical line drawing of a fully electric scooter with visible suspension components and wheel (no text or symbols)
natural_image
Mechanical assembly diagram showing a lever mechanism with rotating parts and directional arrows (no text or symbols)D
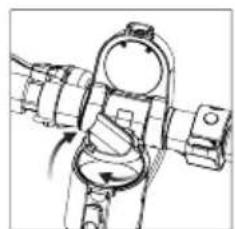
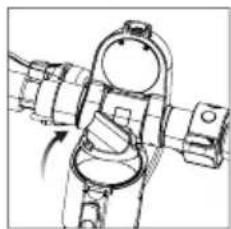
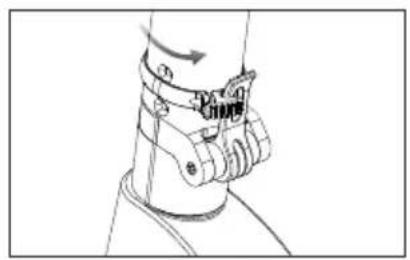
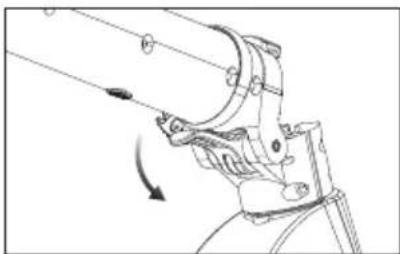
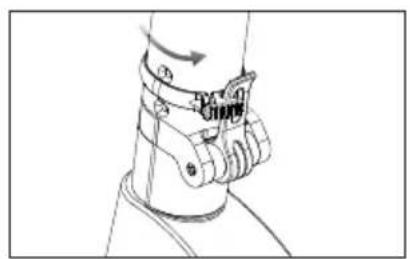
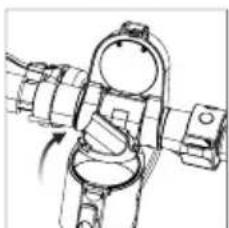
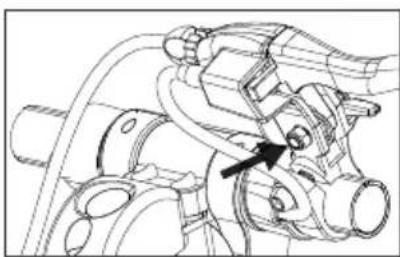
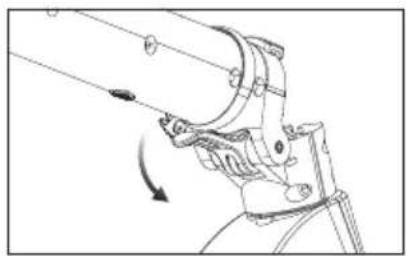
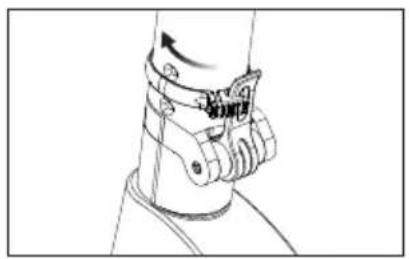
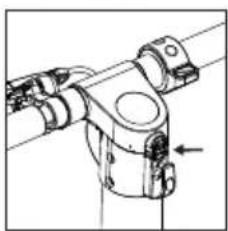
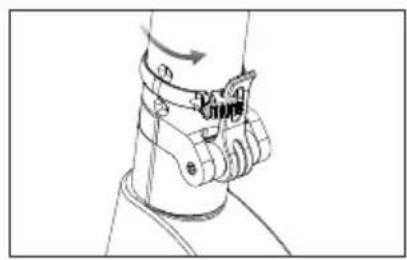
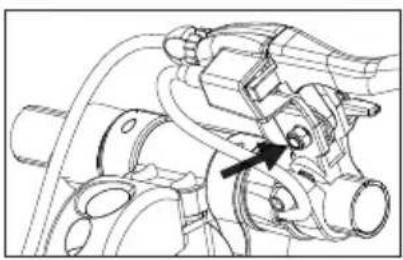
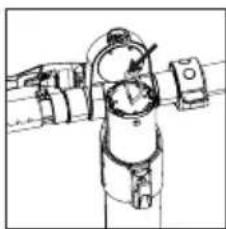
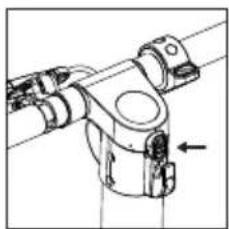
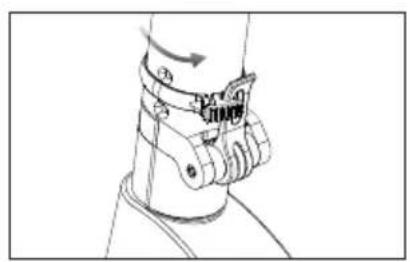
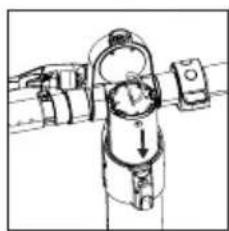
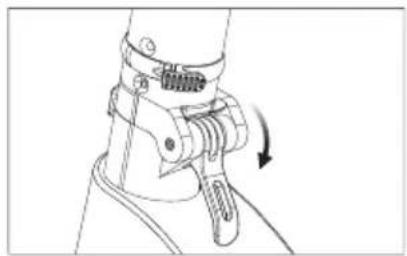
A. Press the rear fender to release the lock and lift the handlebar stem to the upright position
B. Lock the folding device by moving the key up as far as possible, and turn the locking clamp to the right as far as possible to secure the key against unlocking
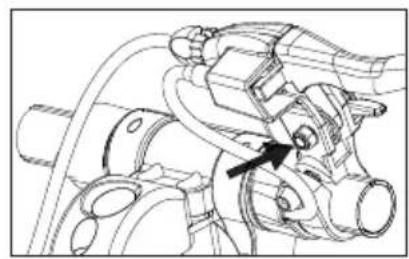
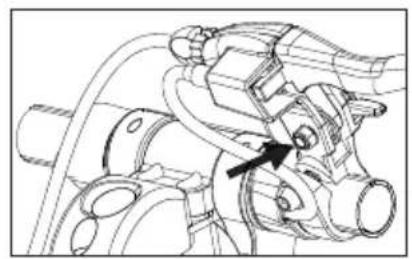
C. Use an M6 Allen key to fix the brake base
D. Tighten the handlebars securely (observe the direction of tightening)
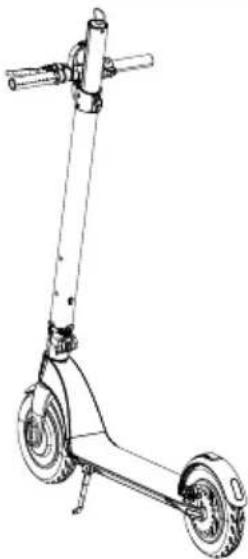
2. Folding
natural_image
Line drawing of a human leg with attached medical or electronic device (no text or symbols)A

natural_image
Line drawing of a mechanical device with a lever and adjustment arrow (no text or symbols)B

natural_image
Mechanical assembly diagram showing a rotating shaft and connecting components (no text or symbols)©

natural_image
Line drawing of a three-wheeled electric scooter with visible suspension components and wheels (no text or symbols)
natural_image
Mechanical assembly diagram showing a motor with rotating components and a downward arrow indicating motion (no text or symbols)D
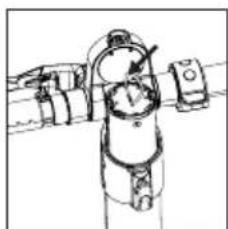
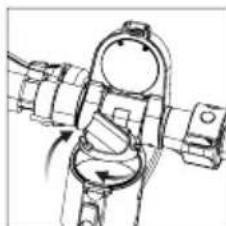
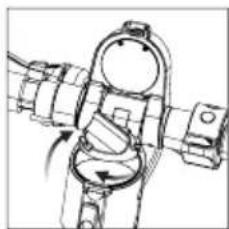
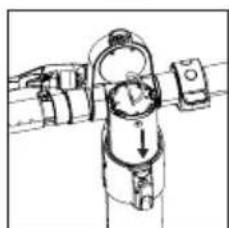
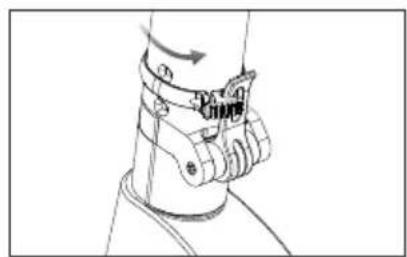
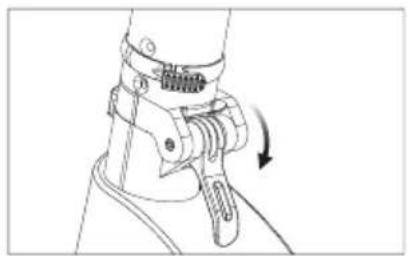
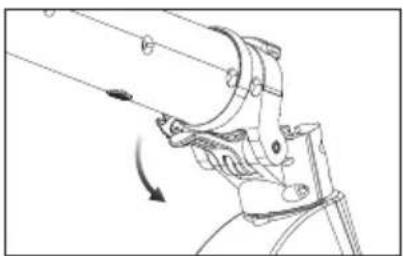
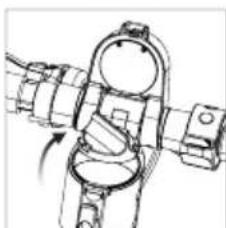
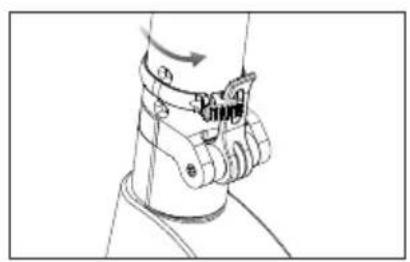
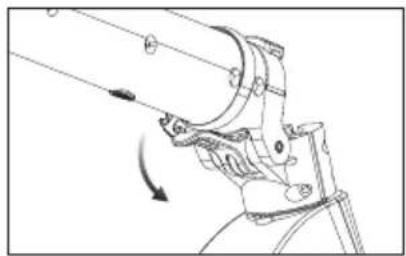
A. Turn the clamp which locks the key anticlockwise
B. Press the folding device key downwards as far as possible
C. Fold the handlebar gently by pulling it down
D. Move the hook provided on the handlebars into the opening in the rear fender and press to lock
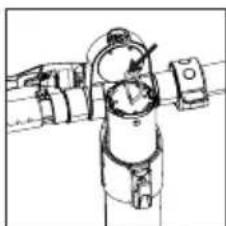
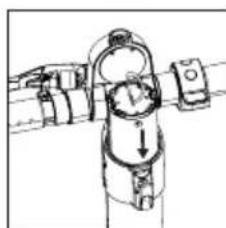
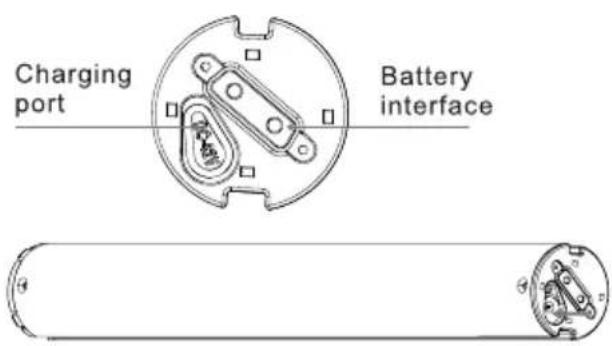
3. Battery Installation/Removal
natural_image
Line drawing of a scooter with two wheels and a handle (no text or symbols)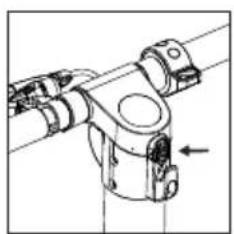
natural_image
Mechanical assembly diagram showing a lever mechanism with no visible text or symbolsA
natural_image
Mechanical assembly diagram showing a linkage mechanism with no visible text or symbolsB
natural_image
Line drawing of a person in a mechanical or industrial setting with no visible text or symbols©
natural_image
Mechanical assembly diagram showing a rotating component with no visible text or symbolsA

natural_image
Mechanical assembly diagram showing a lever mechanism with a downward arrow indicating motion (no text or symbols present)B
natural_image
Mechanical assembly diagram showing a lever mechanism with a directional arrow (no text or labels)©
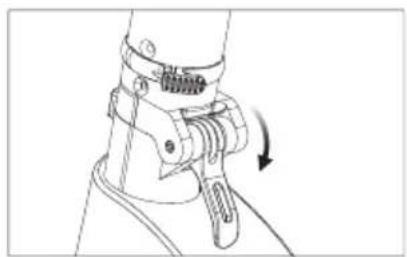
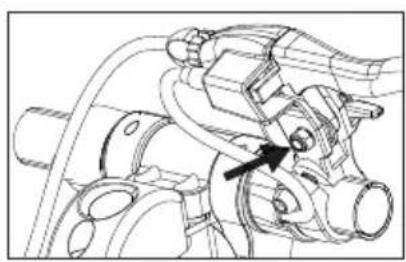
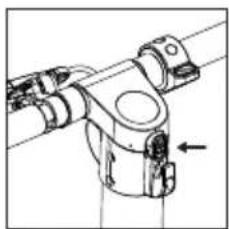
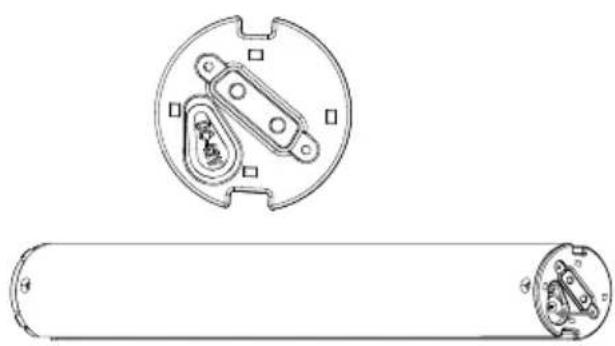
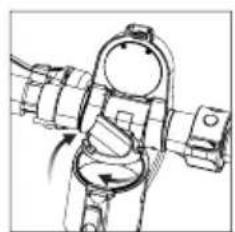
Battery Installation
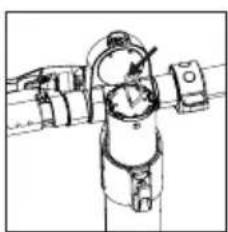
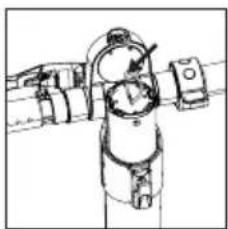
A. Press the LCD-Housing-Lock push button above the hook and move the housing upwards
B. Turn the battery cover anticlockwise and remove it
C. Insert the battery into the opening in the handlebars and turn the cover clockwise to close it
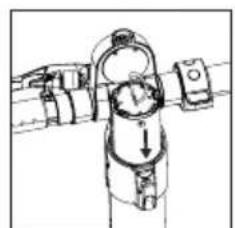
Battery Removal
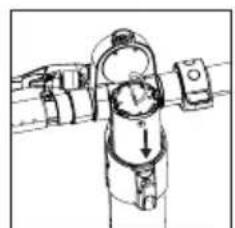
A. Press the push button above the hook to open the LCD Housing and turn the battery cover anticlockwise
B. Use the coloured cord to pull up the battery and remove it
C. Turn the battery cover clockwise and fasten the LCD housing
NOTE!
After the battery has been removed, you can (re)charge it with the supplied charger.
Do not charge the battery when handling, cleaning, or maintaining the scooter.
Guide to safe driving
The content of this chapter is very important, read it carefully and follow all safety rules and procedures. Our company is not responsible for any accidents that result in property or health damage due to the violation of this safe driving guide.
An electric scooter is not only a fun tool but also a means of transport. Following proper safety precautions while driving can protect you and others from an accident. Please note that using your scooter in the field and on public roads can lead to collisions caused by other road users, even if you follow all safety precautions. It is very important to keep a sufficient distance from other road users and from other vehicles.
Driving the scooter
- Observe the local road traffic regulations when driving on a scooter. You should guide the scooter carefully and calmly, paying attention to other people and objects in order to avoid collisions.
- Ride your scooter safely at controlled speed and at a distance from pedestrians and other vehicles. Be ready to stop at any time. Avoid sudden acceleration and braking.
- When walking on the pavement, respect pedestrians' rights, give way to them when passing through the belts, and do not frighten passers-by, especially children.
- Adjust the speed of the scooter to other road users in congested areas. If you want to overtake a group of pedestrians, make sure you have enough space and do it safely. Moving in a crowd at high speed is very dangerous.
- Do not park your scooter in a place that will make walking difficult.
- When driving the scooter, you should be relaxed, have knees slightly bent and head raised.
In the event of sudden acceleration or sudden braking while driving at high speed, the driver can easily become unbalanced and ultimately cause an accident. Try to avoid such situations.
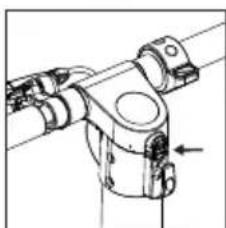
Charging the battery
natural_image
Line drawing of a scooter with attached cable and plug, shown with an inset magnified detail (no text or symbols)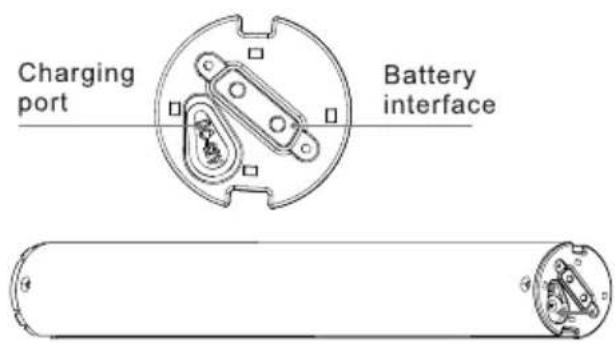
• Make sure that the electrical outlet is dry.
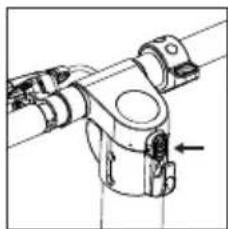
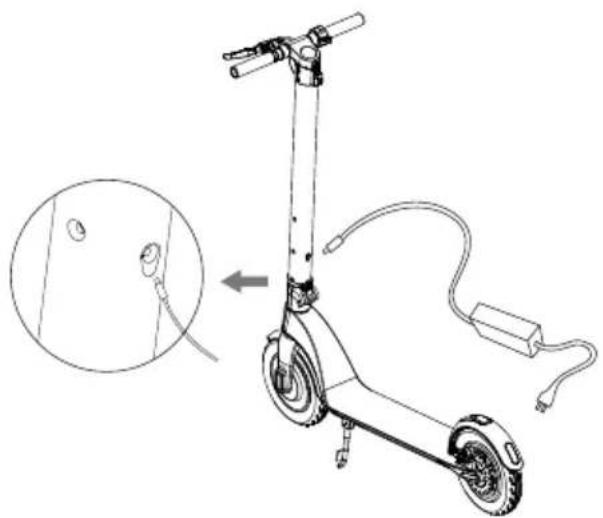
- To (re)charge the battery when it is installed in the scooter, lift the charger-port cap on the handlebar, just above the scooter-folding device.
To (re)charge a removed battery, lift the charger-port cap at the bottom of the battery.
- Plug the adapter plug into the power source (110 V \~ 240 V, 50 Hz \~ 60 Hz), make sure the green charging lamp is lit, insert the other adapter plug into the scooter's charging socket.
- When the red LED on the power supply lights up, the battery is charging correctly, otherwise check all cable connections.
- When the red light turns green, the battery is fully charged. Disconnect the power supply from the power source. Long-lasting charging can shorten battery life.
- Follow the instructions for charging the battery, otherwise it will damage the battery and shorten its service life.
- The time to charge the scooter's battery is about 2 hours. The manufacturer cannot guarantee the same charging time and operation of the battery due to its wear.
- Ensure clean and dry conditions when charging the battery.
- Do not charge the battery when the power outlet is wet.
First run
Preparation
- Select the desired location. This place can be inside or outside, it must have an area of 10 x 10 meters (about 100 square meters). The place should be flat, neither wet nor slippery, without obstacles, without vehicles, children, pets or any other things that could distract your attention.
- Read this manual carefully, if you have the opportunity to do so, for advice from a person who is more experienced in safe driving.
- Wear helmet and protectors to avoid possible injuries. Move the scooter to the center of the area where you will be moving and familiarize yourself with the area.
Start
- Press and hold the POWER push button for 2 seconds to switch the scooter on, then select one of the three speed modes
- Place one foot on the deck plate and with the other foot kick-start the scooter
- Place the other leg on the deck plate and ensure you keep your balance
- Press the thumb throttle with your right thumb, and do not ride too fast
- Squeeze the brake lever with your left hand to brake, and gently press the rear fender to assist the braking
- You can get off the scooter when it is running at a low speed or after it has come to a complete stop
• To warn other users that you are nearby, use the bell fitted next to the brake lever
Cleaning and storage
- Clean the scooter after each ride.
- If the rubber surfaces are difficult to clean, use a toothbrush and toothpaste and clean them with a soft cloth. This method can also remove small scratches.
- Store the scooter indoors, in a cool and dry place. Do not expose the scooter to prolonged sunlight.

When cleaning, the battery charging receptacle must be tightly closed, otherwise you may be electrocuted and the scooter may be seriously damaged. Do not wash your scooter under a high pressure water jet or immerse it in water - this may cause irreparable damage to the unit.
Battery maintenance
The battery is the most important part to maintain. To extend its service life, follow the instructions below:
- Read and follow the notes on battery marking.
- The best battery storage temperature is 10 degrees. Do not store the battery pack at temperatures below -10 degrees or above 35 degrees.
- Do not recharge the battery in ambient temperatures lower than 0 degrees
- move the battery to a room where the temperature is higher than 10 degrees and allow a minute before you start recharging the battery.
- Store the battery in a cool and dry place. A very humid place can cause condensation inside the battery, which can quickly damage the battery.
- When the display shows a low level of battery, connect the battery pack to the charger. Try to prevent the battery from draining completely. Please charge the battery fully before starting to drive. Frequent charging will not damage the battery. On the contrary, long-term storage of an uncharged battery can shorten its service life
Features and Specifications
- Motor Size: 350W
• Battery: 36V 5.0 Ah - Replaceable Battery
• Max speed: 25 km/h (3-step speed control)
• Max. weight: 120 kg
• Upslope: 15-20 degrees
• Cruise-control feature
• Rear brake: disc brake, fender brake (foot brake)
• 8.5 -inch inflatable wheels - Front and rear LED lamps
• LCD for indicating speed and battery-charge level - Warning bell
- Convenient folding device
• Charging current: 42 V 2 A
• Charging time: 2 hours
• Dimensions: 1056x420x450/1186 mm (folded/assembled)
• Net weight: 13.5 kg
- Running distance: up to 20 km (depending on rider weight and type of pavement)
TECHNICAL DATA OF ADAPTOR:
Input voltage: 110-240V\~50/60Hz
Max. Input current: 2.5 A
Output voltage: 42 V
Max output current: 2 A
Sicherheitsregeln
natural_image
Stylized illustration of a car tire with a pressure gauge attached (no text or symbols)natural_image
Mechanical diagram showing a lever mechanism with motion arrows indicating direction (no text or symbols)A
natural_image
Line drawing of a human leg with a wrist strap and wristpin, showing motion direction (no text or symbols)B

natural_image
Mechanical assembly diagram showing a valve mechanism with a black arrow indicating direction (no text or labels)©

natural_image
Technical line drawing of an electric scooter with suspension components and wheels (no text or symbols)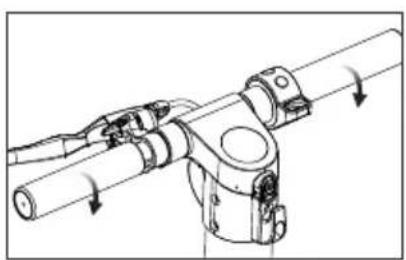
natural_image
Technical line drawing of a mechanical assembly with directional arrows indicating motion (no text or symbols)D
natural_image
Line drawing of a human leg with attached medical or robotic device (no text or symbols)A

natural_image
Technical line drawing of a mechanical clamp or grip assembly with a curved handle and directional arrow (no text or symbols)B
natural_image
Mechanical assembly diagram showing a lever mechanism with motion arrows (no text or symbols)©
natural_image
Line drawing of an electric scooter with visible suspension components and wheels (no text or symbols)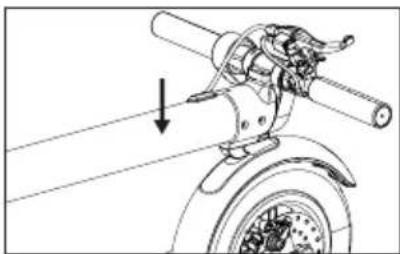
natural_image
Mechanical assembly diagram showing a motor with rotating shaft and gear mechanism (no text or labels)D
3. Battery Installation/Removal
natural_image
Line drawing of a scooter with wheels and handle (no text or symbols)Montage
Demontage

natural_image
Mechanical assembly diagram showing a lever mechanism with no visible text or symbolsA
natural_image
Mechanical assembly diagram showing rotating components and joints (no text or labels)B
natural_image
Line drawing of a robotic arm with articulated joints and control panels (no text or symbols)©

natural_image
Mechanical assembly diagram showing a rotating component with no visible text or symbolsA
natural_image
Mechanical assembly diagram showing a rotating component with a downward arrow indicating motion (no text or symbols)B
natural_image
Mechanical component diagram showing a lever mechanism with a directional arrow (no text or symbols)©
Montage des Akkus:
natural_image
Stylized icon of a car wheel connected to a pressure gauge (no text or symbols)natural_image
Mechanical diagram showing a lever mechanism with motion arrows indicating direction (no text or symbols)A
natural_image
Line drawing of a human arm with wristband and clasp mechanism (no text or symbols)B

natural_image
Mechanical assembly diagram showing a valve mechanism with no visible text or symbolsC
natural_image
Technical line drawing of a two-wheeled electric scooter with visible suspension components and wheelbase (no text or symbols)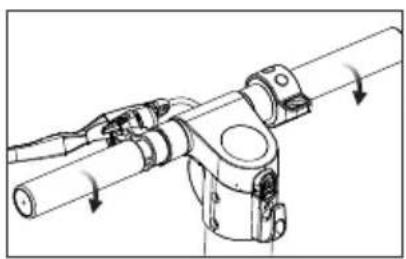
natural_image
Technical line drawing of a mechanical assembly with directional arrows indicating motion (no text or symbols)D
natural_image
Line drawing of a human leg with attached medical or robotic device (no text or symbols)A
natural_image
Mechanical assembly diagram showing a lever mechanism with motion arrow (no text or symbols)B

natural_image
Technical line drawing of a mechanical assembly with no visible text or symbols©
natural_image
Line drawing of a fully electric scooter with visible suspension components and wheels (no text or symbols)
natural_image
Mechanical assembly diagram showing a motor with rotating shaft and gear mechanism (no text or labels)D
natural_image
Line drawing of a scooter with wheels and suspension rod (no text or symbols)Montaż
Demontaż

natural_image
Mechanical assembly diagram showing a lever mechanism with no visible text or symbolsA
natural_image
Mechanical assembly diagram showing a rotating component with directional arrows (no text or labels)B

natural_image
Line drawing of a robotic arm gripping a cylindrical device (no text or symbols)©

natural_image
Mechanical assembly diagram showing a rotating component with no visible text or symbolsA

natural_image
Mechanical assembly diagram showing a lever mechanism with no visible text or symbolsB

natural_image
Mechanical component diagram showing a lever mechanism with a directional arrow (no text or symbols)©
Montaż akumulatora:
natural_image
Line drawing of a scooter with attached cable and plug, shown with an inset magnified detail (no text or symbols)
natural_image
Technical line drawing of a cylindrical mechanical component with two views: top shows internal components, bottom shows external view (no text or symbols)natural_image
Illustration of a car tire with a pressure gauge attached, symbolizing speed or pressure (no text or symbols present)natural_image
Mechanical diagram showing a lever mechanism with motion arrows indicating movement (no text or symbols)A

natural_image
Line drawing of a human leg with a wrist strap and wristpin, showing motion direction (no text or symbols)B
natural_image
Mechanical assembly diagram showing a valve mechanism with no visible text or symbols©

natural_image
Technical line drawing of a two-wheeled electric scooter with suspension components (no text or symbols)
natural_image
Mechanical assembly diagram showing a lever mechanism with rotating parts and directional arrows (no text or symbols)D
natural_image
Line drawing of a human leg with attached medical or electronic device (no text or symbols)A

natural_image
Line drawing of a mechanical device with a lever and adjustment arrow (no text or symbols)B

natural_image
Technical line drawing of a mechanical assembly with no visible text or symbols©
natural_image
Line drawing of a fully electric scooter with visible suspension components and wheels (no text or symbols)
natural_image
Mechanical assembly diagram showing a motor with rotating components and a downward arrow indicating motion (no text or symbols)D
natural_image
Line drawing of a scooter with wheels and handle (no text or symbols)Montáž
Demontáž

natural_image
Mechanical assembly diagram showing a lever mechanism with a directional arrow (no text or labels)A

natural_image
Mechanical assembly diagram showing rotating components and directional arrows (no text or labels)B

natural_image
Line drawing of a person in a mechanical arm holding a device (no text or symbols)©
natural_image
Mechanical assembly diagram showing a rotating shaft and housing (no text or symbols)A
natural_image
Mechanical assembly diagram showing a lever mechanism with no visible text or symbolsB

natural_image
Mechanical component diagram showing a lever mechanism with a directional arrow (no text or symbols)©
Montáž akumulátoru:
natural_image
Technical line drawing of a cylindrical mechanical component with two views: top shows internal components, bottom shows external components (no text or symbols)natural_image
Illustration of a car tire with a pressure gauge attached, symbolizing speed or pressure (no text or symbols present)natural_image
Mechanical assembly diagram showing a lever mechanism with motion arrows (no text or labels)A

natural_image
Line drawing of a human leg with a medical device attached, showing no text or symbolsB

natural_image
Mechanical assembly diagram showing a valve mechanism with no visible text or symbols©
natural_image
Technical line drawing of a scooter's front suspension system (no text or symbols)
natural_image
Technical line drawing of a mechanical assembly with directional arrows indicating motion (no text or symbols)D
natural_image
Line drawing of a human leg with attached medical or electronic device (no text or symbols)A

natural_image
Line drawing of a mechanical device with a lever and adjustment arrow (no text or symbols)B

natural_image
Mechanical assembly diagram showing a lever mechanism with motion arrow (no text or symbols)©

natural_image
Line drawing of a fully electric scooter with visible suspension components and wheels (no text or symbols)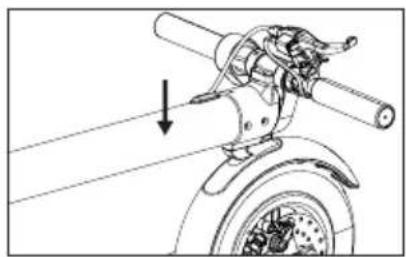
natural_image
Mechanical assembly diagram showing a motor with rotating components and a downward arrow indicating motion (no text or symbols)D
natural_image
Line drawing of a scooter with wheels and suspension rod (no text or symbols)Montáž
Demontáž

natural_image
Mechanical assembly diagram showing a lever mechanism with no visible text or symbolsA

natural_image
Mechanical assembly diagram showing rotating components and directional arrows (no text or labels)B

natural_image
Line drawing of a person in a mechanical or industrial setting with pipes and tools (no text or symbols)©

natural_image
Mechanical assembly diagram showing a rotating component with no visible text or symbolsA

natural_image
Mechanical assembly diagram showing a lever mechanism with no visible text or symbolsB

natural_image
Mechanical component diagram showing a lever mechanism with no visible text or symbols©
Montáž akumulátora:
natural_image
Line drawing of a scooter with attached cable and plug, shown with an inset magnified detail (no text or symbols)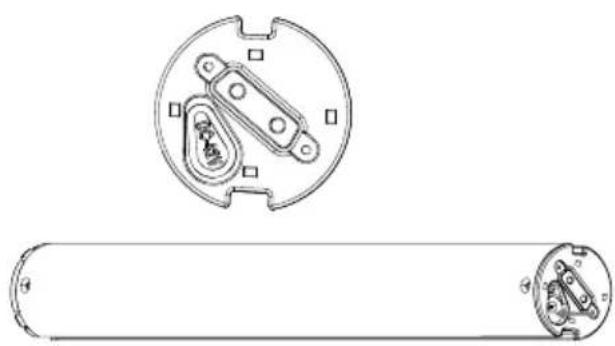
natural_image
Technical line drawing of a cylindrical mechanical component with two views: top shows internal components, bottom shows external components (no text or symbols)natural_image
Illustration of a car tire with a pressure gauge attached (no text or symbols)natural_image
Mechanical diagram showing a lever mechanism with motion arrows indicating direction (no text or symbols)A

natural_image
Line drawing of a person's lower torso wearing a medical or robotic device (no text or symbols visible)B

natural_image
Mechanical assembly diagram showing a valve mechanism with a black arrow indicating direction (no text or labels)©

natural_image
Technical line drawing of a fully electric scooter with visible suspension components and wheelbase (no text or symbols)
natural_image
Mechanical assembly diagram showing a lever mechanism with directional arrows indicating motion (no text or symbols present)D
natural_image
Line drawing of a human leg with attached medical or electronic device (no text or symbols)A

natural_image
Line drawing of a mechanical device with a lever and adjustment arrow (no text or symbols)B

natural_image
Technical line drawing of a mechanical assembly with no visible text or symbols©

natural_image
Line drawing of a fully electric scooter with visible suspension components and wheels (no text or symbols)
natural_image
Mechanical assembly diagram showing a motor with rotating components and a downward arrow indicating motion (no text or symbols)D
natural_image
Line drawing of a scooter with wheels and handle (no text or symbols)Kivétel
Beszerelés

natural_image
Mechanical assembly diagram showing a lever mechanism with no visible text or symbolsA

natural_image
Mechanical assembly diagram showing a rotating component with directional arrows (no text or labels)B

natural_image
Line drawing of a person in a mechanical or industrial setting with pipes and tools (no text or symbols)©

natural_image
Mechanical assembly diagram showing a rotating shaft and housing (no text or symbols)A

natural_image
Mechanical assembly diagram showing a lever mechanism with no visible text or symbolsB

natural_image
Mechanical component diagram showing a lever mechanism with no visible text or symbols©

natural_image
Technical line drawing of a cylindrical mechanical component with two views: top shows internal components, bottom shows external components (no text or symbols)natural_image
Stylized illustration of a car wheel connected to a pressure gauge (no text or symbols)natural_image
Mechanical diagram showing a lever mechanism with motion arrows indicating direction (no text or symbols)A
natural_image
Line drawing of a person's lower torso wearing a medical or surgical device (no text or symbols visible)B
natural_image
Mechanical assembly diagram showing pipe connections and a black arrow indicating a specific component (no text or labels present)©

natural_image
Technical line drawing of a fully electric scooter with visible suspension components and wheelbase (no text or symbols)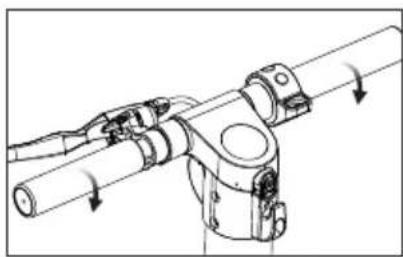
natural_image
Technical line drawing of a mechanical assembly with rotating components (no text or symbols)D
natural_image
Line drawing of a human leg with attached medical or electronic device (no text or symbols)A

natural_image
Technical line drawing of a mechanical clamp or bracket assembly (no text or symbols)B
natural_image
Technical line drawing of a mechanical assembly with no visible text or symbols©

natural_image
Line drawing of a scooter with visible suspension components and wheels (no text or symbols)
natural_image
Mechanical assembly diagram showing a motor with rotating components and a downward arrow indicating motion (no text or symbols)D
natural_image
Line drawing of a scooter with wheels and handle (no text or symbols)Montaža
Demontaža

natural_image
Mechanical assembly diagram showing a lever mechanism with no visible text or symbolsA

natural_image
Technical line drawing of a mechanical assembly with no visible text or symbolsB
natural_image
Technical line drawing of a mechanical assembly or clamp device (no text or symbols visible)©

natural_image
Technical line drawing of a mechanical assembly with no visible text or symbolsA
natural_image
Mechanical assembly diagram showing a lever mechanism with no visible text or symbolsB

natural_image
Mechanical component diagram showing a lever mechanism with no visible text or symbols©
Montaža baterije:
natural_image
Technical line drawing of a cylindrical mechanical component with two views: top shows internal components, bottom shows external components (no text or symbols)natural_image
Stylized illustration of a car tire with a pressure gauge attached (no text or symbols)- Romobil ima napumpane kotače bez zračnica koji zahvaljujući odgovarajućem tlaku zraka u pneumaticima prigušuju vibracije tijekom vožnje.
- Redovito provjeravajte tlak u pneumaticima kako biste osigurali optimalnu ugodu tijekom vožnje i postigli maksimalni domet uz maksimalno napunjenu bateriju. Romobil ima standardne ventile i zato kotače možete pumpati pomoću općedostupnih kompresora. Komplet sadrži i adapter koji olakšava pumpanje prednjeg kotača.
- Zabranjena je vožnja na romobilu s niskim tlakom u pneumaticima jer može uzrokovati nesreću i trajno oštećenje pneumatika koje nije pokriveno jamstvom.
natural_image
Mechanical diagram showing a lever mechanism with motion arrows indicating direction (no text or symbols)A

natural_image
Line drawing of a person's lower torso wearing a medical or robotic device (no text or symbols visible)B

natural_image
Mechanical assembly diagram showing a valve mechanism with a black arrow indicating a specific component (no text or labels present)©

natural_image
Technical line drawing of an electric scooter with visible suspension components and wheel (no text or symbols)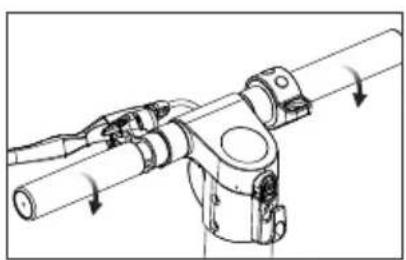
natural_image
Technical line drawing of a mechanical assembly with directional arrows indicating motion (no text or symbols)D
A. Pritisnite stražnji blatobran da biste oslobodili blokadu i podigli cijev upravljača u vertikalni položaj.
B. Blokirajte mehanizam sklapanja dizanjem ključa maksimalno prema gore, zaštitite ključ od deblokiranja okretanjem zaštitnog prstena maksimalno udesno.
C. Pričvrstite kućište kočnice koristeći šesterokutni ključ M6.
D. Pričvrstite ručke upravljača (vodite računa o smjeru zavrtanja).
2. Sklapanje
natural_image
Line drawing of a human leg with attached medical or robotic device (no text or symbols)A
natural_image
Line drawing of a mechanical device with a lever and adjustment arrow (no text or symbols)B
natural_image
Mechanical assembly diagram showing a rotating arm mechanism (no text or symbols)©

natural_image
Line drawing of a fully electric scooter with visible suspension components and wheels (no text or symbols)
natural_image
Mechanical assembly diagram showing a motor with rotating shaft and gear mechanism (no text or labels)D
natural_image
Line drawing of a scooter with wheels and suspension rod (no text or symbols)Montaža
Demontaža
natural_image
Mechanical assembly diagram showing a lever mechanism with a directional arrow (no text or labels)A

natural_image
Mechanical assembly diagram showing a rotating component with no visible text or symbolsB

natural_image
Line drawing of a robotic arm with articulated joints and a tool, no text or symbols present©

natural_image
Mechanical assembly diagram showing a rotating component with no visible text or symbolsA

natural_image
Mechanical assembly diagram showing a clamp or bracket with a downward arrow indicating force or motion (no text or symbols present)B
natural_image
Mechanical component diagram showing a lever mechanism with no visible text or symbols©
Montaža baterije:
A. Pritisnite tipku blokade kućišta zaslona koja se nalazi iznad kuke i podignite kućište prema gore.
B. Okrenite poklopac baterije ulijevo i izvadite ga.
C. Umetnite bateriju u otvor na cijevi upravljača i zatvorite poklopac okretanjem udesno.
Demontaža baterije
A. Otvorite kućište zaslona pritiskom na tipku iznad kuke i otvorite poklopac baterije.
B. Povucite bateriju za šarenu traku i izvadite je.
C. Zatvorite poklopac baterije i spustite kućište zaslona.
NAPOMENA!
Baterija se nakon vađenja može puniti pomoću priloženog punjača.

Ne punite bateriju dok se kreće, sklopi, čišti ili održava skuter.
natural_image
Technical line drawing of a cylindrical mechanical component with two views: top shows internal components, bottom shows external view (no text or symbols)• Uvjerite se da je utičnica suha.
- Ako se punjenje obavlja dok je baterija montirana na romobil, treba otvoriti čep utičnice za punjenje baterije koji se nalazi na cijevi upravljača, odmah iznad mehanizma za sklapanje romobila. Ako se punjenje obavlja dok je baterija demontirana s romobila, treba otvoriti čep utičnice za punjenje koji se nalazi u njenom donjem dijelu.
- Priključite napajanje na izvor napajanja, pobrinite se da zeleno svjetlo punjača svijetli normalno, umetnite drugi utikač u utičnicu za punjenje na skuteru.
- Kada svijetli crveno svjetlo napajanja, to znači da je ispravno punjenje baterije, inače provjerite sve kabelske spojeve.
- Kada će se crveno svjetlo promijeniti u zeleno, zatim u potpunosti napunili ste bateriju. Isključite napajanje iz izvora napajanja. Dugoročno punjenje može skratiti vijek trajanja baterije.
- Slijedite upute za punjenje baterije, inače će oštetiti bateriju i skratiti vijek njezinog trajanja.
- Vrijeme punjenja baterije skutera je oko 2 sata. Ne može se garantirati uvijek isto vremensko punjenje akumulatora zbog trošenja.
- Osigurajte čiste i suhe uvjete tijekom punjenja
• Nemojte puniti bateriju kad je utičnica mokra.
Prva vožnja
Priprema
natural_image
Stylized illustration of a car wheel connected to a pressure gauge (no text or symbols)natural_image
Mechanical diagram showing a lever mechanism with arrows indicating motion direction (no text or symbols)A
natural_image
Line drawing of a person's lower torso wearing a medical or ergonomic device (no text or symbols visible)B
natural_image
Mechanical assembly diagram showing pipe connections and a black arrow indicating a specific component (no text or labels present)©
natural_image
Technical line drawing of an electric scooter with visible suspension components and wheelbase (no text or symbols)
natural_image
Technical line drawing of a mechanical assembly with rotating components (no text or symbols)D
natural_image
Line drawing of a human leg with attached medical or robotic device (no text or symbols)A

natural_image
Technical line drawing of a mechanical clamp or grip assembly with an arrow indicating rotation (no text or symbols present)B

natural_image
Technical line drawing of a mechanical assembly with no visible text or symbols©

natural_image
Line drawing of a fully electric scooter with visible suspension components and wheels (no text or symbols)
natural_image
Mechanical assembly diagram showing a motor with rotating components and a downward arrow indicating motion (no text or symbols)D
natural_image
Mechanical assembly diagram showing a lever mechanism with no visible text or symbolsA

natural_image
Technical line drawing of a mechanical assembly with rotating components (no text or symbols)B
natural_image
Technical line drawing of a mechanical assembly with no visible text or symbols©
natural_image
Technical line drawing of a mechanical assembly with no visible text or symbolsA

natural_image
Mechanical assembly diagram showing a lever mechanism with no visible text or symbolsB

natural_image
Mechanical component diagram showing a lever mechanism with a directional arrow (no text or symbols)©
natural_image
Technical line drawing of a cylindrical mechanical component with two views: top shows internal components, bottom shows external components (no text or symbols)natural_image
Illustration of a car tire with a pressure gauge attached, symbolizing speed or pressure (no text or symbols present)Актуална скорост
Електрическа блокада (няма)
Режим на скоростта
Дисплей
natural_image
Mechanical diagram showing a lever mechanism with motion arrows indicating direction (no text or symbols)A

natural_image
Line drawing of a human leg with a wrist strap and wristpin, showing motion direction (no text or symbols)B

natural_image
Mechanical assembly diagram showing a valve mechanism with a black arrow indicating a specific component (no text or labels present)©

natural_image
Technical line drawing of a two-wheeled electric scooter with suspension components (no text or symbols)
natural_image
Mechanical assembly diagram showing a lever mechanism with rotating parts and directional arrows (no text or symbols)D
natural_image
Line drawing of a human leg with attached medical or robotic device (no text or symbols)A

natural_image
Line drawing of a mechanical device with a curved arrow indicating rotation (no text or symbols)B

natural_image
Technical line drawing of a mechanical assembly with no visible text or symbols©

natural_image
Line drawing of a fully electric scooter with visible suspension components and wheels (no text or symbols)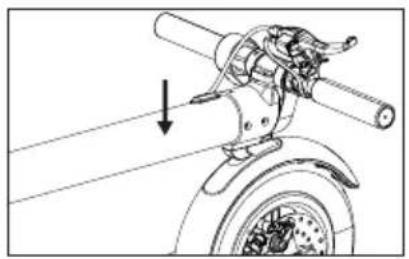
natural_image
Mechanical assembly diagram showing a motor with rotating components and a downward arrow indicating motion (no text or symbols)D
natural_image
Line drawing of a scooter with wheels and suspension rod (no text or symbols)Демонтаж
Монтаж
natural_image
Mechanical assembly diagram showing a lever mechanism with no visible text or symbolsA

natural_image
Mechanical assembly diagram showing a rotating component with directional arrows (no text or labels)B

natural_image
Technical line drawing of a mechanical assembly with no visible text or symbols©

natural_image
Mechanical assembly diagram showing a rotating component with no visible text or symbolsA

natural_image
Mechanical assembly diagram showing a clamp or bracket with a downward arrow indicating force or motion (no text or symbols present)B

natural_image
Mechanical component diagram showing a lever mechanism with no visible text or symbols©
natural_image
Line drawing of a scooter with attached cable and plug, shown in two views: one showing a close-up of the wheel (no text or symbols)
natural_image
Technical line drawing of a mechanical component with two views: top shows circular housing with internal components, bottom shows cylindrical body with internal mechanisms (no text or symbols)natural_image
Stylized icon of a car tire with a pressure gauge, no text or symbols presentnatural_image
Mechanical diagram showing a lever mechanism with motion arrows and a tire (no text or symbols)A
natural_image
Line drawing of a human arm with wristband and clasp mechanism (no text or symbols)B

natural_image
Mechanical assembly diagram showing a valve mechanism with a black arrow indicating a specific component (no text or labels present)©

natural_image
Technical line drawing of a scooter's front suspension system (no text or symbols)
natural_image
Mechanical assembly diagram showing a lever mechanism with rotating parts and directional arrows (no text or symbols)D
natural_image
Line drawing of a human leg with attached medical or robotic device (no text or symbols)A

natural_image
Line drawing of a mechanical device with a lever and adjustment arrow (no text or symbols)B

natural_image
Technical line drawing of a mechanical assembly with no visible text or symbols©

natural_image
Line drawing of a fully electric scooter with visible suspension components and wheels (no text or symbols)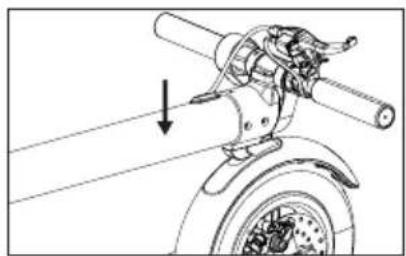
natural_image
Mechanical assembly diagram showing a motor with rotating shaft and gear mechanism (no text or labels)D
natural_image
Line drawing of a scooter with wheels and suspension rod (no text or symbols)Dezasamblarea
Montajul

natural_image
Mechanical assembly diagram showing a lever mechanism with no visible text or symbolsA

natural_image
Mechanical assembly diagram showing a rotating component with no visible text or symbolsB
natural_image
Line drawing of a robotic arm joint (no text or symbols)©

natural_image
Technical line drawing of a mechanical assembly with no visible text or symbolsA

natural_image
Mechanical assembly diagram showing a lever mechanism with no visible text or symbolsB

natural_image
Mechanical component diagram showing a lever mechanism with a directional arrow (no text or symbols)©
natural_image
Line drawing of a scooter with attached cable and plug, shown in two views: one showing a close-up of the seat (no text or symbols)
natural_image
Technical line drawing of a mechanical component with two views: top shows internal components, bottom shows external assembly (no text or symbols)Date tehnice adaptor:
Voltaj intrare: 110-240V\~50/60Hz
Current max.intrare: 2,5A
Voltaj iesire: 42 V
Current max iesire: 2 A
Saugos principai
natural_image
Stylized illustration of a car wheel connected to a pressure gauge (no text or symbols)natural_image
Mechanical assembly diagram showing a lever mechanism with motion arrows (no text or labels)A
natural_image
Line drawing of a human leg with attached medical or robotic device (no text or symbols)B
natural_image
Mechanical assembly diagram showing a motor and gear assembly with no visible text or symbols©

natural_image
Technical line drawing of a scooter's front suspension system (no text or symbols)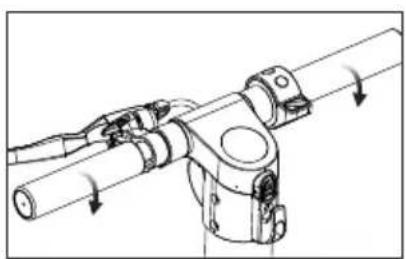
natural_image
Mechanical assembly diagram showing a lever mechanism with rotating parts and directional arrows (no text or symbols)D
natural_image
Line drawing of a human leg with attached medical or electronic device (no text or symbols)A

natural_image
Line drawing of a mechanical device with a lever and adjustment arrow (no text or symbols)B
natural_image
Mechanical assembly diagram showing a rotating arm mechanism (no text or symbols)©
natural_image
Line drawing of a fully electric scooter with visible suspension components and wheels (no text or symbols)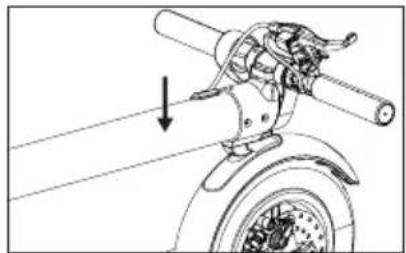
natural_image
Mechanical assembly diagram showing a motor with rotating components and a downward arrow indicating motion (no text or symbols)D
natural_image
Line drawing of a scooter with wheels and handle (no text or symbols)Išmontavimas
Montavimas
natural_image
Mechanical assembly diagram showing a lever mechanism with no visible text or symbolsA

natural_image
Mechanical assembly diagram showing a rotating component with no visible text or symbolsB

natural_image
Line drawing of a person using a mechanical device (no text or symbols)©
natural_image
Mechanical assembly diagram showing a rotating component with no visible text or symbolsA
natural_image
Mechanical assembly diagram showing a clamping mechanism with no visible text or symbolsB

natural_image
Mechanical component diagram showing a lever mechanism with no visible text or symbols©
natural_image
Line drawing of a scooter with attached cable and plug, shown in two views: one showing front view and one with cable (no text or symbols)
natural_image
Technical line drawing of a mechanical component with two views: top shows circular housing with internal components, bottom shows cylindrical body with attached parts (no text or symbols)natural_image
Stylized illustration of a car wheel connected to a pressure gauge (no text or symbols)natural_image
Mechanical assembly diagram showing a lever mechanism with motion arrows (no text or symbols)A

natural_image
Line drawing of a human leg with attached medical or robotic device (no text or symbols)B
natural_image
Mechanical assembly diagram showing a valve mechanism with a black arrow indicating rotation (no text or labels)C
natural_image
Technical line drawing of a scooter's front suspension system (no text or symbols)
natural_image
Mechanical assembly diagram showing a lever mechanism with directional arrows indicating motion (no text or symbols present)D
natural_image
Line drawing of a human leg with attached medical or robotic device (no text or symbols)A

natural_image
Line drawing of a mechanical device with a lever and adjustment arrow (no text or symbols)B

natural_image
Mechanical assembly diagram showing a rotating arm mechanism (no text or symbols)©
natural_image
Line drawing of a fully electric scooter with visible suspension components and wheels (no text or symbols)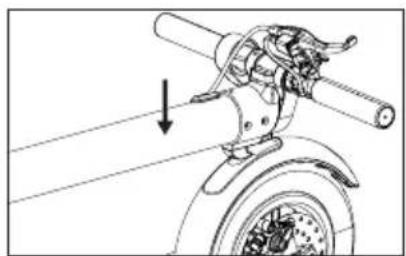
natural_image
Mechanical assembly diagram showing a motor with rotating components and a downward arrow indicating motion (no text or symbols)D
natural_image
Line drawing of a scooter with wheels and suspension rod (no text or symbols)Mahavõtmine
Paigaldamine

natural_image
Mechanical assembly diagram showing a lever mechanism with no visible text or symbolsA
natural_image
Mechanical assembly diagram showing a rotating component with directional arrows (no text or labels)B

natural_image
Technical line drawing of a mechanical assembly or clamp device (no text or symbols visible)©

natural_image
Mechanical assembly diagram showing a rotating component with no visible text or symbolsA
natural_image
Mechanical assembly diagram showing a lever mechanism with no visible text or symbolsB

natural_image
Mechanical assembly diagram showing a lever mechanism with no visible text or symbols©
Aku paigaldamine:
natural_image
Line drawing of a scooter with attached cable and plug, shown in two views: one showing front view and one with cable (no text or symbols)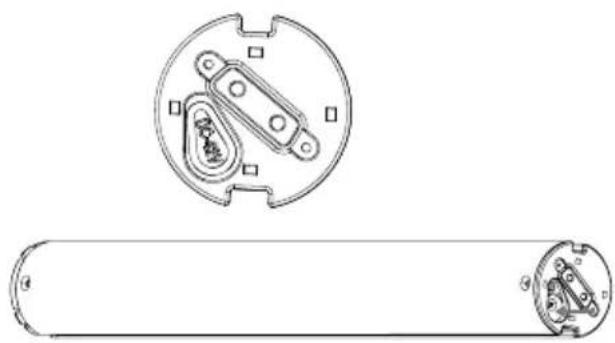
natural_image
Technical line drawing of a mechanical component with two views: top shows circular housing with internal components, bottom shows cylindrical body with internal mechanisms (no text or symbols)natural_image
Stylized icon of a car wheel connected to a pressure gauge (no text or symbols)natural_image
Line drawing of a human leg with attached medical or robotic device (no text or symbols)A
natural_image
Line drawing of a mechanical device with a lever and adjustment arrow (no text or symbols)B

natural_image
Mechanical assembly diagram showing a rotating shaft and connecting rod (no text or symbols)©

natural_image
Line drawing of a fully electric scooter with visible suspension components and wheels (no text or symbols)
natural_image
Mechanical assembly diagram showing a motor and wheel assembly with a downward arrow indicating motion (no text or symbols)D
natural_image
Line drawing of a scooter with wheels and handle (no text or symbols)Montāža
Demontāža

natural_image
Mechanical assembly diagram showing a lever mechanism with no visible text or symbolsA
natural_image
Technical line drawing of a mechanical assembly with no visible text or symbolsB

natural_image
Technical line drawing of a mechanical assembly or clamp device (no text or symbols visible)©

natural_image
Mechanical assembly diagram showing a rotating component with no visible text or symbolsA
natural_image
Mechanical assembly diagram showing a lever mechanism with no visible text or symbolsB

natural_image
Mechanical assembly diagram showing a lever mechanism with no visible text or symbols©
Akumulatora montāža:
natural_image
Line drawing of a scooter with attached cable and plug, shown in two views: one showing front wheel detail and arrow indicating left side (no text or symbols)
natural_image
Technical line drawing of a mechanical component with two views: top shows internal components, bottom shows external assembly (no text or symbols)02-801 Warsaw, Poland
phone:+48 22 331 99 59
e-mail: info@everpol.pl
www.blaupunkt.com
In case of questions or problems please contact our service.
Tel. 00 48 22 331 99 54
E-mail: emobility@blaupunkt.pl
All rights reserved. All brand names are registered trademarks of their respective owners. Specifications are subject to change without prior notice.