
SmartStor NS2300N - Server Promise Technology - Free user manual and instructions
Find the device manual for free SmartStor NS2300N Promise Technology in PDF.


| Product Type | Network Attached Storage (NAS) Server |
| Model | SmartStor NS2300N |
| Processor | Freescale MPC8313 at 333 MHz |
| Memory | 128 MB DDRII SDRAM |
| Flash Memory | 32 MB, 8-bit |
| Disk Drive Support | Two 1.5 Gb/s or 3 Gb/s SATA 3.5-inch drives, hot-swappable |
| RAID Levels | RAID 0, RAID 1 |
| Networking | 10/100/1000 Mb/s Ethernet (RJ45) |
| USB Ports | 1x USB 2.0 Type-A (up to 480 Mb/s) |
| Supported Protocols | SMB, CIFS, NFS, AFP, FTP |
| Max File System Size | Up to 2 TB |
| Power Adapter Input | 100-240V AC, 1.5A, 50-60 Hz |
| Power Adapter Output | 12V DC, 5A |
| Key Features | Data sharing, one-touch backup, print server, user/group management, UPS support, iTunes server plug-in |
| Management | SmartNAVI (Windows) and PASM (web browser) |
| Client OS Support | Windows (Vista, Server 2003, XP, 2000), Linux (Red Hat, SuSe), Mac OS X |
| Maintenance | Firmware upgrade via PASM, software upgrade via download |
| Safety | ESD precautions; battery disposal caution |
| Spare Parts Available | Disk drives, power adapter, screws, Ethernet cable |
Frequently Asked Questions - SmartStor NS2300N Promise Technology
User questions about SmartStor NS2300N Promise Technology
0 question about this device. Answer the ones you know or ask your own.
Ask a new question about this device
Download the instructions for your Server in PDF format for free! Find your manual SmartStor NS2300N - Promise Technology and take your electronic device back in hand. On this page are published all the documents necessary for the use of your device. SmartStor NS2300N by Promise Technology.
USER MANUAL SmartStor NS2300N Promise Technology
© 2008 Promise Technology, Inc. All Rights Reserved.
Copyright by Promise Technology, Inc. (Promise Technology). No part of this manual may be reproduced or transmitted in any form without the expressed, written permission of Promise Technology.
Trademarks
Promise, and the Promise logo are registered in U.S. Patent and Trademark Office. All other product names mentioned herein may be trademarks or registered trademarks of their respective companies.
Important data protection information
You should back up all data before installing any drive controller or storage peripheral. Promise Technology is not responsible for any loss of data resulting from the use, disuse or misuse of this or any other Promise Technology product.
Notice
Although Promise Technology has attempted to ensure the accuracy of the content of this manual, it is possible that this document may contain technical inaccuracies, typographical, or other errors. Promise Technology assumes no liability for any error in this publication, and for damages, whether direct, indirect, incidental, consequential or otherwise, that may result from such error, including, but not limited to loss of data or profits.
Promise Technology provides this publication “as is” without warranty of any kind, either express or implied, including, but not limited to implied warranties of merchantability or fitness for a particular purpose.
The published information in the manual is subject to change without notice. Promise Technology reserves the right to make changes in the product design, layout, and driver revisions without notification to its users.
This version of the Product Manual supersedes all previous versions.
Recommendations
In this Product Manual, the appearance of products made by other companies, including, but not limited to software, servers, and disk drives, is for the purpose of illustration and explanation only. Promise Technology does not recommend, endorse, prefer, or support any product made by another manufacturer.
Contents
Chapter 1: Introduction to SmartStor .....1
About This Manual....1
Architecture 2
Protocol Support 2
Key Benefits 2
Specifications 3
Compatible Backup Software 4
Client OS Support 4
Browser Support 4
Chapter 2: Installation and Setup ....5
Unpacking the SmartStor NS2300N 5
Installing Disk Drives 7
Connecting to the Network 7
Connecting the Power 7
Installing the Software 8
Setting up the SmartStor 11
Connecting to PASM 15
Browser Support 15
Finding the SmartStor's IP Address .....15
PASM in your Browser 16
PASM in SmartNAVI 17
Shutting Down the SmartStor 18
Chapter 3: Connecting to the SmartStor .....19
Setting up a Network Drive on a Windows PC .....19
Setting up a Network Drive on a UNIX or Linux PC .....22
Setting up a Network Drive on a Macintosh PC .....26
Connecting a USB Printer to SmartStor 29
Setting up the Print Server on SmartStor 30
Setting up Windows Printing 30
Setting up Linux Printing 32
Setting up Macintosh Printing .35
Connecting a USB Drive ....37
Disconnecting a USB Drive 40
Setting-up Apple iTunes 40
Chapter 4: SmartNAVI .....45
Working with SmartNAVI 45
Opening SmartNAVI 45
Opening the MSN Window .....46
Opening the Main Window 46
Choosing a SmartNAVI Language .....47
Starting the Advanced Storage Manager (PASM) .....47
Viewing SmartNAVI Information .....48
Closing SmartNAVI 49
Managing Users and Groups ....50
Creating a User ....50
Creating the Default User ....51
Changing User Passwords .....51
Changing User Permissions ....51
Viewing a List of Users .52
Deleting a User ....52
Creating a Group .....52
Viewing a List of Groups 53
Adding Members to a Group .53
Deleting Members from a Group .....53
Deleting a Group ....54
Managing RAID Volumes 55
Creating a RAID Volume .....55
Expanding a RAID Volume .....55
Viewing RAID Volume Status ....56
Viewing a List of RAID Volumes .....56
Recreating a RAID Volume ....57
Managing Backups 58
Doing a Backup Now ....58
Scheduling a Backup .59
Viewing Backup Schedules 60
Changing a Scheduled Backup . . . . . . . . . . . . . . . . . . . . . . . . . . . . . . . . . . . . . . . . . . . . . . . . . 60
Deleting a Scheduled Backup ....61
Restoring Backed-up Files 61
Viewing the Backup Event Log 62
Saving the Event Log ....62
Clearing the Event Log 63
Managing Share Folders ....64
Creating a Share Folder ....64
Opening a Share Folder .....64
Viewing a List of Share Folders .....65
Chapter 4: SmartNAVI, cont.
Managing Share Folders, cont.
Changing Share Folder Permissions .....65
Deleting a Share Folder ....65
Mounting a Share Folder / Creating a Network Drive .....66
Un-mounting a Share Folder / Disconnecting a Network Drive 66
Making Management Settings ....67
Configuring a NAS System 67
Changing Network Settings 69
Locating the SmartStor ....70
Choosing a Default NAS System 70
Enabling or Disabling Event Notification .....70
Viewing the System Event Log 71
Adding Plug-ins ....71
Viewing a List of Plug-ins 72
Viewing Plug-in Version Numbers 72
Enabling and Disabling Plug-ins 73
Removing Plug-ins 73
Managing Downloads 75
Adding a Link 75
Viewing the Download List 76
Removing a Link 76
Pausing and Resuming a Download .....76
Viewing the Downloaded List 77
Opening a Downloaded File ....77
Deleting a Downloaded File 77
Chapter 5: PASM .....79
Connecting to PASM 79
PASM in your Browser 80
PASM in SmartNAVI 81
Choosing a Language .....82
Navigating in PASM 82
Logging out of PASM ....82
Setting up SmartStor with the Setup Wizard 83
Managing Users and Groups ....85
Viewing a List of Users 85
Creating a User 85
Changing the Administrator's Password . . . . . . . . . . . . . . . . . . . . . . . . . . . . . . . . . . . . . . . . . . . . . . . . . . . . . 85
Changing a User's Password 86
Deleting a User 86
Chapter 5: PASM, cont.
Managing Users and Groups, cont.
Viewing a List of Groups .....86
Creating a Group 87
Adding Members to a Group .87
Removing Members from a Group .....87
Deleting a Group .88
Viewing Quotas ....88
Setting Quotas 88
Managing File & Print Services
Setting up Windows Access .90
Setting up UNIX/Linux Access 91
Setting up for Macintosh Access .....92
Setting up for FTP Access 93
Setting up your Print Server .94
Adding Plug-ins .94
Viewing a List of Plug-ins .95
Enabling and Disabling Plug-ins .95
Removing Plug-ins .96
Viewing a List of Folders .....96
Modifying Folder Services .....96
Adding a Folder .....97
Deleting a Folder 97
Setting up Windows Sharing for a Folder .....98
Setting up UNIX and Linux Sharing for a Folder .....98
Setting up FTP Sharing for a Folder .....99
Managing RAID Volumes
Viewing RAID Volume Status ....100
Viewing Disk Drive Information ....101
Creating a RAID Volume 101
Designating a Spare Drive 102
Migrating a RAID Volume 102
Deleting a RAID Volume 103
Viewing an External USB Drive or Memory Stick .....104
Formatting an External USB Drive or Memory Stick .....104
Managing Backups
Enabling One Touch Backup 105
Managing the Network Connection
Viewing Network Setup Information .....106
Making Network Settings 106
Working with Jumbo Frames 107
Chapter 5: PASM, cont.
Making Management Settings ....108
Viewing the Event Log 108
Setting up SMTP Authentication .....108
Viewing the Email Alert List 109
Adding an Email Alert Recipient .....109
Deleting an Email Alert Recipient .....109
Upgrading the System Firmware 110
Enabling and Disabling the Buzzer .....110
Viewing UPS Status ....110
Setting up a UPS 111
Managing Services 112
Setting System Date and Time 112
Running the Network Time Protocol ....112
Viewing the Results of NTP Synchronization .....113
Rebooting the SmartStor 113
Shutting Down the SmartStor .....114
Booting the SmartStor After a Shutdown 114
Locating the SmartStor ....114
Viewing System Information 115
Viewing Enclosure Information .....115
Enabling the Smart Fan 116
Chapter 6: Technology Background .....117
Introduction to RAID 117
RAID 0 – Stripe .....118
RAID 1 - Mirror ..... 119
Choosing a RAID Level 120
RAID 0 120
RAID 1 120
RAID Volume Migration .....121
RAID 0 to RAID 1 .....121
RAID 1 to RAID 0 .....121
RAID Volume Rebuilding .....121
Partition and Format 122
Chapter 7: Troubleshooting .....123
Responding to an Audible Alarm 123
Checking the System Status LED 124
Checking Disk Status LEDs....124
Replacing a Failed Disk Drive 124
Checking RAID Volume Status in PASM 125
SmartStor Responds to a Critical RAID Volume .....125
Responding to an Invalid RAID Volume .....126
Checking File System Status in PASM 127
Rebuilding the File System .....127
Checking the Event Log in PASM .....128
Responding to Events 129
Checking Enclosure Status in PASM 131
Resolving Connections with SmartNAVI 132
Solving Network Connection Problems 133
Checking Your Email Inbox 134
Restoring the Default Password 134
Resolving a Windows Firewall Issue ....135
Chapter 8: Support .....137
Frequently Asked Questions 137
Contacting Technical Support 140
Limited Warranty 143
Returning Product For Repair 145
Appendix A: Maintenance .....147
Upgrading the Firmware 147
Upgrading the Software .....148
Connection Problems After Restart 149
Appendix B: Important Information .....151
GNU General Public License ....151
Battery 151
Index. 153
Chapter 1: Introduction to SmartStor
- About This Manual (page 1)
- Architecture (page 2)
- Protocol Support (page 2)
• Key Benefits (page 2) - Specifications (page 3)
- Compatible Backup Software (page 4)
- Client OS Support (page 4)
- Browser Support (page 4)
Promise Technology's SmartStor NS2300N is a network attached storage (NAS) solution for external storage targeted for small and medium business (SMB) users and small office/home office (SOHO) users.
With a NAS product, users can save their work and have access to files over the network without having to carry around a disk drive or memory stick. The Administrator can manage access privileges for greater security. Multiple backup and synchronization functions protect your data.
About This Manual
This Product Manual describes how to setup, use, and maintain the SmartStor NS2300N. It also describes how to use the SmartNAVI software and Promise Advanced Storage Manager (PASM) software.
This manual includes a full table of contents, chapter task lists, and numerous cross-references to help you find the specific information you are looking for.
Also included are four levels of notices:

Note
A Note provides helpful information such as hints or alternative ways of doing a task.

Important
An Important calls attention to an essential step or point required to complete a task. Important items include things often missed.

Caution
A Caution informs you of possible equipment damage or loss of data and how to avoid them.

Warning
A Warning notifies you of probable equipment damage or loss of data, or the possibility of physical injury, and how to avoid them.
Architecture
The SmartStor NS2300N's architecture is based on the Freescale MPC8313 microprocessor and the Promise PDC20771 Serial ATA RAID Controller. The Gigabit Ethernet port is used for the data transfer and management. The USB port is used for a printer, expansion drives, and Uninterruptable Power Supply (UPS).
Protocol Support
SmartStor NS2300N supports:
- Windows 2000, XP Professional, 2003 Server, and Vista clients through SMB and CIFS protocols
- UNIX and Linux clients through the NFS protocol
• Macintosh clients through the AFP protocol - FTP clients through the FTP protocol
- DLNA clients through UPnP protocol with an optional plug-in
- Up to 16 concurrent connections supported
Key Benefits
- Easy-to-use browser-based management interface
• Data sharing over the network - One-touch backup of designated file folders on client PC
• Network print server with USB printer - User, Group, and Quota management
- UPS support with automated shutdown
• Heterogeneous environment: Windows, UNIX, Linux, and Macintosh - SmartNAVI setup and management software
- Promise Advanced Storage Manager (PASM) software
Specifications
- Disk drive support:
- Two 1.5 Gb/s or 3 Gb/s SATA 3.5-inch disk drives
- Conforms to Serial ATA 1.0 specification and Serial ATA II: Extensions to Serial ATA 1.0 specification (SATA II, phase I specification)
- SATA specification of 3 Gb/s transfers with CRC error-checking
• Hot-swapping of disk drives - Tagged command queuing
- Native command queuing
- Drive roaming among channels
• S.M.A.R.T. status polled every 15 minutes
• Online capacity expansion - RAID Level Migration
- RAID Volume rebuilding
- Gigabyte rounding
- Background rebuilding
• RAID level support: RAID 0 and 1
• Large file system support up to 2 TB
- Unicode file name support
- SATA RAID Controller: Promise PDC20771
• Server on a Chip: Freescale MPC8313, 333MHz
• Networking: 10/100/1000 Mb/s Ethernet Port on motherboard
- USB port: USB 2.0, up to 480 Mb/s, one Type-A connector
- File protocols: SMB, CIFS, FTP, AFP, NFS
- Flash Memory: 32 MB, 8-bit
• Memory: 128 MB DDRII SDRAM
• Power Adapter: Input: 100-240V, 1.5A, 50-60 Hz AC. Output: 12V, 5A, DC
• Network Time Protocol (NTP) client
- Error logging
- Phone home capability (email notification) to contact IT staff
- Hardware monitoring of:
- Fan
- Disk status
- Temperature
- One-Touch button
- P o w e
r • Enclosure status
Compatible Backup Software
SmartStor NS2300N is compatible with the following backup software products:
- VERITAS® NetBackup/Backup Exec™
• CA BrightStor™ ARCserve/Enterprise
• LEGATO® NetWorker™ - Syncsort Backup Express
- Microsoft Backup Software for Windows 95/98/NT/2000/ME/XP
• Dantz Retrospect for Macintosh
Client OS Support
Microsoft Windows:
• Vista Business, Enterprise, and Ultimate; Server 2003, XP Professional, 2000
• Supports Intel IA32, AMD64 and Intel EM64T platforms
UNIX/Linux:
• Red Hat Enterprise Linux 3.0 (AS/WS/ES)
• Red Hat Enterprise Linux 4.0 (AS/WS/ES)
- SuSe Linux Enterprise 10 (Server/Desktop)
Apple Macintosh:
• M a c O S X
Browser Support
Use the latest version of the following browsers to manage the SmartStor NS2300N:
- Internet Explorer
- Netscape Navigator
- Mozilla
- Fire fox
- Safari (MacOS X)
Chapter 2: Installation and Setup
- Unpacking the SmartStor NS2300N (page 5)
- Installing Disk Drives (page 7)
- Connecting to the Network (page 7)
- Connecting the Power (page 7)
- Installing the Software (page 8)
- Setting up the SmartStor (page 11)
- Connecting to PASM (page 15)
- Shutting Down the SmartStor (page 18)
Unpacking the SmartStor NS2300N
The SmartStor NS2300N box contains the following items:
- SmartStor NS2300N Unit
- Screws for disk drives (1 package)
- Ethernet cable
• Q u i c k S t
- Power cord
- a2V DC PowerGAdapter i d e
- CD with SmartNAVI software, Product Manual and Quick Start Guide

Warning
The electronic components within the SmartStor are sensitive to damage from Electro-Static Discharge (ESD). Observe appropriate precautions at all times when handling the SmartStor or its subassemblies.

Important
To configure the SmartStor, you must install the software onto a PC running Windows Vista, 2003 Server, XP Professional, or 2000.
Figure 1. SmartStor NS2300N Front View
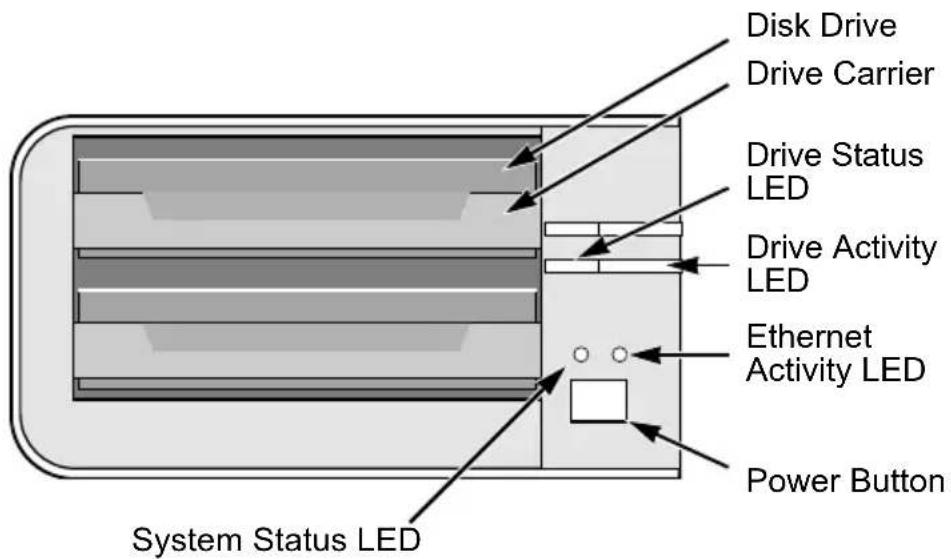
Note: This SmartStor is shown without the front door.
Figure 2. SmartStor NS2300N Rear View
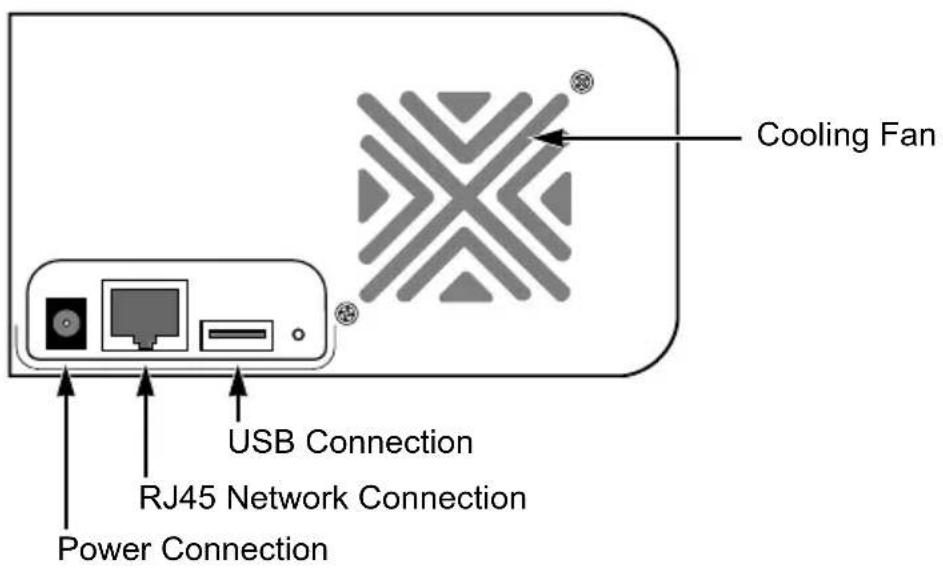
Installing Disk Drives
You can populate the SmartStor NS2300N with SATA 1.5 Gb/s or 3.0 Gb/s disk drives. For optimal performance, install disk drives of the same model and capacity. Your disk drives will become a RAID Volume on the SmartStor.
To install disk drives:
- Open the door on the front of the SmartStor enclosure.
- Pull a disk drive carrier from the enclosure. See Figure 1.
- Carefully lay the disk drive into the drive carrier, so that the screw holes on the sides of the carrier align with the screw holes in the drive.
-
Insert the screws through the holes in the drive carrier and into the sides of the disk drive.
-
Install only the counter-sink screws supplied with the SmartStor.
- Install four screws per disk drive.
-
Snug each screw. Be careful not to over-tighten.
-
Reinstall the drive carrier into the SmartStor enclosure.
Repeat steps 2 through 5 for the other disk drive.
- Close the door on the front of the SmartStor.
Connecting to the Network
To connect the SmartStor to your network:
- Attach one end of the network cable to the RJ45 network connection. See Figure 2.
- Attach the other end of the network cable to your Ethernet hub or switch.
Connecting the Power
To power the SmartStor:
- Attach the power cord from the power source to the power adapter.
- Connect the power adapter to the back of the SmartStor enclosure. See Figure 2.
-
On the front of the SmartStor, press the power button. See Figure 1. It takes about a minute to boot the SmartStor. When fully booted:
-
The System Status LED turns green. See Figure 1.
• The buzzer beeps one time.
Installing the Software
The SmartNAVI software connects your PC to the SmartStor, sets up the SmartStor, sets up network drives on your PC, and performs backups.
To install the software:
- Insert the CD into your CDROM.
- Double-click the SmartNAVI installer icon (right).
- Click the Next button to begin installation.

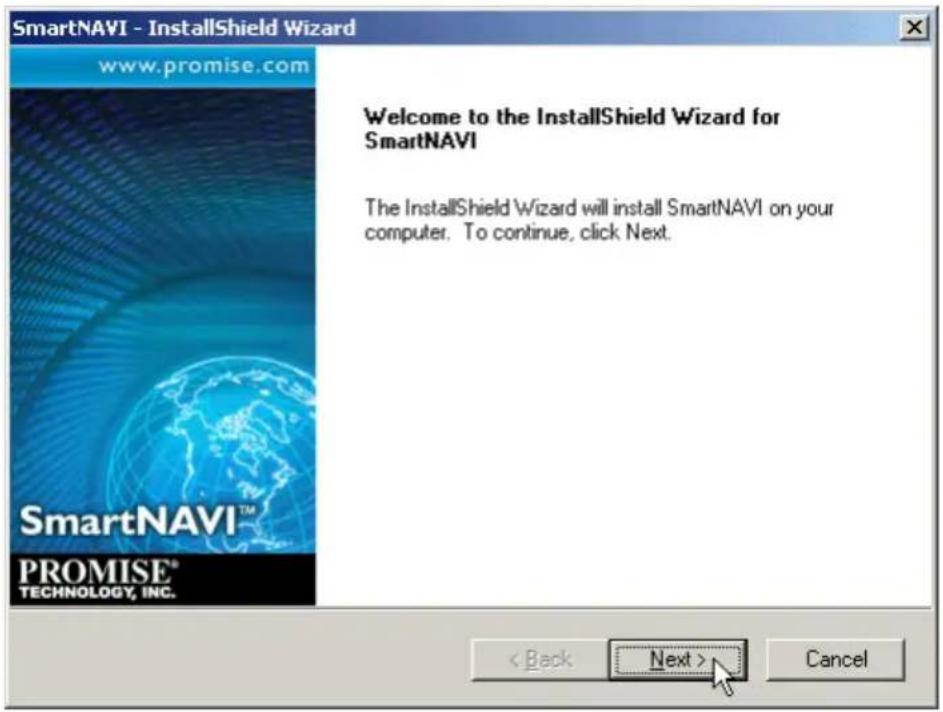
The License Agreement screen appears.
- Click the "I accept the terms..." option, then click the Next button.
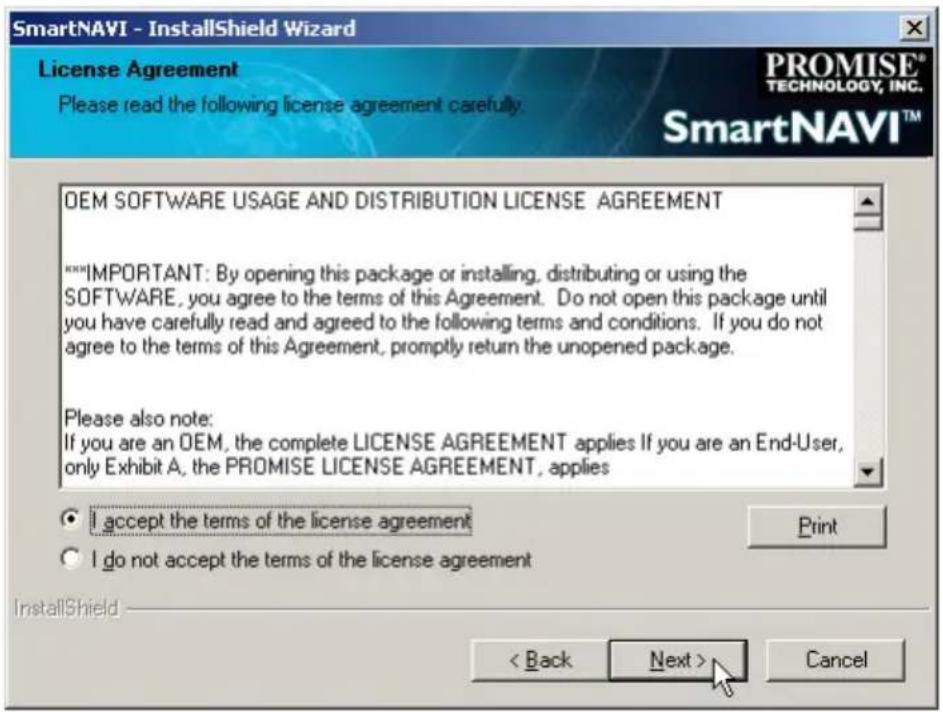
The Choose Destination Location screen appears.
- Optional. Click the Browse... button to choose a new install location for the software.
Click the Next button.
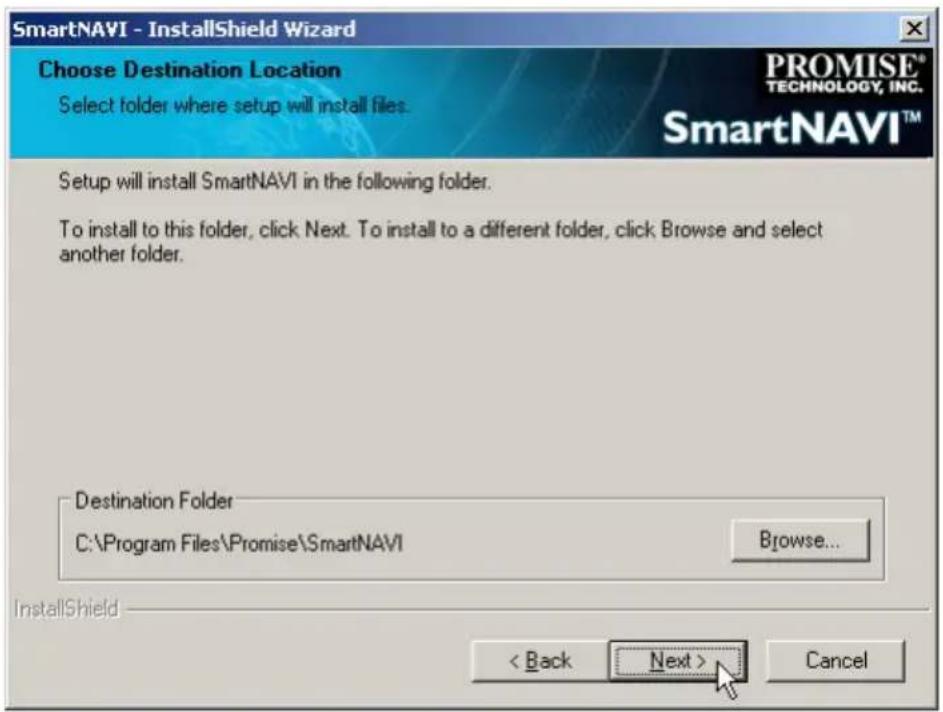
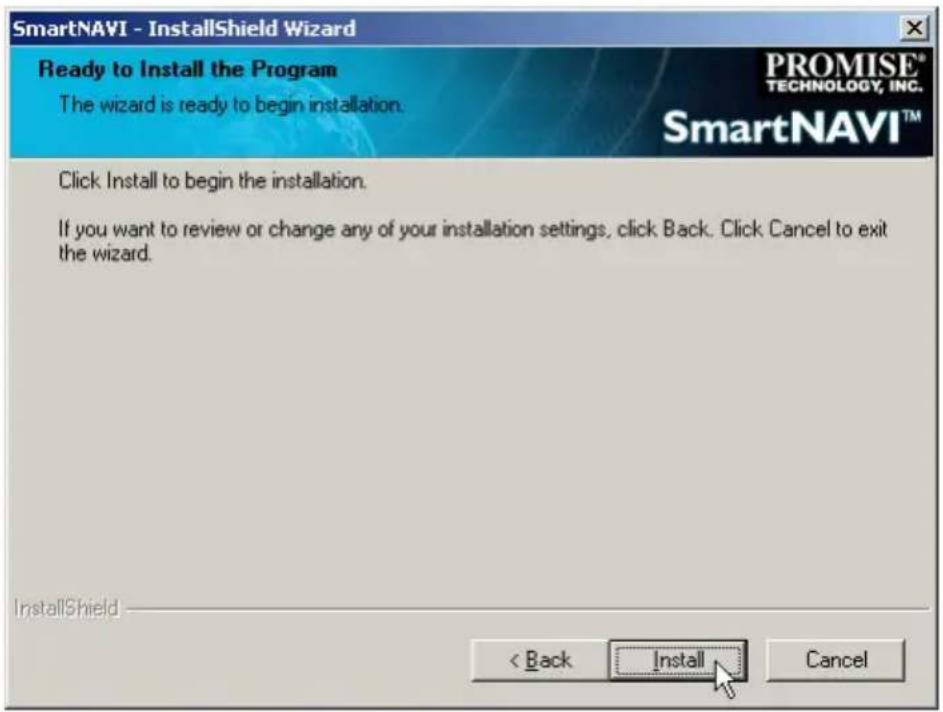
The Ready to Install screen appears.
- Click the Install button to proceed with installation.
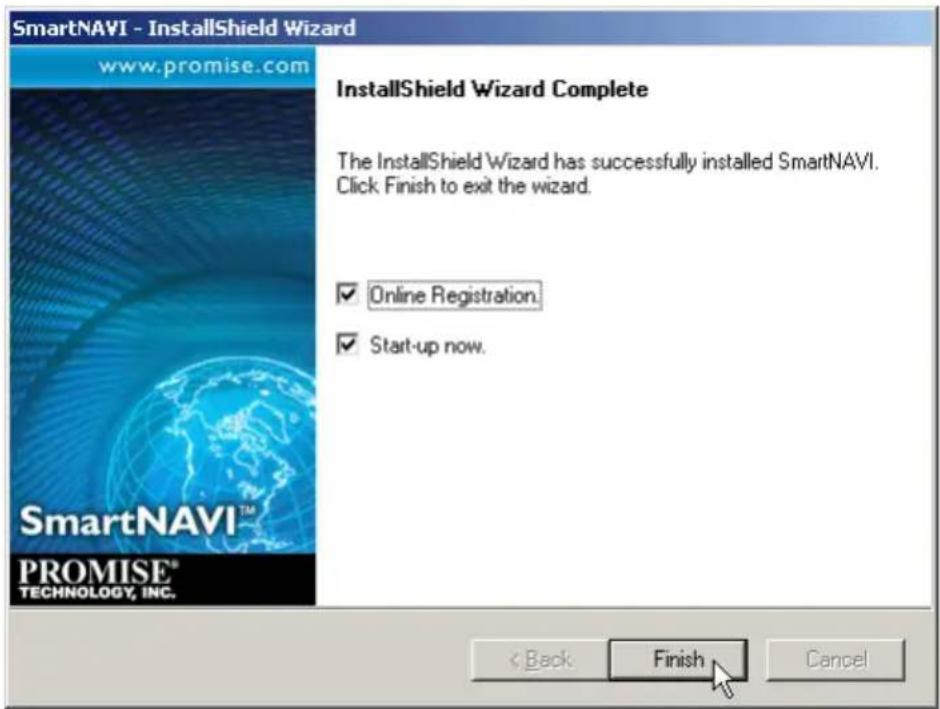
When the installation is finished, the final installation screen appears.
- Click to Finish button to close the installer.
With the Online Registration box checked, your browser will open and go directly to the Promise product registration website. Thank you for taking the time to register.
The installer adds a SmartNAVI icon to the:
• S t a r t m e n u
- Application tray
SmartNAVI loads automatically every time your Windows OS starts.
Setting up the SmartStor
The SmartNAVI performs the setup procedures on your SmartStor. After the procedure is done, you will have a default folder on the SmartStor, set up as a network drive on your PC.
You can change the network settings, create RAID volumes, add and mount folders on your SmartStor after initial setup using SmartNAVI. You can also made more advanced settings using the PASM software. See “Connecting to PASM” on page 15.
To set up your SmartStor:
- Right-click the SmartNAVI icon in the Windows application tray (lower right corner of the screen).
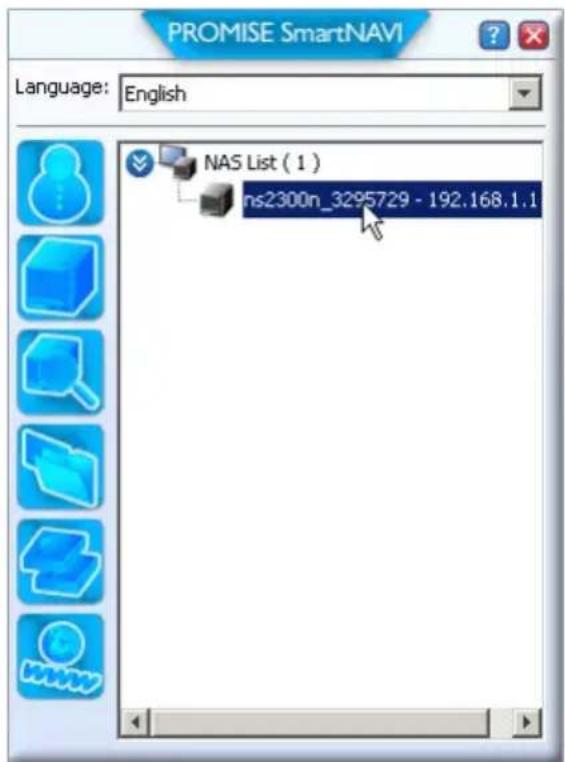
- Choose Open SmartNAVI from the popup menu. The MSN Window opens.
- Optional. From Language dropdown menu, choose the language you prefer.
- Double-click the NS2300N in the NAS list.
The login window opens.
- Type admin in the Username, Password, and Confirm fields, then click the Login button.
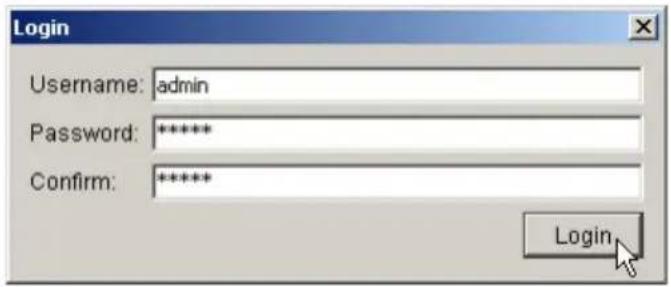
This action creates a default user and logs the default user into SmartNAVI. The Main Window opens.
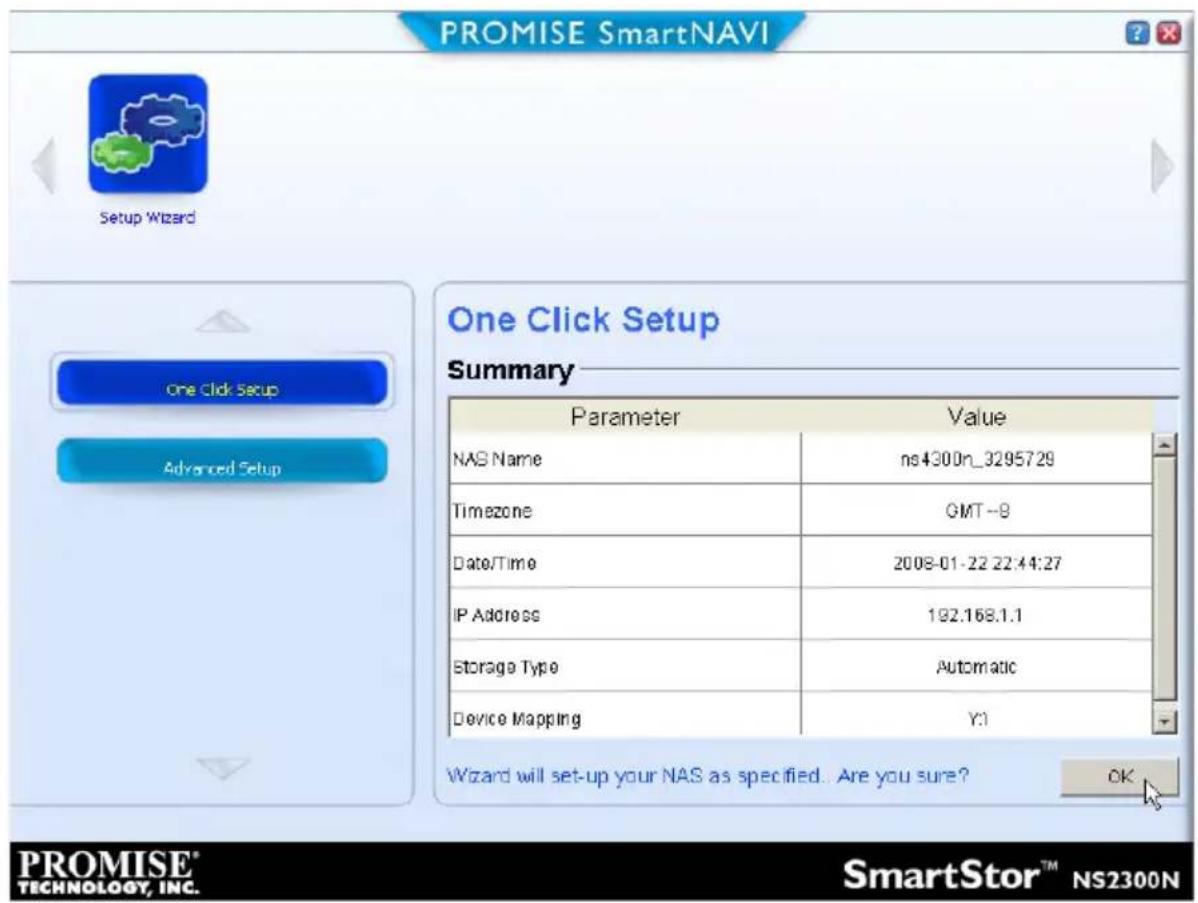
- Choose a Setup Mode and click the button:
• One Click Setup – Loads a collection of default settings. Recommended for most users.
- Advanced Setup – Enables you to make your own settings. Recommended for advanced users.
- Click the OK button to continue.
If you chose One Click Setup, the Wizard creates a RAID Volume and a default folder called Public. You are finished with the setup.
If you chose Advanced Setup, go to the next step.
- Choose Automatic (DHCP) or Manual network settings.
If you chose Manual settings, type entries for each of the following parameters in the fields provided:
• Computer (NAS system) Name
- IP Address
- Subnet Mask
- Gateway
- Primary and Secondary DNS – optional
-
Click the Next button to continue.
-
Choose the following values from their respective dropdown menus:
• Time zone
- Y e a r
• M o n t h
Day
• Time in Hours, Minutes, and Seconds
- Click the Next button to continue.
- Choose Automatic or Manual RAID Volume creation.
If you chose Manual, choose the type of RAID Volume you want:
- Maximum Capacity – RAID 0, using both disk drives
- Data Protection – RAID 1, using both disk drives
- Click the Next button to continue.
- Choose a network drive letter from the dropdown menu.
This drive will be mapped as a network drive on your PC.
The list begins with Z and goes in reverse alphabetical order.
- Click the Next button to continue.
- Review your parameters.
To make changes, click the Previous button.
To accept the parameters and configure your NAS system, click the OK button.
- Click the Yes button in the confirmation box.
The Wizard creates a RAID Volume and a default folder called Public.
The Public folder on the SmartStor appears under My Computer as a network drive.
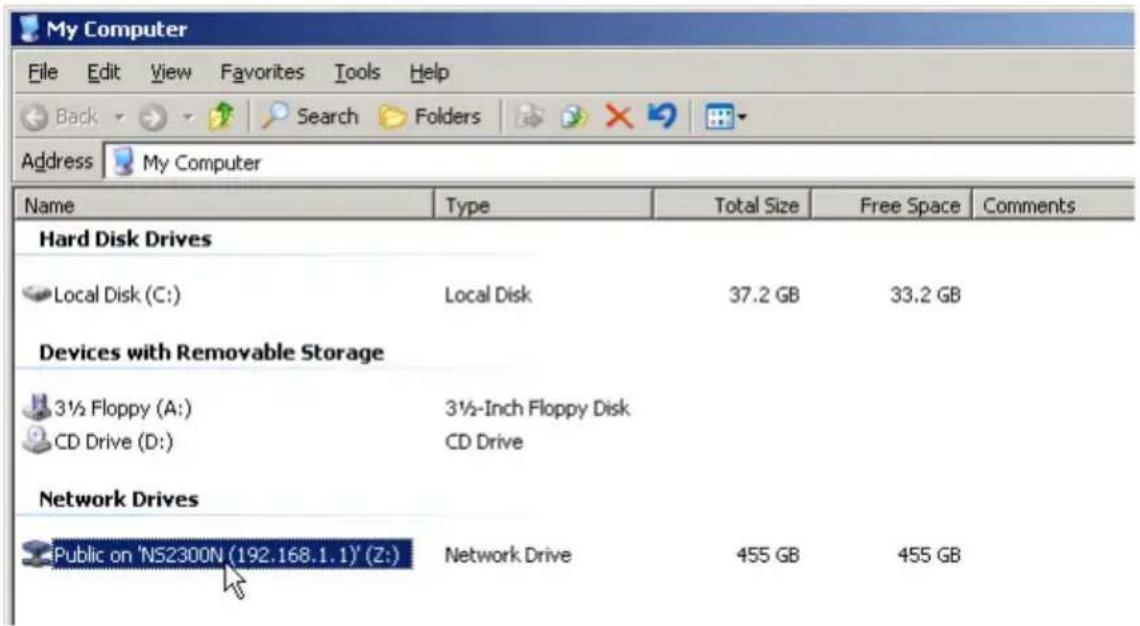
You can now copy files to and from the folder on the SmartStor.
To access this folder from other PCs, see "Chapter 3: Connecting to the SmartStor" on page 19.
To create additional RAID Volumes and folders, see "Chapter 5: PASM" on page 79.
Connecting to PASM
The Promise Advanced Storage Manager (PASM) software is factory-installed on the SmartStor system. PASM runs in the browser on your PC. You can access PASM:
- Directly in your browser (page 16)
• Through SmartNAVI (page 17)
Browser Support
Choose one of the following browsers to use with PASM:
- Internet Explorer
- Netscape Navigator
- Mozilla
- Safari (Mac OS X)
- Fire fox
Finding the SmartStor's IP Address
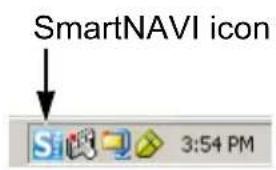
To access the SmartStor in your browser, you must know the SmartStor's IP address. Use SmartNAVI for this purpose.
- Right-click the SmartNAVI icon in the Windows application tray (lower right corner of the screen).
- Choose Open SmartNAVI from the popup menu.
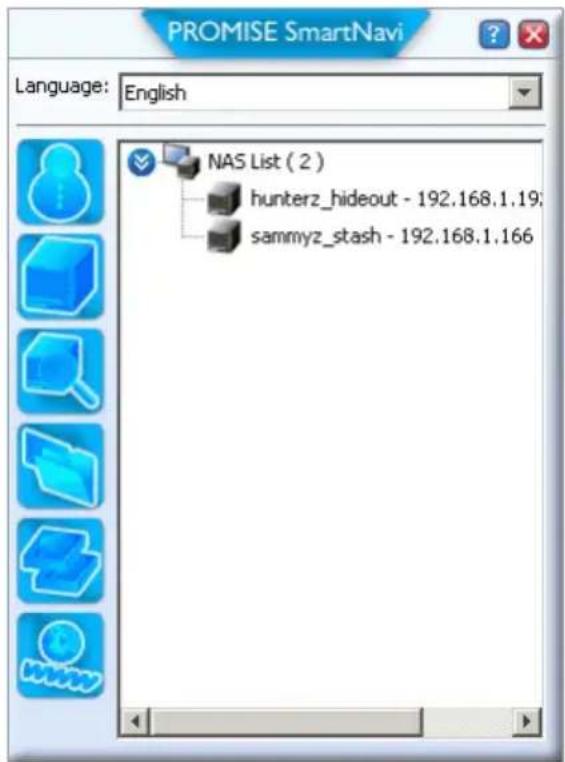
The SmartNAVI MSN window appears with the NAS
List displayed. The IP address of the SmartStor shown in the NAS List.
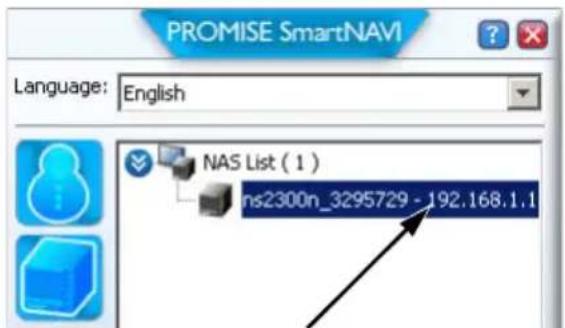
IP address of the SmartStor detected on the network
For more information about SmartNAVI, see "Chapter 4: SmartNAVI" on page 45.
PASM in your Browser
To log into PASM in your browser:
- Start your Browser.
- In the Browser address field, type in the IP address of the SmartStor.
See "Finding the SmartStor's IP Address" on page 15.
Note that the IP address shown below is only an example. The IP address you type into your browser might be different.
- PASM uses an HTTP connection . . . . . . . . . . . . . . . . . . . . . . . . . . . . . . . . . . . . . . . . . . . . . . . . . . . . . . . . . . . . . . . . . . . . . . . . . . . . . . . . . . . . . . . . . . . . http://
- Enter the SmartStor's IP address 192.168.1.1
Together, your entry looks like this: http://192.168.1.1
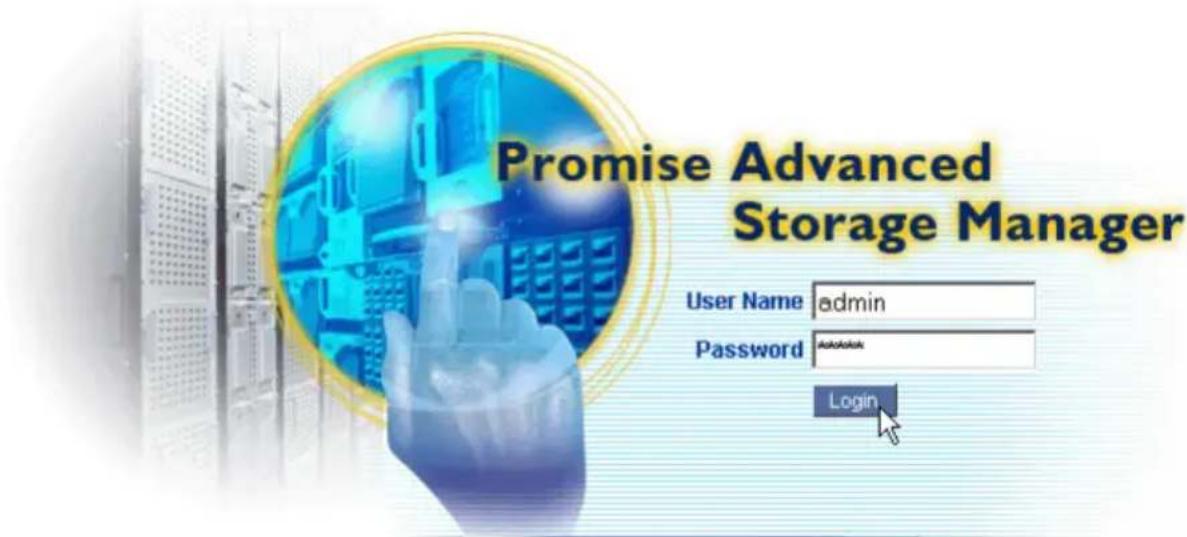
The PASM login screen displays.
© 2008 Promise Technology Inc. All rights reserved.
- Type admin in both the User Name and Password fields, then click the Login button.
The user name and password are case sensitive.
For more information about PASM, see "Chapter 5: PASM" on page 79.
PASM in SmartNAVI
To log into PASM through SmartNAVI:
- On the Windows desktop, right-click the SmartNAVI icon (right).
- Choose Open Advanced Management from the popup menu.
Your default browser starts and the PASM login screen displays.
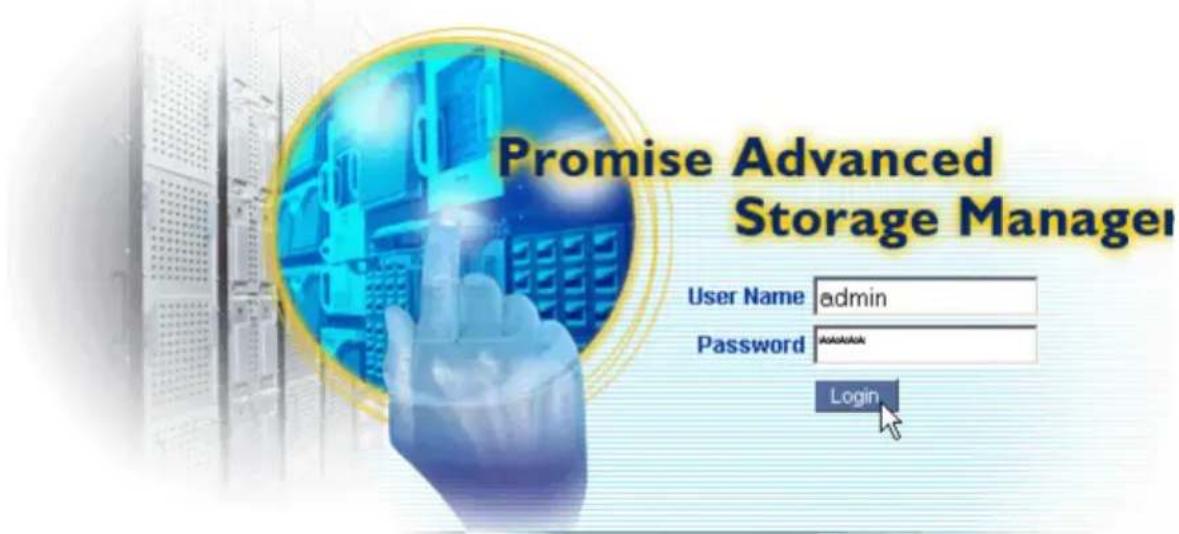
© 2008 Promise Technology Inc. All rights reserved.
- Type admin in both the User Name and Password fields, then click the Login button.
The user name and password are case sensitive.
For more information about PASM, see "Chapter 5: PASM" on page 79.
Shutting Down the SmartStor
To shut down the SmartStor, press and hold the power button until the system status LED turns red. See Figure 3. When the system status LED goes dark, the SmartStor has shut down.
To restart the SmartStor, press the power button again.
Figure 3. Press and hold the Power button
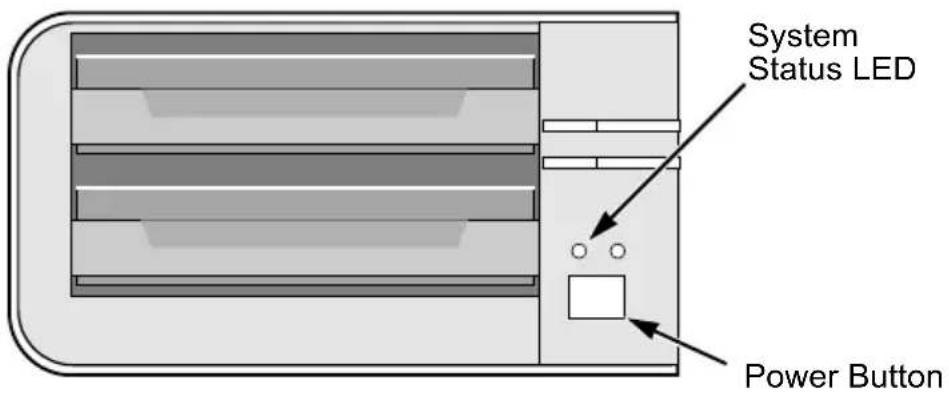
Note: This SmartStor is shown without the front door.
Chapter 3: Connecting to the SmartStor
- Setting up a Network Drive on a Windows PC (page 19)
- Setting up a Network Drive on a UNIX or Linux PC (page 22)
- Setting up a Network Drive on a Macintosh PC (page 26)
- Connecting a USB Printer to SmartStor (page 29)
- Setting up the Print Server on SmartStor (page 30)
- Setting up Windows Printing (page 30)
- Setting up Linux Printing (page 32)
- Setting up Macintosh Printing (page 35)
- Connecting a USB Drive (page 37)
- Disconnecting a USB Drive (page 40)
- Setting-up Apple iTunes (page 40)
To copy files to and from a folder on the SmartStor, you must make the folder a network drive on your PC.
To use the SmartStor as a print server, you must connect the USB printer, enable SmartStor's print server, and set up printing on your PC.
Setting up a Network Drive on a Windows PC
You can also use SmartNAVI for this purpose, see "Mounting a Share Folder / Creating a Network Drive" on page 66. If your PC does not have SmartSYNC, use the following procedure to setup a Network Drive with My Network Places.
To setup a network drive:
- On the Windows desktop, double-click the My Network Places icon.
- Click the Search button in the toolbar.
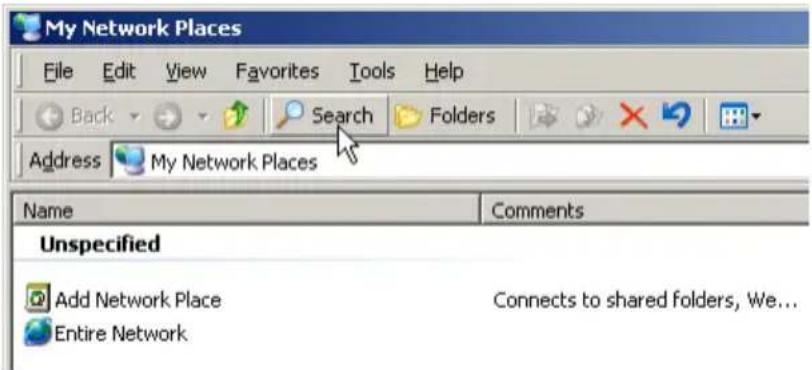
If the Search button is not shown, from the View menu, choose Toolbars, then Standard Buttons.
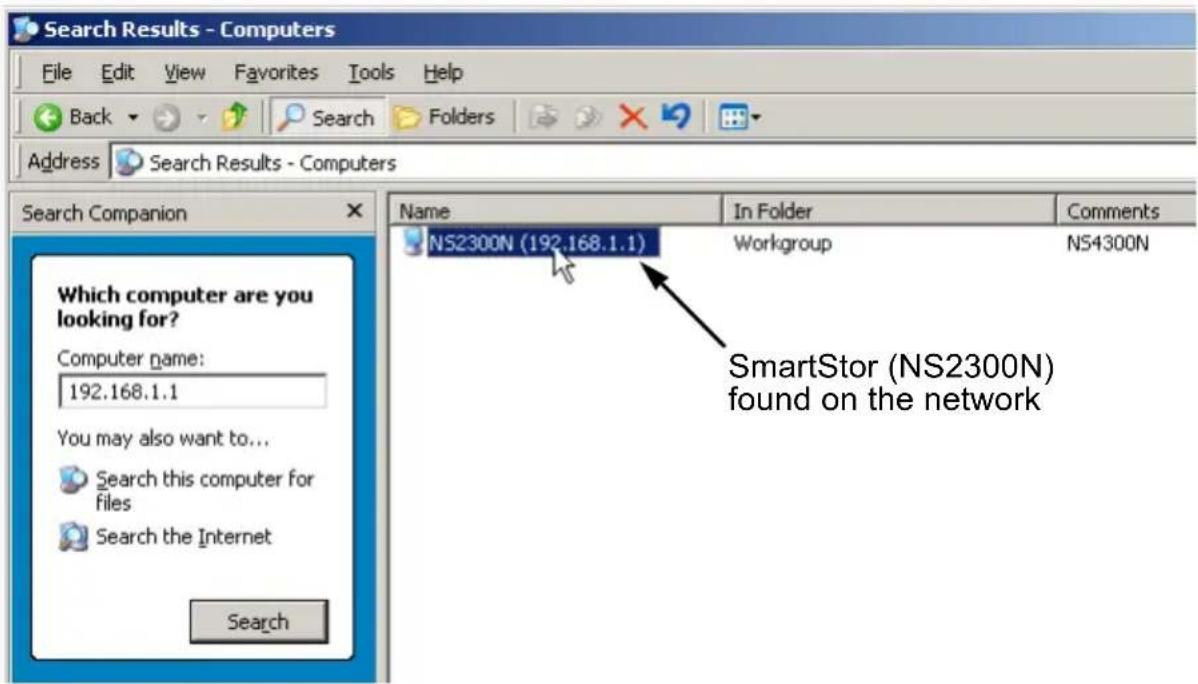
- In the Computer name field, type the IP address of the SmartStor and click the Search button.
See "Finding the SmartStor's IP Address" on page 15.
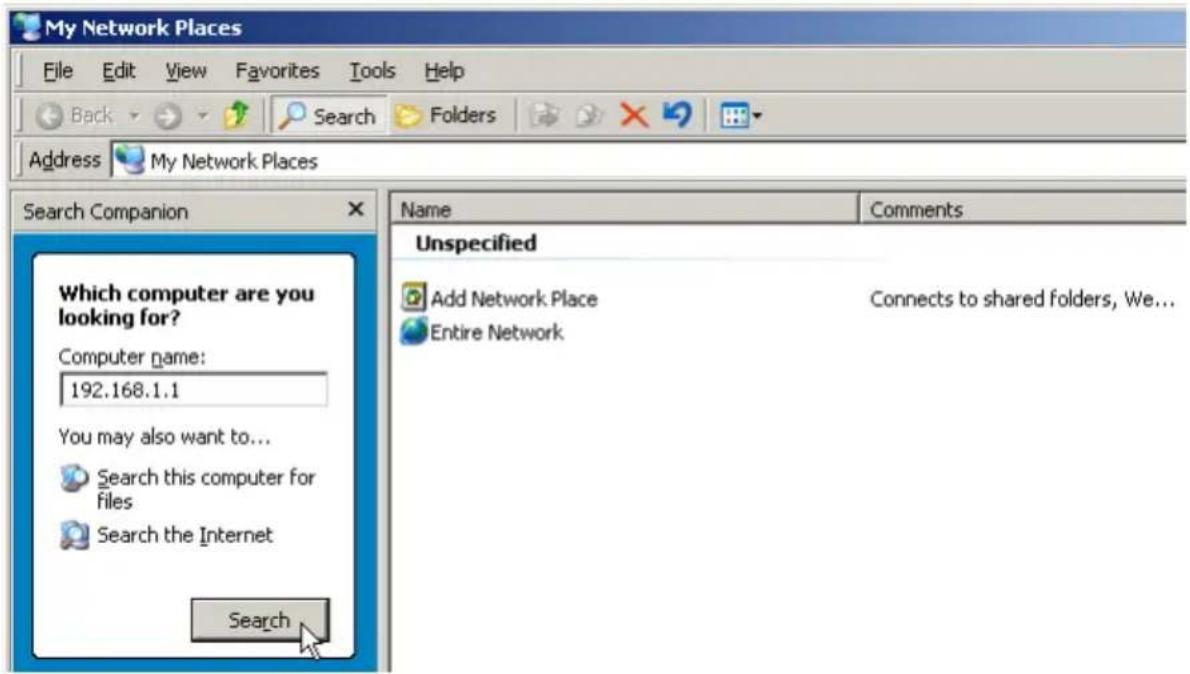
The SmartStor appears in the search results list.
-
Double-click the SmartStor to show the Public folder and any other folders you have created.
-
Right-click the folder you want and choose Map Network Drive from the dropdown menu.
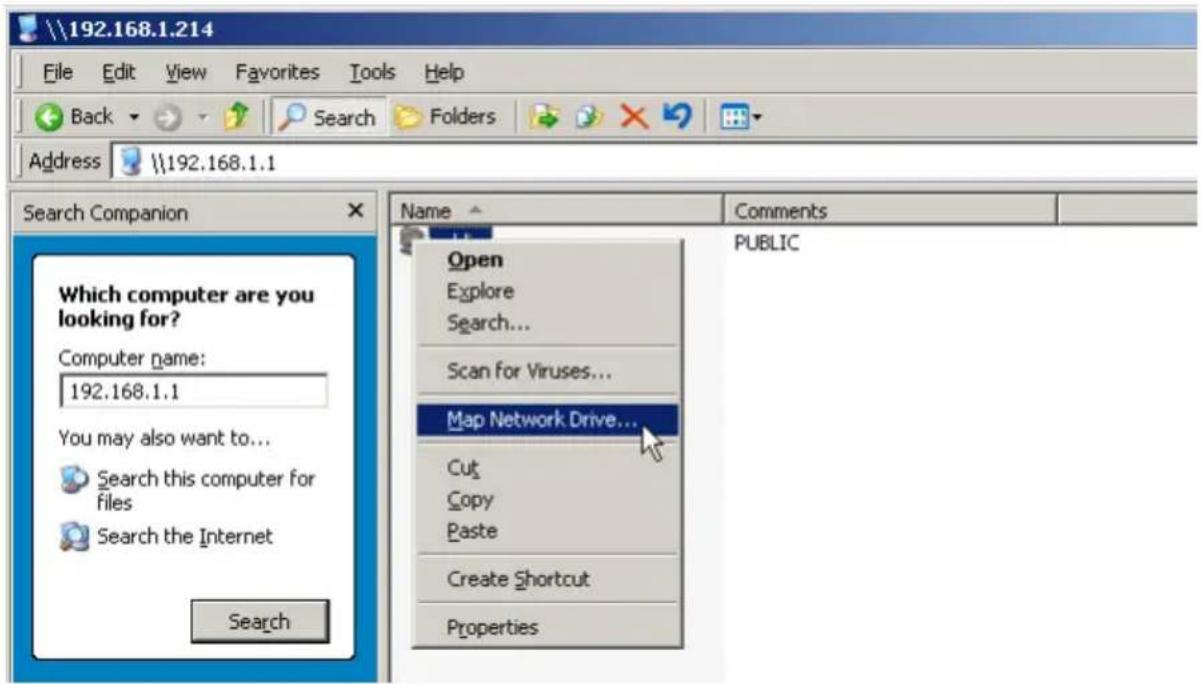
The Map Network Drive dialog box appears.
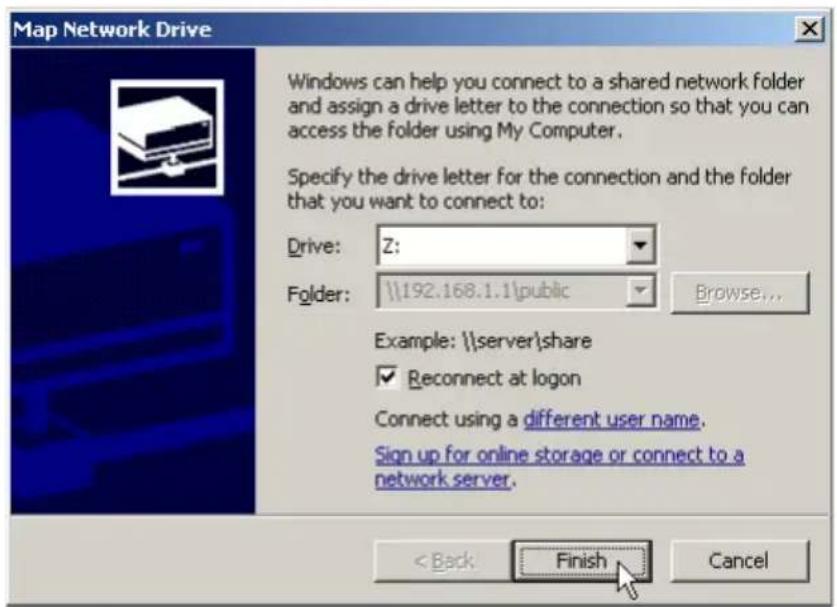
- In the Map Network Drive dialog box, choose a drive letter and click the Finish button.
- Double-click the My Computer icon on your Windows desktop.
The folder on the SmartStor appears under My Computer as a network drive.
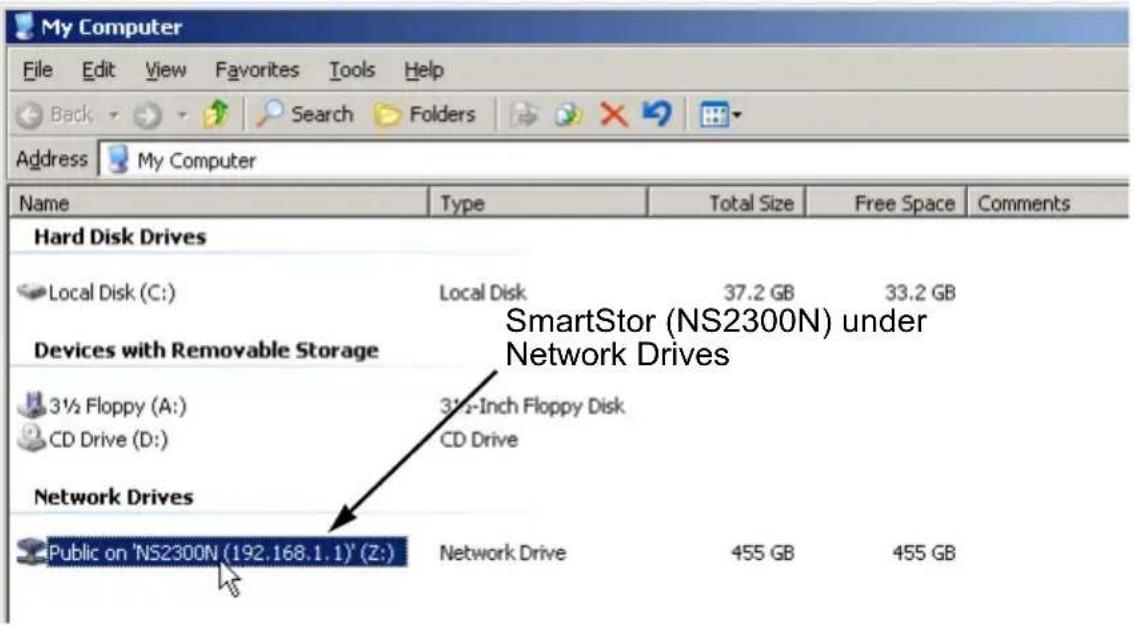
You can now copy files to and from the folder on the SmartStor.
Setting up a Network Drive on a UNIX or Linux PC
Before you can access the SmartStor from a UNIX or Linux PC, you must configure the SmartStor to communicate with UNIX and Linux.
On the Windows PC
1. Start PASM.
See "PASM in your Browser" on page 16 or "PASM in SmartNAVI" on page 17.
2. In the Tree, click the + beside the File & Print icon to expand the Tree, then click the Protocol Control icon.
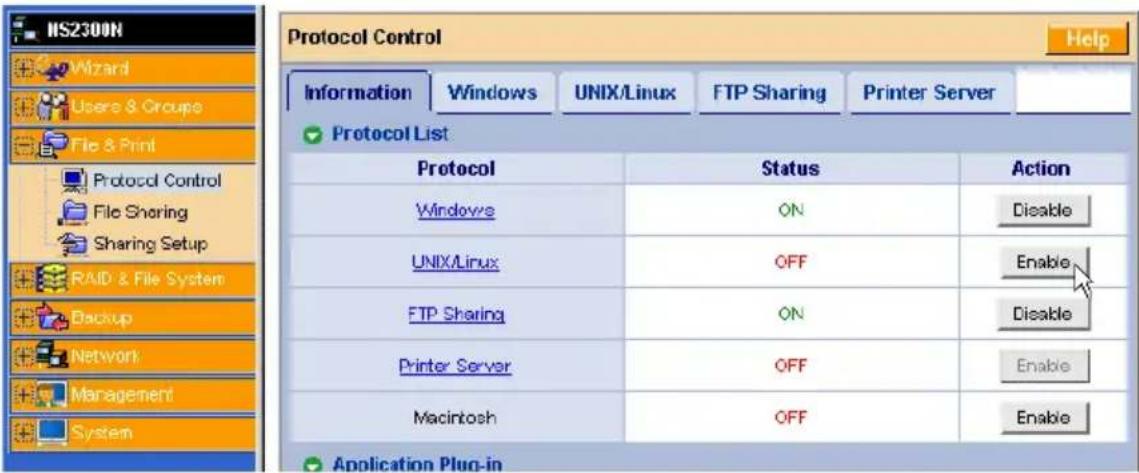
- In the Information tab, click the Enable button next to UNIX/Linux.
- Click the OK button in the confirmation box.
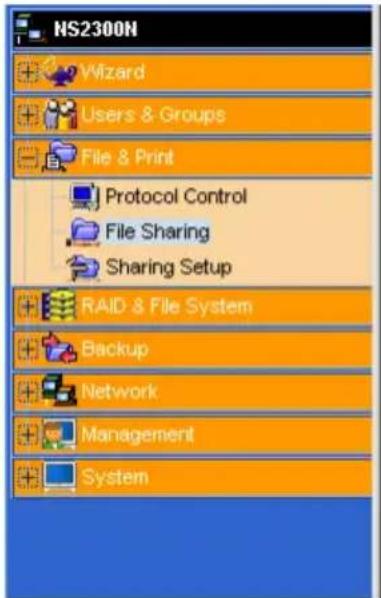
- Click the File Sharing icon in the tree.
- Click the Modify tab.
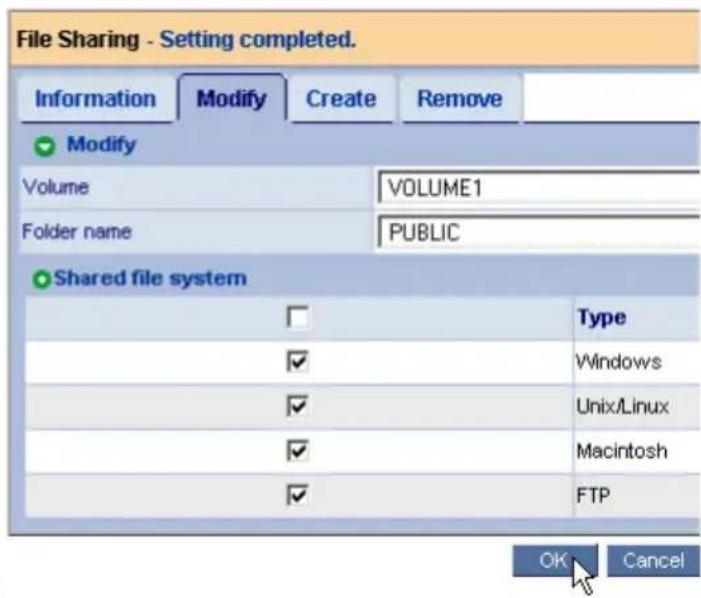
- Check the Unix/Linux box, then click the OK button.
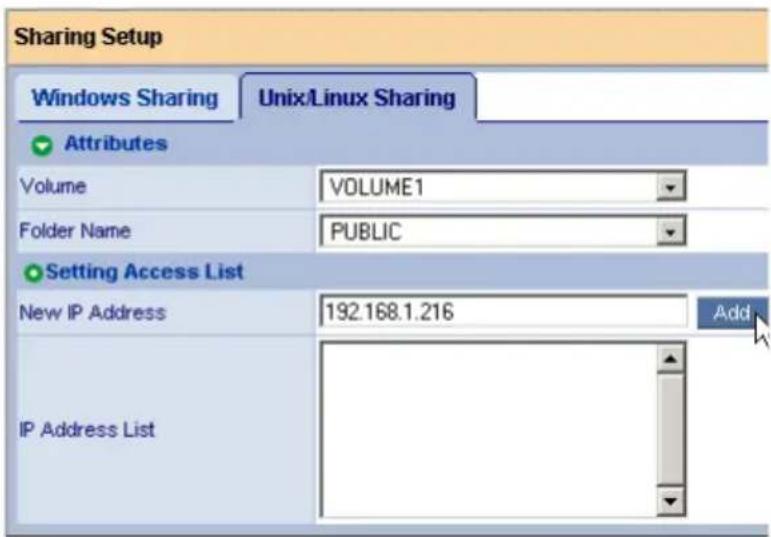
The UNIX/Linux file sharing enables UNIX and Linux PCs to access folders on the SmartStor. In this case, access is given for the PUBLIC folder.
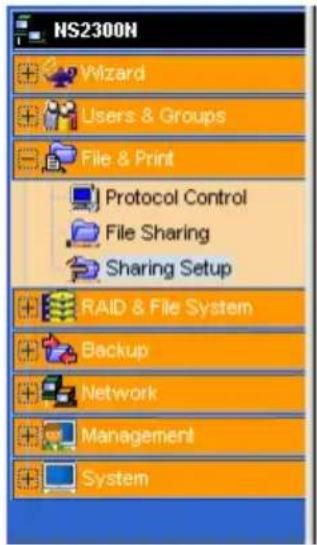
- Click the Sharing Setup icon in the tree.
- Click the UNIX/Linux Sharing tab.
-
Optional. If you are creating a new folder, in the New IP Address field, type the IP address of the UNIX/Linux PC from which you want to access the SmartStor.
-
Click the Add button.
On the UNIX/Linux PC with Command Line Interface
- Open a terminal window.
- Create a new folder for the SmartStor. Type mkdir SmartStor and press Enter.
- Mount the SmartStor. Type mount 192.168.1.1:/VOLUME1/PUBLIC/SmartStor and press Enter.
Note that the IP address shown above is only an example. The IP address you type in your terminal window will be different.
See "Finding the SmartStor's IP Address" on page 15.
Volume1 and Public refer to the default Volume and folder created during setup. See page 11. If you created another volume or folder, use their names.
-
Change to the SmartStor directory. Type cd /SmartStor and press Enter.
You can now copy files to and from the folder on the SmartStor. -
When you are done with the SmartStor, type cd; umount /SmartStor and press Enter.
On the Linux PC with Graphic Desktop
This procedure is for a RedHat Enterprise Linux 4 configuration. If you run a different version of Linux, you might have to adapt the procedure. See your OS documentation.
- From the Applications menu, choose Network Servers.
-
In the Network window, double-click Windows Network.
-
Double-click the SmartStor (NS2300) on the network.
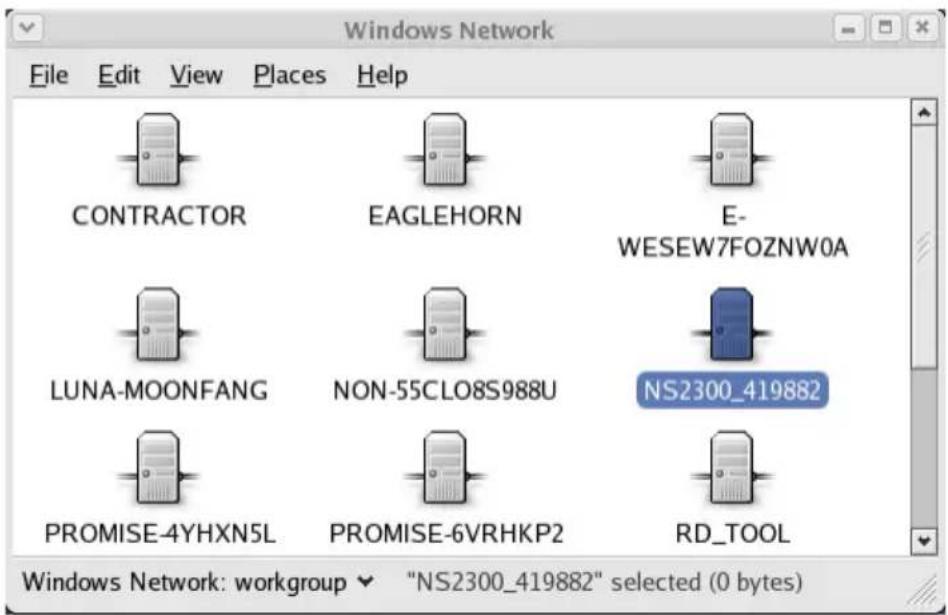
- Double-click the folder you want.
If this is the first time you accessed this folder, an Authentication dialog box opens.
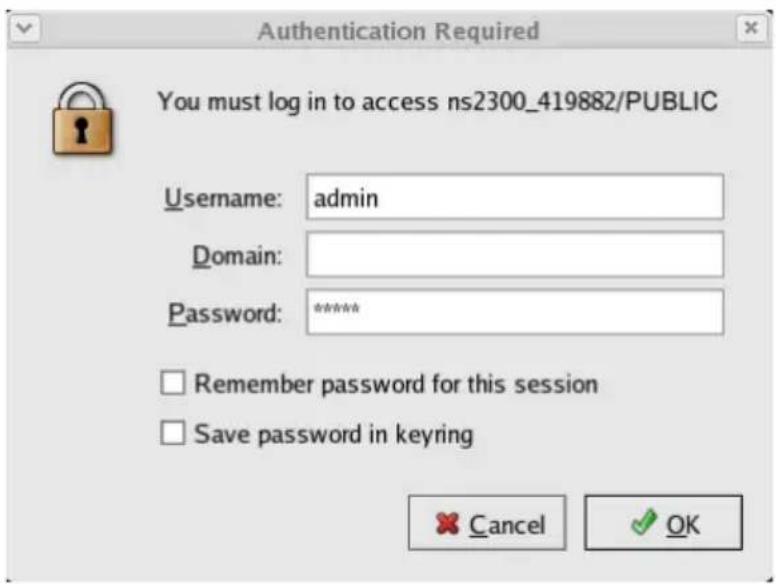
- Type the user name and password in the respective fields, then click the OK button.
The default user name is admin. The default password is admin.
The user name and password are case sensitive.
Leave the Domain field blank.
The folder opens. You can now copy files to and from the folder on the SmartStor.
Setting up a Network Drive on a Macintosh PC
Before you can access the SmartStor from a Macintosh (MacOS X) PC, you must configure the SmartStor to communicate with the MacOS.
On the Windows PC
- Start PASM.
See “PASM in your Browser” on page 16 or “PASM in SmartNAVI” on page 17.
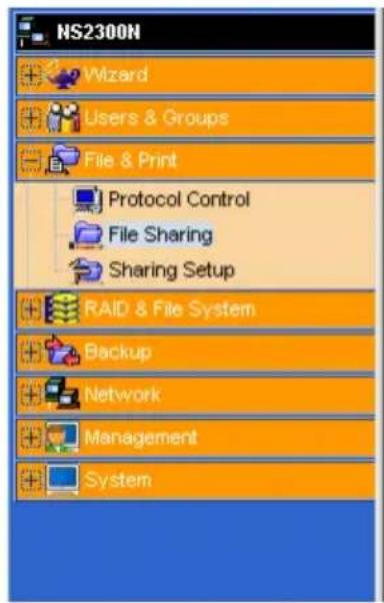
- In the Tree, click the + beside the File & Print icon to expand the Tree, then click the Protocol Control icon.
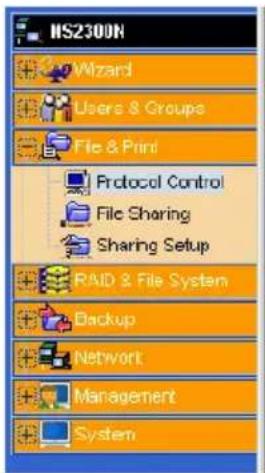
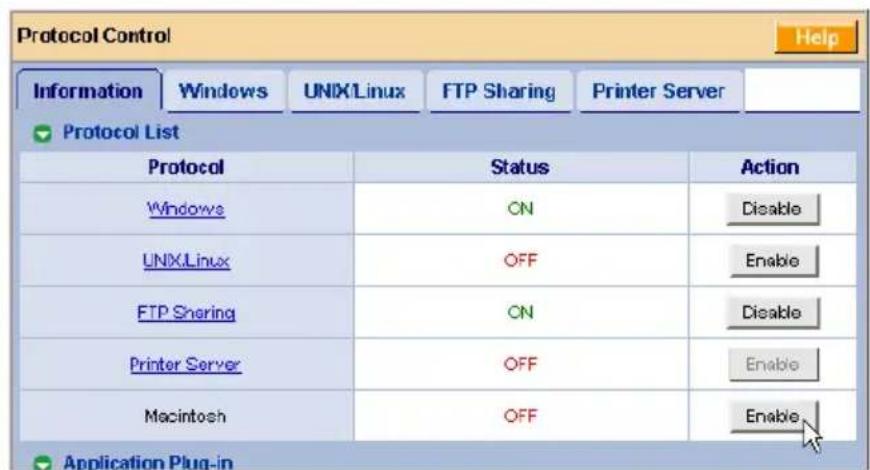
- In the Information tab, click the Enable button next to Macintosh.
- Click the OK button in the confirmation box.
- Click the File Sharing icon in the Tree.
- Click the Modify tab.
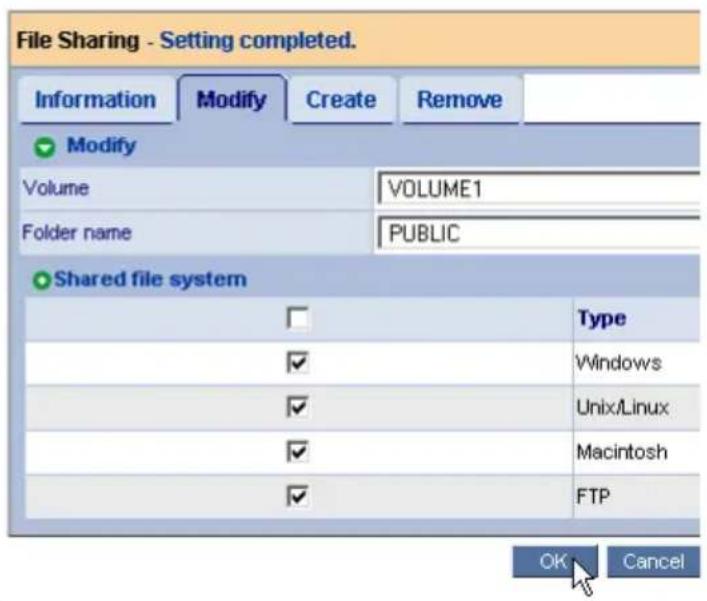
7. Check the Macintosh box, then click the OK button.
The Macintosh file sharing enables Macintosh PCs to access folders on the SmartStor. In this case, access is given for the PUBLIC folder.
On the Macintosh PC
1. From the Go menu, choose Connect to Server.
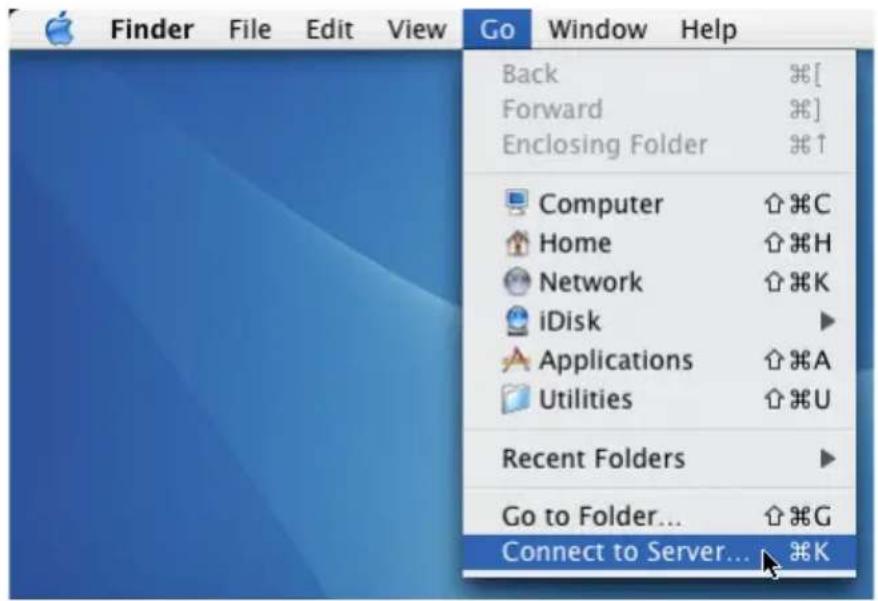
2. In the Connect to Server dialog box, type afp://192.168.1.1 and click the Connect button.
Note that the IP address shown below is only an example. The IP address you type in the dialog box on your Macintosh will be different.
See "Finding the SmartStor's IP Address" on page 15.
Click the + button to add this IP address to the Favorite Servers list.
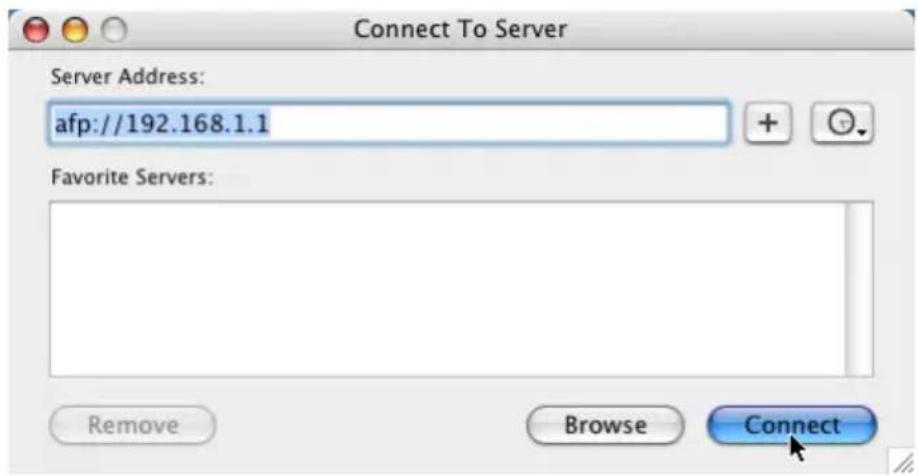
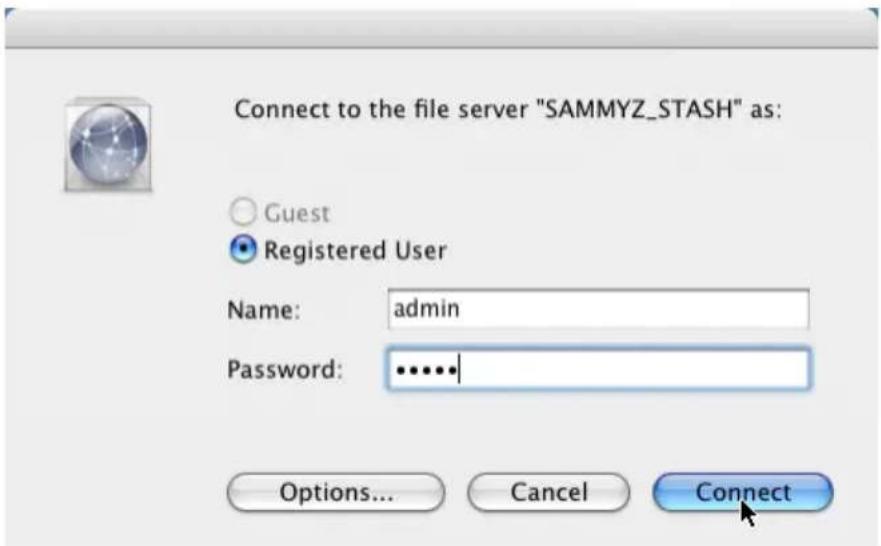
3. Type the user name and password in the respective fields, then click the OK button.
The default user name is admin. The default password is admin. The user name and password are case sensitive.
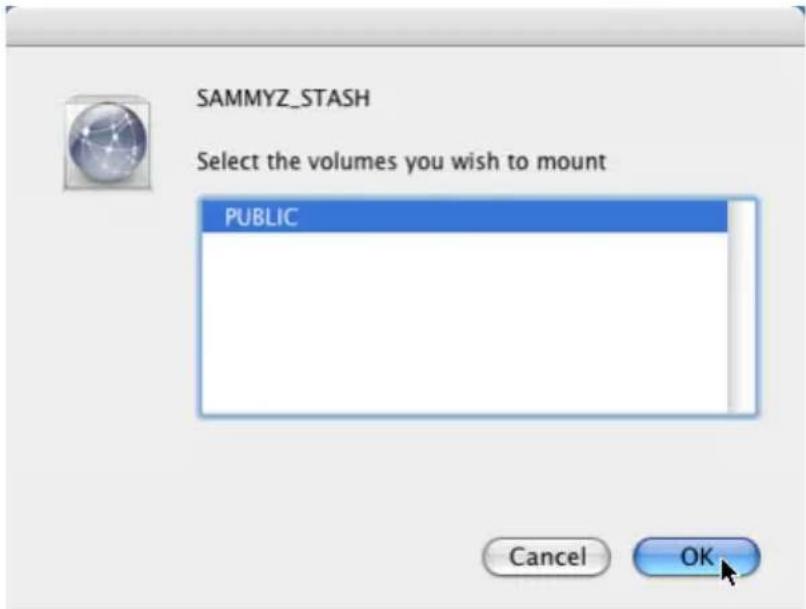
- In the NS2300 dialog box, click the folder you want, then click the OK button.
- In the NS2300 Welcome screen, click the OK button.

A window opens on the Macintosh desktop to access the folder on the SmartStor.
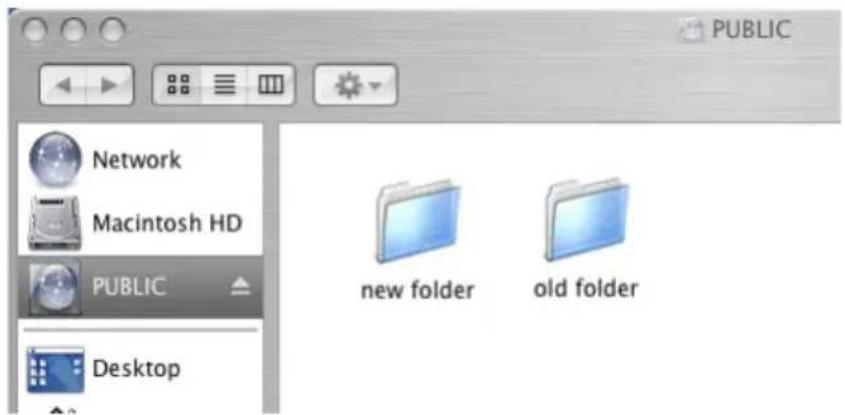
You can now copy files to and from the folder on the SmartStor.
Connecting a USB Printer to SmartStor
To connect a USB printer to the SmartStor:
- Set up your printer according to the printer's Setup Guide or User Manual.
- Install the printer drivers onto your PC as described in the printer's Setup Guide or User Manual.
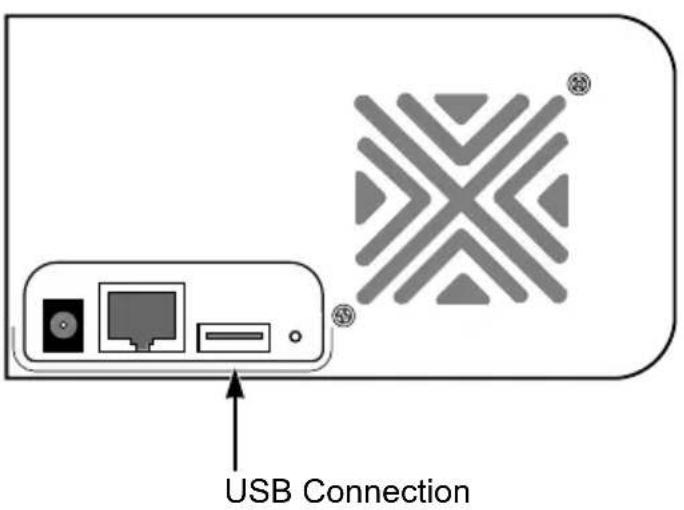
- Attach the USB cable from your printer to one of the USB connections on the back of the SmartStor.
Setting up the Print Server on SmartStor
To set up the SmartStor's print server:
- Start PASM.
See "PASM in your Browser" on page 16 or "PASM in SmartNAVI" on page 17.
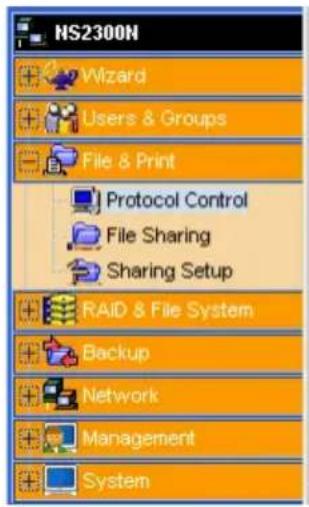
- In the Tree, on the left side of the PASM screen, click the + beside the File & Print icon to expand the Tree.
- Click the Protocol Control icon, then click the Printer Server tab.
- Click the Enable option button beside Printer Server.
- Click the OK button to save your settings.

Setting up Windows Printing
To set up printing on a Windows PC:
- On the Windows desktop, double-click the My Network Places icon.
- Click the Search button in the toolbar.
If the Search button is not shown, from the View menu, choose Toolbars, then Standard Buttons.
- In the Computer name field, type the IP address of the SmartStor and click the Search button in the side bar.
See "Finding the SmartStor's IP Address" on page 15.
The SmartStor appears in the search results list.
- In the computer list, double-click the SmartStor to open it.
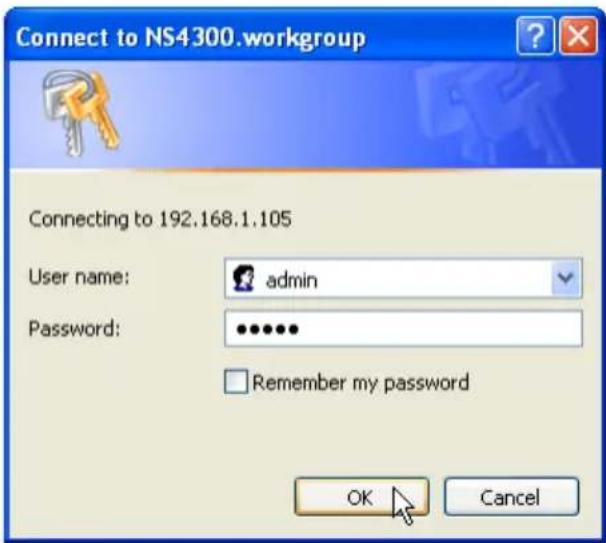
If the Connect to dialog box appears, type the user name and password in the respective fields, then click the OK button.
The default user name is admin. The default password is admin.
The user name and password are case sensitive.
- Right-click the usbptr1 icon folder and choose Connect... from the dropdown menu.
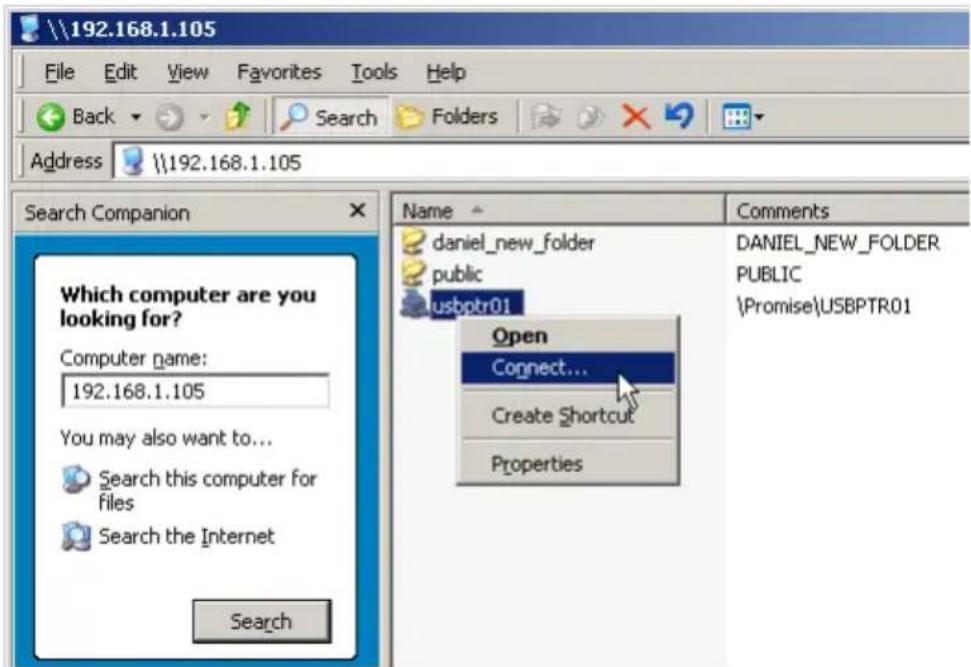
-
When the warning message about printer drivers appears, click the OK button to continue.
-
In the Add Printer Wizard, click the Manufacturer and model name of your USB printer, then click the OK button.
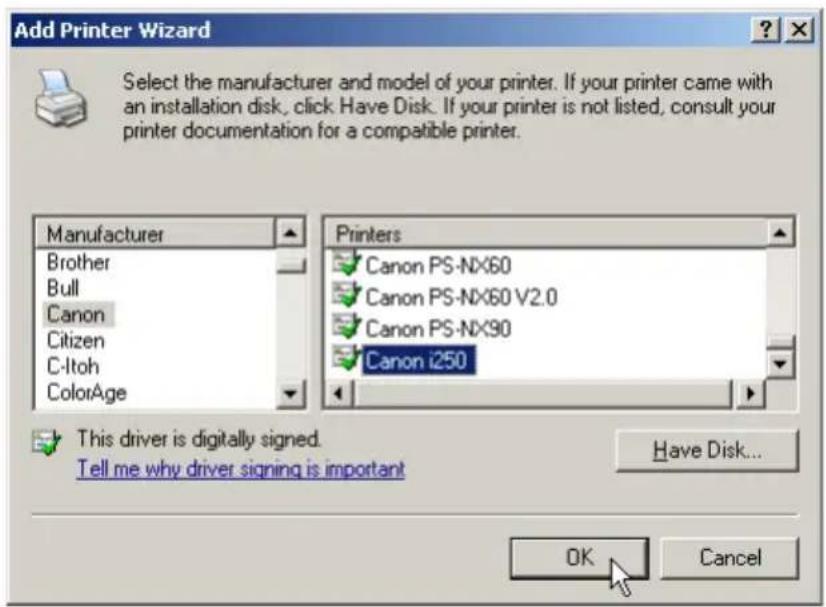
- In the Add Printer Wizard, click the OK button.
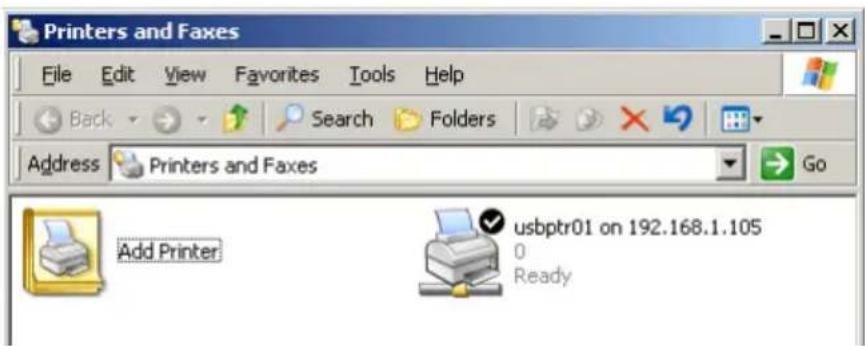
- To verify printer installation, in the Windows Start menu, choose Settings, then Printers and Faxes.
The Printers and Faxes screen appears. The usbptr1 is the USB printer on the SmartStor.
Setting up Linux Printing
This procedure is for a RedHat Enterprise Linux 4 configuration. If you run a different version of Linux, you might have to adapt the procedure. See your OS documentation.
- From the Applications menu, choose System Settings, then Printing.
Printer configuration window opens.
- Click the New button.
Add a new print queue dialog box opens.
- Click the Forward button.
- In the Name field, type a name for the printer, such as NAS_printer, a description, and click the Forward button.
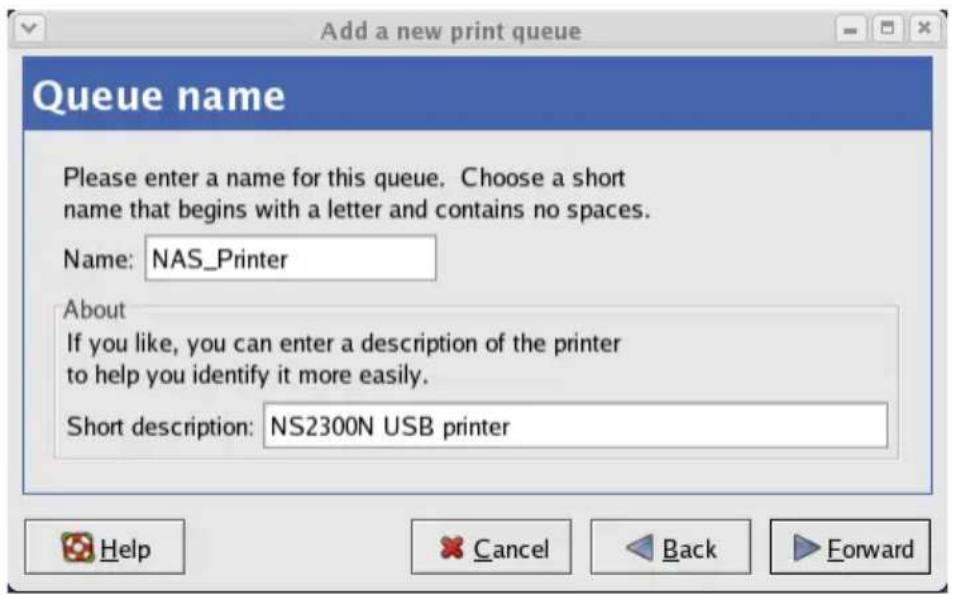
- From the Select a queue type dropdown menu, choose Network Windows (SMB).
- Scroll the list and click the triangle icon beside NS2300.
USBPTR01 appears below NS2300. USBPTR01 represents the USB printer connected to the SmartStor.
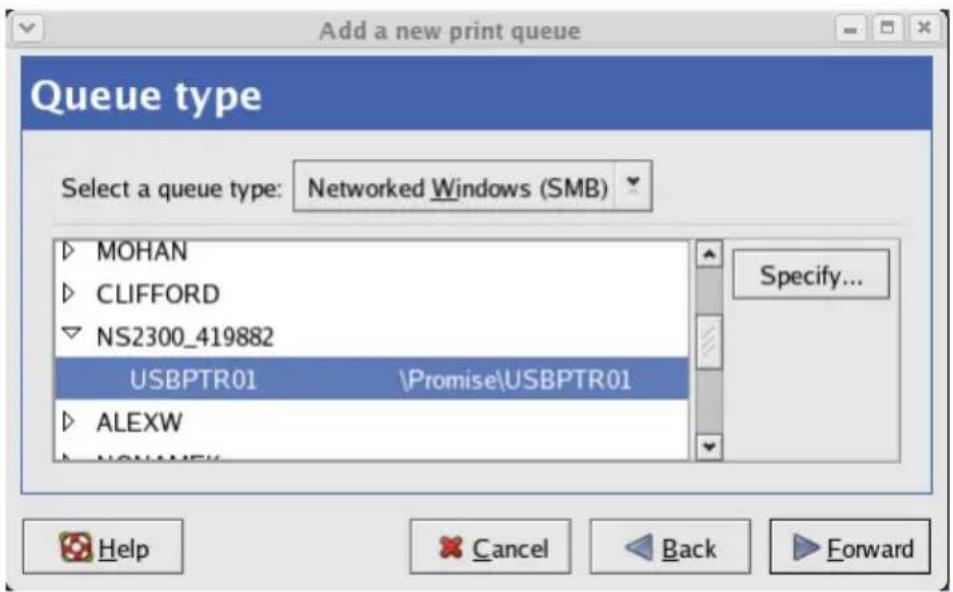
- Highlight USBPTR01 and click the Forward button.
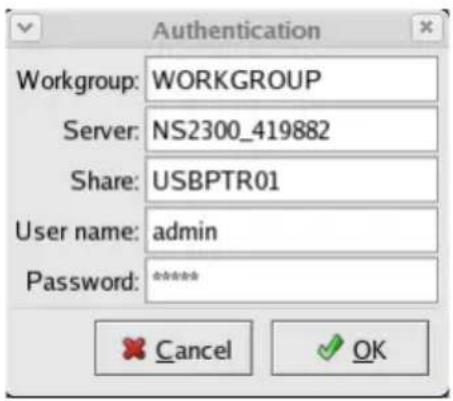
The Authentication dialog box opens.
In the User name and Password fields, type admin, then click the OK button.
The user name and password are case sensitive.
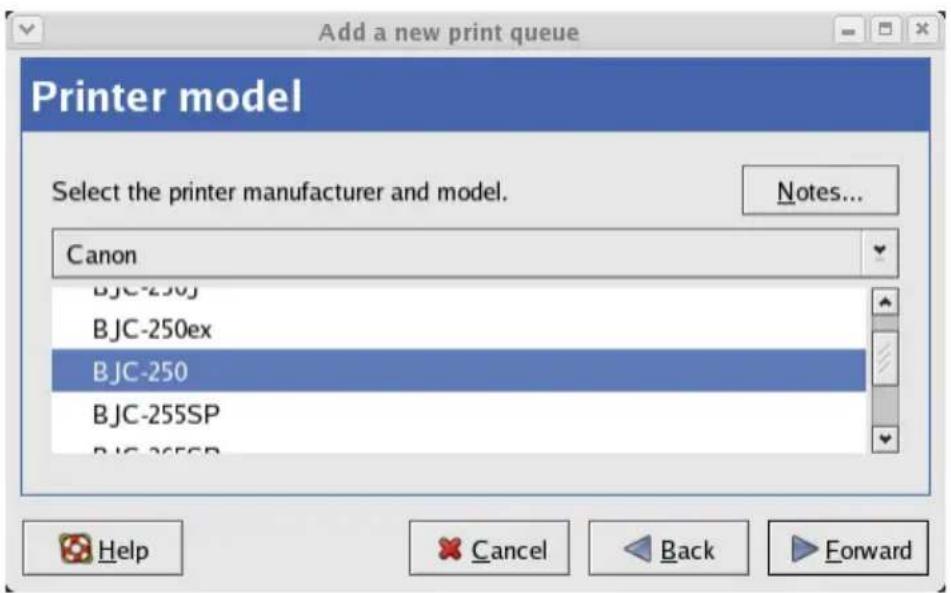
The Printer Model dialog box opens.
- From the dropdown menu, choose the manufacturer of your printer.
From the model list, highlight the model of your computer.
Then click the Forward button.
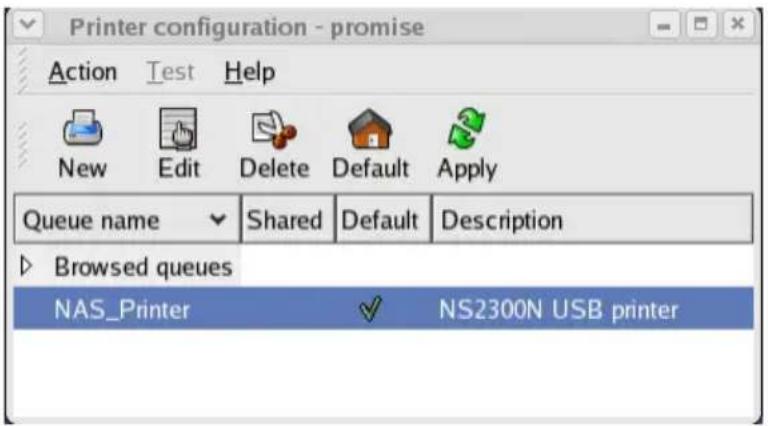
- Click the Finish button.
USBPTR01 is added to your printer list.
Setting up Macintosh Printing
To set up printing on a Macintosh PC:
- From the Apple Menu, choose System Preferences.
- Double-click the Print & Fax icon.
- Click the Setup Printers button.
- In the Printer List, click the Add icon.
The Printer List displays a new panel.
-
In the new panel, from the popup menus, choose:
-
Windows Printing
-
Workgroup
-
From the list, highlight the SmartStor, then click the Choose button.
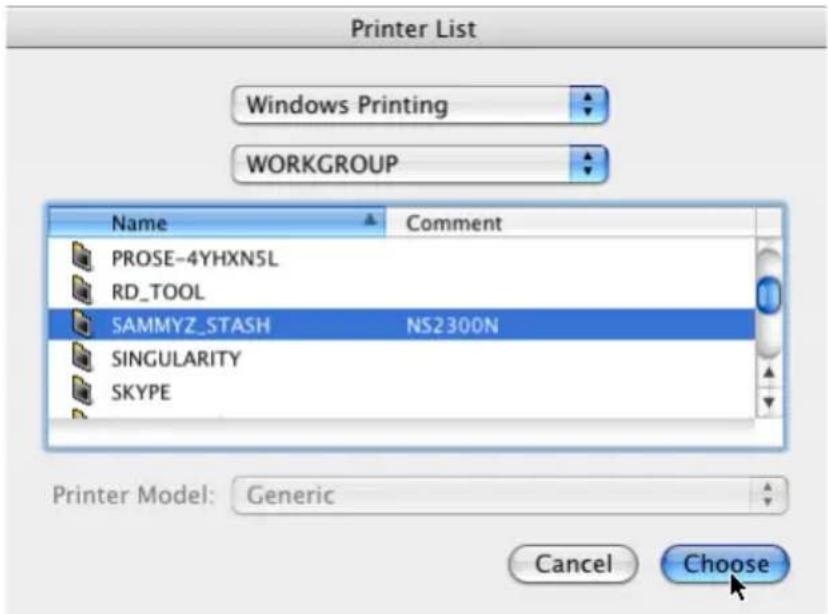
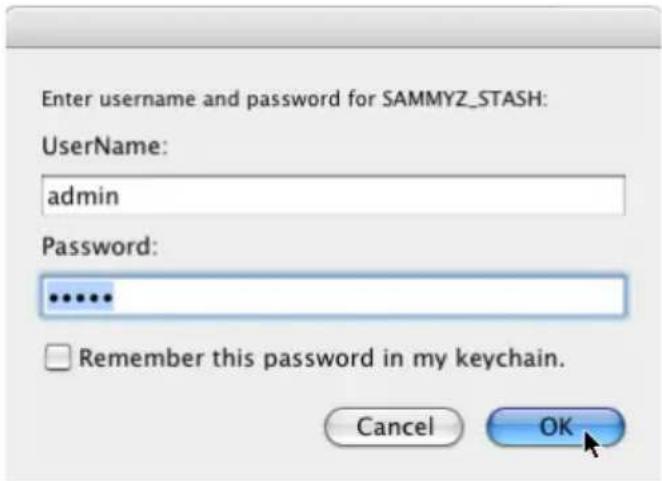
A user name and password dialog box appears.
- Type the user name and password in the respective fields, then click the OK button.
The default user name is admin. The default password is admin.
The user name and password are case sensitive.
The printer list displays a new panel.
- Highlight the USBPTR01 in the list.
USBPRT01 represents the USB printer connected to the SmartStor.
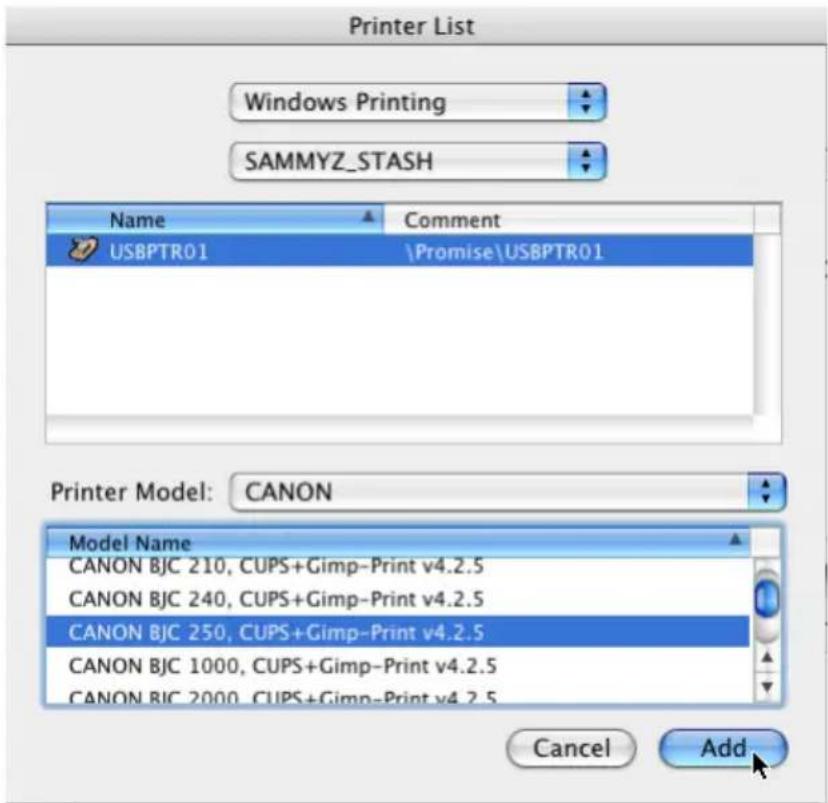
- In the Printer Model popup menu, choose the make of your printer.
- In the Model Name list, choose the model of your printer.
11. Click the Add button.
USBPTR01 is added to your printer list.

Connecting a USB Drive
To connect a USB drive to the SmartStor, attach the USB cable from your external drive to one of the USB connections on the back of the SmartStor.
If you have a USB memory stick, attach it directly to one of the USB connections or use a USB cable, whichever is more convenient.
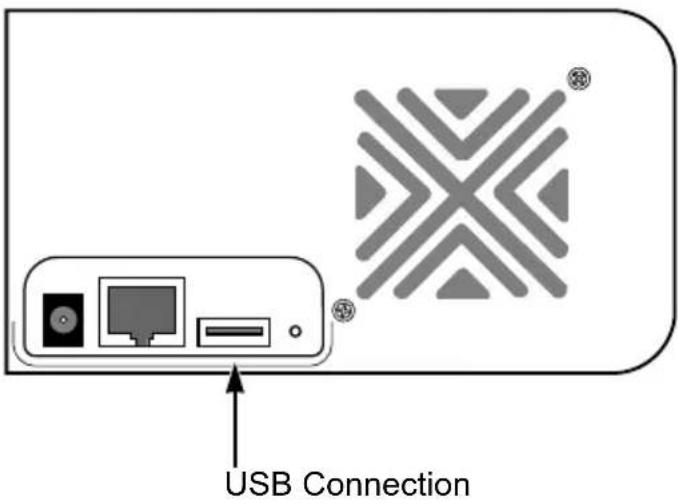
The USB drive or memory stick appears as a folder called usbdisk when you create your network drive. See the instructions on the following page.
SmartStor supports USB drives and memory sticks formatted to FAT32 and Ext3 file formats. If the SmartStor does recognize the USB drive or memory stick, the
usbdisk folder does not appear. See "Formatting an External USB Drive or Memory Stick" on page 104.
Windows PC
The USB drive appears as a folder on the SmartStor when you create a network drive on a Windows PC.
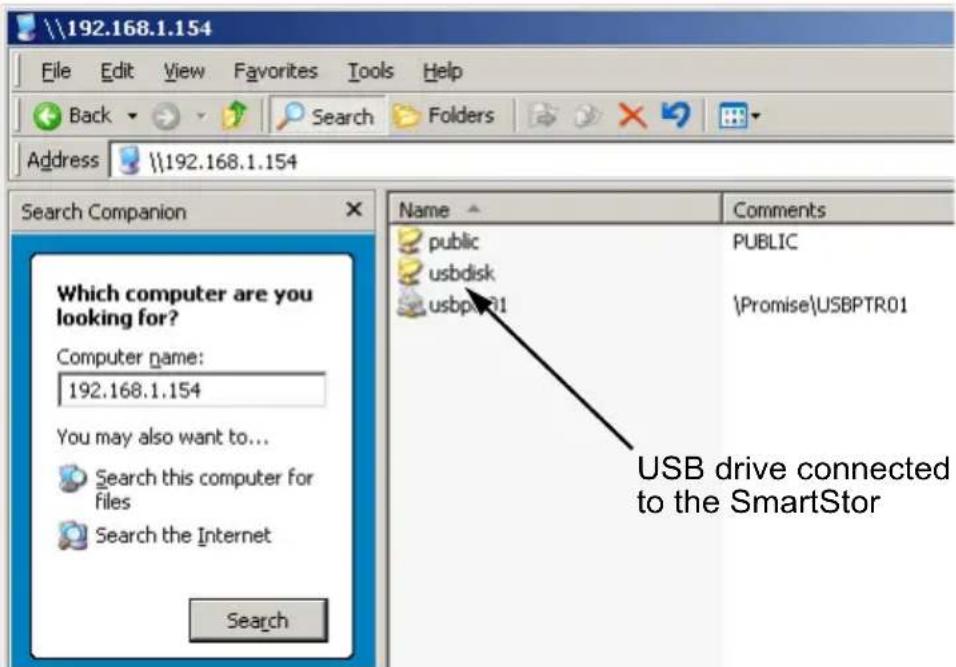
Follow the procedure "Setting up a Network Drive on a Windows PC" on page 19, but choose the usbdisk folder instead of the public folder.
Linux PC
The USB drive appears as a folder on the SmartStor when you create a network drive on a Linux PC.
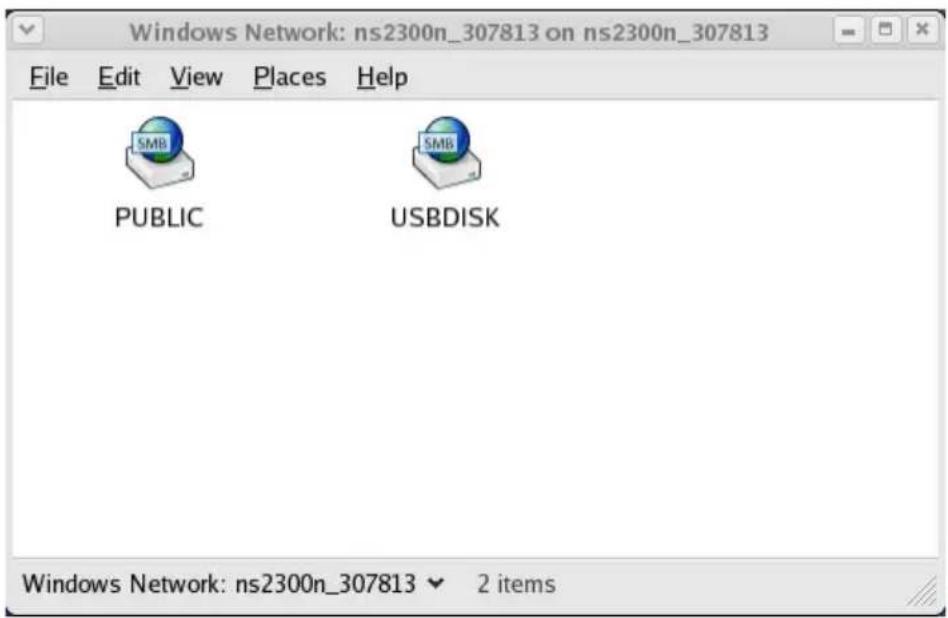
Follow the procedure "Setting up a Network Drive on a UNIX or Linux PC" on page 22, but choose the USBDISK folder instead of the PUBLIC folder.
Macintosh PC
The USB drive appears as a folder on the SmartStor when you create a network drive on a Macintosh PC.
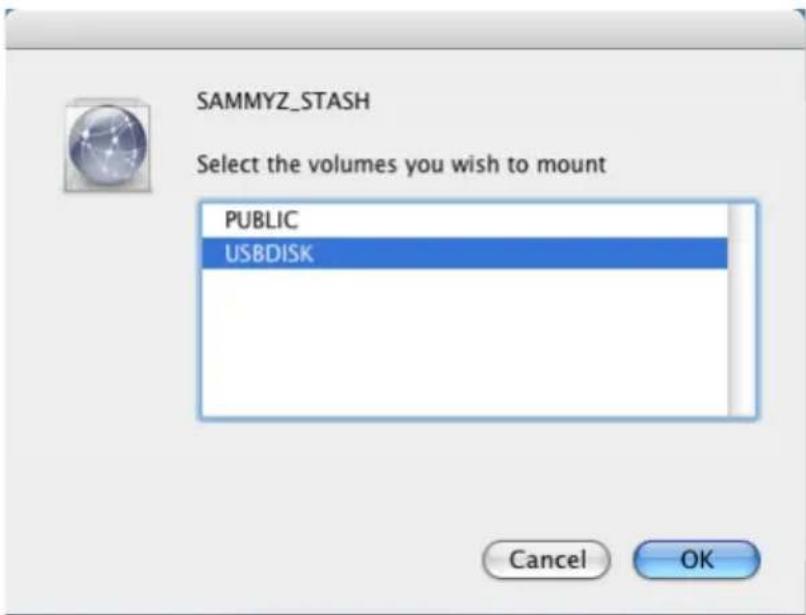
Follow the procedure "Setting up a Network Drive on a Macintosh PC" on page 26, but choose the USBDISK folder instead of the PUBLIC folder.
Disconnecting a USB Drive
To disconnect a USB drive or memory stick from the SmartStor:
- Be sure that no files on the USB drive or memory stick are still open.
- Unplug the USB drive or memory stick from the SmartStor.
The SmartStor automatically unmounts the USB drive or memory stick.
Setting-up Apple iTunes
The iTunes server plug-in enables SmartStor to be a shared resource in the Apple iTunes user interface. You must perform the setup operation on the Windows PC where you installed SmartNAVI.
Downloading the iTunes Plug-in
To download the iTunes plug-in:
- Download your iTunes plug-in from the Promise Support Website. Plug-in file names end with a .ppg extension.
- Save the plug-in file to a convenient place on your PC.
Installing the iTunes Plug-in
To install the iTunes plug-in using SmartNAVI:
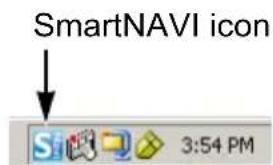
- Right-click the SmartNAVI icon in the Windows application tray (lower right corner of the screen).
- Choose Open SmartNAVI from the popup menu.
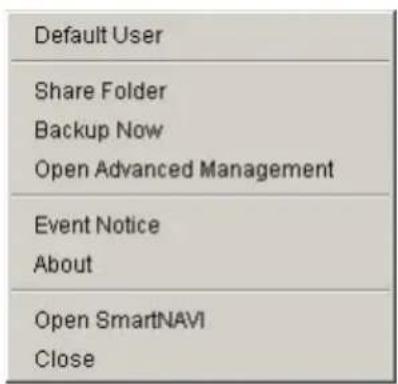
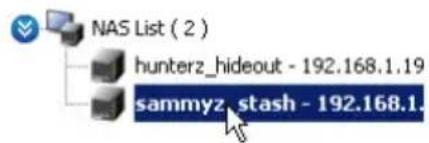
- Double-click a system in the NAS List.
The Main Window opens.
- Click the NAS Management icon.
- Click the Add Plugin button.
- Do one of the following actions:
- Type the name of the plug-in file
- Click the folder icon, navigate to the plug-in file, click it, then click the Open button
- Click the OK button.
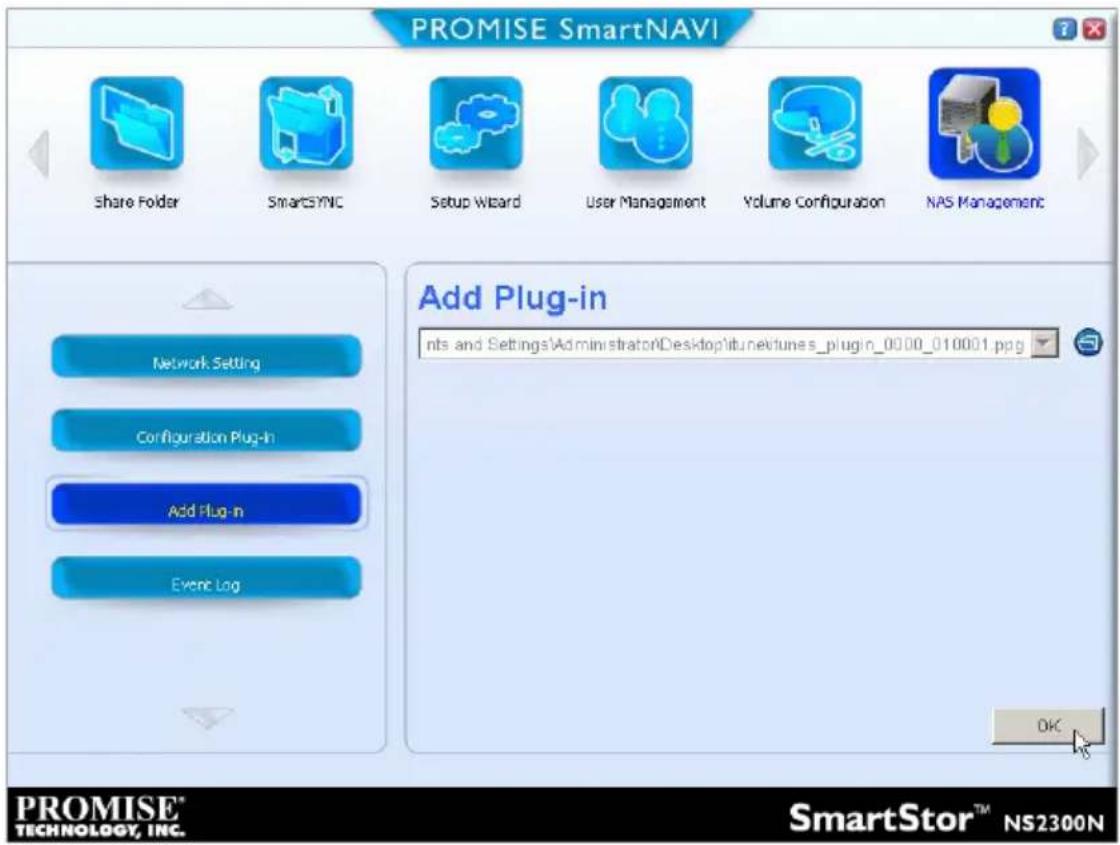
After a few moments, the plug-in is added.

Warning
Do not disconnect the power or shut down the SmartStor while the plug-in installation is running!
- Click the Configure Plugin button.
The newly added plug-in appears in the list. Its Service Status is OFF.
- Click the plug-in to choose it.
The plug-in's name turns red.
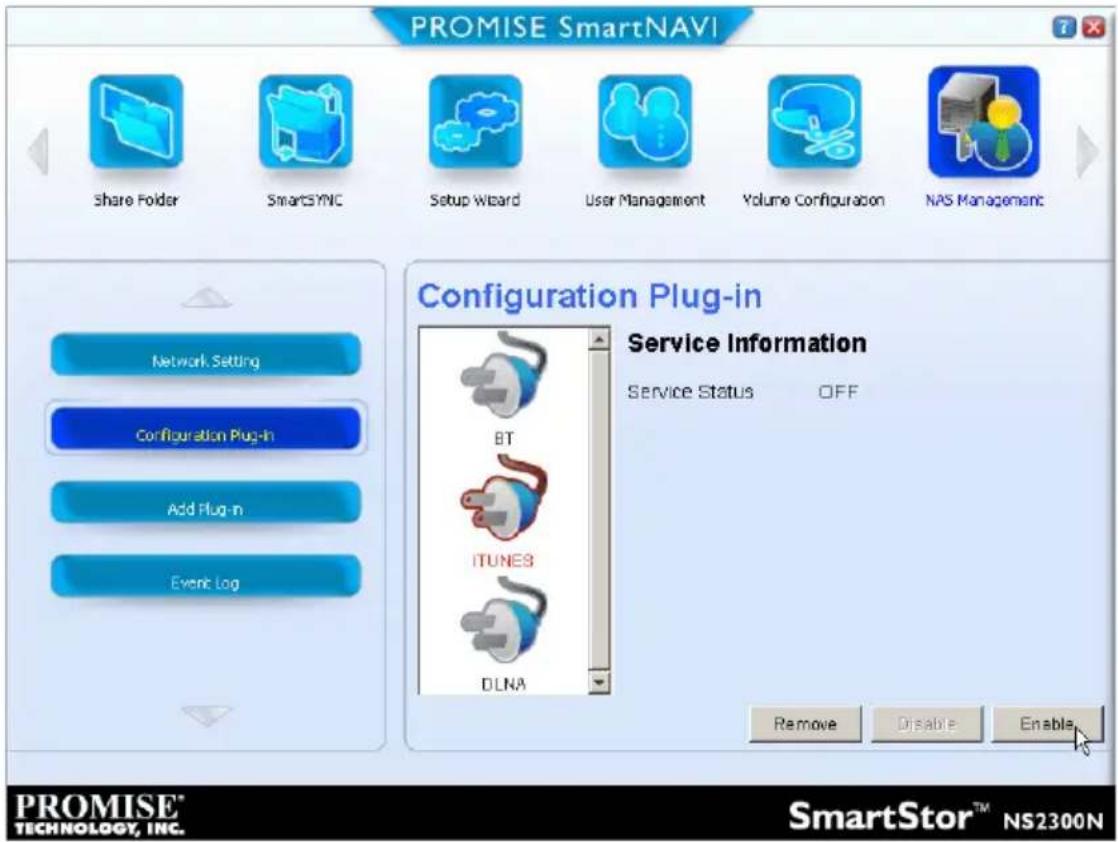
- Click the Enable button.
After a moment, the Service Status changes to ON.
The plug-in is now installed SmartStor.

Note
You can also install the iTunes plug-in using PASM. See "Adding Plug-ins" on page 94 and "Enabling and Disabling Plug-ins" on page 95.
Installing and Configuring Apple iTunes
After you have installed the iTunes plug-in, your system is ready to install and configure iTunes.
- Go to the Apple website and download iTunes.
- Install iTunes onto your PC.
- Be sure your SmartStor is running and connected to your network.
- Open the iTunes application.
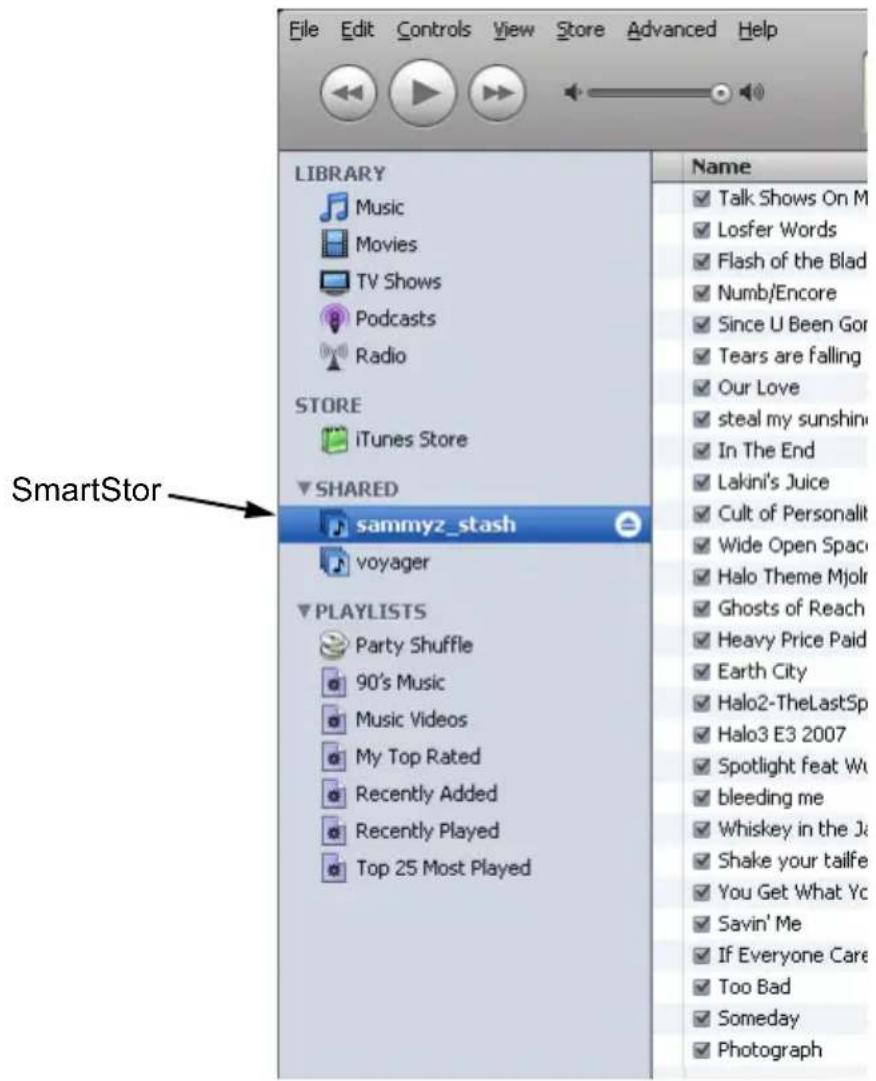
The SmartStor's network name appears on the iTunes screen under Shared.
Click on the SmartStor to display the items stored there.
Chapter 4: SmartNAVI
• Working with SmartNAVI (page 45)
• Managing Users and Groups (page 50)
• Managing RAID Volumes (page 55)
- Managing Backups (page 58)
- Managing Share Folders (page 64)
- Making Management Settings (page 67)
• Managing Downloads (page 75)
Working with SmartNAVI
The SmartNAVI software connects your PC to the SmartStor, performs backups, changes the network settings, create RAID volumes, add and mounts folders, and manages file downloads from the Internet.
This category includes the following topics:
- Opening SmartNAVI (page 45)
- Opening the MSN Window (page 46)
- Opening the Main Window (page 46)
- Choosing a SmartNAVI Language (page 47)
- Starting the Advanced Storage Manager (PASM) (page 47)
- Viewing SmartNAVI Information (page 48)
- Closing SmartNAVI (page 49)
Opening SmartNAVI
To open SmartNAVI:
-
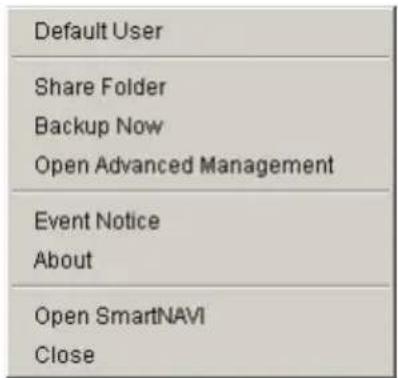
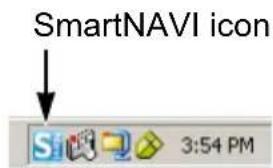
Right-click the SmartNAVI icon in the Windows application tray (lower right corner of the screen).
-
Choose Open SmartNAVI from the popup menu.
Opening the MSN Window
To open the MSN Window, do one of the following actions:
- If the Main Window is open – Click the close icon at the top right corner of the Main Window.
- If neither Window is open – Right-click the SmartNAVI icon in the application tray and choose Open SmartNAVI from the popup menu.
The MSN Window opens.
Opening the Main Window
To open the Main Window, do one of the following actions:
- If neither Window is open – Double-click the SmartNAVI icon in the application tray.
When the MSN Window opens, double-click a system in the NAS List.
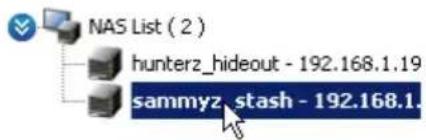
- If the MSN Window is open – Double-click a system in the NAS List. The Main Window opens.
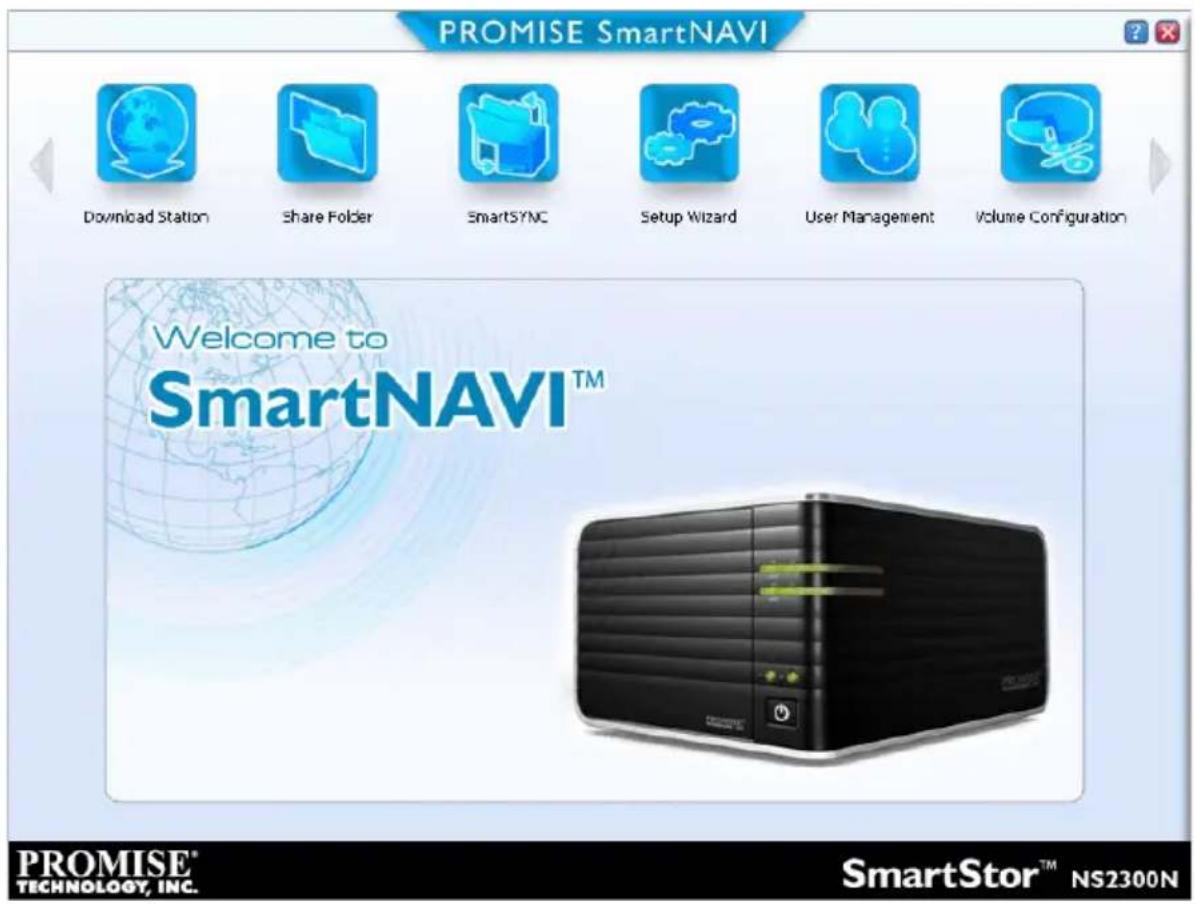
Choosing a SmartNAVI Language
To choose a language:
- Go to the MSN Window.
- Click the Language dropdown menu and choose the language you prefer.

Starting the Advanced Storage Manager (PASM)
This feature opens Promise Advanced Storage Manager (PASM) in your default browser. See the PASM online help or “Chapter 5: PASM” on page 79 for more information.
You can open PASM from:
- MSN Window
- SmartNAVI tray icon
- Your browser
MSN Window
- Click the system in the NAS List that you want to open in PASM.
- Click the Open Advanced Management icon (right).
The PASM login screen appears in your browser.

SmartNAVI Tray Icon
- Right-click the SmartNAVI icon in the application tray.
- Choose Open Advanced Management in the popup menu.
The PASM login screen appears in your browser.
Browser
To use this method, you must know the IP address of the NAS system. See "Finding the SmartStor's IP Address" on page 15.
- Open a browser window.
- In the browser's address field, type the IP address of your NAS system.
Example: http://192.168.1.183/
- Press the Enter key.
The PASM login screen appears in your browser.
Viewing SmartNAVI Information
SmartNAVI is the software application that connects your PC with the SmartStor NAS system.
To view information about SmartNAVI:
- Right-click the SmartNAVI icon in the application tray.
- Choose About from the popup menu.
The About window appears and lists the following information:
- SmartNAVI Version number
- Java Virtual Machine (JVM) Version number
- JVM Vendor name
- SmartNAVI installation directory on your PC
- SmartNAVI Plug-in directory on your PC
- Names of installed Plug-ins
- Version numbers of installed Plug-ins
When you are done with the About window, click the Close button.
Closing SmartNAVI
To close SmartNAVI:
- Click the close icon in the top right corner of the Main Window.
- Click the close icon in the top right corner of the MSN Window.
If you close SmartNAVI this way, you can open it from the application tray icon.
Alternative Method
To close SmartNAVI:
- Right-click the SmartNAVI icon in the application tray.
- Choose Close from the popup menu.
If you close SmartNAVI this way, you must open it from the Start menu.
Managing Users and Groups
This category includes the following topics:
- Creating a User (page 50)
- Creating the Default User (page 51)
- Changing User Passwords (page 51)
- Changing User Permissions (page 51)
• Viewing a List of Users (page 52) - Deleting a User (page 52)
- Creating a Group (page 52)
• Viewing a List of Groups (page 53) - Adding Members to a Group (page 53)
- Deleting Members from a Group (page 53)
- Deleting a Group (page 54)
Creating a User
To create a user:
- Go to the Main Window.
- Click the User Management icon.
- Click the Create New User button.
- Type a Username in the field provided.
Up to 16 characters, A-Z, 0-9, and _, first character must be a letter. No spaces. - Type a Password in the field provided.
Up to 16 characters, A-Z and 0-9. No spaces. - Retype the Password in the Confirm field.
- Click the OK button.

Note
These users can access the share folders but not SmartNAVI or PASM.
Creating the Default User
This feature creates the default user for SmartNAVI.

Important
If you change to a new default user, the previous default user's network drives, backup schedules, username, and password information all will be deleted.
To create the default user:
- Go to the MSN Window.
- Click the Default User icon (right).
The Default User Setting dialog box opens.

OR
- Right-click the SmartNAVI icon in the application tray.
- Choose Default User from the popup menu.
- Type the default username admin in the field provided.
- Type the default password admin in the field provided.
- Retype the password in the Confirm field.
- Click the Save button.
To create additional users, see "Creating a User" on page 50.
Changing User Passwords
To change a user's password:
- Go to the Main Window.
- Click the User Management icon.
- Click the Modify User button.
- Click the user whose password you want to change.
- Admin user only, type the old password in the field provided.
- Type the new password in the field provided.
- Retype the password in the Confirm field.
- Click the OK button.
Changing User Permissions
The Admin user always has read and write permission. All other users have read-only permission by default.
To change permissions:
- Go to the Main Window.
- Click the Share Folder icon.
- Click the Share Folder Permission button.
- Click the share folder whose permissions you want to change.
The folder name turns red.
-
For each user in the list, click one of the following options:
-
Deny access
- Read only
- Read and Write
"Guest" is the only other default user.
- Click the OK button.
The permission change happens immediately.
Viewing a List of Users
To view a list of Users:
- Go to the Main Window.
- Click the User Management icon.
The User List appears.
Deleting a User
To delete a user:
- Go to the Main Window.
- Click the User Management icon.
- Click the Delete User button.
- Click the user you want to delete.
- Click the OK button.
- Click the Yes button in the confirmation box.
Creating a Group
To create a Group:
- Go to the Main Window.
- Click the User Management icon.
-
Click the Create New Group button.
-
Type a Group name in the field provided.
Up to 16 characters, A-Z, 0-9, and _. No spaces.
- Optional. Move members to the Selected User list to add them.
Or add them later.
- Click the OK button.
Viewing a List of Groups
To view a list of Groups:
- Go to the Main Window.
- Click the User Management icon.
- Click the Group List button.
Adding Members to a Group

Note
A User can only belong to one Group. If a User already belongs to a Group and you add him to this Group, you automatically delete him from the previous Group.
To add Users as Group members:
- Go to the Main Window.
- Click the User Management icon.
- Click the Modify Group Member button.
- Click the Group whose membership you want to change.
- Move members to the Selected User list to add them.
- Click the OK button.
Deleting Members from a Group

Note
Deleting a User from a Group does not delete the User from the System.
To delete Users from a Group:
- Go to the Main Window.
- Click the User Management icon.
-
Click the Modify Group Member button.
-
Click the Group whose membership you want to change.
- Move members to the Available User list to delete them.
- Click the OK button.
Deleting a Group
Before you can delete a Group, you must first delete all of the Members from the Group. See “Deleting Members from a Group” on page 53.
To delete a Group:
- Go to the Main Window.
- Click the User Management icon.
- Click the Delete User button.
- Click the Group you want to delete.
- Click the OK button.
- Click the Yes button in the confirmation box.
Managing RAID Volumes
This category includes the following topics:
- Creating a RAID Volume (page 55)
- Expanding a RAID Volume (page 55)
- Viewing RAID Volume Status (page 56)
- Viewing a List of RAID Volumes (page 56)
- Recreating a RAID Volume (page 57)
Creating a RAID Volume
To create a RAID volume:
- Go to the Main Window.
- Click the Volume Configuration icon.
-
Click the Create Volume button.
-
Choose Automatic or Manual RAID Volume creation.
If you chose Manual, choose the type of RAID Volume you want:
- Maximum Capacity – RAID 0, using both disk drives
-
Data Protection – RAID 1, using both disk drives
-
Click the OK button.
The RAID volume takes several minutes to create and initialize, depending on the size of your disk drives.

Note
When you create your RAID volume in PASM, you can choose additional options, such as Multiple RAID volumes.
See "Setting up SmartStor with the Setup Wizard" on page 83.
Expanding a RAID Volume
This feature adds disk drives to your existing RAID volume.
To expand a RAID volume:
- Go to the Main Window.
- Click the Volume Configuration icon.
- Click the Expand Volume button.
- Click the OK button.
- Click the Yes button in the confirmation box.
The RAID volume takes several minutes to expand and initialize, depending on the size of your disk drives.

Notes
Expansion is only available when your NAS system has the proper combination of RAID volume and free disk drives.
For additional expansion options or to change the RAID level of your volume, use PASM.
See "Migrating a RAID Volume" on page 102.
Viewing RAID Volume Status
RAID Volume status includes:
- Volume name
• R A I D I e v e l - Capacity
- Usage – Percentage of capacity used
- Disk drive model and capacity
To view the status of a RAID Volume:
- Go to the Main Window.
- Click the Volume Configuration icon.
- Click the Volume Status List button.
The Volume Status appears.
Viewing a List of RAID Volumes
To view a list of RAID Volumes:
- Go to the Main Window.
- Click the Volume Configuration icon.
The Volume List appears.
Recreating a RAID Volume

Caution
When you recreate a RAID volume, you delete all the data saved in the volume.
Back up any important data before you recreate a volume.
To recreate a RAID volume:
- Go to the Main Window.
- Click the Volume Configuration icon.
-
Click the Recreate Volume button.
-
Choose Automatic or Manual RAID Volume creation.
If you chose Manual, choose the type of RAID Volume you want:
• Maximum Capacity – RAID 0
- Data Protection – RAID 1 or 5, depending on the NAS model and number of drives
-
Click the OK button.
-
Click the Yes button in the first confirmation box.
-
Type YES then click the OK button in the second confirmation box.
The RAID volume takes several minutes to recreate and initialize, depending on the size of your disk drives.
Managing Backups
This category includes the following topics:
- Doing a Backup Now (page 58)
• Scheduling a Backup (page 59) - Viewing Backup Schedules (page 60)
- Changing a Scheduled Backup (page 60)
- Deleting a Scheduled Backup (page 61)
- Restoring Backed-up Files (page 61)
- Viewing the Backup Event Log (page 62)
- Saving the Event Log (page 62)
- Clearing the Event Log (page 63)
Doing a Backup Now
This feature enables you to perform an immediate backup of your files.
You can perform an immediate backup of your files from:
- Main Window
- MSN Window
- SmartNAVI tray icon
Main Window
If you do not have a backup schedule for the NAS, start your backup from the Main Window.
- Click the SmartSYNC icon.
- Click the Schedule List button.
- Check the boxes for the folders you want to backup.
- Click the Backup button.
The backup begins immediately.
MSN Window
Before you can backup from the MSN Window, you must create a backup schedule. See “Scheduling a Backup” on page 59.
- Click the system in the NAS List whose backup you want to run.
- Click the Do Backup Now icon (right).
The backup begins immediately.

SmartNAVI Tray Icon
Before you can backup from the SmartNAVI tray icon, you must create a backup schedule. See “Scheduling a Backup” on page 59.
- Right-click the SmartNAVI icon in the application tray.
- Choose Backup Now in the popup menu.
The backup begins immediately.
The amount of time required depends on the size and number of files being backed up.
The backed up files will appear on the NAS system in a folder named BACKUPDATA_your username.
You can restore the backup files to your PC at any time.
See "Restoring Backed-up Files" on page 61.
Scheduling a Backup
You can schedule backups by the hour, day, or week.
To set a schedule for backing up files from your PC to the NAS system:
- Go to the Main Window.
- Click the SmartSYNC icon.
- Click the Backup/Schedule – NAS button.
- Click the folder whose contents you want to backup.
Click the arrow icons to expand the tree and narrow your choices.
- Click the Schedule button.
- Click an option button for:
• H o u r
Day
- Day of the week
- Choose the corresponding values from the dropdown menus:
• Number of hours
• Time of day in hours and minutes
• Time of day and day of the week
- Click the Add button.
The newly created schedule appears in the Schedule List.
The backed up files will appear on the NAS in a folder named BACKUPDATA_your username.
Viewing Backup Schedules
To view the list of current schedules:
- Go to the Main Window.
- Click the SmartSYNC icon.
- Click the Schedule List button.
The list of all backup schedules appears.
Changing a Scheduled Backup
You can schedule backups by the hour, day, or week.
To change the scheduled backup of files from your PC to the NAS system:
- Go to the Main Window.
- Click the SmartSYNC icon.
- Click the Schedule List button.
- Click the schedule you want to change.
- Click the Modify button.
- Click the folder whose contents you want to backup.
Click the arrow icons to expand the tree and narrow your choices.
- Click the Schedule button.
- Click an option button for:
• H o u r
Day
- Day of the week
- Choose the corresponding values from the dropdown menus:
• Number of hours
• Time of day in hours and minutes
• Time of day and day of the week
- Click the Add button.
The modified schedule appears in the Schedule List.
Deleting a Scheduled Backup

Note
Deleting a scheduled backup has no effect upon any files previously backed-up to the SmartStor.
To delete a scheduled backup:
- Go to the Main Window.
- Click the SmartSYNC icon.
- Click the Schedule List button.
- Click the schedule you want to delete.
- Click the Delete button.
- Click the Yes button in the confirmation box.
Restoring Backed-up Files
You can restore all or any portion of the files in the BACKUPDATA_your username folder on the NAS system.
You can also choose to restore the files to their original location on your PC or an alternative location.
The original file structure is maintained during backup and restoration.

Caution
If you restore to the original folders on your PC, the restore function will overwrite the files in those folders.
Be careful which files you restore and where on your PC you direct the backup files.
To restore your backed-up files from the NAS system to your PC:
- Go to the Main Window.
- Click the SmartSYNC icon.
- Click the Restore button.
-
Click the folder whose contents you want to restore.
Click the arrow icons to expand the tree and narrow your choices. -
Click an option button for:
- Restore to original folder – The backup files will overwrite the files on your PC
- Restore to a specific folder – No files are overwritten on your PC
-
If you chose Restore to a specific folder, do one of the following actions:
-
Type the name of an existing folder in the field provided
- Type the name of an new folder in the field provided
-
Click the Folder icon and navigate to the target folder
-
Click the Restore button.
The restoration begins immediately. The amount of time required depends on the size and number of files being restored.
Viewing the Backup Event Log
Backup events report on backups, schedules, and file transfers.
Events are reported by date, time, severity (information or error) and description.
To view Backup Event Log:
- Go to the Main Window.
- Click the SmartSYNC icon.
-
Click the Event Log button.
-
Optional. Set the Event Filter dropdown menu to display:
• A l l e v e n t s
• Information events only
- Error events only
- Optional. Click the arrow on the Date/Time header to reverse the chronological order.

Note
For NAS system events, see “Viewing the System Event Log” on page 71.
Saving the Event Log
This function saves a copy of the Backup Event Log as a text file onto your PC. The text file records the events displayed in the Event Log window.
Set the Event Filter dropdown menu to display:
• All events
• Information events only
- Error events only
Click the arrow on the Date/Time header to reverse the chronological order.
To save a copy of the Backup Event Log as a text file:
- Go to the Main Window.
- Click the SmartSYNC icon.
- Click the Event Log button.
- Click the Save button.
- Optional. Change the file name or save to a different location.
- Click the Save button in the Save dialog box.
Clearing the Event Log

Note
Before you clear the Backup Event Log, consider saving a copy for future reference. See “Saving the Event Log” on page 62.
To clear the Backup Event Log:
- Go to the Main Window.
- Click the SmartSYNC icon.
- Click the Event Log button.
- Click the Clear All button.
- Click the Yes button in the confirmation box.
Managing Share Folders
This category includes the following topics:
- Creating a Share Folder (page 64)
- Opening a Share Folder (page 64)
- Viewing a List of Share Folders (page 65)
- Changing Share Folder Permissions (page 65)
- Deleting a Share Folder (page 65)
- Mounting a Share Folder / Creating a Network Drive (page 66)
- Un-mounting a Share Folder / Disconnecting a Network Drive (page 66)
Creating a Share Folder
To create a new share folder:
- Go to the Main Window.
- Click the Share Folder icon.
- Click the Create New Share Folder button.
-
Type a folder name in the field provided. Use A-Z, 0-9, - and _. No spaces.
-
Click the Create button.
-
Click the Yes button in the confirmation box. The new folder appears in the Share Folder List.
Opening a Share Folder
This feature opens share folders in the file browser.
From the MSN Window:
-
Click the system in the NAS List whose share folders you want to open.
-
Click the Open Share Folders icon (right). All share folders open on the NAS you chose.
From the Main Window:
- Click the Share Folder icon.
- Double-click the folder in the Share Folder List that you want to open. The share folder opens in your PC's file browser.
Viewing a List of Share Folders
To view a list of Share Folders:
- Go to the Main Window.
- Click the Share Folder icon.
- Double-click the individual share folder to view its contents.
Changing Share Folder Permissions
The Admin user always has read and write permission. All other users have read-only permission by default.
To change permissions:
- Go to the Main Window.
- Click the Share Folder icon.
- Click the Share Folder Permission button.
- Click the share folder whose permissions you want to change.
The folder name turns red.
-
For each user in the list, click one of the following options:
-
Deny access
- Read only
- Read and Write
"Guest" is the only other default user.
- Click the OK button.
The permission change happens immediately.
Deleting a Share Folder

Caution
When you delete a share folder, you delete all the data saved in the folder.
Back up any important data before you delete a folder.
To delete a share folder:
- Go to the Main Window.
- Click the Share Folder icon.
- Click the Delete Share Folder button.
- Click the share folder you want to delete.
The folder name turns red.
- Click the OK button.
- Click the Delete button.
- Click the Yes button in the first confirmation box.
- Type Yes then click the OK button in the second confirmation box.
Mounting a Share Folder / Creating a Network Drive
To mount a share folder (Linux) or create a network drive (Windows):
- Go to the Main Window.
- Click the Share Folder icon.
- Click the Mount Share Folder button.
- Click the share folder you want to mount or make a network drive. The folder name turns red.
- Choose a device name (drive letter) from the dropdown menu.
- Click the Map button.
The share folder appears on your PC as a mounted or network drive.
Un-mounting a Share Folder / Disconnecting a Network Drive
To un-mount a share folder (Linux) or disconnect a network drive (Windows):
- Go to the Main Window.
- Click the Share Folder icon.
- Click the Mount Share Folder button.
- Click the share folder you want to un-mount or delete as a network drive. The folder name turns red.
- Click the Un-Mount button.
- Click the Yes button in the confirmation box.
The share folder is un-mounted (Linux) or disconnected but the link remains (Windows).
Making Management Settings
This category includes the following topics:
- Configuring a NAS System (page 67)
- Changing Network Settings (page 69)
- Locating the SmartStor (page 70)
- Choosing a Default NAS System (page 70)
- Enabling or Disabling Event Notification (page 70)
• Viewing the System Event Log (page 71) - Adding Plug-ins (page 71)
- Viewing a List of Plug-ins (page 72)
- Viewing Plug-in Version Numbers (page 72)
- Enabling and Disabling Plug-ins (page 73)
- Removing Plug-ins (page 73)
Configuring a NAS System
The Setup Wizard has two modes:
- One Click Setup – Loads a collection of default settings. Recommended for most users.
- Advanced Setup – Enables you to make your own settings. Recommended for advanced users.

Caution
Do NOT run the Setup Wizard on a NAS system that is already configured! That action will delete your data and network drives!
One Click Setup
To configure your NAS system using One Click Setup:
- Go to the Main Window.
- Click the Setup Wizard icon.
- Click the One Click Setup button.
- Click the OK button.
Advanced Setup
To configure your NAS system using Advanced Setup:
- Go to the Main Window.
-
Click the Setup Wizard icon.
-
Click the Advanced Setup button.
- Choose Automatic (DHCP) or Manual network settings.
If you chose Manual settings, type entries for each of the following parameters in the fields provided:
• Computer (NAS system) Name
- IP Address
- Subnet Mask
- Gateway
- Primary and Secondary DNS – optional
Click the Next button to continue.
- Choose the following values from their respective dropdown menus:
• Time zone
- Year
• M o n t h
Day
• Time in Hours, Minutes, and Seconds
Click the Next button to continue.
- Choose Automatic or Manual RAID Volume creation.
If you chose Manual, choose the type of RAID Volume you want:
- Maximum Capacity – RAID 0, using both disk drives
- Data Protection – RAID 1, using both disk drives
Click the Next button to continue.
- Choose a network drive letter from the dropdown menu.
This drive will be mapped as a network drive on your PC.
The list begins with Z and goes in reverse alphabetical order.
Click the Next button to continue.
- Review your parameters.
To make changes, click the Previous button.
To accept the parameters and configure your NAS system, click the OK button.
- Click the Yes button in the confirmation box.

Note
When you create your RAID volume in PASM, you can choose additional options, such as Multiple RAID volumes.
See "Setting up SmartStor with the Setup Wizard" on page 83.
Changing Network Settings

Caution
If your NAS system is on a network, check with your Network Administrator before you change the network settings. Incorrect settings can result in address conflicts and connection failures.
To change your network settings:
- Go to the Main Window.
- Click the NAS Management icon.
- Click the Network Setting button.
- Choose Automatic (DHCP) or Manual network settings.
If you chose Manual settings, type entries for each of the following parameters in the fields provided:
• Computer (NAS system) Name
- IP Address
- Subnet Mask
- Gateway
- Primary and Secondary DNS – optional
- Click the OK button.
- Click the Yes button in the Network Setup box.
- Click the OK button in the Information box.
The Main Window closes and the MSN Window opens.
- Click your system in the NAS List.
The Main Window reopens.
Locating the SmartStor
This feature helps you to physically locate a NAS system.
To locate a SmartStor:
- Go to the MSN Window.
- Click the system in the NAS List that you want to locate.
- Click the Locate NAS icon (right).
On the NAS system you chose:
• The buzzer sounds three times
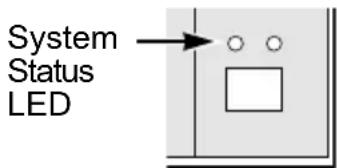
• The Status LED blinks (right)

Choosing a Default NAS System
This feature sets the default NAS system (SmartStor) for the MSN window and SmartNAVI tray icon.
You are not required to set a default NAS. However, setting a default NAS activates several important functions, including:
- Opening a Share Folder
• Performing an Immediate Backup - Starting the Advanced Storage Manager
- Enabling Event Notification
To set a default NAS:
- Go to the MSN Window.
- Click the system in the NAS List that you want to make the default.
- Click the Set Default NAS icon (right).
The default NAS is highlighted in the NAS List.
Enabling or Disabling Event Notification
This feature displays popup notices of events on the default NAS system.
Enabling Event Notification
To enable event notification:
- Right-click the SmartNAVI icon in the application tray.
- Check Event Notice in the popup menu.
SmartNAVI displays a popup message indicating that event notification is working.
Disabling Event Notification
To disable event notification:
- Right-click the SmartNAVI icon in the application tray.
- Uncheck Event Notice in the popup menu.
Viewing the System Event Log
NAS events report functions and status of the NAS system. The Event Log displays the 20 most recent events.
Events are reported by date, time, severity (information or warning) and description.
To view the NAS system's Event Log:
- Go to the Main Window.
- Click the NAS Management icon.
- Click the Event Log button.
Click the arrow on the Date/Time header to reverse the chronological order.

Note
For backup system events, see "Viewing the Backup Event Log" on page 62.
Adding Plug-ins
Application plug-ins are enhancements to SmartStor's capabilities. Available plug-ins include:
- DLNA server – Enables SmartStor to support the UPnP protocol and function as a Digital Media Server (DMS).
- iTunes server – Enables SmartStor to be a shared resource in the Apple iTunes user interface.
- BT server – Enables SmartStor to automatically download Bit Torrent, FTP, and HTTP files using SmartNAVI. See page 75.
SmartNAVI installs plug-ins from your PC. PASM installs plug-ins from a folder on the SmartStor. Also see "Adding Plug-ins" on page 94.
Download your plug-ins from the Promise Support Website. Plug-in file names end with a .ppg extension. Save the plug-in file to a convenient place on your PC.
To add a plug-in to SmartStor:
- Go to the Main Window.
-
Click the NAS Management icon.
-
Click the Add Plugin button.
-
Do one of the following actions:
-
Type the name of the plug-in file
-
Click the folder icon, navigate to the plug-in file, click it, then click the Open button
-
Click the OK button.
After a few moments, the plug-in is added.

Warning
Do not disconnect the power or shut down the SmartStor while the plug-in installation is running!
- Click the Configure Plugin button.
The newly added plug-in appears in the list. Its Service Status is OFF.
- Click the plug-in to choose it.
The plug-in's name turns red.
- Click the Enable button.
After a moment, the Service Status changes to ON.
The plug-in is now installed SmartStor.
Viewing a List of Plug-ins
To view a list of installed plug-ins:
- Go to the Main Window.
- Click the NAS Management icon.
- Click the Configuration Plugin button.
Currently installed plug-ins appear in the Configuration Plugin list.
Viewing Plug-in Version Numbers
To view plug-in version numbers:
- Right-click the SmartNAVI icon in the application tray.
- Choose About from the popup menu.
The About window appears. The About window includes a list of installed plug-ins and their version numbers.
When you are done with the About window, click the Close button
Enabling and Disabling Plug-ins
Enabling Plug-ins
You must add a plug-in to SmartStor before you can use this function.
To enable a plug-in:
- Go to the Main Window.
- Click the NAS Management icon.
- Click the Configuration Plugin button.
- Click the Plug-in you want to enable.
The plug-in's name turns red.
- Click the Enable button.
After a moment, the Service Status changes to ON.
The plug-in is now enabled on SmartStor
Disabling Plug-ins
Disabling a plug-in saves memory space and processing time on the SmartStor. If you do not use a feature, consider disabling its plug-in.
To disable a plug-in:
- Go to the Main Window.
- Click the NAS Management icon.
- Click the Configuration Plugin button.
- Click the Plug-in you want to disable.
The plug-in's name turns red.
- Click the Disable button.
After a moment, the Service Status changes to OFF.
The plug-in is now disabled.
Removing Plug-ins
There are two reasons to remove a plug-in:
• To replace the old plug-in with a new one
- You know that you will never use the plug-in
Before you remove a plug-in, consider disabling it, instead. See “Enabling and Disabling Plug-ins” on page 73.
To remove a plug-in:
- Go to the Main Window.
-
Click the NAS Management icon.
-
Click the Configuration Plugin button.
- Click the Plug-in you want to remove.
The plug-in's name turns red.
- Click the Remove button.
- Click the Yes button in the confirmation box.
The plug-in is removed from SmartNAVI.
If you need the plug-in later, you can reinstall it. See “Adding Plug-ins” on page 71.
Managing Downloads
This category includes the following topics:
- Adding a Link (page 75)
- Viewing the Download List (page 76)
- Removing a Link (page 76)
- Pausing and Resuming a Download (page 76)
• Viewing the Downloaded List (page 77) - Opening a Downloaded File (page 77)
- Deleting a Downloaded File (page 77)
Adding a Link

Note
This feature requires a plug-in for each NAS system. See “Adding Plug-ins” on page 71.
SmartNAVI and the NAS system can download files using several protocols, including:
- Torrent
• H T T P - FTP
- eDonkey
For Torrent files, use your browser to locate the file you want on the Internet and download its link to your PC. Then add the Torrent file link to the Download Station as described below.
To add a Torrent file download link:
- Go to the Main Window.
- Click the Download Station icon.
- Click the Add New Link button.
-
Do one of the following actions:
-
Type the link into the field provided.
-
Click the folder icon, navigate to the link, click it, then click the Open button.
-
Click the Add button.
The file's link is added to the Download List. Downloading begins automatically. Torrent files are saved to the download folder on the NAS system.
Viewing the Download List
The Torrent files in this list have not been downloaded yet.
To view the Download List:
- Go to the Main Window.
- Click the Download Station icon.
- Click the Download List button.
Downloading began automatically when you added the links.
Torrent files are saved to the download folder on the NAS system.
Removing a Link
When you remove a link, the Download Station does not download the corresponding Torrent file.
To remove a Torrent file download link:
- Go to the Main Window.
- Click the Download Station icon.
- Click the Download List button.
- Click the file link you want to remove.
- Click the Remove button.
- Click the Yes button in the confirmation box.
Pausing and Resuming a Download
Pausing a Download
To pause a Torrent file download:
- Go to the Main Window.
- Click the Download Station icon.
- Click the Download List button.
- Click the link of the file download you want to pause.
- Click the Pause button.
Resuming a Download
To resume a Torrent file download:
-
Go to the Main Window.
-
Click the Download Station icon.
- Click the Download List button.
- Click the link of the paused file download you want to resume.
- Click the Start button.
Viewing the Downloaded List
The Torrent files in this list have been downloaded.
To view a list of downloaded files:
- Go to the Main Window.
- Click the Download Station icon.
- Click the Downloaded List button.
Torrent files are saved to the download folder on the NAS system.
Opening a Downloaded File

Note
This feature requires a plug-in for each NAS system. See “Adding Plug-ins” on page 71.
To open a downloaded file:
- Go to the Main Window.
- Click the Download Station icon.
- Click the Downloaded List button.
- Click the file you want to open.
- Click the Open button.
Deleting a Downloaded File

Caution
The feature deletes Torrent files from the download folder on the NAS system.
To delete a downloaded Torrent file:
- Go to the Main Window.
- Click the Download Station icon.
-
Click the Downloaded List button.
-
Click the file you want to delete.
- Click the Delete button.
- Click the Yes button in the confirmation box.
The link and corresponding Torrent file in the download folder on the NAS system are deleted.
Chapter 5: PASM
- Connecting to PASM (below)
- Choosing a Language (page 82)
• Navigating in PASM (page 82) - Logging out of PASM (page 82)
- Setting up SmartStor with the Setup Wizard (page 83)
- Managing Users and Groups (page 85)
- Managing File & Print Services (page 90)
- Managing RAID Volumes (page 100)
- Managing Backups (page 105)
- Managing the Network Connection (page 106)
- Making Management Settings (page 108)
- Managing Services (page 112)
Connecting to PASM
The Promise Advanced Storage Manager (PASM) software is factory-installed on the SmartStor system. PASM runs in the browser on your PC. You can access PASM:
- Directly in your browser. See page 80.
- Through SmartNAVI. See page 81.
PASM in your Browser
To log into PASM in your browser:
- Start your Browser.
- In the Browser address field, type in the IP address of the SmartStor.
See "Finding the SmartStor's IP Address" on page 15.
Note that the IP address shown below is only an example. The IP address you type into your browser will be different.
- PASM uses an HTTP connection .....http://
- Enter the SmartStor's IP address 192.168.1.194
Together, your entry looks like this: http://192.168.1.194
The PASM login screen displays.
Promise Advanced Storage Manager
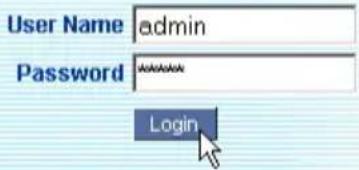
© 2008 Promise Technology Inc. All rights reserved.
- Type the user name and password in the respective fields, then click the Login button.
The default user name is admin. The default password is admin.
The user name and password are case sensitive.
PASM in SmartNAVI
To log into PASM through SmartNAVI:
- On the Windows desktop, right-click the SmartNAVI icon (right).
- Choose Open Advanced Management from the popup menu.
Your default browser starts and the PASM login screen displays.
Promise Advanced Storage Manager

© 2008 Promise Technology Inc. All rights reserved.
- Type the user name and password in the respective fields, then click the Login button.
The default user name is admin. The default password is admin.
The user name and password are case sensitive.
Choosing a Language
To choose a language, click the Language menu in the PASM Header and choose the language you prefer.
Navigating in PASM
The Tree is the primary navigation tool in PASM. Categories of functions listed with a + sign before the icon.
Icons for specific functions are listed under the categories. Click the + sign to show the functions.
Click the function icons to display their information on the screen. Each function has one or more tabs in its screen.
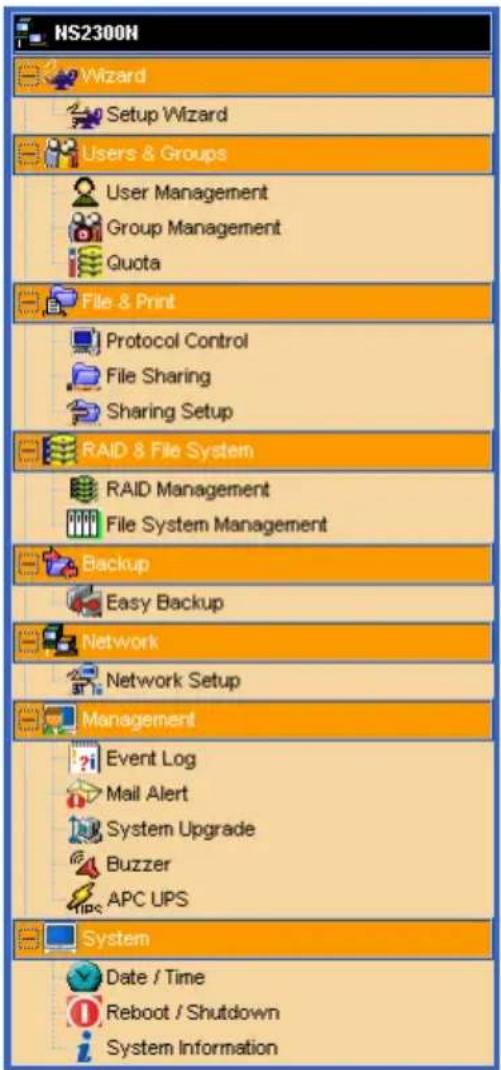
Logging out of PASM
There are two ways to log out of PASM:
- Close your browser window.
- C l i c k Logout in the PASM Header.

Clicking Logout brings you back to the Login Screen. After logging out, you must enter your user name and password in order to log in again.
Setting up SmartStor with the Setup Wizard
If you used the SmartNAVI Setup Wizard to set up your SmartStor, you do not need to run the Setup Wizard in PASM.
If you have not yet set up your SmartStor:
- In the Tree, click the + beside the Wizard icon, then on the Setup Wizard icon to display the Setup Wizard screen.
- Click the Next button to start the Setup Wizard.
The Step 1 screen appears.
- Optional. In the Computer Name field, enter a name for the SmartStor.
Use only letters, numbers, and the underscore character for the name.
-
Under network configuration, choose one of the following options:
-
Configure using DHCP – Choose this option if your network has a DCHP server with addresses available
-
Configure using Specify an IP address – Choose this option if you want to set the IP address and other network setting manually
-
If you chose the Configure using Specify an IP address option, type the following information in the fields provided:
-
IP Address
- Subnet Mask
- Default Gateway IP Address
- Primary DNS
- Secondary DNS
See your Network Administrator for help with these settings.
- Click the Next button to continue.
The Step 2 screen appears.
- Optional. Type a new administrator password into the New Password field.
Retype the new password into the Retype Password field. - Optional. To add a user, click the Add new user option button.
- If you clicked the Add new user option button, type a user name and password into the fields provided, then click the Add button.
- Click the Next button to continue.
The Step 3 screen appears.
-
Check the Enable box to the right of the services you plan to use.
-
Windows – Enables file access from Windows PCs. Also required to use the SmartStor as a print server.
- Unix/Linux – Enables file access from Unix and Linux PCs
- Macintosh – Enables file access from Macintosh PCs
-
FTP – Enables file access from PCs using FTP
-
Optional. Type new names into the Workgroup Name and Computer Description fields.
-
Click the Next button to continue.
The Step 4 screen appears.
You must add at least one folder, which you will access from your PC as a networked drive.
-
To add a folder, click the Add new folder option button.
-
Type a folder name into the field provided, check the boxes of the services you expect to use with this folder, then click the Add button.
Add more folders as required.
- Click the Next button to continue.
The Step 5 screen appears.
If a RAID Volume already exists on the SmartStor, information about the RAID Volume is shown. To change the RAID, you must delete it first, then run the Setup Wizard again. See “Deleting a RAID Volume” on page 103.
- From the RAID Level dropdown menu, choose the RAID level you want for your disk array.
See for "Choosing a RAID Level" on page 106 more information.
-
Highlight disk drives in the Free Disks column and click the >> button to move them to the Disks in RAID column.
-
Click the Next button to continue.
The Finish screen appears.
- Click the Finish button to set up your SmartStor.
The setup process takes several minutes, depending on the size of your disk drives.
Managing Users and Groups
This category includes the following topics:
- Viewing a List of Users (page 85)
- Creating a User (page 85)
- Changing the Administrator's Password (page 85)
- Changing a User's Password (page 86)
- Deleting a User (page 86)
• Viewing a List of Groups (page 86) - Creating a Group (page 87)
- Adding Members to a Group (page 87)
- Removing Members from a Group (page 87)
- Deleting a Group (page 88)
• Viewing Quotas (page 88) - Setting Quotas (page 88)
Viewing a List of Users
To view the list of Users:
- In the Tree, click the + beside the Users & Groups icon.
- Click the User Management icon.
A list of users appears on the Information tab.
Creating a User
You can create up to 512 Users.
To create or add a new user:
- In the Tree, click the + beside the Users & Groups icon.
- Click the User Management icon.
- Click the Create User tab.
- Type a user name in the field provided.
- Type a password into the fields provided.
- Click the OK button.
Changing the Administrator's Password
To change the Administrator's password:
- In the Tree, click the + beside the Users & Groups icon.
-
Click the User Management icon.
-
Click the Change Password tab.
- Type a new password into the fields provided.
- Click the OK button.
If you forget your new password, you reset the SmartStor to the default Administrator's password. See "Restoring the Default Password" on page 124.
Changing a User's Password
To change a user's password:
- In the Tree, click the + beside the Users & Groups icon.
- Click the User Management icon.
- Click the Change Password tab.
- From the User Name dropdown menu, choose the name of the user whose password you want to change.
- Type a new password into the fields provided.
- Click the OK button.
Deleting a User
You cannot delete the Administrator or the Guest. To delete any other user:
- In the Tree, click the + beside the Users & Groups icon.
- Click the User Management icon.
- Click the Delete User tab.
- Click the option button to the left of the user you want to delete.
- Click the OK button.
- In the confirmation box, click the OK button.
Viewing a List of Groups
Groups are composed of users. You can assign permissions to a group, the same as you would do with individual users.
To view a list of groups:
-
In the Tree, click the + beside the Users & Groups icon.
-
Click the Group Management icon.
A list of groups appears on the Information tab.
Creating a Group
Groups are composed of users. You can assign permissions to a group, the same as you would do with individual users. You can create up to 256 groups.
To create a group:
- In the Tree, click the + beside the Users & Groups icon.
- Click the Group Management icon.
- Click the Create tab.
- Type a group name in the field provided.
- Click the OK button.
Adding Members to a Group
You must create a group before you can assign members to it. See “Creating a Group” on page 87.
To add members to a group:
- In the Tree, click the + beside the Users & Groups icon.
- Click the Group Management icon.
- Click the Group Members tab.
- From the dropdown menu, choose a group to which you want to add members.
- Highlight users in the Users column and click the >> button to move them to the Members column.
- Click the OK button.
Removing Members from a Group
- In the Tree, click the + beside the Users & Groups icon.
- Click the Group Management icon.
- Click the Group Members tab.
- From the dropdown menu, choose a group from which you want to remove members
- Highlight users in the Members column and click the << button to move them to the Users column.
- Click the OK button.
Deleting a Group
You must remove all members from the group before you can delete the group. See “Removing Members from a Group” on page 87.
To delete a group:
- In the Tree, click the + beside the Users & Groups icon.
- Click the Group Management icon.
- Click the Delete tab.
- Click the option button next to the group you want to delete.
- Click the OK button.
Viewing Quotas
Quotas are portions of storage space that you assign to each user or group.
To view a quota:
- In the Tree, click the + beside the Users & Groups icon.
- Click the Quota icon.
A list of users and groups, and the following data appear on the screen:
- Currently assigned quotas
- Free space
- Used space
Setting Quotas
Quotas are portions of storage space that you assign to each user or group. Assigning quotas enables you to control how much storage space each user or group can access.
By default, each user and group is assigned an unlimited quota, meaning that any one user or group can access the entire storage space. In the Quota screen, the names of groups are preceded with a @ symbol.
To set a quota:
- In the Tree, click the + beside the Users & Groups icon.
- Click the Quota icon.
- Click the Settings tab.
- Highlight the user or group whose quota you want to assign.
-
Click one of the following options:
-
Unlimited
-
Limited Quota
-
If you chose Limited Quota, type a number into the field provided.
This number represents how many MB of data the user or group can access.
- Click the OK button.

Note
If you set different size quotas for the user and the group, SmartStor will use the smaller quota.
Managing File & Print Services
This category includes the following topics:
- Setting up Windows Access (page 90)
- Setting up UNIX/Linux Access (page 91)
- Setting up for Macintosh Access (page 92)
- Setting up for FTP Access (page 93)
- Setting up your Print Server (page 94)
- Adding Plug-ins (page 94)
- Viewing a List of Plug-ins (page 95)
- Enabling and Disabling Plug-ins (page 95)
- Removing Plug-ins (page 96)
- Viewing a List of Folders (page 96)
- Modifying Folder Services (page 96)
- Adding a Folder (page 97)
- Deleting a Folder (page 97)
- Setting up Windows Sharing for a Folder (page 98)
- Setting up UNIX and Linux Sharing for a Folder (page 98)
- Setting up FTP Sharing for a Folder (page 99)
Setting up Windows Access
To set up access from a Windows PC:
- In the Tree, click the + beside the File & Print icon.
- Click the Protocol Control icon.
- Click the Windows tab.
- Click the Enable option button beside Services.
- Optional. Type a new Computer Description into the field provided.
- Choose the option button to make the SmartStor a member of:
• An Active Directory (AD) Domain
• A W o r k g r o u p
- An Active Directory (AD) Domain - A Work group
Note: If you join an AD Domain, you automatically disable your NIS Domain settings. See "Setting up UNIX/Linux Access" on page 91.
-
Optional. If you chose an AD Domain, enter the following in the fields provided:
-
Domain Name
-
Domain Controller
-
Administrator Name
- Administrator Password
See your Network Administrator for help with this information.
- Optional. If you chose an Workgroup, enter the Workgroup name into the field provided:
See your Network Administrator for help with this information.
- Click the OK button to save your settings.
- In the Tree, click the + beside the Sharing Setup icon.
- Click the Windows Sharing tab.
- Choose a folder from the Folder Name dropdown menu.
- In the User/Group list, highlight the name of a user or group.
Group names are preceded by the @ character.
-
Under Permissions, choose a permission level for this user or group:
-
Deny Access
- Read Only
-
Read and Write
-
Click the OK button to save your settings.
You can now access the folder you chose from a Windows PC.
See “Chapter 3: Connecting to the SmartStor” on page 21 for information about the settings that you must make on your PC.

Note
Windows support is only through SMB and CIFS protocols.
SmartStor supports the Recycle Bin feature. When you delete a file, the file is moved to the Recycle Bin, a hidden folder in the share folder.
Setting up UNIX/Linux Access
To set up access from a UNIX or Linux PC:
- In the Tree, click the + beside the File & Print icon to expand the Tree, then click the Protocol Control icon.
- In the Information tab, click the Enable button next to UNIX/Linux.
- Click the OK button in the confirmation box.
- Optional. To joing a NIS Domain, click the UNIX/Linux tab, then click the Enable option button beside Services.
Note: If you join an NIS Domain, you automatically disable your AD Domain settings. See "Setting up Windows Access" on page 90.
- Enter the Domain name into the field provided.
See your Network Administrator for help with this information.
-
Click the OK button to save your settings.
-
In the Tree, click the + beside the File Sharing icon.
-
Click the Modify tab.
-
From the Folder name dropdown menu, choose the folder you want to access.
-
Check the UNIX/Linux box.
-
Click the OK button to save your settings.
-
In the Tree, click the + beside the Sharing Setup icon.
-
Click the UNIX/Linux Sharing tab.
-
Choose a folder from the Folder Name dropdown menu.
-
In the New IP Address field, type the IP address of the UNIX or Linux PC from which you will access this folder, then click the Add button.
You must designate the IP addresses for each folder individually. You can have up to 256 IP addresses for all of your folders.
- Click the OK button to save your settings.
You can now access the folder you chose from a UNIX or Linux PC.
See “Chapter 3: Connecting to the SmartStor” on page 21 for information about the settings that you must make on your PC.
Setting up for Macintosh Access
To set up access from a Macintosh PC:
-
In the Tree, click the + beside the File & Print icon to expand the Tree, then click the Protocol Control icon.
-
In the Information tab, click the Enable button next to Macintosh.
-
Click the OK button in the confirmation box.
-
In the Tree, click the + beside the File Sharing icon.
-
Click the Modify tab.
-
From the Folder name dropdown menu, choose the folder you want to access.
-
Check the Macintosh box.
-
Click the OK button to save your settings.
You can now access the specified folder from a Macintosh PC.
See “Chapter 3: Connecting to the SmartStor” on page 21 for information about the settings that you must make on your PC.
Setting up for FTP Access
To set up FTP access for your folders:
- In the Information tab, click the Enable button next to FTP.
- Click the OK button in the confirmation box.
- To change FTP settings, click the FTP Sharing tab.
- To specify a new Command Port number, type the number into the field provided.
Port 21 is typically used for the Command Port.
- To specify a range of passive data port numbers, type those numbers into the fields provided.
The port range is 1024 to 65535.
Be sure the port numbers you enter are enabled on your firewall and server. In active mode, the FTP server uses port 20 for the data port.
- If your FTP client uses double-byte characters but does not support Unicode, choose your FTP client's encoding from the Client Coding Type dropdown menu. Choose from:
- Unicode

- Click the OK button to save your settings.
- In the Tree, click the + beside the File Sharing icon, then click the Modify tab.
- From the Folder name dropdown menu, choose the folder you want to access.
- Check the FTP box.
- Click the OK button to save your settings.
You can now access the specified folder from your PC using FTP.
Setting up your Print Server
Your USB printer must be connected to the SmartStor and powered before you can set up the Print Server.
To set up the SmartStor as a printer server:
- In the Tree, click the + beside the File & Print icon to expand the Tree.
- Click the Protocol Control icon, then click the Printer Server tab.
- Click the Enable option button beside Printer Server.
- Click the OK button to save your settings.

Notes
- The Printer Server tab also verifies that your USB printer is connected and online. If you do not see your printer on the Printer Server tab, take the necessary action to connect and power the printer. See “Connecting a USB Printer to SmartStor” on page 31.
- The software driver for your printer must be installed on your PC before you can print from the PC. See the printer's Setup Guide or User Manual.
Adding Plug-ins
Application plug-ins are enhancements to SmartStor's capabilities. Available plug-ins include:
- DLNA server – Enables SmartStor to support the UPnP protocol and function as a Digital Media Server (DMS).
- iTunes server – Enables SmartStor to be a shared resource in the Apple iTunes user interface.
- BT server – Enables SmartStor to automatically download Bit Torrent, FTP, and HTTP files using SmartNAVI. See page 75.
PASM installs plug-ins from a folder on the SmartStor. SmartNAVI installs plug-ins from your PC. Also see "Adding Plug-ins" on page 71.
Download your plug-ins from the Promise Support Website. Plug-in file names end with a .ppg extension. Place the plug-in file into a folder on the SmartStor.
To add a plug-in to SmartStor:
- In the Tree, click the + beside the Management icon.
- Click the System Upgrade icon, then click the Application Plug-in tab.
-
From the Volume dropdown menu, choose the Volume that has the folder with the plug-in file.
-
From the Folder dropdown menu, choose the Folder that contains the plug-in file.
- In the File Name field, type the name of the plug-in file.
Or highlight the file and copy the name, then paste the name into the field.
- Click the OK button to begin the installation.

Warning
Do not disconnect the power or shut down the SmartStor while the plug-in installation is running!
When the installation is done, PASM displays a notification dialog box.
- Click the OK button in the dialog box.
Viewing a List of Plug-ins
To view a list of installed plug-ins:
- In the Tree, click the + beside the File & Print icon to expand the Tree.
- Click the Protocol Control icon.
A list of installed plug-ins and their version numbers appear on the Information tab.
Enabling and Disabling Plug-ins
Enabling Plug-ins
You must add a plug-in to SmartStor before you can use this function.
To enable a plug-in:
- In the Tree, click the + beside the File & Print icon to expand the Tree.
- Click the Protocol Control icon.
- In the Information tab, click the Enable button next to the plug-in you want to enable.
- Click the OK button in the confirmation box.
After a moment, the Service Status changes to ON.
The plug-in is now enabled on SmartStor
Disabling Plug-ins
Disabling a plug-in saves memory space and processing time on the SmartStor. If you do not use a feature, consider disabling its plug-in.
To disable a plug-in:
-
In the Tree, click the + beside the File & Print icon to expand the Tree.
-
Click the Protocol Control icon.
- In the Information tab, click the Disable button next to the plug-in you want to disable.
- Click the OK button in the confirmation box.
After a moment, the Service Status changes to OFF.
The plug-in is now disabled.
Removing Plug-ins
There are two reasons to remove a plug-in:
• To replace the old plug-in with a new one
- You know that you will never use the plug-in
Before you remove a plug-in, consider disabling it, instead. See “Enabling and Disabling Plug-ins” on page 95.
PASM has no mechanism to remove a plug-in. To remove a plug-in, you must use SmartNAVI. See page 73.
Viewing a List of Folders
A folder is the entity that appears as a Network Drive on your PC.
To view the list of folders:
- In the Tree, click the + beside the File & Print icon.
- Click the File Sharing icon.
A list of current folders appears in the Information tab.
Modifying Folder Services
Services enable different types of PCs to access your folders. Use this function to add or remove a service for a specific folder.
To modify the services on a folder:
- In the Tree, click the + beside the File & Print icon.
- Click the File Sharing icon.
- Click the Modify tab
- From the Volume dropdown menu, choose the RAID Volume containing the folder you want to modify.
- From the Folder Name dropdown menu, choose the folder you want to modify.
- Check the boxes beside the services you want to use.
- Click the OK button.
If the service you want is OFF, see:
"Setting up Windows Access" on page 90
"Setting up UNIX/Linux Access" on page 91
"Setting up for Macintosh Access" on page 92
"Setting up for FTP Access" on page 93
Adding a Folder
A folder is the entity that appears as a Network Drive on your PC.
To add a folder:
- In the Tree, click the + beside the File & Print icon.
- Click the File Sharing icon.
- Click the Create tab.
- From the Volume dropdown menu, choose the RAID Volume in which you want to create a new folder.
- In the Folder Name field, type a name for your new folder.
- Check the boxes beside the services you want to use.
- Click the OK button.
To access the new folder from a Windows PC, see “Setting up Windows Sharing for a Folder” on page 98.
To access the new folder from a UNIX or Linux PC, see “Setting up UNIX and Linux Sharing for a Folder” on page 98.
To make the folder a network drive on your PC, see “Chapter 3: Connecting to the SmartStor” on page 21.
Deleting a Folder

Caution
When you delete a folder, you delete all the data saved in the folder. Back up any important data before you delete a folder.
To delete a folder:
- In the Tree, click the + beside the File & Print icon.
- Click the File Sharing icon.
- Click the Remove tab
- Click the option button beside the folder you want to delete.
-
Click the OK button.
-
In the confirmation box, click the OK button to confirm.
Setting up Windows Sharing for a Folder
Windows sharing assigns user access the folders on your SmartStor. By default all users and groups have read-only access.
To set up Windows sharing for a folder:
- In the Tree, click the + beside the File & Print icon.
- Click the Sharing Setup icon.
- Click the Windows Sharing tab.
- From the Volume dropdown menu, choose the RAID Volume containing the folder you want to modify.
- From the Folder Name dropdown menu, choose the folder you want to modify.
-
In the Permission list, click the option button for one of the following permissions for each group and user:
-
Deny Access
- Read Only
-
Read and Write
-
Click the OK button.
Be sure the Windows service is running for this folder. See “Setting up Windows Access” on page 90.
Setting up UNIX and Linux Sharing for a Folder
UNIX and Linux sharing designates which UNIX and Linux PCs can access the folders on your SmartStor. You specify a UNIX or Linux PC by its IP address.
You can add up to 256 IP addresses for all of your folders.
You must designate the IP addresses for each folder individually.
To set up UNIX and Linux sharing for a folder:
- In the Tree, click the + beside the File & Print icon.
- Click the Sharing Setup icon in the tree.
- Click the UNIX/Linux Sharing tab.
- From the Volume dropdown menu, choose the RAID Volume containing the folder you want to modify.
- From the Folder Name dropdown menu, choose the folder you want to modify.
- In the New IP Address field, type the IIP address of the UNIX or Linux PC from which you will access this folder.
7. Click the Add button.
Be sure the UNIX/Linux service is running for this folder. See “Setting up UNIX/Linux Access” on page 91.
Setting up FTP Sharing for a Folder
FTP sharing assigns user access the folders on your SmartStor. By default all users and groups have read-only access.
To set up FTP sharing for a folder:
- In the Tree, click the + beside the File & Print icon.
- Click the Sharing Setup icon.
- Click the FTP Sharing tab.
- From the Volume dropdown menu, choose the RAID Volume containing the folder you want to modify.
- From the Folder Name dropdown menu, choose the folder you want to modify.
-
In the Permission list, click the option button for one of the following permissions for each group and user:
-
Deny Access
- Read Only
-
Read and Write
-
Click the OK button.
Be sure the FTP service is running for this folder. See “Setting up for FTP Access” on page 93.
Managing RAID Volumes
This category includes the following topics:
- Viewing RAID Volume Status (page 100)
- Viewing Disk Drive Information (page 101)
- Creating a RAID Volume (page 101)
- Designating a Spare Drive (page 102)
- Migrating a RAID Volume (page 102)
- Deleting a RAID Volume (page 103)
- Viewing an External USB Drive or Memory Stick (page 104)
- Formatting an External USB Drive or Memory Stick (page 104)
Viewing RAID Volume Status
RAID status refers to the disk drives on your SmartStor and how they are arranged into a RAID Volume.
To view the status of your RAID Volume:
- In the Tree, click the + beside the RAID & File System icon.
- Click the RAID Management icon.
The RAID Status tab displays the current RAID system and its status:
- RAID Name – The name of your RAID, automatically assigned when it was created
- RAID Level – RAID 0 or 1 specified when it was created
- Capacity – Data capacity of the RAID Volume in GB
- RAID Status – Functional is normal. Critical means a disk drive has failed. Offline means you cannot access your data.
Critical and offline RAIDs require you to take corrective action. See "Replacing a Failed Disk Drive" on page 113.
- Action Status – Idle is normal. Rebuilding means the RAID Volume is being rebuilt after a disk drive failure. Migrating means the RAID Volume is adding a disk drive or changing RAID levels.
- Background Activity – None is normal. Running means a background activity is in progress.
Viewing Disk Drive Information
To view information about a disk drive:
- In the Tree, click the + beside the RAID & File System icon.
- Click the RAID Management icon.
The RAID Status tab displays the current RAID system and its status.
- In the Disk List, double-click a disk drive icon.
The disk drive information displays under Disk Status.
Creating a RAID Volume
On SmartStor, the term RAID Volume refers to one or more disk drives working together as a RAID logical drive.
You can also use a USB disk to create a RAID Volume. See “Viewing an External USB Drive or Memory Stick” on page 104.
You must have unassigned disk drives in your SmartStor to create a new RAID.
To create a new RAID Volume:
- In the Tree, click the + beside the RAID & File System icon.
- Click the RAID Management icon.
- Click the Create tab.
- From the RAID Level dropdown menu, choose the RAID level you prefer for your disk array.
See “Choosing a RAID Level” on page 106 for more information.
- Highlight disk drives in the Free Disks column and click the >> button to move them to the Disks in RAID column.
- Click the OK button.
The RAID Volume is created and formatting begins. Formatting requires several minutes, depending on the size of your disk drives.
After formatting is done, you must create folders on your RAID Volume. See "Adding a Folder" on page 97.
Designating a Spare Drive
If you have an unassigned disk drive, you can assign it as a spare drive.
For more information, see “Spare Drive” on page 107 and “Automatic Rebuilding” on page 108.
To assign a spare drive:
- In the Tree, click the + beside the RAID & File System icon.
- Click the RAID Management icon.
- Click the Create tab.
- From the RAID Level dropdown menu, choose Spare Disk.
- Highlight a disk drive in the Free Disks column and click the >> button to move it to the Disks in RAID column.
- Click the OK button.
Migrating a RAID Volume
To migrate a RAID Volume means to change its RAID level or to add disk drives. See “RAID Volume Migration” on page 109 for more information.
To migrate a RAID Volume:
- In the Tree, click the + beside the RAID & File System icon.
- Click the RAID Management icon.
- Click the Modify tab.
- From the Current Volume dropdown menu, choose the RAID Volume which you want to modify.
- In the Migrate to RAID Level dropdown menu, choose the target RAID Level.
- To add disk drives, highlight disk drives in the Free Disks column and click the >> button to move them to the Disks in RAID column.
- Click the OK button.
The RAID Volume is modified as you directed. Migration requires several minutes, depending on the type of modification taking place and the size of your disk drives.
During the modification, your RAID Volume and all of the folders on it are fully accessible.
After the Migration is completed, you must extend the file system in order to use the storage space you have added. You can extend the file system immediately or wait until later.
- Click the File System Management icon.
- In the File System Status tab, click the Extend File System button.
Deleting a RAID Volume

Caution
When you delete a RAID Volume, you delete all the folders in the RAID volume and all the data saved in the folders. Back up any important data before you delete a RAID Volume.

Note
You cannot delete a RAID Volume while a background activity is running, such as Migration or Rebuild. Wait until these activities are completed.
To delete a RAID Volume:
- In the Tree, click the + beside the RAID & File System icon.
- Click the RAID Management icon.
- Click the Delete tab.
- Click the option button beside the RAID Volume you want to delete.
- Click the OK button.
- In the confirmation box, type yes into the field provided, then click the OK button.
After a RAID Volume is deleted, the SmartStor reboots automatically. When the SmartStor is fully booted:
• The System Status LED turns green (right)
- The buzzer beeps one time (if the buzzer is enabled)
- Close your browser then restart the browser to access PASM.
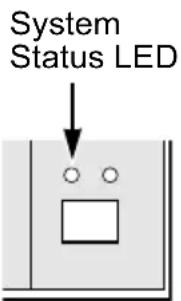
Viewing an External USB Drive or Memory Stick
To view a USB drive or memory stick attached to the SmartStor:
- In the Tree, click the + beside the RAID & File System icon.
- Click the RAID Management icon.
The USB drive or memory stick appears as a USB External Disk
- Click the File System Management icon.
The USB drive or memory stick appears as a Volume called USBDISK.
You do NOT create a RAID Volume or folders with the USB drive or memory stick as you would with the disk drives installed in the SmartStor enclosure.
With the USB drive or memory stick connected to the SmartStor, create a network drive on your PC and choose the USB disk as the folder. Then you can access the USB drive or memory stick from your PC.
See “Chapter 3: Connecting to the SmartStor” on page 21 for more information.
Formatting an External USB Drive or Memory Stick
This option only appears when SmartStor does not recognize the file system on the USB drive or memory stick.

Caution
When you format a USB drive or memory stick, you delete all the data saved on it. Back up any important data before you format.
To format a USB drive or memory stick:
- Attach the USB drive or memory stick to one of the USB ports on the back of the SmartStor.
- In the Tree, click the + beside the RAID & File System icon.
- Click the File System Management icon.
- On the File System Status tab, highlight the USB drive.
- From the Format File System Type dropdown menu, choose a file system:
• FAT 32 – Use for Windows, Linux, and Macintosh PCs, and SmartStor
- Ext3 – Use for UNIX and Linux PCs, and SmartStor
- Click the Format USB Disk button.
- In the confirmation box, type yes, then click the OK button.
Formatting requires several minutes, depending on the size of your USB drive or memory stick.
Managing Backups
This category includes the following topics:
- Enabling One Touch Backup (page 105)
Enabling One Touch Backup
One Touch Backup is a feature that enables you to backup specified folders from your PC to the SmartStor by pressing a button on the front of the SmartStor.
To enable One Touch Backup:
- In the Tree, click the + beside the Backup icon.
- Click the Client Backup icon.
- In the One Touch Backup tab, click the Enable option.
- Click the OK button.
To disable One Touch Backup, click the Disable option, then click the OK button.
Managing the Network Connection
This category includes the following topics:
- Viewing Network Setup Information (page 106)
- Making Network Settings (page 106)
- Working with Jumbo Frames (page 107)
Viewing Network Setup Information
To view network setup information:
- In the Tree, click the + beside the Network icon.
- Click the Network Setup icon.
The current network setup for this SmartStor displays on the Information tab:
- Computer Name
- IP Address
- Subnet Mask
- Default Gateway IP Address
• Primary Domain Name Server IP Address
• Secondary Domain Name Server IP Address
To change these settings, click the Setup tab.
Making Network Settings
To make network settings:
- In the Tree, click the + beside the Network icon.
- Click the Network Setup icon.
- Click the Setup tab.
-
Click an option button to choose an Internet Protocol option:
-
Optional. Type a name for the SmartStor in the Computer Name field.
-
Obtain an IP address automatically – Choose this option to let your DHCP server make the network settings.
-
Specify an IP address – Choose this option if you want to make your network settings manually.
-
Optional. If you chose Specify an IP address, enter the following settings in the fields provided:
-
IP Address
- Subnet Mask
-
Default Gateway IP Address
• Primary Domain Name Server IP Address
• Secondary Domain Name Server IP Address
See your Network Administrator for help in making these settings. -
Click the OK button to save your settings.
Working with Jumbo Frames
The term jumbo frame refers to a frame on a local area network that is larger than the standard 1518 byte size. SmartStor supports jumbo frames up to 7000 bytes.
On SmartStor, the frame size setting is called Maximum Transmission Unit (MTU). The default MTU or frame is 1500 bytes. This setting is appropriate for most users. See your Network Administrator before you change this setting.
To make frame size settings:
- In the Tree, click the + beside the Network icon.
- Click the Network Setup icon.
- Click the Jumbo Frame tab.
-
From the MTU dropdown menu, choose the maximum MTU or frame size:
-
1500 bytes (default)
- 4000 bytes
-
7000 bytes
-
Click the OK button to save your setting.
Making Management Settings
This category includes the following topics:
- Viewing the Event Log (page 108)
- Setting up SMTP Authentication (page 108)
- Viewing the Email Alert List (page 109)
- Adding an Email Alert Recipient (page 109)
- Deleting an Email Alert Recipient (page 109)
- Upgrading the System Firmware (page 110)
- Enabling and Disabling the Buzzer (page 110)
- Viewing UPS Status (page 110)
- Setting up a UPS (page 111)
Viewing the Event Log
The event log keeps a log of the 20 most recent events on the SmartStor. You can use this information to review your actions and to diagnose problems.
To view the Event Log:
- In the Tree, click the + beside the Management icon.
- Click the Event Log icon.
A list of the 20 most recent events displays on the Event Log tab.
Events are ranked in severity as Information, Warning, and Error.
Setting up SMTP Authentication
In order to set up email alerts over a network, you must enable the SMTP service, specify a SMTP server, and in most cases, supply authentication information. See your Network Administrator for help with these settings.
To set up SMTP authentication:
- In the Tree, click the + beside the Management icon.
- Click the Mail Alert icon.
- Click the Setup tab.
- Next to Service, click the Enable option button.
- In the SMTP Server field, type the IP address or the DNS name of your SMTP server.
-
In the From field, the sender's email address that you want to appear in the alert messages.
-
Next to SMTP Authentication:
-
Click the Yes option button to enable authentication.
-
Click the No option button to disable authentication.
Note that most SMTP servers require authentication. -
If you enabled authentication, to the following:
-
In the User Name field, type the mail server account name.
-
In the Password field, type the password of the mailer server account.
-
Click the OK button.
Viewing the Email Alert List
The SmartStor will send alerts via email to the recipients you designate.
To view a list of Email Alert recipients:
- In the Tree, click the + beside the Management icon.
- Click the Mail Alert icon.
The list of recipients displays on the Mail List tab.
See “Checking Your Email Inbox” on page 124 for an example of an email alert message.
Adding an Email Alert Recipient
You can have up to 32 Email Alert recipients.
To add an Email Alert recipient:
- In the Tree, click the + beside the Management icon.
- Click the Mail Alert icon.
- Click the Add tab.
- In the E-Mail Address field, type the recipient's email address.
- Click the OK button.
Deleting an Email Alert Recipient
To delete an Email Alert recipient:
-
In the Tree, click the + beside the Management icon.
-
Click the Mail Alert icon.
-
Click the Delete tab.
-
Click the option button beside the E-Mail Address you want to delete.
-
Click the OK button.
-
In the confirmation box, click the OK button.
Upgrading the System Firmware
See "Upgrading the Firmware" on page 147.
Enabling and Disabling the Buzzer
The SmartStor has a buzzer that sounds when the SmartStor is finished booting and when a problem is detected. The buzzer is enabled by default.
Promise recommends that you leave the buzzer enabled.
To disable the buzzer:
- In the Tree, click the + beside the Management icon.
- Click the Buzzer icon.
- Click the Disable option button.
- Click the OK button.
Click the Enable option button, then click the OK button to enable the buzzer.
Viewing UPS Status
If you have an APC Uninterruptable Power Supply (UPS) attached to the SmartStor, you can check its status in PASM.
To view UPS status:
- In the Tree, click the + beside the Management icon.
- Click the APC UPS icon.
The Information tab displays the status of the UPS.
If there is no UPS connected or recognized, the Status field reports "NO UPS."
Setting up a UPS
To set up a UPS:
- Attach the APC UPS to one of the SmartStor's USB ports.
- In the Tree, click the + beside the Management icon.
- Click the APC UPS icon.
- Click the Setup tab.
The Setup tab enables you to tell the SmartStor how and when to shutdown after a power failure.
Click the option button beside the shutdown option you want:
- Disable (the SmartStor runs until the UPS battery is depleted)
- Shutdown when the UPS reaches a set percentage of reserve power
-
Shutdown after running on the UPS batteries for a set number of minutes
-
Optional. If you chose battery percentage, type a percentage amount in the % field.
- Optional. If you chose remaining runtime or running on batteries, type the number of minutes into the Mins. field.
- Click the OK button.
Managing Services
This category includes the following topics:
- Setting System Date and Time (page 112)
- Running the Network Time Protocol (page 112)
- Viewing the Results of NTP Synchronization (page 113)
- Rebooting the SmartStor (page 113)
- Shutting Down the SmartStor (page 114)
- Booting the SmartStor After a Shutdown (page 114)
- Locating the SmartStor (page 114)
• Viewing System Information (page 115) - Viewing Enclosure Information (page 115)
- Enabling the Smart Fan (page 116)
Setting System Date and Time
- To set the date and time on the SmartStor:
In the Tree, click the + beside the System icon. - Click the Date / Time icon.
- Click the Setup tab.
- From the dropdown menus, choose the time and date values.
- Click the OK button.
Running the Network Time Protocol
You can use the Network Time Protocol (NTP) to set the system date and time on your SmartStor to synchronize itself with an external Time Server.
To run the Network Time Protocol:
- In the Tree, click the + beside the System icon.
- Click the Date / Time icon.
- Click the Time Zone tab.
- From the dropdown menu, choose the time zone for your location.
- Click the OK button.
- Click the NTP tab.
-
In the Time Server field, type the URL of the time server you want to use. URL time.nist.gov is the default.
-
Under Schedule, choose one of the options:
-
Disable – Disables NTP synchronization
- Do it at once – Performs a synchronization when you click the OK button.
- Time interval by hour – Set an hourly interval for a synchronization to happen.
• Daily – Sets the time of day when the synchronization happens. -
Weekly – Sets the time of day and day of the week when the synchronization happens.
-
Click the OK button.
Viewing the Results of NTP Synchronization
To view the results of an NTP synchronization:
- In the Tree, click the + beside the System icon.
- Click the Date / Time icon.
- Click the NTP tab.
The results of the latest synchronization are displayed:
- Last Synchronization Time – Time and date of the last synchronization
- Last Synchronization Result – OK means success
Rebooting the SmartStor
Normally you will only need to reboot the SmartStor is after a firmware upgrade or a plug-in installation. See “Upgrading the Firmware” on page 145. During the reboot, none of your folders will be accessible from your networked PCs.
To reboot the SmartStor:
- In the Tree, click the + beside the System icon.
- Click the Reboot / Shutdown icon.
- Click the Reboot option.
- Click the OK button.
- In the confirmation box, click the OK button.
The reboot runs automatically. When the SmartStor is fully booted:
- The system status LED turns green (right)
- The buzzer beeps one time (if the buzzer is enabled)
See "Enabling and Disabling the Buzzer" on page 110.
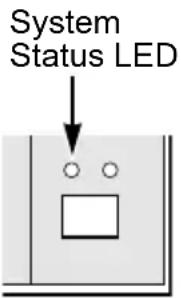
Shutting Down the SmartStor
The only time you need to shut down the SmartStor is to replace the disk drive cooling fan or the power supply. See “Appendix B: Maintenance” on page 145.
During and after the shutdown, none of your folders will be accessible from your networked PCs.
Using PASM
To shut down the SmartStor:
- In the Tree, click the + beside the System icon.
- Click the Reboot / Shutdown icon.
- Click the Shutdown option.
- Click the OK button.
- In the confirmation box, click the OK button.
Directly
To shut down the SmartStor, press and hold the power button for five seconds. The system status LED turns red, then goes dark (right).
Booting the SmartStor After a Shutdown
To restart the SmartStor after a shutdown, press the power button on the front of the SmartStor chassis (right).
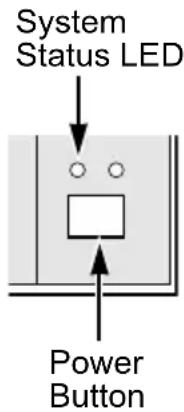
When the SmartStor is fully booted:
- The system status LED turns green (right)
- The buzzer beeps one time (if the buzzer is enabled)
See “Enabling and Disabling the Buzzer” on page 110.
Locating the SmartStor
If your SmartStor in is on a rack with other equipment and you need to locate it quickly, this function will assist you.
To locate the SmartStor:
- In the Tree, click the + beside the System icon.
- Click the System Information icon.
- Click the System Information tab.
- Click the Locate button.
The SmartStor's buzzer beeps three times and the system status LED blinks three times (right).
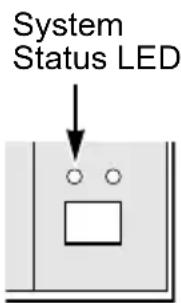
Viewing System Information
To view system information:
- In the Tree, click the + beside the System icon.
- Click the System Information icon.
- Click the System Information tab.
System Information includes:
- Operating System – Embedded Linux
- Firmware Version – Changes when you upgrade the firmware. See "Upgrading the Firmware" on page 145
• CPU model – MPC 8313
• Network Adapter – Gigabit Ethernet
• Network Flow – Inflow and Outflow speeds in bits per second
Viewing Enclosure Information
To view enclosure information:
- In the Tree, click the + beside the System icon.
- Click the System Information icon.
- Click the Enclosure Information tab.
Enclosure Information includes:
- CPU temperature
- System Fan Speed
- Power Status 5V
- Power Status 12V
- Power Status 3.3V
If any values are out of specification, see “Checking Enclosure Status in PASM” on page 120.
Enabling the Smart Fan
The Smart Fan is a feature that turns off the fan to save energy and reduce noise when the fan is not needed to cool the SmartStor enclosure. The Smart Fan is enabled by default.
To enable the Smart Fan:
- In the Tree, click the + beside the System icon.
- Click the System Information icon.
- Click the Enclosure Information tab.
- Under Fan Control, click the Enable option.
- Click the OK button.
Chapter 6: Technology Background
- Introduction to RAID (below)
- Choosing a RAID Level (page 120)
• RAID Volume Migration (page 121)
• RAID Volume Migration (page 121)
Introduction to RAID
RAID (Redundant Array of Independent Disks) allows multiple disk drives to be combined together into a RAID Volume. You create a RAID Volume on your SmartStor when you perform the setup procedure, either in SmartNAVI or the PASM Setup Wizard.
The benefits of a RAID can include:
- Higher data transfer rates for increased server performance
- Increased overall storage capacity for a single Volume
- Data redundancy/fault tolerance for ensuring continuous system operation in the event of a disk drive failure
Different RAID levels use different organizational models and have varying benefits. Also see “Choosing a RAID Level” on page 120. The following outline breaks down the properties for each RAID level supported on the SmartStor:
RAID 0 – Stripe
When a RAID Volume is striped, the read and write blocks of data are interleaved between the sectors of multiple disk drives. Performance is increased, since the workload is balanced between drives or “members” that form the RAID Volume. Identical drives are recommended for performance as well as data storage efficiency.
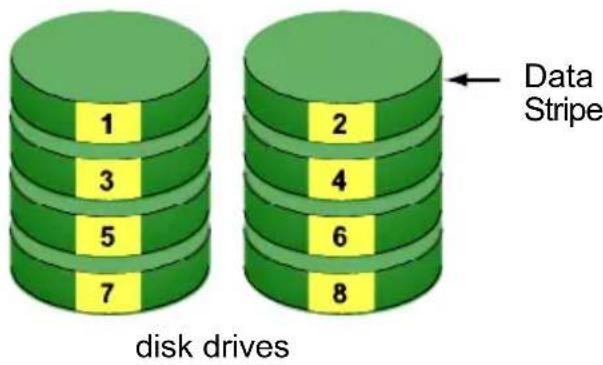
Figure 1. RAID 0 Striping interleaves data across multiple drives
The RAID Volume's data capacity equals the capacity of the smallest disk drive times the number of disk drives. For example, a 200 GB and a 300 GB drive will form a 400 GB RAID Volume instead of 500 GB.
If disk drives of different capacities are used, there will also be unused capacity on the larger drives.
Because RAID 0 does not offer Fault Tolerance, meaning that you cannot recover your data after a disk drive failure, Promise does not recommend a RAID 0 Volume for your SmartStor.
RAID 0 Volumes on SmartStor consist of one or two disk drives.
RAID 1 – Mirror
When a RAID Volume is mirrored, identical data is written to a pair of disk drives, while reads are performed in parallel. The reads are performed using elevator seek and load balancing techniques where the workload is distributed in the most efficient manner. Whichever drive is not busy and is positioned closer to the data will be accessed first.
With RAID 1, if one disk drive fails or has errors, the other mirrored disk drive continues to function. This is called Fault Tolerance. Moreover, if a spare disk drive is present, the spare drive will be used as the replacement drive and data will begin to be mirrored to it from the remaining good drive.
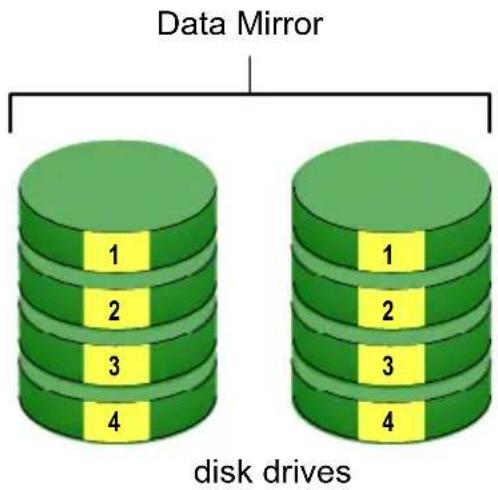
Figure 2. RAID 1 Mirrors identical data to two drives
The RAID Volume's data capacity equals the smaller disk drive. For example, a 300 GB disk drive and a 500 GB disk drive have a combined capacity of 300 GB in a mirrored RAID Volume.
If disk drives of different capacities are used, there will also be unused capacity on the larger drive.
RAID 1 Volumes on SmartStor consist of two disk drives.
Choosing a RAID Level
There are several issues to consider when choosing the RAID level for your Volume. The following discussion summarizes some advantages, disadvantages and applications for each choice.
RAID 0
| Advantages Disadvantages | |
| Implements a striped disk RAID Volume, the data is broken down into blocks and each block is written to a separate disk driveI/O performance is greatly improved by spreading the I/O load across many channels and drivesNo parity calculation overhead is involved | Not a true RAID because it is not fault-tolerantThe failure of just one drive will result in all data in an RAID Volume being lostShould not be used in mission critical environments |
Recommended applications for RAID 0:
- Image Editing
• Pre-Press Applications - Any application requiring high bandwidth
RAID 1
| Advantages Disadvantages | |
| Simplest RAID storage subsystem designCan increase read performance by processing data requests in parallel since the same data resides on two different drives | Very high disk overhead - uses only 50% of total capacity |
Recommended applications for RAID 1:
• Accounting/Financial
- Pay roll
- Any application requiring very high availability
RAID Volume Migration
Migration is the process of:
- Changing the RAID level
- Adding disk drives but keeping the same RAID level
In the migration process, the existing RAID Volume is called the Source. The proposed RAID Volume is called the Target. Each target RAID Volume has certain requirements and they are different for each RAID level. You must meet all of the requirements in order to successfully migrate a RAID Volume.
In most cases, you must add one or more disk drives during the migration process. You can never reduce the number of disk drives.
While the migration is running, you can still access the folders on your RAID Volume and the data they contain.
RAID 0 to RAID 1
A single-drive RAID 0 source Volume can migrate to RAID 1 by adding a disk drive. This action reduces the Volume's capacity by one-half but adds fault tolerance.
RAID 1 to RAID 0
A RAID 1 source Volume can migrate to a RAID 0. This action doubles the Volume's capacity but loses fault tolerance.
RAID Volume Rebuilding
When a disk drive in your RAID 1 Volume fails, your data is still available and the Volume can be recovered.
The RAID 1 Volume will begin to rebuild itself automatically when you remove the failed disk drive and install a new disk drive.
A RAID 0 Volume cannot be rebuilt because of the way in which data is written to the disk drives under RAID 0. Even if there is a designated spare drive, rebuilding is not possible for RAID 0 Volumes.
Partition and Format
When you create a RAID Volume on SmartStor, the RAID Volume is automatically partitioned and formatted for you.
To use your RAID Volume, you must create Folders on the RAID Volume and assign services to those Folders according to your requirements. SmartStor provides file services for Windows, UNIX/Linux and Macintosh, so all of those PCs can access the folders on the SmartStor, even though each PC might have a different file system.
Chapter 7: Troubleshooting
- Responding to an Audible Alarm (page 123)
- Checking the System Status LED (page 124)
- Checking Disk Status LEDs (page 124)
- Replacing a Failed Disk Drive (page 124)
- Checking RAID Volume Status in PASM (page 125)
- Checking File System Status in PASM (page 127)
- Checking the Event Log in PASM (page 128)
- Checking Enclosure Status in PASM (page 131)
- Resolving Connections with SmartNAVI (page 132)
- Solving Network Connection Problems (page 133)
- Restoring the Default Password (page 134)
- Resolving a Windows Firewall Issue (page 135)
This chapter deals problems you might encounter with your SmartStor and how to resolve them. Also see “Frequently Asked Questions” on page 137.
Responding to an Audible Alarm
The SmartStor has two beep patterns
- Single beep, not repeated – The SmartStor is online
- Two beeps, continuously repeated – The SmartStor reports a problem
When you boot or reboot the SmartStor, and the buzzer is enabled, the buzzer sounds one time to indicate that the SmartStor is online.
If you hear the two-beep pattern, check the following items:
- System Status LED (see below)
- Drive Status LED (see page 124)
- RAID Volume status in PASM (see page 125)
- File System status in PASM (see page 127)
• Enclosure status in PASM (see page 131)
• Event Log in PASM (see page 128) - Your email inbox (see page 134)
Checking the System Status LED
The SmartStor system status LED (see Figure 1.) reports the condition of the Enclosure fan and power supply:
- Green – Normal Enclosure function
- Amber – There is a problem with the fan or power supply
- Red – The fan, power supply, or file system has failed
If your SmartStor is configured to work with a UPS, it will continue to run after a power supply failure.
Checking Disk Status LEDs
The disk status LEDs (see Figure 1.) report the condition of the disk drives:
- Green – Normal disk drive function
- Amber – Rebuilding to this disk drive
- Red – Failed disk drive
- Dark – No disk drive is installed
See "Replacing a Failed Disk Drive" on page 124.
Figure 1. SmartStor Disk and System Status LEDs
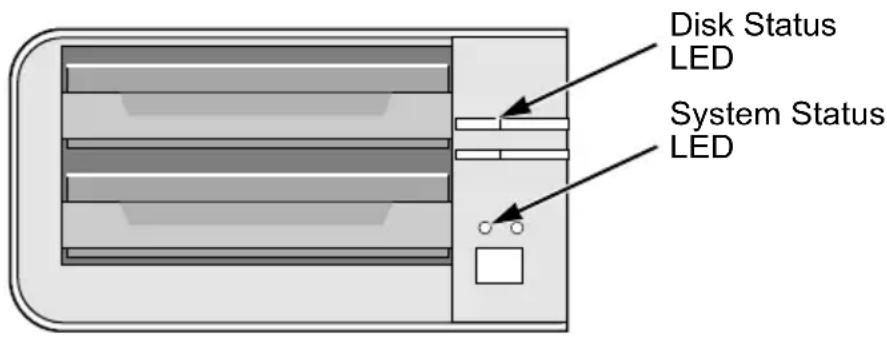
Replacing a Failed Disk Drive
If a disk drive fails, the Disk Status LED is red. See Figure 1. If the disk drive belongs to a RAID Volume, the Volume goes Critical or Offline. See “Checking RAID Volume Status in PASM” on page 125.
Replace the failed disk drive with a new disk drive of the same or slightly greater capacity. You do not have to power down the SmartStor.
- Open the SmartStor's front door.
- Pull out the drive carrier with the failed drive.
-
Remove the failed disk drive from the drive carrier.
-
Install a new disk drive into the carrier.
- Place the carrier with the new disk drive back into the open slot in the SmartStor.
If the failed drive belonged to a RAID Volume, the RAID Volume will begin rebuilding as soon as the new drive is installed.
During the Rebuild, the Disk Status LED show amber. When the Rebuild is finished, the Disk Status LED turns green.
If the replacement drive is free, that is, not assigned to a RAID Volume or as a spare, the Disk Status LED remains dark after you install the new drive.
Checking RAID Volume Status in PASM
To view RAID Volume status:
- Start PASM.
See "PASM in your Browser" on page 80.
Or see "PASM in SmartNAVI" on page 81.
- In the Tree, click the + beside the RAID & File System icon.
- Click the RAID Management icon.
The status is displayed in the RAID Status tab.
Figure 2. PASM reports a Critical RAID Volume
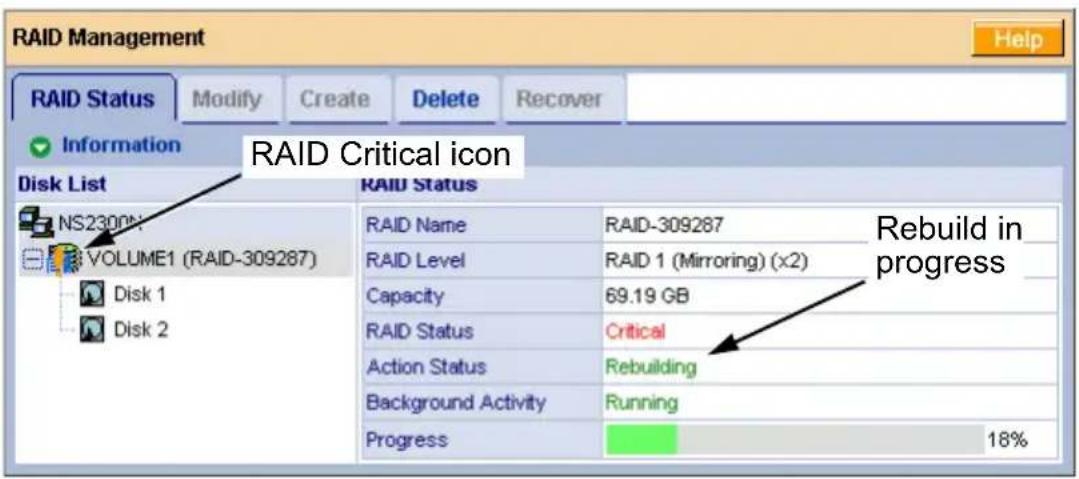
SmartStor Responds to a Critical RAID Volume
How the SmartStor responds to a Critical RAID Volume depends on the RAID level of your Volume and whether you have a spare drive available:
- For RAID 1, you must replace the failed disk drive. The RAID Volume will begin rebuilding itself when you install the new disk drive. See “Replacing a Failed Disk Drive” on page 124.
- RAID 0 Volumes go offline after a disk drive failure. A RAID 0 Volume cannot be rebuilt. All data on the Volume is lost.
Additional Details about Rebuilds
- The Rebuild takes several minutes, depending on the size of your disk drives.
- During a rebuild, you can access your folders on the SmartStor.
- When you replace the failed disk drive with a new disk drive, the new disk drive becomes a Free Drive.
Responding to an Invalid RAID Volume
The SmartStor considers a RAID Volume invalid when the RAID Volume was created by a different SmartStor. However, the RAID Volume itself remains functional and the data on it is safe.
This condition could happen when you:
- Move the disk drives from one SmartStor to a different SmartStor.
- Remove the disk drives in order to send your SmartStor for service.
When the SmartStor's memory does not recognize the RAID Volume, so PASM displays the RAID Volume as invalid. See Figure 3.
Use the Recover function to validate the RAID Volume. The Recover tab is only active when an invalid RAID Volume is present and can be recovered.
Figure 3. An invalid RAID Volume in PASM
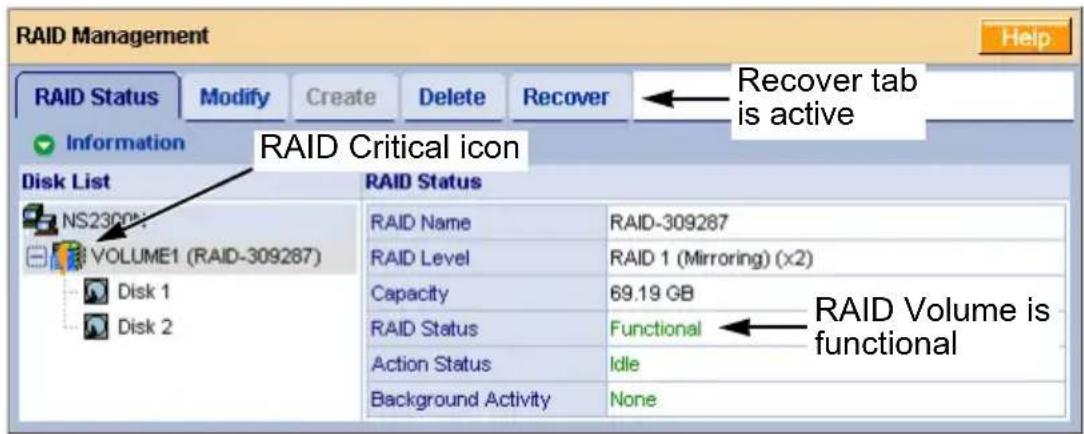
Using the Recover Function
To validate the RAID Volume:
- In the Tree, click the + beside the RAID & File System icon.
- Click the RAID Management icon.
-
Click the Recover tab.
-
On the Recover tab, click the option button beside the invalid RAID Volume.
- Click the OK button.
The SmartStor will reboot itself to update its configuration and recognize the RAID Volume.

Important
Running the Recover function might erase some or all of your SmartStor settings. If that condition happens, run the NAS Setup Wizard. See “Setting up the SmartStor” on page 11.
Checking File System Status in PASM
Typically the first indication of a problem with the SmartStor's file system is when your network drive becomes unavailable.
You might also see the message, "File system contains errors. Please check." when you click the icons under the File & Print menu.
To view File System status:
- Start PASM.
See "PASM in your Browser" on page 80.
Or see "PASM in SmartNAVI" on page 81.
- In the Tree, click the + beside the RAID & File System icon.
- Click the File System Management icon.
- Look for the RAID Volume 📋 icon on the File System Status tab.
If the RAID Volume icon is Critical 📄 (has a yellow!), the file system contains errors and you must rebuild the file system. See below.
Rebuilding the File System

Caution
When you rebuild a File System, you delete all the folders in the RAID volume and all the data saved in the folders.
To rebuild a File System:
- In the Tree, click the + beside the RAID & File System icon.
- Click the File System Management icon.
-
In the File System Status tab, click the RAID Volume Critical 📋 icon to display the Rebuild File System button.
-
Click the Rebuild File System button.
-
In the confirmation box, type yes into the field provided, then click the OK button.
Checking the Event Log in PASM
To view the Event Log in PASM:
To check Enclosure status:
- Start PASM.
See "PASM in your Browser" on page 80.
Or see "PASM in SmartNAVI" on page 81.
-
In the Tree, click the + beside the Management icon.
-
Click the Event Log icon.
The Event Log displays. See Figure 4.
Figure 4. The PASM Event Log
| Event Log | ||
| Event Log | ||
| ✓ Event Log List | ||
| Date / Time | Level | Message |
| Feb 12 13:56:25 | WARNING | Rebuild on array 1 10% |
| Feb 12 13:51:14 | WARNING | Rebuild on array 1 started |
| Feb 12 13:51:14 | WARNING | Disk 2 plugged in |
| Feb 12 13:49:28 | WARNING | RAID status: "CRITICAL". The NS2300N (sammyz_stash) volume "/VOLUME1" is not functioning correctly. |
| Feb 12 13:33:08 | INFO | System is starting to work. |
| Feb 6 14:31:03 | INFO | System is shutting down. |
| Feb 5 13:14:27 | INFO | System is starting to work. |
| Feb 5 11:18:05 | INFO | System is shutting down. |
| Feb 4 15:33:26 | INFO | System is starting to work. |
| Feb 1 18:03:33 | INFO | System is shutting down. |
| Jan 29 11:56:55 | INFO | System is starting to work. |
| Jan 25 19:02:07 | INFO | System is shutting down. |
| Jan 25 17:01:16 | INFO | Delete volume (VOLUME1). |
| Jan 25 16:58:19 | INFO | System is starting to work. |
| Jan 25 16:57:31 | INFO | System is shutting down. |
| Jan 25 16:53:55 | INFO | System is starting to work. |
| Jan 25 16:53:11 | INFO | System is rebooting. |
| Jan 25 16:53:02 | INFO | Delete RAID (RAID-117786). |
| Jan 23 13:27:32 | INFO | System is starting to work. |
| Jan 23 13:27:31 | INFO | System is shutting down. |
- Check the Event Log for reports of disk drive failure or other problems.
Responding to Events
All events are reported in the Event Log. Most events are simply reports that the SmartStor is responding to your commands.
Many events are also reported via email. The SmartStor's buzzer sounds for serious events that require your attention.
A list of event categories is shown below:
- File System (page 129)
- Disk Drives (page 130)
- System (enclosure) (page 129)
• RAID Volumes (page 130)
| Reported Event Corrective Action | |
| File System | |
| File system of volume X content errors! Check the system before continuing. | The file system has a problem. Reboot the SmartStor and check file system again. If the event appears again, the file system has crashed. Rebuild the file system. See page 127. |
| File system capacity usage of volume X is over 90%. | Reduce the number or size of the files or expand the volume size. See “Migrating a RAID Volume” on page 102. |
| File system capacity usage of volume X is 100%. | |
| Rebuilding file system... The file system is being rebuild by user action. | |
| System (enclosure) | |
| System is starting to work. | Normal. |
| System is rebooting. | |
| System is shutting down. | |
| System was shut down abnormally. | The SmartStor shut down incorrectly the last time. See “Shutting Down the SmartStor” on page 114. |
| CPU temperature is higher than 58°C/138°F. System will shut down. | Allow the SmartStor to cool for several minutes. Then restart the SmartStor and check system temperature and fan operation. See page 131. Be sure there is adequate air circulation around the SmartStor. |
| System fan speed is lower than 1800 RPM. Check the system before continuing. | Only reported when the Smart Fan is disabled. See page 116.Replace the fan. See “Contacting Technical Support” on page 140. |
| AC Power failure. System will shut down. | Restore the AC power. Then restart the SmartStor. See “Connecting the Power” on page 7. |
| Disk Drives | |
| Task X timeout on disk Y at LBA [address] | A LBA error. Check the disk drives. See page 124. Check the RAID Volume. See page 125. Replace the disk drive or rebuild the RAID Volume as needed. |
| Task X disk error on disk Y at LBA [address] with status Z | |
| S.M.A.R.T threshold exceeded on disk X | Check the disk drives. See page 124. Replace the failed drive. See page 124. |
| BSL update on disk X at LBA [address] | Bad sector on a disk drive. Check the disk drives. See page 124. Replace the disk drive if it continues to receive BSL updates. |
| BSL log disk X at LBA [address] cleared | Check the disk drives. See page 124. |
| Delete Spare Disk Delete a spare drive. Normal. | |
| RAID Volumes | |
| Create [RAID name, RAID level and X number of disk drives] | Create a RAID Volume. Normal. |
| Delete RAID X Delete a RAID Volume. Normal. | |
| Migration or Rebuilding on array X started. | RAID Volume Migration or Rebuild has started. Normal. |
| Migration or Rebuilding on array X at Y%. | Progress report on RAID Volume Migration or Rebuild. Normal. |
| Migration or Rebuilding on array X paused at Y%. | RAID Volume Migration or Rebuild was paused temporarily by user action. |
| Migration or Rebuilding on array X resumed at Y%. | RAID Volume Migration or Rebuild was paused and then resumed by user action. |
| Migration or Rebuilding on array X completed. | RAID Volume Migration or Rebuild has finished. Normal. |
| Migration or Rebuilding on array X aborted at Y% | RAID Volume Migration or Rebuild was aborted (stopped) by user action. |
| Migration or Rebuilding on array X aborted at Y% because of error. | RAID Volume Migration or Rebuild has aborted (stopped) because of an error. Check the disk drives. See page 124. Check the RAID Volume. See page 125. |
| RAID status: "OFFLINE". The NS2300N X volume Y is offline. | Check the disk drives. See page 124. Replace the failed drive. See page 124. Create a new RAID Volume. See page 101. |
| RAID status: "CRITICAL". The NS2300N X volume Y is not functioning correctly. | Check the disk drives. See page 124. Replace the failed drive. See page 124. The RAID Volume will rebuild automatically. |
| RAID X had some errors. Formatting was aborted! | Check the disk drives. See page 124. Replace the failed drive. See page 124. |
Checking Enclosure Status in PASM
To check Enclosure status:
- Start PASM.
See "PASM in your Browser" on page 80.
Or see "PASM in SmartNAVI" on page 81.
- In the Tree, click the + beside the System icon.
- Click the System Information icon.
- Click the Enclosure Information tab.
Figure 5. The Enclosure Information tab with malfunctions shown
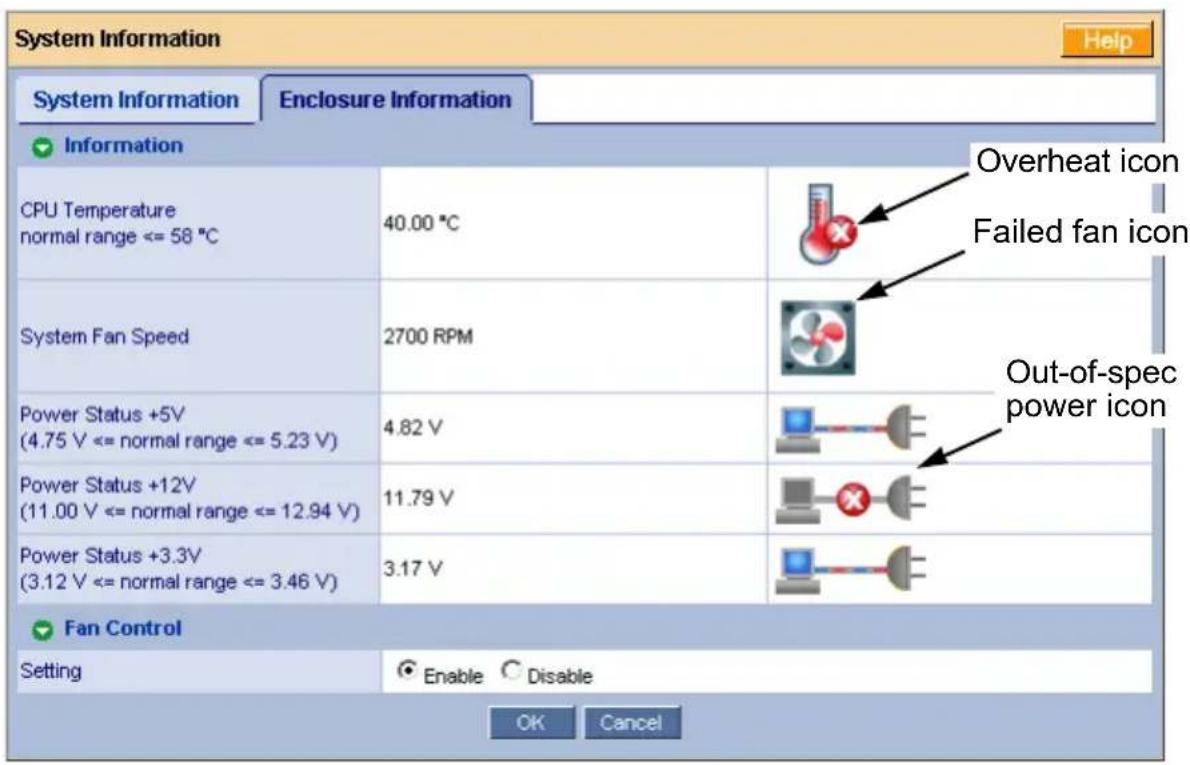
The corrective action you take depends on the nature of the problem:
- If CPU temperature is above specification:
- Be sure there is adequate air flow around the SmartStor.
- Be sure the ambient temperature is below 35^ C (95°F).
- Check the fan speed.
- If the fan speed is below specification, contact Technical Support. See page 140.
- If any power status is out-of-specification, contact Technical Support. See page 140.
Resolving Connections with SmartNAVI
The SmartNAVI software is designed to detect the SmartStor on your network. If SmartNAVI does not detect your SmartStor, check the following items:
- Be sure the SmartStor is powered up and fully booted.
The Power Button and System Status LED should be green. See Figure 6. - Be sure the SmartStor is properly connected to your network.
The Ethernet Activity LED should be green or blinking green. See Figure 6. If the Ethernet Activity LED is dark, see “Solving Network Connection Problems” on page 133.
Figure 6. Power Button, System Status and Ethernet Activity LEDs
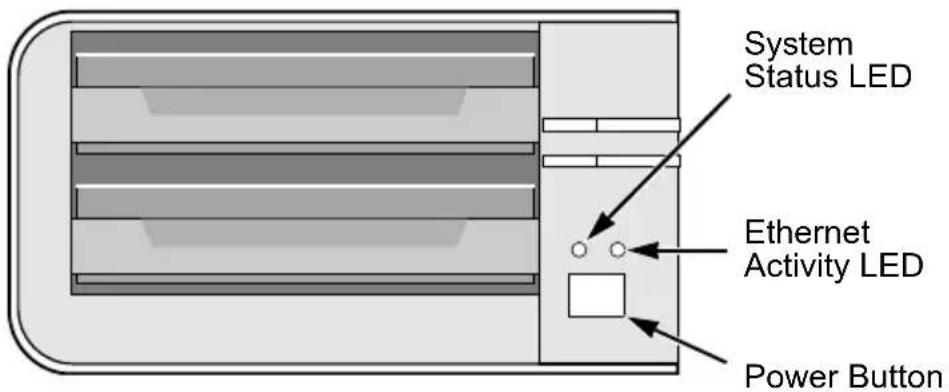
Note: This SmartStor is shown without the front door.
Solving Network Connection Problems
Most network connection problems are the result of poor connections.
When the SmartStor is fully booted and connected to the network, the Ethernet Activity LED indicates status and activity:
- Green – Network link is properly connected
- Flashing Green – Network Activity
- Dark – No Connection
See Figure 6.
If your SmartStor is connected to your network but the Ethernet Activity LED on your SmartStor is dark, check the following items:
- Verify that the switch, hub, or facility network service connection that you are using is operational.
Switches and hubs have LEDs that light when there is a connection and flash when there is activity.
Network service connections generally do not have LEDs to verify whether they actually are connected to the network. See your Network Administrator for assistance.
- Be sure the network cable is firmly attached to the SmartStor network connector at one end and to the network switch, hub, or facility network connection at the other.
- If the cable connections are good, remove the existing network cable and install a known-good network cable.
If you know your network devices are working properly and you know that your network cable is good, but the Ethernet Activity LED remains dark, see "Contacting Technical Support" on page 140.
Checking Your Email Inbox
If you enabled Mail Alert in PASM, the SmartStor will send you an email message when a problem arises. Look for a message from "root."
Figure 7. Email message from the SmartStor.
![! ↑ From Subject Received Size root Notification from NS2300 (El_Abasto) ! Fri 2/15/2008 7:12 PM 1 KB Brian Wu RE: Controller Photos Fri 2/15/2008 7:01 PM 1 KB John Smith RE: Controller Photos Fri 2/15/2008 6:47 PM 5 KB David Chang RE: launch-material schedule Fri 2/15/2008 9:42 AM 20 KB Khanh Nguyen ANNUAL MEETING ANNOUNCEMENT Fri 2/15/2008 8:31 AM 15 KB From: root [root@El_Abasto.workgroup] See “Adding an Email Alert Recipient” on page 109 for more information about email alerts. Restoring the Default Password Normally, you change your password in PASM. See "Changing the Administrator's Password" on page 85. If you changed the password and then forgot the new password, you can reset the SmartStor to the default password: admin. Use a straightened paper clip or the tip of a ball-point pen as a reset tool. To reset the Administrator's password: 1. Verify that the SmartStor is fully booted. 2. Insert your reset tool into the reset button hole on the back of the SmartStor. See Figure 8. 3. Press and hold the reset button for eight seconds, until the System Status LED flashes three times. The Administrator's password is now reset to admin. Figure 8. Reset button and System Status LED  text_image Reset button System Status LED](/content/2026/05/758947/images/a3645526298ddb0d1d1f94401d8badc052d0eeb913be76be148780ca91851a14.jpg)
Resolving a Windows Firewall Issue
If you a running a personal firewall on your Windows PC, the firewall might prevent the you from accessing the SmartStor over your network. Follow this procedure to add an exception for the SmartStor: 1. From the Windows Start menu, choose Settings, then Network Connections. The Network Connections window opens. 2. Right-click Local Area Connection and choose Properties from the popup menu. The local Area Connection properties dialog box opens. 3. Click the Advanced tab. 4. Click the Settings button. The Windows Firewall dialog box opens. 5. Click the Advanced tab. 6. Under Network Connection Setting, click the Settings button. The Advanced Settings dialog box opens. 7. Click the Add button. The Service Settings dialog box opens. 8. In the Description of service field, type Promise NAS utility. 9. In the Name or IP address field, type the IP address of the SmartStor. See "Finding the SmartStor's IP Address" on page 15. 10. In the External Port field, type 49152. 11. Click the UDP option button. 12. In the Internal Port field, type 49152. 13. Click the OK button. Figure 9. Windows Firewall Advanced Service Settings  14. Click the OK buttons in the Advanced Settings, Windows Firewall, and Local Area Connection Properties dialog boxes.Chapter 8: Support
• Frequently Asked Questions (below) - Contacting Technical Support (page 140) - Limited Warranty (page 143) - Returning Product For Repair (page 145)Frequently Asked Questions
Also see “Chapter 7: Troubleshooting” on page 123. The SmartStor worked OK until I turned it off. When I turned it on again, my Windows network drive connection no longer works. When you powered up the SmartStor, the DHCP server assigned a different IP address to the SmartStor. Here are two possible solutions: - You may be able to reset the SmartStor's IP address manually. See "Changing Network Settings" on page 69 or "Making Network Settings" on page 106. Note that changing the SmartStor's IP address may cause an IP address conflict on your network. Check with your Network Administrator before taking this action. - If you cannot restore the previous IP address, you must create new network drives and printer connections. See “Chapter 3: Connecting to the SmartStor” on page 19. When I start Windows, a message displays that says, “Could not reconnect all network drives.” The SmartStor reconnects to your PC shortly after Windows starts. In most cases, the SmartStor network drives will be available by the time you click them. SmartNAVI cannot access the SmartStor over the network. If you a running a personal firewall on your Windows PC, the firewall might prevent you from accessing folders on the SmartStor. You must do one of the following actions: - Disable the firewall - Add an exception for the SmartStor See "Resolving a Windows Firewall Issue" on page 135. I tried to connect my SmartStor as a network drive using SmartSYNC, but Windows displayed an error message. There might be an IP address conflict between the SmartStor and another device on your network. See your Network Administrator for assistance. I cannot log into the SmartStor with through the AD Domain. Be sure you use a "domain name\user name" when you log into the SmartStor using SMB, FTP, or AFP. You must use the "\" character. Many FTP clients do not support a space in the domain name or user name. Also, the SmartStor does not support a user home directory. How does the SmartStor integrate into an NIS Domain? If the NIS domain account or group name is the same as the SmartStor, the SmartStor will apply them to its account or group. If the SmartStor joins a NIS Domain, joining only affects the NFS service and Quota settings. The other services are not affected. How are non-ASCII folder file names displayed? The SmartStor supports Unicode, so you can use non-ASCII characters in your folder names. Windows 98 and ME do not support Unicode, so they cannot display your folder names properly. But you can still access your folders. I tried to copy a Windows shortcut to my network drive, but an error message says there is not enough free disk space. Normally, you can copy a Windows shortcut to a network drive. However, if the network drive is a USB drive or memory stick with FAT32 file format, the SmartStor might not recognize the shortcut and prevent you from copying it. If this situation occurs, choose a different folder in which to copy the shortcut. Does SmartStor support a USB drive or memory stick with FAT16 file format? No. If you attach the FAT16 USB drive or memory stick to SmartStor, you can see the files on it. But if you attempt to copy files to the drive or memory stick, Windows might display a disk full message. How do I remove a USB drive or memory stick from the SmartStor? Be sure that no files on the USB drive or memory stick are still open. Then unplug the USB drive or memory stick from the SmartStor. The SmartStor automatically unmounts the USB drive or memory stick.Can I do a One Touch Backup or a regular Backup on a protected folder or file on my Windows PC?
No. Windows does not allow SmartSYNC to access protected folders and files. If you want to perform a backup, you must first disable protection on your folders and files.Which FTP clients are compatible with the SmartStor's FTP server?
Promise recommends FTP clients that support Unicode, such as Filezilla or Smart FTP for Windows, Filezilla for Linux, and Transmit v3.5.5 for Macintosh. If your FTP client does not support Unicode, you have two choices: - Use only ASCII characters to name your shared folders. - Set your SmartStor for double-byte character encoding. See page 93.Can I move the disk drives from one SmartStor to a different SmartStor?
Yes. However, to access the RAID Volume on the new SmartStor, you must run the Recover function. When SmartStor's memory does not match the RAID Volume on the disk drives, the RAID Volume is considered invalid and the Recover function becomes available. See “Responding to an Invalid RAID Volume” on page 126.I set up email alert recipients but they never receive any messages.
In most cases, you must setup SMTP authentication in order for your alert messages to pass your SMTP server. See “Setting up SMTP Authentication” on page 108.Can SmartStor handle jumbo frames?
Yes. But you must set the maximum frame size in PASM. See “Working with Jumbo Frames” on page 107.I tried to create a share folder called “Admin” but the PASM software would not let me.
The Admin name is a reserved folder name. Choose another folder name.I created a share folder and gave it the same name as a local user. This action caused a conflict.
The system does not check share folder names against user names, therefore it is possible to create two folders with the same name. If this happens, delete the share folder, so that only the user's home folder remains.Contacting Technical Support
Promise Technical Support provides several support options for Promise users to access information and updates. We encourage you to use one of our electronic services, which provide product information updates for the most efficient service and support. If you decide to contact us, please have the following information available: - Product model and serial number • BIOS, firmware, and driver version numbers • A description of the problem / situation - System configuration information, including: motherboard and CPU type, hard drive model(s), SAS/SATA/ATA/ATAPI drives & devices, and other controllers. Technical Support Services| Promise OnlineTM Web Site http://www.promise.com/support/support_eng.asp(technical documents, drivers, utilities, etc.) |
| E-mail Support e-Support On-Line | |
| Fax Support (408) 228-1100 Attn: Technical Support | |
| Phone Support (408) 228-1400 option 4 | |
| If you wish to write us for support: | Promise Technology, Inc.580 Cottonwood DriveMilpitas, CA 95035, USA |
| E-mail Support e-Support On-Line | |
| Fax Support +31 (0) 40 256 9463 Attn: Technical Support | |
| Phone Support +31 (0) 40 235 2600 | |
| If you wish to write us for support: | Promise Technology Europe B.V. Science Park Eindhoven 5542 5692 EL Son, The Netherlands |
| E-mail Support e-Support On-Line | |
| Fax Technical Support +49 (0) | 2 31 56 76 48 - 29Attn: Technical Support |
| Phone Technical Support +49 (0) | 2 31 56 76 48 - 10 |
| If you wish to write us for support: | Promise Technology GermanyEuropaplatz 944269 Dortmund, Germany |
| E-mail Support e-Support On-Line | |
| Fax Support 0039 06 367 12400 Attn: Technical Support | |
| Phone Support 0039 06 367 12626 | |
| If you wish to write us for support: | Promise Technology ItalyPiazza del Popolo 1800187 Roma, Italia |
| E-mail Support e-Support On-Line | |
| Fax Support +886 3 578 2390 Attn: Technical Support | |
| Phone Support +886 3 578 2395 (ext. 8822, 8823) | |
| If you wish to write us for support: | Promise Technology, Inc.2F, No. 30, Industry E. Rd. IXScience-based Industrial ParkHsin-Chu 30075, Taiwan (R.O.C.) |
| E-mail Support e-Support On-Line | |
| Fax Support | +86-10-8857-8015 Attn: Technical Support |
| Phone Support +86-10-8857-8085/8095 | |
| If you wish to write us for support: | Promise Technology ChinaRoom 1205, Tower CWebok Time Center, No.17South Zhong Guan Cun StreetHai Dian District, Beijing 100081, China |
Limited Warranty
Promise Technology, Inc. ("Promise") warrants that for three (3) years from the time of the delivery of the product to the original end user: a) the product will conform to Promise's specifications; b) the product will be free from defects in material and workmanship under normal use and service. This warranty: a) applies only to products which are new and in cartons on the date of purchase; b) is not transferable; c) is valid only when accompanied by a copy of the original purchase invoice. d) Is not valid on spare parts, fans, and power supplies This warranty shall not apply to defects resulting from: a) improper or inadequate maintenance, or unauthorized modification(s), performed by the end user; b) operation outside the environmental specifications for the product; c) accident, misuse, negligence, misapplication, abuse, natural or personal disaster, or maintenance by anyone other than a Promise or a Promise-authorized service center.Disclaimer of other warranties
This warranty covers only parts and labor, and excludes coverage on software items as expressly set above. Except as expressly set forth above, Promise DISCLAIMS any warranties, expressed or implied, by statute or otherwise, regarding the product, including, without limitation, any warranties for fitness for any purpose, quality, merchantability, non-infringement, or otherwise. Promise makes no warranty or representation concerning the suitability of any product for use with any other item. You assume full responsibility for selecting products and for ensuring that the products selected are compatible and appropriate for use with other goods with which they will be used. Promise DOES NOT WARRANT that any product is free from errors or that it will interface without problems with your computer system. It is your responsibility to back up or otherwise save important data before installing any product and continue to back up your important data regularly. No other document, statement or representation may be relied on to vary the terms of this limited warranty. Promise's sole responsibility with respect to any product is to do one of the following: a) replace the product with a conforming unit of the same or superior product; b) repair the product. Promise shall not be liable for the cost of procuring substitute goods, services, lost profits, unrealized savings, equipment damage, costs of recovering, reprogramming, or reproducing of programs or data stored in or used with the products, or for any other general, special, consequential, indirect, incidental, or punitive damages, whether in contract, tort, or otherwise, notwithstanding the failure of the essential purpose of the foregoing remedy and regardless of whether Promise has been advised of the possibility of such damages. Promise is not an insurer. If you desire insurance against such damage, you must obtain insurance from another party. Some states do not allow the exclusion or limitation of incidental or consequential damages for consumer products, so the above limitation may not apply to you. This warranty gives specific legal rights, and you may also have other rights that vary from state to state. This limited warranty is governed by the State of California.Your Responsibilities
You are responsible for determining whether the product is appropriate for your use and will interface with your equipment without malfunction or damage. You are also responsible for backing up your data before installing any product and for regularly backing up your data after installing the product. Promise is not liable for any damage to equipment or data loss resulting from the use of any product.Returning Product For Repair
If you suspect a product is not working properly, or if you have any questions about your product, contact our Technical Support Staff through one of our Technical Services, making sure to provide the following information: - Product model and serial number (required) - Return shipping address • Daytime phone number • Description of the problem • Copy of the original purchase invoice The technician will assist you in determining whether the product requires repair. If the product needs repair, the Technical Support Department will issue an RMA (Return Merchandise Authorization) number. Important
Obtain an RMA number from Technical Support before you return the product and write the RMA number on the label. The RMA number is essential for tracking your product and providing the proper service. Return ONLY the specific product covered by the warranty (do not ship cables, manuals, diskettes, etc.), with a copy of your proof of purchase to: USA and Canada: Promise Technology, Inc. Customer Service Dept. Attn.: RMA # \_\_\_\_ 47654 Kato Road Fremont, CA 94538 Other Countries: Return the product to your dealer or retailer. Contact them for instructions before shipping the product. You must follow the packaging guidelines for returning products: - Use the original shipping carton and packaging - Include a summary of the product's problem(s) - Write an attention line on the box with the RMA number - Include a copy of proof of purchase You are responsible for the cost of insurance and shipment of the product to Promise. Note that damage incurred due to improper transport or packaging is not covered under the Limited Warranty. When repairing returned product(s), Promise may replace defective parts with new or reconditioned parts, or replace the entire unit with a new or reconditioned unit. In the event of a replacement, the replacement unit will be under warranty for the remainder of the original warranty term from purchase date, or 30 days, whichever is longer. Promise will pay for standard return shipping charges only. You will be required to pay for any additional shipping options (such as express shipping).Appendix A: Maintenance
- Upgrading the Firmware (below) - Upgrading the Software (page 148) - Connection Problems After Restart (page 149)Upgrading the Firmware
Follow this procedure to upgrade the firmware on your SmartStor.Downloading the Firmware Upgrade File
To download the upgrade file: 1. Point your browser to http://www.promise.com/support/support\_eng.asp. 2. Download the NS2300N firmware upgrade file to your PC. 3. Copy the firmware upgrade file from your PC to a folder on the SmartStor.Installing the Firmware Upgrade File
1. Start the PASM interface. 2. In the Tree, click the + beside the Management icon. 3. Click the System Upgrade icon. 4. Click the Firmware Upgrade tab. 5. From the Volume dropdown menu, choose the Volume that has the folder with the firmware image file. 6. From the Folder dropdown menu, choose the Folder that contains the firmware upgrade file. 7. In the File Name field, type the name of the firmware upgrade file. Or highlight the file and copy the name, then paste the name into the field. 8. Click the OK button to begin the upgrade. The upgrade takes about two to three minutes. Warning
Do not disconnect the power or shut down the SmartStor while the upgrade is running! When the installation is done, the SmartStor reboots automatically. When the SmartStor beeps once, it is ready for use.Upgrading the Software
Follow this procedure to upgrade the SmartNAVII configuration software on your PC. The software upgrade file automatically overwrites the existing SmartNAVI installation on your PC. Important
To configure the SmartStor, you must install the software onto a PC running Windows Vista, 2003 Server, XP Professional, or 2000.Downloading the Software Upgrade File
To download the upgrade file: 1. Point your browser to http://www.promise.com/support/support\_eng.asp. 2. Download the NS2300N software upgrade file to your PC.Installing the Software Upgrade File
1. Double-click the NAS Utility Installer icon. The Choose Setup Language dialog box appears. 2. Choose your language from the dropdown menu, then click the OK button. 3. On the upgrade notice message, click the Yes button to continue. 4. On the Resuming screen, click the Next button to continue. 5. On the Completed screen, click the Finish button to exit the installer. This action completes the software upgrade.Connection Problems After Restart
If your SmartStor's network settings were set to Obtain an IP address automatically, your DHCP server might assign a different IP address to the SmartStor when you restart the SmartStor after is was shutdown for repairs. This condition does not apply if you assigned your SmartStor's IP address manually. If you experience network drive or printer connection failures, check the SmartStor's current IP address. See “Finding the SmartStor's IP Address” on page 15. If the SmartStor's IP address has changed, your previous network drives and printer connections will no longer work. Here are two possible solutions: \- You may be able to reset the SmartStor's IP address manually. See "Changing Network Settings" on page 69 or "Making Network Settings" on page 106. Note that changing the SmartStor's IP address may cause an IP address conflict on your network. Check with your Network Administrator before taking this action. \- If you cannot restore the previous IP address, you must create new network drives and printer connections. See “Chapter 3: Connecting to the SmartStor” on page 19.Appendix B: Important Information
GNU General Public License
This product includes copyrighted third-party software licensed under the terms of the GNU General Public License. Please see the GNU General Public License (“GPL”) for the exact terms and conditions of this license at www.gnu.org. The GPL source code incorporated into the product is available for free download at our web site www.promise.com/support/download/download\_eng.asp. Subject to GPL, you may re-use, re-distribute and modify the GPL source code. Note that with respect solely to the GPL Software, no warranty is provided, we do not offer direct support for the distribution.Battery
Caution
Risk of explosion if battery is replaced by an incorrect type. Dispose of used batteries according to the instructions.Index
A
about this manual 1 action status, RAID Volume 100 AD domain 90, 138 add email alert recipient 109 folder 84 plug-ins in PASM 94 plug-ins in SmartNAVI 71 spare drive 102 user 83 add member to group PASM 87 SmartNAVI 53 Add Printer Wizard 32 Advanced Setup 12 APC UPS 111 architecture, SmartStor 2 audible alarm 123 Authentication dialog box 25B
background activity, RAID Volume 100 backup change schedule 60 clear event log 63 delete schedule 61 immediate 58 save event log 62 scheduling 59 software list 4 view event log 62 view schedules 60 backup files, restore 61 Bit Torrent server plug-in 71, 94 boot SmartStor after shutdown 114 booting the SmartStor 7 browser support 4, 15 BT server plug-in 71, 94 buttons Extend File System 102 power 6, 132 reset 135 buzzer enable/disable 110 one beep 7 patterns 123C
cable, network 133 clear backup event log 63 client OS support 4, 5, 148 close PASM 82 SmartNAVI 49 computer name 13 connections failed after restart 137, 149 network 7, 133 resolving 132 USB printer 29 connectors network 6, 133 power 6 RJ45 6 USB 6,37 cooling fan 6 CPU temperature 115, 132 create group PASM 87 SmartNAVI 52 create network drive 66 create RAID volume PASM 101 SmartNAVI 55 critical RAID Volume 125D
date and time 13, 112 DCHP server 83 default gateway 83, 107 default NAS 70 default user, SmartNAVI 51 delete email alert recipient 109 group in PASM 88 group in SmartNAVI 54 RAID Volume 103 user in PASM 86 user in SmartNAVI 52 device name 13 DHCP server 13, 106 disconnect network drive 66 disconnect USB drive 40 disk drive assign to RAID Volume 84 assign to RAID volume 7 events 130 move to a different SmartStor 126 replace 124 disk drive information PASM 101 SmartNAVI 56 disk status LED 124 DLNA server plug-in 71, 94 DNS IP address 13 name in SMTP server 108 server 83, 107 domain AD domain name 90 controller 90 downloads add link 75 download list 76 downloaded list 77 open/delete file 77 downloads, cont. pause/resume 76 remove link 76 drive mapping 13E
email alert list,view 109 Email notification 134 enable One Touch Backup 105 Smart Fan 116 enclosure events 129 status 131 error message network drive 138 not enough free disk space 138 ESD warning 5 Ethernet activity LED 132, 133 Ethernet hub or switch 7 event log 128 event log, view PASM 108 SmartNAVI 71 events disk drive 130 enclosure 129 file system 129 RAID Volume 130 response to 129 system 129 expand RAID volume PASM 102 SmartNAVI 55 export access list, UNIX/Linux PC 92 Ext3 file format 37F
fan cooling 6 speed 115, 132 FAT16 file format 138 FAT32 file format 37, 138 file protocol support 3 file system events 129 rebuilding 127 status 127 finding SmartStor's IP address 15 firewall, Windows 135 firmware, updating 147 folder add 84 FTP sharing 99 names 138 services 96 UNIX/Linux sharing 98 view 96 Windows sharing 98 formatting memory stick 104 RAID Volume 101 USB drive 104 free disks 101 FTP access setup 93 client encoding 93 clients 138, 139 sharing setup 99G
gateway IP address 13 GNU General Public License 151 group list PASM 86 SmartNAVI 53H
hub, network 133|
icon SmartNAVI 11, 15 SmartNAVI installer 8 information, SmartNAVI 48 installing SmartNAVI 8 internal port in Windows 136 invalid RAID Volume 126, 139 IP address finding 15 obtain from DHCP server 13, 106 setting 13, 83, 107 SMTP server 108 UNIX/Linux PC 23, 92, 98 iTunes server plug-in 71, 94J
jumbo frames 107, 139L
language PASM 82 SmartNAVI 11, 47 LEDs disk activity 6 disk status 6, 124 Ethernet activity 6, 132, 133 system status 6, 7, 103, 113, 114, 124, 132, 134 Linux export access list 92 setup access 91 setup network drive 22 setup printing 32 sharing setup 98M
Macintosh setup access 92 setup network drive 26 setup printing 35 mail alerts 134 Main Window, open 46 Map Network Drive 21 maximum transmission unit (MTU) 107 memory stick format 138 formatting 104 view 104 migrate RAID volume 102 mirror RAID 119, 120 modify folder services 96 mount share folder 66 MSN Window, open 46 My Computer, network drive 14 My Network Places 19N
NAS system name 13 NAS Utility Installer 148 NAS, default 70 network connecting to 7 connection problems 133 network drive could not reconnect all 137 create 66 disconnect 66 error message 138 in My Computer 14 letter 13 network drive setup Linux 22 Macintosh 26 UNIX 22 network drive setup, cont. Windows 19 network information, view 106 Network Servers 24 network settings PASM 106 SmartNAVI 69 Network Time Protocol (NTP) 112 NIS domain 91, 138 non-ASCII characters in folder name 138 not enough free disk space 138 NTP synchronization, view 1130
One Click Setup 12 One Touch Backup, enable 105 open Main Window 46 MSN Window 46 PASM 79 SmartNAVI 45 OS, client supported 4, 5, 148P
partition and format 122 PASM add member to group 87 add plug-ins 94 add share folder 97 add user 85 browser support 15 change password 85, 86 connect to 79 create group 87 create RAID volume 101 delete group 88 delete share folder 97 delete user 86 disk drive information 101 PASM, cont. enable/disable plug-ins 95 event log 128 expand RAID volume 102 group list 86 in browser 16, 80 language 82 locate SmartStor 114 log out 82 login 16, 17 migrate RAID volume 102 navigating the interface 82 network settings 106 RAID volume status 100 remove group member 87 set quota 88 Setup Wizard 83 through SmartNAVI 17, 47, 81 user list 85 view event log 108 view plug-in list 95 view quota 88 password administrator's 83 NS4300N 36 PASM 80, 81, 85, 86 restore default 134 SmartNAVI 12, 51 SmartStor 25, 27, 30, 33 SMTP server 109 permissions share folders 65 Windows 91 personal firewall 137 Plug-ins add in PASM 94 add in SmartNAVI 71 enable/disable 73, 95 list 72, 95 power adapter 7 power button 6, 132 power status 115 print server, setup 30, 94 printer, name in Linux 33 printing Macintosh 35 Windows 30 protected folders and files 139 protocols supported 2 Public folder 13, 20, 24R
RAID level 84, 100, 101 choosing 120 RAID 0 118, 120 RAID 1 119, 120 RAID Volume 84, 96, 97 automatic rebuilding 121 change RAID level 121 critical 125 delete 103 disk drives 7 events 130 formatting 101 invalid 126, 139 Maximum Capacity or Data Protection 13 migrate 121 partition and format 122 RAID 0 or RAID 1 13 rebuild 126 recover 126, 139 status 125 RAID volume status PASM 100 SmartNAVI 56 RAID, introduction to 117 reboot SmartStor 113 rebuild file system 127 RAID Volume 126 recipient, email alert 139 add 109 delete 109 recover RAID volume 126, 139 recreate RAID volume in Smart-NAVI 57 remove group member PASM 87 SmartNAVI 53 replacing a disk drive 124 resolving connections 132 restore backup files 61 RJ45 connector 7s
save backup event log 62 schedule a backup 59 scheduled backup change 60 delete 61 screws, counter-sink 7 service FTP 84 Macintosh 84 UNIX/Linux 84 set quota 88 setup FTP access 93 Linux printing 32 Macintosh access 92 Macintosh printing 35 print server 30 print server access 94 UNIX/Linux access 91 UPS 111 Windows access 90 Windows printing 30 Setup Wizard in PASM 83 Setup, one-click or advanced 12 share folder list 65 share folder, cont. mount 66 permissions 65 un-mount 66 share folder, add PASM 97 SmartNAVI 64 share folder, delete PASM 97 SmartNAVI 65 shut down SmartStor 18 Smart Fan, enable 116 SmartNAVI add download link 75 add member to group 53 add plug-ins 71 add share folder 64 add user 50 cannot access SmartStor 137 change password 51 close 49 create group 52 create RAID volume 55 default user 51 delete group 54 delete share folder 65 delete user 52 disk drive information 56 download list 76 downloaded list 77 enable/disable plug-ins 73 expand RAID volume 55 group list 53 icon 11, 15 information 48 installer icon 8 installing 8 language 47 language setting 11 locate SmartStor 70 network settings 69 SmartNAVI, cont. open from desktop 45 open/delete downloaded file 77 pause/resume download 76 RAID volume status 56 recreate RAID volume 57 remove download link 76 remove group member 53 setting up SmartStor 11 updating 148 user list 52 user name and password 12 view event log 71 view plug-in list 72 SmartStor boot after shutdown 114 booting 7 cannot connect after restart 137 enclosure info 115 locating with PASM 114 locating with SmartNAVI 70 plug-ins 71, 94 reboot 113 setting up with PASM 83 setting up with SmartNAVI 11 shut down 18, 114 shutting down 18 view system info 115 SMTP authentication 108, 139 spare drive, add 102 specifications 3 status disk drives 124 enclosure 131 file system 127 RAID Volume 125 SmartStor 124 system 124 UPS 110 stripe RAID 118, 120 subnet mask 13, 83, 107 switch, network 133 system events 129 system status LED 7, 103, 113, 114, 124, 132, 134T
temperature, CPU 132 time and date 13 timezone 13U
UDP option in Windows 136 Unicode support 138, 139 UNIX export access list 92 setup access 91 setup network drive 22 sharing setup 98 un-mount share folder 66 updating firmware 147 updating SmartNAVI 148 UPnP protocol 71, 94 UPS 124 setup 111 view 110 USB drive connect 37 disconnect 40 file formats 37 formatting 104 RAID Volume on 101 view 104 Windows shortcuts 138 USB printer, connecting 29 USBDISK 37, 39, 104 user list PASM 85 SmartNAVI 52 user name NS4300N 36 PASM 80, 81 SmartNAVI 12 SmartStor 25, 27, 30, 33 user, add PASM 85 SmartNAVI 50 through Setup Wizard 83V
view backup event log 62 backup schedules 60 download list 76 downloaded list 77 email alert list 109 enclosure info 115 event log 71, 108 folders 96 memory stick 104 view, cont. network information 106 NTP synchronization 113 plug-in list 72, 95 quota 88 share folder list 65 system info 115 UPS status 110 USB drive 104W
Windows AD domain 90 firewall issue 135 setup access 90 setup network drive 19 setup printing 30 setup sharing 98 workgroup 91
- Trademarks
- Important data protection information
- Notice
- Recommendations
- Contents
- Chapter 1: Introduction to SmartStor .....1
- Chapter 2: Installation and Setup ....5
- Chapter 3: Connecting to the SmartStor .....19
- Chapter 4: SmartNAVI .....45
- Chapter 4: SmartNAVI, cont.
- Chapter 5: PASM .....79
- Chapter 5: PASM, cont.
- Chapter 6: Technology Background .....117
- Chapter 7: Troubleshooting .....123
- Chapter 8: Support .....137
- Appendix A: Maintenance .....147
- Appendix B: Important Information .....151
- Index. 153
- Chapter 1: Introduction to SmartStor
- About This Manual
- Note
- Important
- Caution
- Warning
- Architecture
- Protocol Support
- Key Benefits
- Specifications
- Compatible Backup Software
- Client OS Support
- Browser Support
- Chapter 2: Installation and Setup
- Unpacking the SmartStor NS2300N
- Installing Disk Drives
- Connecting to the Network
- Connecting the Power
- Installing the Software
- Setting up the SmartStor
- Connecting to PASM
- Finding the SmartStor's IP Address
- PASM in your Browser
- PASM in SmartNAVI
- Shutting Down the SmartStor
- Chapter 3: Connecting to the SmartStor
- Setting up a Network Drive on a Windows PC
- Setting up a Network Drive on a UNIX or Linux PC
- On the Windows PC
- Start PASM.
- In the Tree, click the + beside the File & Print icon to expand the Tree, then click the Protocol Control icon.
- On the UNIX/Linux PC with Command Line Interface
- On the Linux PC with Graphic Desktop
- Setting up a Network Drive on a Macintosh PC
- Check the Macintosh box, then click the OK button.
- On the Macintosh PC
- From the Go menu, choose Connect to Server.
- In the Connect to Server dialog box, type afp://192.168.1.1 and click the Connect button.
- Type the user name and password in the respective fields, then click the OK button.
- Connecting a USB Printer to SmartStor
- Setting up the Print Server on SmartStor
- Setting up Windows Printing
- Setting up Linux Printing
- Setting up Macintosh Printing
- Click the Add button.
- Connecting a USB Drive
- Windows PC
- Linux PC
- Macintosh PC
- Disconnecting a USB Drive
- Setting-up Apple iTunes
- Downloading the iTunes Plug-in
- Installing the iTunes Plug-in
- Installing and Configuring Apple iTunes
- Chapter 4: SmartNAVI
- Working with SmartNAVI
- Opening SmartNAVI
- Opening the MSN Window
- Opening the Main Window
- Choosing a SmartNAVI Language
- Starting the Advanced Storage Manager (PASM)
- MSN Window
- SmartNAVI Tray Icon
- Browser
- Viewing SmartNAVI Information
- Closing SmartNAVI
- To close SmartNAVI:
- Alternative Method
- Managing Users and Groups
- Creating a User
- Creating the Default User
- OR
- Changing User Passwords
- Changing User Permissions
- To change permissions:
- Viewing a List of Users
- Deleting a User
- Creating a Group
- Viewing a List of Groups
- Adding Members to a Group
- Deleting Members from a Group
- Deleting a Group
- Managing RAID Volumes
- Creating a RAID Volume
- Expanding a RAID Volume
- Notes
- Viewing RAID Volume Status
- Viewing a List of RAID Volumes
- Recreating a RAID Volume
- Managing Backups
- Doing a Backup Now
- Main Window
- Scheduling a Backup
- Viewing Backup Schedules
- Changing a Scheduled Backup
- Deleting a Scheduled Backup
- Restoring Backed-up Files
- Viewing the Backup Event Log
- Saving the Event Log
- Clearing the Event Log
- Managing Share Folders
- Creating a Share Folder
- Opening a Share Folder
- Viewing a List of Share Folders
- Changing Share Folder Permissions
- Deleting a Share Folder
- Mounting a Share Folder / Creating a Network Drive
- Un-mounting a Share Folder / Disconnecting a Network Drive
- Making Management Settings
- Configuring a NAS System
- One Click Setup
- Advanced Setup
- Changing Network Settings
- Locating the SmartStor
- Choosing a Default NAS System
- Enabling or Disabling Event Notification
- Enabling Event Notification
- Disabling Event Notification
- Viewing the System Event Log
- Adding Plug-ins
- Viewing a List of Plug-ins
- Viewing Plug-in Version Numbers
- Enabling and Disabling Plug-ins
- Enabling Plug-ins
- Disabling Plug-ins
- Removing Plug-ins
- Managing Downloads
- Adding a Link
- Viewing the Download List
- Removing a Link
- Pausing and Resuming a Download
- Pausing a Download
- Resuming a Download
- Viewing the Downloaded List
- Opening a Downloaded File
- Deleting a Downloaded File
- Chapter 5: PASM
- Promise Advanced Storage Manager
- Choosing a Language
- Navigating in PASM
- Logging out of PASM
- Setting up SmartStor with the Setup Wizard
- Changing the Administrator's Password
- Changing a User's Password
- Removing Members from a Group
- Viewing Quotas
- Setting Quotas
- Managing File & Print Services
- Setting up Windows Access
- Setting up UNIX/Linux Access
- Setting up for Macintosh Access
- Setting up for FTP Access
- Setting up your Print Server
- Viewing a List of Folders
- Modifying Folder Services
- Adding a Folder
- Deleting a Folder
- Setting up Windows Sharing for a Folder
- Setting up UNIX and Linux Sharing for a Folder
- Click the Add button.
- Setting up FTP Sharing for a Folder
- Viewing Disk Drive Information
- Designating a Spare Drive
- Migrating a RAID Volume
- Deleting a RAID Volume
- To delete a RAID Volume:
- Viewing an External USB Drive or Memory Stick
- Formatting an External USB Drive or Memory Stick
- Enabling One Touch Backup
- Managing the Network Connection
- Viewing Network Setup Information
- Making Network Settings
- Working with Jumbo Frames
- Viewing the Event Log
- Setting up SMTP Authentication
- Viewing the Email Alert List
- Adding an Email Alert Recipient
- Deleting an Email Alert Recipient
- Upgrading the System Firmware
- Enabling and Disabling the Buzzer
- Viewing UPS Status
- Setting up a UPS
- To set up a UPS:
- Managing Services
- Setting System Date and Time
- Running the Network Time Protocol
- Viewing the Results of NTP Synchronization
- Rebooting the SmartStor
- Using PASM
- Directly
- Booting the SmartStor After a Shutdown
- Viewing System Information
- Viewing Enclosure Information
- Enabling the Smart Fan
- Chapter 6: Technology Background
- Introduction to RAID
- RAID 0 – Stripe
- RAID 1 – Mirror
- Choosing a RAID Level
- RAID Volume Migration
- RAID 0 to RAID 1
- RAID 1 to RAID 0
- RAID Volume Rebuilding
- Partition and Format
- Chapter 7: Troubleshooting
- Responding to an Audible Alarm
- Checking the System Status LED
- Checking Disk Status LEDs
- Replacing a Failed Disk Drive
- Checking RAID Volume Status in PASM
- SmartStor Responds to a Critical RAID Volume
- Additional Details about Rebuilds
- Responding to an Invalid RAID Volume
- Using the Recover Function
- Checking File System Status in PASM
- Rebuilding the File System
- Checking the Event Log in PASM
- Responding to Events
- Checking Enclosure Status in PASM
- Resolving Connections with SmartNAVI
- Solving Network Connection Problems
- Checking Your Email Inbox
- Restoring the Default Password
- Resolving a Windows Firewall Issue
- Chapter 8: Support
- Frequently Asked Questions
- Can I do a One Touch Backup or a regular Backup on a protected folder or file on my Windows PC?
- Which FTP clients are compatible with the SmartStor's FTP server?
- Can I move the disk drives from one SmartStor to a different SmartStor?
- I set up email alert recipients but they never receive any messages.
- Can SmartStor handle jumbo frames?
- I tried to create a share folder called “Admin” but the PASM software would not let me.
- I created a share folder and gave it the same name as a local user. This action caused a conflict.
- Contacting Technical Support
- Limited Warranty
- Disclaimer of other warranties
- Your Responsibilities
- Returning Product For Repair
- Appendix A: Maintenance
- Upgrading the Firmware
- Downloading the Firmware Upgrade File
- Installing the Firmware Upgrade File
- Upgrading the Software
- Downloading the Software Upgrade File
- Installing the Software Upgrade File
- Connection Problems After Restart
- Appendix B: Important Information
- GNU General Public License
- Battery
- Index
- A
- B
- C
- D
- E
- F
- G
- H
- |
- J
- L
- M
- N
- 0
- P
- R
- s
- T
- U
- V
- W
Brand : Promise Technology
Model : SmartStor NS2300N
Category : Server