
DSR9005 - Digital decoder PHILIPS - Free user manual and instructions
Find the device manual for free DSR9005 PHILIPS in PDF.


User questions about DSR9005 PHILIPS
0 question about this device. Answer the ones you know or ask your own.
Ask a new question about this device
Download the instructions for your Digital decoder in PDF format for free! Find your manual DSR9005 - PHILIPS and take your electronic device back in hand. On this page are published all the documents necessary for the use of your device. DSR9005 by PHILIPS.
USER MANUAL DSR9005 PHILIPS
For problems that are not related to Premiere programmes or the Premiere smart card, but rather due to your receiver, call the Philips call center on 0180/500 75 31* for Germany or 0820 400 039* for Austria. *open 7 days from 08.00 to 23.00 - 0.12 Euros/min
text_image
CINEOS HIGH EXTENSION CINEOS Signal & TransmissionForeword
EN
Dear Valued Customer,
Thank you for choosing our HDTV receiver. This User Manual will help you get the best out of the extensive and fascinating functions of your new receiver.
With your new HDTV receiver DSR 9005, the whole world of television is open to you for top-quality viewing! You are now ready for the future of television! HDTV is a new way to watch television - a crystal clear, high-definition picture with sharp colours. Premiere offers you Hollywood blockbusters, major sports events and documentaries of the highest quality. Television now becomes an incredible viewing experience.
Your new digital receiver DSR 9005 is of course designed to receive and use Premiere services. It is for those who expect more from television. A Premiere subscription means exclusive programs, a wide selection, comprehensive service and cutting edge technology.
With Premiere you will experience innovations in TV before anyone else. Premiere is the first, and up to now the only, German TV channel with programmes 24-hours a day in high definition.
Premier HD channels offer top Premiere programs in unheard-of quality.
- Enjoy the best current films with picture and sound quality just like in the movie theatre - and in the original wide-screen format.
• See the world as it really is with the Premiere HD special offer. - Experience the best in sports in top quality and see the best football, basketball and ice hockey players and other sports stars.
Premiere offers you more TV enjoyment, more variety and more comfort.
- PREMIERE FILM offers great entertainment to suit all tastes with a selection of 100 films a day with no commercial interruption. DISNEY CHANNEL provides great family entertainment.
- PREMIERE SPORT & PREMIERE FUSSBALL LIVE offer best in sports. You will never miss another goal.
- PREMIERE THEMA includes a wide variety of theme channels for all your moods and interests with documentaries, interactive advice programmes, children's programmes, music channels and adult channels, as well as the best programmes for fans of sci-fi, thrillers, action and classic movies.
- On PREMIERE DIREKT, you can easily book the best current films, exclusive sports events, special events and adult television for whatever time you want and enjoy them at home.
When installing Premiere, please observe the installation instructions that come with the Premiere smart card. If you haven't got a Premiere smart card yet, you can find further information on current Premiere offers on:
0180/ 551 00 00* - www.premiere.de
01/ 49166 200 - www.premiere.at
for Germany
for Austria
or at specific dealers.
We wish you great viewing with your Philips DSR 9005!
Your Philips Team.
*0.12 euros/min on the Deutsche Telekom Ltd. fixed network
1 Quick installation for the reception of satellite ASTRA 19.2° East 58
2 Meaning of symbols 60
3 Safety instructions 61
4 Product description 62
4.1 Front panel 62
4.2 Front panel display 63
4.3 Rear panel 64
5 Inserting your Smartcard 65
5.1 Premiere smart card for Premiere content 65
5.2 DVB-CI and smart card for other pay-TV providers 65
6 Using your remote control when the STB mode is selected 66
7 Connecting your digital receiver 67
7.1 Connections 67
7.2 Connecting to a video projector to watch Digital TV 71
7.3 Connecting an additional satellite receiver to the RF OUT output 72
8 First installation 73
8.1 Installation settings 73
8.2 Channel search 73
8.3 Search failure 74
9 Day-to-day operation 74
9.1 Switching your receiver ON, or to LOW POWER or STAND-BY 74
9.2 Switching from watching digital TV to listening to digital radio 74
9.3 Changing channels while watching digital TV or listening to digital radio 75
9.4 Banner 75
9.5 Volume control - / + / 75
9.6 Current programme options/Lip Synchronisation 76
9.7 Electronic Programme Guide (EPG) 76
9.8 Set or delete recording timers 76
9.9 Viewing teletext 77
9.10 Checking or changing the video output resolution setting 77
10 PIN-Code for the protection of minors 78
11 Premiere features 78
11.1 Premiere Sports portal 78
11.2 PREMIERE DIREKT (Near-Video-on-Demand) 78
12 Premiere Menu 79
12.1 Menu tree 79
12.2 Menu navigation 80
13 Premiere Menu 81
13.1 PIN Code Change 8
13.2 Smartcard 81
13.3 CI module 81
13.4 System81
13.5 Scan82
13.6 Display 82
13.7 Dolby Digital out of the digital audio output 82
13.8 Wake up 82
14 Settings 83
14.1 Timer Manager 83
14.2 Channel Manager 83
14.3 Settings 85
14.4 For Parents 86
14.5 Advanced settings 86
14.6 Channel Search 89
15 Advanced settings 91
15.1 Restoring factory settings 91
15.2 Changing the remote control setting 91
15.3 VCR or DVD recorder control 91
16 Programming your remote control for your audio/video equipment brands 93
16.1 Mode selection (selecting the device you want to control) 93
16.2 Volume and mute control assignment 93
16.3 Changing the brand setting of your remote control for your TV, VCR, DVD or Amplifier 94
16.4 Controlling your TV,Video Recorder, DVD and amplifier 95
17 Glossary 99
18 Troubleshooting 100
19 Technical specifications 102
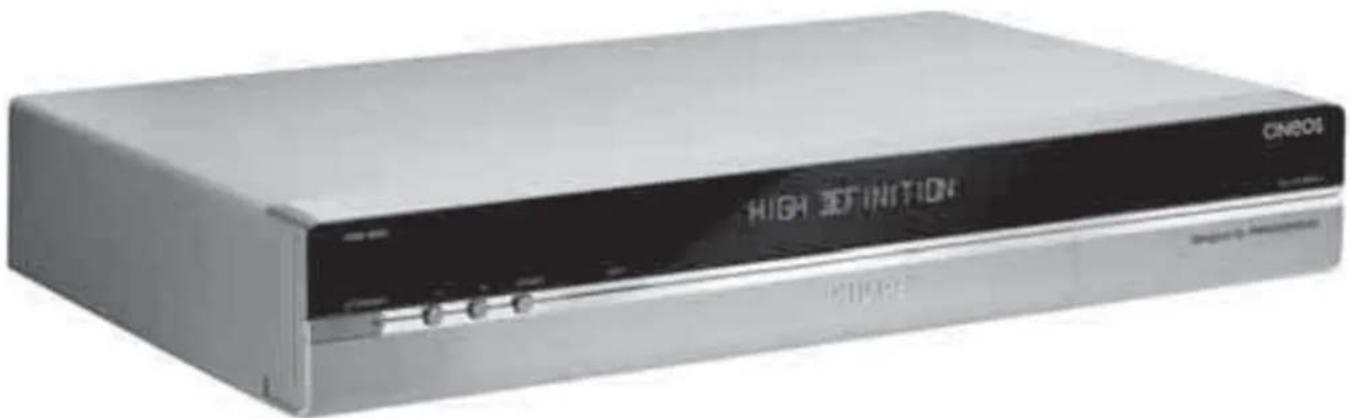
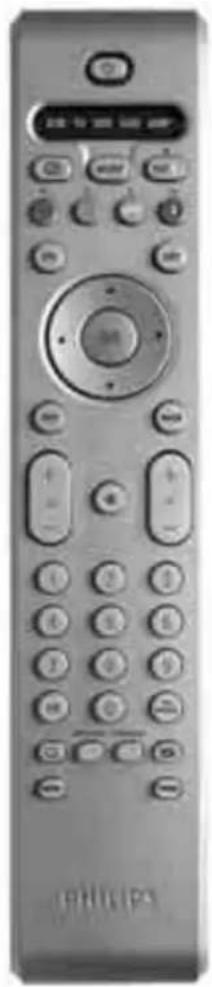
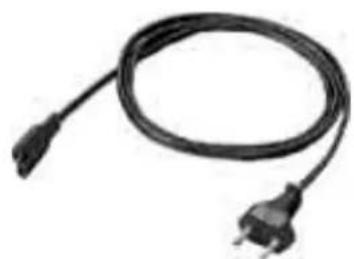
When unpacking your receiver, please make sure the following accessories are included:
EN
natural_image
Front view of a Philips remote control with keypad and buttons (no visible text or symbols on device body)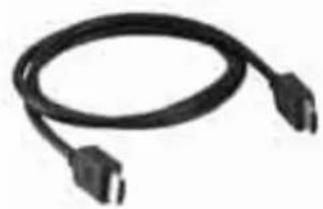
natural_image
Black cable with two connectors, no visible text or symbols2 - HDMI cable
natural_image
Black cable with two terminal plugs, no visible text or symbols3 - Mains cord
natural_image
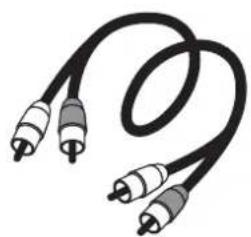
Illustration of a black and gray audio/video cable with two leads (no text or symbols)4 - Audio cable
-1-
Universal remote control with batteries
The package also includes the following documents:
- User manual for receiver
- Quick start guide
• Philips World-Wide Guarantee

Plastic bags can be dangerous. To avoid suffocation keep the bag away from babies and children.
1 Quick installation for the reception of satellite ASTRA 19.2° East
natural_image
Illustration of a smartphone with a digital display and arrow icon (no text or symbols)
Please read the safety and environmental instructions before connecting your receiver.
Your TV set is fitted with an HDMI socket
You already have one satellite antenna installed.
Your antenna is fitted with one universal LNB.
Your antenna is correctly pointed at the ASTRA 19.2° East satellite.
You only want to install channels broadcast on the ASTRA 19.2° East satellite.
If your equipment does not meet all of the above requirements, proceed to chapter 8
- Disconnect your TV set from the mains.
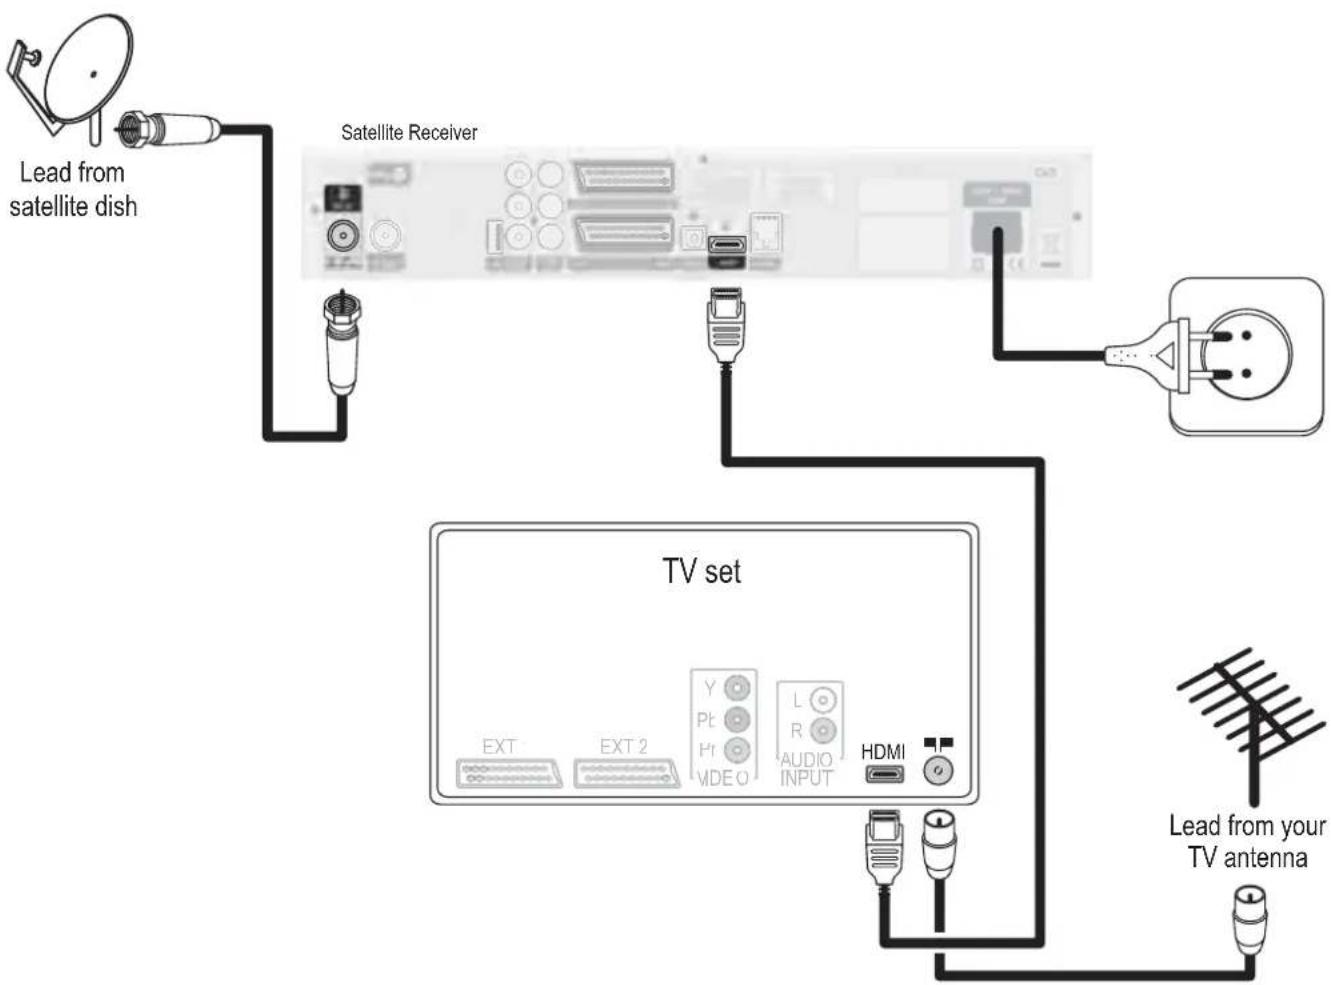
- Connect your receiver as shown below. Do not connect your receiver to the mains now.
When connected as described below, volume control is performed via your TV set.
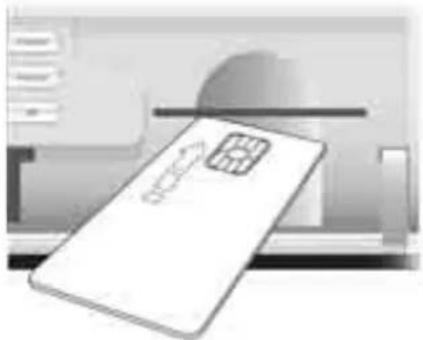
- Insert your smart card in your receiver with the contacts facing up.
Smart card insertion is required for Premiere subscribers only.
flowchart
graph TD
    A["Lead from satellite dish"] --> B["Satellite Receiver"]
    B --> C["TV set"]
    C --> D["Lead from your TV antenna"]
    style A fill:#f9f,stroke:#333
    style B fill:#ccf,stroke:#333
    style C fill:#cfc,stroke:#333
    style D fill:#fcc,stroke:#333
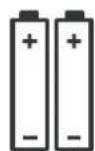
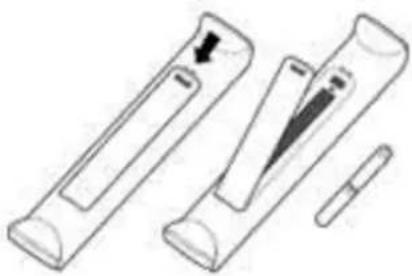
- Insert the two batteries supplied in your remote control.

Batteries are removable from the remote using common household tools. The batteries supplied do not contain hazardous substances such as Mercury, Cadmium, or Lead. However, they must not be disposed of with your household waste but to a local separate battery collection system.
- Switch on your TV set and select the appropriate HDMI input (refer to your TV set user manual).
- Now plug the receiver's power supply cord into the mains. The receiver display indicates BOOTING, WELCOME then
- Press V-Output once. The receiver display should indicate HOMI DETECTED
If OUTPUT is displayed instead, proceed to chapter 8.
- Check that the welcome screen displays on the TV screen.
If no picture is displayed or the picture quality is poor, refer to section Troubleshooting.
- Press P+ then P-. Wait for a few seconds for the First installation screen to appear.
- Select your favourite language.
-
Select your country.
-
Check for adequate signal strength and quality.
- Press OK to start searching for channels on Astra 19.2 East. During the search, a bargraph indicates the channel search progress. This may take some time. It is to ensure the receiver will not miss out on channels.
Once the scan has been successfully completed, a completion message is displayed.
- Press OK.
A new screen appears, with a message indicating that a search for new, upgraded software is in progress:
- Either wait for software detection, and then proceed as indicated on screen. It is recommended to accept software so as to keep your receiver up-to-date.
- Or press EXIT to stop searching for new software.
At the end of first installation, your receiver tunes to the first channel in the main TV list.
For detailed information on first installation, see chapter 8.
For detailed information on other connections, refer to the on-screen help, either by pressing the yellow colour key or via the menu by selecting the Help item. Alternatively, see chapter 7.
Your remote control is set to perform volume control through a Philips TV set. If you have a TV set other than Philips, refer to paragraph 16.3 to adapt the brand setting of your remote control to your TV set.
natural_image
Diagram of two medical or laboratory devices with arrows indicating movement or force (no text or symbols)
text_image
PHILIPS Organic Resources in the present the company's name or name will be expressed by: PHILIPS, 2016.
natural_image
Close-up of a black electronic device with a white horizontal bar and control buttons (no visible text or symbols)
2 Meaning of symbols
EN
 | Important information:Must be read and understood. |
 | Your product has been designed and manufactured with high quality materials and components, which can be recycled and reused.When this crossed-out wheeled bin symbol is attached to a product or its packaging, it means the product is covered by European Directive 2002/96/EC.Please inform yourself about the local separate collection process for electronic products.Please act according to your local rules and do not dispose of your old products with your normal household waste. The correct disposal of your old product will help prevent potential negative consequences for the environment and human health. |
 | The “Material recyclability symbol” affixed on package cardboard and user manual means these parts are recyclable.So do not dispose of them with your normal household waste. |
 | The “Material recyclability symbol” affixed on plastic packaging parts means these parts are recyclable.So do not dispose of them with your normal household waste. |
 | The “Green Dot” affixed on cardboard means PHILIPS pays a financial duty to the “Avoidance and Recovery of Packaging Waste” organization. |
3 Safety instructions
EN

Your receiver has been manufactured to meet the appropriate safety standards, but the instructions below must be followed to operate it safely. These instructions must be kept for future reference.
- Before connecting the receiver to the mains, check that the mains supply voltage corresponds to the voltage printed on the rear of the receiver. If the mains voltage is different, consult your dealer.
- The receiver does not contain any user-serviceable parts. Do not attempt to open it. All maintenance work must be carried out by qualified services centres.
- If you disconnect the receiver from the mains, make sure to unplug it from the wall socket and not just from the AC socket at the back of the unit. Children could seriously injure themselves, as the free end of the cable is still live.
- It is recommended to unplug the receiver from the mains during lightning storms.
- If the power cord is damaged, it must be replaced. Always refer to qualified services centres.
- To prevent fire or shock hazard, do not expose the receiver to rain or moisture.
- The receiver should be placed on a firm surface, and the ventilation openings must not be covered with items, such as newspapers, table clothes, curtains, etc.
- Do not install the receiver near heat sources such as radiators, stoves or other apparatus that produce heat. Protect it from direct sunlight.
- When installing the receiver, ensure there is a gap of approximately 2 cm around the receiver to enable air to circulate freely and prevent overheating.
- Leave accessible the mains connector at the back of the unit in case emergency shutdown is required.
- Do not place any combustible objects on the receiver (candles, etc.).
- No objects filled with liquids, such as vases, should be placed on the unit. The receiver shall not be exposed to dripping or splashing. Should this happen, disconnect your receiver from the mains and consult your dealer.
- Make sure that children do not place any foreign objects in any of the openings.
- For cleaning, use a soft, damp (not wet) cloth. Never use any abrasive cloth and aerosol cleaners.

Your receiver, as any electronic equipment, consumes power. In order to reduce power consumption, please switch your receiver to "Low Power" whenever you are not using it. For maximum energy saving we recommend you switch off the receiver by unplugging it from the mains if you are not using it for a long time, e.g. during holidays.
4 Product description
EN
4.1 Front panel
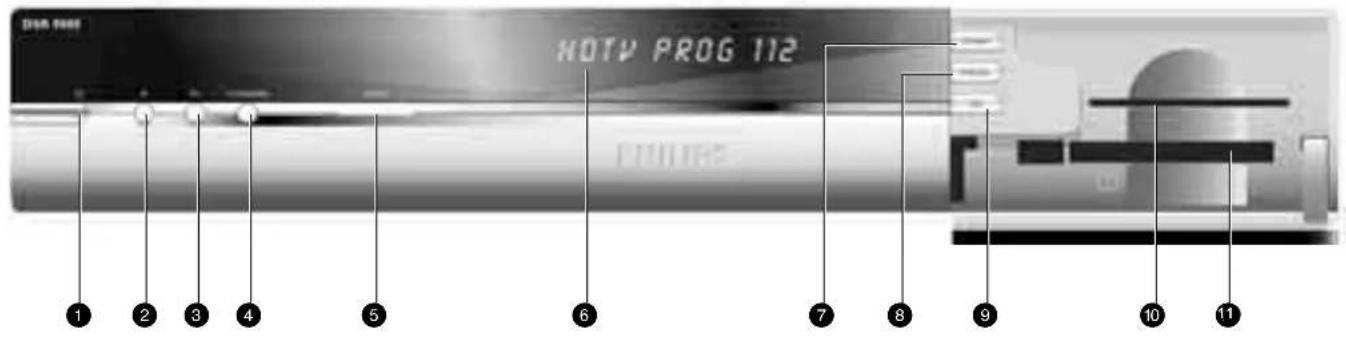
text_image
NOTY PROG 112 1 2 3 4 5 6 7 8 9 10 111 button with indicator.... Standby (short key press)
"Low Power" (2-second key press) - indicator lit in red
Reset (5-second key press).
2 P- Channel down
Wake up the receiver from stand-by or "low power".
3 P+ Channel up
Wake up the receiver from stand-by or "low power".
4 TV/RADIO Toggle between digital TV and digital radio.
Wake up the receiver from stand-by or "low power".
5 HDTV Indicate reception of HD programmes when lit in blue.
6 Display Front panel display. See paragraph 4.2.
Open the door located on the right-hand side of the receiver front panel to access the following:
7 V-Output Switch between output formats (HDMI, YPbPr, or EXT1).
8 V-Format Select picture resolution (Auto, 1080i, 720p, or 576p).
9 OK Confirm selection.
10 Smart card slot (slot 1) See chapter 5.
11 Cl module slot (slot 2)..... See chapter 5.
4.2 Front panel display
4.2.1 Pictograms
| Represents progression of channel scan or volume change. | ||
 | Lit when a recording is running. | |
 | Lit during storage of data at the end of a channel scan. | |
 | Lit when a smart card is required. | |
 | Blinks when receiving a remote control command. | |
 | Lit when at least one recording or reminder has been programmed. | |
 | Lit when watching satellite TV. | |
4.2.2 Description of segment display messages
| Receiver connected to mains and in low power; Ⓧbutton indicator lit in red | |
| Receiver initializing. Please wait. | |
| 2345. - - - - | Receiver in stand-by |
| 2108: DISNEY C | Receiver tuned on a digital TV channel, e.g. Disney Channel. |
| R438: RTL | Receiver tuned on a digital Radio channel |
| RECORDING | Recording in progress. To cancel a recording which is in progress press TIMER then 0. |
| AV FROM EXT 2 | The device connected to the EXT2 SCART of your receiver is playing back a recording. Stop playback to return to digital channels. |
4.3 Rear panel

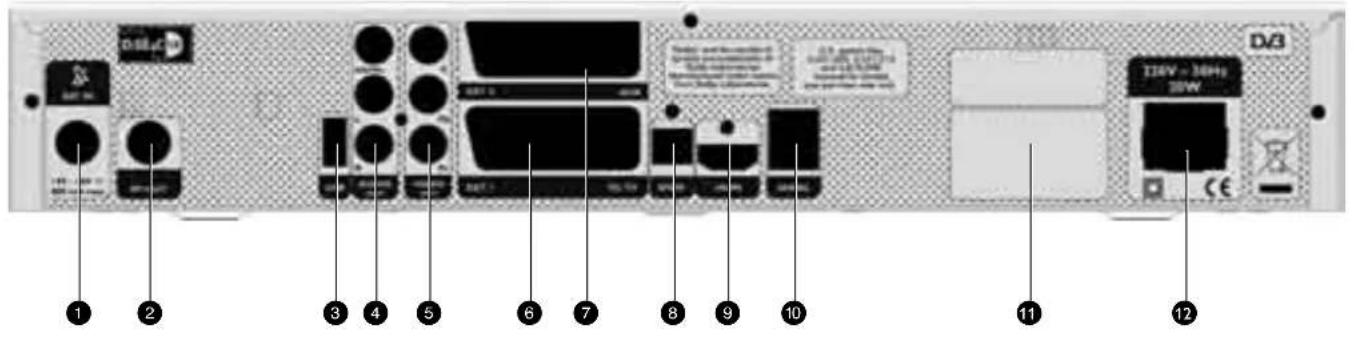
text_image
1 2 3 4 5 6 7 8 9 10 11 12 D/3 T2V - 30Hz 30W CE1 SAT IN (*) Input to connect the cable from your satellite dish
2 RF OUT (*) Output to connect another satellite receiver
3 USB (*) For future use
4 L/R AUDIO OUT (*) Left/Right analogue audio outputs to connect your receiver to your TV left/right analogue inputs
DIGITAL AUDIO OUT (*)...... Digital audio output to connect your receiver to the digital coaxial input of your digital audio equipment
5 YPbPr VIDEO OUT (*) Outputs to connect your receiver to the YPbPr or component inputs of your TV set or video projector ^(2)
6 EXT1/TO TV (*) SCART ^(1) output used to connect your TV set or video projector ^(2)
7 EXT2/AUX (*) SCART ^(1) output to connect your video recorder or DVD player
8 SPDIF (*) Digital audio output to connect your receiver to the digital optical input of your digital audio equipment using an optical cable (not supplied)
9 HDMI (*) ...... HDMI socket used to connect your TV set HDMI input
10 SERIAL (*) Connector used for servicing purposes by qualified service centres
11 Label showing the type and serial number of the receiver
12 230V\~50Hz 20W max(**) Socket to connect the mains cord
* Safety Extra Low Voltage
** Hazardous Voltage
(1) SCART is also called Euroconnector or Péritel.
(2) If you consider using a video projector, refer to its user manual for the best video format to feed it. If necessary, refer to paragraph 14.5.2 to properly set the EXT1/EXT2 SCART Output.
5 Inserting your Smartcard
5.1 Premiere smart card for Premiere content
You will be delivered a Premiere smart card when taking up a Premiere subscription.
Insert your Premiere smart card in the direction indicated by the arrow with the golden chip facing up, and push it as far as it will go into the upper slot.
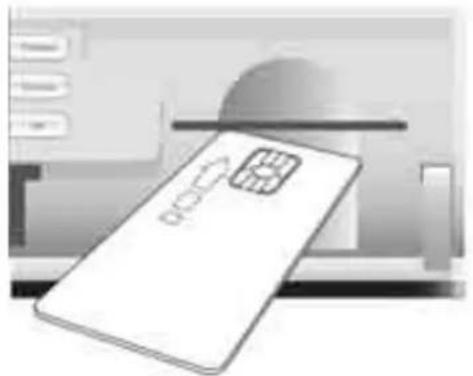
natural_image
Illustration of a credit card with a logo and 'BIOCCY' text, placed on a stand (no readable text beyond branding)5.2 DVB-CI and smart card for other pay-TV providers
To de-scramble programmes from other pay-TV providers, you need a common interface module (not supplied) and a smartcard from the provider broadcasting these programmes (delivered when taking up a subscription).
Insert the common interface module into the lower slot (slot 1), and then insert the smartcard into the common interface module with the golden or silver chip facing up.
Push the smart card as far as it will go into the CI module. To remove the module from the slot, push the button on the left-hand side of the slot.
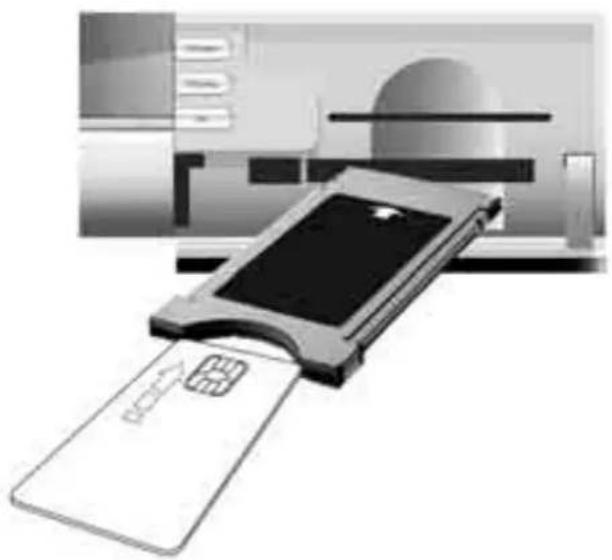
natural_image
Illustration of a credit card with a card slot, displayed against a stylized background (no text or symbols)6 Using your remote control when the STB mode is selected
text_image
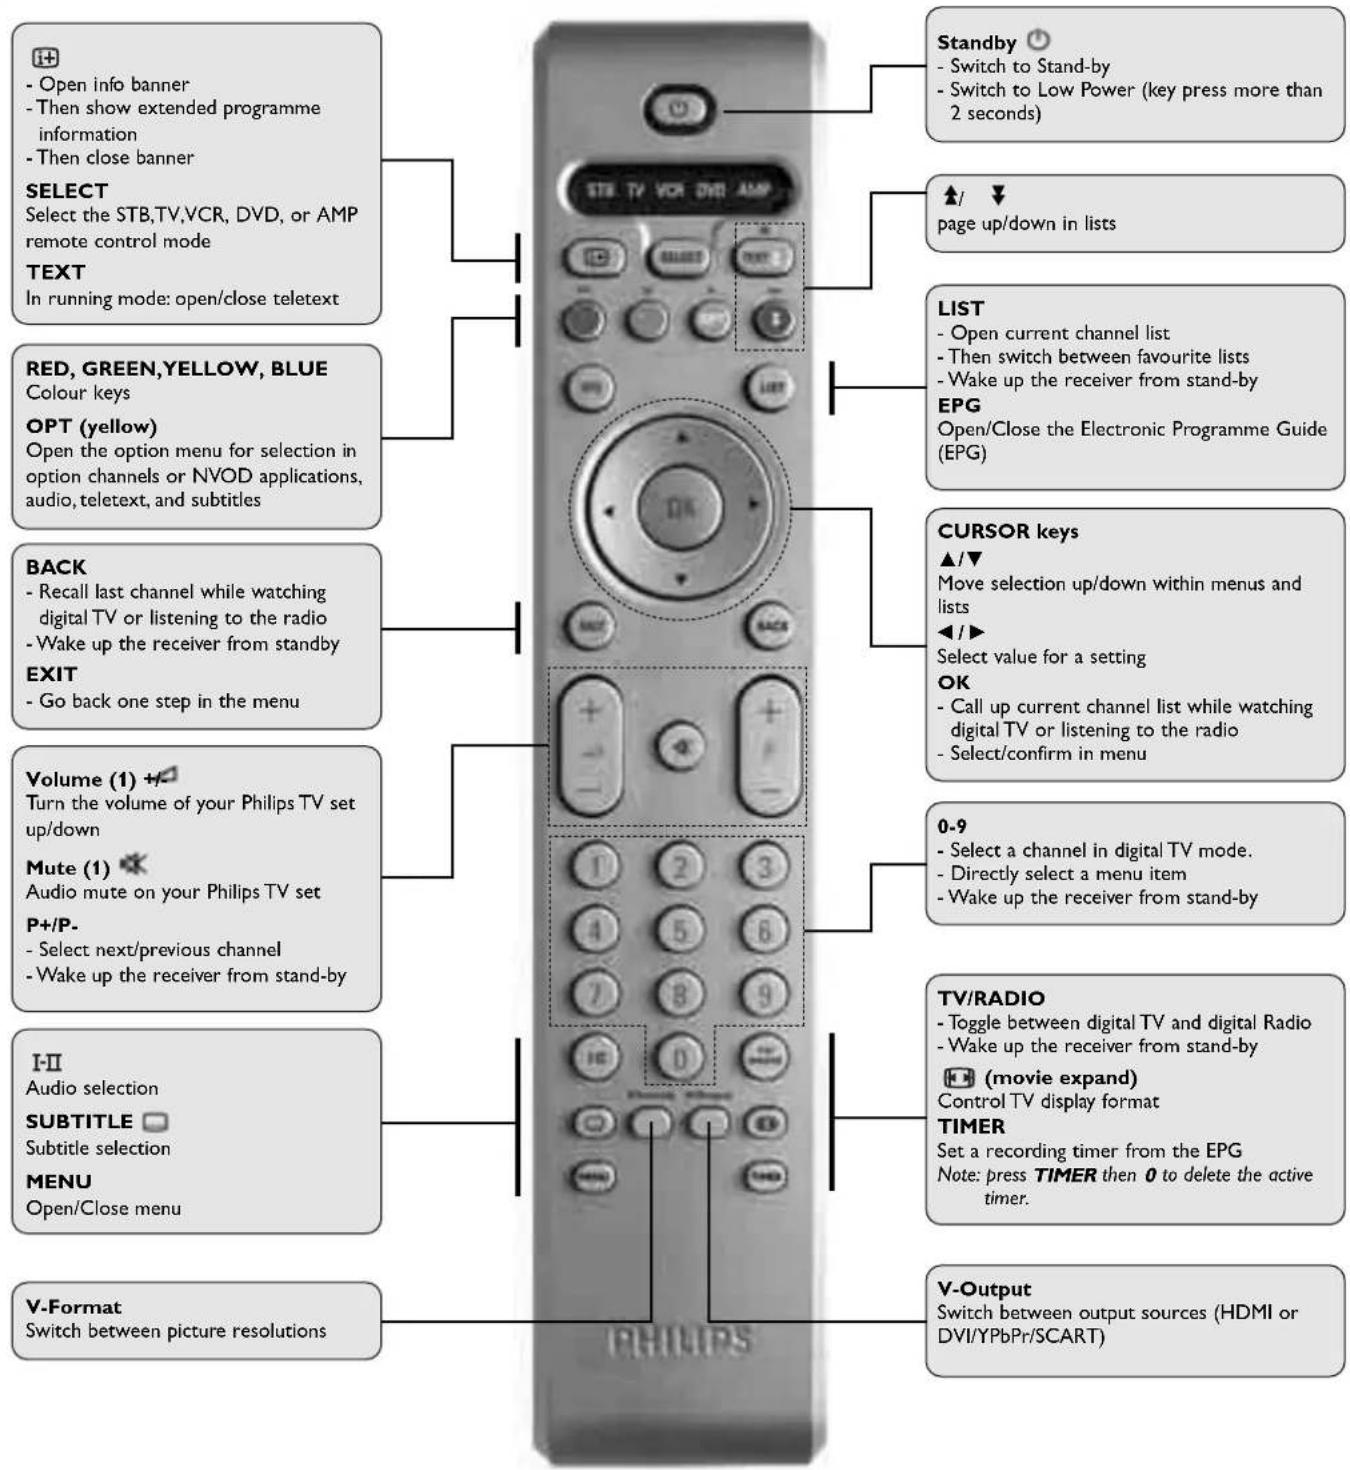
Standby - Switch to Stand-by - Switch to Low Power (key press more than 2 seconds) ▲/ ↓ page up/down in lists SELECT Select the STB,TV,VCR, DVD, or AMP remote control mode TEXT In running mode: open/close teletext RED, GREEN,YELLOW, BLUE Colour keys OPT (yellow) Open the option menu for selection in option channels or NVOD applications, audio, teletext, and subtitles BACK - Recall last channel while watching digital TV or listening to the radio - Wake up the receiver from standby EXIT - Go back one step in the menu Volume (1) + Turn the volume of your Philips TV set up/down Mute (1) Audio mute on your Philips TV set P+/P- - Select next/previous channel - Wake up the receiver from stand-by I-II Audio selection SUBTITLE □ Subtitle selection MENU Open/Close menu CURSOR keys ▲/▼ Move selection up/down within menus and lists ◄/► Select value for a setting OK - Call up current channel list while watching digital TV or listening to the radio - Select/confirm in menu 0-9 - Select a channel in digital TV mode. - Directly select a menu item - Wake up the receiver from stand-by TV/RADIO - Toggle between digital TV and digital Radio - Wake up the receiver from stand-by ( movie expand ) Control TV display format TIMER Set a recording timer from the EPG Note: press TIMER then 0 to delete the active timer. V-Output Switch between output sources (HDMI or DVI/YPbPr/SCART) V-Format Switch between picture resolutions(1) If you have a TV set other than Philips, refer to paragraph 16.3 to change the brand setting of your remote control.
Infrared interference on external devices
To avoid bad remote control reception, place your external devices out of sight of the ambient lights of your TV set.
7 Connecting your digital receiver
There are several ways you can connect and integrate your digital receiver into your existing audio/video equipment setup.

Warning!
Before starting:
- Unplug all equipment (TV set as well as recorder) from the mains. Do not connect your digital receiver to the mains supply now.
- Refer to the relevant connection diagram to incorporate your digital receiver into your existing audio/video setup.
7.1 Connections
7.1.1 Your TV set is HDTV capable (HD-Ready label)
You want to connect your receiver so as to receive HDTV in HD quality.
7.1.1.1 Digital connection to TV via HDMI (lead supplied) - recommended
You have an HD-Ready TV set which is fitted with an HDMI input. Incorporate your receiver in your existing installation as described below.
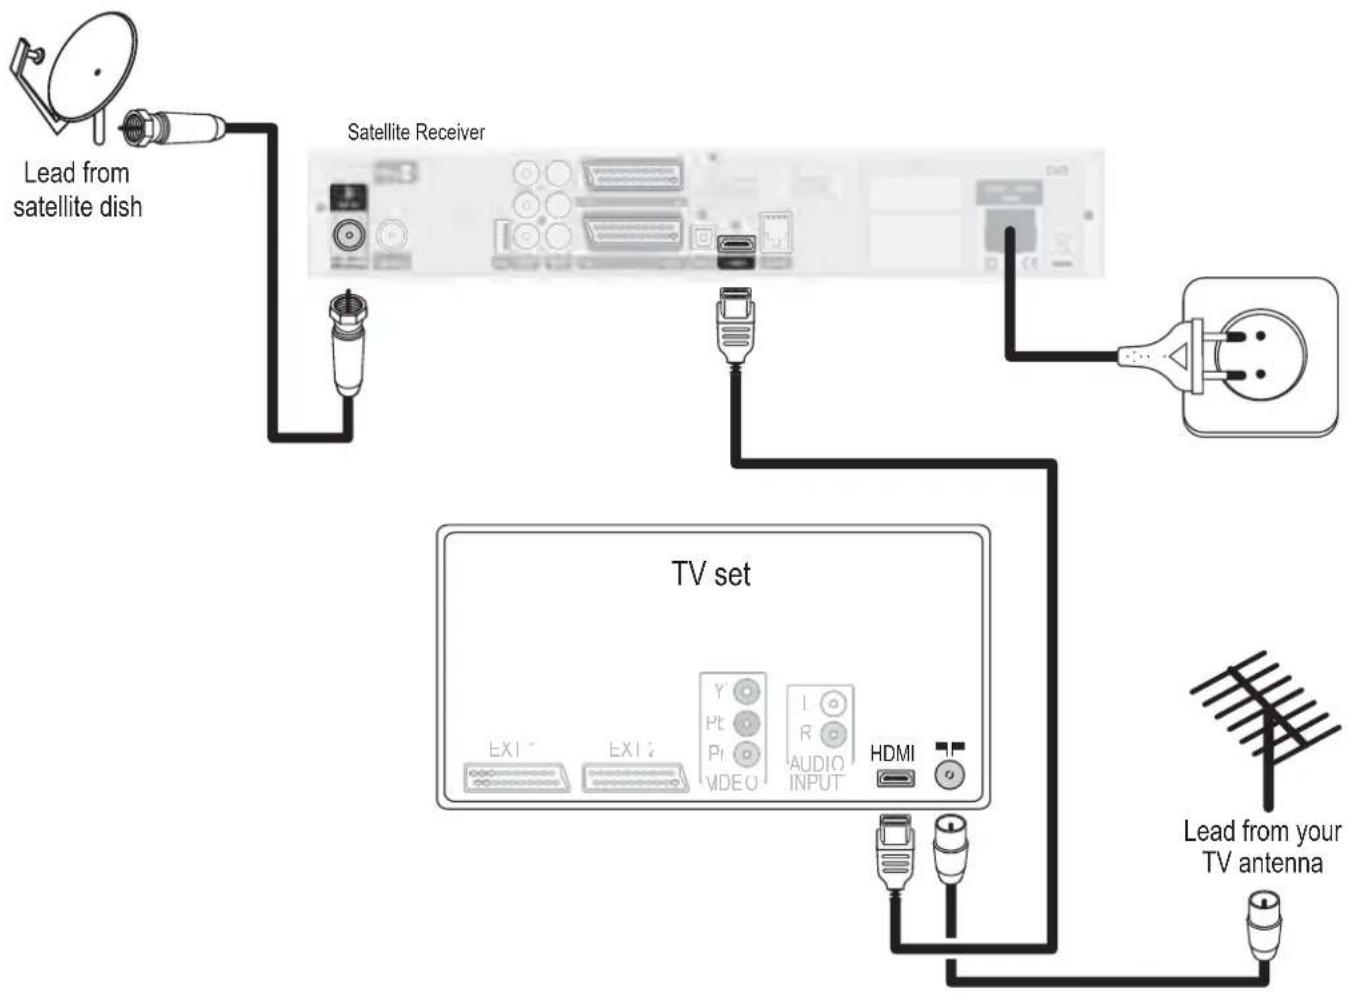
flowchart
graph TD
    A["Lead from satellite dish"] --> B["Satellite Receiver"]
    B --> C["TV set"]
    C --> D["Lead from your TV antenna"]
    style A fill:#f9f,stroke:#333
    style B fill:#ccf,stroke:#333
    style C fill:#cfc,stroke:#333
    style D fill:#fcc,stroke:#333
7.1.1.2 Digital connection to TV via DVI - recommended if your TV set is not fitted with an HDMI input. You have an HD-Ready TV set which is fitted with a DVI input only. Incorporate your receiver in your existing installation as described below.

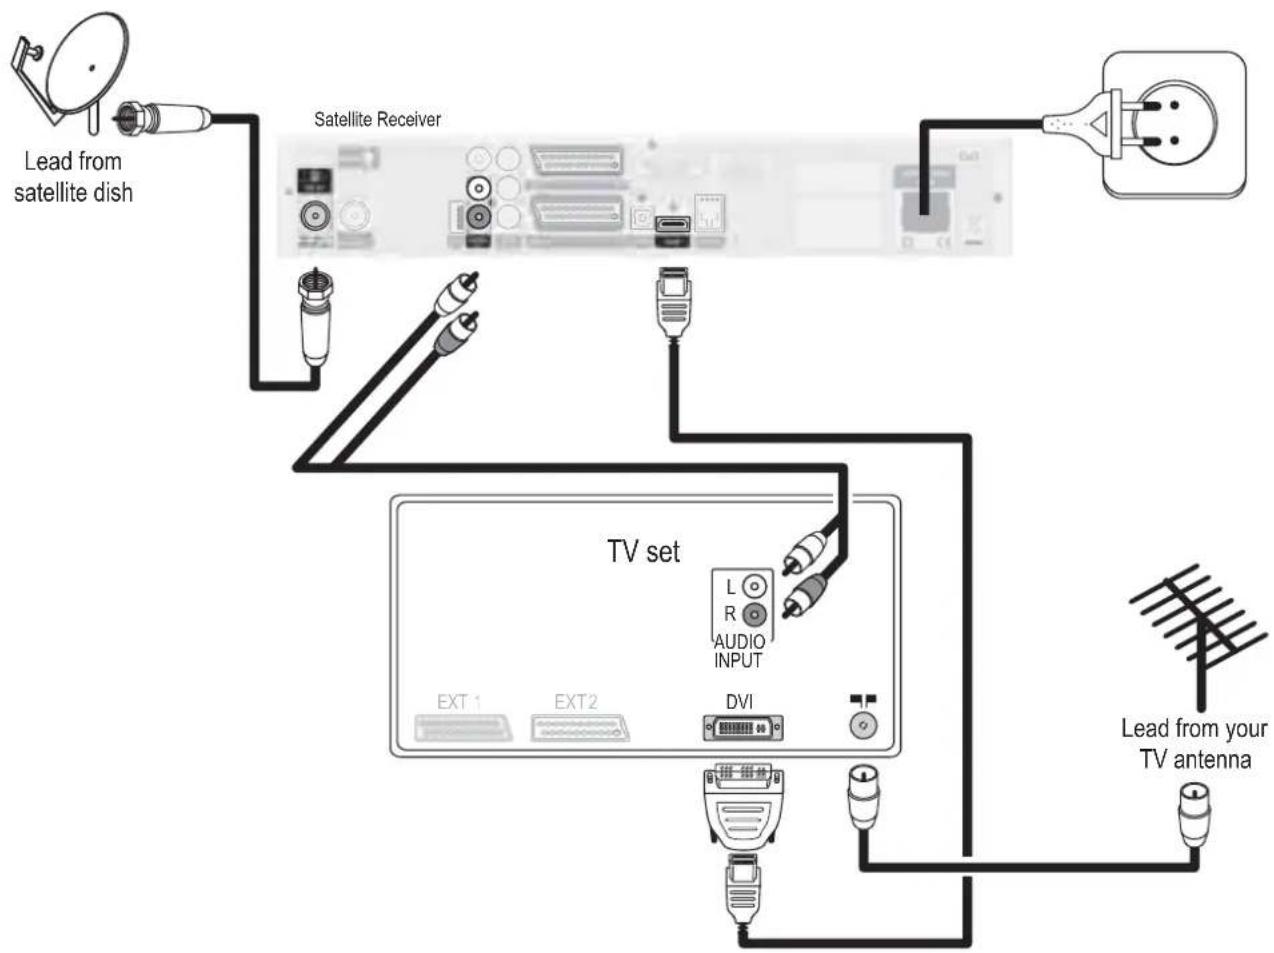
flowchart
graph TD
    A["Lead from satellite dish"] --> B["Satellite Receiver"]
    B --> C["TV set"]
    C --> D["AUDIO INPUT"]
    C --> E["DVI"]
    C --> F["EXT1"]
    C --> G["EXT2"]
    C --> H["Lead from your TV antenna"]
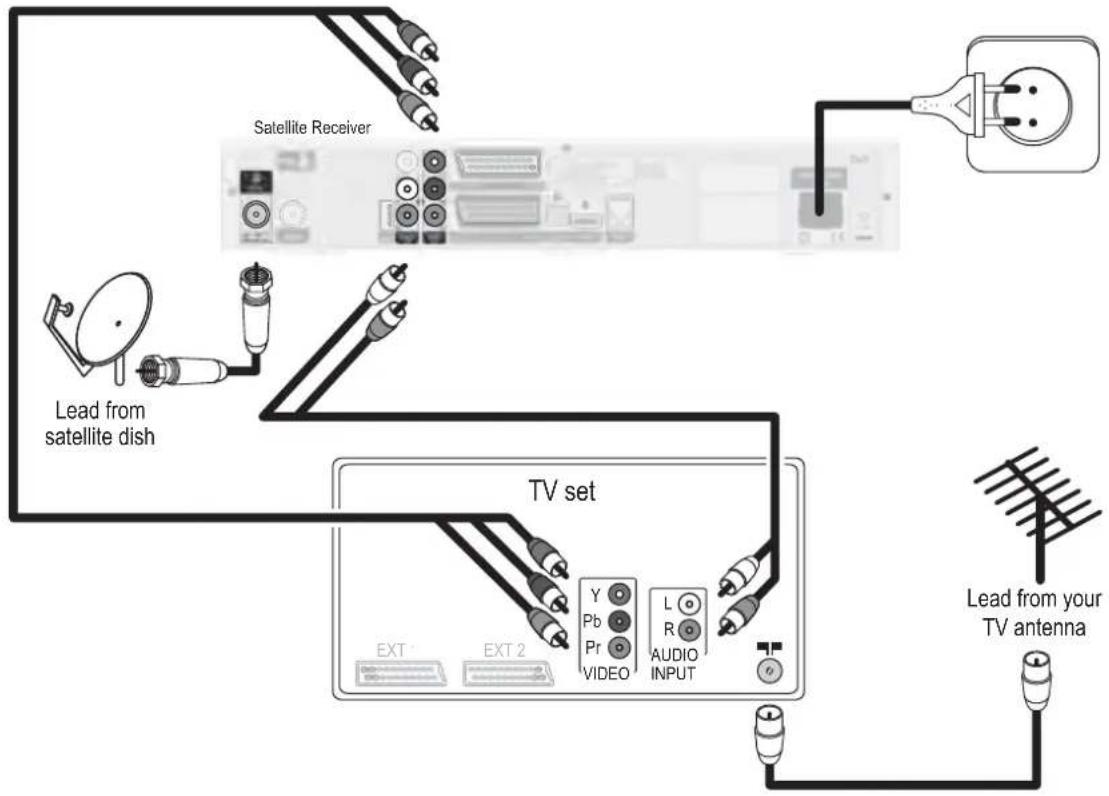
7.1.1.3 Analogue connection to TV via YPbPr (lead not supplied)
You have a TV set which is fitted with a YPbPr input (component input, no HDMI or DVI input). Incorporate your receiver in your existing installation as described below.
You may not be able to receive some content-protected, premium HDTV channels as these are only available through HDMI or DVI connection.
EN
flowchart
graph TD
    A["Satellite Receiver"] --> B["TV set"]
    C["Lead from satellite dish"] --> B
    D["Lead from your TV antenna"] --> B
    B --> E["EXT 1 EXT 2"]
    B --> F["Y Pb Pr VIDEO L R AUDIO INPUT"]
7.1.1.4 Connection to a recorder
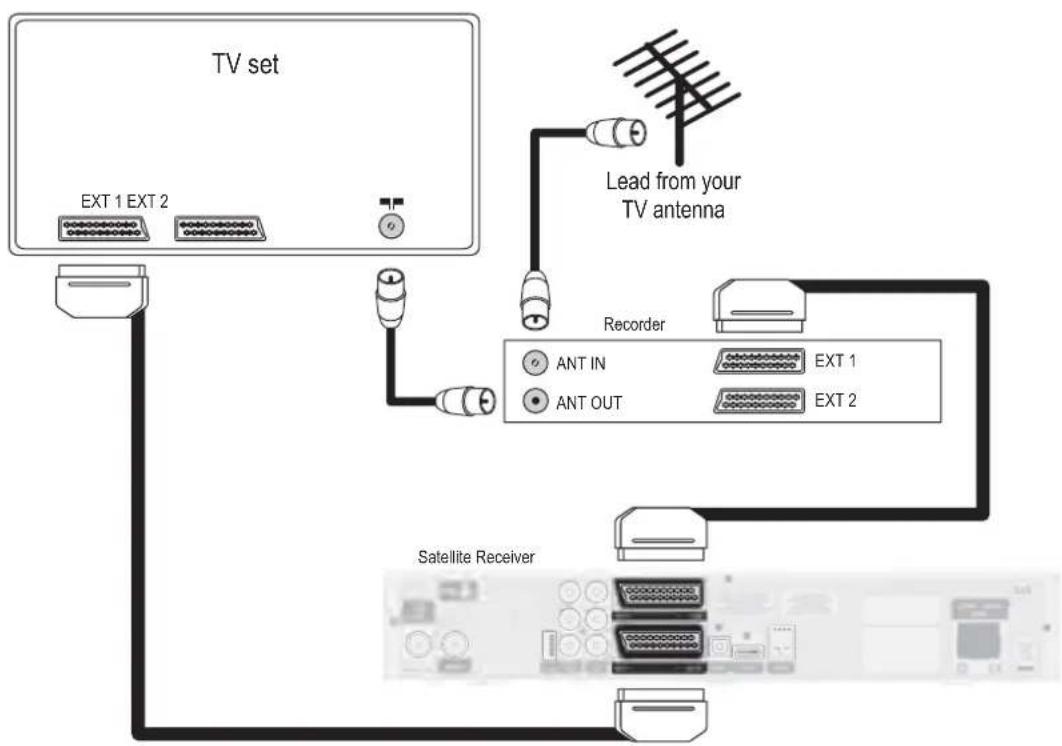
flowchart
graph TD
    A["TV set"] --> B["EXT 1 EXT 2"]
    A --> C["XT 1"]
    A --> D["XT 2"]
    A --> E["Ant 1 IN"]
    A --> F["Ant 1 OUT"]
    A --> G["Lead from your TV antenna"]
    A --> H["Recorder"]
    H --> I["EXT 1"]
    H --> J["EXT 2"]
    H --> K["Satellite Receiver"]
    style A fill:#f9f,stroke:#333
    style H fill:#ccf,stroke:#333
7.1.2 Your TV set is only SDTV capable
Incorporate your receiver in your existing installation as described below.

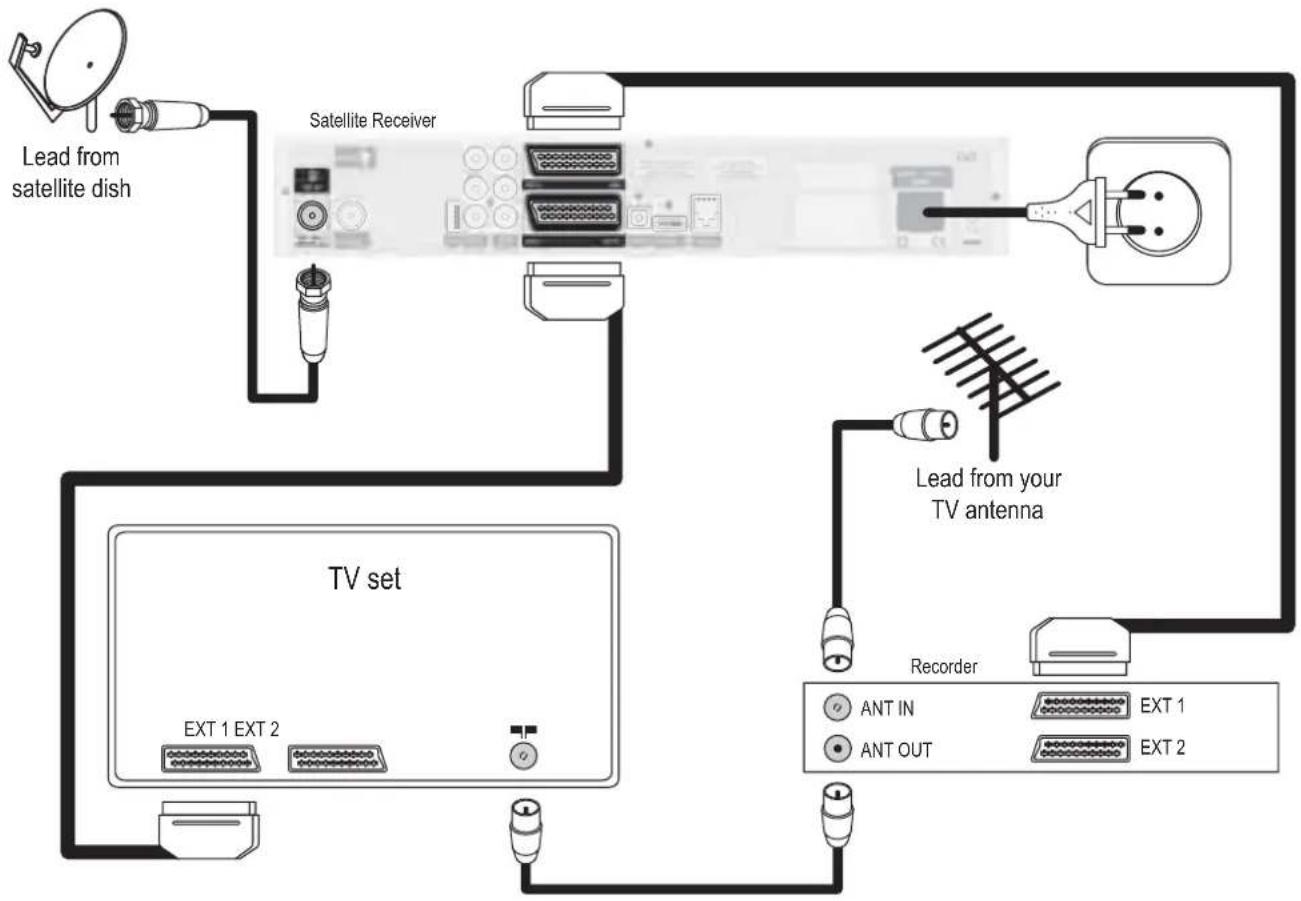
flowchart
graph TD
    A["Lead from satellite dish"] --> B["Satellite Receiver"]
    B --> C["TV set"]
    C --> D["XT 1 EXT 2"]
    D --> E["Ant In"]
    D --> F["Ant OUT"]
    C --> G["XT 1"]
    C --> H["EXT 2"]
    I["Lead from your TV antenna"] --> J["Recorder"]
    J --> K["Ant IN"]
    J --> L["Ant OUT"]
    style A fill:#f9f,stroke:#333
    style B fill:#ccf,stroke:#333
    style C fill:#cfc,stroke:#333
    style D fill:#fcc,stroke:#333
    style E fill:#cff,stroke:#333
    style F fill:#ffc,stroke:#333
    style G fill:#fcc,stroke:#333
    style H fill:#ffc,stroke:#333
- Connect the cable from the satellite dish to the "SAT IN" socket of your digital receiver.
- Connect the "EXT1" SCART socket of your digital receiver to the RGB capable SCART socket of your TV using the SCART lead supplied with your digital receiver.
- Connect the "EXT2" SCART socket of your digital receiver to the "EXT1/OUTPUT" SCART socket of your recorder using a SCART lead.
- Plug all your equipment, excluding your digital receiver, into the mains.
This connection applies to both VCRs and DVD recorders fitted with one or two SCART sockets. With this connection set up, you can:
- watch digital TV while you record analogue TV.
- watch analogue TV while you record digital TV.
- record the digital TV channel you are watching.
- watch play-back from your VCR or DVD.
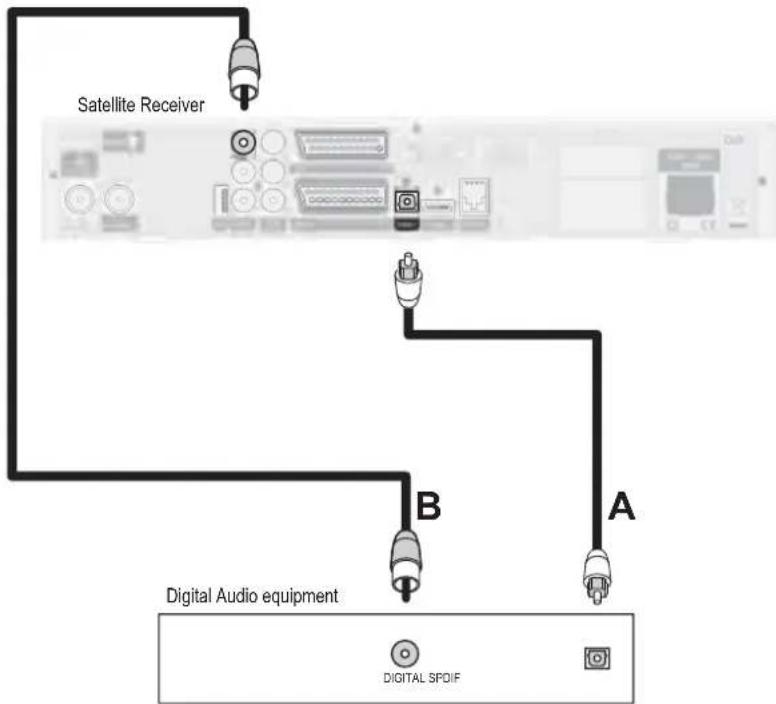
7.1.3 Digital audio connections
Depending on your audio equipment, you have several options to connect your digital receiver.
flowchart
graph TD
    A["Satellite Receiver"] --> B["Router A"]
    B --> C["Digital Audio equipment"]
    C --> D["Digital SPDIF"]
EN
CONNECTION (A)
Either
Connect the "SPDIF" digital audio output socket to the relevant input socket of your audio equipment using an optical cable (not supplied). Consult the user manual of your audio equipment to locate the proper digital audio input. (1)
CONNECTION (B)
Or
Connect the audio “DIGITAL” output socket to the relevant digital audio input socket of your audio equipment using a single CINCH cable (not supplied). Consult the user manual of your audio equipment to locate the proper digital audio input. ^(1)
(1) With either connection, you can only control the volume (up/down and mute) using your audio equipment remote control; refer to the user manual of your audio equipment. To perform volume control using your receiver remote control, refer to the remote control user manual.
When using one of these digital audio connections, you may experience a de-synchronisation between sound and pictures (Lip synchronisation). To restore synchronisation, change the Lip Synchronisation setting as described in paragraph 9.6.
7.2 Connecting to a video projector to watch Digital TV
7.2.1 Your video projector is only SDTV capable
Connect the "EXT1" SCART socket of your digital receiver to your video projector.
Video projectors are often fed with S-Video format video signals. If this is the case with your projector, follow the instructions below for connection and installation:
- Connect a SCART/S-Video adapter to the "TV" SCART of your receiver (not supplied), and connect the adapter to the S-Video input of your video projector by means of a S-Video cable.
- Installation: refer to chapter 14.5.2 to change the "TV/VCR output" setting of your digital receiver to S-VIDEO/PAL-CVBS.
7.2.2 Your video projector is HDTV capable (YPbPr, DVI, or HDMI interface)
Connect the HDMI, DVI, or YPbPr socket of your digital receiver to the corresponding input on your video projector.
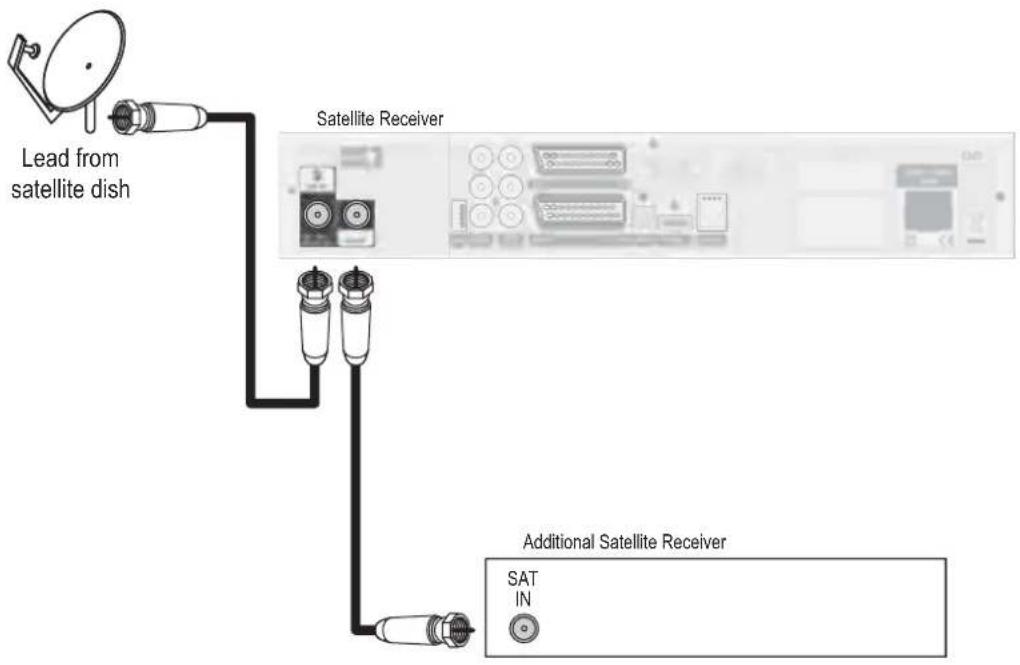
7.3 Connecting an additional satellite receiver to the RF OUT output
EN
flowchart
graph TD
    A["Lead from satellite dish"] --> B["Satellite Receiver"]
    B --> C["Additional Satellite Receiver"]
    C --> D["SAT IN"]
To ensure proper reception only the receiver to be used should be switch on. The other one should be switched off. To switch on or off your additional satellite receiver, refer to its user manual. To switch off your satellite receiver, press the ⏻ button for more than 2 seconds. (You will see the Low Power indicator on the front panel
8 First installation
You have inserted the batteries supplied in your remote control.
Your receiver is connected to the satellite antenna, TV set and other equipment according to one of the diagrams in chapter 7.
- Switch on your TV set and select the appropriate HDMI input (refer to your TV set user manual).
- Plug the receiver's power supply cord into the mains. The receiver display indicates BOOTING, then WELCOME.
- Press V-Output once, then check the receiver display indication:
- If HOME DETECTED is displayed, check that the welcome screen displays on your TV screen.
- if OUTPUT is displayed instead, successively press V-OUTPUT until the source selected matches your connections as described in paragraph 7.1 and the welcome screen appears on your TV screen.
- Press P+ then P-. Wait for a few seconds for the First Installation screen to appear.
text_image
PHILIPS Energia Recognise - 10.0 version New Edition: 2008-2010 REV. 100% - 45.0000 © 2010 Energia Recognise Energia Recognise (English) + Microsoft + Rev. 100% - 45.00008.1 Installation settings
- Select your favourite language.
- Select your country.
- Check for adequate signal strength and quality.
To install ASTRA 19.2° East:
- Press OK to start searching for channels broadcast on the ASTRA 19.2° East satellite. The Installation screen appears.
- Proceed to paragraph 8.2.
To install ASTRA 19.2° East and other satellites:
- Press EXIT to access the Antenna Configuration screen.
- Select antenna settings as described in paragraph 14.6.1.
- Press OK to start searching for channels. The Installation screen appears.
- Proceed to paragraph 8.2.
If you press EXIT during the scanning process, you interrupt the scanning and go back to the previous screen. In this case, none of the channels found are stored.
Once the scan has been successfully completed, a completion message is displayed.
- Press OK.
A new screen appears, with a message indicating that a search for new, upgraded software is in progress:
- Either wait for software detection, and then proceed as indicating on screen. It is recommended to accept software so as to keep your receiver up-to-date. At the end of the first installation, the receiver tunes to the first channel in the main TV list.
- Or press EXIT to stop searching for new software and tune the receiver to the first channel in the main TV list.
text_image
FVLP4 状态栏 状态栏 状态栏 2018-03-098.3 Search failure
In case of channel search failure, a message is displayed.
- Press EXIT to go back to either the First Installation or Antenna Configuration screen.
Before starting a new scan
The following checks are recommended to recover adequate signal quality and strength:
- Check the antenna cable.
- Then check the antenna connection to your receiver (see chapter 7).
- Then change the pointing of your antenna so as to maximize the level of the signal quality and strength bargraph indicators, and then fasten your antenna according to the antenna user manual instructions.
- When the signal strength and quality is adequate, press OK to launch a new search. If the failure message appears again, refer to chapter 17 to find out the reason for failure. For a proper diagnosis and installation check, call your installer.
9 Day-to-day operation
9.1 Switching your receiver ON, or to LOW POWER or STAND-BY
In standby mode, there is no picture, no sound but your receiver is still active and the display indicates the time or
In low power mode, your receiver is off and the ⏻ button indicator is lit in red.
Your receiver is in low power:
- Press P+, P-, or TV/RADIO either on the remote control or front panel, or press any number key on the remote control to switch to standby.
Your receiver is in standby:
- Press P+, P-, or TV/RADIO either on the remote control or front panel, or press any number key on the remote control to switch the receiver on.
You are watching digital TV or listening to digital radio.
- To put your receiver in stand-by, press ⏻ either on the remote control or front panel.
- To put your receiver in "low power", press ⏻ for 2 seconds either on the remote control or front panel.
Although it is recommended to switch your receiver to "low power" when not using it so as to save energy, bear in mind that update functions are not supported in "low power". Thus you should allow your receiver to remain in standby regularly (at least once a week) so as to enable updates.
9.2 Switching from watching digital TV to listening to digital radio
To switch your receiver from digital TV to digital radio and from digital radio to digital TV:
- Press TV/RADIO either on the remote control or on the front panel.
9.3 Changing channels while watching digital TV or listening to digital radio
9.3.1 Using number keys of the remote control
- Dial a number using the remote number keys to tune the corresponding channel.
9.3.2 Using P+/P- keys of the remote control or P+/P- buttons of the front panel
- Press P+ to tune the next channel in the current channel list.
- Press P- to tune the previous channel in the current channel list.
9.3.3 Using channel lists
To select a channel from a channel list:
- Press LIST to display the current channel list (either the main TV list or a favourite list previously selected).
- Press LIST repeatedly to display the list you want to select.
- Scroll to the channel you want to tune using the ▲ or ▼ key. Scroll from one page to another using the ▲ or ▼ remote control key.
- Press OK to confirm your choice. You can preview the channel on the right hand side of the screen or listen to the selected radio channel.
- Press OK again to close the channel list and watch the programme in full screen view.
Empty favourite lists cannot be opened.
9.4 Banner
An information banner is used to display information about the current channel and programme. Each time you change channel, the banner appears at the bottom of the screen, indicating:
• the current date and time
• the current channel list name
- the current channel name and number in the current channel list
- icons indicating the channel characteristics, e.g. availability of subtitles (see icon description table)
- NOW programme information (and NEXT programme information, accessible by pressing the ▶ key)
- a bar graph indicating:
• the start time of the current programme,
• the start time of the next programme,
• the current progress.
To display the banner anytime while watching digital TV or listening to digital radio:
- Press (INFO).
For more info about the current programme while the banner is on:
- Press i+ (INFO) a second time.
To close the banner:
- Press (INFO) a third time.
9.5 Volume control - / + /
Your remote control is set to perform volume control through a Philips TV set. If you have a TV set other than Philips, refer to paragraph 16.3 to adapt the brand setting of your remote control to your TV set.
text_image
Screenshot of a software interface showing a list of image thumbnails with names and sizes, alongside a silhouette of a person.
natural_image
Black and white photo of a person standing near a railing, possibly in a public space or industrial setting (no visible text or symbols)| Icon | Description |
| I-II | Soundtrack selection |
| FAV | Current favourite list |
| Maturity rating available | |
| Scrambled channel | |
| Locked channel | |
| Subtitles available | |
| Dolby Digital audio available | |
| Additional info available | |
| Reminder set | |
| Recording timer set | |
| 16: 9 format available (EPG only) | |
| HD | HD programme available |
| OPT | Alternate options available |
natural_image
Interior view of a dimly lit room with a person standing near a window (no visible text or symbols)9.6 Current programme options/Lip Synchronisation
The OPT key is used to directly access the video content selection, audio language, subtitles language, teletext options and Lip synchronisation (sound-pictures synchronisation).
To change the current programme options:
- Press OPT.
- Set the desired setting using the ◀ or ▶ key.
- Press OPT to exit.
By default, subtitles are disabled.
If you use digital audio connections as described in paragraph 7.1.3 and experience sound-pictures de-synchronisation, change the Lip Synchronisation setting.
To change the Lip Synchronisation setting:
- Press OPT.
- Press the blue colour key.
- Change the setting as appropriate using the ◀ or ▶ key.
- Press the blue colour key to save the change.
- Press OPT to exit.
text_image
Scanned screenshot of a software interface showing menu options and dropdown menus in Chinese9.7 Electronic Programme Guide (EPG)
While watching digital TV or listening to digital radio:
- Press EPG to open the EPG for the current channel. The highlight is on the current programme (also called "NOW" programme).
If after a short time no information appears for the current or the next programme, it means that no information is available.
- Press ⬆ (INFO) to display extended information for the highlighted programme. When information is made up of several pages, press ▲ or ▼ to scroll up or down. Press ⬆ (INFO) again to quit extended information.
- Press the ▼ or ▲ key to move the highlight to the previous or next programme respectively.
- Press the ◀ or ▶ key to view the previous or next day programme list respectively.
- Press P- or P+ to view the previous or next channel programme list respectively. To set a recording timer or a reminder, follow the instructions displayed on the screen.
EPG information has to be updated regularly (at least once a week). Updates are performed automatically every time you turn your receiver to standby. To allow for complete update of EPG information, make sure you regularly turn your receiver to standby. If your EPG information has not been completely updated, some pieces of information may not be available; for instance, you might get incomplete information when performing a search. Also note that EPG information has to be fully reloaded in case of power failure, "low power" mode, or network or content modification.
9.8 Set or delete recording timers
Recording timers are used to perform VCR or DVD recordings.

Please note that during a recording your receiver is locked and most remote control keys are inactive. To watch another digital channel, you must cancel the active timer.
9.8.1 Setting a timer in the EPG
- In the EPG, press TIMER once to set a recording on the selected programme that is highlighted. Press TIMER once again to set a reminder on the programme. The timer type is signalled in the highlight using icon 0.0 for recordings or icon ④ for reminders. Press TIMER a third time to delete the timer.
When setting a timer on a locked channel, you will be prompted to enter your password.
To edit a timer from the EPG:
- Move the highlight to the desired programme and press OK to access the Timer Edition screen.
9.8.2 Cancelling an active timer
A timer is active; recording is signalled by the RECORDING indication on the display.
To delete the active timer:
- If your receiver is in standby, press P+, P-, TV/RADIO, or any number key.
- Press the key sequence TIMER then 0 to cancel the active timer. The
RECORDING indication then disappears and you can change channels.
9.8.3 Your receiver is locked with the RECORDING indication shown on the front display
Your receiver is blocked because a timer is active.
- Press the key sequence TIMER then 0 to cancel the active time and recover full control of your receiver.
9.9 Viewing teletext
- Press TEXT.
- Use number keys to select a page.
- Press TEXT to exit.
9.10 Checking or changing the video output resolution setting
To check the current output resolution setting, press V-Format once.
In case the picture displayed is distorted, try switching between output resolution settings by successively pressing V-Format.
10 PIN-Code for the protection of minors
EN
text_image
Blurred dark image with a central gray rectangular label containing partially visible text.By entering your PIN code, you can watch programmes that have been locked for child protection at any time of the day or night - without neglecting the issue of child protection. For a programme to be passed for universal viewing, a certificate is required by law from the FSK (Free Self Control) on behalf of the State Child Protection Authorities. For a locked programme to be broadcast, a 4-digit PIN code has to be entered. You receive your PIN code together with your smart card.
This code is different from your password (also called "system password").
11 Premiere features
natural_image
Industrial machinery with conveyor belts and a cylindrical component (no visible text or symbols)Some Premiere channels offer you special features. On so-called "Options channels", during sports broadcasts, you can choose between different matches (e.g. football), change audio soundtracks (e.g. stadium/commentary) or choose between different camera angles (Formula 1).
Using the "Options channels" on the PREMIERE DIREKT portal channels, you can also choose the start time of your choice for the movie you're ordering.
text_image
Black-and-white photo of a person in formal attire with a digital display showing text and numbers, likely from a media or news program.11.1 Premiere Sports portal
Premiere sports broadcasts are available via the Options channels. This means that the viewer can choose from a wide variety of channels and angles via the Premiere sports portal.
text_image
Scanned screenshot of a software interface with Chinese text, showing menu options and a dropdown menu with file paths.To select a specific sports event, simply:
- Switch on the Premiere Sports portal.
- Press the yellow OPT button on your remote control. The options menu will be displayed.
- Use the ▲ or ▼ buttons under picture selection to select the desired sports broadcast.
- Press the OK button to view the programme.
11.2 PREMIERE DIREKT (Near-Video-on-Demand)
With PREMIERE DIREKT you choose programmes at different start times, round the clock.
All the information about the programmes on offer, prices and the process of ordering is available on the PREMIERE DIREKT portal or at www.premiere.de/direkt.
text_image
Scanned screenshot of a software interface showing menu options and a dropdown list with numerical values.To view a film you've ordered from the PREMIERE DIREKT portal:
- Switch on PREMIERE DIREKT 5 minutes before the start of the film.
- Press the OPT button on the remote control. The options menu will be displayed.
- Use the ▲ und ▼ buttons under picture selection to select the options channel you ordered with the correct time, for example D2 - 5.30pm.
- Press the OK button on your remote control to view the selected programme.
12 Menu system
12.1 Menu tree
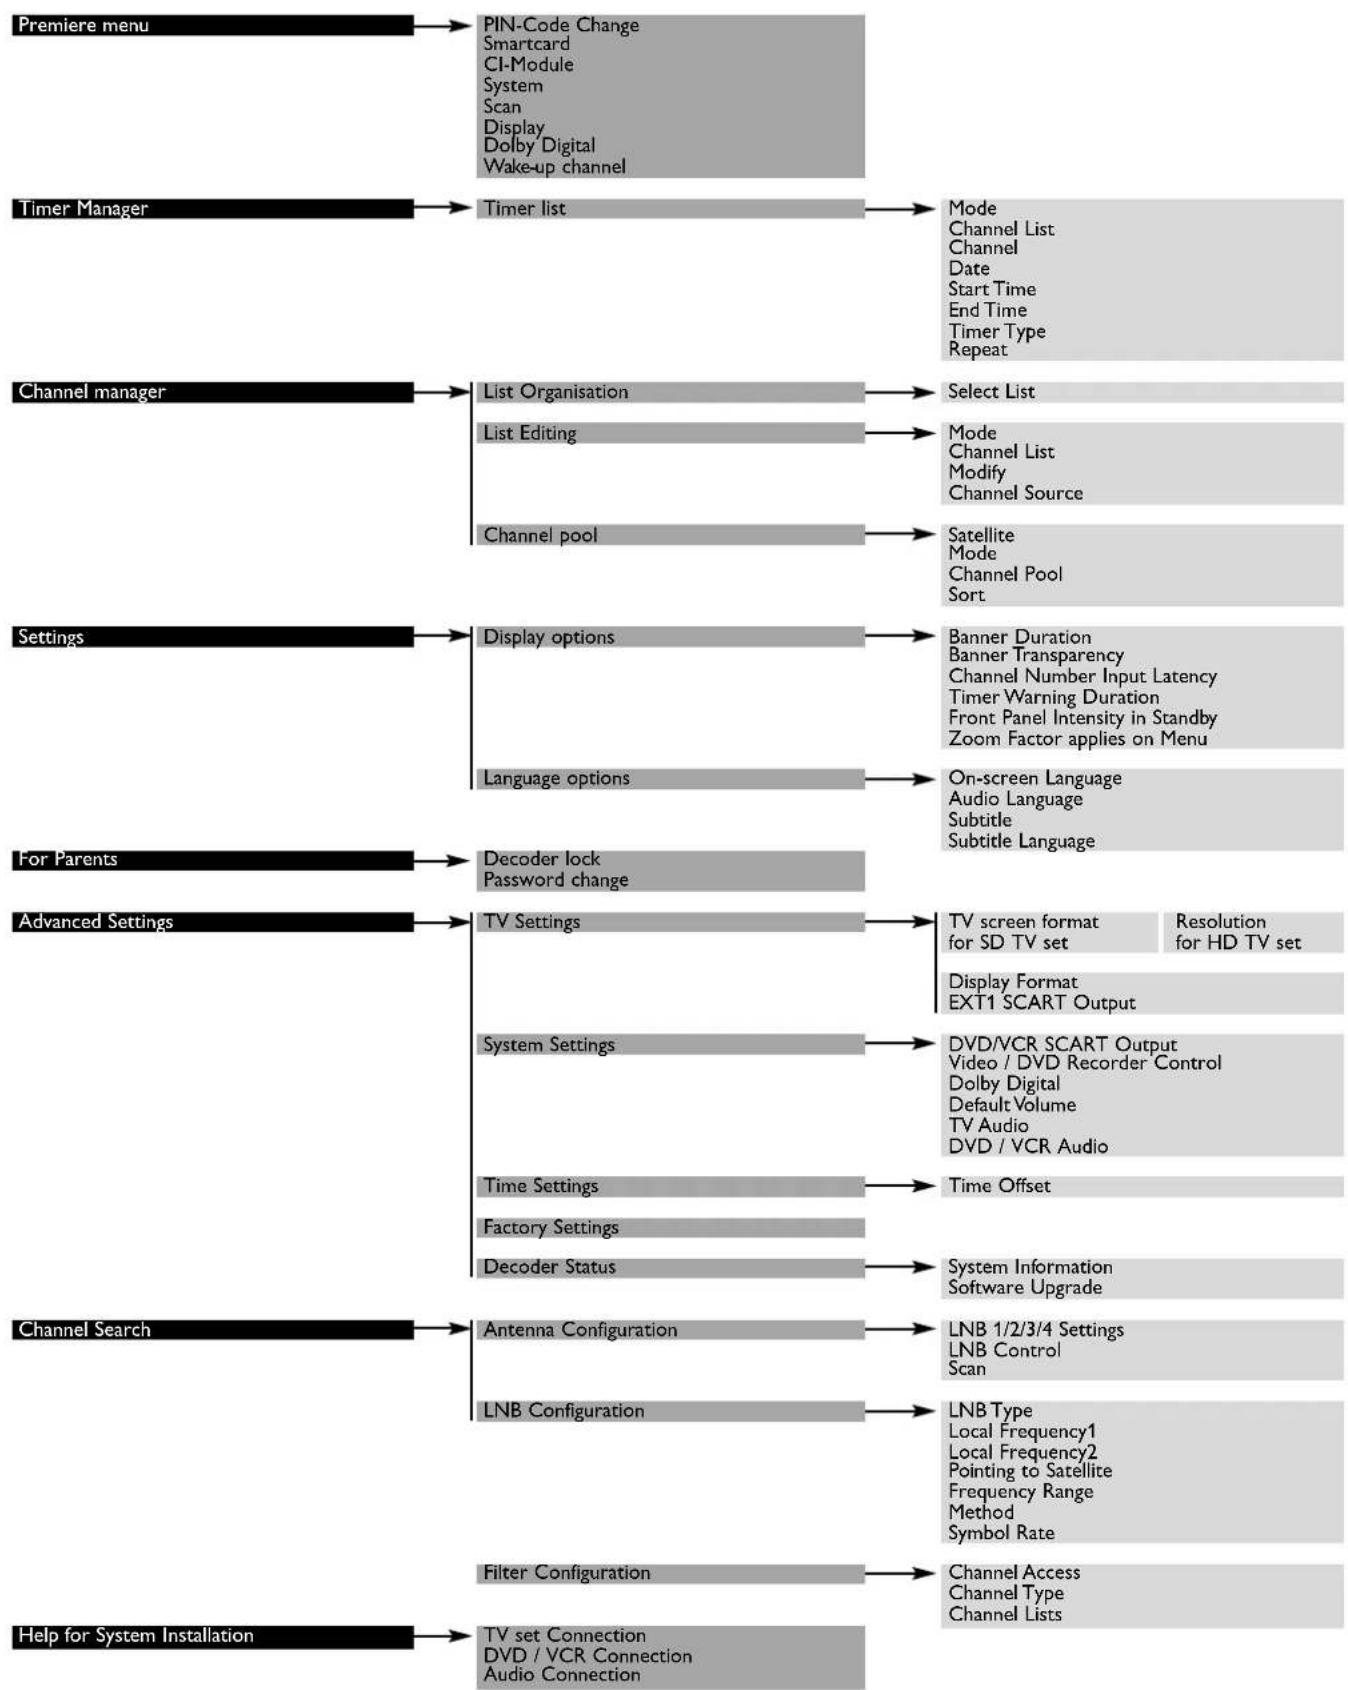
flowchart
graph TD
    A["Premiere menu"] --> B["PIN-Code Change\nSmartcard\nCI-Module\nSystem\nScan\nDisplay\nDolby Digital\nWake-up channel"]
    C["Timer Manager"] --> D["Timer list"]
    D --> E["Mode\nChannel List\nChannel\nDate\nStart Time\nEnd Time\nTimer Type\nRepeat"]
    F["Channel manager"] --> G["List Organisation"]
    G --> H["Select List"]
    I["Settings"] --> J["Display options"]
    J --> K["Banner Duration\nBanner Transparency\nChannel Number Input Latency\nTimer Warning Duration\nFront Panel Intensity in Standby\nZoom Factor applies on Menu"]
    L["For Parents"] --> M["Decoder lock\nPassword change"]
    N["Advanced Settings"] --> O["TV Settings"]
    O --> P["TV screen format for SD TV set"]
    P --> Q["Resolution for HD TV set"]
    R["System Settings"] --> S["DVD/VCR SCART Output\nVideo / DVD Recorder Control\nDolby Digital\nDefault Volume\nTV Audio\nDVD / VCR Audio"]
    T["Channel Search"] --> U["Antenna Configuration"]
    U --> V["LNB 1/2/3/4 Settings\nLNB Control Scan"]
    W["Help for System Installation"] --> X["TV set Connection\nDVD / VCR Connection\nAudio Connection"]
    Y["Time Settings"] --> Z["Time Offset"]
    AA["Factory Settings"] --> AB["Decoder Status"]
    AC["Display Format\nEXT1 SCART Output"] --> AD["System Information\nSoftware Upgrade"]
    AE["Filter Configuration"] --> AF["Channel Access\nChannel Type\nChannel Lists"]
text_image
PROFE PRETAX PROFE PRETAX PRETAX PRETAX12.2 Menu navigation
12.2.1 Basics
While watching digital TV or listening to the radio:
- Press the MENU key to display the Main Menu.
- Press the ▲ or ▼ key to select the desired menu item. Alternatively, dial the number corresponding to the menu item you want to open.
- Press OK to display the sub items.
Press MENU to close the menu and return to watching TV.
12.2.2 Changing settings
Once you highlighted an adjustable item or sub item, you can then access the values and make changes using the ◀ or ▶ key to select an option and number keys to enter numerical values.
When Parental control is activated, you need to enter your password to open certain menu items.
12.2.3 Cancelling/storing changes
- Either press EXIT to exit the screen without storing changes.
- Or press OK to validate changes and exit the screen.
In both cases, the selection moves one step back in the menu.
13 Premiere Menu
The Premiere Menu includes the following items:
o PIN Code Change
o Smartcard
o Cl module
o System
o Scan
o Display
o Dolby Digital
o Wake up
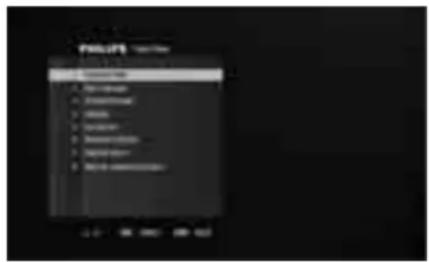
13.1 PIN Code Change
This screen is used to modify the PIN code for the protection of minors. To modify your PIN code, follow the instructions displayed on screen.
13.2 Smartcard
This screen is used to display information about your smartcard.
13.3 Cl module
This screen is used to open a dialogue with the common interface module and the smart card inserted in it.
13.4 System
This screen is used to display information about your receiver, including the Premiere Serial Number and software version.
13.4.1 Software Upgrade
13.4.1.1 Automatic software upgrade notification
While in Stand-by, your receiver searches for software upgrade. If available, a notification is displayed at receiver wake-up from Stand-by. To upgrade your receiver, follow the instructions displayed on screen.
13.4.1.2 Check for new software availability
- Press the red colour key from the System screen described above to launch a search for new software. After a few seconds, the Software Upgrade screen indicates whether new software is available.
- To proceed with the receiver software upgrade, refer to paragraph 14.5.5.2.
13.4.2 Factory Settings
This screen is used to reset your receiver back to the factory default condition.
- Press the green colour key.
- When prompted, press the green colour key again to confirm.
- Alternatively, press EXIT to exit the screen without modifying the receiver settings.
If you reset your receiver to factory settings, you lose all the settings you stored previously.
text_image
Properties Name Properties Name Description Description Description Description Description Description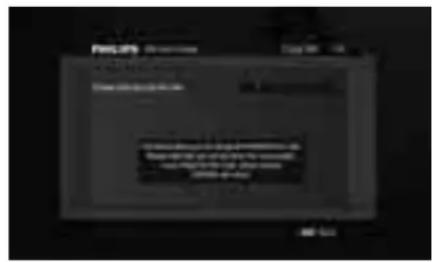
text_image
FisLife Description Page 00 - 14 Show options to this site. If you want to use the system to monitor this site, you will need to access your website (https://www.fislife.com/) http://www.fislife.com/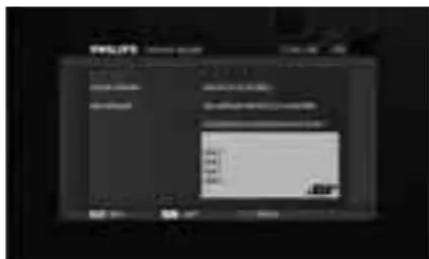
text_image
Scanned screenshot of a software interface with Chinese text, showing menu options and a data input field.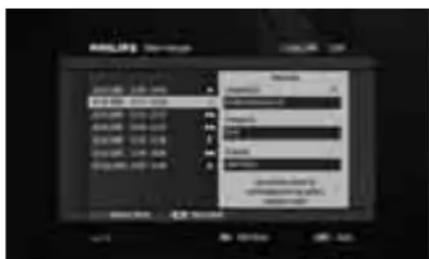
text_image
AQLRS Express Properties Properties Settings Settings Settings Settings Settings Settings Settings Settings Settings Settings Settings Settings Settings Settings Settings Settings Settings Settings Settings Settings Settings Settings Settings Settings Settings Settings Settings Settings Settings Settings Settings Settings Settings Settings Settings Settings Settings Settings Settings Settings Settings Settings Settings Settings Settings Settings Settings Settings Settings Settings Instructions Instructions Instructions Instructions Instructions Instructions Instructions Instructions Instructions Instructions Instructions Instructions Instructions Instructions Instructions Instructions Instructions Instructions Instructions Instructions Instructions Instructions Instructions Instructions Instructions Instructions Instructions Instructions Instructions Instructions Instructions Instructions Instructions Instructions Instructions Instructions Instructions Instructions Instructions Instructions Instructions Instructions Instructions Instructions Instructions Instructions Instructions Instructions Instructions Instructions Interfaces
text_image
RNG 100% 100% 100%
text_image
Scanned screenshot of a software interface with Chinese text fields and buttons, likely from an older application or system.
text_image
General Other You have to use the system to access your computer. You can access your computer to your website or your application.
text_image
FILUTI 2007.10.18 2007.10.19 FILUTI 2007.10.20 2007.10.21 FILUTI 2007.10.22 2007.10.23 FILUTI 2007.10.24 2007.10.25 FILUTI 2007.10.26 2007.10.27 FILUTI 2007.10.28 2007.10.29 FILUTI 2007.10.30 2007.10.31 FILUTI 2007.10.32 2007.10.33 FILUTI 2007.10.34 2007.10.35 FILUTI 2007.10.36 2007.10.37 FILUTI 2007.10.38 2007.10.39 FILUTI 2007.10.40 2007.10.41 FILUTI 2007.10.42 2007.10.43 FILUTI 2007.10.44 2007.10.45 FILUTI 2007.10.46 2007.10.47 FILUTI 2007.10.48 2007.10.49 FILUTI 2007.10.50 2007.10.51 FILUTI 2007.10.52 2007.10.53 FILUTI 2007.10.54 2007.10.55 FILUTI 2007.10.56 2007.10.57 FILUTI 2007.10.58 2007.10.59 FILUTI 2007.10.60 2007.10.61 FILUTI 2007.10.62 2007.10.63 FILUTI 2007.10.64 2007.10.65 FILUTI 2007.10.66 2007.10.67 FILUTI 2007.10.68 2007.10.69 FILUTI 2007.10.70 2007.10.71 FILUTI 2007.10.72 2007.10.73 FILUTI 2007.10.74 2007.10.75 FILUTI 2007.10.76 2007.10.77 FILUTI 2007.10.78 2007.10.79 FILUTI 2007.10.80 2007.10.81 FILUTI
natural_image
Exterior view of a modern office building (no signage)13.5 Scan
This screen is used to view the date and results of the last scan performed. It may also be used to launch a new scan.
- Press the green colour key to search for Premiere channels only.
- Alternatively, press the yellow colour key to search for All channels.
The Antenna Configuration screen is displayed, respectively with the Premiere or All channel access filter set on. - Press OK to start scanning.
13.6 Display
This screen is used to set your receiver according to your TV set screen format and depending on the output selected (HDMI/DVI, YPbPr, or EXT1/2).
- Set values for the following (default settings are underlined):
| HDTV output SDTV output | |||
| HDMI/DVI YPbPr EXT1/2 | |||
| TV Screen Format 16:9 | 4:3 or 16:9, depending on your TV set | ||
| Display format | Full Screen or Pillar Box, or Extended See table in paragraph 14.5.1. | Auto or Letter Box, or Centre Cut-Out | |
| Resolution | Auto, 1080i, 720p, or 576p | Not adjustable (always 576i) | |
| TV SCART Output | Not applicable | RGB (recommended) or CVBS, or S-VIDEO | |
| AV Control | On (recommended) or Off | ||
- Press EXIT to exit the screen.
13.7 Dolby Digital out of the digital audio output
This screen is used to enable/disable Dolby Digital sound.
When Dolby Digital is disabled, you can still get stereo sound in digital format (PCM).
13.8 Wake up
This screen is used to set the channel to be tuned at the receiver wake-up. Default setting is programme 100.
14 Settings
14.1 Timer Manager
The Timer Manager is used to set, edit or delete:
o recording timers for the programmes you want to record using your VCR or DVD recorder,
o reminders for the programmes you want to see in the near future.

To be able to record a digital channel using a VCR or DVD recorder, you must program both your recorder and receiver:
- You must set a timer on your receiver.
- You must also set a timer on the VCR or DVD recorder (refer to the VCR or DVD recorder user manual).
If you have a Philips VCR or DVD recorder, you can avoid setting a timer on the VCR or DVD recorder by using the Video/DVD Recorder Control feature. Refer to paragraph 15.3 for more information on Video/DVD Recorder Control.
To delete an existing timer:
- Scroll to the timer you want to delete.
- Press the red colour key to delete it from the timer list.
- Press EXIT to exit the screen.
To set or edit a timer:
- Scroll to the timer you want to edit and press OK to select it from the timer list.
- Alternatively, simply press the green colour key to set a new timer.
-
Then set or modify the following:
-
Mode: select TV or Radio service using the ◀ or ▶ key.
- Channel list: select the list to which the channel you want to record belongs using the ◀ or ▶ key.
- Channel: select the number of the channel on which the programme you want to record is broadcast using the ◀ or ▶ key or number keys.
- Date: select a date using the number keys or the ◀ or ▶ key.
- Start time: select a start time using the number keys or the ◀ or ▶ key to modify the default time in steps of 1 hour.
- End Time: select a end time using the number keys or the ◀ or ▶ key to modify the default time in steps of 1 hour.
- Timer Type: select Recording or Reminder
- Repeat: select Once for a single recording at the selected time and date, Every day to record once every day, or Every week to record once every week using the ◀ or ▶ key.
- Press OK to confirm, or EXIT to go back to the timer list screen.
When a recording timer is active, you cannot change digital channels, but you can switch to analogue TV from your TV set and zap through analogue channels.
14.2 Channel Manager
The Channel Manager sub menu includes the following items:
o List Organization
o List Editing
o Channel Pool
14.2.1 List Organization
This item is used to add new TV/Radio channel lists, delete existing TV/Radio channel lists, or reorder or rename the existing lists.
- Select TV or Radio channel lists using the TV/RADIO key.
text_image
ADDLE Add Remove Add Delete Export Add Delete Export Add Remove Add Delete Export
text_image
FILIPS 100% 20% 30% 40% 50% 60% 70% 80% 90% 100%
text_image
HILIN Software LOGIC LOGIC
text_image
HELIPS HELIPS HELIPSTo add or delete channel lists:
- Press the green colour key to add a new list. At this stage, the new channel list is empty.
- Or scroll to the list you want to delete using the ▲▼ keys, and press the red colour key. You are then prompted to confirm deletion.
To reorder your existing channel lists:
- Scroll to the list you want to move using the ▲▼ keys.
- Press the yellow colour key to enable the reordering feature.
- Move the channel list to the desired position using the ▲▼ keys.
- Press OK to confirm the new position.
text_image
NLSI NLSI - NLSITo rename an existing channel list:
- Scroll to the list you want to rename using the ▲▼ keys.
- Press OK. A new screen appears.
- Press ▶ to enable the renaming feature.
- Edit the channel list name, using the ◀ or ▶ key to move to the character to be modified, and the ▲▼ keys to scroll through available characters.
Use the red colour key to delete a character, and the green colour key to switch from upper to lower case.
- Press OK to confirm or EXIT to cancel your changes and return to the previous screen.
To confirm your changes and exit the List Organization screen:
- Press EXIT.
text_image
MUSI OK OK Cancel14.2.2 List Editing
This item is used to edit your channel lists.
- Select the list to be edited by setting values for the following:
- Mode: TV or Radio depending on the type of channel list you want to edit
- Channel List: name of the channel list you want to edit
- Modification: modification feature you want to use: Add Channels or Remove/Reorder Channels
In case you selected the Add Channels feature, you must also define the channel pool from which you want to add channels by setting values for the following:
- Satellite: satellite broadcasting the channels you want to add
- Channel Pool: channel properties you want to use as filtering criteria
- Sort: list ordering method
- Press OK to access the next screen. It may take a few seconds for this screen to appear.
text_image
HELIPS OK Cancel OK Cancel OK/Cancel OK/Cancel OK/CancelTo remove channels from the selected list:
- Scroll to the channel you want to delete using the ▲▼ keys and then press OK.
- Alternatively, press the red colour key to delete all channels. You are then prompted to confirm deletion.
To reorder channels in the selected list:
- Scroll to the channel you want to move using the ▲▼ keys.
- Press the yellow colour key. Scrolling arrows appear.
- Move the channel to the desired position using the ▲▼ keys.
- Press OK to confirm.
To add channels to the selected list:
- Press the green colour key to add all the new channels available in the selected channel pool, displayed on the left hand side of the screen.
- Alternatively, scroll to the channel(s) you want to add using the ▲▼ keys and press OK.
- Press EXIT to exit the screen.
14.2.3 Channel Pool
The channel pool contains all the channels found during the scan. This item is used to: o activate or de-activate channels from the channel pool;
o lock or unlock channels from the channel pool.
When zapping through the channel lists, de-activated channel names appear greyed out, and locked channels are protected by PIN-Code.
To set the subset of the channel pool you want to consult:
- Select values for the following:
- Satellite: satellite broadcasting the channels you want to manage
- Mode: TV or Radio depending on the type of channels you want to manage
- Channel Pool: channel properties to be used as filtering criteria
- Sort: list ordering method
- Press OK to access the next screen. It may take a few seconds for this screen to appear.
To activate all channels:
- Press the green colour key.
- Press OK to confirm or EXIT to cancel.
To de-activate a particular channel:
- Scroll to the channel you want to de-activate.
- Press OK to de-activate it. Press OK again to re-activate it.
- Press EXIT to exit the screen.
To lock a particular channel:
- Scroll to the channel you want to lock.
- Press the yellow colour key to lock it. A ⏻ mark appears, indicating that the channel is locked. Press OK again to unlock it.
- Press EXIT to exit the screen.
14.3 Settings
Settings is used to set:
- Display options
- Language options
14.3.1 Display options
This screen is used to set display options according to your preferences.
- Select values for the following:
- Banner Duration: select a banner display duration, from 2 to 8 seconds using the ◀ or ▶ key.
- Banner Transparency: select On to enable banner transparency.
- Channel Number Input Latency: select the time lapse after which a number key press is taken into account, from 1 to 5 using the ◀ or ▶ key.
- Timer Warning Duration: select a banner display duration, from 15 seconds to 5 minutes using the ◀ or ▶ key.
- Front panel intensity in Standby: Low or High
- Zoom factor applies on menu: from 1.0 (no zoom) to 1.2 (+20 % zoom)
- Press OK to confirm.
14.3.2 Language options
This screen is used to set language options according to your preferences.
- Select values for the following:
- On-Screen Language: select a language for on-screen display
• Audio Language: select your audio language - Subtitles: select On, "If audio not available", "Hard of hearing" for special subtitles for deaf or Hard of Hearing viewers, or Off to disable subtitles.
- Subtitles Language: select subtitles language.
- Press OK to confirm.
text_image
Scanned image of a software interface with menu options and buttons, likely from an older application or system.
text_image
PHLPS 100 OK Cancel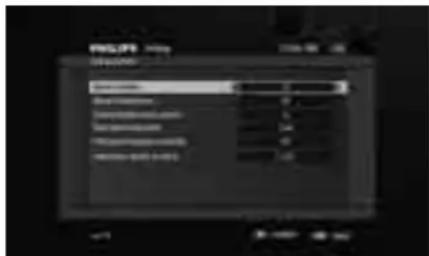
text_image
RISPR Preview Resolution: Gauss width: 0.5 Color: 0.7 Noise level: 0.1 Noise intensity: 3.6 Noise quality: 0.4 FBS (Image quality) 0.5 Noise speed: 0.2
text_image
FILIPS File Properties FileName: 100% File 100%:0.000 File 100%:0.000 File
This screen is used to enable Parental Lock and change your receiver password.
The password is a 4-digit code used to lock channels and features of the receiver. This code is different from the PIN code, which is a 4-digit code used to prevent access to programmes not intended for persons under 18.
To enable Parental Lock:
- Select Yes to enable Parental Lock.
- Alternatively, select No to disable Parental Lock.
Additionally, you may modify your receiver password from this screen.
To modify your receiver password:
1 Press the red colour key to access the Password Change feature.
2 Enter your current password.
If you have never changed your password, enter 1234 (factory setting).
3 Enter your new password using number keys. Note that your password cannot be made up of identical digits.

1911 must not be used as a password!
4 Enter your new password again to confirm.
5 Press EXIT.
text_image
MSN MSN MSN MSN MSN MSN MSN MSN MSN MSN MSN MSN MSN MSN MSN MSN MSN MSN MSN MSN MSN MSN MSN MSN MSN MSN MSN MSN MSN MSN MSN MSN MSN MSN MDM MDM MDM MDM MDM MDM MDM MDM MDM MDM MDM MDM MDM MDM MDM MDM MDM MDM MDM MDM MDM MDM MDM MDM MDM MDM MDM MDM MDM MDM MDM MDM MDM14.5 Advanced settings
The Settings sub menu menu includes the following items:
• TV Settings
- System Settings
- Time Settings
- Decoder Status
- Factory Settings
text_image
FELTS Normaling Form1 Normaling Normaling Normaling Normaling Normaling Normaling Normaling Normaling Normaling Normaling Normaling Normaling Normaling Normaling Normaling Normaling Normaling Normaling Normaling Normaling Normaling Normaling Normaling Normaling Normaling Normaling Normaling Normaling Normaling Normaling Normaling Normaling Normaling Normaling14.5.1 TV Settings
This screen is used to set aspect ratio settings.
- Select values for the following (default settings are underlined):
- Press OK to confirm.
| HDTV output SDTV output | |||
| HDMI/DVI YPbPr EXT1/2 | |||
| Resolution Auto, 1080i, 720p, or 576p Not applicable | |||
| TV Screen Format | Not adjustable (always 16: 9) | 4: 3 or 16: 9, or Auto depending on your TV set | |
| Display format | Full Screen or Pillar Box, or Extended See tables below. | Auto or Letter Box, or Centre Cut-Out | |
| TV SCART Output | CVBS, or S-VIDEO | RGB (recommended) or CVBS, or S-VIDEO | |
Display format is used to set the way the video is transformed in case the broadcast aspect ratio and your TV screen format (4:3 or 16:9) do not match.
Select Auto for automatic format selection.
Case1:
Video via HD connection (HDMI/DVI or YPbPr)
TV screen format is supposed to be 16:9
EN
| Broadcast is 4:3 Broadcast is 16:9 | ||
| Pillar box | 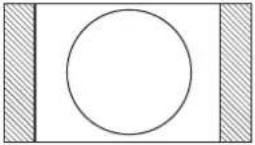 | |
| Extended | 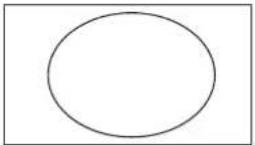 | |
| Full screen | 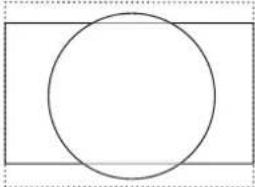 |
Case2:
Video via SCART
TV screen format is either 4:3 or 16:9
| Broadcast is 4:3 Broadcast is 16:9 | |||
| TV is 4:3 | Auto | 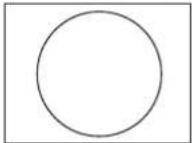 | 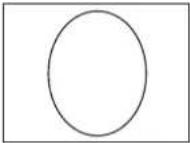 |
| Letter box | 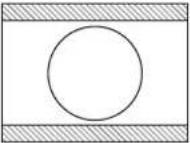 | ||
| Centre cut-out | 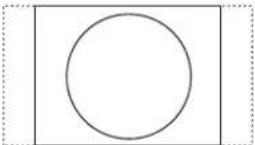 | ||
| TV is 16:9 | Any setting | 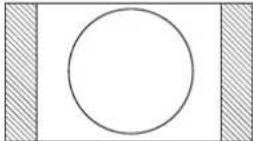 | 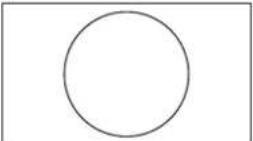 |
text_image
PROFESSION OK14.5.2 System Settings
This screen is used to set your receiver audio/video output settings.
- Select values for the following:
- DVD/VCR SCART Output: select the EXT2 SCART output format supported by your TV set and DVD/VCR (refer to your TV and DVD/VCR user manual for more information)
• Dolby Digital: select ON to enable Dolby Digital sound - Video/DVD Recorder Control: No, Prepare Record, or Record Link depending on the control feature supported by your recorder (for more information, refer to paragraph 15.3 of this manual or to your recorder user manual)
- TV Audio: select Stereo or Mono depending the audio output format of your TV
- DVD/VCR Audio: select Stereo or Mono depending the audio output format of your DVD/VCR
- Default Volume: select the volume level at wake-up.
- Press OK to confirm.
text_image
RSLIF Settings OK Cancel14.5.3 Time Settings
This screen is used to set the local time offset with respect to actual local time retrieved from the network.
The offset setting is updated automatically when tuning on channels broadcasted by Astra.
- Select the appropriate Time Offset with respect to GMT time.
- Press OK to confirm and exit the screen, or EXIT to exit without storing the changes.
text_image
PROFESSION • 100% • 200% • 300% • 400% • 500% • 600% • 700% • 800% • 900% • 1000% • 1100% • 1200% • 1300% • 1400% • 1500% • 1600% • 1700% • 1800% • 1900% • 2000% • 2100% • 2200% • 2300% • 2400% • 2500% • 2600% • 2700% • 2800% • 2900% • 3000% • 3100% • 3200% • 3300% • 3400% • 3500% • 3600% • 3700% • 3800% • 3900% • 4000% • 4100% • 4200% • 4300% • 4400% • 4500% • 4600% • 4700% • 4800% • 4900% • 5000% • 5100% • 5200% • 5300% • 5400% • 5500% • 5600% • 5700% • 5800% • 5900% • 6000% • 6100% • 6200% • 6300% • 6400% • 6500% • 6600% • 6700% • 6800% • 6900% • 7000% • 7100% • 7200% • 7300% • 7400% • 7500% • 7600% • 7700% • 7800% • 7900% • 8000% • 8100% • 8200% • 8300% • 8400% • 8500% • 8600% • 8700% • 8800% • 8900% • 9000% • 9100% • 9200% • 9300% • 9400% • 9500% • 9600% • 9700% • 9800% • 9900% • 100 • All14.5.4 Factory Settings
This screen is used to reset your receiver back to the factory default condition.
- When prompted, press the red colour key to confirm.
- Alternatively, press EXIT to exit the screen without modifying the receiver settings.
If you reset your receiver to factory settings, you lose all the settings you stored previously.
14.5.5 Decoder Status
The Decoder Status sub menu menu includes the following items:
o System Information
o Decoder Upgrade
14.5.5.1 System Information
This screen is used to display information about your receiver, including the Premiere Serial Number and software version.
You can also access this screen via the Premiere menu.
14.5.5.2 Software Upgrade
This item is used for software upgrades. Select it to check the current software version as well as launch a search for new software. After a while, the Software Upgrade screen indicates whether new software is available.
- Press EXIT to exit the screen in case no new software is available. In case software is available, you are offered three options:
- Press the green colour key to choose to upgrade your receiver immediately, and then press OK to launch new software installation.
- Or press the yellow colour key to choose to upgrade your receiver later, and then press OK to confirm your choice. New software installation takes place as soon as you set your receiver to standby.
- Or press the red colour key to refuse to upgrade your receiver and return to the Decoder status sub menu.
text_image
Scanned screenshot of a software interface with Chinese text, showing a dropdown menu and control buttons.
text_image
R4LPS Power 100% 200% 300% 400% 500% 600% 700% 800% 900% 1000% 1100% 1200% 1300% 1400% 1500% 1600% 1700% 1800% 1900% 2000% 2100% 2200% 2300% 2400% 2500% 2600% 2700% 2800% 2900% 3000% 3100% 3200% 3300% 3400% 3500% 3600% 3700% 3800% 3900% 4000% 4100% 4200% 4300% 4400% 4500% 4600% 4700% 4800% 4900% 5000% 5100% 5200% 5300% 5400% 5500% 5600% 5700% 5800% 5900% 6000% 6100% 6200% 6300% 6400% 6500% 6600% 6700% 6800% 6900% 7000% 7100% 7200% 7300% 7400% 7500% 7600% 7700% 7800% 7900% 8000% 8100% 8200% 8300% 8400% 8500% 8600% 8700% 8800% 8900% 9000% 9100% 9200% 9300% 9400% 9500% 9600% 9700% 9800% 9900% 100 Ground/Background OK Unknown/Unknown OK OKAfter successful software installation, a confirmation message is displayed. In case of installation failure, a failure message is displayed, indicating that a new installation attempt will take place as soon as you set your receiver to standby. In both cases, press OK to exit the upgrade process.
You can also launch a search for new software from the screen described above using the red colour key.
Software upgrade messages
| START UPDATE | Software update starting |
| LOADING 000LOADING 100 | Software loading progress: from 0 to 100% |
| SAVING 000SAVING 100 | Software storing progress: from 0 to 100%⚠ Do not unplug the receiver before the end of the storing operation. |
14.6 Channel Search
This item is used to perform full satellite antenna system installation and search for new channels.
Before starting a search, configure the settings according to the following sequence:
14.6.1 Antenna Configuration
- Select appropriate antenna control (Tone Burst or DiSEqC) depending on your setup.
- Allocate the appropriate satellite(s) to the LNB(s). Alternatively, launch auto-detection using the red colour key for automatic identification of available satellites, then press EXIT to go back to the Antenna Configuration screen.
The system can detect the following satellites: ASTRA 19.2° East, ASTRA3 23.5° East, HOT BIRD 13° East, Eutelsat W, and Türksat 1C.
- If necessary, configure the more advanced settings as described in the next paragraphs.
14.6.2 LNB Configuration
To change the LNB and symbol rate settings:
- Press the blue colour key from the Antenna Configuration screen to access the LNB Configuration screen.
- Select the LNB type corresponding to the selected LNB and the satellite it is pointing at.
- Select the desired satellite: default setting is ASTRA 19.2° East. To select another satellite, press the blue colour key.
- Select the frequency range to be scanned: press the blue colour key, and then select either FULL to scan the whole frequency range, or CUSTOM to scan a particular frequency range. In the second case, enter the range low and high frequencies.
- From the LNB configuration screen, you may also access the screen used to select symbol rates for the selected LNB using the red colour key.
- Press EXIT once or twice to go back to the Antenna Configuration screen.
14.6.3 Filter Configuration
To define the channels to be searched:
- Press the green colour key from the Antenna Configuration screen to access the Filter Configuration screen.
- Select values for the following scanning filters:
- Channel Access: select from the available channel groups; i.e. All, FTA (free-to-air), PREMIERE, or FTA+PREMIERE
text_image
Scanned screenshot of a software interface with Chinese text and a dark progress bar, likely from an older application or system.
text_image
RHP3 On Control Battery Battery1 Battery2 Battery3 Battery4 Battery5 Battery6 Battery7 Battery8 Battery9 Battery10 Battery11 Battery12 Battery13 Battery14 Battery15 Battery16 Battery17 Battery18 Battery19 Battery20 Battery21 Battery22 Battery23 Battery24 Battery25 Battery26 Battery27 Battery28 Battery29 Battery30 Battery31 Battery32 Battery33 Battery34 Battery35 Battery36 Battery37 Battery38 Battery39 Battery40 Battery41 Battery42 Battery43 Battery44 Battery45 Battery46 Battery47 Battery48 Battery49 Battery50 Battery51 Battery52 Battery53 Battery54 Battery55 Battery56 Battery57 Battery58 Battery59 Battery60 Battery61 Battery62 Battery63 Battery64 Battery65 Battery66 Battery67 Battery68 Battery69 Battery70 Battery71 Battery72 Battery73 Battery74 Battery75 Battery76 Battery77 Battery78 Battery79 Battery80 Battery81 Battery82 Battery83 Battery84 Battery85 Battery86 Battery87 Battery88 Battery89 Battery90 Battery91 Battery92 Battery93 Battery94 Battery95 Battery96 Battery97 Battery98 Battery99 Battery100
natural_image
Close-up of a computer monitor with a scroll, showing no visible text or symbols on the screen or background.
text_image
Scanned screenshot of a software interface with menu bar, toolbar, and status bar showing text fields and buttons- Channels lists: select RESET to replace all channel lists, VIRGIN to reset the receiver to the factory settings by pressing the red colour key, and then launch first installation, or NO CHANGE to keep your channel lists as they are.
In case you select NO CHANGE, you will need to use the Channel Manager feature to add channels to your lists from the updated channel pool.
- Press EXIT to go back to the Antenna Configuration screen.
14.6.4 Search for new channels
- Check for adequate signal strength and quality for each LNB/satellite.
To display the signal strength and quality for a particular satellite, scroll to the corresponding LNB.
- If necessary, change the pointing of your antenna(s) so as to maximize the level of the signal quality and strength bargraph indicators, then fasten your antenna(s) according to the antenna user manual instructions.
To enable the audible signal quality indicator, press the yellow colour key.
- Press OK to start searching for channels. The Installation screen appears.
During the scanning process, the following information is reported on screen:
• the number of TV and Radio channels found,
• the scanning progress, indicated as a percentage,
- the strength of the signal and the quality of reception.
If you press EXIT during the scanning process, you interrupt the scanning and return to the Antenna Configuration screen. In this case, none of the channels found are stored.
When scanning has been successfully completed, a completion message is displayed as well as the number of channels detected.
- Press OK to tune the receiver to the first channel in the main channel list.
15 Advanced settings
15.1 Restoring factory settings
To restore your receiver factory settings, refer to paragraph 14.5.4.
15.2 Changing the remote control setting
If you have other items of equipment in your home and the remote control of the Philips receiver interferes with them, you can change the setting of the remote control. For this you must first change the setting of your remote control and then change the setting of your receiver.
First change the setting of your remote control:
- Select the STB mode.
- Simultaneously press number keys 1 and 3 and hold them for at least 3 seconds. The green indicator surrounding the ⏻ key blinks twice.
- Simultaneously release the two keys.
- Enter the new setting within the next 60 seconds:
• 1646 for alternative setting (STB 2)
• 1103 for the default factory setting (STB 1)
The green indicator surrounding the ⏻ key blinks twice again, indicating successful setting change. The remote control can also be tested by trying to control the receiver. If the setting has been changed, the remote no longer operates the receiver.
If the batteries are removed while a key is being pressed, the default factory setting is restored.
Then change the setting of your receiver:
- Disconnect your receiver from the mains.
- Reconnect your receiver to the mains. The green indicator turns on, then it turns off while BOOTING displays.
When the green indicator starts blinking, simultaneously and briefly press the P+ and P- buttons on the front panel.
REU > SETTING appears.
- Press the OK key of your remote control.
The display then indicates either the setting change or the setting change failure (see table below).
Remote control setting messages
| RCU : SETTING | Receiver in remote control setting change mode |
| SET TO STB2 orSET TO STB1 | Successful remote control setting change |
| RCU : PASS | Remote control setting changed |
| RCU : FAILED | Remote control setting change failed |
15.3 VCR or DVD recorder control
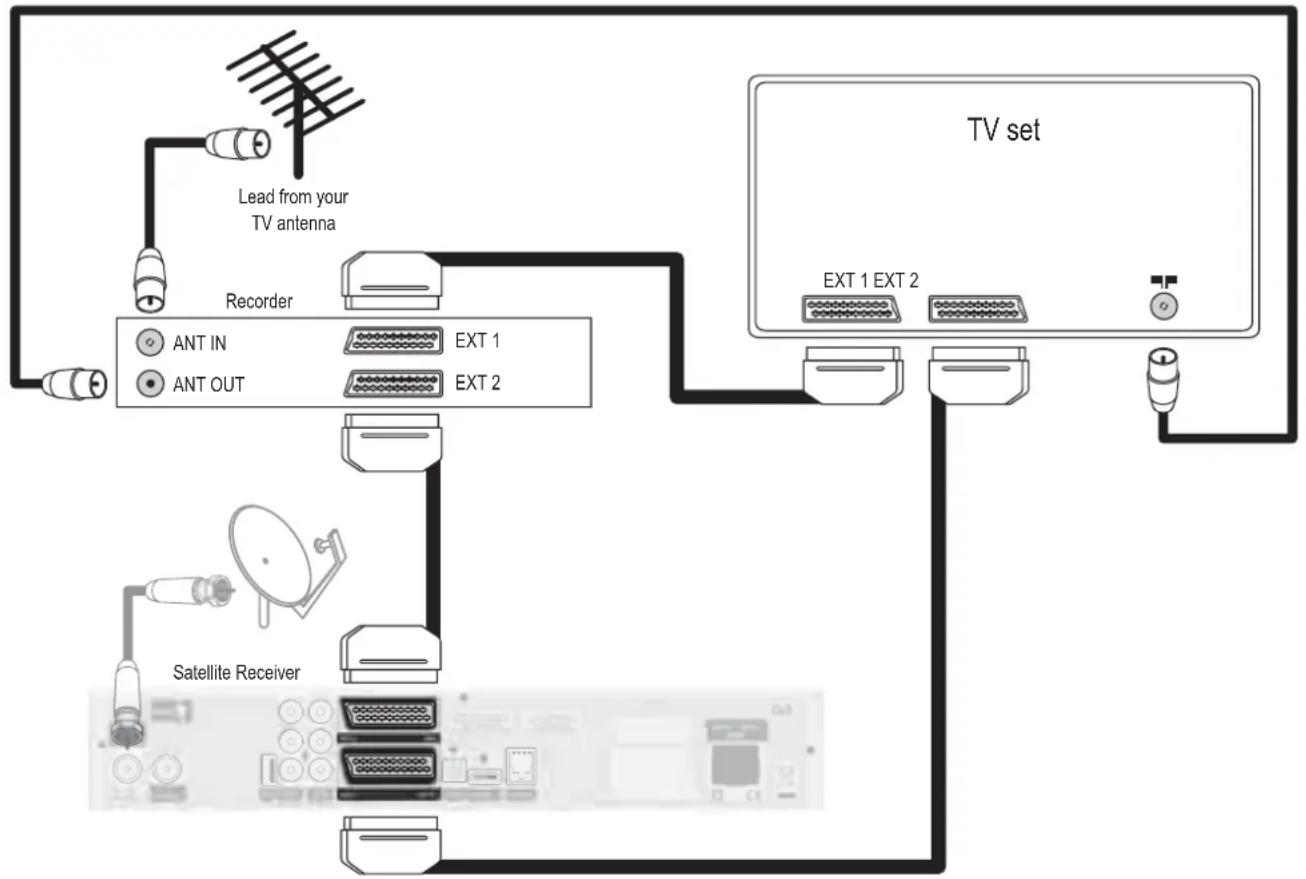
15.3.1 Connecting your equipment for Video/DVD Recorder Control
The Video/DVD Recorder Control feature allows automatic recording without requiring you to programme your VCR or DVD recorder. All you need to do is set a recording timer on your receiver. Your VCR or DVD recorder will then start/stop recording automatically. Prior to setting this feature:
- Consult the user manual of your VCR or DVD recorder to check if and how VCR/DVD is supported (sometimes called Easy Recording). Most Philips VCR and DVD recorders support one of the two Video/DVD Recorder Control options, i.e. Prepare Record or Record Link.
- Check that your TV and VCR or DVD are both fitted with two SCART sockets.
- Incorporate your receiver in your existing installation as described below.

flowchart
graph TD
    A["Lead from your TV antenna"] --> B["Recorder"]
    B --> C["ANT IN"]
    B --> D["ANT OUT"]
    C --> E["EXT 1"]
    D --> F["EXT 2"]
    G["Satellite Receiver"] --> H["Antenna"]
    H --> I["External Display"]
    J["TV set"] --> K["EXT 1 EXT 2"]
    K --> L["External Display"]
- Connect the cable from the satellite dish to the "SAT IN" socket of your digital receiver.
- Connect the “EXT1” SCART socket of your digital receiver to the EXT1 SCART socket of your TV using the SCART lead supplied with your digital receiver.
- Connect the "EXT2" SCART socket of your digital receiver to the EXT2 SCART socket of your recorder (called "IN" or "DECODER") using a SCART lead.
-
Connect the EXT1 SCART socket of your recorder (called "OUT") to the "EXT2" SCART socket of your TV using a SCART lead.
-
Plug all your equipment, excluding your digital receiver, into the mains.
- Read chapter 1 to proceed with the channel scan if not already done.
With this connection set up:
- You can watch digital TV while you record analogue TV.
- You can watch analogue TV while you record digital TV.
- You can record the digital TV channel you are watching.
Some VCR or DVD recorders need to be in standby to use the Easy recording or Record link feature. Refer to your VCR or DVD recorder user manual.
15.3.2 Digital receiver and VCR or DVD recorder settings
- Depending on your VCR or DVD recorder brand and type, you have to set the recording control option to "Prepare Record" or "Record Link". Refer to the VCR or DVD recorder user manual, or try the two options to find out which is most suitable.
- Set your VCR or DVD to "Prepare Record" or "Record Link" to allow control by your digital receiver.
15.3.3 Recording using the Video/DVD Recorder Control feature
- Your digital receiver, TV and VCR or DVD are connected and set according to paragraph 15.3.1.
- You have set a timer on your digital receiver.
- At timer start, your VCR or DVD recorder starts recording, and at timer end it stops recording under the control of your digital receiver. You no longer need VCR or DVD programming to record digital TV channels.
16 Programming your remote control for your audio/video equipment brands
EN
Prior to using your universal remote control, check or set the following:
- Device you want to control (Mode selection)
- Volume and mute control assignment
- Brand setting for your TV, VCR, DVD and Amplifier
16.1 Mode selection (selecting the device you want to control)
Your 5-in-1 remote control can be used to control most of your audio/video equipment through various modes:
- STB mode for the control of your Digital Receiver
- TV mode for the control of your TV set
- VCR mode for the control of your VCR
- DVD mode for the control of your DVD or DVD Recorder
- AMP mode for the control of your audio tuner/amplifier.
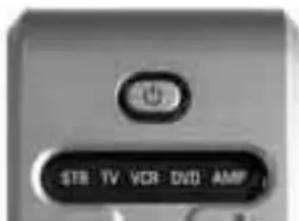
text_image
STB TV VCR DVD AMPPress SELECT once to check which mode is active. To change the mode, press SELECT repeatedly until the desired mode is signalled by the corresponding indicator. The mode sequence is STB --> TV --> VCR --> DVD --> AMP.
16.2 Volume and mute control assignment
16.2.1 Default volume and mute control assignment
For each mode, you can select the device of your audio/video set-up to which volume and mute control is assigned.
When in STB mode, the volume functions ( + , - and keys) can be controlled through your TV set, amplifier, or digital receiver. By default, volume control is performed through a Philips brand TV set.
When in TV, VCR or DVD mode, the volume functions ( + , - and keys) can be controlled through your TV set or amplifier. By default, volume control is performed through a Philips brand TV set.
When in AMP mode, the volume functions ( + , - and keys) can be controlled through a Philips brand amplifier only.
16.2.2 Changing the volume and mute control assignment
The procedures below assume you start from default settings.
Your Digital Receiver (STB), TV, VCR or DVD audio outputs are "all" connected to your amplifier. We advise you to assign volume control to your amplifier for all modes (STB, TV, VCR, and DVD). To do so:
- Press SELECT repeatedly to select the AMP mode.
- Simultaneously press keys 1 and 3 until the AMP indicator turns on then release these keys.
- Enter code 993. The indicator surrounding the ⏻ key blinks once after each entry.
- Press the ✕ key. The indicator surrounding the ⏻ key blinks twice.
From then on, whatever mode you are in, the AMP indicator turns on each time you press one of the (▲+, △- and ✕ keys). When controlling the volume, make sure the source selector of your amplifier is properly set (refer to your amplifier user manual for source selection).
Your TV set is only fitted with SCART connectors (no HDMI, no DVI and no YPbPr)
We advise you to assign volume control to your digital receiver for the STB mode. To do so:
- Press SELECT repeatedly to select the STB mode.
- Simultaneously press keys 1 and 3 until the STB indicator turns on then release the keys.
- Enter code 993. The indicator surrounding the ⏻ key blinks once after each digit entry.
- Press the △- key. The indicator surrounding the ⏻ key blinks twice.
You have made several setting changes and you want to restore the default volume control assignment settings (see table in next paragraph)
Default volume control assignment means:
in TV mode, volume control is performed through a Philips brand TV set
in VCR mode, volume control is performed through a Philips brand TV set
in DVD mode, volume control is performed through a Philips brand TV set
in AMP mode, volume control is performed through a Philips brand amplifier only.
To restore default settings:
- Simultaneously press keys 1 and 3 until the indicator surrounding the ⏻ key blinks twice then release these keys.
- Enter code 981. The indicator surrounding the ⏻ key blinks twice.
16.3 Changing the brand setting of your remote control for your TV, VCR, DVD or Amplifier
By default at first power up or at first installation, your universal remote control is pre-set to control your Digital Receiver as well as most Philips brand audio/video devices.
If you have other brands of devices, or if the presets do not enable you to control your Philips device, please follow the procedure below.
1 Choose one brand code, made up of 4 digits, from the code list at the end of this manual. (If several codes are possible, go through this procedure with the first code and try your remote control. If you are not successful, repeat the procedure with the second code, and so on).
2 Press the SELECT key repeatedly to choose the mode corresponding to the type of device you want to set up (TV,VCR, DVD or Amp/Tuner).
3 Simultaneously press digits 1 and 3 until the indicator surrounding the ⏻ key blinks twice then release these keys.
4 Enter the 4 digit code corresponding to the device brand you have chosen. The indicator surrounding the ⏻ key blinks once after each one of the first three entries. The indicator surrounding the ⏻ key blinks twice after the fourth entry.
If an invalid code has been entered, the indicator surrounding the ⏻ key blinks once only. Restart from step 1.
We advise you to fill in the table below to keep a record of your personal remote control settings. This will be helpful the day you have to replace the remote control batteries (see Note 1 below).
| Default setting | Your personal setting | ||||||
| Brand | Code | Volume control performed through | Brand | Code | Volume control performed through | ||
| MODE | TV set | Philips | 0556 | TV | |||
| Video rec. | Philips | 0081 | TV | ||||
| DVD | Philips | 0539 | TV | ||||
| Amp. | Philips | 1742 | AMP | ||||
| STB | STB 1 | TV | STB (1 or 2) | ||||
1 Battery change
If the battery change takes more than 1 minute the remote control may return to the Philips default settings. Therefore you have to proceed with a new setting of your remote control with the help of the table above for your non-Philips branded devices.
2 Disclaimer
All manufacturers are concerned about the constant improvement of their products. Although your remote control is compatible with most of the equipment of the following list, Philips cannot guarantee its operation with the complete range of products on the market.
16.4 Controlling your TV,Video Recorder, DVD and amplifier
Some of the functions described in the next pages may not be available or have the same behaviour for all brands of the same devices.
16.4.1 Using the remote control when the TV mode is selected
EN

text_image
Standby Standby / Power on/off Red, GREEN,YELLOW, BLUE Contextual keys in teletext CURSOR keys ▲/▼ Item selection in Menu ◄/► Change value of menu item option OK Acknowledge a selection BACK Last channel recall (Philips only) EXIT Exit, Menu off Volume +/ Volume Up/Down Mute * Sound Mute P+/P- Channel Up/Down 0-9 Channel selection I-II Audio track selection MENU Open/Close menu Movie Expand/ TV display format V-Output TV AV/Source selection16.4.2 Using the remote control when the VCR mode is selected
EN
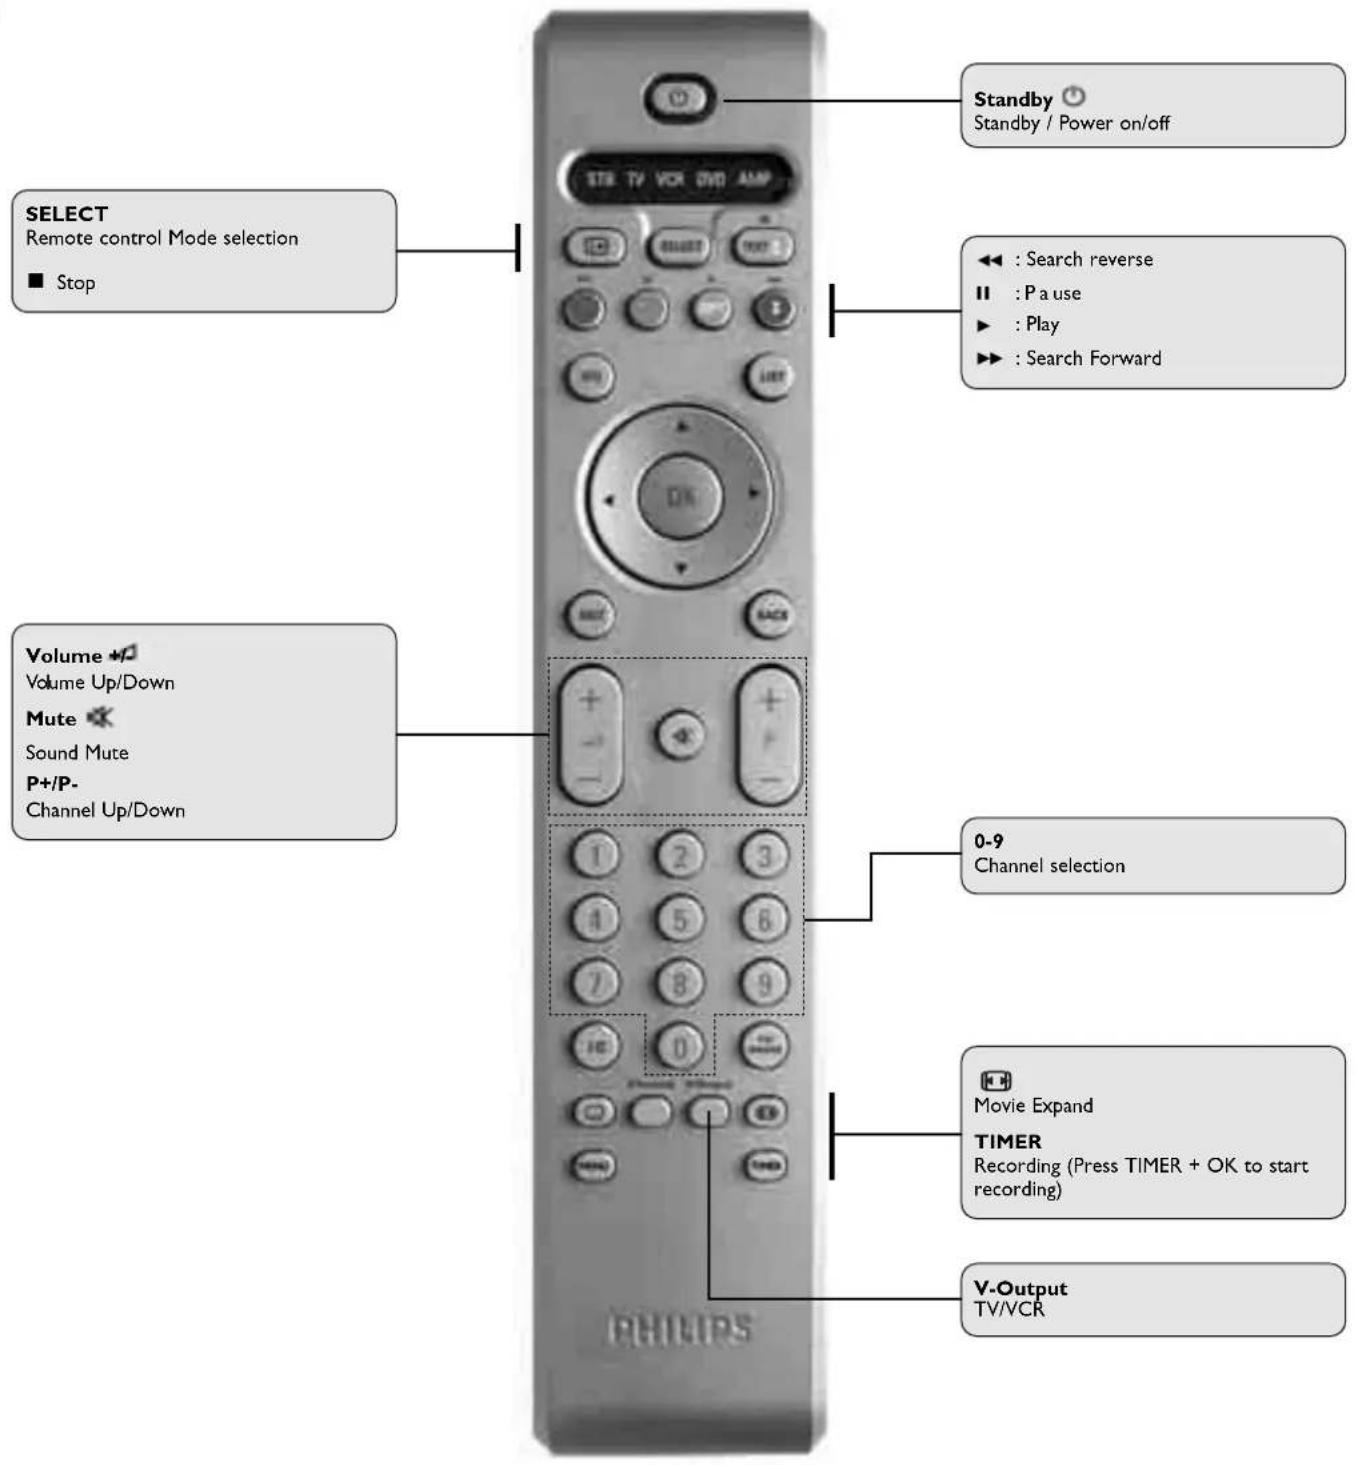
text_image
SELECT Remote control Mode selection ■ Stop Volume # Volume Up/Down Mute Sound Mute P+/P- Channel Up/Down Standby Standby / Power on/off ◀ : Search reverse II : Pa use ▶ : Play ▶ : Search Forward 0-9 Channel selection Movie Expand TIMER Recording (Press TIMER + OK to start recording) V-Output TV/VCR16.4.3 Using the remote control when the DVD mode is selected

text_image
Open/Close On Screen Display SELECT Remote control Mode selection ■ Stop CURSOR keys ▲/▼ Item selection in Menu ◀/▶ Change value of menu item option OK Acknowledge a selection EXIT Menu Off Volume ▲+/- Volume Up / Volume Down Mute ✕ Sound Mute P+/P- Skip forward - Next track / Skip reverse - previous track SUBTITLE □ Subtitle selection MENU Open/Close menu Standby ⚙ Standby / Power on/off ◀ : Search reverse II : Pause ▶ : Play ▶ : skip Forward 0-9 Direct track selection Movie Expand TIMER Recording (Press TIMER + OK to start recording) V-Output Input selection / TV-DVDEN
16.4.4 Using the remote control when the AMP mode (tuner/amplifier) is selected

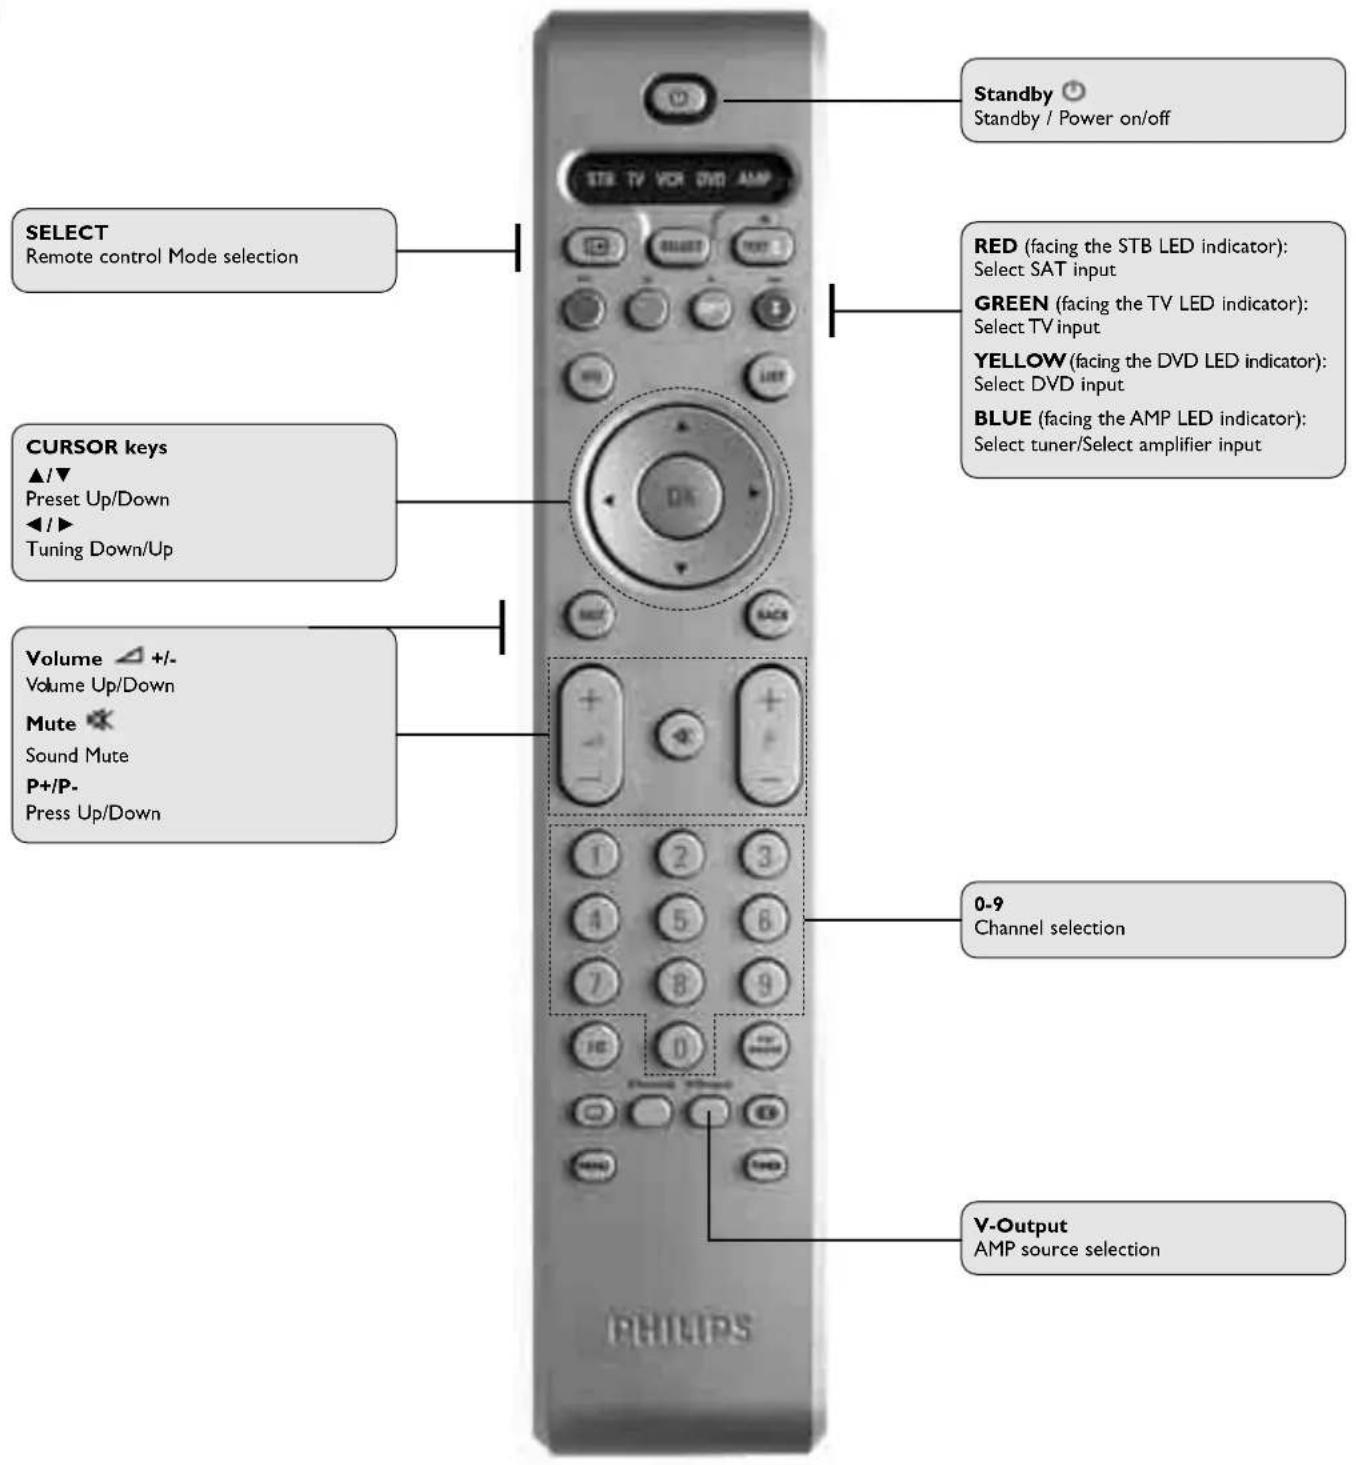
text_image
SELECT Remote control Mode selection CURSOR keys ▲/▼ Preset Up/Down ◄/► Tuning Down/Up Volume △ +/- Volume Up/Down Mute ✕ Sound Mute P+/P- Press Up/Down Standby ⚙ Standby / Power on/off RED (facing the STB LED indicator): Select SAT input GREEN (facing the TV LED indicator): Select TV input YELLOW (facing the DVD LED indicator): Select DVD input BLUE (facing the AMP LED indicator): Select tuner/Select amplifier input 0-9 Channel selection V-Output AMP source selection17 Glossary
Common interface: standardised interface enabling to use a common interface module
Common interface module: hardware unit used together with the appropriate smart card to descramble programmes from a given provider
Dolby Digital: Digital Audio Compressed (5.1 Channel)
DVI: Digital Video Interface
HD: High Definition
HDCP: High-bandwidth Digital-Content Protection
HDMI: High Definition Multimedia Interface
HDTV: High Definition TeleVision
HDTV label: indicates compliance of a receiver with the minimum requirements for HDTV
HD-Ready label: indicates compliance of a TV set with the minimum requirements for HDTV
Lip Synchronisation: setting used to synchronize sound and pictures in case a delay is experienced, in particular if the sound of speech does not match lip movements.
LNB loop-through: function allowing to by-pass the antenna RF signal to the RF output in order to feed another satellite receiver
OSD: On-Screen Display
Password: 4-digit code used to lock channels and features of the receiver
PIN-Code: 4-digit code used to prevent access to inappropriate Premiere programmes (parental control)
SD: Standard Definition
SDTV: Standard Definition TeleVision
SPDIF: Sony/Philips Digital audio InterFace
YPbPr: component video signal (Y for luminance, PbPr for colour)
SCART Loop-through: function allowing automatic signal by-pass for playback from a VCR or DVD player/recorder connected to SCART EXT2
18 Troubleshooting
Please be aware that new software may change the functionality of your receiver.
Should you experience any difficulties with the operation of the receiver, please consult the relevant section of this manual, including this Troubleshooting section. If the problem cannot be solved, call your dealer or a customer service adviser.
| Symptom Cause Remedy | ||
| The display on the front panel does not light up. | Faulty power supply | Check that the power cord is correctly connected. Disconnect this cord and reconnect it to ensure it is in place.Check that the power is available at the wall socket. |
| The welcome screen does not display at first installation. | Faulty connections | Check connections at your TV set (HDMI, DVI or YPbPr connection, and SCART connection). |
| Incorrect TV source selection | Select the appropriate TV source (refer to your TV user manual). | |
| The selected receiver output does not match the connection to your TV set. | Press V-Output once to check the current receiver output setting. If it does not correspond to the actual connection to your TV set, press V-Output repeatedly until the setting and connection match. | |
| No sound or picture but the front panel displays the time or | Receiver in Standby | Press P+, P-, TV/RADIO, or any number key. |
| No sound or picture but the front panel displays a channel number. | Poor connections | Check the connections. |
| Poor signal | Check the connections at the LNB and between the LNB and the receiver, or adjust the dish. | |
| Dish pointed incorrectly | Adjust the dish pointing. Check the signal level from the Antenna Setup menu. | |
| Poor picture | Incorrect dish pointing | Adjust the dish pointing. |
| The remote control does not operate your receiver. | Make sure the receiver is on.Make sure you are pointing the remote control at the receiver front panel.Check the batteries in your remote control. | |
| The display appears frozen and the remote control does not operate your receiver | Receiver "hanged up" or blocked | Press the button on the receiver front panel for at least 5 seconds. Your Preferences will not be lost. Release the button and wait for a stable front display indication. Alternatively, disconnect your receiver from the mains, then reconnect it and wait for a stable front display indication. You can then continue with normal operation. |
| On-screen display working but there is no reception | Poor reception/signal | Check the installation and the antenna positioning. |
| No power fed to LNB | Check the cable between the LNB and the receiver. | |
| Intermittent reception | Faulty connections | Check all connections and cable. |
| Incorrect dish pointing | Adjust the dish pointing. Fasten the antenna securely. | |
| Note 3 - Insert the smart card in the direction of the arrow with the golden chip facing up/down. | The smart card was inserted incorrectly. | Insert the smart card into the receiver as described in the user manual. |
| Sound not synchronized with pictures when using digital audio connection | You use digital audio connection option A or B as described in 7.1.3. | Change sound-pictures synchronisation (Lip Synchronisation) as described in 9.6. |
Symptom Cause Remedy
| Note 9 - Your smart card subscription is no longer active. | Your subscription has not yet been re-activated. | If you are subscribing for the first time, contact the Premiere customer service so that your subscription can be activated.To do this, insert the smart card into the digital receiver. Select a channel to which you are subscribed and wait for around 60 minutes to obtain the activation. |
| As the subscriber programme has not been watched for some time, your subscription could not be re-activated. | If you already subscribe to Premiere, insert the smart card into the digital receiver. Select a channel to which you are subscribed and wait for around 60 minutes to obtain the reactivation. | |
| Note 10 – Your smart card does not allow you to watch this programme. | Your subscription has not yet been re-activated. | If you are subscribing for the first time, contact the Premiere customer service so that your subscription can be activated.To do this, insert the smart card into the digital receiver. Select a channel to which you are subscribed and wait for around 60 minutes to obtain the activation. |
| You have not taken up a subscription to this channel. | Check that you have taken up a subscription to this channel. Otherwise, contact the Premiere hotline to subscribe to this channel. | |
| The picture is not sharp and on-screen text is difficult to read. | TV SCART output format not set to RGB | Change the setting of the TV SCART item to RGB from the System Setting menu. |
| TV SCART not connected to the RGB capable SCART socket of your TV set. | Refer to your TV User Manual. | |
| Inappropriate TV SCART | Use the SCART cable supplied with your receiver. | |
| You cannot find all the channels you think should be available. | The signal to your antenna may be weak. | Try retuning your receiver, following the relevant steps in chapter 1. If you are still missing channels, your antenna may need adjusting. |
| Your antenna may need adjusting | Call your installer. | |
| Some wireless DECT phones (handset + base station) could have a negative effect on the number of channels that you receive. | When you install your receiver, disconnect the wireless DECT phone from the mains or make sure there is a 3-5 metre distance in between the two products (handset + base station) | |
| The picture on some channels seems to have been stretched or squashed. | The broadcast is probably in wide screen and the receiver settings may not be correct. | Check the receiver “TV format” option setting, following the information in paragraph 14.5.1. If you have a wide screen TV, you may also need to check the settings on your TV. |
| Even if you use the number keys, you cannot access a particular channel. | The parental lock has been activated on this channel and a message asks for your parental code. | Enter your parental code to access the channel or remove it as a locked channel. |
| Your subscription rights do not include this channel | Select another channel. | |
| You set a timer but did not record what you wanted. | The recorder was set incorrectly. | Make sure that your recorder is set for the same time as your digital receiver. |
| The order of the channels has changed. | They have been re-arranged as described in paragraph 13.2.2. | Refer to this chapter to change the order again. |
| You have forgotten your receiver password. | From the main menu, press 5 to go to the For Parents screen.When prompted, enter the following 4-digit code: 1911.Then enter 1234 as your current password, and proceed as described in paragraph 14.4. | |
| You have forgotten your PIN code for the protection of minors. | Call the Premiere Call Centre on: 0180/512 00 00* for Germany or 01/49166 400 for Austria |
For problems that are not related to Premiere programmes or the Premiere smart card, but rather due to your receiver, call the Philips call centre on 0180/500 75 31* for Germany or 0820 400 039* for Austria.
*open 7 days from 08.00 to 23.00 - 0.12 Euros/min
19 Technical specifications
This product is in conformity with the requirements of the 95/47/EC and 2002/21/EC directives.
Decoding
- MPEG-2 (720 x 576 interlaced) DVB compliant up to MP@ HL
- MPEG-4/H.264 (1920 x1080 interlaced) DVB compliant up to HP@L4
- Video bit rate: up to 20 Mbit/sec
- Video format: 4 :3 and 16 :9
- Resolution: automatically up to 1920 x 1080 interlaced
Audio decoding
- MPEGI layer I/II
- Dolby Digital
- Multi-channel down-mixing
Ease of Installation
- Preset for 4 satellites including Astra 19.2 East satellite.
- Semi-automatic channel installation
- Automatic channel list update
- Up to 5000 system presets
- Up to 600 user presets
Ease of Use
- 13 digit multi-information display
- Channel list editing for personalized installation (delete, add, move)
- 5 TV channel lists
- 5 Radio channel lists
- Full remote control
- EPG list per channel
- Automatic recording via:
- Timer programming in EPG
- "Easy Recording" for Philips VCR and DVD-RW with:
Either "Prepare Record" Or "Record link" - Now & Next programme monitoring
- 5 in 1 multi-brand remote control
Operation/Features
- Reception of High definition and standard definition digital TV programmes
- TV & Radio modes
- Free-to-air reception
- Premiere and other Pay-TV programmes reception
- Subtitles
- Integrated Teletext decoder
- Parental lock with PIN code
- Audio mode: Mono, Stereo
- Menu-controlled installation and operation
-
8 event Timers/Reminders
-
Automatic VCR play back: Audio L/R + CVBS or RGB/Fast blanking
- Variable LNB frequency
- DiSEqC 1.0 antenna control
- RF input short circuit protection
- Software upgrade: over-the-air download
- 1 Watt consumption in "Low power" mode
- HDMI video & audio digital output
- Dolby Digital audio output
Application system resources
- Processor: 266 MHz
- SDRAM:
- for System: 64 MB
- for Audio/Video/Graphics: 64 MB
- Flash - Data/Code: 16 MB
- EEPROM: 32 kB
Satellite antenna interface
- SAT input: F type connector
- LNC supply (V): 0/14/18
- LNB current (mA): 400 max
- Tone switching: 22 kHz (on/off)
- DiSEqC: 1.0 for 4 sat. orbital positions
- RF loopthrough output: F type connector
Reception-Demodulation
- Demodulation type:
- DVB - S
- DVB - S2
- Input frequency range (MHz): 950-2150
- Input level range (dBm): -65 to -25
- Symbol rate (Mbaud) DVB-S: 2 to 30
- Symbol rate (Mbaud) DVB-S2: 2 to 30
- Satellite band coverage
- Ku band: 10.7 to 12.75 GHz
De-scrambling
- Embedded
- Type: DVB compliant
- Smart card reader: 1 for CA
- CA system: Nagravision
Note: a subscription is required to watch Premiere programmes.
-Via DVB-CI (module and card are not provided)
Connections
- HDMI
- YPbPr
- EXT1 SCART
Output: CVBS, Controlled audio L/R, RGB/FB,
Slow blanking
- EXT2 SCART
Input: CVBS, Slow blanking, Audio L/R, RGB/Fast blanking
Output: CVBS, Audio L/R, Slow blanking during timer if "Prepare Record" mode is activated
- Audio outputs:
L/R outputs: volume controlled analogue audio
DIGITAL output: Dolby Digital or PCM
SPDIF output: Dolby Digital or PCM
- Digital interfaces:
Serial: RJ 9
USB: version 2.0 host
DVB - Cl: 1 slot on the front
Card reader: 1 slot on the front
Accessories
- Remote control type RC4338
- HDMI lead
- User manual
- Worldwide Guarantee booklet
- Batteries: 2 x 1.5V type AA/R06
- Mains cord (2 m)
Miscellaneous
- Temperature range
Operating: +5 to 45 °C
Storage: -10 to +70 °C
- Mains: 230 V \~ +/-10% - 50 Hz
- Power consumption: 20 W
- Low power consumption: 1 W
- Weight: 2 kg
- Including packaging: 3.2 kg
- Dimensions:
- Product: 360 x 220 x 55 mm
- Packaging: 495 × 290 × 120 mm
Multi-language
- Menu: English, German
- User Manual: English, German

- 73/23/EEC
- 93/68/EEC
- 89/336/EEC
This product incorporates copyright protection technology that is protected by U.S. patents and other intellectual property rights. Use of this copyright protection technology must be authorized by Macrovision, and is intended for home and other limited viewing uses only unless otherwise authorized by Macrovision. Reverse engineering or disassembly is prohibited.
Due to continued product improvements, this information is subject to change without notice.
Dolby® and the double D symbol ☒ are registered trademarks of Dolby Laboratories Licensing Corporation.
Dolby Digital ^® is registered trademark of Dolby Laboratories Licensing Corporation.
HDMI, the HDMI logo and High-Definition Multimedia Interface are trademarks or registered trademarks of HDMI Licensing LLC.
Kendo 0129,0262,0274,0389,0438,0637,1464
Kennedy 0233,0462
Kennex 1064
Kingsley 0243
Kioto 0733
Kiton 0695
Kneissel 0265, 0286, 0319, 0389, 0401, 0438, 0462, 0526, 0583, 0637
Kolster 0129, 0274
Konka 0245, 0398, 0445, 0614, 0741
Kontakt 0514
Korting 0114, 0347, 0448
Koyoda 0036
Kraking0265
Kriesler 0039
KTV 0244
Kyoshu 0439, 0445
Kyoto 0190, 0243, 0244
L&S Electronic 0741, 0835
LaSAT 0513
Leader 0036
Lemair 0438
Lenco 0401
Leyco 0099, 0291, 0606
LG 0205, 0583, 0741, 0742, 1175, 1664, 0052
Liesenkotter 0039
Lifetec 0245, 0401, 0695, 0741, 1064, 1164
Local India TV 0291,0398,0629
Lodos 1064
Loewe 0114, 0319, 0539, 0543, 0660, 0682
Logik 0038, 0220, 0907
Logix 0695
Luma 0233, 0286, 0389, 0390, 1064
Lumatron 0244
Lux May 0036, 0608
Luxman 0606
Luxor 0190, 0221, 0235, 0244, 0317, 0383, 0388, 0390, 0500, 0507, 0575, 0658, 1064, 1190
M Electronic 0036, 0131, 0132, 0136, 0190, 0244, 0314, 0373, 0401, 0507
Magnadyne 0114, 0129, 0274, 0543, 0571
Magnafon 0129, 0243, 0543
Magnavox 0063,1481
Magnum0675, 0741, 0742
Manesth 0062, 0244, 0262, 0291, 0347
Manhattan 0695, 1064
Marantz 0439, 0583, 1481
Marelli 0114
Mark 0244, 0741, 0742
Master's 0526
Masuda 0036, 0245
Matsui 0036, 0038, 0062, 0063, 0099, 0204, 0222, 0235, 0244, 0262, 0362, 0382, 0390, 0398, 0460, 0470, 0482, 0514, 0543, 0571, 0583, 0606, 0656, 0741, 1064
Maxent 1782
Mediator 0039
Medion0272, 0539, 0583, 0695, 0741, 0835, 0907, 1064, 1164, 1464, 1927
Megas 0637
MEI 1064
Melectronic 0036, 0131, 0132, 0190, 0222, 0243, 0244, 0274, 0373, 0401, 0438, 0507, 0519, 0539, 0661, 0688, 0741
Memorex 0036, 0087, 0205, 1064
Memphis 0364
Mercury 0036
Metronic 0652
Metz 0114, 0302, 0394, 0415, 0474, 0562, 0614, 0695, 0773, 1190
MGA 0205
Micromaxx 0657, 0695, 0835, 1064
Microstar 0835
Minerva 0097, 0135, 0514, 0543, 0562
Minoka 0439
Mirror 1927
Mistral Electronics 0220
Mitsubishi 0063, 0114, 0120, 0135, 0205, 0539, 0562, 0583, 1064
Mivar 0243, 0244, 0317, 0318, 0319, 0543, 0636
Monaco 0036
MTC 0087, 0243, 0397, 0539
MTLogic 0741
Multibroadcast 0220
Multitec 0513, 0695, 1064
Multitech 0036, 0129, 0243, 0244, 0274, 0291, 0390, 0513
Murphy 0190, 0243
Musikland 0245, 0274
Myryad 0583
NAD 0205, 0388
Naiko 0633
Naonis 0390
NAT 0253
National 0253
NEC 0036, 0038, 0063, 0197, 0244, 0272, 0347, 0401, 0482, 0614, 0731, 0732, 1197, 1731, 1297
Neckermann 0114, 0274, 0347, 0390, 0397, 0438, 0445, 0583
NEI 0364, 0398
Neovia 0892
Nesco 0274
Network 0364
Neufunk 0245, 0583, 0637, 0741
New Tech 0244
Nicam 0571
Nicamagic 0243
Nikkai 0036, 0062, 0063, 0099, 0243, 0244, 0245, 0291, 0364
Nikko 0205
Nobliko 0097, 0129, 0243
Nokia 0190, 0235, 0347, 0366, 0373, 0388, 0401, 0500, 0507, 0575, 0633, 0637, 0658
Nordic 0244
Nordmende 0136, 0222, 0314, 0587, 0741
Novak 0039
Novatronic 0132, 0401, 0558
Oceanic 0190, 0235, 0388, 0500, 0575
Okano 0036, 0397
Omega 0291
Onimax 0741
Onwa 0129, 0245, 0398, 0460, 0608
Optimus 0193
Orion0204, 0262, 0347, 0348, 0382, 0439, 0470, 0543, 0558, 0571, 0583, 0682, 0741, 0907, 1935, 1943
Orline 0245
Ormond 0695, 1064
Orsowe 0543
Osaki 0099, 0244, 0245, 0291, 0382, 0401, 0439, 0583
Osio 0317
Oso 0245
Osume 0063, 0099, 0184, 0245
Otto Versand 0063, 0120, 0136, 0244, 0253, 0262, 0274, 0347, 0388, 0539, 0562, 0571, 0583
Pacific 0470, 0583, 0741, 1064, 1164
Pael 0243
Palladium 0274, 0390, 0397, 0438, 0445, 0657, 0682, 0741, 1164
Palsonic 0244, 0291, 0445
Panama 0244, 0274, 0291
Panasonic 0190, 0253, 0388, 0394, 0543, 0575, 0677, 0880, 1337, 1677
Panavision 0438
Pathe Cinema 0190,0243,0265,0347
Pausa 0036
Penney 0087, 0205
Perdio 0099, 0190, 0243, 0309, 0347
Philco 0114, 0274, 0397, 0445
Philex 0220
Philips 0036, 0039, 0114, 0220, 0265, 0388, 0401, 0450, 0583, 0632, 0799, 1783, 1481
Phoenix 0114, 0243, 0347, 0513
Phonola 0039, 0114, 0220, 0243
Pilot 0733
Pioneer 0136, 0190, 0193, 0314, 0388, 0450, 0513, 0539, 0787
Pionier 0513
Plantron 0036
Playsonic 0244, 0366, 0741, 0742
Portland 0401
Powerpoint 0514
Prandoni-Prince 0388, 0390, 0543
Prima 0291, 0439
Prinston 1064
Prinz 0221, 0388, 0571
Profex 0036, 0190, 0388, 0390
Profi 0036
Profitronic 0129
Proline 0099, 0348, 0438, 0648, 0652, 0657, 0661, 1064
Prosonic 0244, 0606, 0695, 0741
Protech 0036, 0129, 0244, 0274, 0291, 0364, 0445, 0513, 0695, 1064
Proton 0205
ProVision 0583, 0741
Pye 0039, 0114, 0401, 0583
Quadral 0245
Quasar 0036, 0274, 0892
Quelle 0038, 0097, 0131, 0388, 0539, 0562, 0571, 0695, 1064
Questa 0063
Radialva 0245, 0364
Radiola 0039, 0244, 0583
Radiomarelli 0114, 0543
RadioShack 0205
Radiotone 0036, 0291, 0439, 0606, 0675, 0695, 1064
Rank Arena 0063
RBM 0097
RCA 0120, 0652, 1481
Rediffusion 0063, 0373, 0388, 0575
Reflex 0695, 1064
Relisys 0892
Reoc 0741
Rex 0190, 0233, 0286, 0291, 0390, 0438
RFT 0099, 0114, 0291
Roadstar 0036, 0245, 0291, 0309, 0445, 0695, 0741, 1064, 1927
Robotron 0114
Royal Lux 0362, 0439
Saba 0114, 0136, 0190, 0314, 0362, 0388, 0525, 0543, 0575, 0587, 0652, 0741
Saccs 0265
Sagem 0482, 0637
Saisho 0036, 0038, 0204, 0244, 0262, 0291, 0543, 0571
Saivod 0695, 1064, 1190
Sakai 0190
Salora 0190, 0221, 0235, 0317, 0383, 0388, 0390, 0507,
0543, 0575, 0648, 0658
Salsa 0362
Sambers 0129, 0543
Sampo 1782
Samsung 0036, 0087, 0099, 0190, 0205, 0235, 0243, 0244, 0291, 0317, 0397, 0509, 0583, 0614, 0645, 0671, 0709, 0745, 0839
Sandra 0243, 0244
Sansui 0682, 0733, 1564
Santon0036
Sanyo 0038, 0063, 0072, 0099, 0131, 0135, 0184, 0197,
0235, 0243, 0244, 0366, 0397, 0571, 0582, 0731
SBR 0039, 0220, 0583
Schaub Lorenz 0388, 0401, 0513, 0575, 0633, 0741
Schneider 0039, 0097, 0190, 0244, 0245, 0274, 0286, 0379, 0388, 0398, 0421, 0571, 0583, 0675, 0695, 0741, 1064, 1164
Scotch 0205
Scotland 0190
Sears 0205
Seaway 0661
Seelver 1064
0036, 0063, 0129, 0243, 0244, 0245, 0291, 0389,
0514, 0661, 0695, 1064, 1190, 1464
SEI 0114, 0129, 0204, 0233, 0543, 0571
Sei-Sinudyne 0114, 0129, 0233, 0543, 0571
Seleco 0190, 0233, 0286, 0291, 0373, 0389, 0390, 0398, 0438, 0462
Sencora 0036
Sentra 0062
Serino 0120, 0482, 0637
Sharp 0063, 0120, 0184, 0220, 0283, 0518, 0543, 0845, 1190, 1220
Shivaki 0470
Siarem0114, 0129, 0543
Siemens 0184, 0222, 0562
Siera 0039, 0583
Siesta 0397
Silva 0243, 0388, 0675
Silver 0063, 0388, 0742
SilverCrest 1064
Singer 0036, 0114, 0129, 0362, 0460, 0462, 1564
Sinudyne 0114, 0129, 0204, 0233, 0262, 0543, 0571
Skantic 0383
SKY 0907
Sliding0892, 0907
SLX 0695
Smaragd 0514
Soemtron0892
Solavox 0099, 0190, 0388, 0575
Sonawa 0245
Sonitron0235, 0244, 0366, 0397
Sonoko 0036, 0309
Sonolor 0190, 0235, 0309, 0388, 0575
Sontec 0036, 0397
Sony 0038, 0063, 0120, 0129, 0184, 0197, 0380, 0861, 1532, 1678
Sound&Vision0129, 0401
Soundesign0205
Soundwave 0347, 0445, 0742
Spectra 0036
Ssangyong0036
Standard 0036, 0244, 0245, 0347, 0401, 1064
Starlite 0036, 0291
Stenway 0245, 0309
Stern 0190, 0233, 0286, 0390, 0438
Strato 0036, 0291
Strong 1190
Sunkai 0348, 0382, 0482, 0514, 0637, 0892
Sunstar 0036, 0291, 0398, 0606
Superla 0543
SuperTech 0036, 0243, 0245
Supra 0036
Susumu 0245, 0314, 0362
SVA 0614, 0892
Swissline 0274
Sytong 0243
T+A 0474
Tandberg 0394
Tandy 0099, 0120, 0190, 0244, 0245
Tashiko 0063, 0190, 0243, 0244, 0390
Tatung 0038, 0099, 0244, 0543, 0648, 0656, 1783
TCL 1564
TCM 0741,0835
Teac 0036, 0197, 0205, 0291, 0482, 0539, 0695, 0782, 1751
Tec 0036, 0244, 0274, 0286, 0364
Tech Line 0695,1464
Technema 0347
Technics 0583, 0677
TechniSat 0583, 0682
Technisson 0741
Technosonic 0583
Techwood 1190
Tecnimagen 0583
Tedelex 0036,0244,1564
Telecor 0421
Telefunken 0100, 0136, 0314, 0362, 0373, 0513, 0525, 0587,
0652, 0741
Telemeister 0347
Telestar 0583, 0606
Teletech 0036, 0364, 0695, 1064
Teleton0063, 0233, 0244, 0286, 0390
Televideon 0243, 0347
Tempest 0036
Tensai 0036, 0131, 0132, 0244, 0245, 0274, 0347, 0398,
0401, 0404, 0742, 1064
Tenson 0036,0347
Tevion 0583, 0675, 0695, 0741, 0835, 1064, 1164
Texet 0036, 0243, 0244, 0245, 0401
Thomson 0136, 0314, 0362, 0587, 0652
Thorn0062, 0063, 0099, 0100, 0131, 0136, 0220, 0265,
0362, 0388, 0526, 0539, 0562
Thorn-Ferguson 0100, 0220, 0265, 0526
TMK 0205
Tokai 0036, 0190, 0364, 0401, 0695, 1064
Tokaido 1064
Tokyo 0062
Tomashi 0245,0309
Toshiba 0062, 0063, 0087, 0097, 0129, 0136, 0222, 0535,
0645, 0677, 0741, 0745, 1190, 1535
Towada 0244
Trans Continens 0244, 0695, 1064
TRANS-continents 0648, 0892
Transonic 0036
Trical 0184
Trident 0543
Tristar 0220, 0245
Triumph 0204, 0373, 0543, 0583
Tsoschi 0309
TVTEXT 95 0583
Uher 0233, 0347, 0401, 0445, 0507, 0513
Ultravox 0114, 0129, 0243, 0274
Unic Line 0482
United 0741, 0742, 1064,
Universum 0036, 0038, 0063, 0097, 0131, 0132, 0184, 0197,
0204, 0244, 0274, 0291, 0317, 0373, 0388, 0389,
0397, 0438, 0445, 0448, 0500, 0507, 0519, 0539,
0562, 0571, 0645, 0658, 0695, 1064, 1190, 1464
Univox 0114,0190,0364
V2max 0892
V7 Videoseven 1782
V7Videoseven 0907
Vestel 0244, 0583, 0695, 1064, 1190
Videocon 0535
Videologic 0243,0245
Videologique 0245
Videosat 0274
Videotechnic 0244,0347
Videoton 0383
Vidtech 0205
Viewsonic 1782, 0751
Vision 0244, 0347
Vistar 0233
Voxson 0114, 0190, 0390, 0445
Waltham 0136, 0190, 0244, 0383, 0445, 0470, 0695, 1064
Wards 0087, 0193, 0205
Watson 0036, 0245, 0347, 0421, 0606, 0695, 1064, 1464
Watt Radio 0129, 0243, 0571
Wega 0063,0114
Welltech 0741
Weltblick 0244, 0347
Westinghouse 0917
Wharfedale 0583
White Westinghouse 0243, 0347, 0364
Windsor 1064
Windstar 0309,0364
Windy Sam 0583
World-of-Vision 0892, 0907, 0917
Xenius 0661, 0688
Yamaha 0677, 1603
Yamishi 0244, 0309, 0482
Yoko 0036, 0243, 0244, 0245, 0274, 0291, 0366, 0448
Zanela 0265
Zanussi 0233, 0291, 0390
Zenor 0366
Setup Code For All VCRs (V)
Accent 0099
Adyson0099
Aiwa 0027, 0059, 0064, 0334, 0375, 0379, 0769, 1164
Akai 0047, 0068, 0133, 0267, 0342, 0375, 0379, 0669
Akiba 0099
Akura 0099
Alba 0027,0047,0099,0108,0305,0342,0375,0379
Allstar 0108
Ambassador 0047
Amstrad 0027, 0099, 0305
| Anam0064, 0253, 0267 | |
| Anam National 0253 | |
| Anitech 0099 | |
| Ansonic 0027 | |
| Aristona 0108, 0173 | |
| ASA 0064, 0108 | |
| Asuka 0064, 0065 | |
| Audiosonic 0305 | |
| Audioton0047 | |
| Audiovox 0808 | |
| AVP 0027, 0379 | |
| Awa 0070 | |
| Baird 0027, 0068, 0131, 0133 | |
| Bang&Olufsen0526 | |
| Basic Line | 0047, 0099, 0131, 0305 |
| Beko | 0131 |
| Bell&Howell | 0131 |
| Bestar | 0305 |
| Black Diamond | 0669 |
| Black Panther | 0305 |
| Blaupunkt | 0061, 0108, 0253 |
| Blue Sky | 0064, 0099, 0305, 0375, 0379, 0507, 0669, 1164 |
| Bondstec | 0047, 0099 |
| Brandt | 0068, 0347, 0348 |
| Brandt Electronique | 0068 |
| Brinkmann | 0375 |
| Bush | 0027, 0099, 0108, 0305, 0342, 0375, 0379, 0669, 0769 |
| Carrefour | 0072 |
| Carver | 0108 |
| Casio | 0027 |
| Cathay | 0305 |
| Catron | 0047 |
| CGE | 0027 |
| Cimline 0099 | |
| Citizen | 0064, 0305 |
| Clatronic | 0027, 0047, 0099 |
| Colt 0099 | |
| Combitech | 0379 |
| Condor | 0047, 0305 |
| Craig | 0064, 0074, 0099, 0267 |
| Crown | 0047, 0064, 0099, 0305, 0507 |
| Cyrus 0108 | |
| Daewoo | 0047, 0072, 0305, 0379, 0664, 0669, 0871 |
| Dansai | 0099, 0305 |
| Dantax | 0379 |
| Daytron | 0047 |
| De Graaf | 0069, 0075, 0108, 0131, 0193 |
| Decca | 0027, 0094, 0108, 0379 |
| Deitron | 0305 |
| Denko | 0099 |
| Denon | 0069 |
| Diamant | 0064 |
| Dual | 0027, 0068, 0108, 0305, 0375 |
| Dumont | 0027, 0108, 0131 |
| Elbe 0065, 0305 | |
| Elcatech | 0099 |
| Elin | 0267 |
| Elsay | 0099 |
| Elta | 0099, 0305 |
| Emerson | 0027, 0064, 0070, 0072, 0099, 0305, 0620, 0664 |
| ESC | 0047, 0267, 0305 |
| Europhon | 0047 |
| Fast | 0924 |
| Fenner | 0047 |
| Ferguson | 0027, 0068, 0305, 0347, 0348 |
| Fidelity | 0027, 0099, 0267, 0379, 0459 |
| Finlandia 0027, 0064, 0069, 0070, 0075, 0108, 0131, 0133, 0193, 0253, 0411 | |
| Finlux | 0027, 0069, 0108, 0131 |
| Firstline | 0064, 0070, 0072, 0099, 0305, 0375, 0507, 1164 |
| Fisher 0047, 0074, 0131 | |
| Flint | 0375 |
| Frontech | 0047, 0099 |
| Funai 0027, 0620 | |
| Galaxis | 0305 |
| Garrard 0027 | |
| GE | 0075, 0267, 0347 |
| GEC | 0108 |
| General 0047 | |
| General Technic | 0375 |
| Genexxa | 0131 |
| Go Video 0459, 0647, 1164 | |
| GoldHand | 0099 |
| GoldStar | 0064, 0507, 1164 |
| Goodmans | 0027, 0047, 0064, 0099, 0108, 0305, 0375, 0379, 0664, 0669, 0769 |
| GPX | 0064 |
| Gradiente | 0027 |
| Graetz | 0068, 0131, 0267 |
| Granada | 0027, 0064, 0069, 0075, 0108, 0131, 0253, 0267 |
| Grandin0027, 0064, 0099, 0305, 0769 | |
| Grundig0061, 0099, 0108, 0253, 0347, 0374, 0375, 0376, 0379, 0769 | |
| Hanimex | 0379 |
| Hanseatic | 0064, 0065, 0108 |
| Hantor | 0047 |
| Harley Davidson | 0027 |
| Harman/Kardon | 0065 |
| Harwood 0099 | |
| HCM | 0099 |
| Hinari | 0068, 0099, 0267, 0305, 0379 |
| Hisawa | 0379 |
| Hischito | 0072 |
| Hitachi | 0027, 0068, 0069, 0108, 0193, 0267, 0620 |
| Hoheher 0305, 0669 | |
| Hornyphon | 0108 |
| Hypson | 0027, 0064, 0099, 0305, 0507 |
| Imperial 0027 | |
| Ingersoll | 0267 |
| Inno Hit | 0099 |
| Interbuy | 0099 |
| Interfunk | 0108, 0131 |
| Internal | 0305, 0664 |
| International | 0064, 0305, 0669 |
| Intervision | 0027, 0305 |
| Irradio | 0099, 0108 |
| ITT | 0068, 0131, 0133, 0267, 0411 |
| ITT Nokia | 0579 |
| ITV | 0047, 0064, 0305 |
| ITV Videomaster | 0047 |
| JBL | 0305 |
| Jensen | 0068 |
| JMB | 0375, 0379, 0769 |
| Joyce 0027 | |
| JVC | 0068, 0094, 0411 |
| Kaisui | 0099 |
| Kambrook | 0064 |
| Karcher 0108, 0305, 0669 | |
| KEC | 0064, 0305 |
| Kendo | 0099, 0133, 0305, 0342, 0375, 0669 |
| Kenwood | 0065, 0068, 0094 |
| Kimari | 0074 |
| Kneissel | 0064, 0305, 0375, 0379 |
| Korpel | 0099 |
| Kuba Electronic | 0074 |
| Kyoto 0099 | |
| Lenco | 0305 |
| Leyco | 0099 |
| LG | 0064, 0507, 1164 |
| Lifetec | 0375 |
| Lloyd's | 0027 |
| Loewe | 0064, 0108, 1589 |
| Logik | 0099, 0133, 0267 |
Lumatron0620, 1164
Lunatron1164
Lux May 0099
Luxor 0070, 0074, 0075, 0131, 0133, 0342
LXI 0064
M Electronic 0027, 0065
Magnasonic 0305, 0620
Magnavox 0027, 0108, 0669
Magnin0267
Magnum0669
Manesth 0072, 0099, 0108
Marantz 0065, 0108, 0173
Mark 0027, 0305
Mastec 0669
Master's 0305
Matsui 0267, 0375, 0379, 0769
Medion0375, 0379, 0669
Melectronic 0027, 0064, 0065
Memorex 0027, 0064, 0075, 0131, 0267, 0375
Memphis 0099
Metronic 0108
Metz 0064, 0108, 0253, 0374, 0863, 0864, 1589
MGA 0070,0267
Micormay 0375
Minolta 0069
Mitsubishi 0070, 0075, 0094, 0108, 0507, 0669
MTC 0027, 0267
Multitec 0064
Multitech 0027, 0047, 0099
Murphy 0027
Myryad 0108
NAD 0131
Naiko 0375, 0669
National 0253
NEC 0064, 0065, 0068, 0094, 0131, 0305
Neckermann 0108
Nesco 0099
Nikkai 0047, 0099, 0305
Nikko 0064
Nokia 0068, 0069, 0075, 0108, 0131, 0133, 0267, 0305,
0342, 0579
Nordmende 0068, 0094, 0347, 0348, 0411, 0521
Oceanic 0027, 0068, 0075, 0108, 0131, 0133
Okano 0099, 0305, 0342, 0375
Onimax 0669
Optimus 0064, 0075, 0131, 0459, 0620
Orbit 0099
Orion 0375, 0376, 0379, 0769
Osaki 0027, 0064, 0099
Osume 0099
Otto Versand 0108
Pace 0379
Pacific 0027, 0375, 0669, 0769
Palladium 0064, 0068, 0099, 0375
Palsonic 0027, 0099, 0669
Panasonic 0253, 0863, 0864, 1589
Pathe Cinema 0070
Pathe Marconi 0068
Penney 0064, 0065, 0069, 0267
Pentax 0069
Perdio 0027
Philco 0065, 0099
Philips 0108, 0173, 0411, 0620, 1296
Phoenix 0305
Phonola 0108
Pilot 0064
Pioneer 0069, 0094, 0108, 1830
Portland 0047, 0305, 0664
Prinz 0027
Profitronic 0108, 0267
Proline 0027, 0305, 0347, 0669
Prosc0 0871
Prosonic 0305
Protech 0108
ProVision 0305
Pye 0108
Quasar 0305
Quelle 0108
Radialva 0064, 0075
Radiola 0108
Radionette 0064, 1164
RadioShack 0027, 0064
Rank Arena 0068
RCA 0069, 0075, 0267, 0347
Realistic 0027, 0064, 0074, 0075, 0131
Reoc 0375
Rex 0068, 0411
RFT 0099
Ricoh 0061
Roadstar 0064, 0099, 0108, 0267, 0305, 0769
Royal 0099
Saba 0068, 0305, 0347, 0348, 0411, 0521
Saisho 0375
Salora 0070, 0131, 0133
Samsung 0072, 0267, 0459, 0647
Samurai 0047
Sansui 0027, 0068, 0094, 0099, 0133
Sanyo 0074, 0075, 0094, 0131, 0267, 1164
Saville 0267, 0305, 0379
SBR 0108, 0173
Schaub Lorenz 0027, 0068, 0131, 0133, 0342, 0375
Schneider 0027, 0064, 0069, 0099, 0108, 0173, 0267, 0305,
0375, 0379, 0669, 0924
Scott 0070
Sears 0027, 0064, 0069, 0074, 0131
Seaway 0305
SEG 0099, 0108, 0267, 0305, 0664, 0669
SEI 0108
Seleco 0047, 0064, 0068, 0411
Semp 0072
Sentra 0047, 0099
Sharp 0064, 0075, 0596
Shintom 0099, 0131
Shivaki 0064
Siemens 0064, 0108, 0131, 0173, 0347, 0374
Siera 0108
Silva 0064
Silver 0305
Singer 0072
Sinudyne 0108, 0379
Smaragd 0375
Solavox 0047
Sonneclair 0099
Sontec 0064
Sonwa 0669
Sony 0027, 0059, 0061, 0133, 1059
Soundwave 0064, 0375
Ssangyong 0099
Stern 0305
Sunkai 0305, 0375
Sunstar 0027
Suntronic 0027
Sunwood 0099
Supra 0064
Sylvania 0070, 0108
Symphonic 0027, 0620
Tandberg 0305
Tandy 0027,0131
Tashiko 0027, 0064, 0075, 0108, 0267
Tatung 0027, 0068, 0070, 0075, 0108, 0375, 0379
Tchibo 0375
TCM 0375
Teac 0027, 0064, 0068, 0334, 0664, 0669, 0871, 0808
Tec 0047,0099
Tech Line 0099
Technics 0108, 0253
Tedelex 0669
Teknika 0027, 0064
Teleavia 0068
Telefunken0068, 0305, 0347, 0348, 0411, 0521, 0669
Telerent 0253
Teletech 0027, 0099, 0305
Tempest 0047
Tenosal 0099
Tensai 0027, 0099, 0305
Tevion0375, 0669
Texet 0047, 0305
Thomas 0027
Thomson0068, 0094, 0305, 0347, 0348, 0411, 0521, 0749
Thorn 0064, 0068, 0131
Tivo 0749
Tokai 0064,0099
Topline 0375
Toshiba 0068, 0070, 0072, 0108, 0379, 0411, 0459, 0769
Totevision 0064
Towada 0099
Tradex 0108
Uher 0267
Ultravox 0305
Unitech 0267
United 0375,0769
Universum 0027, 0064, 0108, 0131, 0133, 0267, 0375, 1164
Victor 0094
Video Concepts 0072
Video Technic 0027
Videomagic 0064
Videosonic 0267
Villain 0027
Wards 0027, 0065, 0069, 0072, 0074, 0075, 0099, 0108, 0267
Watson 0108, 0379, 0669
Wharfedale 0620
White Westinghouse 0099, 0305
World 0375
Yamaha 0065
Yamishi 0099, 0305
Yokan0099
Yoko 0047, 0064, 0267
Zenith 0027, 0061, 0664
ZX 0375,0379
Denon0517, 0661, 1661
Denver 0726, 0805, 0815, 0925, 1110, 1131, 1950
Desay 0870, 1117
Diamond 0678
Digatron1036
Digihome 0740
Digital i 0920
Digitrex 1942
Digix Media 0853
DiK 0858
Dinamic 0815
DiViDo 0732
DK Digital 0858, 0867, 1281, 2034
DMTech 0810, 1124, 2073
Dragon 0858
DreamX 1178
DSE 1757
DTS 0826
Dual 0678, 0692, 0740, 0757, 0806, 0810, 0817, 0858, 2034, 2073
Durabrand 0740, 0858, 1030, 1154
Easy Home 0884
eBench 1179
ECC 0757
Eclipse 0750, 0778
Elfunk 0877
Elin 0797
Ellion 0877
Elta 0699, 0717, 0797, 0815, 0877, 1142, 1178, 2018
Eltax 0793, 1119, 1123, 2014
Emerson0618, 0732
Encore 0725
Enterprise 0618
Enzer 0728, 1255
EuroLine 0815, 1110, 1142, 1260, 2048
Fenner 0678, 1056
Ferguson 0678,0925
Finlux 0618, 0699, 0768, 0778, 0797, 0810, 1174
Fintec 0811, 1196
Firstline 0740, 0826, 0870, 0896
Fisher 0697
Fujilink 0882
Funai 0702, 0722
Fusion 0889
Futronic 1960
Gateway 1185
GE 0744
Giec 1248
Global Solutions 0795
Global Sphere 1179
Go Video 0810,0896,1126,1997
GoldStar 0618, 0768
Goodmans 0678, 0717, 0740, 0750, 0757, 0810, 0817, 0860,
0906, 1031, 1167, 1248, 1281, 2034, 2041
GPX 0726, 0796
Graetz 0692
Gran Prix 0858, 0925
Grandin 0740, 0743, 1260, 1281
Greenhill 0744
Grundig 0566, 0578, 0678, 0697, 0713, 0722, 0728, 0732, 0740, 0802, 0817, 1031, 1063, 1722, 1757, 1947, 2073
Grunkel 0797, 1183
GVG 1196
H&B 0845, 0868, 0877, 1260, 1262
H&B 0740, 0845, 0868, 0877, 1260, 1262
Hanseatic 0768, 0810, 0817, 1180
Harman/Kardon 0729
Haus 0813, 0876
HCM 0815
HDT 0732
HE 1190
Henss 0740
Himage 0545, 0852, 1187
HiMAX 0870, 1133
Hiper 1275
Hitachi 0600, 0691, 0740, 1946, 1947, 2021
Hiteker 0699, 1184
Hoeher 0678, 0740, 0853, 0858, 1251
Home Electronics 0757
Home Tech Industries 1251
Hoyo 0770
Humax 0673
Hypson0700
Hyundai 0793, 0877, 1045, 1183
ICP 1180
IISonic 1188, 1291
Ingelen0815
InterAct 0724
IRT 0810
ISP 0722
Jamo 2030
Jaton 0692
JBL 1948, 2005
JDB 0757
Jeken 0726
Jepssen1277
Jeutech 0804
JMB 0722
Jocel 0807
JVC 0530, 0566, 0650, 0894, 1191, 1928, 1967
jWin 1078
Kansas Technologies 1260
Karcher 0810
KCL 1115
Kendo 0726, 0740, 0858
Kennex 0740, 0797, 0867, 0925
Kenwood 0517, 0561, 0764, 1090
Kiiro 0797, 0880
King DHome 0826
Kingavon 0845
Kiss 0692, 0868, 2030
Koda 1257
Kotron0878
KXD 0884
Labway 0558, 0736
Lasonic 0770
Lawson 0743, 0795
Lecson0723, 0774
Lenco 0678, 0726, 0740, 0797, 0805, 1056
Lenoxx 1965, 2041, 1154
Lenoxx Sound 1965, 2041
Lexia 0726, 0795
LG 0618, 0768, 0817, 0896, 1933, 2010, 2029
Lifetec 0678, 0858
Limit 0743, 0795, 1131
Linn 1954
LiteOn1085, 1185, 1188
Lodos 0740
Loewe 0566, 0768, 0912
Logix 0732, 0810, 1128
Lumatron 0722, 0732, 0751, 0768, 0860, 1124, 1142
Lunatron0768
Luxman 0600, 1118
Luxor 0740, 1031, 1722, 1757
Magnat 1950, 2046, 2073
Magnavox 0530, 0566, 0702, 0740, 1167
Magnex 0750
Magnum2041
Manhattan0732, 0740
Marantz 0566
Maraton1184
Mark 0740, 0751
Marquant 0797
Mastec 1248
Matsui 0678, 0699, 0722, 0740, 1031, 1722, 1757
Maxim0740, 0899
MBO 0717, 0757, 1056, 1757, 1944
MDS 0740, 0805
Mecotek 0797
Mediencom 0773, 0880
Medion 0657, 0678, 0743, 0810, 0858, 0906, 2034, 2039
MEI 0817
Memorex 0858
Memory 1110
Metronic 0717
Metz 0552, 0598, 0740
MiCO 0750, 0778, 1206, 1248, 1250, 1281
Microboss 0745
Micromaxx 1722, 2034
Micromedia 0530, 0566
Micromega 0566
Microsoft 0549
Microstar 0858
Minato 0779
Minax 0740
Minerva 0732
Minix 1140
Minoka 0797
Minowa 0739
Mirror 0779, 0906
Mitsubishi 0740
Mizuda 0797, 0845
Monyka 0692
MP man1046
MPX 0870
MTLogic 1292
Mustek 0757, 1757, 1944
MW 1173
Mx Onda 0678, 0778, 1206, 1250, 1281, 2007
Myryad 1280, 1281
Mystral 1183
NAD 0719, 0731, 0768
Naiko 0797, 1031
Nakamichi 1226, 1249
Neufunk 0692
Nevir 0797, 0858, 1224
NFREN 0853
NiC 1150
Nikenny 1291
Nikkai 1950
Nintaus 0820, 1078
Nordmende 0858
Noriko 0779
Okano 0779
Olidata 0699
Onkyo 0530, 0654, 1639, 2012
Oopla 1185
Optim0774, 0870
Optimus 0552
Orava 0845
Orbit 0899
Orion 0722, 1033, 1260, 1722
Oritron 0678
Ormond 0740
P&B 0845
Pacific 0722, 0740, 0786, 0795, 0817, 0858
Packard Bell 0858
Palladium 0722, 0806, 1933, 1947, 1956
Panasonic 0517, 1037, 1932, 1935
Panda 0744, 0816
Paramount Pictures 0806
peeKTon 0925, 1067, 1251, 2026
Philco 0717, 0760, 0815
Philips 0530, 0566, 0673, 0702, 1185, 1839, 1840, 1938
Phonotrend 0726
Pioneer 0552, 0598, 0658, 1838, 1927, 1992
Playgo 1292
Plu2 0877,1117
Pointer 0811
Powerpoint 0880, 0899
Prima 0793
Prima Electronic 0793
Primare 0913
Prinz 0858
Prism 0732, 1033, 1180
Prodisma 0880
Proline 0678, 0699, 0713, 0737, 0860, 1031, 1942
Proscan 0549
Proson0740
Prosonic 0779
ProVision 0726, 1190
Radionette 0768, 0896, 1933
Raite 0692
RCA 0549
REALmagic 0701
REC 0517, 0716, 0773, 0793
Red Star 0775, 0786, 0790, 0797, 0815, 0832, 0833, 0925,
1030, 1067, 1950, 2026
Redstar 0775, 0790, 0832, 0925, 2026
Reoc 0779, 0795
Revoy 0726, 0868
Rimax 1263
Roadstar 0716, 0717, 0726, 0740, 0757, 0845, 0860, 0906,
0925, 1033, 1078, 2041
Ronin 0737,0899
Rotel 0650, 1205
Rowa 0543, 0744, 0899
Rownsonic 0816
Saba 0578, 0678, 0796
Saivod 0786, 0858
Salora 0768
Sampo 0725, 0779
Samsung 0517, 0600, 0771, 1102, 1955, 1959, 2035, 0847
Sansui 0722, 0778, 0795, 1180, 1257, 2048
Santosh 1142
Sanyo 0697, 0740, 0900, 1946
SAST 0833
Scan 0732, 0862, 0877
ScanMagic 0757
ScanSonic 1722
Schaub Lorenz 0797, 0815, 1142, 1178, 1262
Schneider 0566, 0678, 0732, 0740, 0806, 0810, 0815, 0817,
0858, 1128, 1180
Schwaiger 0779
Scientific Labs 0795
Scott 0678, 0699, 0745, 0807, 0880, 0908, 1032, 1063,
1260, 1278
Seeltech 1251
SEG 0692, 0740, 0790, 0795, 0899, 1945, 2021
Shanghai 0699
Sharp 0657, 0740, 0779, 2042
Sherman1960
Sherwood 0660, 0744, 0768, 1104
Shinco 0744
Sigma Designs 0701
Sigmatek 1251
Siltex 1251
Silva 0815, 0925
Silva Schneider 0858, 0925, 1174, 2010
Sinudyne 1248
Skantic 0566, 0740, 1030
SKY 2007
Skymaster 0757, 0795
Skyworth 0793, 0925
Sliding1142
SM Electronic 0717, 0757, 0795, 1179
Smart 0732, 0740, 0745
Sogo 0880
Sonic Blue 0810, 1997
Sony 0560, 0600, 0799, 0891, 1097, 1122, 1160, 1560, 1660, 1930, 2008
Sound Color 1260
Sound Lab 1125
Soundmaster 0795
Soundwave 0810
Standard 0678, 0795, 0815, 0858, 0925
Star Cluster 1179
Star Clusters 1254
Starlogic 1032
Starmedia 0845, 0908, 1032, 1045, 1251
Strong 0740
Sunkai 0797, 0877
Sunstech 0858
Sunwood 0815, 0925
Superb 0882
Super Digital 1214
Supervision 0795, 1179
SVA 0699,0887
Sylvania 0702
Symphonic 0702
Synn 0795
Tandberg 0740, 1722, 2021
Tangent 2014
Targa 1254
Tatung 0797,0798
Teac 0719, 0722, 0744, 0768, 0786, 0795, 0817, 1254, 1957, 1962, 2011
Tec 0925
Technica 1124, 1722
Technics 0517, 1932
Technika 0797, 0858, 1124, 1142
Technisson 1142
Technosonic 1078, 1142
Techwood 0719, 0740
Tedelex 1255, 2048
Teletech 0740, 0795
Tensai 0678,0717,0797
TerraTec 0852
Tevion 0678, 0860, 0925, 1063, 1197, 1254, 1950, 1956, 2041
Theta Digital 0598
Thomson0549, 0578
Thule Audio 1034
Tokai 0692, 0725, 0811, 0815, 0817, 0925
Tokiwa 0743
Tom-Tec 0816
Top Suxess 1251
Toshiba 0530, 0722, 1072, 2033
Trans Continens 0853
TRANS-continents 0853, 0858, 0899
Tredex 0826, 0870
Truvox 1129
TSM 1251
Umax 0558, 0717, 1178
United 0699, 0722, 0815, 0853, 1110, 1124, 1142, 1255
Universal 1183
Universum 0618, 0740, 0768, 0806, 0817, 0896, 1254, 1940, 1945, 1956
Uptek 0790
upXus 1307
Venturer 0817
Vestel 0740, 2021
Vieta 0732, 1292
Viewmaster 1111, 1165
Voxson 0757, 0858
Vtrek 0909, 1255
Waitec 1178, 1251, 1944
Walkvision 0744
Welkin0858
Wellington 0740
Welltech 1248
Weltstar 0740
Wesder 0726
Wharfedale 0713, 0723, 0725, 0778, 0779, 0817
Wilson 0858,1260
Windsor 0740
Windy Sam 0600
Woxter 0908, 1032, 1178, 1251
Xbox 0549,1173
Xenius 0817
XLogic 0795
XMS 1215, 1349
Xoro 0833, 0856, 1106, 1210, 1248, 1275, 1276, 1277, 1278, 2009
Xwave 0558,0736
Yakumo 1031, 1083
Yamada 0899, 1031, 1083, 1178, 1185
Yamaha 0517, 0566, 0673
Yamakawa 0692, 0737, 0792, 0899, 1131
Yelo 0807
Yukai 0757,1757,1944
Zenith 0530, 0618
Zenix 0876
Zennox 1292
Zoece 1292

text_image
PHILIPS
Specifications are subject to change without notice.
Trademarks are the property of Koninklijke Philips Electronics N.V. or their respective owners.
2005 © Koninklijke Philips Electronics N.V. All rights reserved.
www.philips.com
3111 176 52727