
RK60358DW - Fridge GORENJE - Free user manual and instructions
Find the device manual for free RK60358DW GORENJE in PDF.


User questions about RK60358DW GORENJE
0 question about this device. Answer the ones you know or ask your own.
Ask a new question about this device
Download the instructions for your Fridge in PDF format for free! Find your manual RK60358DW - GORENJE and take your electronic device back in hand. On this page are published all the documents necessary for the use of your device. RK60358DW by GORENJE.
USER MANUAL RK60358DW GORENJE
natural_image
Black-and-white photo of a child reaching for a plush toy inside a refrigerator (no text or symbols visible)Upright refrigerator - freezer
natural_image
Close-up of a white washing machine front panel with control buttons (no visible text or symbols)Thank you for your confidence in buying our appliance and congratulations on the excellent choice. We hope it will successfully serve its purpose for many years.
Upright refrigerator - freezer (hereinafter: the appliance) is combined from two parts: top part is refrigerator and bottom part is upright freezer.
Refrigerator is used in households for storage of fresh food at temperatures above 0^ C).
Freezer is used in households for freezing fresh food and storage of frozen food for up to one year (depending on the type of food).
Before first operation....3
Appliance description
(equipment may vary with model).... 5
Installation and connection 7
Control panel - appliance with
electronical regulation 10
Control panel - appliance with
mechanical regulation 18
Recommended distribution of food 20
Storing fresh food 21
Storage of food in the COOL'N'FRESH 23
Freezing and storage of frozen food 23
Defrosting the appliance 25
Cleaning 26
Troubleshooting guide 27
Noise level 28
Before fi rst operation
- The appliance is manufactured in compliance with all relevant safety standards; however, it is recommended that persons with impaired physical, motional, or mental abilities, or persons with inadequate experience and knowledge, do not use the appliance without due supervision. The same recommendation applies to minors using the appliance.
- Before connecting the appliance read these instructions carefully. They describe the appliance and provide instructions for its safe and correct use. The instructions are prepared for different types and models of the appliance so they may contain descriptions of functions and components your appliance may not have.
Instructions also contain the NO FROST freezer version, with integrated fan and automatic defrost.
- Remove the wrapping protecting the appliance during transport.
- Door corners are fitted with protective spacers. Remove the spacers and replace them with the attached pegs (certain models only).
- Before connecting the appliance to the mains supply, leave it in upright position for about 2 hours. This will reduce possibility of malfunctions in the cooling system resulting from prior transport and handling.
- The appliance must be connected to the mains supply in accordance with the standing regulations and local requirements.
- The appliance must not be used in open air or exposed to weather precipitation.
- Always disconnect the appliance from power supply (pull the power cord from wall socket) before cleaning and before replacing the light bulb.
- If the power supply cord is damaged, in order to avoid hazard it must be replaced by the service or by qualified personnel.
- In event of long periods without use, switch off the appliance off with the ON/OFF button and disconnect it from mains supply. Empty the appliance, clean the interior and leave the door ajar.
- For the protection of environment, please contact local Borough or Council for correct disposal arrangements.
- Wrappings contain environmentally friendly materials which can be recycled, recovered or disposed without threat to the environment.
- Never let the children play with the appliance.
- Self closing door hinge (certain models only) pulls the door to the cabinet just before closing, thereby preventing the door to remain ajar. Equally it limits the door opening angle and prevents damage to adjacent elements.
- Rating plate with basic information is located in the interior of the appliance. If the sticker plate is not suitable for your language, replace it with the attached one.
- Warning: Ventilation slots on the appliance or built-in element should always be kept clean and unobstructed.
- Warning: Do not use any mechanical accessories when thawing the refrigerator, except for those explicitly recommended by the manufacturer.
- Warning: To prevent any pollution be careful not to damage the insulation or refrigeration tubes at the rear wall during the installation, cleaning and disposal of the appliance.
- Warning: Do not use any electrical devices inside the appliance, except for those explicitly recommended by the manufacturer.
The symbol on the product or on its packaging indicates that this product may not be treated as household waste. Instead it shall be handed over to the applicable collection point for the recycling of electrical and electronic equipment. By ensuring this product is disposed of correctly, you will help prevent potential negative consequences for the environment and human health, which could otherwise be caused by inappropriate waste handling of this product. For more detailed information about recycling of this product, please contact your local city office, your household waste disposal service or the shop where you purchased the product.
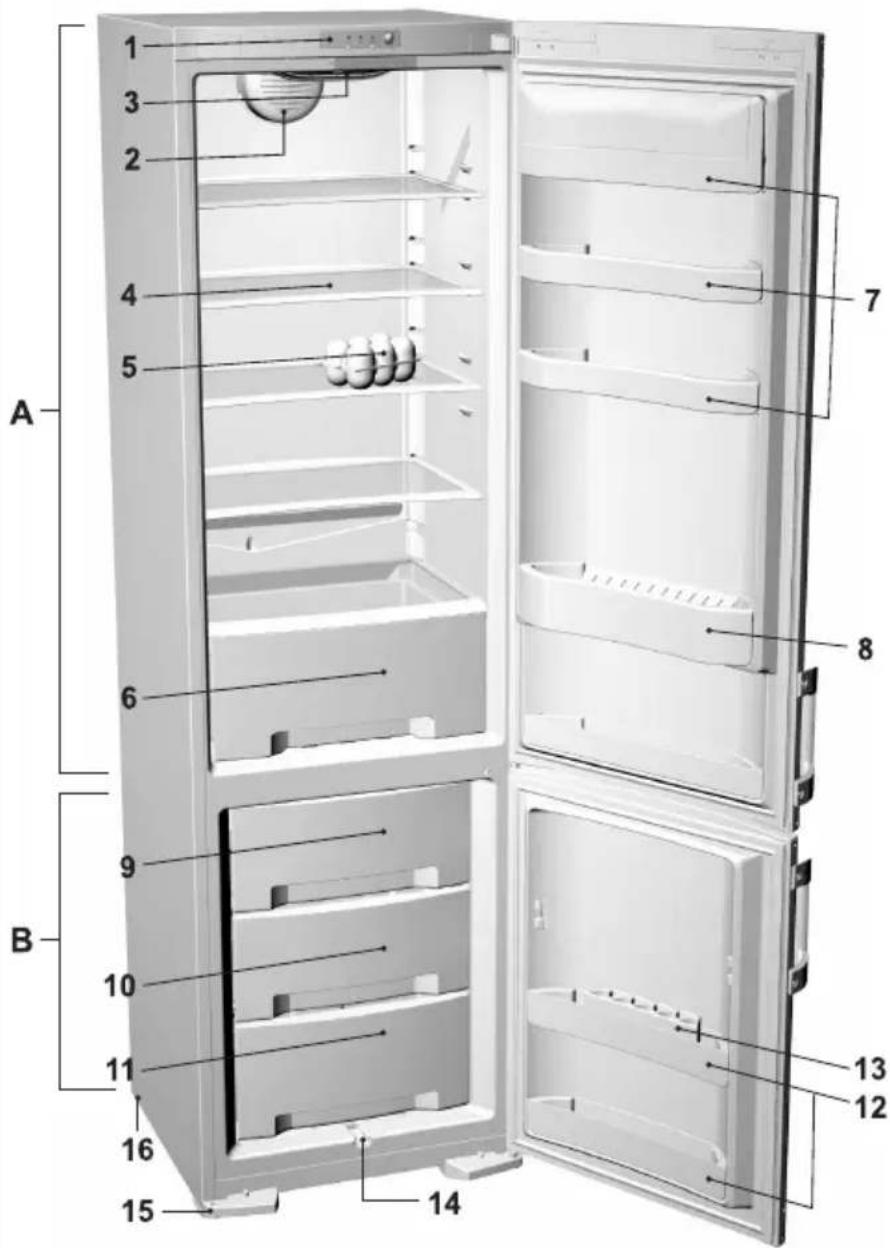
Appliance description (equipment may vary with model)
text_image
1 2 3 4 5 6 7 8 9 10 11 12 13 14 15 A BA Refrigerator (traditional and NO FROST appliance)
1 Control panel
2 Fan*
3 Interior illumination light
4 Shelf (adjustable height)
5 Foldable egg tray (closed 6, open 12 eggs)
6 Crisp tray
7 Door trays (options: deep, shallow, cover or no cover)*
8 Bottle tray with holder*
15 Leg*
16 Wheel*
B Freezer (traditional appliance)
9 Freeze drawer*
10 Storage drawer
11 Storage drawer
12 Door tray*
13 Ice tray*
14 Defrost water groove*
B Freezer (NO FROST appliance)
9 Storage drawer*
10 Freeze drawer
11 Storage drawer
- Interior accessories of the appliance may vary according to the model.
- Drawers are protected against accidental extraction. To extract the drawer from the appliance, open it and lift front part upwards, then pull it out. Certain models are fitted with pull-out slide guides which facilitate opening. Pull-out guide drawers (or shelves) are extracted by lifting the rear end and pulling out inclined under the 45^ angle. Reinsert in opposite sequence.
- Pull-out guide drawers (or shelves) are extracted by lifting the rear end and pulling out inclined under the 45^ angle. Reinsert in opposite sequence.
* Only with some models, equipment may vary with model.
text_image
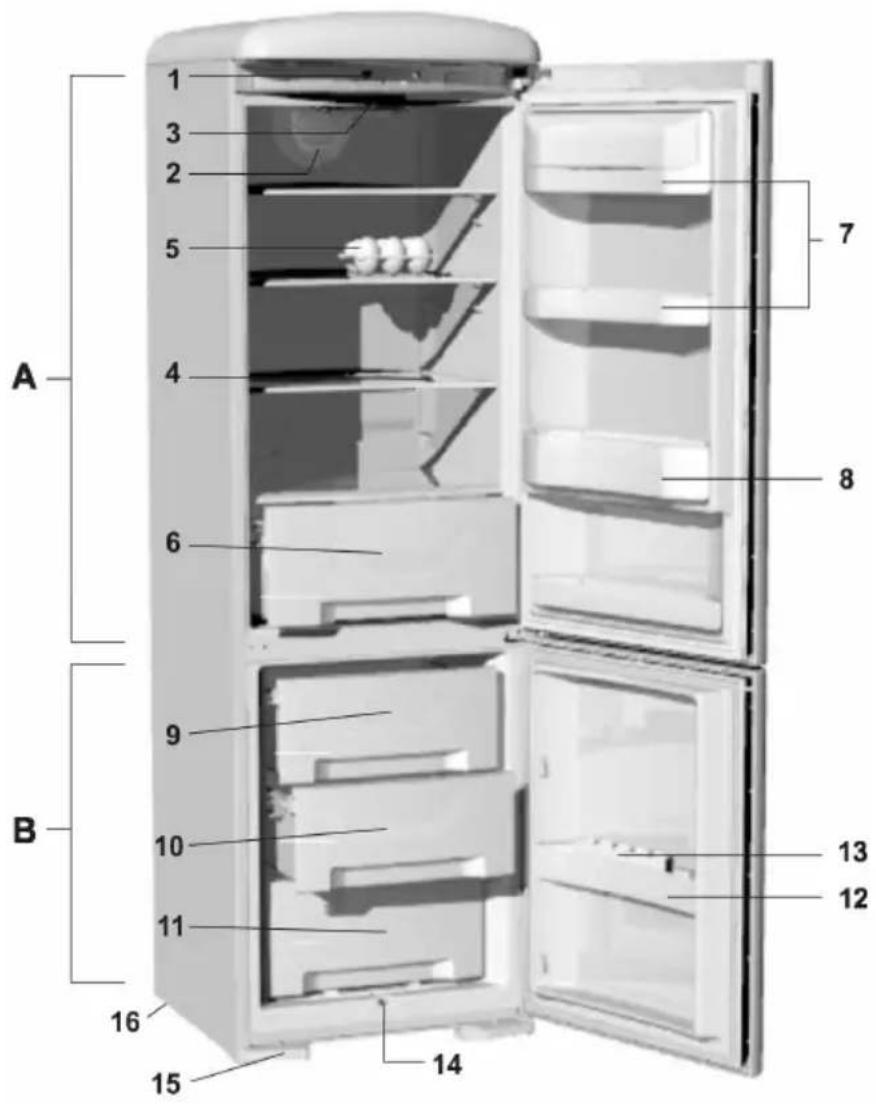
A B 1 3 2 5 4 6 9 10 11 13 12 14 15 16 7 8A Refrigerator
1 Control panel
2 Fan*
3 Interior illumination light
4 Shelf (adjustable height)
5 Foldable egg tray (closed 6, open 12 eggs)
6 Crisp tray
7 Door trays (options: deep, shallow, cover or no cover)*
8 Bottle tray with holder*
15 Leg
16 Wheel
B Freezer
9 Freeze drawer
10 Storage drawer
11 Storage drawer
12 Door tray*
13 Ice tray*
14 Defrost water groove*
- Interior accessories of the appliance may vary according to the model.
- Drawers are protected against accidental extraction. To extract the drawer from the appliance, open it and lift front part upwards, then pull it out. Certain models are fitted with pull-out slide guides which facilitate opening. Pull-out guide drawers (or shelves) are extracted by lifting the rear end and pulling out inclined under the 45^ angle. Reinsert in opposite sequence.
- Pull-out guide drawers (or shelves) are extracted by lifting the rear end and pulling out inclined under the 45^ angle. Reinsert in opposite sequence.
* Only with some models, equipment may vary with model.
Installation and connection
Selecting the location
- Place the appliance in dry and well aired room. The appliance operates best at temperature ranges indicated in the chart below. Relevant class of the appliance is indicated on the rating plate.
| Class Ambient temperature | |
| SN (subnormal) from | +10°C to +32°C |
| N (normal) from +16°C to +32°C | |
| ST (subtropical) from | +16°C to +38°C |
| T (tropical) from +16°C to +43°C | |
Positioning the appliance
natural_image
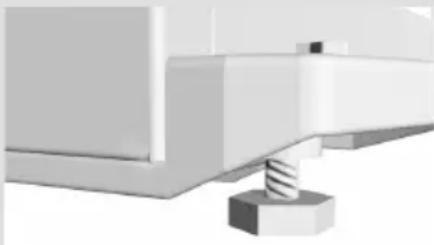
3D rendered mechanical assembly showing a bolted joint and structural components (no text or symbols visible)Positioning the appliance requires two persons in order to avoid injuries or damage to the appliance.
- Place the appliance flatly and firmly on a solid base. The appliance is fitted with adjustable feet on the front side, used to level the appliance. Rear side of the appliance is fitted with wheels (certain models only) facilitating the positioning of the appliance at the preselected place.
- The element above the appliance must be at least 5 cm away to allow sufficient cooling of the condenser.
natural_image
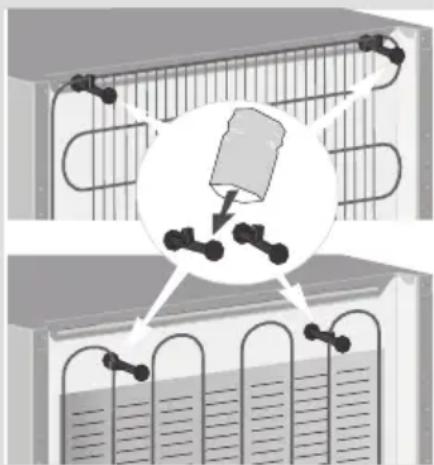
Diagram showing a container with chains and a magnified view of a container being inserted into a storage tank (no text or symbols present)- Two spacers attached to the appliance must be fitted onto the upper edge of the condenser, thus preventing the appliance from being installed too close to the wall (only some models have it). Spacers are manufactured for all-purpose function depending on the distance of the condenser from the appliance. Therefore turn spacers correspondingly and fix them to the appliance.
- Avoid exposing the appliance to direct sunlight or heat sources. If this is not possible, install insulation plate between the appliance and adjacent heat source.
natural_image
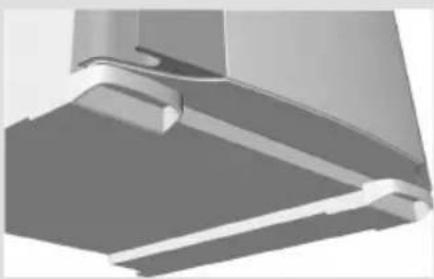
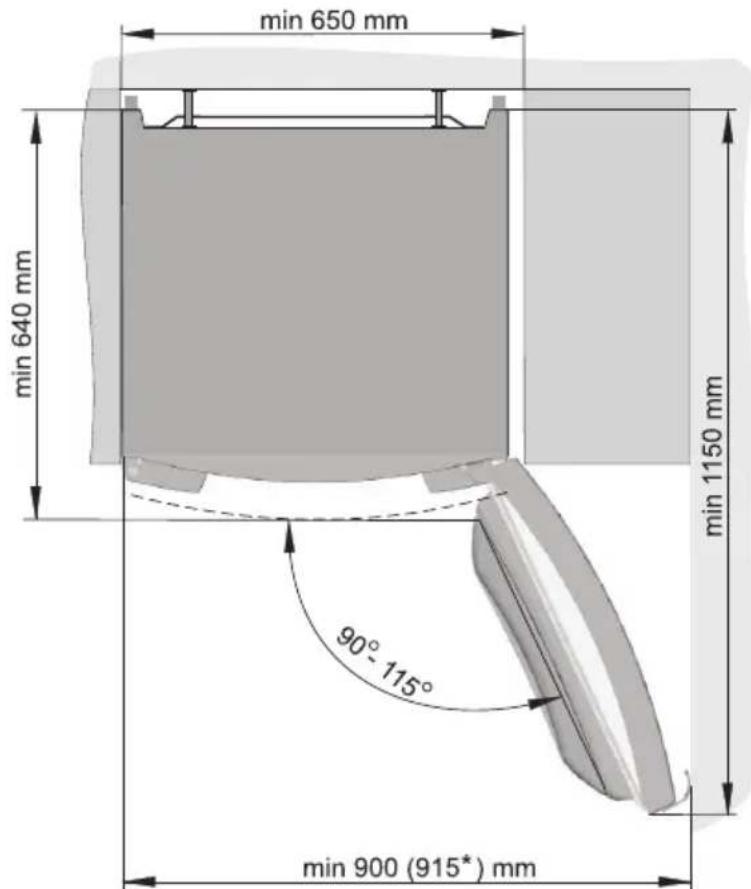
Close-up of a mechanical component with metallic surfaces and a curved bracket (no visible text or symbols)- Bottom front corners of the appliance is fitted with handles to facilitate moving (certain models only). The appliance may stand independently or adjacent to a furniture element or wall. Be sure to leave enough space for the opening of the door, to avoid damage to the appliance or personal injury. Also leave ample space for extracting shelves (see installation diagram).
text_image
min 650 mm min 640 mm min 1150 mm 90° 115° min 900 (915*) mmConnecting to power supply
Remark:
* Applies to OLD TIMER appliances (in the model marking ...O...).
- Use the power cord to connect the appliance to the mains power. Wall outlet must be fitted with ground terminal (safety socket). Nominal voltage and frequency are indicated on the relevant label or rating plate of the appliance.
- Mains power connection and grounding must be in accordance to standing regulations and local requirements.
The appliance is able to accommodate minor temporary voltage fluctuations, which do not exceed -6% to +6%.
Reverse door swing
natural_image
Interior view of a refrigerator with open storage tray (no visible text or symbols)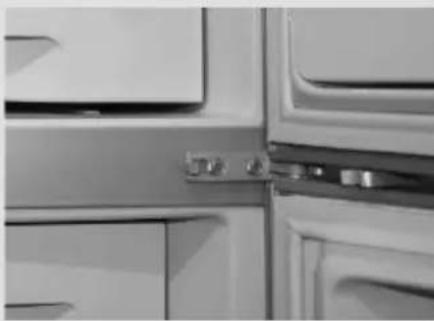
natural_image
Close-up of a white refrigerator with a metallic door handle (no visible text or symbols)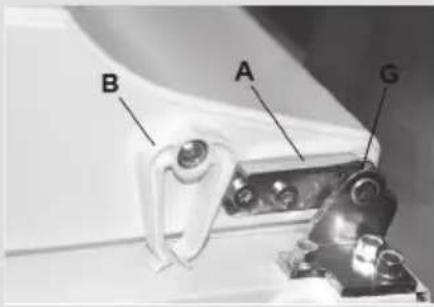
text_image
B A G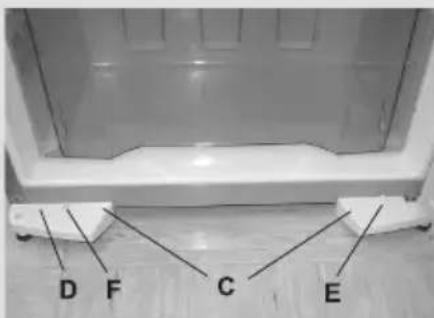
text_image
D F C ERequired tools: socket spanner nr. 8, screwdriver, torx 25.
Caution! After unscrewing of before fi xing hinges, hold the door to prevent it from falling and damaging.
-
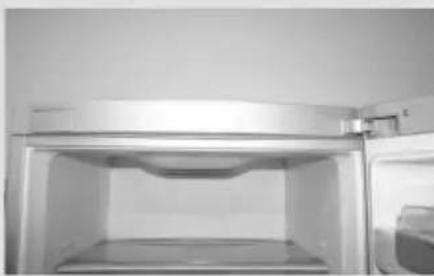
Remove upper hinge cover (save it for eventual later use), remove also the cover on the opposite side of the upper hinge cover (on the opposite side you will insert the attached cover during the assembly), and remove the cover on the opposite side of the upper part of the door.
-
Unscrew upper hinge screws and remove the upper door from the middle hinge.
-
On the bottom side of the upper door unscrew the swing stopper screws and remove the stopper (A). Keep this for eventual use later on. Fix the attached stopper with its bearing on the opposite side of the door.
-
Unscrew the forced door closure system (B) and fix it to the opposite side of the door (certain models only).
-
Unscrew middle hinge screws, remove the door from bottom hinge.
-
Loosen the screws fixing the leg supports (certain models only), then continue the procedure either under cf. 7 or 7.1, depending on the model of the appliance.
-
Tilt the appliance backward (max. 35°) to lean to the rear side of the cabinet. Unscrew the leg support screws (C) - left and right, and remove the leg support cover (D) and place it to the opposite side. Unscrew and remove, then reciprocally replace the position of end switch (E) and decorative peg (F) (for models with forced door closing system). Unscrew three screws fi xing the bottom hinge (save the hinge for later use), and fi x the attached bottom hinge on the opposite side.
7.1. Tilt the appliance backwards (max. 35°) to lean on the housing at the back.
Loosen three screws holding the bottom hinge (save the hinge for eventual subsequent door swing change). On the opposite side affi x the attached bottom hinge. Plug the holes left after the replacement with relevant pegs.
-
Repeat the procedure 3 and 4 on the bottom door. In case there is no bottom door limit peg, transfer the bearing (G) and washer to the opposite side of the door.
-
Proceed with the assembly procedure in opposite sequence.
Remark:
- At OLD TIMER appliances (in the model marking ...O...) alteration of door opening direction is not possible.
Control panel - appliance with electronical regulation
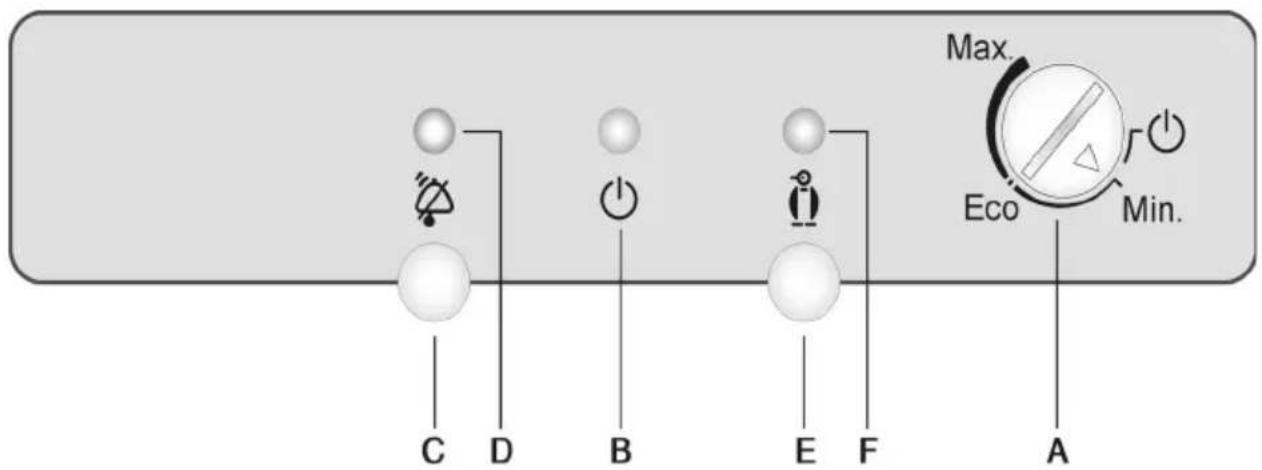
CONTROL UNIT I
Model with knobs
text_image
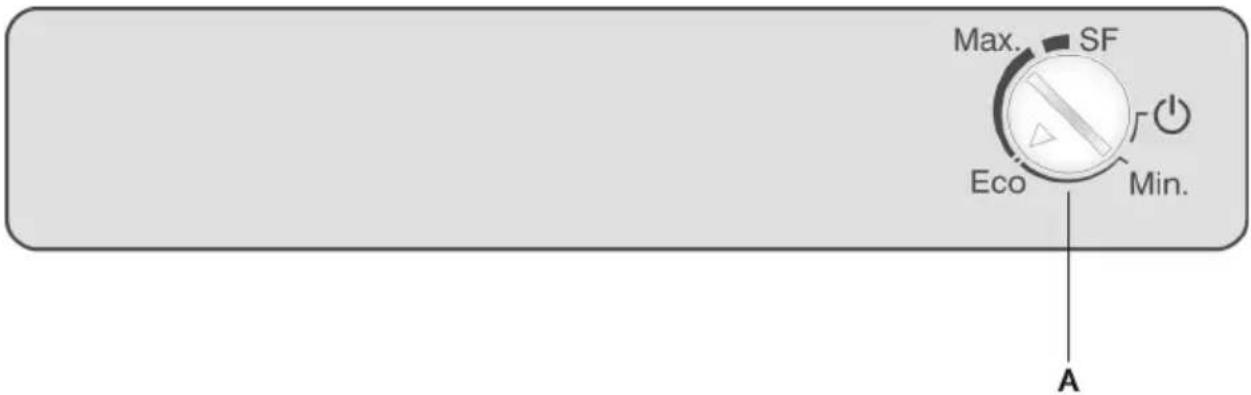
Max. Eco Min. A B C D D E FCONTROL UNIT II
Model without knobs
text_image
Max. SF Eco Min. AA Temperature selector and ON/OFF button
B Green LED: illuminated when the appliance is in operation*
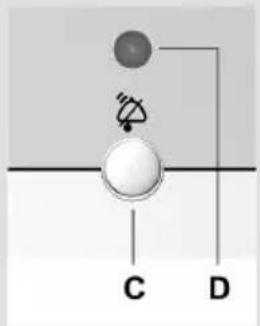
C Freezer alarm off button*
D Red LED: fl ashing with freezer alarm*
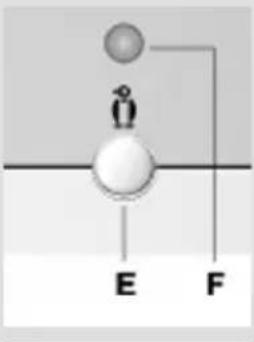
E Fast freeze button*
F Orange LED: on during fast freezing procedure*
* Certain models only.
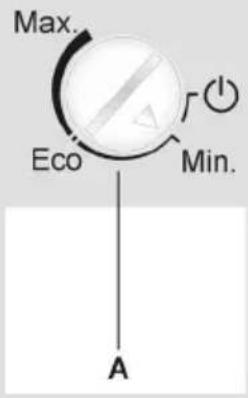
The ON/OFF button
text_image
Max. Eco Min. A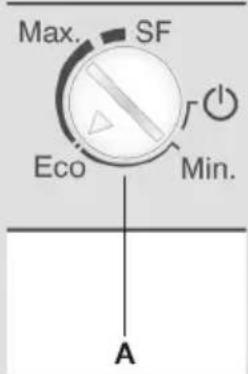
text_image
Max. SF Eco Min. ASetting freezer temperature
Rapid freeze function
text_image
Diagram showing a particle interacting with a horizontal line, labeled E and F at the bottom.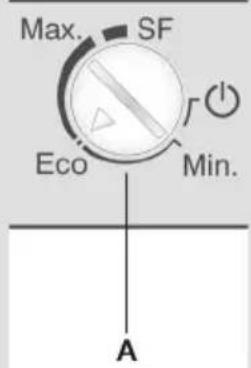
text_image
Max. SF Eco Min. AThe appliance is switched on by turning the button A towards Max. Green LED is on (certain models only). The appliance is switched off when the arrow on the button points to the ON/OFF mark ⏻ (the appliance, however, is still under mains power).
- Temperature of the appliance is set by turning the button A to the position between the Min and Max span.
- Recommended setting of the thermostat knob is to Eco position.
- If the room temperature, in which the appliance is installed, is lower than 16°C, the recommended setting of the thermostat knob is to the Max.
- Use this setting after switching on the appliance for the first time, and when inserting large quantities of unfrozen food (see "Freezing procedure").
- models with keys: press the E key (orange LED F will light up). The setting is automatically deactivated after approximately two days.
- models without keys: rotate the A button to position SF (rapid freeze). After approximately two days, the rapid freeze function is switched off automatically and the appliance operates at the Max level. To repeat the rapid freeze procedure, rotate the A button to position Eco, and then back to SF.
Once the rapid freeze function is automatically deactivated, return the A button back to the desired position.
Freezer Alarm
(certain models only)
natural_image
Pure electrical circuit lines without any symbolsThe sound alarm is activated if the freezer temperature rises above the allowed level (intermittent tone) and red lamp is flashing (D).
- The alarm can be turned off by pressing the Alarm Off button C, while the red light goes off automatically when the temperature inside the freezer reaches desired level and there is no danger for perishable goods.
- If the temperature in the freezer compartment fails to reach the required level even 24 hours after the alarm had been shut down, the alarm sounds again and shuts off automatically when the freezer compartment cools down to the required level and there is no danger for perishable food.
- After the first start, the appliance has a 24-hour default temperature alarm delay, since the freezer is not able to reach the required low temperature immediately. This is to prevent the alarm sounding.
CONTROL UNIT III
Appliance with the valve and temperature display
text_image
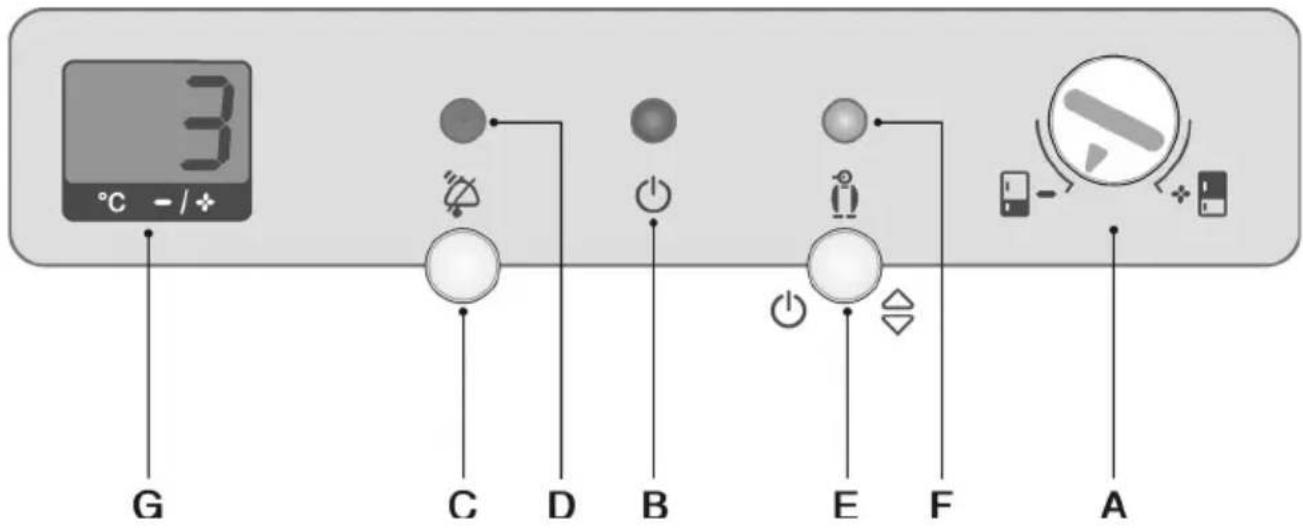
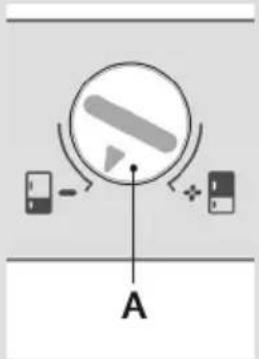
3 °C -/+ G C D B E F AA Refrigerator/freezer selector switch
B Green light lit: appliance is in operation.
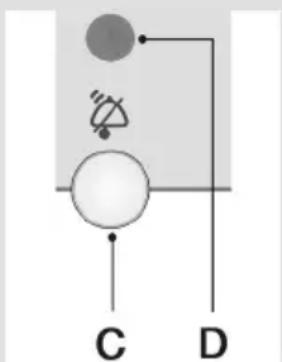
C Freezer sound alarm switch off button.
D Red light flashing: freezer temperature excessively high
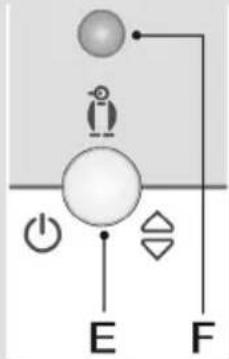
E ON/OFF button and temperature setting
F Orange light lit: Intensive freezing option is on
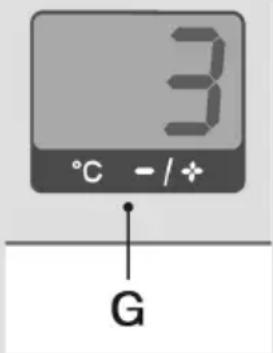
G Digital temperature display: indicates actual refrigerator temperature from +1°C to +9°C, for freezer from -16°C to -24°C and SF (intensive freezing).
Refrigerator/freezer selector
flowchart
graph TD
    A["Central Node"] --> B["Device 1"]
    A --> C["Device 2"]
    A --> D["Device 3"]
    B --> E["Arrow to Center"]
    C --> E
    D --> E
    E --> F["A"]
ON/OFF button and temperature selector
text_image
Diagram showing a mechanical or electrical system with labeled components E and F, a central circle, a penguin, and directional symbols.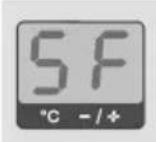
Use the rotating switch A to select the appliance section whose temperature you wish to see on the display, and whose temperature you may set by using the knob E.
ON/OFF button
Use the knob A to select the freezer, and switch the appliance on with a 3-second long press of the knob E. Both the refrigerator and the freezer are switched on, and the operation mode is indicated by the lit green light. Subsequent 3-second long press of the same button switches the entire appliance off.
Refrigerator switch on/off
Model fitted with temperature display enables the fridge to be switched off while the freezer keeps operating. Use the rotating switch A to select the refrigerator, and press the knob E for 3 seconds to switch the refrigerator off. Subsequent 3-second long press of the same button switches the refrigerator back on.
Temperature selection
Use rotating knob A to select refrigerator or freezer, and press knob E to set the desired temperature. Setting is changed in circular sense from the position Max. to Min. (up to intensive freezing in case of freezer). After 5 seconds the temperature setting is automatically saved, and the display indicates current temperature in the selected section of the appliance.
Intensive freezing
Use the rotating switch to select the freezer. By short consecutive pressing of the knob E select the intensive freezing option (SF) and wait for 5 seconds for the setting to be saved. Orange light (F) is lit. If the setting is not switched off manually, it will be switched off automatically after approximately two days. Use this option with the first start of the appliance, before cleaning, and prior inserting large quantities of fresh food into the freezer.
High temperature freezer alarm
natural_image
Simple diagram with two circles and labeled points C and D, connected by lines (no text or symbols beyond labels)Digital display
text_image
3 °C - / + GSound alarm starts in case of excessively high temperature of the freezer (intermittent beep), red light (D) is flashing.
- Alarm is switched of by pressing the knob C. Red light goes off automatically when the freezer is cooled sufficiently and there is no danger for stored food to get foul.
- If the temperature in the freezer is not at the level required for the preservation of stored food, the alarm will be switched on every 24 hours to alert you of this condition.
- At the first start of the appliance the alarm has a 24-hour temperature alarm delay, because the freezer has not reached the required temperature level. This prevents the unnecessary alarm operation.
Indicates current temperature in the refrigerator (positive single digit numeral), or in the freezer (negative double digit numeral). During the setting procedure the display fl ashes and indicates momentary temperature setting. It also fl ashes if the freezer temperature is so high that there is danger for stored food to become foul.
CONTROL UNIT IV
Appliance with two compressors Valve and no frost system appliance
text_image
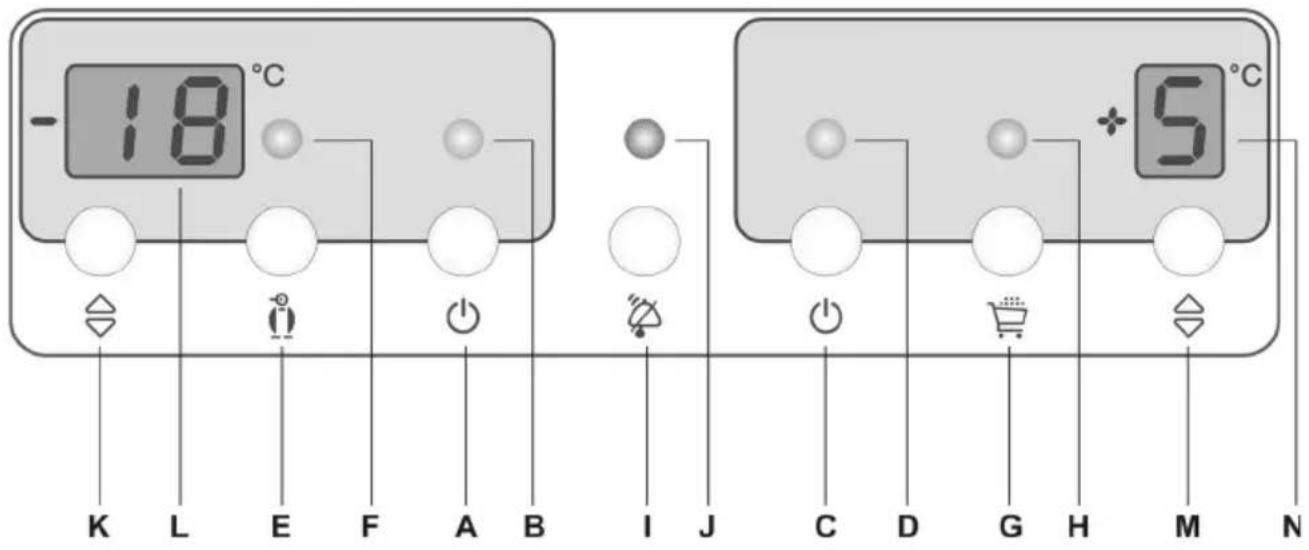
-18 °C K L E F A B I J C D G H M N +5 °CA Freezer ON/OFF button
B Green signal lamp: indicates freezer operation
C Refrigerator ON/OFF button
D Green signal lamp: indicates refrigerator operation
E Intensive freezing ON/OFF button
F Orange signal lamp: intensive freezing in operation
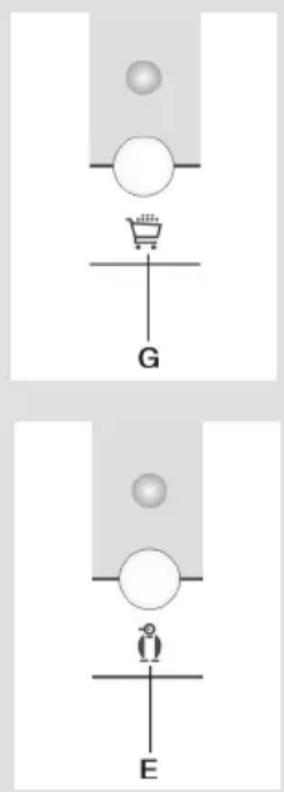
G Intensive cooling ON/OFF button
H Orange signal lamp: intensive cooling in operation
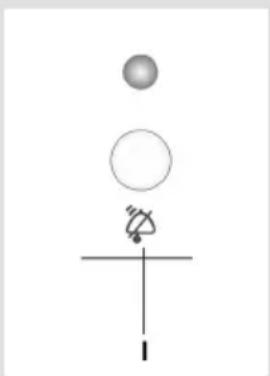
I Sound alarm and child lock ON/OFF button
J Red signal lamp: alarm is active
K Freezer temperature setting button
L Freezer temperature digital display: indicates temp. range -16°C to -24°C.
M Refrigerator temperature setting button
N Refrigerator temperature digital display: indicates temp. range +1°C do +9°C.
Switching the appliance ON/OFF
natural_image
Pure electrical circuit symbol diagram without any text or labelsBefore the first use of the appliance first plug the power cable into the wall socket. Display indicates dashes for both the refrigerator and the freezer.
• Appliance with two compressors
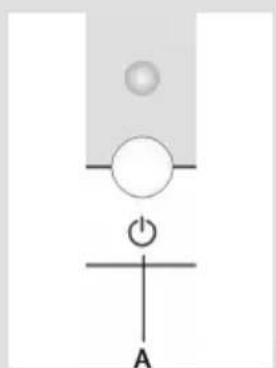
- Switch on or switch off the freezer by pressing the A button and holding it for three seconds. The green led B is lit / goes off. Switch on or switch off the refrigerator by pressing the C button and holding it for three seconds. The green led D is lit / goes off.
- The temperature is indicated on the display; +9 °C for the refrigerator compartment and 0°C for the freezer compartment. These figures blink until the actual
Temperature setting
text_image
-18°C +5°COther settings
natural_image
Simple diagram showing three circles above a horizontal line with a vertical tick mark at the bottom (no text or symbols)temperature in a respective compartment actually falls below these values.
- Valve and no frost system appliance
- Switch the appliance on/off by pressing the button A for 3 seconds. Both the refrigerator and the freezer are started, green signal lamps B and D are on. In this mode you can switch off the refrigerator only by pressing button C for 3 seconds (green signal lamp 2 is off).
- The temperature is indicated on the display; +9 °C for the refrigerator compartment and 0°C for the freezer compartment. These figures blink until the actual temperature in a respective compartment actually falls below these values.
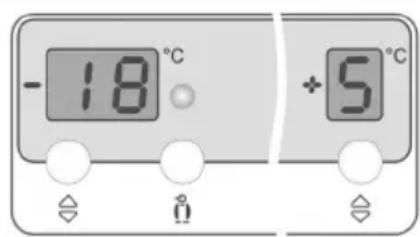
The appliance has been preset in the factory to the recommended temperatures of the refrigerator to +5°C and freezer to -18°C.
Temperature setting range of the refrigerator: +1°C do +9°C. Temperature setting range of the freezer: -16°C do -24°C.
- Freezer temperature is set by pressing button K, and refrigerator temperature by pressing button M.
- After pressing the temperature setting button the display starts flashing and indicates the last selected setting.
- Temperature setting is changed by short consecutive pressing of the button in 1°C steps. During the setting procedure all other buttons are idle.
- Approximately 5 seconds after the setting button is released the display indicates the actual temperature.
Alarm
Continuous sound - open refrigerator door alarm
If the refrigerator door is open for more than one minute, the sound alarm is turned on (continuous tone) and red signal lamp J is on. The alarm is automatically switched off when the door is closed, but you can also switch it off by pressing the alarm off button (I).
Intermittent sound - freezer/refrigerator temperature is too high
Sound alarm is also activated in case of elevated temperature (intermittent tone), and the temperature on the display is flashing.
- Sound alarm is switched off by pressing button I. Red signal lamp and temperature fl ashing are stopped automatically when the freezer/refrigerator is cooled enough that there is no more risk of food becoming foul.
- If the freezer temperature fails to arrive at the adequate level 24 hours after the alarm had been switched off it is activated again, and again switched off automatically when the freezer
text_image
G Eis cooled enough for safe storage of food. During the first start of the appliance there is a 24 hour delay of the temperature alarm to avoid unnecessary alarm operation..
Intermittent alarm sound - power failure signal
If the temperature of the refrigerator or freezer is raised too much as a consequence of power failure, sound alarm is activated (intermittent tone), red signal lamp is on, and the display flashes the highest temperature digit (in case of refrigerator maximum 9°C).

Intensive cooling
Intensive cooling of the refrigerator is activated by pressing the button G (orange signal lamp H is on). It is automatically switched off after 6 hours, and the selection is set back to the pervading value. It is intended for fast cooling of large quantity of inserted food.

Intensive freezing
It is activated by pressing the button E (orange signal lamp F is on), and the intensive cooling of the freezer starts. If the setting is not deactivated (by pressing the E button once again), the setting will e deactivated automatically approximately two days after activation. Setting is intended for fast freezing of large quantities of inserted food. In case of power failure the fast freezing process is repeated. Use the setting also with the first start of the appliance, before intended cleaning, and in case of large quantities of food inserted in the appliance.
Child lock
Integrated child lock protects the appliance from accidental temperature setting changes or even switching the appliance off. You can activate or deactivate the child lock by pressing the alarm button (I) for 3 seconds (both displays flash 'LL' and 'L' for 3 seconds). Once the child lock is activated, only the alarm button is active. Pressing any other button provokes the letters 'LL' and 'L' to appear on the display.
Control panel - appliance with mechanical regulation
CONTROL UNIT V
Model without fan
text_image
- Max. - Min. A BModel with fan
text_image
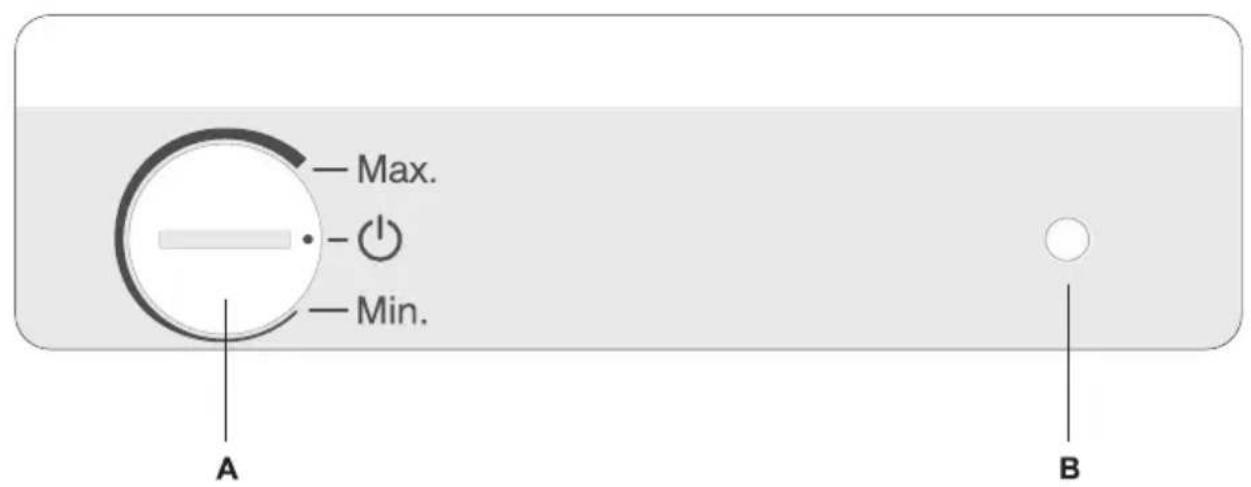
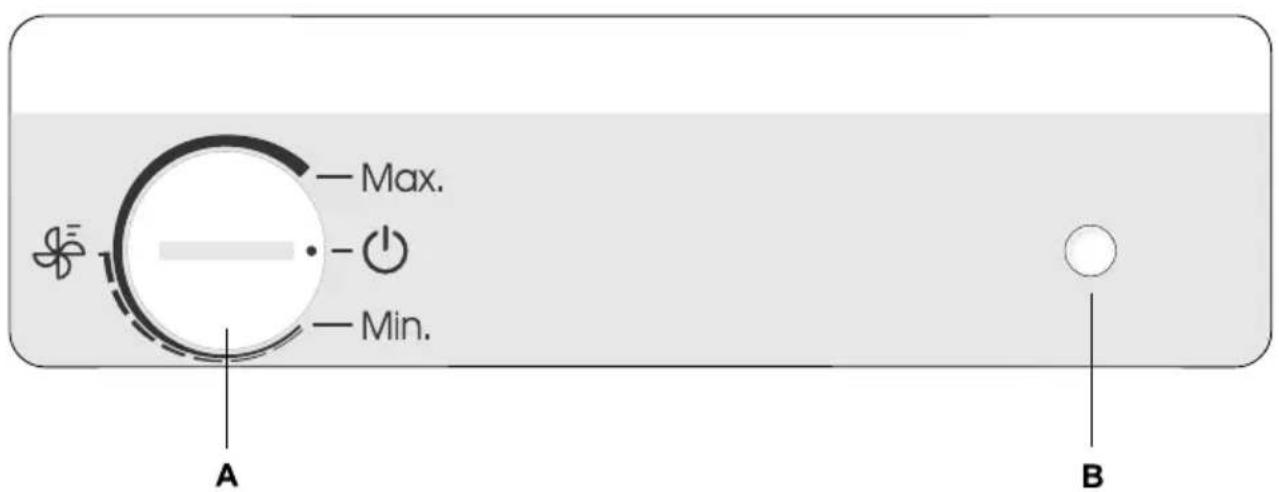
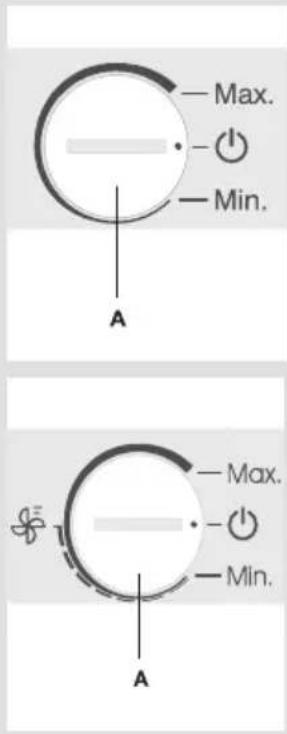
Max. Min. A BA Temperature setting and ON/OFF button
B Illumination ON/OFF push-button
ON/OFF button
text_image
Max. Min. A Max. Min. ATemperature setting
Fan
(only with some models)
The appliance is switched on by turning the button A in clockwise direction, towards Max.
The appliance is switched off when the dot is positioned against the ⏻ (the appliance is still powered).
- Temperature of the refrigerator is set with button A which can be positioned between the Min and Max range.
- Recommended setting is the position between Min and Max.
- If the ambient temperature around the appliance is lower than 16°C the recommended setting of the thermostat is Max.
- The fan contributes to more equal distribution of temperature and faster cooling, as well as reduces formation of dew on the shelves. It only operates when the compressor is activated.
-
Turning on the fan is recommended as an additional function in the following cases:
-
increased temperature in the room (over 30°C),
- increased humidity (during the summer),
- when inserting larger quantities of food (rapid cooling).
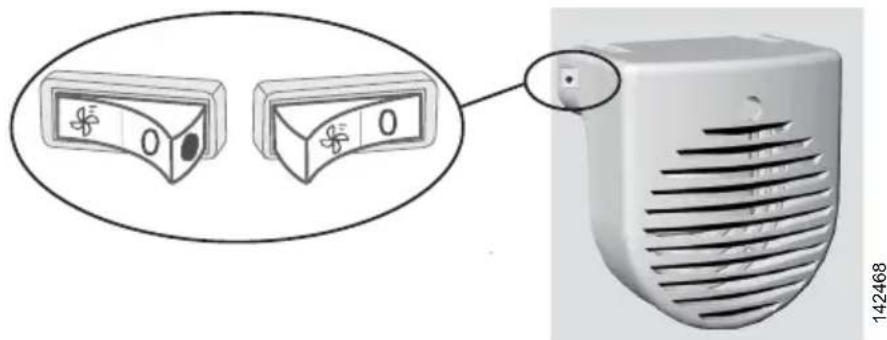
- Turning the fan on / off
$$ \mathrm{ON} = \quad \text { OFF } = 0 $$
text_image
Diagram showing two labeled buttons with a magnified view of the second button, connected to a speaker grille.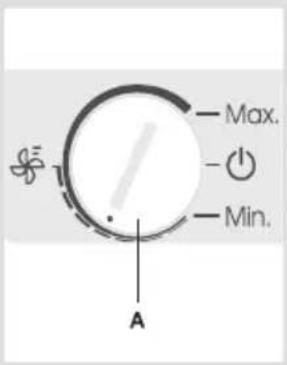
text_image
Max. Min. AWhen the fan is on, a red dot is indicated on the switch.
Note: When the fan is activated, power consumption is increased and temperature in the refrigerator drops.
Hence, we recommend resetting the temperature in the appliance:
- when the fan is activated: between "Min" and ✿ (dashed line),
- without the fan: area between ⚙ and "Max".
Temperature setting for the refrigerator also affects the temperature in the freezer compartment.
Recommended distribution of food
Recommended distribution of food
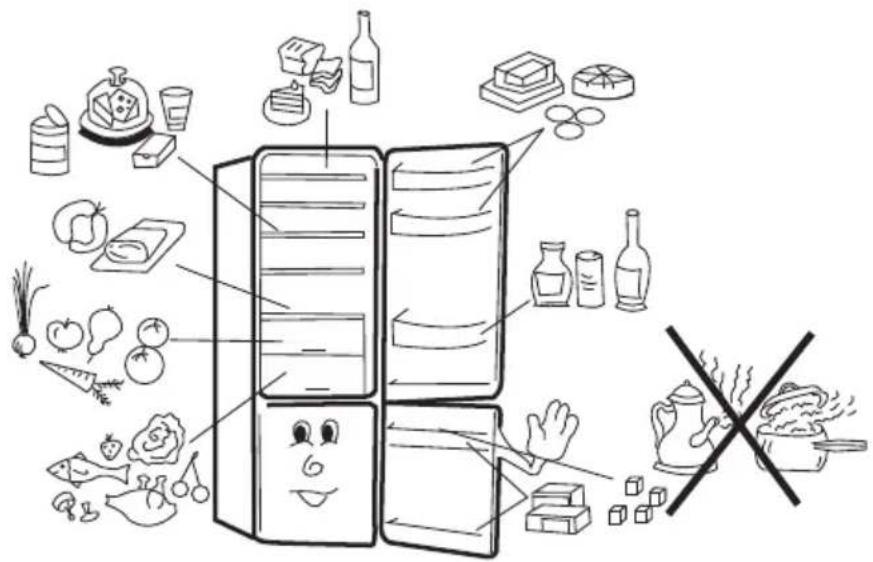
Refrigerator compartments:
- top section: canned food, bread, wine, cake, ...
- middle section: dairy products, cheese, readymade food, desserts, juices, beer, TV-dinners, ...
- bottom section: meat, meat products, delicatessen, ...
- crisp pan: resh fruit, vegetables, salads, appliances without ZERO'N'FRESH drawer also: root vegetables, potatoes, onions, garlic, tomatoes, tropical fruit, sauerkraut, turnips, ...
- ZERO'N'FRESH drawer: fresh meat, meat products, fish, seafood, dairy products, salads, fruit, vegetables, mayonnaise, dips and sauces, ...
Refrigerator door lining compartments:
- top/middle section: eggs, butter, cheese, ...
- bottom section: beverages, cans, bottles, ...
Freezer sections:
- door compartments: packed vegetables, ice cream, ice,...
- other compartments: freezing, storing frozen food or quick cooling of bottles (see section "Freezing and storing frozen food", setting "Quick cooling of drinks in the freezer",...)
text_image
Illustration of a refrigerator with food items including vegetables, dairy products, and a crossed-out kitchen appliance.Storing fresh food
Important precautions for storing fresh food
Proper use of the appliance, adequately packed food, correct temperature and hygienic precautions have substantial impact on the quality of stored food.
Always respect the best before date, printed on the packaging.
Food to be stored in the refrigerator should be properly packed as to prevent absorbing of moisture and building of odors.
Never store infl ammable, volatile or explosive substances.
⚠️ Beverages with high alcohol percentage shall be stored in tightly sealed bottles in upright position.
Some organic solutions e.g: strong oils in lemon/orange peel and acids in butter etc. can cause damage through prolonged contact with plastic surfaces or gaskets, they can cause accelerated ageing of the plastic material.
⚠️ Unpleasant odour inside the refrigerator is a sign that something is wrong with food or that your refrigerator needs cleaning (see chapter on Cleaning).
⚠️ If you are away for a lengthy time, please remove all perishables beforehand.
Interior accessories and space distribution
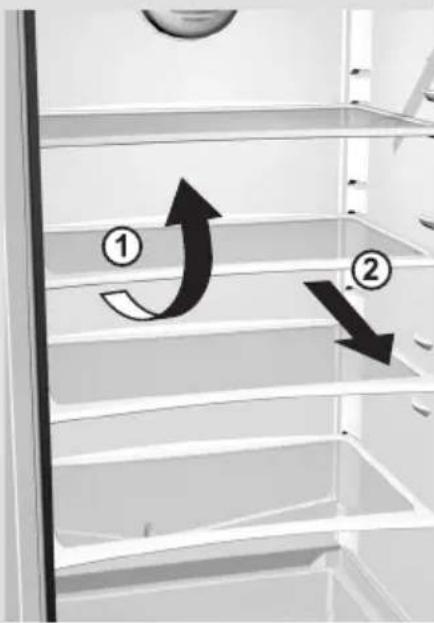
text_image
Diagram showing two labeled arrows (① and ②) pointing to a refrigerator shelf, indicating directional movement or flow.Storage time of fresh foods
Equipment depends on the model.
- Shelves can be optionally placed on the guides inside the appliance. They are protected against pulling out completely by accident. To remove the shelf, raise the back part level off and pull it out. Quickly perishable food should be stored on the back i.e. the coldest part of the shelves.
- Certain models are equipped with wire bottle rack which enables placing of bottles on the cork. It is safeguarded against pulling out. It may be pulled out only if empty, by lifting the front part and pulling it towards you. Place the bottle rack in the appliance in such way to avoid obstruction of door closing by the length of the stacked bottles.
Maximum load of the rack is 9 bottles of 0,75 l, or 13 kg of total mass - see label at the right side of the interior of the appliance.
- Crisp tray below the glass shelf at the bottom of the refrigerator is used for storage of fruit and vegetables. It retains the right level of moisture and prevents drying out.
- The inner refrigerator door consists of various shelves or holders used for storing cheese, butter, eggs, yogurt, and a stock of other smaller packages, tubes, cans etc. The bottom shelf is used for storing bottles.
- The freezer door liner is also fitted with various shelves or holders used for storing frequently used frozen food - quick access (ice cream, already opened packages of vegetables, etc.).
- Fan (certain models only - located under the ceiling or hidden behind rear panel of the refrigerator, or concealed within the freezing unit) improves even distribution of temperature and reduced condensation on storage racks.
Approximate storage time of fresh foods
| Food Period | |
| eggs, marinades, smoked meat up to 10 days | |
| cheese up to 10 days | |
| carrots, etc... up to 8 days | |
| butter up to 7 days | |
| cake, fruit, TV-dinner dishes, raw chunks of meat | up to 2 days |
| fi sh, raw minced meat, seafood up to 1 day | |
Storage of food in the COOL'N'FRESH
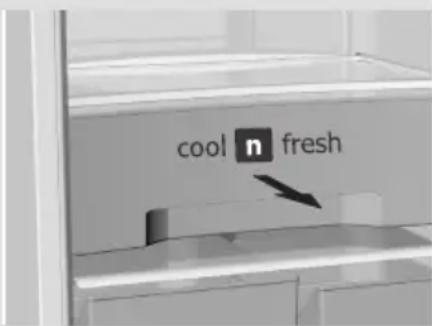
text_image
cool n freshThe COOL 'N'FRESH drawer provides storage of wide selection of fresh food longer than in the traditional refrigerator. Food remains fresh for long time and it preserves its taste and nutritive ingredients. It reduces decay and loss of mass, so fruit and vegetables are more fresh and natural. The drawer must be tightly closed to provide optimum operation.
- Moisture level in the drawer depends upon the moisture of stored food, and on the frequency of opening the drawer.
- When you buy food check its freshness: quality and durability of food depends on it.
- Store non-wrapped animal or vegetable food separately, or wrap it in suitable packages. Be careful to prevent touching of different types of meat. They should be packed and stored separately to avoid bacterial decomposition in case meat turns foul.
- Approximately 30-60 minutes prior use remove food from the drawer to let its aroma and taste develop at ambient temperature.
- Food sensitive to low temperatures is not suitable for storage in the COOL'N'FRESH drawer: pineapple, avocado, bananas, olives, potato, eggplant, cucumber, beans, bell pepper, melons, water melons, pumpkins,...
Freezing and storage of frozen food
Freezing procedure
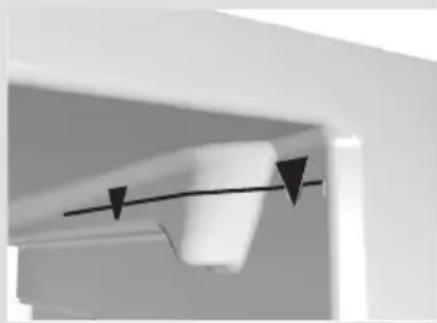
natural_image
Close-up of a ceiling fixture with a curved black arrow and downward-pointing triangle, no visible text or symbols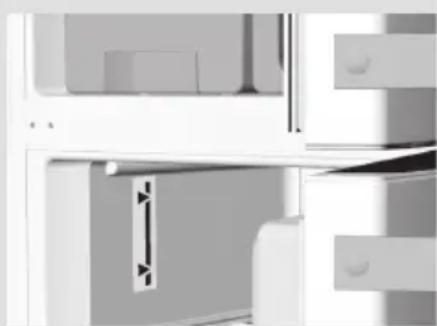
natural_image
Close-up of a mechanical or architectural component with no visible text or symbols- 24 hours before freezing fresh food, activate the rapid freezing function (freeze boost):
- control unit I, II, III and IV: press the E key or rotate the A button to the SF position;
- control unit V with or without the fan: rotate the A button to the mid point between Min and Max; the fan is deactivated.
After this period place fresh food in the freezing compartment. In NO FROST freezer model use central drawer for freezing.
Do not let the already frozen packages touch the fresh ones. To allow the required circulation of cool air, do not place any food above the indicated line – see image below (only with some models).
• After 24 hours you may move the food to the storage compartment, and repeat the freezing procedure if required.
You may also remove the drawers and store frozen food directly on cooling shelves. Do not remove the lower drawer if you have a NO FROST appliance!
- For freezing smaller quantities of fresh food (1-2 kg), the engagement of the fast freeze function is not required.
Important precautions for freezing of fresh food
⚠️ Freeze only such food which is suitable for freezing and can sustain low temperatures. Food should be of adequate quality and fresh.
Select adequate packaging for each kind of food and pack it correctly.
The packaging should be air tight and well sealed without leaking since this could cause substantial vitamin loss and dehydration.
Mark packages with following data: Type, kind and amount; with the date of placing.
It is imperative that food is frozen as quickly as possible. We therefore recommend the size of the package not to be too large and to be cooled before placing into the freezer.
The amount of the fresh foods that can be loaded in the freezer as a single load is declared on the rating plate. If the loaded amount is too large, the quality of freezing is reduced which in turn affects the quality of frozen foods.
Storing commercially frozen food
The storage time and recommended temperature for storing commercially frozen foods is indicated on the packaging. Always follow manufacturer's instructions for storage and use of frozen food. When shopping be careful to choose only food which is adequately packed and provided with complete data and stored in freezers where the temperature never rises above -18°C. Do not buy packages of food wrapped with frost. This indicates that the package was thawed before at least once.
Take care that packages don't start to thaw during transport to your home. Temperature rise shortens the storage time and affects the quality of commercially frozen foods.
Approximate storage time of frozen foods
| Food Storage Period | |
| Fruit, beef from 10 to 12 months | |
| Vegetables, veal, poultry from 8 to 10 months | |
| Venison from 6 to 8 months | |
| Pork from 4 to 6 months | |
| Chopped (minced) meat 4 months | |
| Bread, pastry, TV-dinner, fat free fi sh 3 months | |
| Intestines 2 months | |
| Smoked sausages, fat fi sh 1 month |
Defrosting frozen food
Partially thawed or defrosted foods should be used as soon as possible. Cold air preserves the food but it does not destroy microorganisms which rapidly activate after defrosting and make foods perishable.
Partial defrosting reduces the nutritional value of food, especially fruits, vegetables and readymade meals.
Making ice
natural_image
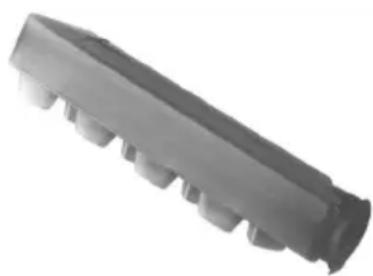
Close-up of a gray cylindrical electronic component with multiple leads (no visible text or symbols)Remove the cap from ice tray (certain models only) and fill it to the mark with filtered cold water. Close it and place it on the door shelf. Ice tray can freeze 8 cubes.
It is recommended to make ice on stock.
Ice cubes are discharged from the tray by turning the tray upside down and placing it under cold running water. Shake the tray, open the cover and pour the ice out.
Defrosting the appliance
Automatic defrosting of the refrigerator
The appliance needs no special defrosting procedure, because ice deposited at the inner back wall is defrosted automatically. Ice deposited on the inner back wall during the compressor operation is defrosted when the compressor stops operating, and condensed water drops are drained through the outlet in the inner back wall into the drain pan situated above the compressor where it evaporates. In case of excessive ice deposits at the inner rear wall of the refrigerator (3-5 mm), switch the appliance off by pressing the ON/OFF button and defrost it manually.
Defrosting traditional freezer
natural_image
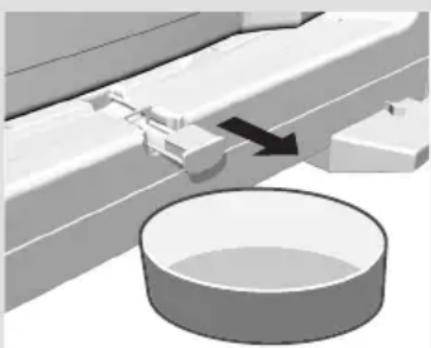
Mechanical assembly diagram showing a bracket with a black arrow indicating direction, and a circular component below (no text or symbols)- Clean the freezer when the frost layer in the freezer reaches thickness of around 3-5 mm.
- 24 hours prior defrosting fresh food activate intensive freezing knob (see section Control of particular models - Intensive freezing), to quickly freeze freshly inserted food. After that empty the freezer and take care that the packages remain frozen.
- Switch the appliance off by turning the temperature selector (A) to the mark 🔊.
- To drain defrost water pull the funnel shaped groove at the bottom of the appliance out, and place a convenient vessel underneath to collect the defrost water.
- Never use powered appliances to defrost the freezer (hair dryer, etc.).
- Avoid using defrosting sprays, as they may cause damage to the plastic parts and may be hazardous to health.
Defrosting traditional freezer
- Clean the interior of the appliance and wipe it dry (see chapter Cleaning).
• Before reloading food into the freezer switch the appliance on. - Defrosting of NO FROST freezer is automatic. Periodic appearance of frost layer eventually disappears automatically.
Cleaning
natural_image
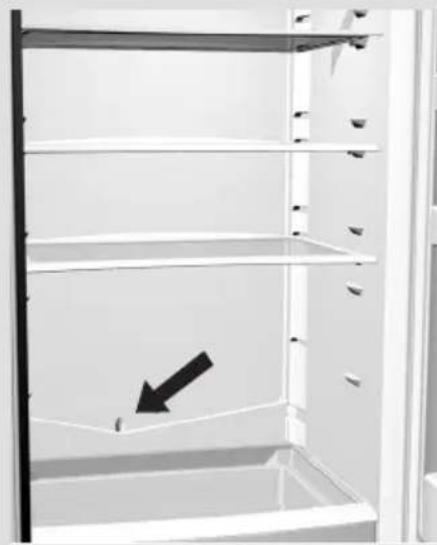
Interior view of a refrigerator with shelves and a black arrow pointing to a small object inside (no text or symbols visible)Prior to any cleaning. Please disconnect the appliance from the mains (turn the thermostat
button to the position ⏻ and pull the power cord from the mains outlet). Special antibacterial protection in top layer of inner walls prevents growth of bacteria and maintains the interior clean and germ free. Make sure to remove traces of any cleaning agents you had been using.
• To clean any surface, use a soft cloth.
- Clean the exterior of the appliance with water and mild liquid detergent.
- For cleaning of plastic, coated, or aluminum parts avoid using abrasive or special cleansing agents (like the stainless steel polish), otherwise you may damage the surface.
- Clean coated and aluminum surfaces using the soft cloth and alcohol based cleaning agent (like glass cleaner).
- Wash the interior of the appliance with mild liquid detergent and lukewarm water, mixed with a little vinegar.
- Groove and drain outlet located below the cooling panel at the rear wall collect the drained water, so should not be clogged (e.g. with food particles). Make sure you inspect them periodically and clean if necessary (use plastic straw to free the outlet hole).
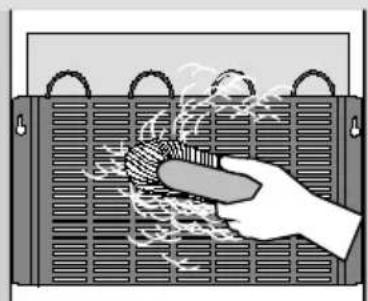
- The condenser on the rear wall must always be clean and free of dust or kitchen fumes deposits, therefore clean the dust periodically with non-metallic brush or vacuum cleaner.
- Clean also the drip pan above the compressor. If you removed the pan, please make sure you replace it to the same position, and check that it is in completely horizontal position!
- Ice and/or frost deposits exceeding 3-5 mm increase energy consumption, so should be defrosted regularly (not for the NO FROST freezer). Do not use sharp pointed objects, solvents or sprays.
• After cleaning switch the appliance on and reload the food.
natural_image
Illustration of a hand cleaning a heat exchanger with visible steam and cooling effect (no text or symbols)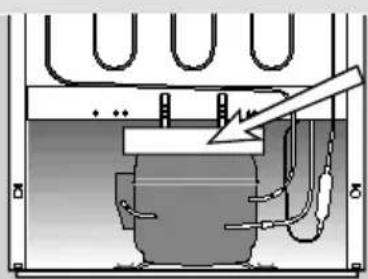
natural_image
Technical diagram of a mechanical assembly with no visible text or symbolsTroubleshooting guide
| Fault: Cause/Remedy | |
| The appliance does not operate after connection to the mains: | ·Check if there is power in the socket and if the appliance is switched on. |
Cooling system operates continuously without intermittent stoppages: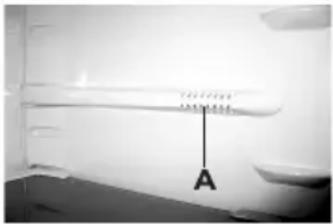 | ·Ambient temperature too high. |
| ·Frequent opening of the door, door open too long. | |
| ·Door not closed properly (particle between door gasket, sagged door, check gasket sealing, etc...). | |
| ·Excessive quantity of fresh food inserted at once. | |
| ·Refrigerator sensor (A) is crammed with fresh food. Free the sensor and allow air to circulate around it (certain models only). | |
| ·Check air circulation for suffi cient cooling of the compressor, and clean the condenser. | |
| Excessive ice formation at the rear interior wall of the refrigerator: | ·Frequent opening of the door, door open too long. |
| ·Inserting hot food in the refrigerator. | |
| ·Food or dish is touching the rear interior panel of the refrigerator. | |
| ·Bad door sealing; clean or replace the gasket if dirty or damaged. | |
| Water dripping from the appliance: | ·Drain outlet is clogged, drain water drips past the collection groove. |
| ·Clean the clogged outlet using plastic straw. | |
| ·Thaw thick ice deposits manually (see chapter Defrosting). | |
| Red light is fl ashing (freezer compartment only): | ·Frequent opening of the door, door open too long. |
| ·Door not closed properly (particle between door gasket, sagged door, damaged gasket, etc...). | |
| ·Excessively long power failure. | |
| ·Excessive quantity of fresh food inserted at once. | |
| Diffi cult door opening: | ·If you attempt to open the immediately closed door of the freezer you may experience resistance. This happens because certain quantity of cold air escapes from the appliance through the open door and is replaced by warm ambient air. Cooling of such air creates negative pressure (vacuum) and suction, which prevents easy opening of the door. This is normalized after several minutes and you can open the door with ease. |
Bulb replacement: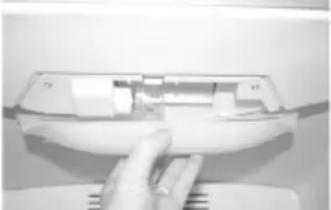 | Before replacing the light bulb, disconnect the appliance form the power supply. Using the screwdriver remove the cover, replace the bulb with a new one (E 14, max. same voltage as the factory one and fi t back the cover. |
| Don’t forget: the old bulb does not belong to organic waste. | |
| The light bulb is aconsumption material and not covered by the warranty. | |
| Bulb lamps used in this appliance are special purpose lamps selected for household appliances use only. They are not suitable for household room illumination. | |
| Green LED is fl ashing: | If the green LED is fl ashing, call the nearest service center. |
| Troubleshooting helpful hints: | If you are not able to fi x the trouble by any of the above tips, turn the thermostat button to the position ⏻,disconnect the power cord from the mains outlet, wait 10 minutes, and reconnect the appliance.Should none of the above guidelines be of positive help, please call for service assistance, quoting information given on the rating plate either within, or at rear of an appliance. |
Noise level
Cooling of refrigerator-freezer appliances is provided by compressor cooling system (for certain appliances also the fan). Operation of this system results in certain noise, the intensity of which depends upon the installation, correct use, and age of the appliance.
- After starting the appliance, the operation of the compressor (the refrigerant flow) may be somewhat louder. This does not mean that something is wrong with the appliance, neither has it any influence on the lifetime of the appliance. Gradually the noise is reduced and eventually subsides.
- Sometimes the appliance produces unusual and stronger noise which is rather unusual for the appliance. This noise is often the consequence of inadequate positioning of the appliance:
- The appliance should be placed on a flat and firm base.
- It should not touch the wall or adjacent kitchen units standing next to it.
- Check whether the accessories in the interior of the appliance are placed correctly in their positions; also check the bottles, tins and other vessels that might touch each other and rattle.
THE MANUFACTURER RESERVES THE RIGHT TO ALTER THE SPECIFICATIONS WITH NO IMPACT TO THE FUNCTIONAL OPERATION OF THE APPLIANCE.
HZS 4066, 3567, HZF 3267, 3767
HZOS 4066, 3567,
COMBI CLA + VTL + OT + EC