
IC-3030IPOE - Security Camera Edimax - Free user manual and instructions
Find the device manual for free IC-3030IPOE Edimax in PDF.


| Product Type | IP Security Camera |
| Model | IC-3030iPoE |
| Brand | Edimax |
| Connectivity | Fast Ethernet, Power over Ethernet (PoE), Wireless 802.11n (select models) |
| Video Compression | H.264, MPEG4, M-JPEG |
| Night Vision | Yes, with automatic IR cut filter |
| Audio Input | Built-in microphone |
| Audio Output | External speaker via audio connector |
| Power Supply | 12V DC power adapter (included) or PoE (IEEE 802.3af) |
| LED Indicators | Power, LAN, Wireless (if applicable), Low light |
| Mounting | Mounting kit included |
| Storage | SD/SD-HC card slot (for local recording) |
| Reset | Reset to default button (press >5 seconds) |
| Software | Administrator Utility & Camera Viewer, Web management |
| Compatible OS | Windows 2000/XP/Vista/7 |
| Minimum CPU Requirement | Intel Pentium 4 2.4 GHz or Dual-Core 2.0 GHz |
| Minimum RAM | 128 MB (256 MB recommended) |
| Minimum VGA Resolution | 1024 x 768 |
| Package Contents | IP Camera, Power Adapter, Ethernet Cable, Mounting Kit, Quick Installation Guide, CD |
Frequently Asked Questions - IC-3030IPOE Edimax
User questions about IC-3030IPOE Edimax
0 question about this device. Answer the ones you know or ask your own.
Ask a new question about this device
Download the instructions for your Security Camera in PDF format for free! Find your manual IC-3030IPOE - Edimax and take your electronic device back in hand. On this page are published all the documents necessary for the use of your device. IC-3030IPOE by Edimax.
USER MANUAL IC-3030IPOE Edimax
Fast Ethernet / Wireless 802.11n / PoE Triple Mode IP Camera with Night Vision
IC-3030i / IC-3030iWn / IC-3030iPoE Quick Installation Guide
Version 1.0 / January, 2011
natural_image
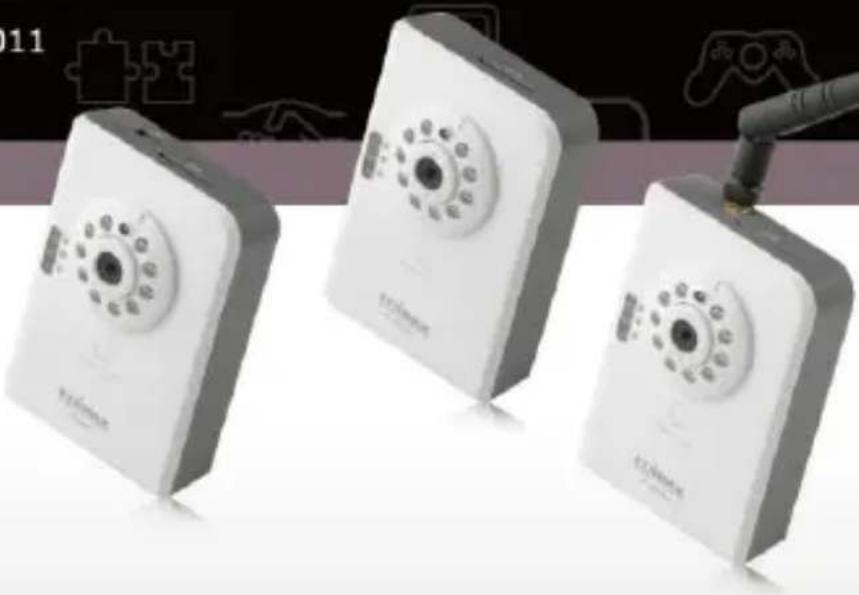
Three white 3D-printed devices with circular buttons and a connector, displayed against a black background with puzzle pieces (no visible text or symbols)ErP Announcement
Product: Internet Camera (IP Camera)
Purpose: 24 hour surveillance and transfer of footage for safety and health reasons as intended use.
Detailed description:
- Health purposes: Users can pass through the Internet (from anywhere) to control the product (IP Camera). It's intended to watch and listen to people who need to be cared for at home and automatically sends e-mails and phone alerts to warn observers and ask for their attention. The product also provides a record function to retain all images and voice information for the sake of reference.
- Safety purposes: Users can initiate a “motion detect” function to record and send e-mails to notify them when doors or windows are opened – potentially by unwarranted persons.
- General purposes: Record/monitor environment footage and sound and store them onto a hard disk as a record.
As we cannot predict when events of this nature may occur, we need for the product to remain active and alert at all times. If the product had to go into “standby/off” mode, it would impact the effectiveness of recording and warning functions resulting in users not getting the information they need.
Based on the ErP official journal of European Union
Directives 2009/125/CE of the European parliament and of the council of 21 October 2009 Article 15 sector 5 part (a) and (b) as below:
"Implementing measures shall have no significant negative impact on the functionality of the product, from the perspective of the user."
"Health, safety and environment shall not be adversely affected."
We announce that the product need not comply with the (EC) No 1275 Standby and on/off mode function of Implementing Measurement.
We will keep up to the newest Implementing Measurements in the future and make the necessary changes if it's related to this product.
ΣDIMAX NETWORKING PEOPLE TOGETHER
Copyright© by Edimax Technology Co, LTD. all rights reserved. No part of this publication may be reproduced, transmitted, transcribed, stored in a retrieval system, or translated into any language or computer language, in any form or by any means, electronic, mechanical, magnetic, optical, chemical, manual or otherwise, without the prior written permission of this Company.
This company makes no representations or warranties, either expressed or implied, with respect to the contents hereof and specifically disclaims any warranties, merchantability or fitness for any particular purpose. Any software described in this manual is sold or licensed "as is". Should the programs prove defective following their purchase, the buyer (and not this company, its distributor, or its dealer) assumes the entire cost of all necessary servicing, repair, and any incidental or consequential damages resulting from any defect in the software. Further, this company reserves the right to revise this publication and to make changes from time to time in the contents hereof without obligation to notify any person of such revision or changes.
The product you have purchased and the setup screen may appear slightly different from those shown in this QIG. For more detailed information about this product, please refer to the User's Manual on the CD-ROM. The software and specifications could be subjected to change without notice. Please visit our web site www.edimax.com for updates. All rights reserved including all brand and product names mentioned in this manual are trademarks and/or registered trademarks of their respective holders.
Linux Open Source Code
Certain Edimax products include software code developed by third parties, including software code subject to the GNU General Public License ("GPL") or GNU Lesser General Public License ("LGPL"). Please see the GNU (www.gnu.org) and LPGL (www.gnu.org) Websites to view the terms of each license. The GPL Code and LGPL Code used in Edimax products are distributed without any warranty and are subject to the copyrights of their authors. For details, see the GPL Code and LGPL Code licenses. You can download the firmware-files at http://www.edimax.com under "Download" page.
1. Product Information
Congratulations on buying this Edimax IP Camera! You've chosen well. This IP camera is ideal for all kinds of video surveillance from home and office safety to child and pet monitoring purposes. This Edimax IP camera is tailor made to stream live video over your network, so you can view its footage from anywhere on your local computers. Better yet, you can view its video and hear its sound live via the Internet! The Edimax IC-3030i series features extremely high picture quality matched by a high frame rate video streaming because of advanced video compression. To get the best video quality, select H.264, MPEG4 or M-JPEG, depending on your network settings.
Before enjoying your new IP camera, please check the package contents. If anything is missing, return this package to your dealer to claim the missing contents.
2. Check your package contents
- 1 x IP Camera
- 1 x Power Adapter
● 1 x Detachable Antenna (IC-3030iWn only) - 1 x Mounting Kit
● 1 x Category 5 Ethernet Cable
● 1 x Quick Installation Guide
● 1 x CD (Including Manual/Utility/Multi-Language QIG)
3. System Requirement
● CPU: Intel Pentium 4 2.4 GHz above or Intel Dual-Core 2.0GHz
● VGA Card Resolution: 1024 x 768 or above
● A CD-ROM Drive
● Hard Disk: At least 128MB (256MB recommended) of available space
- OS: Windows 2000/XP/Vista/7
4. Hardware Installation
4.1 LED and Focusing
You can change the aim and focus of the camera by adjusting the camera head's aim and adjusting the focus ring. Simply point it in your direction of choice and rotate the focus ring to your preference.
Three LEDs indicate the camera's power and networking status.
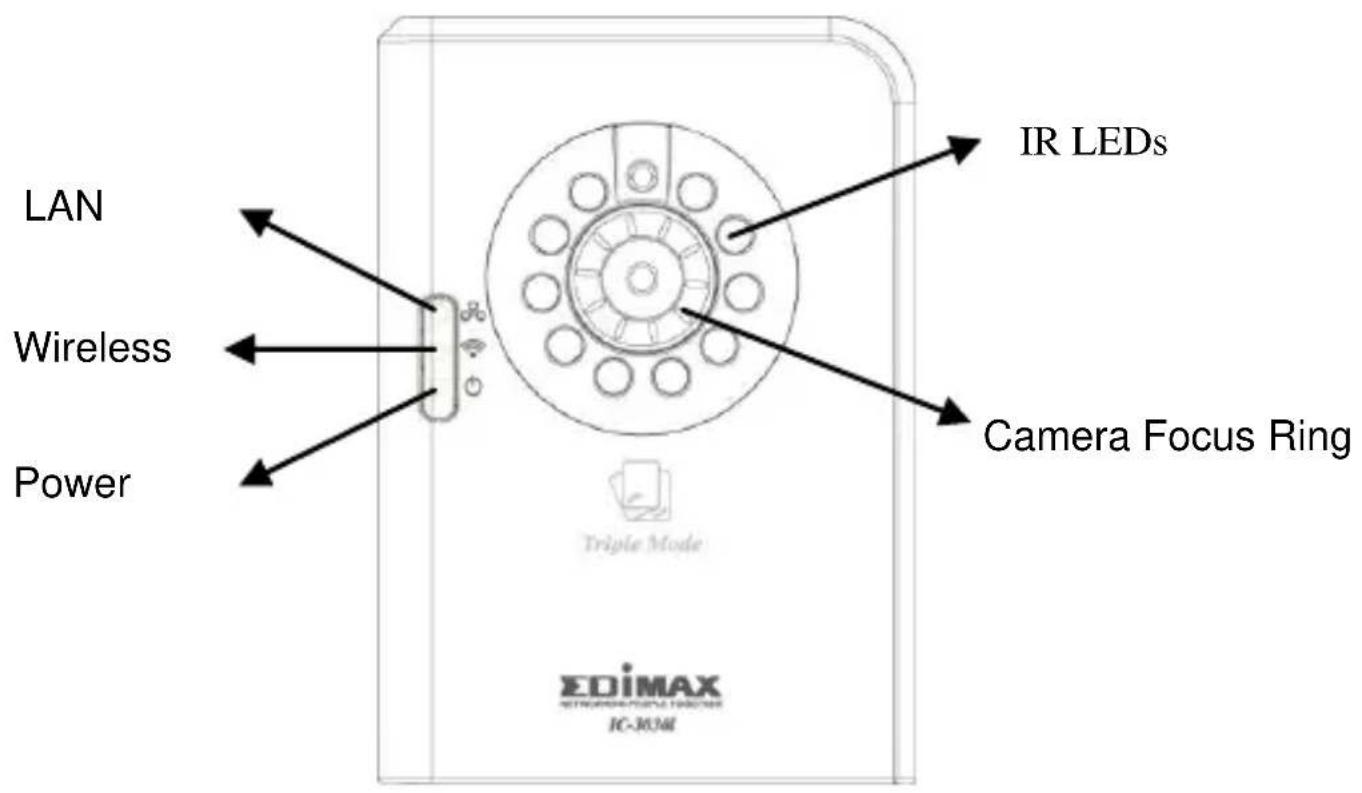
| LED | Description |
LAN | When the IP Camera is linked to a wired network, this LED will light up. The LED will flash while video is transmitted or received through a wired network. |
Wireless  | When the IP Camera is linked to a wireless network, this LED will light up. The LED will flash while video is transmitted or received through a wireless network. |
 | Lights up when environment is too dark |
  | When the camera is powered on and ready for access, this LED will light up. |
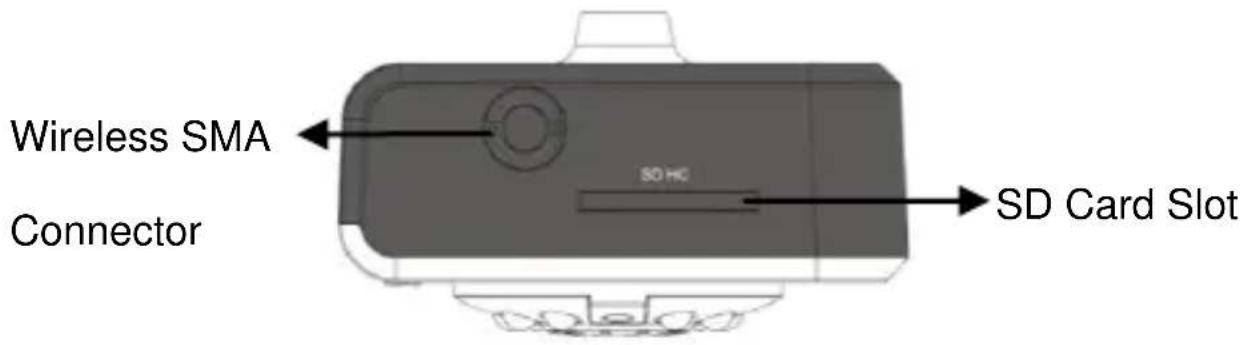
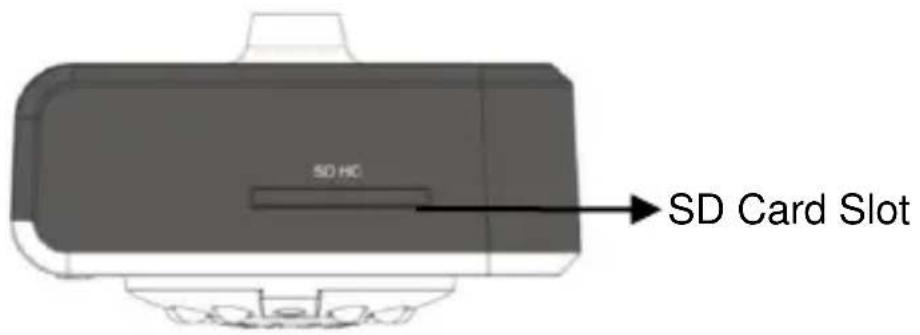
4.2 Camera Ports
Top View
IC-3030i:
IC-3030iWn:
IC-3030iPoE:
Bottom View
Reset to Default / WPS
Audio Connector
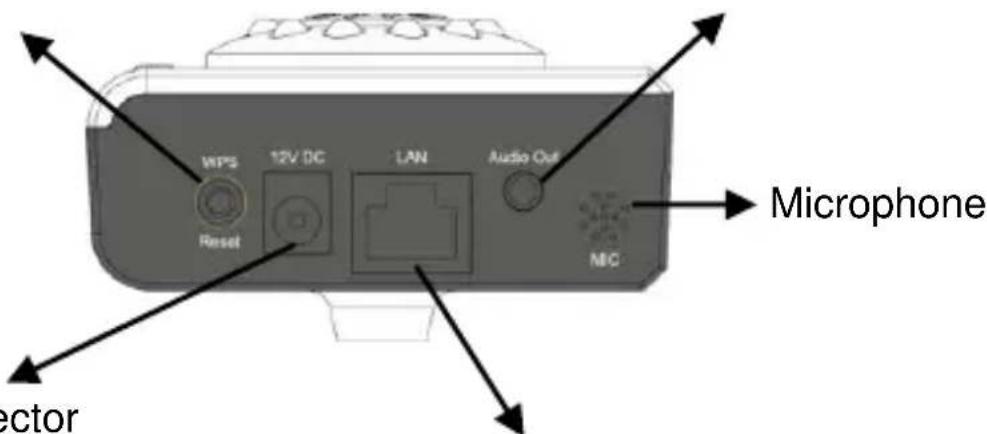
Power Connector
Ethernet Connector
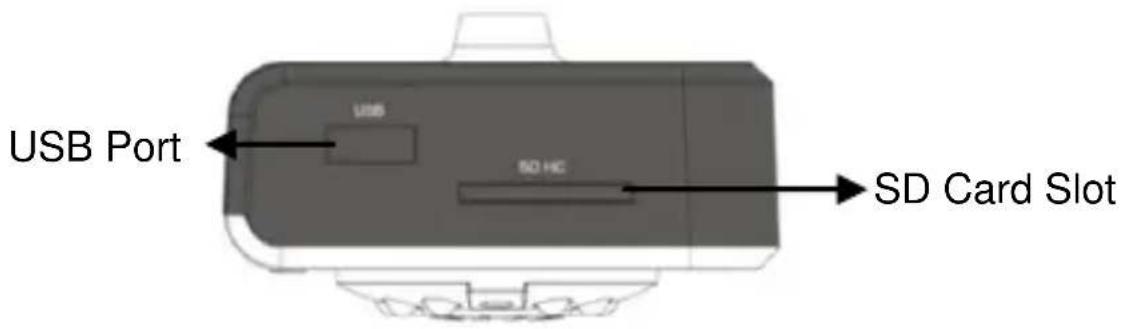
| Name | Description |
| USB Port* (IC-3030i only) | Accepts USB WiFi adapter** to enable wireless |
| SD Card Slot | Accepts SD / SD-HC memory card for image and video storage |
| Wireless SMA Connector (IC-3030iWn only) | A standard reverse SMA connector allows any reverse SMA connector antenna to connect to the IP Camera. |
| Reset to Default / WPS (IC-3030iWn only) | Press and hold WPS button for more than 5 seconds to reset the camera settings to factory default.Press the WPS button (click) on the IP Cam and click on the Access Point that you want to wirelessly connect it to. |
| Power Connector | Connects to 12V DC power adapter |
| Ethernet Connector | Connects to your local area network |
| Audio Connector | Connects to external speaker for audio output |
| Microphone | Built-in microphone for voice pick-up |
Note: The USB port only works with Edimax USB WiFi adapters.
- Unpack your Edimax IP Camera from its packaging and ensure that all the items listed in Chapter 1 are there.
- Connect the Edimax IP Camera to your network by attaching a network cable from your switch or router to the LAN port on the IP Camera.
- Connect the power adapter to the IP Camera and plug the adapter into a power outlet. When the IP Camera is ready, the Power LED will light up.
Note: It is highly recommended to use only the power adapter shipped with the IP Camera. Do NOT use any other power adapter and avoid possible damage to your new device.
5. Software Installation
The Installation Wizard will guide you through this simple process. Below we tell you how to get it started up. The following example is for Windows Vista. The procedure is similar for Windows 2000/XP/7.
- Insert the Edimax CD into your CD-ROM drive. It should start up automatically. If it doesn't, click on "Autorun.exe" in the "Autorun" folder on the CD.
- The Install Wizard will give you four options to choose from. Here you can select program you wish to install. The following installation steps are a demonstration of installing the 'Administrator Utility & Camera Viewer'. Click on 'setup utility'.
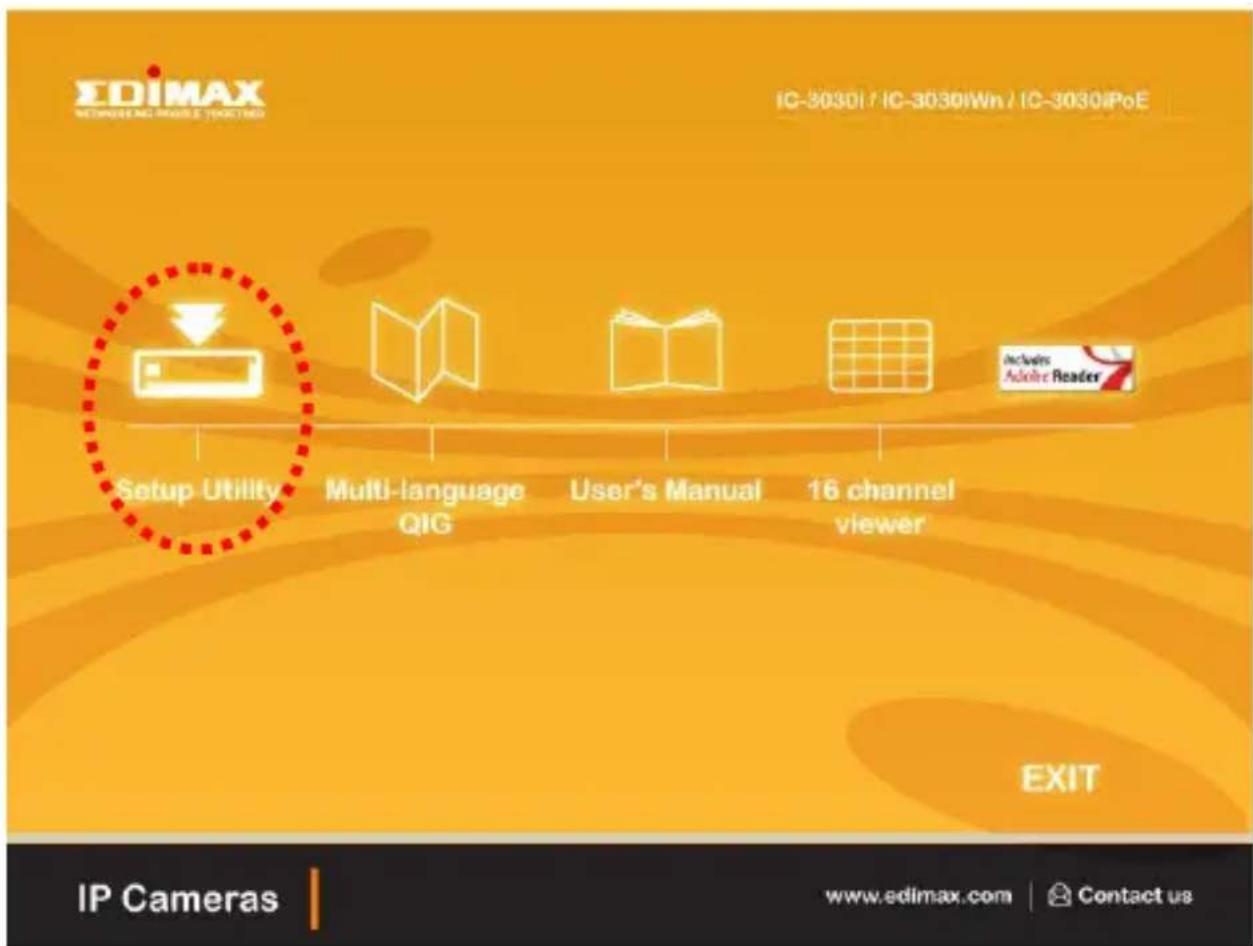
- The 'Install Wizard' should take you here. Click on 'Next' to continue your installation.
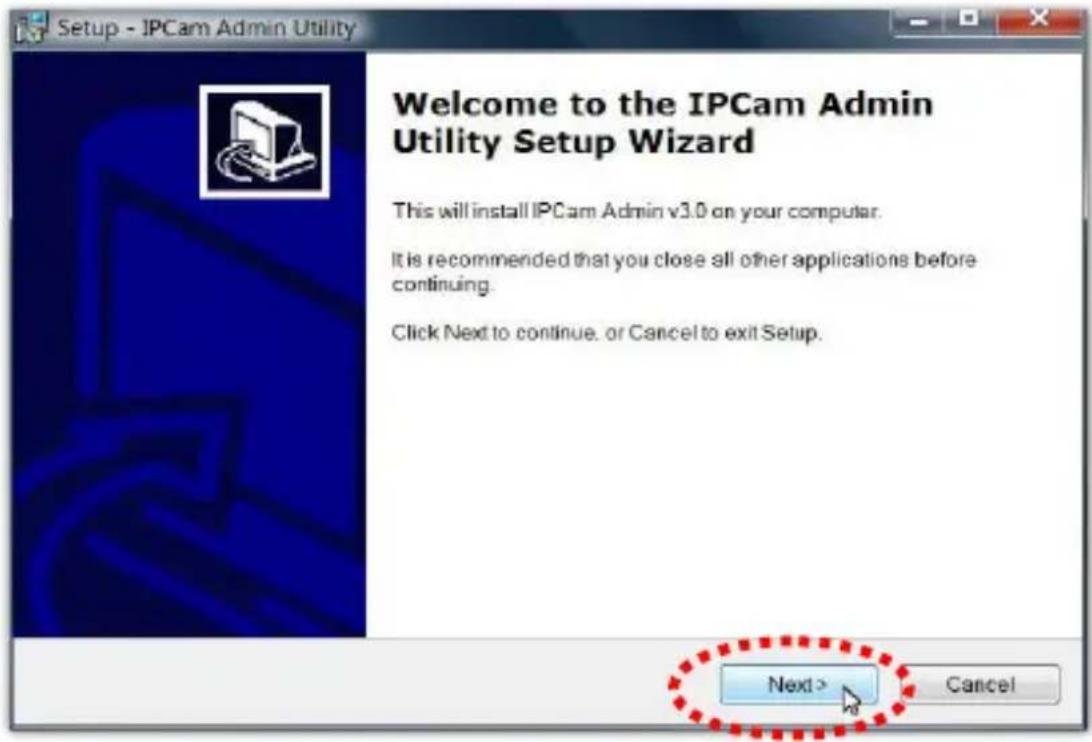
- Click on 'Next' to move to the next step. If you wish to install the program to an alternate location, click on 'Browse' and select a location.
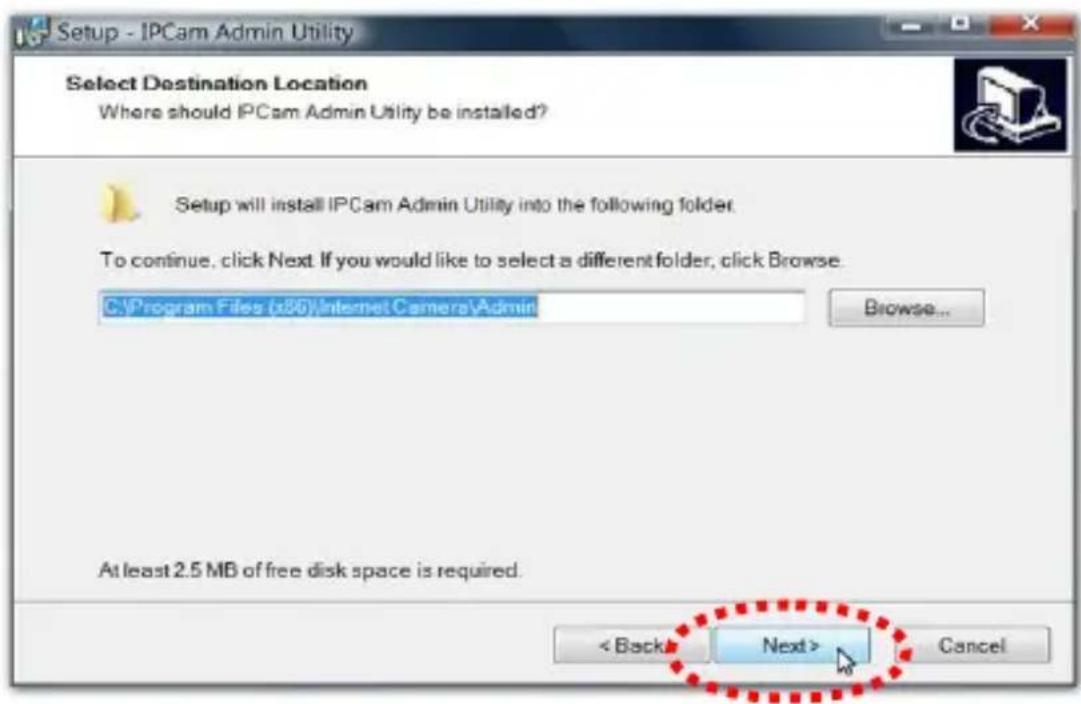
- Click 'Next' to move on to the next step or make your selections here.
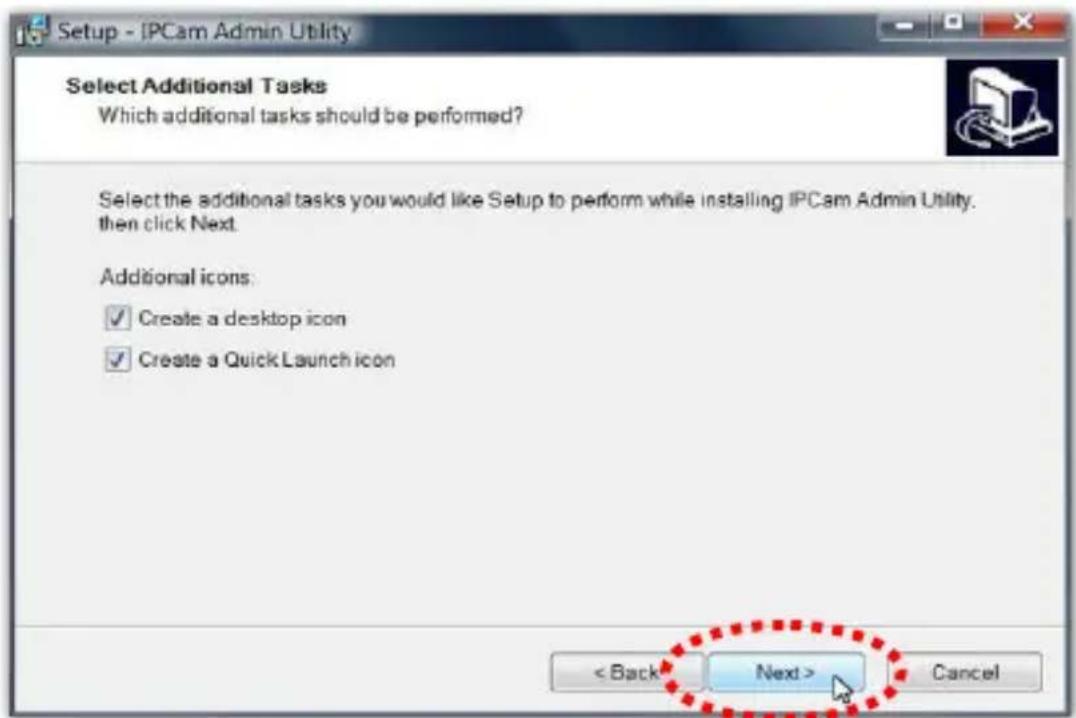
- Click on 'Install' to install the program.
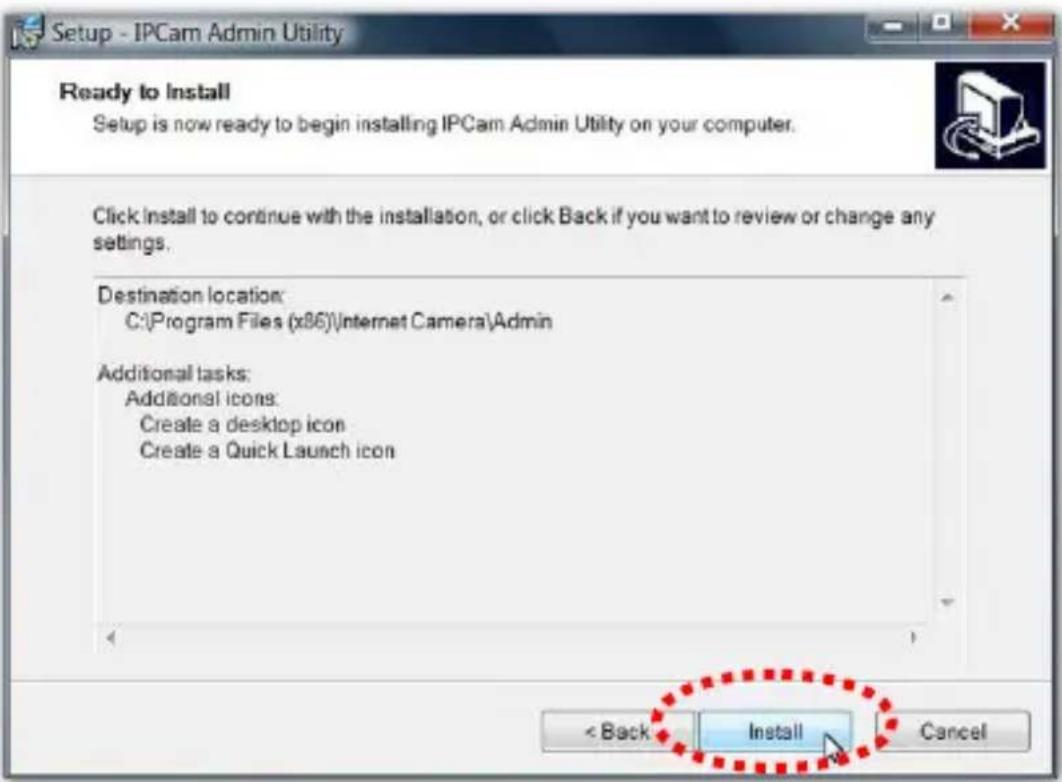
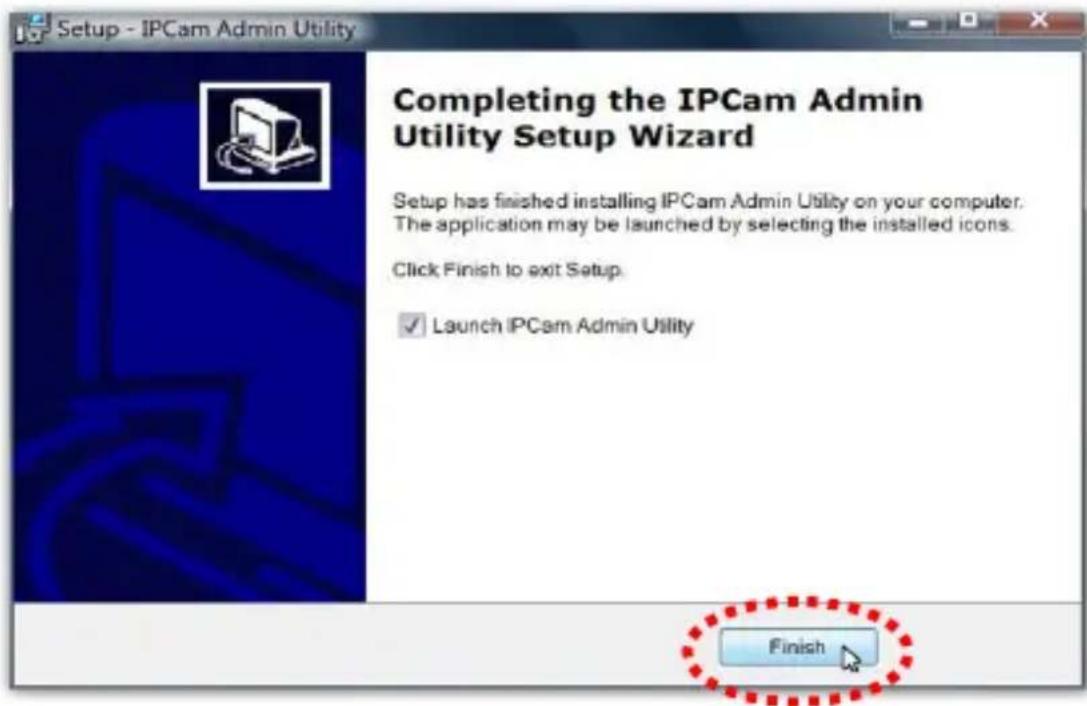
7. Click 'Finish' to confirm the software installation.
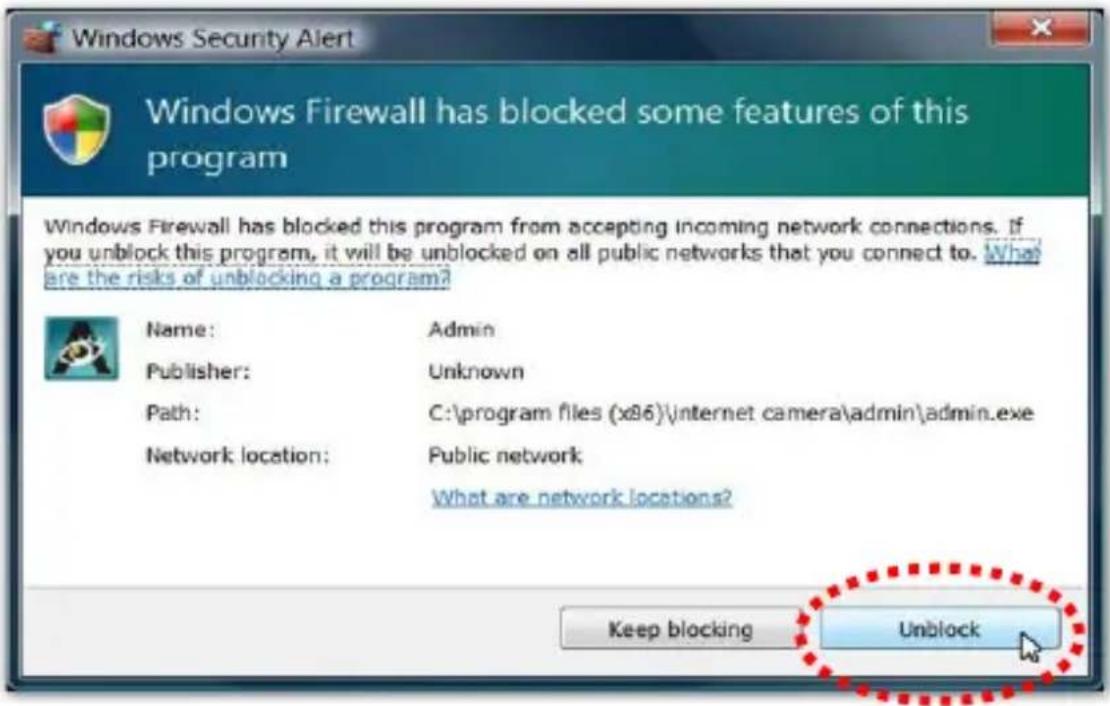
- If you have Windows Defender or other 3rd party firewall software, you may see the following or a similar message, Please click 'Unblock' to allow your Edimax IP camera Utility to pass through the firewall. Not doing so may cause the IP camera utility to not function optimally.
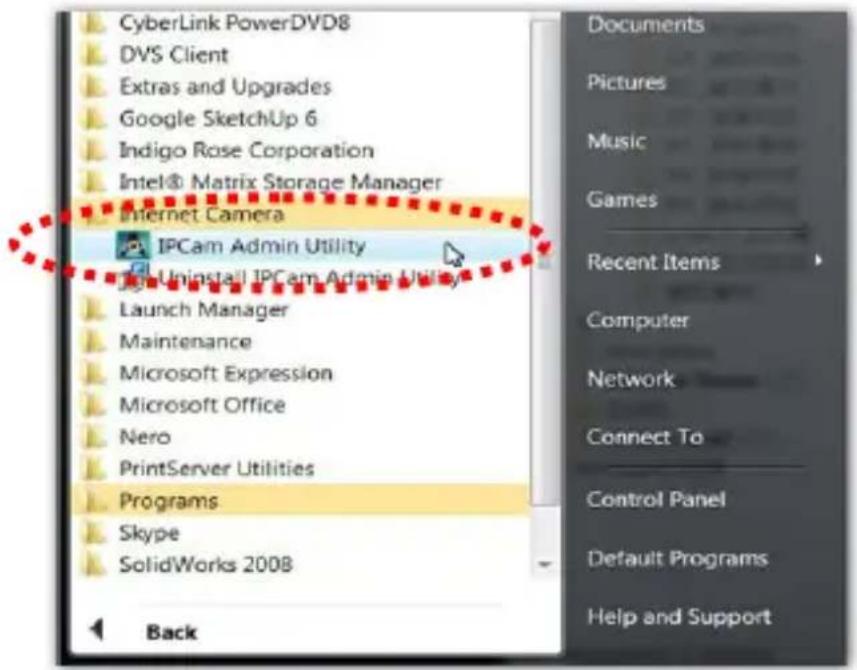
- A new folder named 'Internet Camera' under 'All Programs' will be created. Click on 'IP Cam Admin Utility' to connect to the IP camera and use the camera's functions directly.
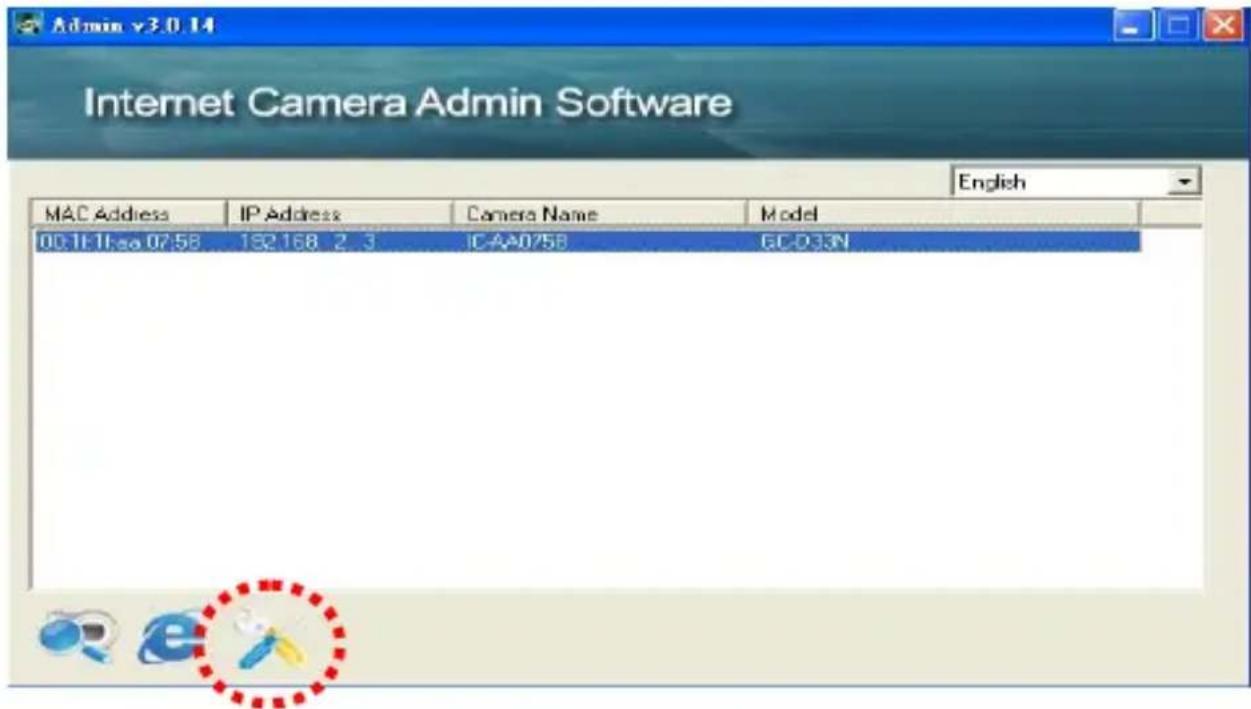
- After installation, the system will automatically run the 'Administrator Utility'. On the first page, the cameras found in your network will be listed. Select the one you wish to configure and click on the 'Configure Camera' icon.
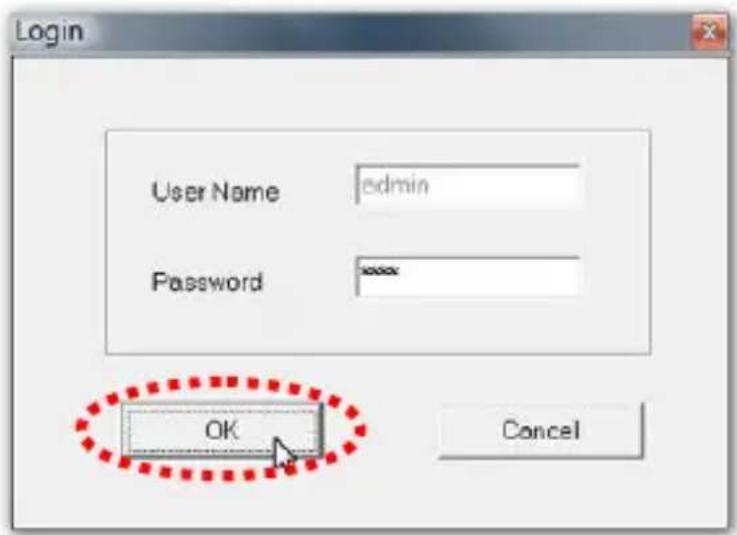
- You will be prompted to insert your user name and password. The default user name is 'admin' (unchangeable), and the default password is '1234' (changeable). Click 'OK' to continue.
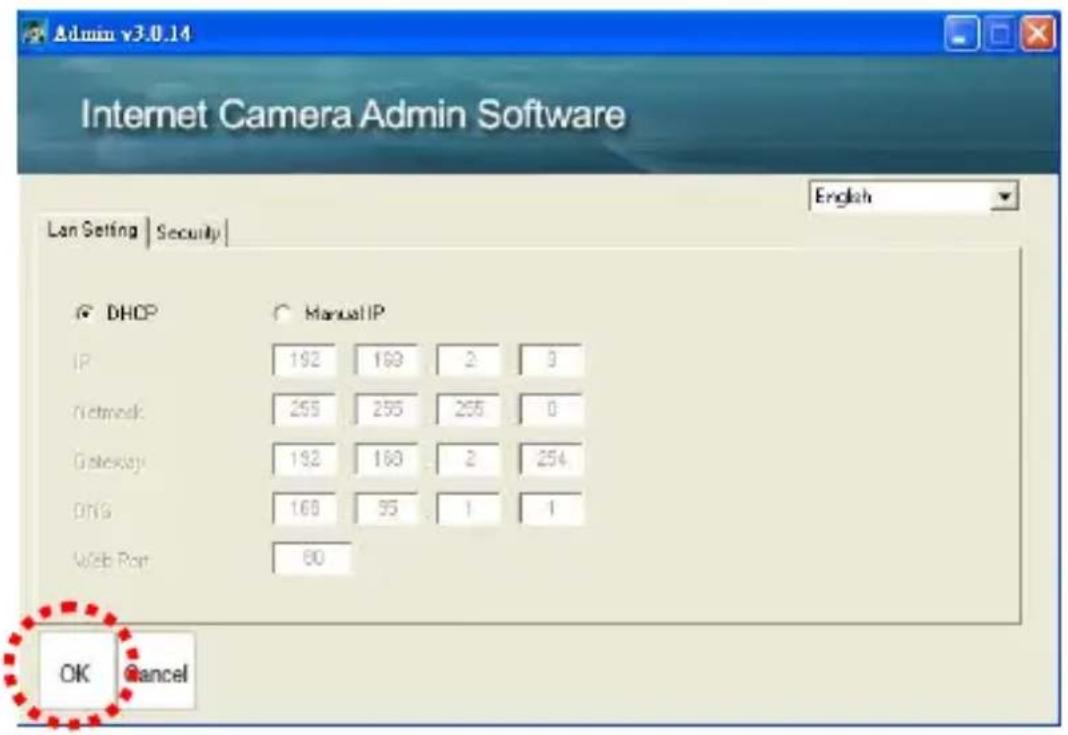
- The program will automatically detect the IP address status of your network and suggest a free IP address for the IP Camera using DHCP. You can accept the suggested address or enter the values manually. If you enter the values manually, ensure that the 'Subnet Mask' is the same for both the camera and the PC. Since the IP Camera works through the network (TCP/IP Protocol) the IP address setting must be correct for you to access the IP camera. Click 'OK' to apply your configuration.
6. WEB Management Interface
You can use your WEB browser (Internet Explorer 5.5 or above) to connect to the IP camera. Type the IP address (see 5.12) in the address bar of your web browser. Bookmark the address for ease of future use. You'll be prompted to insert a user name and password:
User name: admin / Password: 1234
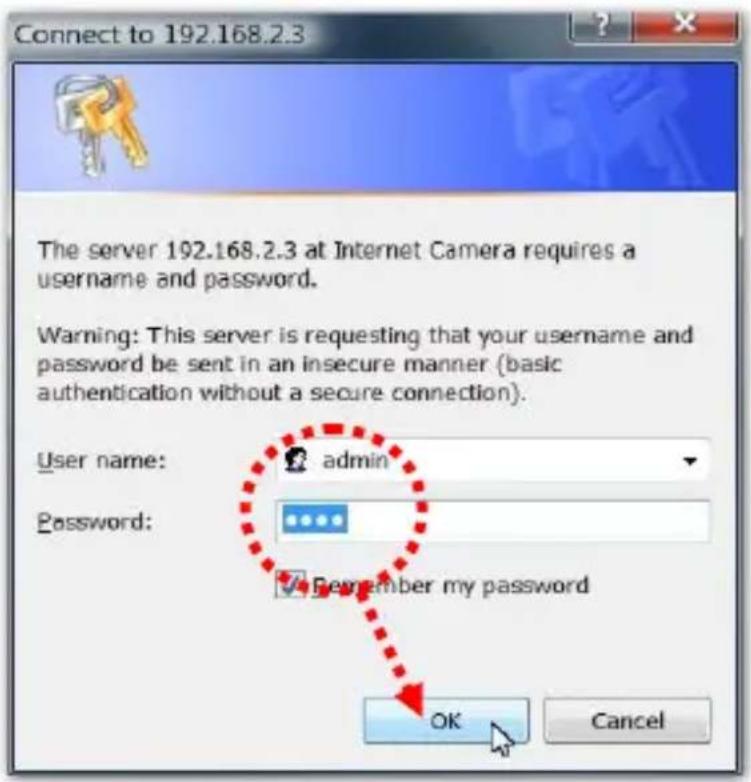
Once you're logged on, you will see the following message appear at the top of Internet Explorer. Click on the message, and click 'Install ActiveX Control...'
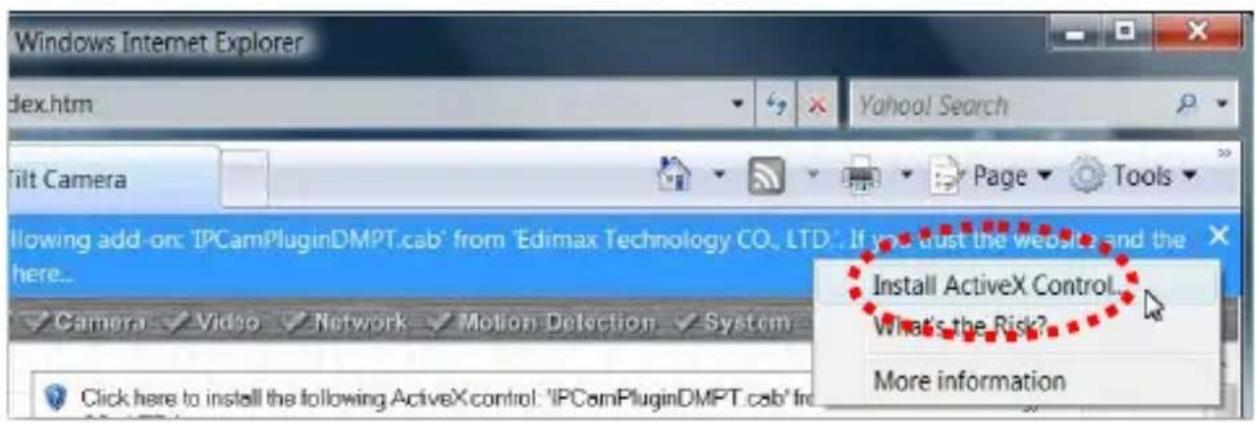
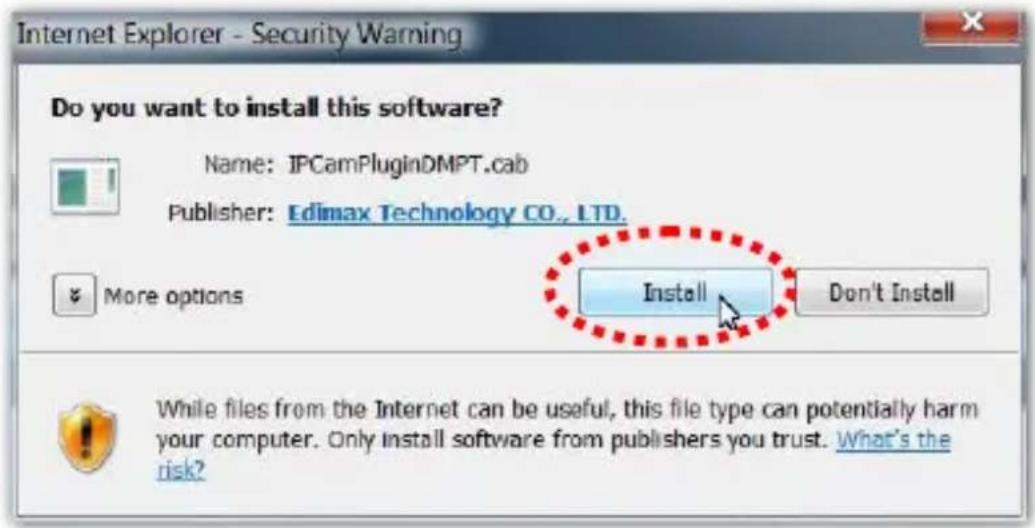
When you see this message, click 'Install'. ActiveX control will be installed, allowing you to access the IP camera.
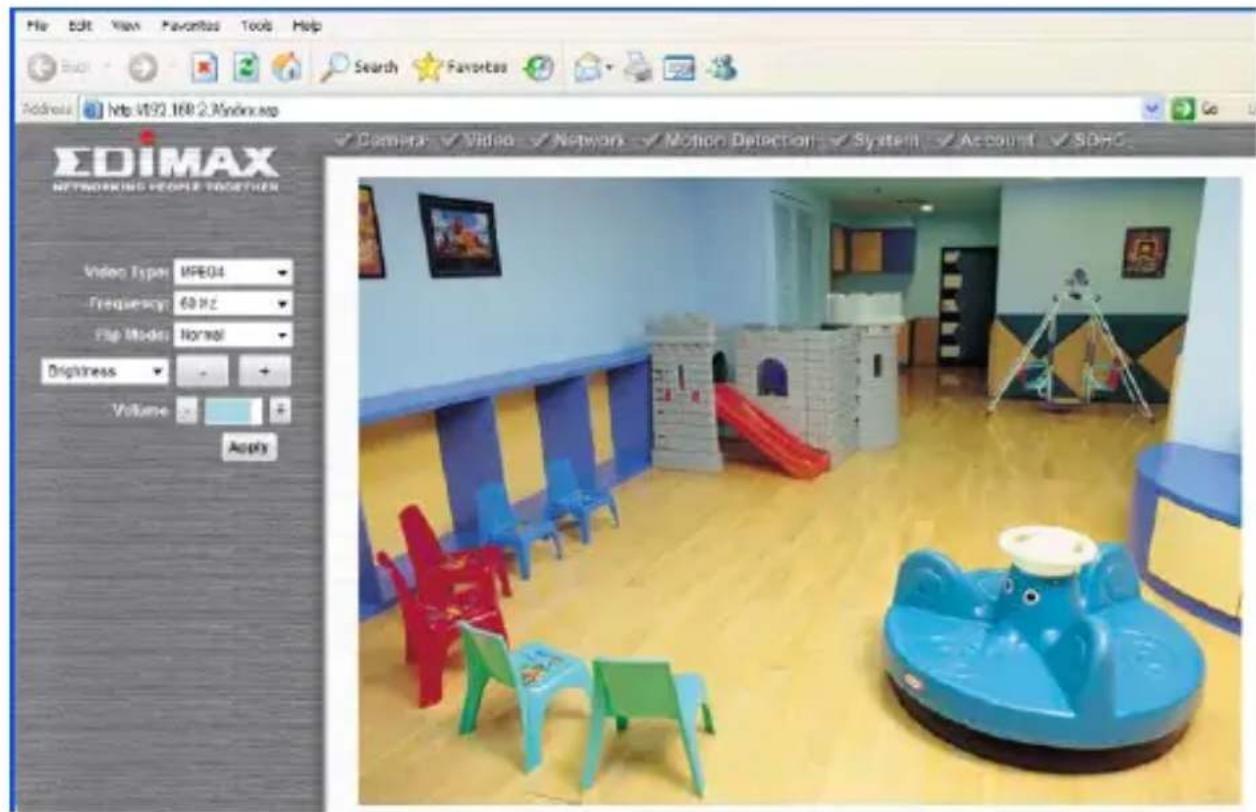
You should now be able to see the images and hear the sounds captured by the Edimax IP camera. For advanced functions, please refer to instructions in the user manual (also on CD-ROM).

EDIMAX Technology Co., Ltd.
www.edimax.com

- Fast Ethernet / Wireless 802.11n / PoE Triple Mode IP Camera with Night Vision
- IC-3030i / IC-3030iWn / IC-3030iPoE Quick Installation Guide
- ErP Announcement
- Detailed description:
- Based on the ErP official journal of European Union
- We announce that the product need not comply with the (EC) No 1275 Standby and on/off mode function of Implementing Measurement.
- ΣDIMAX NETWORKING PEOPLE TOGETHER
- Linux Open Source Code
- Product Information
- Check your package contents
- System Requirement
- Hardware Installation
- LED and Focusing
- Camera Ports
- Software Installation
- Click 'Finish' to confirm the software installation.
- WEB Management Interface
Brand : Edimax
Model : IC-3030IPOE
Category : Security Camera