
TWR-818 - Radio DENVER - Free user manual and instructions
Find the device manual for free TWR-818 DENVER in PDF.


| Product Type | FM/MW/SW1-7 Mini 9 Band Digital Radio with Alarm Clock |
| Brand | Denver |
| Model | TWR-818 |
| Dimensions | 159 x 97 x 34 mm |
| Weight | 260 g (without batteries) |
| Power Supply | DC 3V (2 x UM1 1.5V batteries or external DC 3V 300mA adapter) |
| Battery Type | Two UM1 (D size) 1.5V batteries |
| External Power | DC 3V 300mA (center positive plug) |
| Frequency Ranges | FM 87-108 MHz; MW 526.5-1606.5 kHz; SW1 5.95-6.20 MHz; SW2 7.10-7.30 MHz; SW3 9.50-9.80 MHz; SW4 11.65-12.05 MHz; SW5 13.60-13.80 MHz; SW6 15.10-15.60 MHz; SW7 17.50-17.90 MHz |
| Sensitivity (FM) | ≤20 µV |
| Sensitivity (MW) | ≤3 mV/m |
| Sensitivity (SW) | ≤100 µV |
| Selectivity | 10 dB (single-signal) |
| Speaker | 0.5W, 8Ω |
| Earphone Jack | 3.5mm stereo |
| Display | LCD with time, frequency, band, AM/PM, alarm indicators |
| Clock | 12-hour format with manual setting via Hour/Minute buttons |
| Alarm | Radio alarm with set and ON/OFF buttons; automatically turns on radio at set time |
| Antenna | Telescopic for FM and SW; internal ferrite for MW |
| Bands | FM, MW (AM), SW1-7 (9 bands total) |
Frequently Asked Questions - TWR-818 DENVER
User questions about TWR-818 DENVER
0 question about this device. Answer the ones you know or ask your own.
Ask a new question about this device
Download the instructions for your Radio in PDF format for free! Find your manual TWR-818 - DENVER and take your electronic device back in hand. On this page are published all the documents necessary for the use of your device. TWR-818 by DENVER.
USER MANUAL TWR-818 DENVER
Operating instructions
FM/MW/SW1-7 MINI 9 BAND DIGITAL RADIO WITH ALARM CLOCK
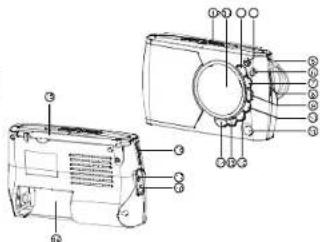
APPEARANCE DIAGRAM & FUNCTION INDICATION
- Band switch
- Display screen
- Hour adjustment button
- Power indicator
- Hand bell
- Lightillumination
- Minute adjustment button
- Tuner
- Time set button
-
Alarmset button
-
Power OFF button
- Alarm ON/OFF button
- AM band/Power ON button
- FM band/Power ON button
- Telescopic antenna
- Volumecontrol
- Earphonejack
- External power socket
- Battery slot
45
text_image
Technical diagram of a device with numbered components, likely an enclosure or fan assemblyLCDEXPLANATION
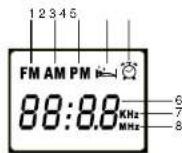
- FMbandindication
- AMband/AMtimeIndication
- PMtime Indication
- AlarmsetIndication
- Alarmsidication
- Frequency/timeindication
- MW frequency unit indication
- SW or FM frequency unit indication
POWER
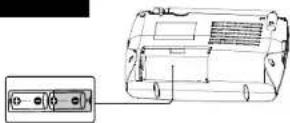
Installing batteries
- The radio uses two UM1 1.5V batteries, please put the
- If the sound is distortion or the volume is faint, please
change the batteries in time
46
Attention:
-
Do not use new and old or different type batteries together.
-
In order to prevent the leakage of the electrolysis liquid or danger of explosion, do not charge, heat or resolve the batteries.
-
If you do not use the radio for a long time, please take out the batteries, lest the leakage of the battery corrodes the parts inthe radio.
UseExternal Power
Please use output DC 3V 300mA regulating external direct current power, check the positive and negative of the plug
RECEPTION OPERATION
-
Press the FM band/Power ON button (14) to turn on the radio, and to receive FM station program, meanwhile the Power indicator(4) will lightup.
-
press the AM band/Power ON button (13) to turn on the radio, and to receive AM station program, meanwhile the Power indicator (4) will light up. Move the Band switch (1) to select MW,SWI-7 station program.
-
When the radio is in the work state, turn the Volume control (15) to adjust to your desired volume.
-
Turn the Tuner (8) and watch the station frequency on the display screen search your desired station program.
-
In order not to affect others, you can use earphone to listen to the radio. Plug the earphones into the Earphone jack (17) (the speaker inside the radio is deactive), you can listen to the radio by earphones.
-
Keep the Light illumination button(6) pressed, the illumination lamp lights up, which is convenient for night operation.
- When you do not listen to the radio, please press the Power OFF (11) to turn off the radio, the time displays on the display screen.
CLOCK SETTING
- After installing batteries, the time"12:00"appears on the LCD.
- Keep the Time set button(9)pressed, meanwhile press the Hour adjustment button (3) to adjust hour, or press the Minute adjustment button (7) to adjust minute, set theclock time.
- If you want to see the time in the state of work, press the Power OFF button (11) to turn off the power, the time appears on the display screen.
- The 12 hours system is used in the radio. The AM on the display screen indicates morning time, The PM on the display screen indicates afternoon time.
ALARM SETTING
After you complete to set the electronic clock time
correctly, you can set the Alarm time:
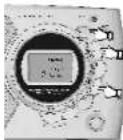
- In the state of clock, press the Alarm set button(10) pressed, the symbol of "or "7:00" on the display screen. Press the Hour adjustment button (3) to adjust hour, and press the Minute adjustment button(7) to adjust minute, adjust to your desired time to turn on the radio.
- When the radio works, press the Alarm set button(10), the alarm time displays on the display screen, and the symbol of "i+".
- When setting alarm ON/OFF time, AM on the LCD means morning time, PM means afternoon time.
ALARMFUNCTION
- After setting the alarm time, keep the radio in the state of clock.
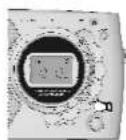
- Press the Alarm ON/OFF button (12) once, the symbol of * * displays on the display screen, the Alarm ON/OFF function begins to work. When the turn on time reaches, the radio will automate to be turned on, the FM band frequency will display on the display screen.
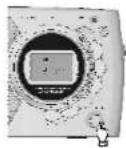
- Press the Alarm ON/OFF button (12) to cancel the "💡" symbol, and press the Power OFF button (11) to turn off the radio.
USE ANTENNA
Receive MW Broadcast
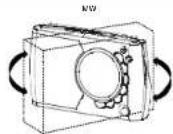
Receiving MW broadcast by using the internal magnetic antenna, and you can get the best reception by rotating the direction of the radio.
Receive FM Broadcast
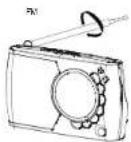
Receiving FM broadcast by using the telescopic antenna, please pull out it to get the best reception by changing its length and direction.
Receive SW Broadcast
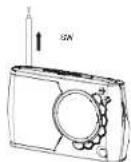
Receiving SW broadcast by using the telescopic antenna, please pull out it and keep it vertical to get the best reception.
COMMON PROBLEMS & HANDLE
- The MW and SW are strongly jammed by the TV set, fluorescent lamp, silicon controlled table lamp, computer and motor and so on. When you use the radio, please keep the radio away from the above-mentioned electrical equipment.
- Reinforcing bar structure inside the multi-storied building and high building will screen the broadcast signal, receiving near the window will improve reception effect.
- The SW and FM broadcast will be strongly jammed by the nearby "BB" station signal, you can improve reception effect by adjusting the length of the antenna and the angle of the radio.
- You can use the soft antenna, one end is stuck to the antenna, the other end is put outside the window, it will improve SW and FM receiving effect.
- The digit display radio is affected by the temperature, humidity and vibration and son on, the digit frequency will maybe deviate. So in using time turn on function, if the frequency deviates, please adjust to receive the correct station.
- When the temperature is under -10°C in winter, it will cause the leakage of LCD, in general, please avoid using the radio under low temperature.
TECHNICAL INDEX
-
FrequencyRange
FM 87-108 MHz
MW 526.5-1606.5KHz
SW1 5.95-6.20 MHz SW2 7.10-7.30 MHz
5W3 9.50-9.80 MHz
SW4 11.65-12.05 MHz
SW5 13.60-13.80 MHz
SW6 15.10-15.60 M H z
SW7 17.50-17.90 M H z -
Sensitivity
FM ≤ 20μV
MW≤ 3 mV/m
SW ≤ 100μV
- Single-signal Selectivity 10dB
POWER: DC 3V
Battery two DM1 1.5V batteries
External Power ⊕ ⊙ 3V 300mA
-
Maximum consume current ≤ 150mA
-
Speaker: 0.66mm/81 /0.5W
-
Earphone: 3.5mm32
-
Unit Size: 159x9/×34mm
-
weight: 260g(withoutbattery)
Electric and electronic equipment contains materials, components and substances that can be hazardous to your health and the environment, if the waste material (discarded electric and electronic equipment) is not handled correctly.
Electric and electronic equipment is marked with the crossed out trash can symbol, seen below. This symbol signifies that electric and electronic equipment should not be disposed of with other household waste, but should be disposed of separately.
All cities have established collection points, where electric and electronic equipment can either be submitted free of charge at recycling stations and other collection sites, or be collected from the households. Additional information is available at the technical department of your city.
