
ECP-719NR - Radio DENVER - Free user manual and instructions
Find the device manual for free ECP-719NR DENVER in PDF.


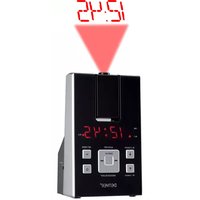
| Product Type | Projection Alarm Clock Radio |
| Brand | Denver |
| Model | ECP-719NR |
| Power Supply | AC 100-240V, 50/60 Hz; Output DC 5V 1.2A |
| Backup Battery | 1x CR2032 3V (not included) |
| Projection Feature | Projects time on wall; focus adjustment; 180° flip |
| Alarm | Dual alarms with snooze (9 min) and alarm off |
| Display Type | LED digital display with brightness dimmer |
| USB Charging | USB port (5V 1.2A) for charging devices |
| Dimensions (approx.) | 150 x 80 x 100 mm |
| Weight (approx.) | 0.5 kg |
| Material | Plastic |
| Color | Black |
| Button Controls | Time set, Alarm set, Hour, Minute, Snooze, Dimmer, Projection on/off, Flip |
| Safety Warnings | Keep ventilated; no naked flames; battery disposal caution |
| Manufacturer | Denver Electronics A/S |
| Compliance | CE marked; RoHS compliant |
| Contents | Main unit, power adapter, user manual |
| Warranty | Standard 1 year (check local) |
| User Manual Available | Downloadable PDF from manufacturer website |
Frequently Asked Questions - ECP-719NR DENVER
User questions about ECP-719NR DENVER
0 question about this device. Answer the ones you know or ask your own.
Ask a new question about this device
Download the instructions for your Radio in PDF format for free! Find your manual ECP-719NR - DENVER and take your electronic device back in hand. On this page are published all the documents necessary for the use of your device. ECP-719NR by DENVER.
USER MANUAL ECP-719NR DENVER
- Projection focus dial
- Projection lens
- SNOOZE button / DIMMER button
- Display
- Alarm 1 indicator
- Alarm 2 indicator
- PROJECTION ON/OFF button
- PROJECTION 180° FLIP button
- HOUR button
- MIN button
- Alarm 1 button
- Alarm 2 button
- TIME SET button / ALARM OFF button
- USB charging port
- Battery compartment
- DC in jack
Connecting to power
- Connect one end of the power adapter to the DC in jack on this product.
- Connect the other end of the power adapter to a wall socket.
Backup system
- This product is equipped with a backup system. It requires a 3V lithium battery (type CR2032, not included). Insert the battery into the battery compartment and make sure the positive and negative (+ or -) sides of the battery are in contact with the corresponding terminals in the battery compartment.
- If a power cut occurs, the product automatically switches to the battery power supply and keeps the clock and alarm settings.
- To open the battery compartment, use a screwdriver to detach the screw on the compartment door.
- When replacing the battery, do not disconnect the power adapter. Otherwise, all clock and alarm settings will be removed.
WARNING
DO NOT INGEST BATTERY, CHEMICAL BURN HAZARD
This product contains a coin/button cell battery. If the coin/button cell battery is swallowed, it can cause severe internal burns in just 2 hours and can lead to death.
Keep new and used batteries away from children. If the battery compartment does not close securely, stop using the product and keep it away from children.
If you think batteries might have been swallowed or placed inside any part of the body, seek immediate medical attention.
Clock setting
- Press and hold the TIME SET button to enter the clock setting mode.
- Press the HOUR button to set the hour and the MIN button to set the minute (press and hold the HOUR or MIN button for faster adjustment).
- Press the TIME SET button to confirm your clock setting.
Alarm setting
You can set two alarm timers simultaneously.
- Press and hold the Alarm 1 or Alarm 2 button to enter the alarm setting mode.
- Press the HOUR button to set the hour and the MIN button to set the minute (press and hold for faster adjustment).
- Press the Alarm 1 or Alarm 2 button to confirm your alarm setting.
Activate and deactivate the alarm
When the clock is displayed, press the Alarm 1 or Alarm 2 button to activate or deactivate the respective alarm timer. If the alarm timer is activated, the corresponding Alarm 1 or Alarm 2 indicator turns on.
Turn off alarm
When alarm rings, press the ALARM OFF button to turn off the alarm.
Snooze
To temporarily silence alarm, press the SNOOZE button. The alarm rings at 9-minute interval.
To cancel the snooze alarm, press the ALARM OFF button.
Display brightness
Press the DIMMER button to change the display brightness level (low or high).
Image projection
- Press the PROJECTION ON/OFF button to project the current clock time on a wall.
- Press the PROJECTION 180° FLIP button to flip the projected image.
- Turn the projection focus dial to adjust the image sharpness.
Charge a USB device
To charge a USB device, using a USB cable (not included), connect a USB device (e.g. smartphone, mp3 player) via to the USB port on the back of this product. The contents in the connected USB device cannot be accessed by this product.
Specifications
| AC power adaptor: | Input: AC100~240 V, 50/60 HzOutput: DC 5V1.2A |
| Battery backup for clock: | 1x DC3V CR2032 (not included) |
| Power adaptor manufacturer: | Dongguan Obelieve Electronic Co., Ltd. |
| Power adaptor model number: | OBL-0501200E |
WARNING
- Keep minimum 5 cm space around the product for sufficient ventilations.
- The ventilation slots should not be covered with items such as newspaper, table-cloths, curtains etc.
- No naked flame sources such as lighted candles should be placed on the product.
- Attention should be drawn to the environmental aspects of battery disposal.
- Use this product in moderate climates.
- Where the mains plug is used as the disconnect device, the disconnect device shall remain readily operable.
- Refer to the information at the bottom of the product for electrical and safety information before installing or operating the product.
- The batteries (battery pack or batteries installed) shall not be exposed to excessive heat such as sunshine, fire or the like.
- CAUTION - Danger of explosion if battery is incorrectly replaced. Replace only with the same or equivalent type of battery
Please notice - All products are subject to change without any notice. We take reservations for errors and omissions in the manual.
ALL RIGHTS RESERVED, COPYRIGHT DENVER ELECTRONICS A/S
DENVER®
www.denver-electronics.com


Electric and electronic equipment contains materials, components and substances that can be hazardous to your health and the environment, if the waste material (discarded electric and electronic equipment) is not handled correctly.
Electric and electronic equipment is marked with the crossed out trash can symbol, seen above. This symbol signifies that electric and electronic equipment should not be disposed of with other household waste, but should be disposed of separately.
All cities have established collection points, where electric and electronic equipment can either be submitted free of charge at recycling stations and other collection sites, or be collected from the households. Additional information is available at the technical department of your city.
DENVER ELECTRONICS A/S
Omega 5A, Soeften
DK-8382 Hinnerup
Denmark
www.facebook.com/denverelectronics


Brand : DENVER
Model : ECP-719NR
Category : Radio