
BSO636SS - Oven BAUMATIC - Free user manual and instructions
Find the device manual for free BSO636SS BAUMATIC in PDF.


User questions about BSO636SS BAUMATIC
0 question about this device. Answer the ones you know or ask your own.
Ask a new question about this device
Download the instructions for your Oven in PDF format for free! Find your manual BSO636SS - BAUMATIC and take your electronic device back in hand. On this page are published all the documents necessary for the use of your device. BSO636SS by BAUMATIC.
USER MANUAL BSO636SS BAUMATIC
natural_image
Simple line drawing of a fish with fins and tail, no text or symbols presentUser Manual for your Baumatic
BSO616SS
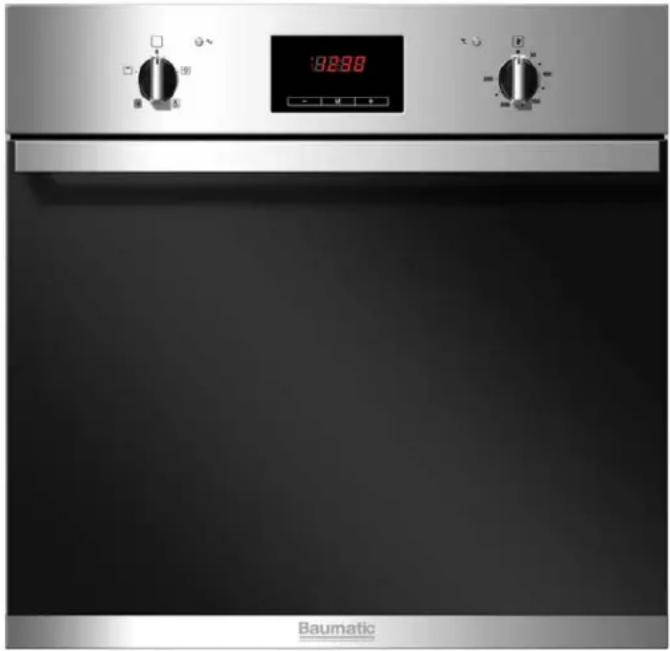
60 cm Fan Oven
BSO636SS
60cm Multifunction Oven
natural_image
Front view of a stainless steel oven with digital display and control knobs (no visible text or symbols)
text_image
Baumatic®NOTE: This User Instruction Manual contains important information, including safety & installation points, which will enable you to get the most out of your appliance. Please keep it in a safe place so that it is easily available for future reference; for you or any person not familiar with the operation of the appliance.
JW 11/10/12
Contents
| Environmental note | 4 | |||||||||||||
| Important | safety | information | 5 - 7 | |||||||||||
| S | p | e | c | i | f | i | c | a | t | i | o | n | s | |
| Product and aperture dimensions | 8 | |||||||||||||
| P | r | o | d | u | c | t | s | p | e | c | i | f | ||
| S | t | a | n | d | a | r | d | a | c | c | e | s | ||
| E | l | e | c | t | r | i | c | a | l | d | e | t | ||
| C | o | o | l | i | n | g | f | a | n | |||||
| C | o | n | t | r | o | l | p | a | n | e | l | |||
| O | v | e | n | p | r | o | g | r | a | m | m | e | ||
| Setting and using the oven programmer/ timer | 11-15 | |||||||||||||
| Selecting manual operation mode | 11 | |||||||||||||
| Setting the time of day | ||||||||||||||
| B | e | f | o | r | e | f | i | r | s | t | u | |||
| Setting the minute minder function | ||||||||||||||
| Setting the semi-automatic cooking function | 13 | |||||||||||||
| S | e | t | t | i | n | g | t | h | e | e | n | |||
| Setting the automatic cooking function | 15 | |||||||||||||
| Cancelling the semi-automatic and automatic cooking functions | 16 | |||||||||||||
| Cancelling the minute minder | 16 | |||||||||||||
| Adjusting the volume of the audio signal | 16 | |||||||||||||
| C | h | a | n | g | i | n | g | t | h | e | t | |||
| Selecting a cooking function and temperature | 17-21 | |||||||||||||
| S | e | l | e | c | t | i | n | g | a | n | o | |||
| O | v | e | n | f | u | n | c | t | i | o | n | s | ||
| T | h | e | r | m | o | s | t | a | t | c | o | n | ||
| Oven operating light | 19 | |||||||||||||
| Cooking guidelines | 20 | |||||||||||||
| W | a | r | n | i | n | g | s | |||||||
| S | h | e | l | f | p | o | s | i | t | i | o | n | ||
| Cleaning and maintenance | 22-24 | |||||||||||||
| Replacing the oven bulb | 23 | |||||||||||||
| Removing the oven door cleaning | ||||||||||||||
| Removing the inner door glass for cleaning | 24 | |||||||||||||
| Installation | 25-27 | |||||||||||||
| E | l | e | c | t | r | i | c | a | l | c | o | n | ||
| Installing the oven into the kitchen cabinet | 26 | |||||||||||||
| P | o | s | i | t | i | o | n | i | n | g | t | h | ||
| V | e | n | t | i | l | a | t | i | o | n | r | e | ||
| My appliance isn't working correctly | 28-30 | |||||||||||||
| Cooking Tables | 3 | 0 | - | 3 | ||||||||||
| Baumatic consumables | 33 | |||||||||||||
| Contact details | 3 | 4 | ||||||||||||
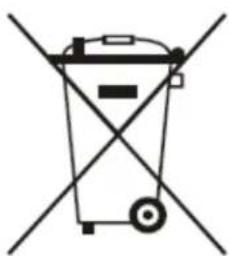
This appliance is marked according to the European directive 2002/96/EC on Waste electrical and Electronic Equipment (WEEE). By ensuring this product is disposed of correctly, you will help prevent potential negative consequences for the environment and human health, which could otherwise be caused by inappropriate waste handling of this product.
The symbol

on the product, or on the documents accompanying the product, indicates that this appliance may not be treated as household waste. Instead it shall be handed over to the applicable collection point for the recycling of electrical and electronic equipment.
Disposal must be carried out in accordance with local environmental regulations for waste disposal.
For more detailed information about treatment, recovery and recycling of this product, please contact your local city office, your household waste disposal service or the shop where you purchased the product.
natural_image
Simple line drawing of a trash bin with crossed lines indicating no waste or restriction (no text or symbols)
- The packaging materials that Baumatic uses are environmentally friendly and can be recycled.
- Please discard all packaging material with due regard for the environment.

text_image
Warning symbol with exclamation mark inside triangleYour safety is of the utmost importance to Bauma. Please make sure that you read this instruction booklet before attempting to install or use the appliance. If you are unsure of any of the information contained in this booklet, please contact the Baumatic Customer Care Department.
General Information
- This appliance is designed for domestic household use and can be built into a standard kitchen cabinet or housing unit.
○ IMPORTANT: The adjacent furniture or housing and all materials used in the installation must be able to withstand a minimum temperature of 85^ C above the ambient temperature of the room it is located in, whilst in use.
○ Certain types of vinyl or laminate kitchen furniture are particularly prone to heat damage or discolouration at temperatures below the guidelines given above. - Any damage caused by the appliance being installed in contravention of this temperature limit, or by placing adjacent cabinet materials closer than 4mm to the appliance, will be the liability of the owner.
- The use of this appliance for any other purpose or in any other environment without the express agreement of Baumatic Ltd will invalidate any warranty or liability claim.
- Your new appliance is guaranteed against electrical or mechanical defects, subject to certain exclusions that are noted in Baumatic's Conditions Of Guarantee. The foregoing does not affect your statutory rights.
- Repairs may only be carried out by Baum atic service engineers or their authorised service agents.
Warning and safety instructions
- This appliance complies with all current European safety legislation. Baumatic does wish to emphasise that this compliance does not remove the fact that the appliance surfaces will become hot during use and retain heat after operation.
Child Safety
○ Baumatic strongly recommend that babies and young children are prevented from being near to the appliance and not allowed to touch the appliance at any time.
- If it is necessary for younger family members to be in the kitchen, please ensure that they are kept under close supervision at all times.
General Safety
- Do not place heavy objects on the oven door or lean on the oven door when it is open, as this can cause damage to the oven door hinges.
- Do not leave heated oil or fat unattended, as this is a fire risk.
- Do not place pans or baking trays directly on the base of the oven cavity, or line it with aluminium foil.
- Do not allow electrical fittings or cables to come into contact with areas on the appliance that get hot.
- Do not use the appliance to heat the room it is located in or to dry clothing.
- Do not install the appliance next to curtains or soft furnishings.
Do not attempt to lift or move cooking appliances by using the oven door or handle, as this may cause damage to the appliance or result in injury to the person lifting the appliance.
Cleaning
- Cleaning of the oven should be carried out on a regular basis.
- Great care should be taken whilst using this appliance and when following the cleaning procedure.
- IMPORTANT: The appliance must be disconnected from the mains before following the cleaning procedure.
Installation

This appliance must be correctly installed by a suitably qualified person, strictly in accordance with the manufacturer's instructions.
○ Baumatic Ltd declines any responsibility for injury or damage, to person or property, as a result of improper use or installation of this appliance.
- Heat, steam and moisture will be created during use of the appliance, take care to avoid injury and ensure that the room is adequately ventilated. If the appliance is going to be used for prolonged periods of time, then additional ventilation may be required.
- Please consult with your qualified installer if you are in any doubt about the amount of ventilation that you will require.
Declaration of conformity
This appliance complies with the following European Directives:
- 2006/95/EC regarding "low voltage"
- 2004/108/E C regarding "electromagnetic disturbances"
- Regulation (EC) N° 1935/2004 regarding “materials in contact with food”
- The above directives comply with 93/68/EEC regarding CE marking.
- The manufacturer declares that the oven is built using certified materials and requires the appliance to be installed in accordance with the standards currently in force. This appliance must be used by a trained person for domestic purposes only.
pecifiS cations
text_image
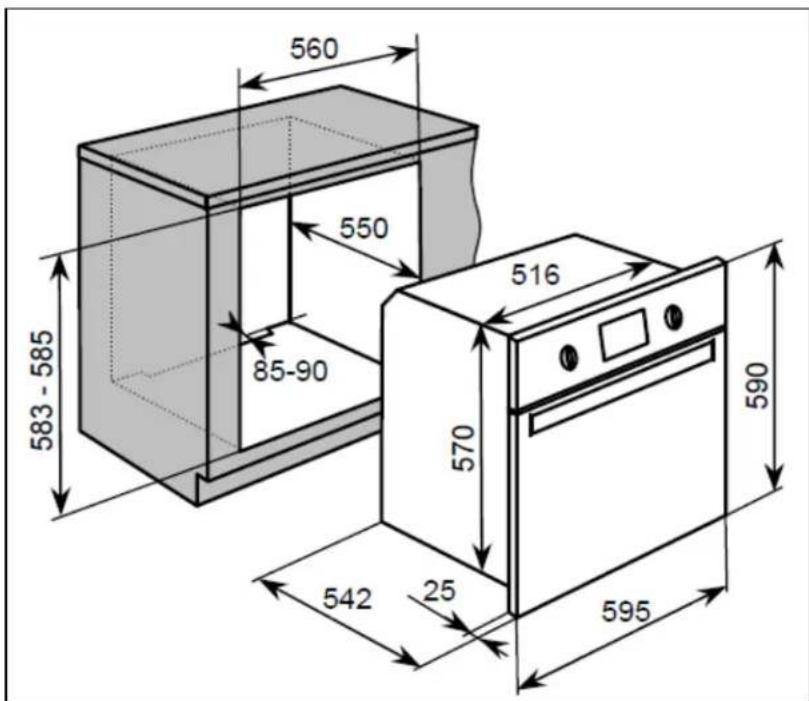
560 550 85-90 516 570 542 25 595 583 - 585 590Product
ensipasture DimDime
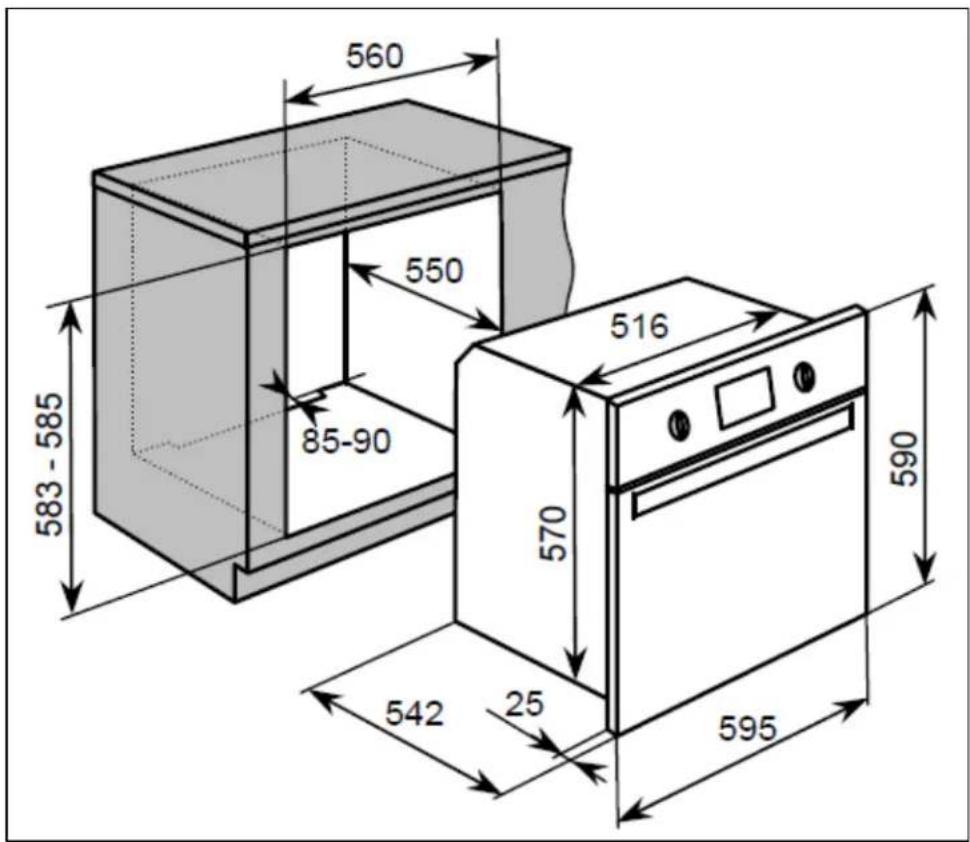
Height: 590 mm 583 mm - 585 mm
Width: 595 mm
Depth: 542 mm
mm560
550 mm (min)
Product specifications
- 4 oven functions (BSO616SS)
- 7 oven functions (BSO636SS)
- Energy efficiency class: A
- Oven gross capacity: 59 litres Oven net capacity: 50 litres
- LED full programmer
○ C o o l i n g f a n
○ Double-glazed removable door
o Removable inner door glass
○ Oven light
Standard accessories
○ 2 x Safety shelves
○ Enamelled baking t ray
○ Trivet
Optional extra
○ BPS2 Pizza stone
Electrical details
Rated Voltage: 220-240 Vac 50 Hz
Supply Connection: 13 A (double pole switch hed outlet with 3mm contact gap)
Max Rated Inputs: 2.35 kWO6B6SS)
Max Rated Inputs:2.40 kW (BSO636SS)
Mains Supply Lead: 3 x 1.5mm ^4
Oven Light Bulb: 25 W/300°C screw type pygmy
Cooling fan
○ A tangential cooling fan is fitted inside of this appliance, to make the internal temperature of the oven stable and the external surface temperature lower.
- After you have finished cooking and switched off the oven, the cooling fan will continue to run for a period of time afterwards. The length of time will depend on how long the oven has been switched on for and at how high a temperature.
For future reference please record the following information which can be found on the rating plate and the date of purchase which can be found on your sales invoice. The rating plate for your oven can be located by opening the oven door and looking around the outer edge of the oven chassis.
Model Number
Serial Number
Date of Purchase ....
Control Panel
text_image
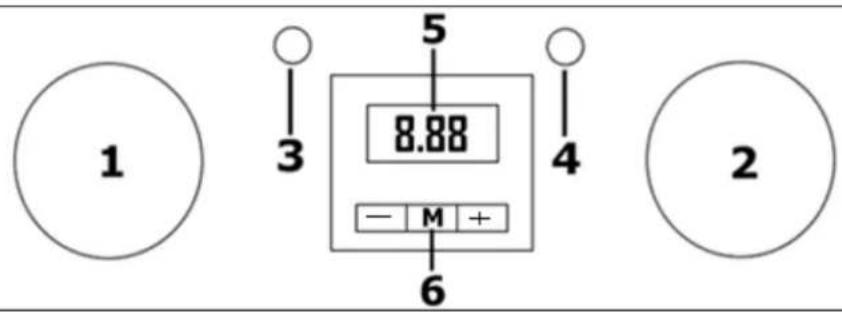
1 3 5 8.88 - M + 6 4 21) Oven function selector knob
2) Thermostat control knob
3) Power indicator light
4) Oven operating light
5) LED display
6) Oven programmer/timer
Oven programmer/ timer
text_image
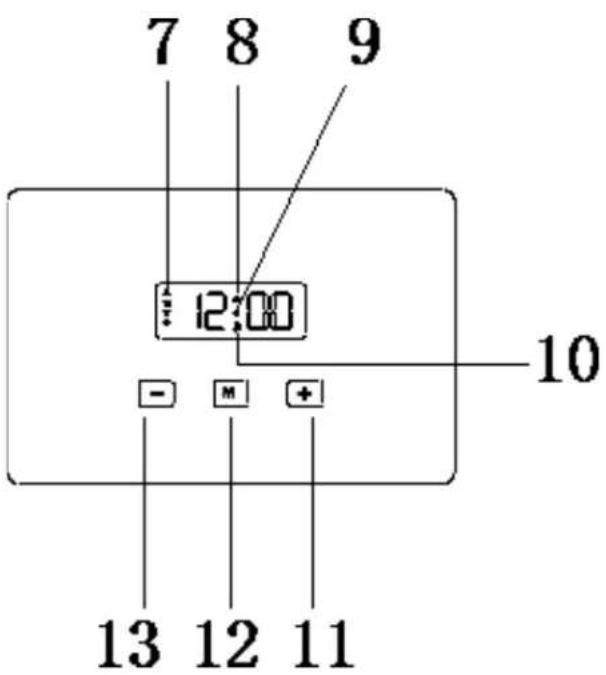
7 8 9 12:00 10 - M + 13 12 117) Automatic cooking symbol
8) Oven in use symbol
9) Decimal point symbol
10) Minute minder symbol
11) Plus button
12) Programme button
13) Minus button
Selecting manual operation mode
After your appliance is connected to your mains supply for the first time, the numbers on the timer display will flash. Before you can select a cooking function or set a temperature, you must set the appliance into “manual operation” mode.
- To select manual operation mode, press the manual button (12) on the control panel.
Setting the time of day
After your appliance is connected to your mains supply for the first time, you must set the time of day before you can use the oven.
- When the oven is connected to your mains supply for the first time (or after a power cut), the digits on the LED display and the automatic cooking symbol (7) will flash.
o Press and hold down the programme button (12) for a couple of seconds. The automatic cooking symbol will go out and the digits will remain steady.
○ Whilst the decimal point symbol (9) is flashing, use the plus (11) and minus (13) buttons to set the correct time of day. - When the correct time of day is shown on the LED display, release the plus and minus buttons and wait a few seconds. The decimal point symbol will stop flashing and the oven is ready to use.
Before first use
To remove any residue from the oven that may have been left from the manufacturing process, you should select the fan oven function and set the thermostat to its maximum temperature setting.
- It is perfectly normal for a smell to be produced during this process.
- You should make sure that at any windows in the room are left open during this process.
- It is advisable for you not to remain in the room whilst the burning off process is taking place.
- You should leave the oven on maximum setting for 30 – 40 minutes.
- After the oven cavity has cooled, it should then be cleaned with warm soapy water, using either a sponge or soft cloth. No abrasive cleaners should be used.
- Outer parts of the oven should be cleaned with warm soapy water, using either a sponge or soft cloth. No abrasive cleaners should be used.
- We would recommend that an appropriate stainless steel cleaner and polish is regularly used on the stainless steel surfaces of this appliance.
Timer functions
The minute minder function
The minute minder function is a countdown time that can be set on the oven programmer/timer. When the countdown time has finished, an audible signal will sound.
- Press and hold down the programme button (12) until the decimal point starts to flash to enter programming mode.
- Use the plus (11) and minus (13) buttons to set the countdown time that you require.
- The maximum countdown time that can be set is 23 hours and 59 minutes.
- When the correct countdown time appears on the LED display, release the plus and minus buttons and the countdown will start immediately.
- The oven in use symbol (8) will appear on the LED display to show that a countdown time is in progress.
- After a few seconds the LED display will return to showing the time of day.
- At the end of the countdown time, an audible signal will sound and the oven in use symbol will go out. The audible signal will sound for 7 minutes before switching off or you can silence it by pressing any of the oven programmer/timer buttons.
- IMPORTANT: If the oven is in use whilst using the minute minder function, the oven WILL NOT switch off at the end of the countdown time. YOU MUST turn the oven function selector knob and the thermostat control knob to their OFF positions.
The semi-automatic cooking function
This function will allow you to set a countdown time similar to the minute minder function, however the oven will switch off at the end of the cooking time.
- Place the food that you want to cook inside of the oven and close the door.
- Select an oven function and cooking temperature using the relevant control knobs.
o Press and hold down the programme button (12) until the decimal point starts to flash to enter programming mode, the oven in use symbol (8) will appear on the LED display. - Release the programme button and then press it again. The automatic cooking symbol (7) will flash and “dur” will appear briefly on the LED display before showing “0.00”.
- Use the plus (11) and minus (13) buttons to set the cooking time that you require.
- The maximum countdown time that can be set is 10 hours.
- When the correct countdown time appears on the LED display, release the plus and minus buttons. Cooking will begin immediately, after a few seconds the countdown time will start.
- The automatic cooking symbol and the oven in use symbol (8) will appear on the LED display.
- At the end of the cooking time, an audible signal will sound and the automatic cooking symbol will flash on the LED display.
To reset the oven and cancel the audible alarm, press the programme button until the oven in use symbol appears on the LED display and the automatic cooking symbol goes out. - IMPORTANT: If you have not turned the oven function selector knob and thermostat control knob to their OFF positions, when you reset the oven it will continue to heat.
The end of cooking function
This function is similar to the semi-automatic function, however instead of setting a countdown time, you select the time of day that you want the oven to switch off at.
- Place the food that you want to cook inside of the oven and close the door.
- Select an oven function and cooking temperature using the relevant control knobs.
o Press and hold down the programme button (12) until the decimal point starts to flash to enter programming mode, the minute minder symbol (10) will appear on the LED display. - Release the programme button and then press it again. The automatic cooking symbol (7) will flash and "dur" will appear on the LED display.
- Release the programme button and then press it for a third time, “end” will appear briefly on the LED display before showing the current time of day.
- Use the plus (11) and minus (13) buttons to set the time of day that you want the oven to switch off at.
- The maximum countdown time that can be set is 10 hours.
- When the correct time of day appears on the LED display, release the plus and minus buttons. Cooking will begin immediately, after a few seconds the countdown time will start.
- The automatic cooking symbol and the oven in use symbol (8) will appear on the LED display.
- At the end of the cooking time, an audible signal will sound and the automatic cooking symbol will flash on the LED display.
To reset the oven and cancel the audible alarm, press the programme button until the oven in use symbol appears on the LED display and the automatic cooking symbol goes out. - IMPORTANT: If you have not turned the oven function selector knob and thermostat control knob to their OFF positions, when you reset the oven it will continue to heat.
The automatic cooking function
This function will allow you to set the time of day that you want the oven to switch off at and how long you want the oven to cook for.
- Place the food that you want to cook inside of the oven and close the door.
- Select an oven function and cooking temperature using the relevant control knobs.
o Press and hold down the programme button (12) until the decimal point starts to flash to enter programming mode, the minute minder symbol (10) will appear on the LED display.
- Release the programme button and then press it again. The automatic cooking symbol (7) will flash and “dur” will appear briefly on the LED display before showing “0.00”.
- Use the plus (11) and minus (13) buttons to set the cooking time that you require.
- The maximum countdown time that can be set is 10 hours.
- When the correct countdown time appears on the LED display, release the plus and minus buttons.
- IMMEDIATELY press the programme button, “end” will appear briefly on the LED display before showing a calculated end of cooking time.
- Use the plus (11) and minus (13) buttons to set the time of day that you want the oven to switch off at.
- The automatic cooking symbol and the time of day will appear on the LED display.
- The appliance will automatically calculate what time of day it needs to switch the oven on at, so that it runs for the cooking time that you set.
- When the oven switches on, the oven in use symbol (8) will appear on the LED display, as well as the automatic cooking symbol.
- At the end of the cooking time, an audible signal will sound and the automatic cooking symbol will flash on the LED display.
To reset the oven and cancel the audible alarm, press the programme button until the oven in use symbol appears on the LED display and the automatic cooking symbol goes out.
- IMPORTANT: If you have not turned the oven function selector knob and thermostat control knob to their OFF positions, when you reset the oven it will continue to heat.
Cancelling the semi-automatic and automatic function
- Press and hold down the minus (13) and plus (11) button simultaneously, until the automatic cooking symbol (7) goes out and the oven in use symbol (8) is lit.
- IMPORTANT: If you do not turn the oven function selector knob and thermostat control knob to their OFF positions, when you reset the timer function, it will continue to heat.
Cancelling the minute minder function
o Press and hold down the programme button (12) until the decimal point starts to flash to enter programming mode.
o Press and hold down the minus (13) and plus (11) buttons simultaneously.
- The minute minder symbol (10) will go out.
- IMPORTANT: If you do not turn the oven function selector knob and thermostat control knob to their OFF positions, when you reset the timer function, it will continue to heat.
Adjusting the volume of the audible signal
The volume of the audible signal has 3 levels, low, medium and high. To adjust the volume, you should proceed as follows:-
- IMPORTANT: The oven timer/programmer must not be in any form of countdown mode and the oven in use symbol (8) must be lit.
o Press and hold down the minus (13) and plus (11) buttons simultaneously until the decimal point starts to flash.
o Press the programme button (12) and the LED display will show "n" followed by a number. 1 is the loudest volume, 2 is the middle volume and 3 is the quietest volume.
- Use the minus button to select the volume level that you desire.
Changing the time of day
- IMPORTANT: The oven timer/programmer must not be in any form of countdown mode and the oven in use symbol (8) must be lit.
- Press and hold down the minus (13) and plus (11) buttons simultaneously until the decimal point starts to flash.
- Release these buttons and then use the minus and plus buttons to alter the time of day.
Selecting a cooking function and temperature

IMPORTANT: Make sure that you have set your oven into manual operation mode before selecting an oven function and temperature.
Selecting an oven function
The oven function selector knob should be used to select the particular mode of cooking that you require. The appliance will utilise different elements within the oven cavity, depending on the oven function that you select. When a function is selected, the power indicator light will come on.
BSO616 SS Oven functions:

OVEN LIGHT: Separate light control which allows the light to be switched on, even when the oven is not cooking.

DEFROST MODE: The fan runs without heat to reduce the defrosting time of frozen foods. The time required to defrost the food will depend on the room temperature, the quantity and type of food. Always check food packaging for the defrosting instructions.

FAN OVEN: This method of cooking uses the circular element while the heat is distributed by the fan. This results in a faster and more economical cooking process. The fan oven allows food to be cooked simultaneously on different shelves, preventing the transmission of smells and tastes from one dish onto another.

HALF GRILL: This method of cooking utilises the inner part only of the top element, which directs heat downwards onto the food. This function is suitable for grilling small portions of bacon, toast and meat etc.
BSO636SS Oven functions:

CONVENTIONAL OVEN: This method of cooking provides traditional cooking, with heat from the top and lower elements. This function is suitable for roasting and baking on one shelf only.

FAN OVEN: This method of cooking uses the circular element while the heat is distributed by the fan. This results in a faster and more economical cooking process. The fan oven allows food to be cooked simultaneously on different shelves, preventing the transmission of smells and tastes from one dish onto another.

GRILL MODE: This method of cooking utilises the inner sections of the top element, which directs heat downwards onto the food. This function is suitable for grilling portions of bacon, toast and meat etc.

FULL GRILL: This method of cooking utilises the inner and outer parts of the top element, which directs heat downwards onto the food. This function is suitable for grilling medium or large portions of sausages, bacon, steaks, fish etc.

DEFROST MODE: The fan runs without heat to reduce the defrosting time of frozen foods. The time required to defrost the food will depend on the room temperature, the quantity and type of food. Always check food packaging for the defrosting instructions.

FAN AND FULL GRILL: This method of cooking utilises the top element in conjunction with the fan, which helps to provide a quick circulation of heat. This function is suitable where quick browning is required and “sealing” the juices in, such as steaks, hamburgers, some vegetables etc.

FAN AND LOWER ELEMENT: This method of cooking utilises the bottom element in conjunction with the fan, which helps to circulate the heat. This function is suitable for sterilizing and erving jars.
Thermostat control knob

text_image
0 250- 200- 150- 50 100- The oven thermostat control knob sets the required temperature of the oven. It is possible to regulate the temperature within a range of 50 - 250°C.
- Turn the control knob clockwise.
Oven operating light
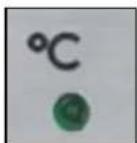
- This light will come on to indicate that the oven's heating elements are in operation. The light will turn off when the temperature set on the thermostat control knob has been reached. It will cycle on and off throughout the cooking time.

You should not place food inside the cavity, until the correct cooking temperature has been reached.
Cooking guidelines
- Please refer to the information given on food packaging for guidance on cooking temperatures and times. Once familiar with the performance of your appliance, temperatures and times can be varied to suit personal preference.
- If you are using the fan oven function, then you should follow the information given on the food packaging for this particular mode of cooking.
- You should pre-heat the oven and not place food inside of it until the oven operating light has gone off. You can choose not to pre-heat when using the fan oven mode; however you should extend the cooking time given on the food packaging by at least ten minutes.
- IMPORTANT: You should ALWAYS pre-heat the oven if you are baking.
- If there is no guidance given on the food packaging specifically for cooking in fan oven mode, you can generally reduce the cooking time and temperature by 10% from the information given for conventional oven cooking.
○ Make sure that frozen foods are thoroughly thawed before cooking, unless the instructions on the food packaging advise that you can “cook from frozen”.
Before cooking, check that any accessories that are not required are removed from the oven.
- Place cooking trays in the centre of the oven and leave gaps between the trays to allow air to circulate.
o Try to open the door as little as possible to view the dishes.
- The oven light will remain on during cooking.
Warnings
- Keep the oven door closed when using ALL oven functions, including the grill function.
- Do not use aluminium foil to cover the enamelled baking tray or heat items wrapped in aluminium foil under the grill. The high reflectivity of the foil could potentially damage the grill element.
- You should also never line the base of your oven with aluminium foil.
During cooking, never place pans or cookware directly onto the bottom of your oven. They should always be placed on the shelf provided.
- The grill heating element becomes extremely hot during operation, avoid touching it inadvertently when handling the food which you are grilling.
- Important: Be careful when opening the door, to avoid contact with hot parts and steam.
Shelf positions
text_image
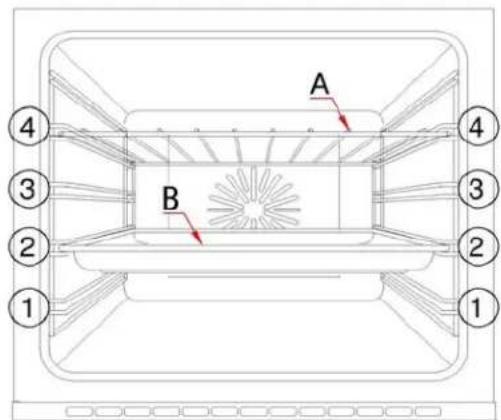
A B 1 2 3 4 1 2 3 4Your oven will come supplied with the following oven furniture:
(A) Safety shelf (x2)
(B) Enamelled baking tray
- The numbers 1 – 4, indicate the different shelf positions that you can utilise within the oven.
- )You should decide about the situation(s to your personal cooking preferences.
Cleaning and maintenance

text_image
Warning symbol with exclamation mark inside triangleCleaning operations must only be carried out when the oven is cool.
The appliance should be disconnected from your mains supply before commencing any cleaning process.
- The oven should be thoroughly cleaned before it is operated for the first time and after each use. This will avoid residual food stuffs becoming baked on the oven cavity. After residues have been baked on several times, they are far more difficult to remove.
- Never clean the oven surfaces by steam cleaning.
- The oven cavity should only be cleaned with warm soapy water, using either a sponge or soft cloth. No abrasive cleaners should be used.
- Any stains that may appear on the bottom of the oven will have originated from food splashes or spilt food, these splashes occur during the cooking process. These could possibly be a result of the food being cooked at an excessively high temperature or being placed in cookware that is too small.
- You should make sure that the cooking temperature that is selected is appropriate for the food that you are cooking. You should also ensue that the food is placed in an adequately sized dish and use the enamelled baking tray where appropriate.
- Outer parts of the oven should only be cleaned with warm soapy water, using either a sponge or soft cloth. No abrasive cleaners should be used.
- We would recommend that an appropriate stainless steel cleaner and polish is regularly used on the stainless steel surfaces of this appliance.
- If you use any form of oven cleaner on your appliance, then you must check with the manufacturer of the cleaner that it is suitable for use on your appliance.
- Any damage that is caused to the appliance by a cleaning product will not be fixed by the manufacturer free of charge, even if the appliance is within the guarantee period.
Replacing the oven bulb

IMPORTANT: The oven must be disconnected from your mains supply before you attempt to either remove or replace the oven bulb.
text_image
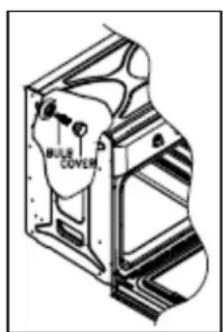
BULB COVER- Remove the oven shelf and the drip tray.
- Remove the light cover by turning it anticlockwise.
-
Unscrew the bulb clockwise and remove it from its holder.
○ Replace the bulb with a 25 W/300°C, screw type pygmy. -
Do not use any other type of bulb.
- Place the lamp cover back into position.
Removing the oven door for cleaning
text_image
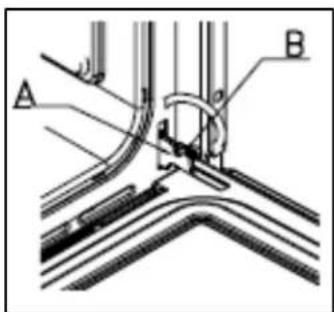
Technical diagram showing labeled components A and B in a mechanical or electrical assembly with curved and straight lines.To facilitate the cleaning of the inside of the oven and the outer frame of the oven, the door can be removed as follows:-
- The hinges (A) have two movable bolts on them (B).
○ If you raise both of the movable bolts (B), then the hinges (A) are released from the oven housing.
- You should grip the sides of the door at the centre and then incline it slightly towards the oven cavity and then pull the door gently away from the oven cavity.
- IMPORTANT: You should make sure that the door is supported at all times and that you place the door on some padded material whilst cleaning it.
- The oven door and door glass should only be cleaned using a damp cloth and a small amount of detergent. The cloth MUST NOT have come into contact with any form of cleaning product or chemical previously.
To refit the door you should slide the hinges back into their slots and open the door fully.
○ IMP ORTANT: The movable bolts (B) must be closed back into their original positions before closing the door.

Take care not to dislodge the hinge locking system when removing the door, as the hinge mechanism has a strong spring.
- Do not immerse the door in water at any time.
Removing the inner door glass for cleaning
- Do not use any abrasive cleaner that could cause damage.
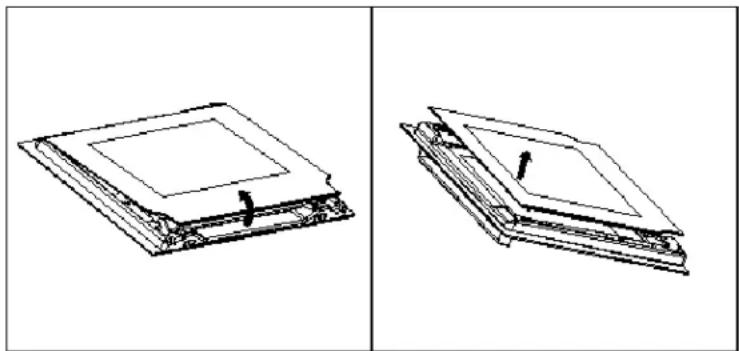
oRemember that if the surface of the glass panel becomes scratched, this could lead to a dangerous failure. - To facilitate cleaning, the inner door glass can be lifted out.
natural_image
Two technical line drawings of a closed book or notebook, showing front and side views with no text or symbols.Grip the top and the bottom of the inner door glass panel.
Gently pull the bottom of the inner door glass panel upwards.
Do not raise the panel more than 35^ as it can damage the securing clips.
The securing clips at the top and bottom of the glass panel will pop out and the glass panel will be free to remove.
If the top securing clips do not pop out when pulling the bottom of the glass panel upwards, then pull the top of the glass panel upwards until the top also pops out.
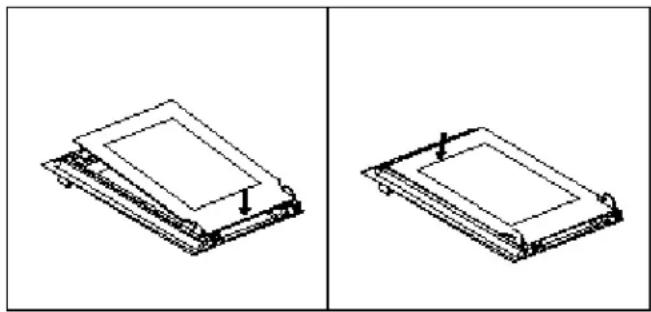
➢ Affeg, cleaset the glass panel correctly back into the reverse order. Ensure the securing clips slot back into place a the glass panel locks into place securely.
natural_image
Two technical line drawings of a mechanical component with mounting holes, shown from front and side views (no text or symbols)IMPORTANT: Remember where the panel of glass is removed om so you can reassemble the door correctly. Do not mix the glasses up or rearrange the order.
INSTALLATION

The installation must be carried out by a suitably qualified person, in accordance with the current version of the following.
- UK Regulations and Safety Standards or their European Norm Replacements.
○ Building Regulations (issued by the Department of the Environment).
○ Building Standards (issued by the Scottish Development Department).
○ IEE Wiring Regulations. - Electricity At Work Regulations.
Electrical connection
Before connecting the appliance, make sure that the supply voltage marked on the rating plate corresponds with your mains supply voltage.
WARNING: THIS APPLIANCE MUST BE EARTHED.
- This appliance should be wired into a 13A double pole switched fused spur outlet, having 3 mm contact separation and placed in an easily accessible position adjacent to the appliance. The spur outlet must still be accessible even when your oven is located in its housing.

flowchart
graph LR
    A["MAINS"] --> B["LIVE"]
    A --> C["EARTH"]
    A --> D["NEUTRAL"]
    E["POWER"] --> F["BROWN"]
    E --> G["YELLOW/GREEN"]
    E --> H["BLUE"]
    I["SUPPLY"] --> J["POWER CORD"]
To connect the oven power cord, loosen and remove the cover on the terminal block, in order to gain access to the contacts inside. Make the connection, securing the cord in place with the cable clamp provided and then immediately close the terminal block cover again.
- If you have to change the oven power cord, the earthing (yellow/green) conductor must always be 10 mm longer than the line conductors.
- Care must be taken to ensure that the temperature of the mains supply cable does not exceed 50°C.
- If the mains supply cable is damaged, then it must be replaced by an appropriate replacement which can be obtained from the Spares Department.
Installing the oven into a kitchen cabinet
text_image
560 550 85-90 516 570 542 25 590 583-585 595Positioning the appliance
- Ensure that the aperture that you will be fitting the oven into is of the size given in the above diagram.
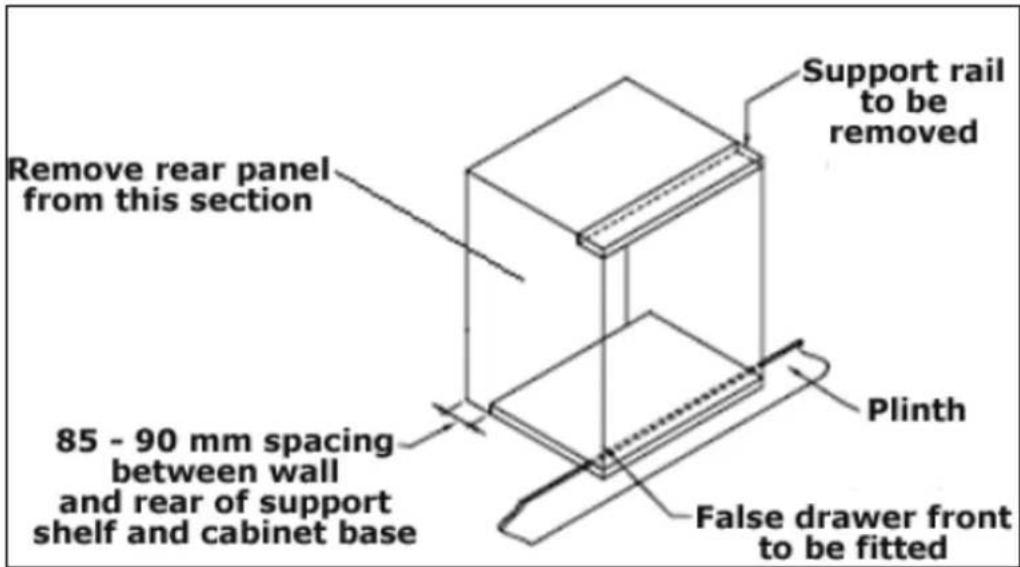
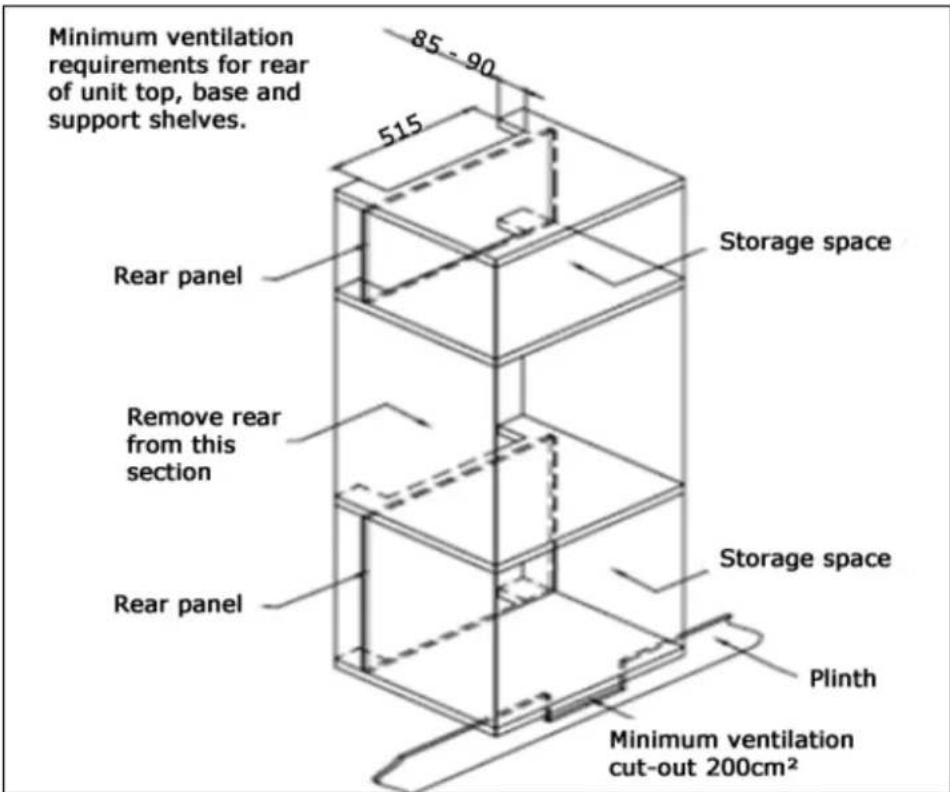
- The oven must be fitted into an oven housing with the ventilation cut-outs shown in the “Ventilation requirements” section on the next page.
- Ensure that the rear panel of the furniture housing unit has been removed.
Ventilation requirements
text_image
Remove rear panel from this section 85 - 90 mm spacing between wall and rear of support shelf and cabinet base Support rail to be removed Plinth False drawer front to be fitted(Figue shows the ventilation and cut-out requirements for the stallation of the appliance into a standard kitchen unit). in
text_image
Minimum ventilation requirements for rear of unit top, base and support shelves. 85 - 90 515 Rear panel Storage space Remove rear from this section Rear panel Storage space Plinth Minimum ventilation cut-out 200cm²(Figure shows the ventilation and out-out requirements for the installation of the appliance into a tall housing unit).
text_image
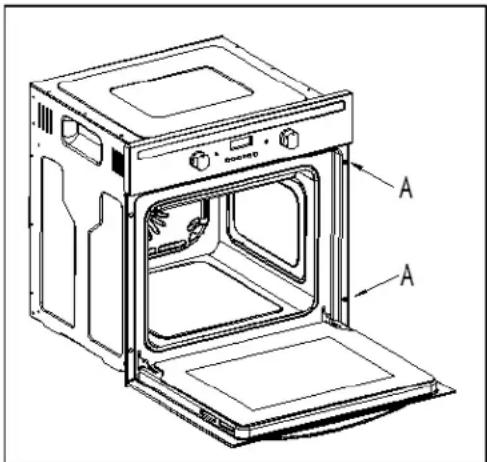
Technical line drawing of an oven with labeled components A and a control panel- Ensure that the oven has been securely fixed into the housing unit. The fixing of the oven into the housing is made by using four screws. These should be screwed through the oven cabinet and into the housing unit.
My appliance isn't working correctly
- The oven isn't coming on.
* Check that the oven is in manual operation mode.
* Check that you have selected a cooking function and a cooking temperature.
- There appears to be no power to the oven and grill.
* Check that the appliance has been connected to the electrical mains supply correctly.
* Check that the mains fuses are in working order.
* Check that the operating instructions for putting the appliance into manual operation mode have been followed.
- The grill function works but the main oven does not.
* Check that you have selected the correct cooking function.
- The grill and top oven element is not working, or cuts out for long periods of time during use.
* Allow the oven to cool for approximately 2 hours. Once cool, check whether the appliance is again working properly.
○ My food is not cooking properly
* Ensure that you are selecting the correct temperature and the correct cooking function for the food that you are cooking. It
may be appropriate to adjust your cooking temperature by plus or minus 10^ C, to achieve the best cooking results.
○ My food is not cooking evenly
* Check that the oven has been installed correctly and is level.
* Check that the correct temperatures and shelf positions are being used.
- The oven light is not working
* Refer to page 23 and follow the “Replacing the oven bulb” section.
- I am getting condensation in my oven
* Steam and condensation is a natural by product of cooking any food with high water content, such as frozen food, chicken etc.
* You may get condensation in the oven cavity and forming between the oven door glasses. This is not necessarily a sign that the oven is not working correctly.
* Do not leave food in the oven to cool after it has been cooked and the oven has been switched off.
* Use a covered container, where practical, when cooking to reduce the amount of condensation that forms.

IMPORTANT: If your appliance appears not to be operating correctly, then you should disconnect it from your mains supply and then contact the Customer Care Department on telephone number (0118) 933 6911.
DO NOT ATTEMPT TO REPAIR THE APPLIANCE YOURSELF.
Please note that if an engineer is asked to attend whilst the product is under guarantee and finds that the problem is not the result of an appliance fault, then you may be liable for the cost of the call out charge.
The appliance must be accessible for the engineer to perform any necessary repair. If your appliance is installed in such a way that an engineer is concerned that damage will be caused to the appliance or your kitchen, then he will not complete a repair.
This includes situations where appliances have been tiled in, sealed in with sealant, have wooden obstructions placed in front of the appliance, like plinths. Or any installation other than the one specified by Baumatic Ltd has been completed.
Please refer to the conditions of guarantee that appear on the warranty card that you receive with the appliance.
IMPORTANT: Baumatic Ltd operates a policy of continuous improvement and reserves the right to adjust and modify its products without prior notification.
Cooking tables – for BSO616SS
The cooking tables below for each function should be viewed as a guide only. Other factors can influence cooking results such as food thickness, weight, shape and quality and personal preference.

Fan oven
| Food | We ht (kg) | Preheat time (mins) | Shelf position (from bottom) | Temperature (°C) time | Cooking (mins) |
| Beef | 1 | 15 | 2 | 200 | |
| Pork | 1 | 15 | 2 | 200 | |
| Chicken | 1.2 | 15 | 2 | 200 50-60 | |
| Duck | 1.5 | 15 | 2 | 200 | |
| Steak | 0.8 | 10 | 2 | 180 | 20-30 |
| Bread | 0.5 | 10 | 2 | 200 | 35-45 |
50-60

Half grill
| Food | Weight (kg) | Preheat time (mins) | Shelf position (from bottom) | Temperature (°C) | Cooking time (mins) |
| Steak | 0.8 | 10 | 3 | 250 | 20-25 |
| Pork | 0.8 | 10 | 3 | 250 | |
| Chicken | 1.2 | 10 | 3 | 250 | 40-45 |
| Sausage | 0.6 | 10 | 4 | 250 | 15-20 |
| Hamburger | 0.6 | 10 | 4 | 250 | 15-20 |
| Corn | 1.2 | 10 | 3 | 250 | 20-25 |
| Vegetables | 0.5 | 10 | 4 | 250 | 15-20 |
| COOKING TABLE | OVEN FUNCTIONS | ||||||
| FAN COOKING | CONVENTIONAL | ||||||
| FOOD | WEIGHT (Kg) | PREHEAT(1)(min.) | TRAY LEVEL | TEMPERATURE °C() | TRAY LEVEL | TEMPERATURE °C() | TIME (min.) |
| MEAT | |||||||
| Beef | 1 | 15 | 2 | 200 | 2 | 220 | 40-50 |
| Pork | 1 | 15 | 2 | 200 | 2 | 220 | 70-80 |
| Turkey | 1.5 | 15 | 2 | 200 | 2 | 220 | 70-80 |
| Lamb | 1.5 | 15 | 2 | 200 | 2 | 220 | 70-80 |
| Chicken | 1.2 | 15 | 2 | 200 | 2 | 220 | 50-60 |
| Duck | 1.5 | 15 | 2 | 200 | 2 | 220 | 50-60 |
| Rabbit | 1 | 15 | 2 | 200 | 2 | 220 | 40-50 |
| FISH | |||||||
| Sirloin | 0.8 | 10 | 2 (1 & 3)* | 180 | 2 (1 & 3)* | 200 | 20-30 |
| PASTA | |||||||
| Lasagna | 1 | 15 | 2 | 200 | 2 | 220 | 20-30 |
| Macaroni Cheese | 1 | 15 | 2 | 200 | 2 | 220 | 30-40 |
| BREAD & PIZZA | |||||||
| White Bread | 0.5 | 10 | 2 (1 & 3)* | 200 | 2 | 220 | 35-45 |
| Multi Grain Bread | 0.5 | 10 | 2 (1 & 3)* | 200 | 2 | 220 | 20-30 |
| Pizza | 0.5 | 15 | 2 (1 & 3)* | 200 | 2 | 220 | 15-20 |
| BAKERY | |||||||
| Cake with baking powder | 0.7 | 10 | 2 (1 & 3)* | 180 | 2 | 200 | 25-35 |
| Apple Pie | 1 | 15 | 2 (1 & 3)* | 180 | 2 | 200 | 30-40 |
| Strudel | 1 | 15 | 2 (1 & 3)* | 180 | 2 | 200 | 40-50 |
| Fruit & Salad Tart | 1.5 | 15 | 2 (1 & 3)* | 180 | 2 | 200 | 35-45 |
| Biscuits | 0.7 | 15 | 1,2,4 | 180 | 2 | 200 | 25-35 |
| (*) Ideally you should pre-heat the oven and not place food inside until the oven operating light has gone out. (**) Using the grill, the food should be turned half way through the cooking time. | |||||||
| COOKING TABLE | OVEN FUNCTIONS | ||||
| BOTTOM ELEMENT + FAN | |||||
| FOOD | WEIGHT (Kg) | PREHEAT(1)(min) | TRAY LEVEL | TEMPERATURE (°C) | TIME (min) |
| PASTA | |||||
| Lasagne | 1 | 15 | 2 | 200 | 40-45 |
| Pasta for Oven | 1 | 15 | 2 | 200 | 45-50 |
| BREAD & PIZZA | |||||
| White Bread | 0.5 | 10 | 1 | 200 | 10--15 |
| Multi Grain Bread | 0.5 | 10 | 1 | 200 | 15--20 |
| Pizza | 0.7 | 15 | 2 | 200 | 20--25 |
| BAKERY | |||||
| Cake with baking powder | 1.5 | 15 | 1 | 180 | 35--40 |
| Fruit & Salad Tart | 1 | 15 | 1 | 180 | 40--45 |
| Biscuits | 0.7 | 15 | 1,2,4 | 180 | 20--25 |
| Bigne' | 0.7 | 15 | 1,2,4 | 180 | 20--25 |
(1) You should pre-heat the oven and not place food inside of it until the oven operating light is switched off (for 10-15 minutes).
(*) If using the pizza stone, this has to be pre-heated in the oven before use.
Baumatic Consumables
- BC001 Degreaser for Dishwashers (200 g)
- BC002 Descaler for Washing Machines and Dishwashers (200 g)
- BC003 Ceramic Hob Cleaner (250 ml)
- BC004 Oven Cleaner (250 ml)
- BC005 Stainless Steel Cleaner and Protector (250 ml)
- BC007 E-Cloth – General Purpose Cloth
- BC008 Microwave Cover
To order a Baumatic consumable product please call 0123 5437 244 and quote the product code. You can also order online from eshop.baumatic.co.uk
Baumatic®
United Kingdom
Baumatic Ltd.,
Baumatic Buildings,
6 Bennet Road,
Reading, Berkshire
RG2 0QX
United Kingdom
Sales Telephone
(0118) 933 6900
Sales Fax
(0118) 931 0035
Customer Care Telephone
(0118) 933 6911
Customer Care Fax
(0118) 986 9124
Spares Telephone
(01235) 437244
Advice Line Telephone
(0118) 933 6933
E-mail:
sales@baumatic.co.uk
customercare@baumatic.co.uk
spares@baumatic.co.uk
technical@baumatic.co.uk
Website:
www.baumatic.co.uk
Facebook:
www.facebook.com/baumatic.uk
Republic of Ireland
Service Telephone
1-890 812 724
Spares Telephone
091 756 771
Czech Republic
Baumatic CR spol s.r.o.
Lípovà 665
460 01 Liberec 4
Czech Republic
+420 483 577 200
www.baumatic.cz
Slovakia
Baumatic Slovakia, s.r.o.
Panenská 34
811 03 Bratislava - Staré Mesto
Slovakia
+421 255 640 618
www.baumatic.sk
Germany
Baumatic GmbH
Bachstr.10-12
D-32 257 Bünde
Deutschland
+49 (0) 5223 99408 0
www.baumatic.de
Italy
Baumatic Italia S.R.L.
Via Galvani N.3
35011 Campodarsego (PD)
+3904 9920 2297
www.baumatic.it
Holland
Baumatic Benelux B.V.
Dukdalfweg 15d
1332 BH ALMERE
Nederland
+31(0)36 549 1553
www.baumatic.nl