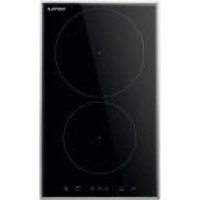
CIT12X3a - Cooker Häfele - Free user manual and instructions
Find the device manual for free CIT12X3a Häfele in PDF.


User questions about CIT12X3a Häfele
0 question about this device. Answer the ones you know or ask your own.
Ask a new question about this device
Download the instructions for your Cooker in PDF format for free! Find your manual CIT12X3a - Häfele and take your electronic device back in hand. On this page are published all the documents necessary for the use of your device. CIT12X3a by Häfele.
USER MANUAL CIT12X3a Häfele
natural_image
Simple geometric diagram of four curved circles arranged in a 2x2 grid within a square frame (no text or symbols)CIT12X3a
IO-HOB-2137 / 9518829
(03.2024 / v1)
GRUNDINFORMATIONEN
DE
4
WICHTIGE SICHERHEITSHINWEISE 5
BESCHREIBUNG DES GERÄTES 9
INSTALLATION 10
BEDIENUNG 13
REINIGUNG UND WARTUNG 23
VORGEHEN IN NOTSITUATIONEN 25
TECHNISCHE DATEN 26
INFORMATIONS GÉNÉRALES 27
DESCRIPTION DU PRODUIT 32
INSTALLATION 33
UTILISATION 36
NETTOYAGE ET ENTRETIEN 46
DONNEES TECHNIQUES 49
BASIC INFORMATION 50
SAFETY INSTRUCTIONS FOR USE 51
DESCRIPTION OF THE APPLIANCE 55
INSTALLATION 56
OPERATION 59
CLEANING AND MAINTENANCE 69
TROUBLESHOOTING 71
SPECIFICATION 73
NL
BASISINFORMATIE 74
AANWIJZINGEN VOOR VEILIG GEBRUIK 75
BESCHRIJVING VAN HET PRODUCT 79
INSTALLATIE 80
BEDIENING 83
REINIGING EN ONDERHOUD 93
HANDELWIJZE BIJ STORINGEN 95
TECHNISCHE GEGEVENS 97
GRUNDINFORMATIONEN
natural_image
Simple line drawing of a tree with cloud-like canopy and two wavy lines at base (no text or symbols)natural_image
Simple line drawing of a three chasing recycling symbol (no text or labels)text_image
min 650mm 5-10 mm ≥30mm ≥30mm X √ min 650mm ≥25mm 5-10 mm ≥30mm
natural_image
Pure technical line drawing of a 3D mechanical part with no text or symbols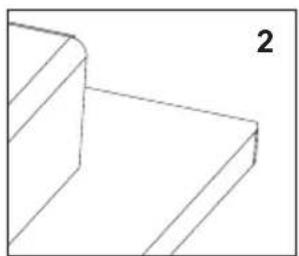
natural_image
Pure 3D geometric lines forming a stepped structure (no text or symbols)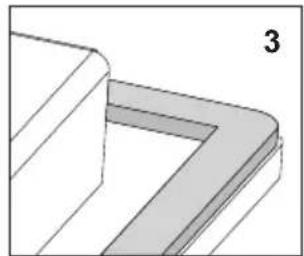
natural_image
3D diagram of a corner bracket with shaded areas, no text or symbols present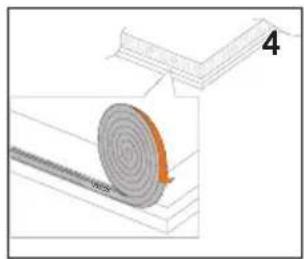
natural_image
Diagram showing a spiral-patterned object on a wooden base, with no visible text or symbols
natural_image
Diagram showing two views of a rectangular frame with arrows indicating direction, no text or symbols presentnatural_image
Simple line drawing of a cooking pot with steam rising from a tray (no text or symbols)natural_image
Five identical cooking pots with crossed-out black X marks, arranged horizontally (no text or symbols)text_image
Diagram showing a cooking pot with three circular kitchen utensils, illustrating the process from heating to drying.natural_image
Line drawing of a hand using a tool to cut or spread material from a block (no text or symbols)natural_image
Diagram showing three containers crossed by a diagonal line, with no text or symbols present.Fleckenentfernung
natural_image
Simple line drawing of a tree with two roots and wavy lines at the base (no text or symbols)natural_image
Simple line drawing of a recycling symbol with three chasing arrows (no text or labels)text_image
min 650mm 5-10 mm ≥30mm ≥30mm X √ min 650mm ≥25mm 5-10 mm ≥30mm
natural_image
Pure 3D geometric diagram of a curved rectangular structure with no text or symbols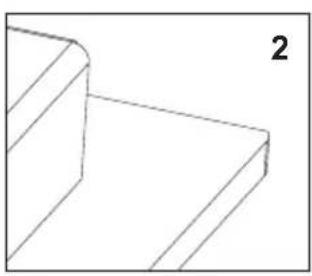
natural_image
Pure 3D geometric lines forming a stepped corner (no text or symbols)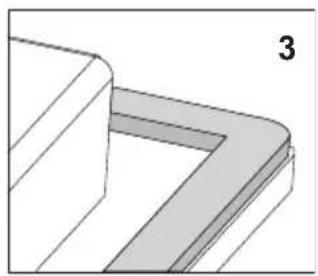
natural_image
Pure 3D geometric diagram showing a corner joint with shaded areas, no text or symbols present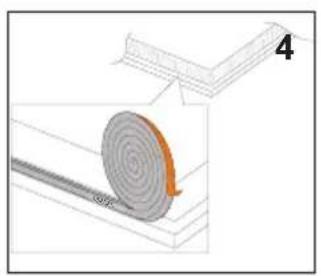
natural_image
Diagram of a mechanical component with a circular roller and an arrow, no visible text or symbols
natural_image
Diagram showing two views of a rectangular object with arrows indicating direction, no text or symbols presentnatural_image
Simple line drawing of a cooking pot with steam rising from a tray (no text or symbols)natural_image
Five identical cooking pots with crossed-out black X marks, arranged horizontally on a base (no text or symbols)text_image
Diagram showing a cooking pot with three circular kitchen utensils, illustrating the use of different kitchen appliances.natural_image
Line drawing of a hand using a tool to cut or spread material from a rectangular block (no text or symbols)natural_image
Crossed construction diagram showing three cylindrical objects and a flat base, no text or symbols presentYour hob combines exceptional ease of use with excellent effectiveness. Once you have read the instructions, operating your hob will not be a problem.
Before being packed and leaving the factory, the safety and functions of this hob were carefully tested.
We ask you to read the User Manual carefully before switching on the appliance. Following the directions in this manual will protect you from any misuse.
Keep this User Manual and store it near at hand.
The instructions should be followed carefully to avoid any unfortunate accidents.
Important!
The appliance may only be operated when you have read and understood this manual thoroughly.
The appliance is designed solely for cooking. Any other use (eg heating a room) is incompatible with the appliance's intended purpose and can pose a risk to the user.
The manufacturer reserves the right to introduce changes which do not affect the operation of the appliance.
Certificate of compliance CE
The Manufacturer hereby declares that this product complies with the general requirements pursuant to the following European Directives:
● The Low Voltage Directive 2014/35/EC,
● Electromagnetic Compatibility Directive 2014/30/EC,
• ErP Directive 2009/125/EC,
and therefore the product has been marked with the CE symbol and the Declaration of Conformity has been issued to the manufacturer and is available to the competent authorities regulating the market.
SAFETY INSTRUCTIONS FOR USE
Notice. The device and its accessible components become hot when the device is in use. Take special care not to come in contact with heating elements. Children under age of 8 should stay away from the device unless they are under constant supervision
Notice. Unsupervised cooking of fat or oil on the hob may be dangerous and lead to fire hazard.
NEVER try to extinguish fire with water. Instead switch off the device and then smother the flame with, e.g., a lid or fire blanket.
Notice. Fire hazard: do not keep things on the cooking surface.
Notice. Metal items, such as knives, forks, spoons, lids and tinfoil should not be kept on the hob as they can become hot.
Notice. If the surface is cracked, please cut off power supply to avoid the risk of electric shock.
This device may only be used by children over age of 8, persons with physical, sensory or mental disabilities, and persons without necessary experience and knowledge only under supervision or when they follow the user's manual given to them by persons responsible for their safety. Please make sure that children do not play with the device. Cleaning and operating the device should not be performed by unsupervised children.
You should not use steam cleaning devices to clean the hob.
Notice. When you have finished using the device, switch off the hob with the controller. Do not rely on the indications of the object detector.
- Before using the induction hob for the first time, carefully read its user manual. This will ensure user safety and prevent damage to the appliance.
- If the induction hob is operated in immediate vicinity to the radio, television set or other radio-frequency-emitting device, make sure that the hob's touch sensor controls operate correctly.
- The hob must be connected by a qualified installer.
- Do not install the appliance near a refrigerator.
- Furniture, where the hob is installed must be resistant to temperatures up to 100°C. This applies to veneers, edges, surfaces made of plastics, adhesives and paints.
- The appliance may only be used once fitted in kitchen furniture. This will protect the user against accidental touching the live part.
- Repairs to electrical appliances may only be conducted by specialists. Improper repairs can be dangerous to the user.
- The appliance is not connected to mains when it is unplugged or the main circuit breaker is switched off.
- Plug of the power cord should be accessible after appliance has been installed.
- Ensure that children do not play with the appliance.
- This appliance is not intended for use by persons (including children) with physical, mental or sensory handicaps, or by those who are inexperienced or unfamiliar with the appliance, unless under supervision or in accordance with the instructions as communicated to them by persons responsible for their safety.
- Persons with implanted devices, which support vital functions (eg, pacemaker, insulin pump, or hearing aids) must ensure that these devices are not affected by the induction hob (the frequency of the induction hob is 20-50 kHz).
- Once power is disconnected all settings and indications are erased. When electric power is restored caution is advisable. If the cooking zones are hot, „H” residual heat indicator will be displayed. Also child lock key will be displayed, as when the appliance is connected for the first time.
- Built-in residual heat indicator can be used to determine if the appliance is on and if it is still hot.
- If the mains socket is near the cooking zone, make sure the cord does not touch any hot areas.
- When cooking using oil and fat do not leave the appliance unattended, as there is a fire hazard.
- Do not use plastic containers and aluminium foil. They melt at high temperatures and may damage the cooking surface.
- Solid or liquid sugar, citric acid, salt or plastic must not be allowed to spill on the hot cooking zone.
- If sugar or plastic accidentally fall on the hot cooking zone, do not turn off the hob and scrape the sugar or plastic off with a sharp scraper. Protect hands from burns and injuries.
SAFETY INSTRUCTIONS FOR USE
- When cooking on induction hob only use pots and pans with a flat base having no sharp edges or burrs as these can permanently scratch the cooking surface.
- Induction hob cooking surface is resistant to thermal shock. It is not sensitive to cold nor hot.
- Avoid dropping objects on the cooking surface. In some circumstances, point impacts such as dropping a bottle of spices, may lead to cracks and chipping of the cooking surface.
- If any damage occurs, seething food can get into the live parts of the induction hob through damaged areas.
- If the cooking surface is cracked, switch off power to avoid the risk of electric shock.
- Do not use the cooking surface as a cutting board or work table.
- Do not place metal objects such as knives, forks, spoons, lids and aluminium foil on the cooking surface as they could become hot.
- Do not install the hob over a heater without a fan, over a dishwasher, refrigerator, freezer or washing machine.
- If the hob has been built in the kitchen worktop, metal objects located in a cabinet below can be heated to high temperatures through the air flowing from the hob ventilation system. As a result it is recommended to use a partition (see Figure 2).
- Please follow the instructions for care and cleaning of induction hob. In the event of misuse or mishandling warranty may be void.
HOW TO SAVE ELECTRICITY

natural_image
Simple line drawing of a tree with two roots and wavy lines at the base (no text or symbols)Using the electricity in a responsible manner not only saves money, but also helps protect the environment. So let's save electricity! This is how it's done:
- Use the correct cookware.
Cookware with flat and a thick base can save up to 1/3 of electricity. Please remember to cover cookware with the lid, otherwise electricity consumption increased four times!
●Always keep the cooking zones and cookware bases clean.
Dirt prevents proper heat transfer. Often burnt stains can be removed only with agents harmful to the environment.
- Avoiding unnecessary lifting the lid to peek into the pot.
- Do not install the hob in the immediate vicinity of refrigerator / freezer.
The electricity consumption is then unnecessarily increased.
UNPACKING

natural_image
Simple line drawing of a three chasing recycling symbol (no text or labels)The appliance was protected from damage at the time of transport. After unpacking, please dispose of all elements of packaging in a way that will not cause damage
to the environment. All materials used for packaging the appliance are environmentally friendly; they are 100% recyclable and are marked with the appropriate symbol.
Important! Keep the packaging material (bags, Styrofoam pieces, etc.) out of reach of children during unpacking.
DISPOSAL
In accordance with European Directive 2002/96/EC and Polish legislation regarding used electrical and electronic goods, this appliance is marked with the symbol of the crossed-out waste container.
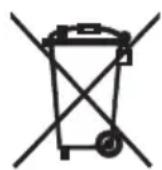
This marking means that the appliance must not be disposed of together with other household waste after it has been used. The user is obliged to hand it over to waste collection centre collecting used electrical and electronic goods. The
collectors, including local collection points, shops and local authority departments provide recycling schemes. Proper handling of used electrical and electronic goods helps avoid environmental and health hazards resulting from the presence of dangerous components and the inappropriate storage and processing of such goods.

Description of hob
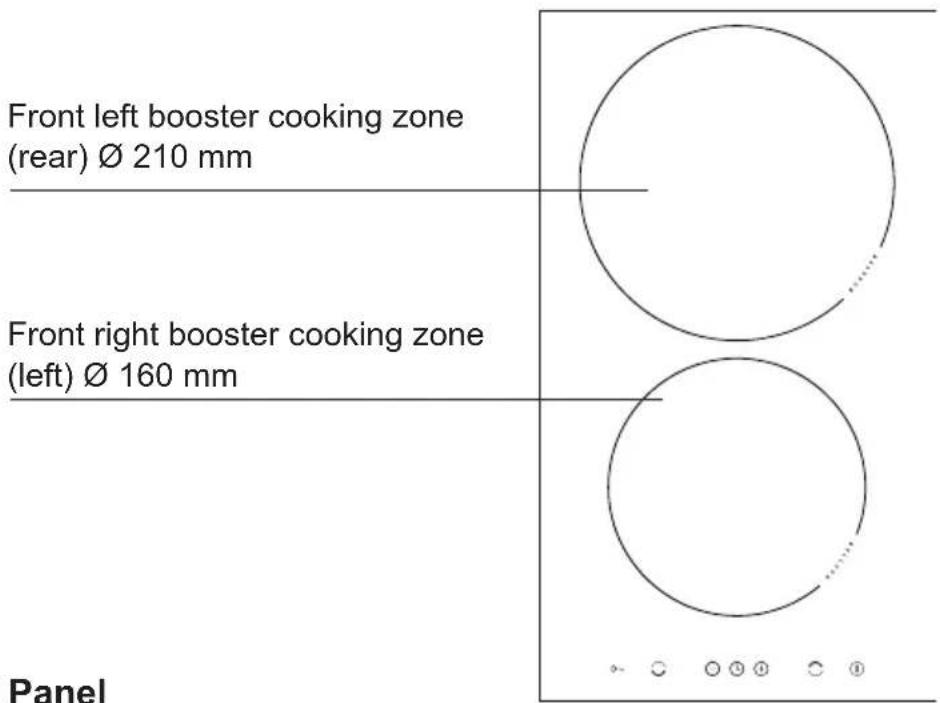
text_image
Front left booster cooking zone (rear) Ø 210 mm Front right booster cooking zone (left) Ø 160 mm Panel
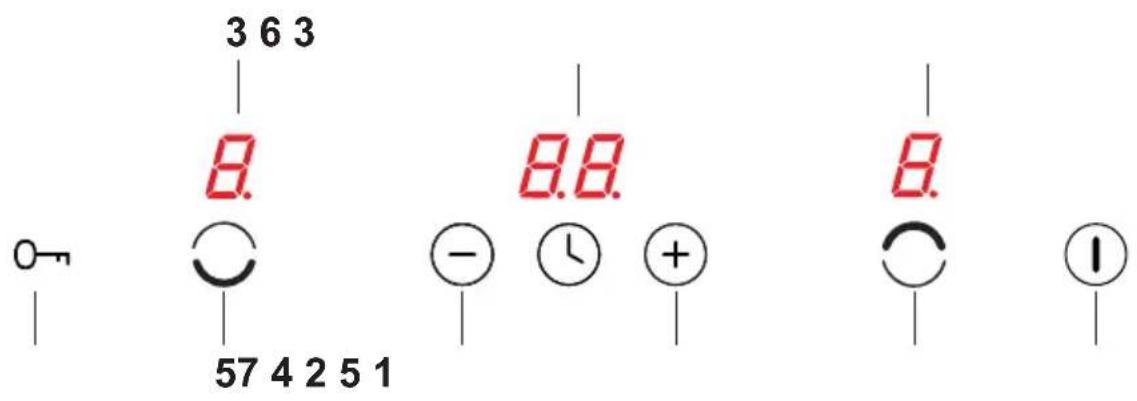
Control Panel
text_image
3 6 3 8. 8. 8. 57 4 2 5 1 - ⏱ ⭕ ⭺ ⬇ ⬊ ⬉ ⬾ ⬙- On/off sensor field
- Higher heat setting selector
- Cooking zone indicator
- Lower heat setting selector
- Cooking zone selector sensor
- Timer display
- Child lock sensor
Making the worktop recess
- Edge of the worktop near the wall must be sealed to prevent ingress of water or other liquids.
- There should be sufficient spacing around the opening, in particular, at least 50 mm distance to the wall and 60 mm distance to the front edge of worktop.
- The distance between the edge of the opening and the side wall of the furniture should be minimum 55 mm.
- Worktop must be made of materials, including veneer and adhesives, resistant to a temperature of 100°C. Otherwise, veneer could come off or surface of the worktop become deformed.
- Edge of the opening should be sealed with suitable materials to prevent ingress of water.
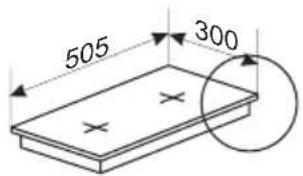
● Worktop opening must cut to dimensions as shown on figure 1. - Ensure minimum clearance of 25 mm below the hob to allow proper air circulation and prevent overheating. See Figure 2.
1
text_image
505 300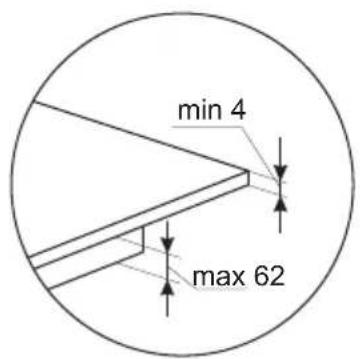
text_image
min 4 max 62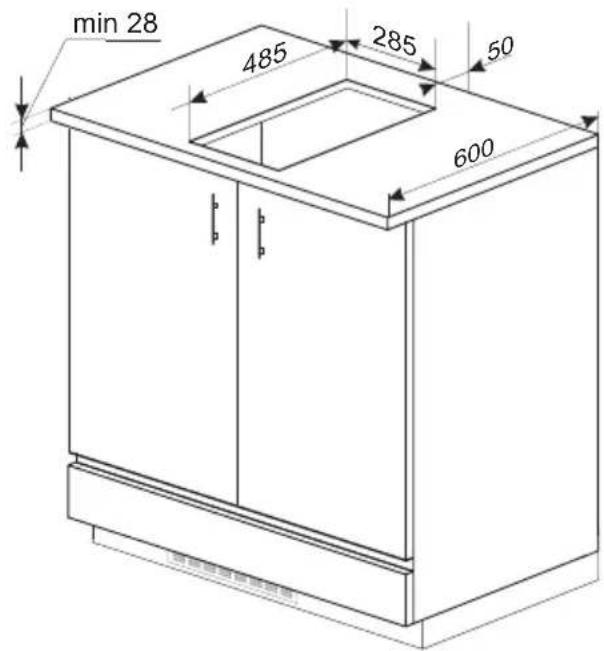
text_image
min 28 485 285 50 600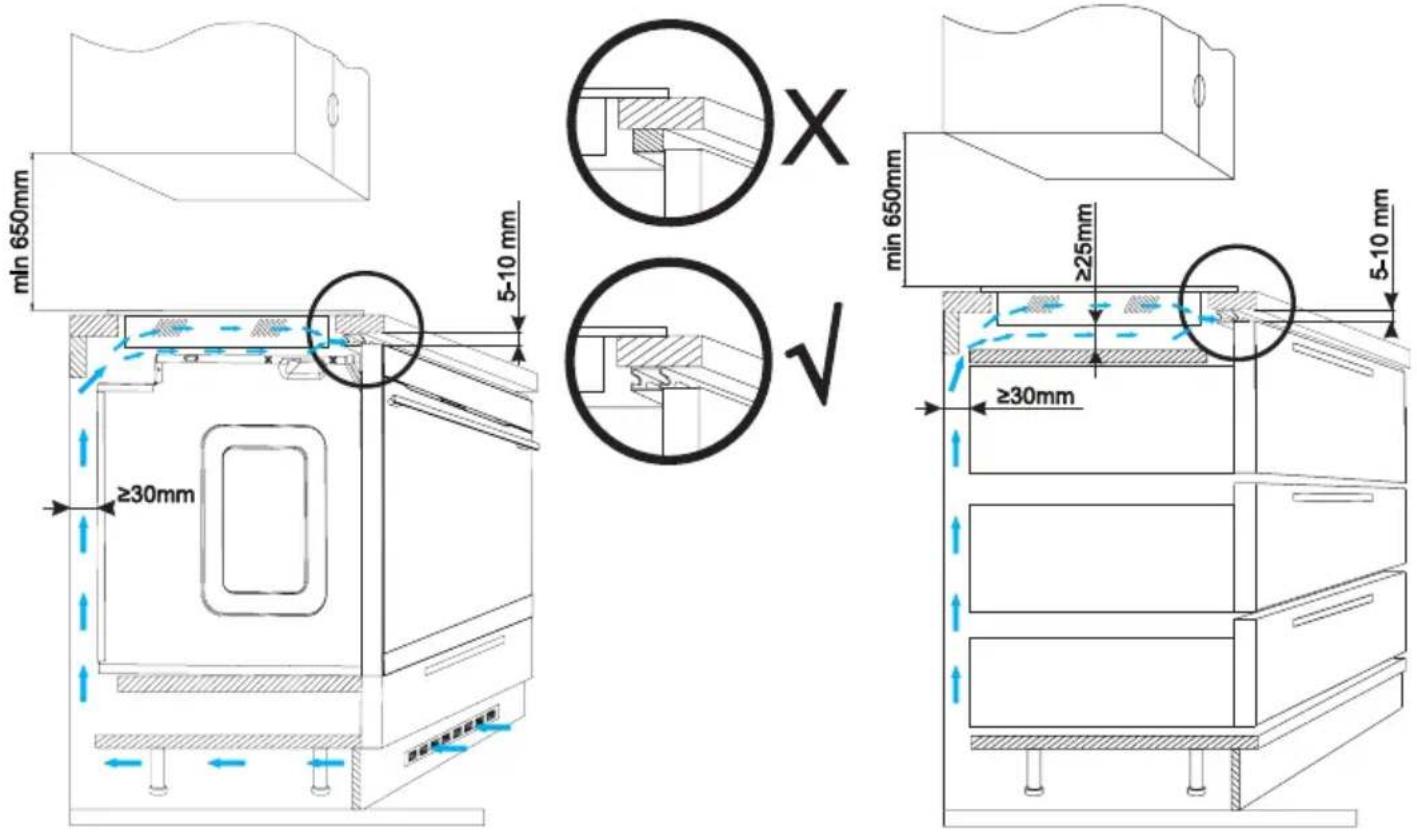
text_image
min 650mm 5-10 mm ≥30mm ≥30mm 5-10 mm ≥25mm min 650mm ≥30mm
When installing the hob in the worktop, a shelf-partition must be installed.
If the hob is installed above a built-in oven, it is not necessary to mount the shelf-partition.
Do not install the hob above the oven without ventilation.

Installing hob
- Using an electrical cord, connect the hob according to electrical diagram provided.
- Remove dust from the worktop, insert hob into the opening and press in firmly.
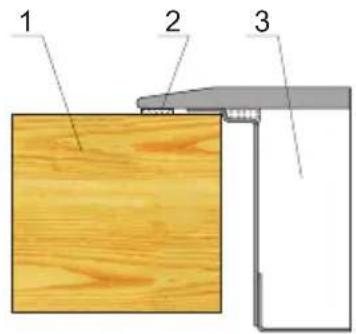
text_image
1 2 31 - Worktop
2 - Hob flange gasket
3 - Ceramic hob
Assembly of the gasket
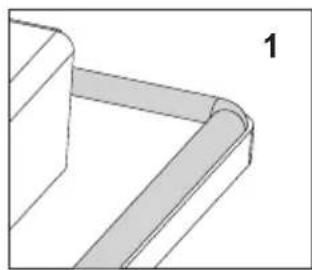
Depending on the model, the seal is already installed at the factory (fig.1)
If the seal has not been fitted at the factory, proceed as follows:
Before installing the hob in the cut-out worktop, the gasket is to be attached to the back of the hob (pic. 2)
To do this, first peel off the protective film from the self-adhesive seal and glue the gasket as close as possible to the outer edge of the hob (fig. 3,4).
natural_image
Pure technical line drawing of a 3D mechanical part with no text or symbols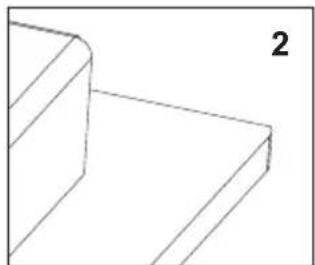
natural_image
Pure 3D geometric lines forming a stepped structure (no text or symbols)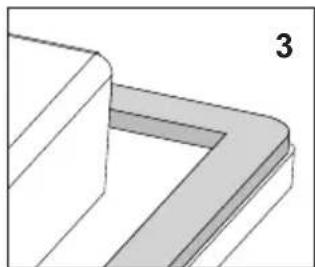
natural_image
Pure 3D geometric diagram showing a corner bracket with no text or symbols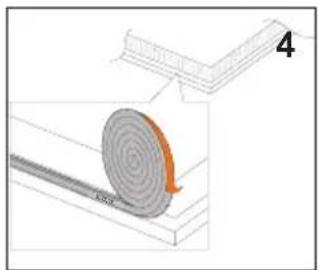
natural_image
Diagram showing a spiral-patterned object on a surface with an arrow indicating rotation (no text or symbols)
Do not install the appliance without the foam gasket.
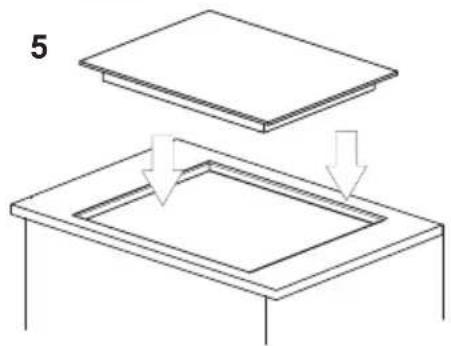
Then turn the hob over insert it into the cut-out of the furniture. Align the positioning symmetrically so that the distances between the hob and the countertop is the same on all sides. (fig. 5)
natural_image
Diagram showing two views of a rectangular frame with downward arrows indicating compression or disassembly (no text or symbols)- The hob has a fixed-mounted cable with a neutral contact and may only be connected to a 220-240 V \~ 50 Hz socket with grounding pin. Socket power circuit should be protected with a 16 A fuse.
Before using the appliance for the first time
- thoroughly clean your induction hob first. The induction hob should be treated with the same care as a glass surface.
- switch on the ventilation in the room or open a window, as the appliance could emit an unpleasant smell during first use.
- operate the appliance while observing all safety guidelines.
Induction cooking zone operation principle
natural_image
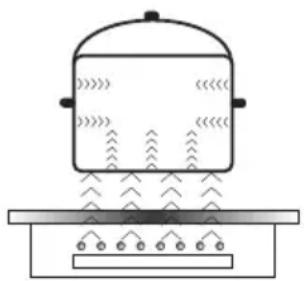
Simple line drawing of a steaming pot on a tray with no text or symbolsElectric oscillator powers a coil placed inside the appliance. This coil produces a magnetic field, which induces eddy currents in the pot, when it is placed on the hob.
These currents make the pot real transmitters of heat, while the hob glass surface remains cool.
This requires the use of pots whose base is ferromagnetic, in other words susceptible to magnetic fields.
Overall, induction technology is characterized by two advantages:
- the heat is only emitted by the pot and its use is maximised,
- there is no thermal inertia, since the cooking starts immediately when the pot is placed on the hob and ends once it is removed.
The protective device:
If the hob has been installed correctly and is used properly, any protective devices are rarely required.
Fan: protects and cools controls and power components. It can operate at two different speeds and is activated automatically. Fan runs until the electronic system has sufficiently cooled down regardless of the appliance or the cooking zones being turned on or off.
Temperature sensor: Temperature of electronic circuits is continuously monitored by a temperature sensor. If temperature is raised beyond a safe level, this protection system will reduce cooking zone heat setting or shut down the cooking zones adjacent to the overheated electronic circuits.
Pan detection: allows the hob to detect pans placed on a cooking zone. Small objects placed on the cooking zone (eg, spoon, knife, ring ...) will not be recognised as pans and the hob will not operate.
The protective device:
If the hob has been installed correctly and is used properly, any protective devices are rarely required.
Fan: protects and cools controls and power components. It can operate at two different speeds and is activated automatically. Fan runs until the electronic system has sufficiently cooled down regardless of the appliance or the cooking zones being turned on or off.
Temperature sensor: Temperature of electronic circuits is continuously monitored by a temperature sensor. If temperature is raised beyond a safe level, this protection system will reduce cooking zone heat setting or shut down the cooking zones adjacent to the overheated electronic circuits.
Pan detection: allows the hob to detect pans placed on a cooking zone. Small objects placed on the cooking zone (eg, spoon, knife, ring ...) will not be recognised as pans and the hob will not operate.

Pan detector
Pan detector is installed in induction hobs. Pan detector starts heating automatically when a pan is detected on a cooking zone and stops heating when it is removed. This helps save electricity.
- When an suitable pan is placed on a cooking zone, the display shows the heat setting.
- Induction requires the use of suitable cookware with ferromagnetic base (see Table).

If a pan is not placed on a cooking zone or the pan is unsuitable, the symbol is displayed. The cooking zone will not operate. If a pan is not detected within 10 minutes, the cooking zone will be switched off.
Switch off the cooking zone using the touch control sensor field rather than by removing the pan.

Pan detector does not operate as the on/off sensor.
The induction hob is equipped with electronic touch control sensor fields, which are operated by touching the marked area with a finger.
Each time a sensor field is touched, an acoustic signal can be heard.

When switching the appliance on or off or changing the heat setting, attention should be paid that only one sensor field at a time is touched. When two or more sensor fields are touched at the same time (except timer and child lock), the appliance ignores the control signals and may trigger a fault indication if sensor fields are touched for a long time.
When you finish cooking switch off the cooking zone using touch control sensor fields and do not rely solely on the pan detector.
The high-quality cookware is an essential condition for efficient induction cooking.

Select cookware for induction cooking

natural_image
Six identical cooking pots with crossed X marks, arranged horizontally (no text or symbols)Cookware characteristics.
- Always use high quality cookware, with perfectly flat base. This prevents the formation of local hot spots, where food might stick. Pots and pans with thick steel walls provide superior heat distribution.
- Make sure that cookware base is dry: when filling a pot or when using a pot taken out of the refrigerator make sure its base is completely dry before placing it on the cooking zone. This is to avoid soiling the surface of the hob.
- Lid prevents heat from escaping and thus reduces heating time and lowers energy consumption.
- To determine if cookware is suitable, make sure that its base attracts a magnet.
- Cookware base has to be flat for optimal temperature control by the induction module.
- The concave base or deep embossed logo of the manufacturer interfere with the temperature induction control module and can cause overheating of the pot or pan.
- Do not use damaged cookware such as cookware with deformed base due to excessive heat.
- When you use large ferromagnetic base cookware, whose diameter is less than the total diameter of the cookware, only the ferromagnetic base heats up. This results in a
situation where it is not possible to uniformly distribute the heat in the cookware. If the ferromagnetic area is reduced due to inclusion of aluminium parts then the effective heated area can be reduced. Problems with the detection of the cookware could arise or cookware may not be detected at all. To achieve optimum cooking results, the diameter of the ferromagnetic base should match that of the cooking zone. If cookware is not detected in a given cooking zone, it is advisable to try it in a smaller cooking zone.
natural_image
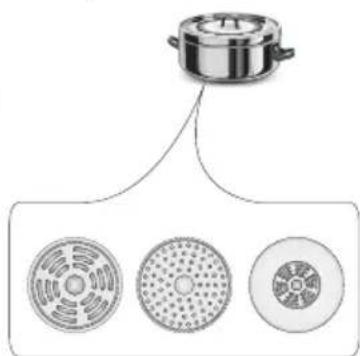
Diagram showing a cooking pot with three circular components below, no text or symbols presentFor induction cooking us only ferromagnetic base materials such as:
- enamelled steel
- cast iron
- special stainless steel cookware designed for induction cooking.
| Marking of kitchen cookware | Check for marking indicating that the cookware is suitable for induction cooking. |
| Use magnetic cookware (enamelled steel, ferrite stainless steel, cast iron). The easiest way to determine if your cookware is suitable is to perform the „magnet test". Find a generic magnet and check if it sticks to the base of the cookware. | |
| Stainless Steel Cookware | is not detected |
| With the exception of the ferromagnetic steel cookware | |
| Aluminium Cookware is not detected | |
| Cast iron High efficiency | |
| Caution: cookware can scratch the hob surface | |
| Enamelled steel High efficiency | |
| Cookware with a flat, thick and smooth base is recommended | |
| Glass Cookware is not detected | |
| Porcelain Cookware is not detected | |
| Cookware with copper base | Cookware is not detected |

Control Panel
- Immediately after the appliance is connected to electrical mains, all displays will light up briefly. Your induction hob is then ready for use.
- The induction hob is equipped with electronic touch control sensor fields, which are operated by touching with a finger for at least 1 second.
- Touching of a sensor field is accompanied by an acoustic signal to acknowledge.

No objects should be placed on the sensor fields (this could cause an error). Touch sensor fields should be always kept clean.
Switching on the appliance
To switch on the appliance touch and hold the on/off sensor field (1) for at least 1 second. All displays (3) will show the number „0”.

If none of the sensor fields is touched within 20 seconds, the appliance switches itself off.
Switching on the cooking zones
Once the appliance is switched on using the on/off sensor field (1), select a cooking zone (5) within the next 20 seconds.
-
When a cooking zone selection sensor field (5) is touched, „0” on the corresponding heat setting indicator display will become bright.
-
Set the desired heat setting using the „+” (2) or „-” (4) sensor fields.

If none of the sensor fields is touched within 20 seconds of switching on the appliance, the cooking zone switches off.

A cooking zone is active when its display shows a digit or a letter. This indicates the cooking zone is ready for the heat setting to be set or changed.
Selecting the cooking zone heat setting
When the cooking zone display (3) shows bright "0", start setting the desired heat setting using the "+" (2) or "-" (4) sensor field.
Switching off cooking zones
- A given cooking zone must be active. Heat setting display is bright.
- To switch off a cooking zone touch the on/off sensor field or touch the lower heat setting sensor field „-” (4) to reduce the heat setting to „0”.
Switching off the appliance
- The hob operates when at least one cooking zone is on.
- To switch off the appliance touch the on/off sensor (1).
If the cooking zone is still hot, the relevant display (3) will show the letter „H” to indicate residual heat.
The Booster Function increases the nominal power of the 210 mm cooking zone from 2000W to 3000W, 160 mm cooking zone from 1200W to 1400W.
In order to activate the Booster function, select the cooking zone, set the heat setting to „9“ and then touch the „+” (2) sensor field again. The letter „P” will be shown on the display.
To deactivate the Booster function, touch the „-” (4) sensor field to reduce the heat setting or lift the cookware from the cooking zone.

For 160, 210 mm cooking zone, operation of the Booster function is limited to 5 minutes. Once the Booster function is automatically deactivated, the cooking zone continues to operate at its nominal power.
The Booster function can be reactivated, provided the appliance electronic circuits and induction coils are not overheated. When the pot is lifted from the cooking zone when the Booster function is in operation, it remains active and the countdown continues.
When the appliance electronic circuits or induction coils overheat when the Booster function is in operation, it is automatically deactivated. The cooking zone continues to operate at its nominal power.
Booster function control
Two cooking zones arranged vertically form a pair.

If activating Booster function causes the overall power limit of a pair to be exceeded, the heat setting of the other cooking zone in a pair will be automatically reduced.
The residual heat indicator
Once a cooking zone is switched off, „H“ is displayed on the relevant cooking zone’s display to warn that the „cooking zone is still hot!”.


Do not touch the cooking zone at this time owing to the risk of burns from residual heat, and do not place any object on it which is sensitive to heat!
When the residual heat indicator goes out, cooking zone can be touched, however keep in mind that it may still be warmer than ambient temperature.

When there is no power, the residual heat indicator does not light up.
The child lock function
The Child Lock function protects the appliance from inadvertent operation by children. The appliance can be operated once the child lock function has been released.
The Child Lock function can be set when the appliance turned on or off.
Turn Child Lock on/off
Touch and hold sensor (7) for 5 seconds to turn Child Lock on/off. Indicator light is on when the Child Lock function is on.

The Child Lock function remains set until it is released even after the appliance has been switched off and then switched on again. Disconnecting the appliance from electrical mains deactivates the Child Lock.
Limiting the operating time
In order to increase efficiency, the induction hob is fitted with a operating time limiter for each of the cooking zones. The maximum operating time is set according to the last heat setting selected.
If you do not change the heat setting for a long time (see table) then the associated cooking zone is automatically switched off and the residual heat indicator is activated. However, you can switch on and operate individual co-oking zones at any time in accordance with the operating instructions.

In order to conserve electricity, after 30 minutes heating setting „9“ will be automatically reduced to the heat setting „8“, but cook time will not change.
| Cooking heat setting | Maximum operating time (hours) |
| U | 2 |
| 1 8,6 | |
| 2 6,7 | |
| 3 5,3 | |
| 4 4,3 | |
| 5 3,5 | |
| 6 2,8 | |
| 7 2,3 | |
| 8 | 2 |
| 9 1,5 | |
| P - ∅ 220 0,08 |
Timer
Timer function makes cooking easier by making it possible to set cook time. It can also be used as a Kitchen Timer.
Setting the Timer
Timer function makes cooking easier by making it possible to set cook time. It can also be used as a Kitchen Timer.
- Touch cooking zone selector sensor field (5) to select a cooking zone. The number „0” will become bright.
- Touch „+” (2) or „-” (4) sensor field to set the desired heat setting ranging from 1 to 9.
- Activate timer by simultaneously touching „+” (2) and „-” (4) sensor fields within 10 seconds.
- Touch „+” (2) or „-” (4) sensor field to set the desired cooking time (01 to 99 minutes).
Decimal dot will be shown on the corresponding cooking zone display to indicate that cooking zone operation is controlled by the timer function.

Timer countdown can be set independently for all cooking zones.
Changing Timer (cook time) setting
Programmed Timer (cook time) setting can be changed at any time.
- Touch cooking zone selector sensor field (5) to select a cooking zone. The display will become bright.
- Programmed timer setting will be shown on the top display.
- Use „+” (2) or „-” (4) sensor field to adjust the timer setting.
Checking Timer countdown
You can check the remaining cook time at any moment by touching the cooking zone selector sensor field (5), and then simultaneously touching „+” (2) and „-” (4) sensor fields.
Stopping Timer
When the set time has elapsed an acoustic signal is sounded, which can be muted by touching any sensor field. If no sensor field is touched, the acoustic signal will stop automatically after 2 minutes.
To stop the timer countdown before the set time has elapsed:
- Touch cooking zone selector sensor field (5) to select a cooking zone. The display will become bright.
- Touch „+” (2) and „-” (4) sensor fields to activate timer.
- Touch „-” (4) sensor field to reduce cook time to „00”. Timer function will be deactivated while the cooking zone continues to operate until it is switched off manually.
Kitchen Timer
When no cooking zones are in use, the Timer function can be used as a regular Kitchen Timer.
Setting Kitchen Timer
When the appliance is off:
- Switch on the appliance by touching the on/off sensor (1).
- Simultaneously touch „+” (2) and „-” (4) sensor fields to select Kitchen Timer.
- Use „+” (2) or „-” (4) sensor field to adjust the Kitchen Timer setting.
Keeping food warm
Keep warm function allows for keeping food warm on a cooking zone. The selected cooking zone operates at a low heat setting. Cooking zone's heat setting is automatically adjusted so that food temperature is kept at a constant temperature of 65^ . Thanks to this, ready to serve, warm food retains its taste and does not stick to the pot's bottom. This function can be also used to melt butter or chocolate. For the keep food warm function to operate correctly, use a flat base pot or frying pan, so that base temperature is accurately measured by the temperature sensor fitted in the cooking zone.
The Keep Warm function can be activated for any cooking zone.
Due to a risk of the growth of microorganisms, it is not recommended to keep food warm for a long time, so the Keep Warm function is switched off after 2 hours.
Keep warm setting is an additional heat setting available between „0“ and „1“ and is indicated on the display as „U“.
Keep warm setting is activated in the same way as described in the section „Switching on the cooking zones”.
Keep warm setting is deactivated in the same way as described in the section „Switching off the cooking zones”.
Stopping Kitchen Timer
When the set time has elapsed an acoustic signal is sounded, which can be muted by touching any sensor field. If no sensor field is touched, the acoustic signal will stop automatically after 2 minutes.
To stop the timer countdown before the set time has elapsed:
- Simultaneously touch „+” (2) and „-” (4) sensor fields to select Kitchen Timer.
- Touch „-” (4) sensor field to reduce time to „00”.
- Kitchen timer will stop.
- Kitchen Timer function does not affect cooking zone operation.
Proper routine maintenance and cleaning of the appliance can significantly extend its trouble-free operation.

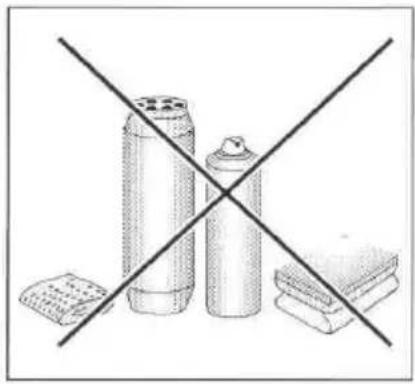
When cleaning induction hobs, the same principles apply as for glass surfaces. Do not use under any circumstances any abrasive or caustic cleaners or scouring powders or pads! Do not use steam or pressure cleaners.
natural_image
Diagram showing three containers crossed by a diagonal line, with no text or symbols present.Cleaning after each use
- Wipe light stains with a damp cloth without detergent. The use of dishwashing liquid may cause a bluish surface discolouration. These persistent stains cannot always be removed right away, even using a special cleaner.
- Firmly adhering dirt can be carefully removed with a scraper. Then wipe the cooking surface with a damp cloth.

natural_image
Line drawing of a hand using a tool to cut or spread material from a block (no text or symbols)Scraper to clean the hob
Removing stains
- Bright stains of pearl colour (residual aluminium) can be removed from the cool hob using a special cleaning agent. Limestone residue (eg. after evaporated water) can be removed by vinegar or a special cleaning agent.
- Do not turn off the cooking zone when removing sugar, food containing sugar, plastic and aluminium foil. Immediately and thoroughly scrape the leftovers off the hot cooking zone using a sharp scraper. Once the bulk of the stain is removed the hob can be turned off and clean the cooled off cooking zone with a special cleaning agent.
Special cleaners are available in supermarkets, electrical and home appliance shops, drug stores, as well as retail food shops and kitchen showrooms. Scrapers can be purchased in DIY and construction equipment stores, as well as in shops carrying painting accessories.
Never apply a detergent on the hot cooking zone. It is best to let the cleaner dry and then wipe it wet. Any traces of the detergent should be wiped off clean with a damp cloth before re-heating. Otherwise, it can be corrosive.
Warranty will be void if you do not follow the above guidelines!
Important!
If the hob's controls do not respond for whatever reason, then turn off the main circuit breaker or remove the fuse and contact customer service.
Important!
In the event of breakage or chipping of the hob cooking surface, turn off and unplug the appliance. To do this, disconnect the fuse or unplug the appliance. Then refer the repair to professional service.
Periodic inspections
In addition to normal cleaning and maintenance:
- carry out periodic checks of touch controls and other elements. After the warranty expires, have authorised service inspect the appliance every two years,
• repair and identified problems, - carry out periodic maintenance of the hob.
Important!
All repairs and adjustments must be performed by a competent technician or by an authorised installer.
In the event of any fault:
- turn off the appliance
- disconnect the power supply
• have the appliance repaired
- Based on the instructions given in the table below, some minor issues can be corrected by the user. Please check the consecutive points in the table before you refer the repair to customer service.
| PROBLEM POSSIBLE CAUSE REMEDY | ||
| 1.The appliance does not work | - no power -check the fuse, | replace if blown |
| 2.Sensor fields do not respond when touched | - appliance is not turned on - | turn on the appliance |
| - sensor field touched too briefly (less than one second) | - touch the sensor field longer | |
| - multiple sensors touched at the same time | - always touch only one sensor field (except when a cooking zone is switched off) | |
| 3.The appliance does not respond and beeps briefly | - child lock feature is active - | deactivate child lock feature |
| 4.The appliance does not respond and emits and extended beep | - improper use (wrong sensor fields touched or sensors touched too briefly) | - reconnect the hob |
| - sensor fields covered or dirty | - uncover or clean the sensor fields | |
| 5.The appliance switches itself off | - no sensor field is touched for 10 seconds of activating the appliance | - switch on the appliance and set heat setting without delay |
| - sensor fields covered or dirty | - uncover or clean the sensor fields | |
| 6.A single cooking zone switches off and residual heat indicator „H” is shown. | - limited cook time - switch on the cooking zone again | |
| - sensor fields covered or dirty | - uncover or clean the sensor fields | |
| - electronic components overheated | ||
| 7.Residual heat indicator extinguished even though the cooking zones are hot | - a power outage or the appliance has been disconnected | - residual heat indicator will be shown again the next time the appliance is turned on and off again |
| 8.Hob cooking surface is cracked. | Danger! Immediately unplug the appliance or switch off the main circuit breaker. Refer the repair to the nearest service centre. | |
| 9.When the problem is still not remedied. | Immediately unplug the appliance or switch off the main circuit breaker (fuse). Refer the repair to the nearest service centre. Important!You are responsible for operating the appliance correctly and maintaining its good condition. If you call service as a result of operating the appliance incorrectly you will be responsible for the costs incurred even under warranty.The manufacturer shall not be held liable for damage caused by failure to follow this manual. | |
| 10.Induction hob makes buzzing sound. | This is normal. Cooling fan is operating to cool down internal electronics. | |
| 11. Induction hob makes hissing and whistling sounds. | This is normal. When using several cooking zones at full power, the hob makes hissing and whistling sounds due to the frequencies used to power the coils. | |
| 12. E2 symbol displayed | Induction coil overheated | - insufficient cooling,- verify if the induction hob is built in according to instructions. |
Rated voltage 220-240V\~50/60 Hz
Rated power: 3,7kW
- induction cooking zone:
- Booster induction cooking zone: ∅ 160 mm 1200/1400 W
- Booster induction cooking zone: ∅ 210 mm 2000/3000 W
Dimensions: 300 x 505 x 62;
Weight: ca.5,5 kg;
Meets the requirements of European standards EN 60335-1; EN 60335-2-6.
natural_image
Simple line drawing of a tree with cloud-like canopy and two wavy base lines (no text or symbols)natural_image
Simple line drawing of a three chasing recycling symbol (no text or labels)text_image
min 650mm 5-10 mm ≥30mm X √ min 650mm ≥25mm ≥30mm 5-10 mm
natural_image
Pure technical line drawing of a 3D mechanical part with no text or symbols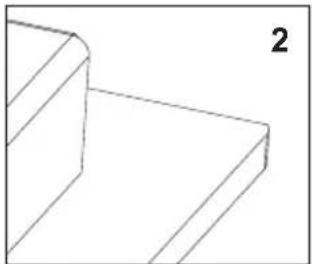
natural_image
Pure 3D geometric lines forming a stepped corner (no text or symbols)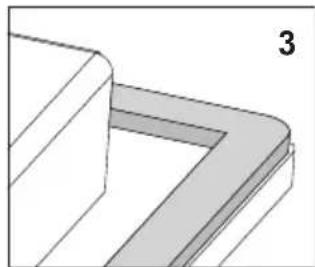
natural_image
3D diagram of a corner bracket with shaded areas, no text or symbols present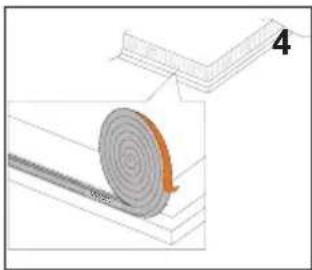
natural_image
Diagram showing a spiral-patterned object on a textured surface with an orange arrow indicating rotation (no text or symbols)