BAS 24 - Drill Ectram - Free user manual and instructions
Find the device manual for free BAS 24 Ectram in PDF.


User questions about BAS 24 Ectram
0 question about this device. Answer the ones you know or ask your own.
Ask a new question about this device
Download the instructions for your Drill in PDF format for free! Find your manual BAS 24 - Ectram and take your electronic device back in hand. On this page are published all the documents necessary for the use of your device. BAS 24 by Ectram.
USER MANUAL BAS 24 Ectram
natural_image
Open hard-shell toolbox containing electronic components and wiring (no visible text or symbols)© Lieferumfang:
1 cordless drill/screwdriver
1 removable battery
1 battery charger
1 storage case
© Etendue des
fournitures:
Figure 1: Torque adjustment facility
Figure 2: Selecting drill or hammer mode
Figure 3: Changing over from 1st gear to 2nd gear
Figure 4: Forward / Reverse selector switch
Figure 5: On/Off switch
Figure 6: Removable battery pack; press both clips to take out the battery pack
Important notes:
It is imperative to read these notes before putting your battery-powered drill/screwdriver into operation:
- The removable Ni-Cd battery pack supplied with your battery-powered drill/screwdriver has to be charged before you use the tool for the first time.
- Use the supplied battery charger to charge the battery pack. It takes a maximum of 1 hour to charge an empty battery. Do not use the supplied battery charger to charge any other tools or appliances.
- The battery pack reaches its maximum capacity after approx. five discharge/charge cycles.
- Ni-Cd batteries will also discharge when they are not in use. It is recommended, there-
fore, to charge the batteries regularly.
- Please note the data quoted on the rating plate of the battery charger. Operate the charger only from the same mains voltage as that quoted on the rating plate.
- In periods of heavy duty the battery pack will grow warm. Allow the battery pack to cool to room temperature before starting to charge it.
Safety regulations:
- Protect your battery-powered drill/screwdriver and charger from the damp and rain.
- Keep the charger and battery-powered drill/screwdriver safe from children.
- Use only sharp drill bits and undamaged, properly fitting screwdriver bits.
- Wear suitable working clothes and safety goggles.
- Never use the battery-powered drill/screwdriver and charger in the vicinity of vapours and combustible liquids.
- Look for concealed electric cables, gas pipes and water pipes before drilling and screwdriving in walls.
- Never throw old batteries into an open fire. Risk of explosion!
GB
- Avoid contact with leaky batteries. Should contact arise nevertheless, wash the affected area of skin immediately with soap and water. If battery acid gets in your eye, rinse the eye with clear water for at least 10 minutes and consult a doctor immediately.
- Protect the charger and its cable from damage and sharp edges. Damaged cables are to be replaced immediately by an electrician.
- Examine your tool for any signs of damage. Have repairs carried out only by an electrician.
- Make sure that the contacts of the Ni-Cd battery pack do not touch other metallic objects, e.g. nails and screws. Risk of short-circuiting!
Putting into operation:
Loading the Ni-Cd battery pack
- Check that your mains voltage is the same as that quoted on the rating plate. Insert the charger in a socket-outlet.
- Pull the battery pack out of the handle (Figure 6) by depressing the clips on the side.
- nsert the battery pack in the charger. The red light comes as a sign that the battery pack is being charged. The green LED comes on to signal that the
charging is completed. It takes 1 hour to charge an empty battery. The temperature of the battery may rise slightly during the charging operation. This is normal.
If the battery pack fails to become charged, please check
● whether there is voltage at the socket-outlet
● whether there is proper contact at the charging contacts on the charger.
If the battery still fails to become charged, please return
● the charger
● the battery pack to our Customer Service Department.
Timely recharging of the Ni-Cd battery pack is recommended in the interest of long battery life. Recharging is always necessary when you notice that the power of the battery-powered drill/screwdriver is decreasing.
Never allow the battery pack to discharge completely. This will result in damage to the Ni-Cd battery pack!
Adjusting the torque (Figure 1)
The Einhell battery-powered drill/screwdriver is equipped with a 17-step mechanical torque adjustment facility. The torque for a speci-
GB
fic size of screw is selected with the set-collar (Figure 1). The correct torque depends on several factors:
● on the type and hardness of material in question
● on the type and length screws used
● on the requirements needing to be met by the screwed joint.
The clutch disengages with a gra- ting sound to indicate when the set torque is reached.
Selecting drill or hammer mode (Figure 2)
For normal drilling, turn the front set-collar to the „drill“ symbol. For drilling with hammer action, turn the front set-collar to the „hammer“ symbol and the set-collar for torque adjustment to the „drill“ symbol.
Changing over from 1st gear to 2nd gear (Figure 3)
You can work at a higher or lower speed depending on the position of the selector switch. To avoid damaging the gear unit you should only change over gears when the tool has stopped.
Drilling
For drilling purposes, move the set-collar to the last step „Drill“ (Figure 1). In this setting the slip clutch is inactive. The maximum torque is
available in drilling mode.
Forward/Reverse switch (Figure 4)
With the slide switch above the On/Off switch you can select the direction of rotation of the battery-powered drill/screwdriver and secure it against being switched on accidentally. You can choose between clockwise and anticlockwise rotation. To avoid causing damage to the gearing it is advisable to change the direction of rotation only when the tool is at a standstill. The On/Off switch is blocked when the slide switch is in centre position.
On/Off switch (Figure 5)
Infinitely variable speed control is possible with the On/Off switch. The further you press the switch, the higher the speed of the battery-powered drill/screwdriver.
Screwdriving
We recommend using self-centering screws (e.g. Torx screws, recessed head screws) designed for reliable working. Be sure to use a bit that matches the screw in shape and size. Set the torque, as described elsewhere in these operating instructions, to suit the size of screw.
GB
Technical data
| Voltage supply 24 V = |
| Speed 0-400 / 0-1150 rpm |
| Torque 17 levels |
| Forward and reverse rotation yes |
| Chuck clamping width 2 - 13 mm |
| Battery charging voltage 24 V = |
| Battery charging current 2 A |
| Mains voltage for charger 230 V ~ 50 Hz |
| Sound pressure level LPA: 72 dB(A) |
| Sound power level LWA: 82 dB(A) |
| Vibration a_W < 2,5 m/s ^a |
| Weigth: 2,3 kg |
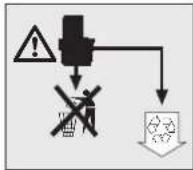
Old and defective batteries do not belong in the refuse bin. Think of the environment! Cadmium is toxic. For correct disposal, return old and defective batteries to your local old battery depot. Ask at your town hall for details of the old battery depots in your area.
F
The undersigned declares in the name of the company that the product is in compliance with the following guidelines and standards.
The image contains no text or characters.
2000/14/EG: L_WM dB(A); L_WA dB(A)
□
90/396/EWG
Eschenstraße 6 · D-94405 Landau/Isar (Germany)
The guarantee period begins on the sales date and is valid for 2 years.
Responsibility is assumed for faulty construction or material or functional defects.
Any necessary replacement parts an necessary repair work are free of charge.
We do not assume responsibility for consequential damage.
Your customer service partner
