
DHP 7 E W566C2 - Dryer HIGH ONE - Free user manual and instructions
Find the device manual for free DHP 7 E W566C2 HIGH ONE in PDF.

| Product type | Condenser tumble dryer with heat pump |
| Brand | HIGH ONE |
| Model | DHP 7 E W566C2 (ref. 10009778) |
| Nominal capacity | 7.0 kg |
| Dimensions (W x D x H) | 600 x 600 x 850 mm |
| Net weight | 41 kg |
| Power supply | 220-240 V~, 50 Hz, 800 W |
| Refrigerant | R290 (propane), 105 g |
| Drying programs | Cotton Extra, ECO, Cotton Ready to Iron, Delicates, Mixed, Synthetic Extra, Synthetic Ready to Store, Wool, Refresh, Warm Air, Cold Air, Shirts, Sports, Bed Linen, Jeans, My Program |
| Additional functions | Delayed start (up to 24 h), Anti-crease (30-120 min), Drying intensity, My Program, Child lock |
| Energy efficiency class | Not specified in the manual; ECO program most efficient |
| Recommended spin speed | 800-1000 rpm (depending on program) |
| Noise level (ECO program) | 67 dB (A) |
| Condensation water tank | Yes, empty after each cycle |
| Filters | Lint filter in door; clean after each cycle; heat exchanger clean every 3 months |
| Drainage system | Upper drainage hose for direct evacuation (optional) |
| Interior light | LED not replaceable by user |
| Installation | On flat and stable floor; do not install in a room at risk of frost; do not place on a washing machine without kit |
| Safety | Child lock; automatic stop at end of program; full tank detection (code E20) |
| Maintenance | Clean lint filter and water tank after each use; clean heat exchanger every 3 months; surface with damp cloth |
| Spare parts and repairability | Parts available for 10 years after end of marketing; repairs by qualified professional |
| Package contents | User manual, upper drainage hose |
Frequently Asked Questions - DHP 7 E W566C2 HIGH ONE
User questions about DHP 7 E W566C2 HIGH ONE
0 question about this device. Answer the ones you know or ask your own.
Ask a new question about this device
Download the instructions for your Dryer in PDF format for free! Find your manual DHP 7 E W566C2 - HIGH ONE and take your electronic device back in hand. On this page are published all the documents necessary for the use of your device. DHP 7 E W566C2 by HIGH ONE.
USER MANUAL DHP 7 E W566C2 HIGH ONE
_
| _
一
1
Thank you!
Thank you for choosing this HIGHONE product. HIGHONE products are chosen, tested, and recommended by ELECTRO DEPOT, so you can be sure you are getting a top-quality, easy-to-use product that won't let you down.
We're confident your new device will be a pleasure to use every day!
Welcome to ELECTRO DEPOT.
Table of Contents

Product overview
Parts
Accessories
Specifications

Product usage
Installation
Operation

Cleaning and maintenance
Cleaning and Care
Trouble Shooting
A
Product overview
Parts
A Power cord Maintenance cover

B Top board Door filter

C Control panel Drum

D Door Water container

E Air inlet

Note:
- The actual model you purchased might differ. Please see the product you purchased in kind prevail.
Accessories
The following parts are optional for specific models.
If your dryer has following parts, please wear gloves to install them as per the instruction below.

Specifications
Model: 10009778 - DHP 7 E W566C2
Dimension (LxWxH): 600x600x850(mm)
Ambient temperature: +2°C \~ +35°C
Rated input power: 800W
Rated voltage: 220-240V\~
Rated frequency: 50Hz
Refrigerant: R290
Weight of product: 41kg
Rated capacity: 7.0kg
GWP: 3
Quantity of refrigerant: 105g

Note:
- The rated capacity is the maximum capacity to be dried at one time. Make sure that the dry clothes which are loaded into the appliance do not exceed the rated capacity.
- Do not install the tumble dryer in a room when there is a risk of frost occurring. At temperatures around freezing point the tumble dryer may not be able to operate properly.
- There is a risk of damage if the condensate water is allowed to freeze in the pump, hoses and / or condensate water container.
B
Product usage
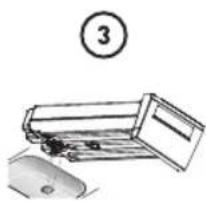
Installation
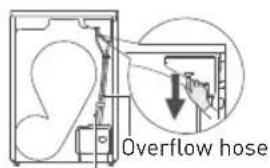
Drain hose
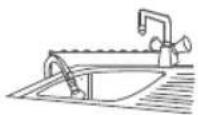
- Pull out the upper drain hose
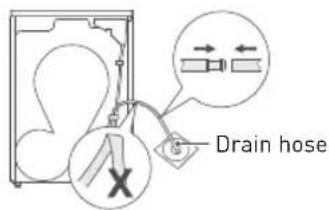
- Put the external drain hose into the floor drain (be careful not to bend the external drain hose)
- Put the hose holder in the washing basin or any other sink.

Transport
Move cautiously. Do not grasp any salient parts of machine. The machine door cannot be used as the handle for transport. If the dryer can't be transported erectly, the dryer can be tilted to right less than 30^ .
Risk of injury and damage!
Improper handling of the appliance may result in injury.
- The appliance is very heavy. Never transport or carry the appliance alone; always with the assistance of another person.
- Remove all obstacles on the transport route and from the installation location, e.g. open doors and clear away objects lying on the floor.
- Do not use the open door as a handhold.
- Remove all package material before using the appliance.
- Before setting up the tumble dryer, check it for any externally visible damage. Do not install or use a damaged tumble dryer.
- Do not install the tumble dryer in a room where there is a risk of frost occurring.
At temperatures around freezing point the tumble dryer may not be able to operate properly. There is a risk of damage if the condensed water is allowed to freeze in the pump and hoses.
B
Product usage
Installation Position

Warning!
- Children can become entangled in the packaging film or swallow small parts and s uffocate. Do not allow children to play with the packaging.
- The appliance must not be installed behind a lockable door, a sliding door or a door with a hinge on the opposite side to that of the tumble dryer, in such a way that a full opening of the tumble dryer door is restricted.
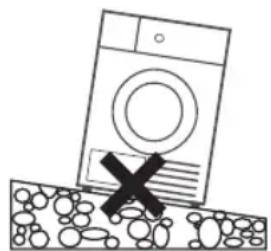
- Do not restrict the floor clearance through deep pile carpets, strips of wood or similar. This might cause heat built-up which would interfere with the operation of the appliance.
- In the appliance enclosure or in the built-instructure, keep ventilation openings clear of obstruction.
-
Do not damage the refrigerant circuit.
-
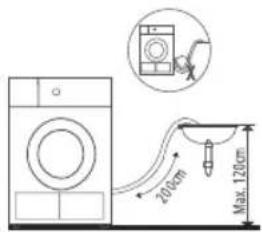
It is recommended that, for your convenience, the machine is positioned close to your washing machine.
- Do not stack this dryer on washing machine without stacking kits. (If you want to stack this dryer on a washing machine, please purchase the independent parts. Installation shall be done by the manufacturer, its service agent or similarly qualified persons to avoid any hazards.)
- The tumble dryer must be installed in a clean place, where dirt does not accumulate. Air must be able to circulate freely around the appliance. Do not obstruct the front air inlet or the air intake grilles at the back of the machine.
- To keep vibration and noise within minimum level when the dryer is in use, it must be placed on a firm and level surface.
- The feet must never be removed.
natural_image
Simple line drawing of a washing machine with a cross symbol on the floor, no text or symbols present.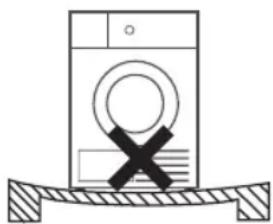
natural_image
Simple line drawing of a washing machine with a cross symbol on its side, resting on a surface (no text or labels)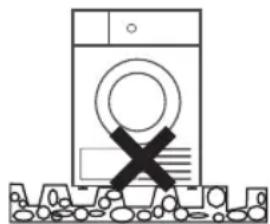
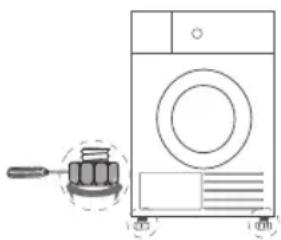
natural_image
Simple line drawing of a washing machine with a black X mark on the front panel, no text or symbols present.Level Adjusting
Once in its permanent operating position, check that the dryer is absolutely level with the aid of a spirit level. If it is not, adjust the feet by hand or using a tool.
natural_image
Line drawing of a washing machine with a brush and a small inset showing a button (no text or symbols)Power Supply Connection
- Make sure that the voltage of the power supply is the same as the electric specification.
- Do not connect the dryer with the power connection board, a universal plug or socket, do not use multi-plug adapters and extension cables.
B
Product usage
Operation

Note:
- Before using, make sure the tumble dryer is installed correctly.
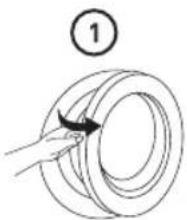
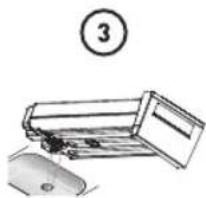
Before Drying
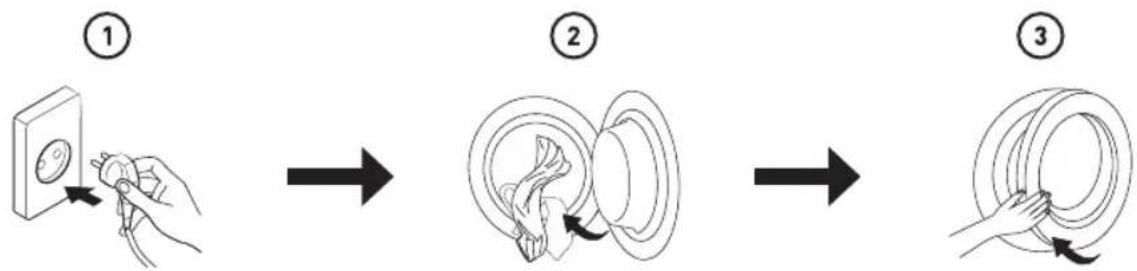
flowchart
graph LR
A["①"] --> B["②"]
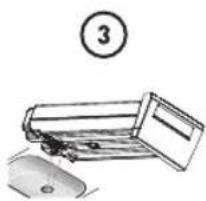
B --> C["③"]
-
Plug in
-
Load
-
Close the door
Drying

On


Select program


Select function or default


Start
After Drying
Buzzer beep and "End" on display.
natural_image
Hand holding a circular object with an arrow indicating rotation (no text or symbols)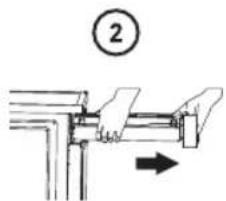
natural_image
Diagram of a printer or printer with a paper clip and a numbered label (3) above it, no readable text or symbols present.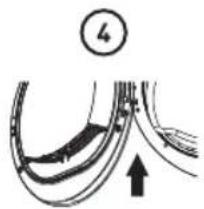
natural_image
Diagram of curved road or pipeline sections with an arrow indicating direction (no text or symbols)
- Open the door and take out laundry
- Pull out the container
- Pour out condensate water
- Clean the filter
- Power off
B
Product usage

Note:
- If the socket with a switch is used, please press the switch to turn off the power directly.
Before Each Drying

Note:
- Leave it to stand for 2 hours after transporting. Before first use, please use the soft fabric to clean the inside drum.
- Put some clean rags into the drum.
- Plug the power, press "On/Off".
- Select the "Refresh" Programme, press "Start/Pause" button.
- After finishing this programme, please follow the “cleaning and care” (refer to page 16) to clean the door filter.
-
During drying, the compressor and the water will generate some noise which is entirely normal.
-
Before drying, thoroughly spin the laundry in washing machine. High spin speed shortens the drying time and saves energy.
- For uniform drying result, sort the laundry according to fabric type and select the appropriate drying programme.
- Before drying, please close zips, hooks and eyelets, button, tie fabric belts, etc.
- Remove all objects from pockets such as lighters and matches.
- Sew in or remove underwiring from bras.
- Close duvet covers and pillow cases to prevent small items from being rolled up inside them.
- Leave jackets open and undo any long zips so that textiles dry evenly.
- Do not over dry the clothes, because over dried clothes can easily get creases.
- Do not dry the articles containing rubber or similar elastic materials.
- Keep the area around the tumble dryer clean. Coal dust or flour may cause an explosion.
- The door shall be opened only after the programme of the tumble dryer is finished to avoid being scalded by hot steam or over heated drying machine.
- Clean the lint filter and empty water container after each use to avoid extension of drying time and increase of energy consumption.
- Do not dry clothes after dry-clean process.
B
Product usage
The reference weight of dry clothes (weight per item)
 |  |  |  |
| Sweater(mixed 800g) | Jacket(cotton 800g) | Jeans(800g) | Bath Towel(cotton 900g) |
 |  |  |  |
| Single bedsheet(cotton 600g) | Work clothes(1120g) | Pyjamas(200g) | Shirt(cotton 300g) |
 |  |  | |
| T-Shirt(cotton 180g) | Underwear(cotton 70g) | Socks(mixed-weave 50g ) |

Note:
- Do not put more load than rated.
- Do not dry dripping wet laundry. The dryer might get damaged.
Only dry laundry suitable for tumble drying. Regard the laundry care labels:

Suitable for tumble drying.

Normal drying process: Drying in the tumbler is possible under normal load and temperature 80°C.

Mild drying process: Caution is appropriate when tumble drying. Select mild process with reduced thermal action.

Do not tumble dry: Articles unsuitable for drying in the tumbler.
B
Product usage
Control Panel

1
On/Off Product is switched on or off.
2
Start/Pause Press the button to start or pause the drying cycle.
3
Option These buttons are used for setting additional functions.
4
Display
The display shows the setting, estimated program time remaining and status messages of your dryer.
5
Programmes
Different drying cycles can be selected according to the users need and the type of laundry to be dried.
Option

Delay
This function is used for delaying the start of the drying programme up to 24 hours. When the delayed programme starts, the time starts to countdown on the display.
- Load your laundry and make sure the machine door is closed.
- Press the "On/Off" button, then use the programme selector knob to select the desired programme.
- You can additionally select the "Anti-Crease" functions according to your need.
- Press the "Delay" button.
- Repeatedly to press the "Delay" button to select the desired delay time.
- After the "Start/Pause" button is pressed, the Dryer is at the running condition. The drying procedure will be automatically performed when the delay time is over.
- If you press the "Start/Pause" button again, the delay function will be paused.
- If you want to cancel the "Delay" function, please press the "On/Off" button, or press the "Delay" button until the appointment time loops back to 0 hour.
B
Product usage

Time
When the "Time" programme is selected, the "Time" button can be used to adjust the drying time in 10 min. steps.

Intensity
You can adjust the dryness level of the laundry by pressing the "Intensity" button.
- The intensity function can be activated only before the programme starts.
- Press the "Intensity" button repeatedly to adjust the drying grade.
- Except the "Cotton Extra", "Cotton Iron", "ECO", "Wool", "Warm", "Cool", "Refresh" programme, all the other programmes can be adjusted with the "Intensity" function.

Anti-Crease
At the end of the drying cycle, the anti-crease time is 30 minutes (default) and 60-90-120 minutes (selected). This function prevents the laundry from creases. The laundry can be removed during the anti-crease phase. Except "Wool" and "Cool", all the other programmes have this function.

My Cycle
Used to define and save your favourite programme, which is used frequently.
- Select the desired programme and other drying functions.
- Press and hold the "Time" for 3 seconds until the beep sounds and the desired programme has been saved.
- Turn the programme selector to the "My Cycle" position, then you can start your favourite programme. If you want to change the "My Cycle" settings, repeat the steps (1) and (2).

Child Lock

- This machine incorporates a special child safety lock, which can prevent children from carelessly pressing buttons or making the faulty operation.
- When the drying cycle is running, press the "Anti-Crease" button for 3 seconds to start child lock function.
- When child lock function is set, the display will show Child lock icon and all button are deactivated, except "On/Off" button. "My Cycle" option is available in standby and delay standby states.
- To deactivate the child lock function, the "Anti-Crease" button shall be pressed for 3 seconds.
B
Product usage
Display
 | Delay |
 | Child lock |
 | Remaining Time indicator/Error message |
| [245Y] | Clean filters (warning) |
 | Anti-crease |
 | Intensity |
Programmes
Programme selector
- When the LED display screen brightens up, rotate the programme knob to select the desired programme.
- Select the "Delay", "Time", "Intensity", "Anti-Crease" functions for additional options.
- Press the "Start/Pause" button.
- Press the "On/Off" button after the programme has completed.
Programme start
The drum will rotate after the programme starts.
The remaining programme time will be displayed.
Programme end
- The drum will stop rotating after the programme ends. The display will show "End" and related LED will illuminate. The dryer will start "Anti-Crease" function if user doesn't remove the load. (Refer to page 12).
Please press "On/Off" button after unloading the tumble dryer to cut off power and pull out the plug.
- Deal with the problems according to "Trouble Shooting" section, if there is an unexpected stop during the drying procedure or the dryer shows an Error Code (Refer to page 19).
Drying Programmes Table
| Programme Max Load Application/Properties Delay Time | |||||
| Extra | 7.0kg | For single or multi-layer cotton laundry to be dried completely for direct storage. | Y | N | |
| ECO | For single or multi-layer cotton laundry to be dried completely for direct wear. | ||||
| Iron | For single layer cotton laundry to remain damp for ironing. | ||||
Programme Max Load Application/Properties Delay Time
| Delicate | 1.0kg | For delicate laundry that is suitable for drying or laundry advised to be hand washed at low temperature. | Y | N | |
| Mix | 3.5kg | For mixed fabrics from cotton and synthetics. | Y | N | |
| Synthetics | Extra | 3.5kg | For thick or multi-layer synthetic fabrics to be dried completely . | Y | N |
| Cupboard | To dry thin synthetic textiles, which are not ironed, such as easy care shirts, baby cloths or socks. | ||||
| Wool | 1.0kg | To refresh you wool items and make them more fresh and fluffy. | Y | N | |
| Time | Refresh 1.0kg | To refresh clothes kept at closed environment for a long time or to remove odors.Min. 20 min to max. 180 min. (in 10 min. steps) | Y | Y | |
| Cool | - | To air items without heating. Min. 10 min to max. 30 min. (in 10 min. steps) | |||
| Warm | - | To dry individual items or complete the drying process of multi-layer fabrics with different drying behavior, such as jackets, pillows or voluminous items. Min 10 min. to max. 150 min. (in 10 min. steps) | |||
| Special | Shirts | 1.0kg | For easy care laundry, such as shirts and blouses equipped with anti-crease functionality to minimize the ironing effort.Place clothes loosely in the dryer.Once dried, remove quickly and hang it on a clothes hanger. | Y | N |
| Sports | 3.0kg | To dry sportswear and thin fabrics from polyester, which are not ironed. | |||
| Bed Linen | 4.0kg | To dry bed linen, bed sheets or other large items. | |||
| Jeans | 4.0kg | To dry jeans or leisure clothes that are spun at high speed in the washing machine. | |||
| My Cycle | - | Define and save your favourite programme. | Y | N |
• Note for Test Institutes:
1. ECO programme is used to assess the compliance with EU Regulation 2023/2533 and 2023/2534 for eco design and energy labelling, measured in accordance with EN 61121.
2. ECO programme is suitable for drying normal wet cotton laundry and it is the most efficient programme in terms of energy consumption for cotton.
Consumption Data
| Model Program Capacity | Final Moisture Content | Drying Time (h:min) | Energy Consumption | Spin Speed | |
| DHP 7 E W566C2 | ECO | 7.0kg 0% 3:10 2.05kWh 1000rpm | |||
| 3.5kg 0% 2:00 1.10kWh 1000rpm | |||||
| Cotton Extra | 7.0kg -3% 3:50 2.30kWh 1000rpm | ||||
| 3.5kg -3% 2:40 1.40kWh 1000rpm | |||||
| Cotton Iron | 7.0kg 12% 2:20 1.80kWh 1000rpm | ||||
| 3.5kg 12% 1:40 0.95kWh 1000rpm | |||||
| Synthetics Extra 3.5kg 0% 1:40 0.95kWh 800rpm | |||||
| Synthetics Cupboard 3.5kg 2% 1:30 0.85kWh 800rpm | |||||
| Wool 1.0kg / | 0:25 0.30kWh | / | |||
| Delicate | 1.0kg 0% 1:25 0.75kWh 800rpm | ||||
* Acoustic airborne noise emission of the ECO programme at full load is 67dB.

Note:
- Thick or multi-layered fabrics, e.g. jackets etc., are not easy to dry. You had better choose Cotton Extra programme or use "Intensity" function.
- As uneven material, thick and multi-layered clothes are not easy to dry, it is better to choose the appropriate time drying programme to completely dry them if some parts of the clothes are still damp after programme finishes.
- Loading the household tumble dryer up to the maximum capacity for the respective programmes will contribute to energy savings.
All data are measured in accordance with EN 61121.
The values given for programmes other than the eco programme are indicative only; The actual consumption may differ from the values given in the table, depending on the amount of the laundry, type of fabric, residual moisture and any additional functions selected.
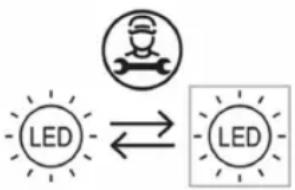
Changing the light
• This product contains a light source exempted of energy efficiency class.
• Light source in this product can only be replaced by qualified professionals.
- Please contact after-sales service if the light source fails.
- The light source shall be removed at the end of the product's useful life, with sorting and recycling done separately.
flowchart
graph LR
    A["LED"] <--> B["LED"]
Cleaning and Care
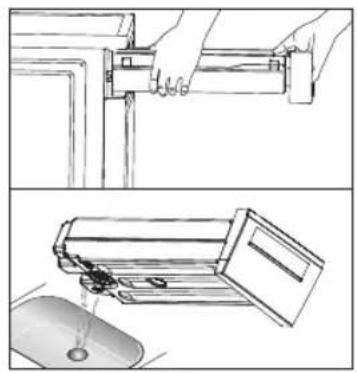
Empty the water container
- Pull out and hold the water container with two hands.
- Tilt the water container, pour out the condensate water into the basin.
- Install the water container.
natural_image
Technical line drawings showing hands installing a mechanical component and pouring liquid into a computer mouse (no text or symbols present)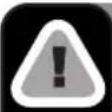
Warning!
- Empty the water container after each use. Once the water container is filled completely, the programme will be paused and the “E20” will light on the display. After the container is emptied, the dryer can be restarted by pressing “Start/Pause” button.
- Do not drink the condensate water.
- Do not use the dryer without the water container.
Clean the filters
This dryer has a primary door lint filter.
Make sure you clean the door filter after each cycle to avoid increased energy consumption and cycle time.
C
Cleaning and maintenance

Note:
- To ensure the double-layer filter can be closed smoothly, the arrows at both ends need to be aligned, and the middle slot and the rib need to be aligned.
Clean the door filter
- Open the door.
- Take out the door filter.
- Open the filter and remove the fluff on the filter screen. You can use a vacuum cleaner to remove the lint or clean it by hand.
- Throw lint in the garbage bin and do not wash it down the drain to avoid micro plastics in the used water system.

Note:
• Take notice of the correct orientation before to insert the door filter.
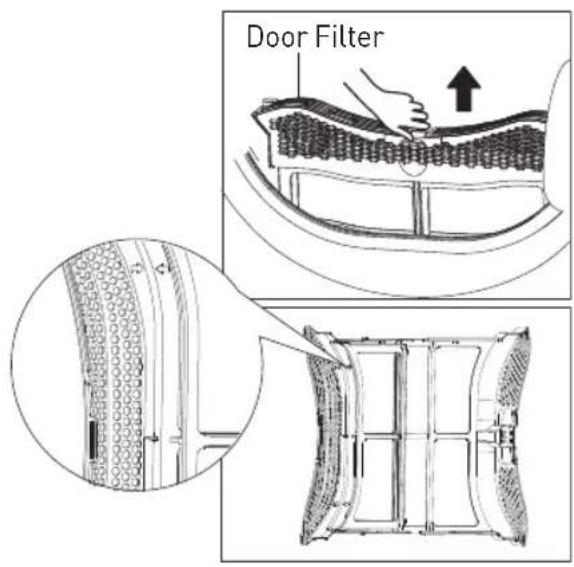
Clean the heat exchanger

Warning!
Do not touch the heat exchanger with your hand, which may cause an injury.
- As necessary, approx. once every 3 months, remove the fluff from the heat exchanger using a vacuum cleaner with a dusting brush attached.
- Clean the heat exchanger without applying any pressure. Otherwise the heat exchanger could be damaged. The dryer will not dry if the cooling fins are damaged or bent.
C
Cleaning and maintenance
Foreign objects removal
In case of foreign objects fall inside below the filter compartment, remove the filter, open the heat exchanger area compartment and remove the foreign object making sure not to touch the heat exchanger with bare hands to avoid injuries.
Clean Tumble dryer

Warning!
- Disconnect the power cord before cleaning!
- Clean the dryer with a wet cloth which is only damped by clean water.
- Do not use solvents, abrasive cleaners, glass cleaners or all-purpose cleaners. These could damage plastic surfaces and other parts.
- Please wear gloves when cleaning.
natural_image
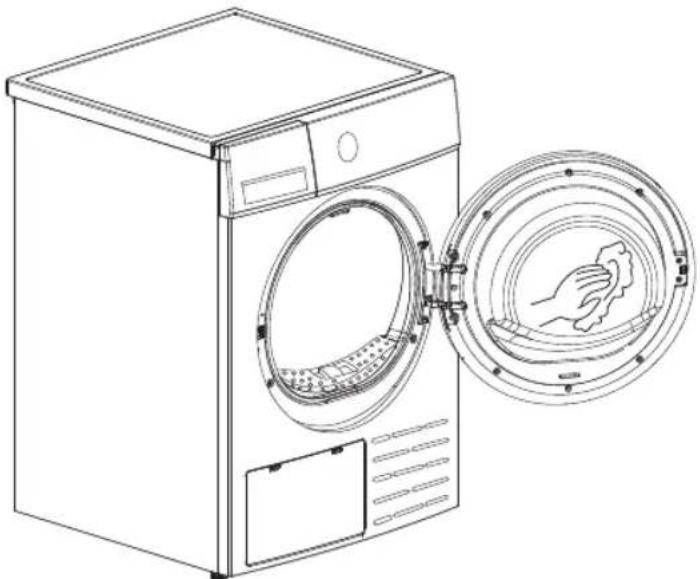
Line drawing of a washing machine with an open door and a circular vent, showing internal components (no text or symbols)After each use:
• Prepare a wet cloth damped by clean water.
- Clean the door, especially the inside window.
- Clean the sealing around the door opening.
- Clean the humidity sensor inside the drum.
• Take out all the filters, clean the sealing and air flow openings.
- Before starting the dryer, dry all parts with a soft cloth.
Trouble Shooting
Many malfunctions and faults that might occur in daily operation can be easily remedied. Time and money will be saved because a service call won't be needed. The following guide may help you to find the reason for a malfunction and correct it.
Display Reason Solutions
| “E20” | • Container is full | • Empty water container |
| • Water pump failure or water level sensor failure | • Please contact your local service center if the problem occurs. | |
| “E33” • Temperature sensor error | ||
| “E82” • PCB communication error |

Warning!
- Self-repair or non-professional repair may create safety risk and cease the guarantee.
- If the LED displays other prompt and the dryer does not work, please call the service.

Note:
Spare parts are available for a minimum time of 10 years after placing the lastunit of present model on the market.
Problem Solution
Display is not on • Check if the power supply works.
- Check if the mains plug is inserted.
- Check the selected programme.
- Press the "On/Off" button.
"E20" is lighting •
Check the water container. If it's full, please pour out the condensate water and restart the dryer.
- If the container is not full, please restart the dryer directly.
- If the "E20" icon is still lighting after you have finished the first two steps, please call the service.
Problem Solution
| “ [IMAGE] is lighting | Clean the lint filter.When the dryer is powered on standby, the “ [IMAGE] icon is lighting will flash for 10 seconds to remind the user to clean the filter. After 10 seconds, the “ [IMAGE] icon will always on, after startup, the “ [IMAGE] icon will disappear. |
| Dryer does not start • Connect the tumble dryer to the mains.Turn on the tumble dryer.Check the door is closed.Check the programme is set.Press the “Start/Pause” button. | |
| Degree of dryness was not reached or drying time too long | Clean lint filter and heat exchanger.Empty the water container.Check the drain hose.Check installation place is appropriate.Keep the air inlet clean.Use higher drying intensity level programme or time programme. |
| There are humming noises • | The compressor is operating. These noises are quite normal and do not indicate a fault. |
| The dryer switches off at the end of the programme | The dryer switches off automatically for energy saving.This is not an error but a normal function. |

Warning!
If you cannot deal with the problems by yourself and need help:
- Press the "On/Off" button.
- Pull out the mains plug and call the service.

natural_image
Solid gray rounded rectangle shape with no text or symbolsMerci !
natural_image
Simple line drawing of a washing machine with a cross symbol on the floor, no text or symbols present.
natural_image
Simple line drawing of a washing machine with a cross symbol on its side, resting on a surface (no text or labels)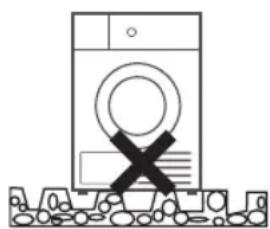
natural_image
Simple line drawing of a washing machine with a cross symbol on the front panel, no text or symbols present.Réglage du niveau
natural_image
Line drawing of a washing machine with a gauze and a plate, no text or symbols presentB
flowchart
graph LR
    A["①: Hand holding panel"] --> B["②: Looping circular component"]
    B --> C["③: Rolling ring with curved arrow"]
- Brancher
- Charger
- Fermer la porte
Séchage

Mettre en marche


Choisir un programme


natural_image
Diagram of a hand holding a circular object with an arrow indicating direction (no text or symbols)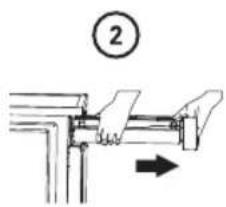
natural_image
Illustration of a printer or printer with a paper roll and a mouse, no text or symbols present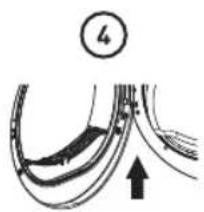
natural_image
Diagram of curved road or pipeline sections with an arrow indicating direction (no text or symbols)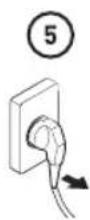
B
natural_image
Technical line drawings showing hands installing a mechanical component and pouring liquid into a computer mouse (no text or symbols present)
Avertissement !
natural_image
Line drawing of a front-loading washing machine with a hand inserting a circular component (no text or symbols)natural_image
Simple line drawing of a washing machine on a surface with a cross symbol (no text or labels)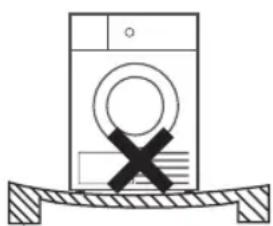
natural_image
Simple line drawing of a washing machine with a cross symbol on its side, placed on a surface (no text or labels)
natural_image
Simple line drawing of a washing machine with a cross symbol on the floor (no text or labels)Waterpas zetten
natural_image
Line drawing of a washing machine with a gasket and wheels, no text or symbols presentB
flowchart
graph LR
    A["①: Hand inserting a component into a panel"] --> B["②: Ring assembly with internal structure"]
    B --> C["③: Hand holding a ring with rotational motion"]
- Steek stekker in stopcontact
- Vul
- Sluit de deur
Drogen

Aan


Selecteer
programma

natural_image
Hand holding a circular object with an arrow indicating direction (no text or symbols)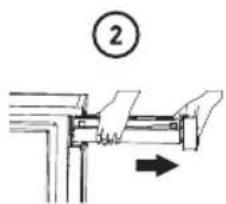
natural_image
Simple line drawing of a device with a numbered circle (3) above it, no text or symbols present.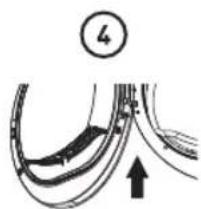
natural_image
Diagram of curved road segments with an arrow indicating upward movement, no text or symbols present
flowchart
graph TD
    A["LED"] <--> B["LED"]
natural_image
Two-step diagram showing hands installing a mechanical component into a panel, and pouring liquid from a mouse into a container (no text or symbols present)
Waarschuwing!
natural_image
Line drawing of a front-loading washing machine with a hand inserting a circular component (no text or symbols)Na elk gebruik:
natural_image
Solid gray rounded rectangle shape with no text or symbols¡Muchas gracias!
natural_image
Simple line drawing of a washing machine with a cross symbol on the floor, no text or symbols present.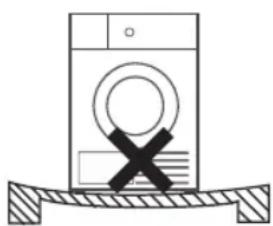
natural_image
Simple line drawing of a washing machine with a cross symbol on its side, resting on a surface (no text or labels)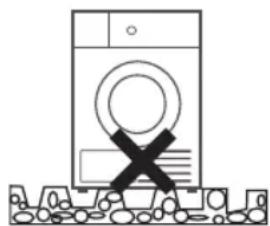
natural_image
Simple line drawing of a washing machine with a cross symbol on its side, no text or symbols present.Ajuste del nivel
natural_image
Line drawing of a washing machine with a grater nearby (no text or symbols)flowchart
graph LR
    A["①: Hand holding cable"] --> B["②: Assembly with ring and valve"]
    B --> C["③: Rolling with hand and loop"]
natural_image
Diagram of a hand holding a circular object with an arrow indicating rotation (no text or symbols)

natural_image
Simple line drawing of a computer monitor with an open lid and mouse, no text or symbols present.
natural_image
Diagram of curved road or pipeline sections with an arrow indicating upward movement, no text or symbols present.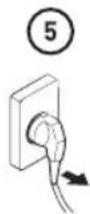
natural_image
Technical line drawings showing hands installing a mechanical component and pouring liquid into a computer mouse (no text or symbols present)
¡Advertencia!
natural_image
Line drawing of a front-loading washing machine with a hand inserting a circular component (no text or symbols)This product is guaranteed against faults caused by defects in manufacturing or the materials used for a period of two years, starting from the date of purchase.* This warranty does not cover defects or damage caused by failure to install the device correctly, incorrect use of the product, or excessive wear and tear.
*proof of purchase required.
CONDITION DE GARANTIE
FR

- Thank you!
- Table of Contents
- A
- Product overview
- Parts
- Note:
- Accessories
- Specifications
- B
- Product usage
- Installation
- Transport
- Installation Position
- Warning!
- Level Adjusting
- Power Supply Connection
- Operation
- Before Drying
- Drying
- After Drying
- Before Each Drying
- Option
- Delay
- Time
- Intensity
- Anti-Crease
- My Cycle
- Child Lock
- Programmes
- Programme start
- Programme end
- Changing the light
- Cleaning and Care
- Empty the water container
- Clean the filters
- C
- Cleaning and maintenance
- Clean the door filter
- Clean the heat exchanger
- Foreign objects removal
- Clean Tumble dryer
- After each use:
- Trouble Shooting
- Problem Solution
- Merci !
- Réglage du niveau
- Séchage
- Avertissement !
- Waterpas zetten
- Drogen
- Waarschuwing!
- Na elk gebruik:
- ¡Muchas gracias!
- Ajuste del nivel
- ¡Advertencia!
- CONDITION DE GARANTIE
- FR
Brand : HIGH ONE
Model : DHP 7 E W566C2
Category : Dryer