USER MANUAL Secacam 1 ZEISS
natural_image
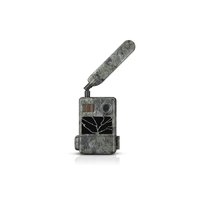
Two military-style surveillance devices: a camouflaged device labeled 'ZEISS' and a cylindrical device with threaded tip (no visible text or symbols on main body)
www.zeiss.com/cop/safety

natural_image
Close-up of a hand inserting electronic components into a device, showing battery slots and a black EJ8 logo (no text or symbols on main subject)

natural_image
Close-up of a hand inserting a battery into a device labeled 'FJECT', showing internal components (no text beyond label)
natural_image
Close-up of a hand using a tool to lift a device into a black box with tree-like patterns (no text or symbols visible)
natural_image
Group of deer in a grassy field with ferns, no visible text or symbols
natural_image
Close-up of hands adjusting a flexible cable with a black plastic device (no text or symbols visible)
natural_image
Close-up of hands holding a black cable buckle with a strap, no text or symbols visible
natural_image
Close-up of hands holding a black belt buckle with a gray strap (no text or symbols visible)
Service Webseite
www.zeiss.ly/secacam-service

FAQ
www.zeiss.ly/secacam-faq

www.zeiss.com/cop/warranty
3.1 Opening and closing the camera 30
3.2 Inserting the batteries 30
3.3 Fitting the antenna 31
3.4 Inserting the SIM 31
- Getting started 32
4.1 Switch settings 32
4.2 Configuring settings 32
- Menu 33
5.1 Capture mode (Photo/Video/Photo+Video) 33
5.2 Image size 34
5.3 Multi shot 34
5.4 Video resolution 34
5.5 Video length 35
5.6 Sensitivity 35
5.7 Flash mode 35
5.8 Timer 35
5.9 Time lapse 36
5.10 Pause capture 36
5.11 Mobile 36
5.12 Transmission 36
5.13 Sent shots/h 37
5.14 GPS data 37
5.15 Battery type 37
5.16 Date/time 37
5.17 Language 37
5.18 Footer cam name 37
5.19 PIN code 37
5.20 Factory Setting 38
5.21 Send test photo 38
5.22 Photo on request 38
5.23 Firmware version 38
5.24 Firmware update 38
5.25 USB Transfer 39
- ZEISS Secacam app & web 40
6.1 Pause transmission 40
6.2 Topping up credit 40
- Network scan 41
- Manually triggering test recordings 41
- Checking recordings 41
- Fitting 42
10.1 Fitting with strap 42
10.2 Fitting with tripod/tree mount 43
- Technical data 44
- Connection to computer 45
- External power supply 45
- Care 45
- Customer service and warranty 46
EN ZEISS Secacam 1 | Instruction manual
Congratulations on the purchase of your ZEISS Secacam 1 trail camera.
Dear customer,
Thank you for choosing one of our quality ZEISS Secacam products.
Please read all instructions carefully and attentively. This applies especially to the safety information. The device has a two-year warranty. If the camera should ever be faulty, you will need your proof of purchase.
Note: You might need to remove the protective film from the camera display by pulling it off using the protruding tab. This may require some strength. Be sure to pull the contact breaker strip out of the battery compartment to use the camera.

WARNING!
To avoid danger of suffocation, keep this plastic bag away from babies and children! There is a risk of suffocation.

WARNING!
Please observe the enclosed safety and legal information, which can also be found under:
www.zeiss.com/cop/safety

1. Contents of box
Carefully unpack the camera and check that all of the following items are contained in the box:
■ ZEISS Secacam 1
■ Mobile antenna
■ Mounting girdle
■ Quick guide with personal activation code
■ Instruction manual
■ SIM card (already inserted)
■ 8 LR6 AA batteries (already inserted)
2. Your ZEISS Secacam 1
Lens: The ZEISS Secacam 1 uses a lens with a 60° angle of view. This allows you to keep an optimal view of gardens or hunts.
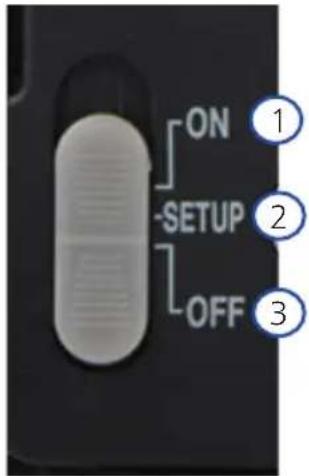
ON/SETUP/OFF switch: The camera is ready to use right away because we have already inserted batteries, a memory card and a SIM card for you. With the switch set to "ON", the ZEISS Secacam is armed after the red flashing status indicator goes out. The display turns on when the switch is set to "SETUP".
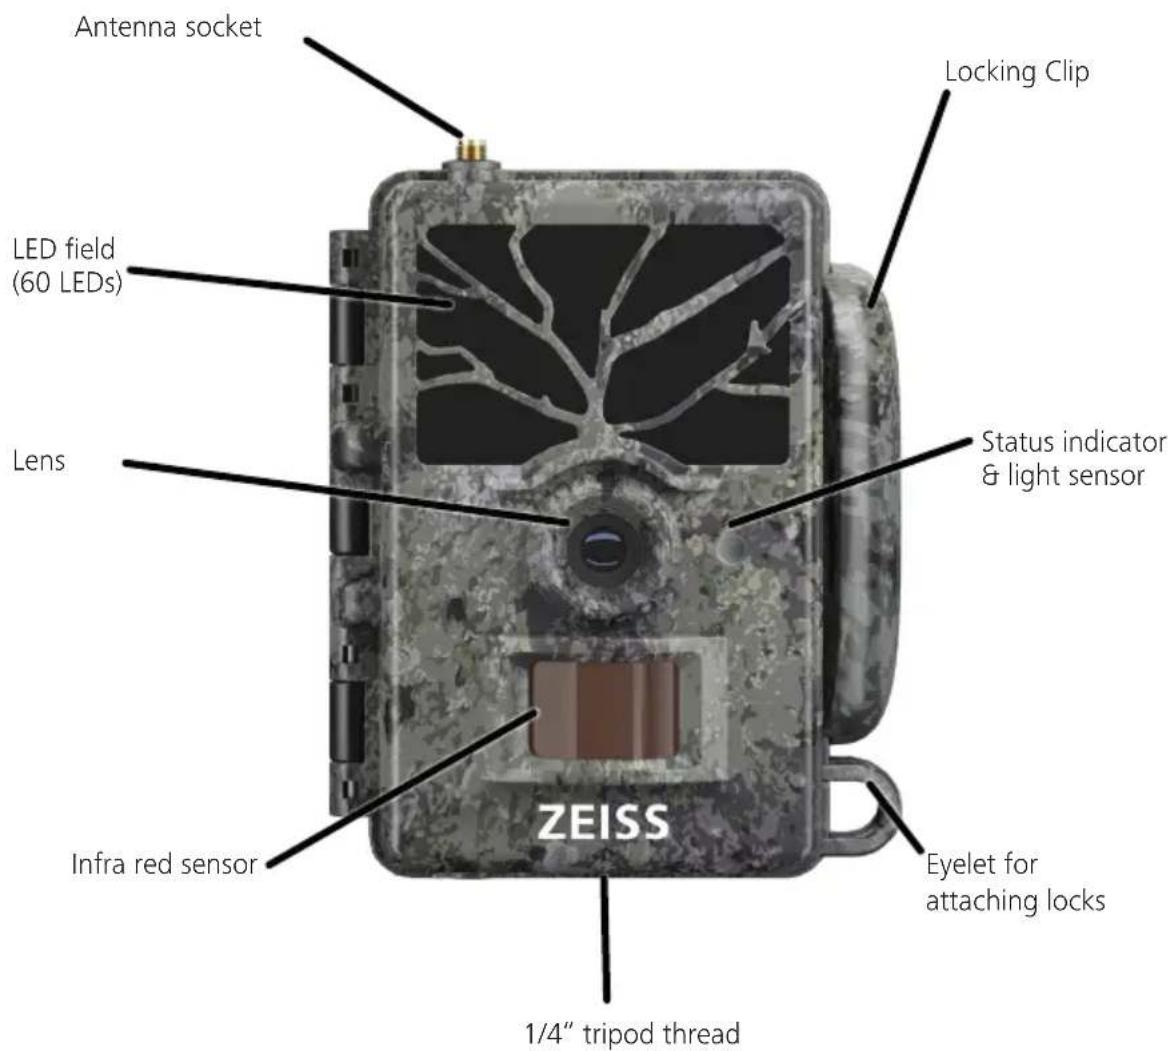
Light sensor: Measures the light intensity. It depends on whether the camera takes color pictures (daylight), black-and-white pictures without flash (twilight) or black-and-white pictures with flash (night).
EJECT (battery ejection): Pressing the EJECT button opens the battery compartment.
Infrared sensor: The passive infrared sensor (PIR) recognizes moving heat sources and triggers the camera. The sensitivity of the sensor can be set in three levels via the menu.
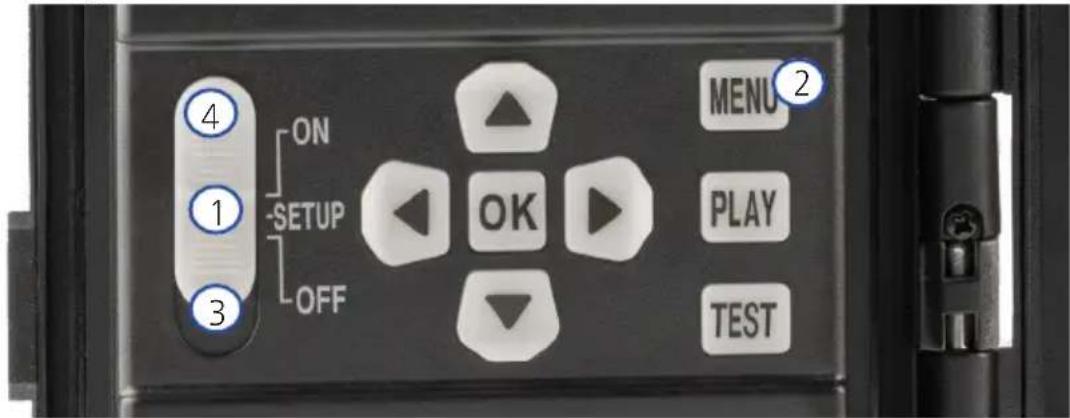
Status indicator: Lights up red: Display switched on. Flashes red (up to 10 seconds): After it goes out, the camera is ready to record.
Color LCD display: Setting the button to "SETUP" turns on the display. You can now check the capturing area, view images or make menu settings after pressing the MENU button.
MENU button: When the display is switched on, the MENU button is used to call up the camera menu.
PLAY button: When the display is switched on, the PLAY button activates review mode.
TEST-Button: A test recording is triggered with the TEST button. If the mobile phone is switched on and connected, this is transmitted to the app, otherwise it is saved internally.
USB-C connection: You can use this connection to access the camera's internal memory (64gb) with a standard USB-C cable (not included).

3. Preparing the camera

CAUTION!
Pull the contact breaker out of the battery compartment. This might need a little force. Only then will the camera's power supply activate so that the camera can be used.
3.1 pening and closing the camera
Open: Loosen the locking clip on the right side of the camera. Grasp the back of the lock with two fingers and pull it away from the camera until the lock pops open.
Close: Close the camera and place the locking clip on the two hooks on the side. Then press the locking clip backwards.
3.2 Inserting the batteries

CAUTION!
The camera must be turned off before inserting new batteries! Please use either disposable or rechargeable batteries, do not mix different types of batteries. For black night photography, please replace all batteries with fully charged batteries.
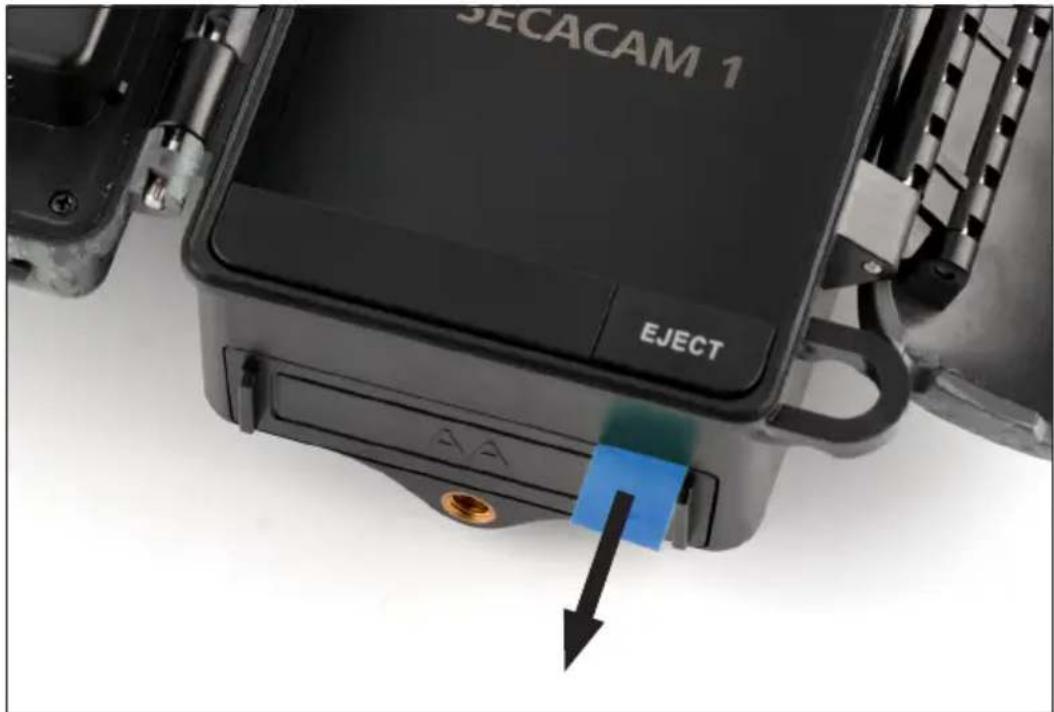
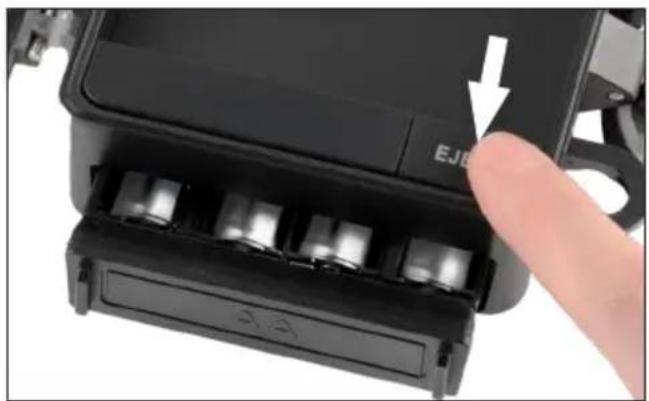
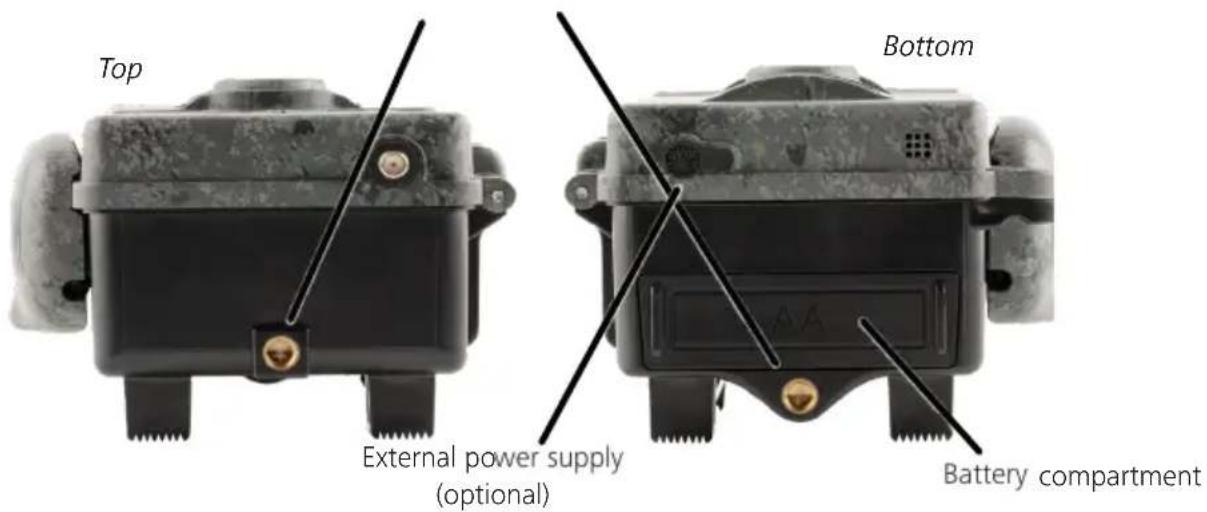
Battery Compartment: Open the camera. Press the EJECT button at the bottom right. The battery compartment now extends about 2 cm out of the bottom of the camera. A mechanism prevents it from falling out. To remove the compartment completely, pull it straight down with a little force.
natural_image
Close-up of a black electronic device with a finger inserted, showing internal components and a white arrow pointing to the component (no text or symbols visible)

natural_image
Close-up of a hand inserting batteries into a device (no visible text or symbols)
When inserting the eight fully charged batteries or rechargeable batteries, please ensure that the polarity is correct; this is marked in the battery compartment. Push the battery compartment completely back into the camera until it clicks into place.
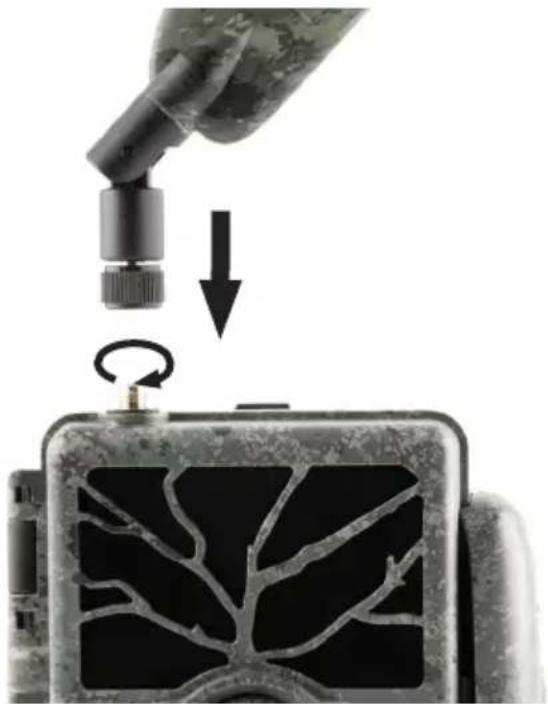
3.3 Fitting the antenna
To access the mobile functions, the antenna must be fitted. Remove the yellow protective cap and then screw the antenna onto the top of the camera housing.
Note: To position the antenna as inconspicuously as possible, it can be angled and rotated at the joint. The reception and transmission of data is not affected by the positioning.
natural_image
Close-up of a hand inserting a plug into a device with a circular arrow indicating rotation (no text or symbols)
3.4 Inserting the SIM
The ZEISS Secacam uses a SIM card for mobile radio transmission.
Note: The camera's mobile function works exclusively with the already inserted ZEISS Secacam SIM card. SIM cards from other providers are not compatible.

CAUTION!
Please do not remove the SIM card and do not replace it - not even with the SIM card of another ZEISS Secacam.
The slot for the SIM card is located on the right side of the opened housing. Insert the SIM card with the contacts facing down and the slanted corner facing to the front left until it audibly clicks into place.
4. Getting started
4.1 Switch settings
If you have equipped the ZEISS Secacam with antenna, batteries and memory card as described above, you can basically start using the camera immediately with our factory settings.
- Set the OFF/SETUP/ON switch to the "ON" position: The camera is turned on and ready to use after a few seconds.
- Set the OFF/SETUP/ON switch to the "SETUP" position: The camera's display is now on so you can check the camera's capturing area, preview photos, or make adjustments.
- Set the OFF/SETUP/ON switch to the "OFF" position: The camera is completely switched off.
4.2 Configuring settings
Before using the camera, you should adjust the settings according to your requirements. All menu items and the possible settings are listed below.
- SETUP: Set the switch to the "SETUP" position: The screen turns on and you can see the home screen for about 2 seconds. The camera then switches to preview mode and shows the section on the display that would also be visible during capturing.
- MENU: To access the menu, you need to set the switch to "SETUP" as described above and then press the MENU button. Use the "Arrow up" and "Arrow down" buttons to navigate to the required menu item. Press the "OK" button to move to the desired menu item and make changes. Press the MENU button to exit the menu.
- OFF: To turn off the camera, set the switch to "OFF".
- ON: To start the surveillance function, set the button to "ON". As soon as the LED light is no longer on, the camera is ready for use. The screen does not turn on in this position.
natural_image
Group of deer with two puppies in a lush green forest (no visible text or symbols)

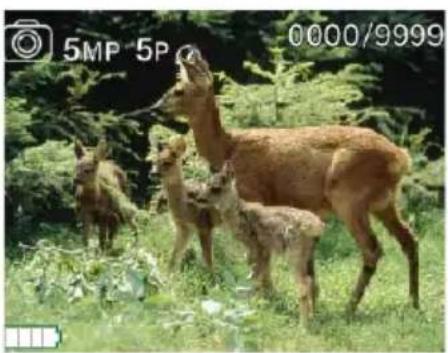
5MP 5P

HD 20s

5p 20s


Camera takes photos with 5x5 MP.
Camera records a 20-second video in 720p.
If both icons appear, the camera will first take the pre-selected number of photos and then records the pre-selected length of video.
The camera is connected to the 4G network and has strong reception.
Internal power supply
External power supply
5.1 Capture mode (Photo/Video/Photo+Video)

Photo: The camera takes photos according to the selected settings in "Image size" and "Multi shot".
Tip: We recommend the "Photo" setting for mobile image transmission.

CAUTION!
Video transmission can only be activated if you have a suitable data plan and only via the ZEISS Secacam app. For more information on data plans, see: www.zeiss.ly/secacam-subcriptions


Photo+Video: First, the camera takes a photo(s) and then a video. The number of photos or the length of the following video depends on the settings under the menu items "Multi shot" or "Video length".

CAUTION!
Saving a video with the "Photo+Video" setting may delay mobile transmission of the captured photos. Sent videos are limited in resolution and recording length.
5.2 Image size
There are three image sizes to choose from with the ZEISS Secacam:
■ 5 MP = 5.0 megapixels = 3,072 x 1,728 pixels
■ 8 MP = 8.0 megapixels = 3,840 x 2,112 pixels
■ 12 MP = 12.0 megapixels = 4,800 x 2,560 pixels
We recommend setting the resolution to 5 MP. Although a higher resolution might result in a partially improved photo quality, it results in larger photo files which, accordingly, require much more space on the memory card. Since the camera has a 5.0 MP CMOS image sensor, the resolutions 12 MP and 8 MP are generated by interpolation. Photos are taken in a 4:3 aspect ratio and saved in the JPEG format.
Note: This setting only affects the images saved on the SD card, not the images sent via mobile (see 5.12).
5.3 Multi shot
Select the number of photos (1 to 5 photos) to be taken in quick succession when triggered in Photo mode.
5P 5 images, each 1 second apart
5P 5 images, < 1 second interval
In practice, the "5P" setting has proven most effective for common use cases. If the camera registers a movement, it will take 5 photos consecutively with a gap of approximately one second between two photos. With this series of photos, you increase the likelihood of capturing a moving object at least once.
However, you can also choose the option to have 3, 4 or 5 photos triggered very quickly one after the other. If the camera registers a movement, it will take 3 to 5 photos consecutively with a gap of around one second between two photos.
Note: When the mobile unit is switched on, in the default setting only the second photo is sent for each series of photos. Experience has taught us that the second photo has the highest chance of showing a moving object the best.
You can set the delay between two recording series under the "Pause capture" menu item (see below).
5.4 Video resolution
There are three video resolutions to choose from with your ZEISS Secacam:
■ 1080p = 1920 x 1080 pixels
■ 720p = 1280 x 720 pixels
■ 480p = 640 x 480 pixels
We recommend 720p resolution. Although the 1080p resolution might result in a partially improved video quality, the video files will be larger and, accordingly, require much more space on the memory card.
The videos are recorded at up to 30 fps (frames per second) and saved in mp4 format.

CAUTION!
For mobile video transmission, the resolution is set to 480p with a maximum of 10 seconds.
5.5 Video length
Under this menu item, specify the duration of a video recording triggered automatically. You can select a duration from 5 to 59 seconds for the video length.

CAUTION!
Please note that night videos have a considerably higher battery consumption than photos. While the LEDs only flash briefly while taking a photo, they light up during the entire recording in a video.
We recommend a maximum video length of 15 seconds. When using the "Photo+Video" mode, we recommend reducing the video length to 10 seconds.
Sent videos are limited in resolution and recording length and do not depend on the device settings in the menu.
5.6 Sensitivity
The ZEISS Secacam has a passive infrared sensor (PIR) that reacts to moving heat sources. You can set the sensitivity of the sensor between "High", "Medium" and "Low". We recommend the "High" setting. However, this settings increase the possibility of false triggering, for example when the camera recognizes moving branches that have been warmed up by sunlight and are now moving in the wind. In this case, we recommend gradually reducing the sensitivity.
5.7 Flash mode
The ZEISS Secacam has three setting options for the exposure time:

Max. range: If the living beings to be captured are moving comparatively slowly (e.g. grazing deer), this setting results in very well illuminated night shots. However, moving objects appear less sharp.

Min. blur: The exposure time is set as short as possible at night. Night shots tend to be a bit darker, but the motion sharpness is at its best.
5.8 Timer
Similar to a clock timer, you can define a time period here in which the camera should take photos. To do this, first select the "On" setting in the "Timer" menu item. The start and stop times are entered in the format hh:mm.
■ Example: A hunt should only be monitored during the night time. For example, you can define the time interval as follows: 22:00 to 06:00. Outside this period, the ZEISS Secacam will remain in stand-by mode.
Outside the selected time interval, the camera will not be triggered and will not take any photos or record any videos.
5.9 Time lapse
Continuous shooting is set in this mode. The camera then automatically triggers a recording at a pre-selected time interval. To do this, first select the "On" setting in the "Time lapse" menu item. The interval between two automatically triggered recordings is entered in the format hh:mm:ss in each case. Use the up and down arrow buttons to change the respective setting, and the right and left buttons to move one position forward or backward. You can choose an interval between recordings from 5 seconds (00:00:05) to 24 hours (23:59:59). Finally, confirm the settings with "OK".
This continuous shooting is possible in both photo mode and video mode, but photo shots make more sense in practice.
Example: You would like to create a time-lapse video. For these popular time lapse recordings, it makes sense to choose a short time interval of about 5 to 10 seconds. With additional software (not included), you can then combine these individual recordings into a time-lapse video.
Tip: It is recommended to set the "Multi shot" to "1" for continuous shooting, so that only one photo is taken per trigger.
5.10 Pause capture
This setting is a forced pause set by you after the recording series has been completed. During the selected interval, the camera will not take pictures or record videos, even if there is movement in front of the camera. This prevents the memory card from being filled with too many unwanted recordings. This is because, depending on the setup, a branch moving in the sunlight or a mouse, for example, may repeatedly trigger almost identical images. To prevent the ZEISS Secacam from taking hundreds of unwanted images in such cases and possibly sending them via mobile, you can define a delay between two motion-activated images. To do this, first select the "On" setting in the "Pause capture" menu item. Use the up and down arrow buttons to change the respective setting. You can choose the delay between 3 seconds (00:00:03) and 24 hours (23:59:59). Once you have finished, confirm with "OK".
Tip: If the surveillance camera is operated in photo mode, a combination of 5 images in series, interrupted by a 5 second delay, has proven successful in practice. For Photo+Video, the recommended interval is 15 seconds for taking videos, and a 15-second delay. The delay can be combined well with the mobile photos/videos per hour function. For example, if you select a maximum of 10 images per hour, we recommend a 6-minute delay. This would spread the 10 recordings over the 60 minutes. Otherwise, it is possible that 10 recordings are taken in the first 5 minutes and the camera does not become active again until an hour later.
5.11 Mobile
Here you can switch the mobile functions on or off. If you switch off this option, the ZEISS Secacam will no longer send you any images. The camera can also no longer be controlled via the ZEISS Secacam app.
5.12 Transmission
(This menu item can only be selected if mobile is switched on.)
If you use the camera in an area where there is only 2G network coverage and sending images takes significantly too long, you can change the method of sending to "M" or even "S", which will speed up sending images.
$$
S = 1 0 2 4 \times 5 7 6 \text { pixels }
$$
$$
M = 1 2 8 0 \times 7 2 0 \text { pixels }
$$
$$
L = 1 9 2 0 \times 1 0 8 0 \text { pixels }
$$
Note: This setting only applies to the images sent via mobile, not the images stored on the SD card.
5.13 Sent shots/h
(This menu item can only be selected if mobile is switched on).
You can set the maximum number of photos/videos sent per hour via mobile in preset levels between 1 and .
Outdoors, for example, moving branches can be heated by the sun's rays and, in combination with wind, lead to undesirable images.
Note: If an event happens after the tenth image with a limitation of, for example, 10 images/hour, it will be recorded and saved on the SD card, but no longer sent. Only events that happen after the next 60 minutes are then sent again. This can result in a surveillance gap of up to one hour.
5.14 GPS data
Note: This menu item can only be selected if mobile is switched on.
Here you can set whether the ZEISS Secacam should determine its GPS position. This allows you to display the location of your camera in the ZEISS Secacam app.
To save power, the camera updates its position data once when it is switched on. This may take some time depending on the position, meaning that the position is not visible on the first images.
5.15 Battery type
The ZEISS Secacam can also be used with LR6 (AA) 1.5 V Mignon rechargeable batteries. For the battery display to work correctly (rechargeable batteries tend to have a higher current capacity at lower voltage values), you can select here whether you are using batteries or rechargeable batteries.
Note: When using rechargeable batteries, the battery display may differ from the actual charge status.
5.16 Date/time
When the "Automatic" setting is selected, the camera loads the date and time from the mobile network. If necessary, you can adjust the time to the corresponding season or time zone using + and -. When the "Manual" setting is selected, you can set the date and time yourself. Use the up and down arrow buttons to change the respective setting, and the right and left arrow buttons to move forward or back one position. Confirm the settings with "OK" to complete. The date and time are now included in every recording.
5.17 Language
Choose the desired menu language. You can choose between German, English, Spanish, French and Italian.
You have the option to choose a name that will appear at the bottom of your images. If you select the "On" option, you can enter a name with a total of 12 characters using the arrow buttons. Use the up and down arrow buttons to change the respective character and the right and left arrow buttons to move forward or back one position.
5.19 PIN code
You can secure the camera with a six-digit PIN to prevent the device being used in case of camera theft. To do this, first select the "On" setting in the "PIN code" menu item. Use the up and down arrow buttons to change the respective setting, and the right and left buttons to move one position forward or backward. Confirm the settings with "OK" to complete.
Note: This option has nothing to do with the PIN code on the quick guide you used to register your ZEISS Secacam. This option is used to password-protect your ZEISS Secacam.

CAUTION!
Please use the PIN code option very carefully. If you forget the selected PIN, the camera is also useless for you. In this case please contact our customer service. If you have booked a corresponding data plan, you can also deactivate the PIN request via the ZEISS Secacam app.
5.20 Factory setting
If you select 'Yes' under this menu item and confirm the selection with 'OK', all settings are reset to the factory settings. This does not affect the date and time.
5.21 Send test photo
(This menu item can only be selected if mobile is switched on.)
If you want to test whether sending recordings via mobile works as desired, you can take a test photo.
Note: We recommend that you familiarize yourself with the Pause capture, Time lapse and Timer functions mentioned above when using mobile mode. The functions will help you take and send the optimal number of photos.
5.22 Photo on request
(This menu item can only be selected if mobile radio is switched on.)
Selecting this menu item allows you to trigger and send photos directly to your ZEISS Secacam app.
5.23 Firmware version
The firmware version currently installed on the camera can be seen here. The ZEISS Secacam is continuously being updated. Please visit www.zeiss.com/cop/downloads and check if software updates with a higher version number are now available for your camera.
5.24 Firmware update
Note: This menu item can only be selected if there is a new firmware version on the SD card. The batteries need to be fully charged in order to install the update.

CAUTION!
Please follow the instructions on the website carefully, otherwise your camera may be damaged!
We are continuously updating our cameras. New firmware versions with optimizations or even new functions can be downloaded from www.zeiss.com/cop/downloads.
5.25 USB Transfer
If you want to manually copy your images and videos to an external device, connect a USB-C stick (FAT32 formatting) to the USB-C port on the bottom of the ZEISS Secacam 1 and select the USB transfer menu item. There are three different transfer methods to choose from:
Folder selection
The ZEISS Secacam 1 shows you media folders that are available on the camera's internal memory and automatically creates a new folder after 1000 recorded media, each sorted by recording date. Use the arrow buttons to navigate to the desired folders, mark them for download with the 'PLAY' button and start the download with the 'OK' button. Wait until the download is complete and remove the stick.
Date selection
Use the arrow buttons to select a time period and confirm your selection with the 'OK' button. All pictures and videos taken during this period will now be transferred to the USB-C stick. Wait until the download is complete and remove the stick.
All folders
If you select this download method, all data will be transferred from the camera's internal memory to the USB-C stick. Please note that this can be very time-consuming.

CAUTION!
The more data you copy at once from the internal memory of the ZEISS Secacam 1 to an external device, the longer the copying process will take.
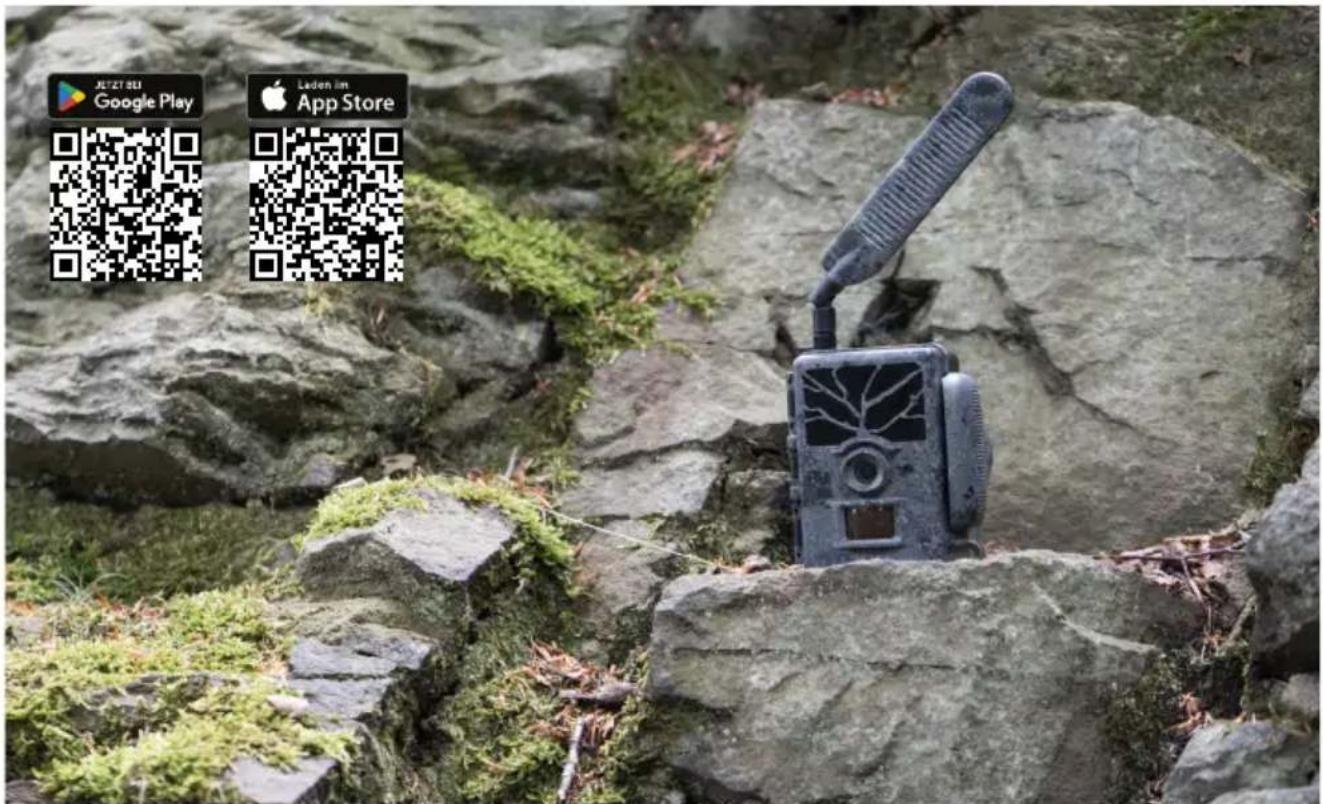
6. ZEISS Secacam app & web
No additional software is required to access and manage the recordings on your ZEISS Secacam. You can conveniently access your ZEISS Secacam user account via the website https://secacam.zeiss.com or using the ZEISS Secacam app for Apple or Android devices. You will need to log in and then enter the ZEISS Secacam activation code to pair your camera with your user account. You will find the PIN under the scratch-off on the front of the quick guide. You can connect as many ZEISS Secacams to your account as you like.
Note: Be sure to keep your ZEISS Secacam activation code. You will need it if you ever need to reregister the camera.
From your user account you can view, delete, share or download recordings. You can name your ZEISS Secacams and view the battery, memory or camera status. The ZEISS Secacam app is very user-friendly, allowing you to easily access and manage all your cameras. It also allows you to manage multiple ZEISS Secacams easily and conveniently. This gives you complete control over all settings and an overview of everything that happens with your ZEISS Secacams – on the road or at home.
6.1 Pause transmission
In the ZEISS Secacam app, you will find the function "Pause transmission" within your camera. This allows you to conveniently pause the send function from your smartphone or PC, either permanently or for a certain period of time. If the pause is permanent, the camera can be reactivated via the app. However, during the pause, the camera continues to take photos and save them to the SD card.
6.2 Purchase Credits
You will find the option to top up your credit under each of your ZEISS Secacams. As soon as it has been used up, your camera will no longer send images. However, these will be saved to the internal memory as usual.
7. Network scan
The ZEISS Secacam automatically searches for the strongest available network. However, if you are not satisfied with your ZEISS Secacam's network connection, you can start a manual network scan. However, this might take some time. To perform a manual search, follow the steps below:
- SETUP: Wait for the camera to fully boot. Wait until "Search network", "Sync server time" and "Search GPS" have gone out on the screen.
- Right arrow button: Here you can see the details about your current network connection.
- Right arrow + left arrow: Press and hold the left and right arrow buttons simultaneously and wait until "Done" appears. If a stronger network is available, the camera will now connect to it, even after the next reboot.
The ZEISS Secacam is now connected to the strongest available network. If there is no stronger network in the vicinity, the ZEISS Secacam remains on the same network as before the scan.
8. Manually triggering test recordings
To check the capturing area or the recording quality, there is the option of manual triggering:
- SETUP: Set the switch to "SETUP". The screen turns on and the start screen is visible for about 2 seconds, after which the camera switches to preview mode and shows the section in the display that would also be visible during the recording.
- OK = recording: Press "OK" to trigger a recording manually. Caution: Depending on whether "Photo" or "Video" is selected in the "Mode" menu, either a photo and/or a video is recorded. Test videos are limited to a maximum of 15 seconds.
Note: To test your camera's mobile connection, you can also have a test image sent to your user account or the ZEISS Secacam app via the camera menu.
9. Checking recordings
- SETUP: Set the switch to "SETUP" and the screen will turn on and show the current capturing area. At the top right, the number of recordings and the theoretically possible number of recordings according to the memory capacity used are displayed.
- PLAY: Press the PLAY button to enter review mode. The screen switches to the last recording taken.
- Right arrow button = forward, left arrow button = back: Use the right and left arrow buttons to skip back or forward through a recording. You can recognize a video recording by the black bars at the top and bottom, as well as by the movie camera icon displayed at the bottom left. To start playing a video, press the OK button.
Deleting recordings: If you want to delete a recording, first go into review mode as described above. Then press the MENU button to enter the menu. Now you have the choice between "Delete" and "Format". If you select "Delete" here, you have the choice between "One" or "All". If you select the "One" option, you will be taken back to review mode. There you can use the left and right arrow buttons to jump and decide which recordings you want to delete by clicking "Yes" and confirming with "OK". If you choose the "All" option, you will be asked again if you really want to delete all files. Only when you select "Yes" and confirm with "OK" will the recordings be deleted.

CAUTION!
If you confirm the "All" selection at this point, you will irretrievably delete all recordings on the memory card!
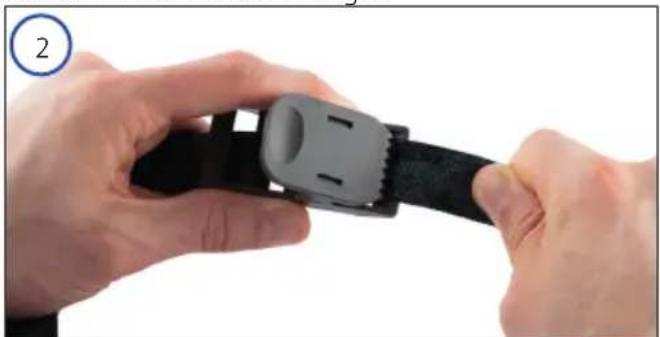
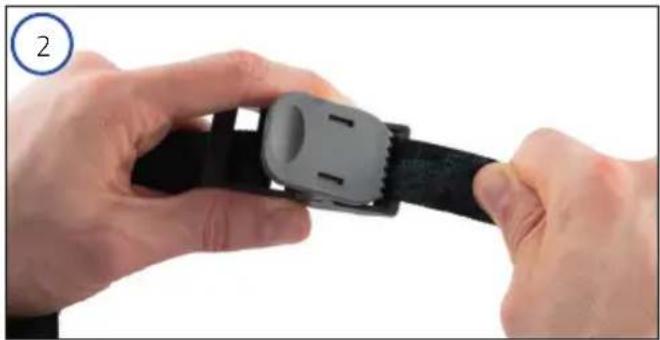
10. Fitting

natural_image
Close-up of hands adjusting a flexible strip on a mechanical device (no text or symbols visible)
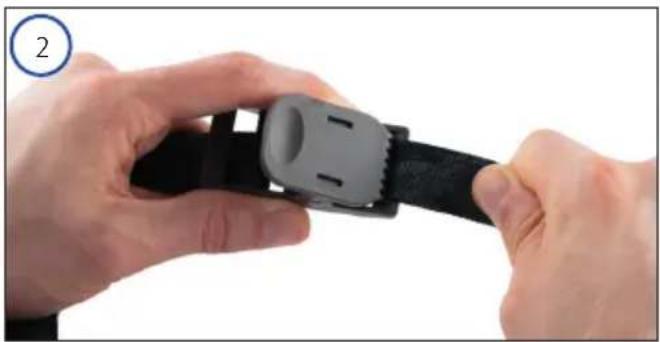
10.1 Fitting with strap
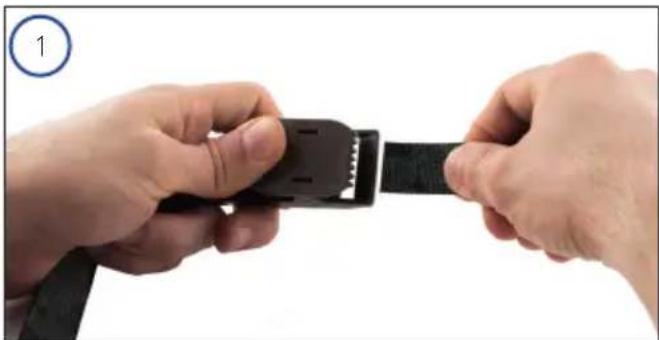
Use the enclosed mounting strap to attach the ZEISS Secacam to a tree, a solid branch or a pole. To do this, guide the retaining strap through the eyelets on the back of the housing. Hold the camera in the intended position and tighten the loose end of the mounting strap until the camera is securely fastened. Make sure to hide the remaining part of the strap.
To release the mounting strap, press the clip and pull out the strap end.
natural_image
Close-up of hands holding a black belt buckle with a numbered circle marker (no text or symbols on the belt itself)

natural_image
Close-up of hands holding a black and gray plastic buckle (no text or symbols visible)
10.2 Fitting with tripod/tree mount
The ZEISS Secacams has a threaded bushing on the top and bottom for a 14 -inch tripod socket (diameter: 6.35 mm, length: 6 mm), which you will find on almost all commercially available camera tripods. This allows you to attach the camera on a variety of tripods, wall mounts or tree mounts available from accessory stores.
Tripod sockez1/4"
Tip: The best height to position a trail camera is around waist high and slightly pointed downwards.
11. Technical data
Element Description
| Image sensor 3.0 megapixels | Photo ratio: 16:9Video ratio: 16:9 |
| Image size 5.0 megapixels as standard | 8.0 megapixels (interpolation)12.0 megapixels (interpolation)24.0 megapixels (interpolation) |
| Number of photos per trigger 1 to 5 | |
| Display 1,9" (TFT-LCD color display) | |
| Continuous shooting Yes: Interval 5 seconds to 24 hours | |
| Video resolutions 1080p = 1920 x 1080 pixels | 720p = 1280 x 720 pixels480p = 640 x 480 pixels |
| Video duration 5 to 59 seconds | |
| Image information stamp Footer cam name | TimeDateMoon phase (guide value)Temperature (guide value) |
| Number of LEDs/flash type 60 black LEDs | 940 nm |
| Trigger time < 0.4 ~ 0.6 seconds | |
| Flash range Up to 25 m | |
| Infrared sensor 1 PIR sensor | Sensitivity adjustable(high | medium | low) |
| Sensor range Up to 25 m depending on object size and temperature difference |
| Storage | SD or SDHC up to 64 GB (EMMC) |
| Ports | USB-C |
| Power supply | 8x LR6 batteries (AA) or8x LR6 (AA) rechargeable batteries |
| External power supply | 12 V - 2 A |
| Dimensions | Approx. 14.3 (H) x 8,5.0 (W) x 8.5 (D)cm |
| Operating temperature | -20°C ~ 55°C |
Note: Design and technical data are subject to change without notice.
12. Connection to computer
Connection with USB cable: Release the locking clip and open the camera. There is a USB-C port on the underside of the camera. You can establish a connection to your computer using a USB-C cable (not included in the scope of delivery). Make sure that the camera is switched off when you connect it to the computer. When the camera is plugged in, it switches on automatically and 'MSDC' appears on the display.
PC: The camera installs itself on the computer as an additional drive labelled 'Removable Disk'. Double-click to open this drive. The 'DCIM' folder contains the '100MEDIA' folder with the recorded photo and video files. After 1,000 recordings, another folder is created, this is called '101MEDIA', '102MEDIA' etc. However, the recordings are numbered consecutively. You can now copy or move the folder or individual files to the computer.
13. External power supply
External power supply: In addition to the power supply via batteries, the camera can also be permanently supplied with power via external power supplies with 12 V voltage and a current strength of at least 2 A. The corresponding socket is located at the bottom of the camera. The hollow plug of the power adapter must have an outer diameter of 4 mm and an inner diameter of 1.7 mm. Important: The positive pole must be on the inside, the negative pole on the outside. Remove the batteries when operating the camera with an external power supply.
External rechargeable battery: When using external rechargeable batteries for a long period of time, 12 V lead-gel batteries are particularly suitable. With a capacity of 4.5 Ah, for example, these batteries are an ideal long-term source of energy for the ZEISS Secacam. Please note that you must use a suitable cable with the correct polarity (positive pole inside) in addition to the rechargeable batteries.
14. Care
Do not use any harsh cleaners such as methylated spirits, thinners, etc. to clean the camera housing and the accessories provided. If necessary, clean the components using a soft, dry cloth.
15. Customer service and warranty
If you have any questions about your product, please contact us:
Phone
International: +49 7364/2022067

Service Website
www.zeiss.ly/secacam-service

FAQ
www.zeiss.ly/secacam-faq

If you want to download the current warranty conditions, visit our website:
www.zeiss.com/cop/warranty
We reserve the right to make changes to the design and scope of delivery in the interests of further technical development. No liability for errors and misprints.
www.zeiss.com/cop/safety

natural_image
Close-up of a hand inserting electronic components into a black device (no visible text or symbols)

natural_image
Close-up of a hand inserting batteries into a black device (no visible text or symbols)
natural_image
Close-up of a hand holding a camera module with a black adjustment knob, showing mechanical assembly (no text or symbols visible)
natural_image
Group of deer in a lush green forest, no visible text or symbols

5MP 5P

HD 20s

5P 20s


■ 5 MP = 5,0 mégapixels = 3,072 x 1,728 pixels
■ 8 MP = 8,0 mégapixels = 3,840 x 2,112 pixels
■ 12 MP = 12,0 mégapixels = 4,800 x 2,560 pixels
5.4 Video resolution
natural_image
Close-up of hands adjusting a flexible cable with a black plastic device (no text or symbols visible)
natural_image
Close-up of hands holding a black plastic buckle with a strap, no text or symbols visible
natural_image
Close-up of hands holding a black belt buckle with a blue circular label (no text or symbols on the belt itself)
FAQ
www.zeiss.ly/secacam-faq

www.zeiss.com/cop/warranty
www.zeiss.com/cop/safety

natural_image
Close-up of a black electronic device with battery slots and a finger inserted, showing internal components (no text or symbols visible)

natural_image
Close-up of a hand inserting batteries into a device labeled 'ELECT' (no additional text or symbols visible)
natural_image
Close-up of a hand adjusting a camera lens with a black adjustment lever (no text or symbols visible)
natural_image
Group of deer in a lush green forest, no visible text or symbols


natural_image
Close-up of hands adjusting a flexible strip on a black electronic device (no text or symbols visible)
natural_image
Close-up of hands holding a black cable buckle with a strap, no text or symbols visible

natural_image
Close-up of hands holding a black belt buckle with a gray strap (no text or symbols visible)
www.zeiss.com/cop/warranty
www.zeiss.com/cop/safety

natural_image
Close-up of a black EJ8 device with a finger inserted, showing internal battery modules (no text or symbols visible)

natural_image
Close-up of a hand inserting batteries into a device labeled 'ELECT' (no additional text or symbols visible)
natural_image
Close-up of a military camera module with a hand adjusting a component, showing a lock and adjustment knob (no text or symbols visible)
natural_image
Group of deer in a forest setting, no visible text or symbols on the animals or background

5MP 5P

HD 20s

5P 20s


■ 5 MP = 5,0 megapixel = 3,072 x 1,728 pixel
■ 8 MP = 8,0 megapixel = 3,840 x 2,112 pixe
■ 12 MP = 12,0 megapixel = 4,800 x 2,560 pixel
natural_image
Close-up of hands adjusting a flexible cable with a black plastic device (no visible text or symbols)
natural_image
Close-up of hands holding a black cable clip with a white connector, no text or symbols visible
natural_image
Close-up of hands holding a black and gray cable with a button, no visible text or symbols
FAQ
www.zeiss.ly/secacam-faq

www.zeiss.com/cop/warranty