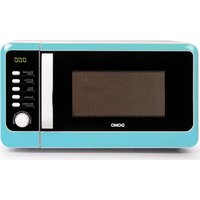
DO2017G - Microwave Oven DOMO - Free user manual and instructions
Find the device manual for free DO2017G DOMO in PDF.


| Brand | DOMO |
| Model | DO2017G |
| Product type | Microwave oven with grill function |
| Power supply voltage | 230 V ~ 50 Hz |
| Microwave output power | 800 W |
| Microwave input power | 1270 W |
| Grill input power | 1000 W |
| Cooking functions | Microwave (5 power levels), grill, combined cooking (C1: 55% MW + 45% grill, C2: 36% MW + 64% grill) |
| Defrosting | By weight (100-2000 g) or by time |
| Automatic programs | 8 programs: reheat, vegetables, fish, meat, pasta, potatoes, pizza, soup |
| Timer / delayed programming | Yes, with start time setting |
| Child safety | Control panel lock (long press 3 s on Stop/Clear) |
| Turntable | Glass, suitable diameter, must always be used |
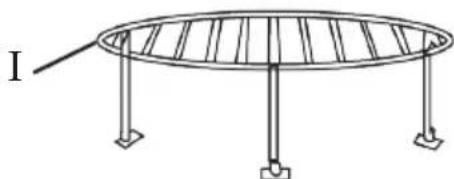
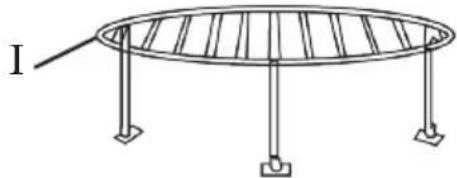
| Grill rack for roasting | Included, must be placed at least 5 mm above the turntable |
| Microwave-safe materials | Heat-resistant glass, microwave-safe plastic, metal-free ceramic, aluminum foil (distance >2.5 cm from walls) |
| Cleaning and maintenance | Clean the interior after each use with a damp cloth. The turntable and grill rack are washable in warm water with mild detergent. Do not use a steam cleaner or corrosive products. |
| Warranty | 2 years, subject to the conditions described in the manual |
| Spare parts / repairability | Available online at webshop.domo-elektro.be. Repairs must be carried out by the manufacturer or an authorized professional. |
| Included accessories | Glass turntable, turntable ring, grill rack for roasting, user manual |
| Installation / free space | Minimum distance of 30 cm above, sufficient lateral and rear clearance for ventilation. Do not place above a heat source. |
Frequently Asked Questions - DO2017G DOMO
User questions about DO2017G DOMO
0 question about this device. Answer the ones you know or ask your own.
Ask a new question about this device
Download the instructions for your Microwave Oven in PDF format for free! Find your manual DO2017G - DOMO and take your electronic device back in hand. On this page are published all the documents necessary for the use of your device. DO2017G by DOMO.
USER MANUAL DO2017G DOMO
natural_image
Front view of a turquoise Doho microwave oven with control panel and digital display (no visible text or symbols on main body)GARANTIEVOORWAARDEN
CONDITIONS DE GARANTIE
This appliance has a two year warranty period. During this period the manufacturer is responsible for any failures that are the direct result of construction failure. When these failures occur the appliance will be repaired or replaced if necessary. The warranty will not be valid when the damage to the appliance is caused by wrong use, not following the instructions or repairs executed by a third party. The guarantee is issued with the original till receipt. All parts, which are subject to wear, are excluded from the warranty.
If your device breaks down within the 2-year warranty period, you can return the device together with your receipt to the shop where you purchased it.
CONDICIONES DE GARANTÍA
RECYCLAGE-INFORMATIE
natural_image
Symbol of a trash bin crossed with no text or numbers, representing waste sorting or disposal (no text present)RECYCLING INFORMATIONEN
natural_image
Recycling symbol icon with three chasing arrows forming a triangle (no text or labels)RECYCLING INFORMATION
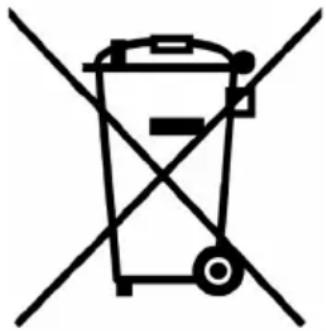
This symbol on the product or on its packaging indicates that this product may not be treated as household waste. Instead it must be brought to the applicable collection point for recycling of electrical and electronic equipment. By ensuring this product is disposed of correctly, you will help prevent potential negative consequences for the environment and human health, which could otherwise be caused by inappropriate waste handling of this product. For more detailed information about recycling of this product, please contact your local city office, your household waste disposal service or the shop where you purchased the product.
The packaging is recyclable. Please treat package ecologically.
natural_image
Symbol of a trash bin crossed out by two diagonal lines (no text or labels)
natural_image
Recycling symbol composed of three chasing arrows forming a triangle (no text or labels)From now on, accessories and parts of Domo appliances can also be ordered online from the Domo webshop*:
http://webshop.domo-elektro.be
You can reach the webshop through the Domo website as well: www.domo-elektro.be. The accessories and parts can also still be obtained at the store where you bought the appliance.
natural_image
Simple black line drawing of a plug with a curved cable (no text or symbols)If the supply cord is damaged, it must be replaced by the manufacturer, its service agent or a similarly qualified person in order to avoid a hazard.

natural_image
Simple line drawing of a circular metal grate or fence structure with four legs and a label 'I' pointing to the top-left corner (no text or symbols on the structure itself)INSTALLATIE VAN HET DRAAIPLATEAU
C-1: 55% microgolf – 45% grill
C-2: 36% micorgolf – 64% grill
natural_image
Warning symbol depicting steam rising inside a triangle (no text or numbers)VOLUME DU FOUR : 20 L
DIAMETRE PLATEAU TOURNANT : 24,5 CM
DIMENSIONS EXTERIEURES (L X P X H) : 453 X 357 X 258 MM
POIDS NET : 10,66 KG
MESURES DE SECURITE IMPORTANTES
natural_image
Simple line drawing of a circular metal grate or support structure with four legs and a labeled point I (no text or symbols on the structure itself)INSTALLATION DU PLATEAU TOURNANT
natural_image
Simple line drawing of a circular metal grate or fence structure with three legs and a central horizontal bar (no text or symbols)INSTALLATION DES DREHTELLERS
This appliance may be used by children from the age of 8 and up, and also by persons with a physical or sensory limitation, as well as mentally limited persons or persons with a lack of experience and knowledge. But only on the condition that these persons have received the necessary instructions on how to use this appliance in a safe way and know the dangers that can occur by using this appliance.
Children cannot be allowed to play with the appliance. Maintenance and cleaning of the appliance may not be done by children, unless they are older than 8 years old and are under supervision. Keep the appliance out of reach of children younger than 8 years old.
This appliance is suitable to be used in a household environment and in similar surroundings such as:
- Kitchen for personnel of shops, offices or other similar professional surroundings
- Farms
- Hotel or motel rooms and other surroundings with a residential character
- Guest rooms or similar
Attention: This appliance cannot be used with an external timer or a separate remote control.
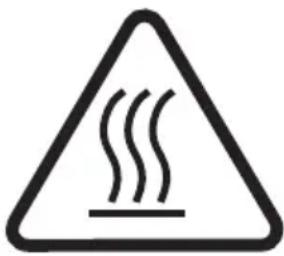
The appliance can become hot during use. Keep the power cord away from hot parts and don't cover the appliance.
- Read all instructions before use.
- Before use, check if the voltage stated on the appliance corresponds with the voltage of the power net at your home.
- Do not let the cord hang on a hot surface or on the edge of a table or counter top.
- Never use the appliance when the cord or plug is damaged, after malfunction or when the appliance itself is damaged. In that case, take the appliance to the nearest qualified service center for check-up and repair.
- Close supervision is necessary when the appliance is used near or by children.
- The use of accessories that are not recommended or sold by the manufacturer can cause fire, electrical shock or injuries.
- Unplug the appliance when it is not in use, before assembling or disassembling any parts and before cleaning the appliance. Put all buttons and knobs into the ‘off’ position and unplug the appliance by grasping the plug. Never unplug by pulling the cord.
- Do not leave a working appliance unattended.
- Never place this appliance near a gas stove or
electrical stove or in a place where it may come into contact with a warm appliance.
- Do not use the appliance outdoors.
- Only use the appliance for its intended use.
• Always use the appliance on a steady, dry and level surface. - Only use the appliance for domestic use. The manufacturer can not be held responsible for accidents that result from improper use of the appliance or not following the instructions described in this manual.
- All repairs should be carried out by the manufacturer or its aftersales service.
- Never immerse the appliance, the cord or the plug in water or any other liquid.
- Make sure that children do not touch the cord or appliance.
- Keep the cord away from sharp edges and hot parts or other heat sources.
- Before use, remove all packaging materials and any promotional stickers.
RECAUTIONARY MEASURES TO PREVENT EXPOSURE TO MICROWAVES
Make sure the oven door is closed; using the oven with the door open can result in harmful exposure to microwaves. It is important to avoid tampering with, or breaking, the safety interlock.
Do not place any object between the door and the oven. Prevent dirt or cleaning agents from accumulating between the door and the oven.
WARNING: when the door or the protective interlock is damaged, you cannot use the oven before a qualified person repairs it.
The appliance can be damaged, may not work correctly or can cause injury if it is not treated with care and is not well maintained.
SPECIFICATIONS
MODEL : DO2017G VOLTAGE : 230V-50Hz
IMPORTANT SAFETY MEASURES
You must observe the following safety measures in order to prevent the risk of fire, electrocution, injuries or exposure to microwaves:
- Warning: do not warm up liquids and other foodstuffs in closed containers, there is a risk of explosion.
- Warning: it is dangerous to allow an unqualified person to remove parts providing protection from microwaves.
- Warning: Unsupervised children are not permitted to use the oven when it is being used for dual purposes (for example, microwave and grill), because the heat released is dangerous.
- Use only kitchen material approved for use in microwaves.
- Clean the oven regularly; all food remains must be removed.
- When you warm up food in a plastic or paper container, you must keep an eye on the oven, because it is possible that the container will burn.
- When smoke forms in the microwave oven, immediately remove the plug from the socket and keep the door closed in order to smother any flames (through starving them of oxygen).
- Do not overcook the food.
- Do not use the oven to store things. Do not store bread, biscuits, etc, in the oven.
- Remove wire fasteners and metal handles from packaging before placing a product in the oven.
- Assemble the oven solely according to the official instructions.
- Eggs in their shells or whole hard-boiled eggs should not be warmed up in the microwave oven. These could explode, even after the oven is switched off.
- Use the appliance strictly according to the directions in the instruction manual. Do not use harmful chemicals or noxious fumes in this appliance. This oven is to be used only for heating.
- The appliance is not suitable for industrial or laboratory use.
- When the electric lead is damaged it must be replaced by the manufacturer, by its after sales service centre or by a qualified person in order to prevent accidents or damage.
- Never keep the appliance outdoors.
- Do not use the oven near water, in a damp space or near a swimming pool.
- The oven may become warm during use. Keep the electric lead well away from hot parts and do not
cover the oven.
- Do not let the cord hang over the edge of a table or counter.
- If you fail to keep the oven clean it may result in damage to the appliance and possibly lead to dangerous situations.
- The content of baby bottles and baby food must always be shaken or stirred. In order to prevent burns the temperature of foodstuffs must be checked before use.
- The warming up of liquids can result in a delayed cooking reaction of the liquid. For this reason, always be careful when you remove the container from the oven.
- Make sure that children cannot play with the appliance.
- Do not place this appliance in a cupboard.
- This appliance is not permitted for use with an external timer or separate remote control.
- Do not use a steam cleaner to clean the appliance.
- Do not use aggressive detergents or sharp objects to clean the glass in the door, this can lead to cracks or damage to the glass
- The door of the appliance may become warm during use.
KEEP THIS LIST OF WARNINGS FOR LATER REFERENCE
IN ORDER TO AVOID THE RISK OF INJURIES
- Attention: Do not touch any (electrical) parts in the appliance's interior. This can result in serious injury or death. Do not dismantle the appliance.
- Incorrect use of the appliance and the earthed plug can lead to electrocution. Do not switch the appliance on before it has been correctly assembled and connected to an earthed socket.
- This appliance must be connected to an earthed socket. When the appliance short-circuits, the earthed socket ensures that the electricity is safely conducted and diverted. If you are not absolutely certain about your electrical system at home, contact a qualified electrician. In the event you need to make use of wiring for an extension, always use a lead with 3 wires.
- Your appliance is provided with a short electric lead to prevent tangling or accidents from tripping over it.
- In the event you use an extension lead you must make sure that the lead has at least the same capacity as that of the oven.
- The extension lead must be placed so that nobody will trip over it or get caught in it.
CLEANING
- Always make sure that the plug has been removed from the socket before you clean the appliance.
• After use, clean the inside of the oven with a damp cloth. - Clean the parts, such as grill, glass turntable/revolving plate, in warm water, using a mild detergent.
- If dirty, you can clean the door, the interlock and the control panel, with a lightly dampened cloth.
MATERIALS PERMITTED FOR USE IN THE MICROWAVE OVEN
Here below is a list of objects that can or cannot be used in the appliance. In the event you cannot find the object you wish to use in the list below, you can apply the following method to check whether the object is suitable for microwave use.
- Fill a microwave-safe container with 250 ml of cold water and place this, together with the object to be tested, in the microwave oven.
- Adjust the microwave to maximum power for 1 min and switch on.
- Feel the object carefully to test whether or not it is warm, if it is, it means it is not suitable for use in the microwave oven.
TAKE CARE: never cook the object for longer than 1 min in the microwave.
MATERIALS NOT PERMITTED FOR USE IN THE MICROWAVE OVEN
- Aluminium foil: Only for covering food. Small pieces of foil can be used to lay on top of food to prevent it from overcooking. Sparks can develop if the foil is placed too close to the microwave's sides. The foil must be at least 2,5 cm from the sides.
- Grill grid: according to the instructions of this manual. The underside of the grill grid must be placed at least 5 mm above the revolving glass plate. Incorrect use can cause the revolving glass plate to crack.
- Crockery: Only microwave-safe crockery. Do not use any crockery that displays cracks or chips.
- Glass jug/can: only use without lids. Only to use for lightly warming. Most glasses are not heat-resistant and can break.
- Glassware: heat-resistant oven glassware is permitted. Take care that the glass does not contain metal decorations or metal parts. Do not use any cracked or damaged glass.
- Oven cooking bags: follow the manufacturer's instructions. Do not close the bag with a metal fastener. Make holes in the bag so that the steam can escape.
- Plastic: only plastic suitable for the microwave. Follow the manufacturer's instructions. The words “microwave safe” must always be clearly visible on the plastic. Some plastic containers become soft if food is heated in them. Cooking bags and closed bags need to be pricked to allow steam to escape.
- Plastic packaging: Only plastic that is microwave approved. It can be used for covering the food so that it does not dry out. Always make sure that the food does not touch the plastic.
- Thermometer: only microwave-safe thermometers.
MATERIALS PERMITTED FOR USE IN THE MICROWAVE OVEN
• Aluminium dish: this can cause sparks. Lay the food on a microwave-safe dish.
- Food container with metal handle(s): can cause sparks. Lay the food on a microwave-safe dish.
- Kitchen material made from metal or with metal finish: Metal shields the food from microwave energy. Metal finishes can cause sparks.
• Metal fasteners: can lead to sparks and can cause fire in the oven.
• Paper bags: can cause fire in the oven.
- Plastic foam: when exposed to high temperatures it can melt or contaminate the food inside the plastic foam container.
• Wood: wood dries out in the microwave and through this can burst or split.
PARTS
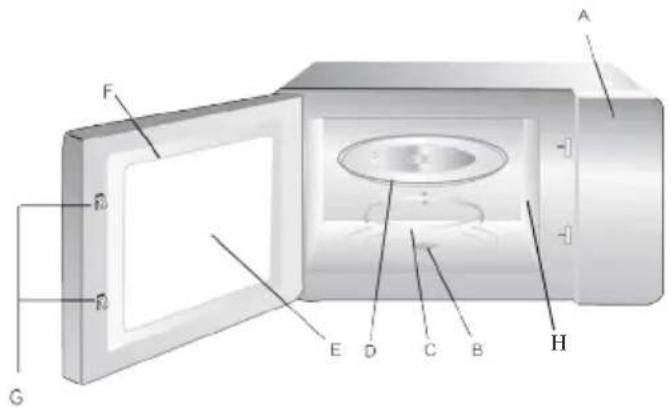
A. Control panel
B. Revolving plate
C. Revolving plate ring
D. Glass revolving plate
E. Display window (for viewing inside)
F. Door
G. Safety lock
H. Microwave guide
I. Grill rack
natural_image
Simple line drawing of a circular metal structure with four legs and a central horizontal bar (no text or symbols)ASSEMBLY OF THE REVOLVING PLATE
-
First place the revolving plate ring in the middle of your microwave oven.
-
Place the revolving plate on the ring; make sure that the middle of the revolving ring fits in the revolving plate support.
- Never place the revolving plate upside down. Always make sure that the revolving plate can turn freely steeds, without obstruction.
- The revolving plate and ring must be used at all times during cooking.
- All food and containers must, at all times, be placed on the glass plate during cooking.
- When the glass plate or the ring display any cracks, you should immediately get in touch with your nearest service centre.
ASSEMBLY
-
Remove all packaging materials and the accessories.
-
Examine the oven for any possible damage such as dents or a damaged door. Do not use the oven if it is damaged.
-
Choose a spot to place your microwave where there is sufficient space to allow the free circulation of air.
-
Make sure that a minimum distance of 10 cm is kept, at the rear and on the left and right-hand sides, from the wall and any cupboard. One side of the microwave must be left completely open.
An open space of at least 30 cm must be allowed above the microwave oven. Attention:
- Never remove the legs underneath your oven.
- Blocking the air intake and outlet can lead to damage to your appliance.
-
Keep the oven as far as away as possible from radio and TV.
-
Plug your oven into the socket, always check whether the voltage in your home corresponds to the voltage stated on your appliance.
Warning: Do not place the oven above a cooking stove or other heat producing appliance(s), this can damage the appliance and your guarantee will not be valid. The accessible part of your appliance may become warm during use.
INSTRUCTIONS FOR USE
ADJUSTING THE CLOCK
- When you plug the microwave into the socket, "0:00" will appear on the display.
- Press on the "clock/pre-set" button; the hour will begin to flash.
- Turn the round dial to set the hour between 0 - 23.
- Press on the "clock-pre-set" button; the minutes will begin to flash.
- Turn the round dial to set the minutes between 0 - 59.
- Press on the "clock/pre-set" button to confirm the hour set.
COOKING WITH THE MICROWAVE
- Press the “micro/grill/combi” button to adjust the microwave power: Press; 1x: P100, 2x: P80, 3x P50, 4x P30 or 5x P10.
- You can also adjust the microwave power by turning the round dial.
- Press the “start/+30sec./confirm” button, to confirm the chosen microwave setting.
- Turn the round dial to adjust the desired length of time.
- Press the "start/+30sec/confirm" button to start the cooking process.
The microwave power is divided as follows:
P100: 100% microwave power
P80: 80% microwave power
P50: 50% microwave power
P30: 30% microwave power
P10: 10% microwave power
COOKING WITH GRILL
- Press the “micro/grill/combi” button; “P100” will appear on the display, turn the round dial to select the grill, “G” will appear on the display.
- Press "start/+30sec/confirm" to confirm the grill setting.
- Turn the round dial to adjust to the desired grilling time.
- Press "start/+30sec/confirm" to start the grill.
Note: the oven will give a signal halfway through the set time during the grilling process, this is normal. For a better result with grilling, it is best to turn the food product over. Close the door and, once again, press the “start/+30sec/confirm” button, in order to carry on the grilling process after turning over the food.
If you do not want to turn over the food then you do not need to do anything else, the grilling process will proceed automatically.
COMBINED COOKING
- Press the "micro/grill/combi" button; "P100" will appear on the display.
- Turn the round dial in order to select the desired combi cooking setting:
C-1: 55% microwave - 45% grill
C-2: 36% microwave - 64% grill
-
Press the "start/+30sec/ confirm button, to confirm the selection.
-
Turn the round dial to adjust the timer.
-
Press the "start/+30sec/confirm" button to start cooking.
FAST COOKING
When the microwave oven is on the pause setting, you press the “start/+30sec/confirm” button once.
The microwave will now heat at full power for 30 seconds.
Each time you repress the “start/+30sec/confirm” button the time duration of heating will be increased by 30 seconds. This way you can adjust the length of time to max. 95 minutes.
You can also use the “start/+30sec/confirm” button during the use of the grill, the combined cooking or defrosting functions in order to lengthen the cooking time.
The cooking time can also be adjusted if you turn the round dial counterclockwise when the microwave is on the pause setting. When you press the “start/+30sec/confirm” button the microwave will heat at 100% during the time set.
Note: the time settings cannot be adjusted with the “start/+30sec/confirm” button during the automatic cooking programmes or during the defrosting by weight process.
DEFROSTING BY WEIGHT
- Press the "W.T./time defrost" button once; "dEF1" will appear on the display.
- Turn the round dial to select the weight of the foodstuff. The weight range selections are from 100 to 2000g.
- Press the "start/+30sec/confirm" button to start defrosting.
DEFROSTING BY TIME
- Press the "W.T./ time defrost" button twice; "dEF2" will appear on the display.
- Turn the round dial to set the defrosting time.
- Press the "start/+30sec/confirm" button to start defrosting.
COOKING IN DIFFERENT STEPS
You can adjust to a maximum of 2 steps. If one of the two steps is defrosting, you
must set this as the first step. After each completed step you will hear a signal. The automatic cooking programmes cannot be selected when using the function “cooking in different steps”.
For example: if you wish first to defrost food for 5 minutes and then to prepare it for 7 minutes using the microwave power of 80%, you must carry out the following selection:
- Press the "W.T./time defrost" button twice; "dEF2" will appear on the display.
- Turn the round dial to set the time to 5 minutes.
- Press the "micro/grill/combi" button.
- Turn the round dial to adjust the microwave power to 80%; “P80” will appear on the display.
- Press the start/+30sec/confirm" button to confirm the selection.
- Turn the round dial to adjust the microwave so that it is set to heat for 7 minutes.
- Press the "start/+30sec/confirm" button to start the cooking process.
COOKING WITH TIMER
First set the clock of your microwave oven to the present hour.
Select the desired cooking program. You can select max. 2 steps. Do not set a defrost function when you are cooking with the timer.
For example, you wish to cook for 7 minutes using 80% microwave power:
- Press the "micro/grill/combi" button.
- Turn the round dial to set the microwave power to "P80".
- Press the "start/+30sec/confirm" button to confirm the selection.
- Turn the round dial to set the time to 7 minutes. Do not press the “start/+30sec/confirm” button at this point but carry out the following instructions.
- Press "clock/pre-set" button, the hour will begin to flash.
- Turn the round dial to set the hour at which you want the microwave oven to start working.
- Press the "clock/pre-set" button; the minutes will begin to flash.
- Set the minutes now.
- Now press the “start/+30sec/confirm” button to confirm the selection. When the set time has been reached you will hear a signal, after which the selected cooking process will start running.
Note: take care to adjust the present time first, before using the timer.
AUTOMATIC COOKING PROGRAMS
Your microwave oven has 8 automatic cooking programs. In order to select these, carry out the following steps:
-
Turn the round dial clockwise in order to make a choice between “A-1” to “A-8”.
-
Press the "start/+30sec/confirm" button to confirm the selected program.
-
Turn the round dial to select the weight for the food to be cooked.
- Press the "start/+30sec/confirm" button to start the cooking process.
- When the cooking program finishes you will hear a signal.
Overview of the automatic cooking programs:
A1: Warming up/heating up
A2: Vegetables
A3: Fish
A4: Meat
A5: Pasta
A6: Potatoes
A7: Pizza
A8: Soup
CHILDPROOF LOCK
Press the “stop/clear” button for 3 seconds to engage the childproof lock.
You will hear a signal that confirms that the childproof lock is switched on and this will be lit up and visible in the display.
In order to disengage the childproof lock you press, again for 3 seconds, the “stop/clear” button. You will hear a signal confirming that the childproof lock is switched off and the sign in the display will disappear.
CHECKING THE SETTINGS
If during the cooking process you wish to check the microwave power you press the “micro/grill/combi” button. The selected power will appear for a few seconds on the display.
If during use of the timer you wish to check the settings, you press the “clock/pre-set” button. The set time will be visible on the display for a few seconds.
If during the cooking process you press the “clock/pre-set” button, the present time will be visible for a few seconds.
EXTRA INFORMATION
- When you first start to turn the round dial you will hear a signal.
- If you have opened the door during the cooking process you must always press the “start/+30sec/confirm” button again in order to let the cooking process continue.
- If you do not press the “start/+30sec/confirm button within 1 minute after setting the desire cooking program, the display settings will switch back to the present time and the selection you made will be cancelled.
- When you have pressed one of your microwave's buttons correctly you will hear a signal. If you do not hear it then you have not pressed the button correctly.
- You will hear a signal that repeats itself 5 times when the cooking process is completely finished.
PRECAUCIONES IMPORTANTES
natural_image
Warning symbol depicting steam rising inside a triangle (no text or numbers)natural_image
Warning symbol depicting steam rising inside a triangle (no text or numbers)natural_image
Simple line drawing of a circular metal structure with three legs and a horizontal panel, labeled 'I' pointing to the top-left corner (no text or symbols on the structure itself)VLOŽENÍ SKLENĚNÉHO TALÍŘE
DOPLNUJÍCÍ INFORMACE
Out of dust bags? Need an anti-scale cartridge?
You can now also order our accessories and parts in the
Domo Webshop
Webshop Domo
Domo- Webshop
Domo Webshop
Surf naar:
Rendez-vous sur:
Einfach unter:
Surf to:
webshop.domo-elektro.be
of scan hier:
ou scannez ici:
oder hier scannen:
or scan here:

- GARANTIEVOORWAARDEN
- CONDITIONS DE GARANTIE
- CONDICIONES DE GARANTÍA
- RECYCLAGE-INFORMATIE
- RECYCLING INFORMATIONEN
- RECYCLING INFORMATION
- INSTALLATIE VAN HET DRAAIPLATEAU
- MESURES DE SECURITE IMPORTANTES
- INSTALLATION DU PLATEAU TOURNANT
- INSTALLATION DES DREHTELLERS
- RECAUTIONARY MEASURES TO PREVENT EXPOSURE TO MICROWAVES
- SPECIFICATIONS
- IMPORTANT SAFETY MEASURES
- KEEP THIS LIST OF WARNINGS FOR LATER REFERENCE
- IN ORDER TO AVOID THE RISK OF INJURIES
- CLEANING
- MATERIALS PERMITTED FOR USE IN THE MICROWAVE OVEN
- MATERIALS NOT PERMITTED FOR USE IN THE MICROWAVE OVEN
- PARTS
- ASSEMBLY OF THE REVOLVING PLATE
- ASSEMBLY
- INSTRUCTIONS FOR USE
- ADJUSTING THE CLOCK
- COOKING WITH THE MICROWAVE
- COOKING WITH GRILL
- COMBINED COOKING
- FAST COOKING
- DEFROSTING BY WEIGHT
- DEFROSTING BY TIME
- COOKING IN DIFFERENT STEPS
- COOKING WITH TIMER
- AUTOMATIC COOKING PROGRAMS
- CHILDPROOF LOCK
- CHECKING THE SETTINGS
- EXTRA INFORMATION
- PRECAUCIONES IMPORTANTES
- VLOŽENÍ SKLENĚNÉHO TALÍŘE
- DOPLNUJÍCÍ INFORMACE
- webshop.domo-elektro.be
Brand : DOMO
Model : DO2017G
Category : Microwave Oven