Tribeca F-TR062 - Above ground pool MSpa - Free user manual and instructions
Find the device manual for free Tribeca F-TR062 MSpa in PDF.


User questions about Tribeca F-TR062 MSpa
0 question about this device. Answer the ones you know or ask your own.
Ask a new question about this device
Download the instructions for your Above ground pool in PDF format for free! Find your manual Tribeca F-TR062 - MSpa and take your electronic device back in hand. On this page are published all the documents necessary for the use of your device. Tribeca F-TR062 by MSpa.
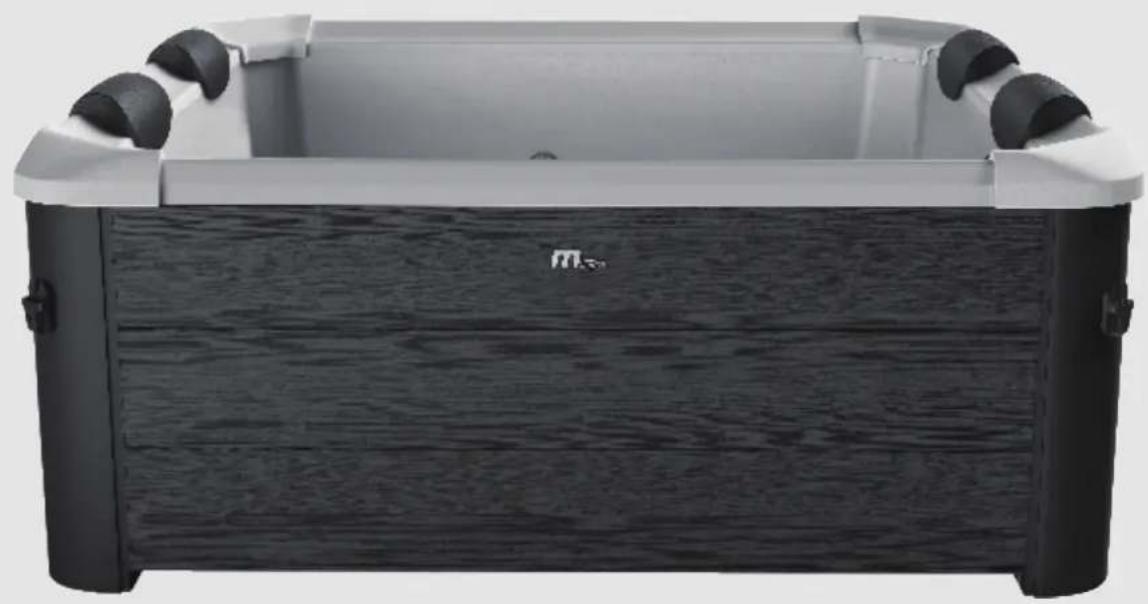
USER MANUAL Tribeca F-TR062 MSpa
natural_image
Black and white photo of a baby bathtub with wooden panels and curved handles (no visible text or symbols)

QUESTIONS? PROBLEMS? MISSING PARTS? For FAQ, Manuals, Videos or Spare Parts, please visit www.the-mspa.com/support
Due to MSpa's continuous product improvement process, MSpa reserves the right to change the specifications and appearance of its products, which may result in updates to the instruction manual without prior notice.
text_image
QR code image with a central logo, likely linking to a digital resource or website.
text_image
QR code image containing encoded data, with a central logo or watermark
text_image
QR code image containing encoded data, no visible human-readable text
text_image
QR code image containing the text 'm' and a small symbol in the center.MSpa Official Site MSpa Setup Videos MSpa Service
Center List
MSpa Owners Manual (Multi-language)
CONTENT
Safety precautions.... 3
Specifications....7
Accessories....7
First use and set-up preparation.... 8
Spa set-up....9
All-IN-ONE control operation.... 11
Water maintenance and chemicals.... 13
Drainage, cleaning and storage.... 14
Precautions for winter use.... 16
Disposal and environmental protection.... 16
Troubleshooting.... 17
MSPA limited warranty.... 18
For your own safety and that of your product, please make sure to follow the safety precautions below. Failure to follow the instructions may result in serious injury, property damage or death. Improper installation or operation will void the warranty.
PLEASE ENSURE THAT YOU READ, UNDERSTAND AND FOLLOW ALL INSTRUCTIONS KEEP THIS MANUAL FOR FUTURE REFERENCE
! DANGER
- Risk of Accidental Drowning. Extreme caution must be exercised to prevent unauthorized access by children.
- Risk of drowning. Inspect the spa cover regularly for leaks, premature wear and tear, damage or signs of deterioration. Never use a worn or damaged cover as it will not provide the level of protection required to prevent unsupervised access to the spa by a child.
- Risk of drowning. Always lock the spa cover after each use.
- Risk of injury. The suction fittings in this spa are sized to match the specific water flow created by the pump. Never operate the spa if the suction fittings are broken or missing. Never replace a suction fitting with an incompatible one.
- Appliances that are obviously damaged must not be operated.
- Risk of injury. If the supply cord is damaged, it must be replaced by the manufacturer, a service agent or a similarly qualified person in order to avoid hazards.
- Risk of Electric Shock. Do not permit any electrical appliances, such as lights, telephones, radios or televisions, within 1.5m (5 feet) of a spa tub.
- Risk of Electric Shock. Do not use the spa when it is raining, thundering or lightning.
!WARNING
- To reduce the risk of electric shock, do not use an extension cord, timers, plug adaptors or converter plugs to connect the unit to the electrical supply; provide a properly located outlet.
- This appliance with its incorporated heating elements must be connected to a grounded mains supply socket with a supply cord fitted with a plug and a RCD (residual current device) having a rated residual operating current not exceeding 30 mA.
- Never use the appliance without the RCD provided with it! Always test the correct operation of the RCD before use, unless the RCD is of a self-checking type!
- This appliance with earthing must only be plugged directly into an earthed socket-outlet for fixed wiring.
- Parts containing live components, except those parts supplied with safety extra-low voltage not exceeding 12V, must be inaccessible to anyone using the spa.
- Parts incorporating electrical components, except remote control devices, must be located or fixed so that they cannot fall into the spa.
- Electrical installation should fulfill the local requirement or standards.
- The wired controller must be properly stored in the side pocket when not in use, to protect it from falling or other hazards.
-
This appliance can be used by children aged 8 years and above and by persons with reduced physical, sensory or mental capabilities or a lack of experience and knowledge, provided that they are supervised or have been instructed on the safe use of the appliance and understand the hazards involved. Children must not play with the appliance or perform any cleaning or user maintenance operations without supervision.
-
To reduce risk or injury, keep children away from this product unless they are closely supervised at all times.
- To reduce the risk of child drowning, supervise children all times. Attach and lock the spa cover after each use.
- Make sure that the floor is able to support the expected load, which can be found on the specifications sheet. You will need to calculate the expected water capacity load plus the total weight.
- An adequate draining system must be provided around the spa to deal with overflow water.
• To reduce the risk of injury:
a) Lower water temperatures are recommended for young children and when spa use exceeds 10 minutes. In order to avoid the possibility of hyperthermia (heat stress) occurring, it is recommended that the average spa-pool water temperature does not exceed 40^ C ( 104^ F). Consider that the comfortable temperature ranged during use may be lower than the maximum safe temperature.
b) Since excessive water temperatures have a high potential for causing fetal damage during the early months of pregnancy, pregnant or possibly pregnant women should limit the spa water temperature to 38^ C ( 100^ F).
c) Before entering the spa or hot tub, the user should measure the water temperature with an accurate thermometer since the tolerance of water temperature regulating devices may vary.
d) The use of alcohol, drugs or medication before or during spa use may lead to unconsciousness with the possibility of drowning.
e) The use of alcohol, drugs or medication can greatly increase the risk of fatal hyperthermia in spas.
f) The causes and symptoms of hyperthermia may be described as follows: Hyperthermia occurs when the internal body temperature reaches a level several degrees above the normal body temperature of 37^ C ( 98.6^ F). The symptoms of hyperthermia include an increase in the body's internal temperature, dizziness, lethargy, drowsiness, and fainting. The effects of hyperthermia include a failure to perceive heat; a failure to recognize the need to exit the spa; an unawareness of impending hazards; fetal damage in pregnant women; a physical inability to exit the spa; and unconsciousness resulting in the danger of drowning.
g) Obese persons or persons with a history of heart disease, low or high blood pressure, circulatory system problems, or diabetes should consult a physician before using a spa.
h) Persons using medication should consult a physician before using a spa since some medication may induce drowsiness or affect the heart rate, blood pressure, or circulation.
i) Check with a doctor before use if pregnant, diabetic, in poor health, or under medical care.
- People with an infectious disease should not use a spa or hot tub.
- To avoid injury, exercise care when entering or exiting the spa or hot tub.
- Water temperatures in excess of 40°C (104°F) may be injurious to your health.
- Never use a spa or hot tub alone or allow others to use the spa alone.
- Do not use a spa or hot tub immediately following strenuous exercise.
- Spa heat in conjunction with alcohol, drugs, or medication can cause unconsciousness.
- Exit immediately if uncomfortable, dizzy, or sleepy. Spa heat can cause hyperthermia and unconsciousness.
- To prevent freezing, the spa must not be exposed to temperatures below 0^ C ( 32^ F) if there is still water in the pool. It is helpful to place a temperature barrier mat between the spa pool and the ground. A similar mat made of foam or any other material with a heat barrier function can also be used. Do not turn on the spa when the water is frozen.
- Never pour water with a temperature higher than 40^ (104°F) into the spa directly.
- Always unplug the product from the electrical outlet before removing, cleaning, servicing or making any adjustments.
-
Never jump or dive into a spa or any shallow body of water.
-
No part of the electric appliance is to be located above the bath during use.
- Do not bury the electrical cord. Locate the cord where it will not be damaged by lawn mowers, hedge trimmers or any other equipment.
- Do not attempt to plug in or unplug the product while standing in water or when your hands are wet.
- Do not use the spa if it is damaged on delivery and/or if it malfunctions in any way.
- Contact the MSpa service center for further instructions.
- Keep all pets away from the spa to avoid any damage.
- Do not add bath oil or bath salt to the spa water.
- Avoid putting your head under the water at all times.
- Avoid swallowing the spa water.
- The spa contains a UVC emitter. To replace or repair the UVC emitter, contact a professional operator. It's strictly forbidden for users to replace the UVC emitter. Unintended use of the appliance or damage to the housing may result in the escape of dangerous UVC radiation. UVC radiation, even in small doses, may cause harm to the eyes and skin.
- WARNING: Do not operate the UVC emitter when it is removed from the appliance enclosure or when the appliance is obviously damaged.
- Consult experts or local authorities to apply local or national laws/regulations relating to childproof fencing, safety barriers, lighting, and other safety requirements.
- The A-weighted emission sound pressure level is below 70 dB(A).
!CAUTION
- Always add chemicals to water, never add water to chemicals. Adding water to chemicals may cause strong fumes or violent reactions and hazardous chemical spray.
- For water that has already been used, dispose of it promptly or use water chemicals for cleaning.
- Usually, it is recommended to drain and refill a spa with clean water every 3-5 days.
- Use the chemical kit for disinfection in accordance with manufacturer's instructions.
- Do not leave or set up the spa with a temperature lower than 4^ C ( 39^ F) if the heater is not operating.
- Always enter and exit the spa or hot tub slowly and cautiously. Take extra care if the floor is wet.
- To avoid damage to the pump, never turn on the spa or hot tub if it is not filled to the minimum water line.
- The spa or hot tub must only be placed on a properly prepared site that meets the floor loading requirement.
- Do not leave the spa empty for an extended period of time. Drain the spa completely if it is not going to be used for a long period of time. Do not expose the spa to direct sunlight.
- Check regularly before each use. When the spa is not in use, store it away immediately or keep it in an enclosed area.
- Open the spa top lid when the Bubble function is on.
- In order to avoid a hazard due to the inadvertent resetting of the thermal cut-out, this appliance must not be supplied through an external switching device, such as a timer, or connected to a circuit that is regularly switched on and off by the utility.
- Once the spa is installed, refer to the relevant chapters for details concerning cleaning, periodic checks and other maintenance.
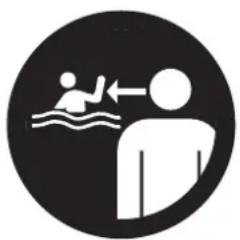
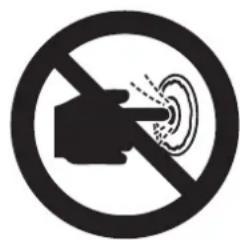
SPA LINER WARNING EXPLANATION
natural_image
Symbolic icon showing a person swimming with an arrow indicating water movement (no text or numbers present)Adult supervision Read user's manual

natural_image
Icon of a person using a laptop inside a black circle (no text or symbols)
natural_image
Prohibition sign with crossed-out lines and water wave, no text presentNo diving
text_image
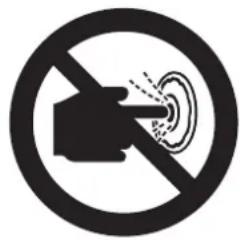
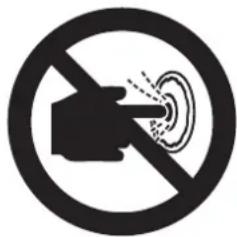
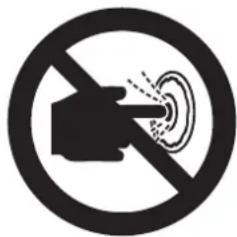
Prohibition sign with hand gesture and sound waves inside circleDo not put fingers in massage jet
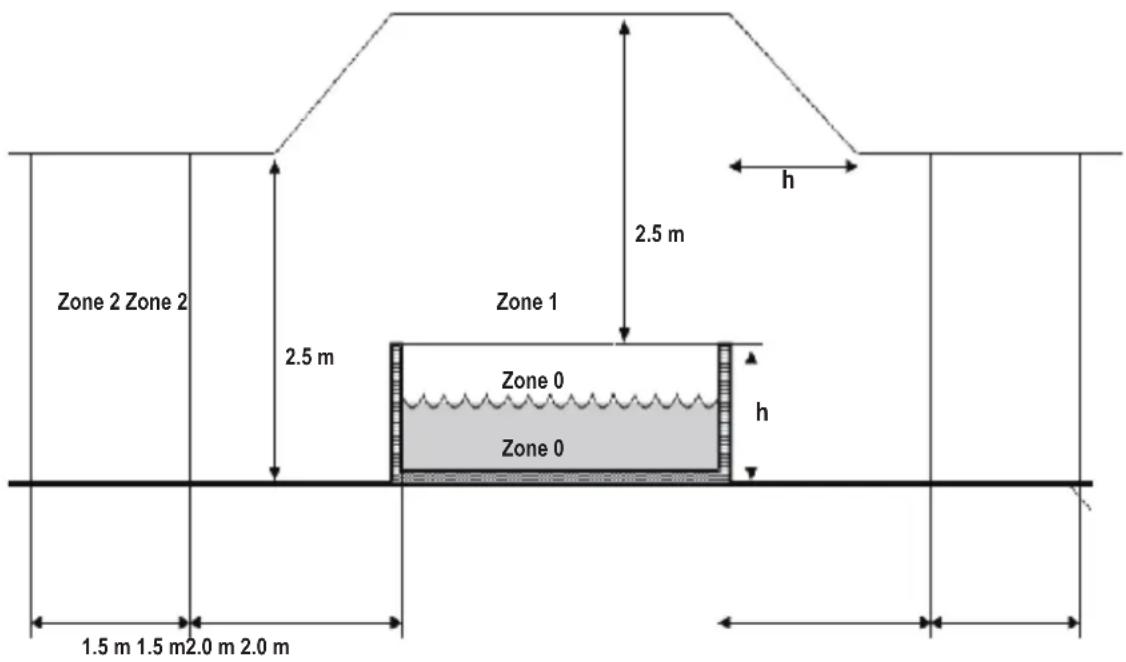
Warning: The appliance's water protection levels vary across different product zones, as shown in the following diagram. (The installation regulations comply with IEC 60364-7-702.)
text_image
Zone 2 Zone 2 2.5 m 2.5 m Zone 1 Zone 0 Zone 0 h 1.5 m 1.5 m 2.0 m 2.0 m hNOTE - The measured zone dimensions are limited by walls and fixed partitions.
| Zones | Description of the zones |
| Zone 0 | Zone 0 is the interior of the basin including any recesses in the walls or floor. |
| Zone 1 | Zone 1 is limited byZone 0A vertical plane 2m from the rim of the basin.The floor or the surface expected to be occupied by the users.The horizontal plane 2.5m above the floor or the surface. |
| Zone 2 | Zone 2 is limited byA vertical plane external to zone 1 and a parallel plane 1.5m from the former.The floor or surface intended to be occupied by the users. |
SPECIFICATIONS
| Model No./Name | Shape | Seating Capacity | Water Capacity | Outside Dimensions | Inside Dimensions | Height Weight | Temp Increasing Rate | |
| F-TR062W Tribeca | Square | 6 | 850 L (224 gal) | 1.6 m (63") x 1.6 m (63") | 1.4 m (55") x 1.4 m (55") | 0.65m (26") | 91.7 kg (202.2 lbs) | |
| Control System | Rating Power | Heater | Massage Air Blower | Filter Pump | UVC Radiant flux | Top Lid | ||
| AC 220-240 V~50 Hz | 2300W | 2200W | Level 1: 300 WLevel 2: 500 WLevel 3: 720 W | 1800 L/h | 40000 μW | Rhino-TechTM reinforced PVC | ||
natural_image
Simple 3D illustration of an open box (no text or symbols)PARTS CHECKS
Please examine equipment before use.
Notify customer service of any damaged or missing parts at the time of purchase.

text_image
Open-end panel *1 Plastic wood panel *3 One with MSpa Logo Spa liner Corner beam *4 Top trim *4 x1 x3 Bottom seal *4 Buckle spa cover Foldable foam mat Inflatable bladder
text_image
All-in-one control box+ U-shape cover Top trim joint *4 Soft corner cushion *4 Side panel joint *4 Headrest *4 User manual Repair kit
text_image
Filter cartridge *2 Filter cartridge base*1 Garden hose adaptor Water / air channel stoppers Wrench Chemical dispenser for 1" tablets Inflation hose and adaptor for bladder screw*4+ L-shape wrenchNOTE:
The drawings are for reference only. Actual products may vary. Not to scale.
Site preparation and requirements
- The spa can be installed indoors or outdoors in around 15 minutes by 2 persons. For household use only.
- The spa must be set up on a flat, smooth, and supporting surface that can bear the maximum load of the filled spa with the listed maximum number of occupants. Check with a qualified contractor or structural engineer to verify the requirement.
- Make sure that the area is free of sharp objects under or around the spa. The uneven or unsound surface can damage the spa and void your warranty. Level the surface before filling the spa with water.
- Provide an adequate drainage system around the spa to deal with overflow water and splashes.
- Provide convenient, local water use regulations for refill methods and adjust parameters as required by the water treatment department. Make sure there is enough space around the spa to allow full use of the equipment for maintenance and/or service.
- Consider locating the spa with as little noise disturbance as possible.
Additional requirements for indoor installation
- Humidity is a natural side effect of indoor spa installation. The room must be properly ventilated to allow moisture to escape. Install a ventilating system to prevent excess condensation and moisture in the room.
- Ensure that the spa can be removed from the building without destroying any part of the built structure.
- Consider any local regulations on these topics.
- Consider not installing the spa on carpet or other floor materials that promote or harbor moisture and bacteria, or that could be affected by water treatment chemicals used in the spa.
Additional requirements for outdoor installation
- Do not place the hot tub on grass or dirt as this will increase the amount of debris entering the hot tub and can damage the floor. To ensure a longer life, do not expose the hot tub to direct sunlight.
- Do not install or use the spa outdoors at a temperature lower than 4^ (39°F).
- Do not use the spa when the water inside the circulation system, pump, or pipework is frozen. Put a heat preservation mat between the base of the spa and the ground to prevent heat loss from the bottom of the spa and to provide better heat retention.
- Consider local environmental conditions, such as groundwater and the risk of frost.
RCD Testing
!WARNING
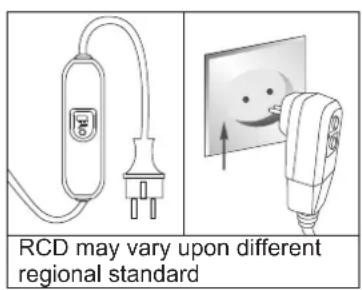
Risk of electric shock: This product is provided with a RCD located at the end of the power cord. The RCD must be tested before each use. Do not use the spa if the RCD does not function properly.
Disconnect the power cord until the fault has been identified and corrected. Contact a licensed electrician to correct the fault. There are no serviceable parts inside the RCD. Opening the RCD will void the warranty.
- Plug the machine into the mains.
- Press the RESET button on the RCD. The indicator turns red.
- Press the TEST button on the RCD. The red color shown on the indicator should disappear. Otherwise the RCD is faulty. Do not use the spa if the spa is faulty. Contact a qualified electrician to correct the fault.
- Press the RESET button on the RCD again. The indicator should turn red. When it does, the spa is ready for use.
text_image
RCD may vary upon different regional standard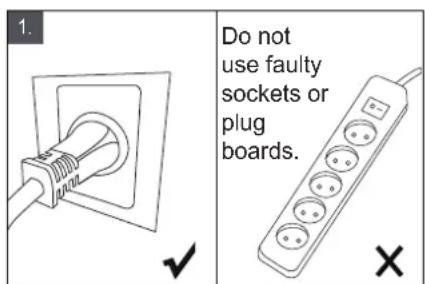
text_image
1. Do not use faulty sockets or plug boards. ✓ ✗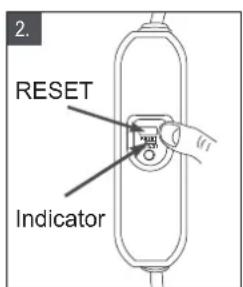
text_image
2. RESET Indicator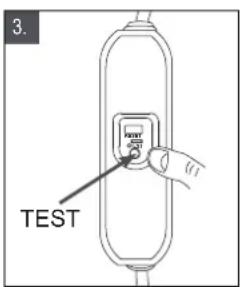
text_image
3. TESTImages for reference only.
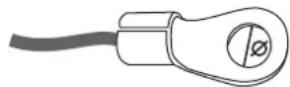
Applicable equipotential terminals: 4mm≤∅ ≤7mm
Spa Control Unit Connected External Equipotential Bonding Conductors
A qualified electrician should wire the spa control unit to the household equipotential terminal using a 2.5mm^2 - 6mm^2 solid copper conductor.
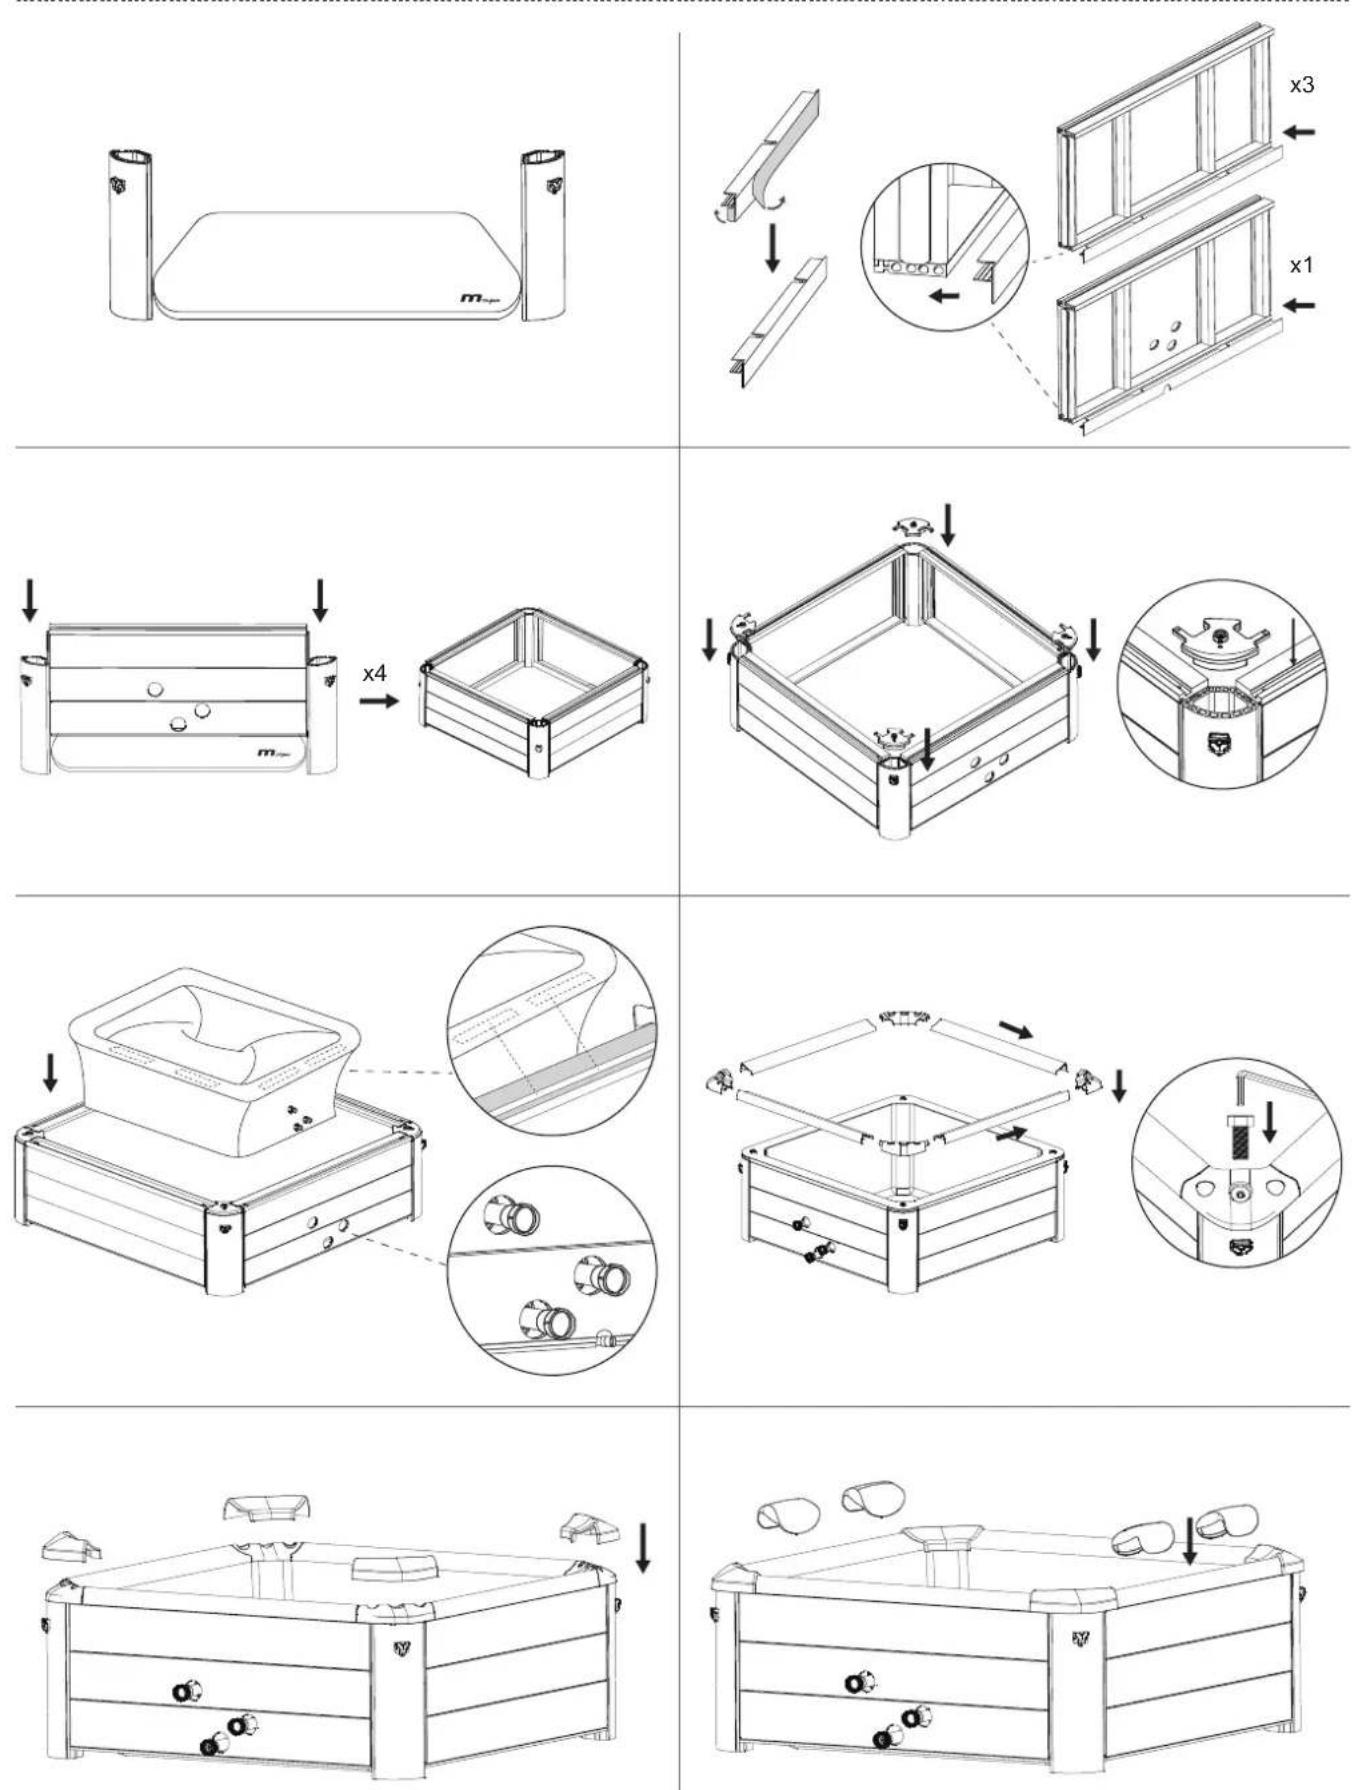
NOTE: Move the entire package to the selected site. Do not drag the spa tub across the ground as this can cause damage and leakage. Open the carton carefully as this can be used to store the spa over long periods or when not in use.
SPA SETUP
text_image
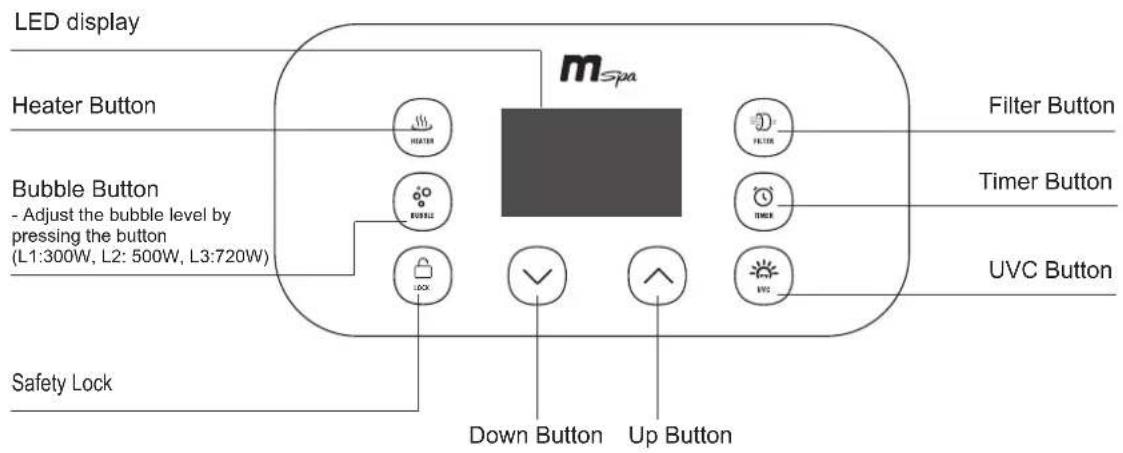
LED display Heater Button Bubble Button - Adjust the bubble level by pressing the button (L1:300W, L2: 500W, L3:720W) Safety Lock m Spa Filter Button Timer Button UVC Button Down Button Up Button
LED display
Once powered-up, press the RESET on the RCD. The LED displays the current water temperature automatically. NOTE: The actual water temperature may vary from the temperature displayed on the LED screen by as much as approximately 1°C.

HEATING
- Press the HEATER button to turn the heating system on/off. The HEATER icon shown on the LED display means the heating system is activated. The flashing HEATER icon means the spa is at the set temperature and the heating system is at rest.
- Pressing the UP or DOWN button to adjust the water to the desired temperature setting (from 20^ C to 40^ C). The new and desired temperature setting will remain on the LED display for 3 seconds to confirm the new value.
NOTE: The default temperature is 40^ C.
NOTE: If the heating system is turned on, the filtration system will automatically start.
NOTE: When the water temperature is below 1^ C ( 33.8^ F), the anti-icing system will be activated automatically to heat the water to 3^ C ( 37.4^ F).
IMPORTANT: The following conditions will lead to slow water heating
- An ambient temperature lower than 10^ (50°F).
- An outdoor wind speed above 3.5-5.4m/s (8-12mph).
- If the air bubble function is activated when the heater is on.
- If the spa cover is not properly in place when the heater is on.
natural_image
Diagram of a two-tiered storage unit with heat exchanger and cooling panel (no text or labels)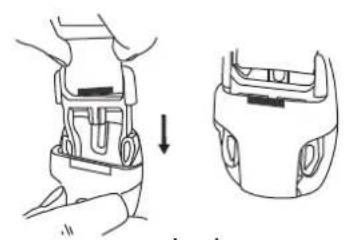
natural_image
Diagram showing a hand pressing a device into a side view, with no visible text or symbols.Lock
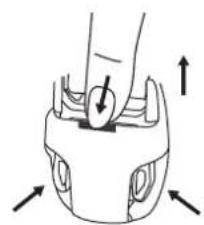
natural_image
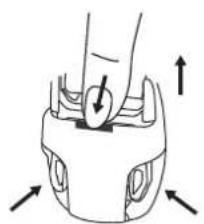
Diagram of a hand holding a small object with directional arrows indicating movement or force (no text or symbols)Unlock
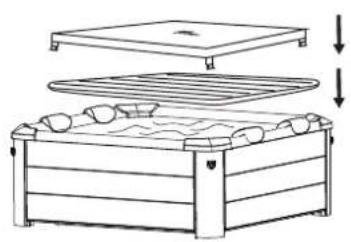
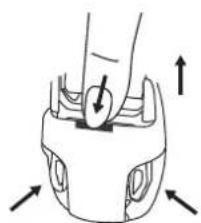
NOTE: Always keep the spa cover on to minimize heat loss when heating the water. Make sure the cover, and mostly its side facing water, will not come into contact with the ground or any other dirt when not in use. Covers shall be cleaned inside and out periodically using a suitable solution that includes adequate disinfection (e.g. 10ml/l of free Chlorine).

FILTRATION
Press the FILTER button to turn the function on/off. The FILTER icon shown on the LED display means the function is activated.
NOTE: The filtration system will automatically start when the heating or UVC sanitizing system is activated.
NOTE: After turning off the heating system, the filtration system will automatically stop in 30 seconds.
Filter Cartridge Cleaning Reminder: When the FILTER icon flashes continuously, the filter cartridge must be cleaned or replaced. Once this has been done, press the FILTER button for 3 seconds to reset the reminder.
Auto-filtration: When the spa is in stand-by mode, the filtration system will operate automatically for 60 minutes every 8 hours.

BUBBLE MASSAGE
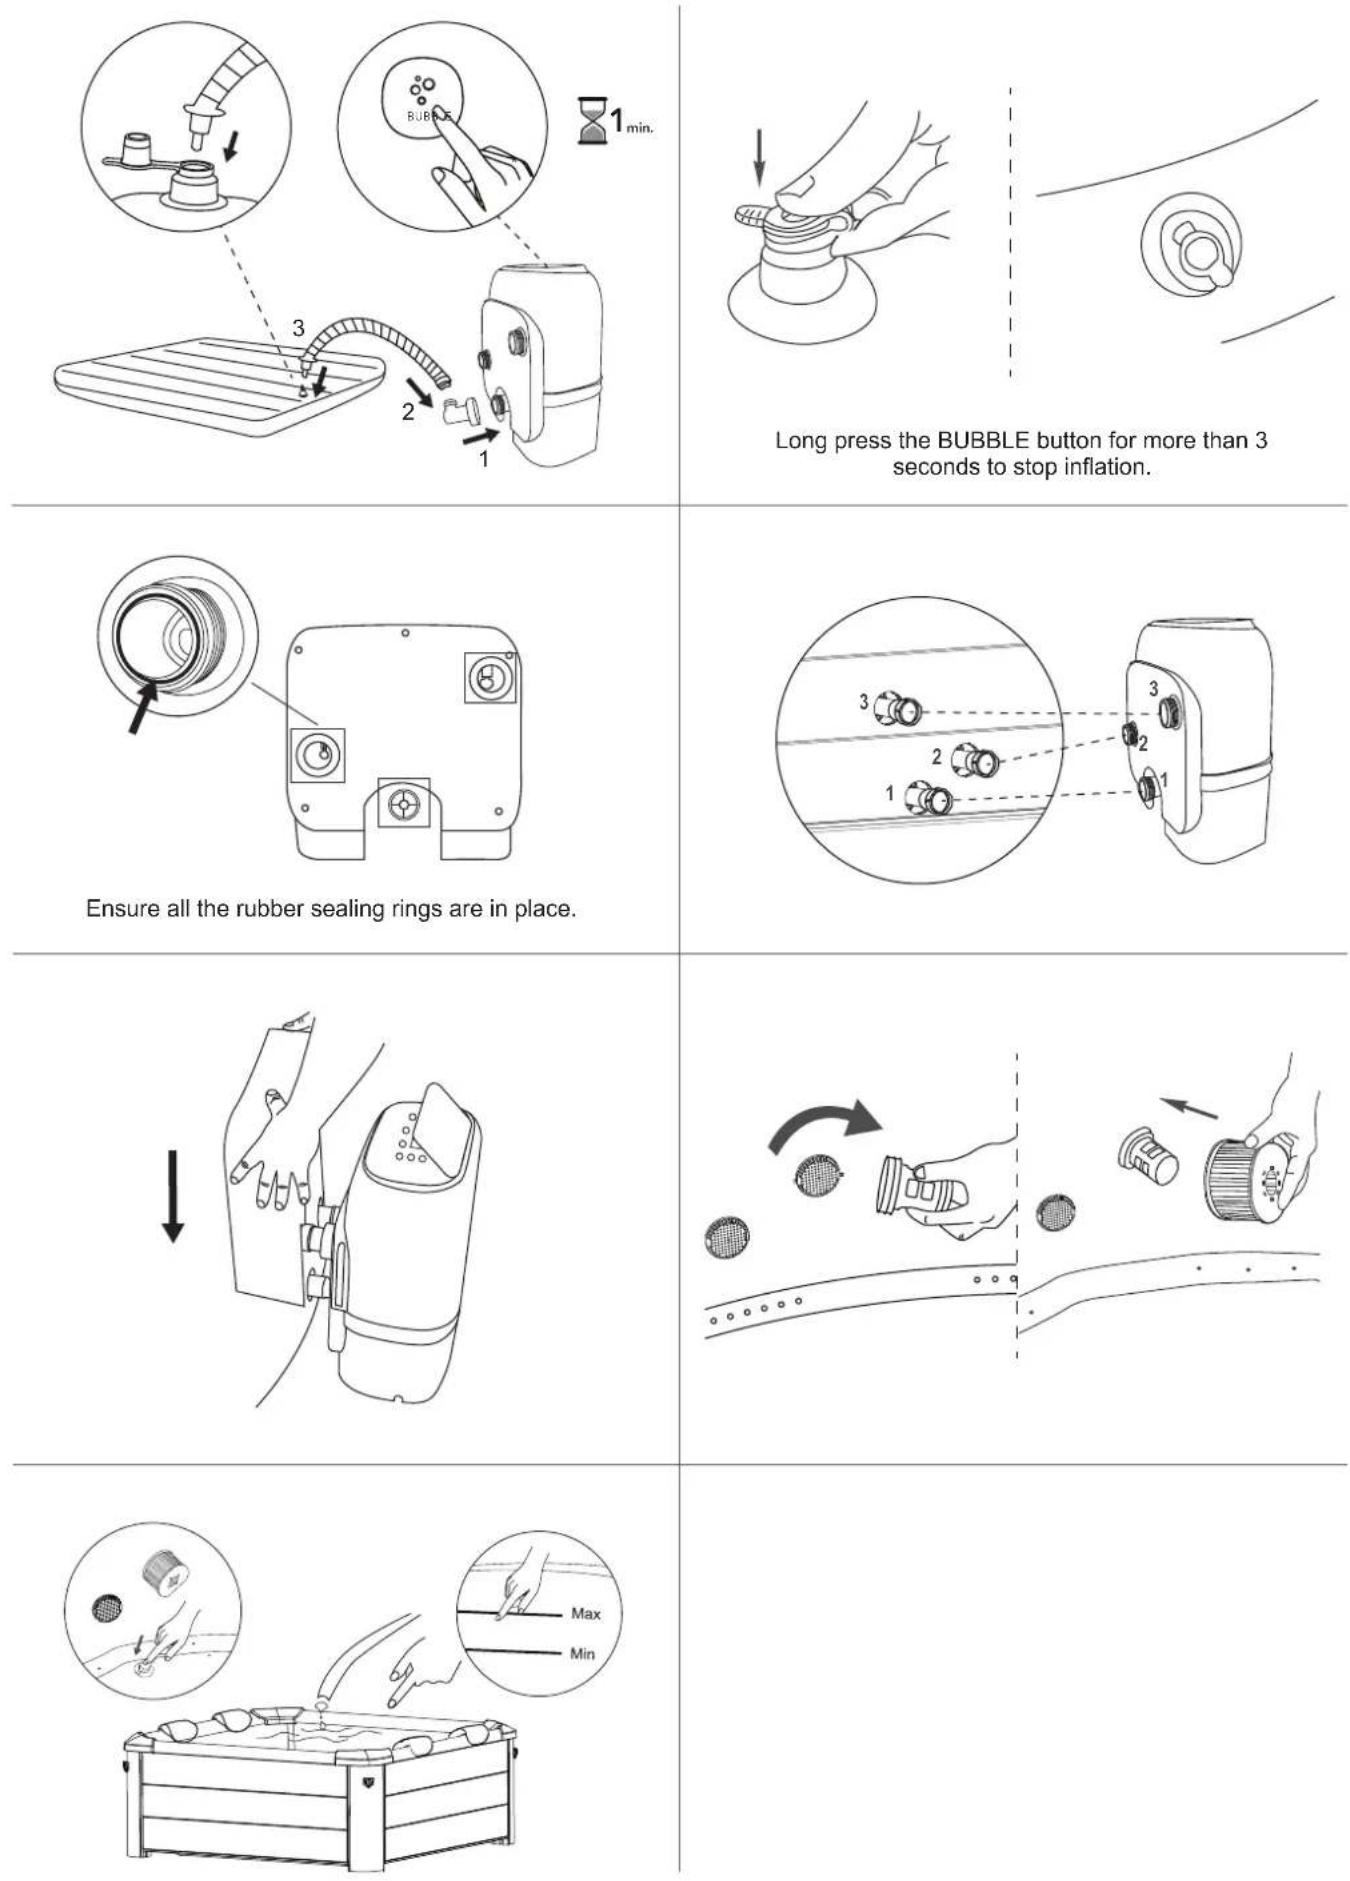
Press the BUBBLE button to turn the function on; hold down the BUBBLE button for 3 seconds to turn the function off.
The bubble setting can be adjusted to three different levels. The default setting is at level 2 (500W). Press the BUBBLE button to switch the setting to level 3 (720W). Press it again to switch to level 1 (300W).
IMPORTANT: Do not turn on the massage system when the cover is attached. Air can accumulate inside the spa and cause irreparable damage and bodily harm.
NOTE: The bubbling massage function will shut down automatically after every 20 minutes of operation as a safety precaution. This can be reactivated after 10 minutes by pressing the BUBBLE button again.

HEATING TIMER
To set the number of hours FROM NOW when the heater will activate:
-
Press the TIMER button to enter pre-setting mode. The TIMER icon is shown on the LED display.
-
Pressing the ⬆ UP or ⬆ DOWN button will cause the LED to flash. While it is flashing, you can adjust the number of hours before heater activation (from 1 to 99 hours). The desired timer setting will remain on the LED display for 3 seconds to confirm the value.
To modify the timer setting: Press the Timer button again and use the UP or the DOWN button to adjust.
Cancel the setting: Press the TIMER button for 3 seconds.
NOTE: Activating the heating system or rebooting the spa will cancel the timer setting.

UVC SANITIZER
Press the ⚙️ UVC button to turn the UVC sanitizing system on/off. The UVC icon shown on the LED display means the UVC sanitizing system is activated.
NOTE: The UVC emitter is built inside the control box. Therefore, the function can be turned on at any time, even with people inside the spa.

SAFETY LOCK
Press the ⏻ button to lock/unlock the controller. In safety lock mode, the controller is disabled and the spa retains all previous settings.

Celsius/Fahrenheit Toggle Button
The temperature can be displayed in either Celsius or Fahrenheit. Press the ⏻ DOWN button for 3 seconds to toggle between the two options.

CAUTION: ALWAYS ENSURE THE SPA IS UNPLUGGED BEFORE STARTING ANY MAINTENANCE WORK TO AVOID THE RISK OF INJURY OR DEATH.
FILTER CARTRIDGE MAINTENANCE
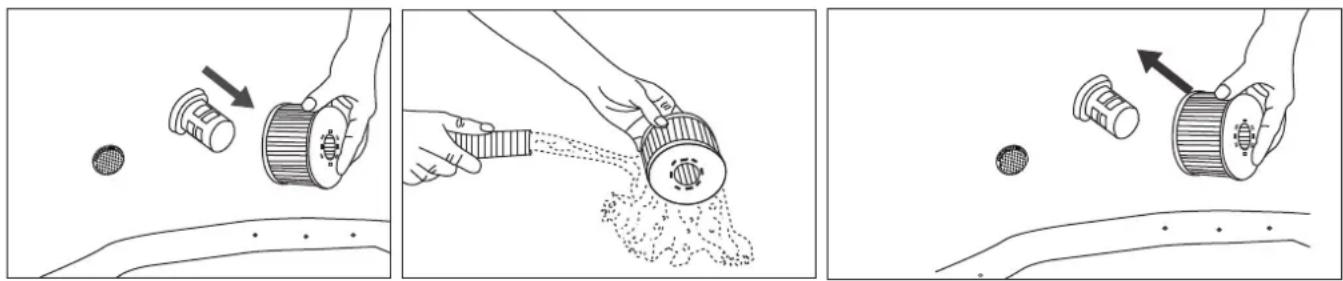
- Inspect and clean the filter cartridge gently after each use. Follow the steps below:
natural_image
Three-step illustration showing hands using a mechanical device to generate material, with no visible text or symbols.NOTE: Change the filter cartridge every 3-5 days, if the filter cartridge remains soiled and discolored.
NOTE: When the spa is filled with water, there should always be a filter cartridge installed on the base.
NOTE: Turn off all the functions before changing or cleaning the filter cartridge.
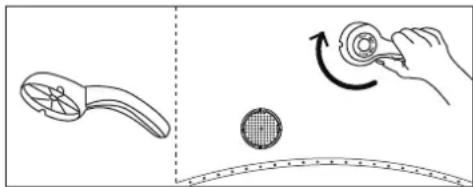
- If the spa's inlet or outlet becomes clogged with dirt, use the wrench to unscrew the cap and then clean it when necessary.
NOTE: Before unscrewing the part, make sure the spa is empty. Never unscrew it when the spa is filled with water!
natural_image
Illustration showing a hand holding a circular object with an arrow indicating rotation, alongside a tool and a curved ruler (no text or symbols)SPA WATER
- Change the spa water every 3-5 days depending on use. If dirt is visible in the water or if the water becomes cloudy and the correct water chemistry does not clear it up, change the water and clean the spa tub. See the “Cleaning, draining and storage” section for instructions.
- We recommend taking a shower before using the spa, as cosmetic products, lotions and other residues on the skin can quickly degrade the water quality.
- When the spa is not in use, cover it with the buckle cover to prevent pollution.
- Use spa chemicals to maintain the proper water conditions. Spa damage caused by chemical abuse or poor spa water management is not covered by warranty. Consult with your local spa or pool retailer for more information on chemical use.
Water Sanitation
The spa owner must regularly check and keep the spa water sanitized with scheduled maintenance (daily, if necessary). Adding sanitizer or other chemicals will control bacteria and the reproduction of viruses in the spa water. Maintaining the correct water balance through the appropriate use of sanitizers is the most important factor in maximizing the life and appearance of the spa and ensuring clean, healthy, and safe water. Adopting the proper technique is important for testing and treating spa water. Contact your spa professional if you have any questions on chemicals, sanitizers, test kits, or test procedures.
Water Balance
Follow the instructions below to maintain your spa water.
| PARAMETER TEST FREQUENCY CORRECT LEVEL | ||
| pH | Daily | 7.2-7.6 when using Chlorine; 7.2-7.8 when using Bromine |
| Free Chlorine | Daily | 3-5 ppm |
| Bromine residual | Daily | 2-4 ppm |
| Total Alkalinity (TA) | Weekly | 80-120 ppm |
| Total Hardness (TH) | Weekly | 200-500 ppm |
NOTE
- A low pH will damage the spa tub and pump. Any damage resulting from a chemical imbalance will void the warranty.
- A high pH (hard water) will result in white coagulations inside the filter pump, which may lead to pump damage.
Water Treatment:
- It is good practice with an existing spa to keep all air jets open and valves closed to allow chemically treated water to flush through all pipework.
- Always follow the chemical manufacturer's instructions and health and hazard warnings.
- Never mix chemicals together. Add the chemicals to the spa water separately. Thoroughly dissolve each chemical before adding it to the water.
- Please note that chlorine and bromine products should never be mixed. This is extremely dangerous. If you usually use chlorine-based products and if you want to switch to bromine-based products or vice versa, it is essential that you change the spa water first.
- Do not add chemicals if the spa is occupied. This can cause skin or eye irritation.
- Do not overuse chemicals or use concentrated chlorine. This can damage the spa tub and cause a potential hazard to your skin. Improper chemical use will void the warranty.
FLOATING DISPENSER
Your spa comes with a standard chemical dispenser: This dispenser only applies to 1" tablet. Do not pour liquid or granules into the dispenser.

NOTE: Remove the chemical dispenser from spa when the spa is in use.
DRAINAGE, CLEANING AND STORAGE
Spa Drainage

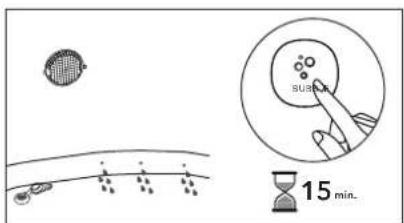
text_image
SUB 15 min.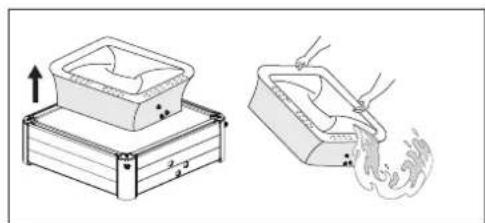
natural_image
Illustration of two steps of a container being placed, one with an upward arrow and the other with hands holding a flame (no text or symbols)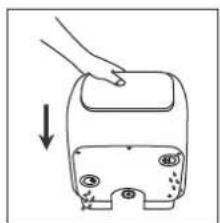
natural_image
Diagram showing a hand pressing down on a device component with an arrow indicating downward motion (no text or symbols present)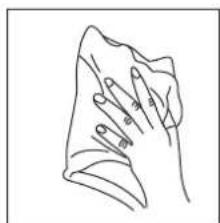
natural_image
Line drawing of a hand holding a cloth or towel (no text or symbols)Cleaning the Spa Tub
If dirt is visible in the water or if the water becomes cloudy and the correct water chemistry does not clear it up, change the water and clean the spa tub. See the "Spa tub drainage" section on how to drain the spa. While empty, clean and/or replace the filter cartridge. Use a sponge and mild soap solution to wipe away any soil or stains on the inside of the spa wall. Rinse thoroughly before refilling with clean water.
IMPORTANT: Do not use steel wool, hard brushes or abrasive cleaners.
Disassemble Instructions
Remove all the parts in the reverse order of the installation steps.
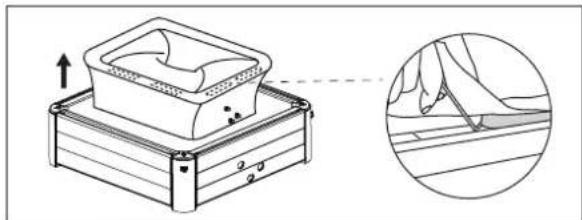
NOTE: To remove the liner, use an L-wrench to pry the retaining block out of the side panel slot. Do not drag the liner directly.
Spa Bladder Deflation
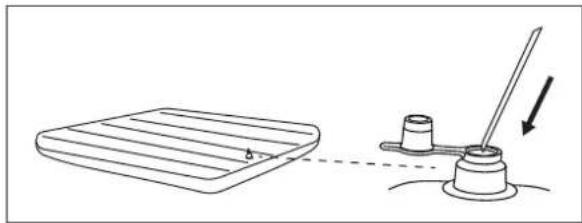
- Open the valve cap to deflate the bladder. For quick deflation, insert the straw (included in the repair kit) into the valve.
- Once the deflation is completed, re-place the cap back.
natural_image
Technical illustration of a mechanical assembly with an inset showing hand positioning on a surface (no text or symbols)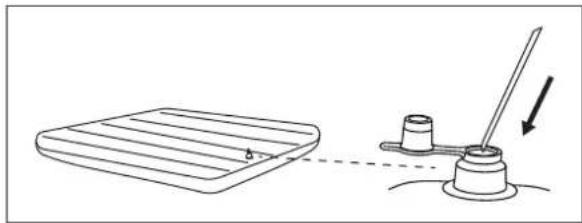
natural_image
Simple line drawing of a flatboard and a mechanical device with a lever (no text or symbols)Spa Tub and Air Bladder Repair
Use the enclosed repair patch to repair any puncture:
- Clean and dry the area to be repaired thoroughly
- Apply the glue to the PVC patch and quickly attach it to the damaged surface. (Glue is not included)
- Smooth the surface to remove any air bubbles and allow it to dry for 5-10 minutes
NOTE: Glue is not included.
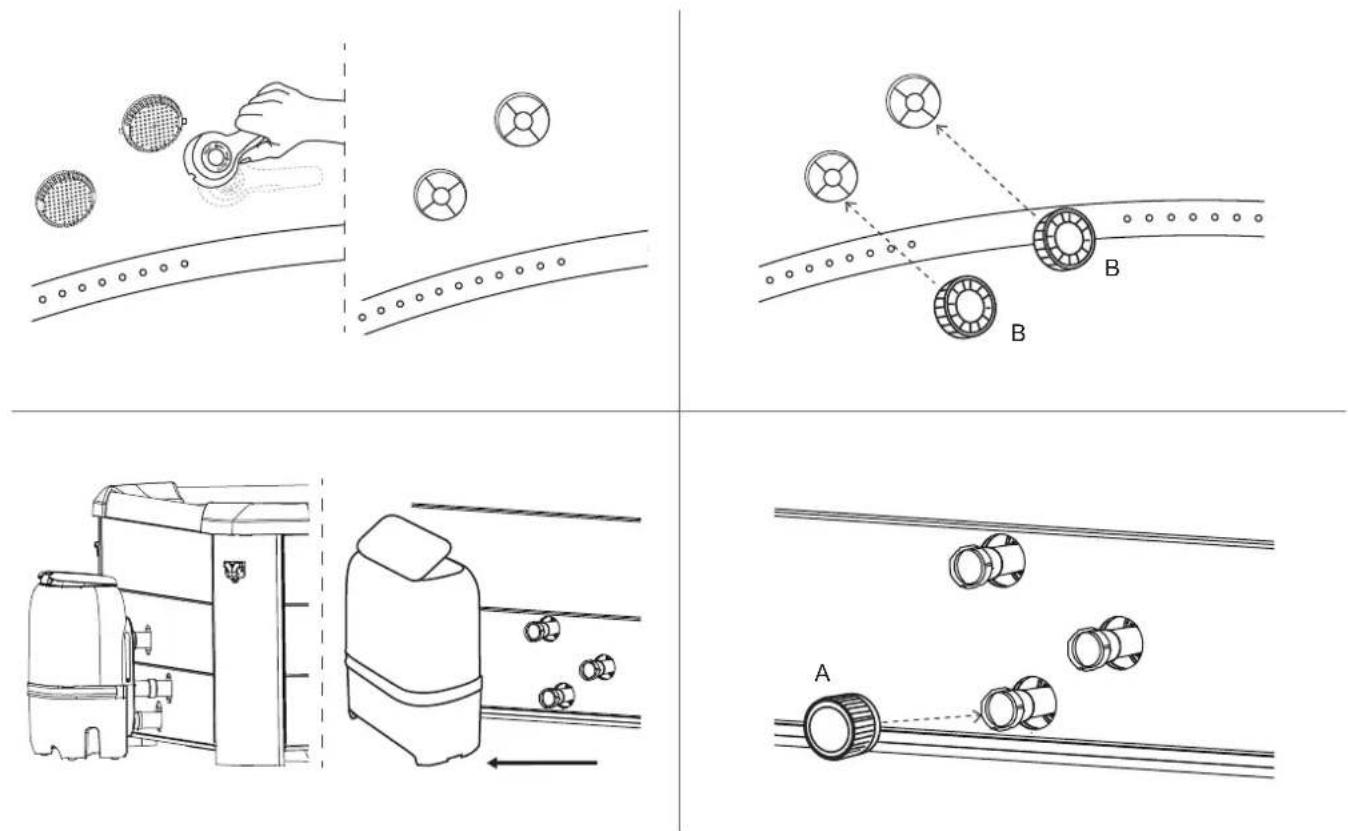
Water / Air Channel Stopper Instructions
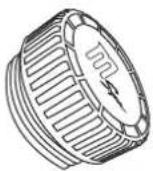
A. Air channel stopper x 1pc
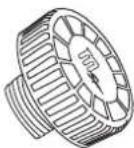
B. Water channel stopper x 2pcs
These caps are used to prevent water leakage when taking off the control box without draining the water.
NOTE: Please make sure to unplug the power pack from the electrical receptacle before the above actions.
text_image
Technical diagram illustrating four stages of a mechanical assembly: wire rolling, rollerblading, cleaning machine, and rolling conveyor.Storage and Preparation for Future Use
- Drain and clean the spa by following the "Drainage" and "Spa Cleaning" sections.
- Refer to the instructions to deflate air bladder.
- Make sure all the spa components and accessories are thoroughly clean and dry before storage. Air-dry the spa tub in the mild sun for an hour before folding.
- Fold the spa tub loosely and avoid any sharp corners to prevent damage or leakage to the spa liner.
- Prepare new additional cartridges for next time use.
- Store the spa and accessories in a dry, temperature-controlled environment, between 0°C and 40°C (32°F - 104°F). We recommend storing the spa with desiccant.
- The original packaging is recommended for storage.
- After long-term storage, fill the spa with clean water and sanitizer, and turn on the FILTER for at least 1 hour before use.
text_image
m_spmPRECAUTIONS FOR WINTER USE
Installation
Low temperature will harden the PVC material and make it more fragile.
- The new spa might have been stored or transported at a low temperature (below 4^ C / 39^ F) before it is unfolded. Put the package indoors or somewhere warm for 12 hours to soften the material before use.
Heating and Heat Preservation
In cold weather, heating the water up will take much more time. It is suggested to:
- Fill the spa tub with lukewarm water (not higher than 40°C / 104°F) to get it heated more quickly.
- Use ground mat and inflatable bladder for better heat preservation effect.
- When the outdoor temperature is below 4^(39^) , even when not using the spa, as long as it is filled with water, the heater should always be turned on (or put the spa in stand-by mode) to prevent water from freezing.
- Your spa is equipped with an Anti-icing System. Put the spa in stand-by mode, when the ambient temperature is below 1^ C / 33.8^ F, the filter will run automatically. And when the water temperature falls below 1^ C/ 33.8^ F the heater will run automatically. This will help prevent water from freezing. If you are not going to use the spa in near future, please disassemble the spa and store it following the storage procedure.
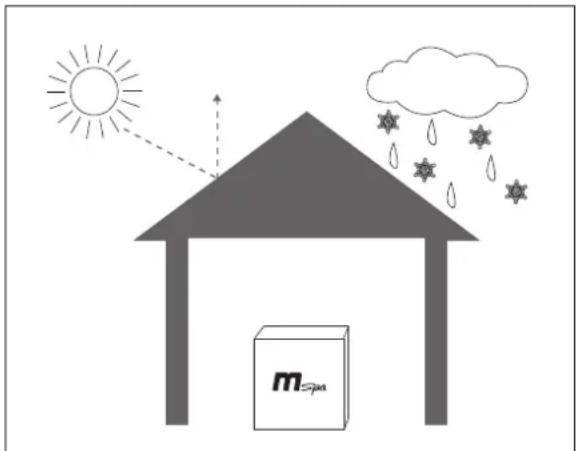
In Rainy days
For spa placed outdoors, do not use it when it rains.
If the spa is placed under rain shelter, do not turn on the bubble function. This is because the rain in the nearby air will also be sucked into the pump, causing the bubble generator to get damp and rusty which could result in malfunction and void your warranty.
It is recommended to put the plug and socket somewhere not exposed to rain to prevent damage caused by water accumulation due to excessive rain.
DISPOSAL AND ENVIRONMENTAL PROTECTION
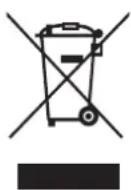
This mark indicates that the product should not be disposed of with other household waste. To prevent possible harm to the environment or human health from uncontrolled waste disposal, products should be recycled responsibly to promote the sustainable reuse of material resources. Information on disposal can be obtained from your local authorities.
To return your used device, please use the return and collection systems or contact the retailer where the product was purchased for environmentally safe recycling.
ERROR CODE CHART
| LED READING CAUSE SOLUTION | ||
| ---/888 / EEP | The Signal wire is loose | Contact local MSpa Service Center |
| Communication failed | Contact local MSpa Service Center | |
| F0 | Water temperature is below 0°C (32°F) or exceeds 50°C (122°F) | Change the water |
| Temperature sensor failure | Contact local MSpa Service Center | |
| F1 | F1 immediately shows after pressing FILTER, HEATING or UVC | Clean the parts and tubes that the water goes through |
| F1 shows 15s after pressing FILTER, HEATING or UVC | 1. Add more water to the minimum line2. Clean the parts and tubes that water goes through3. Contact local MSpa Service Center | |
| PROBLEM CAUSE SOLUTION | ||
| NO DISPLAY ON THE CONTROL PANEL | Power socket failure | Change a socket or repair the socket before use |
| RCD is off | Reset the RCD by following the RCD Testing section | |
| Press the Reset button, the controller is not displayed | Contact local MSpa Service Center | |
| RCD broken | Contact local MSpa Service Center | |
| SPA LEAKING | Spa in&outlet connection not securely tight | Tighten the in&outlet connection |
| Drainage valve is not closed completely | Close the drainage valve. Contact the MSpa Service Center, if the spa is still leaking | |
| Water leaks from the spa pool body | Repair the leaking hole/split with the repair kit material | |
| NOT HEATING PROPERLY | Temperature set too low | Set a higher temperature |
| Dirty filter cartridge | Clean or replace the filter cartridge | |
| The water level is not at the minimum water line | Add more water to the minimum line | |
| Heater failure | Contact local MSpa Service Center | |
| The filter pump DOES NOT WORK | Refer to the "FILTER PUMP DOES NOT WORK" section | |
| WATER NOT CLEAN | Water has been used for long period of time | Change the water |
| Insufficient filtration time | Extend the filtration time | |
| Dirty filter cartridge | Clean or replace the filter cartridge in time | |
| Improper water maintenance | Refer to the chemical manufacturer's instructions | |
| NO BUBBLE | Auto-off 10 minutes | Wait for 10 minutes and turn on the Bubble button again |
| Internal parts damaged | Contact local MSpa Service Center | |
| One-way valve broken | Contact local MSpa Service Center | |
| FILTER PUMP DOES NOT WORK | Filter cartridge clogged by dirt or other objects | Clean or replace the filter cartridge |
| Filter system failure | Contact local MSpa Service Center | |
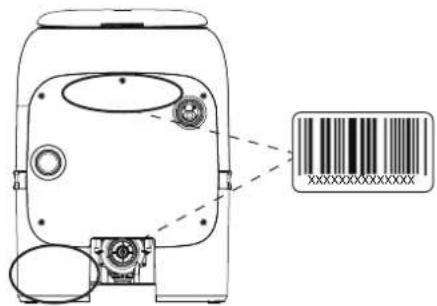
Where can I find the serial number?
At the back of control box. Or at the foot of the control box.
text_image
XXXXXXXXXXXXXXHow can I find my service contact?
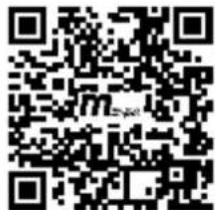
* Scan the QR code below or visit https://www.the-mspa.com/after-sales.
-
Input the serial number of your spa.
-
The corresponding service provider will be displayed.
text_image
QR code image containing encoded data, no visible human-readable text* You can find the contact information of local service center on the back of the warranty card
CONTACT YOUR LOCAL MSPA DEALER OR SERVICE CENTER FOR ANY PRODUCT-RELATED QUESTIONS OR PROBLEMS.
MSPA LIMITED WARRANTY
MSpa® has been manufactured with reliability and simplicity in mind. All products have been inspected and found free of defects before leaving the factory.
MSpa guarantees this product against any defects identified in the material or workmanship for a period of:
Spa pool liner – twelve (12) months from the original date of purchase.
Electrical parts (control box) – twelve (12) months from the original date of purchase.
Spa rigid wall frames – twenty-four (24) months from the original date of purchase.
The warranty period begins on the date of purchase and MSpa requires the presentation of the original proof of purchase to ascertain the date. During the warranty period, MSpa will, at its sole discretion, repair or replace any defective product. Replaced products or repaired parts will be warranted for only the unexpired portion of the original warranty.
Shipping Policy
Consumers are responsible for the shipping/freight when return the defective parts to MSpa authorized service center or ORPC-Oriental Recreational Products (Shanghai) Co., Ltd.
Warranty Policy
- This limited warranty does not apply to any defect caused by negligence, accident, misuse, or any other reason beyond MSpa's reasonable control, including but not limited to: normal wear and tear, negligence or failure to follow the product instructions, improper or inadequate maintenance; connection to an improper power supply; chemical water damage, loss of pool water, unauthorized product modification or repair; use for commercial purposes; fire, lightning, flood or other external causes.
- This warranty is valid only in the country of purchase in such countries where MSpa sells and services the same model with identical technical specifications. Warranty service outside the country of purchase is limited to the terms and conditions of the corresponding warranty in the country of service. Where the cost of repairs or replacement is not covered by this warranty, MSpa will advise the owners and the cost shall be charged to the owner.
- This warranty only applies to the original purchaser and terminates upon any transfer of ownership.
- All repairs for which warranty claims are made must be pre-authorized by ORPC through an accredited distributor or agent provided that the defective part be returned to the distributor or agent Transportation Prepaid, if requested.
- The authorized selling dealer is responsible for all in-field service work carried out on your MSpa product. ORPC will not be responsible for any process charges performed by unauthorized service personnel.
- Products marked with both MSpa and importer are governed exclusively by the warranty provided by the importer.
Warranty Registration
Please Always keep the purchase receipt and warranty card in case of a future warranty inquiry. All claims must be submitted to an MSpa authorized dealer or service partner. It is essential that all claims submitted provide all the necessary information, including Customer name, Purchase receipt, Serial No., Product No., Problem, and requested Parts.
natural_image
Black and white photo of a poolside bathtub with curved handles and wooden panels (no visible text or symbols)


text_image
QR code image with a central logo, likely linking to a digital resource or website.text_image
QR code image with embedded text 'm' and Chinese character '万向' in centertext_image
QR code image containing encoded data, no visible human-readable textCentre de service MSpa
text_image
m=2000natural_image
Symbolic icon showing a person swimming with water and an arrow indicating direction (no text or numbers present)natural_image
Icon of a person using a computer (no text or symbols)Lire le manuel

natural_image
Prohibition sign with crossed-out lines and wave pattern (no text)Pas de plongeon
natural_image
Prohibition sign showing a hand without sound waves, enclosed in a circle (no text or symbols)natural_image
Simple 3D illustration of an open cardboard box (no text or symbols)CONTRÔLE DES PIÈCES
natural_image
Two-step diagram showing a plug and a wall-mounted socket connected to a smiley face (no text or symbols)natural_image
Diagram of a two-tiered storage unit with a flat top and a grid base, showing internal structure and downward arrows indicating assembly (no text or symbols)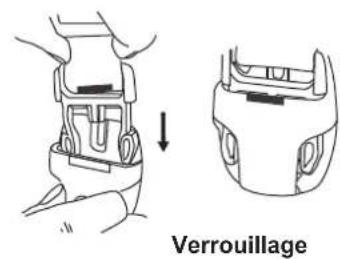
text_image
Verrouillage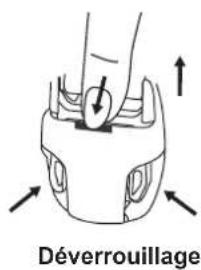
text_image
Déverrouillagenatural_image
Illustration showing a hand holding a circular object with a curved arrow, alongside a tool and a mesh circle (no text or symbols)EAU DU SPA
natural_image
Line drawing of a rectangular container with circular supports and a central bowl (no text or symbols)text_image
Technical diagram showing a hand operating a device with labeled parts and directional arrows indicating assembly or connection.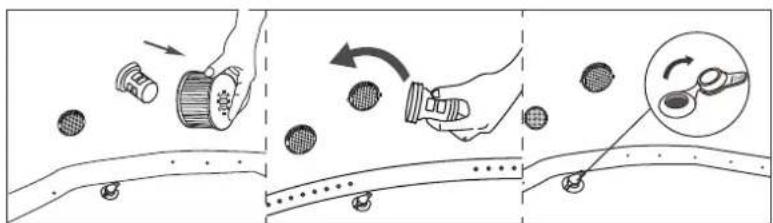
text_image
Diagram illustrating three stages of a mechanical or cleaning process with labeled components and directional arrows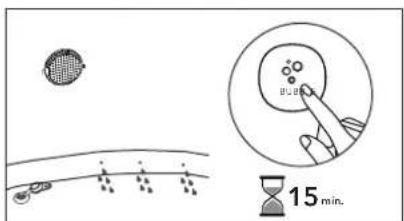
text_image
15 min.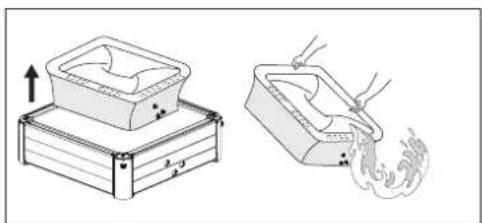
natural_image
Illustration of two steps: a box with internal contents being placed on top, and a hand pouring liquid into a container (no text or symbols)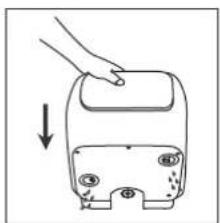
natural_image
Diagram of a hand pressing down on a device component with an arrow indicating downward motion (no text or symbols)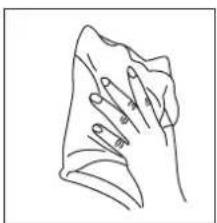
natural_image
Line drawing of a hand holding a piece of paper or cloth (no text or symbols)natural_image
Diagram showing a layered structure with an arrow indicating upward motion, alongside a magnified circular view of a hand holding a tool (no text or symbols present)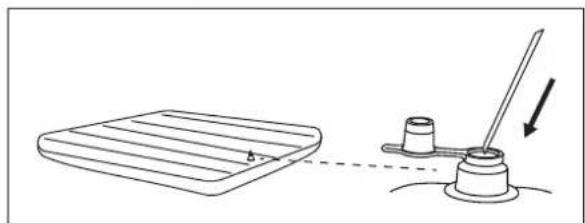
natural_image
Simple line drawing of a slide and a stand with a downward arrow, no text or symbols presenttext_image
Technical diagram illustrating four stages of a mechanical assembly: wire rolling, rollerblading, cleaning machine, and rolling conveyor.text_image
Diagram illustrating solar radiation and rain effects around a warehouse, with labeled components and symbolic elements.PRÉCAUTIONS À PRENDRE EN CAS D'UTILISATION EN HIVER
Installation
text_image
Diagram of a device with barcode bar and barcode symbol, showing internal components and alignment instructionstext_image
QR code image with embedded text 'm' and Chinese character '元' in centerGARANTIE LIMITÉE MSPA
natural_image
Black and white photo of a poolside bathtub with wooden panels and curved handles (no visible text or symbols)
text_image
QR code image with a central logo and text 'm24'text_image
QR code image containing encoded data, with a central logo and text 'm'text_image
QR code image with embedded text 'm' and Chinese characters 'z' in the centertext_image
QR code image containing encoded data, no visible text or symbols beyond the matrix patternnatural_image
Black circular icon showing a person swimming with an arrow indicating water movement (no text or symbols)natural_image
Icon of a person using a computer (no text or symbols)natural_image
Prohibition sign with crossed-out lines and wave pattern (no text)Springen verboten
natural_image
Prohibition sign showing a hand emitting sound waves without any text or symbolsnatural_image
Simple 3D illustration of an open box (no text or symbols)TEILEÜBERPRÜFUNG
natural_image
Diagram of a roof structure with roof panels and side-mounted fans (no text or symbols)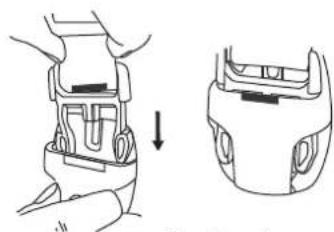
natural_image
Diagram showing a hand holding a device with a lock mechanism, before and after a close-up view (no text or symbols)Verriegeln
natural_image
Diagram of a hand pressing down on a mechanical component with directional arrows indicating movement (no text or symbols)Entriegeln
natural_image
Illustration showing a hand holding a circular object with a curved arrow, next to a tool and a grid-patterned circle (no text or symbols)WHIRLPOOL-WASSER
natural_image
Illustration of two hand-drawn containers with arrows indicating movement, one emitting smoke from a container (no text or symbols)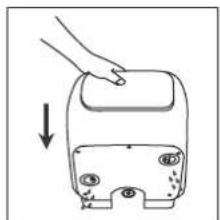
natural_image
Diagram showing a hand pressing down on a device component with an arrow indicating downward motion (no text or symbols present)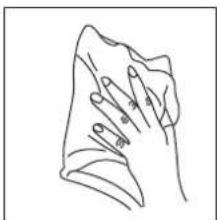
natural_image
Line drawing of a hand holding a piece of paper or cloth (no text or symbols)natural_image
Technical diagram showing a mechanical assembly with an inset close-up of a hand holding a tool, no text or symbols present.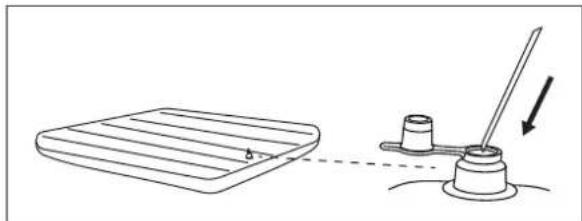
natural_image
Simple line drawing of a slide and a stand with a downward arrow, no text or symbols presenttext_image
Technical diagram illustrating four stages of a mechanical or industrial process: cutting, rolling, packing, and finishing.text_image
Diagram of a device with barcode and barcode scanning instruction, showing labeled components and text.text_image
QR code image containing encoded data, no visible human-readable textBESCHRÄNKTE GARANTIE VON MSPA
natural_image
Black and white photo of a poolside bathtub with wooden panels and curved handles (no visible text or symbols)
text_image
QR code image containing encoded data, with a small logo or watermark in the center.text_image
QR code image containing encoded data, with a central logo or watermark.text_image
QR code image containing encoded data, no visible text or symbols beyond the matrix patterntext_image
QR code image containing encoded data, no visible text or symbols beyond the matrix patternnatural_image
Circular icon showing a person swimming with an arrow indicating water movement (no text or symbols)natural_image
Icon of a person using a computer (no text or symbols)natural_image
Prohibition sign with crossed-out lines and wave pattern (no text)No bucear
natural_image
Prohibition sign showing a hand emitting sound waves without any text or symbolsnatural_image
Simple 3D illustration of an open box (no text or symbols)natural_image
Two technical illustrations: one showing a plug with a power outlet, the other showing a wall-mounted cable with a smiley face (no text or symbols)natural_image
Diagram of a storage tank with a tray and side panel, showing internal components (no text or symbols)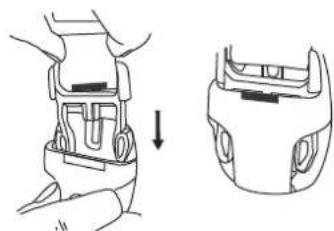
natural_image
Diagram showing a hand holding a device with a close-up view of its side panel (no text or symbols present)Bloquear
natural_image
Diagram of a hand holding a small object with directional arrows indicating movement or force (no text or symbols)Desbloquear
natural_image
Three-step illustration showing hands using a mechanical device to generate material, with no visible text or symbols.natural_image
Illustration showing a hand holding a circular object with a curved arrow, alongside a tool and a grid-patterned circle (no text or symbols)AGUA DEL SPA
natural_image
Illustration of two steps: a box being placed on top and a hand pouring liquid into a container (no text or symbols)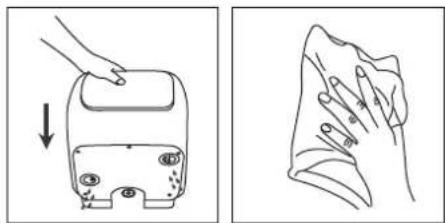
natural_image
Illustration showing a hand pressing down on a device and cleaning a surface with fingers (no text or symbols)natural_image
Technical diagram showing a mechanical assembly with an inset close-up of a hand holding a tool, no text or symbols present.